

Page 1

Leica Image Shuttle 3
Instructions
1
1
Page 2

TABLE OF CONTENTS
SYSTEM REQUIREMENTS...............................................................................................03
INSTALLATION................................................................................................................04
SCREEN SECTIONS LEICA S (Typ 007)
TOP SECTION ..............................................................................................................08
BOTTOM SECTION .......................................................................................................10
CAMERA SETTING SCREEN .........................................................................................12
FILE SETTING SCREEN.................................................................................................14
QUICKVIEW .................................................................................................................16
LIVE VIEW PHOTO ........................................................................................................18
LIVE VIEW VIDEO .........................................................................................................19
SCREEN SECTIONS LEICA S/S-E (Typ 006)
TOP SECTION ..............................................................................................................20
BOTTOM SECTION .......................................................................................................22
CAMERA SETTING SCREEN .........................................................................................24
FILE SETTING SCREEN.................................................................................................26
QUICKVIEW .................................................................................................................28
SCREEN SECTIONS LEICA S2/S2-P
TOP SECTION ..............................................................................................................30
BOTTOM SECTION .......................................................................................................32
CAMERA SETTING SCREEN .........................................................................................34
FILE SETTING SCREEN.................................................................................................36
QUICKVIEW .................................................................................................................38
2
Page 3

SCREEN SECTIONS LEICA SL (Typ 601)
TOP SECTION ..............................................................................................................40
BOTTOM SECTION .......................................................................................................42
CAMERA SETTING SCREEN .........................................................................................44
FILE SETTING SCREEN.................................................................................................46
QUICKVIEW .................................................................................................................48
LIVE VIEW PHOTO ........................................................................................................50
LIVE VIEW VIDEO .........................................................................................................51
SCREEN SECTIONS LEICA M/M-P (Typ 240), LEICA M MONOCHROM (TYP 246)
TOP SECTION ..............................................................................................................52
BOTTOM SECTION .......................................................................................................54
CAMERA SETTING SCREEN .........................................................................................56
FILE SETTING SCREEN.................................................................................................58
QUICKVIEW .................................................................................................................60
GENERAL FUNCTIONS
MENU TAB OPTIONS ...................................................................................................62
PHOTO WORKFLOW ....................................................................................................64
WORKFLOW WITH ADOBE® PHOTOSHOP® LIGHTROOM® .............................................66
3
Page 4

LEICA IMAGE SHUTTLE 3
Leica Image Shuttle is a software to remote control your Leica camera and transfer the images
instantly to the hard drive of your computer via USB cable connection.
4
Page 5

SUPPORTED LEICA CAMERAS:
- LEICA S (Typ 007)
- LEICA S/S-E (Typ 006)
- LEICA S2
- LEICA SL (Typ 601)
- LEICA M/M-P (Typ 240), LEICA M MONOCHROM (Typ 246)
®
OS X® 10.10 AND HIGHER
- MAC
Supported operation system:
_ Macintosh computer with Intel CPU
_ min. 1 GB RAM (ideal: 2 GB RAM or more)
_ min. 50 MB free space on the hard disc
_ USB 2.0 or higher
5
Page 6

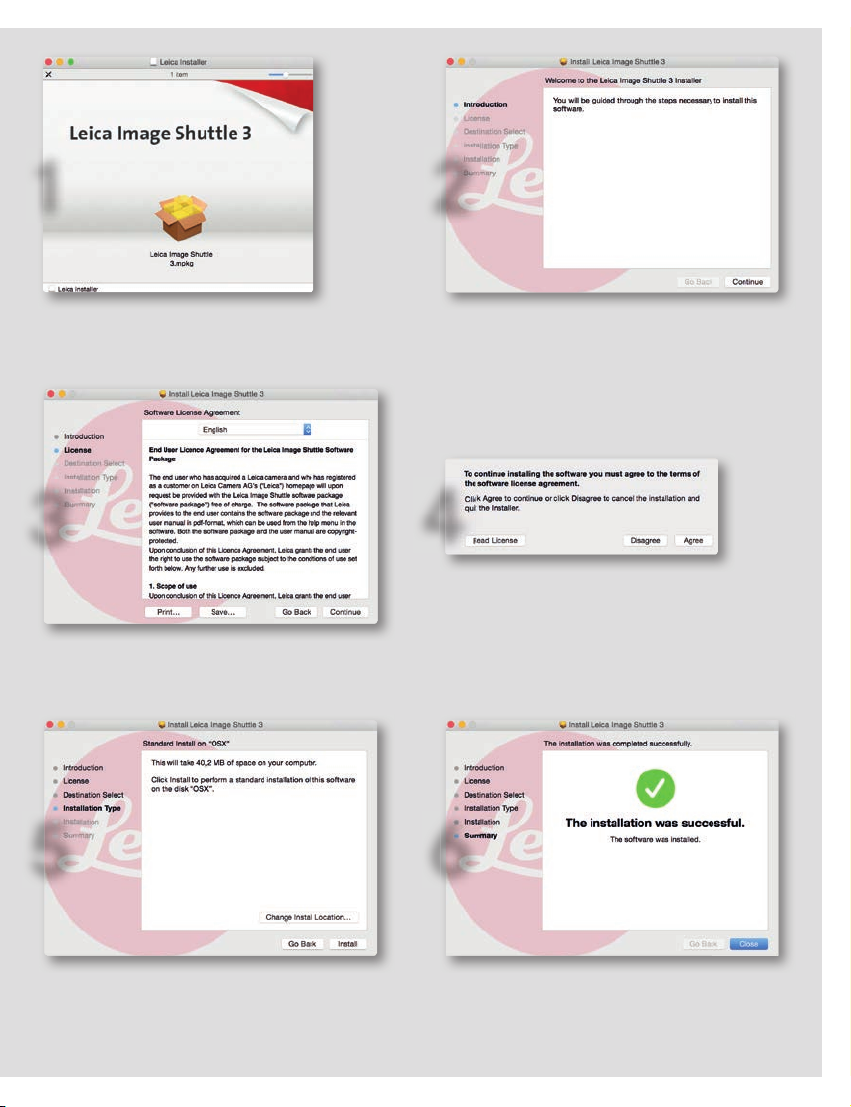
INSTALLATION
Download the installer program for »Leica Image Shuttle 3« in the Owners Area on the Leica
Camera homepage (https://owners.leica-camera.com).
WITH MAC OSX
®
Double-click on the installation file »LEICA Image Shuttle« to start the installation. You will then
be requested to read and accept the license agreement. After the installation, the software will
be saved to your hard disc’s program folder. To enable easy access, you can drag the software
icon to the MAC OSX
®
dock.
6
Page 7
1 2
3
5
4
6
7
Page 8
SCREEN SECTIONS
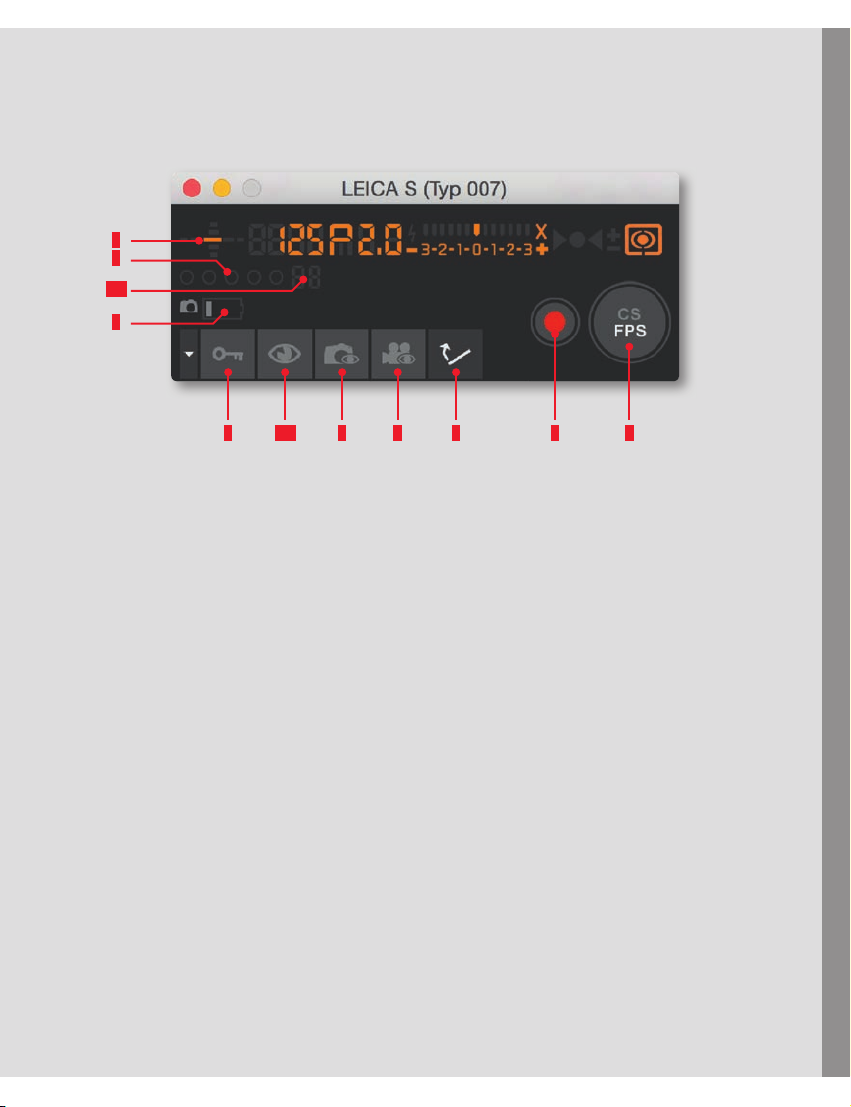
UPPER SECTION
The camera’s viewfinder display with its information and status indications is replicated here (1).
LEICA S (Typ 007)
Furthermore, there is a battery charge status display (2) plus buttons for Mirror Pre-Release (3),
Key Lock (6), Quick View (6.1), Live View Photo (7), Live View Video (8), Video start/stop (9), and
(photo) shutter release (4).
Depending on the camera setting, the latter will display either »FPS« (Focal Plane Shutter) or
»CS« (Central Shutter).
If mirror pre-release is activated, the first click on the shutter release button lets the mirror flip
up, the second releases the shutter. Alternatively, you can release the camera shutter by
pressing the space bar. The Transfer Status display (5) indicates that pictures are still being
transferred from the camera to the computer. The number of pictures still to be transferred is
shown to the right (5.1).
The Key Lock button (6) allows you to disable the operating elements on the camera used for
exposure control, i.e. the shutter speed/setting dial and the click wheel, in order to prevent
unintentional setting. Clicking on the Quick View button (6.1) opens a window that shows the
respective picture after every shot.
Clicking the Live View Photo (7) and Live View Video (8) buttons calls up the respective screen
on the computer monitor, thus allowing critical examination of decisive image characteristics
such as exposure, depth of field, and composition.
8
Page 9
5.1
LEICA S (Typ 007)
1
5
2
6
6.1 7 8 3 9 4
9
Page 10

LOWER SECTION
This area provides you with access to the most important camera and picture parameters. All
settings you perform on the camera are automatically transferred to the software. Likewise,
parameters you set in the software for the camera (such as shutter speed, focusing method,
LEICA S (Typ 007)
color space, etc.) are transferred to the camera.
Thus, you can use the software to remotely control the Leica S (Typ 007), or allow the software to
run unobtrusively in the background so that the pictures taken will be saved on your computer.
The lower section of the program window is divided into two areas, which you can access by
clicking on the relevant tab.
CAMERA SETTINGS (7):
Here, you can find the settings for exposure control and metering modes, aperture and shutter
speed, exposure compensation, and ISO. In addition, you can set white balance, the focusing
mode, and, in the case of manual focusing, the distance.
FILE SETTINGS (8):
This area includes settings for the file format and for the name and storage location of the
pictures taken. Furthermore, you can set the JPEG color space and –resolution here.
10
Page 11
7 8
LEICA S (Typ 007)
11
Page 12
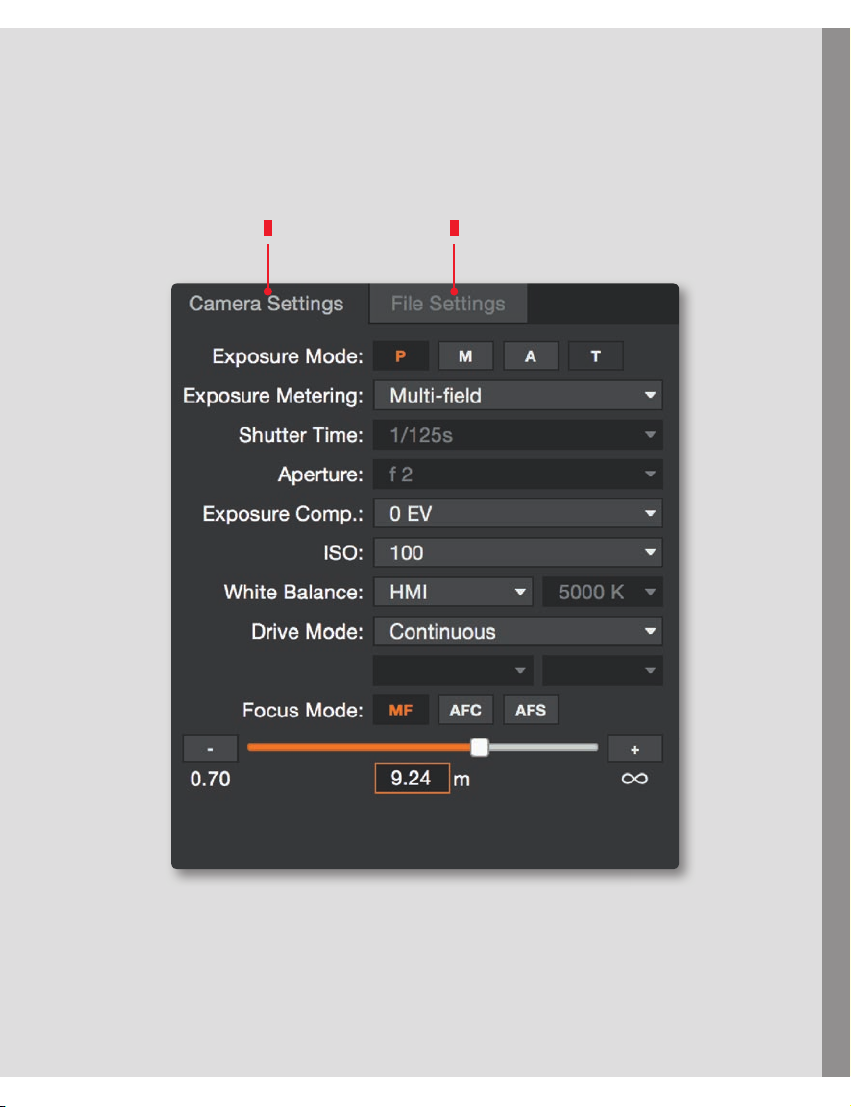
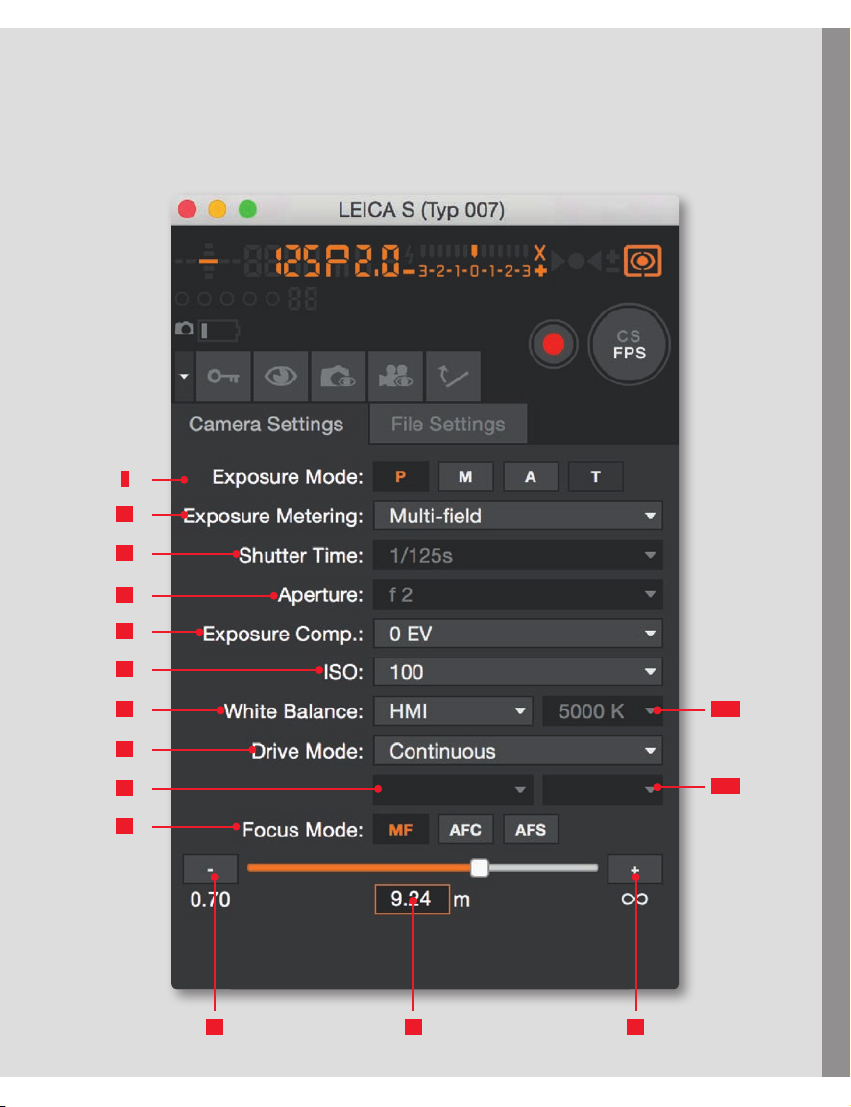
CAMERA SETTING SCREEN
Exposure Mode (9): Here, you can select automatic program mode (P), aperture priority mode
(A), shutter speed priority mode (T), or set shutter speed and aperture yourself manual mode (m).
Depending on the selected exposure control mode, you can set Shutter Speed (11) and/or
LEICA S (Typ 007)
Aperture (12).
Exposure Metering (10): You can select between multi-zone, center-weighted, and spot.
Exposure Compensation (13): Can be set from -3 EV to +3 EV in half steps.
ISO (14): For selecting the various ISO settings on the camera.
White balance (15): For selecting one of the presets or Color Temperature, with which you can
set the white balance by specifying the color temperature value in Kelvin. A range of 2000K to
13100K (15.1) is available.
Drive Mode (16): The following settings are available:
Single: Clicking on the shutter release button results in one exposure.
Continuous: Pictures are taken as long as the shutter release button is activated by keeping the
respective mouse button pressed.
2s and 12s Self Timer: Clicking on the shutter release button starts the respective delay time.
Exp. Bracketing: This mode allows creating picture series, e.g. for HDR images. You can select
between 3 or 5 exposures and exposure variations of 0.5, 1, 2, or 3EV. Clicking on the shutter
release button results in the camera automatically taking the respective pictures.
Interval: In this mode, the camera takes a series of pictures with predetermined time intervals
between them. These can be utilized, e.g. to create a time-lapse video.
Focus Mode (18): For selecting continuous (AFC) single (AFS), or manual focusing (MF).
With continuous focusing mode activated, the camera constantly monitors the focus setting and
adjusts it if necessary.
If you want to set the focus manually, an additional display appears. It allows changing the setting
either by clicking on the +/- buttons for small adjustments, or by dragging the slider to the desired
distance.
12
Page 13
10
11
12
13
LEICA S (Typ 007)
9
14
15
16
17
18
15.1
17.1
1919 20
13
Page 14
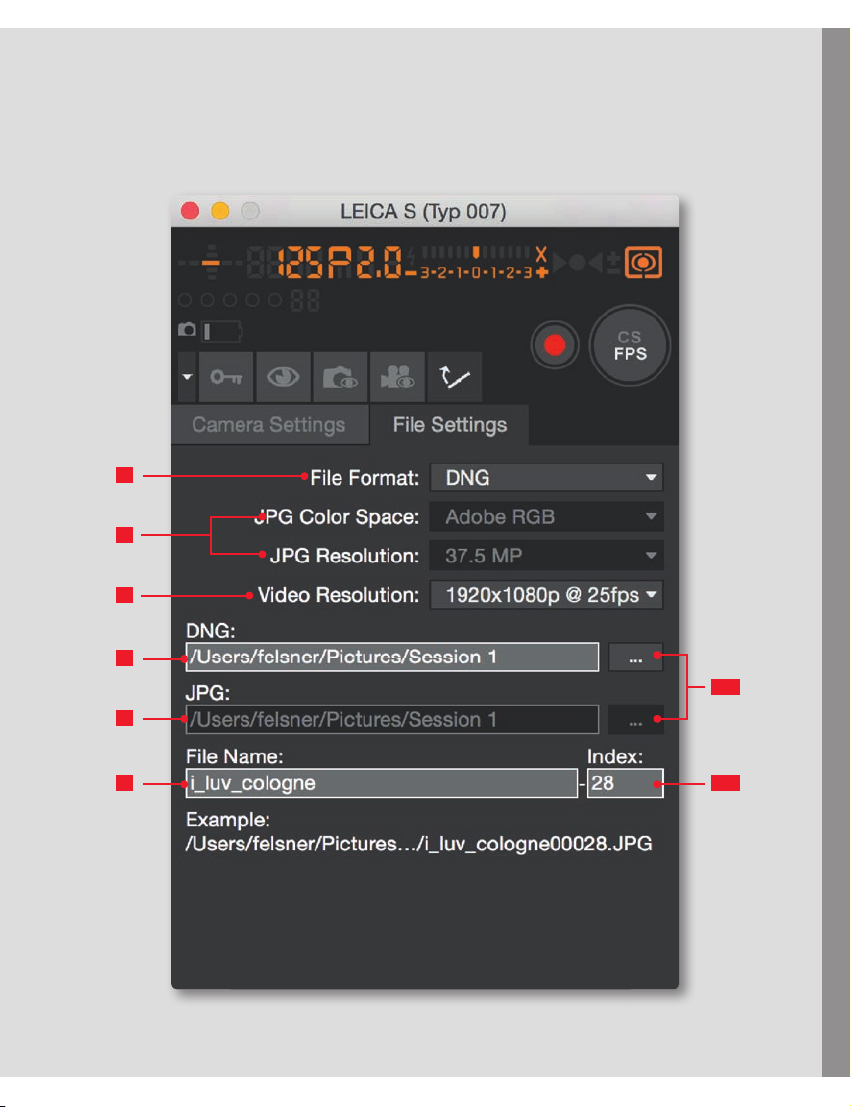
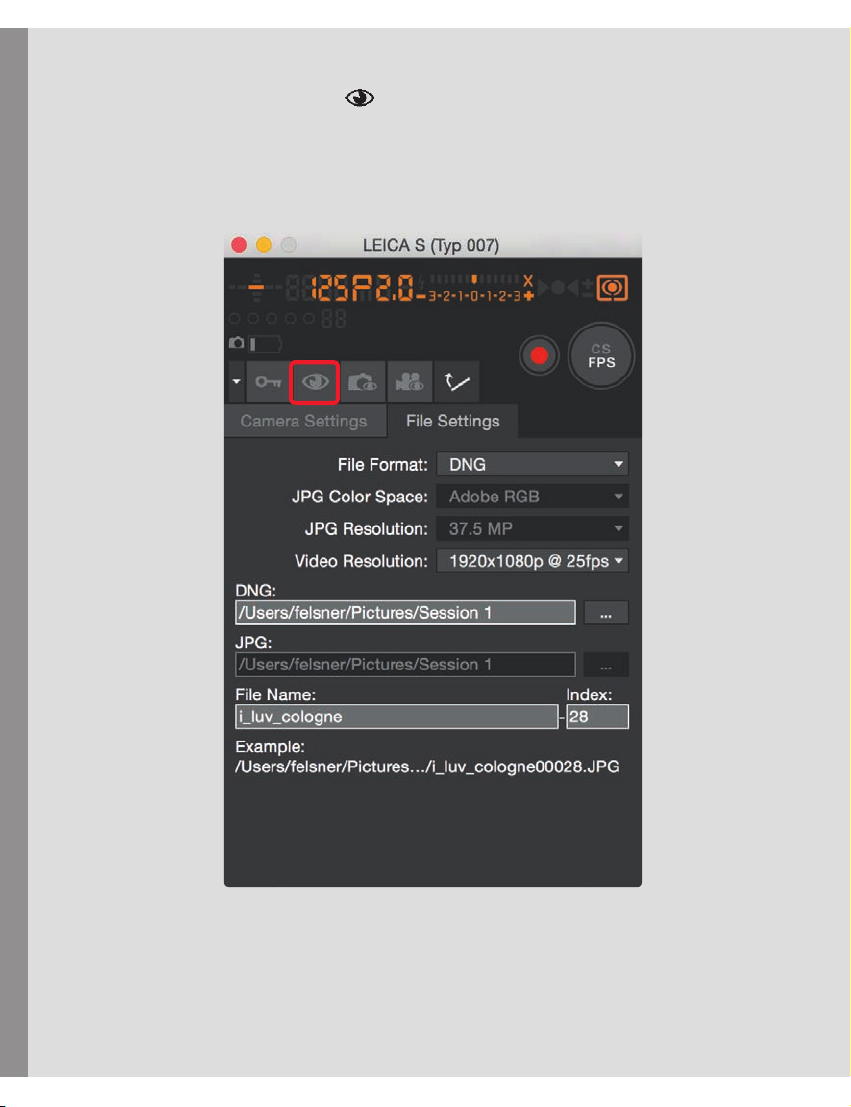
FILE SETTING SCREEN
File Format (21): You can select whether you want to save your pictures in the DNG format
(Digital Negative = RAW format), the JPG format, or simultaneously in both.
If JPG is activated, you can also select the JPG Color Space (sRGB, AdobeRGB, or ECI-RGB 2.0)
LEICA S (Typ 007)
and the JPG Resolution (both 22).
Video Resolution (23): For the selection of the desired resolution/frame rate setting.
DNG / JPG (24/25): Indicates the paths details and in which folders the respective files are
saved on the computer. You can change this by either directly entering the desired locations in
the respective boxes, or clicking on the buttons to the right of the path details (24.1).
File Name (26): Indicates the first part of the image file’s name. You can change this by directly
entering the desired characters. To the right, the second part of the image file’s name, i.e. the
number (25.1) is shown. By clicking on this box, you can reset it to O or set any other number as
a starting point.
14
Page 15
21
22
23
LEICA S (Typ 007)
24
25
24.1
25.126
15
Page 16
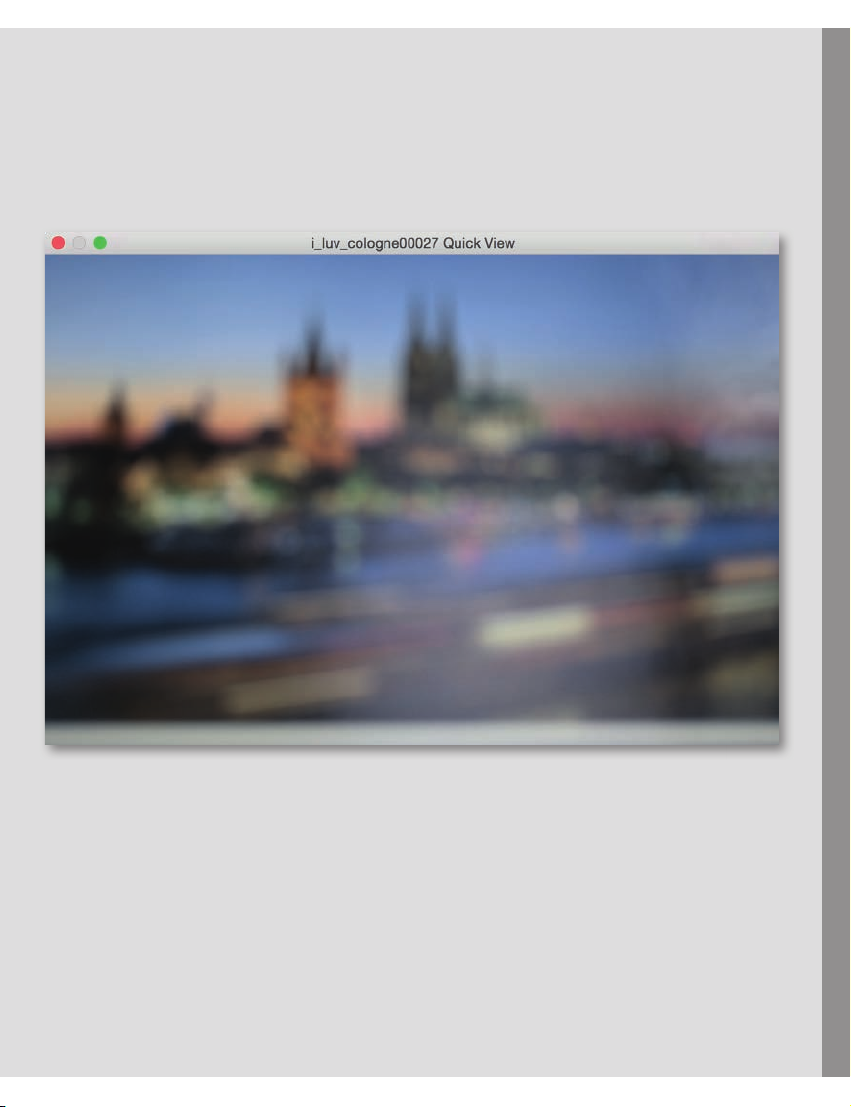
QUICKVIEW
Clicking on the Quickview Symbol opens a scalable window that shows the respective
picture after every shot.
LEICA S (Typ 007)
16
Page 17
LEICA S (Typ 007)
17
Page 18

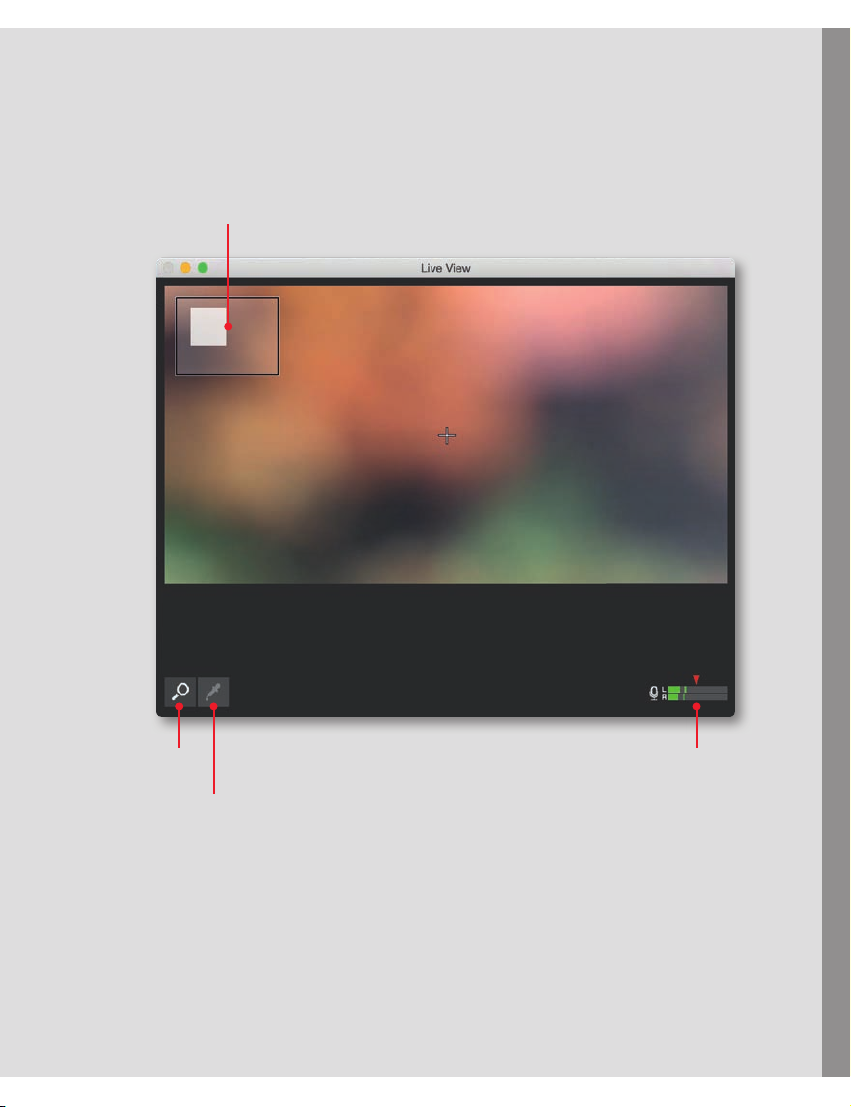
LIVE VIEW PHOTO
LEICA S (Typ 007)
Zoom Map
18
Zoom Exposure simulation Scalable
window
White balance
Greycard LV
Notice:
In review mode, an enlarged image section can be moved by clicking anywhere near the
edges of the Live View screen. The AF metering mark can be positioned by clicking on
the desired location. After that, AF operation is activated by clicking on the respective
button.
Page 19
LIVE VIEW VIDEO
LEICA S (Typ 007)
Zoom Map
Zoom Audio
White balance
Greycard LV
19
Page 20
SCREEN SECTIONS
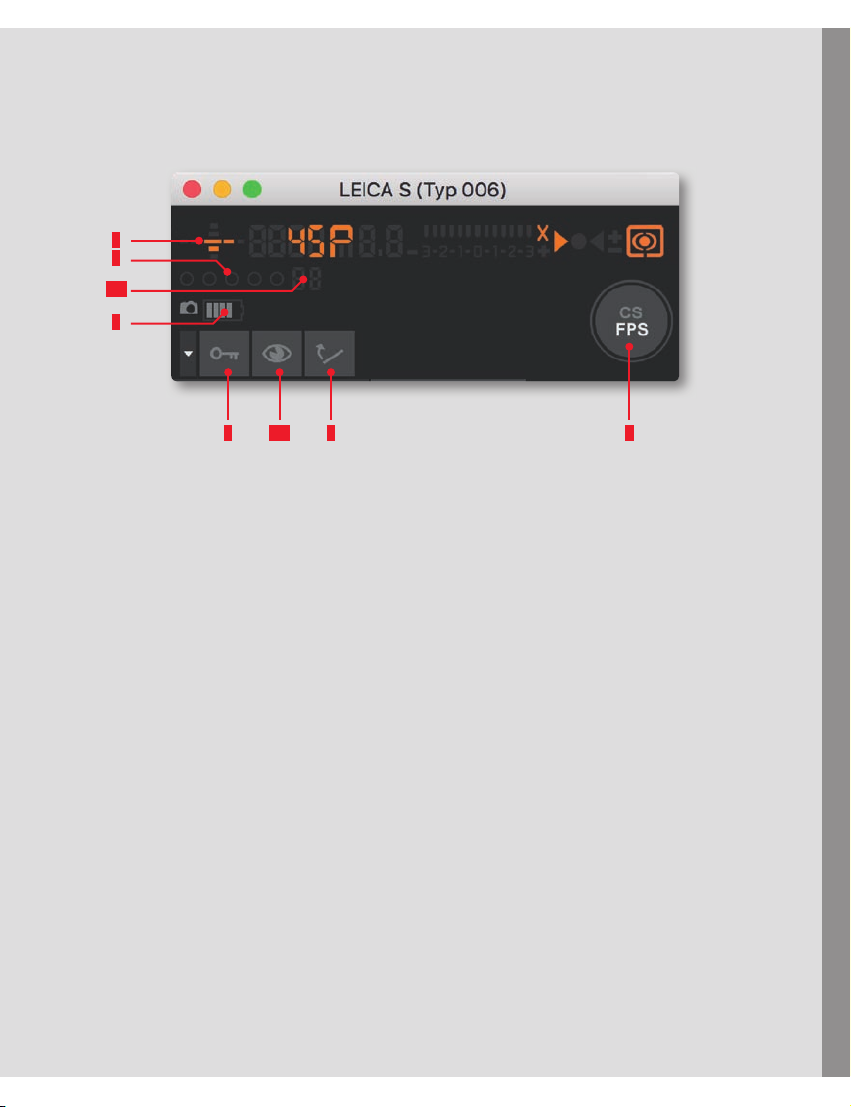
UPPER SECTION
The camera’s viewfinder display with its information and status indications is replicated here (1).
LEICA S/S-E (Typ 006)
Furthermore, there is a battery charge status display (2) plus buttons for Mirror Pre-Release (3),
Key Lock (6), Quick View (6.1) and (photo) shutter release.
Depending on the camera setting, the latter will display either »FPS« (Focal Plane Shutter) or
»CS« (Central Shutter).
If mirror pre-release is activated, the first click on the shutter release button lets the mirror flip
up, the second releases the shutter. Alternatively, you can release the camera shutter by
pressing the space bar. The Transfer Status display (5) indicates that pictures are still being
transferred from the camera to the computer. The number of pictures still to be transferred is
shown to the right (5.1).
The Key Lock button (6) allows you to disable the operating elements on the camera used for
exposure control, i.e. the shutter speed/setting dial and the click wheel, in order to prevent
unintentional setting.
Clicking on the Quick View button (6.1) opens a window that shows the respective picture after
every shot.
20
Page 21
5.1
LEICA S/S-E (Typ 006)
1
5
2
6
6.1 3 4
21
Page 22

LOWER SECTION
This area provides you with access to the most important camera and picture parameters. All
settings you perform on the camera are automatically transferred to the software. Likewise,
parameters you set in the software for the camera (such as shutter speed, focusing method,
color space, etc.) are transferred to the camera.
LEICA S/S-E (Typ 006)
Thus, you can use the software to remotely control the Leica S/S-E (Typ 006), or allow the
software to run unobtrusively in the background so that the pictures taken will be saved on your
computer.
The lower section of the program window is divided into two areas, which you can access by
clicking on the relevant tab.
CAMERA SETTINGS (7):
Here, you can find the settings for exposure control and metering modes, aperture and shutter
speed, exposure compensation, and ISO. In addition, you can set white balance, the focusing
mode, and, in the case of manual focusing, the distance.
FILE SETTINGS (8):
This area includes settings for the file format and for the name and storage location of the
pictures taken. Furthermore, you can set the JPEG color space and –resolution here.
22
Page 23

7 8
LEICA S /S-E (Typ 006)
23
Page 24

CAMERA SETTING SCREEN
Exposure Mode (9): Here, you can select automatic program mode (P), aperture priority mode
(A), shutter speed priority mode (T), or set shutter speed and aperture yourself manual mode (m).
Depending on the selected exposure control mode, you can set Shutter Speed (11) and/or
Aperture (12).
LEICA S/S-E (Typ 006)
Exposure Metering (10): You can select between multi-zone, center-weighted, and spot.
Exposure Compensation (13): Can be set from -3 EV to +3 EV in half steps.
ISO (14): For selecting the various ISO settings on the camera.
White balance (15): For selecting one of the presets or Color Temperature, with which you can
set the white balance by specifying the color temperature value in Kelvin. A range of 2000K to
13100K (15.1) is available.
Drive Mode (16): The following settings are available:
Single: Clicking on the shutter release button results in one exposure.
Continuous: Pictures are taken as long as the shutter release button is activated by keeping the
respective mouse button pressed.
2s and 12s Self Timer: Clicking on the shutter release button starts the respective delay time.
Exp. Bracketing: This mode allows creating picture series, e.g. for HDR images. You can select
between 3 or 5 exposures and exposure variations of 0.5, 1, 2, or 3EV. Clicking on the shutter
release button results in the camera automatically taking the respective pictures.
Focus Mode (18): For selecting continuous (AFC) single (AFS), or manual focusing (MF).
With continuous focusing mode activated, the camera constantly monitors the focus setting and
adjusts it if necessary.If you want to set the focus manually, an additional display appears. It allows
changing the setting either by clicking on the +/- buttons for small adjustments, or by dragging
the slider to the desired distance.
24
Page 25

10
11
12
13
LEICA S/S-E (Typ 006)
9
14
15
16
17
18
15.1
17.1
1919 20
25
Page 26

FILE SETTING SCREEN
File Format (21): You can select whether you want to save your pictures in the DNG format
(Digital Negative = RAW format), the JPG format, or simultaneously in both.
If JPG is activated, you can also select the JPG Color Space (sRGB, AdobeRGB, or ECI-RGB 2.0)
and the JPG Resolution. DNG / JPG (24/25): Indicates the paths details and in which folders the
LEICA S/S-E (Typ 006)
respective files are saved on the computer. You can change this by either directly entering the
desired locations in the respective boxes, or clicking on the buttons to the right of the path
details (24.1). File Name (26): Indicates the first part of the image file’s name. You can change
this by directly entering the desired characters. To the right, the second part of the image file’s
name, i.e. the number (25.1) is shown. By clicking on this box, you can reset it to O or set any
other number as a starting point.
26
Page 27

21
22
23
LEICA S/S-E (Typ 006)
24
25
24.1
25.126
27
Page 28

QUICKVIEW
Clicking on the Quickview Symbol opens a scalable window that shows the respective
picture after every shot.
LEICA S/S-E (Typ 006)
28
Page 29

LEICA S/S-E (Typ 006)
29
Page 30

SCREEN SECTIONS
LEICA S2
UPPER SECTION
The camera’s viewfinder display with its information and status indications is replicated here (1).
Furthermore, there is a battery charge status display (2) plus buttons for Mirror Pre-Release (3),
Key Lock (6), Quick View (6.1), and (photo) shutter release (4).
Depending on the camera setting, the latter will display either »FPS« (Focal Plane Shutter) or
»CS« (Central Shutter).
If mirror pre-release is activated, the first click on the shutter release button lets the mirror flip
up, the second releases the shutter. Alternatively, you can release the camera shutter by
pressing the space bar. The Transfer Status display (5) indicates that pictures are still being
transferred from the camera to the computer. The number of pictures still to be transferred is
shown to the right (5.1).
The Key Lock button (6) allows you to disable the operating elements on the camera used for
exposure control, i.e. the shutter speed/setting dial and the click wheel, in order to prevent
unintentional setting. Clicking on the Quick View button (6.1) opens a window that shows the
respective picture after every shot.
30
Page 31

5.1
LEICA S2
1
5
2
6
6.1 3 4
31
Page 32

LOWER SECTION
This area provides you with access to the most important camera and picture parameters. All
LEICA S2
settings you perform on the camera are automatically transferred to the software. Likewise,
parameters you set in the software for the camera (such as shutter speed, focusing method,
color space, etc.) are transferred to the camera.
Thus, you can use the software to remotely control the Leica S2, or allow the software to run
unobtrusively in the background so that the pictures taken will be saved on your computer.
The lower section of the program window is divided into two areas, which you can access by
clicking on the relevant tab.
CAMERA SETTINGS (7):
Here, you can find the settings for exposure control and metering modes, aperture and shutter
speed, exposure compensation, and ISO. In addition, you can set white balance, the focusing
mode, and, in the case of manual focusing, the distance.
FILE SETTINGS (8):
This area includes settings for the file format and for the name and storage location of the
pictures taken. Furthermore, you can set the JPEG color space and –resolution here.
32
Page 33

7 8
LEICA S2
33
Page 34

CAMERA SETTING SCREEN
Exposure Mode (9): Here, you can select automatic program mode (P), aperture priority mode
LEICA S2
(A), shutter speed priority mode (T), or set shutter speed and aperture yourself manual mode (m).
Depending on the selected exposure control mode, you can set Shutter Speed (11) and/or
Aperture (12).
Exposure Metering (10): You can select between multi-zone, center-weighted, and spot.
Exposure Compensation (13): Can be set from -3 EV to +3 EV in half steps.
ISO (14): For selecting the various ISO settings on the camera.
White balance (15): For selecting one of the presets or Color Temperature, with which you can
set the white balance by specifying the color temperature value in Kelvin. A range of 2000K to
13100K (15.1) is available.
Drive Mode (16): The following settings are available:
Single: Clicking on the shutter release button results in one exposure.
Continuous: Pictures are taken as long as the shutter release button is activated by keeping the
respective mouse button pressed.
2s and 12s Self Timer: Clicking on the shutter release button starts the respective delay time.
Exp. Bracketing: This mode allows creating picture series, e.g. for HDR images. You can select
between 3 or 5 exposures and exposure variations of 0.5, 1, 2, or 3EV. Clicking on the shutter
release button results in the camera automatically taking the respective pictures.
Focus Mode (18): For selecting continuous (AFC) single (AFS), or manual focusing (MF).
With continuous focusing mode activated, the camera constantly monitors the focus setting and
adjusts it if necessary. If you want to set the focus manually, an additional display appears. It
allows changing the setting either by clicking on the +/- buttons for small adjustments, or by
dragging the slider to the desired distance.
34
Page 35

10
11
12
13
LEICA S2
9
14
15
16
17
18
15.1
17.1
1919 20
35
Page 36

FILE SETTING SCREEN
File Format (21): You can select whether you want to save your pictures in the DNG format
LEICA S2
(Digital Negative = RAW format), the JPG format, or simultaneously in both.
If JPG is activated, you can also select the JPG Color Space (sRGB, AdobeRGB, or ECI-RGB 2.0)
and the JPG Resolution (both 22).
DNG / JPG (24/25): Indicates the paths details and in which folders the respective files are
saved on the computer. You can change this by either directly entering the desired locations in
the respective boxes, or clicking on the buttons to the right of the path details (24.1).
File Name (26): Indicates the first part of the image file’s name. You can change this by directly
entering the desired characters. To the right, the second part of the image file’s name, i.e. the
number (25.1) is shown. By clicking on this box, you can reset it to O or set any other number as
a starting point.
36
Page 37

21
22
24
25
LEICA S2
24.1
26
25.1
37
Page 38

QUICKVIEW
Clicking on the Quickview Symbol opens a scalable window that shows the respective
LEICA S2
picture after every shot.
38
Page 39

LEICA S2
39
Page 40

SCREEN SECTIONS
UPPER SECTION
The camera’s viewfinder display with its information and status indications is replicated here (1).
LEICA SL (Typ 601)
Furthermore, there is a battery charge status display (2) plus buttons for Key Lock (6), Quick
View (6.1), Live View Photo (7), Live View Video (8), Video start/stop (9), and (photo) shutter
release (4).
The Transfer Status display (5) indicates that pictures are still being transferred from the camera
to the computer. The number of pictures still to be transferred is shown to the right (5.1).
The Key Lock button (6) allows you to disable the operating elements on the camera used for
exposure control, i.e. the shutter speed/setting dial and the click wheel, in order to prevent
unintentional setting. Clicking on the Quick View button (6.1) opens a window that shows the
respective picture after every shot.
Clicking the Live View Photo (7) and Live View Video (8) buttons calls up the respective screen
on the computer monitor, thus allowing critical examination of decisive image characteristics
such as exposure, depth of field, and composition.
40
Page 41

5.1
LEICA SL (Typ 601)
1
5
2
6
6.1 7 8 9 4
41
Page 42

LOWER SECTION
This area provides you with access to the most important camera and picture parameters. All
settings you perform on the camera are automatically transferred to the software. Likewise,
parameters you set in the software for the camera (such as shutter speed, focusing method,
LEICA SL (Typ 601)
color space, etc.) are transferred to the camera.
Thus, you can use the software to remotely control the Leica SL (Typ 601), or allow the software to
run unobtrusively in the background so that the pictures taken will be saved on your computer.
The lower section of the program window is divided into two areas, which you can access by
clicking on the relevant tab.
CAMERA SETTINGS (7):
Here, you can find the settings for exposure control and metering modes, aperture and shutter
speed, exposure compensation, and ISO. In addition, you can set white balance, the focusing
mode, and, in the case of manual focusing, the distance.
FILE SETTINGS (8):
This area includes settings for the file format and for the name and storage location of the
pictures taken. Furthermore, you can set the JPEG color space and –resolution here.
42
Page 43

7 8
LEICA SL (Typ 601)
43
Page 44

CAMERA SETTING SCREEN
Exposure Mode (9): Here, you can select automatic program mode (P), aperture priority mode
(A), shutter speed priority mode (T), or set shutter speed and aperture yourself manual mode (m).
Depending on the selected exposure control mode, you can set Shutter Speed (11) and/or
LEICA SL (Typ 601)
Aperture (12).
Exposure Metering (10): You can select between multi-zone, center-weighted, and spot.
Exposure Compensation (13): Can be set from -3 EV to +3 EV.
ISO (14): For selecting the various ISO settings on the camera.
White balance (15): For selecting one of the presets or Color Temperature, with which you can
set the white balance by specifying the color temperature value in Kelvin.
Drive Mode (16): The following settings are available:
Single: Clicking on the shutter release button results in one exposure.
Continuous: Pictures are taken as long as the shutter release button is activated by keeping the
respective mouse button pressed.
2s and 12s Self Timer: Clicking on the shutter release button starts the respective delay time.
Exp. Bracketing: This mode allows creating picture series, e.g. for HDR images. You can select
between 3 or 5 exposures and exposure variations of 0.5, 1, 2, or 3EV. Clicking on the shutter
release button results in the camera automatically taking the respective pictures.
Interval: In this mode, the camera takes a series of pictures with predetermined time intervals
between them. These can be utilized, e.g. to create a time-lapse video.
Focus Mode (18): For selecting continuous (AFC) single (AFS), or manual focusing (MF).
With continuous focusing mode activated, the camera constantly monitors the focus setting and
adjusts it if necessary.
If you want to set the focus manually, an additional display appears. It allows changing the setting
either by clicking on the +/- buttons for small adjustments, or by dragging the slider to the desired
distance.
44
Page 45

10
11
12
13
LEICA SL (Typ 601)
9
14
15
16
17
18
15.1
17.1
1919 20
45
Page 46

FILE SETTING SCREEN
File Format (21): You can select whether you want to save your pictures in the DNG format
(Digital Negative = RAW format), the JPG format, or simultaneously in both.
If JPG is activated, you can also select the JPG Color Space and the JPG Resolution (both 22).
LEICA SL (Typ 601)
Video Resolution (23): For the selection of the desired resolution/frame rate setting.
DNG / JPG (24/25): Indicates the paths details and in which folders the respective files are
saved on the computer. You can change this by either directly entering the desired locations in
the respective boxes, or clicking on the buttons to the right of the path details (24.1).
File Name (26): Indicates the first part of the image file’s name. You can change this by directly
entering the desired characters. To the right, the second part of the image file’s name, i.e. the
number (25.1) is shown. By clicking on this box, you can reset it to O or set any other number as
a starting point.
Sensor Format (21.1): Select 35mm or Sensor crop APS-C
Aspect Ratio (21.2): Select different aspect ratios for JPEG’s and DNG’s.
46
Page 47

21
21.1
21.2
22
LEICA SL (Typ 601)
23
24
25
26
24.1
25.1
47
Page 48

QUICKVIEW
Clicking on the Quickview Symbol opens a scalable window that shows the respective
picture after every shot.
LEICA SL (Typ 601)
48
Page 49

LEICA SL (Typ 601)
49
Page 50

LIVE VIEW PHOTO
LEICA SL (Typ 601)
50
Zoom Exposure simulation Scalable
window
White balance
Greycard LV
Notice:
In review mode, an enlarged image section can be moved by clicking anywhere near the
edges of the Live View screen. The AF metering mark can be positioned by clicking on
the desired location. After that, AF operation is activated by clicking on the respective
button.
Page 51

LIVE VIEW VIDEO
LEICA SL (Typ 601)
Zoom Audio
White balance
Greycard LV
51
Page 52

SCREEN SECTIONS
UPPER SECTION
The camera’s viewfinder display with its information and status indications is replicated here (1).
Furthermore, there is a battery charge status display (2), Quick View (4) and (photo) shutter
release (5).
Alternatively, you can release the camera shutter by pressing the space bar. The Transfer Status
display (3) indicates that pictures are still being transferred from the camera to the computer.
The number of pictures still to be transferred is shown to the right (3.1).
Clicking on the Quick View button (4) opens a window that shows the respective picture after
LEICA M/M-P (TYP 240), LEICA M MONOCHROM (TYP 246)
every shot.
52
Page 53

3.1
LEICA M/M-P (TYP 240), LEICA M MONOCHROM (TYP 246)
1
3
2
4
5
53
Page 54

LOWER SECTION
This area provides you with access to the most important camera and picture parameters. All
settings you perform on the camera are automatically transferred to the software. Likewise,
parameters you set in the software for the camera (such as shutter speed, focusing method,
color space, etc.) are transferred to the camera.
Thus, you can use the software to remotely control the LEICA M/M-P (Typ 240), LEICA M
Monochrom (Typ 246), or allow the software to run unobtrusively in the background so that the
pictures taken will be saved on your computer.
The lower section of the program window is divided into two areas, which you can access by
clicking on the relevant tab.
LEICA M/M-P (TYP 240), LEICA M MONOCHROM (TYP 246)
CAMERA SETTINGS (7):
Here, you can find the settings for exposure control and metering modes, aperture and shutter
speed, exposure compensation, and ISO. In addition, you can set white balance.
FILE SETTINGS (8):
This area includes settings for the file format and for the name and storage location of the
pictures taken. Furthermore, you can set the JPEG color space and –resolution here.
54
Page 55

7 8
LEICA M/M-P (TYP 240), LEICA M MONOCHROM (TYP 246)
55
Page 56

CAMERA SETTING SCREEN
Exposure Mode (9): Here, you can select automatic program mode (P), aperture priority mode
(A), shutter speed priority mode (T), or set shutter speed and aperture yourself manual mode (m).
Depending on the selected exposure control mode, you can set Shutter Speed (11) and/or
Aperture (12). Exposure Metering (10): You can select between multi-zone, center-weighted,
and spot. Exposure Compensation (13): Can be set from -3 EV to +3 EV in half steps. ISO
(14): For selecting the various ISO settings on the camera. White balance (15): For selecting
one of the presets or Color Temperature, with which you can set the white balance by specifying
the color temperature value in Kelvin. A range of 2000K to 13100K (15.1) is available.
Drive Mode (16): The following settings are available:
Single: Clicking on the shutter release button results in one exposure.
Continuous: Pictures are taken as long as the shutter release button is activated by keeping the
LEICA M/M-P (TYP 240), LEICA M MONOCHROM (TYP 246)
respective mouse button pressed.
2s and 12s Self Timer: Clicking on the shutter release button starts the respective delay time.
Exp. Bracketing: This mode allows creating picture series, e.g. for HDR images. You can select
between 3 or 5 exposures and exposure variations of 0.5, 1, 2, or 3EV. Clicking on the shutter
release button results in the camera automatically taking the respective pictures.
56
Page 57

10
11
13
14
LEICA M/M-P (TYP 240), LEICA M MONOCHROM (TYP 246)
9
15
16
17
15.1
17.1
57
Page 58

FILE SETTING SCREEN
File Format (21): You can select whether you want to save your pictures in the DNG format
(Digital Negative = RAW format), the JPG format, or simultaneously in both.
If JPG is activated, you can also select the JPG Color Space and the JPG Resolution (both 22).
Video Resolution (23): For the selection of the desired resolution/frame rate setting.
DNG / JPG (24/25): Indicates the paths details and in which folders the respective files are
saved on the computer. You can change this by either directly entering the desired locations in
the respective boxes, or clicking on the buttons to the right of the path details (24.1).
File Name (26): Indicates the first part of the image file’s name. You can change this by directly
entering the desired characters. To the right, the second part of the image file’s name, i.e. the
number (25.1) is shown. By clicking on this box, you can reset it to O or set any other number as
a starting point.
LEICA M/M-P (TYP 240), LEICA M MONOCHROM (TYP 246)
58
Page 59

21
22
23
LEICA M/M-P (TYP 240), LEICA M MONOCHROM (TYP 246)
24
25
26
24.1
25.1
59
Page 60

QUICKVIEW
Clicking on the Quickview Symbol opens a scalable window that shows the respective
picture after every shot.
LEICA M/M-P (TYP 240), LEICA M MONOCHROM (TYP 246)
60
Page 61

LEICA M/M-P (TYP 240), LEICA M MONOCHROM (TYP 246)
61
Page 62

OPTION MENU FUNCTIONS
Meter/Feet:
This option can be used to select whether distances are specifi ed in meters or feet.
Automatic Updates:
Every time you start the program, this option checks whether a new version of the Image Shuttle
software is available on the Leica server. This requires an Internet connection.
Check Updates:
Checks on request whether a new version of the Image Shuttle software is available on the
Leica server. This requires an Internet connection.
Always On Top:
Sets up the software so that the program window is always kept in the foreground. Click on the
menu option again to deactivate the function.
Transparency:
To keep the program window in the foreground but less obtrusively, the Image Shuttle software
includes the option of displaying the window semi-transparently. Transparency values of 0 % to
60 % are available.
62
Page 63

FOTO-WORKFLOW
The Leica Image Shuttle software can easily be integrated into your photo workflow. This kind
of workflow is essentially possible using any RAW converter software that provides a hot folder
function. A hot folder is a special folder that is continuously monitored by the RAW converter
software.
63
Page 64

WORKFLOW WITH ADOBE® PHOTOSHOP® LIGHTROOM
®
64
Page 65

Adobe Photoshop Lightroom®is a powerful program for organizing images and converting DNG
data. This software enables pictures to be monitored directly on the screen when transferring
photographs to the computer using the USB cord. To do this, settings in the Image Shuttle
software and in Lightroom are needed.
Image data that is saved to a folder of your choice using Image Shuttle is then displayed
in Lightroom. However, for this to work Lightroom must know which folder the images can
be found in.
The File menu in Lightroom contains the „Automatic Import“ function for this purpose.
This is where you can make the various settings required to create a smooth automatic
import of the image data.
Select File → Automatic Import → Automatic Import Settings.
In the subsequent dialog box, first select the folder you want Lightroom to monitor. This
must be identical to the folder you have selected as the storage location in the Image
Shuttle software. In addition, this folder may not contain ANY data when creating the
automatic import.
During the automatic import, Lightroom will automatically move all image data stored
in this folder to a destination folder and then provide it in the Lightroom library.
Under Destination, you can select the folder to which the image data will be moved.
To provide better clarify, a subfolder is created with the name of your choice.
65
Page 66

66
Page 67

There are a range of options for renaming the imported image data.
Likewise, there are various options for performing specific basic corrections on
imported images. These can be set using the Development Settings option. Refer to the
Adobe Photoshop Lightroom manual for a detailed description.
Lightroom enables you to create different meta data records. For example, these
include information about the photographer, copyright holder, keywords, etc. The
necessary settings can be found under the „Custom“ option in the Meta Data menu.
You can also specify keywords for the automatic import, which are then assigned to all
imported files. The „Keywords“ input box is available for this purpose.
Under „Initial Preview“, you have the option of setting the size of the preview files
created.
Once you have made all the necessary settings for the automatic import in Lightroom you
then have to activate the Automatic Import function (under File → Automatic Import).
From now on, images saved on the hard drive by the Leica Image Shuttle software will
automatically be moved to the selected folder in Lightroom, renamed and assigned meta data
if necessary, and are then available in the Lightroom catalog.
67
Page 68

68
Leica Camera AG I Am Leitz-Park 5 I 35578 Wetzlar I DEUTSCHLAND
Telefon +49(0)6441-2080-0 I Telefax +49(0)6441-2080-333 I www.leica-camera.com
 Loading...