

Page 1
_en_GKL221_User.book Page 1 Monday, April 11, 2011 2:30 PM
Leica GKL221 Charger
EN
User Manual
Version 1.2
English
Page 2
_en_GKL221_User.book Page 2 Monday, April 11, 2011 2:30 PM
Introduction
This manual contains important safety directions as well as instructions for setting up the product and
operating it. Refer to "4 Safety Directions" for further information. Read carefully through this manual
before switching on the product.
EN
Product identification The model and the serial number of the product are indicated on the type plate. Enter the model and
serial number in this manual and always refer to this information when contacting the agency or Leica
Geosystems authorized service workshop.
Type: ____________________ Serial No.: ____________________
Symbols The symbols used in this manual have the following meanings:
Type Description
Danger
Warning
Caution
Indicates an imminently hazardous situation which, if not avoided, will result in
death or serious injury.
Indicates a potentially hazardous situation or an unintended use which, if not
avoided, could result in death or serious injury.
Indicates a potentially hazardous situation or an unintended use which, if not
avoided, may result in minor or moderate injury and/or appreciable material,
financial and environmental damage.
Important paragraphs which must be adhered to in practice as they enable the
product to be used in a technically correct and efficient manner.
GKL221, Introduction 2
Page 3
_en_GKL221_User.book Page 3 Monday, April 11, 2011 2:30 PM
Table of Contents
In this manual Chapter Page
1 System Description 4
2Operation 8
2.1 Battery Adapter 8
2.2 Connecting the Charger 9
2.3 Inserting and Removing the Batteries 11
2.4 Selection Button 14
2.5 Charging the Battery 15
2.6 Indicators 17
2.7 Tips 20
3 Care and Transport 21
3.1 Transport 21
3.2 Storage 21
3.3 Cleaning and Drying 21
4 Safety Directions 22
4.1 General 22
4.2 Purpose 22
4.3 Limits of Use 23
4.4 Areas of Responsibilities 23
4.5 Hazards of Use 24
4.6 Electromagnetic Compatibility EMC 25
4.7 FCC Statement, Applicable in U.S. 26
5 Technical Data 28
EN
3 Table of Contents, GKL221
Page 4
_en_GKL221_User.book Page 4 Monday, April 11, 2011 2:30 PM
1 System Description
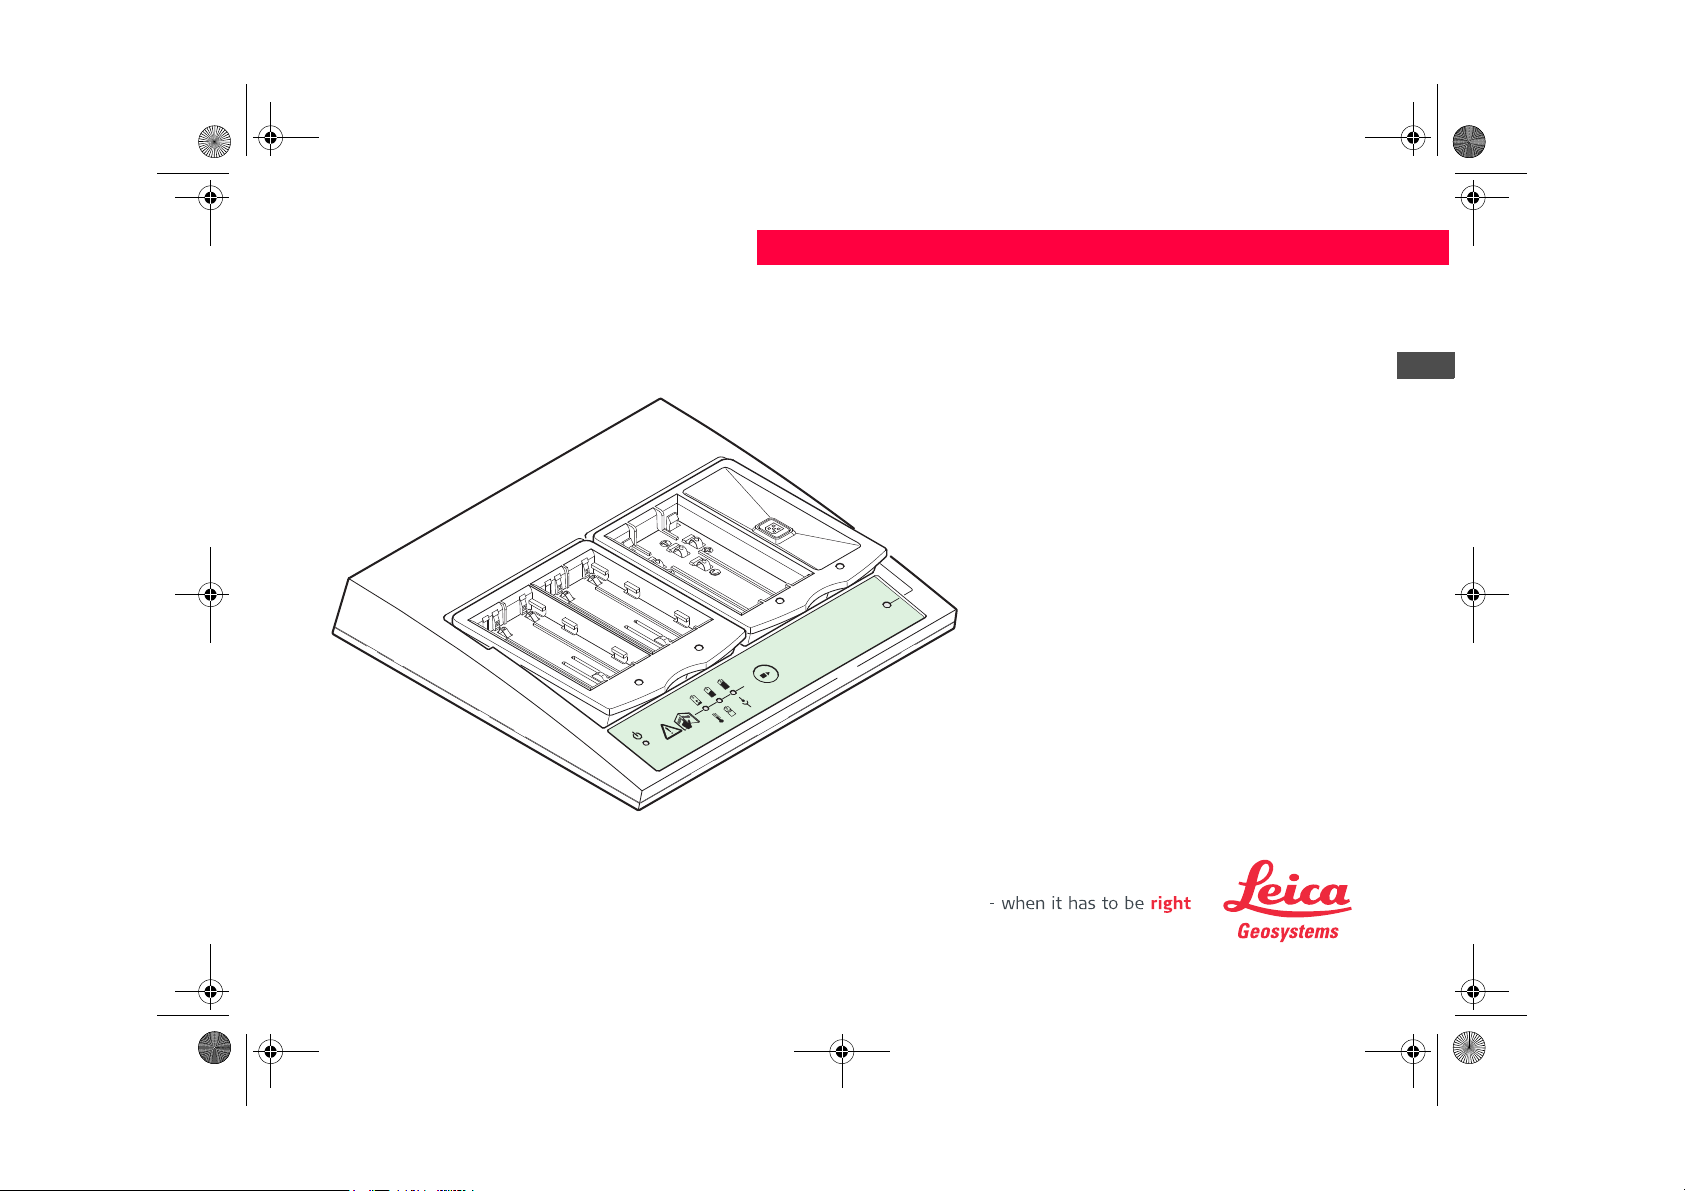
Description The Leica Geosystems GKL221 is an intelligent charger with advanced charging technology. It is
designed to charge all Leica batteries. As power supply, the mains as well as GDC221 vehicle dapter
EN
General information Up to five batteries can be connected to the charger. Two batteries can be charged at the same time.
connected to the cigarette lighter socket of a vehicle can be used. The GKL221 is a very useful complement to all of your battery operated Leica Geosystems products.
With more than two batteries connected, the rest are charged in the order they were connected.
Beside charging, the charger can also discharge and refresh batteries.
We recommend starting up the product at this point, while continuing to read the Operating Instructions.
GKL221, System Description 4
Page 5
f
jik
ab c de
GKL221_002
m
n
l
g
h
_en_GKL221_User.book Page 5 Monday, April 11, 2011 2:30 PM
可充兩個LI-ON電
池(選購)
GEB90
GEB211
GEB212
GEB221
GEB241
可充個+個5
針的電池(選購)
GEB111
GEB121
5針的電池
GEB87
GEB187
GEB77
GEB79
GEB70
GEB71
GEB171
5針的電池
GEB87
GEB187
GEB77
GEB79
GEB70
GEB71
GEB171
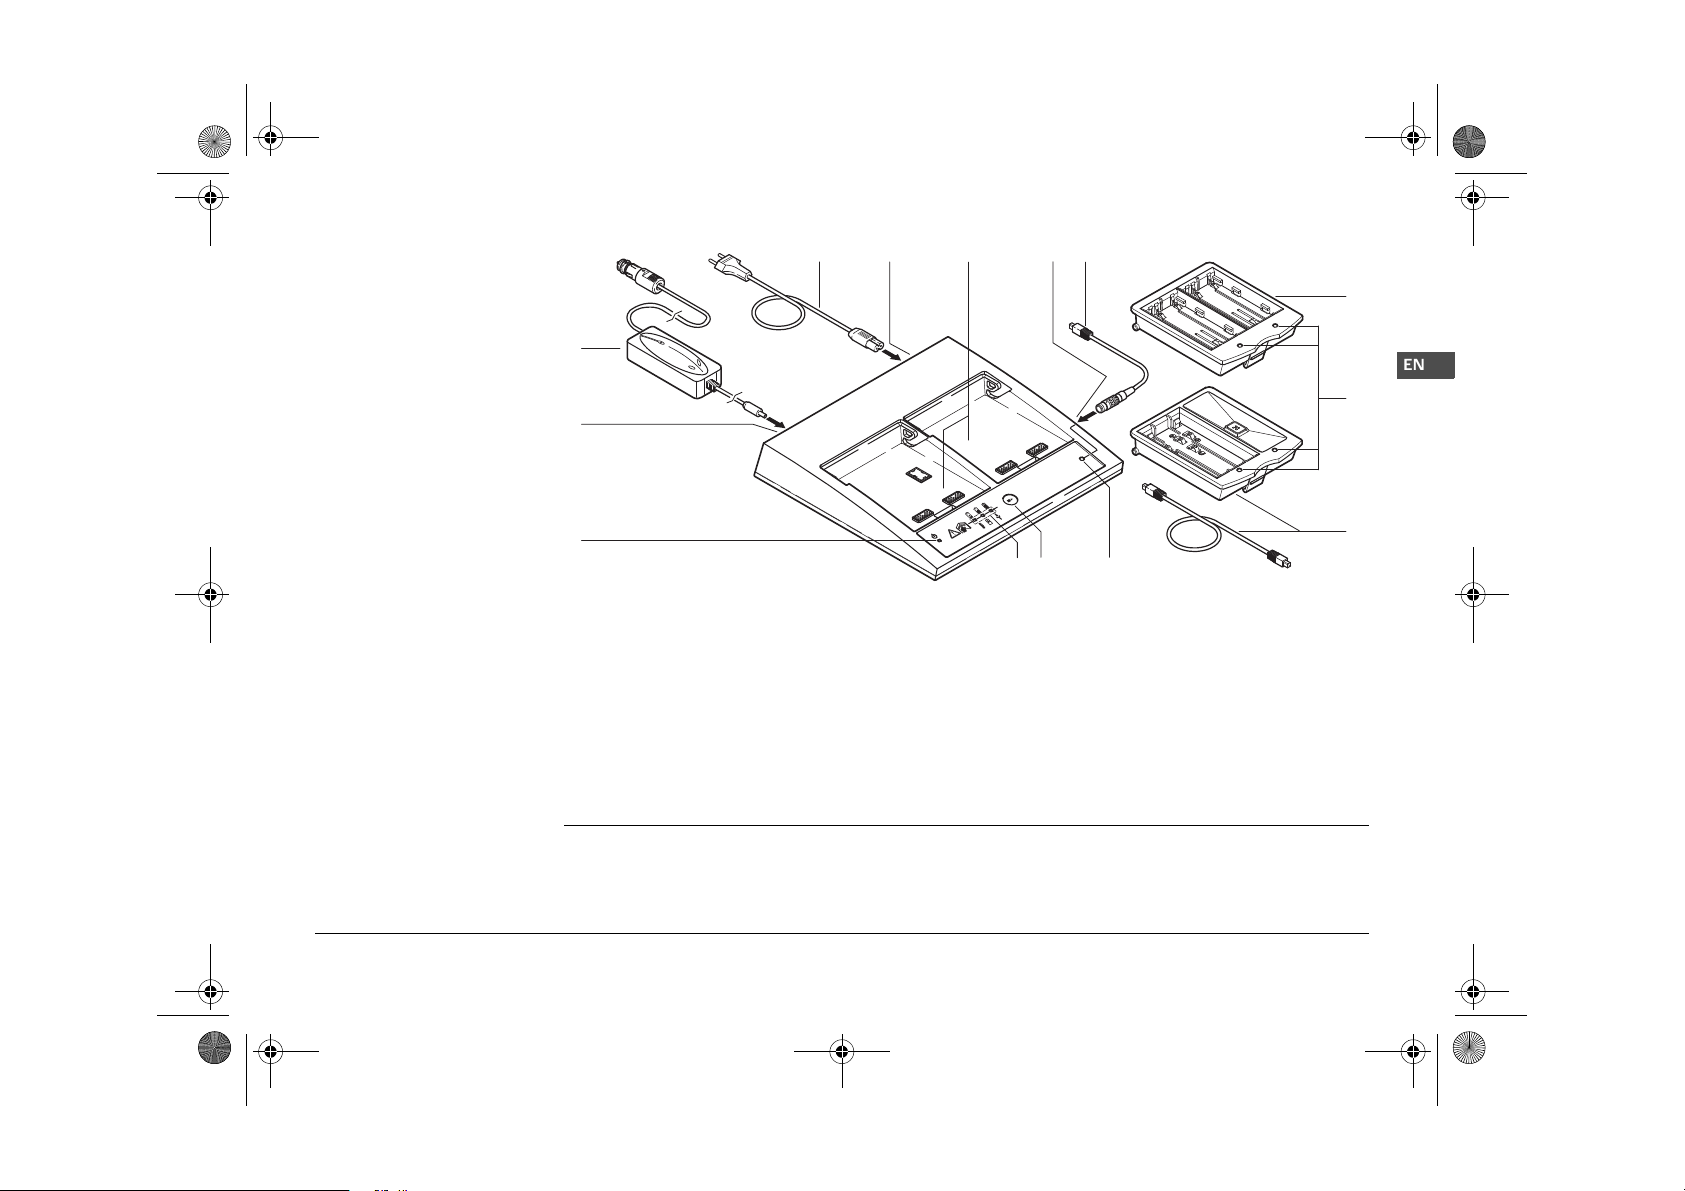
System components
a) Mains cable, specific for relevant country
b) Mains cable socket on the charger
c) Adapter bays I and II for the GDI221 / GDI222
battery adapters
d) External battery cable connection
e) Cable socket for external 5 pole batteries
f) Vehicle adapter GDC221, optional
g) Vehicle cable socket on the charger
h) Function indicator
EN
i) Capacity and error indicators
j) Selection button
k) Status indicator for external battery connection
l) GDI221 battery adapter, optional
m) Battery status indicators
n) GDI222 battery adapter and 5 pole charging
cable, optional
5 System Description, GKL221
Page 6
_en_GKL221_User.book Page 6 Monday, April 11, 2011 2:30 PM
Rechargeable batteries The following Leica Geosystems batteries can be charged:
GEB90
GEB211
GEB212
GEB221
EN
GEB241
GE B 111
GEB121
GEB87
GEB187
GEB77
GEB79
GEB70
GEB71
GEB171
GKL221_014
GKL221, System Description 6
The charger is designed to recharge and discharge original Leica batteries as well as some NiMH/NiCd
camcorder batteries. Refer to section "2.3 Inserting and Removing the Batteries" for more information.
Page 7
_en_GKL221_User.book Page 7 Monday, April 11, 2011 2:30 PM
Charger and battery
adapters
Using the charger in combination with the battery adapters, enables the following batteries to be
connected to the charger:
Charger / battery adapter Rechargeable batteries
GKL221 with two GDI221 Up to four Li-Ion batteries and one battery with a
5 pole socket.
GKL221 with one GDI221 and one GDI222 Up to two Li-Ion batteries, one camcorder type
battery and two batteries with 5 pole sockets.
GKL221 with two GDI222 Up to two camcorder type batteries and three
batteries with 5 pole sockets.
EN
7 System Description, GKL221
Page 8
GKL221_003
_en_GKL221_User.book Page 8 Monday, April 11, 2011 2:30 PM
2Operation
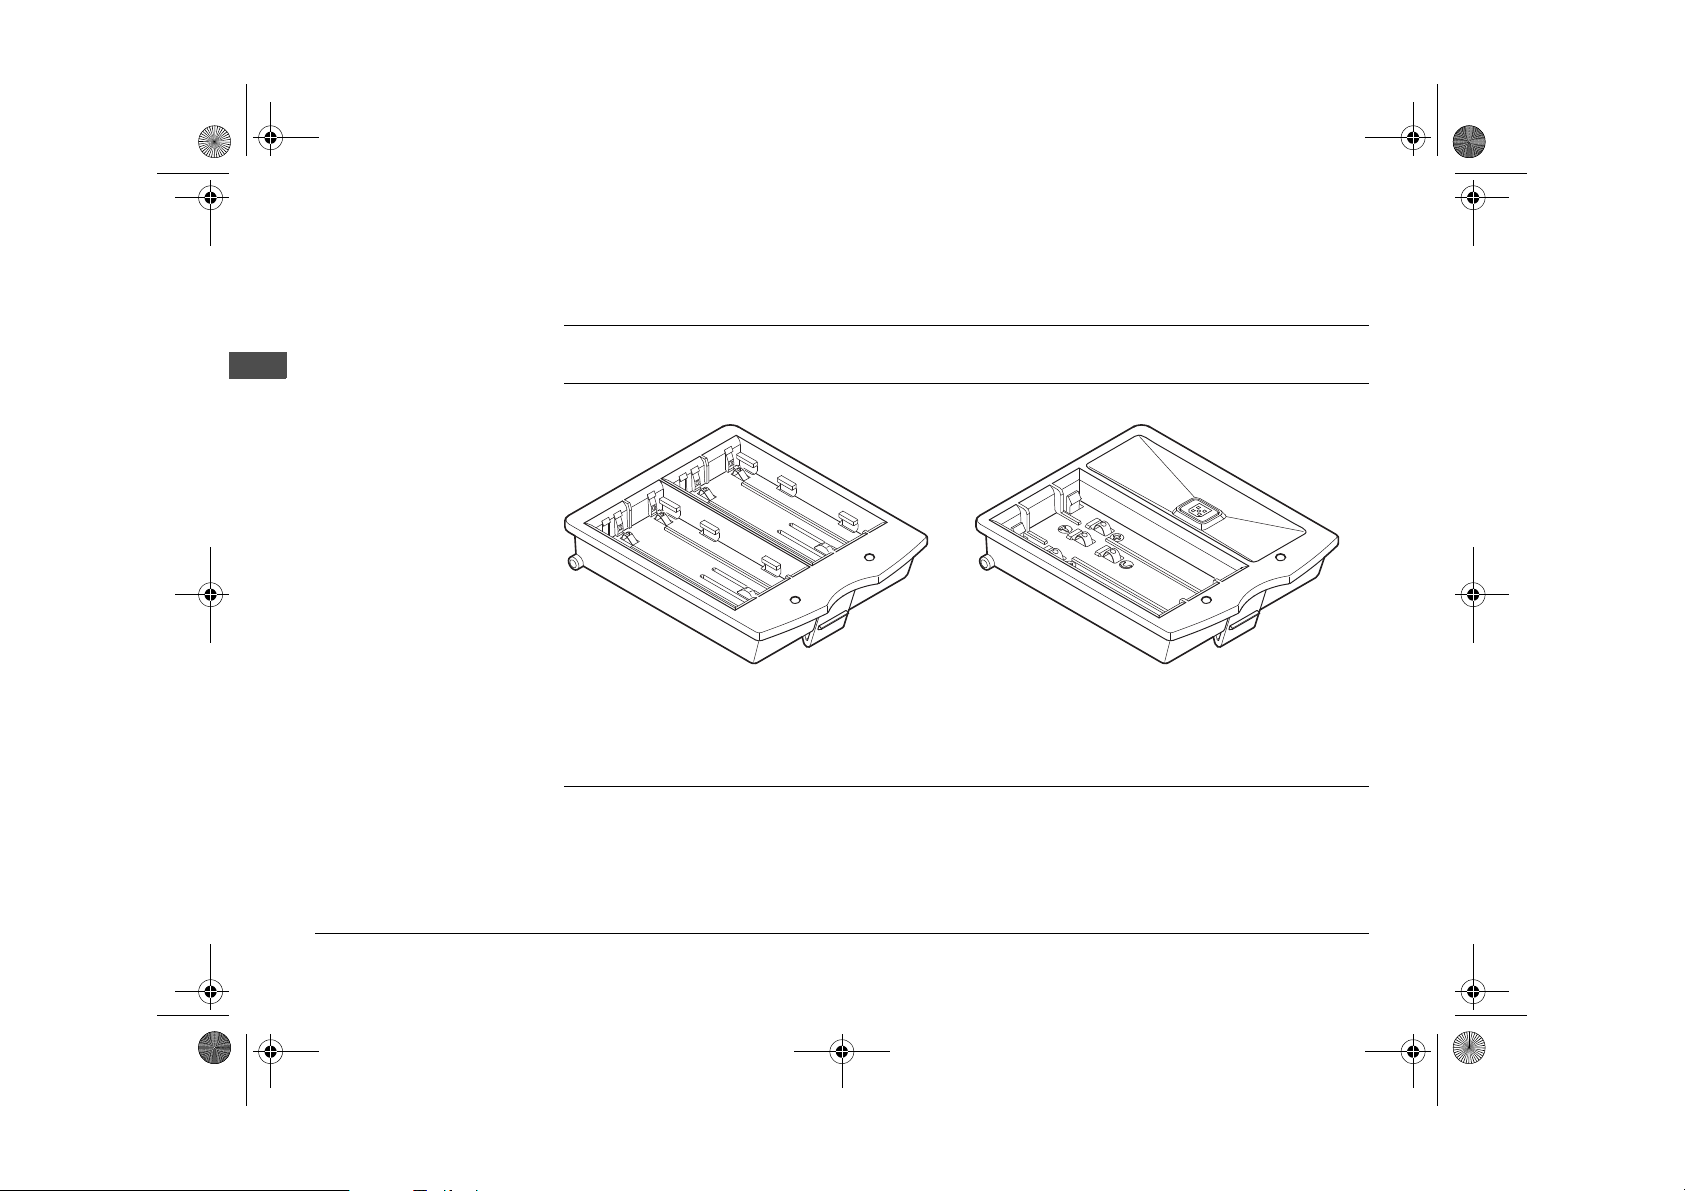
2.1 Battery Adapter
Purpose The battery adapter connects the charger to the corresponding batteries and has one LED per charging
EN
Type The following battery adapters are available:
bay that indicates the status of the battery.
GDI221
• For two Leica Geosystems Li-Ion batteries
GEB90, GEB211, GEB212, GEB221 or
GEB241.
GKL221_004
GDI222
• For one Leica Geosystems NiMH battery
GEB111 or GEB121 and one NiCd or NiMH
5 pole battery.
GKL221, Operation 8
Page 9
_en_GKL221_User.book Page 9 Monday, April 11, 2011 2:30 PM
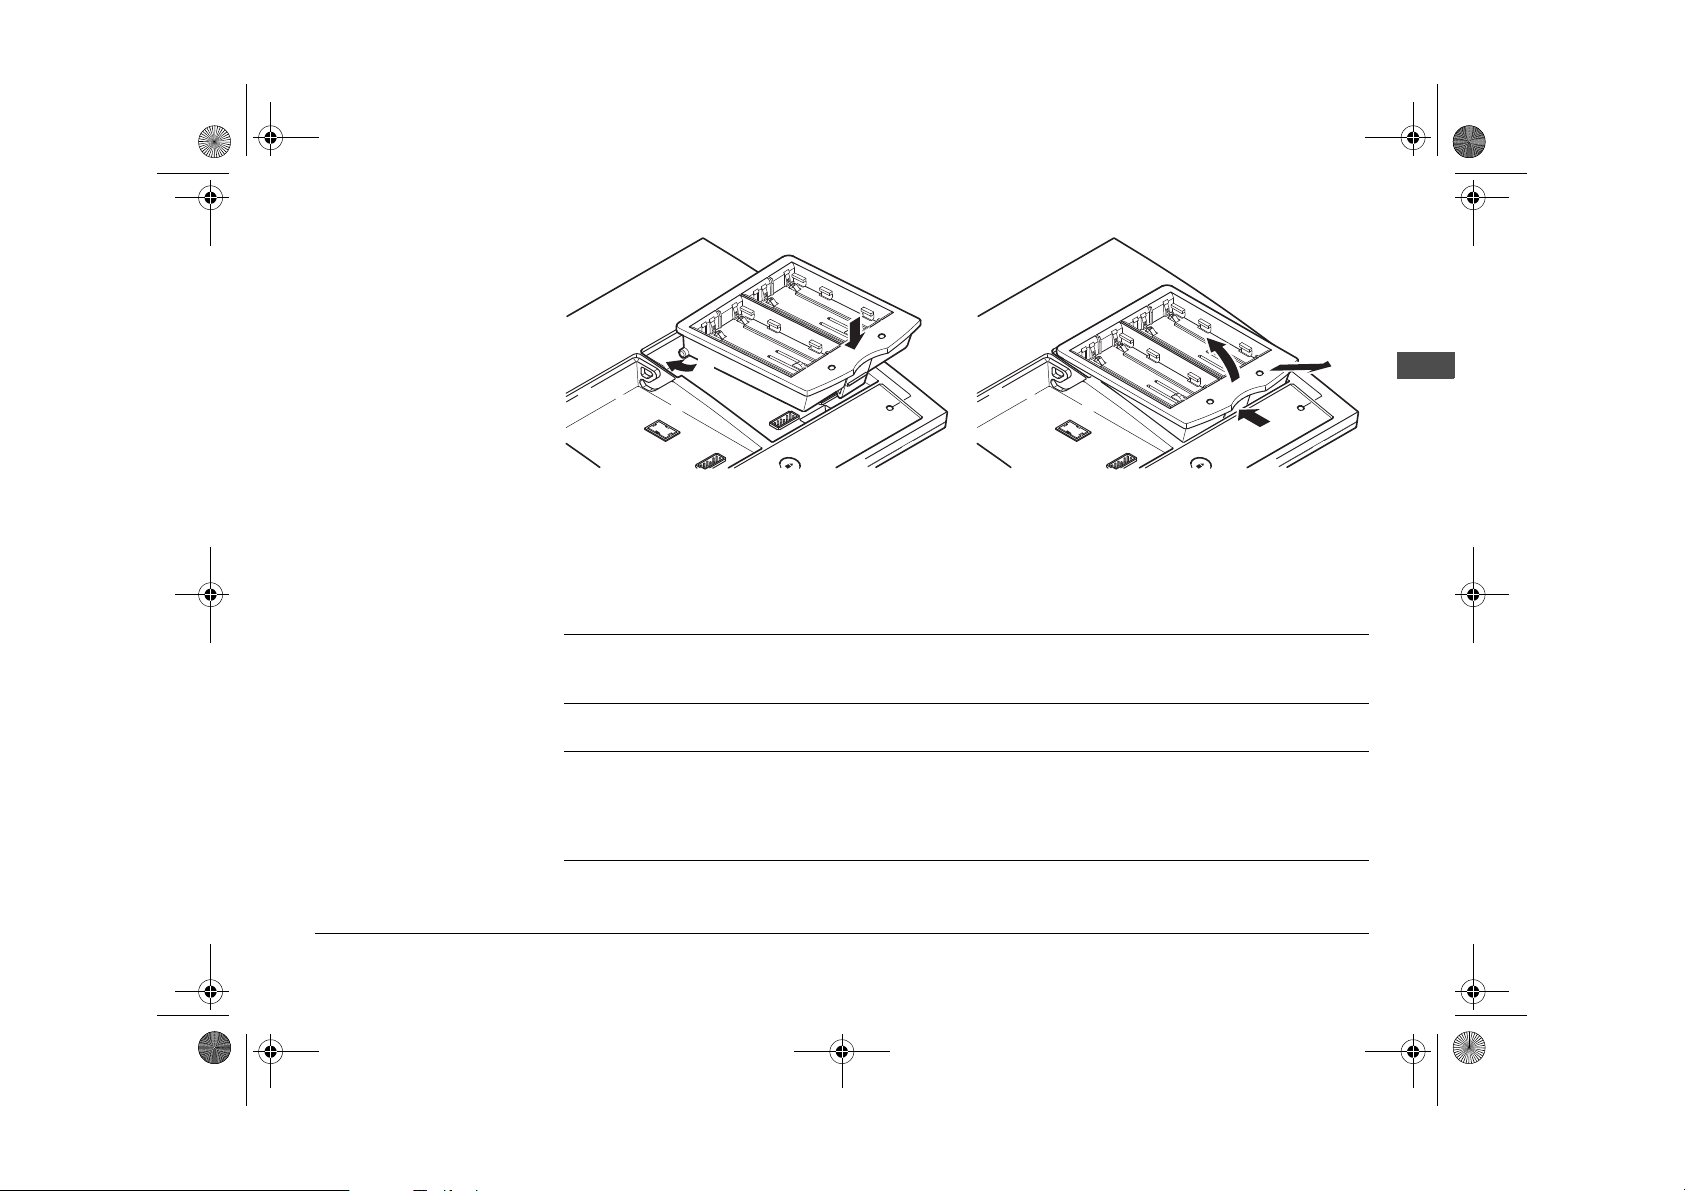
Inserting and removing
2
1
GKL221_005
Inserting
1. Insert the battery adapter along the rear
guiding edge.
2. Press on the front of the battery adapter until
it clicks and locks into place.
GKL221_006
Removing
1. Press on the front edge of the battery adapter
to open it.
2. Carefully lift it up to the stop point.
3. Remove the adapter by pulling it out forwards.
2.2 Connecting the Charger
Warning Only use the charger in dry rooms! Never use the charger when it is wet or damp!
Start up Always set the charger on a firm surface before starting it up.
Connect the charger either:
• With the supplied mains cable to the mains power socket or
• With the optional GDC211 vehicle adapter to the battery circuit of a vehicle
3
2
1
EN
9 Operation, GKL221
Page 10

_en_GKL221_User.book Page 10 Monday, April 11, 2011 2:30 PM
EN
Function check After the adapter is connected to the mains or to the vehicle's battery circuit, the red, yellow and green
Pull the plug from the mains socket and from the vehicle's power socket, if the charger will not be used
for a long period.
Only use the vehicle adapter for power supply from a vehicle. If the power supply comes from other
sources, such as transformers, malfunctions could occur. Refer to section "5 Technical Data" for information on voltage and rated power.
Check older vehicles and makes sure that the + pole is on the middle contact surface of the cigarette
lighter socket. Should the polarity be wrong, then the fuse in the charger or the fuse in the vehicle
adapter has to be changed. The fuse in the charger has to be changed by an authorised Leica Geosystems service workshop. The fuse in the vehicle adapter has to be changed as described in the manual
of the adapter.
function indicators light up once, the capacity and error indicators light up red and green. This is a function check.
If no battery was inserted, then only the green function indicator will light up.
If the status indicator and the three capacity and error indicators light up and remain red, then a defect
was detected. Refer to section "2.6 Indicators" for additional information.
GKL221, Operation 10
Page 11

_en_GKL221_User.book Page 11 Monday, April 11, 2011 2:30 PM
2.3 Inserting and Removing the Batteries
Li-Ion batteries
2
1
GKL221_007
Warning Only charge or discharge batteries recommended by Leica Geosystems. Only use Leica Geosystems
Li-Ion batteries.
Inserting:
1. Insert the battery flush to the front edge of the
GDI221 battery bay.
2. Push the battery downwards with only slight
pressure to the stop position.
Removing:
• Push the battery backwards to the stop and
then remove it.
EN
11 Operation, GKL221
Page 12

_en_GKL221_User.book Page 12 Monday, April 11, 2011 2:30 PM
EN
NiCd and NiMH batteries
2
1
GKL221_008
The Leica Geosystems GEB111 and GEB121 batteries have four contact surfaces, whereas
camcorder batteries made by third parties only have three. The charger can distinguish between these
two types of batteries and adjust the charging process accordingly.
Camcorder batteries with three contact surfaces must meet the following specifications to prevent
damage:
• Voltage: 6 V
• Type of battery: NiCd or NiMH
• Minimum capacity: NiCd 1500 mAh, NiMH 1800 mAh
• Compatible contacts in the correct sequence, i.e. "+, T, -" in one line.
Camcorder batteries that meet these specifications are monitored for temperature and charged with a
current of 1.6 A.
Inserting:
1. Insert the battery into the front edge of the
GDI222 battery bay.
2. Press it downwards until it clicks into place.
Removing:
• Pull up the back of the battery and remove it.
GKL221, Operation 12
Page 13

GKL221 010
1
2
_en_GKL221_User.book Page 13 Monday, April 11, 2011 2:30 PM
Batteries with 5 pole
charging sockets
External batteries with 5
pole charging sockets
GKL221_009
2
1
Leica Geosystems batteries with 5 pole charging
sockets, e.g. the GEB87 or GEB70, must be
connected to the 5 pole charging socket of the
charging cable.
Leica Geosystems batteries with 5 pole charging
sockets, e.g. the GEB87 or GEB70, must be
connected to the external battery connection
socket of the charging cable.
Batteries on external battery connection
sockets can be charged without terminating a charging process that has already
begun.
EN
13 Operation, GKL221
Page 14

_en_GKL221_User.book Page 14 Monday, April 11, 2011 2:30 PM
2.4 Selection Button
EN
Functions
The selection button is used to select a
charging bay and to toggle between
the charging and discharging modes.
GKL221_011
Functions Press the
selection
button
Select the charging
bay
Switching between
charging and
discharging modes
Discharging is indicated by the red status indicator flashing. When the process of discharging is
completed, the green indicator starts to flash, indicating that the battery is now being charged.
Less than two
seconds
More than three
seconds
Description
The next bay containing a battery is selected. The selected
bay is indicated by the yellow status indicator flashing quickly
for about three seconds; the battery capacity is also displayed.
Switching to the discharging mode causes the status indicator
to flash yellow-red for about five seconds, switching into
charging mode causes it to flash yellow-green for about five
seconds.
GKL221, Operation 14
Page 15

_en_GKL221_User.book Page 15 Monday, April 11, 2011 2:30 PM
2.5 Charging the Battery
Procedure
Set the charging sequence The GKL221 charger can charge two batteries simultaneously.
Priorities Batteries are charged at the external battery connection without interrupting a charging process already
Retaining the full charge When the battery is fully charged, it may remain connected. NiCd and NiMH batteries are charged in
Step Description
1. Insert the battery adapter.
2. Connect the charger to the power supply, the green function indicator lights up.
3. Insert the battery. The yellow status indicator flashes to indicate that the battery has been
recognized.
4. Make sure the green status indicator remains on.
The battery is now being charged. Refer to section "2.6 Indicators Lamps", if after
connecting the battery a different status indicator lights up.
Check the status indicator after about one minute.
5. The battery has been completely charged when the green status indicator starts to flash.
6. The battery may be removed or remain connected to ensure it is fully charged when
When more than one battery is connected to the charger, the one connected first is charged first.
Always connect the more urgently needed battery first.
begun.
turns to retain their full charge. In this way, the intrinsic self-discharging is compensated and the battery
is always fully charged and ready for use. Refer to section "Charging modes" for more information.
Refer to section "5 Technical Data", for information on the charging times.
needed. Refer to section "Charging modes" for more information.
EN
15 Operation, GKL221
Page 16

_en_GKL221_User.book Page 16 Monday, April 11, 2011 2:30 PM
Refreshing the battery The refresh function totally discharges the battery and then puts it on quick charge.
Step Description
1. Connect the charger to the power supply.
EN
2. Insert the battery. The yellow status indicator flashes to indicate that the battery has been
3. Press the selection button for more than three seconds to start the process of discharging
4. When the battery has been discharged, it is put on quick charge. The status indicator lights
5. The battery has been completely charged when the green status indicator starts to flash.
recognized.
the battery. Discharging is indicated by the red status indicator flashing.
Discharging may take a long time for large capacity batteries. To keep discharge
times short, only use this function with batteries that are empty or low on charge.
up green.
We recommend refreshing NiCd and NiMH batteries two to three times when their capacity
starts to sink noticeably.
For Li-Ion batteries, a single discharging and charging cycle is sufficient. We recommend
carrying out the process when the battery capacity indicated on the charger or on a Leica
Geosystems product deviates significantly from the actual battery capacity available.
GKL221, Operation 16
Page 17

_en_GKL221_User.book Page 17 Monday, April 11, 2011 2:30 PM
2.6 Indicators
Explaination of the
symbols
Operation indicators
Status indicators
Symbol Meaning
LED Off.
LED on permanently.
LED flashes.
Symbol LED Meaning
Off The charger is not connected to the power supply.
Green The charger is connected to the power supply.
Symbol LED Meaning
Off The connected battery was not recognized.
Yellow The connected battery was recognized. The charger is in
stand-by mode as two other batteries are being charged or
discharged.
Green The connected battery is now being charged.
Green The connected battery is fully charged and can be removed.
EN
17 Operation, GKL221
Page 18

_en_GKL221_User.book Page 18 Monday, April 11, 2011 2:30 PM
Symbol LED Meaning
EN
Red The charger has detected an error.
Red A battery to be refreshed is connected. The battery is being
discharged.
Yellow Indicates the active, selected bay.
Capacity and error indicators
Capacity indicators
GKL221, Operation 18
• In normal operation, the three capacity and error indicators light up green to indicate the capacity
of the battery in the selected bay. After selecting the bay, the indicators light up for about ten to
fifteen seconds, then they switch off.
• In case of an error, the capacity and error indicators turn red to show that there is an error in the
selected bay.
LEDs Meaning
The battery charge is less than 20%.
The battery charge is at least 20%.
The battery charge is at least 50%.
The battery charge is at least 80%.
Presently, the level of charge can only be displayed for the Leica Geosystems GEB211, GEB212,
GEB221, GEB241 and GEB90 batteries.
Page 19

_en_GKL221_User.book Page 19 Monday, April 11, 2011 2:30 PM
Error indicators
LEDs Meaning Measures to take
The battery is too cold or overheated. Refer to section "Temperature range" for
additional information.
The battery is defective. Use a different battery.
Faulty contact on the battery or the
battery adapter.
Hardware error in the charger. Contact an authorised Leica Geosys-
If the charger indicates an error when the battery is connected:
• Connect a different battery to check if the fault lies with the battery or the charger.
• If the problem persists, contact an authorised Leica Geosystems service workshop.
In case of error, please also check:
• If there is power coming from the mains or vehicle battery power circuit.
• If the cables are all correctly connected and no obvious faults can be detected.
• If the function indicator is lit on the optionally connected vehicle adapter.
Check the contacts.
tems service workshop.
EN
19 Operation, GKL221
Page 20

_en_GKL221_User.book Page 20 Monday, April 11, 2011 2:30 PM
2.7 Tips
Tips • To charge batteries to their full capacity, new NiCd and NiMH batteries should be fully discharged
• Let the batteries in the instrument discharge as much as possible. It prevents the so-called "memory
EN
• When using the vehicle adapter, always keep the motor running while charging the batteries.
and charged three to five times.
effect" with NiCd batteries.
GKL221, Operation 20
Avoid sudden ambient temperature changes while charging the batteries (e.g. do not let the sun shine
directly on the batteries or on the charger). Sudden ambient temperature changes may cause the
charging process to end prematurely without having fully charged the batteries.
Page 21

_en_GKL221_User.book Page 21 Monday, April 11, 2011 2:30 PM
3 Care and Transport
3.1 Transport
Shipment When transporting the product by rail, air or sea, always use the complete original Leica Geosystems
packaging, transport container and cardboard box, or its equivalent, to protect against shock and vibration.
3.2 Storage
Product Respect the temperature limits when storing the product, particularly in summer if the product is inside
a vehicle. Refer to section "5 Technical Data" for information about temperature limits.
3.3 Cleaning and Drying
Product Use only a clean, soft, lint-free cloth for cleaning.
Cables and plugs Keep plugs clean and dry. Blow away any dirt lodged in the plugs of the connecting cables.
EN
21 Care and Transport, GKL221
Page 22

_en_GKL221_User.book Page 22 Monday, April 11, 2011 2:30 PM
4 Safety Directions
4.1 General
Description The following instructions should enable the person responsible for the product and the person who
EN
4.2 Purpose
Permitted use • Charging and discharging batteries of differing cell technologies.
Adverse use • Use of the product without instruction.
actually uses the equipment to anticipate and avoid operational hazards
The person responsible for the product must ensure that all users understand these instructions and
adhere to them.
• Use outside of the intended limits.
• Disabling safety systems.
• Removal of hazard notices.
• Opening the product using tools, for example screwdriver, unless this is specifically permitted for
• Modification or conversion of the product.
• Use after misappropriation.
• Use of products with obviously recognizable damages or defects.
• Use with accessories from other manufacturers without the prior explicit approval of Leica
certain functions.
Geosystems.
Warning Adverse use can lead to injury, malfunction and damage. It is the task of the person responsible for the
GKL221, Safety Directions 22
equipment to inform the user about hazards and how to counteract them. The product is not to be operated until the user has been instructed on how to work with it.
Page 23

_en_GKL221_User.book Page 23 Monday, April 11, 2011 2:30 PM
4.3 Limits of Use
Environment Suitable for use in dry environment only and not under adverse conditions
4.4 Areas of Responsibilities
Manufacturer
of the product
Manufacturers of non
Leica Geosystems
accessories
Person in charge of the
product
Warning The person responsible for the product must ensure that it is used in accordance with the instructions.
Leica Geosystems AG, CH-9435 Heerbrugg, hereinafter referred to as Leica Geosystems, is responsible for supplying the product, including the user manual and original accessories, in a completely safe
condition.
The manufacturers of non-Leica Geosystems accessories are responsible for developing, implementing and communicating safety concepts for their products, and are also responsible for the effectiveness of those safety concepts in combination with the Leica Geosystems product.
The person in charge of the product has the following duties:
• To understand the safety instructions on the product and the instructions in the user manual
• To be familiar with local regulations relating to safety and accident prevention.
• To inform Leica Geosystems immediately if the product becomes unsafe.
This person is also accountable for the training and the deployment of personnel who use the product
and for the safety of the equipment in use.
EN
23 Safety Directions, GKL221
Page 24

_en_GKL221_User.book Page 24 Monday, April 11, 2011 2:30 PM
4.5 Hazards of Use
Warning The absence of instruction, or the inadequate imparting of instruction, can lead to incorrect or adverse
EN
Warning The product is not designed for use under wet and severe conditions. If unit becomes wet it may cause
Warning If you open the product, either of the following actions may cause you to receive an electric shock.
use, and can give rise to accidents with far-reaching human, material, financial and environmental
consequences
Precautions:
All users must follow the safety directions given by the manufacturer and the directions of the person
responsible for the product.
you to receive an electric shock.
Precautions:
Use the product only in dry environments, for example in buildings or vehicles. Protect the product
against humidity. If the product becomes humid, it must not be used !
• Touching live components
• Using the product after incorrect attempts were made to carry out repairs.
Precautions:
Do not open the product. Only Leica Geosystems authorized service workshops are entitled to repair
these products.
Warning Batteries not recommended by Leica Geosystems may be damaged if charged or discharged. They
GKL221, Safety Directions 24
may burn and explode.
Precautions:
Only charge and discharge batteries recommended by Leica Geosystems.
Page 25

_en_GKL221_User.book Page 25 Monday, April 11, 2011 2:30 PM
Warning If the product is improperly disposed of, the following can happen:
• If polymer parts are burnt, poisonous gases are produced which may impair health.
• If batteries are damaged or are heated strongly, they can explode and cause poisoning, burning,
corrosion or environmental contamination.
• By disposing of the equipment irresponsibly you may enable unauthorized persons to use it in
contravention of the regulations, exposing themselves and third parties to the risk of severe injury
and rendering the environment liable to contamination.
Precautions:
The product must not be disposed with household waste.
Dispose of the product appropriately in accordance with the national regulations in
force in your country.
Always prevent access to the product by unauthorized personnel.
Product specific treatment and waste management information can be downloaded from the Leica
Geosystems home page at http://www.leica-geosystems.com/treatment or received from your Leica
Geosystems dealer.
4.6 Electromagnetic Compatibility EMC
Description The term Electromagnetic Compatability is taken to mean the capability of the product to function
smoothly in an environment where electromagnetic radiation and electrostatic discharges are present,
and without causing electromagnetic disturbances to other equipment.
EN
Warning Electromagnetic radiation can cause disturbances in other equipment
Although the product meets the strict regulations and standards which are in force in this respect, Leica
Geosystems cannot completely exclude the possibility that other equipment may be disturbed.
25 Safety Directions, GKL221
Page 26

_en_GKL221_User.book Page 26 Monday, April 11, 2011 2:30 PM
Caution May cause failure in other equipment if the product is used with third party components, e.g. third party
EN
Warning If the product is operated with connecting cables attached at only one of their two ends, for example
cables or external batteries.
Precautions:
Only use equipment or accessories recommended by Leica Geosystems. When combined with the
product, they meet the strict requirements stipulated by the guidelines and standards.
external supply cables, interface cables, the permitted level of electromagnetic radiation may be
exceeded and the correct functioning of other products may be impaired.
Precautions:
While the product is in use, connecting cables, for example product to external battery, product to
computer, must be connected at both ends.
4.7 FCC Statement, Applicable in U.S.
Warning This product has been tested and found to comply with the limits for a Class B digital device, pursuant
to part 15 of the FCC Rules.
These limits are designed to provide reasonable protection against harmful interference in a residential
installation.
This equipment generates, uses and can radiate frequency energy and, if not installed and used in
accordance with the instructions, may cause harmful interference to radio communications.
However, there is no guarantee that interference will not occur in a particular installation.
If this equipment does cause harmful interference to radio or television reception, which can be determined by turning the equipment off and on, the user is encouraged to try to eliminate the interference
by one or more of the following measures:
• Reorient or relocate the receiving antenna
• Increase the separation between the equipment and the receiver
GKL221, Safety Directions 26
Page 27

_en_GKL221_User.book Page 27 Monday, April 11, 2011 2:30 PM
• Connect the equipment to an outlet on a circuit different from that to which the receiver is
connected.
• Consult the dealer or an experienced radio/TV technician for help.
Warning Changes or modifications not expressly approved by Leica Geosystems for compliance could void the
user’s authority to operate the equipment.
EN
Labels
GKL221_013
Type: GKL221 Art.No.: .......
.....................................................................
..................................................
........................
..................................................
.........................................
.......................................
...............................
.................................
This device complies with part 15 of the FCC Rules. Operation
is subject to the following two conditions: (1) This device may
not cause harmful interference, and (2) this device must
accept any interference received, including interference that
may cause undesired operation.
27 Safety Directions, GKL221
Page 28

_en_GKL221_User.book Page 28 Monday, April 11, 2011 2:30 PM
5 Technical Data
Power supply • Mains connection, ~
• D/C voltage connection,
EN
Input voltage • 100 - 240 VAC, 50/60 Hz
• 24VDC
Charging power Maximum 18 VDC / maximum 4.0 A; depends on the type of battery
Discharging 4 W
Power rating
Operating environment Only operate in dry environments, e.g. in buildings and vehicles
Temperature range
Charging modes Quick charging mode for:
~ : 75 W : 55 W
IP40, according to IEC60529
Storage: -40°C to +70°C -40°F to +158°F
Operating: ~ :
• All Leica Geosystems batteries. It features temperature monitoring and battery recognition.
Charging current is maximum 4.0 A, depending on the battery.
• All standard camcorder batteries with three contact surfaces and temperature monitoring.
Charging current maximum 1.6 A
Normal charging mode for:
• NiCd and NiMH batteries with temperature below +10°C.
• Li-Ion batteries with temperature below +6°C
• Almost or totally empty Li-Ion, NiCd and NiMH batteries.
:
0°C to +40°C
0°C to +50°C
+32°F to 104°F
+32°F to 122°F
GKL221, Technical Data 28
Page 29

_en_GKL221_User.book Page 29 Monday, April 11, 2011 2:30 PM
Conservation charging mode for:
• NiCd and NiMH batteries. Charging current depends on the type of battery. Charging is done in
turns of about fifteen seconds per battery.
Li-Ion batteries do not require conservation charging, as they do not loose their charge when not used.
Charging technology Switch off conditions in the quick charging mode:
For NiCd and NiMH batteries: For Li-Ion batteries:
Timer Timer
Capacity Capacity
Battery temperature Battery temperature
Negative voltage difference Charging current
Temperature increase per minute
Double inflection method
Conservation charging of NiCd and NiMH batteries:
Monitors battery voltage, charging current and battery temperature.
Cell type • NiCd
• NiMH
•Li-Ion
EN
29 Technical Data, GKL221
Page 30

_en_GKL221_User.book Page 30 Monday, April 11, 2011 2:30 PM
EN
Recharging and
discharging times
Recharging and discharging times depend primarily on the charging and discharging current, the
capacity of the battery and the state of charge it is in when connected.
The following guidelines can be given:
Quick charging at 20°C:
NiCd batteries NiMH batteries Li-Ion batteries
max 2200 mAh 1.0 to 1.5 h max 2200 mAh 1.5 to 2.0 h max 4600 mAh 2.5 to 3.5 h
max 7200 mAh 2.5 to 4.0 h max 4900 mAh 2.0 to 2.5 h
max 10000 mAh2.5to 5.5 h
Discharging:
For NiCd and NiMH batteries Li-Ion batteries
6V batteries with 600 mAh per hour 7.4V batteries with 500 mAh per hour
12V batteries with 300 mAh per hour
Indication Refer to section"2.6 Indicators".
Weight Charger including two battery adapters: 1.12 kg
Dimensions W X D X H: maximum 237 mm x 227 mm x 43 mm; including the battery adapter
GKL221, Technical Data 30
 Loading...