

Page 1
No: IS-0000 – rev. A
QMotion
QzHub3 / QzHub App 2.0
User’s Guide
Dimensions, HWL ....................1”H x 2.8125” W x 3.3125”L
LED Indicator ............... Power, WiFi, Zigbee/BLE, Ethernet
Power ...........................................90-240V +/- 10%, 50/60Hz
Available Plug Type ...............................................Type A (Nema)
Ports .......................................................................Ethernet, USB
Operation ................................................................... WPS Button
Storing Temperature .................................................. -20° to 60°C
Operating Temperature ................................................ 0° to 50°C
Regulatory ................. Meets US and Europe standards CE, FCC
Compliance ....................... Meets RoHS and REACH regulations
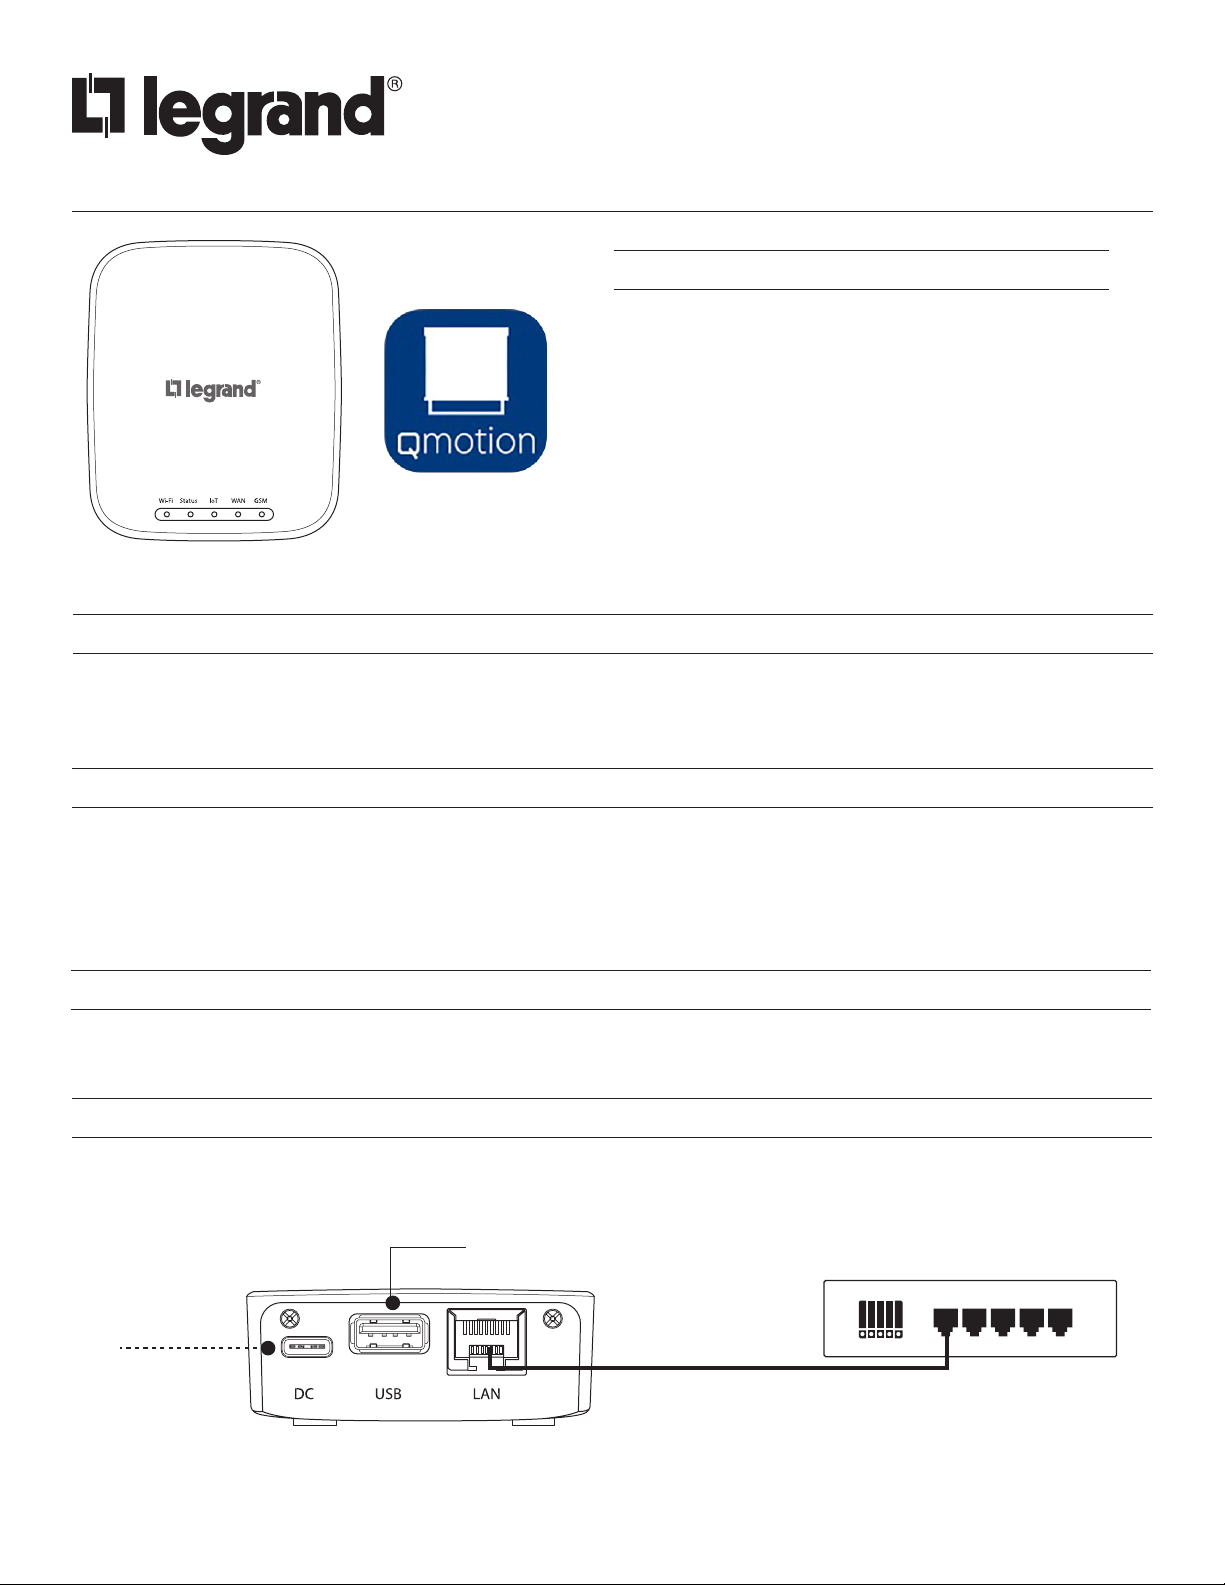
OVERVIEW
®
SPECIFICATIONS
The QzHub3 hardware device allows you to easily control your QMotion Zigbee-enabled, motorized shades from your phone in
conjunction with the QzHub App. The QzHub App’s intuitive interface and simple navigation allows you to easily edit, add, commission,
and control local shades.
FEATURES AND OPERATION OVERVIEW
• The QzHub3 can handle up to 32 nodes (base) to 105 nodes (for full network size, if using Range Extenders). Nodes include
shades, remotes and extenders.
• ZigBee 3.0 ready and scalable for future updates
• USB expandability with an on-board USB expansion port
SOFTWARE
Download the QMotion QzHub App from either Google Play or the App Store.
CONNECTION DIAGRAM
Simply hook the power cord in and connect the QzHub3 to a router with an Ethernet cable.
USB PORT
ROUTER
POWER
ETHERNET
1
Page 2
ELIOT CLOUD
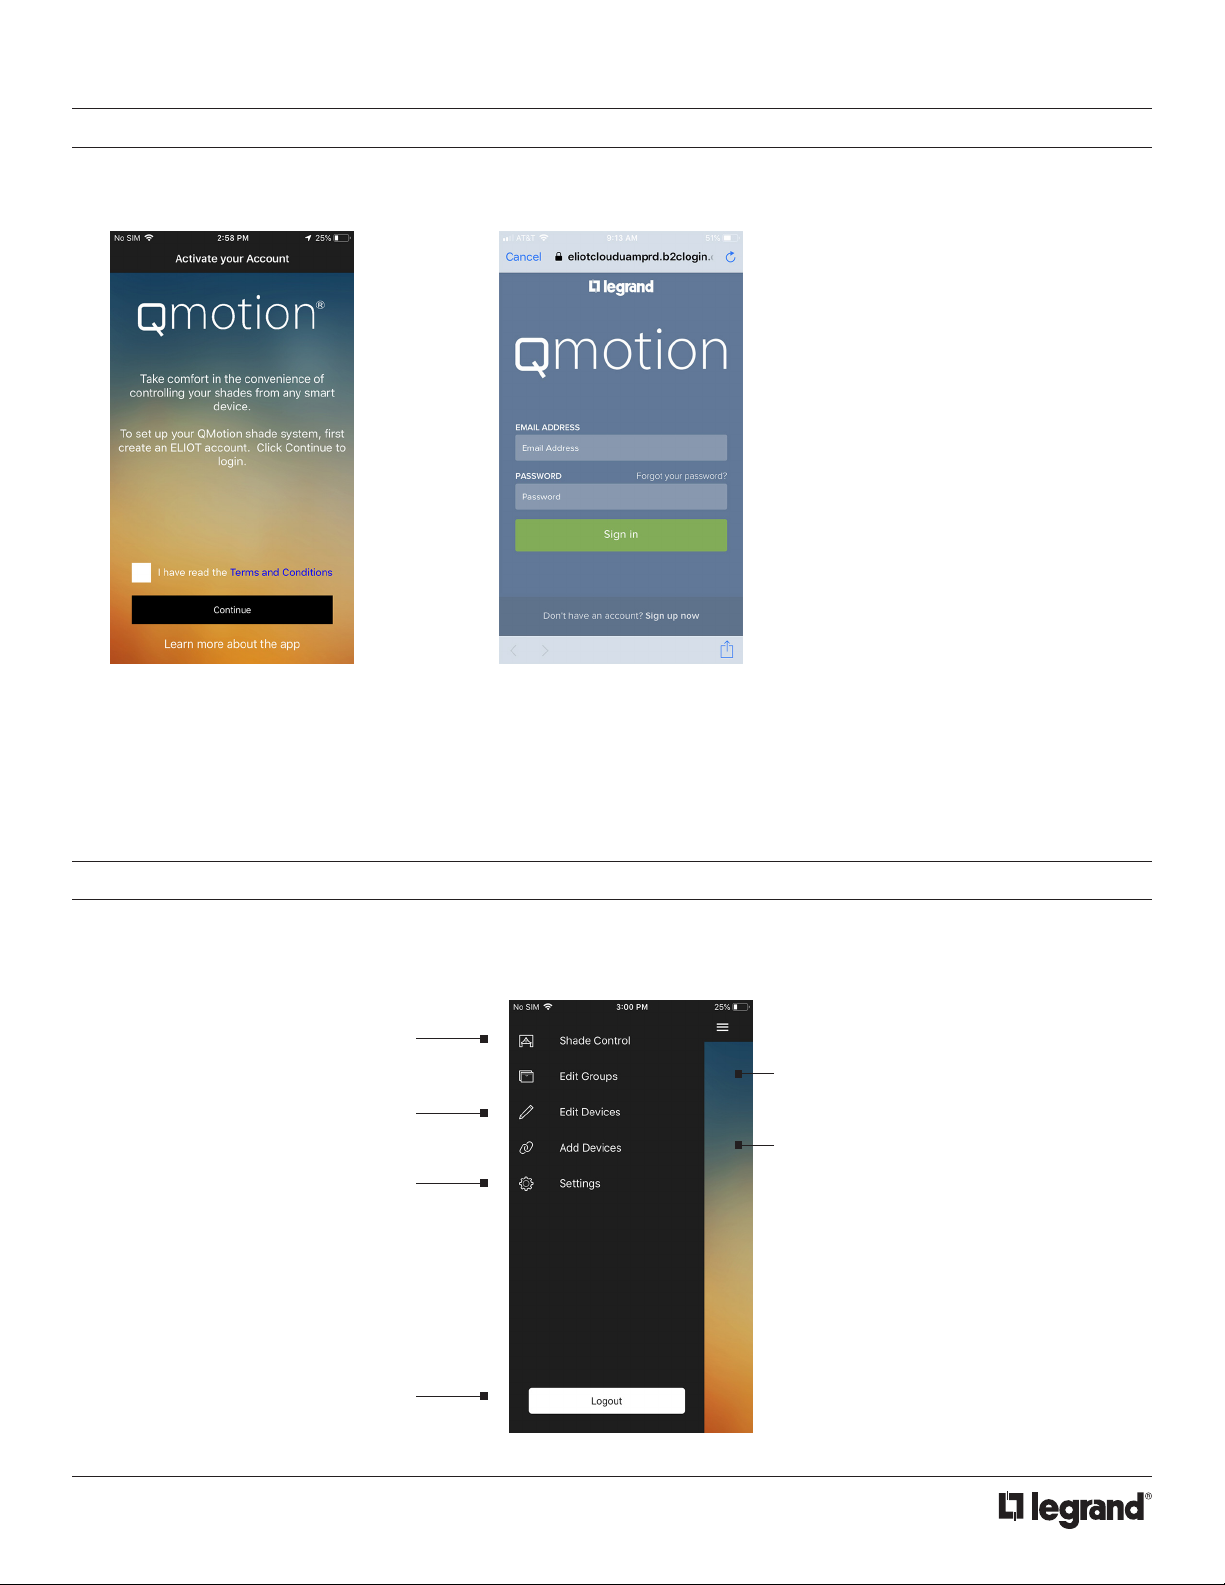
Download the QMotion QzHub App from either Google Play or the App Store.
1. To start using your app you will
need to agree to the new Terms
and Conditions. Check the box
and tap the continue button.
2. You will need to create an Eliot
cloud account to enable you
as a user for the QzHub App.
Follow the on-screen prompts to
create an account.
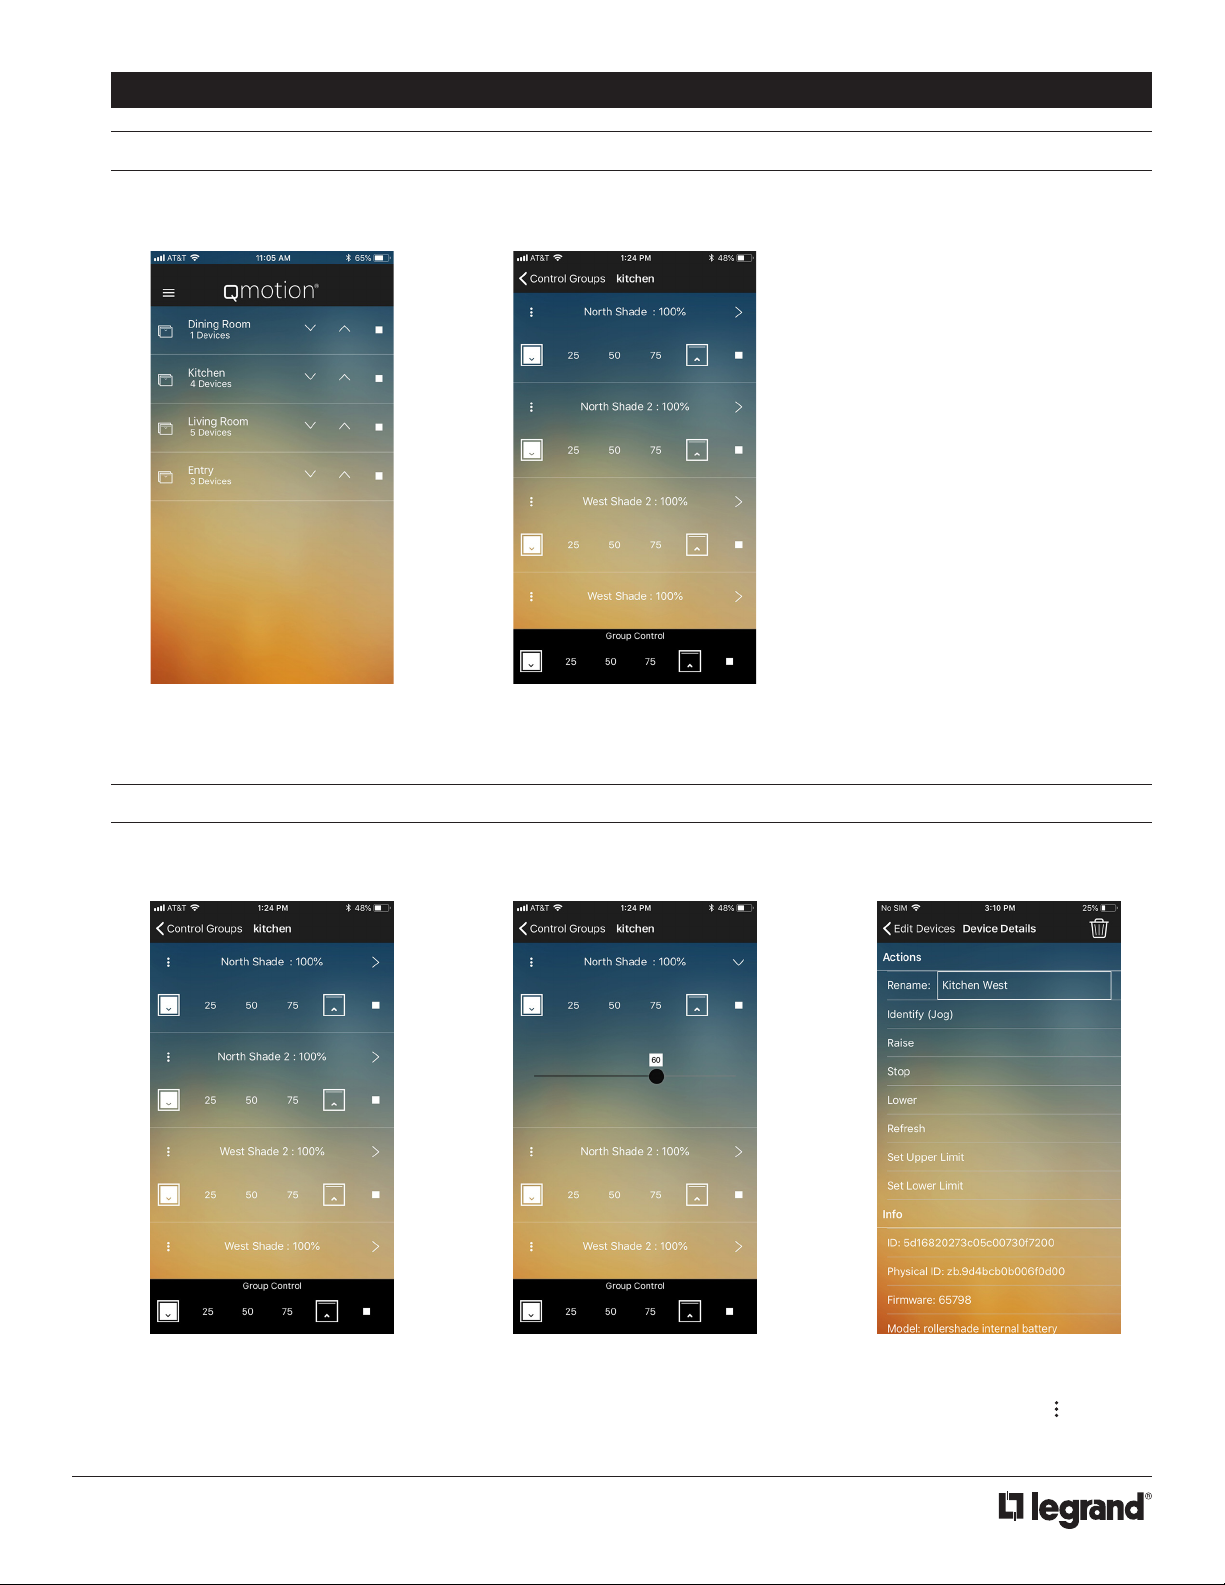
SOFTWARE NAVIGATION
Tap the menu button in the upper left corner, or swipe from the left of the page to open the navigation menu. Select an item in the list to
go to another page.
Shade Control- Visually lists
shades for individual control
Edit Groups- Rename, add, delete and
Edit Devices- Edit devices
through Information and
Actions
Settings- Manage hubs and
user settings
change devices in your groups
Add Devices- For installer use
Logout- Logout of the Eliot
cloud account
2
Page 3
USER INSTRUCTIONS
GROUP CONTROL PAGE
By default, the app launches to Group Control. This page contains a list of your device groups that can be raised and lowered
using the arrow buttons. Tap a group to access individual group control.
1. A list of various shade groups
is displayed. Tap the up/down
arrows to raise/lower the shades.
2. To access individual shade
control, tap the group to open the
shade control page. See below.
SHADE CONTROL PAGE
The Shade Control page displays each shade in the currently selected group. The list can be scrolled horizontally to show more.
You can send preset commands to all shades in the group from the dock on the bottom of the page.
1. Raise, lower, or pause individual
shades from this page by tapping
on the up, down, pause, and
preset value buttons.
2. For more granular control, tap
the down arrow which will open a
0-100% slider.
3
3. Group controls are still accessible
on the bottom dock. For quick
access by tapping the icon, it
will take you to the Edit Devices
page for that shade.
Page 4
INSTALLER INSTRUCTIONS
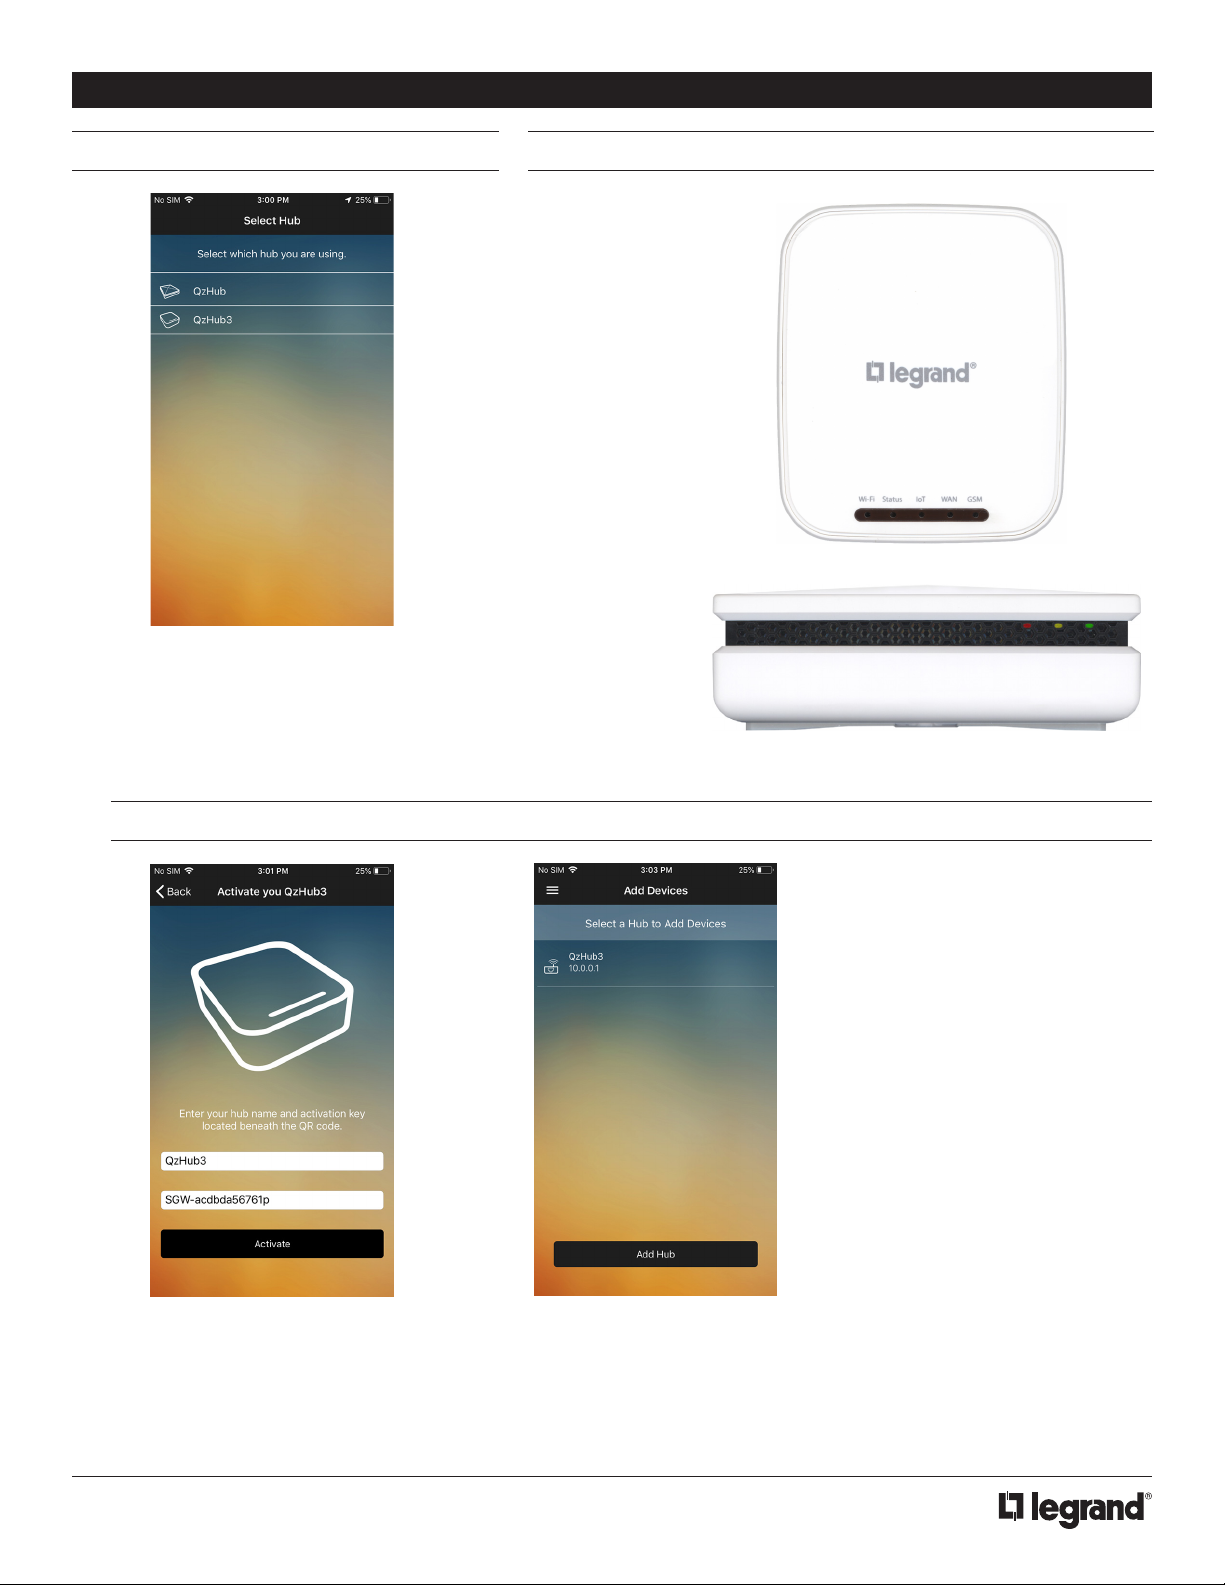
SELECTING THE HUB QZHUB HARDWARE
QzHub3
1. Upon logging in you will not have a
designated hub and the first screen will
prompt you to select which hub will be
used in set up.
QzHub
ACTIVATING A HUB - QZHUB3
1. To activate a QzHub3 you need
to give it a name and enter its
Gateway ID that is located on the
bottom of the device. Ensure it is
plugged into a router with internet
access and tap the activate
button.
2. Once activated, you will see the
hub displayed and you can tap on
it to begin joining shades.
4
Page 5
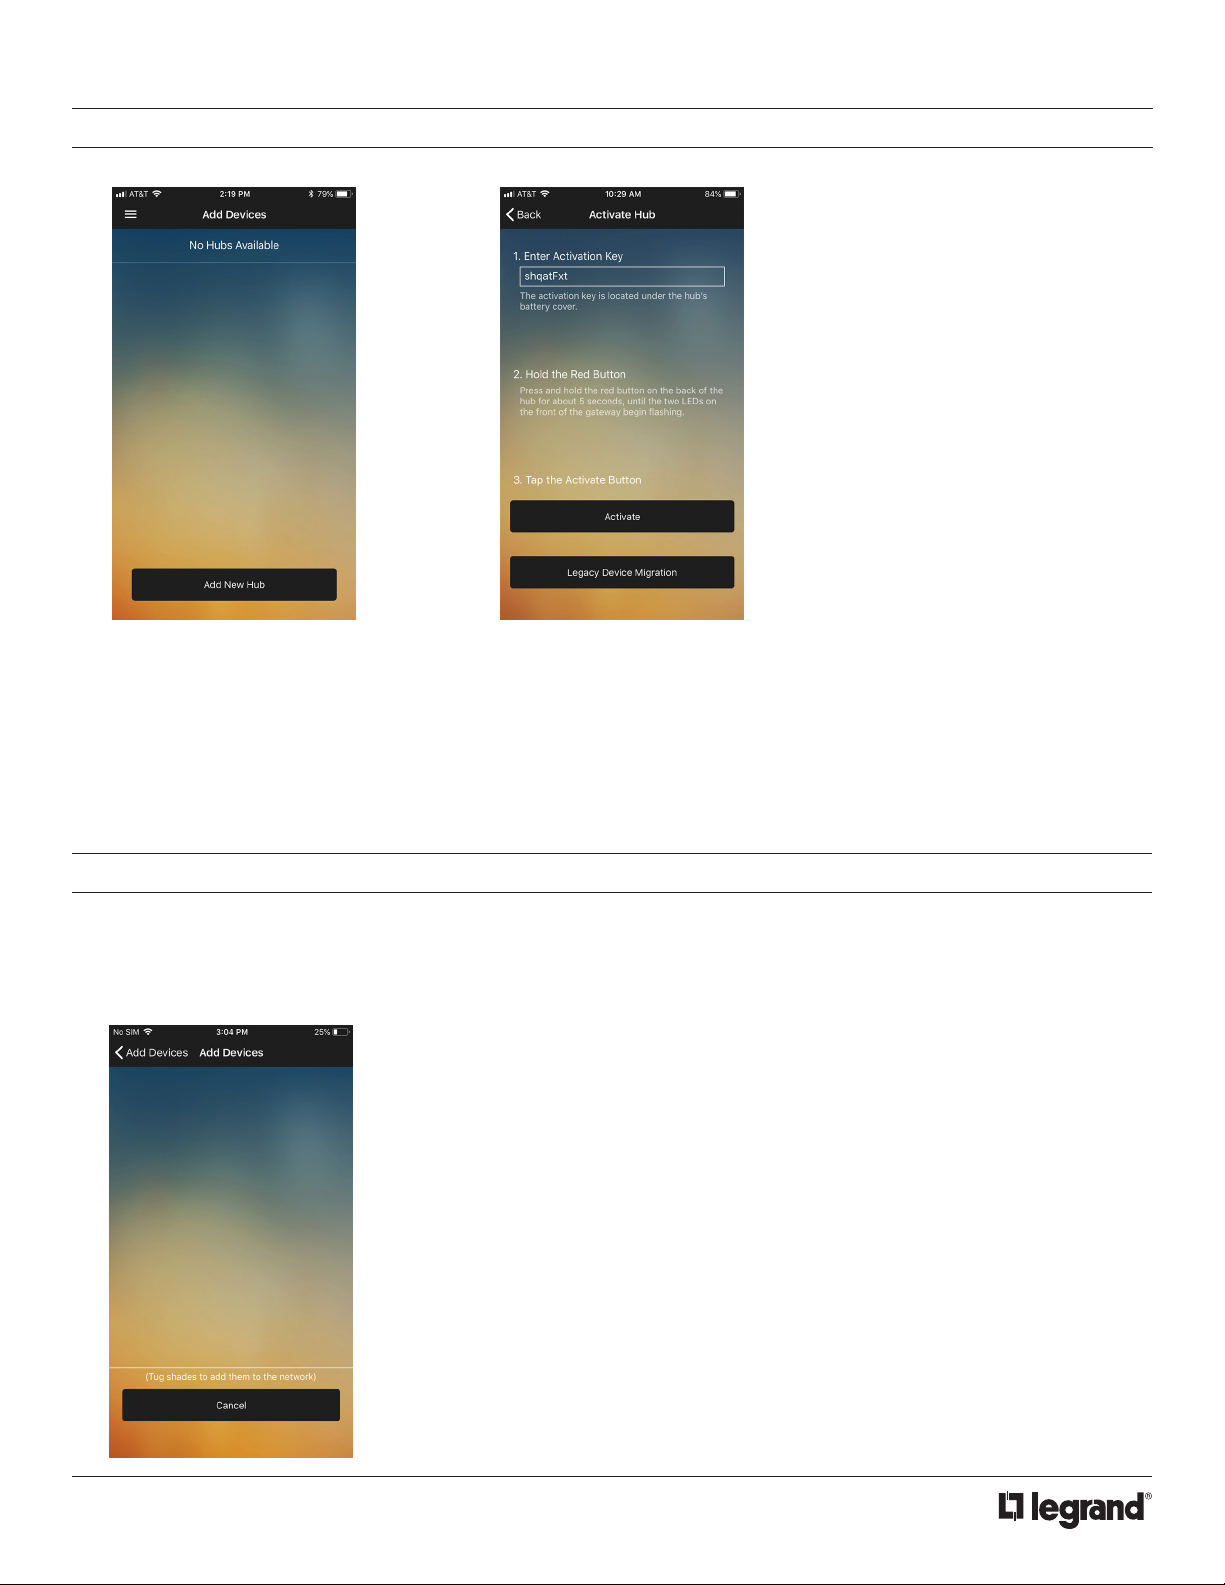
ACTIVATING A HUB - QZHUB
1. To activate a QzHub ensure it is
plugged into a router. Enter the
6 digit code (located under the
battery cover), press and hold
the red button on the back to put
the hub in join mode, about 5
seconds. When the LEDs flash
tap the activate button.
2. Once the hub is activated you will
see it listed on the devices page.
Tap on it to begin joining shades.
ADDING A RANGE EXTENDER OR REMOTE
To add a range extender or remote to the network, follow these simple steps.
NOTE: You will not see a notification whether it joined on the app. Observe the device and its response to joining a Zigbee network.
1. Tap on your hub, put it into pairing mode
to allow your remote or extender to
join. Follow the device manufacturer’s
instructions to join it to the hub. See
page 13 for Qmotion remotes.
5
Page 6

ADDING SHADES
Once a hub has been activated, you can start adding shades to the network. NOTE: You can only join one shade at a time.
1. Go to the Add Devices page and
tap on your hub to begin pairing
shades. Simply tap on the “Enable
Pairing” button to put the hub into
join mode.
2. One at a time, tug on the shades
to cause them to search for an
available network. Once the
shade is found it will display as a
row item.
SETTING LIMITS
Setting Limits can be accessed from the Edit Devices page under each individual shade.
3. From here you should rename
the shade to make it easy to find
when creating your groups.
1. To set limits, tap on the Set Upper/
Lower Limit button
2. Enter in the tick value you wish
to set it to and press OK and
the shade will move to that limit.
To see the current tick value
scroll to the bottom of the device
settings to see.row item.
6
Page 7

EDIT DEVICES
1. To configure your devices, open
the navigation menu and select
Edit Devices. This wil list your
available shades. Tap on a device
to begin editing.
2. The details page displays device
information. The Information section
displays details about the device such as
battery level, network info, and various
diagnostic data. The Actions section allows
you to:
Identify: Physically jogs shade
Raise: Raises shade to its upper limit
Stop: Stops the shade
Lower: Lowers shade to its lower limit
Refresh: Refreshes to the current shade values
3. To delete from the list page, you
can swipe or long press to delete.
This will remove the device from
the hub. To delete the device,
select the device and tap on the
trash icon. To delete the device,
select the device and tap on the
trash icon.
7
Page 8

EDIT GROUPS
The Edit Groups page takes you to an overview of your device groups. These will typically be a room or location in your home.
1. Tap on the Edit Group which
takes you to the Edit Groups
page.
2. To add a new group, tap the “+”
icon on the top right corner of the
page. You will be prompted to enter
a name. Using the keypad, choose
a name and press Create.
3. Tap on a group to begin editing.
Rename by tapping the name field
and editing.
4. All shades available on the hub will
be visible. Tap the toggle button to
add a shade to the group. A shade
can be part of multiple groups.
Shades that are not in the group are
grayed out. Changes are immediate
with the toggle switch.
5. To delete a group, swipe left
(iOS) or long press (Android) on
the group name and tap the red
Delete button. Confirm delete.
8
Page 9

SETTINGS - QZHUB3
Open the navigation menu, tap on Settings, and select the hub. In the
Settings page you may rename the QzHub3. It also displays the activation
key used to authorized additional/other devices.
ACTIONS
Firmware Update: Update QzHub3 firmware if available
Local Only Mode: See QZHub Settings (below)
Deactivate Gateway: Deactivate and delete your Gateway
INFO
Other data regarding the QzHub including IP addresses, firmware
versions, and ZigBee channels
USERS
Add User: Enter the email of the Eliot account you would like to give
access to the is hub
Revoke User: Removes user from access to the hub
Transfer Ownership: Enter the email of the Eliot account you would like
to transfer hub ownership. See “Technical Notes” (page 11) for further
details
Integrate: Generates a token for integrating 3rd party systems
SETTINGS - QZHUB
In the Settings page you may rename the QzHub. It also displays the
activation key used to authorized additional/other devices.
ACTIONS
Firmware Update: Update QzHub firmware if available
Local Only Mode: Updates QzHub to local wireless protocols only
INFO
Other data regarding the QzHub including IP addresses, firmware
versions, and ZigBee channels
9
Page 10

QZHUB3 - TRANSFERRING OWNERSHIP AND REVOKING ACCESS
1. In the settings for QzHub3, tap
on the Transfer Ownership
and enter the email that you are
transferring access to. You can
also add users to the hub that will
grant them access to use the hub
as well.
QZHUB3 - THIRD PARTY
INTEGRATIONS
If you are integrating with a 3rd party
system, you will need and integration code.
2. The person who now only needs
to log in to their Eliot account
when they open the app and they
will have access to the shades.
3. To revoke a user, simply tap
on the revoke button and enter
the email address you need to
remove.
RESETTING HUB SELECTION
If you need switch between hubs you are commissioning or editing you need to reset
the hub selection.
1. Tap on the integration button and
tap the generate code. You will
use the 6 digit code to enable the
hub for the system.
1. Navigate to the settings page and
tap on the Reset Hub Selection
button.
10
2. A prompt will appear asking if
you are sure you want to reset. In
order for the reset you will need
to close the app completely and
reopen it.
Page 11

TECHNICAL NOTES
1. On your Eliot account you are only allowed one QzHub and one QzHub3.
2. QzHub3 Join Shade Blink Pattern:
- IoT: Slow flash when in pairing mode; Rapid flash when device is joining
3. QzHub3 only allows one admin user. If that user deletes the hub, all added users will be deleted. To transfer admin ownership,
under hub settings you can tap on Transfer Ownership and follow the prompts to transfer.
MULTI-VIEW LINE DRAWING - QZHUB3
TOP VIEW
1”
3.3125”
2.8125”
TOP VIEWLEFT SIDE VIEW RIGHT SIDE VIEW BACK VIEW
BOTTOM VIEW
Input: 5V 1.5A
Model: 950193-US
11
Page 12

TUG COMMANDS
Tug Command Mode will allow certain features to be performed manually without a learned remote. Read the following instructions
completely before starting the procedure. Inputs from the user are time sensitive. If the shade times out before entering a tug
command, reutrn the shade to the Upper Limit Position and begin the procedure over.
TO ENTER TUG COMMAND MODE
1. Start with the shade at the Upper Limit Position
2. Perform two consecutive 6 inch tugs, waiting 1 second between tugs NOTE: Shade will jog, then travel up, setting a few inches
below the Upper Limit Position.
SHADE IS NOW IN TUG COMMAND MODE: There is a 10 second opportunity to enter a tug command before the shade will leave Tug
Command Mode and resume normal operation.
3. Once the shade is in Tug Command Mode, perform additional 6 inch tugs to select a command option. After each tug, the shade
will return to its starting position. Once the shade returns to its starting position, wait 1 second before performing the next tug (a
brake is engaged during this 1 second wait, making the shade difficult to tug). After the tug sequence is performed (1-4 Tugs), wait
5 seconds and the shade will accept the tug command.
1 Tug - Join ZigBee Network / Identify
2 Tugs - Set Lower Limit Position
3 Tugs - ZigBee Network Reset
4 Tugs - Factory Master Reset
JOIN ZIGBEE NETWORK/IDENTIFY
This command will allow the shade to join an open ZigBee network. If the shade is not connected to a ZigBee network, the shade will
“micro-jog” while trying to find a network. Once a ZigBee network is found, the shade will seek the Upper Limit Position hardstop. If a
ZigBee network is not found after 1 minute, the shade will stop “micro-jogging” and wait for further inputs. If the shade “micro-jogs” but
does not find a network, make sure the ZigBee network coordinator (Qube/Range Extender) is open for devices joining the network.
If the shade is already connected to a ZigBee network, the shade will continually “long jog” up and down for 2 minutes. Manual operation
of the shade will not be available during this operation. Wait until the 2 minute “long jog” is complete to proceed. If the shade “Identifies”
on a network, but is unable to pair to a remote, perform the ZigBee Network Reset tug command and then connect the shade to the
correct ZigBee network.
SET LOWER LIMIT
This command will allow the Lower Limit Position to be adjusted without a remote. The shade will travel to the current Lower Limit
Position and then jog. Manually adjust the shade to the desired Lower Limit Position. To set this new position as the Lower Limit
Position, leave the shade to idle for 1 minute. After the 1 minute has passed, the shade will jog to confirm the new Lower Limit Position.
ZIGBEE NETWORK RESET
This command will remove the shade from its current ZigBee network. This command will also delete any groups/scenes that are stored
on the shade. Tugging the shade after a ZigBee Network Reset will cause the shade to “micro-jog” and search for an open ZigBee
network.
FACTORY MASTER RESET
This command will perform a ZigBee Network Reset as well as restore the Upper & Lower Limits Positions and Intermediate Set-points
to their default values. Tugging the shade after a Factory Master Reset will cause the shade to “micro-jog” and search for an open
ZigBee network.
12
Page 13

TROUBLESHOOTING
• Make sure QzHub3 and app are on the same network.
• If you need to clear a shade manually, or the shade is not discoverable and you need to reset it, follow the manual tug commands
on previous page.
• Zigbee channels are in the same frequency range as Wi-Fi. The QzHub will select a channel, but we recommend selecting a Wi-Fi
channel away from the related ZigBee channel. To view current ZigBee channel, go to QzHub3 Settings page.
PAIRING REMOTE TO ROLLER SHADE
20%UP
40%
DOWN
CHANNEL
CH
1
2 3 4 5
NOTE: Shades are wireless, sleepy devices and may take a moment to respond.
1. Ensure the remote is clear and not paired to any other hub. In order to clear the device, use a paperclip to press the Program
button four times on the back of the remote (see diagram).
2. Join the remote to the QzHub3 by putting the hub in join mode (see page 5, “Adding A Range Extender or Remote”) and then
pressing any button on the remote. (Channel LEDs will race from left to right)
3. To associate a shade with a channel, use a paperclip to press the Program button on the back of the remote. (Channel LEDs will
scroll back and forth).
4. Press and release the Up button on the remote. Shade will jog in response.
5. Tug the hembar on the shade 6-10 inches. Shade will jog and move to the Upper Limit which will register the shade to the selected
channel.
60%
80%
PROGRAM
Pin Hole
BACK VIEWFRONT VIEW
13
Page 14

WARRANTY INFORMATION INFORMATIONS RELATIVES À LA GARANTIE INFORMACIÓN DE LA GARANTÍA
QMotion Incorporated, (the “Manufacturer”) warrants that this QMotion® window shade product will be free from defects in materials and workmanship
for 5 years, beginning from the date first sold to the commercial or residential consumer who has, or intends to, use the product, as evidenced by such
consumer’s proof of purchase:
Exclusions From this Limited Warranty: This limited warranty shall be null and void and no part of it shall apply if any one of the following occur: 1) the
product has not been properly installed by a qualified installer in accordance with all Manufacturer specifications; 2) the product has been subject to
unauthorized service; 3) the product has been subject to mis-handling, misuse, or abuse; 4) the product has been modified;5) the product has suffered
damage resulting from lightning, power surges, vandalism, fire, earthquake, acts of nature, or any other cause which the product was not designed to
withstand; 6) the product has been used, or attempted to be used, for other than the customary usage or for other than the product’s intended use; 7) the
product has not been maintained; 8) damage to the product caused by battery decay or corrosion; 9) the product has been installed in an exterior setting.
This Limited Warranty extends only to the original owner. This Limited Warranty is not transferable. This Limited Warranty does not cover normal wear or
tear or deterioration which occurs with the passage of time.
Batteries originally provided with a new product, if any, are produced by a third party and are not warranted by Manufacturer. No employee, distributor,
dealer, agent or representative is authorized to change the terms of this Limited Warranty in any way, to extend the warranty time periods, or to grant
additional warranties, and no attempt to do any of the foregoing will be binding upon Manufacturer.
IF THIS LIMITED WARRANTY COVERS A CONSUMER PRODUCT, AS DEFINED BY THE MAGNUSON-MOSS WARRANTY ACT, THEN NO
WARRANTIES, EXPRESSED OR IMPLIED (INCLUDING, BUT NOT LIMITED TO, THE WARRANTY OF MERCHANTABILITY OR FITNESS
FOR A PARTICULAR PURPOSE) SHALL EXTEND BEYOND THE APPLICABLE TIME PERIOD STATED IN BOLD FACE TYPE ABOVE. IF THIS
LIMITED WARRANTY COVERS A COMMERCIAL PRODUCT, THEN THIS LIMITED WARRANTY IS IN LIEU OF ALL OTHER REPRESENTATIONS,
GUARANTEES, OR OTHER EXPRESS OR IMPLIED WARRANTIES (INCLUDING, WITHOUT LIMITATION, THE WARRANTY OF MERCHANTABILITY
OR FITNESS FOR A PARTICULAR PURPOSE) AND ALL SUCH OTHER EXPRESSED OR IMPLIED WARRANTIES ARE HEREBY SPECIFICALLY
DISCLAIMED.
Claims for defects in material and workmanship covered by this Limited Warranty must be made in writing to the dealer from whom the product was
originally first purchased within the warranty period stated above. Manufacturer may either send a service representative or have the product returned
to Manufacturer’s facility, at Buyer’s expense, for inspection. If judged by Manufacturer to be defective in material or workmanship, and to otherwise be
covered by this Limited Warranty, the product will be replaced or repaired at the option of Manufacturer, in its sole and absolute discretion, free from
all charges except authorized transportation and replacement labor. Replacement labor, transportation costs, and any other costs or charges by the
dealer, wholesaler, distributor, contractor, or installer are not covered by this Limited Warranty. Any replacement unit may be a model determined by
Manufacturer to be equivalent to the defective model, or a product that has been factory refurbished. The remainder of original warranty period will apply
to any repair/replacement unit.
THE REMEDIES OF BUYER SET FORTH IN THIS LIMITED WARRANTY ARE EXCLUSIVE AND ARE IN LIEU OF ALL OTHER REMEDIES. THE
LIABILITY OF MANUFACTURER WHETHER IN CONTRACT, TORT, UNDER ANY WARRANTY OR OTHERWISE, SHALL NOT EXTEND BEYOND
ITS OBLIGATION TO REPAIR OR REPLACE, AT ITS OPTION, ANY PRODUCT OR PART FOUND BY MANUFACTURER TO BE DEFECTIVE IN
MATERIAL OR WORKMANSHIP AND OTHERWISE SUBJECT TO THIS LIMITED WARRANTY.MANUFACTURER SHALL NOT BE RESPONSIBLE
FOR ANY DIRECT, INDIRECT, SPECIAL OR CONSEQUENTIAL DAMAGES OF ANY NATURE.
This Warranty gives specific legal rights and Buyer may have other rights, which may vary from state to state. However, some states do not allow
limitations on how long an implied warranty lasts or the exclusion or limitation of incidental or consequential damages so the above limitations or
exclusions may not apply specific buyers.
No. IS-0000 Rev. A
© Copyright 2019 Legrand All Rights Reserved.
© Copyright 2019 Tous droits réservés Legrand.
© Copyright 2019 Legrand Todos los derechos reservados.
800.877.849.6070
www.qmotionshades.com
 Loading...