

Page 1

No: 9000249 – 02/18 rev. 2
Qsync
Country of Origin: Made in China
QMotion
Qsync™ Network Gateway
Installation Instructions
®
OVERVIEW
QMotion’s Qsync™ is a network gateway for QMotion automated shades. The
Qsync system with the QMotion app enables control of all QMotion products
including motorized roller shades, honeycomb shades, and motorized drapery
rods. QMotion shades move up and down easier than sending a text message.
The updated version is available for iOS and Android.
COMPATIBILITY
The Qsync application is compatible with both Gen2 and Gen3 shades. Please
conrm the correct Qsync is installed to match the technology of the shades.
FEATURES AND OPERATION OVERVIEW
• Smartphone and tablet control from many units on the same Qsync network system
• Sends QMotion commands as a standard remote would
• Use pictures and names to identify groups or zones
• Create groups that can be controlled together
• Set up once on a single device, then the settings load to the other smartphones and tablets automatically
IDENTIFY PARTS OF THE QSYNC PACKAGE
Verify the contents of the Qsync
package and gather materials:
A B
A. Ethernet Cable
B. Qsync
C. Antenna
D. Power Adapter
D
C
1
Page 2

ASSEMBLY INSTRUCTIONS
STEP 1 Attach the antenna to the Qsync by screwing it onto the
coaxial connector on Qsync’s back plate. For best performance,
position the antenna as high up as possible and without
obstructions between it and the shades.
STEP 2 Plug the power cord into Qsync’s front plate. Plug the
cord into a power outlet.
STEP 3 Connect Qsync to one of your router’s LAN ports using
an Ethernet cable. Do not use the Internet Port. Qsync will
only receive commands from this WiFi network (WAN). Before
continuing, ensure that your phone or tablet is connected to this
router’s WiFi network.
Coax
Connector
Power Connector
No: 9000249 – 02/18 Rev. 2
INSTALLING THE QSYNC APP
Download and Install the “QMotion Qsync” app from the App
Store or Google Play by searching under that name. Open the
QMotion Qsync app. The screen shown allows you to select
Qsync devices on the same WiFi network.
2
2
Page 3
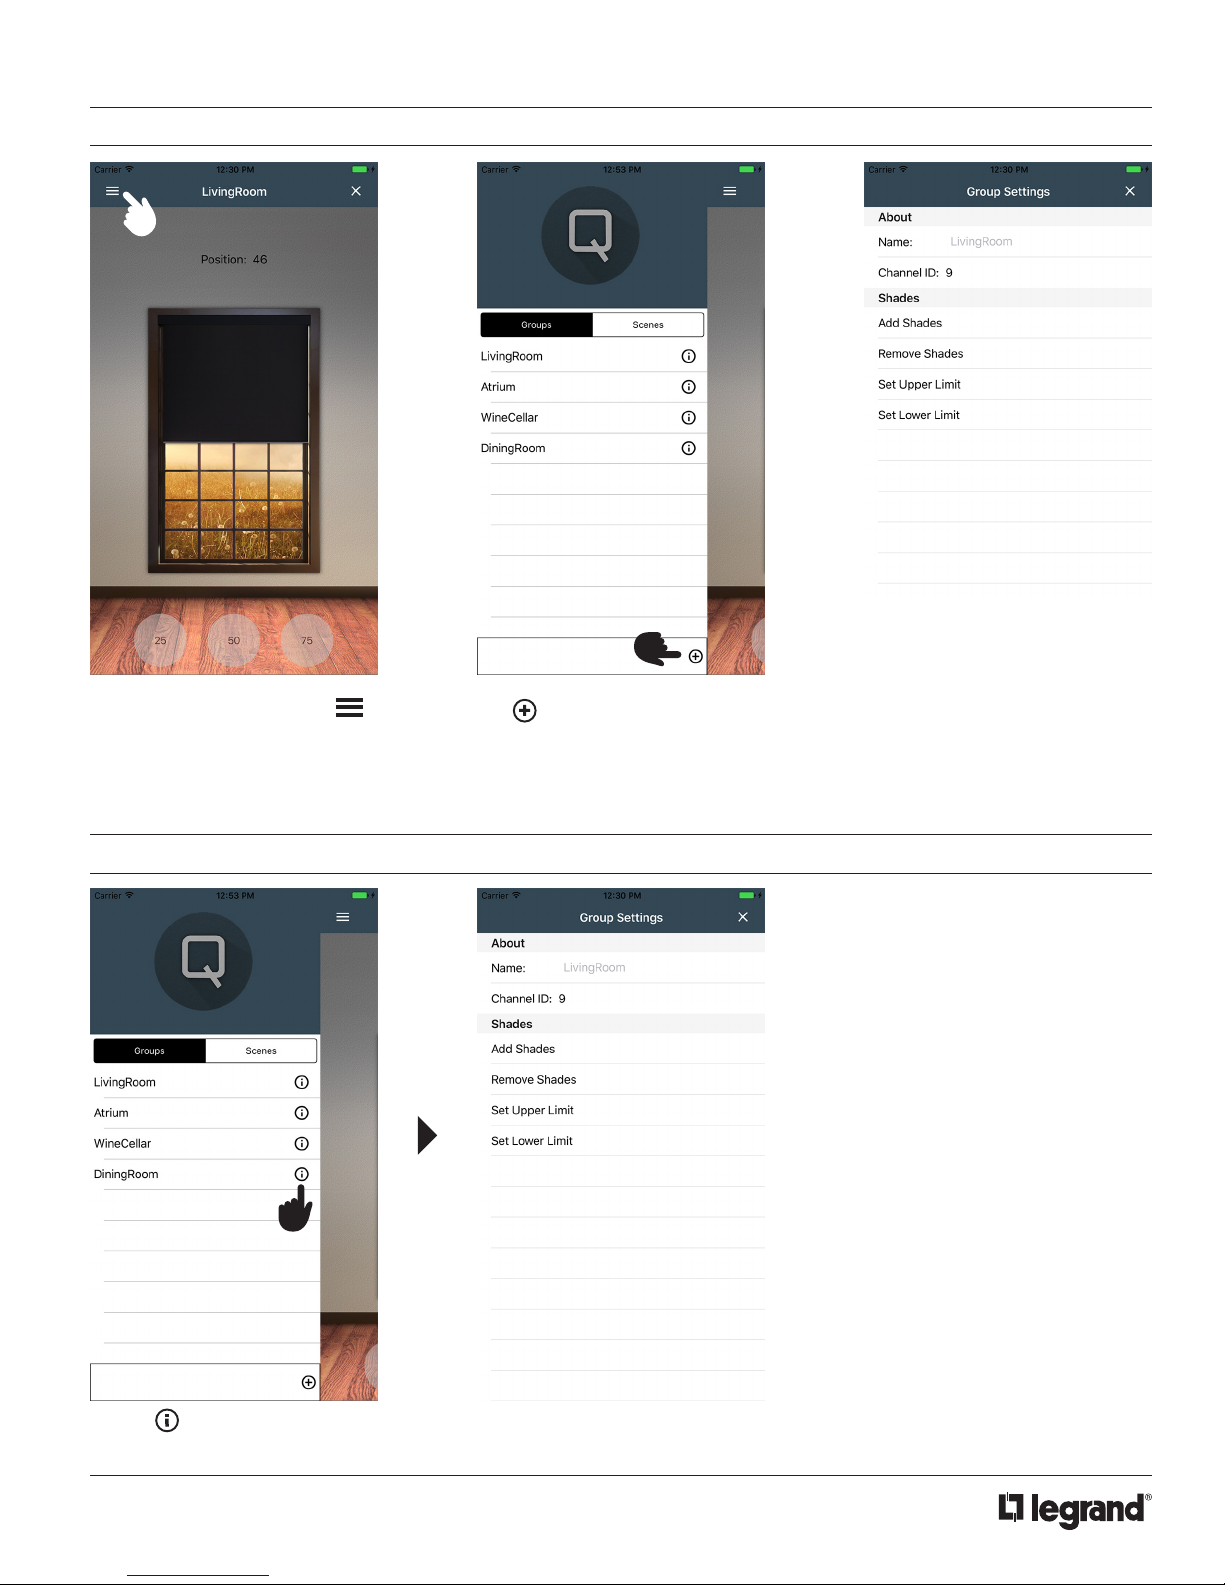
ADDING A GROUP AND ADD/DELETE SHADES IN A GROUP
To add a group of shades, tap .
You can also swipe from the left to
view groups.
Tap to add a new group.
NOTE: Max # groups supported:
AM/FM: 200
Name the group. Add shades by
selecting Add Shades. Delete
shades by selecting Remove
Shades. Follow on-screen
instructions for each. Shades can
be added to one or multiple groups.
Tap the icon to edit an existing
group and add/remove shades.
EDITING AN EXISTING SHADE GROUP
No: 9000249 – 02/18 Rev. 2
3
Page 4

To delete a group of shades, tap .
DELETING A SHADE GROUP
Choose the group name that you wish to
delete. For Apple Devices, swipe that name
to the left. For Android Device, press and hold
the group name you wish to delete. Then you
will see an option to delete the group. Tap the
red delete button to delete that group. Please
note, in order for future groups to be added
correctly, you must remove every shade from
the group prior to deleting it.
Conrm deletion.
To get started, rst select a group
by tapping .
USING QSYNC WITH GROUPS
Tap on the group you would like
to control. You can control synced
groups you created.
You can now use the control
buttons to change shade positions.
Alternatively, you can swipe the
on-screen shade to the position you
desire.
No: 9000249 – 02/18 Rev. 2
4
Page 5

To begin, tap on the main page. Then
select the scenes section.
USING QSYNC WITH SCENES
Tap to add a new scene. You
can also click to edit an existing
scene.
You can add one or multiple groups
to a scene. You can also set the
position for each group within that
scene to a desired setting. When
you access the scene, all the shade
groups within that scene will go to
the new position set by that scene.
TROUBLESHOOTING
SHADE ADDITION AND REMOVAL
1. Follow the instructions in the app
• Once the shades have reached their top position, tug them and then press next
2. If the shades do NOT respond or reach their top position:
• First try to use the remote control device to return the shade to their top position
• If that doesn’t work, use a short, quick tug on the shade to return the shade to the top position
- Note: this may take multiple attempts
• Finally, if the shade is still unresponsive, remove the batteries (one will sufce) for 30 seconds to perform
a hard reset of the shade
- The shade should eventually time out after a minute or two and return to its top position and
be ready for addition/removal from the app
- If the shade does not, try to resync it with your remote control and move it to its top position
- If this still doesn’t work, repeat all the steps above until shade becomes responsive
- Call support for further help if the shade still doesn’t respond
SHADE LIMIT CONFIGURATION
1. Follow the instructions in the app
2. If for some reason this fails, most likely due to network connectivity/RF interference, the shade might
become unresponsive and seemingly removed from the group
• Wait 1 - 2 minutes to see if the shade times out and returns to top position which at this point it
should be responsive to group commands once again
• If the above doesn’t work, use a short tug command to get it to return to top position
• If that doesn’t work, follow the steps in the Shade Addition and Removal tips above
No: 9000249 – 02/18 Rev. 2
5
Page 6

TROUBLESHOOTING (continued)
GROUP DELETION AND ADDITION
1. Shades are added to groups based on “Channel Numbers” which are a simple identier number linking them to the group
NOTE: Max # groups supported: AM/FM: 200
2. Shades are NOT added to groups based on group names.
3. Groups (Channel Numbers) are stored locally on the shade
• This means that shades NEED to be deleted from groups before the group is deleted to let the shade
know they are no longer part of that group
• If you do not delete them from the group before removing the group, any new groups created that
have the same channel ID as the old group will inherit the previous group’s collection of shades
• The above is intended behavior and should be taken into consideration when creating and deleting group
4. When adding or deleting a group, if the group does not show up in My Groups list, this may be due to a poor network connection.
To resolve, exit out of the app by tapping . Re-open the app. If this has not xed the problem, your device could be having WiFi
connectivity issues. Check for a WiFi connection or try to move closer to the WiFi router
OTHER UNEXPECTED BEHAVIOR
If you encounter any other non-documented, unexpected behavior, this is most likely due to network connectivity
and/or RF interference.
1. Try closing the program completely, not just minimizing it, and restarting the app
• iOS - double click the home button and swipe up on the app window
• Android - various, on stock OS, tap the square button in the toolbar at the bottom and swipe the app window to the right
2. If this doesn’t work, try resetting the Qsync from the settings page accessible by clicking the “i” button on the Qsync selection page
3. Next try a hard restart by unplugging the power cable from the Qsync, waiting 30 seconds, and then plugging back in
4. Finally, if all else has failed, from the settings page, click the “erase” option
• Warning, only use this as your last option as all groups and scenes will be
deleted and will need to be recreated
• Note: before erasing the Qsync, remember to remove all shades from any groups
5. If issues persist, please call or email QMotion support
If you still experience difculties,
please call toll-free
1.877.849.6070
No: 9000249 – 02/18 Rev. 2
6
Page 7

CE COMPLIANCE - QSYNC-433FM
QMotion ® Qsync
MODEL: QMRS-433AM
François Médart
Contact for HomeRun Holdings Corp.
11 Bis rue du petit Guyencourt
Is in conformity with:
R&TTE DIRECTIVE: 1999/5/EC
51220 CORMICY
FRANCE
COUNCIL DIRECTIVE: 93/68/EEC
RoHS DIRECTIVE: 2011/65/EU; 2002/95/EC
QMotion
3400 Copter Road
And the following:
EN 300 220-1 v2.3.1 (ERM/SRD - technical characteristics & test methods)
EN 300 220-2 v2.4.1 (ERM/SRD - harmonized essential requirements)
EN 301 489-1 v1.9.2 (ERM/EMC - common technical requirements)
Pensacola, FL 32514
Toll Free: 877.859.6070
Fax: 850.208.3409
USA
EN 301 489-3 v1.4.1 (ERM/EMC - specic conditions for short range devices)
EN 61000-3-2/-3 (Harmonics & Flicker)
IEC 60335-1:2001 4th Ed. incl. Corrigendum 1:2002 + A1:2004 + A2:2006 incl. Corringendum 1:2006
EN 60335-1: 2002 + A11:2004 + A1:2004 + A12:2006 + A2”2006 + A13:2008 + A14:2010 + A15:2011
AS/NZS 60335-1:2011
Qsync, model Qsync-433AM, when installed and maintained according to the entire Manufacturer’s Instructions, meets the provisions
of the above listed EU Directives.
CE COMPLIANCE - QSYNC-433FM
QMotion ® Qsync
MODEL: QMRS-433FM
Is in conformity with:
MACHINERY DIRECTIVE: 2006/42/EC
RE DIRECTIVE: 2014/53/EU
RoHS DIRECTIVE: 2011/65/EU
And the following:
EN 13120:2009+A1:2014 (Internal Blinds)
IEC 60335-1:2010 (5th Ed.) incl. Corr. 1:2010 &
Corr. 2011+A1:2013
EN 60335-1:2012+A11:2014
EN 60335-2-97:2006+A11:2008+A2:2010
IEC 60335-2-97:2002 (2nd Ed.)+A1:2004+A2:2008
EN ISO 12100:2010 (Machinery assessment)
EN ISO 13857:2008 (Machinery assessment)
EN 300 220-1 v3.1.1 (2017-02)
EN 300 220-2 v3.1.1 (2017-02)
EN 301 489-3 v2.1.1 (2017-02)
EN 301 489-1 v2.1.1 (2017-03)
IEC 61000-4-2: Ed. 2.0
IEC 61000-4-3: Ed. 3.2
CISPR 16-2-3 1st Ed.2003
Qsync, model QMRS-433FM, when installed and maintained
according to the entire manufacturer’s instructions, meets the
provisions of the above listed EU Directives.
Ton de Zeeuw
Contact for QMotion
Raritan Europe B.V.
Jan van Galenstraat 59
3115 JG Schiedam
The Netherlands
Tel: +31.(0)10.2844040
Fax: +31.(0)10.2844049
VAT: NL803738614B01/KvK-CoC:24256806/EORI:NL803738614
QMotion
3400 Copter Road
Pensacola, FL 32514
Toll Free: 877.859.6070
Fax: 850.208.3409
USA
If you still experience difculties,
please call toll-free
1.877.849.6070
No. IS-9000249 – 02/18 rev. 2
© Copyright 2017 Legrand All Rights Reserved.
© Copyright 2017 Tous droits réservés Legrand.
© Copyright 2017 Legrand Todos los derechos reservados.
800.555.9891
7
www.legrand.us/qmotion
 Loading...