

LEGRAND PRO 21 7756 16 User Manual
PRO 21™
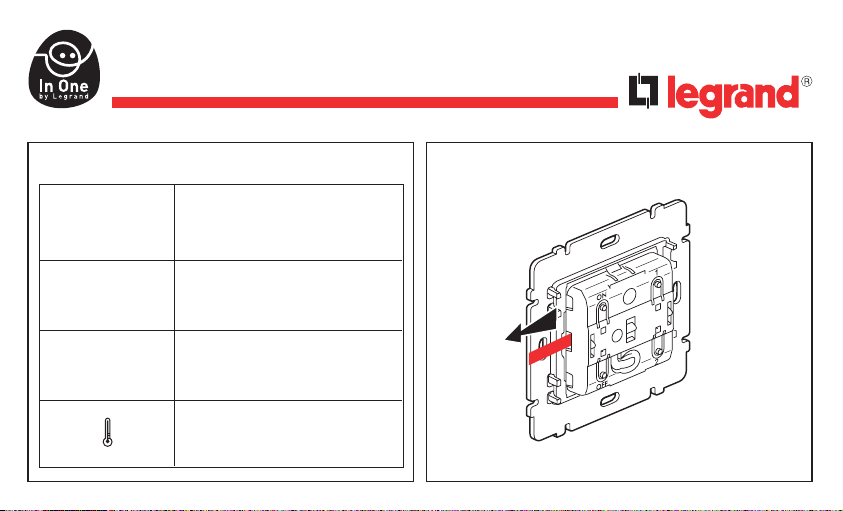
Radio scenario switch
7756 16
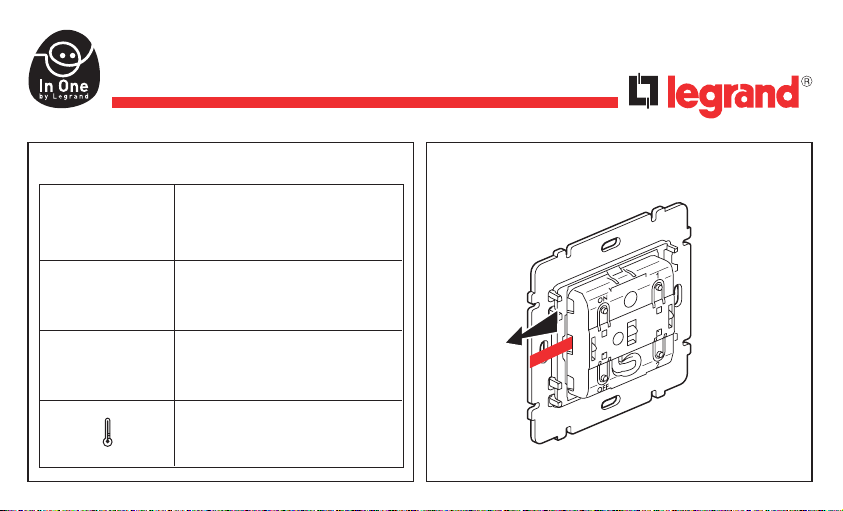
Characteristics Connection
N0064HA7/00
Power supply 1 lithium battery CR 2032
Radio frequency 868,3 Mhz
Range approx. 200 m in free field
+ 5°C to + 45°C

2
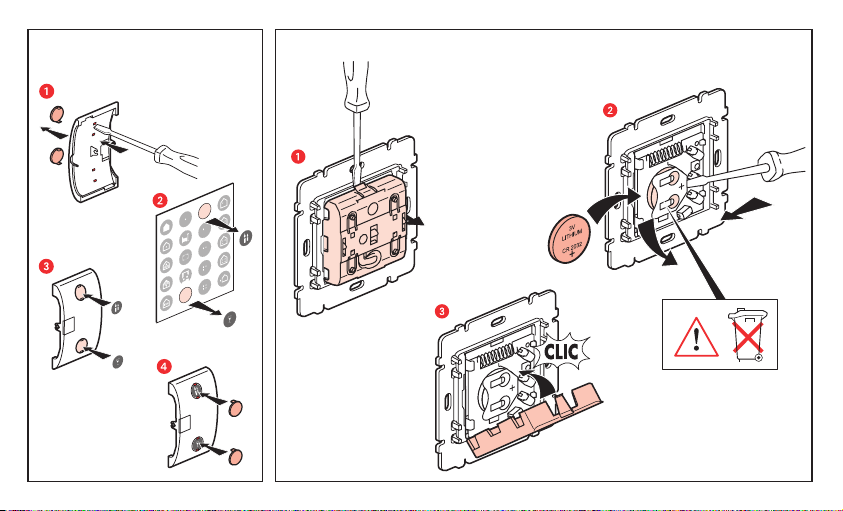
Pictogram fitting onto rocker
plates
Battery replacement
3
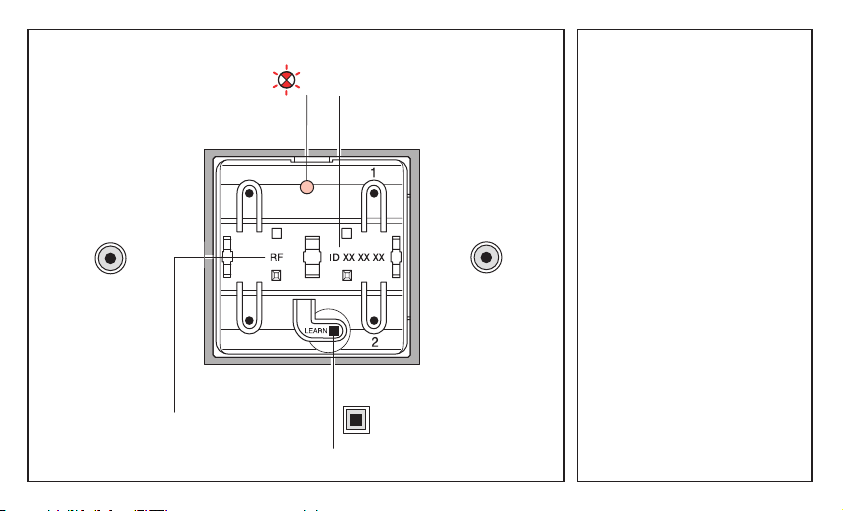
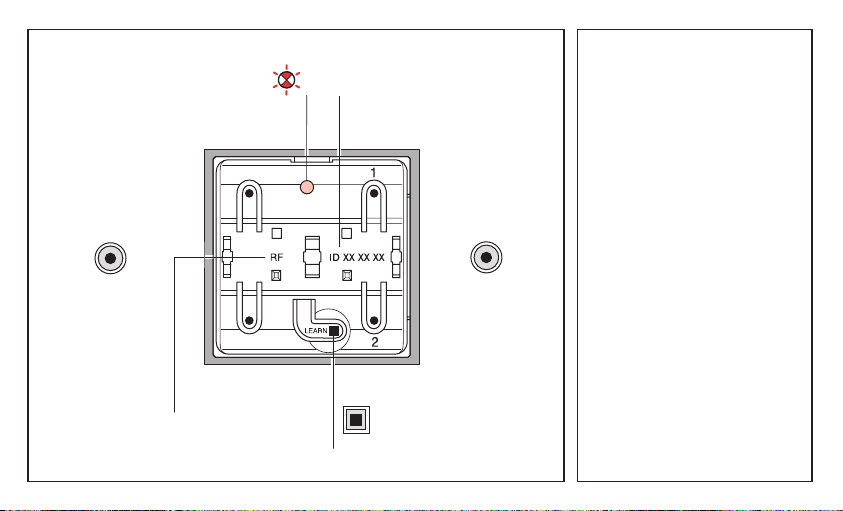
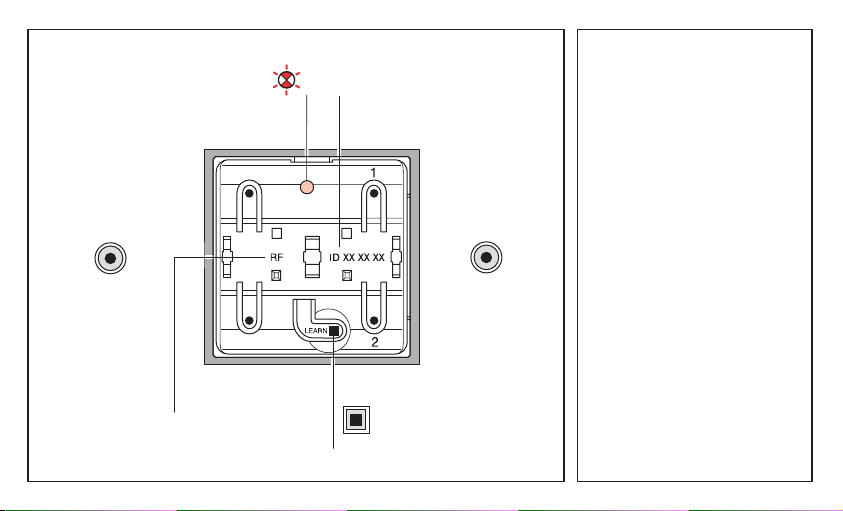
Description
LEARN indicator light
Control keysControl keys
Identification No.
LEARN key
Communication media
RF => Radio Frequency
Factory settings
On first powering up, pressing the
ON and OFF keys controls all the
lighting receivers in the factory settings.
Pressing LEARN
(1)
twice cancels
this general control function.
(1)
Programming or learning key.
ON
ON / OFF 1 / 2
OFF

4
Operation
The lighting scenario switch can simultaneously control a set of actors that have been associated with it during the learning
(1)
, it then acts as leader
(2)
of the scenario.
Using the ON or OFF keys, the lighting scenario switch lets you control the lighting points linked to the actors that are
associated with the ON key, as follows :
- switch on by short press on the ON key
- switch off by short press on the OFF key
- increase light level by a long press on the ON key
- decrease light level by a long press on the OFF key
Note : only ON key learning is necessary, the OFF key is learnt automatically.
Using key 1 or 2, the lighting scenario switch lets you control the lighting points linked to the actors that are associated
with key 1 or 2, as follows :
- scenario
(2)
by a short press on key 1 or 2
- increase light level by a long press on key 1
- decrease light level by a long press on the key 2
(1)
Learning : action of associating products to be controlled simultaneously from a central point. The procedure on page 5.
describes how to perform this association.
(2)
Scenario : the set of products (actors) that are associated with a control key.
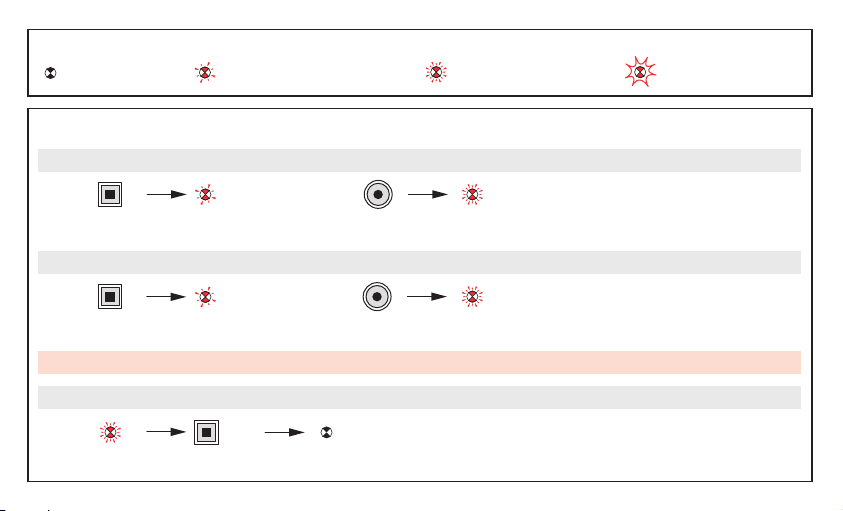
5
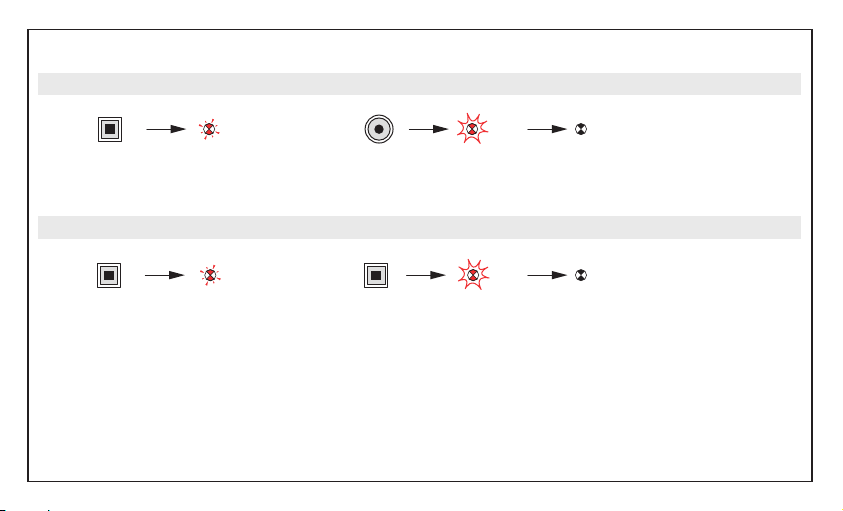
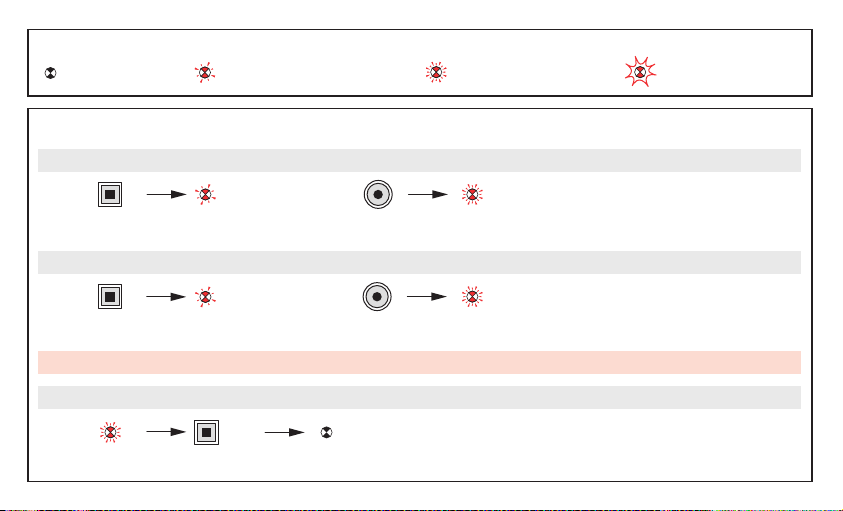
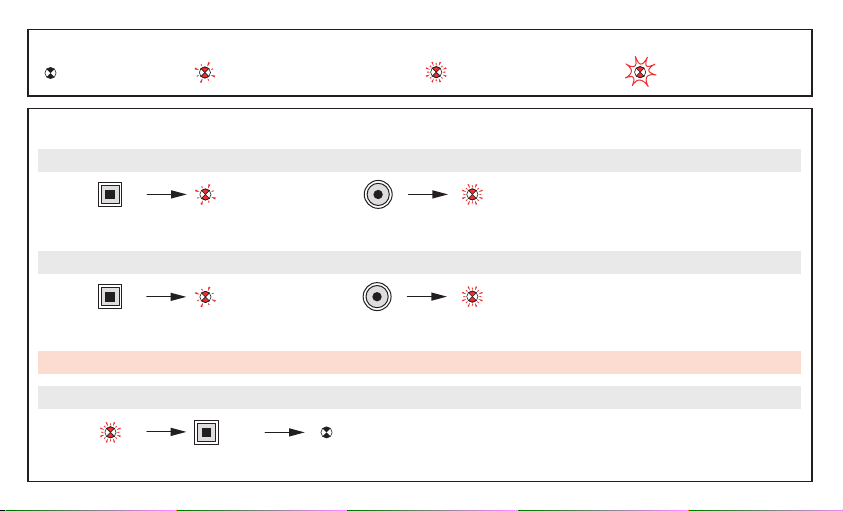
Learn scenario
Key
The indicator lamp
goes off
Press LEARN Press the command key that is to
control the scenario
Press LEARN
Press LEARN
Press the command key that is to be
associated with the leader
The indicator lamps of all the products go off.
The scenario is recorded.
Step 1 : Start the learn phase (on the LEADER)
Step 2 : Add an actor to the scenario (on the ACTOR)
Step 3 : Record the scenario (on the LEADER)
To add a number of products to the scenario, repeat operations and for each actor.
The indicator lamp
blinks slowly
The indicator lamp
blinks quickly
The indicator lamp
flashes
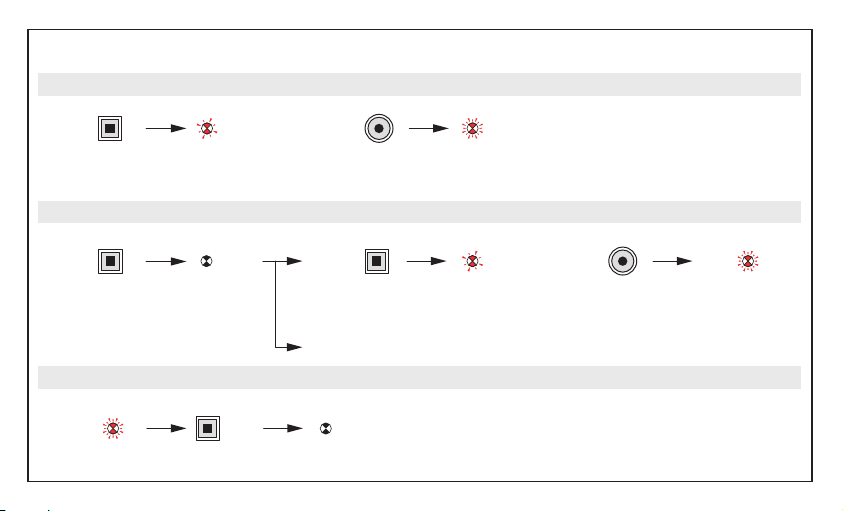
6
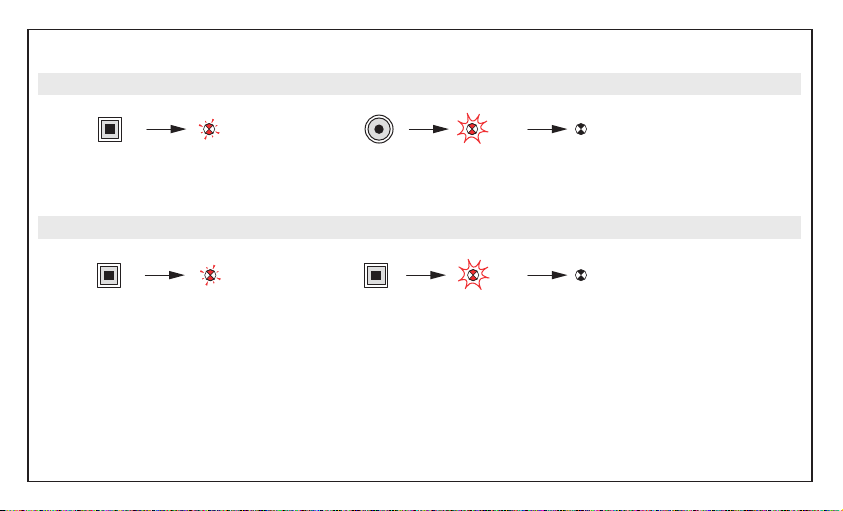
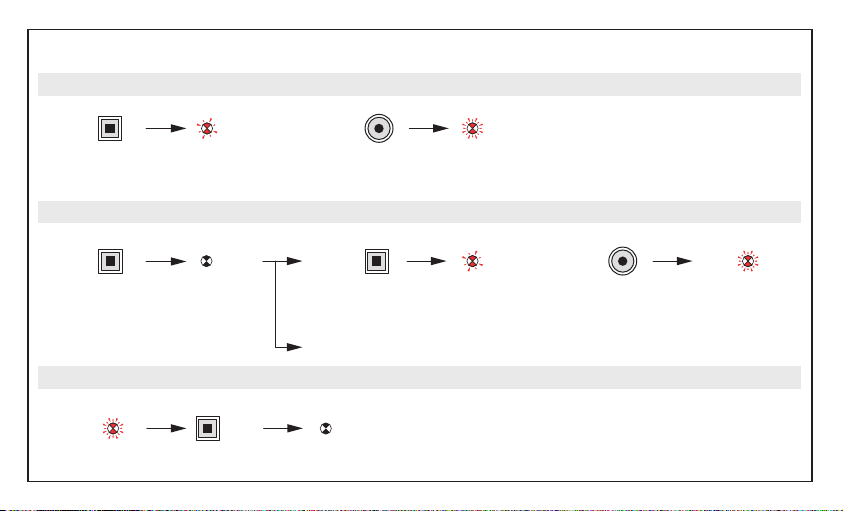
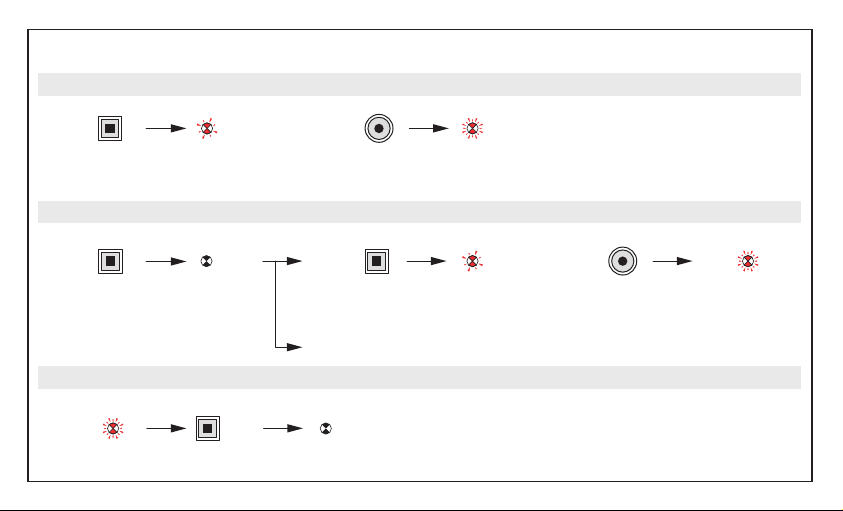
Modification of a scenario
Press LEARN Press the command key
that controls the scenario
The indicator lamps of all the product
in the scenario blink.
Press the command key
that is to be associated
Step 1: Open the scenario (on the LEADER)
Press LEARN
or
Press LEARN
To remove the product from the
scenario, go to step 3
Step 2 : Modify the state of an actor in the scenario (on the ACTOR)
Step 3 : Record the scenario (on the LEADER)
Press LEARN
The indicator lamps of all the products go off.
The scenario is recorded.
7
Clearing a scenario
Press LEARN
The scenario is cleared
Press the command key
and hold it down for 10 s
Clear all the scenarios linked with the command key (on the LEADER)
Press LEARN
Return the product to
factory configuration
Press LEARN and hold
down for 10 s
Clear all the scenarios linked to this product (on the LEADER)
5 s
5 s
8
DECLARATION DE CONFORMITE
Nous déclarons que les produits satisfont aux dispositions de :
We declare that the products satisfy the provisions of :
La Directive 1999/5/CE du Parlement européen
et du Conseil du 9 mars 1999 "R&TTE"
sous réserve d'une utilisation conforme à sa destination on condition that they are used in the manner
et/ou d'une installation conforme aux normes en vigueur intended and/or in accordance with the current
et/ou aux recommandations du constructeu
Ces dispositions sont assurées pour la directive 1999/5/CEE par la conformité aux normes suivantes :
These provisions are ensured for directive 1999/5/CEE by conformity to the following standards :
r installation standards and/or with the manufacturer's
recommandantions
EN 60669-2-1
EN 300220-3

9
PRO 21™
Licht Szenarioschalter Funk
7756 16
Technische Daten Anschlüsse
Spannungsversorgung
1 x Lithiumbatterie CR 2032
Funkfrequenz 868,3 Mhz
Reichweite ca. 200 m freies Feld
+ 5°C bis + 45°C

10
Anbringen der Piktogramme
auf den Tasten
Auswechseln der Batterie

11
Beschreibung
Leuchtdiode LEARN
BedientastenBedientasten
Gerätenummer
Taste LEARN
Kommunikationsmedien
RF = Funkfrequenz
Werkseinstellung
Bei erstmaliger Inbetriebnahme
(Spannungsversorgung) werden
alle Teilnehmer innerhalb einer
Anlage über die ON und OFF, Taste
zentral angesteuert (Zentralbefehl).
Diese Werkseinstellung kann durch
zweifaches Drücken der LEARNTaste gelöscht werden.
(1)
Taste zum Programmieren
„Einlernen“.
ON
ON / OFF 1 / 2
OFF

12
Funktionsweise
Der Licht Szenario- Schalter steuert alle Empfänger der Beleuchtungsanlage gleichzeitig an, die ihm beim Einlernen durch
LEARN- Programmieren
(1)
zugeordnet wurden. Der Licht Szenario- Schalter ist ein Sensor.
Ein- und Ausschalten sowie Dimmen erfolgt über die ON- und OFF- Tasten am Gerät. Die Zuordnung der Aktoren erfolgt
über die ON Taste.
- Einschalten : Kurzer Tastendruck ON
- Ausschalten : Kurzer Tastendruck OFF
- Heller- Dimmen : Langer Tastendruck ON
- Dunkler- Dimmen : Langer Tastendruck OFF
Hinweis : Einlernen erfolgt über die Taste ON. Die Taste OFF „lernt“ ihre Funktion automatisch.
Über die Tasten 1 oder 2 auf dem Licht- Szenario Schalter erfolgt das Schalten und Dimmen der Aktoren, die der Taste 1
oder 2 zugeordnet sind :
- Szenario
(2)
: Kurzer Druck auf die Taste 1 oder 2
- Heller Dimmen : Langer Tastendruck Taste 1
- Dunkler Dimmen : Langer Tastendruck Taste 2
(1)
LEARN : Einlernen mehrerer Aktoren mit einem Szenario Schalter durch „Erlernen eines Szenarios“ zur gleichzeitigen
Ansteuerung. Einlernen: Erfolgt nach dem Einlernverfahren wie auf Seite 13 beschriebenen.
(2)
Szenario Befehle : Folge von Aktionen, die auf den Befehl eines Sensor von einem Aktor ausgeführt werden.

13
Einlernen der Teilnehmer
Legende
Die Leuchtdiode
erlischt
Die Lerntaste LEARN drücken
(Lernmodus aktivieren)
Bedientaste drücken, die dem Aktor
zugeordnet werden soll.
Die Lerntaste
LEARN drücken
Die Lerntaste LEARN am
Sensor drücken (Lernmodus schließen)
Bedientaste drücken, die den Sensor
zugeordnet werden soll.
Die Leuchtdiode der LEARN Taste erlischt auf allen eingelernten
Aktoren. Der Einlernprozess ist abgeschlossen.
1. Schritt : Einlernmodus aktivieren (auf dem Sensor)
2. Schritt : Einlernmodus aktivieren (auf dem Aktor)
3. Schritt : Einlernmodus beenden
Um mehrere Aktor einen Sensor zuzuordnen,. die Arbeitsschritte und bei jedem der betreffenden Aktoren wiederholen.
Die Leuchtdiode blinkt
langsam ca.1Hz
Die Leuchtdiode blinkt
schnell ca. 2Hz
Die Leuchtdiode
blitzt ca. 5Hz

14
Änderung einer Funktionszuordnung (löschen oder zusätzlich einlernen)
Die Lerntaste
LEARN drücken
Bedientaste drücken, welche die
Aktoren ansteueren.
Die Leuchtdioden auf allen zugeordneten
Aktoren blinken.
Die Bedientaste drücken, die
zugeordnet werden soll.
1. Schritt : Auswahl der Funktion am Sensor
Die Lerntaste
LEARN drücken
oder
Die Lerntaste
LEARN drücken
Um den Aktor aus der Sensor Konfiguration zu löschen, die Lerntaste LEARN
drücken. Die Leuchtdioden der LEARN Taste erlischt auf allen Aktoren. Der
Prozess ist abgeschlossen.
2. Schritt : Aktor am Sensor hinzufügen oder löschen (am AKTOR)
Die Lerntaste
LEARN drücken
Die Leuchtdioden der LEARN Taste erlischt auf allen Aktoren.
Der Prozess ist abgeschlossen.
3. Schritt : Das Funktionszuordnung beenden
15
Löschen aller Funktionszuordnung oder Aktoren
Die Lerntaste
LEARN drücken
Die Zuordnung ist gelöscht
Die Bedientaste 10 Sekunden
lang gedrückt halten.
Alle eingelernte Zuordnungen am Sensor löschen
Die Lerntaste
LEARN drücken
Das Produkt kehrt zur
Werkseinstellung zurück.
Die Lerntaste 10 Sekunden
lang gedrückt halten.
Alle Sensoren auf Werkseinstellung zurücksetzten
5 s
5 s

16
DECLARATION DE CONFORMITE
Nous déclarons que les produits satisfont aux dispositions de :
We declare that the products satisfy the provisions of :
La Directive 1999/5/CE du Parlement européen
et du Conseil du 9 mars 1999 "R&TTE"
sous réserve d'une utilisation conforme à sa destination on condition that they are used in the manner
et/ou d'une installation conforme aux normes en vigueur intended and/or in accordance with the current
et/ou aux recommandations du constructeu
Ces dispositions sont assurées pour la directive 1999/5/CEE par la conformité aux normes suivantes :
These provisions are ensured for directive 1999/5/CEE by conformity to the following standards :
r installation standards and/or with the manufacturer's
recommandantions
EN 60669-2-1
EN 300220-3
17
PRO 21™
Interescenario de iluminación radio
7756 16
Características Conexión
Alimentación 1 pila de litio CR 2032
Frecuencia RF 868,3 Mhz
Alcance aproximado 200 m en campo libre
+ 5°C a + 45°C
18
Montaje de los pictogramas
en los dedos
Sustitución de la pila
19
Descripción
Piloto LEARN
Teclas de
mando
Teclas de
mando
N° de identificación
Tecla LEARN
Medios de comunicación
RF => Radiofrecuencia
Configuración de fábrica
Durante la primera puesta en tensión la pulsación de las teclas ON y
OFF controla todos los receptores
de alumbrado de la instalación.
Una doble pulsación de la tecla
LEARN
(1)
anula esta función de
mando general.
(1)
Tecla de programación o de
aprendizaje.
ON
ON / OFF 1 / 2
OFF

20
Funcionamiento
El interescenario de iluminación puede controlar simultáneamente un conjunto de actores que se le asocian durante el
aprendizaje
(1)
, funciona entonces como líder
(2)
del escenario.
El interescenario de iluminación permite controlar con las teclas ON y OFF los puntos de luz conectados a los actores
asociados a la tecla ON, en :
- encendido por una pulsación corta de la tecla ON
- apagado por una pulsación corta de la tecla OFF
- regulación + por una pulsación larga de la tecla ON
- regulación - por una pulsación larga de la tecla OFF
Observación : sólo es necesario el aprendizaje de la tecla ON, la tecla OFF se realiza automáticamente.
El interescenario de iluminación permite controlar con las teclas 1 ó 2 los puntos de luz conectados a los actores asociados a la tecla 1 ó 2, en :
- escenario
(2)
por una pulsación corta de una tecla 1 ó 2
- regulación + por una pulsación larga de la tecla 1
- regulación - por una pulsación larga de la tecla 2
(1)
Aprendizaje : asociación de productos con el fin de controlarlos simultáneamente a partir de un punto central.
Esta asociación se realiza aplicando el procedimiento descrito en la página 21.
(2)
Escenario : conjunto de los productos (actores) que están asociados a una tecla de mando.
21
Aprendizaje del escenario
Leyenda
Led Off
Pulsar LEARN Pulsar la tecla de mando que va a
controlar el escenario
Pulsar LEARN
Pulsar LEARN
Pulsar la tecla de mando que va a
estar asociada al líder
El led en todos los mecanismos se apaga
El escenario ha sido grabado
Paso 1 : crear el escenario, fase LEARN (en el LÍDER)
Paso 2 : añadir un actor al escenario (en el ACTOR)
Etapa 3 : grabar el escenario (en el LÍDER)
Para asociar más mecanismos al escenario, repetir en cada actor las operaciones y .
Parpadeo lento
Parpadeo rápido Flash
22
Modificación de un escenario
Pulsar LEARN Pulsar la tecla de mando que
controla el escenario
El led de todos los mecanismos del
escenario parpadea
Pulsar la tecla de mando
que va a ser sociada
Paso 1 : abrir el escenario (en el LÍDER)
Pulsar LEARN
o
Pulsar LEARN
Para eliminar el producto del escenario ir al
punto "Grabar el escenario"
Paso 2 : modificar el estado de un actor del escenario (en el ACTOR)
Pulsar LEARN
El led de todos los mecanimos se apaga
El escenario ha sido grabado
Paso 3 : grabar el escenario (en el LÍDER)

23
Borrado de un escenario
Pulsar LEARN
El escenario ha sido borrado
Pulsar la tecla de mando
durante 10s
Borrar todos los escenarios vinculados a la tecla de mando (en el LÍDER)
Pulsar LEARN
Configuraciónde fábrica
Pulsar LEARN
durante10s
Borrar todos los escenarios vinculados a este producto (en el LÍDER)
5 s
5 s
24
DECLARATION DE CONFORMITE
Nous déclarons que les produits satisfont aux dispositions de :
We declare that the products satisfy the provisions of :
La Directive 1999/5/CE du Parlement européen
et du Conseil du 9 mars 1999 "R&TTE"
sous réserve d'une utilisation conforme à sa destination on condition that they are used in the manner
et/ou d'une installation conforme aux normes en vigueur intended and/or in accordance with the current
et/ou aux recommandations du constructeu
Ces dispositions sont assurées pour la directive 1999/5/CEE par la conformité aux normes suivantes :
These provisions are ensured for directive 1999/5/CEE by conformity to the following standards :
r installation standards and/or with the manufacturer's
recommandantions
EN 60669-2-1
EN 300220-3

25
PRO 21™
¢È·ÎfiÙ˘ ÛÂÓ·Ú›ˆÓ ·Û‡ÚÌ·ÙÔ˜
7756 16
Г·Ъ·ОЩЛЪИЫЩИО¿ ™‡Ó‰ÂÛË
∆ÚÔÊÔ‰ÔÛ›· 1 Ì·Ù·Ú›· ÏÈı›Ô˘ CR 2032
™˘¯ÓfiÙËÙ· RF 868,3 Mhz
∂Ì‚¤ÏÂÈ· ÂÚ›Ô˘ 200 m Û ÂχıÂÚÔ Â‰›Ô
+ 5°C ¤ˆ˜ + 45°C

26
∆ФФı¤ЩЛЫЛ ЩˆУ ВИОФУФЫ˘М‚fiПˆУ ЫЩ· П‹ОЩЪ·
∞ÓÙÈηٿÛÙ·ÛË Ù˘ Ì·Ù·Ú›·˜
27
¶ВЪИБЪ·‹
ºˆÙÂÈÓ‹ ¤Ó‰ÂÈÍË LEARN
¶Ï‹ÎÙÚ·
ÂϤÁ¯Ô˘
¶Ï‹ÎÙÚ·
ÂϤÁ¯Ô˘
∞Ъ. ·У·БУТЪИЫЛ˜
¶Ï‹ÎÙÚÔ LEARN
ª¤Ы· ВИОФИУˆУ›·˜
RF => ƒ·‰ИФЫ˘¯УfiЩЛЩ·
∂ЪБФЫЩ·ЫИ·О¤˜ Ъ˘ıМ›ЫВИ˜
∆ЛУ ЪТЩЛ КФЪ¿ Ф˘ Щ›ıВЩ·И ˘fi
Щ¿ЫЛ, ЩФ ¿ЩЛМ· ЩˆУ П‹ОЩЪˆУ
ON ‹ OFF ВП¤Б¯ВИ ЩФ Ы‡УФПФ ЩˆУ
ЫЛМВ›ˆУ КˆЩИЫМФ‡ ЩЛ˜
ВБО·Щ¿ЫЩ·ЫЛ˜ “In One by
Legrand”.
∆Ô ‰ÈÏfi ¿ÙËÌ· ÙÔ˘ Ï‹ÎÙÚÔ˘
Learn
(1)
·О˘ЪТУВИ ·˘Щ‹ ЩЛ
ПВИЩФ˘ЪБ›· БВУИОФ‡ ВП¤Б¯Ф˘.
(1)
¶П‹ОЩЪФ ЪФБЪ·ММ·ЩИЫМФ‡ ‹
ÂÎÌ¿ıËÛ˘.
ON
ON / OFF 1 / 2
OFF

28
§ÂÈÙÔ˘ÚÁ›·
√ ‰И·ОfiЩЛ˜ ЫВУ·Ъ›ˆУ КˆЩИЫМФ‡ МФЪВ› У· ВП¤БНВИ Щ·˘Щfi¯ЪФУ· ¤У· Ы‡УФПФ ЪФ˚fiУЩˆУ (actors) МВ ·˘ЩfiУ О·Щ¿ ЩЛУ
ВОМ¿ıЛЫЛ
(1)
. ™ЩЛУ ВЪ›ЩˆЫЛ ·˘Щ‹ ПВИЩФ˘ЪБВ› ˆ˜ leader (ВУЩФП¤·˜) ЩФ˘ ЫВУ·Ъ›Ф˘
(2)
.
√ ‰И·ОfiЩЛ˜ ЫВУ·Ъ›ˆУ КˆЩИЫМФ‡ ВИЩЪ¤ВИ ЩФУ ¤ПВБ¯Ф ·fi Щ· П‹ОЩЪ· √¡ ‹ OFF ЩˆУ ЫЛМВ›ˆУ КˆЩИЫМФ‡ Ф˘
Ы˘У‰¤ФУЩ·И МВ ЩФ˘˜ actors ФИ ФФ›ФИ ¤¯Ф˘У Ы˘У‰˘·ЫЩВ› МВ ЩФ П‹ОЩЪФ √¡, ЫВ :
- ¿Ó·ÌÌ· МВ Ы‡УЩФМФ ¿ЩЛМ· ЩФ˘ П‹ОЩЪФ˘ √¡
- Û‚‹ÛÈÌÔ МВ Ы‡УЩФМФ ¿ЩЛМ· ЩФ˘ П‹ОЩЪФ˘ √FF
- Ú‡ÌÈÛË ·‡ÍÔ˘Û· Ì ·Ú·ÙÂٷ̤ÓÔ ¿ÙËÌ· ÙÔ˘ Ï‹ÎÙÚÔ˘ √¡
- Ú‡ıÌÈÛË Êı›ÓÔ˘Û· Ì ·Ú·ÙÂٷ̤ÓÔ ¿ÙËÌ· ÙÔ˘ Ï‹ÎÙÚÔ˘ √FF
¶·Ú·Ù‹ÚËÛË : ÌfiÓÔ Ô ÚÔÁÚ·ÌÌ·ÙÈÛÌfi˜ ÙÔ˘ Ï‹ÎÙÚÔ˘ ON Â›Ó·È ··Ú·›ÙËÙÔ˜, ÙÔ Ï‹ÎÙÚÔ OFF ÚÔÁÚ·ÌÌ·Ù›˙ÂÙ·È
·˘ÙfiÌ·Ù·.
√ ‰И·ОfiЩЛ˜ ЫВУ·Ъ›ˆУ ˆЩИЫМФ‡ ВИЩЪ¤ВИ ЩФУ ¤ПВБ¯Ф ·fi ЩФ П‹ОЩЪФ 1 ‹ 2 ЩˆУ ЫЛМВ›ˆУ КˆЩИЫМФ‡ Ф˘ Ы˘У‰¤ФУЩ·И МВ
ЩФ˘˜ actors ФИ ФФ›ФИ ¤¯Ф˘У Ы˘У‰˘·ЫЩВ› МВ ЩФ П‹ОЩЪФ 1 ‹ 2, ЫВ :
- ÛÂÓ¿ÚÈÔ
(2)
МВ Ы‡УЩФМФ ¿ЩЛМ· ЩФ˘ П‹ОЩЪФ˘ 1 ‹ 2
- Ú‡ÌÈÛË ·‡ÍÔ˘Û· Ì ·Ú·ÙÂٷ̤ÓÔ ¿ÙËÌ· ÙÔ˘ Ï‹ÎÙÚÔ˘ 1
- Ú‡ÌÈÛË Êı›ÓÔ˘Û· Ì ·Ú·ÙÂٷ̤ÓÔ ¿ÙËÌ· ÙÔ˘ Ï‹ÎÙÚÔ˘ 2
(1)
¶ЪФБЪ·ММ·ЩИЫМФ˜ ‹ ∂ОМ¿ıЛЫЛ : Ы˘У‰˘·ЫМfi˜ ЩˆУ ВИМ¤ЪФ˘˜ ЪФ˚fiУЩˆУ (actors) МВ ЫЩfi¯Ф ЩФУ Щ·˘Щfi¯ЪФУФ ¤ПВБ¯fi ЩФ˘˜
·fi ¤У· ОВУЩЪИОfi ЫЛМВ›Ф (leader).
√ Ы˘У‰˘·ЫМfi˜ ·˘Щfi˜ Ъ·БМ·ЩФФИВ›Щ·И ВК·ЪМfi˙ФУЩ·˜ ЩЛ ‰И·‰ИО·Ы›· Ф˘ ВЪИБЪ¿КВЩ·И ЫЩЛ ЫВП›‰· 29.
(2)
™ВУ¿ЪИФ: ЩФ Ы‡УФПФ ЩˆУ actors (ВОЩВПВЫЩТУ ЫВУ·Ъ›Ф˘) Ф˘ ВП¤Б¯ФУЩ·И МВ ¤У· П‹ОЩЪФ ВП¤Б¯Ф˘.
29
∂ÂÍ‹ÁËÛË Î·Ù¿ÛÙ·ÛË ÊˆÙÂÈÓ‹˜ ¤Ó‰ÂÈ͢
§Â˙¿ÓÙ·
∏ ʈÙÂÈÓ‹
¤Ó‰ÂÈÍË Û‚‹ÓÂÈ
¶·Ù‹ÛÙÂ ÙÔ
LEARN
¶·Ù‹ÛÙ ÙÔ Ï‹ÎÙÚÔ ÂϤÁ¯Ô˘ ÙÔ ÔÔ›Ô
ı· ÂϤÁ¯ÂÈ ÙÔ ÛÂÓ¿ÚÈÔ
¶·Ù‹ÛÙÂ ÙÔ
LEARN
¶·Ù‹ÛÙÂ ÙÔ
LEARN
¶·Ù‹ÛÙ ÙÔ Ï‹ÎÙÚÔ ÂϤÁ¯Ô˘ Ô˘ ı¤ÏÂÙÂ
Ó· Û˘Ó‰˘¿ÛÂÙ Ì ÙÔ leader
√È ˆÙÂÈÓ¤˜ ÂӉ›ÍÂȘ fiÏˆÓ ÙˆÓ ÚÔ˚fiÓÙˆÓ Û‚‹ÓÔ˘Ó.
∆Ô ÛÂÓ¿ÚÈÔ ·ÔıË·ÙËÎÂ.
™Ù¿‰ÈÔ 1 : ÍÂΛÓËÌ· Ù˘ ÂÎÌ¿ıËÛ˘ (¿ӈ ÛÙÔ LEADER)
™Ù¿‰ÈÔ 2 : ÚÔÛı¤ÛÙ ¤Ó·Ó actor ÛÙÔ ÛÂÓ¿ÚÈÔ (¿ӈ ÛÙÔÓ actor)
™Ù¿‰ÈÔ 3 : ·ÔıË·ÛÙ ÙÔ ÛÂÓ¿ÚÈÔ (¿ӈ ÛÙÔ LEADER)
°И· У· ЪФЫı¤ЫВЩВ ФПП¿ ЪФ˚fiУЩ· ЫЩФ ЫВУ¿ЪИФ, В·У·П¿‚ВЩВ БИ· О¿ıВ ¤У· ·fi ·˘Щ¿ (actors) ЩИ˜ ВУ¤ЪБВИВ˜ Î·È .
∏ ʈÙÂÈÓ‹ ¤Ó‰ÂÈÍË
·Ó·‚ÔÛ‚‹ÓÂÈ ·ÚÁ¿
∏ ʈÙÂÈÓ‹ ¤Ó‰ÂÈÍË
·Ó·‚ÔÛ‚‹ÓÂÈ ÁÚ‹ÁÔÚ·
∏ ʈÙÂÈÓ‹ ¤Ó‰ÂÈÍË
·Ó·‚ÔÛ‚‹ÓÂÈ ¤ÓÙÔÓ·
30
∆ÚÔÔÔ›ËÛË ÂÓfi˜ ÛÂÓ·Ú›Ô˘
¶·Ù‹ÛÙÂ ÙÔ
LEARN
¶·Ù‹ÛÙ ÙÔ Ï‹ÎÙÚÔ ÂϤÁ¯Ô˘
Ô˘ ÂϤÁ¯ÂÈ ÙÔ ÛÂÓ¿ÚÈÔ
√È ˆÙÂÈÓ¤˜ ÂӉ›ÍÂȘ fiÏˆÓ ÙˆÓ
ÚÔ˚fiÓÙˆÓ ÙÔ˘ ÛÂÓ·Ú›Ô˘ ·Ó·‚ÔÛ‚‹ÓÔ˘Ó.
¶·Ù‹ÛÙÂ ÙÔ Ï‹ÎÙÚÔ
ÂϤÁ¯Ô˘ Ô˘ ÂÈı˘Ì›ÙÂ
Ó· Û˘Ó‰˘¿ÛÂÙÂ
™Ù¿‰ÈÔ 1 : ·ÓÔ›ÍÙ ÙÔ ÛÂÓ¿ÚÈÔ (¿ӈ ÛÙÔ LEADER)
¶·Ù‹ÛÙÂ ÙÔ
LEARN
‹
¶·Ù‹ÛÙÂ ÙÔ LEARN
°È· Ó· ··ÈÚ¤ÛÂÙÂ ÙÔ ÚÔ˚fiÓ ·fi ÙÔ ÛÂÓ¿ÚÈÔ,
ÂÚ¿ÛÙ ÛÙÔ ÛÙ¿‰ÈÔ 3
™Ù¿‰ÈÔ 2: ÙÚÔÔÔ›ËÛË Ù˘ ηٿÛÙ·Û˘ ÂÓfi˜ actor ÙÔ˘ ÛÂÓ·Ú›Ô˘ (¿ӈ ÛÙÔÓ actor)
¶·Ù‹ÛÙÂ ÙÔ
LEARN
√È ˆÙÂÈÓ¤˜ ÂӉ›ÍÂȘ fiÏˆÓ ÙˆÓ ÚÔ˚fiÓÙˆÓ Û‚‹ÓÔ˘Ó.
∆Ô ÛÂÓ¿ÚÈÔ ·ÔıË·ÙËÎÂ.
™Ù¿‰ÈÔ 3 : ·ÔıË·ÛÙ ÙÔ ÛÂÓ¿ÚÈÔ (¿ӈ ÛÙÔ LEADER)
 Loading...