

LEGRAND NV-P20-LLNL, NV-P20-ARWH, NV-P20-LLNT, NV-P20-LLN, NV-P20-VLWH Installation Instructions Manual
...
Nuvo Living Light POE Keypad, Arteor, Valena Life, and adorne ●
Claviers POE Living Light de Nuvo, Arteor, Valena Life, et adorne ●
Nuvo Living Light POE Tastaturen, Arteor, Valena Life, und adorne ●
Tastierino Nuvo Living Light POE, Arteor, Valena Life, e adorne ●
Teclado Nuvo Living Light POE, Arteor, Valena Life, e adorne ●
Teclado con alimentación a través de Ethernet e iluminación
viva Nuvo, Arteor, Valena Life, y adorne
Installation Instructions ● Fiche d’instructions ● Bedienungsanleitung ● Manuale di istruzioni ●
Folha de Instruções ● Hoja de instrucciones
Part Numbers:
EN
Nuvo NV-P20-LLN, NV-P20-LLNT, NV-P20-LLNL
Arteor NV-P20-ARWH, NV-P20-LLN
Valena Life NV-P20-VLWH, NV-P20-VLIV, NV-P20-VLAL
adorne NV-P20-ADWH, NV-P20-ADMG
Numéros de pièces :
FR
Nuvo NV-P20-LLN, NV-P20-LLNT, NV-P20-LLNL
Arteor NV-P20-ARWH, NV-P20-LLN
Valena Life NV-P20-VLWH, NV-P20-VLIV, NV-P20-VLAL
adorne NV-P20-ADWH, NV-P20-ADMG
Teilenummern:
DE
Nuvo NV-P20-LLN, NV-P20-LLNT, NV-P20-LLNL
Arteor NV-P20-ARWH, NV-P20-LLN
Valena Life NV-P20-VLWH, NV-P20-VLIV, NV-P20-VLAL
adorne NV-P20-ADWH, NV-P20-ADMG
Codici articolo:
IT
Nuvo NV-P20-LLN, NV-P20-LLNT, NV-P20-LLNL
Arteor NV-P20-ARWH, NV-P20-LLN
Valena Life NV-P20-VLWH, NV-P20-VLIV, NV-P20-VLAL
adorne NV-P20-ADWH, NV-P20-ADMG
Números de Referência:
PT
Nuvo NV-P20-LLN, NV-P20-LLNT, NV-P20-LLNL
Arteor NV-P20-ARWH, NV-P20-LLN
Valena Life NV-P20-VLWH, NV-P20-VLIV, NV-P20-VLAL
adorne NV-P20-ADWH, NV-P20-ADMG
Números de pieza:
ES
Nuvo NV-P20-LLN, NV-P20-LLNT, NV-P20-LLNL
Arteor NV-P20-ARWH, NV-P20-LLN
Valena Life NV-P20-VLWH, NV-P20-VLIV, NV-P20-VLAL
adorne NV-P20-ADWH, NV-P20-ADMG
1507255
Rev D
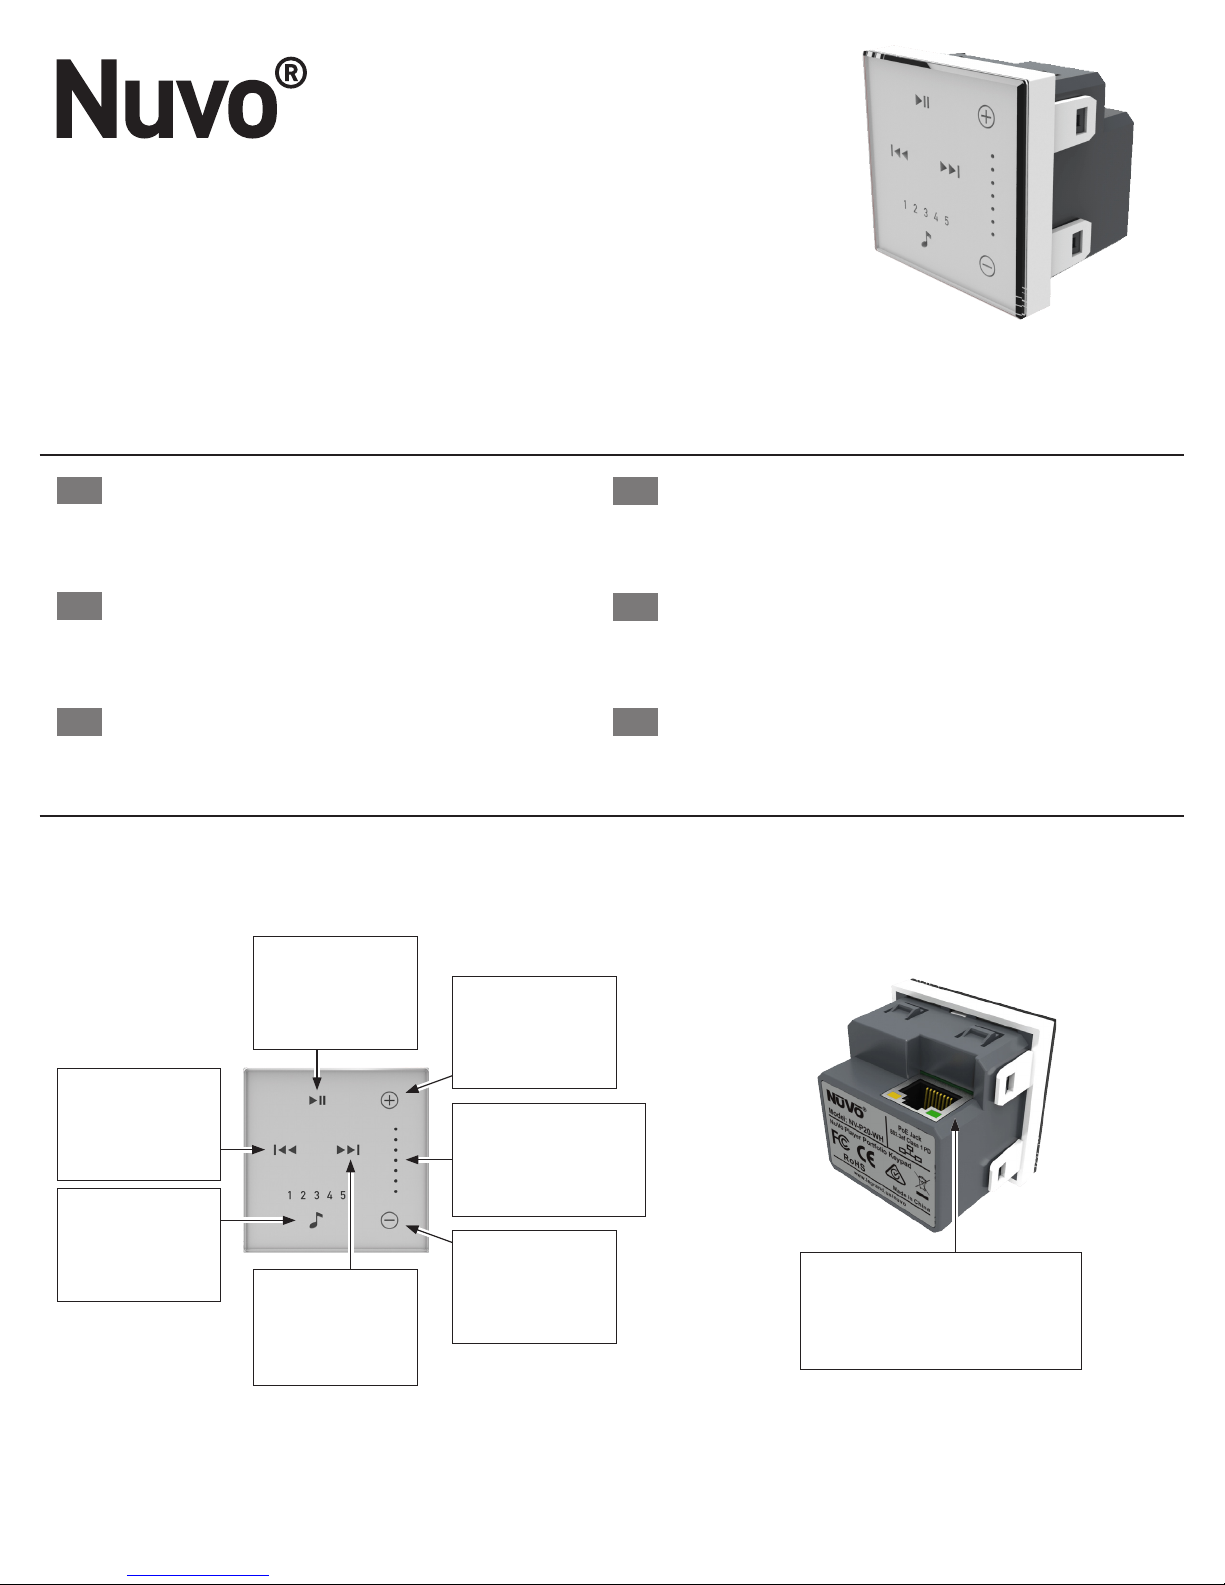
Figure 1: Features Fig. 1, Fig. 2 ● Fonctions Fig. 1, Fig. 2 ● Eigenschaften Abb. 1 und Abb. 2 ● Caratteristiche Fig. 1,
Fig. 2 ● Funcionalidades Fig. 1, Fig. 2 ● Características Fig. 1, Fig. 2
Play / Pause
Lecture / Pause
Skip Back
Saut arrière
Zurück
Brano precedente
Para a frente
Saltar hacia atrás
Favorites
Favoris
Favoriten
Preferiti
Favoritos
Favoritos
Play / Pause
Riproduzione/Pausa
Reproduzir / Pausar
Reproducir / pausar
Skip Forward
Saut avant
Vor
Brano successivo
Para trás
Saltar hacia adelante
Fig. 1 / Fig. 1 / Abb.1 / Fig. 1 / Fig. 1 / Fig. 1
Volume Up
Volume +
Lauter
Volume Su
Aumentar volume
Subir volumen
Volume Indicator
Indicateur de volume
Lautstärkeanzeige
Indicatore del volume
Indicador de volume
Indicador de volumen
Volume Down
Volume -
Leiser
Volume Giù
Diminuir volume
Bajar volumen
802.11af POE Network Connection
Connexion réseau POE 802.11af
Anschluss für 802.11af PoE-Netzwerk
Collegamento rete 802.11af POE
Ligação de rede 802.11af POE
Conexión de red POE 802.11af
Fig. 2 / Fig. 2 / Abb.2 / Fig. 2 / Fig. 2 / Fig. 2

This instruction sheet covers the installation of the NV-P20-XX models listed above. The Nuvo P20 keypad provides instant access to core features
EN
such as volume control, mute, skip tracks, play / pause and access to the top 5 favorites without needing to use the app on a phone or tablet. This
keypad features capacitive touch control and is fully backlit with white LED. The Nuvo P20 keypad is powered by a single 802.11af POE (Power Over
Ethernet) connection that would be supplied from a compatible POE switch or injector.
Adding a Keypad to the Nuvo Player System
This installation assumes the Player Portfolio system is already installed. If not, please refer to the Player Portfolio manual to install all of the zones before
keypads are added. Once all the zones have been added follow the steps below to bind a keypad with a zone.
Important: The P20 Keypad requires a single Power Over Ethernet (802.11af POE) connection and needs to be connected to the same network, or subnet,
of the zone it is intended to control.
Fig. 3 / Fig. 3 / Abb.3 / Fig. 3 / Fig. 3 / Fig. 3 Fig. 4 / Fig. 4 / Abb.4 / Fig. 4 / Fig. 4 / Fig. 4 Fig. 5 / Fig. 5 / Abb.5 / Fig. 5 / Fig. 5 / Fig. 5
STEP 1: Navigate to the Settings menu by pressing the gear icon at the bottom of the home page (Fig. 3).
STEP 2: Select “Add a component” (Fig. 4).
STEP 3: Select “Keypad” (Fig 5).
Fig. 6 / Fig. 6 / Abb.6 / Fig. 6 / Fig. 6 / Fig. 6 Fig. 7 / Fig. 7 / Abb.7 / Fig. 7 / Fig. 7 / Fig. 7 Fig. 8 / Fig. 8 / Abb.8 / Fig. 8 / Fig. 8 / Fig. 8
STEP 4: Look for the LEDs to have a breathing motion. If the LEDs are not breathing, select “The LED’s are not breathing” at the bottom of the screen
(Fig. 6 & Fig 7). If the LED’s are breathing, select “Next” (Fig 8).
2
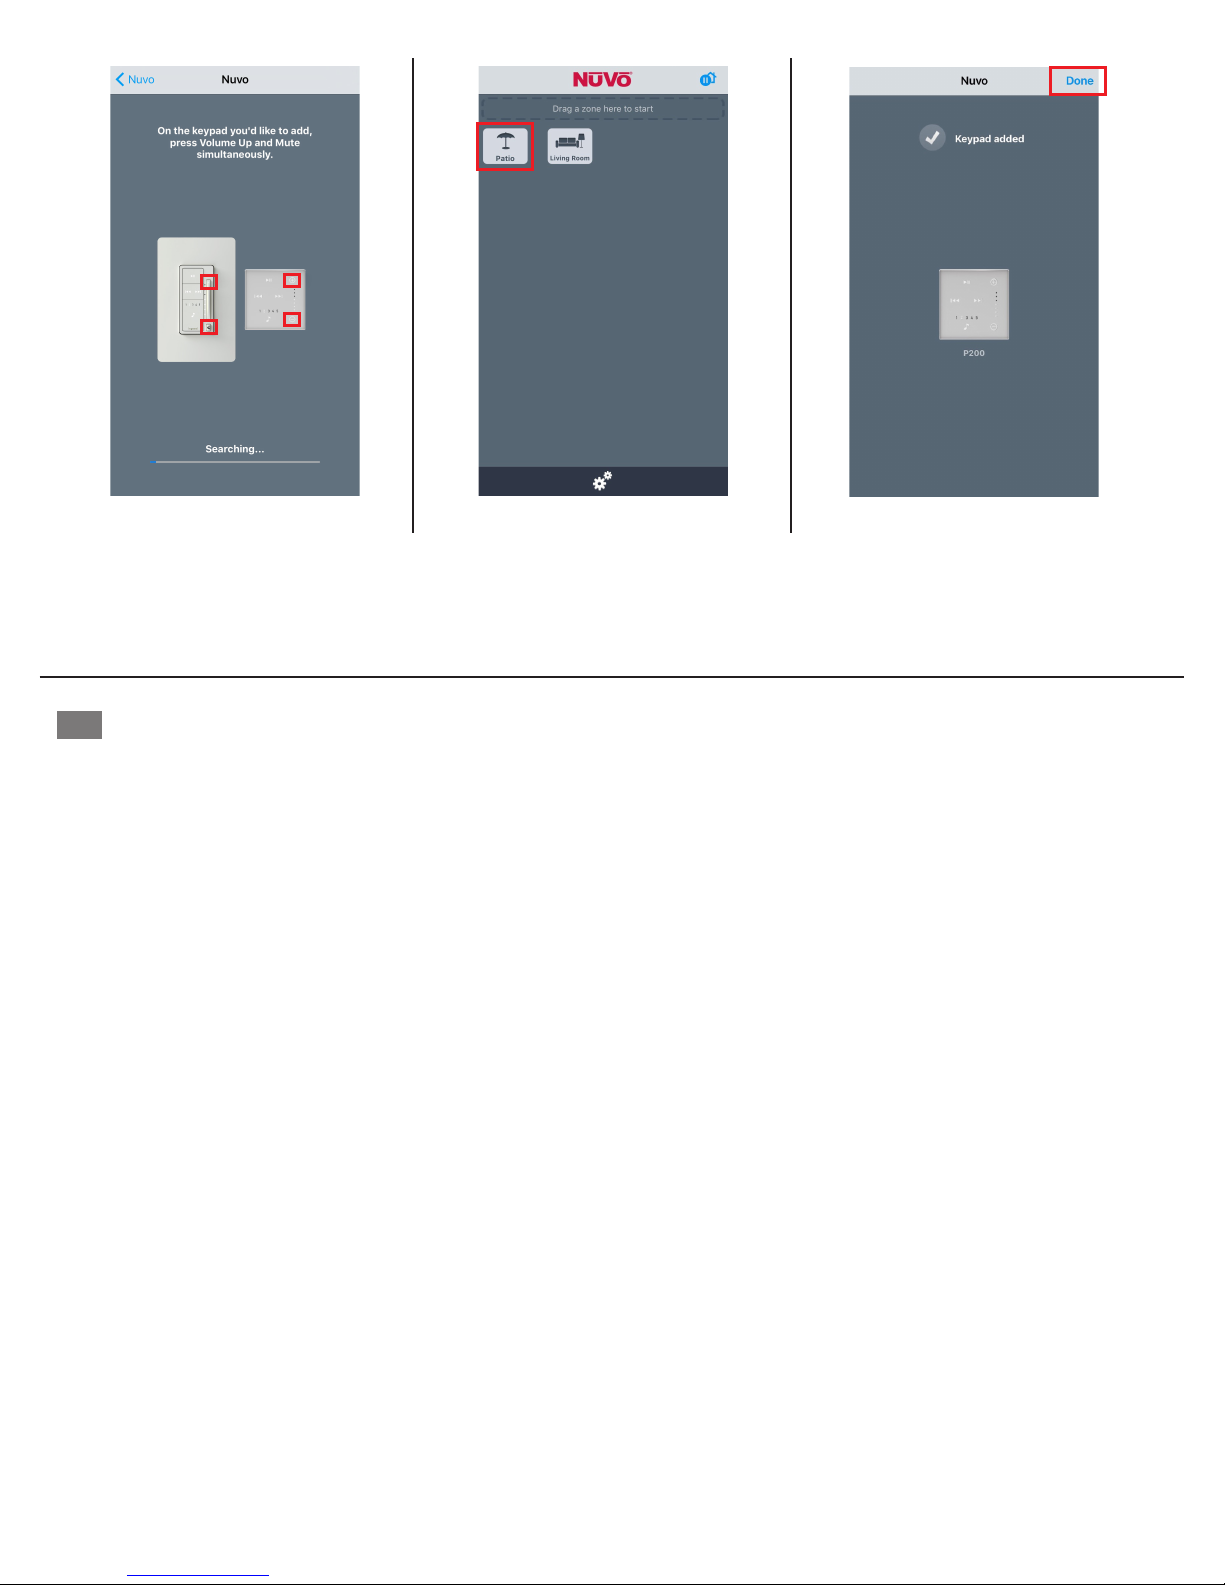
Fig. 9 / Fig. 9 / Abb.9 / Fig. 9 / Fig. 9 / Fig. 9 Fig. 10 / Fig. 10 / Abb.10 / Fig. 10 / Fig. 10 / Fig. 10 Fig. 11 / Fig. 11 / Abb.11 / Fig. 11 / Fig. 11 / Fig. 11
STEP 5: Push the VOLUME UP and MUTE keys simultaneously to bind the keypad to the system (Fig. 9).
STEP 6: Select the Zone that the keypad is to be associated with (Fig. 10).
STEP 7: If the connection is successful “Keypad added” will be displayed, and it will show the associated zone. Press “Done” (Fig. 11).
Cette che d’instructions décrit la procédure d’installation des modèles NV-P20-XX énumérés ci-dessus. Le clavier Nuvo P20 vous permet d’accéder
FR
instantanément à des fonctions clés comme le réglage du volume, le mode muet, le passage des pistes, le mode Lecture / Pause, ainsi qu’à cinq
préréglages favoris sans que vous ayez besoin d’utiliser l’application sur un téléphone ou une tablette. Ce clavier dispose de commandes tactiles
capacitives et d’un système de rétro-éclairage par DEL blanches. Le clavier Nuvo P20 est alimenté par une connexion 802.11af POE (Power Over
Ethernet) unique, fournie par un interrupteur ou un injecteur POE compatible.
Ajout d’un clavier au Player System de Nuvo
Cette installation suppose que le système Player Portfolio est déjà installé. Si ce n’est pas le cas, veuillez vous reporter au manuel
du Player Portfolio pour installer toutes les zones avant l’ajout des claviers. Une fois toutes les zones ajoutées, suivez les étapes
ci-dessous pour lier un clavier à une zone.
Important : Le clavier P20 nécessite une connexion Power Over Ethernet unique (POE 802.11af), et doit être connecté au même réseau ou sous-réseau
que la zone qu’il doit contrôler.
ÉTAPE 1 : Naviguez jusqu’au menu Paramètres en appuyant sur l’icône en forme d’engrenage en bas de la page d’accueil (g. 3).
ÉTAPE 2 : Sélectionnez « Ajoutez un composant. » (g. 4).
ÉTAPE 3 : Sélectionnez « Clavier » (g. 5).
ÉTAPE 4 : Vériez qu’il y a un mouvement de respiration au niveau des DEL. Si les DEL ne respirent pas, sélectionnez « Les DEL ne respirent pas » en
bas de l’écran (g.6 et g.7). Si les DEL respirent, sélectionnez « Suivant » (g. 8).
ÉTAPE 5 : Appuyez sur les touches VOLUME + et MUTE en même temps pour lier le clavier au système (g. 9).
ÉTAPE 6 : Sélectionnez la zone à laquelle le clavier doit être associé (g. 10).
ÉTAPE 7 : Si la connexion est établie, la notication « Clavier ajouté » apparaîtra, et la zone associée sera afchée. Appuyez sur « Terminé » (g. 11).
3
 Loading...