

LEGRAND Nuvo P200, Nuvo P100, Nuvo P300, Nuvo P400, Nuvo P500 Product Manual

P100
Player P100, P200, and P300
Product Manual
P200
P300

TABLE OF CONTENTS
Quick Links . . . . . . . . . . . . . . . . . . . . 3
Overview . . . . . . . . . . . . . . . . . . . . . 4
The Nuvo Player Portfolio Audio System . . . . . . . . 4
Product Features. . . . . . . . . . . . . . . . .5
NV-P100-XX Single Zone Player
(Ethernet&Wireless). . . . . . . . . . . . . . . . . . .5
NV-P200-XX Single Zone Player
(Ethernet&Wireless) . . . . . . . . . . . . . . . . . . 6
NV-P300-XX Player Preamplifier
(Ethernet & Wireless). . . . . . . . . . . . . . . . . . .7
Setup and Installation . . . . . . . . . . . . . . 8
Network Requirements . . . . . . . . . . . . . . . . .8
Connecting Speakers to the NV-P100-XX and
NV-P200-XX . . . . . . . . . . . . . . . . . . . . . . . .8
Setting Up Your System Using the App. . . . .9
New System Setup . . . . . . . . . . . . . . . . . . . .9
Wired Setup . . . . . . . . . . . . . . . . . . . . . . .10
Wireless Setup . . . . . . . . . . . . . . . . . . . . . 11
Adding a Component to an Existing System . . . . . 12
Changing an Existing Ethernet Connected
ComponentTo Wireless . . . . . . . . . . . . . . . . 12
Using the Nuvo Player App . . . . . . . . . . 13
The Dashboard . . . . . . . . . . . . . . . . . . . . . 13
Music Selection . . . . . . . . . . . . . . . . . . . . . 13
Bluetooth Playback . . . . . . . . . . . . . . . . . . . 14
Direct Stream . . . . . . . . . . . . . . . . . . . . . . 14
Line In . . . . . . . . . . . . . . . . . . . . . . . . . . 15
Media Servers. . . . . . . . . . . . . . . . . . . . . . 15
The Settings Menu . . . . . . . . . . . . . . . 16
Add a Nuvo Component . . . . . . . . . . . . . . . . 16
Zones . . . . . . . . . . . . . . . . . . . . . . . . . . 16
Keypads . . . . . . . . . . . . . . . . . . . . . . . . . 18
This App . . . . . . . . . . . . . . . . . . . . . . . . . 18
Music Library . . . . . . . . . . . . . . . . . . . . . . 18
Music Services . . . . . . . . . . . . . . . . . . . . . 19
General . . . . . . . . . . . . . . . . . . . . . . . . . 20
International . . . . . . . . . . . . . . . . . . . . . . 21
Help . . . . . . . . . . . . . . . . . . . . . . . . . . . 21
The Music Share Software . . . . . . . . . . 22
Troubleshooting . . . . . . . . . . . . . . . . 24
Front Panel LEDs . . . . . . . . . . . . . . . . . . . .24
Not Connected . . . . . . . . . . . . . . . . . . . . . 24
Amazon Alexa Voice Control Integration. . . 26
Prerequisites . . . . . . . . . . . . . . . . . . . . . . 26
Connecting Alexa to Your Legrand Nuvo Player . . . 26
Setup Additional Music Service Providers. . . . . . . 29
Supported Alexa Commands . . . . . . . . . . . . . 29
Specifications. . . . . . . . . . . . . . . . . . 30
iOS and Android Requirements . . . . . . . . . . . . 30
NV-P100-XX Amplifier . . . . . . . . . . . . . . . . . 30
NV-P200-XX Amplifier . . . . . . . . . . . . . . . . . 31
NV-P300-XX Preamplifier . . . . . . . . . . . . . . . 32
Regulatory Compliance . . . . . . . . . . . . 33
Player Portfolio Audio System | Product Manual
2

QUICK LINKS
GENERAL
What is the Nuvo Player Portfolio System?
What wireless configurations are supported by the
Nuvo Player Portfolio System?
Where can I can I find more information on my Nuvo
Player?
The LED on my Player is flashing. What does that
mean?
Does my Player have international options?
NUVO P100, P200, AND P300
WIRELESS PLAYERS
SETTINGS MENU
What do all of the options on the settings menu do?
What is a zone?
How do I add a component to my system?
Can I change an existing Ethernet connected zone
into a wireless connection?
I didn’t register my Player during setup. How can I
register now?
STREAMED MUSIC
Can I stream music from a shared network library?
What is the difference between the P100, P200, and
P300 players?
Are there specific network requirements?
How do I set up my Nuvo Player?
Can I connect speakers to my Nuvo Player?
Where do I find the specifications for my Nuvo
Player?
NUVO PLAYER APP
How do I download the Nuvo Player app?
How do I use my Nuvo Player app?
What play options does my app offer?
What music services can I stream?
Are there special requirements for direct
streaming?
VOICE INTEGRATION
Can I connect my Alexa device?
Are there special requirements for voice integration
with my Alexa device?
Can I set up multiple music service providers?
What commands will Alexa Support?
Can I use Bluetooth® technology with my app?
Player Portfolio Audio System | Product Manual
3
OVERVIEW
Welcome to the Nuvo Player Portfolio Audio System!
This system offers you the opportunity to enjoy your favorite music from any room of your home, at any time, with
simplicity of operation. Imagine playing music from your personal library or easily streaming true, high-fidelity music
from the Internet by touching a button on your Apple or Android Wi-Fi-enabled portable device. Use this guide to set
up your audio system and begin filling your home with beautiful music.
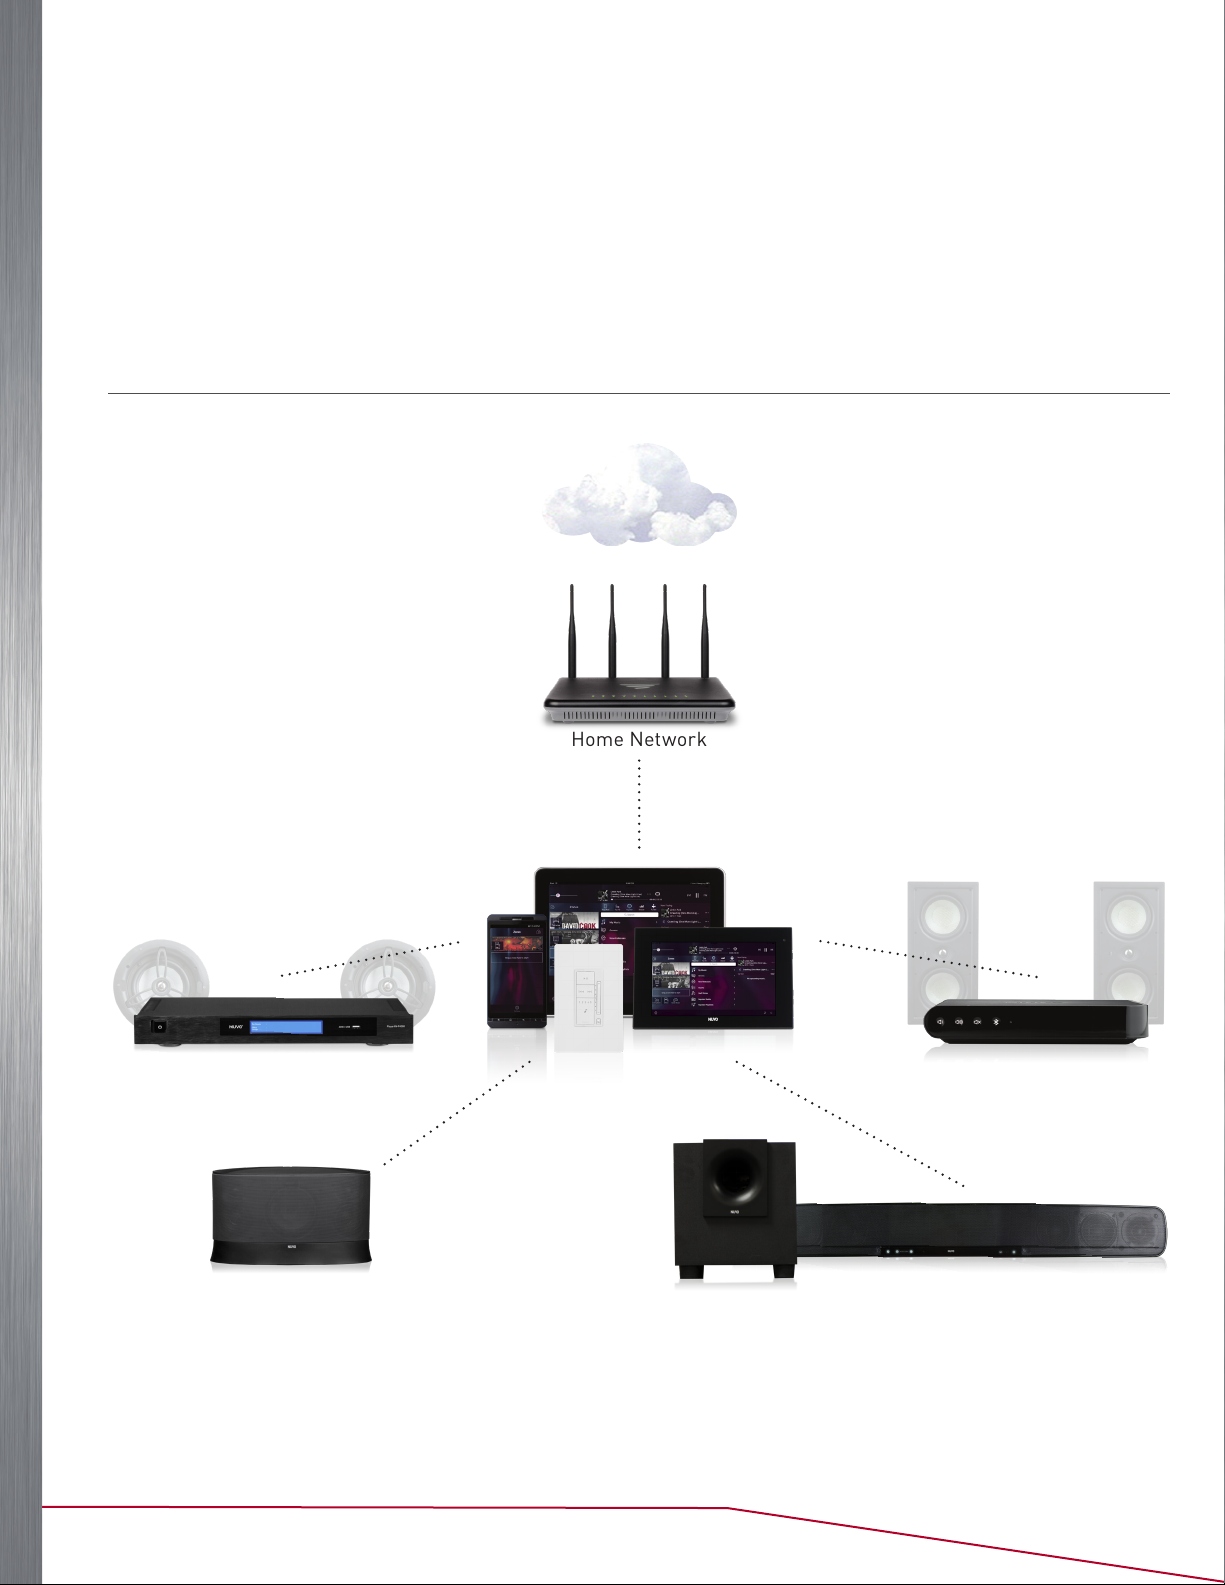
THE NUVO PLAYER PORTFOLIO AUDIO SYSTEM
(Example shows a wireless set-up method.)
Internet
Professional Multi-Zone
Rack-Mount Players
Tabletop Speakers
Home Network
Control
Wired/Wireless
Single-Zone Players
Home Theater
Player Portfolio Audio System | Product Manual
4
PRODUCT FEATURES
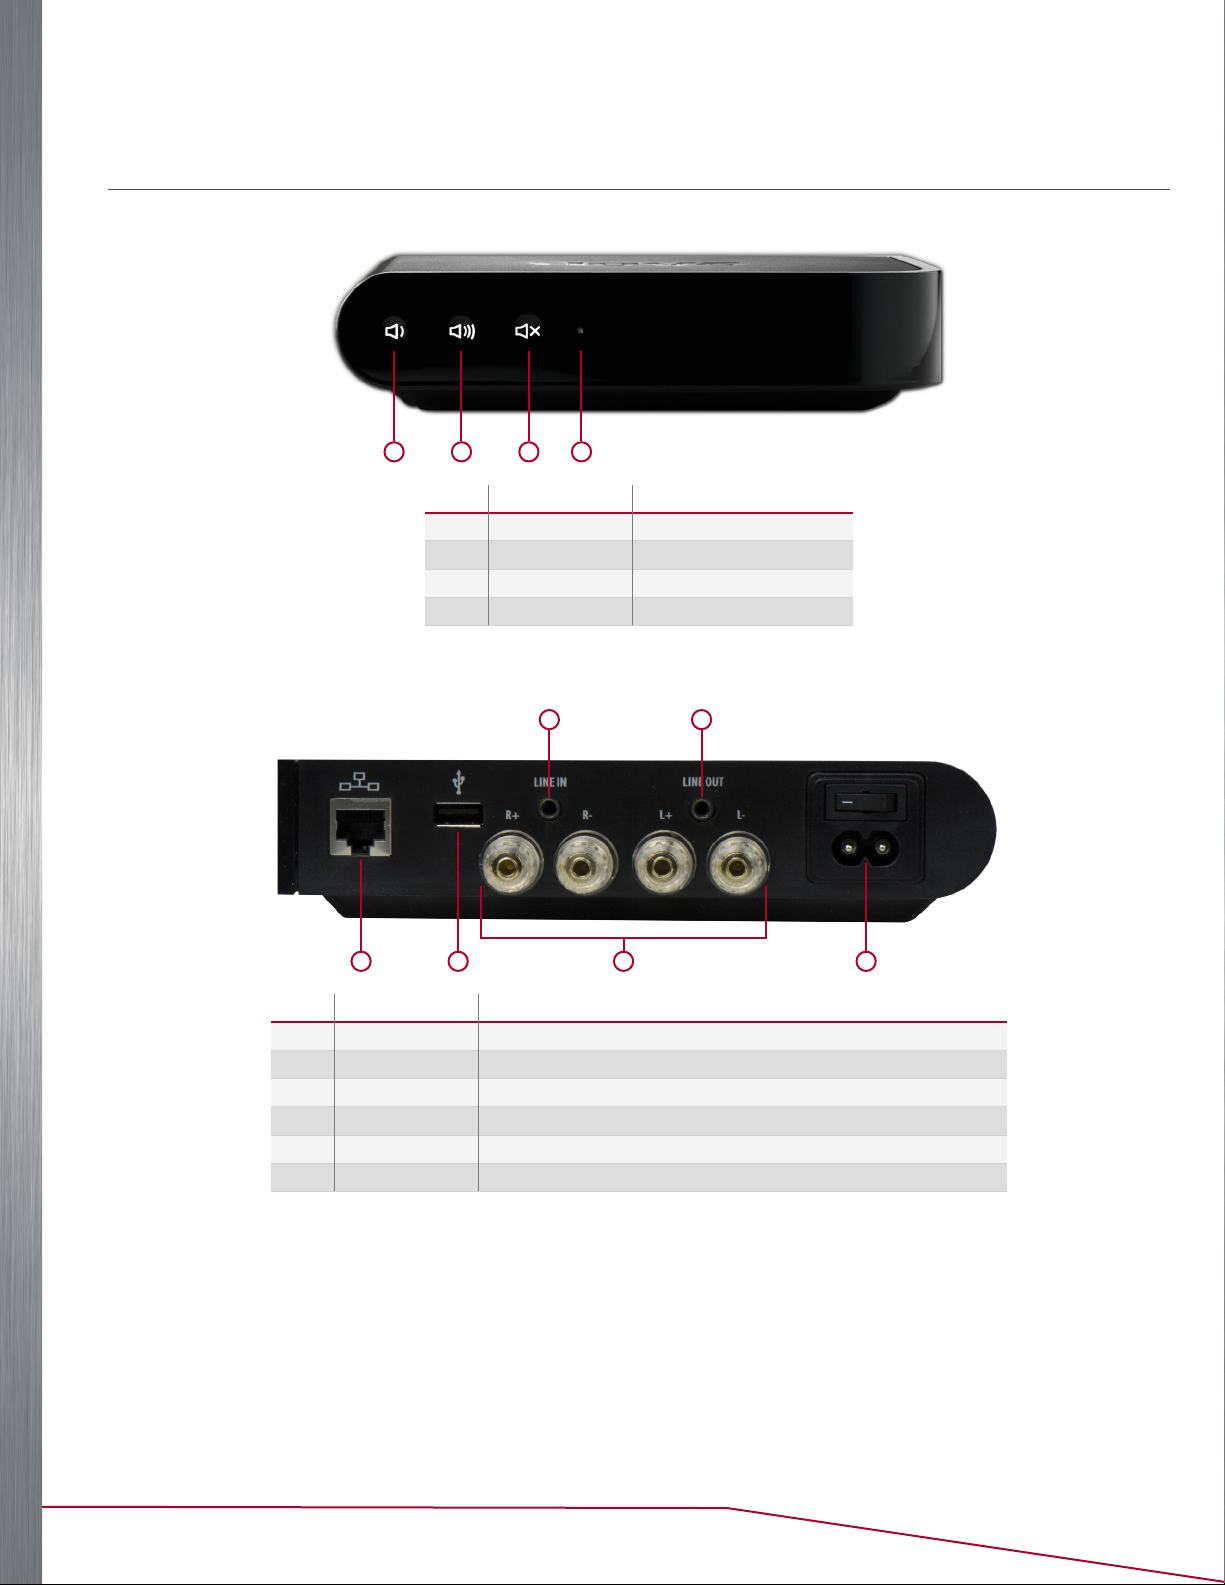
NVP100XX SINGLE ZONE PLAYER ETHERNET&WIRELESS
FRONT PANEL
1 2 3 4
Item Name Description
1 Volume Down Decreases audio volume
2 Volume Up Increases audio volume
3 Mute Mutes/un-mutes audio
4 LED Indicator Indicates player status
BACK PANEL
43
1 2 5 6
Item Name Description
1 Ethernet RJ45 port for a wired connection to a network router
2 USB** USB connection port for sharing music content from a storage device
3 Audio In 3.5mm stereo analog line-level input port
4 Audio Out* 3.5mm stereo analog line-level output port
5 Speaker Outputs* Speaker connection ports
6 AC Universal AC power supply connection port
* If using a video device as the source for audio output, no perceptible delay in audio occurs when a single player zone is selected. If two or more
player zones are playing the audio from the video source, an audio buffer engages that adds a delay between the audio and video source.
** Not all USB drives are supported natively by the USB port. USB drives should meet USB 2.0 requirements.
Player Portfolio Audio System | Product Manual
5
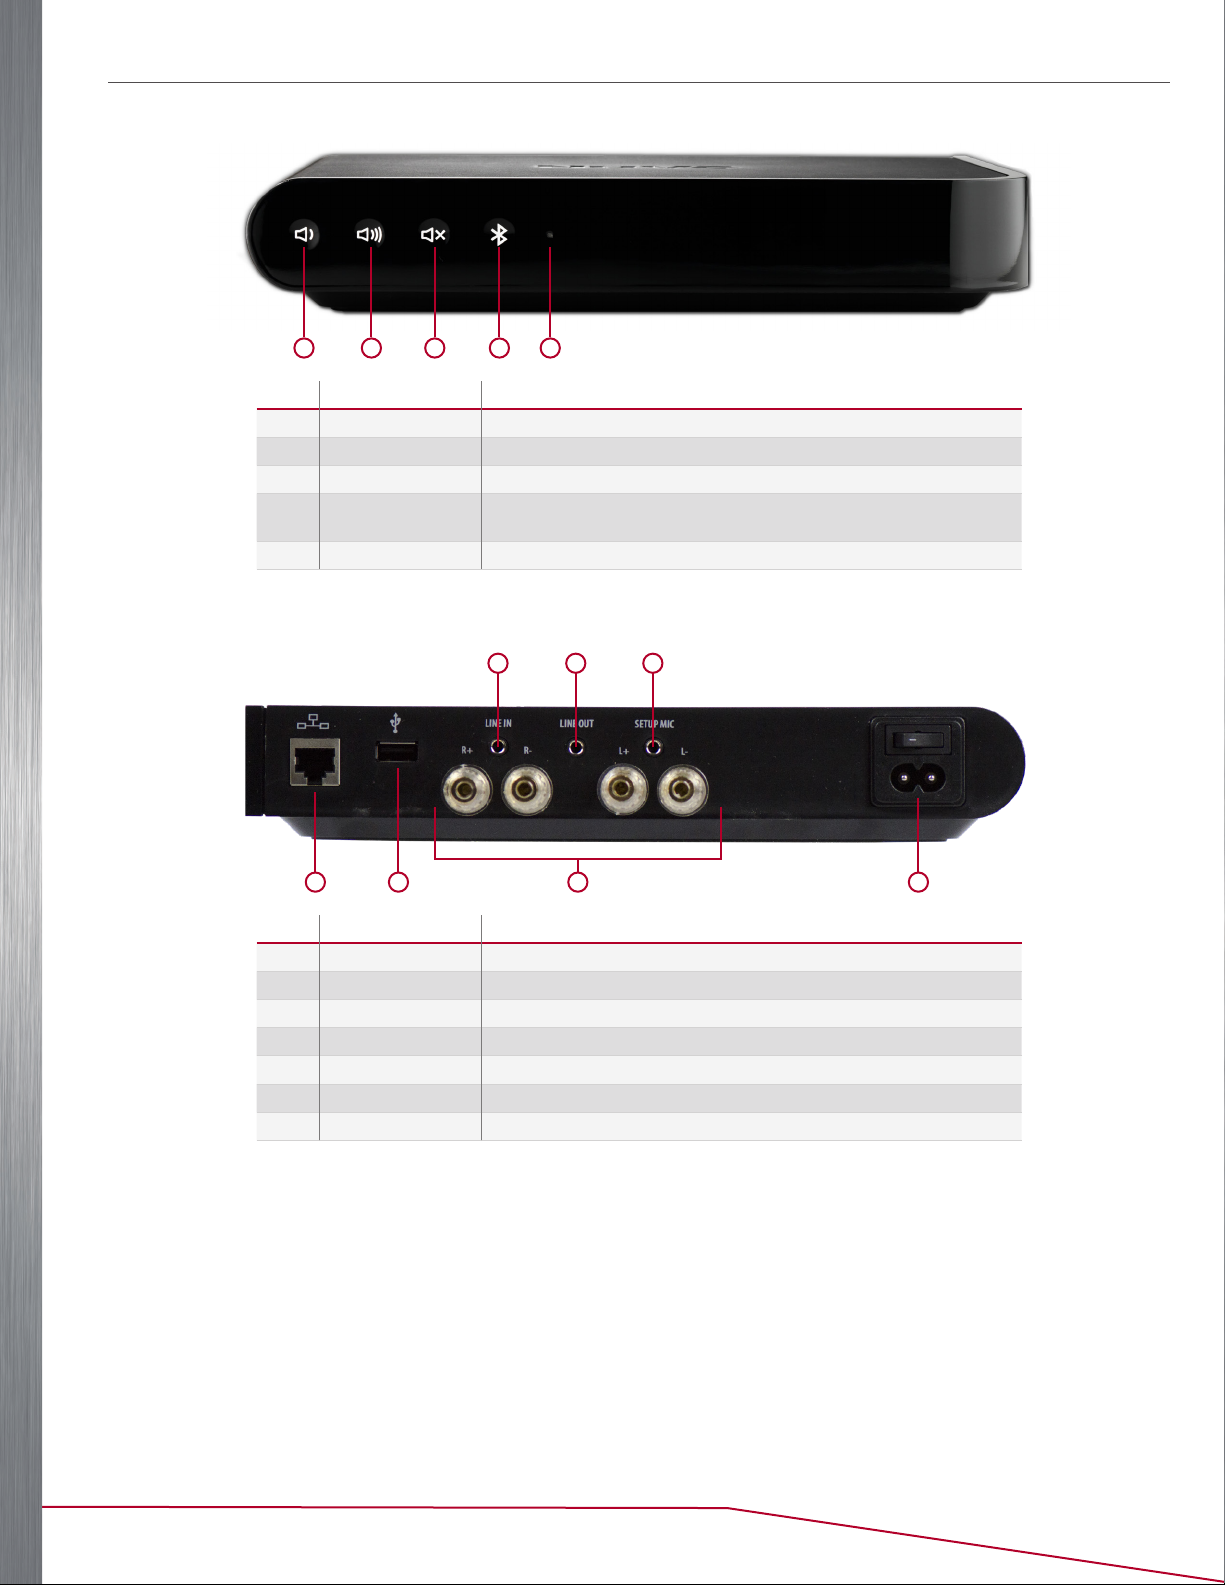
NVP200XX SINGLE ZONE PLAYER ETHERNET&WIRELESS
FRONT PANEL
1 2 3 4 5
Item Name Description
1 Volume Down Decreases audio volume
2 Volume Up Increases audio volume
3 Mute Mutes/un-mutes audio
4 Bluetooth Connects to saved paired devices, breaks current device connections,
5 LED Indicator Indicates player status
BACK PANEL
allows device discovery, and accepts pairing requests
543
1 2 6 7
Item Name Description
1 Ethernet RJ45 port for a wired connection to a network router
2 USB** USB connection port for sharing music content from a storage device
3 Audio In 3.5mm stereo analog line-level input port
4 Audio Out* 3.5mm stereo analog line-level output port
5 Setup Mic 3.5mm input for use with future software upgrades ONLY
6 Speaker Outputs* Speaker connection ports
7 AC Universal AC power supply connection port
* If using a video device as the source for audio output, no perceptible delay in audio occurs when a single player zone is selected. If two or more
player zones are playing the audio from the video source, an audio buffer engages that adds a delay between the audio and video source.
** Not all USB drives are supported natively by the USB port. USB drives should meet USB 2.0 requirements.
Player Portfolio Audio System | Product Manual
6
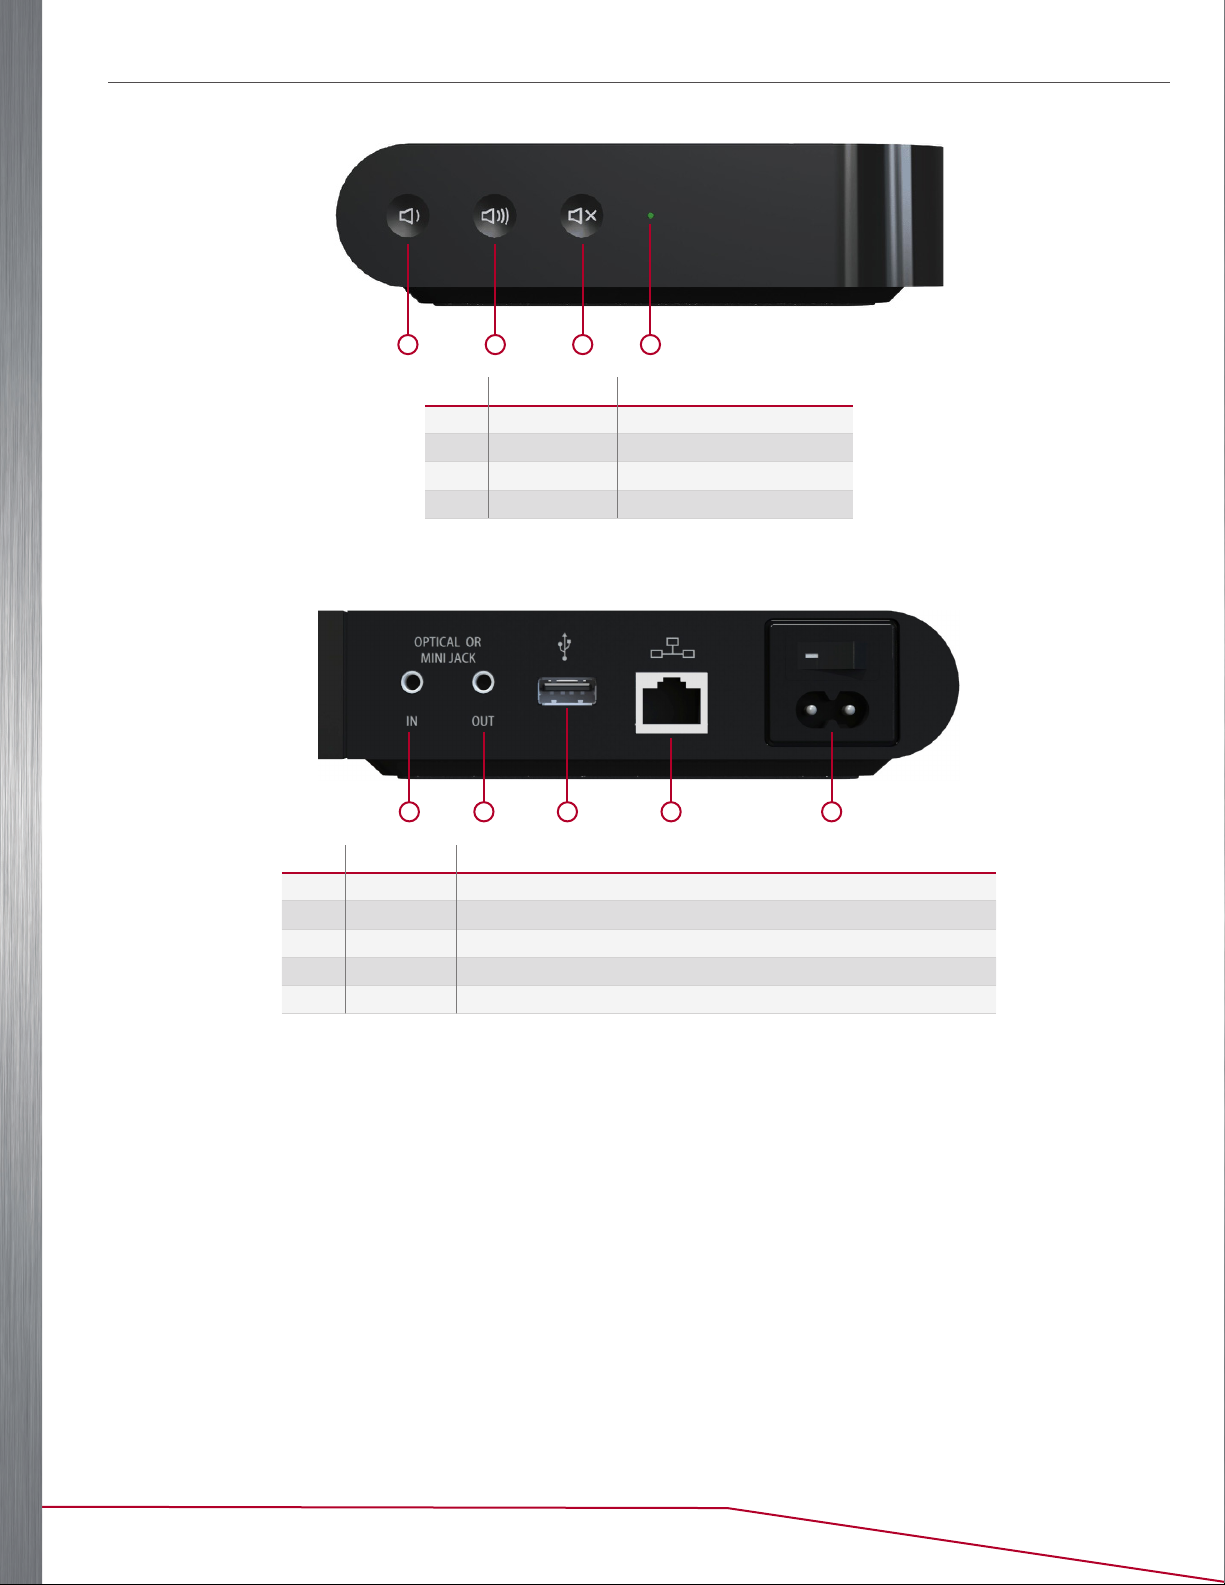
NVP300XX PLAYER PREAMPLIFIER ETHERNET & WIRELESS
FRONT PANEL
1 2 3 4
Item Name Description
1 Volume Down Decreases audio volume
2 Volume Up Increases audio volume
3 Mute Mutes/un-mutes audio
4 LED Indicator Indicates player status
BACK PANEL
1 2 3 4 5
Item Name Description
1 Audio In Combination 3.5mm stereo line-level and mini TOSLINK optical input
2 Audio Out* Combination 3.5mm stereo line level and mini TOSLINK optical output
3 USB** USB connection port for sharing music content from a storage device
4 Ethernet RJ45 port for a wired connection to a network router
5 AC Universal AC power supply connection port
* If using a video device as the source for audio output, no perceptible delay in audio occurs when a single player zone is selected. If two or more
player zones are playing the audio from the video source, an audio buffer engages that adds a delay between the audio and video source.
** Not all USB drives are supported natively by the USB port. USB drives should meet USB 2.0 requirements.
Player Portfolio Audio System | Product Manual
7
SETUP AND INSTALLATION
NETWORK REQUIREMENTS
A live Internet connection is necessary for initial setup of your Nuvo Player Portfolio System. For wired Ethernet
connectivity, a minimum 100 MB wired network is necessary for proper communication. Wireless-compatible devices
use dual band 802.11n wireless communication. To ensure that all components are compatible and communicating
correctly, it is strongly suggested that network routers using the older 802.11g protocol be upgraded to support
Multicast and UPnP and be Wi-Fi® Certified before you proceed with the setup.
When using an Ethernet connection to the system router, or for initial setup, make a connection from your home
network to one Ethernet port ( ) on the device, using a standard Ethernet cable.
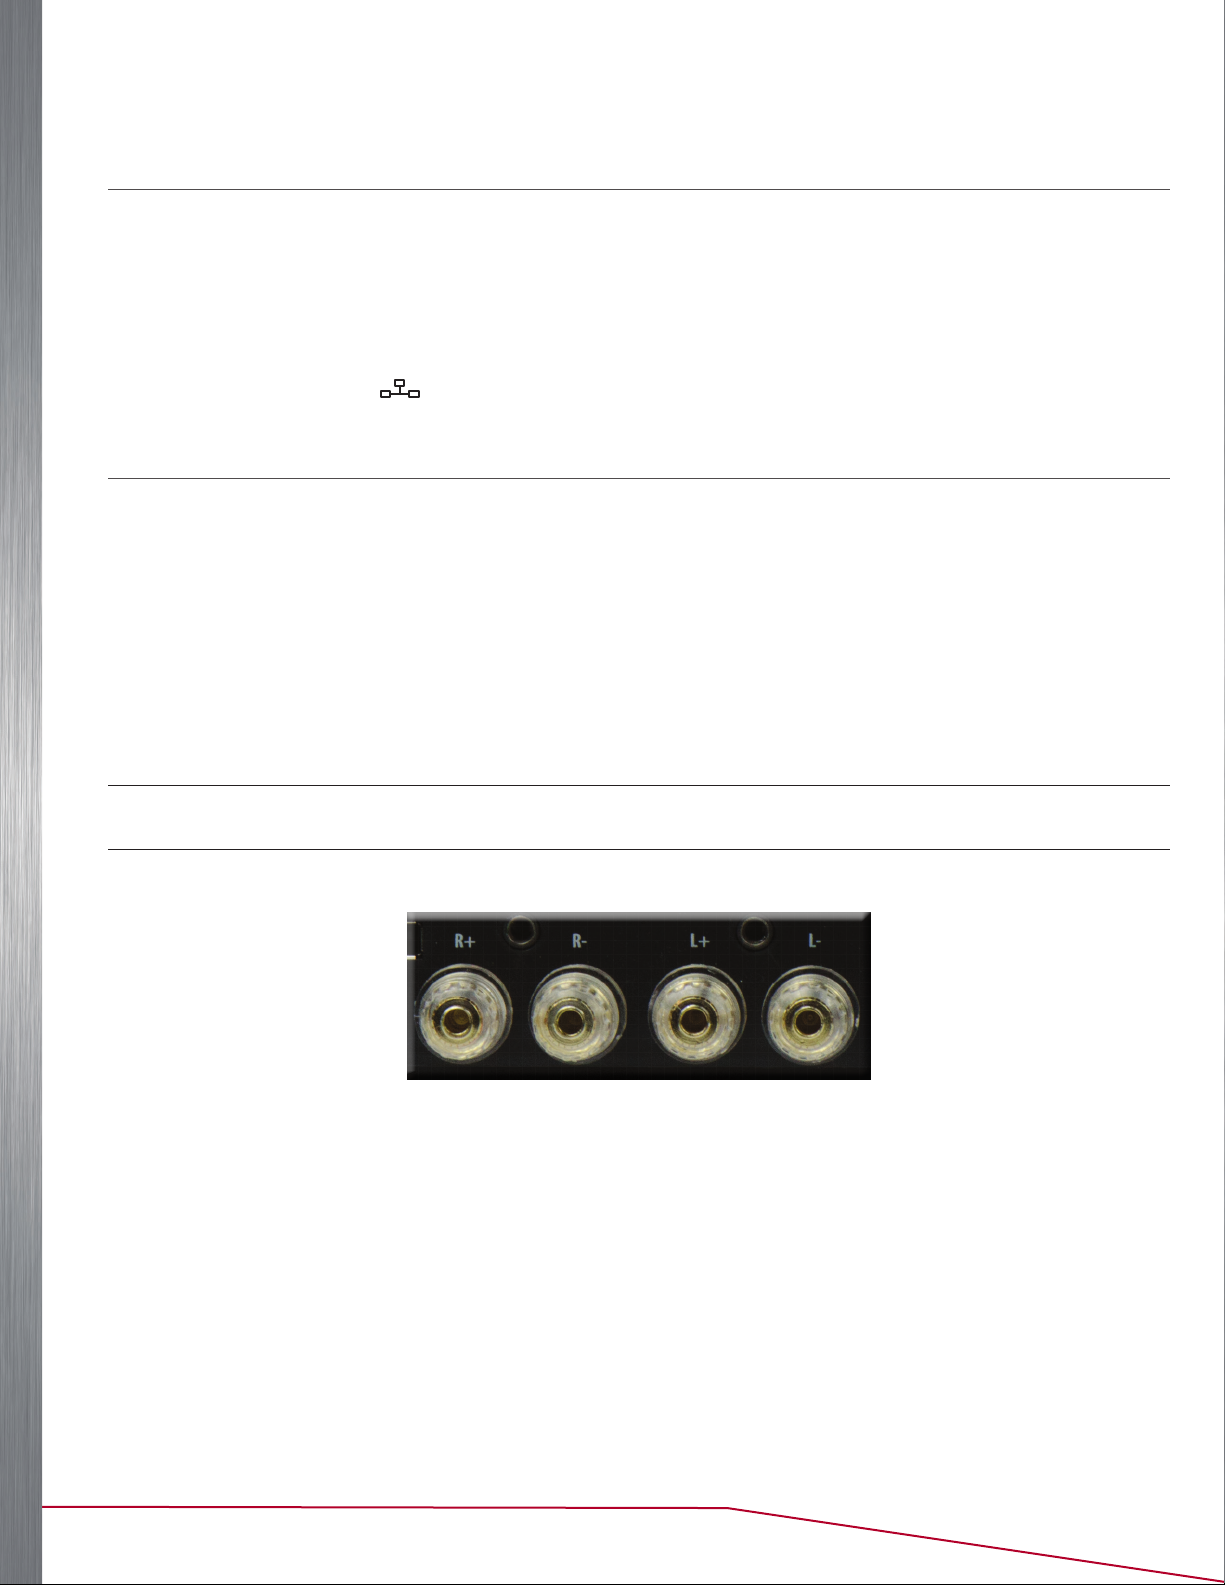
CONNECTING SPEAKERS TO THE NVP100XX AND NVP200XX
The NV-P100-XX and NV-P200-XX players are equipped with five-way binding posts for connecting the amplified audio
signal to the speakers. (See Figure 1).
NOTE: Speakers can be bookshelf, floor-standing, or installed in the wall or ceiling. 16-gauge speaker wire is recommended. Up to 12-gauge speaker wire can be used, if desired.
The binding posts accept multiple methods for terminating the wire:
• Unscrew the post to expose the hole for the speaker wire. Strip approximately 1/4 inch of insulation from the inner
conductor wire, and insert the wire into the hole. Screw the post back into place until the wire is firmly secured.
• Terminate the speaker wire into “banana” plugs and insert those plugs into the end of the binding posts.
• Spade, pin, and wrapping connection methods are also acceptable.
IMP O R TANT: Be careful to keep the positive and negative speaker connections consistent at both ends. Crossing the positive (+) and negative (-) terminations inhibits the
audio quality coming from the amplifier.
Figure 1
Player Portfolio Audio System | Product Manual
8
SETTING UP YOUR SYSTEM USING THE APP
Once you have connected your system to the local network, you are ready to begin adding components in their desired
locations, naming those locations for local control, and creating your multi-zone music system. The process is easily
done from a compatible mobile device using the Nuvo Player app.
NEW SYSTEM SETUP
The Nuvo Player system is multi-lingual. Upon setting up a new system, the app automatically uses the default
language of your device. Once the system is setup up, if another language is desired, go to settings > international >
language and select another language.
Perform the following steps to set up your system:
IMPORTANT WIRELESS CONFIGURATION SETUP CONSIDERATIONS
Not all wireless networks and devices are supported. The Nuvo Player Portfolio wireless capable devices are Wi-Fi
Alliance Certified, so Wi-Fi Alliance Certified wireless access points and routers should be used. There may be cases
where non-Wi-Fi Alliance Certified devices work. Supported network modes and encryption methods include:
• 802.11n, WPA2 is recommended.
• 802.11ac is not supported. Wireless access points must be in 802.11n or 802.11n/ac mixed mode.
• WPA2 is only supported using AES.
Unsupported network modes and encryption methods are grayed out on the menu. The following network encryption
types are not supported:
• WPA1
• WPA2 Enterprise
• Guest networks
NOTE: WiFi® is a registered trademark of Wi-Fi Alliance®.
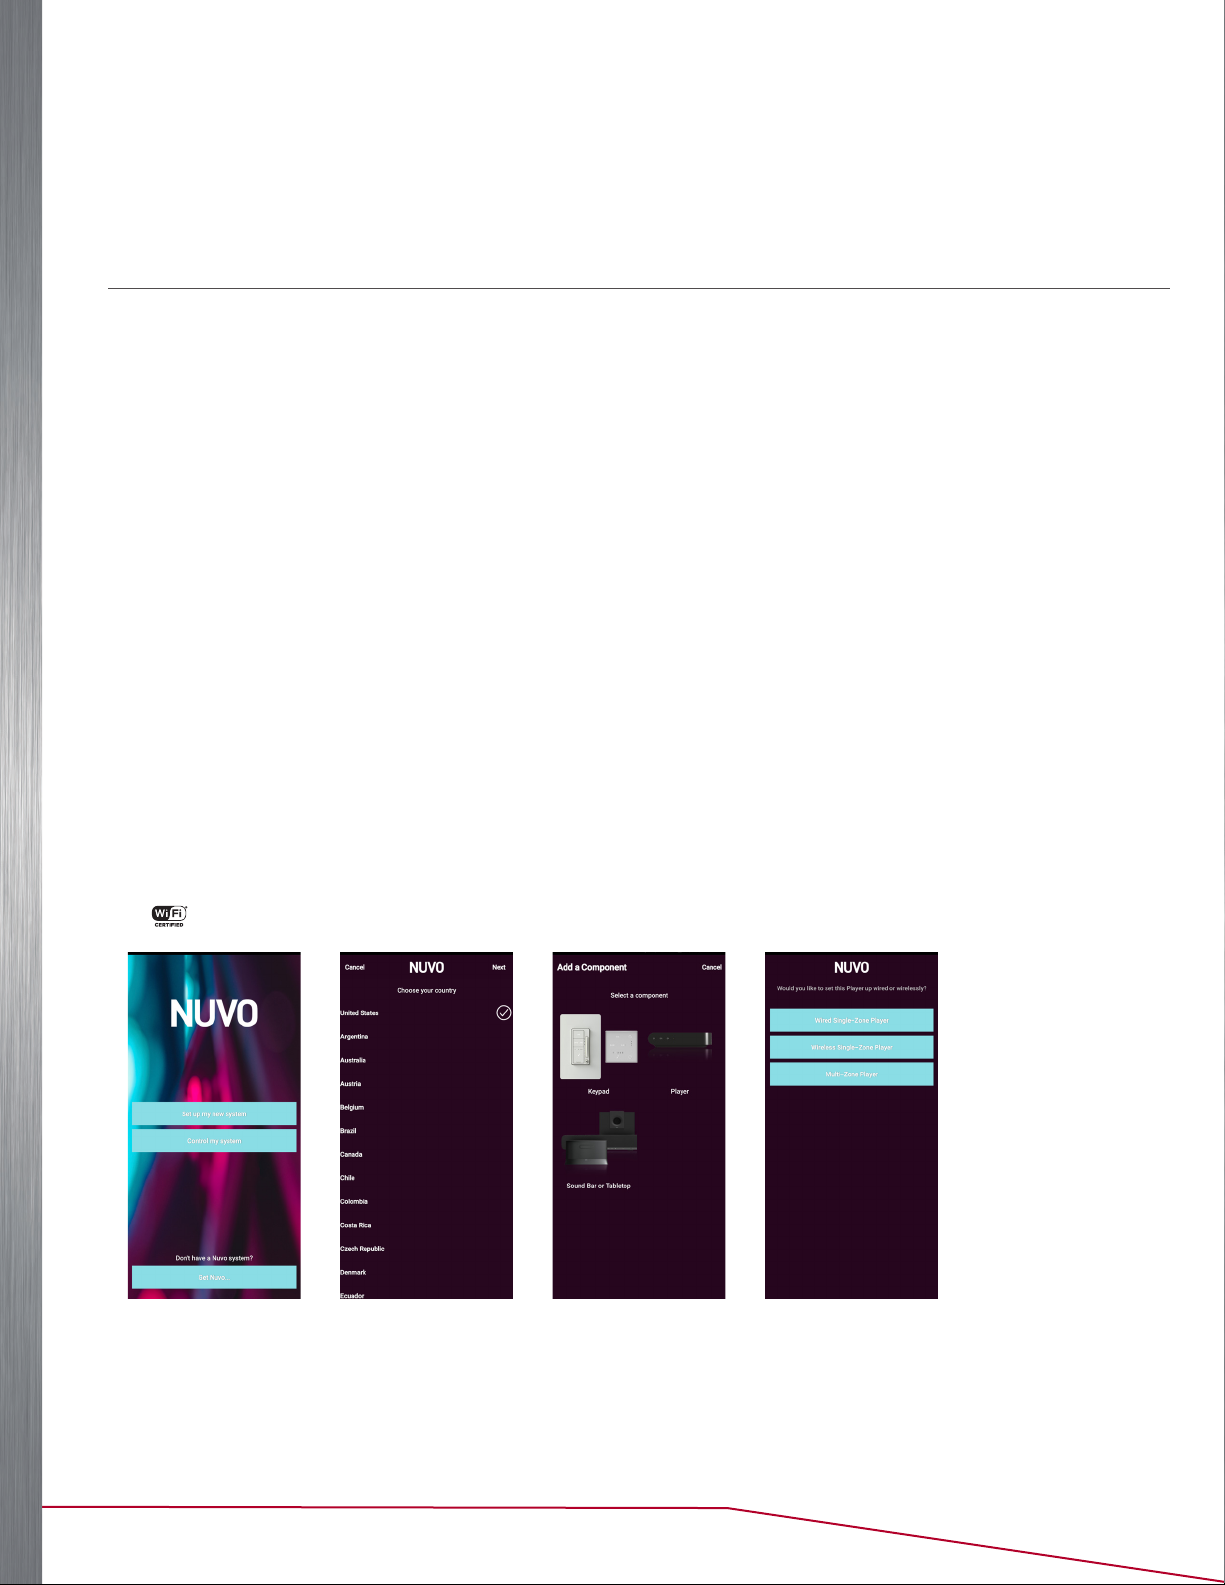
Figure 2 Figure 3 Figure 4 Figure 5
1. Download the Nuvo Player app to a mobile device connected to your home network. The app is available on the
App Store or on Google Play.
NOTE: Google Play and the Google Play logo are trademarks of Google LLC. App Store is a service mark of Apple Inc., registered in the U.S. and other countries.
Player Portfolio Audio System | Product Manual
9
2. Select Setup my new system (See Figure 2).
NOTE: Control my system is used to connect a new mobile device to an existing system.
3. Select your location and press Next (See Figure 3).
4. Select Player as the component (See Figure 4).
5. Select a setup option (See Figure 5).
• For a wired setup, press Wired Single-Zone Player. Continue to “Wired Setup” on page 10.
• For a wireless setup, press Wireless Single-Zone Player. Continue to “Wireless Setup” on page 11.
NOTE: An Ethernet connection is required for initial setup, even if your Nuvo component will be used wirelessly.
WIRED SETUP
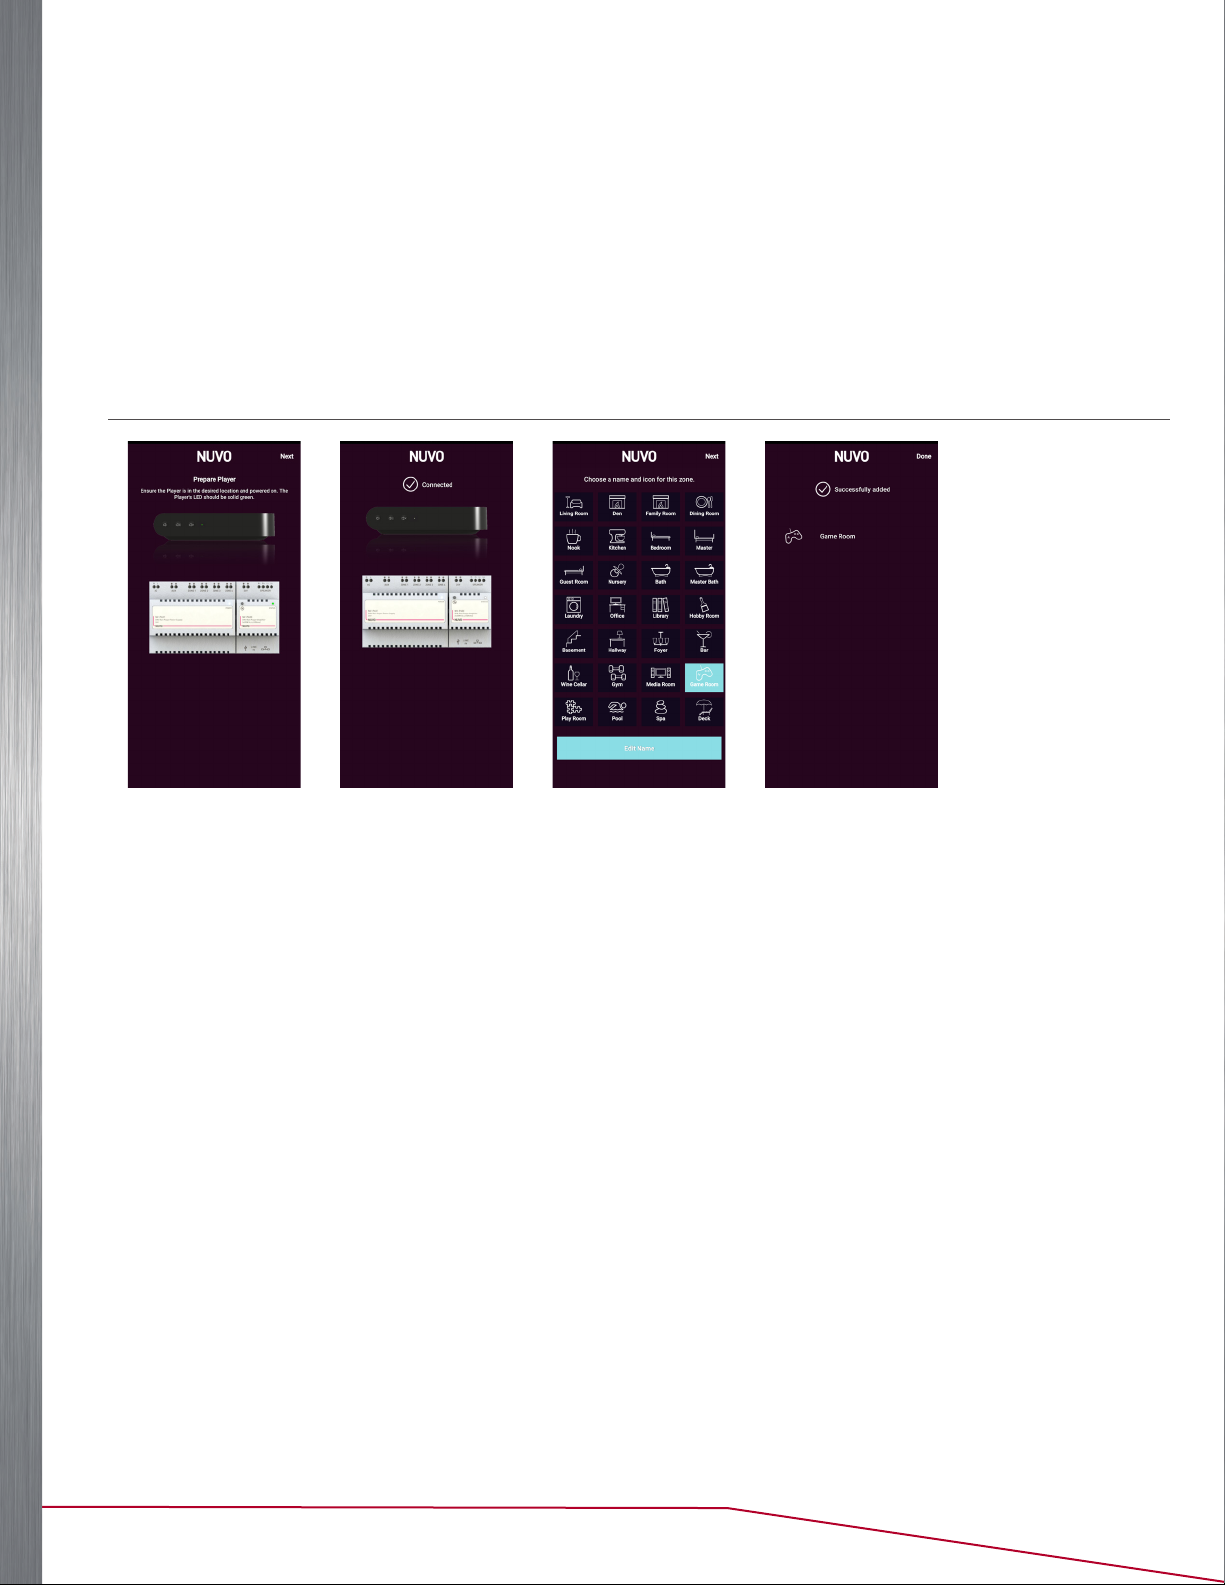
Figure 6 Figure 7 Figure 8 Figure 9
1. The app automatically searches for the Nuvo component (See Figure 6). Once a component is identified, the
screen shows a connection. (See Figure 7).
NOTE: If the connection fails, check that the component is connected to the same network as the mobile device running the Nuvo Player app.
2. Choose a name and icon for the zone, then press Next (See Figure 8).
NOTE: A name can be later edited by selecting Edit Name from the bottom of the app screen (See Figure 8).
3. The screen displays the zone and a message that the zone was added successfully. Press Done to complete the
setup (See Figure 9).
Player Portfolio Audio System | Product Manual
10
WIRELESS SETUP
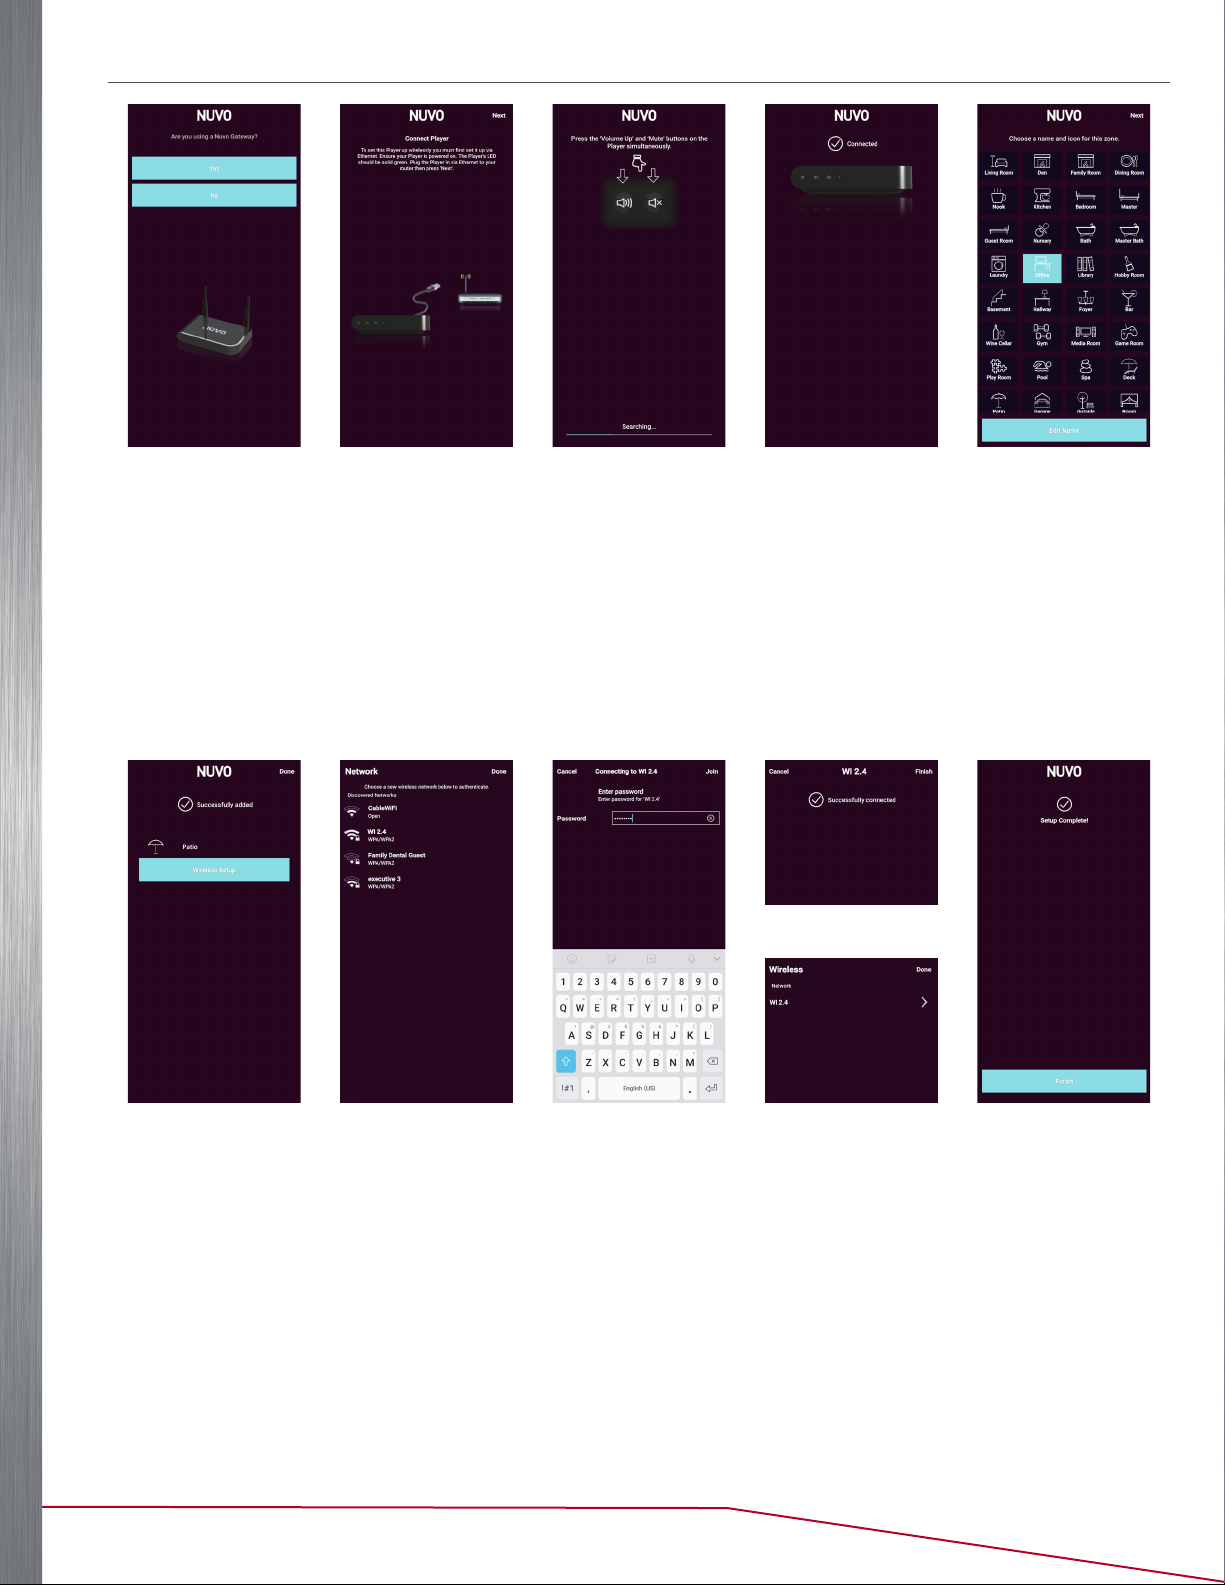
Figure 10 Figure 11 Figure 12 Figure 13 Figure 14
1. Select No as the response to “Are you using a Nuvo Gateway?” (See Figure 10).
2. Confirm that the component is powered on and has an Ethernet connection to the same network as the mobile
device running the Nuvo Player app (See Figure 11). The status LED on the Player illuminates a solid green.
3. Press the Volume up and Mute buttons simultaneously on the component to initiate the binding process (See
Figure 12). Once bound, the component shows as connected (See Figure 13). The status LED on the component
illuminates a solid white and the app moves to the ZONE ICON screen.
4. Choose a name and icon for the zone, then press Next to continue (See Figure 14).
NOTE: A name can be later edited by selecting Edit Name from the bottom of the app screen (See Figure 14).
Figure 18
Figure 15 Figure 16 Figure 17
5. The screen displays the zone and a message that the zone was added successfully. Select Wireless Setup to
search for available wireless networks. (See Figure 15).
6. After the networks have been discovered (See Figure 16), select the same network as where the Nuvo Player app
is connected, then enter the password for the network. Select Join. (See Figure 17).
7. If the correct password is entered, “Joining” displays on the screen. When successfully connected, the screen
displays a successful connection message (See Figure 18).
Figure 19 Figure 20
NOTE: If an incorrect password is entered, Connection Failed displays and you need to enter the password again.
8. The screen shows the connection in the wireless settings (See Figure 19). Press Done to continue.
9. If you are prompted to register, choose one of the following options:
• Complete the registration form and select Register.
• Select Later to register the product at a later date (See “General” on page 20 for more detail).
Player Portfolio Audio System | Product Manual
11
0. The screen displays Setup Complete! (See Figure 20). Select Finish and the app jumps to the HOME screen.
a. Remove the Ethernet connection from the player.
NOTE: A software update may be necessary for any Nuvo components. If prompted with an update, select Continue to update the firmware.
ADDING A COMPONENT TO AN EXISTING SYSTEM
See “Add a Nuvo Component” on page 16.
CHANGING AN EXISTING ETHERNET CONNECTED COMPONENTTO WIRELESS
IMP O R TANT: This section only applies to players that are capable of being wireless. Rackmount players do not have a wireless option.
Figure 21 Figure 22 Figure 23 Figure 24 Figure 25
To change a wireless-capable component from wired operation to wireless operation, perform the following steps:
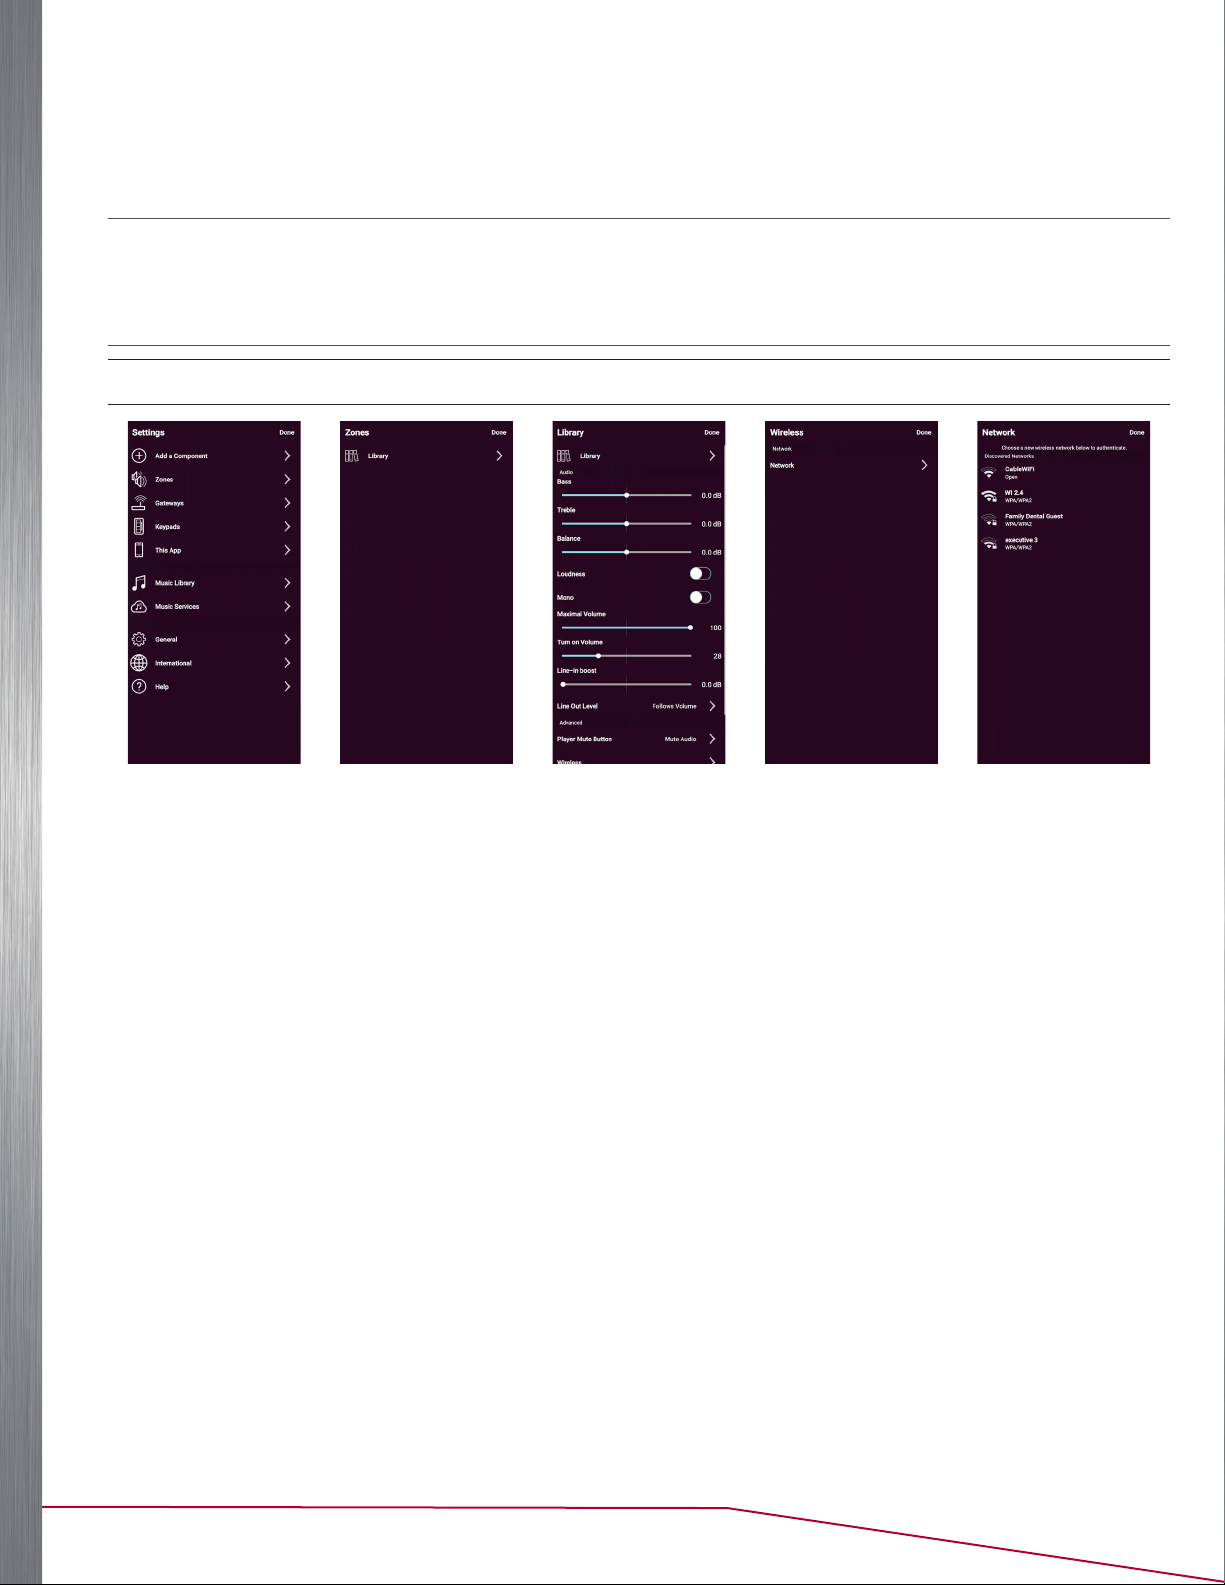
1. Navigate to the SETTINGS menu (See Figure 21). Refer to “The Settings Menu” on page 16 for more detail.
2. Choose the zone name for update (See Figure 22).
3. Select the Wireless option (See Figure 23).
4. Select the Network option (See Figure 24).
5. Select the same network as where the Nuvo Player app is connected (See Figure 25), then enter the password for
the network. Select Join. (See Figure 17).
6. If the correct password is entered, “Joining” displays on the screen. When successfully connected, the screen
displays a successful connection message (See Figure 18).
NOTE: If an incorrect password is entered, Connection Failed displays and you need to enter the password again.
7. The screen shows the connection in the wireless settings (See Figure 19). Press Done.
Player Portfolio Audio System | Product Manual
12
USING THE NUVO PLAYER APP
The Nuvo Player app offers wireless system control from any Wi-Fi-enabled mobile device. The Nuvo Player app is
available on the App Store or on Google Play. Both versions offer the same look and control options. When used with
tablets, the display is optimized for a view of the complete system’s operation on one screen.
THE DASHBOARD
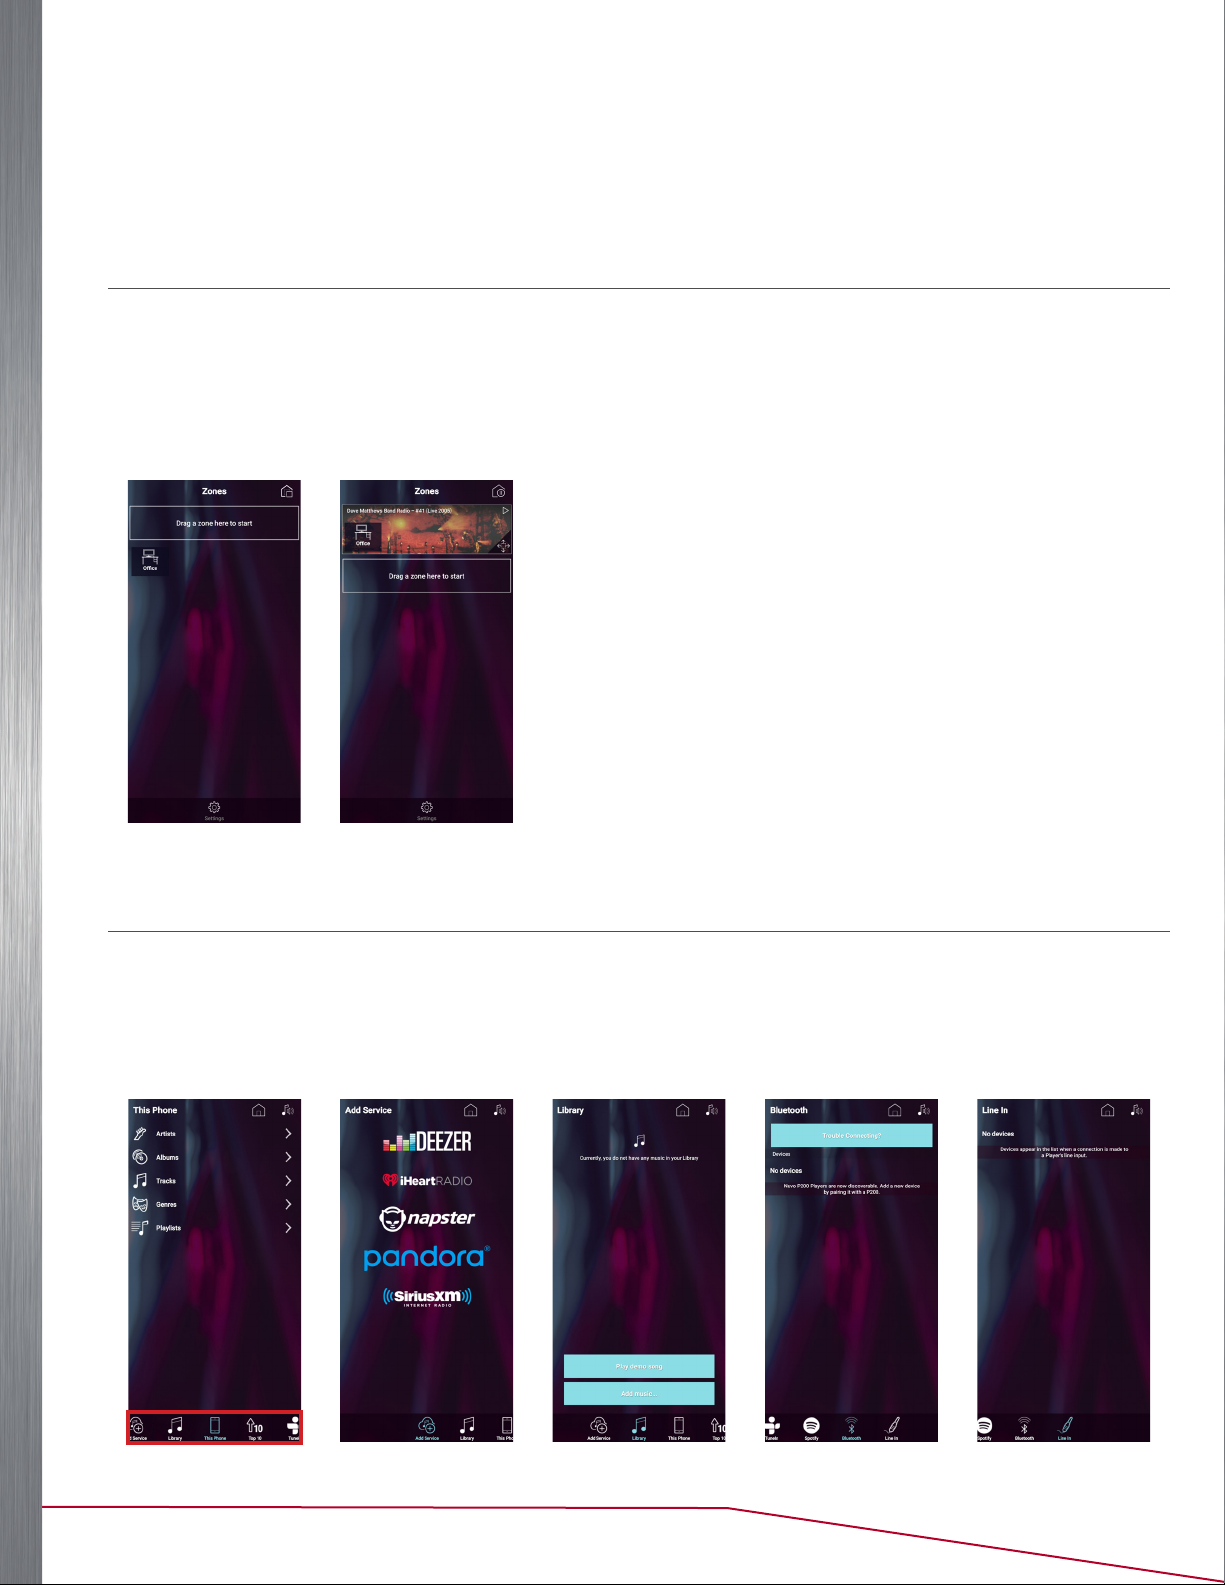
System control begins with the Dashboard. Each available zone is represented by an icon. To make a music selection,
drag and drop a zone into a zone group, or simply tap an inactive zone to activate the zone. Once your music selection
is made, the related album art and Now Playing information appears in the zone group. Play music on an individual
zone or share music across zones by dragging and dropping multiple zones into a single group. To deactivate a zone
and stop the music playback in that zone, drag the icon into the open dashboard area below the zone groups (See
Figure 26 & Figure 27).
Figure 26 Figure 27
MUSIC SELECTION
When a zone group is activated (See Figure 27), the app jumps to the music navigation pane (See Figure 28). From
there, any of the available streaming services (See Figure 29), personal music libraries (See Figure 30), Bluetooth®
(See Figure 31), Direct Stream, local Line-in sources (See Figure 32), or media servers can be selected for playback.
The available music choices are visible in a music selection ribbon at the bottom of the screen (See Figure 28). As you
scroll across the selections using your finger, the current service highlights and the display changes accordingly.
Figure 28 Figure 29 Figure 30 Figure 31 Figure 32
Player Portfolio Audio System | Product Manual
13
 Loading...