

Page 1

USER´S MANUAL
BEDIENUNGSANLEITUNG
MANUEL D´UTILISATION
MANUAL DE USUARIO
INSTRUKCJA OBSŁUGI
MANUALE D´USO
U500® IEM SERIES
IN-EAR MONITORING SYSTEM
Page 2

CONTENTS / INHALTSVERZEICHNIS / CONTENU / CONTENIDO / TREŚĆ / CONTENUTO
ENGLISH
SAFETY INSTRUCTIONS 3
INTRODUCTION 5
CONNECTIONS, OPERATING AND DISPLAY ELEMENTS 5
TRANSMITTER 5
POCKET RECEIVER 7
TRANSMITTER OPERATION 8
POCKET RECEIVER OPERATION 13
TROUBLESHOOTING 16
RECOMMENDATIONS FOR ERROR PREVENTION 16
TECHNICAL DATA 17
MANUFACTURER’S DECLARATIONS 19
DEUTSCH
SICHERHEITSHINWEISE 20
EINFÜHRUNG 21
ANSCHLÜSSE, BEDIEN- UND ANZEIGEELEMENTE 22
SENDER 22
TASCHENEMPFÄNGER 23
BEDIENUNG SENDER 25
BEDIENUNG TASCHENEMPFÄNGER 29
FEHLERSUCHE 32
EMPFEHLUNGEN FÜR DIE FEHLERVERMEIDUNG 33
TECHNISCHE DATEN 33
HERSTELLERERKLÄRUNGEN 36
FRANCAIS
MESURES PRÉVENTIVES 37
INTRODUCTION 38
RACCORDEMENTS, ÉLÉMENTS DE COMMANDE ET D’AFFICHAGE 39
ÉMETTEUR 39
RÉCEPTEUR DE POCHE 40
MODE D’EMPLOI DE L’ÉMETTEUR 42
MODE D’EMPLOI DU RÉCEPTEUR DE POCHE 46
DIAGNOSTIC DES PANNES 49
RECOMMANDATIONS POUR ÉVITER LES PANNES 50
CARACTÉRISTIQUES TECHNIQUES 50
DÉCLARATIONS 53
ESPAÑOL
INSTRUCCIONES DE SEGURIDAD 54
INTRODUCCIÓN 55
CONEXIONES, ELEMENTOS DE MANEJO Y ELEMENTOS DE VISUALIZACIÓN 56
TRANSMISOR 56
RECEPTOR DE PETACA 57
MANEJO DEL TRANSMISOR 58
MANEJO DEL RECEPTOR DE PETACA 63
BÚSQUEDA DE ERRORES 66
RECOMENDACIONES PARA EVITAR FALLOS 66
DATOS TÉCNICOS 67
DECLARACIONES DEL FABRICANTE 70
POLSKI
ŚRODKI OSTROŻNOŚCI 71
WPROWADZENIE 72
GNIAZDA, ELEMENTY OBSŁUGI I WSKAŹNIKI 73
NADAJNIK 73
KIESZONKOWY ODBIORNIK 74
OBSŁUGA NADAJNIKA 76
OBSŁUGA KIESZONKOWEGO ODBIORNIKA 80
ZNAJDOWANIE BŁĘDU 83
ZALECENIA DOTYCZĄCE ZAPOBIEGANIA BŁĘDOM 84
SPECYFIKACJE 84
DEKLARACJE PRODUCENTA 87
ITALIANO
INDICAZIONI SULLA SICUREZZA 88
INTRODUZIONE 89
CONNETTORI, ELEMENTI DI COMANDO E DI VISUALIZZAZIONE 90
TRASMETTITORE 90
RICEVITORE PORTATILE 91
USO DEL TRASMETTITORE 93
USO DEL RICEVITORE PORTATILE 97
RICERCA ERRORI 100
CONSIGLI PER LA PREVENZIONE DEGLI ERRORI 101
DATI TECNICI 101
DICHIARAZIONI DEL PRODUTTORE 104
Page 3

ENGLISH
YOU‘ VE MADE THE RI GHT CHOICE!
We hav e design ed this pr oduct to o perat e reliabl y over many y ears . LD Syst ems sta nds for th is with i ts name an d many year s of exp erience
as a man ufact urer of hi gh-qual ity audio p roduc ts. Plea se read t his User ‘s Manua l caref ully, so th at you can b egin maki ng optim um use of
your L D Syste ms produc t quickl y.
You ca n nd more inf ormat ion about L D-SYSTEMS at our I nterne t site W WW.LD-SYSTEMS.COM
SAFETY INFORMATION
1. Ple ase rea d these in struc tions c areful ly.
2. Ke ep all infor mation a nd instr uctio ns in a saf e place.
3. Fol low the ins truc tions.
4. Ob serve a ll safe ty warn ings. Ne ver remo ve safe ty warn ings or ot her infor matio n from the e quipment .
5. Us e the equipm ent only in t he inten ded manner a nd for the in tended pu rpose .
6. Us e only suf cient ly stab le and comp atible s tands and /or mount s (for xed i nstal lation s). Make cer tain th at wall mo unts are p roperl y
ins talled an d secure d. Make cer tain th at the equ ipment is i nstall ed secur ely and can not fall do wn.
7. Duri ng inst allatio n, obser v e the appl icable sa fety r egulat ions for y our count ry.
8. Nev er inst all and oper ate the e quipment n ear radia tors , heat re gister s, ove ns or other s ource s of heat . Make cer tain tha t the equip ment
is alw ays ins talled s o that is c ooled suf cient ly and can not over heat.
9. Nev er place s ources o f igniti on, e.g. , burning c andles, o n the equipm ent.
10. Ve ntilat ion slit s must no t be blocke d.
11. K eep a minimum di stanc e of 20 cm aro und and abov e the devi ce.
12. Do n ot use th is equipme nt in the imme diate v icinit y of wate r (does n ot apply t o special o utdoor e quipment - in t his cas e, obser ve the
spec ial inst ruct ions not ed below. Do n ot expo se this equ ipment to ammable m ateri als, uid s or gases . Avoid dir ect sunli ght!
13. M ake cert ain tha t dripping o r splashe d water c annot en ter the equ ipment . Do not plac e conta iners lle d with liq uids, suc h as vase s or
drin king ves sels, on t he equipme nt.
14. M ake cer tain tha t object s canno t fall int o the devic e.
15. Us e this equ ipment onl y with th e acces sories r ecommend ed and int ended by th e manufac turer.
16. Do n ot open or mo dify thi s equipmen t.
17. Af ter conn ectin g the equipm ent, che ck all cabl es in order t o preven t damage o r acciden ts, e.g ., due to tr ipping ha zards .
18. Dur ing tra nspor t, make ce rtain t hat the e quipment c annot fa ll down and p ossibl y cause pr opert y damage a nd perso nal injuri es.
19. If y our equipm ent is no lon ger func tioning pr operly , if uids or obj ects h ave got ten insid e the equipm ent or if it h as been dam aged in
anot h er way, sw itch it o ff immedi ately an d unplug it f rom the ma ins outl et (if it is a p owered d evice). T his equipme nt may onl y be repair ed
by au thoriz ed, quali ed pers onnel.
20. Cl ean the equ ipment us ing a dry cl oth.
21. C omply wi th all appli cable dis posal la ws in your c ountr y. During di sposal o f packag ing, ple ase sepa rate pl astic an d paper/car dboard .
22. P lasti c bags mus t be kept ou t of reac h of childre n.
23. P lease no te that c hanges or m odica tions no t expre ssly appr oved by t he part y respo nsible f or complia nce could vo id the use r´s
aut horit y to opera te the equ ipment.
FOR EQU IPMENT THAT C ONNECTS T O THE POWER MA INS
24. C AUTIO N: If the po wer cord o f the devic e is equippe d with an e arthin g conta ct, the n it must b e connect ed to an ou tlet wi th a prot ectiv e
gro und. Neve r deacti vate t he prote ctive g round of a p ower cor d.
25. If t he equipmen t has been e xposed t o stron g uc tuatio ns in temper ature (f or examp le, aft er trans port), do n ot swit ch it on immedi ately.
Mois ture and c ondens ation cou ld damage t he equipme nt. Do no t switc h on the equi pment unt il it has r eached r oom temper ature .
26. Be fore con nectin g the equip ment to th e power ou tlet, r st ver ify th at the main s volta ge and fre quency m atch the v alues sp ecied on
the eq uipment . If the equi pment ha s a volta ge selec tion swi tch, con nect th e equipmen t to the pow er outle t only if th e equipmen t values
and th e mains pow er value s match. I f the inclu ded power c ord or pow er adapt er does not t in your wa ll outle t, cont act your e lectr ician.
27. Do no t step on t he power c ord. Make c erta in that th e power ca ble does no t become ki nked, es peciall y at the main s outle t and/or pow er
adap ter and th e equipmen t connec tor.
28. W hen connec ting the e quipmen t, make ce rtain t hat the po wer cord o r power ad apter is al ways f reely ac cessib le. Alwa ys disc onnect t he
equip ment fro m the powe r supply if t he equipme nt is not in u se or if you w ant to cle an the equip ment. A lways u nplug the po wer cord a nd
powe r adapte r from the p ower out let at th e plug or adap ter and no t by pulling o n the cord . Never to uch the pow er cord and p ower adap ter
wit h wet hand s.
29. W henever p ossible , avoid sw itchin g the equipm ent on and of f in quick s uccess ion becau se othe rwise t his can sh orten t he usef ul life of
the equipment.
30. IMP ORTANT I NFORMAT ION: Repla ce fuse s only wit h fuse s of the same t ype and r ating . If a fuse bl ows rep eatedl y, please c ontac t an
aut horise d servi ce centr e.
31. To di sconnec t the equi pment fr om the pow er mains com pletel y, unplug th e power cor d or power ad apter f rom the po wer outl et.
32. I f your devi ce is equipp ed with a V olex powe r connec tor, the ma ting Vole x equipmen t connec tor mus t be unlocke d before i t can be
remo ved. How ever, thi s also mean s that th e equipmen t can slide a nd fall dow n if the pow er cable i s pulled, wh ich can lea d to pers onal
injur ies and/or o ther dam age. For t his reas on, alwa ys be car eful whe n laying c ables.
33. Un plug the po wer cord an d power ad apter fr om the pow er outle t if there i s a risk of a l ightnin g strik e or befor e exte nded perio ds
of dis use.
34. The appliance is not to be used by persons (including children) with reduced physical, sensory or mental capabilities, or lack of experience
and knowledge.
ENGLISH
DEUTSCHFRANCAIS
ESPAÑOL
ITALIANO POLSKI
3
Page 4
35. Children must be instructed not to play with the device.
36. If the power cord of the device is damaged, do not use the device. The power cord must be replaced by an adequate cable or assembly from an
authorized service center.
CAUTION:
To redu ce the ris k of elect ric shoc k, do not r emove co ver (or back) . There ar e no user se rvice able
par ts insi de. Maint enance an d repair s should be e xclusi vely car ried ou t by qualie d servi ce
personnel.
DEUTSCHENGLISH
FRANCAIS
CAUT ION! HIGH VOLU MES IN AUDIO PR ODUCTS!
Thi s device is m eant for p rofes sional us e. Ther efore, c ommerc ial use of t his equipme nt is subj ect to th e respec tivel y applica ble natio nal acciden t preve ntion ru les and re gulati ons. As a m anufac turer, Ad am Hall is obl igate d to notif y you for mally ab out the ex isten ce of pote ntial
ESPAÑOL
health risks.
Hear ing damag e due to high v olume and pr olonged e xposu re: When in u se, thi s produc t is capabl e of produc ing high so und-pre ssure l evels
(SPL ) that can l ead to irr evers ible hear ing damag e in perf ormers , employe es, and aud ience memb ers. Fo r this rea son, avo id prolon ged
exp osure t o volumes in e xcess o f 90 dB.
NOTE: Thi s equipmen t has been t ested a nd found to c omply wi th the limi ts for a Cl ass B dig ital dev ice, pur suant t o Part 15 of t he FCC
Rule s. Thes e limits ar e desig ned to pro vide rea sonable p rotec tion aga inst har mful int erfer ence in a re sident ial inst allat ion. This e quipment
gener ates , uses and c an radia te radio f requen cy energ y and, if no t inst alled and us ed in accor dance wi th the ins truc tions, m ay caus e
har mful int erfer ence to ra dio communi cation s. Howe ver, ther e is no guar antee t hat inte rfere nce will no t occur in a pa rticu lar inst allati on.
POLSKI
If thi s equipmen t does cau se harm ful inte rfere nce to rad io or telev ision re ceptio n, which c an be deter mined by t urning th e equipmen t off
and on , the user i s encoura ged to tr y to corr ect the in terf erence b y one or more o f the follo wing mea sures:
- Reor ient or re locate t he recei ving ant enna.
- Incr ease the s epara tion bet ween the e quipmen t and recei ver.
- Conne ct the eq uipment in to an out let on a circ uit dif ferent f rom tha t to which t he recei ver is con nected .
- Cons ult the de aler or an ex perienc ed radio/ TV tec hnician fo r help.
The w arning tr iangle w ith lig htning s ymbol indi cates d angerou s uninsul ated vol tage in side the uni t, whic h may caus e an
electrical shock .
The w arning tr iangle w ith exc lamat ion mark ind icate s import ant oper ating an d mainte nance ins truc tions.
War ning! Thi s device is d esigne d for use be low 2000 me tres in a ltitu de.
War ning! Thi s produc t is not int ended for u se in trop ical clim ates.
ITALIANO
4
Page 5
INTRODUCTION
Unlimited freedom of movement on the stage and always perfect monitor sound directly in your ear – this is why we developed the wireless U500
in-ear monitoring systems in Germany. Their clear, modern design and easy operation make them the perfect choice, and not just for beginners. The
reliable radio transmission and the low-frequency response of 40 Hz to 16 kHz ensure professional performance. U500 in-ear sets are available in
ve frequency bands.
LDU5047IEM – In-Ear Monitoring-System 470 - 490 MHz
LDU5051IEM – In-Ear Monitoring-System 514 - 542 MHz
LDU505IEM – In-Ear Monitoring-System 584 - 608 MHz
LDU506IEM – In-Ear Monitoring-System 655 - 679 MHz
LDU508IEM – In-Ear Monitoring-System 823 - 832 MHz + 863 – 865 MHz
ENGLISH
• Reliable in-ear monitoring with over 100 m range
• 96 channels to choose from
• 2, 10 or 30 mW ERP selectable transmit power
• Convenient infrared synchronisation
• User name and memory input for 10 custom presets
• Wide frequency response
• 3-band EQ with parametric mids
• Switchable limiter
• Operation in stereo or mono mode
• Direct monitoring via headphone output on transmitter
• Bodypack with three-stage switchable squelch
• 10-hour bodypack operating time with two AA batteries
• Up to 12 systems can be used simultaneously
• U500® IEM transmitter compatible with U300® IEM bodypacks
LDU50xIEM includes
transmitter, BNC antenna, pocket receiver, receiver antenna, mains adapter, 2x AA batteries, 19-inch rack mounting kit, user manual
LDU50xIEMHP includes
transmitter, BNC antenna, pocket receiver, receiver antenna, stereo-in-ear earphone, power adapter, 2x AA batteries, 19-inch rack mount kit, user manual
Please note
The use of the wireless microphone system may require a license, depending on the country of use. For detailed information please contact the
relevant authority in your country.
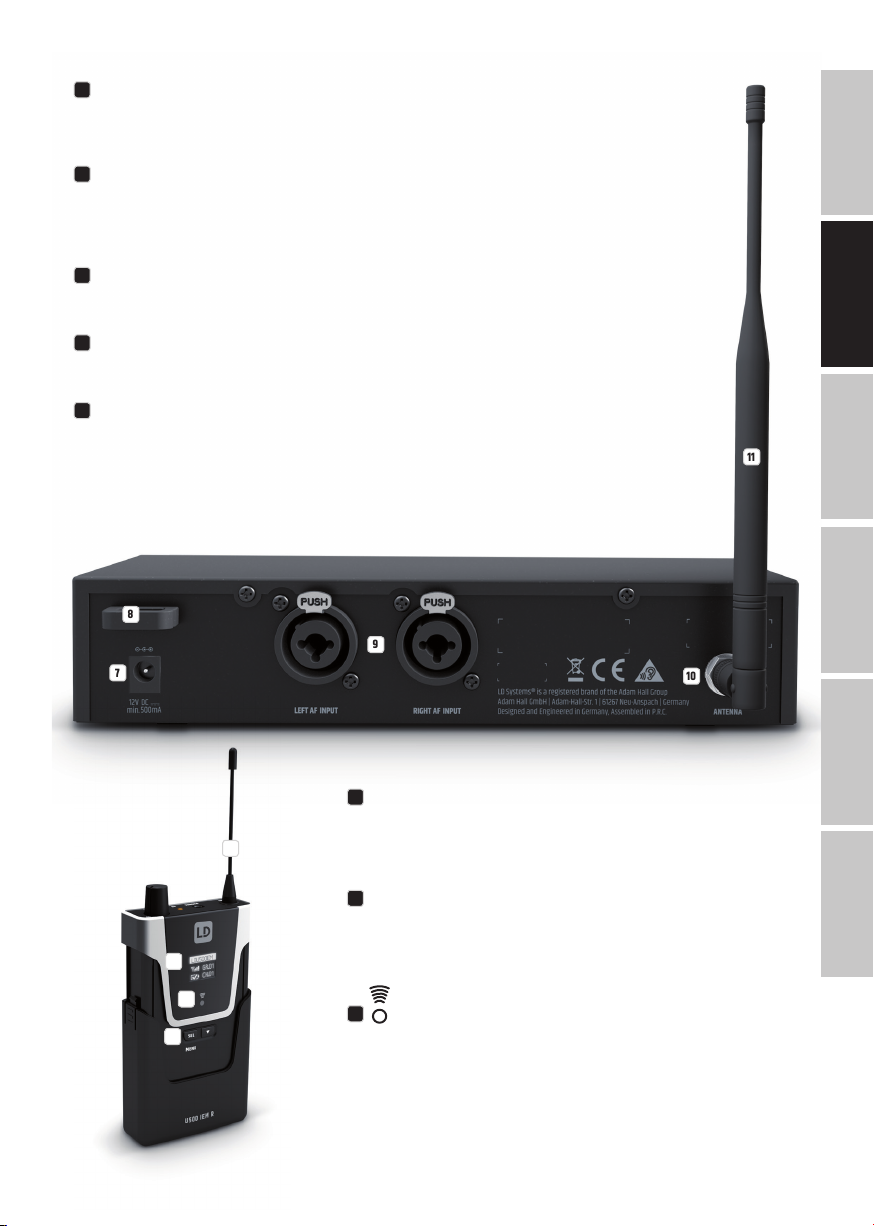
CONNECTIONS, OPERATING AND DISPLAY ELEMENTS
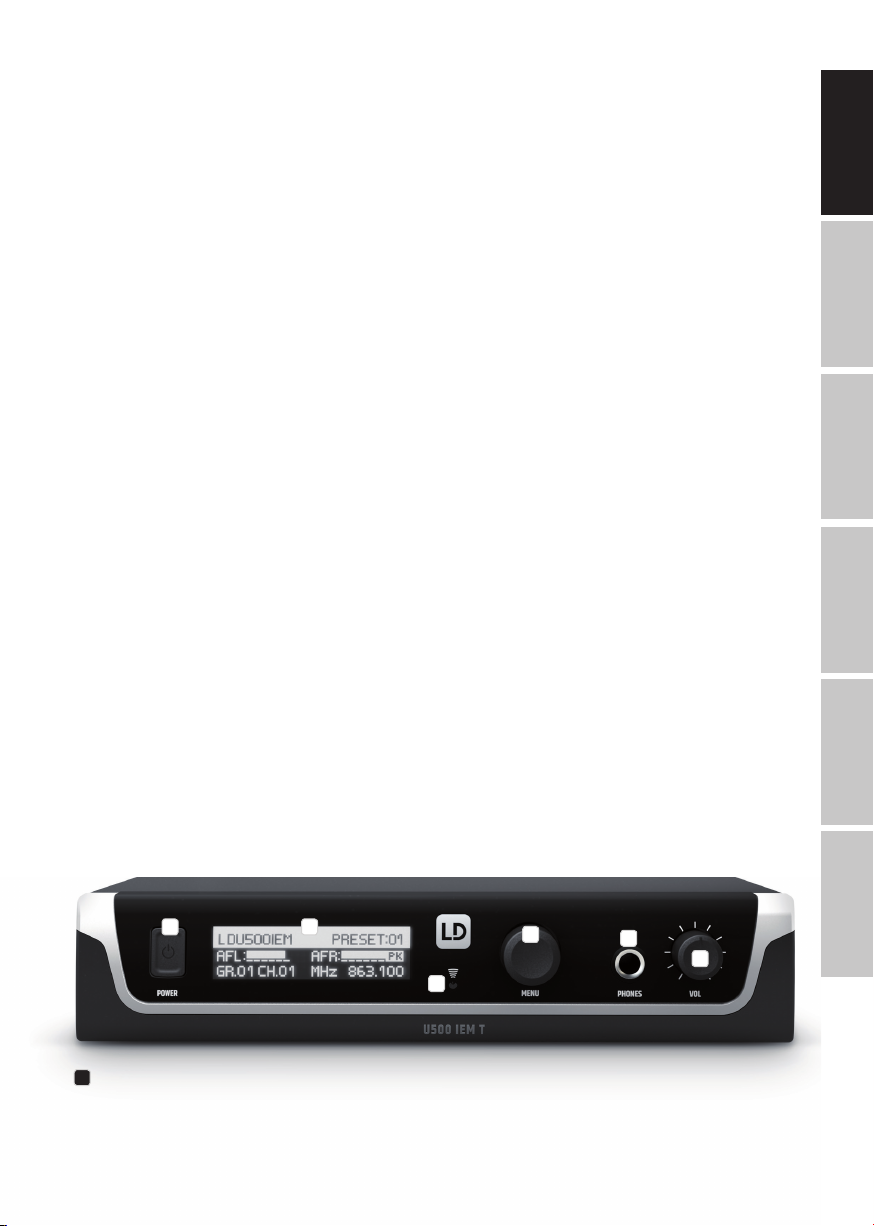
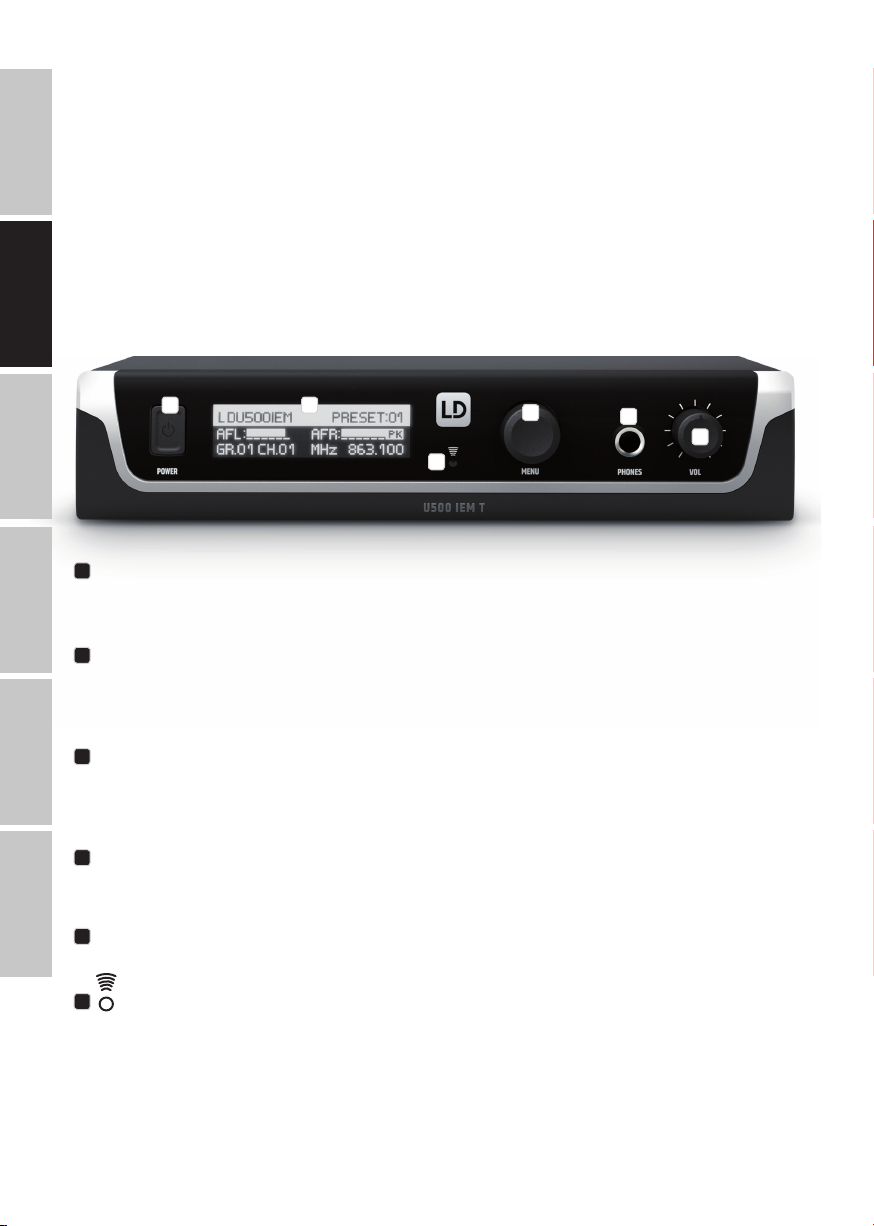
TRANSMITTER
DEUTSCHFRANCAIS
ESPAÑOL
1 2
6
1
POWER
On/off switch. Press and hold the button for approximately 1 second to turn the device on or off. Press the button briey (!) to go directly from the
editing menu to the main display.
3
4
5
ITALIANO POLSKI
5
Page 6
8
7
9
10
11
2
OLED DISPLAY
Multifunctional OLED graphic display for displaying the transmission frequency, frequency group and channel, individual user
name, preset number and audio level for the left and right input channels on the main display. The menu items, sub-menu
items and corresponding editing options are displayed in the editing menu.
3
MENU
Rotary-push encoder for navigating in the editing menu and for adjusting system settings and changing values in the corresponding menu items. Starting from the main display, the overall volume can be adjusted directly by turning the rotary-push
encoder.
DEUTSCHENGLISH
4
HEADPHONES
Headphone output with 6.3 mm stereo jack socket for controlling the audio signal directly at the transmitter. The headphone
output signal is routed before the MONO/STEREO circuit and after INPUT GAIN, LIMITER and EQUALIZER. There is a high pass lter
in the headphone output signal path.
5
VOL
Volume control for the integrated HEADPHONE output.
FRANCAIS
6
Infrared interface for synchronising the relevant system settings of the receiver with the transmitter (e.g. radio frequency).
ESPAÑOL
POLSKI
7
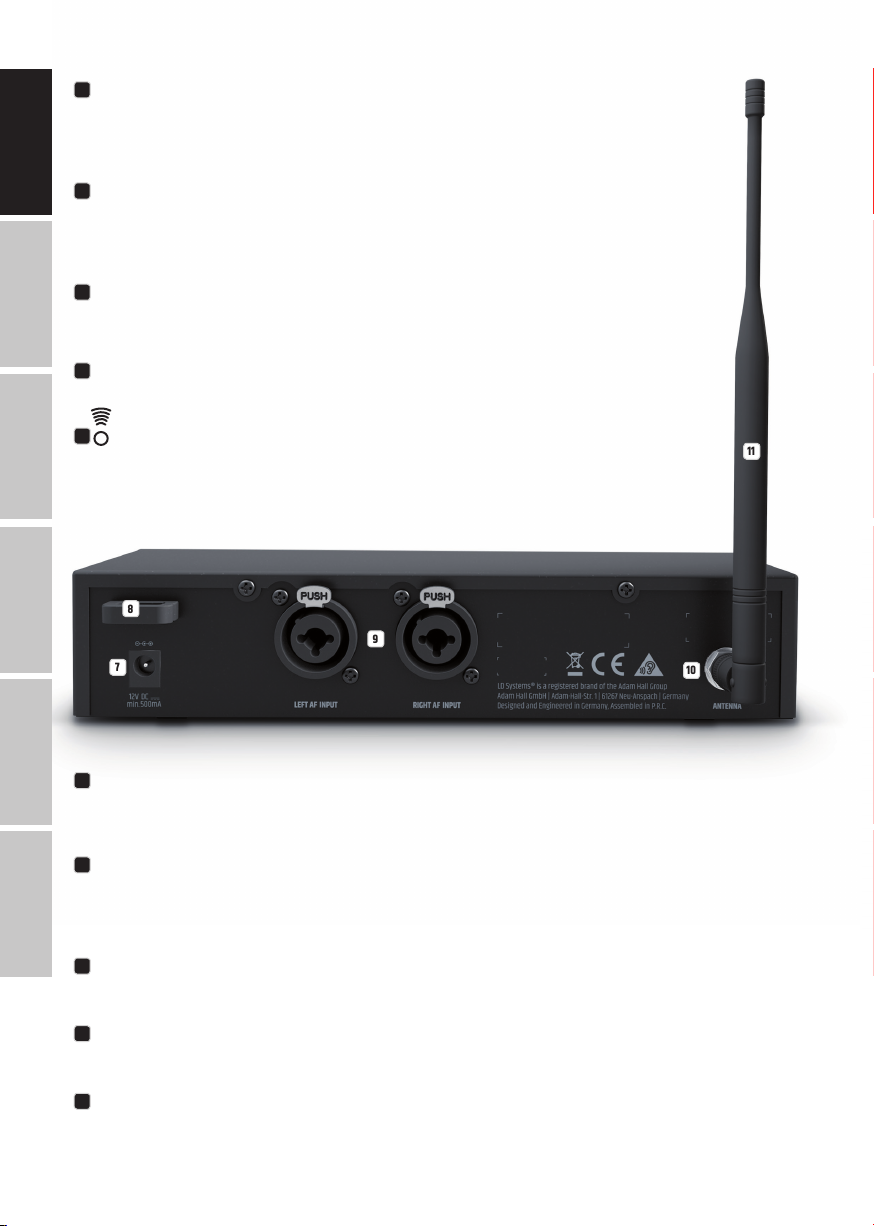
DC SOCKET
Low-voltage socket for the power supply of the device (12V DC 500mA, plus internal). Please use only the mains adapter
supplied.
8
ITALIANO
CABLE STRAIN-RELIEF
Use the strain relief for the exible cable of the mains adapter to protect the transmitter’s
low-voltage socket and the mains adapter’s low voltage plug from accidental damage, and also avoid unintentional removal
of the plug.
9
AF INPUT LEFT / RIGHT
Balanced line inputs left and right with XLR / 6.3 mm jack combo sockets.
10
ANTENNA
BNC connection for the supplied transmitter antenna.
11
TRANSMITTER ANTENNA
Transmitter antenna with BNC connection.
6
Page 7

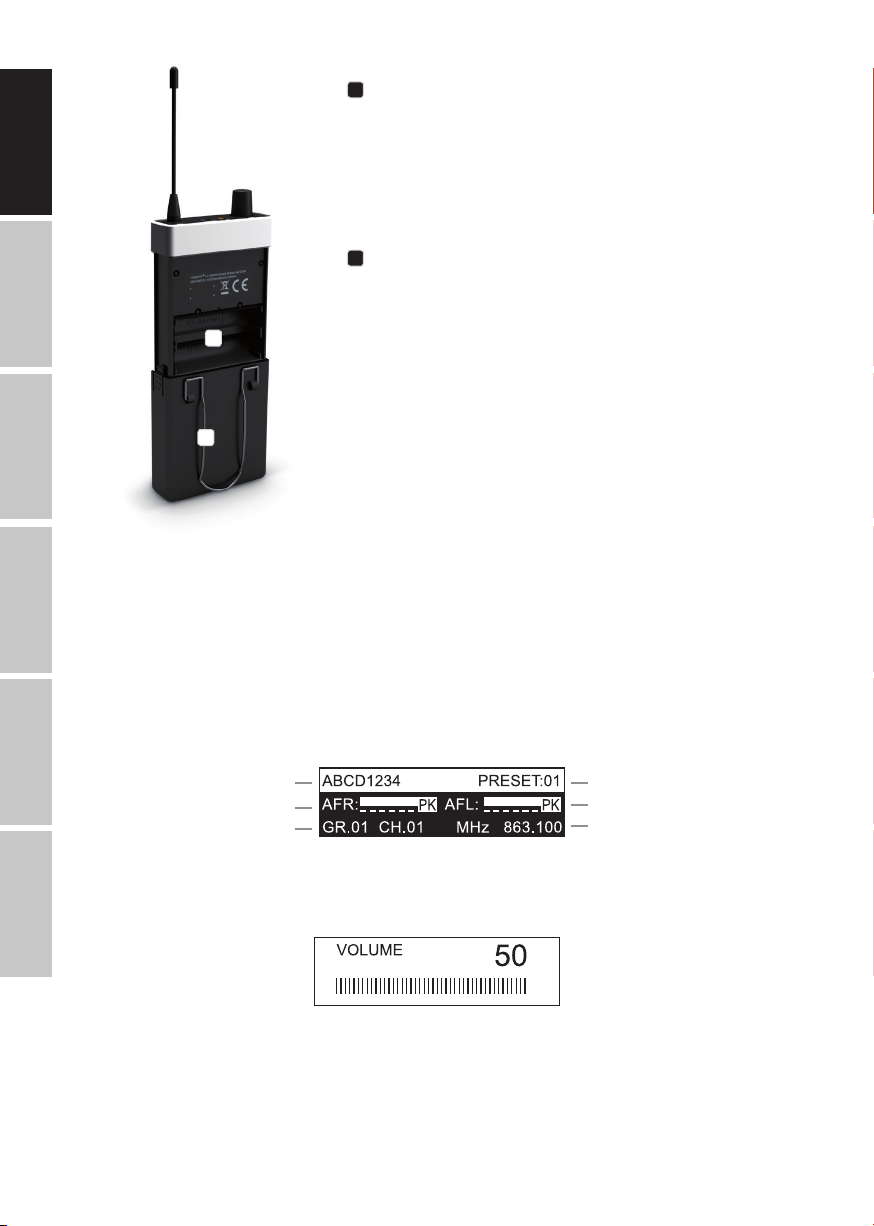
POCKET RECEIVER
12
ANTENNA
Removable antenna of the pocket receiver. For optimum reception, do not cover or kink.
Make sure that the antenna is rmly connected to the receiver during operation (hand-
12
tighten the antenna's screw thread without tools).
13
OLED DISPLAY
ENGLISH
Multifunctional OLED graphic display for displaying the frequency group and the radio
channel, the individual user name, the reception strength and the battery status as well
13
14
15
as the audio level for the left and right channel. The menu items, sub-menu items and
corresponding editing options are displayed in the editing menu.
14
Infrared interface for synchronising the relevant system settings of the receiver with the
transmitter (e.g. radio frequency).
15
MENU / SEL AND
DEUTSCHFRANCAIS
Control key for navigating in the editing menu, adjusting system settings and changing
values in the corresponding menu items. To make the keys accessible for operation, press
the two markers on the sides of the battery compartment cover and pull it down from the
housing until it stops.
16
ANTENNA CONNECTION
Antenna connection with screw thread.
17
HEADPHONES
3.5 mm stereo jack socket for connecting earphones or headphones.
ESPAÑOL
18
17
16
19
Pin assignment:
18
RF
The RF indicator LED lights up when a radio signal is available. If the LED does not light
ITALIANO POLSKI
up during operation, check whether the radio channel of the receiver matches the radio
channel of the transmitter or reduce the distance between receiver and transmitter.
19
ON / OFF - VOL
Turn the volume control clockwise over the snap-in point to turn on the receiver and further
to the right to increase the volume. Turn the knob anticlockwise to decrease the volume
and over the snap-in point to turn off the receiver. Always keep the volume at a comfortable
level to avoid hearing damage.
7
Page 8
20
BATTERY COMPARTMENT
To replace the batteries, open the battery compartment of the pocket receiver by simultaneously pressing both markers on the sides of the battery cover and pulling it downwards
from the housing as far as it will go. Remove the used batteries and replace with new
batteries (2x AA/LR6, alkaline), following the diagram in the battery compartment. Now slide
the battery compartment cover back onto the housing until it clicks into place. If you do not
use the receiver for a long time, remove the batteries to prevent damage to the receiver
from leaking batteries.
21
DEUTSCHENGLISH
20
BELT CLIP
On the back of the pocket receiver there is a belt clip that can be used to attach the receiver
to a trouser waistband, belt or similar.
FRANCAIS
21
ESPAÑOL
TRANSMITTER OPERATION
To establish a radio connection between transmitter and receiver, the frequency group and channel or radio frequency of both devices must match.
When putting the wireless transmission system into operation, be sure to position the receiver in the direct line of sight of the transmitter.
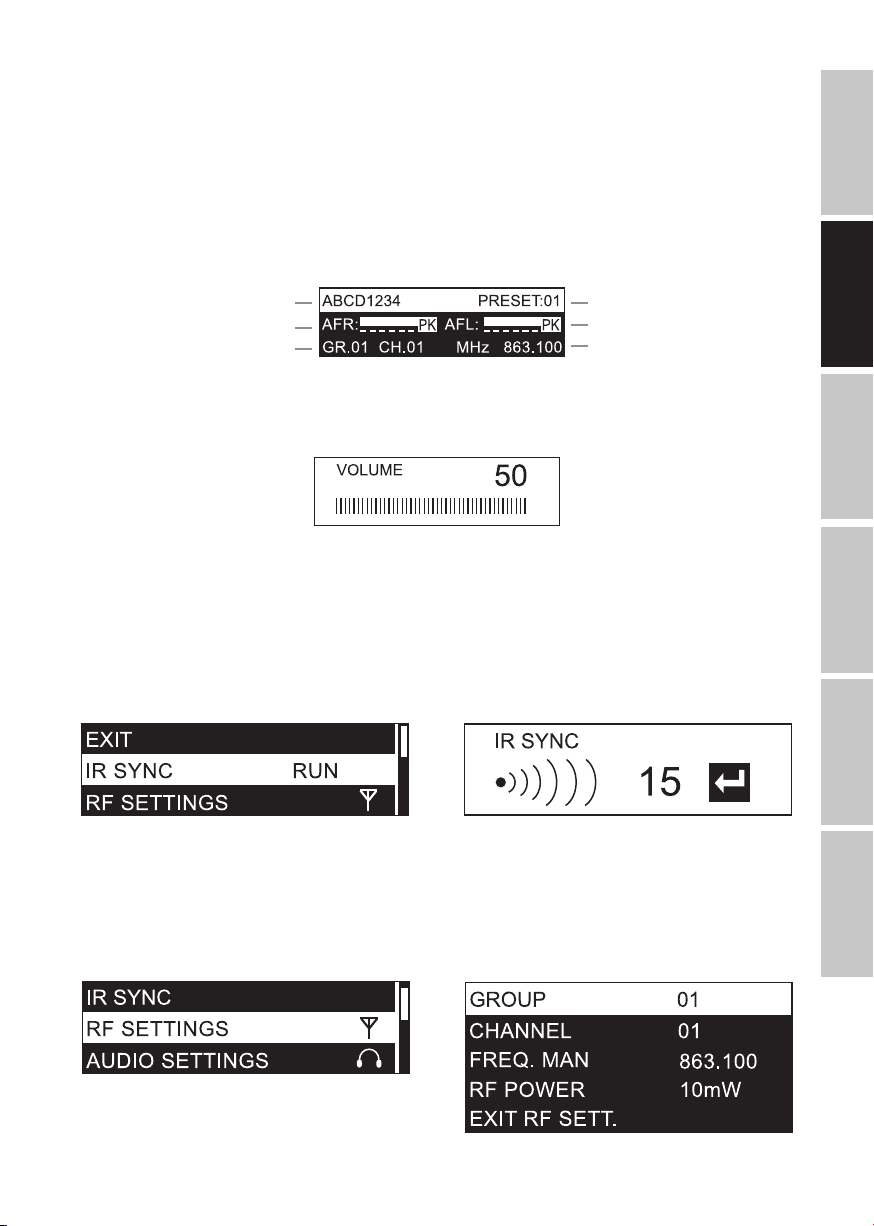
MAIN DISPLAY
After switching on the transmitter, the greeting "Welcome" is displayed briey. The main display then appears with the following information:
individual user name, preset number, level of the audio input signals with peak display, frequency group and channel (GR.xx and CH.xx) and the
current radio frequency in MHz.
POLSKI
Individual user name
Audio signal level / peak (PK) right channel
Frequency group and channel
VOLUME
ITALIANO
Starting from the main display, the overall volume can be adjusted directly by turning the rotary-push encoder MENU from 00 to 50. The display
changes automatically to the corresponding display when the encoder is turned. After about 3 seconds of inactivity, the main display is automatically restored; pressing the encoder switches to the main display immediately.
Preset number
Audio signal level / peak (PK) left channel
Radio frequency in MHz
8
Page 9
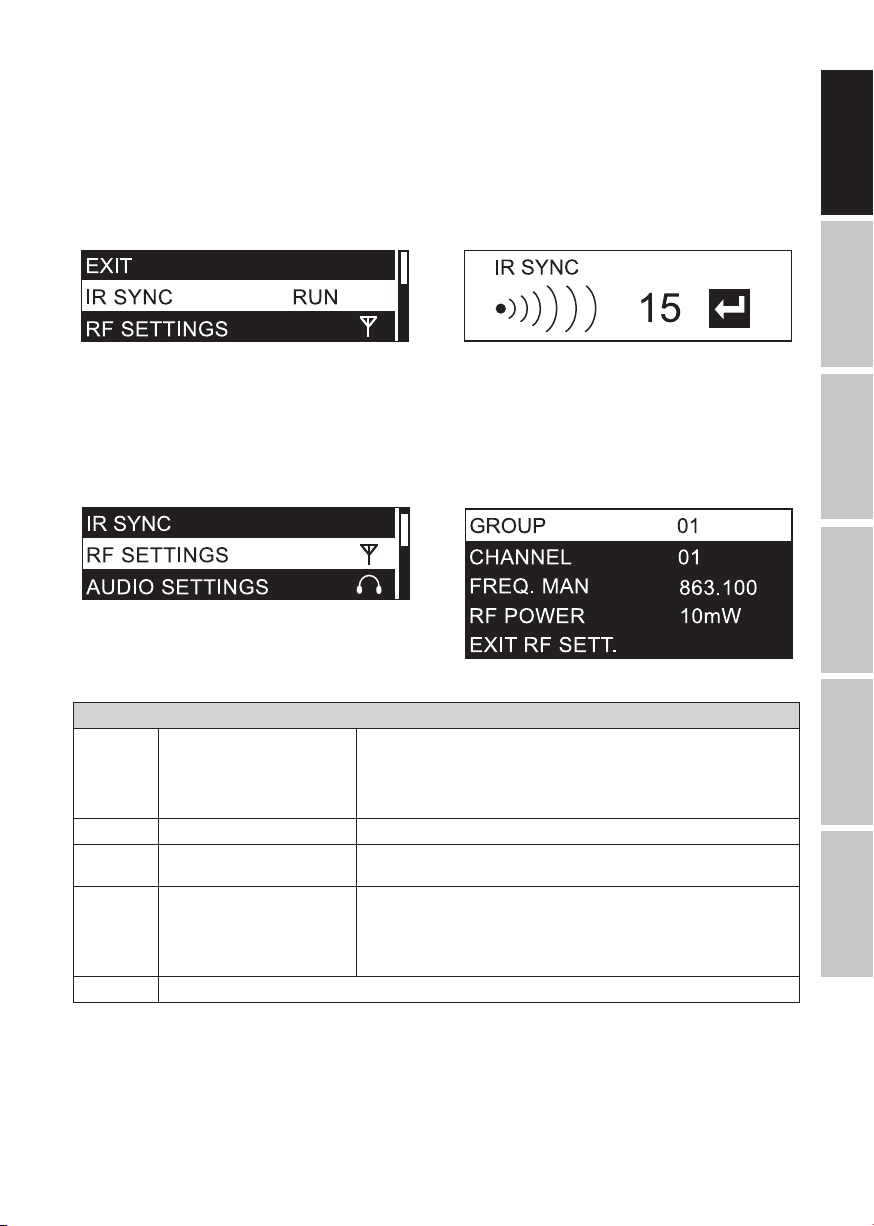
INFRARED SYNCHRONISATION (IR SYNC RUN)
To synchronise the pocket receiver with the radio frequency set in the transmitter and the individual user name, bring the infrared interface of the
receiver into direct visual contact with the infrared interface of the transmitter (distance approx. 10 cm) and switch on the receiver. Now press the
rotary-push encoder of the transmitter (MENU) to enter the main menu and select IR SYNC RUN (highlighted) by turning the encoder. Press MENU
again to start the synchronisation process. After a few seconds the process is completed and the display of the receiver changes for a short time
to “IR SYNC ”, thereby conrming successful synchronisation. To cancel the operation, press MENU. Briey (!) press POWER to return directly to the
main display; after about 12 seconds of inactivity the main display will appear automatically. Please note: Direct sunlight can interfere with the
synchronisation process.
RADIO UNIT CONFIGURATION (RF SETTINGS)
Press the transmitter's rotary-push encoder (MENU) to enter the main menu, then turn the encoder to select RF SETTINGS (highlighted). Press the
encoder again to enter the sub-menu and select the desired sub-menu item by turning the encoder, then conrm by pressing the encoder. If you
change a value by turning the encoder, conrm the value change by pressing the encoder. The sub-menu items and the corresponding information
can be found in the following table. Briey (!) press POWER to return directly to the main display; after about 12 seconds of inactivity the main
display will appear automatically.
ENGLISH
DEUTSCHFRANCAIS
ESPAÑOL
RF SETTINGS (change value = turn encoder, conrm value change = press encoder)
GROUP U5047IEM frequency group 1
U5051IEM frequency group 1
U505IEM frequency groups 1 – 10
U506IEM frequency groups 1 – 10
U508IEM frequency groups 1 – 8
CHANNEL Frequency channel 1 – 12 Select channel and conrm 2x
FREQ MAN Set radio frequency manually Step 1: Set frequency in 1 MHz increments and conrm
RF POWER Set transmit power 470 – 490 MHz: 2mW / 10mW / 30mW
EXIT RF SETT. Exit sub-menu (press encoder)
Select group and conrm 2x
Step 2: Set frequency in 25 kHz increments and conrm
514 – 542 MHz: 2mW / 10mW / 30mW
584 – 608 MHz: 2mW / 10mW / 30mW
655 – 679 MHz: 2mW / 10mW / 30mW
823 – 832 MHz: 2mW / 10mW / 30mW, 863 – 865 MHz: 2mW / 10mW
ITALIANO POLSKI
9
Page 10
Information about transmit power and squelch setting in the bodypack receiver:
Select a low transmit power if the transmitter and receiver are in close proximity to each other; the squelch in the receiver should also be set to a
low level as a guide. For greater distances between transmitter and receiver, select a higher transmit power and adjust the squelch in the receiver
accordingly. For more information on setting the squelch, refer to the “SQUELCH SETTING” section under “POCKET RECEIVER OPERATION” in this manual.
In any case, make sure that the transmitter and receiver have direct eye contact and that no obstacles between the transmitter and receiver can
interfere with radio operation.
Depending on the situation, different settings may be required for trouble-free operation. Please note that when other transmitters are used in the
vicinity this increases interference that may cause problems with the radio connection. Selecting a different radio frequency can avoid interference
in this case.
CAUTION! BEFORE adjusting the squelch, make sure that the receiver volume is set to the lowest possible level, as changing the squelch threshold
DEUTSCHENGLISH
may cause loud background noise that can potentially inict hearing damage as well as damage to connected headphones or earphones.
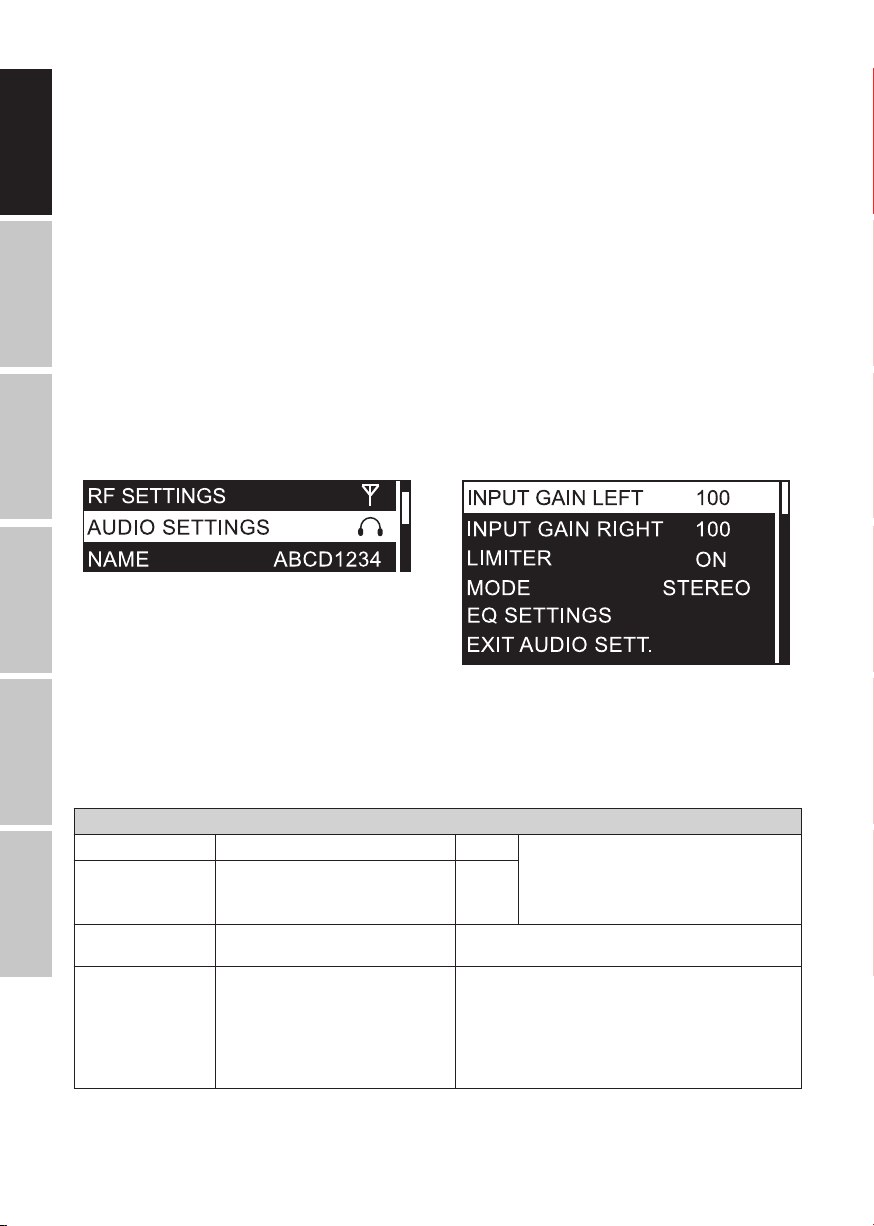
AUDIO SETTINGS
Press the transmitter's rotary-push encoder (MENU) to enter the main menu, then turn the encoder to select AUDIO SETTINGS (highlighted). Press the
encoder again to enter the sub-menu and select the desired sub-menu item by turning the encoder. Conrm your entry by pressing the encoder.
If you change a value by turning the encoder, conrm the value change by pressing the encoder. The sub-menu items and the corresponding
information can be found in the following table. Briey (!) press POWER to return directly to the main display; after about 12 seconds of inactivity
FRANCAIS
the main display will appear automatically.
ESPAÑOL
POLSKI
AUDIO SETTINGS (change value = turn encoder, conrm value change = press encoder)
INPUT GAIN LEFT Input gain left channel 000 – 100 For an optimum signal-to-noise ratio, set the signals
ITALIANO
INPUT GAIN RIGHT Input gain right channel 000 – 100
LIMITER Activate / deactivate input limiter ON = enabled (recommended)
MODE Setting the operating mode to Mono / Stereo
The selected operating mode is shown in the
display of the receiver (M = Mono, S = Stereo)
OFF = disabled
MONO = Input signals left and right are summed to a mono signal.
Shift the signal to the left or right on the receiver (BALANCE).
STEREO = playback of the input signal in stereo. Setting the balance
on the receiver (BALANCE)
Activate the STEREO mode in the transmitter even if you want to
use the FOCUS mode in the pocket receiver.
left and right as high as possible, but make sure the
PEAK indicator does not appear in the display, or only
briey, in order to avoid signal distortion. Adjust the
output level of the playback device if necessary.
10
Page 11

EQ SETTINGS BASS EQ G: +/- 15dB Bass frequency gain from -15dB to +15dB
f: 60Hz / 80Hz / 100Hz / 200Hz Setting the bass frequency
MIDDLE EQ G: +/- 15dB Centre frequency gain from -15dB to +15dB
f: 500Hz / 1000Hz / 1500Hz /
2500Hz
Q: 0.50 / 0.75 / 1.00 / 1.25 Setting the Q-factor
TREBLE EQ G: +/- 15dB Treble frequency gain from -15dB to +15dB
f: 10.0kHz / 12.5kHz / 15.0kHz
/ 17.5kHz
EXIT EQ
SETT.
EXIT AUDIO SETT. Exit sub-menu (press encoder)
INDIVIDUAL USERNAME (NAME)
Press the transmitter's rotary-push encoder (MENU) to enter the main menu, then turn the encoder to select NAME (highlighted) and press the
encoder to conrm. Now set the individual name (up to 8 digits) by turning the encoder to select a letter, character or number for the rst digit of
the name and conrm by pressing the encoder. This is followed by the input for the second digit and so on. Once the name is complete, press the
encoder again to conrm. Briey (!) press POWER to return directly to the main display; after about 12 seconds of inactivity the main display will
appear automatically.
SET THE DISPLAY BRIGHTNESS (BRIGHTNESS)
Press the transmitter's rotary-push encoder (MENU) to enter the main menu, then turn the encoder to select BRIGHTNESS (highlighted) and press
the encoder to conrm. Select the 3-step display brightness (HIGH = high, MID = medium, LOW = low) by turning the encoder as desired and press 2x
on the encoder to conrm. Briey (!) press POWER to return directly to the main display; after about 12 seconds of inactivity the main display will
appear automatically.
Exit equalizer menu (press encoder)
Setting the centre frequency
Setting the treble frequency
ENGLISH
DEUTSCHFRANCAIS
ESPAÑOL
LOCK OPERATING ELEMENTS (PANEL LOCK)
Press the transmitter's rotary-push encoder (MENU) to enter the main menu, then turn the encoder to select PANEL LOCK (highlighted) and press the
encoder to conrm. To lock the control elements, select ON by turning the encoder and press the encoder twice to conrm. Briey (!) press POWER
to return directly to the main display; after about 10 seconds of inactivity the main display will appear automatically. If one of the POWER controls or
the MENU rotary-push encoder is pressed, "PANEL LOCK ON" briey appears on the display and setting changes are blocked. To unlock the controls,
press and hold the rotary-push encoder for about 2 seconds and select OFF in the PANEL LOCK menu item to permanently allow operation using the
controls.
ITALIANO POLSKI
11
Page 12
SAVE PRESET
Settings under RF SETTINGS, AUDIO SETTINGS and the individual name can be stored in up to 10 different presets. Once you have made the appropriate
settings, press the transmitter's rotary-push encoder (MENU) to enter the main menu, then turn the encoder to select SAVE PRESET (highlighted)
and press the encoder to conrm. Now select the preset number you want to use for saving by turning the encoder (01 - 10), conrm by pressing
the encoder, then select YES by turning the encoder and conrm by pressing the encoder twice. If you want to cancel the process, select NO and
likewise conrm. Briey (!) press POWER to return directly to the main display; after about 12 seconds of inactivity the main display will appear
automatically.
DEUTSCHENGLISH
LOAD PRESET
Press the transmitter's rotary-push encoder (MENU) to enter the main menu, then turn the encoder to select LOAD PRESET (highlighted) and press
the encoder to conrm. Now select the preset number you want to load by turning the encoder (01 - 10), conrm by pressing the encoder, then se-
FRANCAIS
lect YES by turning the encoder and conrm by pressing the encoder twice. If you want to cancel the process, select NO and likewise conrm. Briey
(!) press POWER to return directly to the main display; after about 12 seconds of inactivity the main display will appear automatically.
ESPAÑOL
VIEW SOFTWARE VERSION (SOFTWARE)
Press the rotary-push encoder of the transmitter (MENU) to enter the main menu and then select SOFTWARE (highlighted) by turning the encoder.
Briey (!) press POWER to return directly to the main display; after about 12 seconds of inactivity the main display will appear automatically.
POLSKI
LEAVE MAIN MENU (EXIT)
To leave the main menu and return to the main display, select EXIT (highlighted) by turning the rotary-push encoder and press the encoder. Briey
(!) press POWER to return directly to the main display; after about 12 seconds of inactivity the main display will appear automatically.
ITALIANO
12
Page 13
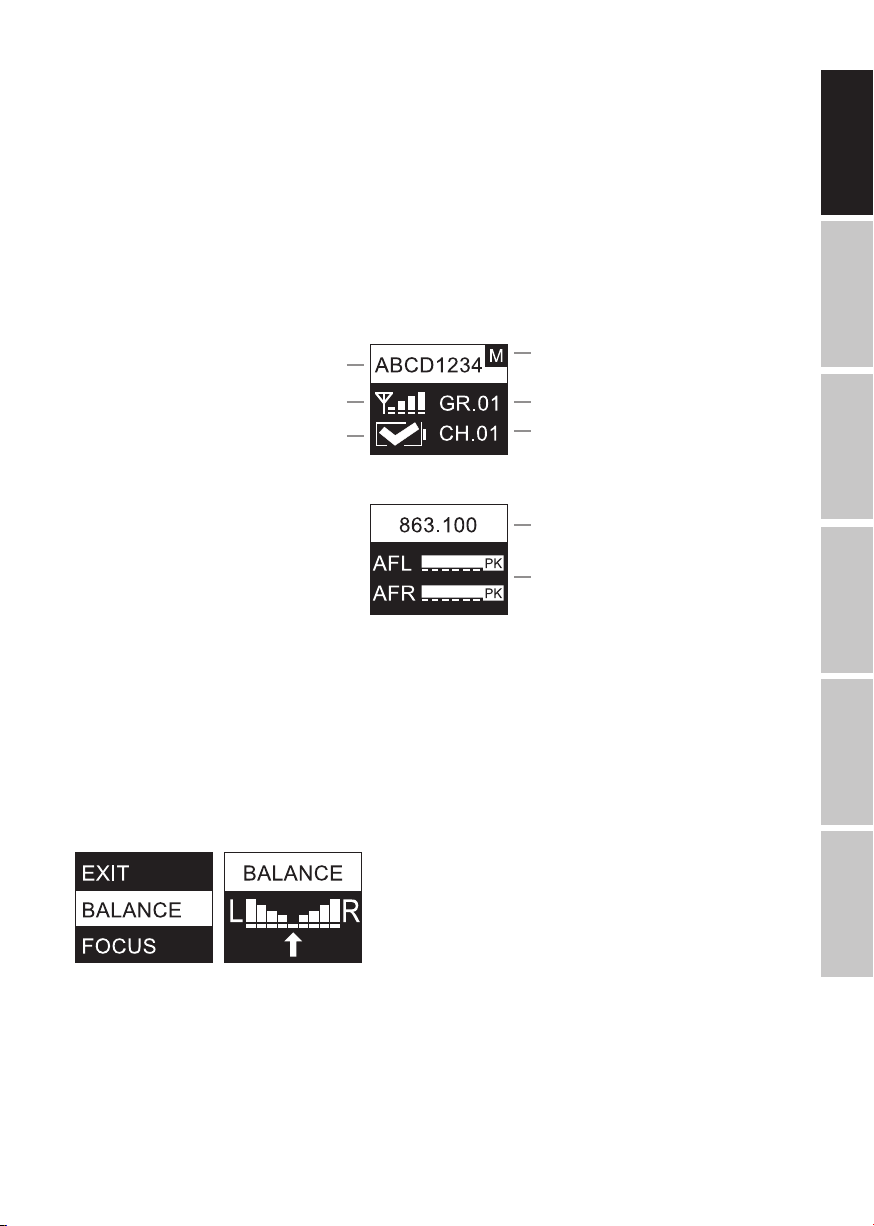
POCKET RECEIVER OPERATION
To establish a radio connection between transmitter and receiver, the channel group and channel number or the radio frequency of the two devices
must match.
When putting the wireless transmission system into operation, be sure to position the receiver in direct line of sight with the transmitter.
MAIN DISPLAY
Shortly after switching on the pocket receiver, the main display A appears with the following information: Individual user name, operating mode,
radio signal reception strength, battery status, frequency group and channel.
Alternatively, the main display B is shown with the radio frequency in MHz and the level of the left and right audio signal with peak display (PK).
Briey press the button to switch between the two display variants.
Main display A
Individual user name
Operating mode Mono / Stereo
ENGLISH
DEUTSCHFRANCAIS
Receiving strength of the radio signal
Battery status
Main display B
SET VOLUME BALANCE (BALANCE / FADER)
MONO mode: Activate MONO mode in the transmitter. The two channels left and right are mono summed. In the receiver, the mono signal can
be shifted to the left or right in BALANCE. Press SEL (MENU) for about 2 seconds to enter the main menu, then, if not already selected, press SEL
repeatedly to select BALANCE (highlighted) and press to conrm. Now move the signal to the left or right as desired by pressing (repeatedly
if necessary). To exit, press SEL, select EXIT again by pressing SEL and press to conrm. The main display will automatically appear after approxi-
mately 5 seconds of inactivity.
STEREO mode: Activate STEREO mode in the transmitter. A stereo signal available to the transmitter is also reproduced in stereo in the pocket
receiver (deactivate FOCUS mode – FOCUS OFF). In the receiver, the balance between the left and right channel can be set in the menu item BALANCE.
Press SEL (MENU) for about 2 seconds to enter the main menu, then, if not already selected, press SEL repeatedly to select BALANCE (highlighted)
and press to conrm. Now adjust the balance as desired by pressing (repeatedly if necessary). To exit, press SEL, select EXIT by pressing SEL
again and press to conrm. The main display will automatically appear after approximately 5 seconds of inactivity.
Frequency group
Frequency channel
Radio frequency
Left channel
Audio signal level / peak (PK)
Right channel
ESPAÑOL
ITALIANO POLSKI
13
Page 14
FOCUS mode: The two channels left and right are played back in the middle and the volume balance between the two channels can be adjusted
directly on the pocket receiver (e.g. left channel mixer mono sum, right channel solo vocals). Activate STEREO mode in the transmitter. Press SEL
(MENU) on the pocket receiver for about 2 seconds to enter the main menu, then press SEL repeatedly to select FOCUS (highlighted) and press the
arrow button to conrm. Press again to activate the FOCUS ON mode. Conrm by pressing SEL and now select FADER by pressing SEL repeat-
edly if necessary and press . Now adjust the balance as desired by pressing (repeatedly if necessary). To exit, press SEL, select EXIT by pressing
SEL again and press to conrm. The main display will automatically appear after approximately 5 seconds of inactivity.
DEUTSCHENGLISH
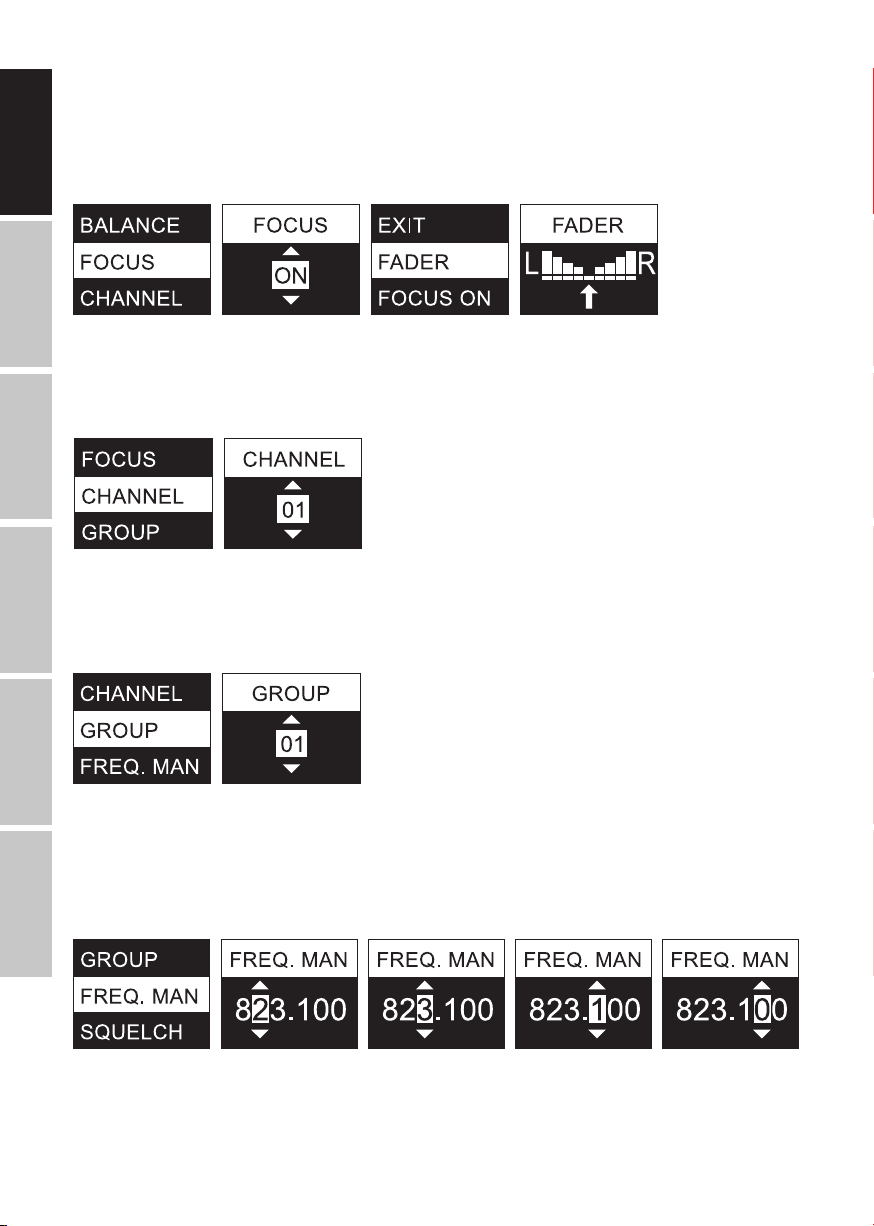
SET FREQUENCY CHANNEL (CHANNEL)
Press SEL (MENU) for about 2 seconds to enter the main menu, then press SEL repeatedly to select CHANNEL (highlighted) and press to conrm.
Now select the desired frequency channel by pressing (repeatedly if necessary). To exit, press SEL, select EXIT again by pressing SEL and press
FRANCAIS
to conrm. The main display will automatically appear after approximately 5 seconds of inactivity.
ESPAÑOL
SET FREQUENCY GROUP (GROUP)
Press SEL (MENU) for about 2 seconds to enter the main menu, then press SEL repeatedly to select GROUP (highlighted) and press to conrm.
Now select the desired frequency group (depending on the model) by pressing (repeatedly if necessary). To exit, press SEL, select EXIT again by
pressing SEL and press to conrm. The main display will automatically appear after approximately 5 seconds of inactivity.
POLSKI
MANUALLY SET THE RADIO FREQUENCY (FREQ. MAN.)
Press SEL (MENU) for about 2 seconds to enter the main menu, then press SEL repeatedly to select FREQ. MAN. (highlighted) and press to conrm.
Now select the radio frequency range below 820, 830 or 860 MHz by pressing (repeatedly if necessary) and press SEL again to set the frequency
ITALIANO
in 1 MHz increments using . Then press SEL to adjust the radio frequency in 100kHz increments by pressing and press SEL again to adjust the
radio frequency in 25kHz increments. To exit, press SEL, select EXIT again by pressing SEL and press to conrm. The main display will automatically
appear after approximately 5 seconds of inactivity.
14
Page 15

ADJUST NOISE BARRIER (SQUELCH)
The 3-stage squelch prevents unwanted noise when the transmitter is off. In addition, sudden noise is suppressed if the signal transmitted from the
transmitter to the receiver is not strong enough (e.g. due to the distance being too great). CAUTION! BEFORE adjusting the squelch, make sure that
the receiver volume is set to the lowest possible level, as changing the squelch threshold may cause loud background noise that can potentially in-
ict hearing damage as well as damage to connected headphones or earphones. Set the squelch (when the transmitter is off) to the lowest setting
where ambient noise is still effectively suppressed (LOW / MID / HI). In the "HI" setting, the transmission range may be reduced under unfavourable
circumstances. Press SEL (MENU) for about 2 seconds to enter the main menu, then press SEL repeatedly to select SQUELCH (highlighted) and press
to conrm. Now select the desired setting by pressing (repeatedly if necessary). To exit, press SEL, select EXIT again by pressing SEL and press
to conrm. The main display will automatically appear after approximately 5 seconds of inactivity.
SET DISPLAY BRIGHTNESS (DISPLAY)
Press SEL (MENU) for about 2 seconds to enter the main menu, then press SEL repeatedly to select DISPLAY (highlighted) and press to conrm.
Now select the desired setting by pressing (repeatedly if necessary) (HI = brightness high / LOW = brightness low). To exit, press SEL, select EXIT
again by pressing SEL (repeatedly if necessary) and press to conrm. The main display will automatically appear after approximately 5 seconds
of inactivity.
LEAVE MAIN MENU (EXIT)
To exit the main menu and return to the main display, select EXIT (highlighted) by pressing SEL repeatedly (highlighted) and then press . After
approximately 5 seconds of inactivity, the main display will appear automatically.
ENGLISH
DEUTSCHFRANCAIS
ESPAÑOL
BATTERY STATUS
The battery charge status is shown in the display and continuously updated (main display A).
indicates a charge status of approx. 70% and indicates a charge status of approx. 30%. As soon as a critically low charge status is
reached, the display changes to "LOW BATTERY" approximately every 3 seconds, the symbol for “low battery” appears and a pure tone at
approx. 500Hz is emitted via the headphone socket as an acoustic warning signal. Replace depleted batteries immediately.
appears when the batteries are fully charged,
ITALIANO POLSKI
15
Page 16

TROUBLESHOOTING
PROBLEM DISPLAY SOLUTION
No audio signal or level
too low
DEUTSCHENGLISH
Receiver: Reception is not indicated by RF LED. Check if the transmitter is turned on.
Receiver: Display lighting is switched off Check that the receiver is switched on and that the
Receiver: Reception is not indicated by RF LED.
Transmitter: Device is switched on. Audio signal
is available.
FRANCAIS
Receiver: Reception is indicated by RF LED. Check whether an audio signal is present at the
Distortion and
interference
ESPAÑOL
Distorted sound Receiver: "LOW BATTERY" is displayed.
Receiver: Reception is indicated by RF LED. Remove possible sources of interference (digital devices,
Receiver: Peak is shown AF PK in the receiver and
transmitter display.
POLSKI
battery charge status is sufcient.
Check that the radio frequency of the transmitter and
receiver is the same.
Check the transmit power.
Reduce the distance between transmitter and receiver.
Make sure that there is a direct line of sight between
transmitter and receiver.
Make sure that the antennas of transmitter and receiver
are correctly connected, not covered and not kinked.
Reduce the level of noise reduction (SQUELCH)
transmitter.
If necessary, increase the signal level of the playback
device or check the GAIN setting in the transmitter.
other radio systems).
Increase the level of noise reduction (SQUELCH)
at the receiver.
Check the headphone output of the transmitter.
Make sure that the available signal is "clean".
If necessary, reduce the signal level of the playback
device or lower the audio level GAIN in the transmitter.
RECOMMENDATIONS FOR ERROR PREVENTION
• When using a radio transmitter and a radio receiver on your body at the same time, position the two devices as far apart
from each other as possible.
• Do not install the radio receiver and radio transmitter together in a rack, and position a receiver rack as far away
ITALIANO
from a transmitter rack as possible.
• When rack-mounting transmitters or receivers, maintain at least half a height unit between the two.
• Use separate power supplies for transmitter and receiver and do not use the same power supply for wireless systems
made by different manufacturers.
16
Page 17

TECHNICAL DATA
Model Number: LDU5047IEMT LDU5051IEMT LDU505IEMT LDU506IEMT LDU508IEMT
Product type: In-Ear monitoring In-Ear monitoring In-Ear monitoring In-Ear monitoring In-Ear monitoring
Type: Transmitter Transmitter Transmitter Transmitter Transmitter
Transmission frequency range: 470 – 490 MHz 514 – 542 MHz 584 – 608 MHz 655 – 679 MHz 823 – 832 MHz,
RF-groups: 1 1 10 10 8
RF-channels: 12 12 12 12 12
Transmission method: FM, mono/stereo FM, mono/stereo FM, mono/stereo FM, mono/stereo FM, mono/stereo
Rated HF output power: 2 mW, 10 mW,
30 mW
Antenna gain: 2 dBi 2 dBi 2 dBi 2 dBi 2 dBi
Antenna connector: BNC BNC BNC BNC BNC
Audio frequency response (- 3dB): 35 Hz – 16000 Hz 35 Hz – 16000 Hz 35 Hz – 16000 Hz 35 Hz – 16000 Hz 35 Hz – 16000 Hz
THD+N @ 1kHz, +4dBu input signal: < 0.3 % < 0.3 % < 0.3 % < 0.3 % < 0.3 %
S/N –ratio @ 1kHz, A-weighted: 93 dB 93 dB 93 dB 93 dB 93 dB
Dynamic range @ 1kHz, non-weighted: 88 dB 88 dB 88 dB 88 dB 88 dB
Input sensitivity: - 9 dBu (all gain
controls full,
stereo mode)
Max. input level: 18 dBu (gain
controls set to
90, TX Volume
control set to 38,
stereo mode)
CMRR IEC: < 45 dB < 45 dB < 45 dB < 45 dB < 45 dB
Line inputs: 2 2 2 2 2
Line input connectors: XLR (balanced)
/ Combo TRS
6.3 mm
Input impedance: 12 kohms 12 kohms 12 kohms 12 kohms 12 kohms
Controls: POWER on-off
-button, MENU
rotary-pushencoder, phones
volume
Indicators: Multifunctional
OLED-display
Power consumption (nominal): 3.5 W 3.5 W 3.5 W 3.5 W 3.5 W
Operating voltage: 12 – 18 V DC 12 – 18 V DC 12 – 18 V DC 12 – 18 V DC 12 – 18 V DC
Voltage input connector: 5.3 mm barrel
jack, plus inside
Ambient temperature (in operation): 0 °C – 35 °C 0 °C – 35 °C 0 °C – 35 °C 0 °C – 35 °C 0 °C – 35 °C
Relative humidity: < 80 %
(non-condensing)
2 mW, 10 mW,
30 mW
- 9 dBu (all gain
controls full,
stereo mode)
18 dBu (gain
controls set to
90, TX Volume
control set to 38,
stereo mode)
XLR (balanced)
/ Combo TRS
6.3 mm
POWER on-off
-button, MENU
rotary-pushencoder, phones
volume
Multifunctional
OLED-display
5.3 mm barrel
jack, plus inside
< 80 %
(non-condensing)
863 – 865 MHz
823 – 832 MHz
2 mW, 10 mW,
30 mW
863 – 865 MHz
2 mW, 10 mW
- 9 dBu (all gain
controls full,
stereo mode)
18 dBu (gain
controls set to
90, TX Volume
control set to 38,
stereo mode)
XLR (balanced)
/ Combo TRS
6.3 mm
POWER on-off
-button, MENU
rotary-pushencoder, phones
volume
Multifunctional
OLED-display
5.3 mm barrel
jack, plus inside
< 80 %
(non-condensing)
ENGLISH
DEUTSCHFRANCAIS
ESPAÑOL
ITALIANO POLSKI
17
Page 18

Dimensions (W x H x D): 212 x 43 x 123 mm 212 x 43 x 123 mm 212 x 43 x 123 mm 212 x 43 x 123 mm 212 x 43 x 123 mm
Weight: 0.66 kg
Accessories included: Power adapter,
Model Number: LDU5047IEMR LDU5051IEMR LDU505IEMR LDU506IEMR LDU508IEMR
DEUTSCHENGLISH
Product type: In-Ear monitoring In-Ear monitoring In-Ear monitoring In-Ear monitoring In-Ear monitoring
Type: Bodypack receiver,
Transmission frequency range: 470 – 490 MHz 514 – 542 MHz 584 – 608 MHz 655 – 679 MHz 823 – 832 MHz,
RF-groups: 1 1 10 10 8
FRANCAIS
RF-channels: 12 12 12 12 12
Phones output: 3.5 mm stereo
Phones minimum impedance: 16 ohms 16 ohms 16 ohms 16 ohms 16 ohms
Phones max output level: 80 mW @
ESPAÑOL
Audio frequency response: 40 Hz – 16000 Hz 40 Hz – 16000 Hz 40 Hz – 16000 Hz 40 Hz – 16000 Hz 40 Hz – 16000 Hz
L/R crosstalk 100 Hz/1 kHz/10 kHz: 55/55/53 dB´s 55/55/53 dB´s 55/55/53 dB´s 55/55/53 dB´s 55/55/53 dB´s
Residual noise: 5.5 uVrms
Antenna connector: Threaded
Controls: ON/OFF/VOLUME,
POLSKI
Indicators: Multifunctional
Power consumption (nominal): 0.7 W 0.7 W 0.7 W 0.7 W 0.7 W
Operating voltage: 2 x 1.5 V DC
ITALIANO
Ambient temperature (in operation): 0 °C – 35 °C 0 °C – 35 °C 0 °C – 35 °C 0 °C – 35 °C 0 °C – 35 °C
Relative humidity: < 80 %
Dimensions (W x H x D, without antenna): 64 x 100 x 24 mm 64 x 100 x 24 mm 64 x 100 x 24 mm 64 x 100 x 24 mm 64 x 100 x 24 mm
Weight: 0.095 kg 0.095 kg 0.095 kg 0.095 kg 0.095 kg
Accessories included: Threaded
Other Features: Additional
(with antenna)
BNC-antenna, 19“
rack mount kit
non-diversity
jack
33 ohm load /
33 mW @
16 ohm load
(a-weighted)
connector
SEL,
OLED-display,
RF-LED
AA-batteries
(non-condensing)
antenna, 2x AA
battery
low battery
indication:
500 Hz signal via
headphone jack
0.66 kg
(with antenna)
Power adapter,
BNC-antenna, 19“
rack mount kit
Bodypack receiver,
non-diversity
3.5 mm stereo
jack
80 mW @
33 ohm load /
33 mW @
16 ohm load
5.5 uVrms
(a-weighted)
Threaded
connector
ON/OFF/VOLUME,
SEL,
Multifunctional
OLED-display,
RF-LED
2 x 1.5 V DC
AA-batteries
< 80 %
(non-condensing)
Threaded
antenna, 2x AA
battery
Additional
low battery
indication:
500 Hz signal via
headphone jack
0.66 kg
(with antenna)
Power adapter,
BNC-antenna, 19“
Rrack mount kit
Bodypack receiver,
non-diversity
863 – 865 MHz
3.5 mm stereo
jack
80 mW @
33 ohm load /
33 mW @
16 ohm load
5.5 uVrms
(a-weighted)
Threaded
connector
ON/OFF/VOLUME,
SEL,
Multifunctional
OLED-display,
RF-LED
2 x 1.5 V DC
AA-batteries
< 80 %
(non-condensing)
Threaded
antenna, 2x AA
battery
Additional
low battery
indication:
500 Hz signal via
headphone jack
18
Page 19
Model Number: LDIEHP2
Product type: Stereo in-ear
headphones
Frequency response: 20 Hz – 20000 Hz
Impedance: 33 ohms
Audio connector: 3.5 mm stereo
plug
Cable: 1.27 m
(detachable)
Weight: 0.016 kg
Accessories included: 3 pairs of silicone
ear buds, 3 pairs
of foam ear buds
MANUFACTURER´S DECLARATIONS
MANUFACTURER‘S WARRANTY & LIMITATIONS OF LIABILITY
You can nd our current warranty conditions and limitations of liability at: https://cdn-shop.adamhall.com/media/pdf/MANUFACTURERS-DECLARATIONS_
LD_SYSTEMS.pdf To request warranty service for a product, please contact Adam Hall GmbH, Adam-Hall-Str. 1,
61267 Neu Anspach / Email: Info@adamhall.com / +49 (0)6081 / 9419-0.
CORRECT DISPOSAL OF THIS PRODUCT
(valid in the European Union and other European countries with a differentiated waste collection system)
This symbol on the product, or on its documents indicates that the device may not be treated as household waste. This is to avoid environmental damage or personal injury due to uncontrolled waste disposal. Please dispose of this product separately from other waste and have it
recycled to promote sustainable economic activity. Household users should contact either the retailer where they purchased this product, or their
local government ofce, for details on where and how they can recycle this item in an environmentally friendly manner. Business users should
contact their supplier and check the terms and conditions of the purchase contract. This product should not be mixed with other commercial waste
for disposal.
FCC STATEMENT
This device complies with Part 15 of the FCC Rules. Operation is subject to the following two conditions:
(1) This device may not cause harmful interference, and
(2) This device must accept any interference received, including interference that may cause undesired operation
CE Compliance
Adam Hall GmbH states that this product meets the following guidelines (where applicable):
R&TTE (1999/5/EC) or RED (2014/53/EU) from June 2017
Low voltage directive (2014/35/EU)
EMV directive (2014/30/EU)
RoHS (2011/65/EU)
The complete declaration of conformity can be found at www.adamhall.com.
Furthermore, you may also direct your enquiry to info@adamhall.com.
EU DECLARATION OF CONFORMITY
Hereby, Adam Hall GmbH declares that this radio equipment type is in compliance with Directive 2014/53/EU.
The full text of the EU declaration of conformity is available at the following
internet address: www.adamhall.com/compliance/
ENGLISH
DEUTSCHFRANCAIS
ESPAÑOL
ITALIANO POLSKI
19
Page 20

DEUTSCH
SIE HABEN DIE RICHTIGE WAHL GETROFFEN!
Dieses Gerät wurde unter hohen Qualitätsanforderungen entwickelt und gefertigt, um viele Jahre einen reibungslosen Betrieb zu gewährleisten.
Dafür steht LD Systems mit seinem Namen und der langjährigen Erfahrung als Hersteller hochwertiger Audioprodukte. Bitte lesen Sie diese Bedienungsanleitung sorgfältig, damit Sie Ihr neues Produkt von LD Systems schnell optimal einsetzen können.
Mehr Informationen zu LD SYSTEMS nden Sie auf unserer Internetseite WWW.LD-SYSTEMS.COM
SICHERHEITSHINWEISE
1. Lesen Sie diese Anleitung bitte sorgfältig durch.
2. Bewahren Sie alle Informationen und Anleitungen an einem sicheren Ort auf.
DEUTSCHENGLISH
3. Befolgen Sie die Anweisungen.
4. Beachten Sie alle Warnhinweise. Entfernen Sie keine Sicherheitshinweise oder andere Informationen vom Gerät.
5. Verwenden Sie das Gerät nur in der vorgesehenen Art und Weise.
6. Verwenden Sie ausschließlich stabile und passende Stative bzw. Befestigungen (bei Festinstallationen). Stellen Sie sicher, dass Wandhalterungen
ordnungsgemäß installiert und gesichert sind. Stellen Sie sicher, dass das Gerät sicher installiert ist und nicht herunterfallen kann.
7. Beachten Sie bei der Installation die für Ihr Land geltenden Sicherheitsvorschriften.
8. Installieren und betreiben Sie das Gerät nicht in der Nähe von Heizkörpern, Wärmespeichern, Öfen oder sonstigen Wärmequellen. Sorgen Sie dafür,
dass das Gerät immer so installiert ist, dass es ausreichend gekühlt wird und nicht überhitzen kann.
9. Platzieren Sie keine Zündquellen wie z.B. brennende Kerzen auf dem Gerät.
FRANCAIS
10. Lüftungsschlitze dürfen nicht blockiert werden.
11. Halten Sie einen Mindestabstand von 20 cm seitlich und oberhalb des Geräts ein.
12. Betreiben Sie das Gerät nicht in unmittelbarer Nähe von Wasser. Bringen Sie das Gerät nicht mit brennbaren Materialien, Flüssigkeiten oder
Gasen in Berührung. Direkte Sonneneinstrahlung vermeiden!
13. Sorgen Sie dafür, dass kein Tropf- oder Spritzwasser in das Gerät eindringen kann. Stellen Sie keine mit Flüssigkeit gefüllten Behältnisse wie
Vasen oder Trinkgefäße auf das Gerät.
14. Sorgen Sie dafür, dass keine Gegenstände in das Gerät fallen können.
15. Betreiben Sie das Gerät nur mit dem vom Hersteller empfohlenen und vorgesehenen Zubehör.
16. Öffnen Sie das Gerät nicht und verändern Sie es nicht.
17. Überprüfen Sie nach dem Anschluss des Geräts alle Kabelwege, um Schäden oder Unfälle, z. B. durch Stolperfallen zu vermeiden.
ESPAÑOL
18. Achten Sie beim Transport darauf, dass das Gerät nicht herunterfallen und dabei möglicherweise Sach- und Personenschäden
verursachen kann.
19. Wenn Ihr Gerät nicht mehr ordnungsgemäß funktioniert, Flüssigkeiten oder Gegenstände in das Geräteinnere gelangt sind, oder das Gerät an-
derweitig beschädigt wurde, schalten Sie es sofort aus und trennen es von der Netzsteckdose (sofern es sich um ein aktives Gerät handelt). Dieses
Gerät darf nur von autorisiertem Fachpersonal repariert werden.
20. Verwenden Sie zur Reinigung des Geräts ein trockenes Tuch.
21. Beachten Sie alle in Ihrem Land geltenden Entsorgungsgesetze. Trennen Sie bei der Entsorgung der Verpackung bitte Kunststoff und Papier bzw.
Kartonagen voneinander.
22. Kunststoffbeutel müssen außer Reichweite von Kindern aufbewahrt werden.
23. Sämtliche vom Benutzer vorgenommenen Änderungen und Modikationen, denen die für die Einhaltung der Richtlinien verantwortliche Partei
POLSKI
nicht ausdrücklich zugestimmt hat, können zum Entzug der Betriebserlaubnis für das Gerät führen.
BEI GERÄTEN MIT NETZANSCHLUSS
24. ACHTUNG: Wenn das Netzkabel des Geräts mit einem Schutzkontakt ausgestattet ist, muss es an einer Steckdose mit Schutzleiter angeschlossen
werden. Deaktivieren Sie niemals den Schutzleiter eines Netzkabels.
25. Schalten Sie das Gerät nicht sofort ein, wenn es starken Temperaturschwankungen ausgesetzt war (beispielsweise nach dem Transport). Feuchtigkeit und Kondensat könnten das Gerät beschädigen. Schalten Sie das Gerät erst ein, wenn es Zimmertemperatur erreicht hat.
26. Bevor Sie das Gerät an die Steckdose anschließen, prüfen Sie zuerst, ob die Spannung und die Frequenz des Stromnetzes mit den auf dem Gerät
angegebenen Werten übereinstimmen. Verfügt das Gerät über einen Spannungswahlschalter, schließen Sie das Gerät nur an die Steckdose an,
ITALIANO
wenn die Gerätewerte mit den Werten des Stromnetzes übereinstimmen. Wenn das mitgelieferte Netzkabel bzw. der mitgelieferte Netzadapter
nicht in Ihre Netzsteckdose passt, wenden Sie sich an Ihren Elektriker.
27. Treten Sie nicht auf das Netzkabel. Sorgen Sie dafür, dass spannungsführende Kabel speziell an der Netzbuchse bzw. am Netzadapter und der
Gerätebuchse nicht geknickt werden.
28. Achten Sie bei der Verkabelung des Geräts immer darauf, dass das Netzkabel bzw. der Netzadapter stets frei zugänglich ist. Trennen Sie das
Gerät stets von der Stromzuführung, wenn das Gerät nicht benutzt wird, oder Sie das Gerät reinigen möchten. Ziehen Sie Netzkabel und Netzadapter
immer am Stecker bzw. am Adapter und nicht am Kabel aus der Steckdose. Berühren Sie Netzkabel und Netzadapter niemals mit nassen Händen.
29. Schalten Sie das Gerät möglichst nicht schnell hintereinander ein und aus, da sonst die Lebensdauer des Geräts beeinträchtigt werden könnte.
30. WICHTIGER HINWEIS: Ersetzen Sie Sicherungen ausschließlich durch Sicherungen des gleichen Typs und Wertes. Sollte eine Sicherung wiederholt
auslösen, wenden Sie sich bitte an ein autorisiertes Servicezentrum.
31. Um das Gerät vollständig vom Stromnetz zu trennen, entfernen Sie das Netzkabel bzw. den Netzadapter aus der Steckdose.
32. Wenn Ihr Gerät mit einem verriegelbaren Netzanschluss bestückt ist, muss der passende Gerätestecker entsperrt werden, bevor er entfernt werden kann. Das bedeutet aber auch, dass das Gerät durch ein Ziehen am Netzkabel verrutschen und herunterfallen kann, wodurch Personen verletzt
werden und/oder andere Schäden auftreten können. Verlegen Sie Ihre Kabel daher immer sorgfältig.
33. Entfernen Sie Netzkabel und Netzadapter aus der Steckdose bei Gefahr eines Blitzschlags oder wenn Sie das Gerät länger nicht verwenden.
34. Das Gerät darf nicht von Personen (einschließlich Kindern) mit eingeschränkten körperlichen, sensorischen oder geistigen Fähigkeiten oder
mangelnder Erfahrung und Kenntnis benutzt werden.
20
Page 21
35. Kinder müssen angewiesen werden, nicht mit dem Gerät zu spielen.
36. Wenn das Netzkabel des Geräts beschädigt ist, darf das Gerät nicht verwendet werden. Das Netzkabel muss durch ein adäquates Kabel oder eine
spezielle Baugruppe von einem autorisierten Service-Center ersetzt werden.
ACHTUNG
Entfernen Sie niemals die Abdeckung, da sonst das Risiko eines elektrischen Schlages besteht. Im In-
neren des Geräts benden sich keine Teile, die vom Bediener repariert oder gewartet werden können.
Lassen Sie Wartung und Reparaturen ausschließlich von qualiziertem Servicepersonal durchführen.
Das gleichseitige Dreieck mit Blitzsymbol warnt vor nichtisolierten, gefährlichen Spannungen im Geräteinneren, die einen elektrischen
Schlag verursachen können.
Das gleichseitige Dreieck mit Ausrufungszeichen kennzeichnet wichtige Bedienungs- und Wartungshinweise.
Warnung! Dieses Gerät ist für eine Nutzung bis zu einer Höhe von maximal 2000 Metern über dem Meeresspiegel bestimmt.
Warnung! Dieses Gerät ist nicht für den Einsatz in tropischen Klimazonen bestimmt.
ACHTUNG HOHE LAUTSTÄRKEN BEI AUDIOPRODUKTEN!
Dieses Gerät ist für den professionellen Einsatz vorgesehen. Der kommerzielle Betrieb dieses Geräts unterliegt den jeweils gültigen nationalen
Vorschriften und Richtlinien zur Unfallverhütung. Als Hersteller ist Adam Hall gesetzlich verpichtet, Sie ausdrücklich auf mögliche Gesundheitsrisiken
hinzuweisen. Gehörschäden durch hohe Lautstärken und Dauerbelastung: Bei der Verwendung dieses Produkts können hohe Schalldruckpegel
(SPL) erzeugt werden, die bei Künstlern, Mitarbeitern und Zuschauern zu irreparablen Gehörschäden führen können. Vermeiden Sie länger anhaltende
Belastung durch hohe Lautstärken über 90 dB.
ENGLISH
DEUTSCHFRANCAIS
EINFÜHRUNG
Unbegrenzte Bewegungsfreiheit auf der Bühne und dabei immer den perfekten Monitor-Sound direkt im Ohr - dafür haben wir die drahtlosen U500
In-Ear Monitoring-Systeme in Deutschland entwickelt. Mit ihrem klaren, modernen Design und der unkomplizierten Bedienung sind sie nicht nur für
Einsteiger eine ideale Wahl. Die zuverlässige Funkübertragung und der tiefreichende Frequenzgang von 40 Hz – 16 kHz sorgen für eine professionelle
Performance. U500 In-Ear-Sets sind in fünf Frequenzbändern erhältlich.
LDU5047IEM – In-Ear Monitoring-System 470 - 490 MHz
LDU5051IEM – In-Ear Monitoring-System 514 - 542 MHz
LDU505IEM – In-Ear Monitoring-System 584 - 608 MHz
LDU506IEM – In-Ear Monitoring-System 655 - 679 MHz
LDU508IEM – In-Ear Monitoring-System 823 - 832 MHz + 863 - 865 MHz
• Zuverlässiges In-Ear Monitoring mit über 100 m Reichweite
• 96 Kanäle zur Auswahl
• 2, 10 oder 30 mW ERP wählbare Sendeleistung
• Bequeme Infarot-Synchronisation
• Eingabe von Nutzernamen und Speicher für 10 eigene Presets
• Weitreichender Frequenzgang
• 3-Band EQ mit parametrischen Mitten
• Zuschaltbarer Limiter
• Betrieb im Stereo- oder Mono-Modus
• Direct Monitoring über Kopfhörerausgang am Sender
• Bodypack mit dreistug schaltbarer Rauschsperre
• 10 h Bodypack-Laufzeit mit zwei AA-Batterien
• Bis 12 Systeme simultan einsetzbar
• U500® IEM-Sender kompatibel mit U300® IEM-Bodypacks
ESPAÑOL
ITALIANO POLSKI
21
Page 22
Lieferumfang LDU50xIEM
Sender, BNC-Antenne, Taschenempfänger, Empfängerantenne, Netzteil, 2x AA Batterien, 19“ Rackeinbau-Kit, Bedienungsanleitung
Lieferumfang LDU50xIEMHP
Sender, BNC-Antenne, Taschenempfänger, Empfängerantenne, Stereo In Ear Ohrhörer, Netzteil, 2x AA Batterien, 19“ Rackeinbau-Kit, Bedienungsanleitung
Hinweis
Der Einsatz des Funkmikrofon-Systems kann je nach Verwendungsland eine Lizenz erfordern. Für ausführliche Informationen wenden Sie sich bitte
an die zuständige Behörde Ihres Landes.
DEUTSCHENGLISH
ANSCHLÜSSE, BEDIEN- UND ANZEIGEELEMENTE
SENDER
FRANCAIS
ESPAÑOL
1
POWER
Ein- bzw. Ausschalter. Drücken und halten Sie den Taster für die Dauer von circa 1 Sekunde, um das Gerät ein- bzw. auszuschalten. Drücken Sie den
Taster kurz (!), um aus dem Bearbeitungsmenü direkt zur Hauptanzeige zu gelangen.
2
OLED DISPLAY
Multifunktionales OLED-Grakdisplay für die Anzeige der Übertragungsfrequenz, von Frequenzgruppe und -kanal, des individuellen Benutzenamens,
der Presetnummer und des Audiopegels für den linken und rechten Eingangskanal in der Hauptanzeige. Im Bearbeitungsmenü werden die Menüpunkte, die Untermenüpunkte und die entsprechenden Bearbeitungsoptionen angezeigt.
POLSKI
3
MENU
Dreh-Drück-Encoder zum Navigieren im Bearbeitungsmenü und zum Anpassen von Systemeinstellungen und Ändern von Werten in den entsprechenden Menüpunkten. Ausgehend von der Hauptanzeige kann die Gesamtlautstärke direkt durch Drehen des Dreh-Drück-Encoders eingestellt
werden.
4
ITALIANO
PHONES
Kopfhörerausgang mit 6,3mm Stereo-Klinkenbuchse für die Kontrolle des anliegenden Audiosignals direkt am Sender. Das Signal für den Kopfhörer-
ausgang wird vor der MONO/STEREO-Schaltung und hinter INPUT GAIN, LIMITER und dem EQUALIZER abgegriffen. Im Signalweg des Kopfhörerausgangs
benden sich ein Hochpass-Filter.
5
VOL
Lautstärkeregler für den integrierten Kopfhörerausgang PHONES.
1 2
3
6
4
5
6
Infrarot-Schnittstelle zum Synchronisieren der relevanten Systemeinstellungen des Empfängers mit dem Sender (z.B. Funkfrequenz).
22
Page 23
8
7
9
10
11
7
DC-BUCHSE
Kleinspannungsbuchse für die Spannungsversorgung des Geräts (12V DC 500mA, Plus innen). Verwenden Sie bitte ausschließlich
den mitgelieferten Netzadapter.
8
KABEL-ZUGENTLASTUNG
Nutzen Sie die Zugentlastung für das exible Kabel des Netzadapters, um die Kleinspannungsbuchse des Senders und den
Kleinspannungsstecker des Netzadapters vor unbeabsichtigter Beschädigung zu schützen und ein ungewolltes Herausziehen
des Steckers zu vermeiden.
9
AF INPUT LEFT / RIGHT
Symmetrische Line-Eingänge links und rechts mit XLR / 6,3mm Klinken Combobuchsen.
10
ANTENNA
BNC-Anschluss für die mitgelieferte Senderantenne.
11
SENDERANTENNE
Senderantenne mit BNC-Anschluss.
ENGLISH
DEUTSCHFRANCAIS
ESPAÑOL
TASCHENEMPFÄNGER
12
ANTENNE
Abnehmbare Antenne des Taschenempfängers. Für einen optimalen Empfang nicht verde-
12
13
14
15
cken oder knicken. Achten Sie darauf, dass die Antenne im Betrieb fest mit dem Empfänger
verbunden ist (Schraubgewinde der Antenne ohne Werkzeug handfest anziehen).
13
OLED DISPLAY
Multifunktionales OLED-Grakdisplay für die Anzeige der Frequenzgruppe und des Funk-
kanals, des individuellen Benutzenamens, der Empfangsstärke und des Batteriestatus sowie
des Audiopegels für den linken und rechten Kanal. Im Bearbeitungsmenü werden die Menüpunkte, die Untermenüpunkte und die entsprechenden Bearbeitungsoptionen angezeigt.
14
Infrarot-Schnittstelle zum Synchronisieren der relevanten Systemeinstellungen des
Empfängers mit dem Sender (z.B. Funkfrequenz).
ITALIANO POLSKI
23
Page 24

DEUTSCHENGLISH
15
MENU / SEL UND
Bedientaster zum Navigieren im Bearbeitungsmenü und zum Anpassen von Systemeinstellungen und Ändern von Werten in den entsprechenden Menüpunkten. Um die Taster für die
Bedienung zugänglich zu machen, drücken Sie auf die beiden Markierungen an den Seiten
des Batteriefachdeckels und ziehen ihn nach unten vom Gehäuse, bis zum Anschlag.
16
ANTENNENANSCHLUSS
Antennenanschluss mit Schraubgewinde.
17
PHONES
18
17
16
3,5mm Stereo-Klinkenbuchse zum Anschließen eines Ohr- bzw. Kopfhörers.
19
FRANCAIS
ESPAÑOL
POLSKI
ITALIANO
Pinbelegung:
18
RF
Die Anzeige-LED RF leuchtet bei anliegendem Funksignal. Leuchtet die LED im Betrieb nicht,
überprüfen Sie, ob der Funkkanal des Empfängers mit dem Funkkanal des Senders übereinstimmt bzw. reduzieren Sie die Distanz zwischen Empfänger und Sender.
19
ON / OFF - VOL
Drehen Sie den Lautstärkeregler im Uhrzeigersinn über den Rastpunkt, um den Empfänger
einzuschalten und weiter nach rechts, um die Lautstärke zu erhöhen. Drehen Sie den Regler
gegen den Uhrzeigersinn, um die Lautstärke zu verringern und über den Rastpunkt, um den
Empfänger auszuschalten. Halten Sie die Lautstärke stets auf einem angenehmen Level, um
Gehörschäden zu vermeiden.
20
BATTERIEFACH
Zum Austauschen der Batterien öffnen Sie das Batteriefach des Taschenempfängers, indem
Sie gleichzeitig auf die Markierungen an den Seiten des Batteriefachdeckels drücken und
ihn nach unten vom Gehäuse ziehen, bis zum Anschlag. Entnehmen Sie die verbrauchten
Batterien und setzen frische Batterien (2x Typ AA / LR6, Alkaline) gemäß der Abbildungen im
20
21
Batteriefach ein. Schieben Sie den Batteriefachdeckel nun wieder auf das Gehäuse, bis der
Deckel einrastet. Nutzen Sie den Empfänger für längere Zeit nicht, entnehmen Sie bitte die
Batterien, um Beschädigungen am Empfänger durch auslaufende Batterien zu vermeiden.
21
GÜRTELCLIP
Auf der Rückseite des Taschenempfängers bendet sich ein Gürtelclip, mit dessen Hilfe der
Empfänger an einem Hosenbund, Gürtel oder Ähnlichem befestigt werden kann.
24
Page 25
BEDIENUNG SENDER
Um eine Funkverbindung zwischen Sender und Empfänger herzustellen, müssen Frequenzgruppe und -kanal respektive die Funkfrequenz
beider Geräte übereinstimmen.
Achten Sie bei der Inbetriebnahme des drahtlosen Übertragungssystems darauf, den Empfänger in direktem Sichtkontakt mit dem Sender
zu positionieren.
DISPLAY HAUPTANZEIGE
Nach dem Einschalten des Senders wird als Begrüßungstext für kurz Zeit „WELCOME“ angezeigt, danach erscheint die Hauptanzeige mit folgenden
Informationen: Individueller Benutzername, Preset-Nummer, Pegel der Audio-Eingangssignale mit Peak-Anzeige, Frequenzgruppe und -kanal (GR.xx
und CH.xx) und die aktuelle Funkfrequenz in MHz.
Individueller Benutzername
Audiosignal-Pegel / Peak (PK) rechter Kanal
Frequenzgruppe und -kanal
LAUTSTÄRKE (VOLUME)
Ausgehend von der Hauptanzeige kann die Gesamtlautstärke direkt durch Drehen des Dreh-Drück-Encoders MENU von 00 bis 50 eingestellt werden.
Die Anzeige im Display wechselt beim Drehen des Encoders automatisch zur entsprechenden Darstellung. Nach circa 3 Sekunden Inaktivität wird
automatisch wieder die Hauptanzeige angezeigt, durch Drücken des Encoders wechselt die Anzeige sofort zur Hauptanzeige.
INFRAROT SYNCHRONISATION (IR SYNC RUN)
Um den Taschenempfänger mit der im Sender eingestellten Funkfrequenz und dem individuellen Benutzernamen zu synchronisieren, bringen Sie
die Infrarot-Schnittstelle des Empfängers in direkten Sichtkontakt zur Infrarot-Schnittstelle des Senders (Distanz ca. 10 cm) und schalten den Empfänger ein. Drücken Sie nun auf den Dreh-Drück-Encoder des Senders (MENU), um in das Hauptmenü zu gelangen und wählen dann durch Drehen
des Gebers den Menüpunkt IR SYNC RUN aus (hell hinterlegt). Drücken Sie wiederum auf MENU, um den Synchronisierungsvorgang auszulösen.
Nach wenigen Sekunden ist der Vorgang abgeschlossen und die Anzeige im Display des Empfängers wechselt für kurze Zeit auf „IR SYNC “, als
Bestätigung für die erfolgreiche Synchronisierung. Zum Abbrechen des Vorgangs drücken Sie auf MENU. Drücken Sie kurz (!) auf POWER, um direkt
zur Hauptanzeige zurückzukehren, nach circa 12 Sekunden Inaktivität wird die Hauptanzeige automatisch angezeigt. Hinweis: Direkte Sonneneinstrahlung kann den Synchronisierungsvorgang stören.
Presetnummer
Audiosignal-Pegel / Peak (PK) linker Kanal
Funkfrequenz in MHz
ENGLISH
DEUTSCHFRANCAIS
ESPAÑOL
KONFIGURATION DER FUNKEINHEIT (RF SETTINGS)
Drücken Sie auf den Dreh-Drück-Encoder des Senders (MENU), um in das Hauptmenü zu gelangen und wählen dann durch Drehen des Encoders den
Menüpunkt RF SETTINGS aus (hell hinterlegt). Drücken Sie wiederum auf den Encoder, um ins Untermenü zu gelangen und wählen den gewünschten
Untermenüpunkt durch Drehen des Encoders aus, bestätigen Sie durch Drücken auf den Encoder. Ändern Sie einen Wert durch Drehen des Encoders,
bestätigen Sie die Wertänderung durch Drücken des Encoders. Entnehmen Sie die Untermenüpunkte und die entsprechenden Informationen dazu
aus nachfolgender Tabelle. Drücken Sie kurz (!) auf POWER, um direkt zur Hauptanzeige zurückzukehren, nach circa 12 Sekunden Inaktivität wird die
Hauptanzeige automatisch angezeigt.
ITALIANO POLSKI
25
Page 26

RF SETTINGS (Wert ändern = Encoder drehen, Wertänderung bestätigen = Encoder drücken)
GROUP U5047IEM Frequenzgruppe 1
CHANNEL Frequenzkanal 1 - 12 Kanal auswählen und 2x bestätigen
FREQ MAN Funkfrequenz manuell einstellen Schritt 1: Frequenz in 1 MHz Schritten einstellen und bestätigen
U5051IEM Frequenzgruppe 1
U505IEM Frequenzgruppen 1 - 10
U506IEM Frequenzgruppen 1 - 10
U508IEM Frequenzgruppen 1 - 8
DEUTSCHENGLISH
RF POWER Einstellen der Sendeleistung 470 - 490 MHz: 2 mW / 10 mW / 30 mW
EXIT RF SETT. Untermenü verlassen (Encoder drücken)
Informationen zu Sendeleistung und Einstellung der Rauschsperre im Taschenempfänger:
FRANCAIS
Wählen Sie eine geringe Sendeleistung, wenn sich Sender und Empfänger in unmittelbarer Nähe zueinander benden, die Rauschsperre (Squelch)
im Empfänger sollte dabei als Richtwert ebenfalls auf niedriger Stufe eingestellt sein. Bei größeren Distanzen zwischen Sender und Empfänger
wählen Sie eine höhere Sendeleistung und passen die Rauschsperre im Empfänger entsprechend an. Weitere Informationen zum Einstellen der
Rauschsperre nden Sie im Abschnitt „BEDIENUNG TASCHENEMPFÄNGER“ unter „RAUSCHSPERRE EINSTELLEN“ in dieser Anleitung. Achten Sie in allen
Fällen darauf, dass sich Sender und Empfänger in direktem Blickkontakt benden und keine Hindernisse zwischen Sender und Empfänger den
Funkbetrieb stören können.
Je nach Situation können abweichende Einstellungen für einen störungsfreien Betrieb erforderlich sein. Beachten Sie, dass beim Einsatz weiterer
Sendeanlagen in der Nähe zunehmend Interferenzen auftreten können, die Störungen bei der Funkverbindung verursachen. Die Wahl einer anderen
ESPAÑOL
Funkfrequenz kann in diesem Fall Störungen vermeiden.
VORSICHT! Achten Sie VOR dem Einstellen der Rauschsperre darauf, dass die Lautstärke des Empfängers auf einen möglichst niedrigen Level einge-
stellt ist, beim Verändern der Rauschsperren-Schwelle können laute Nebengeräusche auftreten, die unter Umständen Gehörschäden und Schäden
an angeschlossenen Kopf-oder Ohrhörern verursachen.
AUDIO-EINSTELLUNGEN (AUDIO SETTINGS)
Drücken Sie auf den Dreh-Drück-Encoder des Senders (MENU), um in das Hauptmenü zu gelangen und wählen dann durch Drehen des Encoders
den Menüpunkt AUDIO SETTINGS aus (hell hinterlegt). Drücken Sie wiederum auf den Encoder, um ins Untermenü zu gelangen und wählen den
POLSKI
gewünschten Untermenüpunkt durch Drehen des Encoders aus. Bestätigen Sie durch Drücken auf den Encoder. Ändern Sie einen Wert durch
Drehen des Encoders, bestätigen Sie die Wertänderung durch Drücken des Encoders. Entnehmen Sie die Untermenüpunkte und die entsprechenden
Informationen dazu aus nachfolgender Tabelle. Drücken Sie kurz (!) auf POWER, um direkt zur Hauptanzeige zurückzukehren, nach circa 12 Sekunden
Inaktivität wird die Hauptanzeige automatisch angezeigt.
Gruppe auswählen und 2x bestätigen
Schritt 2: Frequenz in 25 kHz Schritten einstellen und bestätigen
514 - 542 MHz: 2 mW / 10 mW / 30 mW
584 - 608 MHz: 2 mW / 10 mW / 30 mW
655 - 679 MHz: 2 mW / 10 mW / 30 mW
823 - 832 MHz: 2 mW / 10 mW / 30 mW, 863 - 865 MHz: 2 mW / 10 mW
ITALIANO
26
Page 27

AUDIO SETTINGS (Wert ändern = Encoder drehen, Wertänderung bestätigen = Encoder drücken)
INPUT GAIN LEFT Eingangsverstärkung linker Kanal 000 - 100 Für einen optimalen Rauschabstand pegeln Sie die
INPUT GAIN RIGHT Eingangsverstärkung rechter Kanal 000 - 100
LIMITER Eingangs-Limiter aktivieren / deaktivieren ON = aktiviert (empfohlen)
MODE Einstellen der Betriebsart Mono / Stereo
EQ SETTINGS BASS EQ G: +/- 15 dB Verstärkung der Bassfrequenzen von - 15 dB bis + 15 dB
EXIT AUDIO SETT. Untermenü verlassen (Encoder drücken)
Die ausgewählte Betriebsart wird im Display
des Empfängers angezeigt (M = Mono, S =
Stereo)
f: 60 Hz / 80 Hz / 100 Hz / 200 Hz Einstellen der Bassfrequenz
MIDDLE EQ G: +/- 15 dB Verstärkung der Mittenfrequenzen von - 15 dB bis + 15 dB
f: 500 Hz / 1000 Hz / 1500 Hz /
2500 Hz
Q: 0.50 / 0.75 / 1.00 / 1.25 Einstellen des Gütefaktors
TREBLE EQ G: +/- 15 dB Verstärkung der Höhenfrequenzen von - 15 dB bis + 15 dB
f: 10.0 kHz / 12.5 kHz / 15.0 kHz
/ 17.5 kHz
EXIT EQ
SETT.
Equalizer-Menü verlassen (Encoder drücken)
OFF = deaktiviert
MONO = Eingangssignale links und rechts werden Mono-summiert
wiedergegeben. Verschieben des Signals nach links oder rechts am
Empfänger (BALANCE).
STEREO = Wiedergabe des Eingangssignals in Stereo. Einstellen der
Balance am Empfänger (BALANCE)
Aktivieren Sie die Betriebsart STEREO im Sender auch, wenn Sie die
Betriebsart FOCUS im Taschenempfänger nutzen wollen.
Einstellen der Mittenfrequenz
Einstellen der Höhenfrequenz
Signale links und rechts so hoch wie möglich ein, sorgen aber dafür, dass die PEAK-Anzeige im Display nicht
oder nur kurzzeitig erscheint, um Signalverzerrungen
zu vermeiden. Passen Sie ggf. auch den Ausgangspegel des Zuspielgeräts an.
ENGLISH
DEUTSCHFRANCAIS
ESPAÑOL
INDIVIDUELLER BENUTZERNAME (NAME)
Drücken Sie auf den Dreh-Drück-Encoder des Senders (MENU), um in das Hauptmenü zu gelangen, wählen dann durch Drehen des Encoders den
Menüpunkt NAME aus (hell hinterlegt) und drücken zum Bestätigen auf den Encoder. Den individuellen Namen (bis zu 8 Stellen) stellen Sie nun ein,
indem Sie durch Drehen des Encoders einen Buchstaben, ein Zeichen oder eine Zahl für die erste Stelle des Namens auswählen und durch Drücken
auf den Encoder bestätigen. Nun folgt die Eingabe für die zweite Stelle usw.. Ist der Name komplettiert, drücken Sie zum Bestätigen abermals auf
den Encoder. Drücken Sie kurz (!) auf POWER, um direkt zur Hauptanzeige zurückzukehren, nach circa 12 Sekunden Inaktivität wird die Hauptanzeige
automatisch angezeigt.
DISPLAY-HELLIGKEIT EINSTELLEN (BRIGHTNESS)
Drücken Sie auf den Dreh-Drück-Encoder des Senders (MENU), um in das Hauptmenü zu gelangen, wählen dann durch Drehen des Encoders den
Menüpunkt BRIGHTNESS aus (hell hinterlegt) und drücken zum Bestätigen auf den Encoder. Wählen Sie die 3-stuge Display-Helligkeit (HIGH = hoch,
MID = mittel, LOW = niedrig) durch Drehen des Encoder nach Wunsch aus und drücken zum Bestätigen 2x auf den Encoder. Drücken Sie kurz (!) auf
POWER, um direkt zur Hauptanzeige zurückzukehren, nach circa 12 Sekunden Inaktivität wird die Hauptanzeige automatisch angezeigt.
ITALIANO POLSKI
27
Page 28
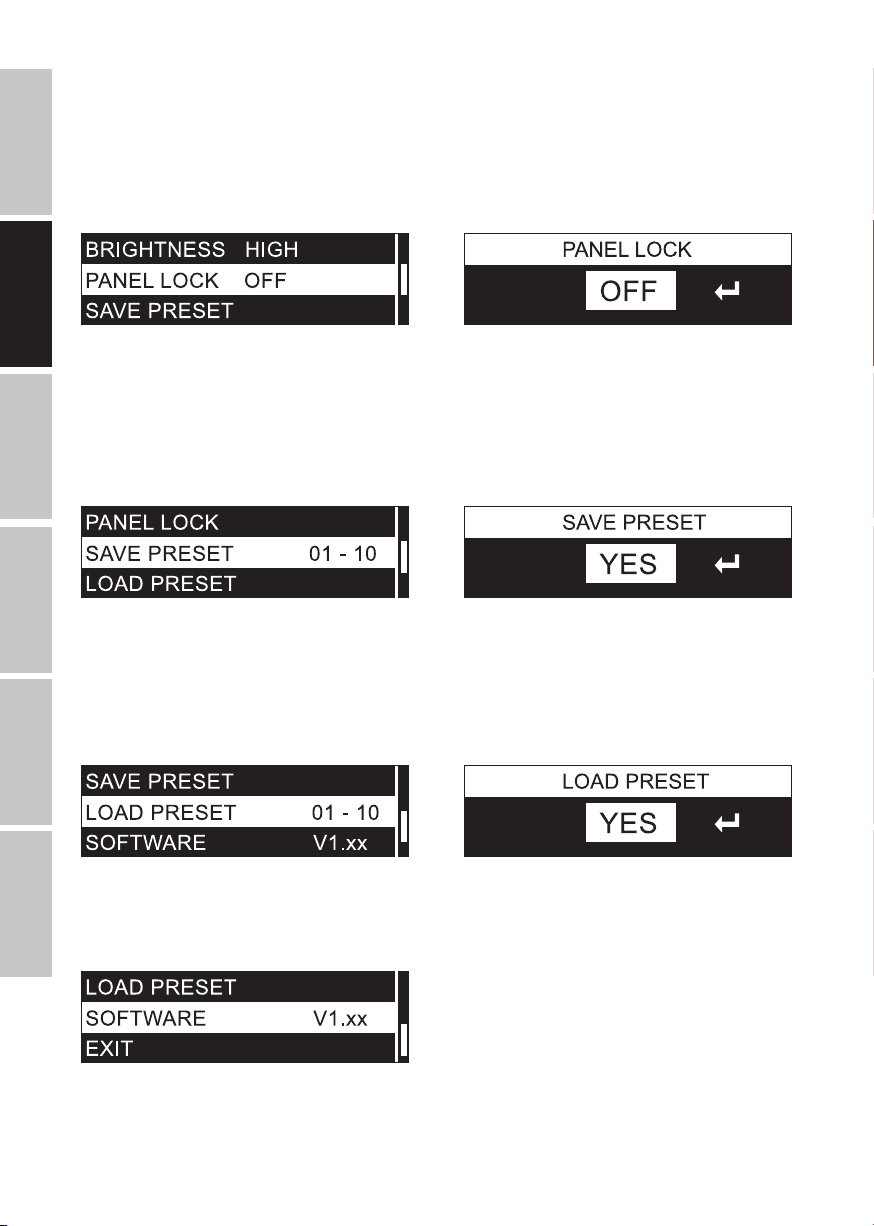
BEDIENELEMENTE SPERREN (PANEL LOCK)
Drücken Sie auf den Dreh-Drück-Encoder des Senders (MENU), um in das Hauptmenü zu gelangen, wählen dann durch Drehen des Encoders den
Menüpunkt PANEL LOCK aus (hell hinterlegt) und drücken zum Bestätigen auf den Encoder. Zum Sperren der Bedienelemente wählen Sie durch
Drehen des Encoders ON aus und drücken zum Bestätigen 2x auf den Encoder. Drücken Sie kurz (!) auf POWER, um direkt zur Hauptanzeige zurück-
zukehren, nach circa 10 Sekunden Inaktivität wird die Hauptanzeige automatisch angezeigt. Wird nun eines der Bedienelemente POWER oder der
Dreh-Drück-Encoder MENU betätigt, wird im Display für kurze Zeit „PANEL LOCK ON“ angezeigt und das Ändern von Einstellungen ist blockiert. Zum
Entsperren der Bedienelemente drücken und halten Sie den Dreh-Drück-Encoder für die Dauer von circa 2 Sekunden, wählen Sie im Menüpunkt
PANEL LOCK die Option OFF aus, um die Bedienung durch die Bedienelemente permanent zu erlauben.
DEUTSCHENGLISH
PRESET SICHERN (SAVE PRESET)
Einstellungen unter RF SETTINGS, AUDIO SETTINGS und der individuelle Name lassen sich in bis zu 10 verschiedenen Presets speichern. Nachdem Sie
die entsprechenden Einstellungen vorgenommen haben, drücken Sie auf den Dreh-Drück-Encoder des Senders (MENU), um in das Hauptmenü zu
FRANCAIS
gelangen, wählen dann durch Drehen des Encoders den Menüpunkt SAVE PRESET aus (hell hinterlegt) und drücken zum Bestätigen auf den Encoder.
Wählen Sie nun durch Drehen des Encoders die Preset-Nummer aus, die Sie zum Speichern verwenden wollen (01 - 10), bestätigen durch Drücken auf
den Encoder, wählen dann durch Drehen des Encoders YES aus und bestätigen den Vorgang durch zweimaliges Drücken auf den Encoder. Wollen Sie
den Vorgang abbrechen, wählen Sie NO und bestätigen ebenfalls. Drücken Sie kurz (!) auf POWER, um direkt zur Hauptanzeige zurückzukehren, nach
circa 12 Sekunden Inaktivität wird die Hauptanzeige automatisch angezeigt.
ESPAÑOL
PRESET LADEN (LOAD PRESET)
Drücken Sie auf den Dreh-Drück-Encoder des Senders (MENU), um in das Hauptmenü zu gelangen, wählen dann durch Drehen des Encoders den
Menüpunkt LOAD PRESET aus (hell hinterlegt) und drücken zum Bestätigen auf den Encoder. Wählen Sie nun durch Drehen des Encoders die
Preset-Nummer aus, die Sie laden wollen (01 - 10), bestätigen durch Drücken auf den Encoder, wählen dann durch Drehen des Encoders YES aus und
bestätigen den Vorgang durch zweimaliges Drücken auf den Encoder. Wollen Sie den Vorgang abbrechen, wählen Sie NO und bestätigen ebenfalls.
POLSKI
Drücken Sie kurz (!) auf POWER, um direkt zur Hauptanzeige zurückzukehren, nach circa 12 Sekunden Inaktivität wird die Hauptanzeige automatisch
angezeigt.
ITALIANO
SOFTWAREVERSION ABLESEN (SOFTWARE)
Drücken Sie auf den Dreh-Drück-Encoder des Senders (MENU), um in das Hauptmenü zu gelangen und wählen dann durch Drehen des Encoders den
Menüpunkt SOFTWARE aus (hell hinterlegt). Drücken Sie kurz (!) auf POWER, um direkt zur Hauptanzeige zurückzukehren, nach circa 12 Sekunden
Inaktivität wird die Hauptanzeige automatisch angezeigt.
28
Page 29
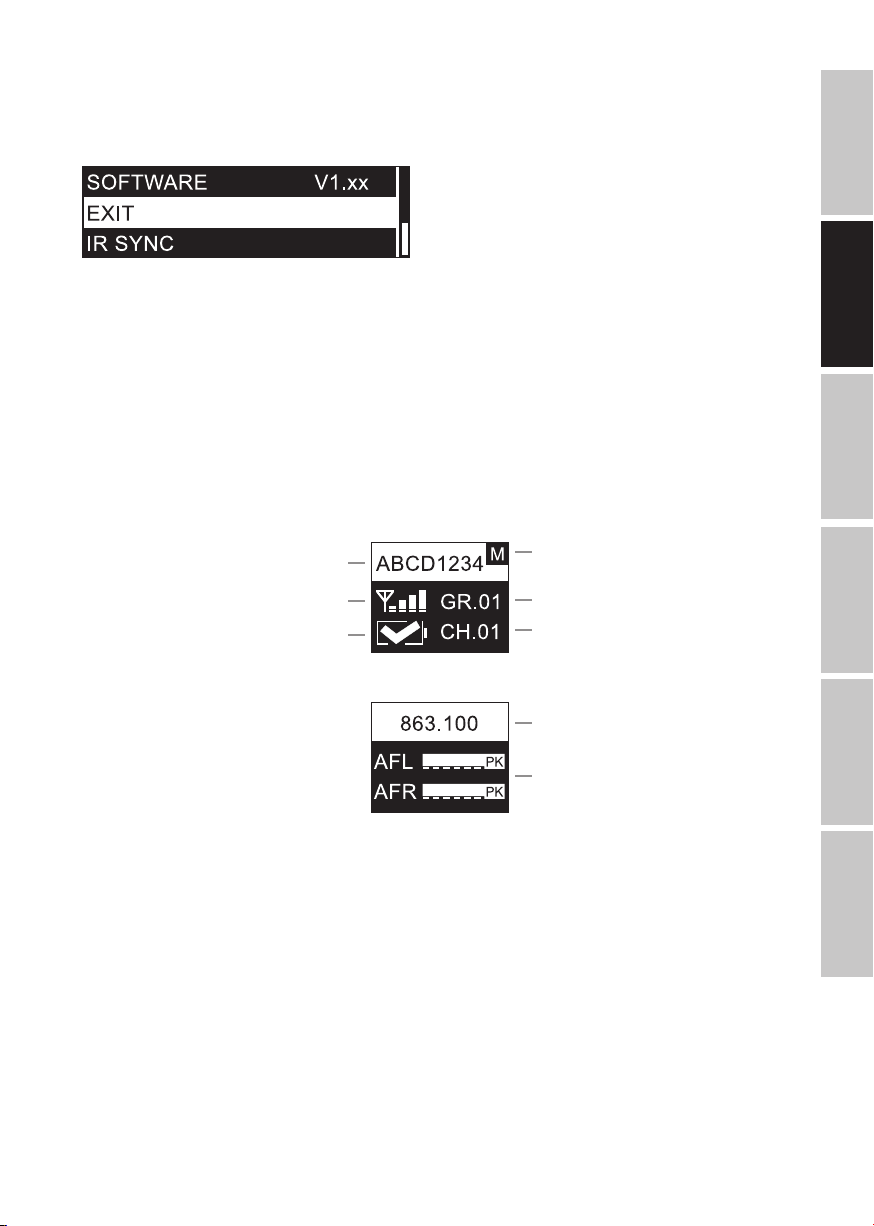
HAUPTMENÜ VERLASSEN (EXIT)
Um das Hauptmenü zu verlassen und zur Hauptanzeige zurückzugelangen, wählen Sie durch Drehen des Dreh-Drück-Encoders den Menüpunkt EXIT
aus (hell hinterlegt) und drücken auf den Encoder. Drücken Sie kurz (!) auf POWER, um direkt zur Hauptanzeige zurückzukehren, nach circa 12 Sekunden Inaktivität wird die Hauptanzeige automatisch angezeigt.
BEDIENUNG TASCHENEMPFÄNGER
Um eine Funkverbindung zwischen Sender und Empfänger herzustellen, müssen Kanalgruppe und Kanalnummer respektive die Funkfrequenz
beider Geräte übereinstimmen.
Achten Sie bei der Inbetriebnahme des drahtlosen Übertragungssystems darauf, den Empfänger in direktem Sichtkontakt mit dem Sender zu
positionieren.
DISPLAY HAUPTANZEIGE
Kurz nach dem Einschalten des Taschenempfängers wird die Hauptanzeige A mit folgenden Informationen angezeigt: Individueller Benutzername,
Betriebsart, Empfangsstärke des Funksignals, Batteriestatus und Frequenz-Gruppe und -Kanal.
Alternativ wird die Hauptanzeige B mit Funkfrequenz in MHz und Pegel des linken und rechten Audiosignals mit Peak-Anzeige (PK) angezeigt.
Drücken Sie kurz auf den Taster , um zwischen den beiden Anzeigevarianten umzuschalten.
Hauptanzeige A
Individueller Benutzername
Betriebsart Mono / Stereo
ENGLISH
DEUTSCHFRANCAIS
Empfangsstärke des Funksignals
Batteriestatus
Hauptanzeige B
BALANCE BZW. LAUTSTÄRKEVERHÄLTNIS EINSTELLEN (BALANCE / FADER)
Betriebsart MONO: Aktivieren Sie im Sender die Betriebsart MONO. Die beiden Kanäle links und rechts werden Mono-summiert wiedergegeben.
Im Empfänger kann im Menüpunkt BALANCE das Mono-Signal nach links oder rechts verschoben werden. Drücken Sie für circa 2 Sekunden auf
den Taster SEL (MENU), um in das Hauptmenü zu gelangen, wählen dann, falls nicht schon ausgewählt, durch wiederholtes Drücken auf SEL den
Menüpunkt BALANCE aus (hell hinterlegt) und drücken zum Bestätigen auf den Taster . Verschieben Sie nun das Signal wunschgemäß nach
links oder rechts durch (ggf. wiederholtes) Drücken auf den Taster . Um den Menüpunkt zu verlassen, drücken Sie auf SEL, wählen abermals
durch Drücken auf SEL den Menüpunkt EXIT aus und drücken zum Bestätigen auf. Die Hauptanzeige wird nach circa 5 Sekunden Inaktivität
automatisch angezeigt.
Frequenzgruppe
Frequenzkanal
Funkfrequenz
Linker Kanal
Audiosignal-Pegel / Peak (PK)
Rechter Kanal
ESPAÑOL
ITALIANO POLSKI
29
Page 30
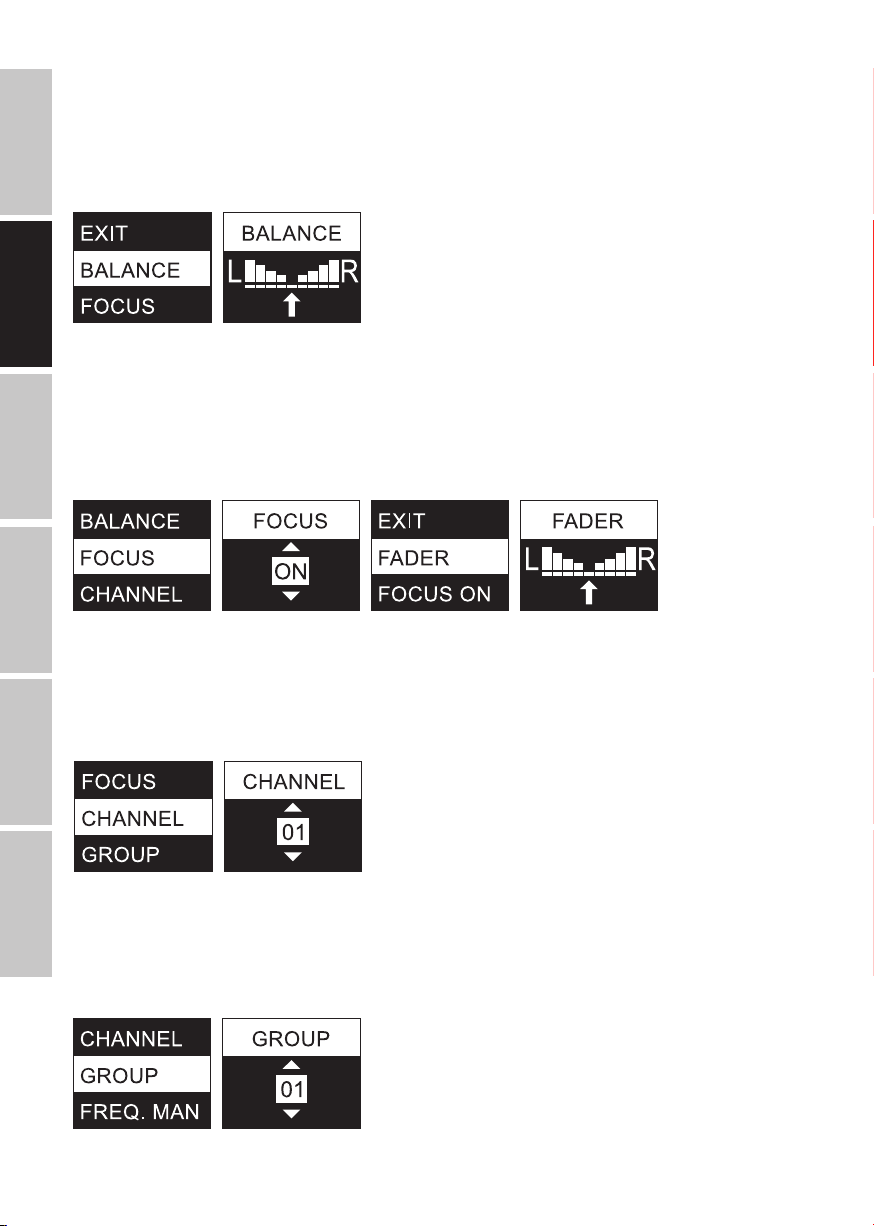
Betriebsart STEREO: Aktivieren Sie im Sender die Betriebsart STEREO. Ein am Sender anliegendes Stereo-Signal wird im Taschenempfänger auch in
Stereo wiedergegeben (Betriebsart FOCUS deaktivieren FOCUS OFF). Im Empfänger kann im Menüpunkt BALANCE die Balance zwischen dem linken
und rechten Kanal eingestellt werden. Drücken Sie für circa 2 Sekunden auf den Taster SEL (MENU), um in das Hauptmenü zu gelangen, wählen dann,
falls nicht schon ausgewählt, durch wiederholtes Drücken auf SEL den Menüpunkt BALANCE aus (hell hinterlegt) und drücken zum Bestätigen auf
den Taster . Stellen Sie nun die Balance nach Wunsch durch (ggf. wiederholtes) Drücken auf den Taster ein. Um den Menüpunkt zu verlassen,
drücken Sie auf SEL, wählen abermals durch Drücken auf SEL den Menüpunkt EXIT aus und drücken zum Bestätigen auf . Die Hauptanzeige wird
nach circa 5 Sekunden Inaktivität automatisch angezeigt.
DEUTSCHENGLISH
Betriebsart FOCUS: Die beiden Kanäle links und rechts werden mittig wiedergegeben und das Lautstärkeverhältnis der beiden Kanäle kann direkt
am Taschenempfänger eingestellt werden (z.B. linker Kanal Mischpult Mono-Summe, rechter Kanal Solo-Gesang). Aktivieren Sie im Sender die
Betriebsart STEREO. Drücken Sie am Taschenempfänger für circa 2 Sekunden auf den Taster SEL (MENU), um in das Hauptmenü zu gelangen, wählen
FRANCAIS
dann durch wiederholtes Drücken auf SEL den Menüpunkt FOCUS aus (hell hinterlegt) und drücken zum Bestätigen auf den Pfeiltaster . Drücken
Sie abermals auf , um die Betriebsart FOCUS zu aktivieren (FOCUS ON). Bestätigen Sie durch Drücken auf SEL und wählen nun den Menüpunkt
FADER durch ggf. wiederholtes Drücken auf SEL aus und drücken auf . Stellen Sie nun das Lautstärkeverhältnis nach Wunsch durch (ggf. wiederholtes) Drücken auf ein. Um den Menüpunkt zu verlassen, drücken Sie auf SEL, wählen abermals durch Drücken auf SEL den Menüpunkt EXIT aus
und drücken zum Bestätigen auf . Die Hauptanzeige wird nach circa 5 Sekunden Inaktivität automatisch angezeigt.
ESPAÑOL
FREQUENZKANAL EINSTELLEN (CHANNEL)
Drücken Sie für circa 2 Sekunden auf den Taster SEL (MENU), um in das Hauptmenü zu gelangen, wählen dann durch wiederholtes Drücken auf SEL
den Menüpunkt CHANNEL aus (hell hinterlegt) und drücken zum Bestätigen auf den Taster . Wählen Sie nun den gewünschten Frequenzkanal
durch (ggf. wiederholtes) Drücken auf den Taster aus. Um den Menüpunkt zu verlassen, drücken Sie auf SEL, wählen abermals durch (ggf. wieder-
POLSKI
holtes) Drücken auf SEL den Menüpunkt EXIT aus und drücken zum Bestätigen auf . Die Hauptanzeige wird nach circa 5 Sekunden Inaktivität
automatisch angezeigt.
ITALIANO
FREQUENZGRUPPE EINSTELLEN (GROUP)
Drücken Sie für circa 2 Sekunden auf den Taster SEL (MENU), um in das Hauptmenü zu gelangen, wählen dann durch wiederholtes Drücken auf
SEL den Menüpunkt GROUP aus (hell hinterlegt) und drücken zum Bestätigen auf den Taster . Wählen Sie nun die gewünschte Frequenzgruppe
(modellabhängig) durch (ggf. wiederholtes) Drücken auf den Taster aus. Um den Menüpunkt zu verlassen, drücken Sie auf SEL, wählen abermals
durch (ggf. wiederholtes) Drücken auf SEL den Menüpunkt EXIT aus und drücken zum Bestätigen auf . Die Hauptanzeige wird nach circa 5 Sekunden
Inaktivität automatisch angezeigt.
30
Page 31

FUNKFREQUENZ MANUELL EINSTELLEN (FREQ. MAN.)
Drücken Sie für circa 2 Sekunden auf den Taster SEL (MENU), um in das Hauptmenü zu gelangen, wählen dann durch wiederholtes Drücken auf SEL
den Menüpunkt FREQ. MAN. aus (hell hinterlegt) und drücken zum Bestätigen auf den Taster . Wählen Sie nun den Bereich der Funkfrequenz
unter 820, 830 oder 860 MHz durch (ggf. wiederholtes) Drücken auf den Taster aus und drücken abermals auf SEL, um nun die Frequenz in 1 MHz
Schritten mit Hilfe des Tasters einzustellen. Drücken Sie dann auf den Taster SEL, um die Funkfrequenz in 100kHz-Schritten durch Drücken auf den
Taster einzustellen und nochmals auf SEL, um die Funkfrequenz in 25 kHz Schritten einzustellen. Um den Menüpunkt zu verlassen, drücken Sie
auf SEL, wählen abermals durch (ggf. wiederholtes) Drücken auf SEL den Menüpunkt EXIT aus und drücken zum Bestätigen auf . Die Hauptanzeige
wird nach circa 5 Sekunden Inaktivität automatisch angezeigt.
RAUSCHSPERRE EINSTELLEN (SQUELCH)
Die 3-stuge Rauschsperre verhindert unerwünschte Nebengeräusche, wenn der Sender ausgeschaltet ist. Darüber hinaus werden auch plötzlich
auftretende Störgeräusche unterdrückt, falls das vom Sender an den Empfänger übertragene Signal nicht stark genug ist (z.B. durch zu große
Distanz). VORSICHT! Achten Sie VOR dem Einstellen der Rauschsperre darauf, dass die Lautstärke des Empfängers auf einen möglichst niedrigen
Level eingestellt ist, beim Verändern der Rauschsperren-Schwelle können laute Nebengeräusche auftreten, die unter Umständen Gehörschäden
und Schäden an angeschlossenen Kopf-oder Ohrhörern verursachen. Stellen Sie die Rauschsperre (bei ausgeschaltetem Sender) auf die niedrigste
Einstellung ein, bei der Nebengeräusche noch wirksam unterdrückt werden (LOW / MID / HI). In der Einstellung „HI“ kann sich unter ungünstigen
Umständen die Übertragungsreichweite verringern. Drücken Sie für circa 2 Sekunden auf den Taster SEL (MENU), um in das Hauptmenü zu gelangen,
wählen dann durch wiederholtes Drücken auf SEL den Menüpunkt SQUELCH aus (hell hinterlegt) und drücken zum Bestätigen auf den Taster .
Wählen Sie nun die gewünschte Einstellung durch (ggf. wiederholtes) Drücken auf den Taster aus. Um den Menüpunkt zu verlassen, drücken Sie
auf SEL, wählen abermals durch (ggf. wiederholtes) Drücken auf SEL den Menüpunkt EXIT aus und drücken zum Bestätigen auf . Die Hauptanzeige
wird nach circa 5 Sekunden Inaktivität automatisch angezeigt.
ENGLISH
DEUTSCHFRANCAIS
ESPAÑOL
DISPLAYHELLIGKEIT EINSTELLEN (DISPLAY)
Drücken Sie für circa 2 Sekunden auf den Taster SEL (MENU), um in das Hauptmenü zu gelangen, wählen dann durch wiederholtes Drücken auf SEL
den Menüpunkt DISPLAY aus (hell hinterlegt) und drücken zum Bestätigen auf den Taster . Wählen Sie nun die gewünschte Einstellung durch (ggf.
wiederholtes) Drücken auf den Taster aus (HI = Helligkeit hoch / LOW = Helligkeit niedrig). Um den Menüpunkt zu verlassen, drücken Sie auf SEL,
wählen abermals durch (ggf. wiederholtes) Drücken auf SEL den Menüpunkt EXIT aus und drücken zum Bestätigen auf . Die Hauptanzeige wird
nach circa 5 Sekunden Inaktivität automatisch angezeigt.
HAUPTMENÜ VERLASSEN (EXIT)
Um das Hauptmenü zu verlassen und zur Hauptanzeige zurückzugelangen, wählen Sie durch wiederholtes Drücken auf SEL den Menüpunkt EXIT aus
(hell hinterlegt) und drücken auf den Taster . Nach circa 5 Sekunden Inaktivität wird die Hauptanzeige automatisch angezeigt.
ITALIANO POLSKI
31
Page 32

BATTERIESTATUS
Der Ladestatus der Batterien wird im Display angezeigt und stetig aktualisiert (Hauptanzeige A). Bei voll geladenen Batterien erscheint das Symbol
, ist ca. 70% Ladestatus erreicht, das Symbol , bei ca. 30% . Sobald ein kritisch niedriger Ladestatus erreicht ist, wechselt die
Anzeige im Display etwa alle 3 Sekunden auf „LOW BATTERY“, das Symbol für „Batterie schwach“ erscheint und als akustisches Warnsignal
wird ein Sinuston bei circa 500Hz über die Kopfhörerbuchse ausgegeben. Ersetzen Sie nun umgehend die verbrauchten Batterien.
DEUTSCHENGLISH
FEHLERSUCHE
PROBLEM ANZEIGE LÖSUNG
Kein Audiosignal oder zu
FRANCAIS
niedriger Pegel
Empfänger: Empfang wird durch RF-LED
nicht angezeigt.
Überprüfen Sie, ob der Sender eingeschaltet ist.
Empfänger: Displaybeleuchtung ist abgeschaltet Überprüfen Sie, ob der Empfänger eingeschaltet und der
Empfänger: Empfang wird durch RF-LED
nicht angezeigt.
Sender: Gerät ist eingeschaltet. Audiosignal liegt an.
ESPAÑOL
POLSKI
Empfänger: Empfang wird durch RF-LED angezeigt. Überprüfen Sie, ob ein Audiosignal am Sender anliegt.
Verzerrungen und
Störgeräusche
ITALIANO
Verzerrter Klang Empfänger: „LOW BATTERY“ wird angezeigt .
Empfänger: Empfang wird durch RF-LED angezeigt. Entfernen Sie mögliche Quellen für Interferenzen (Digital-
Empfänger: Peak-Anzeige AF PK im Empfänger- und
Sender-Display wird angezeigt .
Ladestatus der Batterien ausreichend ist.
Überprüfen, ob Funkfrequenz von Sender und
Empfänger übereinstimmt.
Überprüfen Sie die Sendeleistung.
Verringern Sie den Abstand zwischen Sender
und Empfänger.
Stellen Sie sicher, dass zwischen Sender und Empfänger
eine direkte Sichtverbindung besteht.
Stellen Sie sicher, dass die Antennen von Sender und
Empfänger korrekt angeschlossen, nicht verdeckt und
nicht geknickt sind.
Verringern Sie die Stärke der Rauschunterdrückung
(SQUELCH)
Erhöhen Sie ggf. den Signal-Pegel vom Zuspielgerät bzw.
überprüfen Sie die GAIN-Einstellung im Sender.
geräte, andere Funksysteme).
Erhöhen Sie die Stärke der Rauschunterdrückung
(SQUELCH) am Empfänger.
Ersetzen Sie die Batterien im Empfänger.
Überprüfen Sie am Kopfhörerausgang des Senders, ob das
anliegende Signal „sauber“ ist.
Verringern Sie ggf. den Signal-Pegel vom Zuspielgerät
bzw. senken Sie den Audio-Pegel GAIN im Sender.
32
Page 33

EMPFEHLUNGEN FÜR DIE FEHLERVERMEIDUNG
• Positionieren Sie bei der gleichzeitigen Verwendung eines Funksenders und eines Funkempfängers am Körper die beiden Geräte so weit
wie möglich voneinander entfernt.
• Bauen Sie Funkempfänger und Funksender nicht gemeinsam in ein Rack ein und positionieren ein Empfänger-Rack so weit wie möglich
von einem Sender-Rack entfernt.
• Halten Sie beim Rackeinbau zwischen Sendern bzw. Empfängern mindestens einen Abstand von einer halben Höheneinheit.
• Nutzen Sie separate Netzteile für Sender und Empfänger und verwenden Sie ein Netzteil nicht gemeinsam für Drahtlossysteme
unterschiedlicher Hersteller.
TECHNISCHE DATEN
Modellnummer: LDU5047IEMT LDU5051IEMT LDU505IEMT LDU506IEMT LDU508IEMT
Produkttyp: In-Ear-Monitoring In-Ear-Monitoring In-Ear-Monitoring In-Ear-Monitoring In-Ear-Monitoring
Typ: Sender Sender Sender Sender Sender
Funkfrequenzbereich: 470 – 490 MHz 514 – 542 MHz 584 – 608 MHz 655 – 679 MHz 823 – 832 MHz,
HF-Gruppen: 1 1 10 10 8
HF-Kanäle: 12 12 12 12 12
Übertragungsverfahren: FM, Mono / Stereo FM, Mono /Stereo FM, Mono /Stereo FM, Mono /Stereo FM, Mono /Stereo
Sendeleistung, nominal: 2 mW, 10 mW,
Antennengewinn: 2 dBi 2 dBi 2 dBi 2 dBi 2 dBi
Antennenanschluss: BNC BNC BNC BNC BNC
Audio-Frequenzgang (- 3dB): 35 Hz – 16000 Hz 35 Hz – 16000 Hz 35 Hz – 16000 Hz 35 Hz – 16000 Hz 35 Hz – 16000 Hz
Klirrfaktor (THD+N) bei 1 kHz, +4 dBu
Eingangssignal:
Signal-Rausch-Verhältnis bei 1 kHz,
A-bewertet:
Dynamikumfang bei 1 kHz, unbewertet: 88 dB 88 dB 88 dB 88 dB 88 dB
Eingangsempndlichkeit: - 9 dBu (alle Gain-
Max. Eingangspegel: 18 dBu
Gleichtaktunterdrückung, CMRR IEC: < 45 dB < 45 dB < 45 dB < 45 dB < 45 dB
Line-Eingänge: 2 2 2 2 2
Anschlüsse Line-Eingänge: XLR (symmetrisch)
Eingangsimpedanz: 12 kOhm 12 kOhm 12 kOhm 12 kOhm 12 kOhm
30 mW
< 0,3 % < 0,3 % < 0,3 % < 0,3 % < 0,3 %
93 dB 93 dB 93 dB 93 dB 93 dB
Regler in Vollaussteuerung,
Stereobetrieb)
(Gain-Regler
eingestellt auf
90, TX-Lautstärkeregler
eingestellt auf
38, Stereo-
betrieb)
/ 6,3-mm-
Stereoklinke
(TRS), Combo
2 mW, 10 mW,
30 mW
- 9 dBu (alle Gain-
Regler in Vollaussteuerung,
Stereobetrieb)
18 dBu
(Gain-Regler
eingestellt auf
90, TX-Lautstärkeregler
eingestellt auf
38, Stereo-
betrieb)
XLR (symmetrisch)
/ 6,3-mm-
Stereoklinke
(TRS), Combo
2 mW, 10 mW,
30 mW
- 9 dBu (alle Gain-
Regler in Vollaussteuerung,
Stereobetrieb)
18 dBu
(Gain-Regler
eingestellt auf
90, TX-Lautstärkeregler
eingestellt auf
38, Stereo-
betrieb)
XLR (symmetrisc h) / 6,3-mm-
Stereoklinke
(TRS), Combo
2 mW, 10 mW,
30 mW
- 9 dBu (alle Gain-
Regler in Vollaussteuerung,
Stereobetrieb)
18 dBu
(Gain-Regler
eingestellt auf
90, TX-Lautstärkeregler
eingestellt auf
38, Stereo-
betrieb)
XLR (symmetrisch)
/ 6,3-mm-
Stereoklinke
(TRS), Combo
863 – 865 MHz
823 – 832 MHz
2 mW, 10 mW,
30 mW
863 – 865 MHz
2 mW, 10 mW
- 9 dBu (alle Gain-
Regler in Vollaussteuerung,
Stereobetrieb)
18 dBu
(Gain-Regler
eingestellt auf
90, TX-Lautstärkeregler
eingestellt auf
38, Stereo-
betrieb)
XLR (symmetrisch)
/ 6,3-mm-
Stereoklinke
(TRS), Combo
ENGLISH
DEUTSCHFRANCAIS
ESPAÑOL
ITALIANO POLSKI
33
Page 34

Bedienelemente: POWER EIN/
Anzeigeelemente: Multifunktionales
Leistungsaufnahme, nominal: 3,5 W 3,5 W 3,5 W 3,5 W 3,5 W
DEUTSCHENGLISH
Betriebsspannung: 12 – 18 V DC 12 – 18 V DC 12 – 18 V DC 12 – 18 V DC 12 – 18 V DC
DC-Buchse: 5,3-mm-Hohl-
Umgebungstemperatur (Betrieb): 0 °C – 35 °C 0 °C – 35 °C 0 °C – 35 °C 0 °C – 35 °C 0 °C – 35 °C
Relative Luftfeuchtigkeit: < 80 %
FRANCAIS
Abmessungen (B x H x T): 212 x 43 x 123 mm 212 x 43 x 123 mm 212 x 43 x 123 mm 212 x 43 x 123 mm 212 x 43 x 123 mm
Gewicht: 0,66 kg
Zubehör (im Lieferumfang): Netzadapter,
ESPAÑOL
Modellnummer: LDU5047IEMR LDU5051IEMR LDU505IEMR LDU506IEMR LDU508IEMR
Produkttyp: In-Ear-Monitoring In-Ear-Monitoring In-Ear-Monitoring In-Ear-Monitoring In-Ear-Monitoring
Typ: Taschen-
POLSKI
Funkfrequenzbereich: 470 – 490 MHz 514 – 542 MHz 584 – 608 MHz 655 – 679 MHz 823 – 832 MHz,
HF-Gruppen: 1 1 10 10 8
HF-Kanäle: 12 12 12 12 12
Kopfhörerausgang: 3,5-mm-Stereo-
Min. Impedanz, Kopfhörer: 16 Ohm 16 Ohm 16 Ohm 16 Ohm 16 Ohm
ITALIANO
Max. Ausgangspegel, Kopfhörer: 80 mW bei
Audio-Frequenzgang: 40 Hz – 16000 Hz 40 Hz – 16000 Hz 40 Hz – 16000 Hz 40 Hz – 16000 Hz 40 Hz – 16000 Hz
Übersprechen L/R, 100 Hz / 1 kHz / 10 kHz: 55 / 55 / 53 dB 55 / 55 / 53 dB 55 / 55 / 53 dB 55 / 55 / 53 dB 55 / 55 / 53 dB
Eigenrauschen: 5,5 µVrms
Antennenanschluss: Gewinde-
Bedienelemente: EIN/AUS/LAUT-
AUS-Schalter,
MENÜ DrehDrück-Regler,
Kopfhörer-Lautstärke
OLED-Display
steckerbuchse,
positiver Innenkontakt
(nicht
kondensierend)
(mit Antenne)
BNC-Antenne,
19"-Rack-Montagekit
empfänger,
Non-Diversity
klinkenbuchse
33 Ohm /
33 mW bei
16 Ohm
(A-bewertet)
anschluss
STÄRKE, AUSWAHL,
POWER EIN/
AUS-Schalter,
MENÜ DrehDrück-Regler,
Kopfhörer-Lautstärke
Multifunktionales
OLED-Display
5,3-mm-Hohlsteckerbuchse,
positiver Innenkontakt
< 80 %
(nicht
kondensierend)
0,66 kg
(mit Antenne)
Netzadapter,
BNC-Antenne,
19"-Rack-Montagekit
Taschenempfänger,
Non-Diversity
3,5-mm-Stereoklinkenbuchse
80 mW bei
33 Ohm /
33 mW bei
16 Ohm
5,5 µVrms
(A-bewertet)
Gewindeanschluss
EIN/AUS/LAUTSTÄRKE, AUSWAHL,
34
POWER EIN/
AUS-Schalter,
MENÜ DrehDrück-Regler,
Kopfhörer-Lautstärke
Multifunktionales
OLED-Display
5,3-mm-Hohlsteckerbuchse,
positiver Innenkontakt
< 80 %
(nicht
kondensierend)
0,66 kg
(mit Antenne)
Netzadapter,
BNC-Antenne,
19"-Rack-Montagekit
Taschenempfänger,
Non-Diversity
863 – 865 MHz
3,5-mm-Stereoklinkenbuchse
80 mW bei
33 Ohm /
33 mW bei
16 Ohm
5,5 µVrms
(A-bewertet)
Gewindeanschluss
EIN/AUS/LAUTSTÄRKE, AUSWAHL,
Page 35

Anzeigeelemente: Multifunktionales
OLED-Display,
HF-LED
Leistungsaufnahme, nominal: 0,7 W 0,7 W 0,7 W 0,7 W 0,7 W
Betriebsspannung: 2 x 1,5 V DC
AA-Batterien
Umgebungstemperatur (Betrieb): 0 °C – 35 °C 0 °C – 35 °C 0 °C – 35 °C 0 °C – 35 °C 0 °C – 35 °C
Relative Luftfeuchtigkeit: < 80 %
(nicht
kondensierend)
Abmessungen (B x H x T, ohne Antenne): 64 x 100 x 24 mm 64 x 100 x 24 mm 64 x 100 x 24 mm 64 x 100 x 24 mm 64 x 100 x 24 mm
Gewicht: 0,095 kg 0,095 kg 0,095 kg 0,095 kg 0,095 kg
Zubehör (im Lieferumfang): Antenne mit
Gewinde, 2 x
AA-Batterien
Weitere Features: Zusätzliche
Batterie-Statusanzeige:
500-Hz-Signal
über Kopfhörerbuchse
Modellnummer: LDIEHP2
Produkttyp: Stereo-In-Ear-
Kopfhörer
Frequenzgang: 20 Hz – 20000 Hz
Impedanz: 33 Ohm
Audio-Anschluss: 3,5-mm-Stereo-
stecker
Kabel: 1,27 m
(abtrennbar)
Gewicht: 0,016 kg
Zubehör (im Lieferumfang): 3 Paar Silikon
Ohrpassstücke
und 3 Paar
Schaumstoff
Ohrpassstücke
Multifunktionales
OLED-Display,
HF-LED
2 x 1,5 V DC
AA-Batterien
< 80 %
(nicht
kondensierend)
Antenne mit
Gewinde, 2 x
AA-Batterien
Zusätzliche
Batterie-Statusanzeige:
500-Hz-Signal
über Kopfhörerbuchse
Multifunktionales
OLED-Display,
HF-LED
2 x 1,5 V DC
AA-Batterien
< 80 %
(nicht
kondensierend)
Antenne mit
Gewinde, 2 x
AA-Batterien
Zusätzliche
Batterie-Statusanzeige:
500-Hz-Signal
über Kopfhörerbuchse
Multifunktionales
OLED-Display,
HF-LED
2 x 1,5 V DC
AA-Batterien
< 80 %
(nicht
kondensierend)
Antenne mit
Gewinde, 2 x
AA-Batterien
Zusätzliche
Batterie-Statusanzeige:
500-Hz-Signal
über Kopfhörerbuchse
Multifunktionales
OLED-Display,
HF-LED
2 x 1,5 V DC
AA-Batterien
< 80 %
(nicht
kondensierend)
Antenne mit
Gewinde, 2 x
AA-Batterien
Zusätzliche
Batterie-Statusanzeige:
500-Hz-Signal
über Kopfhörerbuchse
ENGLISH
DEUTSCHFRANCAIS
ESPAÑOL
35
ITALIANO POLSKI
Page 36

HERSTELLERERKLÄRUNGEN
HERSTELLERGARANTIE & HAFTUNGSBESCHRÄNKUNG
Unsere aktuellen Garantiebedingungen und Haftungsbeschränkung nden Sie unter: https://cdn-shop.adamhall.com/media/pdf/MANUFACTURERS-
DECLARATIONS_LD_SYSTEMS.pdf. Im Service Fall wenden Sie sich bitte an Adam Hall GmbH, Adam-Hall-Str. 1,
61267 Neu Anspach / E-Mail Info@adamhall.com / +49 (0)6081 / 9419-0.
KORREKTE ENTSORGUNG DIESES PRODUKTS
(Gültig in der Europäischen Union und anderen europäischen Ländern mit Mülltrennung) Dieses Symbol auf dem Produkt oder dazugehörigen
Dokumenten weist darauf hin, dass das Gerät am Ende der Produktlebenszeit nicht zusammen mit dem normalen Hausmüll entsorgt werden
darf, um Umwelt- oder Personenschäden durch unkontrollierte Abfallentsorgung zu vermeiden. Bitte entsorgen Sie dieses Produkt getrennt von
DEUTSCHENGLISH
anderen Abfällen und führen es zur Förderung nachhaltiger Wirtschaftskreisläufe dem Recycling zu. Als Privatkunde erhalten Sie Informationen zu
umweltfreundlichen Entsorgungsmöglichkeiten über den Händler, bei dem das Produkt erworben wurde, oder über die entsprechenden regionalen
Behörden. Als gewerblicher Nutzer kontaktieren Sie bitte Ihren Lieferanten und prüfen die ggf. vertraglich vereinbarten Konditionen zur Entsorgung der
Geräte. Dieses Produkt darf nicht zusammen mit anderen gewerblichen Abfällen entsorgt werden.
CE-Konformität
Hiermit erklärt die Adam Hall GmbH, dass dieses Produkt folgenden Richtlinien entspricht (soweit zutreffend):
R&TTE (1999/5/EG) bzw. RED (2014/53/EU) ab Juni 2017
Niederspannungsrichtlinie (2014/35/EU)
EMV-Richtlinie (2014/30/EU)
FRANCAIS
RoHS (2011/65/EU)
Die vollständige Konformitätserklärung nden Sie unter www.adamhall.com.
Des Weiteren können Sie diese auch unter info@adamhall.com anfragen.
EG-KONFORMITÄTSERKLÄRUNG
Hiermit erklärt die Adam Hall GmbH, dass dieser Funkanlagentyp der Richtlinie 2014/53/EU entspricht.
Der vollständige Text der EU-Konformitätserklärung ist unter der folgenden
Internetadresse verfügbar: www.adamhall.com/compliance/
ESPAÑOL
POLSKI
ITALIANO
36
Page 37

FRANCAIS
VOUS AVEZ FAIT LE BON CHOIX!
Cet appareil a été développé et fabriqué en appliquant des exigences de qualité très élevées : il garantit des années de fonctionnement sans
problème. Grâce à de nombreuses années d‘expérience, LD Systems est un nom connu dans le domaine des produits audio haut de gamme. Veuillez
lire attentivement ce Manuel Utilisateur : vous apprendrez rapidement à utiliser votre appareil LD Systems de façon optimale.
Pour plus d‘informations sur LD Systems, visitez notre site Web, WWW.LD-SYSTEMS.COM
MESURES PRÉVENTIVES
1. Veuillez lire attentivement ce manuel.
2. Rangez tous les documents d‘information et d‘instructions en lieu sûr.
3. Veuillez suivre toutes les instructions
4. Observez tous les messages d‘avertissement N‘enlevez pas de l‘appareil les étiquettes de sécurité ou autres informations.
5. N‘utilisez l‘appareil que pour des applications et de la façon appropriées.
6. Utilisez exclusivement des pieds et des dispositifs de xation stables et adaptés lorsque l‘appareil est utilisé en installation xe. Assurez-vous que
les xations murales ont été montées correctement, et qu‘elles sont sécurisées. Vériez que l‘appareil est installé en toute sécurité, et qu‘il ne peut
pas tomber.
7. Lors de l‘installation, observez les règlementations de sécurité en vigueur dans votre pays.
8. N‘installez et n‘utilisez pas l‘appareil à proximité de radiateurs, d‘accumulateurs de chaleur, de fours ou de toute autre source de chaleur. Vériez
que l‘appareil est installé de façon à bénécier en permanence d‘un refroidissement efcace et qu‘il ne peut pas chauffer de façon excessive.
9. Ne placez aucune source de amme sur l‘appareil – par exemple, une bougie allumée.
10. Ne bloquez pas les ouïes d‘aération. Éviter toute exposition directe aux rayons du soleil !
11. Gardez une distance minimale de 20 cm autour et au-dessus de l‘appareil.
12. N‘utilisez pas l‘appareil à proximité immédiate d‘eau (à moins qu‘il ne s‘agisse d‘un appareil conçu pour une utilisation en extérieur – dans ce cas,
respectez les instructions correspondantes ci après) Ne mettez pas l‘appareil en contact avec des matériaux, des liquides ou des gaz inammables.
13. Vériez qu‘aucune projection ou liquide ne puisse s‘introduire dans l‘appareil. Ne posez sur l‘appareil aucun objet renfermant du liquide : vase,
verre d‘eau...
14. Vériez qu‘aucun petit objet ne puisse tomber à l‘intérieur de l‘appareil.
15. N‘utilisez avec cet appareil que des accessoires recommandés et approuvés par le fabricant.
16. N‘ouvrez pas l‘appareil, et n‘essayez pas de le modier.
17. Lors du branchement de l‘appareil, sécurisez le passage du câble secteur, an d‘éviter tout dommage ou accident, par exemple quelqu‘un qui
trébuche sur le câble.
18. Lors du transport, vériez que l‘appareil ne peut tomber, ce qui pourrait provoquer des dommages matériels et/ou corporels.
19. Si votre appareil ne fonctionne plus correctement, que de l‘eau ou des objets ont pénétré à l‘intérieur, ou qu‘il a été endommagé de quelque
façon que ce soit, éteignez-le immédiatement et débranchez sa prise secteur (s‘il s‘agit d‘un appareil alimenté). Cet appareil ne doit être réparé que
par un personnel autorisé.
20. Pour le nettoyage de l‘appareil, utilisez un chiffon sec.
21. Observez toutes les réglementations en vigueur dans votre pays pour mettre l‘appareil au rebut. Lorsque vous jetez l‘emballage de l‘appareil,
veuillez séparer plastique, papier et carton.
22. Les lms plastique doivent être mis hors de portée des enfants.
23. Veuillez noter que les changements ou modications n‘ayant pas été expressément approuvés par la partie responsable de la conformité
pourraient annuler le droit accordé à l‘utilisateur de faire fonctionner l‘équipement.
APPAREILS RELIÉS AU SECTEUR
24. ATTENTION : Si le câble de l‘appareil est muni d‘un l de terre, il doit être relié à une prise murale avec terre. Ne désactivez jamais la mise à la
terre d‘un appareil.
25. N‘allumez pas l‘appareil immédiatement s‘il a subi une grande différence de température ambiante (par exemple, lors du transport). L‘humidité
et la condensation pourraient l‘endommager. Ne mettez l‘appareil sous tension que lorsqu‘il est parvenu à la température de la pièce.
26. Avant de relier l‘appareil à la prise murale, vériez que la valeur et la fréquence de tension secteur sur laquelle il est réglé correspondent bien
à la valeur et à la fréquence de la tension secteur locale. Si l‘appareil possède un sélecteur de tension, ne le branchez sur la prise murale qu‘après
avoir vérié que la valeur réglée correspond à la valeur effective de la tension secteur. Si la che du cordon secteur ou du bloc adaptateur livré avec
votre appareil ne correspond pas au format de votre prise murale, veuillez consulter un électricien.
27. Ne piétinez pas le câble secteur. Assurez-vous que le câble secteur n‘est pas trop pincé, notamment au niveau de l‘arrière de l‘appareil (ou de son
adaptateur secteur) et de la prise murale.
28. Lors du branchement de l‘appareil, vériez que l‘accès au câble secteur ou au bloc adaptateur reste facile. Sortez la che secteur de la prise
murale dès que vous n‘utilisez pas l‘appareil pendant un certain temps, ou si vous désirez nettoyer l‘appareil. Pour ce faire, tirez toujours sur la che
elle-même, ou sur le bloc secteur lui-même ; ne tirez jamais sur le câble. Ne manipulez jamais le câble secteur ou l‘adaptateur secteur avec des
mains mouillées.
29. N‘éteignez/rallumez pas l‘appareil rapidement plusieurs fois de suite : vosu risquez de réduire la longévité de ses composants internes.
30. CONSEIL IMPORTANT : Ne remplacez le fusible que par un fusible de même type et du même calibre. Si le fusible fond de façon répétée, veuillez
consulter un centre de réparations agréé.
31. Pour séparer complètement l‘appareil du secteur, débranchez le cordon secteur ou l‘adaptateur de la prise murale.
32. Si votre appareil est muni d‘un connecteur secteur verrouillable (Volex), il faut d‘abord déverrouiller le mécanisme avant d‘enlever le cordon secteur. Attention, lorsque vous retirez le câble secteur, à ne pas faire bouger l‘appareil, ce qui pourrait se traduire par un risque de chute, de blesser
quelqu‘un, ou tout autre dommage. Manipulez toujours le cordon secteur avec soin.
ENGLISH
DEUTSCHFRANCAIS
ESPAÑOL
ITALIANO POLSKI
37
Page 38

33. Débranchez la che secteur ou l‘adaptateur de la prise murale en cas d‘orage, ou si vous n‘utilisez pas l‘appareil pendant une longue période.
34. L’appareil ne peut pas être utilisé par des personnes (y compris des enfants) ayant des capacités physiques, sensorielles ou mentales limitées
ou un manque d’expérience et de connaissances.
35. On doit interdire aux enfants de jouer avec l’appareil.
36. Si le câble d’alimentation de l’appareil est endommagé, l’appareil ne peut pas être utilisé. Le cordon d’alimentation doit être remplacé par un
câble approprié ou un module spécial provenant d’un centre de service agréé.
ATTENTION :
Ne démontez jamais le couvercle de l‘appareil, vous risquez de recevoir un choc électrique. L‘appareil
ne renferme aucune pièce ni composant réparable ou remplaçable par l‘utilisateur. Ne conez
DEUTSCHENGLISH
Le pictogramme en forme de triangle équilatéral contenant un éclair terminé d‘une èche avertit l‘utilisateur de la présence d‘une
tension dangereuse à l‘intérieur de l‘appareil, tension susceptible de provoquer un choc électrique.
Le pictogramme en forme de triangle équilatéral renfermant un point d‘exclamation signale à l‘utilisateur la présence d‘instructions
importantes concernant l‘utilisation ou l‘entretien de l‘appareil.
l‘entretien et la réparation qu‘à un personnel qualié.
FRANCAIS
Attention ! Cet appareil est conçu pour une utilisation à une altitude maximale de 2000 m au-dessus du niveau de la mer.
Attention ! Ce produit ne convient pas à une utilisation dans les climats tropicaux.
ATTENTION ! NIVEAUX SONORES ÉLEVÉS SUR LES PRODUITS AUDIO
ESPAÑOL
Cet appareil a été conçu en vue d‘une utilisation professionnelle. L‘utilisation commerciale de cet appareil est soumise aux réglementations et
directives en vigueur dans votre pays en matière de prévention d‘accident. En tant que fabricant, Adam Hall est tenu de vous avertir formellement
des risques relatifs à la santé. Risques provoqués par une exposition prolongée à des niveaux sonores élevés : Lors de l‘utilisation de ce produit, il
est possible d‘atteindre des niveaux de pression sonore (exprimés en dB SPL) élevés, susceptibles de provoquer des dommages auditifs irréparables
chez les artistes, les techniciens et le public. Évitez toute exposition prolongée à des niveaux de pression sonore élevés (supérieurs à 90 dB SPL).
INTRODUCTION
Une liberté de mouvement totale sur scène avec toujours un son de retour parfait directement dans l’oreille, tel était notre objectif lorsque nous
POLSKI
avons développé les systèmes d’in-ear monitoring sans l U500 en Allemagne. Du fait de leur design clair et moderne et de leur facilité d’utilisation,
ils sont le choix idéal également pour les débutants. La transmission radio able et la réponse en basses fréquences de 40Hz à 16kHz garantissent
des performances professionnelles. Les sets intra-auriculaires U500 sont disponibles en cinq versions différentes suivant les bandes de fréquences
utilisées.
LDU5047IEM – Système d’in-ear monitoring 470 - 490MHz
LDU5051IEM – Système d’in-ear monitoring 514 - 542MHz
LDU505IEM – Système d’in-ear monitoring 584 - 608MHz
LDU506IEM – Système d’in-ear monitoring 655 - 679MHz
ITALIANO
LDU508IEM – Système d’in-ear monitoring 823 - 832MHz + 863 - 865MHz
• In-ear monitoring able avec une portée de plus de 100m
• 96canaux au choix
• Puissance d’émission sélectionnable de 2, 10 ou 30mW PAR
• Synchronisation pratique par infrarouge
• Saisie de noms d’utilisateur et mémoire pour 10presets personnalisés
• Réponse en fréquence étendue
38
Page 39

• Égaliseur à 3bandes avec médianes paramétriques
• Limiteur commutable
• Mode stéréo ou mono au choix
• Monitoring direct via la sortie casque de l’émetteur
• Émetteur ceinture avec circuit de squelch commutable à trois niveaux
• Autonomie de l’émetteur ceinture de 10h avec deux piles AA
• Jusqu’à 12systèmes pouvant être utilisés simultanément
• Compatibilité entre les émetteurs U500® IEM et les émetteurs ceinture U300® IEM
Inclus dans la livraison du LDU50xIEM
Émetteur, antenne BNC, récepteur de poche, antenne du récepteur, bloc secteur, 2piles AA, kit de montage en rack 19“, mode d’emploi
Inclus dans la livraison du LDU50xIEMHP
Émetteur, antenne BNC, récepteur de poche, antenne du récepteur, écouteurs stéréo intra-auriculaires, bloc secteur, 2piles AA, kit de montage en
rack 19“, mode d’emploi
Remarque
Selon le pays, l’utilisation d’un système de micro sans l peut requérir une licence. Pour obtenir des informations détaillées, veuillez vous adresser
aux autorités compétentes de votre pays.
RACCORDEMENTS, ÉLÉMENTS DE COMMANDE ET D’AFFICHAGE
ÉMETTEUR
ENGLISH
DEUTSCHFRANCAIS
1 2
6
1
POWER
Interrupteur marche/arrêt. Appuyez sur la touche et maintenez-la enfoncée durant 1seconde environ pour mettre l’appareil en marche ou l’arrêter.
Appuyez brièvement (!) sur la touche pour accéder directement à l’écran principal depuis le menu d’édition.
2
ÉCRAN OLED
Écran graphique OLED multifonction permettant d’afcher la fréquence de transmission, le registre et le canal de fréquences, le nom d’utilisateur
personnalisé, le numéro de preset et le niveau audio pour le canal d’entrée gauche et droit. Le menu d’édition afche les options de menu, les
options de sous-menu et les options de modication correspondantes.
3
MENU
Encodeur rotatif à bouton poussoir permettant de parcourir le menu d’édition, d’ajuster les paramètres du système et de modier les valeurs
des options de menu correspondantes. Le volume général peut être directement réglé depuis l’écran principal en tournant l’encodeur rotatif à
bouton poussoir.
4
PHONES
Sortie casque avec prise jack stéréo 6,3mm permettant de contrôler directement sur l’émetteur le signal audio délivré. Le signal pour la sortie
casque est capturé avant le circuit MONO/STEREO et après le gain d’entrée (INPUT GAIN), le limiteur (LIMITER) et l’égaliseur (EQUALIZER). Le signal
de la sortie casque transite par un ltre passe-haut.
5
VOL
Potentiomètre de réglage du volume pour la sortie casque intégrée PHONES.
3
4
5
ESPAÑOL
ITALIANO POLSKI
39
Page 40

8
7
9
10
11
6
Interface infrarouge permettant de synchroniser les paramètres système du récepteur avec l’émetteur (par ex. la fréquence radio).
7
PRISE DC
Prise basse tension pour l’alimentation de l’appareil (12V CC 500mA, plus interne). Utilisez exclusivement
l’adaptateur réseau fourni.
DEUTSCHENGLISH
8
DÉCHARGE DE TRACTION DE CÂBLE
Utilisez la décharge de traction pour le câble exible de l’adaptateur réseau pour protéger la prise basse tension de l’émetteur et le
connecteur basse tension de l’adaptateur réseau des dommages non intentionnels et pour éviter une déconnexion
involontaire du connecteur.
9
AF INPUT LEFT / RIGHT
Entrées de ligne gauche et droite symétriques avec connecteurs de type Combo (XLR/jack) / 6,3mm.
FRANCAIS
10
ANTENNE
Connecteur BNC pour l’antenne de l’émetteur fournie.
11
ANTENNE DE L’ÉMETTEUR
Antenne de l’émetteur avec connecteur BNC.
ESPAÑOL
POLSKI
ITALIANO
40
12
13
14
15
RÉCEPTEUR DE POCHE
12
ANTENNE
Antenne amovible du récepteur de poche. Pour une réception optimale, ne pas la couvrir
ou la plier. Veillez à ce que l’antenne soit solidement xée sur le récepteur pendant le
fonctionnement (serrer le letage de l’antenne à la main, sans outil).
13
ÉCRAN OLED
Écran graphique OLED multifonction permettant d’afcher le registre de fréquences et le
canal radio, le nom d’utilisateur personnalisé, l’intensité du signal et le niveau de charge des
piles ainsi que le niveau audio pour le canal gauche et droit. Le menu d’édition afche les
options de menu, les options de sous-menu et les options de modication correspondantes.
14
Interface infrarouge permettant de synchroniser les paramètres système du récepteur avec
l’émetteur (par ex. la fréquence radio).
Page 41

15
MENU / SEL ET
Boutons de commande permettant de parcourir le menu d’édition, d’ajuster les paramètres
du système et de modier les valeurs dans les options de menu correspondantes. Pour
rendre les boutons accessibles en vue de leur utilisation, appuyez sur les deux marquages
apparaissant sur les côtés du couvercle du compartiment à piles et faites-le coulisser sur le
boîtier en tirant vers le bas, jusqu’en butée.
16
PRISE D’ANTENNE
Prise d’antenne avec letage.
17
18
17
16
19
PHONES
Prise jack stéréo 3,5 mm pour le raccordement d’un écouteur ou d’un casque.
Affectation
des broches:
18
RF
La LED RF s’allume en présence d’un signal radio. Si la LED ne s’allume pas durant l’utilisation,
vériez si le canal radio du récepteur est bien réglé sur le canal radio de l’émetteur, ou
réduisez la distance entre le récepteur et l’émetteur.
19
ON / OFF - VOL
Tournez le potentiomètre de réglage du volume dans le sens des aiguilles d’une montre
au-delà du cran pour allumer le récepteur et de nouveau vers la droite pour augmenter
le volume. Tournez le potentiomètre dans le sens inverse des aiguilles d’une montre pour
réduire le volume, et au-delà du cran pour éteindre le récepteur. Maintenez toujours le
volume à un niveau agréable pour éviter tout dommage auditif.
ENGLISH
DEUTSCHFRANCAIS
ESPAÑOL
20
COMPARTIMENT À PILES
Pour changer les piles, ouvrez le compartiment à piles du récepteur de poche en appuyant
simultanément sur les marquages apparaissant sur les côtés du couvercle du compartiment
à piles, avant de le faire coulisser sur le boîtier en tirant vers le bas, jusqu’en butée. Retirez
les piles déchargées et insérez les nouvelles piles (2piles AA, LR6, alcalines) conformément
20
21
aux schémas gurant dans le compartiment à piles. Refermez ensuite le couvercle du compartiment à piles en le faisant coulisser sur le boîtier jusqu’à ce qu’il soit encliqueté. Si vous
n’utilisez pas le récepteur pendant une longue période, veuillez retirer les piles an d’éviter
qu’une éventuelle fuite ne l’endommage.
21
CLIP DE CEINTURE
Le récepteur de poche est équipé à l’arrière d’un clip de ceinture permettant de le xer à la
ceinture d’un pantalon, à une ceinture ou à un élément similaire.
ITALIANO POLSKI
41
Page 42

MODE D’EMPLOI DE L’ÉMETTEUR
Pour établir une liaison radio entre l’émetteur et le récepteur, le registre et le canal de fréquences ou la fréquence radio des deux appareils doivent
être identiques.
Lors de la mise en service du système de transmission sans l, assurez-vous de diriger le récepteur en contact visuel direct vers l’émetteur.
AFFICHAGE PRINCIPAL DE L’ÉCRAN
À la mise sous tension de l’émetteur, un message de bienvenue s’afche brièvement (WELCOME). L’écran principal met ensuite à disposition les
informations suivantes: Nom d’utilisateur personnalisé, numéro de preset, niveau des signaux d’entrée audio avec témoin de crête (Peak), registre
et canal de fréquences (GR.xx et CH.xx) et la fréquence radio actuelle en MHz.
DEUTSCHENGLISH
Nom d’utilisateur personnalisé
Niveau du signal audio / crête (PK) du canal droit
Registre et canal de fréquences
VOLUME
Depuis l’écran principal, le volume général peut être directement réglé de 00 à 50 en tournant l’encodeur rotatif à bouton poussoir MENU. Le
FRANCAIS
réglage effectué en tournant l’encodeur s’afche alors automatiquement à l’écran. Au bout d’environ 3secondes d’inactivité, l’écran principal
s’afche à nouveau automatiquement. Pour un afchage immédiat de l’écran principal, appuyez sur l’encodeur.
ESPAÑOL
SYNCHRONISATION PAR INFRAROUGE (IR SYNC RUN)
An de synchroniser le récepteur de poche avec la fréquence radio congurée sur le récepteur et le nom d’utilisateur personnalisé, dirigez l’interface infrarouge du récepteur en contact visuel direct vers l’interface infrarouge de l’émetteur (distance d’environ 10cm) et allumez le récepteur.
Appuyez ensuite sur l’encodeur rotatif à bouton poussoir de l’émetteur (MENU) pour accéder au menu principal, puis tournez-le pour sélectionner
l’option de menu IR SYNC RUN (mise en surbrillance). Appuyez une nouvelle fois sur MENU pour lancer le processus de synchronisation. Le processus
prend n au bout de quelques secondes et l’écran du récepteur afche brièvement la mention «IR SYNC » pour conrmer l’exécution réussie de
la synchronisation. Pour annuler le processus, appuyez sur MENU. Appuyez brièvement (!) sur POWER pour revenir directement à l’écran principal.
Celui-ci s’afche à nouveau automatiquement au bout d’environ 12secondes d’inactivité. Remarque: La lumière directe du soleil peut perturber le
processus de synchronisation.
POLSKI
CONFIGURATION DE L’UNITÉ RADIO (RF SETTINGS)
ITALIANO
Appuyez sur l’encodeur rotatif à bouton poussoir de l’émetteur (MENU) pour accéder au menu principal, puis tournez-le pour sélectionner l’option de
menu RF SETTINGS (mise en surbrillance). Appuyez une nouvelle fois sur l’encodeur pour accéder au sous-menu et tournez-le pour sélectionner l’option de sous-menu souhaitée, puis appuyez sur l’encodeur pour conrmer. Tournez l’encodeur pour modier une valeur et appuyez sur l’encodeur
pour conrmer la modication apportée. Les options de sous-menu et les informations associées sont présentées dans le tableau suivant. Appuyez
brièvement (!) sur POWER pour revenir directement à l’écran principal. Celui-ci s’afche à nouveau automatiquement au bout d’environ 12secondes
d’inactivité.
Numéro de preset
Niveau du signal audio / crête (PK) du canal gauche
Fréquence radio en MHz
42
Page 43

RF SETTINGS (Modier la valeur = tourner l’encodeur, conrmer la modication de valeur = appuyer sur l’encodeur)
GROUP U5047IEM Registre de fréquences 1
U5051IEM Registre de fréquences 1
U505IEM Registres de fréquences
1 - 10
U506IEM Registres de fréquences
1 - 10
U508IEM Registres de fréquences
1 - 8
CHANNEL Canaux de fréquences 1 - 12 Sélectionner le canal puis conrmer deux fois
FREQ MAN Régler la fréquence radio manu-
ellement
RF POWER Régler la puissance d’émission 470 - 490 MHz : 2 mW / 10 mW / 30 mW
EXIT RF SETT. Quitter le sous-menu (appuyer sur l’encodeur)
Informations relatives à la puissance d’émission et au réglage du circuit de squelch sur le récepteur de poche:
Sélectionnez une faible puissance d’émission si l’émetteur et le récepteur sont à proximité immédiate l’un de l’autre. Le circuit de squelch (Squelch)
du récepteur doit également être réglé à un niveau bas comme valeur de référence. En cas de distance plus importante entre l’émetteur et le
récepteur, sélectionnez une puissance d’émission plus élevée et réglez le circuit de squelch du récepteur en conséquence. Vous trouverez de plus
amples informations concernant le réglage du circuit de squelch à la section «RÉGLAGE DU CIRCUIT DE SQUELCH» du chapitre «MODE D’EMPLOI
DU RÉCEPTEUR DE POCHE» de ce manuel. Dans tous les cas, veillez à ce que l’émetteur et le récepteur soient en contact visuel direct et qu’aucun
obstacle ne puisse perturber la liaison radio entre l’émetteur et le récepteur.
Selon les situations, différents réglages peuvent s’avérer nécessaires pour un fonctionnement sans perturbations. Veuillez noter que l’utilisation
d’autres émetteurs à proximité peut provoquer des interférences de plus en plus fréquentes venant perturber la liaison radio. Le cas échéant, il est
possible d’éviter ces interférences en choisissant une autre fréquence radio.
ATTENTION! AVANT de régler le circuit de squelch, assurez-vous que le volume du récepteur est réglé sur le niveau le plus bas possible. La modication du seuil de squelch peut provoquer des bruits parasites forts susceptibles de causer des dommages auditifs et d’endommager les casques et
écouteurs connectés.
Sélectionner le registre puis conrmer deux fois
Étape 1 : Régler la fréquence par paliers de 1 MHz puis conrmer
Étape 2 : Régler la fréquence par paliers de 25 kHz puis conrmer
514 - 542 MHz : 2 mW / 10 mW / 30 mW
584 - 608 MHz : 2 mW / 10 mW / 30 mW
655 - 679 MHz : 2 mW / 10 mW / 30 mW
823 - 832 MHz : 2 mW / 10 mW / 30 mW, 863 - 865 MHz : 2 mW / 10 mW
ENGLISH
DEUTSCHFRANCAIS
ESPAÑOL
RÉGLAGES AUDIO (AUDIO SETTINGS)
Appuyez sur l’encodeur rotatif à bouton poussoir de l’émetteur (MENU) pour accéder au menu principal, puis tournez-le pour sélectionner l’option de
menu AUDIO SETTINGS (mise en surbrillance). Appuyez une nouvelle fois sur l’encodeur pour accéder au sous-menu et tournez-le pour sélectionner
l’option de sous-menu souhaitée. Appuyez sur l’encodeur pour valider. Tournez l’encodeur pour modier une valeur et appuyez sur l’encodeur pour
conrmer la modication apportée. Les options de sous-menu et les informations associées sont présentées dans le tableau suivant. Appuyez
brièvement (!) sur POWER pour revenir directement à l’écran principal. Celui-ci s’afche à nouveau automatiquement au bout d’environ 12secondes
d’inactivité.
ITALIANO POLSKI
43
Page 44

AUDIO SETTINGS (Modier la valeur = tourner l’encodeur, Conrmer la modication de valeur = appuyer sur l’encodeur)
INPUT GAIN LEFT Gain d’entrée du canal gauche 000 - 100 Pour un rapport signal/bruit optimal, réglez les
INPUT GAIN RIGHT Gain d’entrée du canal droit 000 - 100
LIMITER Activer/désactiver le limiteur d’entrée ON = activé (recommandé)
DEUTSCHENGLISH
MODE Réglage du mode Mono/Stéréo
FRANCAIS
EQ SETTINGS BASS EQ B: +/- 15dB Amplication des basses fréquences de - 15dB à + 15dB
ESPAÑOL
EXIT AUDIO SETT. Quitter le sous-menu (appuyer sur l’encodeur)
Le mode de fonctionnement sélectionné
s’afche à l’écran du récepteur (M = mono,
S = stéréo)
f: 60Hz / 80Hz / 100Hz /
200Hz
MIDDLE EQ B: +/- 15dB Amplication des fréquences médianes de - 15dB à + 15dB
f: 500 Hz / 1000 Hz / 1500 Hz
/ 2500 Hz
Q: 0.50 / 0.75 / 1.00 / 1.25 Réglage du critère de qualité
TREBLE EQ B: +/- 15dB Amplication des fréquences aiguës de - 15dB à + 15dB
f: 10.0 kHz / 12.5 kHz / 15.0 kHz
/ 17.5 kHz
EXIT EQ
SETT.
Quitter le menu de l’égaliseur (appuyer sur l’encodeur)
OFF = désactivé
MONO = Les signaux d’entrée gauche et droit sont sommés en
mono. Orientation du signal à gauche ou à droite sur le récepteur
(BALANCE).
STEREO = Restitution du signal d’entrée en stéréo. Réglage de la
balance sur le récepteur (BALANCE)
Activez le mode STEREO sur l’émetteur même si vous souhaitez
utiliser le mode FOCUS sur le récepteur de poche.
Réglage de la basse fréquence
Réglage de la fréquence médiane
Réglage de la fréquence aiguë
signaux gauche et droit au niveau le plus élevé
possible en veillant à ce que le témoin de crête (PEAK)
n’apparaisse pas à l’écran ou seulement pour une
courte durée an d’éviter la distorsion de signal. Si
nécessaire, réglez également le niveau de sortie de
la source.
POLSKI
NOM D’UTILISATEUR PERSONNALISÉ (NAME)
Appuyez sur l’encodeur rotatif à bouton poussoir de l’émetteur (MENU) pour accéder au menu principal, puis tournez-le pour sélectionner l’option
de menu NAME (mise en surbrillance) et appuyez sur l’encodeur pour conrmer. Saisissez ensuite un nom personnalisé (jusqu’à 8caractères) en
tournant l’encodeur pour sélectionner le premier caractère du nom (une lettre, un signe ou un chiffre) et appuyez sur l’encodeur pour conrmer.
S’ensuit la saisie du deuxième caractère, etc. Lorsque le nom est complet, appuyez une nouvelle fois sur l’encodeur pour conrmer la saisie.
Appuyez brièvement (!) sur POWER pour revenir directement à l’écran principal. Celui-ci s’afche à nouveau automatiquement au bout d’environ
12secondes d’inactivité.
ITALIANO
RÉGLAGE DE LA LUMINOSITÉ DE L’ÉCRAN (BRIGHTNESS)
Appuyez sur l’encodeur rotatif à bouton poussoir de l’émetteur (MENU) pour accéder au menu principal, puis tournez-le pour sélectionner l’option
de menu BRIGHTNESS (mise en surbrillance) et appuyez sur l’encodeur pour conrmer. Tournez l’encodeur pour sélectionner l’un des 3niveaux de
luminosité de l’écran proposés (HIGH = haut, MID = moyen, LOW = faible) et appuyez 2fois sur l’encodeur pour conrmer. Appuyez brièvement (!) sur
POWER pour revenir directement à l’écran principal. Celui-ci s’afche à nouveau automatiquement au bout d’environ 12secondes d’inactivité.
44
Page 45

VERROUILLAGE DES ÉLÉMENTS DE COMMANDE (PANEL LOCK)
Appuyez sur l’encodeur rotatif à bouton poussoir de l’émetteur (MENU) pour accéder au menu principal, puis tournez-le pour sélectionner l’option de
menu PANEL LOCK (mise en surbrillance) et appuyez sur l’encodeur pour conrmer. Pour verrouiller les éléments de commande, sélectionnez ON en
tournant l’encodeur et appuyez 2fois sur l’encodeur pour conrmer. Appuyez brièvement (!) sur POWER pour revenir directement à l’écran principal.
Celui-ci s’afche à nouveau automatiquement au bout d’environ 10secondes d’inactivité. Dès lors, si l’un des éléments de commande POWER ou
l’encodeur rotatif à bouton poussoir MENU est actionné, l’écran afche brièvement la mention «PANEL LOCK ON» et la modication des paramètres
est verrouillée. Pour déverrouiller les éléments de commande, appuyez sur l’encodeur rotatif à bouton poussoir et maintenez-le enfoncé durant
2secondes environ, puis sélectionnez OFF dans l’option de menu PANEL LOCK an d’autoriser de façon permanente la commande via les éléments
de commande.
ENREGISTREMENT DE PRESET (SAVE PRESET)
Les réglages effectués dans RF SETTINGS et AUDIO SETTINGS ainsi que le nom personnalisé peuvent être enregistrés dans 10presets différents au
maximum. Après avoir réalisé ces réglages, appuyez sur l’encodeur rotatif à bouton poussoir de l’émetteur (MENU) pour accéder au menu principal,
puis tournez-le pour sélectionner l’option de menu SAVE PRESET (mise en surbrillance) et appuyez sur l’encodeur pour conrmer. Tournez ensuite
l’encodeur pour sélectionner le numéro de preset que vous souhaitez utiliser pour l’enregistrement (01 - 10), appuyez sur l’encodeur pour conrmer,
puis sélectionnez YES en tournant l’encodeur et appuyez deux fois sur l’encodeur pour conrmer le processus. Si vous souhaitez annuler le processus, sélectionnez NO et conrmez également. Appuyez brièvement (!) sur POWER pour revenir directement à l’écran principal. Celui-ci s’afche à
nouveau automatiquement au bout d’environ 12secondes d’inactivité.
ENGLISH
DEUTSCHFRANCAIS
ESPAÑOL
CHARGEMENT DE PRESET (LOAD PRESET)
Appuyez sur l’encodeur rotatif à bouton poussoir de l’émetteur (MENU) pour accéder au menu principal, puis tournez-le pour sélectionner l’option de
menu LOAD PRESET (mise en surbrillance) et appuyez sur l’encodeur pour conrmer. Tournez ensuite l’encodeur pour sélectionner le numéro de preset que vous souhaitez charger (01 - 10), appuyez sur l’encodeur pour conrmer, puis sélectionnez YES en tournant l’encodeur et appuyez deux fois
sur l’encodeur pour conrmer le processus. Si vous souhaitez annuler le processus, sélectionnez NO et conrmez également. Appuyez brièvement (!)
sur POWER pour revenir directement à l’écran principal. Celui-ci s’afche à nouveau automatiquement au bout d’environ 12secondes d’inactivité.
CONSULTER LA VERSION DU LOGICIEL (SOFTWARE)
Appuyez sur l’encodeur rotatif à bouton poussoir de l’émetteur (MENU) pour accéder au menu principal, puis tournez-le pour sélectionner l’option de
menu SOFTWARE (mise en surbrillance). Appuyez brièvement (!) sur POWER pour revenir directement à l’écran principal. Celui-ci s’afche à nouveau
automatiquement au bout d’environ 12secondes d’inactivité.
ITALIANO POLSKI
45
Page 46

QUITTER LE MENU PRINCIPAL (EXIT)
Pour quitter le menu principal et revenir à l’écran principal, tournez l’encodeur rotatif à bouton poussoir pour sélectionner l’option de menu EXIT
(mise en surbrillance) et appuyez sur l’encodeur. Appuyez brièvement (!) sur POWER pour revenir directement à l’écran principal. Celui-ci s’afche à
nouveau automatiquement au bout d’environ 12secondes d’inactivité.
DEUTSCHENGLISH
MODE D’EMPLOI DU RÉCEPTEUR DE POCHE
Pour établir une liaison radio entre l’émetteur et le récepteur, le registre et le numéro de canal ou la fréquence radio des deux appareils doivent
être identiques.
Lors de la mise en service du système de transmission sans l, assurez-vous de diriger le récepteur en contact visuel direct vers l’émetteur.
AFFICHAGE PRINCIPAL DE L’ÉCRAN
FRANCAIS
Peu après la mise sous tension du récepteur de poche, l’afchage principal A indique les informations suivantes: Nom d’utilisateur personnalisé,
mode de fonctionnement, intensité du signal radio, niveau de charge des piles, registre et canal de fréquences.
Alternativement, l’afchage principal B indique la fréquence radio en MHz ainsi que le niveau du signal audio gauche et droit avec témoin
de crête (PK).
Appuyez brièvement sur la touche pour passer d’un afchage à l’autre.
ESPAÑOL
Afchage principal A
Nom d’utilisateur personnalisé
Mode Mono/Stéréo
Intensité du signal radio
Niveau de charge des piles
Afchage principal B
POLSKI
RÉGLAGE DE LA BALANCE OU DE LA RÉPARTITION DU VOLUME (BALANCE / FADER)
Mode MONO: Activez le mode MONO sur l’émetteur. Les deux canaux gauche et droit sont sommés en mono. Sur le récepteur, le signal mono peut
ITALIANO
être orienté à gauche ou à droite dans l’option de menu BALANCE. Appuyez sur la touche SEL (MENU) durant environ 2secondes pour accéder au
menu principal, puis, si ce n’est déjà fait, appuyez plusieurs fois sur SEL pour sélectionner l’option de menu BALANCE (mise en surbrillance) et appuy-
ez sur la touche pour conrmer. Orientez ensuite le signal à gauche ou à droite selon vos besoins en appuyant (plusieurs fois si nécessaire) sur
la touche . Pour quitter l’option de menu, appuyez sur SEL, sélectionnez l’option de menu EXIT en appuyant une nouvelle fois sur SEL et appuyez
sur pour conrmer. L’écran principal s’afche automatiquement au bout d’environ 5secondes d’inactivité.
Registre de fréquences
Canal de fréquences
Fréquence radio
Canal gauche
Niveau du signal audio / crête (PK)
Canal droit
46
Page 47

Mode STEREO: Activez le mode STEREO sur l’émetteur. Un signal stéréo présent sur l’émetteur est restitué en stéréo également dans le récepteur
de poche (désactiver le mode FOCUS: FOCUS OFF). Sur le récepteur, la balance entre le canal droit et gauche peut être réglée dans l’option de menu
BALANCE. Appuyez sur la touche SEL (MENU) durant environ 2secondes pour accéder au menu principal, puis, si ce n’est déjà fait, appuyez plusieurs
fois sur SEL pour sélectionner l’option de menu BALANCE (mise en surbrillance) et appuyez sur la touche pour conrmer. Réglez ensuite la
balance selon vos besoins en appuyant (plusieurs fois si nécessaire) sur la touche . Pour quitter l’option de menu, appuyez sur SEL, sélectionnez
l’option de menu EXIT en appuyant une nouvelle fois sur SEL et appuyez sur pour conrmer. L’écran principal s’afche automatiquement au bout
d’environ 5secondes d’inactivité.
Mode FOCUS: Les deux canaux gauche et droit sont restitués de façon centrée et la répartition du volume des deux canaux peut être réglée directement sur le récepteur de poche (par ex. le canal gauche pour la console de mixage sommée en mono, le canal droit pour le chant en solo). Activez
le mode STEREO sur l’émetteur. Appuyez sur la touche SEL (MENU) du récepteur de poche durant environ 2secondes pour accéder au menu principal,
puis appuyez plusieurs fois sur SEL pour sélectionner l’option de menu FOCUS (mise en surbrillance) et appuyez sur la èche pour conrmer.
Appuyez une nouvelle fois sur pour activer le mode FOCUS (FOCUS ON). Appuyez sur SEL pour conrmer, puis sélectionnez l’option de menu FADER
en appuyant plusieurs fois si nécessaire sur SEL et appuyez sur . Réglez ensuite la répartition du volume selon vos besoins en appuyant (plusieurs
fois si nécessaire) sur . Pour quitter l’option de menu, appuyez sur SEL, sélectionnez l’option de menu EXIT en appuyant une nouvelle fois sur SEL
et appuyez sur pour conrmer. L’écran principal s’afche automatiquement au bout d’environ 5secondes d’inactivité.
RÉGLAGE DU CANAL DE FRÉQUENCES (CHANNEL)
Appuyez sur la touche SEL (MENU) durant environ 2secondes pour accéder au menu principal, puis appuyez plusieurs fois sur SEL pour sélectionner
l’option de menu CHANNEL (mise en surbrillance) et appuyez sur la touche pour conrmer. Sélectionnez ensuite le canal de fréquences souhaité
en appuyant (plusieurs fois si nécessaire) sur la touche . Pour quitter l’option de menu, appuyez sur SEL, sélectionnez l’option de menu EXIT en
appuyant à nouveau sur SEL (plusieurs fois si nécessaire) et appuyez sur pour conrmer. L’écran principal s’afche automatiquement au bout
d’environ 5secondes d’inactivité.
ENGLISH
DEUTSCHFRANCAIS
ESPAÑOL
RÉGLAGE DU REGISTRE DE FRÉQUENCES (GROUP)
Appuyez sur la touche SEL (MENU) durant environ 2secondes pour accéder au menu principal, puis appuyez plusieurs fois sur SEL pour sélectionner
l’option de menu GROUP (mise en surbrillance) et appuyez sur la touche pour conrmer. Sélectionnez ensuite le registre de fréquences souhaité
(selon le modèle) en appuyant (plusieurs fois si nécessaire) sur la touche . Pour quitter l’option de menu, appuyez sur SEL, sélectionnez l’option
de menu EXIT en appuyant à nouveau sur SEL (plusieurs fois si nécessaire) et appuyez sur pour conrmer. L’écran principal s’afche automatiquement au bout d’environ 5secondes d’inactivité.
ITALIANO POLSKI
47
Page 48

RÉGLAGE MANUEL DE LA FRÉQUENCE RADIO (FREQ. MAN.)
Appuyez sur la touche SEL (MENU) durant environ 2secondes pour accéder au menu principal, puis appuyez plusieurs fois sur SEL pour sélectionner
l’option de menu FREQ. MAN. (mise en surbrillance) et appuyez sur la touche pour conrmer. Sélectionnez maintenant la plage de la fréquence
radio, soit 820, 830 ou 860MHz, en appuyant (plusieurs fois si nécessaire) sur la touche et appuyez une nouvelle fois sur SEL pour régler la
fréquence par paliers de 1MHz à l’aide de la touche . Appuyez ensuite sur la touche SEL pour régler la fréquence radio par paliers de 100kHz en
appuyant sur la touche et de nouveau sur SEL pour régler la fréquence radio par paliers de 25kHz. Pour quitter l’option de menu, appuyez sur SEL,
sélectionnez l’option de menu EXIT en appuyant à nouveau sur SEL (plusieurs fois si nécessaire) et appuyez sur pour conrmer. L’écran principal
s’afche automatiquement au bout d’environ 5secondes d’inactivité.
DEUTSCHENGLISH
RÉGLAGE DU CIRCUIT DE SQUELCH (SQUELCH)
Le circuit de squelch à 3niveaux permet d’éviter les crépitements indésirables lorsque l’émetteur est éteint. En outre, les sons parasites soudains
FRANCAIS
sont également éliminés si le signal transmis de l’émetteur au récepteur n’est pas assez fort (par ex. en raison d’une distance trop importante).
ATTENTION! AVANT de régler le circuit de squelch, assurez-vous que le volume du récepteur est réglé sur le niveau le plus bas possible. La modi-
cation du seuil de squelch peut provoquer des bruits parasites forts susceptibles de causer des dommages auditifs et d’endommager les casques
et écouteurs connectés. Réglez le circuit de squelch (lorsque l’émetteur est éteint) sur le niveau le plus bas permettant encore d’éliminer les
crépitements de manière efcace (LOW / MID / HI). Dans des circonstances défavorables, le niveau «HI» est susceptible de réduire la portée de la
transmission. Appuyez sur la touche SEL (MENU) durant environ 2secondes pour accéder au menu principal, puis appuyez plusieurs fois sur SEL pour
sélectionner l’option de menu SQUELCH (mise en surbrillance) et appuyez sur la touche pour conrmer. Sélectionnez ensuite le réglage souhaité
en appuyant (plusieurs fois si nécessaire) sur la touche . Pour quitter l’option de menu, appuyez sur SEL, sélectionnez l’option de menu EXIT en
appuyant à nouveau sur SEL (plusieurs fois si nécessaire) et appuyez sur pour conrmer. L’écran principal s’afche automatiquement au bout
d’environ 5secondes d’inactivité.
ESPAÑOL
POLSKI
RÉGLAGE DE LA LUMINOSITÉ DE L’ÉCRAN (DISPLAY)
Appuyez sur la touche SEL (MENU) durant environ 2secondes pour accéder au menu principal, puis appuyez plusieurs fois sur SEL pour sélectionner
l’option de menu DISPLAY (mise en surbrillance) et appuyez sur la touche pour conrmer. Sélectionnez ensuite le réglage souhaité en appuyant
(plusieurs fois si nécessaire) sur la touche (HI = haute luminosité / LOW = faible luminosité). Pour quitter l’option de menu, appuyez sur SEL,
sélectionnez l’option de menu EXIT en appuyant à nouveau sur SEL (plusieurs fois si nécessaire) et appuyez sur pour conrmer. L’écran principal
s’afche automatiquement au bout d’environ 5secondes d’inactivité.
ITALIANO
QUITTER LE MENU PRINCIPAL (EXIT)
Pour quitter le menu principal et revenir à l’écran principal, appuyez plusieurs fois sur SEL pour sélectionner l’option de menu EXIT (mise en surbrillance) et appuyez sur la touche . L’écran principal s’afche automatiquement au bout d’environ 5secondes d’inactivité.
48
Page 49

NIVEAU DE CHARGE DES PILES
L’état de charge des piles s’afche à l’écran et s’actualise en permanence (afchage principal A). Lorsque les piles sont complètement chargées,
le symbole
de charge est d’environ 30%. Dès que l’état de charge atteint un niveau critiquement bas, l’écran afche la mention «LOW BATTERY» toutes les
3secondes environ, le symbole de «batterie faible»
guise de signal d’avertissement acoustique. Remplacez alors immédiatement les piles déchargées.
apparaît. Si l’état de charge atteint environ 70%, c’est le symbole qui lui succède, puis le symbole lorsque l’état
apparaît et une tonalité sinusoïdale est émise à environ 500Hz, via la prise casque, en
DIAGNOSTIC DES PANNES
PROBLÈME AFFICHAGE SOLUTION
Pas de signal audio ou
niveau trop faible
Distorsions et sons
parasites
Son distordu Récepteur: La mention «LOW BATTERY» s’afche.
Récepteur: La LED RF n’indique pas la réception. Vériez si l’émetteur est allumé.
Récepteur: L’éclairage de l’écran est coupé. Vériez si le récepteur est allumé et si l’état de charge
Récepteur: La LED RF n’indique pas la réception.
Émetteur: L’appareil est allumé. Un signal audio
est présent.
Récepteur: La LED RF indique la réception. Vériez si un signal audio est présent sur l’émetteur.
Récepteur: La LED RF indique la réception. Éloignez les éventuelles sources d’interférences (appar-
Récepteur: Le témoin de crête AF PK s’afche à l’écran
du récepteur et de l’émetteur.
des piles est sufsant.
Vériez si la fréquence radio de l’émetteur et du récep-
teur est identique.
Vériez la puissance d’émission.
Réduisez la distance entre l’émetteur et le récepteur.
Assurez-vous que l’émetteur et le récepteur sont en
contact visuel direct.
Assurez-vous que les antennes de l’émetteur et du
récepteur sont correctement connectées, non couvertes
et non pliées.
Réduisez l’intensité de la suppression du bruit (SQUELCH)
Augmentez si nécessaire le niveau du signal de la source
ou vériez le réglage du GAIN sur l’émetteur.
eils numériques, autres systèmes sans l).
Augmentez l’intensité de la suppression du bruit
(SQUELCH) sur le récepteur.
Remplacez les piles du récepteur.
Vériez si le signal présent sur la sortie casque de l’émetteur est «propre».
Réduisez si nécessaire le niveau du signal de la source ou
baissez le niveau audio GAIN sur l’émetteur.
ENGLISH
DEUTSCHFRANCAIS
ESPAÑOL
ITALIANO POLSKI
49
Page 50

RECOMMANDATIONS POUR ÉVITER LES PANNES
• En cas d’utilisation simultanée d’un émetteur radio et d’un récepteur radio sur le corps, placez les deux appareils le plus loin possible l’un
de l’autre.
• N’installez pas les récepteurs radio et les émetteurs radio ensemble dans un rack et placez le rack des récepteurs aussi loin que possible
du rack des émetteurs.
• En cas de montage en rack, conservez une distance d’au moins une demi-unité de hauteur entre les émetteurs et les récepteurs.
• Utilisez des blocs secteur séparés pour les émetteurs et les récepteurs et ne vous servez pas d’un bloc secteur commun pour des systèmes
sans l provenant de divers fabricants.
DEUTSCHENGLISH
CARACTÉRISTIQUES TECHNIQUES
Référence du modèle : LDU5047IEMT LDU5051IEMT LDU505IEMT LDU506IEMT LDU508IEMT
Type de produit : In-Ear Monitoring In-Ear Monitoring In-Ear Monitoring In-Ear Monitoring In-Ear Monitoring
Type: Émetteur Émetteur Émetteur Émetteur Émetteur
Plage de fréquences d'émission : 470 – 490 MHz 514 – 542 MHz 584 – 608 MHz 65 – 679 MHz 823 – 832 MHz,
FRANCAIS
Groupes RF : 1 1 10 10 8
Canaux RF : 12 12 12 12 12
Méthode de transmission : FM, mono/ stéréo FM, mono /stéréo FM, mono/ stéréo FM, mono/ stéréo FM, mono /stéréo
Puissance nominale de sortie HF : 2 mW, 10 mW,
30 mW
2 mW, 10 mW,
30 mW
2 mW, 10 mW,
30 mW
2 mW, 10 mW,
30 mW
ESPAÑOL
Gain antenne : 2 dBi 2 dBi 2 dBi 2 dBi 2 dBi
Connecteur antenne : BNC BNC BNC BNC BNC
Réponse en fréquence audio (- 3dB) : 35 Hz – 16000 Hz 35 Hz – 16000 Hz 35 Hz – 16000 Hz 35 Hz – 16000 Hz 35 Hz – 16000 Hz
THD+N @ 1 kHz, signal d'entrée +4 dBu : < 0,3 % < 0,3 % < 0,3 % < 0,3 % < 0,3 %
Rapport signal/bruit @ 1 kHz, pondéré A : 93 dB 93 dB 93 dB 93 dB 93 dB
POLSKI
Plage dynamique @ 1 kHz, non pondéré : 88 dB 88 dB 88 dB 88 dB 88 dB
Sensibilité d'entrée : - 9 dBu (tous
Niveau d'entrée max. : 18 dBu (réglages
ITALIANO
TRMC CEI : < 45 dB < 45 dB < 45 dB < 45 dB < 45 dB
Entrées de ligne : 2 2 2 2 2
Connecteurs d'entrée de ligne: Combo XLR
Impédance d'entrée : 12 kohms 12 kohms 12 kohms 12 kohms 12 kohms
les réglages de
gain à pleine
puissance, mode
stéréo)
de gain dénis
sur 90, réglage
du volume TX
déni sur 38,
mode stéréo)
(symétrique) /
TRS 6,3 mm
- 9 dBu (tous
les réglages de
gain à pleine
puissance, mode
stéréo)
18 dBu (réglages
de gain dénis
sur 90, réglage
du volume TX
déni sur 38,
mode stéréo)
Combo XLR
(symétrique) /
TRS 6,3 mm
- 9 dBu (tous
les réglages de
gain à pleine
puissance, mode
stéréo)
18 dBu (réglages
de gain dénis
sur 90, réglage
du volume TX
déni sur 38,
mode stéréo)
Combo XLR
(symétrique) /
TRS 6,3 mm
- 9 dBu (tous
les réglages de
gain à pleine
puissance, mode
stéréo)
18 dBu (réglages
de gain dénis
sur 90, réglage
du volume TX
déni sur 38,
mode stéréo)
Combo XLR
(symétrique) /
TRS 6,3 mm
863 – 865 MHz
823 – 832 MHz
2 mW, 10 mW,
30 mW
863 – 865 MHz
2 mW, 10 mW
- 9 dBu (tous
les réglages de
gain à pleine
puissance, mode
stéréo)
18 dBu (réglages
de gain dénis
sur 90, réglage
du volume TX
déni sur 38,
mode stéréo)
Combo XLR
(symétrique) /
TRS 6,3 mm
50
Page 51

Réglages : Bouton
Indicateurs: Écran OLED
Consommation d'énergie (nominale) : 3,5 W 3,5 W 3,5 W 3,5 W 3,5 W
Tension de fonctionnement : 12 – 18 V CC 12 – 18 V CC 12 – 18 V CC 12 – 18 V CC 12 – 18 V CC
Connecteur d'alimentation : Connecteur cy-
Température ambiante
(en fonctionnement) :
Humidité relative : < 80 %
Dimensions (l x h x p): 212 x 43 x 123 mm 212 x 43 x 123 mm 212 x 43 x 123 mm 212 x 43 x 123 mm 212 x 43 x 123 mm
Poids: 0,66 kg
Accessoires inclus : Adaptateur
Référence du modèle : LDU5047IEMR LDU5051IEMR LDU505IEMR LDU506IEMR LDU508IEMR
Type de produit : In-Ear Monitoring In-Ear Monitoring In-Ear Monitoring In-Ear Monitoring In-Ear Monitoring
Type: Récepteur
Plage de fréquences d'émission : 470 – 490 MHz 514 – 542 MHz 584 – 608 MHz 655 – 679 MHz 823 – 832 MHz,
Groupes RF : 1 1 10 10 8
Canaux RF : 12 12 12 12 12
Sortie casque : Jack stéréo
Impédance minimale du casque : 16 ohms 16 ohms 16 ohms 16 ohms 16 ohms
Niveau de sortie maximale du casque : 80 mW à
Réponse en fréquence audio : 40 Hz – 16000 Hz 40 Hz – 16000 Hz 40 Hz – 16000 Hz 40 Hz – 16000 Hz 40 Hz – 16000 Hz
Diaphonie G/D 100 Hz/1 kHz/10 kHz : 55/55/53 dB 55/55/53 dB 55/55/53 dB 55/55/53 dB 55/55/53 dB
Bruit résiduel : 5,5 uVrms
Connecteur antenne : Connecteur leté Connecteur leté Connecteur leté Connecteur leté Connecteur leté
marche-arrêt
POWER, encodeur-poussoir
rotatif MENU,
volume du
casque
multifonctions
lindrique 5,3 mm,
plus intérieur
0 °C – 35 C° 0 °C – 35 C° 0 °C – 35 C° 0 °C – 35 C° 0 °C – 35 C°
(sans
condensation)
(avec antenne)
secteur, antenne
BNC, kit de
montage sur
rack 19 "
ceinture, sans
Diversity
3,5 mm
une charge de
33 ohms /
33 mW à une
charge de
16 ohms
(pondéré A)
Bouton
marche-arrêt
POWER, encodeur-poussoir
rotatif MENU,
volume du
casque
Écran OLED
multifonctions
Connecteur cylindrique 5,3 mm,
plus intérieur
< 80 %
(sans
condensation)
0,66 kg
(avec antenne)
Adaptateur
secteur, antenne
BNC, kit de
montage sur
rack 19 "
Récepteur
ceinture, sans
Diversity
Jack stéréo
3,5 mm
80 mW à
une charge de
33 ohms /
33 mW à une
charge de
16 ohms
5,5 uVrms
(pondéré A)
Bouton
marche-arrêt
POWER, encodeur-poussoir
rotatif MENU,
volume du
casque
Écran OLED
multifonctions
Connecteur cylindrique 5,3 mm,
plus intérieur
< 80 %
(sans
condensation)
0,66 kg
(avec antenne)
Adaptateur
secteur, antenne
BNC, kit de
montage sur
rack 19 "
Récepteur
ceinture, sans
Diversity
863 – 865 MHz
Jack stéréo
3,5 mm
80 mW à
une charge de
33 ohms /
33 mW à une
charge de
16 ohms
5,5 uVrms
(pondéré A)
ENGLISH
DEUTSCHFRANCAIS
ESPAÑOL
ITALIANO POLSKI
51
Page 52

Réglages: ON/OFF/VOLUME,
Indicateurs: Écran OLED
Consommation d'énergie (nominale) : 0,7 W 0,7 W 0,7 W 0,7 W 0,7 W
Tension de fonctionnement : 2 piles AA
DEUTSCHENGLISH
Température ambiante
(en fonctionnement) :
Humidité relative : < 80 %
Dimensions (l x h x p, sans antenne) : 64 x 100 x 24 mm 64 x 100 x 24 mm 64 x 100 x 24 mm 64 x 100 x 24 mm 64 x 100 x 24 mm
Poids: 0,095 kg 0,095 kg 0,095 kg 0,095 kg 0,095 kg
FRANCAIS
Accessoires inclus : Antenne letée,
Autres caractéristiques : Indicateur
ESPAÑOL
Référence du modèle : LDIEHP2
Type de produit : Écouteurs
Réponse en fréquence: 20 Hz – 20000 Hz
Impédance : 33 ohms
Connecteur audio : Jack stéréo
POLSKI
Câble : 1,27 m
Poids: 0,016 kg
Accessoires inclus : 3 paires
ITALIANO
SEL,
multifonctions,
LED RF
1,5 V CC
0° C - 35° C 0° C - 35° C 0° C - 35° C 0° C - 35° C 0° C - 35° C
(sans
condensation)
2 piles AA
supplémentaire
de piles faibles :
signal 500 Hz via
la prise casque
intra-auriculaires
stéréo
3,5 mm
(amovible)
d'embouts
d'écouteurs en
silicone, 3 paires
d'embouts
d'écouteurs en
mousse
ON/OFF/VOLUME,
SEL,
Écran OLED
multifonctions,
LED RF
2 piles AA
1,5 V CC
< 80 %
(sans
condensation)
Antenne letée,
2 piles AA
Indicateur
supplémentaire
de piles faibles :
signal 500 Hz via
la prise casque
ON/OFF/VOLUME,
SEL,
Écran OLED
multifonctions,
LED RF
2 piles AA
1,5 V CC
< 80 %
(sans
condensation)
Antenne letée,
2 piles AA
Indicateur
supplémentaire
de piles faibles :
signal 500 Hz via
la prise casque
ON/OFF/VOLUME,
SEL,
Écran OLED
multifonctions,
LED RF
2 piles AA
1,5 V CC
< 80 %
(sans
condensation)
Antenne letée,
2 piles AA
Indicateur
supplémentaire
de piles faibles :
signal 500 Hz via
la prise casque
ON/OFF/VOLUME,
SEL,
Écran OLED
multifonctions,
LED RF
2 piles AA
1,5 V CC
< 80 %
(sans
condensation)
Antenne letée,
2 piles AA
Indicateur
supplémentaire
de piles faibles :
signal 500 Hz via
la prise casque
52
Page 53

DECLARATIONS
GARANTIE FABRICANT & LIMITATION DE RESPONSABILITÉ
Nos conditions actuelles de garantie et de limitation de responsabilité sont disponibles à l‘adresse suivante : https://cdn-shop.adamhall.com/media/
pdf/MANUFACTURERS-DECLARATIONS_LD_SYSTEMS.pdf. Pour les réparations, veuillez contacter Adam Hall GmbH, Adam-Hall-Str. 1, 61267 Neu Anspach /
E-Mail Info@adamhall.com / +49 (0)6081 / 9419-0.
TRI ET MISE AUX DÉCHETS CORRECTE DE CE PRODUIT
(Valid in the European Union and other European countries with waste separation)
(Applicable dans l‘Union Européenne et les autres pays européens pratiquant le tri des déchets) La présence de ce symbole sur le produit
ou sur la documentation correspondante indique qu‘en n de vie, le produit ne doit pas être jeté avec les déchets normaux, an d‘éviter tout
dommage à l‘environnement ou aux personnes consécutive à une élimination non contrôlée des déchets. Séparez-le des autres types de déchets
et recyclez-le, an de promouvoir la réutilisation durable des ressources naturelles. Nous conseillons aux utilisateurs non professionnels de
contacter le revendeur chez qui ils ont acheté le produit, ou un représentant gouvernemental local, pour plus de détails sur le lieu de collecte et la
façon de recycler cet appareil dans le meilleur respect de l‘environnement possible.. Nous invitons les utilisateurs professionnels à contacter leur
fournisseur et à vérier les termes et conditions de leur contrat d‘achat. Ce produit ne doit pas être mélangé à d‘autres déchets commerciaux lors
de la collecte.
Conformité CE
La société Adam Hall GmbH déclare par la présente que ce produit est compatible avec les régulations suivantes (le cas échéant) :
R&TTE (1999/5/EG) et RED (2014/53/EU) à partir de juin 2017
Directive basse tension (2014/35/EU)
Directive CEM (2014/30/EU)
RoHS (2011/65/EU)
La Déclaration de Conformité complète est disponible sur le site Web www.adamhall.com.
Pour toute information complémentaire, contactez-nous : info@adamhall.com.
DÉCLARATION DE CONFORMITÉ CE
Adam Hall GmbH déclare par la présente que ce type d‘équipement radio est conforme à la directive 2014/53/EU.
Le texte intégral de la déclaration de conformité CE est disponible à l‘adresse suivante
Adresse Internet disponible : www.adamhall.com/compliance/
ENGLISH
DEUTSCHFRANCAIS
ESPAÑOL
53
ITALIANO POLSKI
Page 54

ESPAÑOL
¡GRACIAS POR ELEGIR LD-SYSTEMS!
Este equipo está diseñado y fabricado con los estándares de calidad más exigentes, para garantizar un correcto funcionamiento durante muchos
años. Los productos de LD-Systems se caracterizan por su gran calidad, avalada por el prestigio de la marca y una dilatada experiencia como fabricante. Lea atentamente este manual de usuario para poder aprovechar rápidamente toda la funcionalidad de su nuevo producto de LD Systems.
Si desea obtener información sobre LD-SYSTEMS, visite nuestro sitio web WWW.LD-SYSTEMS.COM
MEDIDAS DE SEGURIDAD
1. Lea atentamente las instrucciones de este manual.
2. Guarde toda la información en un lugar seguro para futuras consultas.
DEUTSCHENGLISH
3. Siga las instrucciones indicadas.
4. Siga todas las advertencias. No quite las instrucciones de seguridad ni cualquier otra información indicada en el equipo.
5. Utilice el equipo únicamente según la nalidad prevista.
6. Utilice solo soportes y jaciones que sean robustos y adecuados cuando instale el equipo en instalaciones jas. Asegúrese de que los soportes de
pared están correctamente instalados y rmemente jados. Asegúrese de que el equipo está sólidamente instalado y no se puede caer.
7. Al instalar el equipo, respete las normas de seguridad aplicables en su país.
8. Evite instalar el equipo cerca de radiadores, acumuladores de calor, estufas o cualquier otra fuente de calor. Asegúrese de que el equipo esté
instalado en un lugar con ventilación suciente para evitar cualquier sobrecalentamiento.
9. No coloque sobre el equipo fuentes de llamas sin protección, por ejemplo, velas encendidas.
FRANCAIS
10. Evite bloquear las rejillas de ventilación. ¡Evite la luz solar directa!
11. Mantenga una distancia mínima de 20 cm alrededor y encima del equipo.
12. No utilice este equipo cerca del agua (excepto los equipos especícamente diseñados para uso en exterior, en cuyo caso tenga en cuenta las
indicaciones mencionadas a continuación). No exponga este equipo a materiales, líquidos o gases inamables.
13. Evite exponer el equipo a gotas o salpicaduras que puedan caer dentro del mismo. No coloque recipientes llenos de líquido, como oreros o
vasos, sobre el equipo.
14. Asegúrese de no dejar caer ningún objeto dentro del equipo.
15. Emplee el equipo únicamente con los accesorios recomendados por el fabricante.
16. No abra el equipo ni intente modicarlo.
17. Una vez conectado el equipo, compruebe que en toda la longitud del cableado no hay peligro de que provoque una caída, por ejemplo.
ESPAÑOL
18. Durante el transporte, asegúrese de que el equipo no se caiga y pueda causar daños personales o materiales.
19. Si el equipo no funciona correctamente, o si se ha vertido líquido sobre él, o si un objeto ha caído en su interior o si ha sufrido algún desperfecto,
apague inmediatamente el equipo y desenchufe el cable eléctrico (si se trata de un equipo activo). Únicamente un técnico especialista debe
reparar el equipo.
20. Para limpiar el equipo utilice un paño seco.
21. Procure seguir las normas vigentes en su país sobre reciclaje de desechos. Separe los componentes de plástico, papel y cartón del paquete para
reciclarlos en sus contenedores respectivos.
22. No deje las bolsas de plástico al alcance de los niños.
23. Tenga en cuenta que la realización de cambios o modicaciones que no estén expresamente autorizados por el responsable de cumplimiento
normativo podría anular la autoridad del usuario para utilizar el equipo.
POLSKI
PARA LOS EQUIPOS CON TOMA ELÉCTRICA
24. ADVERTENCIA: Si el cable eléctrico está provisto de un contacto de protección, debe conectarse a una toma eléctrica con conexión a tierra. No
desactivar nunca esta conexión de protección a tierra del cable eléctrico.
25. Si el equipo ha estado expuesto a un cambio brusco de temperatura (por ejemplo, después del transporte), no lo encienda inmediatamente. La
condensación o la humedad podrían dañar el equipo. Deje que el equipo alcance la temperatura ambiente antes de encenderlo.
26. Antes de conectar el cable eléctrico a la toma de corriente, compruebe si la tensión y la frecuencia del suministro eléctrico coinciden con
las especicaciones de este equipo. Si el equipo dispone de un selector de tensión, antes de enchufarlo a la red eléctrica, asegúrese de que el
valor seleccionado coincide con la tensión de suministro. Si el enchufe o el adaptador de corriente no encajan en la toma eléctrica, consulte a un
ITALIANO
electricista.
27. Asegúrese de que el cable eléctrico no está pinzado. Evite que el cable resulte pellizcado, sobre todo en los extremos de conexión al equipo y en
la toma eléctrica.
28. Al conectar el equipo, asegúrese de que el cable eléctrico o el adaptador de corriente estén siempre accesibles. Desconecte el equipo de la toma
de corriente cuando no esté en uso o antes de limpiarlo. Para ello, desconecte el cable eléctrico y el adaptador de corriente del conector del equipo
en vez de desenchufar el cable de la toma eléctrica. No tocar el cable eléctrico ni el adaptador de corriente con las manos húmedas.
29. No encienda y apague el equipo en cortos intervalos de tiempo, ya que se reduce así la vida útil del sistema.
30. NOTA IMPORTANTE: Sustituya los fusibles únicamente por otros del mismo tipo y de las mismas características. Si el fusible se funde continuamente, póngase en contacto con un servicio técnico autorizado.
31. Para desconectar completamente el equipo de la tensión eléctrica, desenchufe el cable eléctrico o el adaptador de corriente de la toma
eléctrica.
32. Si el equipo dispone de un enchufe eléctrico Volex, deberá desbloquearse el Volex del equipo para desenchufarlo. Esto implica que un tirón en el
cable eléctrico puede desplazar el equipo y provocar daños personales o materiales. Por tanto, asegúrese de instalar los cables con sumo cuidado.
33. Si es probable que caiga un rayo por una tormenta eléctrica o si no va a emplear el equipo durante mucho tiempo, desenchufe el cable eléctrico
y el adaptador de corriente.
34. El equipo no debe ser utilizado por personas (incluidos niños) con capacidades físicas, sensoriales o mentales reducidas o sin la experiencia y los
conocimientos necesarios.
54
Page 55

35. Se debe advertir a los niños que no jueguen con el equipo.
36. Si el cable de alimentación del equipo está dañado, el equipo no debe utilizarse. El cable de alimentación debe ser sustituido por un cable
adecuado o un conjunto de piezas especial en un centro de servicio autorizado.
ATENCIÓN:
Para evitar el riesgo de descarga eléctrica, no retire la tapa. El equipo no contiene elementos que el
usuario pueda reparar o sustituir. Para cualquier tarea de mantenimiento o reparación, acuda a un
técnico cualicado.
El símbolo de rayo dentro de un triángulo equilátero advierte al usuario de la presencia de tensiones peligrosas sin aislamiento
dentro del equipo que pueden causar una descarga eléctrica.
El símbolo de exclamación dentro de un triángulo equilátero advierte al usuario de la existencia de importantes instrucciones de uso
y mantenimiento.
¡Advertencia! Este equipo está diseñado para ser utilizado a una altura que no supere los 2000metros sobre el nivel del mar.
¡Advertencia! Este equipo no está diseñado para funcionar en climas tropicales.
¡ADVERTENCIA: ALTO VOLUMEN!
Este equipo se destina a un uso profesional. Por consiguiente, si se aplica a un uso comercial, estará sujeto a las normas y reglamentos de la
Asociación para la prevención de accidentes de su sector profesional. Como fabricante, Adam Hall tiene la obligación de informar formalmente a
los usuarios de la existencia de posibles riesgos para la salud. Daños auditivos por exposición prolongada a un nivel SPL alto: este equipo puede
generar fácilmente un nivel de presión sonora (SPL) lo sucientemente elevado como para causar daños auditivos permanentes a los artistas, el
personal de producción y el público. Deben tomarse precauciones para evitar la exposición prolongada a un SPL de más de 90dB.
INTRODUCCIÓN
Hemos desarrollado los sistemas inalámbricos de monitorización in-earU500 en Alemania para permitir una ilimitada libertad de movimientos
sobre el escenario y, además, llevar siempre un sonido de monitorización perfecto directamente al oído. Son la opción ideal —no solo para nova-
tos— por su diseño moderno de líneas claras y su fácil manejo. La able transferencia inalámbrica y la excelente respuesta en frecuencia de bajos
de 40Hz-16kHz aseguran una calidad profesional. Los sets in-earU500 están disponibles para su funcionamiento en cinco bandas de frecuencia.
LDU5047IEM – Sistema de monitorización in-ear 470 - 490MHz
LDU5051IEM – Sistema de monitorización in-ear 514 - 542MHz
LDU505IEM – Sistema de monitorización in-ear 584 - 608MHz
LDU506IEM – Sistema de monitorización in-ear 655 - 679MHz
LDU508IEM – Sistema de monitorización in-ear 823 - 832MHz + 863 - 865MHz
ENGLISH
DEUTSCHFRANCAIS
ESPAÑOL
• Monitorización in-ear able con un alcance superior a 100m
• 96 canales para elegir
• Potencia de transmisión seleccionable entre 2, 10 o 30 mW ERP
• Cómoda sincronización por infrarrojos
• Introducción de nombres de usuario y memoria para 10 presets propios
• Amplia respuesta en frecuencia
• Ecualizador tribanda con medios paramétricos
• Limitador que se puede conectar adicionalmente
• Funcionamiento en modo estéreo o mono
ITALIANO POLSKI
55
Page 56

• Monitorización directa a través de la salida de los auriculares en el transmisor
• Petaca con silenciador de tres niveles conmutables
• Petaca con dos pilas AA y 10 horas de autonomía
• Pueden utilizarse hasta 12 sistemas simultáneamente
• Transmisor U500® IEM compatible con petacas U300® IEM
Volumen de suministro del LDU50xIEM
Transmisor, antena BNC, receptor de petaca, antena de receptor, fuente de alimentación, 2 pilas AA, kit para montaje en rack de 19” y manual
de instrucciones
DEUTSCHENGLISH
Volumen de suministro del LDU50xIEMHP
Transmisor, antena BNC, receptor de petaca, antena de receptor, auriculares in-ear estéreo, fuente de alimentación, 2 pilas AA, kit para montaje en rack
de 19” y manual de instrucciones
Nota
Dependiendo del país de uso, puede ser necesario tener una licencia para utilizar el sistema de micrófono inalámbrico. Si desea información
detallada, consulte con la autoridad competente en su país.
FRANCAIS
CONEXIONES, ELEMENTOS DE MANEJO Y ELEMENTOS DE VISUALIZACIÓN
TRANSMISOR
ESPAÑOL
1
POWER
Interruptor de encendido/apagado. Pulse y mantenga pulsado este botón durante 1 segundo aproximadamente para encender o apagar el equipo.
POLSKI
Pulse el botón de forma breve (!) para acceder directamente a la pantalla principal desde el menú de edición.
2
PANTALLA OLED
Pantalla gráca OLED multifuncional que indica la frecuencia de transmisión, el grupo de frecuencia y el canal, el nombre de usuario, el número
de preset y el volumen de los canales de entrada izquierdo y derecho en la pantalla principal. En el menú de edición se muestran las opciones de
menú, las opciones de submenú y las opciones de edición correspondientes.
ITALIANO
3
MENU
Mando giratorio y pulsable para navegar por el menú de edición, adaptar los ajustes del sistema y modicar valores en las opciones de menú
correspondientes. Desde la pantalla principal se puede ajustar el volumen general girando directamente el mando giratorio y pulsable.
4
PHONES
Salida de auriculares con toma jack estéreo de 6,3 mm para controlar la señal de audio directamente en el transmisor. La señal para la salida de los
auriculares se toma de la conmutación MONO/STEREO, después de INPUT GAIN, LIMITER y del EQUALIZER. En la trayectoria de la señal de la salida de
los auriculares hay un ltro paso alto.
5
VOL
Regulador de volumen para la salida integrada de auriculares PHONES.
6
Interfaz de infrarrojos para sincronizar los ajustes de sistema pertinentes del receptor con los del transmisor (p. ej., frecuencia de radio).
1 2
6
3
4
5
56
Page 57

8
7
9
10
11
7
TOMA DC
Toma de baja tensión para el suministro eléctrico del equipo (12V CC 500mA, polo positivo en el interior). Utilice exclusivamente
el adaptador de corriente suministrado.
8
PRENSAESTOPAS DEL CABLE
Utilice el prensaestopas del cable exible del adaptador de corriente para proteger de daños accidentales la toma de baja
tensión del transmisor y el conector de baja tensión del adaptador de corriente y evitar la extracción involuntaria del conector.
9
AF INPUT LEFT / RIGHT
Entradas de línea balanceadas izquierda y derecha con conectores combo XLR / jack de 6,3mm.
10
ANTENNA
Conector BNC para la antena transmisora suministrada.
ANTENA TRANSMISORA
11
Antena transmisora con conector BNC.
ENGLISH
DEUTSCHFRANCAIS
ESPAÑOL
RECEPTOR DE PETACA
12
ANTENA
Antena desmontable del receptor de petaca. Para asegurar una recepción óptima, evite
cubrirla o doblarla. Tenga en cuenta que, durante el funcionamiento, la antena está unida
12
13
14
jamente al receptor (apretar la rosca de la antena a mano, sin herramientas).
13
PANTALLA OLED
Pantalla gráca OLED multifuncional que indica el grupo de frecuencia y el canal de radio, el
nombre de usuario, la potencia de recepción y el estado de las pilas, así como el volumen de
los canales izquierdo y derecho. En el menú de edición se muestran las opciones de menú,
las opciones de submenú y las opciones de edición correspondientes.
14
ITALIANO POLSKI
Interfaz de infrarrojos para sincronizar los ajustes de sistema pertinentes del receptor con
15
los del transmisor (p. ej., la frecuencia de radio).
15
MENU / SEL UND
Botones para navegar por el menú de edición, adaptar los ajustes del sistema y modicar
valores en las opciones de menú correspondientes. Para poder acceder a los botones,
presione las dos marcas que hay en los laterales de la tapa del compartimento de pilas y
tire de ella hacia abajo desde la carcasa hasta llegar al tope.
57
Page 58

16
CONEXIÓN DE ANTENA
Conexión de antena con rosca.
18
17
16
19
17
PHONES
Toma jack estéreo de 3,5mm para conectar auriculares.
DEUTSCHENGLISH
FRANCAIS
ESPAÑOL
POLSKI
ITALIANO
20
21
Asignación
de pines de
conexión:
18
RF
El LED RF se ilumina si se capta una señal de radio. Si este LED no se ilumina durante el
funcionamiento del dispositivo, compruebe que el canal de radio del receptor coincide con
el canal de radio del transmisor o reduzca la distancia entre el receptor y el transmisor.
19
ON / OFF - VOL
Gire el regulador de volumen hacia la derecha más allá del tope para activar el receptor y
siga girando este regulador hacia la derecha para aumentar el volumen. Gire el regulador de
volumen hacia la izquierda para reducir el volumen y siga girándolo más allá del tope para
apagar el receptor. Mantenga siempre el volumen a un nivel agradable para evitar daños a
los oídos.
20
COMPARTIMENTO DE PILAS
Para cambiar las pilas, abra el compartimento de pilas del receptor de petaca, oprimiendo
al mismo tiempo las marcas en los laterales de la tapa del compartimento de pilas y
tirando de ella hacia abajo desde la carcasa hasta llegar al tope. Extraiga las pilas agotadas
y sustitúyalas por pilas nuevas (2 pilas tipo AA/LR6, alcalinas) siguiendo las ilustraciones
incluidas en el compartimento de pilas. Ahora, vuelva a insertar la tapa del compartimento
de pilas en la carcasa hasta que la tapa encaje en su sitio. Si no va a usar el receptor durante
largo tiempo, extraiga las pilas para evitar daños en el receptor causados por la fuga del
líquido de las pilas.
21
CLIP DE CINTURÓN
En la parte posterior del receptor de petaca se encuentra un clip de cinturón con el
que se puede jar el receptor a la cinturilla del pantalón o a un cinturón u otra prenda
de vestir similar.
MANEJO DEL TRANSMISOR
Para establecer una conexión inalámbrica entre el transmisor y el receptor, el grupo y el canal de frecuencia respecto a la frecuencia de radio
deberán ser los mismos en ambos dispositivos.
Para poner en marcha el sistema de transmisión inalámbrico, debe apuntar con el receptor directamente al transmisor.
PANTALLA PRINCIPAL
Después de encender el transmisor, aparece brevemente el texto de saludo "WELCOME" y a continuación aparece la pantalla principal con la
siguiente información: Nombre de usuario, número de preset, nivel de las señales de entrada de audio con indicación de nivel máximo, grupo y
canal de frecuencia (GR.xx y CH.xx) y la frecuencia de radio actual en MHz.
Nivel de señal de audio / nivel máximo (PK)
Nombre de usuario
del canal derecho
Grupo y canal de frecuencia
Número de preset
Nivel de señal de audio / nivel máximo
(PK) del canal izquierdo
Frecuencia de radio en MHz
58
Page 59

VOLUMEN (VOLUME)
Desde la pantalla principal se puede ajustar el volumen general girando directamente el mando giratorio y pulsable MENU de 00 a 50. Al girar el
mando giratorio, la indicación en pantalla cambia automáticamente para mostrar la información correspondiente. Después de unos 3 segundos de
inactividad, se vuelve a mostrar automáticamente la pantalla principal, pero, si se pulsa el mando giratorio, el cambio es inmediato.
SINCRONIZACIÓN POR INFRARROJOS (IR SYNC RUN)
Para sincronizar el receptor de petaca con la frecuencia de radio y el nombre de usuario ajustados en el transmisor, apunte con la interfaz de
infrarrojos del receptor directamente a la interfaz de infrarrojos del transmisor (a una distancia de unos 10 cm) y encienda el receptor. Ahora, pulse
el mando giratorio y pulsable del transmisor (MENU) para acceder al menú principal y gírelo para seleccionar la opción de menú IR SYNC RUN (marcada en color claro). Vuelva a pulsar MENU para iniciar el proceso de sincronización. Transcurridos unos segundos, el proceso naliza y la indicación
en pantalla del receptor cambia durante unos instantes a "IR SYNC " para conrmar que la sincronización se ha realizado correctamente. Para
cancelar el proceso, pulse MENU. Pulse POWER brevemente (!) para volver directamente a la pantalla principal. Tras unos 12 segundos de inactividad
se muestra la pantalla principal automáticamente. Nota: La radiación solar directa puede afectar al proceso de sincronización.
CONFIGURACIÓN DE LA UNIDAD DE RADIO (RF SETTINGS)
Pulse el mando giratorio y pulsable del transmisor (MENU) para acceder al menú principal y gírelo para seleccionar la opción de menú RF SETTINGS
(marcada en color claro). Vuelva a pulsar el mando giratorio para acceder al submenú y gírelo para seleccionar la opción de submenú deseada;
conrme pulsando el mando giratorio. Gire el mando giratorio para modicar un valor y púlselo para conrmar la modicación. En la siguiente
tabla encontrará las opciones de submenú y la información correspondiente. Pulse POWER brevemente (!) para volver directamente a la pantalla
principal. Tras unos 12 segundos de inactividad se muestra la pantalla principal automáticamente.
ENGLISH
DEUTSCHFRANCAIS
ESPAÑOL
RF SETTINGS (modicar valor = girar mando giratorio; conrmar modicación del valor = pulsar mando giratorio)
GROUP U5047IEM Grupo de frecuencia 1
U5051IEM Grupo de frecuencia 1
U505IEM Grupos de frecuencia 1 - 10
U506IEM Grupos de frecuencia 1 - 10
U508IEM Grupos de frecuencia 1 - 8
CHANNEL Canal de frecuencia 1 - 12 Seleccione un canal y conrme 2 veces
FREQ MAN Ajuste manual de la frecuencia
de radio
RF POWER Ajuste de la potencia de transmisión 470 - 490 MHz: 2 mW / 10 mW / 30 mW
EXIT RF SETT. Salir del submenú (pulsar el mando giratorio)
Seleccione un grupo y conrme 2 veces
Paso 1: Ajuste la frecuencia por tramos de 1 MHz y conrme
Paso 2: Ajuste la frecuencia por tramos de 25 MHz y conrme
514 - 542 MHz: 2 mW / 10 mW / 30 mW
584 - 608 MHz: 2 mW / 10 mW / 30 mW
655 - 679 MHz: 2 mW / 10 mW / 30 mW
823 - 832 MHz: 2 mW / 10 mW / 30 mW, 863 - 865 MHz: 2 mW / 10 mW
ITALIANO POLSKI
59
Page 60

Información sobre la potencia de transmisión y el ajuste del silenciador en el receptor de petaca:
Seleccione una potencia de transmisión baja si el transmisor y el receptor se encuentran muy cerca entre sí. En este caso, el silenciador (Squelch)
del receptor también se debe ajustar a un nivel bajo como valor orientativo. Si la distancia entre el transmisor y el receptor es mayor, seleccione
una potencia de transmisión más alta y adapte el silenciador en el receptor como corresponda. Encontrará más información sobre el ajuste del silenciador en el punto "AJUSTE DEL SILENCIADOR" del apartado "MANEJO DEL RECEPTOR DE PETACA" de este manual de uso. En cualquier caso, asegúrese
de que el transmisor y el receptor se apunten entre sí y que no haya obstáculos entre ellos que puedan interferir en la radiotransmisión.
Dependiendo de la situación, pueden ser necesarios distintos ajustes para un funcionamiento sin interferencias. Tenga en cuenta que, al usar más
sistemas de transmisión cerca, pueden aparecer cada vez más interferencias que causan interrupciones en la conexión inalámbrica. En este caso, se
pueden evitar problemas seleccionando otra frecuencia de radio.
¡CUIDADO! ANTES de ajustar el silenciador, asegúrese de que el volumen del receptor esté ajustado al nivel más bajo. Al modicar el umbral del
DEUTSCHENGLISH
silenciador pueden producirse ruidos a alto volumen que podrían causar problemas de audición y daños en los auriculares conectados.
AJUSTES DE AUDIO (AUDIO SETTINGS)
Pulse el mando giratorio y pulsable del transmisor (MENU) para acceder al menú principal y gírelo para seleccionar la opción de menú AUDIO
SETTINGS (marcada en color claro). Vuelva a pulsar el mando giratorio para acceder al submenú y gírelo para seleccionar la opción de submenú deseada. Conrme su selección pulsando el mando giratorio. Gire el mando giratorio para modicar un valor y púlselo para conrmar la modicación.
En la siguiente tabla encontrará las opciones de submenú y la información correspondiente. Pulse POWER brevemente (!) para volver directamente
a la pantalla principal. Tras unos 12 segundos de inactividad se muestra la pantalla principal automáticamente.
FRANCAIS
ESPAÑOL
POLSKI
AUDIO SETTINGS (modicar valor = girar mando giratorio; conrmar valor = pulsar mando giratorio)
INPUT GAIN LEFT Ganancia de entrada del canal izquierdo 000 - 100 Para obtener una relación señal/ruido óptima, ajuste
INPUT GAIN RIGHT Ganancia de entrada del canal derecho 000 - 100
ITALIANO
LIMITER Activar/desactivar el limitador de entrada ON = activado (recomendado)
MODE Ajuste del modo mono/estéreo
El modo de funcionamiento seleccionado
se muestra en la pantalla del receptor
(M = mono; S = estéreo)
OFF = desactivado
MONO = las señales de entrada izquierda y derecha se reproducen
pasadas a mono. Desplazamiento de la señal a la izquierda o a la
derecha en el receptor (BALANCE).
STEREO = reproducción de la señal de entrada en estéreo. Ajuste
del balance en el receptor (BALANCE)
Active el modo de funcionamiento STEREO también en el transmisor
si quiere utilizar el modo FOCUS en el receptor de petaca.
las señales del canal izquierdo y del derecho tan altas
como sea posible pero, para evitar las distorsiones de
la señal, asegúrese de que en la pantalla no aparezca
la indicación PEAK (o si lo hace, que sea brevemente).
Dado el caso, adapte también el nivel de salida del
reproductor.
60
Page 61

EQ SETTINGS BASS EQ G: +/- 15dB Amplicación de las frecuencias de graves de - 15dB a + 15dB
f: 60 Hz / 80 Hz / 100 Hz /
200 Hz
MIDDLE EQ G: +/- 15dB Amplicación de las frecuencias de medios de - 15dB a + 15dB
f: 500 Hz / 1000 Hz / 1500 Hz
/ 2500 Hz
Q: 0.50 / 0.75 / 1.00 / 1.25 Ajuste del factor de calidad
TREBLE EQ G: +/- 15dB Amplicación de las frecuencias de agudos de - 15dB a + 15dB
f: 10.0k Hz / 12.5 kHz / 15.0 kHz
/ 17.5 kHz
EXIT EQ
SETT.
EXIT AUDIO SETT. Salir del submenú (pulsar el mando giratorio)
NOMBRE DE USUARIO (NAME)
Pulse el mando giratorio y pulsable del transmisor (MENU) para acceder al menú principal y gírelo para seleccionar la opción de menú NAME (marcada
en color claro). Púlselo de nuevo para conrmar. Ahora, ajuste el nombre (hasta 8 caracteres) girando el mando giratorio para seleccionar una
letra, un símbolo o un número para el primer carácter del nombre y pulse el mando giratorio para conrmar. A continuación, introduzca el segundo
carácter y así sucesivamente. Cuando el nombre esté completo, pulse de nuevo el mando giratorio para conrmar. Pulse POWER brevemente (!)
para volver directamente a la pantalla principal. Tras unos 12 segundos de inactividad se muestra la pantalla principal automáticamente.
AJUSTE DEL BRILLO DE PANTALLA (BRIGHTNESS)
Pulse el mando giratorio y pulsable del transmisor (MENU) para acceder al menú principal y gírelo para seleccionar la opción de menú BRIGHTNESS
(marcada en color claro). Púlselo de nuevo para conrmar. Seleccione el nivel de brillo de pantalla deseado (3 niveles: HIGH = alto; MID = medio y
LOW = bajo) girando el mando giratorio y pulse el mando giratorio dos veces para conrmar. Pulse POWER brevemente (!) para volver directamente
a la pantalla principal. Tras unos 12 segundos de inactividad se muestra la pantalla principal automáticamente.
Salir del menú del ecualizador (pulsar el mando giratorio)
Ajuste de la frecuencia de graves
Ajuste de la frecuencia de medios
Ajuste de la frecuencia de agudos
ENGLISH
DEUTSCHFRANCAIS
ESPAÑOL
BLOQUEO DE LOS ELEMENTOS DE MANEJO (PANEL LOCK)
Pulse el mando giratorio y pulsable del transmisor (MENU) para acceder al menú principal y gírelo para seleccionar la opción de menú PANEL
LOCK (marcada en color claro). Púlselo de nuevo para conrmar. Para bloquear los elementos de manejo, gire el mando giratorio para seleccionar
ON y púlselo dos veces para conrmar. Pulse POWER brevemente (!) para volver directamente a la pantalla principal. Tras unos 10 segundos de
inactividad se muestra la pantalla principal automáticamente. Si ahora se acciona uno de los elementos de manejo POWER o el mando giratorio
y pulsable MENU, en la pantalla aparece brevemente "PANEL LOCK ON" y no es posible modicar los ajustes. Para desbloquear los elementos de
manejo, mantenga pulsado el mando giratorio durante unos 2 segundos y seleccione OFF en la opción de menú PANEL LOCK para permitir el uso de
los elementos de manejo de forma permanente.
ITALIANO POLSKI
61
Page 62

GUARDAR PRESET (SAVE PRESET)
Los ajustes de RF SETTINGS, AUDIO SETTINGS y el nombre de usuario se pueden guardar en hasta 10 presets distintos. Después de hacer los ajustes
pertinentes, pulse el mando giratorio y pulsable del transmisor (MENU) para acceder al menú principal y gírelo para seleccionar la opción de menú
SAVE PRESET (marcada en color claro). Púlselo de nuevo para conrmar. Ahora, gire el mando giratorio para seleccionar el número de preset que quiere utilizar para guardar los ajustes (01-10), pulse el mando giratorio para conrmar, gírelo para seleccionar YES y púlselo dos veces para conrmar
el proceso. Para cancelar el proceso, seleccione NO y conrme. Pulse POWER brevemente (!) para volver directamente a la pantalla principal. Tras
unos 12 segundos de inactividad se muestra la pantalla principal automáticamente.
DEUTSCHENGLISH
CARGAR PRESET (LOAD PRESET)
Pulse el mando giratorio y pulsable del transmisor (MENU) para acceder al menú principal y gírelo para seleccionar la opción de menú LOAD PRESET
(marcada en color claro). Púlselo de nuevo para conrmar. Ahora, gire el mando giratorio para seleccionar el número de preset que quiere cargar
(01-10), pulse el mando giratorio para conrmar, gírelo para seleccionar YES y púlselo dos veces para conrmar el proceso. Para cancelar el proceso,
FRANCAIS
seleccione NO y conrme. Pulse POWER brevemente (!) para volver directamente a la pantalla principal. Tras unos 12 segundos de inactividad se
muestra la pantalla principal automáticamente.
ESPAÑOL
VER LA VERSIÓN DE SOFTWARE (SOFTWARE)
Pulse el mando giratorio y pulsable del transmisor (MENU) para acceder al menú principal y gírelo para seleccionar la opción de menú SOFTWARE
(marcada en color claro). Pulse POWER brevemente (!) para volver directamente a la pantalla principal. Tras unos 12 segundos de inactividad se
muestra la pantalla principal automáticamente.
POLSKI
SALIR DEL MENÚ PRINCIPAL (EXIT)
Para salir del menú principal y volver a la pantalla principal, gire el mando giratorio y pulsable para seleccionar la opción de menú EXIT (marcada
en color claro) y pulse el mando giratorio. Pulse POWER brevemente (!) para volver directamente a la pantalla principal. Tras unos 12 segundos de
inactividad se muestra la pantalla principal automáticamente.
ITALIANO
62
Page 63

MANEJO DEL RECEPTOR DE PETACA
Para establecer una conexión inalámbrica entre el transmisor y el receptor, el grupo y el número de canal respecto a la frecuencia de radio deberán
ser los mismos en ambos dispositivos.
Para poner en marcha el sistema de transmisión inalámbrico, debe apuntar con el receptor directamente al transmisor.
PANTALLA PRINCIPAL
Poco después de encender el receptor de petaca, aparece la pantalla principal A con la siguiente información: Nombre de usuario, modo de funcionamiento, potencia de recepción de la señal de radio, estado de las pilas y grupo y canal de frecuencia.
De forma alternativa se muestra la pantalla principal B con la frecuencia de radio en MHz y el nivel de las señales de audio izquierda y derecha con
indicación del nivel máximo (PK).
Pulse brevemente el botón para cambiar entre las dos variantes de pantalla.
Pantalla principal A
Nombre de usuario
Modo de funcionamiento mono/estéreo
ENGLISH
DEUTSCHFRANCAIS
Potencia de recepción de la señal de radio
Estado de las pilas
Pantalla principal B
AJUSTE DE BALANCE O DE LA RELACIÓN DE VOLUMEN (BALANCE / FADER)
Modo de funcionamiento MONO: Active el modo de funcionamiento MONO en el transmisor. Ambos canales, izquierdo y derecho, se reproducen pas-
ados a mono. En el receptor se puede desplazar la señal mono a izquierda o derecha en la opción de menú BALANCE. Pulse el botón SEL (MENU) unos
2 segundos para acceder al menú principal. A continuación, pulse varias veces SEL para seleccionar la opción de menú BALANCE (marcada en color
claro) (si no está ya seleccionada) y pulse el botón para conrmar. Ahora, desplace la señal a la izquierda o a la derecha según desee pulsando el
botón las veces necesarias. Para salir de la opción de menú, pulse SEL, seleccione la opción de menú EXIT volviendo a pulsar SEL y pulse para
conrmar. La pantalla principal aparece automáticamente tras unos 5 segundos de inactividad.
Modo de funcionamiento STEREO: Active el modo de funcionamiento STEREO en el transmisor. Cuando haya una señal estéreo en el transmisor,
también se reproducirá en estéreo en el receptor de petaca (desactivar modo de funcionamiento FOCUS: FOCUS OFF). En el receptor se puede ajustar
el balance entre el canal izquierdo y el derecho en la opción de menú BALANCE. Pulse el botón SEL (MENU) unos 2 segundos para acceder al menú
principal. A continuación, pulse varias veces SEL para seleccionar la opción de menú BALANCE (marcada en color claro) (si no está ya seleccionada)
y pulse el botón para conrmar. Ahora, ajuste el balance deseado pulsando el botón las veces necesarias. Para salir de la opción de menú,
pulse SEL, seleccione la opción de menú EXIT volviendo a pulsar SEL y pulse para conrmar. La pantalla principal aparece automáticamente tras
unos 5 segundos de inactividad.
Grupo de frecuencia
Canal de frecuencia
Frecuencia de radio
Canal izquierdo
Nivel de señal de audio / nivel máximo (PK)
Canal derecho
ESPAÑOL
ITALIANO POLSKI
63
Page 64

Modo de funcionamiento FOCUS: Ambos canales, izquierdo y derecho, se reproducen centrados y la relación de volumen de ambos canales se
puede ajustar directamente en el receptor de petaca (p. ej., canal izquierdo = suma a mono de la mesa de mezclas; canal derecho = la voz de un
cantante solista). Active el modo de funcionamiento STEREO en el transmisor. En el receptor de petaca, pulse el botón SEL (MENU) unos 2 segundos
para acceder al menú principal. A continuación, pulse varias veces SEL para seleccionar la opción de menú FOCUS (marcada en color claro) y pulse
el botón de echa para conrmar. Vuelva a pulsar para activar el modo de funcionamiento FOCUS (FOCUS ON). Conrme pulsando SEL y se-
leccione ahora la opción de menú FADER volviendo a pulsar SEL las veces necesarias, a continuación pulse . Ahora, ajuste la relación de volumen
deseada pulsando las veces necesarias. Para salir de la opción de menú, pulse SEL, seleccione la opción de menú EXIT volviendo a pulsar SEL y
pulse para conrmar. La pantalla principal aparece automáticamente tras unos 5 segundos de inactividad.
DEUTSCHENGLISH
AJUSTE DEL CANAL DE FRECUENCIA (CHANNEL)
Pulse el botón SEL (MENU) unos 2 segundos para acceder al menú principal. A continuación, pulse varias veces SEL para seleccionar la opción de
FRANCAIS
menú CHANNEL (marcada en color claro) y pulse el botón para conrmar. Ahora, seleccione el canal de frecuencia deseado pulsando el botón
las veces necesarias. Para salir de la opción de menú, pulse SEL, seleccione la opción de menú EXIT volviendo a pulsar SEL las veces necesarias y
pulse para conrmar. La pantalla principal aparece automáticamente tras unos 5 segundos de inactividad.
ESPAÑOL
AJUSTE DEL GRUPO DE FRECUENCIA (GROUP)
Pulse el botón SEL (MENU) unos 2 segundos para acceder al menú principal. A continuación, pulse varias veces SEL para seleccionar la opción de
menú GROUP (marcada en color claro) y pulse el botón para conrmar. Ahora, seleccione el grupo de frecuencia deseado (en función del
modelo) pulsando el botón las veces necesarias. Para salir de la opción de menú, pulse SEL, seleccione la opción de menú EXIT volviendo a
pulsar SEL las veces necesarias y pulse para conrmar. La pantalla principal aparece automáticamente tras unos 5 segundos de inactividad.
POLSKI
ITALIANO
AJUSTE MANUAL DE LA FRECUENCIA DE RADIO (FREQ. MAN.)
Pulse el botón SEL (MENU) unos 2 segundos para acceder al menú principal. A continuación, pulse varias veces SEL para seleccionar la opción
de menú FREQ. MAN. (marcada en color claro) y pulse el botón para conrmar. Ahora, seleccione el rango de frecuencia de radio en 820,
830 u 860MHz pulsando el botón las veces necesarias y vuelva a pulsar SEL para ajustar la frecuencia en pasos de 1MHz con el botón . A
continuación, pulse el botón SEL para ajustar la frecuencia de radio en pasos de 100kHz presionando el botón y vuelva a pulsar SEL para ajustar
la frecuencia de radio en pasos de 25kHz. Para salir de la opción de menú, pulse SEL, seleccione la opción de menú EXIT volviendo a pulsar SEL las
veces necesarias y pulse para conrmar. La pantalla principal aparece automáticamente tras unos 5 segundos de inactividad.
64
Page 65

AJUSTE DEL SILENCIADOR (SQUELCH)
El silenciador de 3 niveles impide que haya ruidos indeseados cuando el transmisor está apagado. Además, también suprime los ruidos de inter-
ferencias que aparecen de repente en caso de que la señal transmitida del transmisor al receptor no sea lo bastante fuerte (p. ej., debido a una
gran distancia). ¡CUIDADO! ANTES de ajustar el silenciador, asegúrese de que el volumen del receptor esté ajustado al nivel más bajo. Al modicar el
umbral del silenciador pueden producirse ruidos a alto volumen que podrían causar problemas de audición y daños en los auriculares conectados.
Ajuste el silenciador (con el transmisor apagado) al nivel más bajo al que todavía se consigan suprimir los ruidos indeseados (LOW / MID / HI). En el
ajuste "HI" puede verse reducido el alcance de transmisión si las condiciones son desfavorables. Pulse el botón SEL (MENU) unos 2 segundos para
acceder al menú principal. A continuación, pulse varias veces SEL para seleccionar la opción de menú SQUELCH (marcada en color claro) y pulse el
botón para conrmar. Ahora, seleccione el ajuste deseado pulsando el botón las veces necesarias. Para salir de la opción de menú, pulse SEL,
seleccione la opción de menú EXIT volviendo a pulsar SEL las veces necesarias y pulse para conrmar. La pantalla principal aparece automáticamente tras unos 5 segundos de inactividad.
AJUSTE DEL BRILLO DE PANTALLA (DISPLAY)
Pulse el botón SEL (MENU) unos 2 segundos para acceder al menú principal. A continuación, pulse varias veces SEL para seleccionar la opción de
menú DISPLAY (marcada en color claro) y pulse el botón para conrmar. Ahora, seleccione el ajuste deseado pulsando el botón las veces
necesarias (HI = brillo alto / LOW = brillo bajo). Para salir de la opción de menú, pulse SEL, seleccione la opción de menú EXIT volviendo a pulsar SEL
las veces necesarias y pulse para conrmar. La pantalla principal aparece automáticamente tras unos 5 segundos de inactividad.
ENGLISH
DEUTSCHFRANCAIS
ESPAÑOL
SALIR DEL MENÚ PRINCIPAL (EXIT)
Para salir del menú principal y volver a la pantalla principal, pulse SEL varias veces para seleccionar la opción de menú EXIT (marcada en color claro)
y pulse el botón . La pantalla principal aparece automáticamente tras unos 5 segundos de inactividad.
ESTADO DE LAS PILAS
El estado de carga de las pilas se muestra en la pantalla y se actualiza constantemente (pantalla principal A). Cuando las pilas están completamente cargadas, aparece el símbolo
aparece
BATTERY", aparece el símbolo de "carga baja" y se emite un tono a modo de aviso a unos 500Hz a través de la toma de los auriculares. En
este momento debe sustituir las pilas agotadas de inmediato.
. En cuanto se alcanza un estado de carga tan bajo que llega a ser crítico, la indicación en pantalla cambia cada 3 segundos a "LOW
; cuando están alrededor del 70%, aparece el símbolo , y cuando están alrededor del 30%,
ITALIANO POLSKI
65
Page 66

BÚSQUEDA DE ERRORES
PROBLEMA INDICACIÓN SOLUCIÓN
No hay señal de audio
o el nivel es demasiado
bajo
DEUTSCHENGLISH
Receptor: El LED RF no indica la recepción. Compruebe que el transmisor está encendido.
Receptor: La iluminación de la pantalla está apagada Compruebe si el receptor está encendido y si el estado de
Receptor: El LED RF no indica la recepción.
Transmisor: El equipo está encendido. Existe señal
de audio.
FRANCAIS
Receptor: El LED RF indica la recepción. Compruebe si existe señal de audio en el transmisor.
Distorsiones e interferencias
Receptor: El LED RF indica la recepción. Elimine la posible fuente de interferencias (equipos
ESPAÑOL
Sonido distorsionado Receptor: Muestra "LOW BATTERY".
Receptor: En la pantalla del receptor y del transmisor
se muestra un indicador de nivel máximo AF PK.
POLSKI
carga de las pilas es suciente.
Compruebe que la frecuencia de radio del transmisor
coincide con la del receptor.
Compruebe la potencia de transmisión.
Reduzca la distancia entre el transmisor y el receptor.
Verique que el transmisor y el receptor se apunten
directamente entre sí.
Asegúrese de que las antenas del transmisor y del receptor estén bien conectadas, sin cubrir y sin doblar.
Reduzca la intensidad de la supresión de ruido (SQUELCH)
Si procede, aumente el nivel de la señal del reproductor o
compruebe el ajuste de GAIN en el transmisor.
digitales, otros sistemas inalámbricos).
Aumente la intensidad de la supresión de ruido (SQUELCH)
en el receptor.
Sustituya las pilas del receptor.
Compruebe si en la salida de auriculares del transmisor
hay una señal "limpia".
En caso necesario, reduzca el nivel de señal del reproductor o el nivel de audio GAIN del transmisor.
RECOMENDACIONES PARA EVITAR FALLOS
• Al llevar encima un transmisor y un receptor de radio al mismo tiempo, colóquelos lo más alejados posible entre sí.
• No monte un transmisor y un receptor de radio juntos en un rack y coloque el rack de receptores lo más lejos posible del rack de transmisores.
• Para el montaje en rack, mantenga una distancia entre transmisores y receptores de media unidad de altura como mínimo.
• Utilice fuentes de alimentación separadas para transmisores y receptores y no utilice una fuente de alimentación común para sistemas
ITALIANO
inalámbricos de fabricantes distintos.
66
Page 67

DATOS TÉCNICOS
Número de modelo: LDU5047IEMT LDU5051IEMT LDU505IEMT LDU506IEMT LDU508IEMT
Tipo de producto: Monitor
Tipo: Transmisor Transmisor Transmisor Transmisor Transmisor
Intervalo de frecuencias de transmisión: 470 – 490 MHz 514 – 542 MHz 584 – 608 MHz 655 – 679 MHz 823 – 832 MHz,
Grupos de radiofrecuencia: 1 1 10 10 8
Canales de radiofrecuencia: 12 12 12 12 12
Métodos de transmisión: FM, mono/
Potencia nominal de salida de alta
frecuencia:
Ganancia de antena: 2 dBi 2 dBi 2 dBi 2 dBi 2 dBi
Conector de antena: BNC BNC BNC BNC BNC
Respuesta de frecuencia de audio
(-3 dB):
THD+N a 1 kHz, señal de entrada +4 dBu: < 0,3 % < 0,3 % < 0,3 % < 0,3 % < 0,3 %
Relación señal/ruido a 1 kHz,
ponderación A:
Intervalo dinámico a 1 kHz, sin ponderar: 88 dB 88 dB 88 dB 88 dB 88 dB
Sensibilidad de entrada: - 9 dBu (todos
Máx. nivel de entrada: 18 dBu (controles
CMRR IEC: < 45 dB < 45 dB < 45 dB < 45 dB < 45 dB
Entradas de línea: 2 2 2 2 2
Conectores de entrada de línea: XLR (balanceado)
Impedancia de entrada: 12 kohm 12 kohm 12 kohm 12 kohm 12 kohm
Controles: Botón de encen-
Indicadores: Pantalla OLED
Consumo energético (nominal): 3,5 W 3,5 W 3,5 W 3,5 W 3,5 W
intraauricular
estéreo
2 mW, 10 mW,
30 mW
35 Hz – 16000 Hz 35 Hz – 16000 Hz 35 Hz – 16000 Hz 35 Hz – 16000 Hz 35 Hz – 16000 Hz
93 dB 93 dB 93 dB 93 dB 93 dB
los controles
de ganancia al
máximo, modo
estéreo)
de ganancia
ajustados a
90, control de
volumen TX
ajustado a 38,
modo estéreo)
/ TRS combo de
6,3 mm
dido y apagado,
control de menú
giratorio y pulsable, volumen
de auriculares
multifuncional
Monitor
intraauricular
FM, mono/
estéreo
2 mW, 10 mW,
30 mW
- 9 dBu (todos
los controles
de ganancia al
máximo, modo
estéreo)
18 dBu (controles
de ganancia
ajustados a
90, control de
volumen TX
ajustado a 38,
modo estéreo)
XLR (balanceado)
/ TRS combo de
6,3 mm
Botón de encendido y apagado,
control de menú
giratorio y pulsable, volumen
de auriculares
Pantalla OLED
multifuncional
Monitor
intraauricular
863 – 865 MHz
FM, mono/
estéreo
823 – 832 MHz
2 mW, 10 mW,
30 mW
863 – 865 MHz
2 mW, 10 mW
- 9 dBu (todos
los controles
de ganancia al
máximo, modo
estéreo)
18 dBu (controles
de ganancia
ajustados a
90, control de
volumen TX
ajustado a 38,
modo estéreo)
XLR (balanceado)
/ TRS combo de
6,3 mm
Botón de encendido y apagado,
control de menú
giratorio y pulsable, volumen
de auriculares
Pantalla OLED
multifuncional
ENGLISH
DEUTSCHFRANCAIS
ESPAÑOL
ITALIANO POLSKI
67
Page 68

Tensión de funcionamiento: 12 – 18 V CC 12 – 18 V CC 12 – 18 V CC 12 – 18 V CC 12 – 18 V CC
Conector de tensión de entrada: Jack de barril de
Temperatura ambiente
(en funcionamiento):
Humedad relativa: < 80 %
DEUTSCHENGLISH
Dimensiones (Ancho × Alto × P): 212 × 43 × 123 mm 212 × 43 × 123 mm 212 × 43 × 123 mm 212 × 43 × 123 mm 212 × 43 × 123 mm
Peso: 0,66 kg
Accesorios incluidos: Adaptador de
FRANCAIS
Número de modelo: LDU5047IEMR LDU5051IEMR LDU505IEMR LDU506IEMR LDU508IEMR
Tipo de producto: Monitor
Tipo: Receptor de
ESPAÑOL
Intervalo de frecuencias de transmisión: 470 – 490 MHz 514 – 542 MHz 584 – 608 MHz 655 – 679 MHz 823 – 832 MHz,
Grupos de radiofrecuencia: 1 1 10 10 8
Canales de radiofrecuencia: 12 12 12 12 12
Salida de auriculares: Jack estéreo de
POLSKI
Impedancia mínima de los auriculares: 16 ohmios 16 ohmios 16 ohmios 16 ohmios 16 ohmios
Nivel máximo de salida de auriculares: 80 mW con
Respuesta de frecuencia de audio: 40 Hz – 16000 Hz 40 Hz – 16000 Hz 40 Hz – 16000 Hz 40 Hz – 16000 Hz 40 Hz – 16000 Hz
ITALIANO
Diafonía L/R 100 Hz/1 kHz/10 kHz: 55/55/53 dB 55/55/53 dB 55/55/53 dB 55/55/53 dB 55/55/53 dB
Ruido residual: 5,5 uVrms
Conector de antena: Conector roscado Conector roscado Conector roscado Conector roscado Conector roscado
Controles: ON/OFF/VOLUME,
Indicadores: Pantalla OLED
Consumo energético (nominal): 0,7 W 0,7 W 0,7 W 0,7 W 0,7 W
Tensión de funcionamiento: 2 pilas AA de
5,3 mm, positivo
dentro
0 °C – 35 °C 0 °C – 35 °C 0 °C – 35 °C 0 °C – 35 °C 0 °C – 35 °C
(sin condensación)
(con antena)
corriente, antena
BNC, kit para
montaje en rack
de 19"
intraauricular
petaca, sin
diversidad
3,5 mm
carga de
33 ohmios /
33 mW con
carga de
16 ohmios
(ponderación a)
SEL,
multifuncional,
LED RF
1,5 V CC
Jack de barril de
5,3 mm, positivo
dentro
< 80 %
(sin condensación)
0,66 kg
(con antena)
Adaptador de
corriente, antena
BNC, kit para
montaje en rack
de 19"
Monitor
intraauricular
Receptor de
petaca, sin
diversidad
Jack estéreo de
3,5 mm
80 mW con
carga de
33 ohmios /
33 mW con
carga de
16 ohmios
5,5 uVrms
(ponderación a)
ON/OFF/VOLUME,
SEL,
Pantalla OLED
multifuncional,
LED RF
2 pilas AA de
1,5 V CC
Jack de barril de
5,3 mm, positivo
dentro
< 80 %
(sin condensación)
0,66 kg
(con antena)
Adaptador de
corriente, antena
BNC, kit para
montaje en rack
de 19"
Monitor
intraauricular
Receptor de
petaca, sin
diversidad
863 – 865 MHz
Jack estéreo de
3,5 mm
80 mW con
carga de
33 ohmios /
33 mW con
carga de
16 ohmios
5,5 uVrms
(ponderación a)
ON/OFF/VOLUME,
SEL,
Pantalla OLED
multifuncional,
LED RF
2 pilas AA de
1,5 V CC
68
Page 69

Temperatura ambiente (en funcionamiento):
Humedad relativa: < 80 %
Dimensiones (ancho × alto × profundidad, sin antena):
Peso: 0,095 kg 0,095 kg 0,095 kg 0,095 kg 0,095 kg
Accesorios incluidos: Antena roscada,
Otras características: Indicación
Número de modelo: LDIEHP2
Tipo de producto: Auriculares in-ear
Respuesta en frecuencia: 20 Hz – 20000 Hz
Impedancia: 33 ohmios
Conector de audio: Conector estéreo
Cable: 1,27 m
Peso: 0,016 kg
Accesorios incluidos: 3 pares de
0 °C – 35 °C 0 °C – 35 °C 0 °C – 35 °C 0 °C – 35 °C 0 °C – 35 °C
(sin condensación)
64 × 100 × 24 mm 64 × 100 × 24 mm 64 × 100 × 24 mm 64 × 100 × 24 mm 64 × 100 × 24 mm
2 pilas AA
adicional de
batería baja:
señal de 500 Hz a
través del jack de
los auriculares
estéreo
de 3,5 mm
(desconectable)
almohadillas de
silicona, 3 pares
de almohadillas
de espuma
< 80 %
(sin condensación)
Antena roscada,
2 pilas AA
Indicación
adicional de
batería baja:
señal de 500 Hz a
través del jack de
los auriculares
< 80 %
(sin condensación)
Antena roscada,
2 pilas AA
Indicación
adicional de
batería baja:
señal de 500 Hz a
través del jack de
los auriculares
< 80 %
(sin condensación)
Antena roscada,
2 pilas AA
Indicación
adicional de
batería baja:
señal de 500 Hz a
través del jack de
los auriculares
< 80 %
(sin condensación)
Antena roscada,
2 pilas AA
Indicación
adicional de
batería baja:
señal de 500 Hz a
través del jack de
los auriculares
ENGLISH
DEUTSCHFRANCAIS
ESPAÑOL
69
ITALIANO POLSKI
Page 70

DECLARACIÓN DEL FABRICANTE
GARANTÍA DEL FABRICANTE Y LIMITACIÓN DE RESPONSABILIDAD
Consulte nuestras condiciones de garantía y limitaciones de responsabilidad en: https://cdn-shop.adamhall.com/media/pdf/MANUFACTURERS-
DECLARATIONS_LD_SYSTEMS.pdf. En caso de necesitar servicio técnico, póngase en contacto con Adam Hall GmbH, Adam-Hall-Str. 1, 61267 Neu Anspach
(Alemania); correo electrónico Info@adamhall.com; +49 (0)6081 / 9419-0.
ELIMINACIÓN CORRECTA DE ESTE PRODUCTO
(Aplicable en la Unión Europea y en los países europeos que dispongan de un sistema de recogida selectiva) El símbolo que aparece sobre el
producto o en la documentación adjunta indica que al nal de la vida útil del equipo, no deberá desecharlo con los demás residuos
domésticos, con el n de evitar posibles efectos negativos en el medio ambiente y en la salud humana debidos al vertido incontrolado de desechos.
DEUTSCHENGLISH
La recogida selectiva ayuda a su posterior reciclaje y fomenta la reutilización sostenible de los componentes de este equipo. Si es un particular,
póngase en contacto con el distribuidor donde adquirió este producto, o con el ayuntamiento, para informarse sobre el reciclaje adecuado de este
equipo. Si es una empresa, póngase en contacto con su proveedor para informarse sobre los términos y condiciones de su contrato de
compra-venta. Este producto no debe mezclarse con otros residuos industriales.
CONFORMIDAD CE
Adam Hall GmbH declara por la presente que este producto es conforme con las siguientes directivas (según sea aplicable):
R&TTE (1999/5/CE) o RED (2014/53/UE) a partir de junio de 2017
Directiva de baja tensión (2014/35/UE)
FRANCAIS
Directiva EMC (2014/30/UE)
RoHS (2011/65/UE)
Puede consultar la declaración de conformidad completa en www.adamhall.com.
También puede solicitarla a info@adamhall.com.
DECLARACIÓN CE DE CONFORMIDAD
Adam Hall GmbH declara por la presente que este tipo de equipo de radio cumple con la Directiva 2014/53/UE.
El texto completo de la declaración de conformidad de la UE está disponible en la siguiente dirección
Dirección de Internet disponible: www.adamhall.com/compliance/
ESPAÑOL
POLSKI
ITALIANO
70
Page 71

POLSKI
GRATULUJEMY WYBORU!
To urządzenie zostało zaprojektowane i wyprodukowane przy zastosowaniu najwyższych kryteriów jakościowych w celu zapewnienia wieloletniej
bezawaryjnej eksploatacji. Firma LD Systems gwarantuje to swoją marką i wieloletnim doświadczeniem w wytwarzaniu wysokiej jakości produktów
audio. Proszę starannie przeczytać niniejszą instrukcję obsługi, aby móc jak najszybciej zacząć użytkować ten produkt marki LD Systems.
Dalsze informacje na temat rmy LD SYSTEMS dostępne są na naszej stronie internetowej WWW.LD-SYSTEMS.COM
ŚRODKI OSTROŻNOŚCI
1. Należy dokładnie przeczytać niniejszą instrukcję.
2. Wszystkie informacje i instrukcje przechowywać w bezpiecznym miejscu.
3. Należy przestrzegać zaleceń.
4. Należy przestrzegać wszystkich wskazówek ostrzegawczych. Nie wolno usuwać wskazówek bezpieczeństwa ani innych informacji znajdujących się
na urządzeniu.
5. Używać urządzenia wyłącznie w sposób zgodny z jego przeznaczeniem.
6. Stosować wyłącznie stabilne i pasujące statywy, ew. elementy mocujące (w przypadku instalacji stałych). Należy zadbać o prawidłową instalację
uchwytów ściennych i ich odpowiednie zabezpieczenie. Zapewnić bezpieczną instalację urządzenia i upewnić się, że urządzenie nie spadnie.
7. Podczas instalacji przestrzegać obowiązujących w danym kraju przepisów bezpieczeństwa.
8. Urządzenie instalować i eksploatować z dala od grzejników, zasobników ciepła, pieców i innych źródeł ciepła. Zadbać o zainstalowanie urządzenia
w taki sposób, aby zawsze było ono wystarczająco chłodzone i nie mogło ulec przegrzaniu.
9. Nie umieszczać na urządzeniu źródeł zapłonu, takich jak np. palące się świece.
10. Nie wolno blokować szczelin wentylacyjnych. Unikać bezpośredniego działania promieni słonecznych!
11. Zachowaj odległość co najmniej 20 cm wokół i nad urządzeniem.
12. Nie używać urządzenia w bezpośrednim sąsiedztwie wody (nie dotyczy specjalnych urządzeń do stosowania na zewnątrz – w takim przypadku
należy przestrzegać podanych poniżej wskazówek specjalnych). Urządzenie nie może mieć kontaktu z palnymi materiałami, płynami ani gazami.
13. Zabezpieczyć urządzenie przed wniknięciem kapiącej lub pryskającej wody. Nie wolno stawiać na urządzeniu pojemników napełnionych płynami,
takich jak wazony czy naczynia z piciem.
14. Należy zadbać o to, aby do urządzenia nie wpadały żadne przedmioty.
15. Urządzenie można eksploatować tylko przy użyciu akcesoriów zalecanych i przewidzianych przez producenta.
16. Nie otwierać urządzenia ani nie dokonywać w nim zmian.
17. Po podłączeniu urządzenia sprawdzić wszystkie ciągi kablowe, aby zapobiec szkodom lub wypadkom np. w wyniku potknięcia.
18. Podczas transportu zadbać o to, aby urządzenie nie upadło, gdyż może to spowodować uszkodzenie mienia i obrażenia ciała.
19. Jeśli urządzenie nie działa prawidłowo, do jego wnętrza dostały się płyny lub przedmioty lub jeśli urządzenie zostało uszkodzone w inny sposób,
należy je natychmiast wyłączyć i odłączyć od gniazda sieciowego (jeśli urządzenie jest aktywne). Naprawę takiego urządzenia może wykonać tylko
autoryzowany personel specjalistyczny.
20. Do czyszczenia urządzenia stosować suchą ściereczkę.
21. Przestrzegać obowiązujących w danym kraju przepisów dotyczących usuwania odpadów. Podczas utylizacji opakowania oddzielić tworzywo
sztuczne od papieru i tektury.
22. Worki z tworzywa sztucznego należy przechowywać w miejscu niedostępnym dla dzieci.
23. Wszelkie zmiany czy modykacje urządzeń, które nie zostały wyraźnie zatwierdzone przez stronę odpowiedzialną za zgodność, mogą spowodować
utratę przez użytkownika prawa do posługiwania się tym sprzętem.
DOTYCZY URZĄDZEŃ Z ZASILANIEM SIECIOWYM
24. UWAGA: jeśli kabel sieciowy urządzenia jest wyposażony w zestyk ochronny, należy go podłączyć do gniazda z przewodem uziemiającym. Nigdy
nie wolno dezaktywować przewodu uziemiającego kabla sieciowego.
25. Nie włączać urządzenia bezpośrednio po narażeniu go na silne wahania temperatury (np. po transporcie). Wilgoć i skropliny mogą uszkodzić
urządzenie. Włączyć urządzenie dopiero wtedy, gdy osiągnie temperaturę pokojową.
26. Przed podłączeniem urządzenia do gniazda elektrycznego należy sprawdzić, czy napięcie i częstotliwość sieci elektrycznej odpowiada wartościom
podanym na urządzeniu. Jeśli urządzenie jest wyposażone w przełącznik napięcia, należy podłączyć je do gniazda tylko wówczas, gdy wartości
urządzenia odpowiadają wartościom sieci elektrycznej. Jeśli dołączony kabel sieciowy lub dołączony adapter sieciowy nie pasuje do gniazda elektrycznego, należy skontaktować się z elektrykiem.
27. Nie stawać na kablu sieciowym. Należy zadbać o to, aby kable przewodzące napięcie nie były zagięte przy gnieździe sieciowym, przy adapterze
sieciowym ani przy gnieździe urządzenia.
28. Przy podłączaniu urządzenia zawsze należy zadbać o to, aby kabel sieciowy lub adapter sieciowy był zawsze łatwo dostępny. Odłączyć urządzenie
od źródła zasilania, gdy nie jest ono używane lub gdy ma zostać poddane czyszczeniu. Zawsze należy wyjmować kabel sieciowy i adapter sieciowy z
gniazda, chwytając za wtyczkę lub adapter, a nie za kabel. Nigdy nie dotykać kabla sieciowego i adaptera sieciowego mokrymi dłońmi.
29. W miarę możliwości nie włączać i wyłączać urządzenia w krótkich odstępach czasu, gdyż może to mieć negatywny wpływ na jego żywotność.
30. WAŻNA INFORMACJA: bezpieczniki należy wymieniać wyłącznie na bezpieczniki tego samego typu i o takich samych wartościach. Jeśli bezpiecznik
stale się przepala, należy skontaktować się z autoryzowanym centrum serwisowym.
31. Aby całkowicie odłączyć urządzenie od sieci, należy wyjąć kabel sieciowy lub adapter sieciowy z gniazda.
32. Jeśli urządzenie jest wyposażone w przyłącze sieciowe Volex, konieczne jest odblokowanie odpowiedniej wtyczki urządzenia Volex, zanim będzie
możliwe jej odłączenie. Oznacza to także, iż w wyniku pociągnięcia za kabel urządzenie może się przesunąć i spaść, co może spowodować obrażenia
ciała i/lub inne szkody, dlatego ważne jest, aby przewody były odpowiednio poprowadzone.
33. W przypadku zagrożenia uderzeniem pioruna lub jeśli urządzenie przez dłuższy czas nie jest używane, należy wyjąć kabel sieciowy i adapter
sieciowy z gniazda.
ENGLISH
DEUTSCHFRANCAIS
ESPAÑOL
ITALIANO POLSKI
71
Page 72

34. Urządzenie nie może być używane przez osoby (w tym dzieci) o ograniczonych możliwościach zycznych, sensorycznych lub umysłowych, a także
nieposiadające doświadczenia i wiedzy.
35. Należy poinstruować dzieci, aby nie bawiły się urządzeniem.
36. Jeśli przewód zasilający jest uszkodzony, nie należy używać urządzenia. Przewód zasilający należy wymienić na odpowiedni lub specjalny podzespół, który można uzyskać w autoryzowanym centrum serwisowym.
UWAGA:
Nigdy nie zdejmować pokrywy, gdyż grozi to porażeniem prądem. We wnętrzu urządzenia nie ma
żadnych części, które mogłyby zostać naprawione bądź poddane czynnościom konserwacyjnym przez
użytkownika. Czynności konserwacyjne i naprawy może przeprowadzać wyłącznie wykwalikowany
DEUTSCHENGLISH
Trójkąt równoboczny z symbolem błyskawicy sygnalizuje nieizolowane, niebezpieczne napięcie we wnętrzu urządzenia, które może
spowodować porażenie prądem.
Trójkąt równoboczny z wykrzyknikiem oznacza ważne wskazówki dotyczące obsługi i konserwacji.
personel serwisowy.
FRANCAIS
Ostrzeżenie! To urządzenie przeznaczone jest do użytku do maksymalnej wysokości 2000 m n.p.m.
Ostrzeżenie! To urządzenie nie jest przewidziane do użytku w tropikalnych strefach klimatycznych.
UWAGA! WYSOKI POZIOM GŁOŚNOŚCI PRODUKTÓW AUDIO!
ESPAÑOL
To urządzenie przewidziane jest do zastosowań profesjonalnych. Komercyjne stosowanie tego urządzenia podlega obowiązującym w danym kraju
przepisom i wytycznym dotyczącym zapobiegania wypadkom. Firma Adam Hall jest jako producent zobowiązana do wyraźnego informowania o
potencjalnym zagrożeniu dla zdrowia. Utrata słuchu w wyniku wysokiego poziomu głośności i długotrwałego narażenia: podczas stosowania tego
produktu może powstać wysoki poziom ciśnienia akustycznego (SPL), który może doprowadzić do nieodwracalnego uszkodzenia słuchu u artystów,
pracowników i widzów. Należy unikać długotrwałego narażenia na wysoki poziom głośności powyżej 90 dB.
WPROWADZENIE
Nieograniczona swoboda ruchu na scenie i zawsze doskonały system odsłuchu bezpośrednio w uchu. Aby to osiągnąć, opracowaliśmy w Niemczech
POLSKI
bezprzewodowe systemy odsłuchu dousznego U500. Dzięki prostemu, nowoczesnemu wzornictwu i nieskomplikowanej obsłudze stanowią one
doskonały wybór nie tylko dla początkujących. Niezawodna transmisja radiowa i pasmo przenoszenia niskich częstotliwości od 40 Hz do 16 kHz
zapewniają profesjonalne działanie. Zestawy słuchawkowe U500 są dostępne w pięciu zakresach częstotliwości:
LDU5047IEM — System odsłuchu dousznego 470–490 MHz
LDU5051IEM — System odsłuchu dousznego 514–542 MHz
LDU505IEM — System odsłuchu dousznego 584–608 MHz
LDU506IEM — System odsłuchu dousznego 655–679 MHz
ITALIANO
LDU508IEM — System odsłuchu dousznego 823–832 MHz + 863–865 MHz
• Niezawodny system odsłuchu dousznego o zasięgu ponad 100 m
• 96 kanałów do wyboru
• Możliwość przełączenia mocy systemu ERP — 2, 10 lub 30 mW
• Wygodna synchronizacja przez port podczerwieni
• Nazwa użytkownika i dane wejściowe pamięci dla 10 niestandardowych ustawień
• Szeroki zakres częstotliwości
• 3-pasmowy equalizer zparametrycznym środkiem
• Przełączany ogranicznik
• Praca w trybie mono lub stereo
72
Page 73

• Bezpośredni odsłuch przez wyjście słuchawkowe na nadajniku
• Moduł bodypack z trójstopniowym przełączanym tłumieniem szumów
• Czas działania modułu bodypack — 10 godzin na dwóch bateriach AA
• Możliwość jednoczesnej pracy maks. 12 systemów
• Nadajnik U500® IEM kompatybilny z modułem bodypack U300® IEM
Zakres dostawy LDU30xIEM
Nadajnik, antena BNC, odbiornik kieszonkowy, antena odbiorcza, zasilacz, 2 baterie AA, zestaw do montażu na stelażu 19”, instrukcja obsługi
Zakres dostawy LDU50xIEMHP
Nadajnik, antena BNC, odbiornik kieszonkowy, antena odbiorcza, douszne słuchawki stereo, zasilacz, 2 baterie AA, zestaw do montażu na stelażu 19”,
instrukcja obsługi
Wskazówka
W niektórych krajach stosowanie bezprzewodowego systemu mikrofonowego może wymagać posiadania licencji. Szczegółowe informacje otrzymasz we właściwym urzędzie swojego kraju.
GNIAZDA, ELEMENTY OBSŁUGI I WSKAŹNIKI
NADAJNIK
ENGLISH
DEUTSCHFRANCAIS
1 2
6
1
POWER
Włącznik/ wyłącznik. Aby włączyć lub wyłączyć urządzenie, należy nacisnąć i przytrzymać przycisk przez ok. 1 sekundę. Naciśnij krótko przycisk (!), aby
przejść bezpośrednio z menu edycyjnego do ekranu głównego.
2
OLED DISPLAY
Wielofunkcyjny wyświetlacz graczny OLED do prezentacji częstotliwości nadawania, grupy i kanału częstotliwości, indywidualnej nazwy użytkownika, ustawionego numeru i poziomu dźwięku dla lewego i prawego kanału wejściowego na wyświetlaczu głównym. W menu edycji znajdują się
elementy menu, elementy podmenu i odpowiednie opcje edycji.
3
MENU
Pokrętło enkodera do nawigacji w menu edycji oraz do wprowadzania ustawień systemu i zmiany wartości w odpowiednich pozycjach menu.
Począwszy od wyświetlacza głównego, całkowita głośność może być regulowana bezpośrednio przez obrócenie pokrętła.
4
PHONES
Wyjście słuchawkowe z gniazdem jack stereo 6,3 mm do sterowania sygnałem audio bezpośrednio na nadajniku. Sygnał wyjściowy ze słuchawek jest
wykorzystywany przed obwodem MONO/STEREO i po obwodach INPUT GAIN, LIMITER i EQUALIZER. W ścieżce sygnału wyjściowego słuchawek znajduje
się ltr górnoprzepustowy.
5
VOL
Regulacja głośności dla zintegrowanego wyjścia słuchawkowego PHONES.
6
Interfejs podczerwieni umożliwiający synchronizację odpowiednich ustawień systemowych odbiornika z nadajnikiem (np. częstotliwość radiowa).
3
4
5
ESPAÑOL
ITALIANO POLSKI
73
Page 74

8
7
9
10
11
7
GNIAZDO DC
Gniazdo niskiego napięcia do podłączania urządzenia (12 V DC / 500 mA, plus do wewnątrz). Używać wyłącznie zawartego w
zestawie adaptera sieciowego.
8
UCHWYT ZABEZPIECZAJĄCY PRZED WYRWANIEM KABLA
Zastosować reduktor naprężeń dla elastycznego kabla zasilacza sieciowego, aby zabezpieczyć gniazdo niskiego napięcia nadajnika oraz
miniaturową wtyczkę napięcia zasilacza sieciowego przed niezamierzonym uszkodzeniem
czy też odłączeniem.
DEUTSCHENGLISH
9
AF INPUT LEFT / RIGHT
Symetryczne wejścia liniowe z lewej i prawej strony z gniazdami XLR / 6,3 mm jack combo.
10
ANTENA
Złącze BNC dla dostarczonej anteny nadawczej.
FRANCAIS
11
ANTENA NADAWCZA
Antena nadawcza ze złączem BNC.
ESPAÑOL
POLSKI
ITALIANO
74
KIESZONKOWY ODBIORNIK
12
ANTENA
Zdejmowana antena odbiornika kieszonkowego. Dla zapewnienia optymalnego odbioru
nie zakrywać ani nie zginać anteny. Upewnić się, że antena jest solidnie przymocowana do
12
13
14
15
odbiornika podczas pracy (dokręcić ręcznie gwint anteny bez użycia narzędzi).
13
WYŚWIETLACZ OLED
Wielofunkcyjny wyświetlacz graczny OLED do prezentacji grupy częstotliwości i kanału
radiowego, indywidualnej nazwy użytkownika, siły sygnału i stanu baterii oraz poziomu
dźwięku dla kanału lewego i prawego. W menu edycji znajdują się elementy menu, elementy
podmenu i odpowiednie opcje edycji.
14
Interfejs podczerwieni umożliwiający synchronizację odpowiednich ustawień systemowych
odbiornika z nadajnikiem (np. częstotliwość radiowa).
Page 75

15
MENU / SEL ORAZ
Przyciski obsługi w menu edycji oraz do wprowadzania ustawień systemu i zmiany wartości
w odpowiednich pozycjach menu. Aby przyciski były dostępne do obsługi, należy nacisnąć
dwa znaczniki po bokach pokrywy komory baterii i wyjąć ją z obudowy aż do oporu.
16
ZŁĄCZE ANTENY
Złącze anteny z gwintem śrubowym.
17
PHONES
Gniazdo jack stereo 3,5 mm do podłączania słuchawek nausznych lub dousznych.
18
17
16
19
Obłożenie
styków:
18
RF
Wskaźnik LED RF świeci się podczas odbioru sygnału radiowego. Jeśli dioda LED nie świeci się
podczas pracy, należy sprawdzić, czy kanał radiowy odbiornika pasuje do kanału radiowego
nadajnika. Ewentualnie można zmniejszyć odległość między odbiornikiem a nadajnikiem.
ENGLISH
DEUTSCHFRANCAIS
ESPAÑOL
19
ON / OFF - VOL
Obrócić pokrętło głośności w prawo przez punkt zatrzaskowy, aby włączyć odbiornik. Dalsze
obracanie w prawo spowoduje zwiększenie głośności. Obrócić pokrętło w lewo, aby zmniejszyć głośność. Dalsze obrócenie przez punkt zatrzaskowy spowoduje wyłączenie odbiornika.
Należy zadbać o komfortowy poziom głośności, aby uniknąć uszkodzenia słuchu.
20
PRZEGRODA BATERII
Aby wymienić baterie w odbiorniku kieszonkowym, należy nacisnąć jednocześnie oba
oznaczone miejsca na bokach pokrywy baterii i zdjąć ją z obudowy aż do oporu. Wyjąć zużyte
baterie i włożyć nowe (2 x AA / LR6, alkaliczne) zgodnie z oznaczeniami w komorze na baterie. Nasunąć pokrywę baterii na obudowę tak, aby się zatrzasnęła. W razie dłuższej przerwy
w używaniu odbiornika należy wyjąć baterie, by nie dopuścić do uszkodzenia urządzenia
wskutek wycieku elektrolitu.
20
21
21
KLIPS NA PASEK
Z tyłu odbiornika kieszonkowego znajduje się klips na pasek. Umożliwia on przypięcie
odbiornika do spodni, paska itp.
ITALIANO POLSKI
75
Page 76

OBSŁUGA NADAJNIKA
Aby ustanowić połączenie radiowe między nadajnikiem i odbiornikiem, grupa częstotliwości i kanał odpowiadający częstotliwości obu urządzeń
muszą być zgodne.
Podczas uruchamiania systemu transmisji bezprzewodowej należy się upewnić, że odbiornik znajduje się w bezpośrednim zasięgu nadajnika.
WIDOK GŁÓWNY WYŚWIETLACZA
Po włączeniu nadajnika wyświetli się krótki tekst powitalny „WELCOME”, a następnie pojawi się ekran główny z następującymi informacjami: Indywidualna nazwa użytkownika, ustawiony numer, poziom sygnałów wejściowych audio ze wskazaniem wartości szczytowej, grupa i kanał częstotliwości
DEUTSCHENGLISH
(GR.xx i CH.xx) oraz bieżąca częstotliwość radiowa w MHz.
Indywidualna nazwa użytkownika
Poziom sygnału audio / wartość
szczytowa (Peak, PK) prawego kanału
Grupa i kanał częstotliwości
GŁOŚNOŚĆ (VOLUME)
FRANCAIS
Począwszy od wyświetlacza głównego, całkowita głośność może być regulowana bezpośrednio przez obrócenie pokrętła enkodera MENU na wartość
z zakresu od 00 do 50. Na wyświetlaczu automatycznie zmienia się ekran na odpowiedni po obróceniu pokrętła enkodera. Po około 3 sekundach
bezczynności wyświetlacz automatycznie powraca do ekranu głównego, a naciśnięcie enkodera powoduje natychmiastowe przełączenie wyświetlacza na ekran główny.
ESPAÑOL
SYNCHRONIZACJA PODCZERWIENI (IR SYNC RUN)
Aby zsynchronizować odbiornik kieszonkowy z częstotliwością radiową ustawioną w nadajniku i nazwą użytkownika, należy wprowadzić interfejs
podczerwieni odbiornika w bezpośredni kontakt z interfejsem podczerwieni nadajnika (odległość ok. 10 cm) i włączyć odbiornik. Nacisnąć pokrętło
enkodera nadajnika (MENU), aby przejść do menu głównego, a następnie obracając pokrętło, wybrać pozycję menu IR SYNC RUN (podświetloną).
Nacisnąć ponownie MENU, aby rozpocząć proces synchronizacji. Po kilku sekundach proces zostanie zakończony i na wyświetlaczu odbiornika pojawi
się na krótki czas komunikat „IR SYNC ”, aby potwierdzić udaną synchronizację. Aby anulować operację, nacisnąć przycisk MENU. Krótko (!) nacisnąć
przycisk POWER, aby powrócić bezpośrednio do wyświetlacza głównego. Po około 12 sekundach bezczynności automatycznie pojawi się ekran główny.
Wskazówka: Bezpośrednie promieniowanie słoneczne może zakłócać proces synchronizacji.
Numer ustawień wstępnych
Poziom sygnału audio / wartość szczy-
towa (Peak, PK) lewego kanału
Częstotliwość radiowa w MHz
POLSKI
KONFIGURACJA ŁĄCZNOŚCI RADIOWEJ (RF SETTINGS)
ITALIANO
Nacisnąć pokrętło enkodera nadajnika (MENU), aby przejść do menu głównego, a następnie obracając pokrętło wybrać pozycję menu RF SETTINGS
(podświetloną). Ponownie nacisnąć pokrętło, aby przejść do podmenu i wybrać żądaną pozycję, obracając pokrętło. Potwierdzić wybór, naciskając
je. W przypadku zmiany wartości przez obrócenie pokrętła enkodera potwierdzić tę zmianę, naciskając pokrętło. Pozycje podmenu i odpowiednie
informacje można znaleźć w poniższej tabeli. Krótko (!) nacisnąć przycisk POWER, aby powrócić bezpośrednio do wyświetlacza głównego. Po około 12
sekundach bezczynności automatycznie pojawi się ekran główny.
76
Page 77

RF SETTINGS (zmienić wartość = obrócić pokrętło enkodera; potwierdzić zmianę wartości = nacisnąć pokrętło enkodera)
GROUP Grupa częstotliwości U5047IEM 1
Grupa częstotliwości U5051IEM 1
Grupa częstotliwości U505IEM 1–10
Grupa częstotliwości U506IEM 1–10
Grupa częstotliwości U508IEM 1–8
CHANNEL Kanał częstotliwości 1–12 Wybrać kanał i potwierdzić dwukrotnie
FREQ MAN Ręczne ustawianie częstotliwości Krok 1: Ustawić częstotliwość w krokach 1 MHz i potwierdzić
RF POWER Ustawić zakres nadawania 470–490 MHz: 2 mW / 10 mW / 30 mW
EXIT RF SETT. Wyjście z podmenu (nacisnąć pokrętło enkodera)
Informacje na temat mocy nadawania i ustawienia tłumienia szumów w odbiorniku kieszonkowym:
Wybrać niską moc nadawania, jeśli nadajnik i odbiornik znajdują się w bliskiej odległości od siebie. Tłumienie szumów w odbiorniku należy również
ustawić jako wartość standardową na niskim poziomie. W przypadku większych odległości między nadajnikiem a odbiornikiem należy wybrać
większą moc nadawania i odpowiednio wyregulować tłumienie szumów w odbiorniku. Więcej informacji na temat ustawiania tłumienia szumów
można znaleźć w rozdziale „OBSŁUGA NADAJNIKA KIESZONKOWEGO” w rozdziale „USTAWIENIE TŁUMIENIA SZUMÓW” w niniejszej instrukcji. We wszystkich
przypadkach należy się upewnić, że nadajnik i odbiornik znajdują się w bezpośredniej bliskości i że żadne przeszkody pomiędzy nadajnikiem i
odbiornikiem nie będą zakłócać komunikacji radiowej.
W zależności od sytuacji, w celu zapewnienia bezproblemowej pracy, mogą być wymagane różne ustawienia. Należy pamiętać, że jeśli w pobliżu
używane są inne nadajniki, mogą występować większe zakłócenia i powodować problemy z łącznością radiową. W tym przypadku zakłóceniom może
zapobiec wybór innej częstotliwości radiowej.
OSTROŻNIE! PRZED ustawieniem tłumienia szumów należy się upewnić, że poziom głośności odbiornika jest ustawiony na najniższy możliwy
poziom, ponieważ zmiana progu tłumienia może spowodować głośny hałas w tle, który z kolei może spowodować uszkodzenie słuchu oraz
podłączonych słuchawek.
Wybrać grupę i potwierdzić dwukrotnie
Krok 2: Ustawić częstotliwość w krokach 25 kHz i potwierdzić
514–542 MHz: 2 mW / 10 mW / 30 mW
584–608 MHz: 2 mW / 10 mW / 30 mW
655–679 MHz: 2 mW / 10 mW / 30 mW
823–832 MHz: 2 mW / 10 mW / 30 mW, 863–865 MHz: 2mW / 10mW
ENGLISH
DEUTSCHFRANCAIS
ESPAÑOL
USTAWIENIA AUDIO (AUDIO SETTINGS)
Nacisnąć pokrętło enkodera nadajnika (MENU), aby przejść do menu głównego, a następnie obracając pokrętło, wybrać pozycję menu AUDIO
SETTINGS (podświetloną). Ponownie nacisnąć pokrętło, aby przejść do podmenu i wybrać żądaną pozycję, obracając pokrętło. Potwierdzić ustawienia,
naciskając enkoder. W przypadku zmiany wartości przez obrócenie pokrętła enkodera potwierdzić tę zmianę, naciskając pokrętło. Pozycje podmenu i
odpowiednie informacje można znaleźć w poniższej tabeli. Krótko (!) nacisnąć przycisk POWER, aby powrócić bezpośrednio do wyświetlacza głównego. Po około 12 sekundach bezczynności automatycznie pojawi się ekran główny.
ITALIANO POLSKI
77
Page 78

AUDIO SETTINGS (zmienić wartość = obrócić pokrętło enkodera, potwierdzić zmianę wartości = nacisnąć pokrętło enkodera)
INPUT GAIN LEFT Wzmocnienie na wejściu w lewym kanale 000 - 100 Aby uzyskać optymalny stosunek sygnału do szumu,
INPUT GAIN RIGHT Wzmocnienie na wejściu w prawym kanale 000 - 100
LIMITER Aktywacja / dezaktywacja ogranicznika
DEUTSCHENGLISH
MODE Ustawianie trybu mono / stereo
FRANCAIS
EQ SETTINGS BASS EQ G: +/-15 dB Wzmocnienie częstotliwości basów z - 15 dB do + 15 dB
ESPAÑOL
EXIT AUDIO SETT. Wyjście z podmenu (nacisnąć pokrętło enkodera)
POLSKI
INDYWIDUALNA NAZWA UŻYTKOWNIKA (NAME)
Nacisnąć pokrętło enkodera nadajnika (MENU), aby przejść do menu głównego, a następnie obracając pokrętło, wybrać pozycję menu NAME (podświetloną) i nacisnąć pokrętło w celu potwierdzenia. Aby nadać indywidualną nazwę (do 8 znaków), wybrać literę, podkreślnik lub cyfrę dla pierwszego
znaku nazwy, obracając pokrętło enkodera ipotwierdzić, naciskając je. Następnie dokonać wyboru dla drugiego miejsca itd. Po wprowadzeniu nazwy
należy ponownie nacisnąć pokrętło, aby potwierdzić. Krótko (!) nacisnąć przycisk POWER, aby powrócić bezpośrednio do wyświetlacza głównego. Po
około 12 sekundach bezczynności automatycznie pojawi się ekran główny.
wejściowego
Wybrany tryb pracy jest wyświetlany na
ekranie odbiornika (M = mono, S = stereo)
f: 60 Hz / 80 Hz / 100 Hz /
200 Hz
MIDDLE EQ G: +/-15 dB Wzmocnienie średnich częstotliwości z - 15 dB do + 15 dB
f: 500 Hz / 1000 Hz / 1500 Hz
/ 2500 Hz
Q: 0,50 / 0,75 / 1,00 / 1,25 Ustawienie współczynnika jakości
TREBLE EQ G: +/-15 dB Wzmocnienie średnich częstotliwości z - 15 dB do + 15 dB
f: 10,0 kHz / 12,5 kHz / 15,0 kHz
/ 17,5 kHz
EXIT EQ
SETT.
Wyjście z menu equalizera (nacisnąć pokrętło enkodera)
ON = aktywowany (zalecane)
OFF = zdezaktywowany
MONO = sygnały wejściowe z lewej i prawej strony są sumowane
do sygnału monofonicznego. Przesunięcie sygnału w lewo lub w
prawo na odbiorniku (BALANCE).
STEREO = odtwarzanie sygnału wejściowego w trybie stereo.
Ustawianie balansu na odbiorniku (BALANCE)
Tryb STEREO w nadajniku powinien być ustawiony, nawet w celu
korzystania z trybu FOCUS w odbiorniku kieszonkowym.
Ustawienie częstotliwości basów
Ustawianie średnich częstotliwości
Regulacja wysokiej częstotliwości
należy wyrównać sygnały z lewej i prawej strony tak
wysoko, jak to możliwe. Aby uniknąć zniekształcenia
sygnału. Przy czym należy się upewnić, że wskaźnik
PEAK na wyświetlaczu nie świeci się lub zaświeca jedynie na krótko. W razie potrzeby wyregulować poziom
wyjściowy urządzenia odtwarzającego.
ITALIANO
USTAWIANIE JASNOŚCI EKRANU (BRIGHTNESS)
Nacisnąć pokrętło enkodera nadajnika (MENU), aby przejść do menu głównego, a następnie obracając pokrętło, wybrać pozycję menu BRIGHTNESS
(podświetloną) i nacisnąć pokrętło w celu potwierdzenia. Wybrać 3-stopniową jasność wyświetlacza (HIGH = wysoka, MID = średnia, LOW = niska),
obracając pokrętło enkodera w żądany sposób i nacisnąć je 2 razy, aby potwierdzić. Krótko (!) nacisnąć przycisk POWER, aby powrócić bezpośrednio
do wyświetlacza głównego. Po około 12 sekundach bezczynności automatycznie pojawi się ekran główny.
78
Page 79

BLOKADA PANELU STEROWNIA (PANEL LOCK)
Nacisnąć pokrętło enkodera nadajnika (MENU), aby przejść do menu głównego, a następnie obracając pokrętło, wybrać pozycję menu PANEL LOCK
(podświetloną) i nacisnąć pokrętło w celu potwierdzenia. Aby zablokować panel sterowania, należy wybrać opcję ON (wł.), obracając pokrętło, i
nacisnąć je 2 razy, aby potwierdzić. Krótko (!) nacisnąć przycisk POWER, aby powrócić bezpośrednio do wyświetlacza głównego. Po około 10 sekundach bezczynności automatycznie pojawi się ekran główny. W przypadku naciśnięcia jednego z elementów sterujących POWER lub pokrętła MENU
na wyświetlaczu pojawi się na krótko komunikat „PANEL LOCK ON” i zostanie zablokowana możliwość zmiany ustawień. Aby odblokować elementy
sterujące, nacisnąć i przytrzymać pokrętło przez około 2 sekundy, wybrać opcję OFF (wył.) w pozycji menu PANEL LOCK, aby umożliwić stałą obsługę za
pośrednictwem elementów sterujących.
ZAPISANIE WSTĘPNYCH USTAWIEŃ (SAVE PRESET)
Ustawienia RF SETTINGS, AUDIO SETTINGS i poszczególne nazwy można zapisać w maksymalnie 10 różnych zestawach ustawień wstępnych. Po wybraniu odpowiednich ustawień nacisnąć pokrętło enkodera nadajnika (MENU), aby przejść do menu głównego, a następnie obracając pokrętło, wybrać
pozycję menu SAVE PRESET (podświetloną) i nacisnąć pokrętło w celu potwierdzenia. Należy wybrać numer zestawu ustawień wstępnych, które mają
być zapisane, obracając pokrętło (01–10), potwierdzić naciskając pokrętło, a następnie wybrać YES (tak), obracając pokrętło i naciskając je dwa razy,
aby potwierdzić. Aby anulować proces, wybrać NO (nie) i również potwierdzić. Krótko (!) nacisnąć przycisk POWER, aby powrócić bezpośrednio do
wyświetlacza głównego. Po około 12 sekundach bezczynności automatycznie pojawi się ekran główny.
ENGLISH
DEUTSCHFRANCAIS
WCZYTYWANIE USTAWIEŃ WSTĘPNYCH (LOAD PRESET)
Nacisnąć pokrętło enkodera nadajnika (MENU), aby przejść do menu głównego, a następnie obracając pokrętło, wybrać pozycję menu LOAD PRESET
(podświetloną) i nacisnąć pokrętło w celu potwierdzenia. Należy wybrać numer zestawu ustawień wstępnych, które mają być wczytane, obracając
pokrętło (01–10), potwierdzić, naciskając pokrętło, a następnie wybrać YES (tak), obracając pokrętło i naciskając je dwa razy, aby potwierdzić. Aby
anulować proces, wybrać NO (nie) i również potwierdzić. Krótko (!) nacisnąć przycisk POWER, aby powrócić bezpośrednio do wyświetlacza głównego.
Po około 12 sekundach bezczynności automatycznie pojawi się ekran główny.
SPRAWDZENIE WERSJI OPROGRAMOWANIA (SOFTWARE)
Nacisnąć pokrętło enkodera nadajnika (MENU), aby przejść do menu głównego, a następnie obracając pokrętło, wybrać pozycję menu SOFTWARE
(podświetloną). Krótko (!) nacisnąć przycisk POWER, aby powrócić bezpośrednio do wyświetlacza głównego. Po około 12 sekundach bezczynności
automatycznie pojawi się ekran główny.
ESPAÑOL
ITALIANO POLSKI
79
Page 80

WYJŚCIE Z MENU GŁÓWNEGO (EXIT)
Aby opuścić menu główne i wrócić do głównego ekranu, należy wybrać za pomocą pokrętła enkodera pozycję menu EXIT (podświetlona) i nacisnąć
pokrętło. Krótko (!) nacisnąć przycisk POWER, aby powrócić bezpośrednio do wyświetlacza głównego. Po około 12 sekundach bezczynności
automatycznie pojawi się ekran główny.
DEUTSCHENGLISH
OBSŁUGA KIESZONKOWEGO ODBIORNIKA
Aby ustanowić połączenie radiowe między nadajnikiem i odbiornikiem, grupa i numer kanału odpowiadające częstotliwości obu urządzeń muszą
być zgodne.
Podczas uruchamiania systemu transmisji bezprzewodowej należy się upewnić, że odbiornik znajduje się w bezpośrednim zasięgu nadajnika.
FRANCAIS
WIDOK GŁÓWNY WYŚWIETLACZA
Krótko po włączeniu odbiornika kieszonkowego pojawia się główny widok A z następującymi informacjami: Indywidualna nazwa użytkownika, tryb
pracy, siła sygnału radiowego odbiornika, stan baterii oraz grupa i kanał częstotliwości.
Alternatywnie na głównym widoku B jest pokazywana częstotliwość radiowa w MHz oraz poziom lewego i prawego sygnału audio z wartością
szczytową (Peak, PK).
Krótko nacisnąć przycisk , aby przełączać warianty widoków na ekranie.
ESPAÑOL
Główny ekran A
Indywidualna nazwa użytkownika
Tryb pracy mono / stereo
Siła sygnału radiowego odbiornika
Stan baterii
Główny ekran B
POLSKI
USTAWIANIE BALANSU LUB STOSUNKU GŁOŚNOŚCI (BALANCE / FADER)
ITALIANO
Tryb pracy MONO: Aktywować w nadajniku tryb pracy MONO. Oba kanały, lewy i prawy, są sumowane do sygnału monofonicznego. W odbiorniku
sygnał mono można przesunąć w lewo lub w prawo w menu BALANCE. Naciskać przycisk SEL (MENU) przez około 2 sekundy, aby wejść do menu
głównego, a następnie, jeśli nie został on jeszcze wybrany, kilkukrotnie przycisk SEL, aby wybrać pozycję menu BALANCE (podświetlona) i nacisnąć
przycisk , aby potwierdzić. Przesunąć sygnał w lewo lub w prawo w zależności od potrzeb, naciskając przycisk (w razie potrzeby kilkukrotnie).
Aby opuścić daną pozycję menu, nacisnąć przycisk SEL, wybrać EXIT, ponownie naciskając przycisk SEL w pozycji menu EXIT i nacisnąć przycisk, aby
potwierdzić. Ekran główny pojawi się automatycznie po około 5 sekundach bezczynności.
Grupa częstotliwości
Kanał częstotliwości
Częstotliwość radiowa
Kanał lewy
Poziom sygnału audio / wartość szczytowa (Peak, PK)
Kanał prawy
80
Page 81

Tryb pracy STEREO: Aktywować w nadajniku tryb pracy STEREO. Sygnał stereo obecny w nadajniku jest również odtwarzany w trybie stereo w
odbiorniku kieszonkowym (wyłączenie trybu FOCUS za pomocą opcji FOCUS OFF). W odbiorniku balans między lewym i prawym kanałem może być
ustawiony w pozycji menu BALANCE. Naciskać przycisk SEL (MENU) przez około 2 sekundy, aby wejść do menu głównego, a następnie, jeśli nie został
on jeszcze wybrany, kilkukrotnie przycisk SEL, aby wybrać pozycję menu BALANCE (podświetlona) i nacisnąć przycisk , aby potwierdzić. Ustawić
balans zgodnie z życzeniem, naciskając przycisk (w razie potrzeby powtórzyć). Aby opuścić daną pozycję menu, nacisnąć przycisk SEL, wybrać EXIT,
ponownie naciskając przycisk SEL w pozycji menu EXIT i nacisnąć przycisk , aby potwierdzić. Ekran główny pojawi się automatycznie po około 5
sekundach bezczynności.
Tryb pracy FOKUS: Oba kanały, lewy i prawy, są odtwarzane przy środkowym ustawieniu, a stosunek głośności obu kanałów może być regulowany
bezpośrednio na odbiorniku kieszonkowym (lewy kanał = miks mono-sum, prawy kanał = wokal solo). Aktywować w nadajniku tryb pracy STEREO.
Naciskać przycisk SEL (MENU) przez około 2 sekundy, aby wejść do menu głównego, a następnie kilkukrotnie przycisk SEL, aby wybrać pozycję menu
FOKUS (podświetlona) i nacisnąć przycisk , aby potwierdzić. Nacisnąć ponownie przycisk , aby aktywować tryb pracy FOCUS (FOCUS ON). Potwierdzić, naciskając przycisk SEL i wybierając pozycję menu FADER przez kilkukrotne naciśnięcie przycisku SEL, jeśli to konieczne, i wybranie przycisku
. Ustawić stosunek głośności zgodnie z życzeniem, naciskając przycisk (w razie potrzeby powtórzyć). Aby opuścić daną pozycję menu, nacisnąć
przycisk SEL, wybrać EXIT, ponownie naciskając przycisk SEL w pozycji menu EXIT i nacisnąć przycisk , aby potwierdzić. Ekran główny pojawi się
automatycznie po około 5 sekundach bezczynności.
USTAWIANIE KANAŁU CZĘSTOTLIWOŚCI (CHANNEL)
Naciskać przycisk SEL (MENU) przez około 2 sekundy, aby wejść do menu głównego, a następnie kilkukrotnie przycisk SEL, aby wybrać pozycję menu
CHANNEL (podświetlona) i nacisnąć przycisk , aby potwierdzić. Wybrać kanał częstotliwości zgodnie z życzeniem, naciskając przycisk (w razie
potrzeby powtórzyć). Aby opuścić daną pozycję menu, nacisnąć przycisk SEL, ponownie wybrać pozycję menu EXIT, naciskając (ponownie) przycisk SEL
oraz nacisnąć przycisk , aby potwierdzić. Ekran główny pojawi się automatycznie po około 5 sekundach bezczynności.
ENGLISH
DEUTSCHFRANCAIS
ESPAÑOL
USTAWIANIE GRUPY CZĘSTOTLIWOŚCI (GROUP)
Naciskać przycisk SEL (MENU) przez około 2 sekundy, aby wejść do menu głównego, a następnie kilkukrotnie przycisk SEL, aby wybrać pozycję menu
GROUP (podświetlona) i nacisnąć przycisk , aby potwierdzić. Wybrać grupę częstotliwości zgodnie z życzeniem (w zależności od modelu), naciskając przycisk (w razie potrzeby powtórzyć). Aby opuścić daną pozycję menu, nacisnąć przycisk SEL, ponownie wybrać pozycję menu EXIT, naciskając
(ponownie) przycisk SEL oraz nacisnąć przycisk , aby potwierdzić. Ekran główny pojawi się automatycznie po około 5 sekundach bezczynności.
ITALIANO POLSKI
81
Page 82

RĘCZNE USTAWIANIE CZĘSTOTLIWOŚCI RADIOWEJ (FREQ. MAN.)
Naciskać przycisk SEL (MENU) przez około 2 sekundy, aby wejść do menu głównego, a następnie kilkukrotnie przycisk SEL, aby wybrać pozycję menu
FREQ. MAN. (podświetlona) i nacisnąć przycisk , aby potwierdzić. Wybrać zakres częstotliwości radiowej poniżej 820, 830 lub 860 MHz, naciskając
przycisk (w razie potrzeby kilkukrotnie) i ponownie nacisnąć przycisk SEL, aby ustawić częstotliwość w krokach 1 MHz za pomocą przycisku .
Następnie nacisnąć przycisk SEL, aby regulować częstotliwość radiową co 100 kHz, naciskając przycisk oraz ponownie nacisnąć przycisk SEL, aby
regulować częstotliwość radiową co 25 kHz. Aby opuścić daną pozycję menu, nacisnąć przycisk SEL, ponownie wybrać pozycję menu EXIT, naciskając
(ponownie) przycisk SEL oraz nacisnąć przycisk , aby potwierdzić. Ekran główny pojawi się automatycznie po około 5 sekundach bezczynności.
DEUTSCHENGLISH
USTAWIANIE TŁUMIENIA SZUMÓW (SQUELCH)
3-stopniowe tłumienie zapobiega niepożądanemu hałasowi, gdy nadajnik jest wyłączony. Ponadto są tłumione nagłe zakłócenia, jeśli sygnał
przesyłany z nadajnika do odbiornika nie jest wystarczająco silny (np. z powodu zbyt dużej odległości). OSTROŻNIE! PRZED ustawieniem tłumienia
FRANCAIS
szumów należy się upewnić, że poziom głośności odbiornika jest ustawiony na najniższy możliwy poziom, ponieważ zmiana progu tłumienia może
spowodować głośny hałas w tle, który z kolei może spowodować uszkodzenie słuchu oraz podłączonych słuchawek. Ustawić tłumienie szumów (gdy
nadajnik jest wyłączony) na najniższą wartość, aby hałas otoczenia był nadal skutecznie tłumiony (LOW / MID / HI). Przy ustawieniu „HI” zasięg transmisji może zostać zmniejszony w niekorzystnych warunkach. Naciskać przycisk SEL (MENU) przez około 2 sekundy, aby wejść do menu głównego, a
następnie kilkukrotnie przycisk SEL, aby wybrać pozycję menu SQUELCH (podświetlona) i nacisnąć przycisk , aby potwierdzić. Wybrać ustawienie
zgodnie z życzeniem, naciskając przycisk (w razie potrzeby powtórzyć). Aby opuścić daną pozycję menu, nacisnąć przycisk SEL, ponownie wybrać
pozycję menu EXIT, naciskając (ponownie) przycisk SEL oraz nacisnąć przycisk , aby potwierdzić. Ekran główny pojawi się automatycznie po około
5 sekundach bezczynności.
ESPAÑOL
USTAWIANIE JASNOŚCI EKRANU (DISPLAY)
POLSKI
Naciskać przycisk SEL (MENU) przez około 2 sekundy, aby wejść do menu głównego, a następnie kilkukrotnie przycisk SEL, aby wybrać pozycję menu
DISPLAY (podświetlona) i nacisnąć przycisk , aby potwierdzić. Wybrać ustawienie zgodnie z życzeniem, naciskając przycisk (w razie potrzeby
powtórzyć). (HI = wysoka jasność, LOW = niska jasność). Aby opuścić daną pozycję menu, nacisnąć przycisk SEL, ponownie wybrać pozycję menu
EXIT, naciskając (ponownie) przycisk SEL oraz nacisnąć przycisk , aby potwierdzić. Ekran główny pojawi się automatycznie po około 5 sekundach
bezczynności.
ITALIANO
WYJŚCIE Z MENU GŁÓWNEGO (EXIT)
Aby opuścić menu główne i wrócić do głównego ekranu, należy wybrać za pomocą kilkukrotnego naciśnięcia SEL pozycję menu EXIT (podświetlona)
i nacisnąć przycisk . Po około 5 sekundach bezczynności automatycznie pojawi się główny ekran.
82
Page 83

STAN BATERII
Stan naładowania baterii jest wyświetlany na ekranie i stale aktualizowany (ekran główny A). Przy w pełni naładowanej baterii wyświetlany jest
symbol
niskiego poziomu naładowania co około 3 sekundy na wyświetlaczu pojawia się komunikat „BATTERY LOW” i symbol niskiego poziomu naładowania
baterii
wymienić zużyte baterie.
. Gdy naładowanie wynosi 70%, pokazany jest symbol , a przy 30% naładowaniu — symbol . Po osiągnięciu krytycznie
, a przez gniazdo słuchawkowe jest emitowany dźwiękowy sygnał ostrzegawczy o częstotliwości około 500 Hz. Niezwłocznie należy
ZNAJDOWANIE BŁĘDU
PROBLEM KOMUNIKAT ROZWIĄZANIE
Brak sygnału audio lub
zbyt niski poziom sygnału
Odbiornik: Odbiór nie jest sygnalizowany przez diodę
LED.
Sprawdzić, czy nadajnik jest włączony.
ENGLISH
DEUTSCHFRANCAIS
Odbiornik: Oświetlenie wyświetlacza jest wyłączone Sprawdzić, czy odbiornik jest włączony i czy poziom
Odbiornik: Odbiór nie jest sygnalizowany przez diodę
RF-LED.
Nadajnik: Urządzenie jest włączone. Sygnał dźwiękowy
jest włączony.
Odbiornik: Odbiór jest sygnalizowany przez diodę
RF-LED.
Zniekształcenia i szumy Odbiornik: Odbiór jest sygnalizowany przez diodę
RF-LED.
Zniekształcony dźwięk Odbiornik: Pojawi się komunikat „LOW BATTERY”.
Odbiornik: Na ekranie odbiornika i nadajnika jest
wyświetlana wartość szczytowa AF PK.
naładowania baterii jest wystarczający.
Sprawdzić, czy częstotliwość nadajnika i odbiornika jest
zgodna.
Sprawdzić moc nadawania.
Zmniejszyć odległość między nadajnikiem a odbiornikiem.
Upewnić się, że nadajnik jest skierowany bezpośrednio
na odbiornik.
Upewnić się, że anteny nadajnika i odbiornika są prawidłowo podłączone, nie są zakryte ani wygięte.
Zmniejszyć poziom tłumienia szumów (SQUELCH)
Sprawdzić, czy w nadajniku jest obecny sygnał audio.
W razie potrzeby zwiększyć poziom sygnału urządzenia
odtwarzającego lub sprawdzić ustawienie GAIN (wzmocnienie) w nadajniku.
Usunąć wszelkie ewentualne źródła zakłóceń (urządzenia
cyfrowe, inne systemy bezprzewodowe).
Zwiększyć poziom redukcji szumów (SQUELCH) w
odbiorniku.
Wymienić baterie w kieszonkowym odbiorniku.
Sprawdzić wyjście słuchawkowe nadajnika, aby upewnić
się, że sygnał jest „czysty”.
W razie potrzeby zmniejszyć poziom sygnału urządzenia
odtwarzającego lub poziom sygnału audio GAIN (wzmocnienia) w nadajniku.
ESPAÑOL
ITALIANO POLSKI
83
Page 84

ZALECENIA DOTYCZĄCE ZAPOBIEGANIA BŁĘDOM
• W przypadku jednoczesnego używania nadajnika i odbiornika radiowego przy ciele oba urządzenia należy umieścić jak najdalej od siebie.
• Nie należy instalować odbiornika i nadajnika radiowego razem w szae stelażowej. Stelaż na odbiornik należy umieszczać jak najdalej od
stelaża na nadajnik.
• W przypadku montażu nadajników lub odbiorników w szae stelażowej należy je odsunąć od siebie na co najmniej połowę jednostki wysokości.
• Należy stosować oddzielne zasilacze do nadajnika i odbiornika oraz nie stosować tego samego zasilacza do systemów bezprzewodowych
różnych producentów.
DEUTSCHENGLISH
SPECYFIKACJE
Numer modelu: LDU5047IEMT LDU5051IEMT LDU505IEMT LDU506IEMT LDU508IEMT
Typ produktu: Słuchawki
FRANCAIS
Typ: Nadajnik Nadajnik Nadajnik Nadajnik Nadajnik
Zakres częstotliwości nadawania: 470 – 490 MHz 514 – 542 MHz 584 – 608 MHz 655 – 679 MHz 823 – 832 MHz,
Grupy RF: 1 1 10 10 8
Kanały RF: 12 12 12 12 12
Metoda nadawania: FM, mono /stereo FM, mono/ stereo FM, mono /stereo FM, mono /stereo FM, mono/ stereo
ESPAÑOL
Znamionowa moc wyjściowa HF: 2 mW, 10 mW,
Zysk anteny: 2 dBi 2 dBi 2 dBi 2 dBi 2 dBi
Złącze antenowe: BNC BNC BNC BNC BNC
Pasmo przenoszenia audio (-3dB): 35 Hz – 16000 Hz 35 Hz – 16000 Hz 35 Hz – 16000 Hz 35 Hz – 16000 Hz 35 Hz – 16000 Hz
POLSKI
THD+N przy 1kHz, +sygnał wejściowy
4dBu:
Wsp. S/N przy 1 kHz, korekcja A: 93 dB 93 dB 93 dB 93 dB 93 dB
Dynamiczny zakres przy 1 kHz, bez
korekcji:
Czułość wejścia: - 9 dBu (wszyst-
ITALIANO
Maks. poziom wejścia: 18 dBu (regulatory
CMRR IEC: < 45 dB < 45 dB < 45 dB < 45 dB < 45 dB
Wejścia liniowe: 2 2 2 2 2
Złącza wejść liniowych: XLR (zbalanso-
Impedancja wejścia: 12 kiloomów 12 kiloomów 12 kiloomów 12 kiloomów 12 kiloomów
douszne w
systemach
monitorowania
30 mW
< 0,3 % < 0,3 % < 0,3 % < 0,3 % < 0,3 %
88 dB 88 dB 88 dB 88 dB 88 dB
kie regulatory
wzmocnienia na
maks. wart., tryb
stereo)
wzmocnienia
na 90, poziom
głośności TX na
38, tryb stereo)
wane) / Combo
TRS 6,3 mm
Słuchawki
douszne w
systemach
monitorowania
2 mW, 10 mW,
30 mW
- 9 dBu (wszystkie regulatory
wzmocnienia na
maks. wart., tryb
stereo)
18 dBu (regulatory
wzmocnienia
na 90, poziom
głośności TX na
38, tryb stereo)
XLR (zbalansowane) / Combo
TRS 6,3 mm
Słuchawki
douszne w
systemach
monitorowania
2 mW, 10 mW,
30 mW
- 9 dBu (wszystkie regulatory
wzmocnienia na
maks. wart., tryb
stereo)
18 dBu (regulatory
wzmocnienia
na 90, poziom
głośności TX na
38, tryb stereo)
XLR (zbalansowane) / Combo
TRS 6,3 mm
Słuchawki
douszne w
systemach
monitorowania
2 mW, 10 mW,
30 mW
- 9 dBu (wszystkie regulatory
wzmocnienia na
maks. wart., tryb
stereo)
18 dBu (regulatory
wzmocnienia
na 90, poziom
głośności TX na
38, tryb stereo)
XLR (zbalansowane) / Combo
TRS 6,3 mm
84
Słuchawki
douszne w
systemach
monitorowania
863 – 865 MHz
823 – 832 MHz
2 mW, 10 mW,
30 mW
863 – 865 MHz
2 mW, 10 mW
- 9 dBu (wszystkie regulatory
wzmocnienia na
maks. wart., tryb
stereo)
18 dBu (regulatory
wzmocnienia
na 90, poziom
głośności TX na
38, tryb stereo)
XLR (zbalansowane) / Combo
TRS 6,3 mm
Page 85

Elementy sterujące: Przycisk zasilania
Kontrolki: Wielofunkcyjny
Zużycie energii (nominalne): 3,5 W 3,5 W 3,5 W 3,5 W 3,5 W
Napięcie robocze: 12 – 18 V DC 12 – 18 V DC 12 – 18 V DC 12 – 18 V DC 12 – 18 V DC
Złącze wejścia napięcia: wtyk typu barrel
Temperatura otoczenia (podczas pracy): 0 °C – 35 °C 0 °C – 35 °C 0 °C – 35 °C 0 °C – 35 °C 0 °C – 35 °C
Wilgotność względna: < 80 %
Wymiary (szer. x wys. x dł.): 212 x 43 x 123 mm 212 x 43 x 123 mm 212 x 43 x 123 mm 212 x 43 x 123 mm 212 x 43 x 123 mm
Masa: 0,66 kg
Dołączone akcesoria: Zasilacz, antena
Numer modelu: LDU5047IEMR LDU5051IEMR LDU505IEMR LDU506IEMR LDU508IEMR
Typ produktu: Słuchawki
Typ: Odbiornik
Zakres częstotliwości nadawania: 470 – 490 MHz 514 – 542 MHz 584 – 608 MHz 655 – 679 MHz 823 – 832 MHz,
Grupy RF: 1 1 10 10 8
Kanały RF: 12 12 12 12 12
Wyjście słuchawkowe: stereo jack
Minimalna impedancja słuchawek: 16 omów 16 omów 16 omów 16 omów 16 omów
Maksymalny poziom wyjścia
słuchawkowego:
Pasmo przenoszenia audio: 40 Hz – 16000 Hz 40 Hz – 16000 Hz 40 Hz – 16000 Hz 40 Hz – 16000 Hz 40 Hz – 16000 Hz
Przesłuch L/P 100 Hz / 1 kHz / 10 kHz: 55/55/53 dB 55/55/53 dB 55/55/53 dB 55/55/53 dB 55/55/53 dB
Szum resztkowy: 5,5 uVrms
Złącze antenowe: Złączka
wł.-wył., obro-
towy enkoder
MENU, głośność
słuchawek
wyświetlacz
OLED
jack 5,3 mm, plus
wkładka
(bez kondensacji)
(z anteną)
BNC, zestaw
montażowy do
stelaża 19"
douszne w
systemach
monitorowania
Bodypack,
non-diversity
3,5 mm
80 mW przy
33-omowym
obciążeniu /
33 mW przy
16-omowym
obciążeniu
(korekcja A)
gwintowana
Przycisk zasilania
wł.-wył., obrotowy enkoder
MENU, głośność
słuchawek
Wielofunkcyjny
wyświetlacz
OLED
wtyk typu barrel
jack 5,3 mm, plus
wkładka
< 80 %
(bez kondensacji)
0,66 kg
(z anteną)
Zasilacz, antena
BNC, zestaw
montażowy do
stelaża 19"
Słuchawki
douszne w
systemach
monitorowania
Odbiornik
Bodypack,
non-diversity
stereo jack
3,5 mm
80 mW przy
33-omowym
obciążeniu /
33 mW przy
16-omowym
obciążeniu
5,5 uVrms
(korekcja A)
Złączka
gwintowana
Przycisk zasilania
wł.-wył., obrotowy enkoder
MENU, głośność
słuchawek
Wielofunkcyjny
wyświetlacz
OLED
wtyk typu barrel
jack 5,3 mm, plus
wkładka
< 80 %
(bez kondensacji)
0,66 kg
(z anteną)
Zasilacz, antena
BNC, zestaw
montażowy do
stelaża 19"
Słuchawki
douszne w
systemach
monitorowania
Odbiornik
Bodypack,
non-diversity
863 – 865 MHz
stereo jack
3,5 mm
80 mW przy
33-omowym
obciążeniu /
33 mW przy
16-omowym
obciążeniu
5,5 uVrms
(korekcja A)
Złączka
gwintowana
ENGLISH
DEUTSCHFRANCAIS
ESPAÑOL
ITALIANO POLSKI
85
Page 86

Elementy sterujące: ON/OFF/VOLUME,
Kontrolki: Wielofunkcyjny
Zużycie energii (nominalne): 0,7 W 0,7 W 0,7 W 0,7 W 0,7 W
Napięcie robocze: 2 x 1,5 V DC
DEUTSCHENGLISH
Temperatura otoczenia (podczas pracy): 0 °C – 35 °C 0 °C – 35 °C 0 °C – 35 °C 0 °C – 35 °C 0 °C – 35 °C
Wilgotność względna: < 80 %
Wymiary (szer. x wys. x dł.), bez anteny: 64 x 100 x 24 mm 64 x 100 x 24 mm 64 x 100 x 24 mm 64 x 100 x 24 mm 64 x 100 x 24 mm
Masa: 0,095 kg 0,095 kg 0,095 kg 0,095 kg 0,095 kg
Dołączone akcesoria: Antena
FRANCAIS
Pozostałe funkcje: Dodatkowy
ESPAÑOL
Numer modelu: LDIEHP2
Typ produktu: Słuchawki
Pasmo przenoszenia: 20 Hz – 20000 Hz
Impedancja: 33 omy
POLSKI
Złącze audio: wtyczka stereo
Kabel: 1,27m
Masa: 0,016 kg
Dołączone akcesoria: 3 pary
ITALIANO
SEL,
wyświetlacz
OLED, RF LED
baterie AA
(bez kondensacji)
gwintowana, 2 x
baterie AA
wskaźnik
niskiego poziomu
naładowania
baterii:
sygnał 500 Hz
przez gniazdo
słuchawek
douszne
stereofoniczne
3,5 mm
(odłączany)
silikonowych
końcówek
dousznych, 3
pary piankowych
końcówek
dousznych
ON/OFF/VOLUME,
SEL,
Wielofunkcyjny
wyświetlacz
OLED, RF LED
2 x 1,5 V DC
baterie AA
< 80 %
(bez kondensacji)
Antena
gwintowana, 2 x
baterie AA
Dodatkowy
wskaźnik
niskiego poziomu
naładowania
baterii:
sygnał 500 Hz
przez gniazdo
słuchawek
ON/OFF/VOLUME,
SEL,
Wielofunkcyjny
wyświetlacz
OLED, RF LED
2 x 1,5 V DC
baterie AA
< 80 %
(bez kondensacji)
Antena
gwintowana, 2 x
baterie AA
Dodatkowy
wskaźnik
niskiego poziomu
naładowania
baterii:
sygnał 500 Hz
przez gniazdo
słuchawek
ON/OFF/VOLUME,
SEL,
Wielofunkcyjny
wyświetlacz
OLED, RF LED
2 x 1,5 V DC
baterie AA
< 80 %
(bez kondensacji)
Antena
gwintowana, 2 x
baterie AA
Dodatkowy
wskaźnik
niskiego poziomu
naładowania
baterii:
sygnał 500 Hz
przez gniazdo
słuchawek
ON/OFF/VOLUME,
SEL,
Wielofunkcyjny
wyświetlacz
OLED, RF LED
2 x 1,5 V DC
baterie AA
< 80 %
(bez kondensacji)
Antena
gwintowana, 2 x
baterie AA
Dodatkowy
wskaźnik
niskiego poziomu
naładowania
baterii:
sygnał 500 Hz
przez gniazdo
słuchawek
86
Page 87

DEKLARACJE PRODUCENTA
GWARANCJA PRODUCENTA I OGRANICZENIE ODPOWIEDZIALNOŚCI
Nasze aktualne warunki gwarancji i informacje dotyczące ograniczenia odpowiedzialności znajdą Państwo na stronie: https://cdn-shop.adamhall.
com/media/pdf/MANUFACTURERS-DECLARATIONS_LD_SYSTEMS.pdf. W razie konieczności skorzystania z serwisu proszę skontaktować się z rmą Adam
Hall GmbH, Adam-Hall-Str. 1, 61267 Neu Anspach / e-mail Info@adamhall.com / +49 (0)6081 / 9419-0.
PRAWIDŁOWA UTYLIZACJA NINIEJSZEGO PRODUKTU
(Obowiązuje w Unii Europejskiej i innych krajach europejskich stosujących system sortowania odpadów) Niniejszy symbol na produkcie lub związan-
ych z nim dokumentach wskazuje, iż urządzenie po zakończeniu okresu użytkowania nie może być utylizowane razem ze standardowymi odpadami
domowymi, aby uniknąć szkód w środowisku lub szkód na osobie powstałych w wyniku niekontrolowanego usuwania odpadów. Niniejszy produkt należy
utylizować oddzielnie od innych odpadów i przekazać do punktu recyklingu w celu ponownego wykorzystania użytych w nim materiałów w ramach idei
zrównoważonego rozwoju. Klienci prywatni otrzymują informacje w zakresie przyjaznych dla środowiska możliwości usuwania odpadów od sprzedawcy, u
którego produkt został zakupiony, lub w odpowiednich placówkach regionalnych. Użytkownicy będący przedsiębiorcami proszeni są o kontakt ze swoimi
dostawcami i ewentualne sprawdzenie uzgodnionych umownie warunków utylizacji urządzeń. Niniejszy produkt nie może być utylizowany razem z innymi
odpadami przemysłowymi.
Deklaracja zgodności CE
Firma Adam Hall GmbH niniejszym oświadcza, że produkt ten jest zgodny z następującymi dyrektywami (o ile mają zastosowanie):
dyrektywa w sprawie urządzeń radiowych i końcowych urządzeń telekomunikacyjnych (1999/5/WE) lub dyrektywa w sprawie urządzeń radiowych
(2014/53/UE) od czerwca 2017 r.
dyrektywa niskonapięciowa (2014/35/UE)
dyrektywa w sprawie kompatybilności elektromagnetycznej (2014/30/UE)
dyrektywa w sprawie ograniczenia stosowania niektórych niebezpiecznych substancji w sprzęcie elektrycznym i elektronicznym (2011/65/UE)
Pełna wersja deklaracji zgodności znajduje się na stronie internetowej www.adamhall.com.
Ponadto zapytania w tej sprawie można przesyłać na adres e-mail info@adamhall.com.
DEKLARACJA ZGODNOŚCI WE
Adam Hall GmbH niniejszym oświadcza, że ten typ sprzętu radiowego jest zgodny z dyrektywą 2014/53/UE.
Pełny tekst deklaracji zgodności UE jest dostępny pod następującym adresem
Dostępny adres internetowy: www.adamhall.com/compliance/
ENGLISH
DEUTSCHFRANCAIS
ESPAÑOL
87
ITALIANO POLSKI
Page 88

ITALIANO
AVETE FATTO LA SCELTA GIUSTA!
Quest‘apparecchio è stato sviluppato e prodotto secondo elevati standard qualitativi che garantiscono un funzionamento regolare per molti anni.
Per questo motivo LD Systems, con il suo nome e la pluriennale esperienza, rappresenta un‘azienda produttrice di prodotti audio di qualità. Leggete
attentamente questo manuale d‘uso per utilizzare al meglio il vostro nuovo prodotto LD Systems.
Per maggiori informazioni su LD SYSTEMS, consultate la nostra pagina web WWW.LD-SYSTEMS.COM
MISURE PRECAUZIONALI
1. Leggere attentamente il presente manuale di istruzioni.
2. Conservare tutte le indicazioni e le istruzioni in un luogo sicuro.
DEUTSCHENGLISH
3. Seguire le istruzioni.
4. Rispettare tutte le avvertenze. Non rimuovere dal dispositivo le indicazioni sulla sicurezza o altre informazioni.
5. Utilizzare il dispositivo solo nei modi previsti dal manuale.
6. Utilizzare esclusivamente stativi e ssaggi stabili e adatti (per installazioni sse). Vericare che i supporti a parete siano installati e ssati a
regola d‘arte. Vericare che il dispositivo sia installato in modo stabile e non possa cadere.
7. Durante l‘installazione, osservare le normative sulla sicurezza in vigore nel proprio Paese.
8. Non installare né azionare il dispositivo in prossimità di radiatori, accumulatori termici, stufe o altre fonti di calore. Accertarsi che il dispositivo sia
sempre installato in modo che venga raffreddato a sufcienza e non possa surriscaldarsi.
9. Non appoggiare sul dispositivo fonti di combustione, quali candele accese.
FRANCAIS
10. Le fessure di areazione non devono essere bloccate. Evitare l‘esposizione diretta ai raggi solari.
11. Mantenere una distanza minima di 20 cm intorno e sopra al dispositivo.
12. Non attivare il dispositivo nelle immediate vicinanze di acqua (questo punto non interessa i dispositivi specici per l‘esterno, per i quali valgono
le speciali indicazioni riportate di seguito). Non portare mai il dispositivo a contatto con materiali, liquidi o gas inammabili.
13. Accertarsi che all‘interno del dispositivo non possa penetrare acqua per gocciolamento o spruzzo. Non collocare sul dispositivo oggetti contenenti
liquidi, quali vasi, tazze o bicchieri.
14. Assicurarsi che non sia possibile la caduta di oggetti nel dispositivo.
15. Azionare il dispositivo esclusivamente con gli accessori appositamente consigliati e previsti dal produttore.
16. Non aprire né modicare il dispositivo.
17. Una volta collegato il dispositivo, vericare tutti i cavi per evitare danni o incidenti, ad esempio per inciampo.
ESPAÑOL
18. Durante il trasporto, assicurarsi che il dispositivo non possa cadere e causare possibili danni a cose e/o persone.
19. Se il dispositivo non funzionasse più correttamente, vi fosse caduto sopra del liquido o un oggetto o fosse stato danneggiato in altro modo,
spegnerlo immediatamente e staccare la spina (se si tratta di un dispositivo attivo). La riparazione del dispositivo deve essere afdata esclusivamente a personale qualicato autorizzato.
20. Per la pulizia del dispositivo utilizzare un panno pulito.
21. Rispettare le leggi sullo smaltimento in vigore nel Paese di installazione. Al momento di smaltire l‘imballo, separare la plastica dalla carta
e dal cartone.
22. I sacchetti di plastica devono essere tenuti lontani dalla portata dei bambini.
23. Notare che eventuali modiche o alterazioni non espressamente approvate dal responsabile della conformità possono annullare la facoltà
dell‘utente di utilizzare l‘apparecchiatura.
POLSKI
DISPOSITIVI CON ALLACCIAMENTO DI RETE
24. ATTENZIONE: se il cavo di rete è dotato di contatto di protezione, deve essere collegato a una presa di rete con messa a terra. Non disattivare mai
la connessione di messa a terra di un cavo di rete.
25. Non accendere il dispositivo subito dopo essere stato sottoposto a forti variazioni di temperatura (ad esempio dopo il trasporto). Umidità e
condensa potrebbero danneggiare il dispositivo. Accendere il dispositivo solo dopo che ha raggiunto la temperatura ambiente.
26. Prima di collegare il dispositivo alla presa, controllare innanzitutto se la tensione e la frequenza della rete elettrica coincidono con i valori
indicati sul dispositivo stesso. Nel caso di dispositivo munito di selettore di tensione, collegarlo alla presa unicamente se i valori del dispositivo
coincidono con quelli della rete elettrica. Se il cavo di rete o l‘adattatore di rete forniti in dotazione non sono compatibili con la presa, rivolgersi
ITALIANO
a un elettricista.
27. Non calpestare il cavo di rete. Accertarsi che i cavi sotto tensione, in particolare della presa di rete o dell‘adattatore di rete,
non vengano pizzicati.
28. Durante il cablaggio del dispositivo, vericare sempre che il cavo di rete e l‘adattatore di rete siano costantemente accessibili. Staccare sempre
il dispositivo dall‘alimentazione di rete quando non è utilizzato o durante la pulizia. Per staccare dalla presa il cavo di rete e l‘adattatore di rete,
tirare sempre dalla spina o dall‘adattatore e non dal cavo. Non toccare mai il cavo di alimentazione e l’alimentatore con le mani umide.
29. Evitare per quanto possibile di accendere e spegnere velocemente il dispositivo per non pregiudicarne la durata.
30. NOTA IMPORTANTE: Sostituire i fusibili esclusivamente con fusibili dello stesso tipo e valore. Se un fusibile continua a saltare, rivolgersi a un
centro di assistenza autorizzato.
31. Per staccare completamente il dispositivo dalla rete elettrica, rimuovere il cavo di rete o l‘adattatore di rete dalla presa.
32. Per staccare un dispositivo provvisto di presa Volex, è prima necessario sbloccare la relativa spina Volex del dispositivo stesso. Tirando il cavo di
rete, però, il dispositivo potrebbe spostarsi e cadere, provocando danni alle persone o di altro genere. Prestare quindi la più scrupolosa attenzione
durante la posa dei cavi.
33. In caso di pericolo di caduta di fulmine, o se il dispositivo rimane inutilizzato a lungo, staccare sempre il cavo di rete e l‘adattatore di rete
dalla presa.
34. Il dispositivo non deve essere utilizzato da persone (compresi i bambini) con capacità siche, sensoriali o mentali limitate o con scarsa
esperienza e conoscenza.
88
Page 89

35. I bambini devono essere istruiti a non giocare con il dispositivo.
36. Se il cavo di alimentazione del dispositivo è danneggiato, quest‘ultimo non deve essere utilizzato. Il cavo di alimentazione deve essere sostituito
con un cavo appropriato o un‘unità speciale da un centro di assistenza autorizzato.
ATTENZIONE:
non togliere mai il coperchio di protezione perché sussiste il pericolo di scosse elettriche. L‘interno
del dispositivo non contiene parti che possono essere riparate o sottoposte a manutenzione da parte
dell‘utente. Per gli interventi di manutenzione e di riparazione rivolgersi esclusivamente a personale
qualicato.
Il triangolo equilatero con il simbolo del lampo segnala la presenza di tensioni pericolose non isolate all‘interno dell‘apparecchio che
possono causare scosse elettriche.
Il triangolo equilatero con punto esclamativo segnala la presenza di importanti informazioni relative all’uso e alla manutenzione.
Avvertimento! Questo dispositivo è destinato per l’utilizzo a un’altitudine non superiore ai 2.000metri sul livello del mare.
Avvertimento! Questo dispositivo non è destinato all’uso nei climi tropicali.
ATTENZIONE! PRODOTTI AUDIO con LIVELLI SONORI ELEVATI!
Questo dispositivo è destinato a uso professionale. Il suo utilizzo in ambito commerciale è soggetto alle normative e alle direttive nazionali vigenti
in materia di prevenzione di infortuni. In qualità di produttore, Adam Hall è tenuto per legge a informare espressamente gli utenti degli eventuali
rischi per la salute. Danni all‘udito provocati da un’esposizione prolungata a un livello sonoro elevato: l‘utilizzo di questo prodotto può generare
elevati livelli di pressione sonora (SPL) che possono provocare danni irreparabili all‘udito di artisti, collaboratori e spettatori. Evitare l‘esposizione
prolungata a livelli sonori elevati, superiori a 90dB.
INTRODUZIONE
Libertà di movimento illimitata sul palco con il suono di monitoraggio perfetto sempre nell’orecchio: è per rispondere a questa esigenza che
abbiamo sviluppato in Germania i sistemi di monitoraggio in-ear U500 senza li. Caratterizzati da un design moderno e denito e semplici da utilizzare, sono la scelta ideale per principianti e non. L’afdabile trasmissione radio e la profonda risposta in frequenza da 40 Hz a 16 kHz garantiscono
performance di livello professionale. I set in-ear U500 sono disponibili su cinque diverse bande di frequenze.
LDU5047IEM – Sistema di monitoraggio in-ear da 470 - 490 MHz
LDU5051IEM – Sistema di monitoraggio in-ear da 514 - 542 MHz
LDU505IEM – Sistema di monitoraggio in-ear da 584 - 608 MHz
LDU506IEM – Sistema di monitoraggio in-ear da 655 - 679 MHz
LDU508IEM – Sistema di monitoraggio in-ear da 823 - 832 MHz + 863 - 865 MHz
ENGLISH
DEUTSCHFRANCAIS
ESPAÑOL
• Monitoraggio in-ear afdabile con una portata di oltre 100 m
• Possibilità di selezione di 96 canali
• Potenza di trasmissione selezionabile da 2, 10 o 30 mW ERP
• Pratica sincronizzazione a infrarossi
• Inserimento dei nomi utenti e memoria per 10 preset personalizzati
• Ampia risposta in frequenza
• Equalizzatore a 3 bande con medi parametrici
• Limitatore selezionabile
ITALIANO POLSKI
89
Page 90

• Funzionamento in modalità stereo o mono
• Monitoraggio diretto tramite l’uscita cufe del trasmettitore
• Bodypack con ltro di soppressione del rumore commutabile su tre livelli
• 10 ore di autonomia del bodypack con due batterie AA
• Possibilità di utilizzare contemporaneamente no a 12 sistemi
• Trasmettitore U500® IEM compatibile con i bodypack U300® IEM
Dotazione di LDU50xIEM
DEUTSCHENGLISH
Trasmettitore, antenna BNC, ricevitore portatile, antenna del ricevitore, alimentatore, 2 batterie AA, kit di montaggio rack da 19”, istruzioni d’uso
Dotazione di LDU50xIEMHP
Trasmettitore, antenna BNC, ricevitore portatile, antenna del ricevitore, auricolari in-ear stereo, alimentatore, 2 batterie AA, kit di montaggio rack da 19”,
istruzioni d’uso
Nota
L’impiego del sistema radiomicrofono può essere soggetto a licenza a seconda del Paese d’uso. Per informazioni dettagliate rivolgersi alle autorità
competenti del proprio Paese.
FRANCAIS
CONNETTORI, ELEMENTI DI COMANDO E DI VISUALIZZAZIONE
TRASMETTITORE
ESPAÑOL
1
POLSKI
ITALIANO
POWER
Interruttore di accensione/spegnimento. Per accendere o spegnere il dispositivo tenere premuto il tasto per circa 1 secondo. Premere brevemente
il tasto (!) per passare direttamente dal menu operativo alla schermata principale.
2
OLED DISPLAY
Display graco OLED multifunzione per la visualizzazione, nella schermata principale, della frequenza di trasmissione, del gruppo e del canale di
frequenza, del nome utente personale, del numero di preset e del livello audio dei canali di ingresso sinistro e destro. Nel menu operativo vengono
visualizzate le voci di menu, le voci di sottomenu e le rispettive opzioni di elaborazione.
3
MENU
Encoder a rotazione/pressione per la navigazione nel menu operativo e per l’adeguamento delle impostazioni di sistema e la modica dei valori
nelle voci di menu corrispondenti. Dalla schermata principale è possibile impostare direttamente il volume generale ruotando l’encoder a rotazi-
one/pressione.
4
PHONES
Uscita cufe con connettore jack stereo da 6,3 mm per il controllo del segnale audio direttamente dal trasmettitore. Il segnale dell’uscita cufe
viene prelevato prima del circuito MONO/STEREO e dopo INPUT GAIN, LIMITATORE ed EQUALIZZATORE. Nel segnale dell’uscita cufa si trova un ltro
passa alto.
5
VOL
Regolatore del volume per l’uscita cufe integrata PHONES.
1 2
6
3
4
5
90
Page 91

8
7
9
10
11
6
Interfaccia a infrarossi per sincronizzare le impostazioni di sistema del ricevitore con il trasmettitore (ad esempio la radiofrequenza).
7
PRESA DC
Presa di bassa tensione per l’alimentazione del dispositivo (12 V DC 500 mA, con polo positivo al centro). Utilizzare esclusivamente
l’adattatore di rete in dotazione.
8
SCARICO DELLA TRAZIONE DEI CAVI
Sfruttare lo scarico della trazione del cavo essibile dell’adattatore di rete per proteggere la presa di bassa tensione del
trasmettitore e il connettore a bassa tensione dell’adattatore di rete da danni involontari e prevenire l’estrazione accidentale
della spina.
9
AF INPUT LEFT / RIGHT
Ingressi di linea sinistro e destro bilanciati con prese combo XLR / jack da 6,3 mm.
10
ANTENNA
Collegamento BNC per l’antenna del trasmettitore in dotazione.
11
ANTENNA DEL TRASMETTITORE
Antenna del trasmettitore con collegamento BNC
ENGLISH
DEUTSCHFRANCAIS
ESPAÑOL
RICEVITORE PORTATILE
12
ANTENNA
Antenna rimovibile del ricevitore tascabile. Per una ricezione ottimale evitare di coprire o
piegare. Controllare che, durante il funzionamento, l'antenna sia collegata saldamente al
12
13
14
15
ricevitore (serrare bene la lettatura dell'antenna senza utilizzare attrezzi).
13
DISPLAY OLED
Display graco OLED multifunzione per la visualizzazione del gruppo e del canale di frequenza, del nome utente personale, della potenza di ricezione, dello stato della batteria e del
livello audio dei canali sinistro e destro. Nel menu operativo vengono visualizzate le voci di
menu, le voci di sottomenu e le rispettive opzioni di elaborazione.
14
Interfaccia a infrarossi per sincronizzare le impostazioni di sistema del ricevitore con il
trasmettitore (ad esempio la radiofrequenza).
ITALIANO POLSKI
91
Page 92

DEUTSCHENGLISH
15
MENU / SEL UND
Tasto di comando per la navigazione nel menu operativo e per l'adeguamento delle
impostazioni di sistema e la modica dei valori nelle voci di menu corrispondenti. Per
rendere accessibile il tasto di comando, premere le due marcature ai lati del coperchio dello
scomparto batterie e fare scorrere quest'ultimo verso il basso, no all'arresto.
16
COLLEGAMENTO ANTENNA
Collegamento antenna con lettatura.
17
PHONES
18
17
16
Presa jack stereo da 3,5 mm per il collegamento di cufe o auricolari.
19
FRANCAIS
ESPAÑOL
POLSKI
ITALIANO
Disposizione
pin:
18
RF
L'indicatore LED RF si illumina in presenza del segnale radio. Se durante il funzionamento
la spia LED non si accende, vericare che il canale radio del ricevitore corrisponda al canale
radio del trasmettitore, oppure ridurre la distanza tra ricevitore e trasmettitore.
19
ON / OFF - VOL
Ruotare il regolatore del volume in senso orario no a sentire un clic per accendere il ricevitore e ruotarlo verso destra per alzare il volume. Ruotare il regolatore in senso antiorario
per ridurre il volume e no a sentire un clic per spegnere il ricevitore. Mantenere sempre il
volume a un livello gradevole per non danneggiare l’udito.
20
SCOMPARTO BATTERIE
Per la sostituzione delle batterie aprire il relativo scomparto del trasmettitore portatile
premendo contemporaneamente sulle due marcature laterali del coperchio e fare scorrere
quest'ultimo verso il basso, no all'arresto. Togliere le batterie scariche e sostituirle con batterie nuove (2 del tipo AA, LR6, alcaline) osservando le immagini nello scomparto batterie.
Fare scorrere il coperchio dello scomparto batterie verso il dispositivo no a farlo scattare in
20
21
posizione. Se il ricevitore non viene utilizzato per un periodo prolungato, togliere le batterie
per evitare che, perdendo liquido, danneggino il dispositivo.
21
CLIP DA CINTURA
Sul retro del ricevitore portatile si trova una clip da cintura che consente di ssare il ricevitore al cinturino dei pantaloni, alla cintura o simili.
92
Page 93

USO DEL TRASMETTITORE
Per stabilire un collegamento radio fra trasmettitore e ricevitore, il gruppo e il canale di frequenza devono coincidere con la radiofrequenza dei due
dispositivi.
Quando si mette in servizio il sistema di trasmissione senza li, aver cura che il ricevitore sia orientato direttamente verso il trasmettitore.
SCHERMATA PRINCIPALE DEL DISPLAY
In seguito all'accensione del trasmettitore, verrà visualizzato brevemente il saluto "WELCOME" e, successivamente, comparirà la schermata principale con le seguenti informazioni: Nome utente personale, numero di preset, livello dei segnali di ingresso audio con indicazione del picco, gruppo e
canale di frequenza (GR.xx e CH.xx) e radiofrequenza attuale in MHz.
ENGLISH
Nome utente personale
Livello del segnale audio/
picco (PK) canale destro
Gruppo e canale di frequenza
VOLUME
Dalla schermata principale è possibile impostare direttamente il volume generale da 00 a 50 ruotando l'encoder a rotazione/pressione per
selezionare la voce. Ruotando l'encoder, la schermata sul display passa automaticamente alla visualizzazione corrispondente. Dopo circa 3 secondi
di inattività viene nuovamente mostrata in automatico la schermata principale, mentre premendo l'encoder la visualizzazione passa subito alla
schermata principale.
SINCRONIZZAZIONE A INFRAROSSI (IR SYNC RUN)
Per sincronizzare il ricevitore portatile con la radiofrequenza impostata nel trasmettitore e il nome utente personale, orientare l'interfaccia a
infrarossi del ricevitore verso quella del trasmettitore (distanza circa 10 cm) e accendere il ricevitore. Premere ora l'encoder a rotazione/pressione
del trasmettitore (MENU) per accedere al menu principale e, ruotando l'encoder, selezionare la voce di menu IR SYNC RUN (sfondo chiaro). Premere
di nuovo MENU per avviare la procedura di sincronizzazione. Dopo pochi secondi la procedura è terminata e il display del ricevitore mostra brevemente il messaggio "IR SYNC " a conferma che la sincronizzazione è stata eseguita correttamente. Per interrompere la procedura premere MENU.
Premere brevemente (!) POWER per tornare direttamente alla schermata principale; dopo circa 12 secondi di inattività si apre automaticamente la
schermata principale. Nota: l'irraggiamento solare diretto può disturbare la procedura di sincronizzazione.
CONFIGURAZIONE DELL'UNITÀ RADIO (RF SETTINGS)
Premere ora l'encoder a rotazione/pressione del trasmettitore (MENU) per accedere al menu principale e, ruotando l'encoder, selezionare la voce
di menu RF SETTINGS (sfondo chiaro). Premere nuovamente l'encoder per accedere al sottomenu e selezionare la voce di sottomenu desiderata
ruotando l'encoder, quindi confermare premendo l'encoder. Per modicare un valore ruotare l'encoder e confermare premendolo. Le voci di
sottomenu e le relative informazioni sono riportate nella seguente tabella. Premere brevemente (!) POWER per tornare direttamente alla schermata
principale; dopo circa 12 secondi di inattività si apre automaticamente la schermata principale.
Numero preset
Livello del segnale audio/picco (PK)
canale sinistro
Radiofrequenza in MHz
DEUTSCHFRANCAIS
ESPAÑOL
ITALIANO POLSKI
93
Page 94

RF SETTINGS (Modica valore = ruotare encoder, conferma modica valore = premere encoder)
GROUP U5047IEM Gruppo di frequenza 1
CHANNEL Canale di frequenza 1 - 12 Selezionare il canale e confermare 2 volte
FREQ MAN Impostazione manuale della
DEUTSCHENGLISH
RF POWER Impostazione della potenza di
EXIT RF SETT. Uscire dal sottomenu (premere encoder)
FRANCAIS
Informazioni sulla potenza di trasmissione e sull'impostazione del ltro di soppressione del rumore nel ricevitore portatile:
selezionare una potenza di trasmissione bassa se il trasmettitore e il ricevitore si trovano vicini; anche il valore di riferimento del ltro di soppressione del rumore (squelch) del ricevitore deve essere impostato su un livello basso. Se la distanza che separa il trasmettitore e il ricevitore è maggiore, selezionare una potenza di trasmissione più alta e adeguare di conseguenza il ltro di soppressione del rumore del ricevitore. Per maggiori
informazioni sull'impostazione del ltro di soppressione del rumore consultare la sezione "USO DEL RICEVITORE PORTATILE" sotto a "IMPOSTAZIONE
DEL FILTRO DI SOPPRESSIONE DEL RUMORE" nelle presenti istruzioni. In ogni caso, vericare che tra il trasmettitore e il ricevitore non vi siano ostacoli
che possono disturbare il funzionamento radio.
A seconda della situazione potrebbe essere necessario applicare delle impostazioni diverse per garantire un funzionamento efciente. Tenere
ESPAÑOL
presente che se vengono utilizzati altri impianti di trasmissione nelle vicinanze potrebbero vericarsi maggiori interferenze che disturbano il
collegamento radio. In questo caso, per evitare disturbi, selezionare un'altra radiofrequenza.
ATTENZIONE! PRIMA di impostare il ltro di soppressione del rumore accertarsi che il volume del ricevitore sia impostato sul livello più basso
possibile, perché modicando la soglia dei ltri di soppressione del rumore possono generarsi dei rumori di fondo alti che, in certi casi, possono
danneggiare l'udito e le cufe o gli auricolari collegati.
U5051IEM Gruppo di frequenza 1
U505IEM Gruppi di frequenza 1 - 10
U506IEM Gruppi di frequenza 1 - 10
U508IEM Gruppi di frequenza 1 - 8
radiofrequenza
trasmissione.
Selezionare il gruppo e confermare 2 volte
Step 1: Impostare la frequenza con incrementi di 1 MHz e confermare
Passo 2: Impostare la frequenza con incrementi di 25 kHz e confermare
470 - 490 MHz: 2 mW / 10 mW / 30 mW
514 - 542 MHz: 2 mW / 10 mW / 30 mW
584 - 608 MHz: 2 mW / 10 mW / 30 mW
655 - 679 MHz: 2 mW / 10 mW / 30 mW
823 - 832 MHz: 2 mW / 10 mW / 30 mW, 863 - 865 MHz: 2 mW / 10 mW
IMPOSTAZIONI AUDIO (AUDIO SETTINGS)
Premere l'encoder a rotazione/pressione del trasmettitore (MENU) per accedere al menu principale e, ruotando l'encoder, selezionare la voce di
menu AUDIO SETTINGS (sfondo chiaro). Premere nuovamente l'encoder per accedere al sottomenu e selezionare la voce di sottomenu desiderata
POLSKI
ruotando l'encoder. Confermare l'immissione premendo il codicatore. Per modicare un valore ruotare l'encoder e confermare premendolo. Le
voci di sottomenu e le relative informazioni sono riportate nella seguente tabella. Premere brevemente (!) POWER per tornare direttamente alla
schermata principale; dopo circa 12 secondi di inattività si apre automaticamente la schermata principale.
ITALIANO
94
Page 95

AUDIO SETTINGS (Modica valore = ruotare encoder, conferma modica valore = premere encoder)
INPUT GAIN LEFT Amplicazione in ingresso del canale sinistro 000 - 100 Per un rapporto segnale/rumore ottimale, impostare
INPUT GAIN RIGHT Amplicazione in ingresso del canale destro 000 - 100
LIMITER Attivare/Disattivare il limitatore di ingresso ON = attivato (raccomandato)
MODE Impostare la modalità di funzionamento
EQ SETTINGS BASS EQ G: +/- 15 dB Regolazione delle basse frequenze da - 15 dB a + 15 dB
EXIT AUDIO SETT. Uscire dal sottomenu (premere encoder)
NOME UTENTE PERSONALE (NAME)
Premere l'encoder a rotazione/pressione del trasmettitore (MENU) per accedere al menu principale e, ruotando l'encoder, selezionare la voce
di menu NAME (sfondo chiaro), quindi premere l'encoder per confermare. Inserire un nome personale (max. 8 caratteri) ruotando l'encoder per
selezionare una lettera, il trattino basso o un numero per il primo carattere del nome, quindi premere l'encoder per confermare. Poi proseguire
con l’immissione per il secondo posto ecc. Una volta completato il nome, premere nuovamente l'encoder per confermare. Premere brevemente (!)
POWER per tornare direttamente alla schermata principale; dopo circa 12 secondi di inattività si apre automaticamente la schermata principale.
Mono/Stereo
La modalità di funzionamento selezionata
viene visualizzata sul display del ricevitore (M
= Mono, S = Stereo)
f: 60 Hz / 80 Hz / 100 Hz /
200 Hz
MIDDLE EQ G: +/- 15 dB Amplicazione delle medie frequenze da - 15 dB a + 15 dB
f: 500 Hz / 1000 Hz / 1500 Hz
/ 2500 Hz
Q: 0,50 / 0,75 / 1,00 / 1,25 Impostazione del fattore di qualità
TREBLE EQ G: +/- 15 dB Amplicazione delle alte frequenze da - 15 dB a + 15 dB
f: 10,0 kHz / 12,5 kHz / 15,0 kHz
/ 17,5 kHz
EXIT EQ
SETT.
Uscire dal menu equalizzatore (premere encoder)
OFF = disattivato
MONO = i segnali di ingresso sinistro e destro vengono riprodotti
convertendoli in segnale mono. Trasferimento del segnale verso
sinistra o destra sul ricevitore (BALANCE).
STEREO = riproduzione del segnale di ingresso in stereo. Impostare
il bilanciamento del ricevitore (BALANCE)
Attivare la modalità di funzionamento STEREO del trasmettitore
anche quando si desidera utilizzare la modalità di funzionamento
FOCUS del ricevitore portatile.
Impostazione della bassa frequenza
Impostazione della media frequenza
Impostazione dell'alta frequenza
i segnali sinistro e destro al livello più alto possibile
vericando però che l'indicatore di PICCO del display
non si accenda o lo faccia solo brevemente, per evitare distorsioni del segnale. Se necessario adeguare
anche il livello di uscita del dispositivo di riproduzione.
ENGLISH
DEUTSCHFRANCAIS
ESPAÑOL
IMPOSTAZIONE DELLA LUMINOSITÀ DEL DISPLAY (BRIGHTNESS)
Premere l'encoder a rotazione/pressione del trasmettitore (MENU) per accedere al menu principale e, ruotando l'encoder, selezionare la voce di
menu BRIGHTNESS (sfondo chiaro), quindi premere l'encoder per confermare. Selezionare uno dei 3 livelli di luminosità del display (HIGH = alta,
MID = intermedia, LOW = bassa) ruotando l'encoder, quindi premere 2 volte l'encoder per confermare. Premere brevemente (!) POWER per tornare
direttamente alla schermata principale; dopo circa 12 secondi di inattività si apre automaticamente la schermata principale.
ITALIANO POLSKI
95
Page 96

BLOCCO DEGLI ELEMENTI DI COMANDO (PANEL LOCK)
Premere l'encoder a rotazione/pressione del trasmettitore (MENU) per accedere al menu principale e, ruotando l'encoder, selezionare la voce
di menu PANEL LOCK (sfondo chiaro), quindi premere l'encoder per confermare. Per bloccare gli elementi di comando, selezionare ON ruotando
l'encoder, quindi premere 2 volte l'encoder per confermare. Premere brevemente (!) POWER per tornare direttamente alla schermata principale;
dopo circa 10 secondi di inattività si apre automaticamente la schermata principale. Se si preme uno degli elementi di comando POWER o il MENU
dell'encoder a rotazione/pressione appare brevemente sul display la scritta "PANEL LOCK ON" e non sarà quindi possibile modicare le impostazioni.
Per sbloccare gli elementi di comando, tenere premuto l'encoder di rotazione/pressione per circa 2 secondi, quindi selezionare l'opzione OFF dalla
voce di menu PANEL LOCK per consentire in maniera denitiva l'uso degli elementi di comando.
DEUTSCHENGLISH
SALVATAGGIO PRESET (SAVE PRESET)
Le impostazioni delle voci RF SETTINGS, AUDIO SETTINGS e del nome personale consentono di salvare no a 10 preset. Dopo aver applicato le
impostazioni del caso, premere l'encoder a rotazione/pressione del trasmettitore (MENU) per accedere al menu principale e, ruotando l'encoder,
FRANCAIS
selezionare la voce di menu SAVE PRESET (sfondo chiaro), quindi premere l'encoder per confermare. Selezionare il numero di preset che si desidera
salvare (01 - 10) ruotando l'encoder, quindi confermare premendo l'encoder, selezionare YES ruotando l'encoder e confermare la procedura
premendo due volte l'encoder. Se si desidera interrompere la procedura, selezionare NO e confermare. Premere brevemente (!) POWER per tornare
direttamente alla schermata principale; dopo circa 12 secondi di inattività si apre automaticamente la schermata principale.
ESPAÑOL
CARICAMENTO PRESET (LOAD PRESET)
Premere l'encoder a rotazione/pressione del trasmettitore (MENU) per accedere al menu principale e, ruotando l'encoder, selezionare la voce
di menu LOAD PRESET (sfondo chiaro), quindi premere l'encoder per confermare. Selezionare il numero di preset che si desidera caricare (01 - 10)
ruotando l'encoder, quindi confermare premendo l'encoder, selezionare YES ruotando l'encoder e confermare la procedura premendo due volte
l'encoder. Se si desidera interrompere la procedura, selezionare NO e confermare. Premere brevemente (!) POWER per tornare direttamente alla
schermata principale; dopo circa 12 secondi di inattività si apre automaticamente la schermata principale.
POLSKI
LETTURA DELLA VERSIONE DEL SOFTWARE (SOFTWARE)
ITALIANO
Premere l'encoder a rotazione/pressione del trasmettitore (MENU) per accedere al menu principale e, ruotando l'encoder, selezionare la voce di
menu SOFTWARE (sfondo chiaro). Premere brevemente (!) POWER per tornare direttamente alla schermata principale; dopo circa 12 secondi di
inattività si apre automaticamente la schermata principale.
96
Page 97

USCITA DAL MENU PRINCIPALE (EXIT)
Per uscire dal menu principale e tornare alla schermata principale, selezionare la voce di menu EXIT ruotando l'encoder a rotazione/pressione (su
sfondo chiaro), quindi premere l'encoder. Premere brevemente (!) POWER per tornare direttamente alla schermata principale; dopo circa 12 secondi
di inattività si apre automaticamente la schermata principale.
ENGLISH
USO DEL RICEVITORE PORTATILE
Per stabilire un collegamento radio fra trasmettitore e ricevitore, i due dispositivi devono avere la stessa radiofrequenza e lo stesso gruppo e
numero di canale.
Quando si mette in servizio il sistema di trasmissione senza li, aver cura che il ricevitore sia orientato direttamente verso il trasmettitore.
SCHERMATA PRINCIPALE DEL DISPLAY
Poco dopo aver acceso il ricevitore portatile si apre la schermata principale A con le seguenti informazioni: nome utente personale, modalità di
funzionamento, potenza di ricezione del segnale radio, stato della batteria e gruppo e canale di frequenza.
In alternativa, si apre la schermata principale B con la radiofrequenza in MHz e il livello del segnale audio sinistro e destro con indicazione
del picco (PK).
Premere brevemente il tasto per spostarsi tra le due schermate.
Schermata principale A
Nome utente personale
Potenza di ricezione del segnale radio
Stato batterie
Schermata principale B
IMPOSTAZIONE DEL BILANCIAMENTO O DEL RAPPORTO DEL VOLUME (BALANCE / FADER)
Modalità di funzionamento MONO: attivare la modalità di funzionamento MONO sul trasmettitore. I due canali sinistro e destro vengono riprodotti
convertendoli in segnale mono. Dalla voce di menu BALANCE del ricevitore è possibile spostare il segnale mono verso sinistra o destra. Premere il
tasto SEL (MENU) per circa 2 secondi per accedere al menu principale, quindi selezionare, se non è ancora stato fatto, la voce di menu BALANCE (su
sfondo chiaro) premendo più volte SEL, inne premere il tasto per confermare . Ora è possibile spostare a piacimento il segnale verso sinistra o
destra premendo (se necessario ripetutamente) il tasto . Per uscire dalla voce di menu, premere SEL, selezionare la voce di menu EXIT premendo
nuovamente SEL e premere per confermare. Dopo circa 5 secondi di inattività la schermata principale comparirà in automatico.
Modalità di funzionamento mono / stereo
Gruppo di frequenza
Canale di frequenza
Radiofrequenza
Canale sinistro
Livello del segnale audio / picco (PK)
Canale destro
DEUTSCHFRANCAIS
ESPAÑOL
ITALIANO POLSKI
97
Page 98

Modalità di funzionamento STEREO: Attivare la modalità di funzionamento STEREO sul trasmettitore. Il segnale stereo del trasmettitore viene
riprodotto in stereo anche sul ricevitore portatile (FOCUS OFF per disattivare la modalità di funzionamento FOCUS). Dalla voce di menu BALANCE del
ricevitore è possibile impostare il bilanciamento tra il canale sinistro e destro. Premere il tasto SEL (MENU) per circa 2 secondi per accedere al menu
principale, quindi selezionare, se non è ancora stato fatto, la voce di menu BALANCE (su sfondo chiaro) premendo più volte SEL, inne premere il
tasto per confermare . Ora è possibile impostare a piacimento il bilanciamento premendo (se necessario ripetutamente) il tasto . Per uscire
dalla voce di menu, premere SEL, selezionare la voce di menu EXIT premendo nuovamente SEL e premere per confermare. Dopo circa 5 secondi di
inattività la schermata principale comparirà in automatico.
DEUTSCHENGLISH
Modalità di funzionamento FOCUS: I due canali sinistro e destro vengono riprodotti al centro, mentre il rapporto del volume dei due canali può
essere impostato direttamente dal ricevitore portatile (ad es. mixer somma mono canale sinistro, canto solista canale destro). Attivare la modalità
di funzionamento STEREO sul trasmettitore. Premere il tasto SEL (MENU) del ricevitore portatile per circa 2 secondi per accedere al menu principale,
FRANCAIS
quindi selezionare la voce di menu FOCUS (su sfondo chiaro) premendo più volte SEL, inne premere il tasto freccia per confermare. Premere
nuovamente per attivare la modalità di funzionamento FOCUS (FOCUS ON). Confermare premendo SEL e selezionare la voce di menu FADER
premendo ripetutamente SEL se necessario, quindi premere . Ora è possibile impostare a piacimento il rapporto del volume premendo (ev.
ripetutamente) il tasto . Per uscire dalla voce di menu, premere SEL, selezionare la voce di menu EXIT premendo nuovamente SEL e premere
per confermare. Dopo circa 5 secondi di inattività la schermata principale comparirà in automatico.
ESPAÑOL
IMPOSTAZIONE DEL CANALE DI FREQUENZA (CHANNEL)
Premere il tasto SEL (MENU) per circa 2 secondi per accedere al menu principale, quindi selezionare la voce di menu CHANNEL (su sfondo chiaro)
premendo più volte SEL, inne premere il tasto per confermare. Ora è possibile impostare a piacimento il canale di frequenza premendo (se
necessario ripetutamente) il tasto . Per uscire dalla voce di menu, premere SEL, selezionare la voce di menu EXIT premendo di nuovo (se
necessario ripetutamente) SEL e premere per confermare. Dopo circa 5 secondi di inattività la schermata principale comparirà in automatico.
POLSKI
ITALIANO
IMPOSTAZIONE DEL GRUPPO DI FREQUENZA (GROUP)
Premere il tasto SEL (MENU) per circa 2 secondi per accedere al menu principale, quindi selezionare la voce di menu GROUP (su sfondo chiaro)
premendo più volte SEL, inne premere il tasto per confermare. Ora è possibile impostare a piacimento il gruppo di frequenza premendo (se necessario ripetutamente) il tasto . Per uscire dalla voce di menu, premere SEL, selezionare la voce di menu EXIT premendo di nuovo (se necessario
ripetutamente) SEL e premere per confermare. Dopo circa 5 secondi di inattività la schermata principale comparirà in automatico.
98
Page 99

IMPOSTAZIONE MANUALE DELLA RADIOFREQUENZA (FREQ. MAN.)
Premere il tasto SEL (MENU) per circa 2 secondi per accedere al menu principale, quindi premere ripetutamente SEL per selezionare la voce di menu
FREQ. MAN. (su sfondo chiaro) e confermare premendo il tasto . Selezionare un'area di radiofrequenza inferiore a 820, 830 o 860 MHz premendo
(ev. ripetutamente) il tasto e premere nuovamente SEL per impostare la frequenza in intervalli da 1 MHz con il tasto . Premere il tasto SEL
per impostare la radiofrequenza in intervalli da 100 kHZ con il tasto e premere nuovamente SEL per impostare la radiofrequenza in intervalli da
25 kHz. Per uscire dalla voce di menu, premere SEL, selezionare la voce di menu EXIT premendo di nuovo (ev. ripetutamente) SEL e premere per
confermare. Dopo circa 5 secondi di inattività la schermata principale comparirà in automatico.
IMPOSTAZIONE DEL FILTRO DI SOPPRESSIONE DEL RUMORE (SQUELCH)
Il ltro di soppressione del rumore a 3 livelli blocca i rumori di fondo indesiderati quando il trasmettitore è spento. e sopprime inoltre interferenze
improvvise che possono vericarsi se il segnale trasmesso dal trasmettitore al ricevitore non è sufcientemente forte (ad esempio per l'eccessiva
distanza tra trasmettitore e ricevitore). ATTENZIONE! PRIMA di impostare il ltro di soppressione del rumore accertarsi che il volume del ricevitore sia
impostato sul livello più basso possibile, perché modicando la soglia dei ltri di soppressione del rumore possono generarsi dei rumori di fondo
alti che, in certi casi, possono danneggiare l'udito e le cufe o gli auricolari collegati. A trasmettitore spento, impostare il ltro di soppressione del
rumore al livello più basso possibile, per sopprimere con maggiore efcacia i rumori di fondo (LOW / MID / HI). Se l'impostazione è "HI", è possibile
che in condizioni sfavorevoli la portata della trasmissione si riduca. Premere il tasto SEL (MENU) per circa 2 secondi per accedere al menu principale,
quindi selezionare la voce di menu SQUELCH (su sfondo chiaro) premendo più volte SEL, inne premere il tasto per confermare. Ora è possibile
applicare l'impostazione desiderata premendo (se necessario ripetutamente) il tasto . Per uscire dalla voce di menu, premere SEL, selezionare
la voce di menu EXIT premendo di nuovo (se necessario ripetutamente) SEL e premere per confermare. Dopo circa 5 secondi di inattività la
schermata principale comparirà in automatico.
ENGLISH
DEUTSCHFRANCAIS
ESPAÑOL
IMPOSTAZIONE DELLA LUMINOSITÀ DEL DISPLAY (DISPLAY)
Premere il tasto SEL (MENU) per circa 2 secondi per accedere al menu principale, quindi selezionare la voce di menu DISPLAY (su sfondo chiaro)
premendo più volte SEL, inne premere il tasto per confermare. Ora è possibile applicare l'impostazione desiderata premendo (se necessario
ripetutamente) il tasto (HI = luminosità alta / LOW = luminosità bassa). Per uscire dalla voce di menu, premere SEL, selezionare la voce di menu
EXIT premendo di nuovo (se necessario ripetutamente) SEL e premere per confermare. Dopo circa 5 secondi di inattività la schermata principale
comparirà in automatico.
USCITA DAL MENU PRINCIPALE (EXIT)
Per uscire dal menu principale e tornare alla schermata principale, selezionare la voce di menu EXIT (su sfondo chiaro) premendo SEL, quindi
premere il tasto per confermare. Dopo circa 5 secondi di inattività la schermata principale comparirà in automatico.
ITALIANO POLSKI
99
Page 100

STATO BATTERIE
Il livello di carica delle batterie viene visualizzato sul display ed è sempre aggiornato (schermata principale A). Con le batterie completamente
cariche viene visualizzata l'icona
. Non appena viene raggiunto un livello di carica critico, la schermata del display mostra ogni 3 secondi la scritta "LOW BATTERY", compare l'icona
"batteria scarica"
sostituire immediatamente le batterie scariche.
e, come un segnale di avviso acustico, viene emesso dalla presa cufe un suono puro a circa 500 Hz. In questo caso
, se il livello di carica è ca. il 70% viene visualizzata l'icona e a circa il 30% compare l'icona
DEUTSCHENGLISH
RICERCA ERRORI
PROBLEMA SCHERMATA SOLUZIONE
FRANCAIS
Assenza di segnale audio
o livello troppo basso
Ricevitore: Il ricevitore non viene visualizzato dal
LED RF.
Vericare se il trasmettitore è acceso.
Ricevitore: illuminazione display spenta. Vericare che il ricevitore sia acceso e che il livello di
Ricevitore: la ricezione non viene indicata dal LED RF.
Trasmettitore: il dispositivo è acceso. Segnale
ESPAÑOL
audio presente.
POLSKI
Ricevitore: la ricezione viene visualizzata dal LED RF. Vericare la presenza del segnale audio sul trasmettitore.
Distorsioni e interferenze Ricevitore: la ricezione viene visualizzata dal LED RF. Allontanare le possibili sorgenti di interferenza (disposi-
ITALIANO
Distorsione del suono Ricevitore: appare "LOW BATTERY".
Ricevitore: viene visualizzata l'indicazione del picco AF
PK sul display del ricevitore e del trasmettitore.
carica delle batterie sia sufciente.
Vericare la corrispondenza delle radiofrequenze di
trasmettitore e ricevitore.
Controllare la potenza di trasmissione.
Ridurre la distanza tra trasmettitore e ricevitore.
Assicurarsi che tra trasmettitore e ricevitore siano rivolti
l'uno verso l'altro direttamente.
Assicurarsi che le antenne di trasmettitore e ricevitore
siano collegate correttamente, non siano coperte e non
siano piegate.
Ridurre la potenza della soppressione del rumore
(SQUELCH)
Aumentare ev. il livello del segnale del dispositivo
di riproduzione o vericare l'impostazione GAIN del
trasmettitore.
tivi digitali, altri sistemi radio).
Aumentare la potenza della soppressione del rumore
(SQUELCH) sul ricevitore.
Sostituire le batterie del ricevitore.
Controllare che l'uscita cufe del trasmettitore se il
segnale presente è "pulito".
Ridurre ev. il livello del segnale del dispositivo di riproduzione o abbassare il livello audio GAIN del trasmettitore.
100
 Loading...