


la-z-boy.com
La-Z-Boy Incorporated
1284 N. Telegraph Road
Monroe, MI 48162
operating instructions
__________
instrucciones de operación
__________
instructions
Reclining Sofa
sofas & modulars
________
sofás y unidades modulares
________
canapés et modulaires
©2013 La-Z-Boy Incorporated |
93000495-00 Rev. 08/2013 |

Congratulations!
You are now the proud owner of state-of-the-art furniture by La-Z-Boy®.
You have just selected one of the finest quality upholstered products produced in the furniture industry, backed by over 80 years of quality manufacturing experience. La-Z-Boy is proud of our
designs and craftsmanship and knows you will feel the same as you enjoy your new furniture’s comfort and style.
IMPORTANT
Read these instructions thoroughly before using your La-Z-Boy® furniture. Keep them for future reference.
Table of Contents |
|
Important Safety Instructions..................................... |
4-5 |
Reclina-Way® Motion Sofa Glide |
|
Adjustment Instructions ................................................ |
6 |
Reclina-Way® Motion Sofa 3-Position Legrest |
|
Operating Instructions .................................................. |
7 |
Reclina-Way® Motion Sofa Reclining |
|
Tension Adjustment Instructions ................................. |
8-9 |
La-Z-Time® Motion Upholstery and La-Z-Time |
|
Motion-Modulars® Assembly Instructions................... |
10-13 |
La-Z-Time® Motion Upholstery & La-Z-Time Motion-Modulars® |
|
Legrest Tension Adjustment Instructions ..................... |
14-15 |
La-Z-Time® Motion Upholstery & La-Z-Time Motion-Modulars® |
|
Reclining Tension Adjustment Instructions................... |
16-17 |
Sleep Sofa Operating Instructions ............................... |
18 |
Furniture Placement Guide .......................................... |
19 |
Cup Holder Cleaning Instructions................................ |
20 |
Notes........................................................................ |
21 |
2 |
|
3 |
|
|
|

Important Safety Instructions:
Important: Read these instructions thoroughly before using.
 DANGER – To reduce the risk of serious injury or death:
•To prevent suffocation keep plastic bags away from children.
•Do not sit or lie on mattress of sleep sofa except when it is fully extended. Never close unit with person or animal inside.
 WARNING – To reduce the risk of burns, fire or serious injury:
•Always keep open flame and lit cigarettes away from upholstered furniture. Upholstered furniture may burn rapidly with toxic gas and thick smoke.
•Closely supervise children and disabled persons using this product.
•Sit down in the unit slowly. To avoid tip over, do not throw your weight against the back of the unit. Move the unit into or out of the reclining position slowly, making sure that no children or pets are in close proximity.
•This product has many moving parts, serious injury can occur if not used properly. Keep hands, fingers and body parts away from the mechanism. To reduce the risk of head entrapment and other injuries, keep children and pets away from openings and moving parts in and around furniture.
•Only the occupant should operate the unit. Never attempt to open the legrest by pulling on it.
•Do not stand, sit, or place extra weight on the arms, back or open legrest.
•To safely exit the unit and prevent a tripping hazard, bring the back upright and close the legrest.
•Do not use this product if it is damaged. Do not use attachments or substitute parts.
•This product is intended for indoor residential use only.
•Provide a clear path for operation of the back and legrest. Place tables and area rugs at a distance to allow the legrest to fully extend without rubbing or interference.
•This product is not intended for use as a health care device.
•Do not operate the unit until the back is installed and locked.
•Use care when moving the product. Before lifting the product, secure the mechanism to prevent unexpected opening or movement. Never move the product by the mechanism, legrest, handle, reclining back, or swivel base. Disconnect modular units. Securely grip non-moving parts only.
•Do not sit or place extra weight on the head area of the sleep sofa mattress. Excess weight can cause the sleep surface to tip up and back.
•This unit is equipped with a tension adjustment feature for the reclining mechanism that is preset at the factory. The tension setting can be changed for your personal preference. To avoid tip over and insure stability, do not operate the unit with the tension adjustment wing nuts completely loosened (See Reclining Tension Adjustment Instructions).
Important Safety Instructions:
Important: Read these instructions thoroughly before using.
•Keep hands, arms and body parts away from the open area between a reclined back and an upright back on a motion sofa or modular. This area must remain clear at all times to provide unobstructed movement and prevent injury that could occur when a reclined back is returning toward
the upright position.
•Use of this product requires adequate strength to bring the back upright and close the legrest. Selecting the maximum tension settings could make bringing the back upright and closing the legrest difficult.
•Do not use La-Z-Boy® furniture in a recreational vehicle (or other moving vehicle) while the vehicle is in motion. This furniture is not intended to protect its occupant in an accident. Safely secure the furniture while the vehicle is in motion to prevent injury or damages from any sudden stop.
•Do not place containers with hot beverages in the cup holders. The furniture has motion and beverages may spill and injure the occupant. Do not place oversized or uncovered beverage containers in the cup holders.
•If you give this product to someone else, include this Operating Instructions manual.
NOTICE – To reduce the risk of product damage:
•Damage will occur to the mechanism if the legrest is forced closed from the 1st or 2nd position. The legrest must be extended to the 3rd position and then closed.
•Do not move the units while connected together. The purpose of the bracket system is to connect the units and prevent them from being separated while on the floor. The bracket system does not provide adequate structural support for the movement of connected units.
•Some units contain cup holders. Take care to prevent spilling of beverages, which could result in damage to cover.
Save These Instructions |
Save These Instructions |
4 |
5 |
Reclina-Way® Motion Sofa
Glide Adjustment Instructions
 WARNING – To reduce the risk of serious injury:
•Provide a clear path for operation of the back and legrest. Place tables and area rugs at a distance to allow the legrest to fully extend without rubbing or interference.
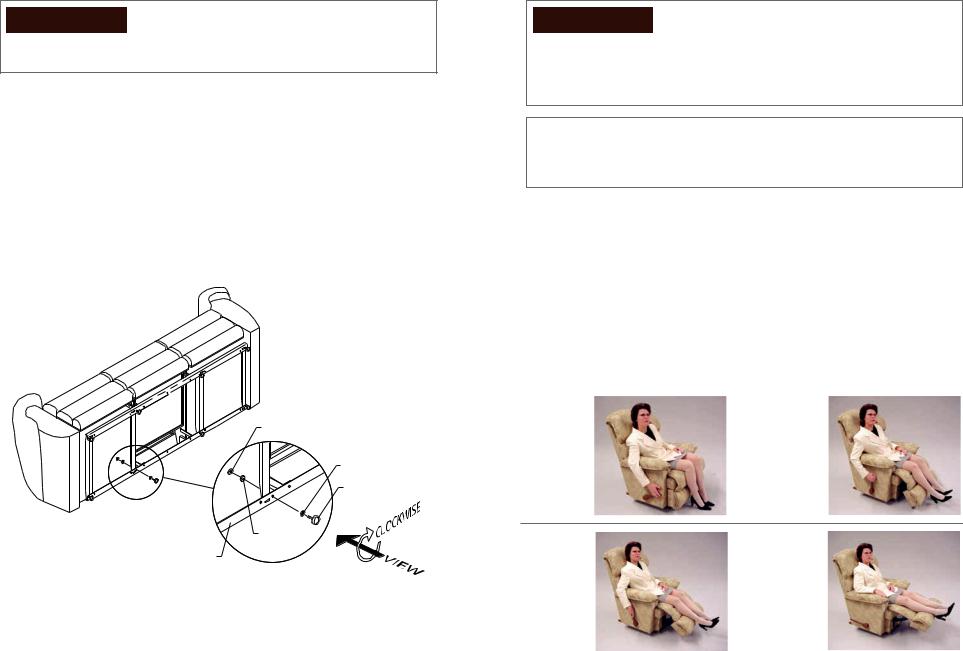
Adjusting the Glides
Make sure the glides are adjusted to a height that provides a clear path for operation of the legrest.
Each glide is attached to the base rail by one jam nut and one lock washer on top of the base rail, and one jam nut on the bottom of the base rail.
1.To extend the glide, loosen the upper jam nut by rotating clockwise. Turn the lower jam nut clockwise to the desired height.
2.Tighten the upper jam nut by rotating counterclockwise.
3.Repeat steps one and two for each adjustable glide on the unit, if needed.
4.Repeat this procedure, as necessary, to level the sofa.
Upper Jam Nut
Lower Jam Nut
Adjustable Glide
Lock
Washer
Base Rail
Reclina-Way® Motion Sofa
3-Position Legrest Operating Instructions
 WARNING -- To reduce the risk of serious injury:
•Provide a clear path for operation of the back and legrest. Place tables and area rugs at a distance to allow the legrest to fully extend without rubbing or interference.
•To safely exit the unit and prevent a tripping hazard, bring the back upright and close the legrest.
NOTICE – To prevent product damage:
•Damage will occur to the mechanism if the legrest is forced closed from the 1st or 2nd position. The legrest must be extended to the 3rd position and then closed.
To Operate the Legrest
1.Your Reclina-Way® motion sofa is equipped with a three-position locking legrest for customized seating comfort. Simply pull on the handle rotating it counterclockwise to control the legrest (FIGURE 1). You may stop in any one of three ideal positions. The 1st position is slightly inclined for relaxing reading (FIGURE 2). The 2nd position is slightly more inclined for comfortable television viewing (FIGURE 3). The 3rd position is fully extended for complete relaxation (FIGURE 4). To lower the legrest, rotate the handle counterclockwise to the fully extended position, then rotate clockwise to the fully closed position.
2.The sofa back can be reclined with the legrest closed or extended. To recline, apply pressure to the back. Sit upright to return the back to an upright position.
3.Bring the back upright and close the legrest before getting out of the unit.
FIGURE 1 |
FIGURE 2 |
CLOSED |
1ST POSITION |
POSITION |
|
FIGURE 3 |
FIGURE 4 |
2ND POSITION |
3RD POSITION |
6 |
|
7 |
|
|
|
Reclina-Way® Motion Sofa
Reclining Tension Adjustment Instructions
 WARNING – To reduce the risk of injury:
•This unit is equipped with a tension adjustment feature for the reclining mechanism that is preset at the factory. The tension setting can be changed for your personal preference. To avoid tipover and insure stability, do not operate the unit with the tension adjustment wing nuts completely loosened (see Reclining Tension Adjustment Instructions).
NOTICE – To reduce the risk of product damage:
•Make sure the legrest on each unit is closed before tilting forward and adjusting the tension.
•Do not completely tighten the wing nuts. The tension springs should not be completely compressed after making adjustments. If this occurs, the wing nuts must be loosened a minimum of ½-turn to avoid damage to the spring tension assembly.
•Do not completely loosen the wing nuts. The spring should not slide on the bolt after making adjustments. If the spring slides on the bolt, tighten the wing nut a minimum of ½-turn after the spring no longer slides on the bolt.
•Adjust both wing nuts equally.
Adjustment Instructions
You can adjust the tension of the reclining mechanism to respond to your individual size.
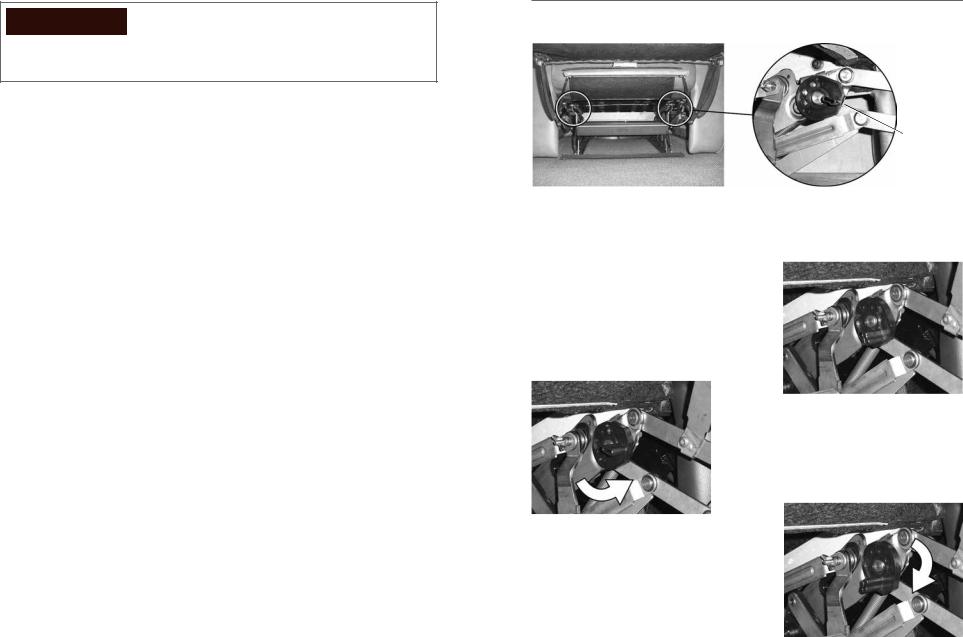
1.Gently tilt the reclining sofa forward to rest on its arms and top of the back. Locate the wing nuts, one on each side, toward the back of the recliner under each reclining seat (FIGURE 1).
2.Adjust the tension by turning the wing nuts in 1⁄4-turn increments until the desired setting is reached.
•A taller or heavier person may choose to increase the reclining tension by tightening the wing nuts clockwise.
•A smaller person may choose to decrease the reclining tension by loosening the wing nuts counterclockwise.
3.Return the reclining sofa to the upright position. Test the new setting. Make additional adjustments if needed, repeating these steps.
Reclina-Way® Motion Sofa
Reclining Tension Adjustment Instructions
FIGURE 1
Wing |
Tension |
Nut |
Spring |
8 |
9 |
La-Z-Time® Motion Upholstery and La-Z-Time
Motion-Modulars® Assembly Instructions
 WARNING – To reduce the risk of injury:
•Do not operate the unit until the back is installed and locked.
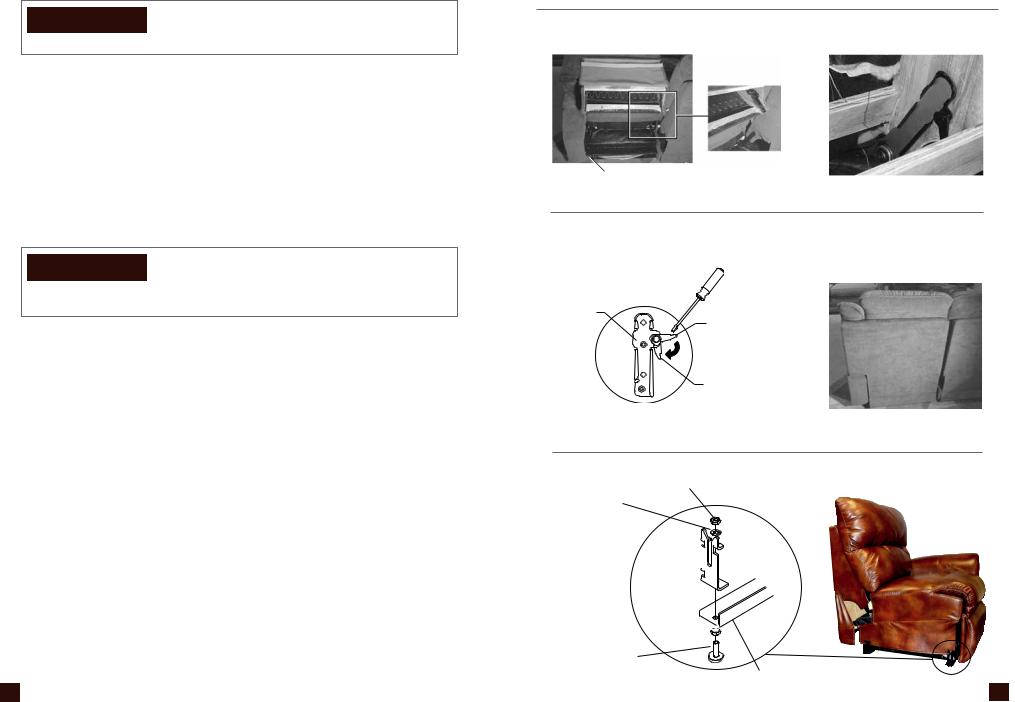
1.Install the backs, if applicable (some styles come with the backs installed).
•Lay the back on the seat. Lift the back at a slight angle and align the brackets inside the back with the brackets on the body (FIGURE 1).
•Lower the back onto the body, making sure the back and body brackets are completely engaged.
•To make sure the back is properly installed, lift the back upholstery cover to visually confirm that both sets of back and body brackets are engaged (FIGURE 2).
•If you are unable to install the back properly contact your La-Z-Boy® dealer for assistance.
•Lock the brackets by using a screwdriver to push down the locking levers (FIGURE 3).
•Pull the outside back upholstery cover down tight. Firmly press the fastening tape on the outside back upholstery cover to the fastening tape on the bottom of the rear rail (FIGURE 1 and FIGURE 4).
 WARNING – To reduce the risk of serious injury:
•Provide a clear path for operation of the back and legrest. Place tables and area rugs at a distance to allow the legrest to fully extend without rubbing or interference.
2.Place units in the desired location.
3.Adjustable glides are provided on units with metal base rails. Make sure the glides are adjusted to a height that provides a clear path for operation of the legrest (see Furniture Placement Guide).
•Each glide is attached to the base rail by one jam nut and one lock washer on top of the front attachment bracket or base rail, and one jam nut on the bottom of the base rail (FIGURE 5, Motion-Modular unit featured). Loosen the jam nut located on top of the front attachment bracket or base rail.
•Holding the top jam nut, turn the glide clockwise to lower the unit or counterclockwise to raise the unit.
•Tighten the bottom jam nut to the base rail, then tighten the top jam nut to the lock washer on top of the front attachment bracket. Make sure both jam nuts are tight to prevent the bracket from rotating on the base rail.
•Repeat this step for each adjustable glide, if necessary.
4.Motion sofa or chair assembly is complete. If assembling modular units, proceed to the following page.
La-Z-Time® Motion Upholstery and La-Z-Time
Motion-Modulars® Assembly Instructions
FIGURE 1 |
FIGURE 2 |
 Fastening Tape
 Back
Back
Bracket
 Body
Body
Bracket
Fastening Tape
FIGURE 3 |
FIGURE 4 |
Back
Bracket Locking
Lever
Locked
Position
FIGURE 5
Upper Jam Nut
Lock Washer
Bracket 
Attachment
Lower 


Jam Nut
Adjustable |
|
Glide |
Base Rail |
|
10 |
11 |
La-Z-Time® Motion Upholstery and La-Z-Time
Motion-Modulars® Assembly Instructions
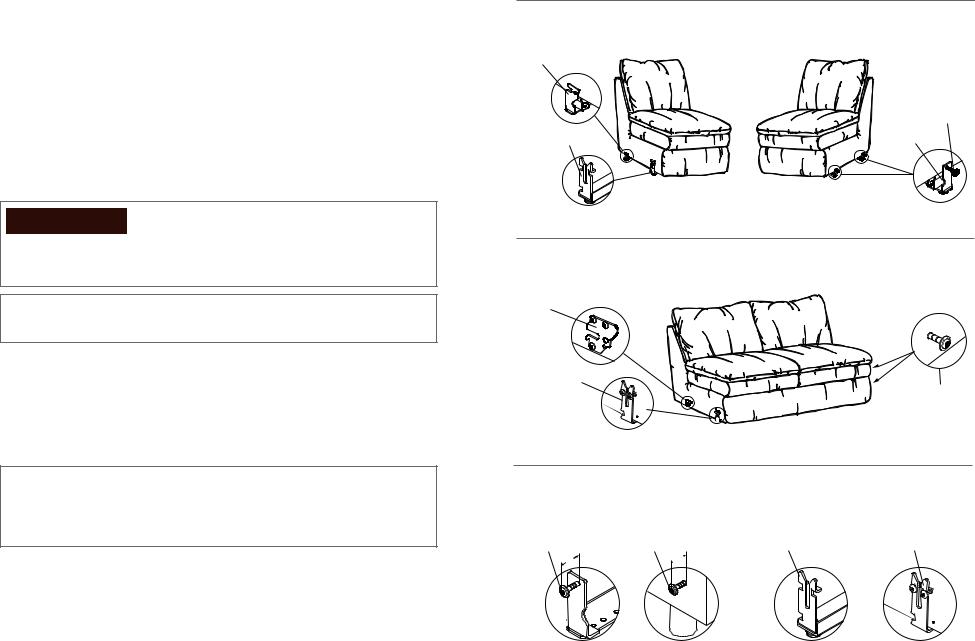
Motion-Modular units with metal base rails have one bracket in the back and one “U” bracket in the front on the right side (sitting) of modular units without right side arms, and two stud mounts with threaded studs on the left side (sitting) of modular units without left side arms (FIGURE 1).
Motion-Modular units with wood legs have one side mount bracket in the back and one “U” bracket in the front on the right side (sitting) of modular units without right side arms, and two threaded studs on the left side (sitting) of modular units without left side arms (FIGURE 2).
5.Use a T-30 torx driver to loosen the threaded studs to approximately 1”; this measurement may vary depending on the fabric and style (FIGURE 3). The threaded studs are located on the left side (sitting) of modular units without left side arms.
6.To start, place the units to be attached next to each other, about 2" apart. Position the unit with the threaded studs slightly behind the unit with the attachment brackets. Separate the fronts of the units to be connected, about 6" apart. Slide the rear of the unit with the threaded studs toward the unit with the attachment brackets, aligning the threaded studs to the rear bracket. Pull the unit with the threaded studs forward to engage the rear bracket.
 WARNING – To reduce the risk of serious injury:
•The front of the unit must be raised to engage the front bracket. Please seek assistance if you are unable to lift at least 57 pounds.
•Keep feet clear of the unit when lowering into position.
NOTICE – To reduce the risk of product damage:
•Lift from the base rail. Do not lift from the upholstery or the bottom of the legrest.
7.Lift the front of the unit with the threaded stud approximately 3” off the ground, aligning it
to the unit with the attachment bracket. Gently lower the threaded stud into the front attachment bracket (FIGURE 4). Keep feet clear of the unit when lowering into position.
NOTE: Due to variations in upholstery and style, the threaded stud length may need to be adjusted to fit into the attachment brackets or control gaps between units. Loosen or tighten the threaded studs to provide adequate clearance.
8.Continue connecting the modular units until all have been securely joined.
NOTICE – To reduce the risk of product damage:
•Do not move the units while connected together. The purpose of the bracket system is to connect the units and prevent them from being separated while on the floor. The bracket system does not provide adequate structural support for the movement of connected units.
9.All modular units must be disconnected to safely move the modular group. To disconnect the units, lift up the left side (sitting) modular unit (with threaded studs) approximately 3” to clear the front attachment bracket, move the front of the unit over and return it to the floor. Slide the unit with the threaded studs backward to disengage the rear bracket.
La-Z-Time® Motion Upholstery and La-Z-Time
Motion-Modulars® Assembly Instructions
FIGURE 1
Rear Rail
Bracket
Front Rail
“U” Bracket
FIGURE 2
Rear
Side
Mount
Bracket
Front Side
Mount “U”
Bracket
Threaded
Stud
Stud
Mount
Threaded
Stud
FIGURE 3 |
|
|
FIGURE 4 |
|
Threaded |
Threaded |
|
Front Rail “U” |
Front Side Mount |
Stud |
Stud |
1" |
Bracket |
“U” Bracket |
1" |
|
|
|
Stud 
Mount
Base Units |
Leg Units |
Base Units |
Leg Units |
12 |
|
13 |
|
|
|
La-Z-Time® Motion Upholstery &
La-Z-Time Motion-Modulars® Legrest
Tension Adjustment Instructions
 WARNING – To reduce the risk of injury:
•Use of this product requires adequate strength to bring the back upright and close the legrest. Selecting the maximum tension settings could make bringing the back upright and closing the legrest difficult.
Legrest Tension Adjustment Instructions
1.Stand beside the unoccupied unit and pull the release handle to extend the legrest. Make sure not to lean or put pressure on the extended legrest, as it will close. From under the legrest, lift the mechanism cover to access the tension adjustment wheels. The wheels are located toward the front of the mechanism, one on each side (FIGURE 1). Each wheel has three adjustment settings.
2.The legrest tension adjustment wheels are factory set in the center position (FIGURE 2). The center position provides average legrest tension and support.
3.A taller or heavier person may choose to increase the amount of legrest tension for added leg support. To increase the amount of legrest tension, turn the adustment wheels up and toward the front of the recliner (FIGURE 3). Both legrest tension adjustment wheels must be set in the same position.
4.A smaller person may choose to decrease the amount of legrest tension for easier closing of the legrest. To decrease the amount of legrest tension, turn the adustment wheels down and toward the back of the recliner (FIGURE 4). Both legrest tension adjustment wheels must be set in the same position.
5.Close the legrest. Test the new legrest tension setting and make adjustments if needed.
6.Repeat these instructions to customize each reclining seat in your motion sofa or modular group.
La-Z-Time® Motion Upholstery &
La-Z-Time Motion-Modulars® Legrest
Tension Adjustment Instructions
FIGURE 1
Legrest
Tension
Adjustment
Wheel
Adjustment wheel location, one on each side
FIGURE 2
FIGURE 3
Average legrest tension
FIGURE 4
Maximum legrest tension
Minimum legrest tension
14 |
|
15 |
|
|
|
La-Z-Time® Motion Upholstery &
La-Z-Time Motion-Modulars® Reclining
Tension Adjustment Instructions
 WARNING – To reduce the risk of injury:
•This unit is equipped with a tension adjustment feature for the reclining mechanism that is preset at the factory. The tension setting can be changed for your personal preference. To avoid tipover and insure stability, do not operate the unit with the tension
adjustment wing nuts completely loosened (see Reclining Tension Adjustment Instructions).
•Use of this product requires adequate strength to bring the back upright and close the legrest. Selecting the maximum tension settings could make bringing the back upright and closing the legrest difficult.
NOTICE – To reduce the risk of product damage:
•Do not completely tighten the wing nuts. The tension springs should not be completely compressed after making adjustments. If this occurs, the wing nuts must be loosened a minimum of ½-turn to avoid damage to the spring tension assembly.
•Do not completely loosen the wing nuts. The spring should not slide on the bolt after making adjustments. If the spring slides on the bolt, tighten the wing nut a minimum of ½-turn after the spring no longer slides on the bolt.
•Adjust both wing nuts equally.
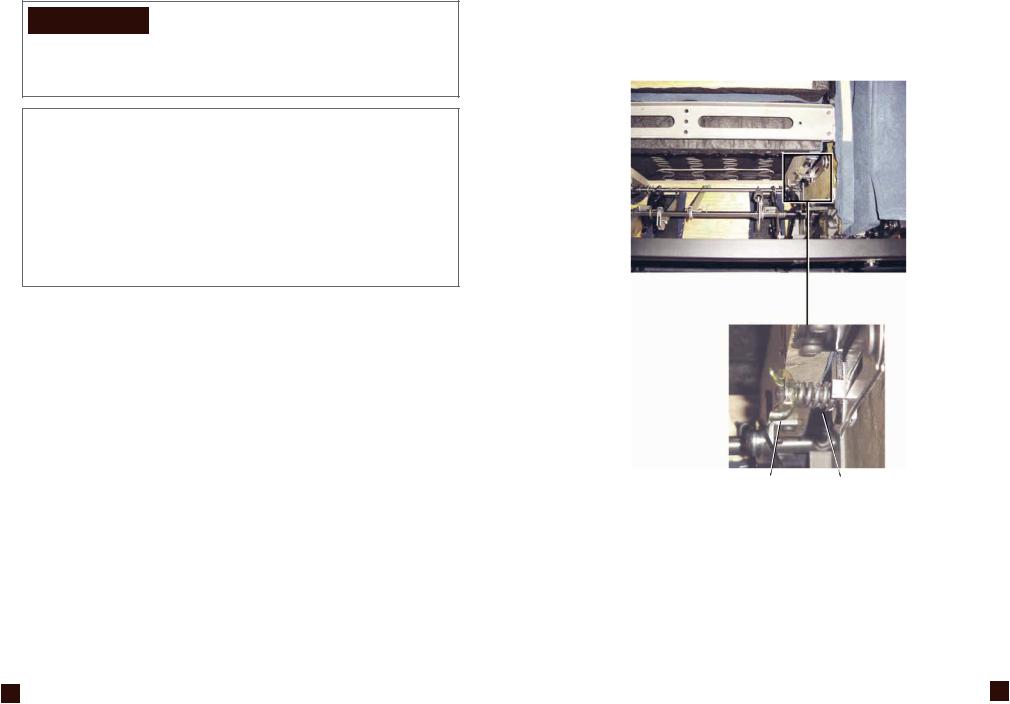
Reclining Tension Adjustment Instructions
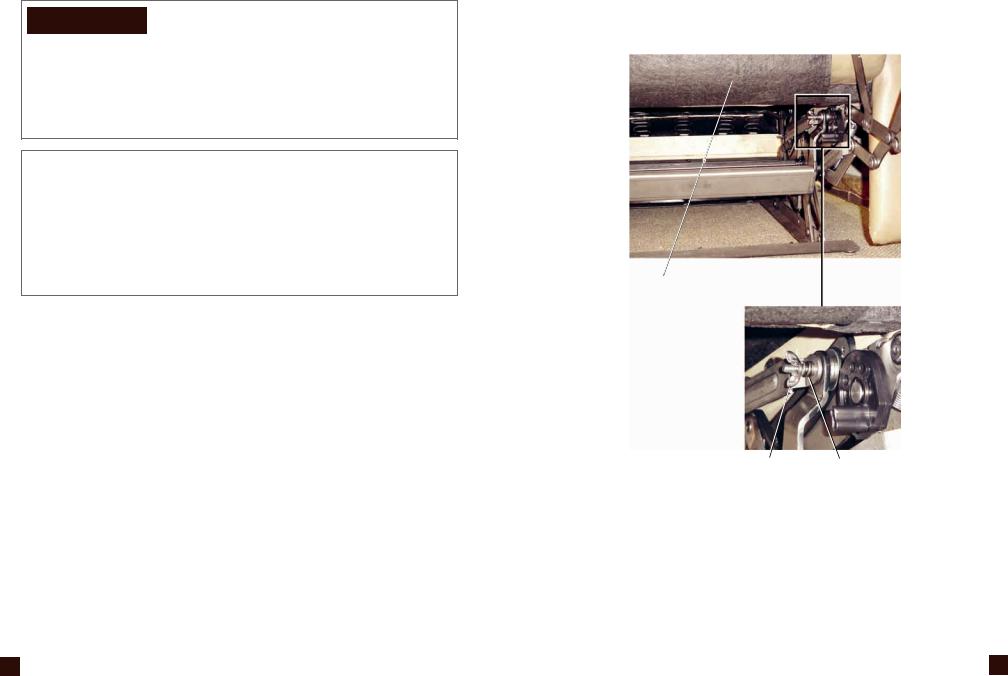
1.Stand beside the unoccupied unit and pull the release handle to extend the legrest. Make sure not to lean or put pressure on the extended legrest, as it will close. From under the legrest, lift the mechanism cover to access the reclining tension wing nuts. The wing nuts are located toward the front of the mechanism, one on each side (FIGURE 1). The wing nuts located toward the back of the mechanism are fasteners and do not affect tension.
2.Adjust the reclining tension by turning the wing nuts in ¼-turn increments until the desired setting is reached. Adjust both wing nuts equally.
•A taller or heavier person may choose to increase the amount of tension by tightening the wing nuts clockwise.
•A smaller person may choose to decrease the amount of tension by loosening the wing nuts counterclockwise.
3.Close the legrest. Test the new reclining tension setting and make adjustments if needed.
4.Repeat these instructions to customize each reclining seat in your motion sofa or modular group.
La-Z-Time® Motion Upholstery &
La-Z-Time Motion-Modulars® Reclining
Tension Adjustment Instructions
FIGURE 1
Mechanism
Cover
Reclining Tension
Tension Spring
Wing Nut
16 |
17 |

Sleep Sofa Operating Instructions
 DANGER – To reduce the risk of serious injury or death:
•Do not sit or lie on mattress of sleep sofa except when it is fully extended. Never close unit with person or animal inside.
 WARNING – To reduce the risk of injury:
•Do not sit or place extra weight on the head area of the mattress. Excess weight can cause the sleep surface to tip up and back.
Setting Up Your Motion-Modular Sleep Sofa Bed
1.Remove all loose cushions. Grasp the handle located in the center of the deck and lift in an upward direction (FIGURE 1).
2.Step back while pulling the sleeper mechanism out to the first extended position. When the mechanism reaches this position the center support legs will rest on the floor (FIGURE 2).
3.Reach over and grasp the center of the one piece front leg. Pull up and lower the front leg to the floor (FIGURE 3).
Additional Feature
The sleep sofa features a television viewing headrest position. To raise the headrest, stand to the side of the sleep sofa and pull the head portion of the sleeper mechanism upward. Lift upward again to release the locking mechanism and lower the headrest to its original position (FIGURE 4).
FIGURE 1 |
FIGURE 2 |
FIGURE 3 |
FIGURE 4 |
18 |
|
Furniture Placement Guide
 WARNING – To reduce the risk of serious injury:
•Provide a clear path for operation of the back and legrest. Place tables and area rugs at a distance to allow the legrest to fully extend without rubbing or interference.
Reclining Units
To place your reclining unit the proper distance from the wall, fully recline the unit and leave a minimum of 2" of space between the top of the back and the wall (FIGURE 1).
Place tables and area rugs at a distance to allow the legrest to fully extend without rubbing or interference. Interference with the legrest may cause it to not close completely (FIGURE 2). If the legrest is not closed completely, it may pop out unexpectedly and could cause injury. Some units have adjustable glides that can be raised to help prevent rubbing and interference with area rugs; see Assembly Instructions and Adjustment Instructions for details. Proper clearance for an area rug is demonstrated in FIGURE 3.
Make sure tables and other items are at a safe distance to avoid interference with the operation of the legrest. Improper placement of a table could cause the occupant to become trapped in the unit; this is demonstrated in FIGURE 4. There must be enough clearance for the legrest to be fully extended before closing.
FIGURE 1 |
FIGURE 2 |
Rug interference causes legrest to remain open
FIGURE 3 |
FIGURE 4 |
Proper
Clearance
19
 Loading...