


la-z-boy.com
La-Z-Boy Incorporated
1284 N. Telegraph Road
Monroe, MI 48162
operating instructions
__________
instrucciones de operación
__________
instructions
Luxury-Lift®
power recliner
________
Sillón reclinable
________
fauteuil inclinable ÉlectroPlus
©2013 La-Z-Boy Incorporated |
93000528-00 Rev. 02/13 |

Congratulations!
You are now the proud owner of a stat e-of-the-art Luxury-Lift® Power Recliner by La-Z-Boy.®
You have just selected one of the finest quality upholstered products produced in the furniture industry, backed by over 80 years of quality manufacturing experience.
La-Z-Boy is proud of our designs and craftsmanship and knows you will feel the same as you enjoy your new furniture’s comfort and style.
IMPORTANT
Read the safety and other instructions before using your Luxury-Lift® Power Recliner. Keep this manual for future reference.
Table of Contents |
|
Important Safety Instructions ..................................... |
4-5 |
Luxury-Lift® Power Recliner Assembly Instructions ........ |
6-11 |
Luxury-Lift® Power Recliner Battery Backup |
|
Assembly Instructions............................................................... |
12 |
Luxury-Lift® Power Recliner Operating Instructions........... |
13 |
1ML Luxury-Lift® Power Recliner Massage |
|
and Heat Operating Instructions...................................... |
14-15 |
1HL Luxury-Lift® Power Recliner |
|
Heat Operating Instructions............................................. |
16-17 |
1LF Luxury-Lift® Power Recliner |
|
Operating Instructions............................................................ |
18 |
Luxury-Lift® Power Recliner Troubleshooting ............. |
19-24 |
Notes ............................................................................... |
25 |
2 |
|
3 |
|
|
|

Important Safety Instructions:
Important: Read these instructions thoroughly before using.
 DANGER -- To reduce the risk of electric shock, serious injury or death:
•Do not let children play on or near the chair when in use. Serious injury or death could occur if head or body parts are under the chair arms when the chair is moved from the full lift to the seated position.
•Disconnect the electrical plug from outlet before cleaning, moving, servicing or when not in use for an extended period of time.
•Do not use this product if it is wet, in water, around water or any liquid. Do not handle the plug or remote control with wet hands.
•To prevent suffocation keep plastic bags away from children.
•Plug directly into a wall outlet. Do not use an extension cord, adapter or surge protector.
WARNING -- To reduce the risk of burns, fire, electric shock, serious injury or death:
•Always keep open flame and lit cigarettes away from upholstered furniture. Upholstered furniture may burn rapidly with toxic gas and thick smoke.
•Closely supervise children and disabled persons using this product.
•Sit down in the unit slowly. To avoid tip over, do not throw your weight against the back of the unit. Move the unit into or out of the reclining position slowly, making sure that no children or pets are in close proximity
•This product has many moving parts; serious injury can occur if not used properly. Keep hands, fingers and body parts away from the mechanism. To reduce the risk of head entrapment and other injuries, keep children and pets away from openings and moving parts in and around furniture.
•Only the occupant should operate the unit. Never attempt to open the legrest by pulling on it.
•Do not stand, sit, or place extra weight on the arms, back or open legrest.
•To safely exit the unit and prevent a tripping hazard, bring the back upright and close the legrest.
•Do not use this product if it is damaged. Do not use attachments or substitute parts.
•This product is intended for indoor residential use only.
•Provide a clear path for operation of the back and legrest. Place tables and area rugs at a distance to allow the legrest to fully extend without rubbing or interference.
•Check the condition of the power transformers, electrical cords, plugs, and connectors monthly. Keep the power transformers and electrical cords away from heat sources. Never operate the unit with a damaged power transformer, electrical cord, plug, or connector. Contact your La-Z-Boy® dealer for service.
•Do not use unit if power control is damaged or wet. Do not use unit if the hand wand has been dropped in water or any liquid. Contact your La-Z-Boy® dealer for service.
•This product is not intended for use as a health care device. Some medications and physical limitations may impair your ability to operate this product in a safe manner. Consult your physician if you are taking prescribed or over the counter medication, or if you have physical limitations.
•Users of medical devices should contact their health care provider before using this product. Do not use this product if you have poor circulation, are immobile, or cannot sense heat, except as directed by your health care provider.
Save These Instructions
Important Safety Instructions:
Important: Read these instructions thoroughly before using.
•Do not use this product where aerosol (spray) products are being used or where oxygen is being administered.
•In the event of a power failure, the battery backup provided may not lift the user to a fully raised position. To ensure lift functionality during a power outage, a battery backup system must be purchased separately. Contact your La-Z-Boy® dealer for more information. Replace the power transformer batteries every six months and after each power failure use.
•Do not operate the unit until the back is installed and locked.
•Before moving the product, disconnect the electrical plug from the wall outlet and secure the mechanism to prevent unexpected opening or movement. Never move the product by the mechanism, legrest, handle, reclining back or swivel base.
•Do not attempt to disassemble or service the pump or motor; no serviceable parts are inside. Contact your La-Z-Boy® dealer for service.
•The 1HL/1ML lift chairs are intended for a single occupant, not exceeding 500 pounds. Do not operate the chair with more than one occupant in or on any part of the chair.
•The 1LF lift chairs are intended for a single occupant, not exceeding 300 pounds. Do not operate the chair with more than one occupant in or on any part of the chair.
•Do not allow electrical cord to be pinched between moving parts or between the frame and the floor. Do not place cord under carpet or in a location where it could become worn.
•Do not use pillow, blanket, or other cover between occupant and chair surface when heat is engaged.
•Always unplug the power cord before connecting or disconnecting the hand wand.
•Unplug the power cord immediately if you detect strange odors or fumes coming from the chair.
•Burns may result from improper use and care of internal heating pads. To avoid risk of burns, do not use pins, do not allow heating pad area to become wet, and do not remove upholstery cover.
•To reduce the risk of electric shock, this product has a polarized plug (one blade is wider than the other). This plug will fit in a polarized outlet only one way. If the plug does not fit fully in the outlet, reverse the plug. If it still does not fit, contact a qualified electrician to install the proper outlet. Do not change the plug in any way.
•Do not attempt to disconnect the power plug by pulling the power cord. Always hold the power plug and pull it out.
•If you give this product to someone else, include this Operating Instructions manual.
NOTICE – To reduce the risk of product damage:
• To prevent damage to the power transformer, do not plug in until instructed.
Save These Instructions
4 |
5 |

Luxury-Lift® Power Recliner
Assembly Instructions
NOTICE: Do not plug the transformer in until instructed.
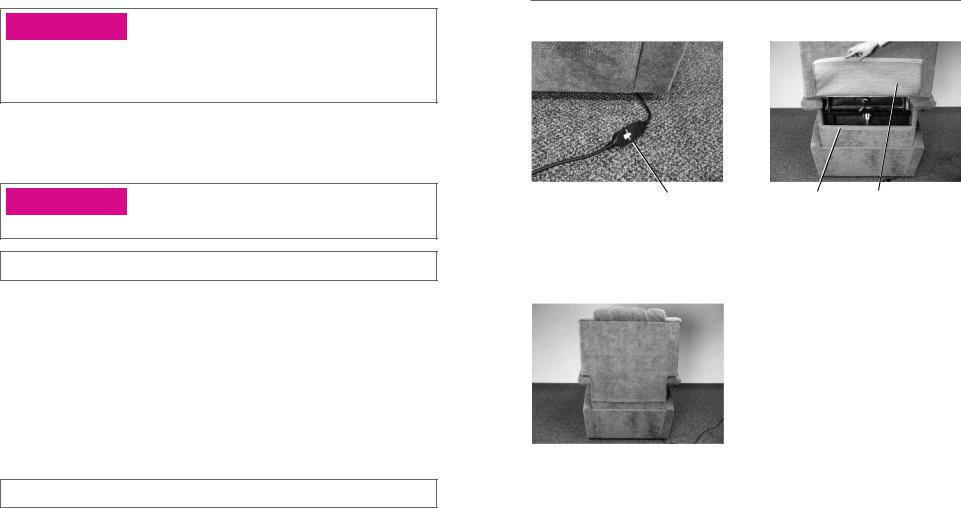
1.Carefully cut the cable tie holding the Power Transformer box to the rear rail (FIGURE 1). Set the box aside.
2.The Power Transformer connector is tucked into the rear upholstered panel, toward the bottom of the chair (FIGURE 1). Remove the Power Transformer connector from the upholstered panel.
3.Roll the lift chair onto its back side. Locate the cable tie on the rear base (FIGURE 2).
•Carefully cut the cable tie securing the lift base (FIGURE 2).
•Return the lift chair to the upright position, being careful not to pinch the Power Transformer connector or cord.
4.Lay the back across the chair arms with the front of the back facing the seat.
•Note the location of the fastening tape on the black nonwoven flap and the fastening tape on the back seat spring rail (FIGURE 3). Do not attach the fastening tape at this time.
•Lay the black nonwoven flap down toward the seat (FIGURE 4).
 WARNING – To reduce the risk of injury:
•Do not operate the unit until the back is installed and locked.
5.Install the back.
•With the back across the chair arms, lift the back at a slight angle and align the brackets on the back with the brackets on the body.
•Lower the back onto the body, making sure the back and body brackets are completely engaged (FIGURE 5).
-Lift the back upholstery cover to visually confirm that both sets of back and body brackets are engaged (FIGURE 5). If one or both brackets are not engaged, remove the back and repeat the steps above.
-If you are unable to install the back properly, contact your La-Z-Boy® dealer for assistance.
•Lock the brackets by using a screwdriver to push down the locking levers (FIGURE 6).
(Assembly Instructions Continued)
6
Luxury-Lift® Power Recliner
Assembly Instructions
FIGURE 1 |
(1ML shown) |
FIGURE 2 |
(1ML shown) |
Power |
Power Transformer |
Cable Tie |
Transformer Box |
Connector |
|
|
|
|
FIGURE 3 (1ML shown) FIGURE 4 (1ML shown)
Fastening Tape Black Nonwoven Flap |
Black Nonwoven Flap |
|
|
FIGURE 5 |
FIGURE 6 |
Back and Body |
Locking Lever in Locked Position |
|
Brackets Engaged |
|
7 |
|
|
|

Luxury-Lift® Power Recliner
Assembly Instructions
6.From the front of the chair, push the black nonwoven flap with fastening tape, between the seat and the back, toward the back of the chair (FIGURE 7).
7.Gently roll the chair forward to rest on the front arms. Lift the back upholstery cover to access the connectors (only applies to 1HL and 1ML styles).
•If assembling a 1ML style, proceed to step 8.
•If assembling a 1HL style, proceed to step 9.
•If assembling a 1LF style, proceed to step 10.
8.Connect the green, 6-pin back massage connectors (only applies to 1ML styles).
•Align the clips on the green connectors and push the connectors together until they lock (FIGURE 8).
9.Connect the black and the red, 2-pin back heating pad connectors (only applies to 1HL and 1ML styles).
•Align the clips on the black connector and the red connector and push the connectors together until they lock (FIGURE 8).
10.Attach the black nonwoven flap to the back seat spring rail, to form a pocket between the seat and the back that prevents objects from falling into the mechanism.
•Locate the fastening tape on the black nonwoven flap and the fastening tape on the back seat spring rail (FIGURE 9).
•Attach the black nonwoven flap to the back seat spring rail by pressing the fastening tape together, working from the center out (FIGURE 10).
•Lift the elastic bands to connect the ends of the fastening tape.
 WARNING – To reduce the risk of serious injury:
•Provide a clear path for operation of the back and legrest. Place tables and area rugs at a distance to allow the legrest to fully extend without rubbing or interference.
11.Gently roll the chair back on to the base. Choose a location for the lift chair that is close to an electrical outlet.
(Assembly Instructions Continued)
Luxury-Lift® Power Recliner
Assembly Instructions
FIGURE 7 |
FIGURE 8 |
(1ML shown) |
Black Nonwoven Flap |
Back Heating Pad |
Back Massage |
with Fastening Tape |
Connection |
Connection |
|
|
|
FIGURE 9 |
(1ML shown) |
FIGURE 10 |
(1ML shown) |
Inner Body Back Panel |
|
|
|
Back Seat |
Black Nonwoven Flap |
Spring Rail |
with Fastening Tape |
8 |
|
9 |
|
|
|
Luxury-Lift® Power Recliner
Assembly Instructions
 WARNING – To reduce the risk of serious injury:
•Check the condition of the power transformers, electrical cords, plugs, and connectors monthly. Keep the power transformers and electrical cords away from heat sources. Never operate the unit with a damaged power transformer, electrical cord, plug, or connector. Contact your La-Z-Boy® dealer for service.
12.Connect the Power Transformer connectors.
•Remove the Power Transformer from the box and unwind the cord.
•Align the clips on the power transformer connector and the connector behind the chair
and push the connectors together until they lock (FIGURE 11).
 DANGER – To reduce the risk of serious injury or death:
• Plug directly into a wall outlet. Do not use an extension cord, adapter or surge protector.
NOTICE: To prevent product damage operate this chair only when it is upright, setting on its base.
13.The automatic homing feature returns the lift chair to the seated position after power is restored following a power interruption. This feature may cause the lift chair to move slightly when plugged in. Plug the Power Transformer directly into a wall outlet.
14.Retrieve the hand wand from the pocket. Stand beside the chair and press the toggle lever on the hand wand toward the UP position. Raise the lift chair until the inner body back panel is slightly above the outer body back panel (FIGURE 12).
15.Locate the fastening tape on the back upholstery cover and the fastening tape on the inner body back panel (FIGURE 12).
•Pull the back upholstery cover down tight. Firmly press the fastening tape on the back upholstery cover to the fastening tape on the inner body back panel (FIGURE 13).
•Press the toggle lever on the hand wand toward the DOWN position to lower the lift chair.
16.Proceed to the Battery Backup Assembly Instructions.
NOTICE: To prevent damage to the connectors and cords, it is important to unfasten all connections prior to removing the back.
17.To remove the back, unplug the Power Transformer from the electrical outlet and disconnect the Power Transformer connection at the base of the chair. Reverse the Assembly Instructions steps.
Luxury-Lift® Power Recliner
Assembly Instructions
FIGURE 11 |
(1ML shown) |
FIGURE 12 |
(1ML shown) |
Power Transformer Connection |
Inner Body |
Back |
|
Back Panel |
Upholstery Cover |
|
|
|
FIGURE 13 |
(1ML shown) |
10 |
|
11 |
|
|
|
Luxury-Lift® Power Recliner
Battery Backup Assembly Instructions
 WARNING – To reduce the risk of serious injury:
•In the event of a power failure, the battery backup provided may not lift the user to a fully raised position. To ensure lift functionality during a power outage, a battery backup system must be purchased separately. Contact your La-Z-Boy® dealer for more information.
Replace the power transformer batteries every six months and after each power failure use.
Battery Backup Assembly Instructions
The performance of the built-in battery backup cannot be guaranteed in the mevent of a power failure. If you require continuing use during a power outage, you should purchase a separate battery backup system. Contact your La-Z-Boy® dealer for more information.
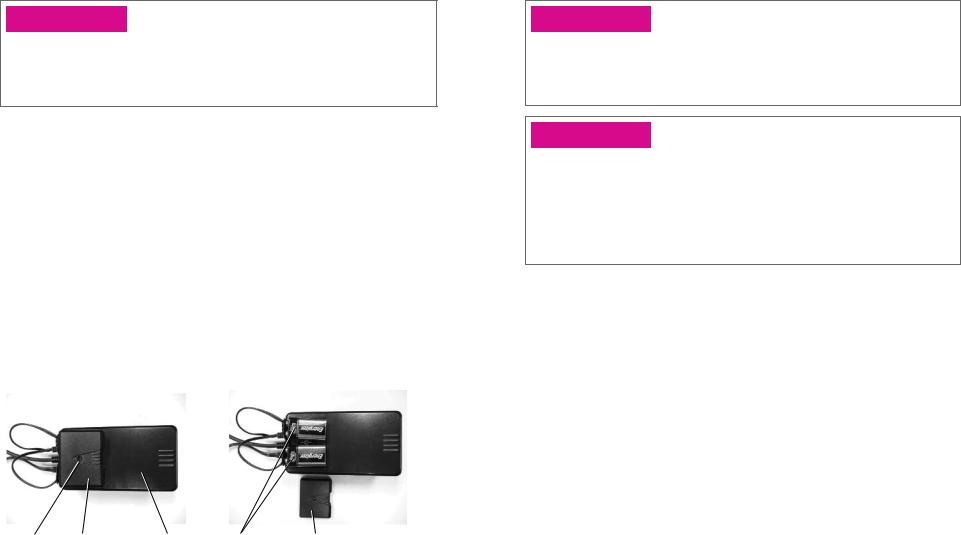
The Battery Backup is located in the Power Transformer and uses two 9-volt alkaline batteries (not included).
1.Unplug the Power Transformer from the electrical outlet and disconnect the Power Transformer connection at the base of the chair.
2.Remove the Phillips head screw from the battery cover on top of the power transformer (FIGURE 1).
3.Place the connection caps over the battery terminals on each battery. Place the batteries in the Power Transformer (FIGURE 2).
4.Place the battery cover over the batteries and secure with the Phillips head screw removed in Step 2 (FIGURE 1).
5.Proceed to the Operating Instructions.
FIGURE 1 |
FIGURE 2 |
||
|
|
|
|
|
|
|
|
Phillips |
Battery |
Power |
(2) 9-volt |
Battery |
Head Screw |
Cover |
Transformer |
Alkaline |
Cover |
|
|
|
Batteries |
|
Luxury-Lift® Power Recliner Transformer Specifications:
Input: AC120V 60Hz 5AT
Output: DC 9.6V 0.3A – DC 29.5V 1.7A
Luxury-Lift® Power Recliner
Operating Instructions
 DANGER – To reduce the risk of serious injury or death:
•Do not let children play on or near the chair when in use. Serious injury or death could occur if head or body parts are under the chair arms when the chair is moved from the full lift to the seated position.
•Plug directly into a wall outlet. Do not use an extension cord, adapter or surge protector.
 WARNING – To reduce the risk of serious injury:
•The 1HL/1ML lift chairs are intended for a single occupant, not exceeding 500 pounds. Do not operate the chair with more than one occupant in or on any part of the chair.
•The 1LF lift chairs are intended for a single occupant, not exceeding 300 pounds. Do not operate the chair with more than one occupant in or on any part of the chair.
•Sit down in the unit slowly. To avoid tip over, do not throw your weight against the back of the unit. Move the unit into or out of the reclining position slowly, making sure that no children or pets are in close proximity.
The automatic homing feature returns the lift chair to the seated position after the power is restored following a power interruption. This feature may cause the lift chair to move slightly when plugged in. Connect the Power Transformer connector to the connector at the base of the lift chair. Plug the power transformer directly into a wall outlet.
Luxury-Lift® Power Recliner Operation
Remove the hand wand from the outside arm pocket.
•To use the power assistance feature to sit in the chair, stand beside the chair and press the toggle lever toward the UP position on the hand wand. Release the toggle lever when the chair reaches a comfortable height to sit against, depending on your personal needs and preference. Step back into the chair and sit in the center of the seat while keeping your feet firmly on the floor. Press the toggle lever toward the DOWN position on the hand wand to lower the chair. Release the toggle lever when you reach the seated position.
•The legrest extension is separate from the back recline, allowing you to raise the legrest without reclining the back. To extend the legrest, press the toggle lever toward the DOWN position on the hand wand. Release the toggle lever when the legrest reaches a comfortable height.
•To recline the back, press the toggle lever toward the DOWN position on the hand wand. Release the toggle lever when you reach the desired recline position.
•To return the back to the upright position from the recline position, press the toggle lever toward the UP position on the hand wand. Release the toggle lever when the back is upright.
•To lower the legrest, press the toggle lever toward the UP position on the hand wand. Release the toggle lever when you reach the seated position.
•To use the power assistance feature to exit the chair, firmly position your feet to maintain balance and prevent sliding or falling. Press the toggle lever toward the UP position to raise the chair, to stop movement of the chair release the toggle lever. When the chair reaches a height that enables you to comfortably stand, release the toggle lever and carefully exit the chair.
12 |
(Operating Instructions Continued) |
13 |
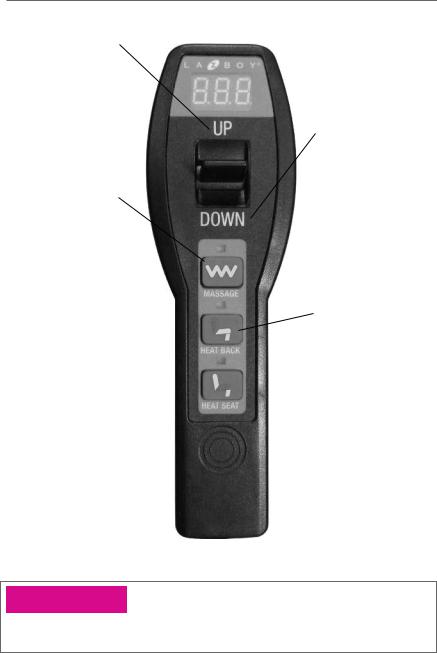
1ML Luxury-Lift® Power Recliner
Massage and Heat Operating Instructions
1ML Lift Chair Heat and Massage Functions and Automatic Timer Operation (1ML hand wand image shown on page 15.)
The heat and massage systems have an automatic timer that will shut off the HEAT and MASSAGE functions after approximately 15* minutes of operation.
•Pressing the MASSAGE button will start the massage.
•Press the MASSAGE button once for low speed, indicated by a green LED.
•Press the MASSAGE button twice for medium speed, indicated by an amber LED.
•Press the MASSAGE button three times for high speed, indicated by a red LED.
•Pressing the HEAT BACK will start the heat in the lumbar area.
•Press the HEAT BACK button once for low heat, indicated by a green LED.
•Press the HEAT BACK button twice for high heat, indicated by a red LED.
•Pressing the HEAT SEAT button will start the heat in the upper thigh area.
•Press the HEAT SEAT button once for low heat, indicated by a green LED.
•Press the HEAT SEAT button twice for high heat, indicated by a red LED.
•To turn off the heat and massage functions, press the heat and massage buttons that are activated. The function is off when the LED is off.
•The heat and massage cycles will temporarily stop when using the UP or DOWN function, but will resume when the UP or DOWN function is complete.
*The control unit features overheating protection. The massage and heat functions will run for up to two 15 minute cycles. After two continuous cycles, the massage and heat will shut down. The hand wand display will show HOT for 15 seconds if another heat or massage cycle is attempted prior to the cool down period. There is no danger of burns or fire.
Allowing the system to cool down for 7½ minutes will provide one 15 minute massage and heat cycle. Allowing the system to cool down for 15 minutes, will provide two 15 minute massage and heat cycles.
(Operating Instructions Continued)
1ML Luxury-Lift® Power Recliner
Massage and Heat Operating Instructions
Press and hold the toggle lever UP to raise the chair.
Press and hold the toggle lever UP to return to the seated position from the reclined position.
Press button once for low speed 6-motor massage (green LED).
Press button twice for medium speed 6-motor massage (amber LED).
Press button three times for high speed 6-motor massage (red LED).
Press button once to activate  low heat (green LED) in the
upper thigh area.
Press button twice to activate high heat (red LED) in the upper thigh area.
Press and hold the toggle lever DOWN to lower the chair to the seated position.
Press and hold the toggle lever DOWN to raise the legrest and recline the chair back.
Press button once to activate low heat (green LED) in the lumbar area.
Press button twice to activate high heat (red LED) in the lumbar area.
 WARNING – To reduce the risk of serious injury:
•Do not use unit if power control is damaged or wet. Do not use unit if the hand wand has been dropped in water or any liquid. Contact your La-Z-Boy® dealer for service.
14 |
|
15 |
|
|
|
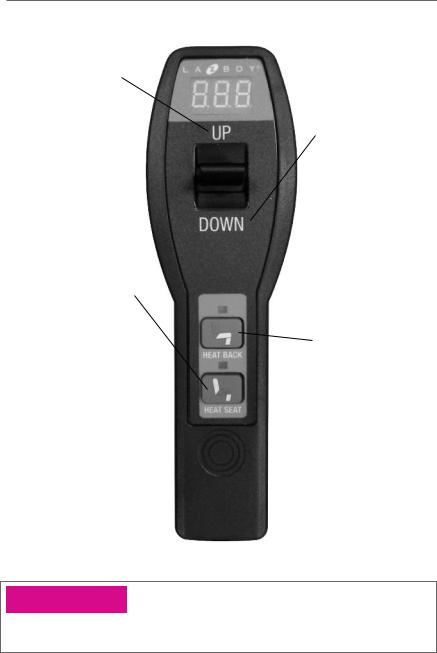
1HL Luxury-Lift® Power Recliner
Heat Operating Instructions
1HL Lift Chair Heat Functions and Automatic Timer Operation (1HL hand wand image is shown on page 17.)
The heat system has an automatic timer that will shut off the HEAT functions after approximately 15* minutes of operation.
•Pressing the HEAT BACK will start the heat in the lumbar area.
•Press the HEAT BACK button once for low heat, indicated by a green LED.
•Press the HEAT BACK button twice for high heat, indicated by a red LED.
•Pressing the HEAT SEAT button will start the heat in the upper thigh area.
•Press the HEAT SEAT button once for low heat, indicated by a green LED.
•Press the HEAT SEAT button twice for high heat, indicated by a red LED.
•To turn off the heat functions, press the heat buttons that are activated. The function is off when the LED is off.
•The heat cycle will temporarily stop when using the UP or DOWN function, but will resume when the UP or DOWN function is complete.
*The control unit features overheating protection. The heat functions will run for up to two 15 minute cycles. After two continuous cycles the heat will shut down. The hand wand display will show HOT for 15 seconds if another heat cycle is attempted prior to the cool down period. There is no danger of burns or fire.
Allowing the system to cool down for 7½ minutes will provide one 15 minute heat cycle. Allowing the system to cool down for 15 minutes, will provide two 15 minute heat cycles.
(Operating Instructions Continued)
1HL Luxury-Lift® Power Recliner
Heat Operating Instructions
Press and hold the toggle lever UP to raise the chair.
Press and hold the toggle lever UP to return to the seated position from the reclined position.
Press button once to activate low heat (green LED) in the upper thigh area.
Press button twice to activate high heat (red LED) in the upper thigh area.
Press and hold the toggle lever DOWN to lower the chair to the seated position.
Press and hold the toggle lever DOWN to raise the legrest and recline the chair back.
Press button once to activate low heat (green LED) in the lumbar area.
Press button twice to activate high heat (red LED) in the lumbar area.
 WARNING – To reduce the risk of serious injury:
•Do not use unit if power control is damaged or wet. Do not use unit if the hand wand has been dropped in water or any liquid. Contact your La-Z-Boy® dealer for service.
16 |
|
17 |
|
|
|

1LF Luxury-Lift® Power Recliner
Operating Instructions
1LF Lift Chair does not have heat or massage features.
Press and hold the toggle lever UP to raise the chair.
Press and hold the toggle lever UP to return to the seated position from the reclined position.
Press and hold the toggle lever DOWN to lower the chair to the seated position.
Press and hold the toggle lever DOWN to raise the legrest and recline the chair back.
 WARNING – To reduce the risk of serious injury:
•Do not use unit if power control is damaged or wet. Do not use unit if the hand wand has been dropped in water or any liquid. Contact your La-Z-Boy® dealer for service.
Luxury-Lift® Power Recliner
Troubleshooting
 WARNING – To reduce the risk of injury:
•Do not attempt to disassemble or service the pump or motor; no serviceable parts are inside. Contact your La-Z-Boy® dealer for service.
Troubleshooting for Luxury-Lift® Power Recliners
The lift chairs are equipped with built-in amperage overload protection. This feature prevents damage to the motors and electronics if there is an overload, by stopping the operation of the motors.
If the amperage overload protector trips and shuts down the motors:
1. Release the UP or DOWN toggle switch. The system should reset automatically.
If the amperage overload protector trips repeatedly, check the following:
1.Make sure the cable tie, used to secure the lift base during shipping, has been removed.
2.Make sure the operating capacity has not been exceeded and there is only one occupant in the chair.
3.Make sure there is nothing interfering with the movement of the chair.
If the lift recliner does not work, check the following:
1.Make sure the Power Transformer is plugged into an electrical outlet.
2.Make sure the electrical outlet is working. For example, make sure there are no blown fuses or tripped circuit breakers.
3.Make sure all the connectors are secure; refer to the Assembly Instructions.
4.Make sure the electrical cords are not crimped or pinched. Make sure the electric cord or plug is not damaged.
5.Make sure the operating capacity has not been exceeded and there is only one occupant in the chair; refer to the Operating Instructions.
If the amperage overload protection continues to trip, or if the lift recliner still does not operate properly, contact your dealer for instructions on returning the chair for examination and repair. Except for replacement of the Power Transformer, never attempt to make any repairs or adjustments yourself.
Power Transformer Replacement
If the Power Transformer must be replaced:
1.Unplug the Power Transformer from the electrical outlet.
2.Disconnect the power transformer from the connector behind the chair; refer to the Assembly Instructions.
3.Align the clips on the power transformer connector and the connector behind the chair, and push the connectors together until they lock; refer to the Assembly Instructions.
(Troubleshooting Continued)
18 |
|
19 |
|
|
|
Luxury-Lift® Power Recliner
Troubleshooting
DANGER – To reduce the risk of serious injury or death:
• Plug directly into a wall outlet. Do not use an extension cord, adapter or surge protector.
When the control unit detects an error, one of thirty-four (34) error codes is displayed on the hand wand to identify the cause. Most error codes must be evaluated and repaired by a La-Z-Boy® dealer. The following error codes can be evaluated by the consumer, however, adequate strength and mobility are required to check the connections under the chair. If you are unable to perform the solutions recommended below, contact your La-Z-Boy® dealer for service.
ERROR |
CAUSE |
SOLUTION |
|||
CODE |
|||||
|
|
|
|
||
HOT |
The control unit features |
The massage and heat functions will run for two |
|||
|
overheating protection. |
15 minute cycles. After two continuous cycles, |
|||
|
The overheating protection |
the massage and heat will shut down. |
|||
|
|
|
|
||
|
shuts down the massage |
Allowing the system to cool down for 7½ minutes |
|||
|
and heat system when the |
will provide one 15 minute massage and heat cycle. |
|||
|
cycle is complete. |
Allowing the system to cool down for 15 minutes |
|||
|
|
||||
|
There is no danger of |
will provide two 15 minute massage and heat cycles. |
|||
|
burns or fire due to |
The HOT code will be displayed for 15 seconds if |
|||
|
overheating. |
||||
|
another heat or massage cycle is attempted prior |
||||
|
|
||||
|
(Only applies to 1ML |
to the cool down period. If the HOT code is still |
|||
|
and 1HL styles.) |
displayed after 30 minutes, contact your |
|||
|
|
La-Z-Boy® dealer. |
|||
|
|
|
|
|
|
E36 |
The recline motor is not |
1. Unplug the transformer from the wall outlet, and |
|||
|
connected to the master |
disconnect from the connector behind the chair. |
|||
|
control module (MCM). |
2. Gently roll the chair forward to rest on the front |
|||
|
|
||||
|
|
arms. The black MCM unit is located under |
|||
|
|
the chair. |
|
|
|
|
|
|
|||
|
|
3. The recline motor |
|
|
|
|
|
connector is red. Plug |
|
|
|
|
|
the red connector into |
|
|
|
|
|
the port marked with |
|
|
|
|
|
a red dot on the MCM. |
step 3 |
|
|
|
|
4. Gently roll the chair back |
|
||
|
|
|
|
||
|
|
onto the base. Reconnect transformer into |
|||
|
|
the connector behind the chair, and plug the |
|||
|
|
transformer directly into a wall outlet. |
|||
|
|
|
|
|
|
Luxury-Lift® Power Recliner
Troubleshooting
ERROR |
CAUSE |
|
SOLUTION |
|
|
|
CODE |
|
|
|
|||
|
|
|
|
|
|
|
E37 |
The lift motor is not |
1. |
Unplug the transformer from the wall outlet, and |
|||
|
connected to the master |
|
disconnect from the connector behind the chair. |
|||
|
control module (MCM). |
2. |
Gently roll the chair forward to rest on the |
|||
|
|
|||||
|
|
|
front arms. The black MCM unit is located |
|||
|
|
|
under the chair. |
|
|
|
|
|
|
|
|
|
|
|
|
3. |
The lift motor connector |
|
|
|
|
|
|
is yellow. Plug the yellow |
|
|
|
|
|
|
connector into the port |
|
|
|
|
|
|
marked with a yellow dot |
|
|
|
|
|
|
on the MCM. |
|
|
|
|
|
4. |
Gently roll the chair back |
|
step 3 |
|
|
|
|
|
|
||
|
|
|
|
|
||
|
|
|
onto the base. Reconnect transformer into |
|||
|
|
|
the connector behind the chair, and plug |
|||
|
|
|
the transformer directly into a wall outlet. |
|||
|
|
|
|
|
|
|
E38 |
The legrest motor is not |
1. |
Unplug the transformer from the wall outlet, and |
|||
|
connected to the master |
|
disconnect from the connector behind the chair. |
|||
|
control module (MCM). |
2. |
Gently roll the chair forward to rest on the front |
|||
|
|
|||||
|
|
|
arms. The black MCM unit is located under |
|||
|
|
|
the chair. |
|
|
|
|
|
|
|
|
|
|
|
|
3. |
The legrest motor |
|
|
|
|
|
|
connector is blue. Plug |
|
|
|
|
|
|
the blue connector into |
|
|
|
|
|
|
the port marked with a |
|
|
|
|
|
|
blue dot on the MCM. |
|
step 3 |
|
|
|
4. |
Gently roll the chair back |
|
|
|
|
|
|
|
|
||
|
|
|
|
|
||
|
|
|
onto the base. Reconnect transformer into |
|||
|
|
|
the connector behind the chair,and plug |
|||
|
|
|
the transformer directly into a wall outlet. |
|||
|
|
|
|
|
|
|
(Troubleshooting Continued)
20 |
|
21 |
|
|
|

Luxury-Lift® Power Recliner
Troubleshooting
ERROR |
CAUSE |
|
SOLUTION |
|
|
|
CODE |
|
|
|
|||
|
|
|
|
|
|
|
E39 |
The seat massage unit |
1. |
Unplug the transformer from the wall outlet, and |
|||
|
is not connected under |
|
disconnect from the connector behind the chair. |
|||
|
the seat. |
2. |
Gently roll the chair forward to rest on the front |
|||
|
|
|||||
|
(Only applies to 1ML styles.) |
|
arms. The seat massage and heat connectors are |
|||
|
|
|
attached to the bottom of the seat springs, under |
|||
|
|
|
the chair. |
|
|
|
|
|
|
|
step 3 |
|
|
|
|
3. |
The seat massage |
|
|
|
|
|
|
|
|
||
|
|
|
connectors are brown. |
|
|
|
|
|
|
Push the brown |
|
|
|
|
|
|
connectors together |
|
|
|
|
|
|
until they lock. |
|
|
|
|
|
4. |
Gently roll the chair back |
|
|
|
|
|
|
|
|
||
|
|
|
onto the base. Reconnect transformer into |
|||
|
|
|
the connector behind the chair, and plug |
|||
|
|
|
the transformer directly into a wall outlet. |
|||
|
|
|
|
|
|
|
E40 |
The back massage unit is |
1. |
Unplug the transformer from the wall outlet, and |
|||
|
not connected inside the |
|
disconnect from the connector behind the chair. |
|||
|
lower back. |
2. |
Gently roll the chair forward to rest on the front |
|||
|
|
|||||
|
(Only applies to |
|
arms. Push the outside back down, toward the |
|||
|
1ML styles.) |
|
floor, to move the inner body from the outer |
|||
|
|
|
body. Lift the lower outside back cover to |
|||
|
|
|
separate the fastening tape, and access the |
|||
|
|
|
back springs. The back massage and heat |
|||
|
|
|
connectors are attached to the back springs. |
|||
|
|
3. |
The back massage |
|
|
|
|
|
|
|
|
||
|
|
|
connectors are green. |
|
|
|
|
|
|
Push the green connectors |
|
|
|
|
|
|
together until they lock. |
|
|
|
|
|
4. |
Press the fastening tape |
|
|
|
|
|
|
together to attach the |
|
step 3 |
|
|
|
|
lower outside back cover |
|
|
|
|
|
|
|
|
|
|
|
|
|
to the inner body. Lift the back and push the |
|||
|
|
|
inner body into the outer body. |
|
|
|
|
|
5. |
Gently roll the chair back onto the base. |
|||
|
|
|
Reconnect transformer into the connector |
|||
|
|
|
behind the chair, and plug the transformer |
|||
|
|
|
directly into a wall outlet. |
|
|
|
|
|
|
|
|
|
|
Luxury-Lift® Power Recliner
Troubleshooting
ERROR |
CAUSE |
|
SOLUTION |
||
CODE |
|
||||
|
|
|
|
|
|
E41 |
The seat heating pad |
1. |
Unplug the transformer from the wall outlet, and |
||
|
is not connected under |
|
disconnect from the connector behind the chair. |
||
|
the seat. |
2. |
Gently roll the chair forward to rest on the front |
||
|
|
||||
|
(Only applies to 1ML |
|
arms. The seat massage and heat connectors are |
||
|
and 1HL styles.) |
|
attached to the bottom of the seat springs, |
||
|
|
|
under the chair. |
|
|
|
|
|
step 3 |
||
|
|
3. |
The seat heating pad |
|
|
|
|
|
|
||
|
|
|
connectors are black |
|
|
|
|
|
and red. Push the black |
|
|
|
|
|
and red connectors |
|
|
|
|
|
together until they lock. |
|
|
|
|
4. |
Gently roll the chair back |
|
|
|
|
|
|||
|
|
|
onto the base. Reconnect transformer behind the |
||
|
|
|
chair, and plug the transformer directly into a |
||
|
|
|
wall outlet. |
||
|
|
|
|
|
|
E42 |
The back heating pad |
1. |
Unplug the transformer from the wall outlet, and |
||
|
is not connected inside |
|
disconnect from the connector behind the chair. |
||
|
the lower back. |
2. |
Gently roll the chair forward to rest on the front |
||
|
|
||||
|
(Only applies to 1ML |
|
arms. Push the outside back down, toward the |
||
|
and 1HL styles.) |
|
floor, to move the inner body from the outer body. |
||
|
|
|
Lift the lower outside back cover to separate the |
||
|
|
|
fastening tape, and access the back springs. The |
||
|
|
|
back massage and heat connectors are attached |
||
|
|
|
to the back springs. |
|
|
|
|
|
|
||
|
|
3. |
The back heating pad |
|
|
|
|
|
connectors are black |
|
|
|
|
|
and red. Push the black |
|
|
|
|
|
and red connectors |
|
|
|
|
|
together until they lock. |
step 3 |
|
|
|
4. |
Press the fastening tape |
|
|
|
|
|
|
||
|
|
|
|||
|
|
|
together to attach the lower outside back cover |
||
|
|
|
to the inner body. Lift the back and push the |
||
|
|
|
inner body into the outer body. |
||
|
|
5. |
Gently roll the chair back onto the base. |
||
|
|
|
Reconnect transformer into the connector |
||
|
|
|
behind the chair, and plug the transformer |
||
|
|
|
directly into a wall outlet. |
||
|
|
|
|
|
|
(Troubleshooting Continued)
22 |
|
23 |
|
|
|
 Loading...