

Page 1

operating instructions
instrucciones de operación
__________
__________
instructions
Reclining Sofa
sofas & modulars
________
sofás y unidades modulares
________
la-z-boy.com
La-Z-Boy Incorporated
12 84 N. Telegraph Road
Monroe, MI 4816 2
©2013 La-Z-Boy Incorporated
canapés et modulaires
93000495-00 Rev. 08/2013
Page 2

Congratulations!
Table of Contents
You are now the proud owner of
state-of-the-art furniture by La-Z-Boy
You have just selected one of the
finest quality upholstered products
produced in the furniture industry,
backed by over 80 years of
quality manufacturing experience.
La-Z-Boy is proud of our
designs and craftsmanship and
knows you will feel the same as
Important Safety Instructions.....................................4-5
®
.
Reclina-Way
®
Motion Sofa Glide
Adjustment Instructions................................................6
Reclina-Way
®
Motion Sofa 3-Position Legrest
Operating Instructions..................................................7
Reclina-Way
®
Motion Sofa Reclining
Tension Adjustment Instructions.................................8-9
La-Z-Time
Motion-Modulars
La-Z-Time
®
Motion Upholstery and La-Z-Time
®
Assembly Instructions...................1 0- 1 3
®
Motion Upholstery & La-Z-Time Motion-Modulars
®
Legrest Tension Adjustment Instructions.....................14-15
La-Z-Time
®
Motion Upholstery & La-Z-Time Motion-Modulars
®
Reclining Tension Adjustment Instructions...................16-17
Sleep Sofa Operating Instructions ...............................18
you enjoy your new furniture’s
Furniture Placement Guide ..........................................19
Cup Holder Cleaning Instructions................................20
comfort and style.
Notes........................................................................21
IMPORTANT
Read these instructions thoroughly
before using your La-Z-Boy
Keep them for future reference.
2
®
furniture.
3
Page 3

Important Safety Instructions:
Important: Read these instructions thoroughly before using.
Important Safety Instructions:
Important: Read these instructions thoroughly before using.
DANGER
• To prevent suffocation keep plastic bags away from children.
• Do not sit or lie on mattress of sleep sofa except when it is fully extended. Never close unit with
person or animal inside.
WARNING
• Always keep open flame and lit cigarettes away from upholstered furniture. Upholstered furniture may
burn rapidly with toxic gas and thick smoke.
• Closely supervise children and disabled persons using this product.
• Sit down in the unit slowly. To avoid tip over, do not throw your weight against the back of the unit.
Move the unit into or out of the reclining position slowly, making sure that no children or pets are
in close proximity.
• This product has many moving parts, serious injury can occur if not used properly. Keep hands, fingers
and body parts away from the mechanism. To reduce the risk of head entrapment and other injuries,
keep children and pets away from openings and moving parts in and around furniture.
• Only the occupant should operate the unit. Never attempt to open the legrest by pulling on it.
• Do not stand, sit, or place extra weight on the arms, back or open legrest.
• To safely exit the unit and prevent a tripping hazard, bring the back upright and close the legrest.
• Do not use this product if it is damaged. Do not use attachments or substitute parts.
• This product is intended for indoor residential use only.
• Provide a clear path for operation of the back and legrest. Place tables and area rugs at a distance to
allow the legrest to fully extend without rubbing or interference.
• This product is not intended for use as a health care device.
• Do not operate the unit until the back is installed and locked.
• Use care when moving the product. Before lifting the product, secure the mechanism to prevent
unexpected opening or movement. Never move the product by the mechanism, legrest, handle, reclining
back, or swivel base. Disconnect modular units. Securely grip non-moving parts only.
• Do not sit or place extra weight on the head area of the sleep sofa mattress. Excess weight can cause
the sleep surface to tip up and back.
• This unit is equipped with a tension adjustment feature for the reclining mechanism that is preset at
the factory. The tension setting can be changed for your personal preference. To avoid tip over and
insure stability, do not operate the unit with the tension adjustment wing nuts completely loosened
(See Reclining Tension Adjustment Instructions).
– To reduce the risk of serious injury or death:
– To reduce the risk of burns, fire or serious injury:
• Keep hands, arms and body parts away from the open area between a reclined back and an upright
back on a motion sofa or modular. This area must remain clear at all times to provide unobstructed
movement and prevent injury that could occur when a reclined back is returning toward
the upright position.
• Use of this product requires adequate strength to bring the back upright and close the legrest.
Selecting the maximum tension settings could make bringing the back upright and closing the
legrest difficult.
• Do not use La-Z-Boy
is in motion. This furniture is not intended to protect its occupant in an accident. Safely secure the
furniture while the vehicle is in motion to prevent injury or damages from any sudden stop.
• Do not place containers with hot beverages in the cup holders. The furniture has motion and
beverages may spill and injure the occupant. Do not place oversized or uncovered beverage
containers in the cup holders.
• If you give this product to someone else, include this Operating Instructions manual.
NOTICE
• Damage will occur to the mechanism if the legrest is forced closed from the 1st or 2nd
position. The legrest must be extended to the 3rd position and then closed.
• Do not move the units while connected together. The purpose of the bracket system is to
connect the units and prevent them from being separated while on the floor. The bracket
system does not provide adequate structural support for the movement of connected units.
• Some units contain cup holders. Take care to prevent spilling of beverages, which could result
in damage to cover.
®
furniture in a recreational vehicle (or other moving vehicle) while the vehicle
– To reduce the risk of product damage:
Save These Instructions
4
Save These Instructions
5
Page 4

Reclina-Way®Motion Sofa
Glide Adjustment Instructions
Reclina-Way®Motion Sofa
3-Position Legrest Operating Instructions
WARNING
• Provide a clear path for operation of the back and legrest. Place tables and area rugs
at a distance to allow the legrest to fully extend without rubbing or interference.
Adjusting the Glides
Make sure the glides are adjusted to a height that provides a clear path for operation of the legrest.
Each glide is attached to the base rail by one jam nut and one lock washer on top of the base rail,
and one jam nut on the bottom of the base rail.
1. To extend the glide, loosen the upper jam nut by rotating clockwise. Turn the lower
jam nut clockwise to the desired height.
2. Tighten the upper jam nut by rotating counterclockwise.
3. Repeat steps one and two for each adjustable glide on the unit, if needed.
4. Repeat this procedure, as necessary, to level the sofa.
– To reduce the risk of serious injury:
Upper Jam Nut
WARNING
• Provide a clear path for operation of the back and legrest. Place tables and area rugs
at a distance to allow the legrest to fully extend without rubbing or interference.
• To safely exit the unit and prevent a tripping hazard, bring the back upright
and close the legrest.
-- To reduce the risk of serious injury:
NOTICE – To prevent product damage:
• Damage will occur to the mechanism if the legrest is forced closed from the 1st or
2nd position. The legrest must be extended to the 3rd position and then closed.
To Operate the Legrest
®
1. Your Reclina-Way
seating comfort. Simply pull on the handle rotating it counterclockwise to control the legrest
(F
IGU RE 1). You may stop in any one of three ideal positions. The 1st position is slightly inclined
for relaxing reading (F
television viewing (F
To lower the legrest, rotate the handle counterclockwise to the fully extended position, then
rotate clockwise to the fully closed position.
2. The sofa back can be reclined with the legrest closed or extended. To recline, apply pressure
to the back. Sit upright to return the back to an upright position.
3. Bring the back upright and close the legrest before getting out of the unit.
FIGURE 1
CLOSED
POSITION
motion sofa is equipped with a three-position locking legrest for customized
IGU RE 2). The 2nd position is slightly more inclined for comfortable
IGU RE 3). The 3rd position is fully extended for complete relaxation (FI GURE 4).
IGURE 2
F
1ST POSITION
Lower Jam Nut
Adjustable Glide
Lock
Washer
Base Rail
6
F
IGURE 3
2ND POSITION 3RD POSITION
IGURE 4
F
7
Page 5
Reclina-Way®Motion Sofa
Reclining Tension Adjustment Instructions
Reclina-Way®Motion Sofa
Reclining Tension Adjustment Instructions
WARNING
• This unit is equipped with a tension adjustment feature for the reclining mechanism
that is preset at the factory. The tension setting can be changed for your personal
preference. To avoid tipover and insure stability, do not operate the unit with the tension
adjustment wing nuts completely loosened (see Reclining Tension Adjustment Instructions).
– To reduce the risk of injury:
NOTICE – To reduce the risk of product damage:
• Make sure the legrest on each unit is closed before tilting forward and
adjusting the tension.
• Do not completely tighten the wing nuts. The tension springs should not be completely
compressed after making adjustments. If this occurs, the wing nuts must be loosened
a minimum of ½-turn to avoid damage to the spring tension assembly.
• Do not completely loosen the wing nuts. The spring should not slide on the bolt after
making adjustments. If the spring slides on the bolt, tighten the wing nut a minimum
of ½-turn after the spring no longer slides on the bolt.
• Adjust both wing nuts equally.
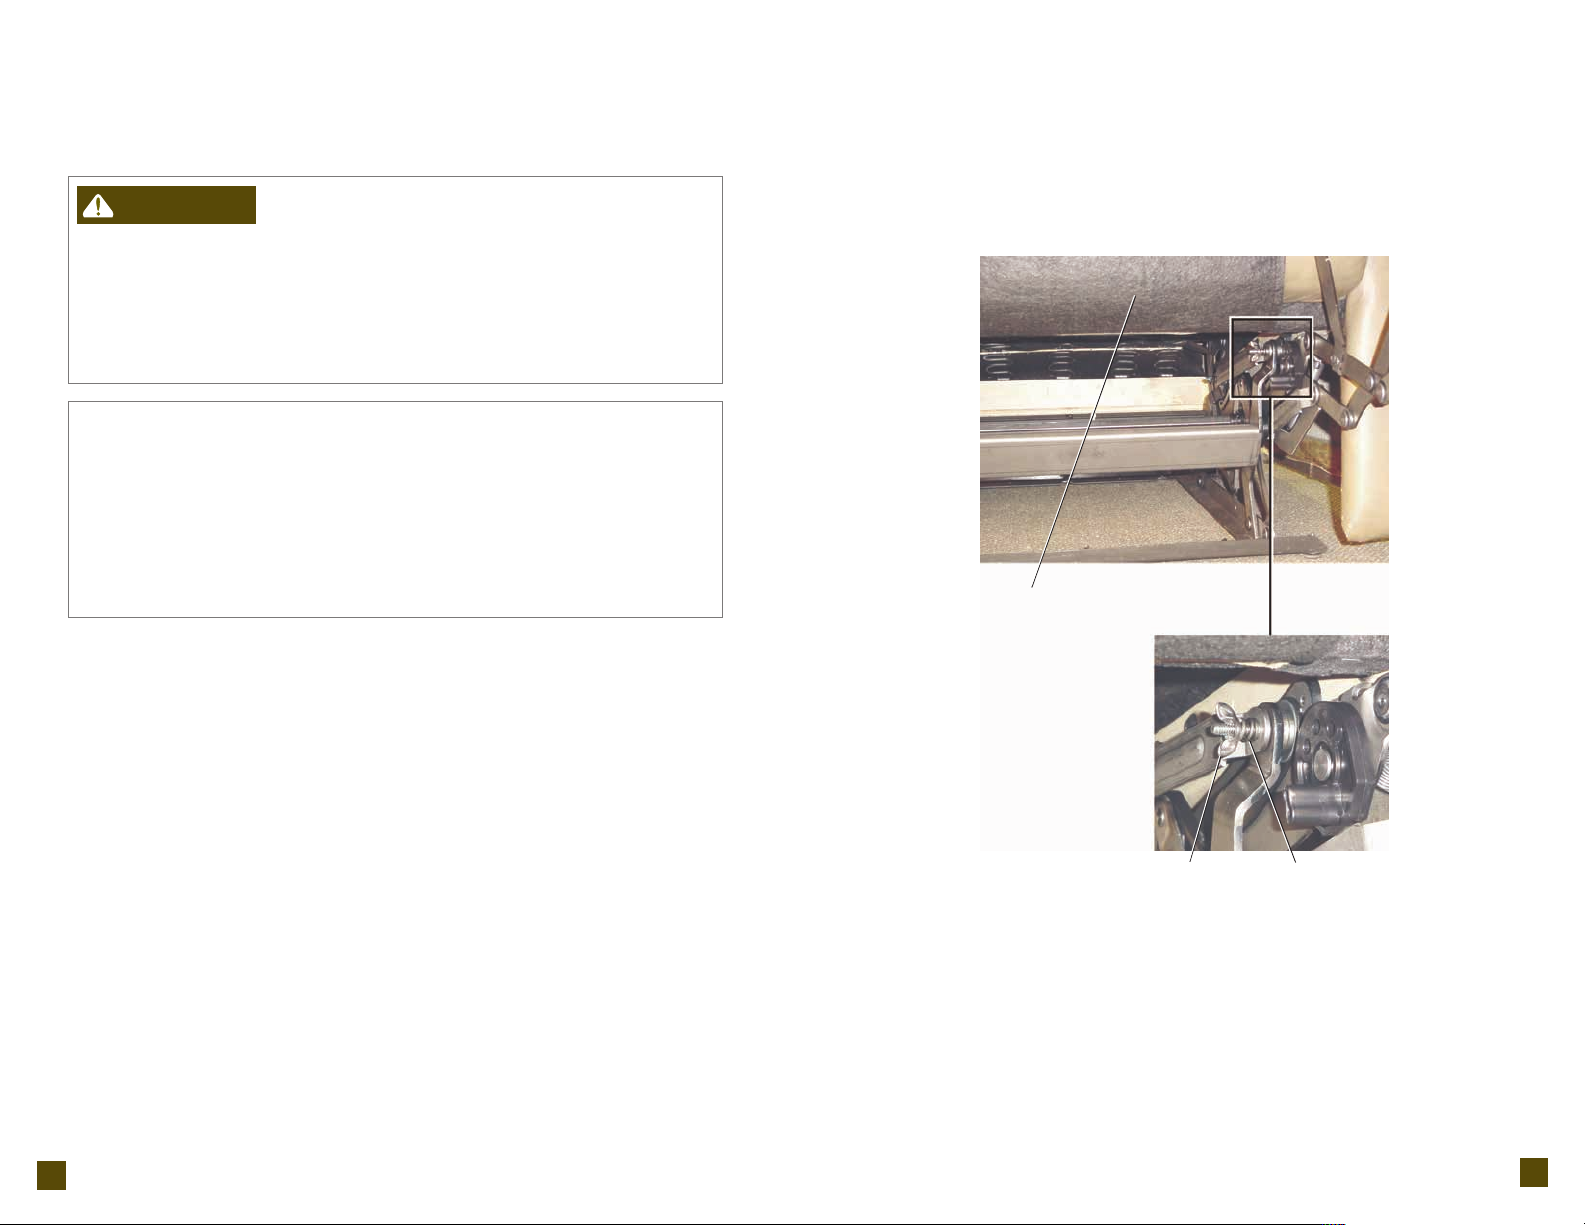
Adjustment Instructions
You can adjust the tension of the reclining mechanism to respond to your individual size.
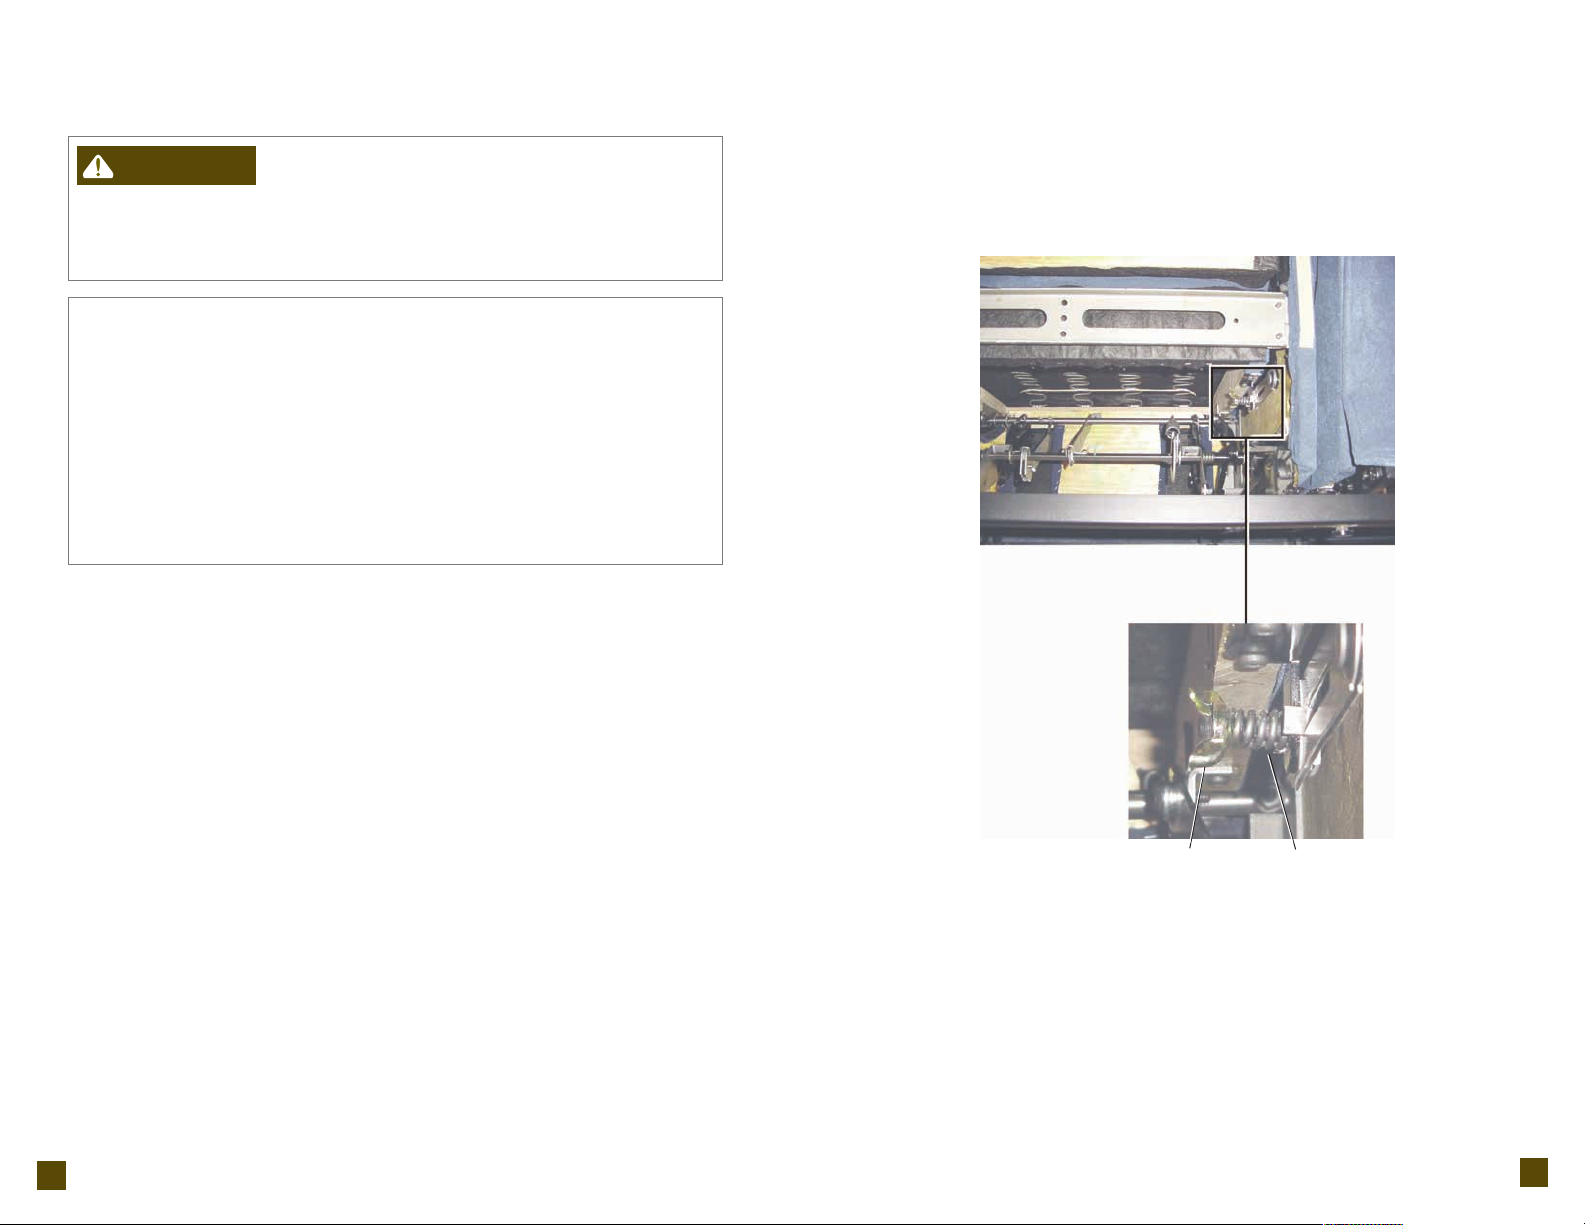
1. Gently tilt the reclining sofa forward to rest on its arms and top of the back. Locate the wing nuts,
one on each side, toward the back of the recliner under each reclining seat (F
1
2. Adjust the tension by turning the wing nuts in
• A taller or heavier person may choose to increase the reclining tension by tightening
the wing nuts clockwise.
• A smaller person may choose to decrease the reclining tension by loosening the wing
nuts counterclockwise.
3. Return the reclining sofa to the upright position. Test the new setting. Make additional adjustments
if needed, repeating these steps.
⁄4-turn increments until the desired setting is reached.
IGU RE 1).
FIGURE 1
Wing
Nut
Tension
Spring
8
9
Page 6
La-Z-Time®Motion Upholstery and La-Z-Time
Motion-Modulars
®
Assembly Instructions
®
La-Z-Time
Motion Upholstery and La-Z-Time
Motion-Modulars
®
Assembly Instructions
WARNING
• Do not operate the unit until the back is installed and locked.
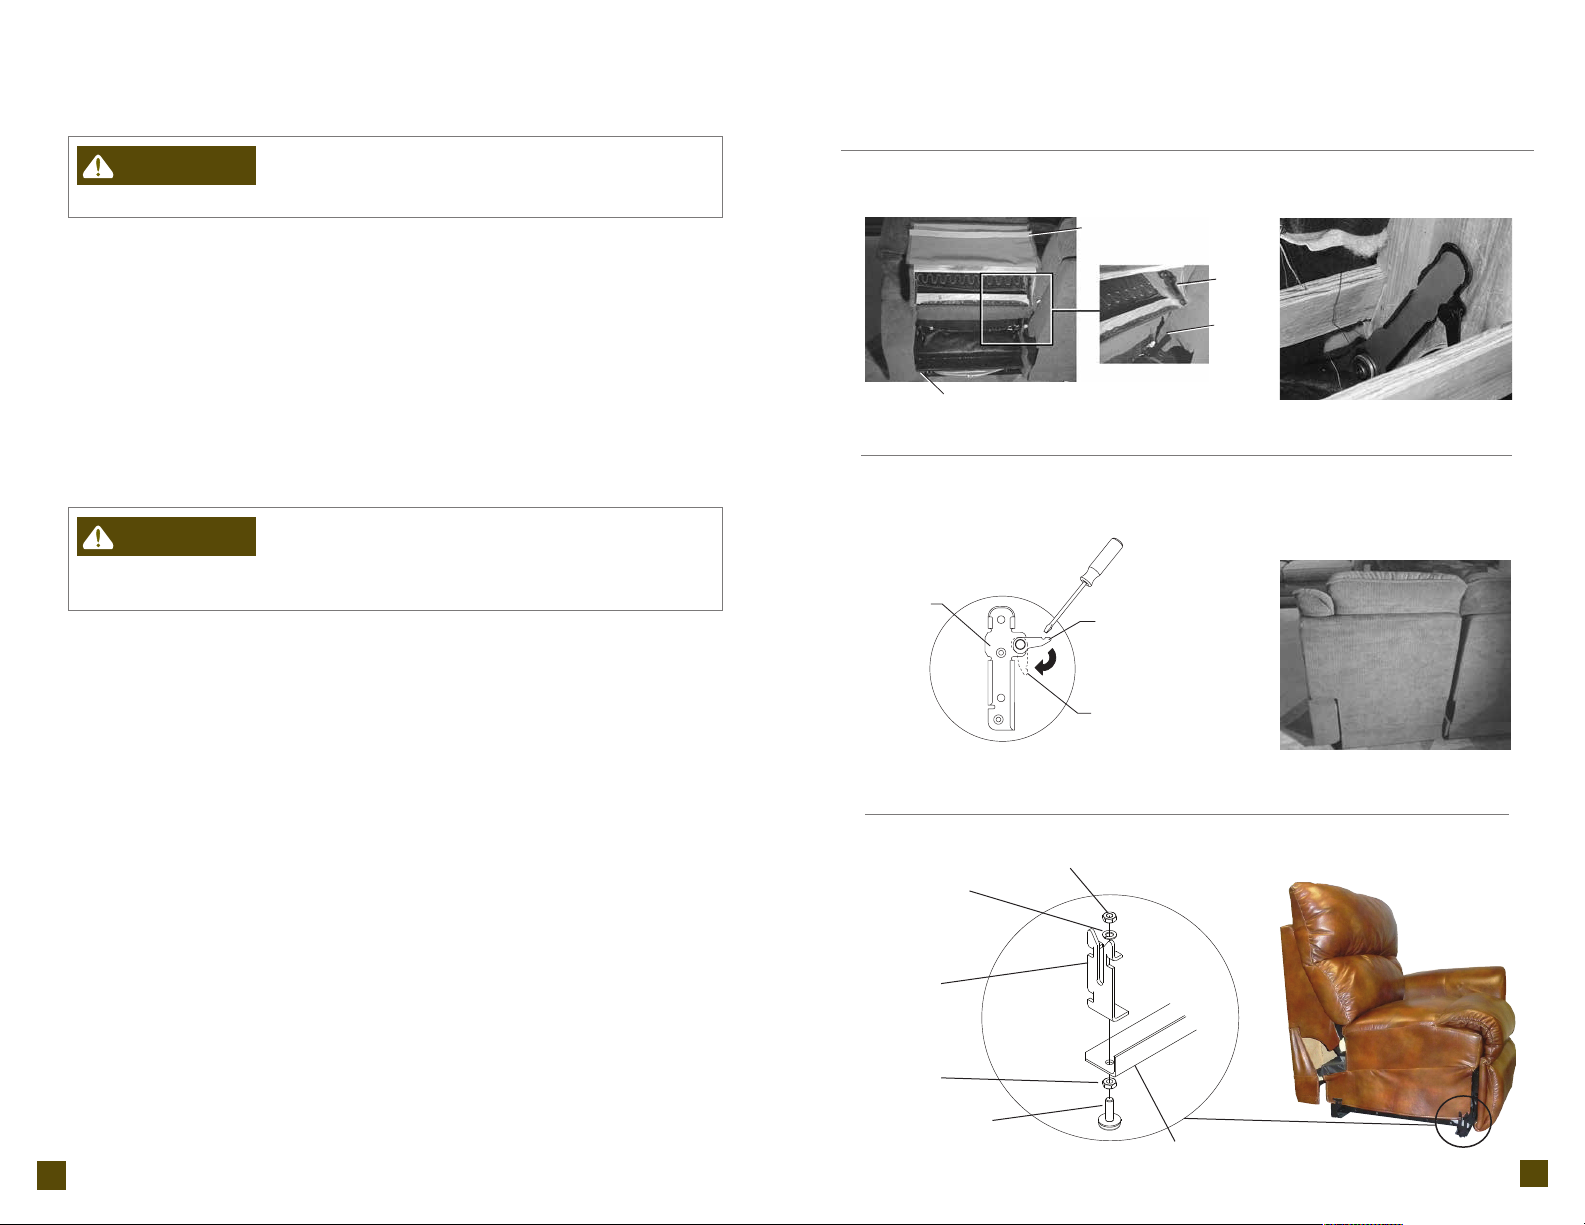
1. Install the backs, if applicable (some styles come with the backs installed).
• Lay the back on the seat. Lift the back at a slight angle and align the brackets inside the back
with the brackets on the body (F
• Lower the back onto the body, making sure the back and body brackets are completely engaged.
• To make sure the back is properly installed, lift the back upholstery cover to visually confirm
that both sets of back and body brackets are engaged (F
• If you are unable to install the back properly contact your La-Z-Boy
• Lock the brackets by using a screwdriver to push down the locking levers (F
• Pull the outside back upholstery cover down tight. Firmly press the fastening tape on the outside
back upholstery cover to the fastening tape on the bottom of the rear rail (F
WARNING
• Provide a clear path for operation of the back and legrest. Place tables and area rugs at
a distance to allow the legrest to fully extend without rubbing or interference.
2. Place units in the desired location.
3. Adjustable glides are provided on units with metal base rails. Make sure the glides are adjusted
to a height that provides a clear path for operation of the legrest (see Furniture Placement Guide).
• Each glide is attached to the base rail by one jam nut and one lock washer on top of the front
attachment bracket or base rail, and one jam nut on the bottom of the base rail (F
Motion-Modular unit featured). Loosen the jam nut located on top of the front attachment
bracket or base rail.
• Holding the top jam nut, turn the glide clockwise to lower the unit or counterclockwise to raise the unit.
• Tighten the bottom jam nut to the base rail, then tighten the top jam nut to the lock washer on top of
the front attachment bracket. Make sure both jam nuts are tight to prevent the bracket from rotating
on the base rail.
• Repeat this step for each adjustable glide, if necessary.
4. Motion sofa or chair assembly is complete. If assembling modular units, proceed to the following page.
– To reduce the risk of injury:
IGU RE 1).
IGU RE 2).
®
– To reduce the risk of serious injury:
dealer for assistance.
IGU RE 3).
IGU RE 1 and FIG URE 4).
IGURE 5,
FIGURE 1
IGURE 3
F
Back
Bracket
IGURE 5
F
Lock Washer
Fastening Tape
Upper Jam Nut
Fastening Tape
Locking
Lever
Locked
Position
Back
Bracket
Body
Bracket
F
IGURE 2
F
IGURE 4
Bracket
Attachment
Lower
Jam Nut
Adjustable
Glide
10
Base Rail
11
Page 7
1"
1"
La-Z-Time®Motion Upholstery and La-Z-Time
Motion-Modulars
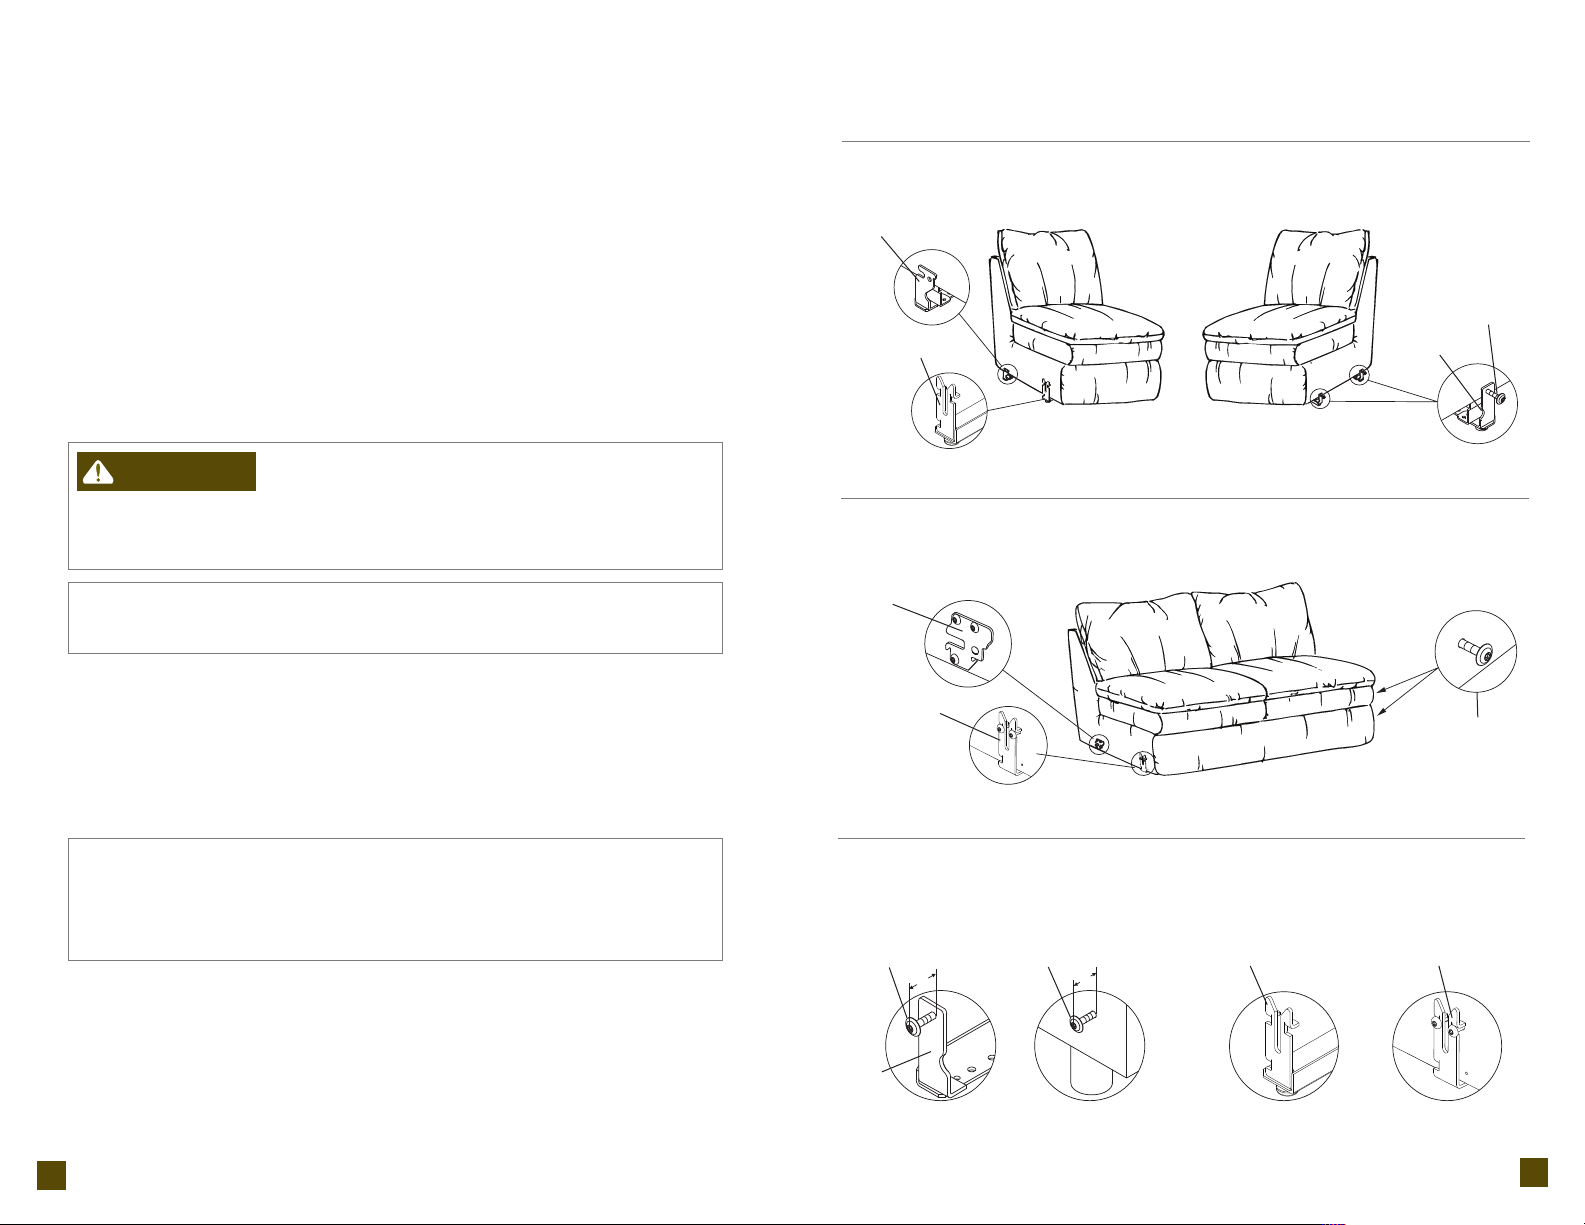
Motion-Modular units with metal base rails have one bracket in the back and one “U” bracket in the
front on the right side (sitting) of modular units without right side arms, and two stud mounts with
threaded studs on the left side (sitting) of modular units without left side arms (F
Motion-Modular units with wood legs have one side mount bracket in the back and one “U” bracket
in the front on the right side (sitting) of modular units without right side arms, and two threaded
studs on the left side (sitting) of modular units without left side arms (FIGURE 2).
5. Use a T-30 torx driver to loosen the threaded studs to approximately 1”; this measurement may
vary depending on the fabric and style (F
(sitting) of modular units without left side arms.
6. To start, place the units to be attached next to each other, about 2" apart. Position the unit with
the threaded studs slightly behind the unit with the attachment brackets. Separate the fronts of
the units to be connected, about 6" apart. Slide the rear of the unit with the threaded studs toward
the unit with the attachment brackets, aligning the threaded studs to the rear bracket. Pull the unit
with the threaded studs forward to engage the rear bracket.
®
Assembly Instructions
IGU RE 1).
IGU RE 3). The threaded studs are located on the left side
La-Z-Time®Motion Upholstery and La-Z-Time
Motion-Modulars
FIGURE 1
Rear Rail
Bracket
Front Rail
“U” Bracket
®
Assembly Instructions
Stud
Mount
Threaded
Stud
WARNING
• The front of the unit must be raised to engage the front bracket. Please seek assistance
if you are unable to lift at least 57 pounds.
• Keep feet clear of the unit when lowering into position.
– To reduce the risk of serious injury:
NOTICE – To reduce the risk of product damage:
• Lift from the base rail. Do not lift from the upholstery or the bottom of the legrest.
7. Lift the front of the unit with the threaded stud approximately 3” off the ground, aligning it
to the unit with the attachment bracket. Gently lower the threaded stud into the front attachment
bracket (F
NOTE: Due to variations in upholstery and style, the threaded stud length may need to be adjusted to
fit into the attachment brackets or control gaps between units. Loosen or tighten the threaded studs
to provide adequate clearance.
8. Continue connecting the modular units until all have been securely joined.
IGU RE 4). Keep feet clear of the unit when lowering into position.
NOTICE – To reduce the risk of product damage:
• Do not move the units while connected together. The purpose of the bracket system is
to connect the units and prevent them from being separated while on the floor. The bracket
system does not provide adequate structural support for the movement of connected units.
9. All modular units must be disconnected to safely move the modular group. To disconnect the units,
lift up the left side (sitting) modular unit (with threaded studs) approximately 3” to clear the front
attachment bracket, move the front of the unit over and return it to the floor. Slide the unit with
the threaded studs backward to disengage the rear bracket.
IGURE 2
F
Rear
Side
Mount
Bracket
Front Side
Mount “U”
Bracket
F
IGURE 3
Threaded
Stud
Stud
Mount
Base Units
Threaded
Stud
Leg Units
IGURE 4
F
Front Rail “U”
Bracket
Base Units
Threaded
Stud
Front Side Mount
“U” Bracket
Leg Units
12
13
Page 8
La-Z-Time®Motion Upholstery &
La-Z-Time Motion-Modulars
®
Tension Adjustment Instructions
Legrest
La-Z-Time®Motion Upholstery &
La-Z-Time Motion-Modulars
®
Tension Adjustment Instructions
Legrest
WARNING
• Use of this product requires adequate strength to bring the back upright and close the
legrest. Selecting the maximum tension settings could make bringing the back upright
and closing the legrest difficult.
Legrest Tension Adjustment Instructions
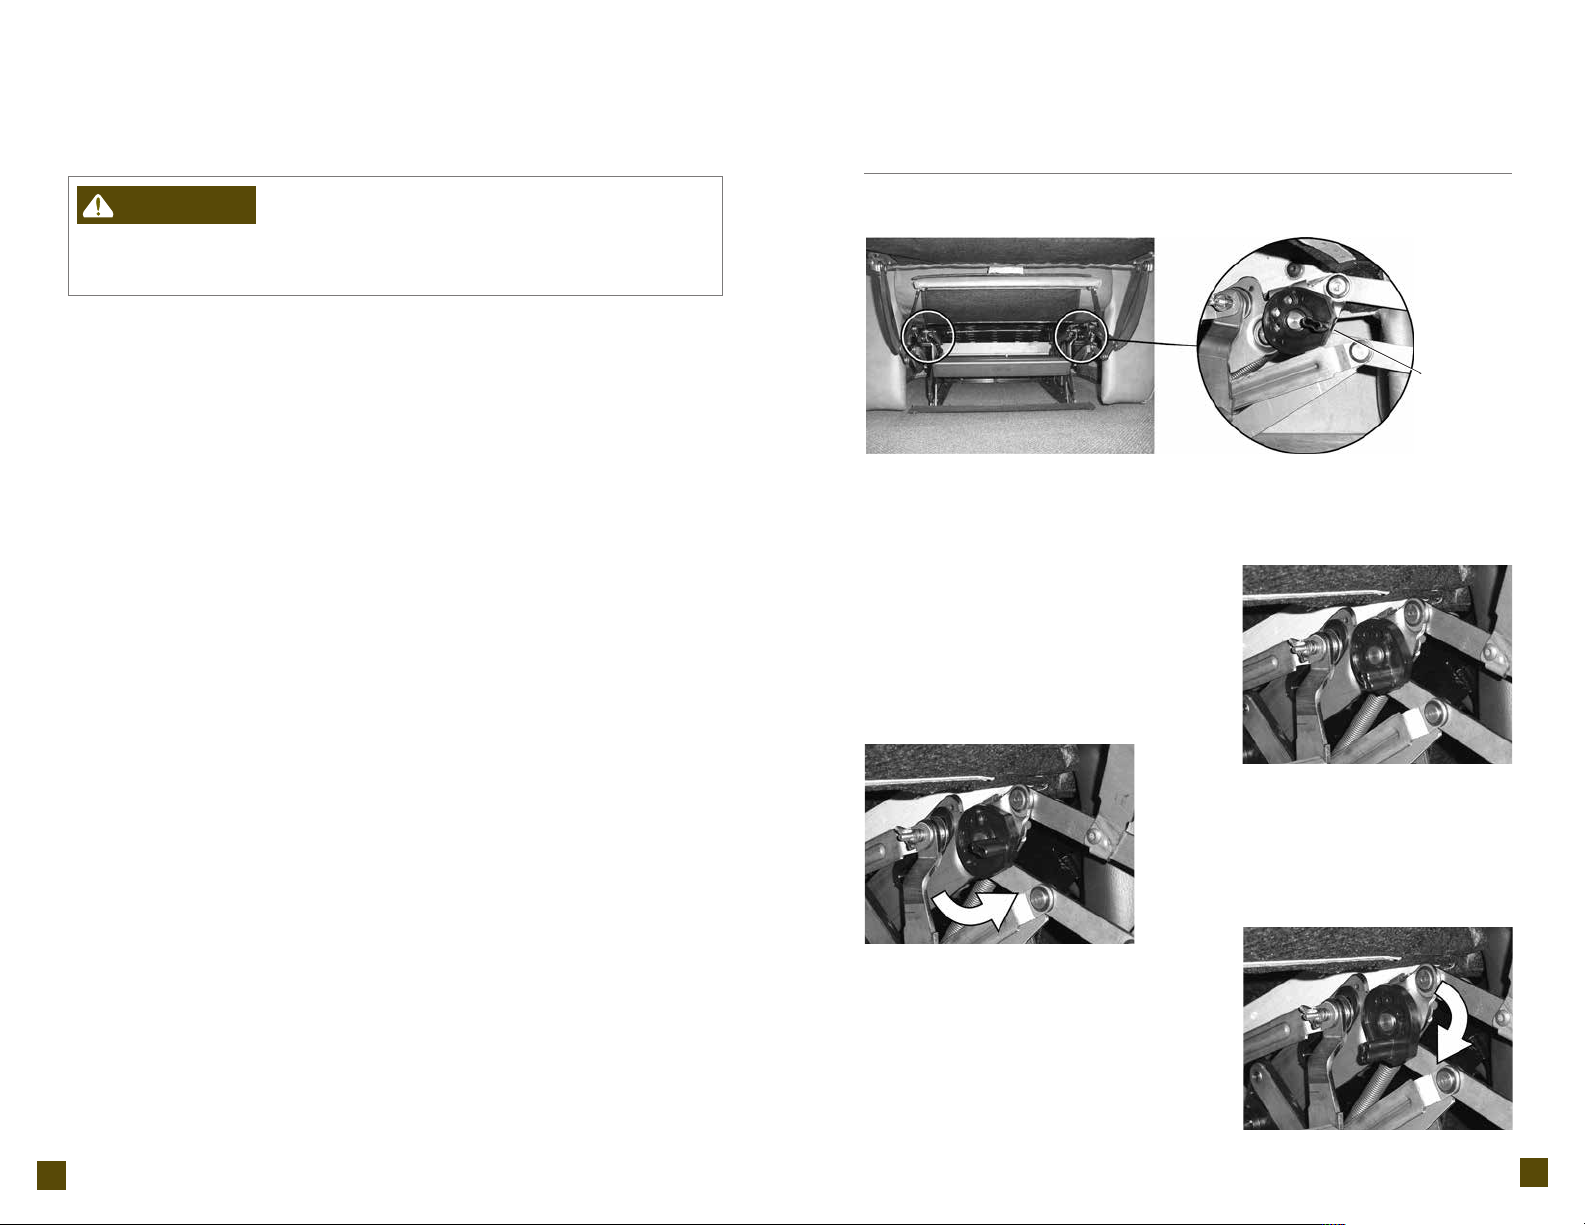
1. Stand beside the unoccupied unit and pull the release handle to extend the legrest. Make sure not
to lean or put pressure on the extended legrest, as it will close. From under the legrest, lift the
mechanism cover to access the tension adjustment wheels. The wheels are located toward the front
of the mechanism, one on each side (F
2. The legrest tension adjustment wheels are factory set in the center position (F
position provides average legrest tension and support.
3. A taller or heavier person may choose to increase the amount of legrest tension for added leg
support. To increase the amount of legrest tension, turn the adustment wheels up and toward the
front of the recliner (F
4. A smaller person may choose to decrease the amount of legrest tension for easier closing of the
legrest. To decrease the amount of legrest tension, turn the adustment wheels down and toward the
back of the recliner (FIGURE 4). Both legrest tension adjustment wheels must be set in the same position.
5. Close the legrest. Test the new legrest tension setting and make adjustments if needed.
6. Repeat these instructions to customize each reclining seat in your motion sofa or modular group.
– To reduce the risk of injury:
IGU RE 1). Each wheel has three adjustment settings.
IGU RE 2). The center
IGURE 3). Both legrest tension adjustment wheels must be set in the same position.
FIGURE 1
Legrest
Tension
Adjustment
Wheel
Adjustment wheel location, one on each side
FIGURE 2
FIGURE 3
Average legrest tension
FIGURE 4
Maximum legrest tension
Minimum legrest tension
14
15
Page 9
La-Z-Time®Motion Upholstery &
La-Z-Time Motion-Modulars
®
Tension Adjustment Instructions
Reclining
La-Z-Time®Motion Upholstery &
La-Z-Time Motion-Modulars
®
Tension Adjustment Instructions
Reclining
WARNING
• This unit is equipped with a tension adjustment feature for the reclining mechanism
that is preset at the factory. The tension setting can be changed for your personal
preference. To avoid tipover and insure stability, do not operate the unit with the tension
adjustment wing nuts completely loosened (see Reclining Tension Adjustment Instructions).
• Use of this product requires adequate strength to bring the back upright and close
the legrest. Selecting the maximum tension settings could make bringing the back
upright and closing the legrest difficult.
– To reduce the risk of injury:
NOTICE – To reduce the risk of product damage:
• Do not completely tighten the wing nuts. The tension springs should not be completely
compressed after making adjustments. If this occurs, the wing nuts must be loosened
a minimum of ½-turn to avoid damage to the spring tension assembly.
• Do not completely loosen the wing nuts. The spring should not slide on the bolt after
making adjustments. If the spring slides on the bolt, tighten the wing nut a minimum
of ½-turn after the spring no longer slides on the bolt.
• Adjust both wing nuts equally.
Reclining Tension Adjustment Instructions
1. Stand beside the unoccupied unit and pull the release handle to extend the legrest. Make sure not
to lean or put pressure on the extended legrest, as it will close. From under the legrest, lift the
mechanism cover to access the reclining tension wing nuts. The wing nuts are located toward the
front of the mechanism, one on each side (F
mechanism are fasteners and do not affect tension.
2. Adjust the reclining tension by turning the wing nuts in ¼-turn increments until the desired
setting is reached. Adjust both wing nuts equally.
• A taller or heavier person may choose to increase the amount of tension by tightening
the wing nuts clockwise.
• A smaller person may choose to decrease the amount of tension by loosening the
wing nuts counterclockwise.
3. Close the legrest. Test the new reclining tension setting and make adjustments if needed.
4. Repeat these instructions to customize each reclining seat in your motion sofa or modular group.
IGU RE 1). The wing nuts located toward the back of the
FIGURE 1
Mechanism
Cover
Reclining
Tension
Wing Nut
Tension
Spring
16
17
Page 10
Sleep Sofa Operating Instructions Furniture Placement Guide
DANGER
• Do not sit or lie on mattress of sleep sofa except when it is fully extended. Never
close unit with person or animal inside.
WARNING
• Do not sit or place extra weight on the head area of the mattress. Excess weight can
cause the sleep surface to tip up and back.
Setting Up Your Motion-Modular Sleep Sofa Bed
1. Remove all loose cushions. Grasp the handle located in the center of the deck and lift in an
upward direction (F
2. Step back while pulling the sleeper mechanism out to the first extended position. When the
mechanism reaches this position the center support legs will rest on the floor (F
3. Reach over and grasp the center of the one piece front leg. Pull up and lower the front leg
to the floor (F
Additional Feature
The sleep sofa features a television viewing headrest position. To raise the headrest, stand to the
side of the sleep sofa and pull the head portion of the sleeper mechanism upward. Lift upward again
to release the locking mechanism and lower the headrest to its original position (F
IGU RE 3).
– To reduce the risk of serious injury or death:
– To reduce the risk of injury:
IGU RE 1).
IGU RE 2).
IGU RE 4).
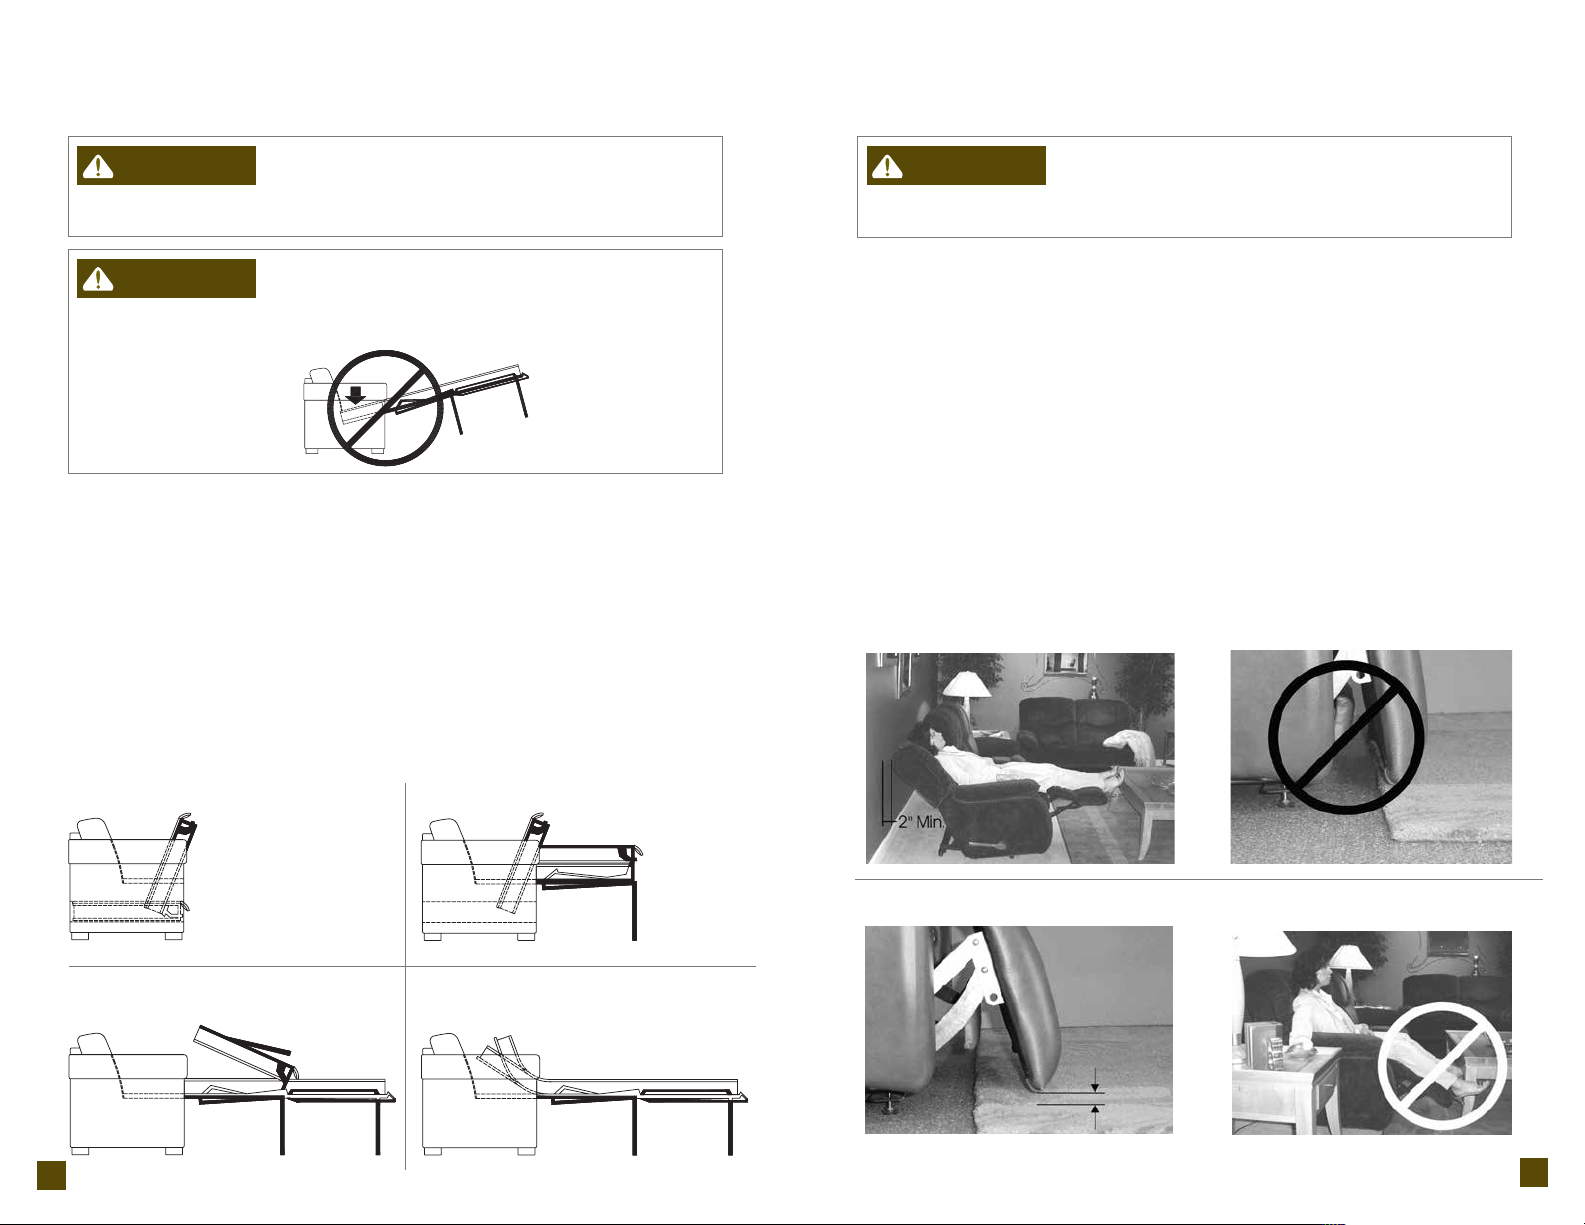
WARNING
• Provide a clear path for operation of the back and legrest. Place tables and area rugs
at a distance to allow the legrest to fully extend without rubbing or interference.
Reclining Units
To place your reclining unit the proper distance from the wall, fully recline the unit and leave a
minimum of 2" of space between the top of the back and the wall (F
Place tables and area rugs at a distance to allow the legrest to fully extend without rubbing or
interference. Interference with the legrest may cause it to not close completely (F
legrest is not closed completely, it may pop out unexpectedly and could cause injury. Some units
have adjustable glides that can be raised to help prevent rubbing and interference with area rugs;
see Assembly Instructions and Adjustment Instructions for details. Proper clearance for an area rug
is demonstrated in F
Make sure tables and other items are at a safe distance to avoid interference with the operation
of the legrest. Improper placement of a table could cause the occupant to become trapped in
the unit; this is demonstrated in FIGURE 4. There must be enough clearance for the legrest to be
fully extended before closing.
FIGURE 1
– To reduce the risk of serious injury:
IGU RE 3.
F
IGURE 2
IGU RE 1).
IGU RE 2). If the
IGURE 1
F
FIGURE 3
18
F
IGURE 2
IGURE 4
F
F
IGURE 3
Rug interference causes
legrest to remain open
FIGURE 4
Proper
Clearance
19
Page 11

Cup Holder Cleaning Instructions
Care and Cleaning Instructions for the Cup Holder
The finish on the cup holder can be damaged during use or cleaning. It is recommended that a
coaster be used to reduce the chance for damage, and that the cleaning instructions be followed.
Use water and mild soap, such as dish soap, to clean the cup holders. Dry immediately
and thoroughly with a soft clean cloth to maintain the finish.
The use of harsh, abrasive cleaners is not recommended and must be avoided.
Notes
20
21
Page 12

¡Felicitaciones!
Tabla de contenidos
Usted es ahora el feliz propietario de un
®
mobiliario La-Z-Boy
de vanguardia.
Acaba de seleccionar uno de los
productos tapizados de más alta calidad
originados en la industria mobiliaria,
con el respaldo de más de 80 años
de excelencia en fabricación.
En La-Z-Boy estamos orgullosos de
nuestros diseños y nuestro trabajo,
y sabemos que usted sentirá lo mismo
Instrucciones importantes de seguridad........................ 24-25
Instrucciones de ajuste de los tornillos niveladores
del sofá móvil Reclina-Way
Sofá reclinable Reclina-Way
®
................................................26
®
Instrucciones de operación
del apoyapiernas de tres posiciones.................................27
Instrucciones de ajuste de la tensión de reclinación
del sofá móvil Reclina-Way
®
.........................................28-29
Instrucciones de armado de los muebles tapizados móviles
La-Z-Time
®
y las unidades La-Z-Time Motion-Modulars®......30-33
Instrucciones de ajuste de la tensión de reclinación de los
muebles tapizados móviles La-Z-Time
de las unidades La-Z-Time Motion-Modulars
®
y del apoyapiernas
®
...................34-35
Instrucciones de ajuste de la tensión de reclinación de
los muebles tapizados móviles La-Z-Time
La-Z-Time Motion-Modulars
®
......................................... 36-37
®
y las unidades
cuando comience a disfrutar del confort
y el estilo de su nuevo mobiliario.
Instrucciones de operación del sofá cama........................ 38
Guía para la ubicación del mobiliario................................39
Instrucciones de limpieza del portavasos..........................40
Notas............................................................................. 41
IMPORTANTE
Lea atentamente estas instrucciones
antes de utilizar su mobiliario La-Z-Boy
Guárdelas para futura referencia.
22
®
.
23
Page 13

Instrucciones importantes de seguridad
Importante: lea estas instrucciones detenidamente antes de usar el sillón.
Instrucciones importantes de seguridad
Importante: lea estas instrucciones detenidamente antes de usar el sillón.
PELIGRO
• Mantenga bolsas de plástico alejadas de los niños para que éstos no se asfixien.
• No se siente ni se recueste sobre el colchón del sofá cama excepto cuando está completamente extendido.
Nunca cierre la unidad con una persona o animal dentro de ella.
ADVERTENCIA
• Mantenga siempre las llamas y cigarrillos encendidos alejados de muebles tapizados. Los tapizados
pueden quemarse rápidamente emitiendo gases tóxicos y humo espeso.
• Vigile estrechamente a los niños y personas discapacitadas cuando utilizan este producto.
• Siéntese lentamente en la unidad. Para evitar que se vuelque, no se arroje contra el respaldo. Recline o
enderece la unidad lentamente despues de asegurarse que no hayan niños o mascotas en las cercanías.
• Este producto tiene muchas piezas que se mueven y, por lo tanto, pueden ocurrir lesiones graves si
no se utiliza correctamente. Mantenga las manos, los dedos y otras partes del cuerpo alejadas del
mecanismo. Para reducir la posibilidad de que la cabeza quede atrapada como también otras lesiones,
no permita que niños y mascotas se acerquen a las aberturas y piezas móviles del mueble.
• Sólo el ocupante debe operar la unidad. Nunca trate de abrir el apoyapiernas jalándolo.
• No se pare, no se siente ni coloque peso adicional sobre los apoyabrazos,
el respaldo o el apoyapiernas abierto.
• Para levantarse de la unidad y no tropezar, regrese el respaldo a su posición
vertical y pliegue el apoyapiernas.
• Si el producto está dañado, no lo use. No utilice accesorios ni componentes sustitutos.
• Este producto es solamente para uso en espacios interiores residenciales.
• Asegúrese que el sillón, respaldo y apoyapiernas tengan suficiente espacio para su operación.
Coloque tapetes y mesas de forma que el descansapiernas pueda extenderse sin que haga
contacto con los mismos.
• No se debe usar este producto como un dispositivo para cuidado de la salud.
• No opere la unidad antes de haber instalado y asegurado el respaldo.
• Tenga cuidado al mover este producto. Antes de alzarlo, asegure el mecanismo para evitar que
se abra o mueva inesperadamente. Nunca lo mueva mediante el mecanismo, el apoyapiernas,
la manija, el respaldo reclinable o base giratoria. Desconecte las unidades modulares. Agarre
la unidad solamente por las partes que no se mueven.
• No se siente ni ponga más peso del normal en la cabecera del colchón. Un peso excesivo en esta zona
puede hacer que la superficie para dormir se levante e incline hacia atrás.
• Esta unidad está equipada con una característica para ajuste de tensión del mecanismo de reclinado
que fue ajustado en la fábrica. Usted puede modificar la tensión a su gusto personal. Para evitar que
se vuelque y para asegurar la estabilidad, no opere la unidad con las tuercas de mariposa de ajuste
flojas completamente (vea las instrucciones para el ajuste de la tensión de reclinado).
– Para reducir el riesgo de lesiones graves o muerte:
– Para reducir el riesgo de sufrir quemaduras,
incendios o lesiones graves:
• Mantenga las manos, los brazos y partes del cuerpo alejados del área abierta entre el respaldo reclinado
y el respaldo vertical en un sofá reclinable o modular. Esta área debe estar sin obstrucciones para
permitir el movimiento libre e impedir lesiones que pueden ocurrir mientras un respaldo reclinado
regresa a la posición vertical.
• El uso de este producto requiere tener fuerza adecuada para regresar el respaldo a su posición
recta y cerrar el apoyapiernas. El seleccionar la máxima tensión puede hacer más difícil alzar
el respaldo y cerrar el apoyapiernas.
• No utilice mobiliario La-Z-Boy
se encuentre en movimiento. Este mobiliario no ha sido diseñado para proteger a su usuario en caso
de un accidente. Procure sujetar y fijar de manera segura el mobiliario mientras el vehículo está en
movimiento, para prevenir lesiones o daños que se puedan producir al frenar repentinamente.
• No coloque contenedores con bebidas calientes en los portavasos. El mueble tiene movimiento y las
bebidas podrían derramarse y lesionar al ocupante. No coloque contenedores de bebidas de tamaño
demasiado grande o sin tapar en los portavasos.
• Si le da este producto a otra persona, déle también este manual de instrucciones de operación.
AVISO
• El mecanismo se dañará si se fuerza el apoyapiernas para plegarlo desde la primera o
segunda posición. Se debe extender el apoyapiernas a la tercera posición y entonces
se puede plegarlo.
• No mueva las unidades mientras están conectadas entre sí. El objetivo del sistema de soportes
es conectar las unidades y evitar que se separen mientras están en el suelo. El sistema de soportes
no brinda un soporte estructural adecuado para el movimiento de las unidades conectadas.
• Algunas unidades contienen portavasos. Tenga cuidado de evitar derrames de las bebidas, lo cual
puede ocasionar daño en la cubierta.
– Para reducir el riesgo de daños al producto:
®
en un vehículo de uso recreativo (o cualquier otro vehículo) cuando éste
24
Guarde estas instrucciones Guarde estas instrucciones
25
Page 14

Instrucciones de ajuste de los tornillos
niveladores del sofá móvil Reclina-Way
Sofá reclinable Reclina-Way®Instrucciones de
®
operación del apoyapiernas de tres posiciones
ADVERTENCIA ADVERTENCIA
• Asegúrese que el sillón, respaldo y apoyapiernas tengan suficiente espacio para su
operación. Coloque tapetes y mesas de forma que el apoyapiernas pueda extenderse
sin que haga contacto con los mismos.
Ajuste de los tornillos niveladores
Asegúrese de que los tornillos niveladores se ajusten a una altura que deje
un espacio libre para la operación del apoyapiernas.
Cada tornillo nivelador está sujeto al travesaño de la base por una contratuerca
y una arandela de seguridad encima del travesaño de la base, y una contratuerca en la parte inferior
de dicho travesaño.
1. Para extender el tornillo nivelador, afloje la contratuerca superior girándola en sentido horario.
Gire la contratuerca inferior en sentido horario hasta la altura deseada.
2. Apriete la contratuerca superior girándola en sentido contrahorario.
3. Repita los pasos uno y dos para cada tornillo nivelador ajustable de la unidad, si es necesario.
4. Repita este procedimiento según sea necesario para nivelar el sofá.
– Para reducir el riesgo de lesiones graves:
• Asegúrese que el sillón, respaldo y apoyapiernas tengan suficiente espacio para su
operación. Coloque tapetes y mesas de forma que el apoyapiernas pueda extenderse
sin que haga contacto con los mismos.
• Para levantarse de la unidad y no tropezar, regrese el respaldo a su posición
vertical y pliegue el apoyapiernas.
AVISO – Para reducir el riesgo de daños al producto:
• El mecanismo se dañará si se fuerza el apoyapiernas para plegarlo desde la primera o
segunda posición. Se debe extender el apoyapiernas a la tercera posición y entonces
se puede plegarlo.
Para operar el apoyapiernas
1. Su sofá móvil Reclina-Way
un confort de asiento personalizado. Simplemente jale la manija y gírela en sentido contrahorario
para controlar el apoyapiernas (F
ideales. La 1ra posición es ligeramente inclinada, para sentarse relajadamente a leer (F
La 2da posición es algo más inclinada, para ver televisión cómodamente (F
es completamente extendida, para una completa relajación (F
gire la manija primero en sentido contrahorario a la posición completamente extendida, y luego en
sentido horario a la posición completamente cerrada.
2. El respaldo del sofá puede reclinarse con el apoyapiernas cerrado o extendido. Para reclinarlo,
aplique presión al respaldo. Para devolver el respaldo a la posición vertical, siéntese derecho.
3. Antes de salir de la unidad, mueva el respaldo a la posición vertical y cierre el apoyapiernas.
FIGURA 1
POSICIÓN
CERRADA
Contratuerca superior
-- Para reducir el riesgo de lesiones graves:
®
está equipado con un apoyapiernas trabable de tres posiciones para
IGU RA 1). Puede detenerse en cualquiera de las tres posiciones
IGU RA 2).
IGU RA 3). La 3ra posición
IGU RA 4). Para bajar el apoyapiernas,
IGURA 2
F
1ra POSICIÓN
Contratuerca inferior
Tornillo nivelador
ajustable
IGURA 4
F
Arandela
de seguridad
Travesaño
de la base
26
IGURA 3
2da POSICIÓN 3ra POSICIÓN
F
27
Page 15

Instrucciones de ajuste de la tensión
de reclinación del sofá móvil Reclina-Way
Instrucciones de ajuste de la tensión
®
de reclinación del sofá móvil Reclina-Way
®
ADVERTENCIA
• Esta unidad está equipada con una característica para ajuste de tensión del mecanismo
de reclinado que fue ajustado en la fábrica. Usted puede modificar la tensión a su gusto
personal. Para evitar que se vuelque y para asegurar la estabilidad, no opere la unidad
con las tuercas de mariposa de ajuste flojas completamente (vea las instrucciones
para el ajuste de la tensión de reclinado).
-- Para reducir el riesgo de lesiones:
AVISO -- Para reducir el riesgo de daños al producto:
• Asegúrese de que el apoyapiernas de cada unidad esté cerrado antes de inclinarlas
hacia adelante para ajustar la tensión.
• No apriete completamente las tuercas mariposa. Los resortes de tensión no deben
comprimirse completamente después de realizar ajustes. Si esto ocurriera, las tuercas
mariposa deben aflojarse un mínimo de ½ vuelta para evitar que se dañe
el mecanismo de tensión a resorte.
• No afloje completamente las tuercas mariposa. El resorte no debe deslizarse sobre
el perno después de hacer los ajustes. Si esto ocurrie ra, apriete la tuerca mariposa
girándola en sentido horario un mínimo de ½ vuelta una vez que el resorte ya no se
deslice sobre el perno.
• Ajuste ambas tuercas mariposa por igual.
Instrucciones de ajuste
Puede ajustar la tensión del mecanismo reclinable para que éste se adapte al tamaño de su cuerpo.
1. Incline suavemente el sofá reclinable hacia adelante para que descanse sobre los apoyabrazos y
la parte superior del respaldo. Localice las tuercas mariposa, una a cada lado, ubicadas hacia la parte
posterior del sofá recli nable, debajo de cada asiento reclinable (F
2. Ajuste la tensión girando las tuercas mariposa en aumentos de ¼ de vuelta hasta
alcanzar el ajuste deseado.
• Una persona más alta o más pesada puede elegir aumentar la tensión de reclinación apretando
las tuercas mariposa en sentido horario.
• Una persona de contextura más pequeña puede elegir disminuir la tensión de reclinación
aflojando las tuercas mariposa en sentido contrahorario.
3. Vuelva a colocar el sofá reclinable en posición vertical. Pruebe el ajuste nuevo. Realice los ajustes
adicionales necesarios repitiendo estos pasos.
IGU RA 1).
FIGURA 1
Tuerca
mariposa
Resorte
de tensión
28
29
Page 16

Instrucciones de armado de los muebles tapizados móviles
La-Z-Time
®
y las unidades La-Z-Time Motion-Modulars
®
Instrucciones de armado de los muebles tapizados móviles
La-Z-Time
®
y las unidades La-Z-Time Motion-Modulars
®
ADVERTENCIA
• No opere la unidad antes de haber instalado y asegurado el respaldo.
1. Instale los respaldos, si corresponde (algunos modelos vienen con los respaldos instalados).
• Coloque el respaldo sobre el asiento. Levántelo a un pequeño ángulo y alinee las ménsulas
de soporte del mismo con las ménsulas del cuerpo (F
• Baje el respaldo sobre el cuerpo, asegurándose de que las ménsulas de soporte
se enganchen completamente.
• Para asegurarse de que el respaldo esté instalado en forma correcta, levante la funda
del tapizado y confirme visualmente que tanto el conjunto de soportes de la estructura
como el del respaldo están acoplados (F
• Si no logra instalar correctamente el respaldo, comuníquese con el representante de La-Z-Boy
para solicitar ayuda.
• Con un destornillador, empuje hacia abajo las palancas de seguro para asegurar los soportes (F
• Jale hacia abajo la funda externa del tapizado del respaldo hasta que quede tirante. Presione
firmemente la cinta de sujeción ubicada en la funda externa del tapizado del respaldo contra
la cinta de sujeción ubicada en la parte inferior del travesaño posterior (FIG URAS 1 y 4).
ADVERTENCIA
• Asegúrese que el sillón, respaldo y apoyapiernas tengan suficiente espacio para su
operación. Coloque tapetes y mesas de forma que el apoyapiernas pueda extenderse
sin que haga contacto con los mismos.
2. Coloque las unidades en la ubicación deseada.
3. Se proporcionan dispositivos de deslizamiento ajustables en las unidades con travesaños de base de metal.
Asegúrese de ajustar los dispositivos de deslizamiento delanteros a una altura que ofrezca suficiente
espacio para el funcionamiento del apoyapiernas (Guía para la ubicación del mobiliario).
• Todos los dispositivos de deslizamiento están unidos al riel de base mediante una contratuerca y una
arandela de seguridad en la parte superior del soporte de ajuste o del travesaño de base, así como una
contratuerca en la parte inferior del travesaño de base (FIGURA 5, se muestra la Unidad modular).
Afloje la contratuerca en la parte superior del soporte de conexión delantero o del travesaño de base.
• Sosteniendo la contratuerca superior, gire el dispositivo de deslizamiento en sentido de las agujas
del reloj para bajar la unidad o en sentido contrario para elevarla.
• Ajuste la contratuerca inferior al travesaño de base y, a continuación, ajuste la contratuerca
superior a la arandela de seguridad del soporte de ajuste delantero. Asegúrese de que ambas
contratuercas estén ajustadas para evitar que el soporte gire en el travesaño de base media.
• Repita este paso para todos los dispositivos de deslizamiento ajustable, si es necesario.
4. Se completó el ensamblaje del sofá o silla. Si se ensamblan unidades modulares, proceda
con la siguiente página.
30
– Para reducir el riesgo de lesiones:
IGU RA 1).
IGU RA 2).
– Para reducir el riesgo de lesiones graves:
®
IGU RA 3).
FIGURA 1
IGURA 3
F
Ménsula
del respaldo
IGURA 5
F
Arandela de
seguridad
Conexión de
soporte
Contratuerca
inferior
Tornillo nivelador
ajustable
Cinta de sujeción
Contratuerca
superior
Cinta de
sujeción
Palanca de
inmovilización
Posición
trabada
Ménsula
de soporte
del respaldo
Ménsula
de
soporte
del
cuerpo
Travesaño de
la base
F
IGURA 2
F
IGURA 4
31
Page 17

Instrucciones de armado de los muebles tapizados móviles
1"
1"
La-Z-Time
Las unidades modulares con rieles de base de metal cuentan con un soporte en la parte posterior y un
soporte "U" en la parte delantera, del lado derecho (área para sentarse) de las unidades modulares sin
apoyabrazos derechos, así como dos soporte de pasador con pasadores roscados del lado izquierdo (área
para sentarse) de las unidades modulares sin apoyabrazos izquierdos (F
Las unidades modulares con patas de madera cuentan con un soporte de montaje en
la parte posterior y un soporte "U" en la parte delantera, del lado derecho (área para sentarse)
de las unidades modulares sin apoyabrazos derechos, así como dos pasadores roscados del lado
izquierdo (área para sentarse) de las unidades modulares sin apoyabrazos izquierdos (F
5. Con un destornillador Torx T-30 afloje las pasador roscado hasta aproximadamente 1"; esta
medida puede variar según la tela y el estilo (F
del lado izquierdo (área para sentarse) de las unidades modulares sin apoyabrazos izquierdos.
6. Para comenzar, coloque las unidades que se conectarán una junto a otra, a aproximadamente 2"
de distancia. Sitúe la unidad con los pasadores roscados levemente detrás de la unidad con los
soportes de conexión. Separe los frentes de las unidades que se conectarán, a aproximadamente
6" de distancia. Deslice la parte posterior de la unidad con los pasadores roscados hacia la unidad
con los soportes de ajuste, alineando los pasadores roscados con el soporte posterior. Tire la unidad
con los pasadores roscados hacia adelante para conectar el soporte posterior.
®
y las unidades La-Z-Time Motion-Modulars
IGURA 1).
IGU RA 2).
IGU RA 3). Los pasadores roscados están ubicados
®
Instrucciones de armado de los muebles tapizados móviles
La-Z-Time
FIGURA 1
Soporte del riel
posterior
Soporte del riel en
“U” delantero
®
y las unidades La-Z-Time Motion-Modulars
Pasador
roscado
Soporte de
pasador
®
ADVERTENCIA
• El frente de la unidad debe elevarse para conectar el soporte delantero. Pida ayuda si no
le es posible levantar 57 libras.
• Mantenga los pies alejados de la unidad al bajarla hacia su posición.
– Para reducir el riesgo de lesiones graves:
AVISO – Para reducir el riesgo de daños al producto:
• Eleve desde el travesaño de base. No eleve del tapizado ni de la parte inferior del apoyapiernas.
7. Eleve el frente de la unidad hasta el pasador roscado a aproximadamente 3" del suelo, alineándolo
con la unidad con el soporte de conexión. Baje suavemente el pasador roscado hacia el frente
del soporte de conexión (F
NOTA: debido a variaciones del tapizado y del estilo, el pasador roscado puede necesitar ajustarse para
poder fijarse en los soportes de ajuste o en las grietas de control entre las unidades. Afloje o apriete
los pasadores roscados para permitir la distancia adecuada.
8. Continúe conectando las unidades modulares hasta que se hayan unido firmemente.
IGURA 4). Mantenga los pies alejados de la unidad al bajarla hacia su posición.
AVISO – Para reducir el riesgo de daños al producto:
• No mueva las unidades mientras están conectadas entre sí. El objetivo del sistema de
soportes es conectar las unidades y evitar que se separen mientras están en el suelo.
El sistema de soportes no brinda un soporte estructural adecuado para el movimiento
de las unidades conectadas.
9. Todas las unidades modulares deben desconectarse para mover de forma segura el grupo modular.
Para desconectar las unidades, eleve la unidad modular del lado izquierdo (área para sentarse)
(con los pasadores roscados) aproximadamente 3" para distanciar el soporte de conexión, mueva
el frente de la unidad hacia arriba y devuélvala al suelo. Deslice la unidad con los pasadores
roscados hacia atrás para desconectar el soporte posterior.
IGURA 2
F
Soporte
de montaje
lateral
posterior
Soporte del
montaje lateral
frontal en “U”
F
IGURA 3
Pasador
roscado
Soporte de
pasador
Unidades de
base
Pasador
roscado
Patas
IGURA 4
F
Soporte del riel en
“U” delantero
Unidades de
base
Pasador
roscado
Soporte del montaje lateral
frontal en “U”
Patas
32
33
Page 18

Instrucciones de ajuste de la tensión de reclinación de los
®
muebles tapizados móviles La-Z-Time
de las unidades La-Z-Time Motion-Modulars
y del apoyapiernas
®
Instrucciones de ajuste de la tensión de reclinación de los
®
muebles tapizados móviles La-Z-Time
de las unidades La-Z-Time Motion-Modulars
y del apoyapiernas
®
ADVERTENCIA
• El uso de este producto requiere tener fuerza adecuada para regresar el respaldo a su
posición recta y cerrar el apoyapiernas. El seleccionar la máxima tensión puede hacer más
difícil alzar el respaldo y cerrar el apoyapiernas.
Instrucciones de ajuste de la tensión de reclinación del apoyapiernas
1. Permanezca junto a la unidad desocupada y tire de la manija de liberación para extender
el apoyapiernas. Asegúrese de no apoyarse o poner presión en el apoyapiernas extendido, porque
éste se cerrará. Desde abajo del apoya piernas, levante la cubierta del mecanismo para tener
acceso a las ruedas de ajuste de tensión de reclinación. Las ruedas están ubicadas hacia el frente
del mecanismo, una a cada lado (F
2 Las ruedas de ajuste de tensión de reclinación del apoyapiernas en la posición central están
preajustadas de fábrica. La posición central provee soporte y tensión al apoyapiernas.
3. Una persona más alta y con más peso puede elegir aumentar la tensión de reclinación
del apoyapiernas para ofrecer más soporte a las piernas. Para aumentar la tensión de reclinación
del apoyapiernas, gire las ruedas de ajuste hacia arriba y hacia el frente del sillón reclinable
(FIGU RA 3). Ambas ruedas de ajuste de la tensión de reclinación del apoyapiernas deben estar
en la misma posición.
4. Una persona de contextura más pequeña puede disminuir la tensión de reclinación del apoyapiernas
para facilitar el cierre del mismo. Para disminuir la tensión de reclinación del apoyapiernas, gire
las ruedas de ajuste hacia abajo y hacia el respaldo del sillón reclinable (F
de ajuste de la tensión de reclinación del apoyapiernas deben estar en la misma posición.
5. Cierre el apoyapiernas. Pruebe el ajuste nuevo de la tensión de reclinación del apoyapiernas y realice
más ajustes si es necesario.
6. Repita estas instrucciones para personalizar cada asiento reclinable en su sofá móvil o grupo modular.
– Para reducir el riesgo de lesiones:
IGURA 1). Cada rueda tiene tres ajustes.
IGURA 4). Ambas ruedas
FIGURA 1
Rueda de ajuste
de la tensión
de reclinación
del apoya piernas
Ubicación de la rueda de ajuste, una en cada lado
FIGURA 2
FIGURA 3
Promedio de tensión de
reclinación del apoyapiernas
FIGURA 4
Tensión de reclinación máxima
del apoyapiernas
Tensión de reclinación mínima
34
del apoyapiernas
35
Page 19

Instrucciones de ajuste de la tensión de reclinación de
los muebles tapizados móviles La-Z-Time
La-Z-Time Motion-Modulars
®
y las unidades
®
Instrucciones de ajuste de la tensión de reclinación de
los muebles tapizados móviles La-Z-Time
La-Z-Time Motion-Modulars
®
y las unidades
®
ADVERTENCIA
• Esta unidad está equipada con una característica para ajuste de tensión del mecanismo
de reclinado que fue ajustado en la fábrica. Usted puede modificar la tensión a su gusto
personal. Para evitar que se vuelque y para asegurar la estabilidad, no opere la unidad
con las tuercas de mariposa de ajuste flojas completamente (vea las instrucciones para
el ajuste de la tensión de reclinado).
• El uso de este producto requiere tener fuerza adecuada para regresar el respaldo
a su posición recta y cerrar el apoyapiernas. El seleccionar la máxima tensión puede
hacer más difícil alzar el respaldo y cerrar el apoyapiernas.
– Para reducir el riesgo de lesiones:
AV ISO – Para reducir el riesgo de daños al producto:
• No apriete completamente las tuercas mariposa. Los resortes de tensión no deben
comprimirse completamente después de realizar ajustes. Si esto ocurriera, las tuercas
mariposa deben aflojarse un mínimo de ½ vuelta para evitar que se dañe el mecanismo
de tensión a resorte.
• No afloje completamente las tuercas mariposa. El resorte no debe deslizarse sobre el perno
después de hacer los ajustes. Si esto ocurriera, apriete la tuerca mariposa girándola
en sentido horario un mínimo de ½ vuelta una vez que el resorte ya no se deslice
sobre el perno.
• Ajuste ambas tuercas mariposa por igual.
Instrucciones de ajuste de la tensión de reclinación
1. Permanezca junto a la unidad desocupada y tire de la manija de liberación para extender
el apoyapiernas. Asegúrese de no apoyarse o poner presión en el apoyapiernas extendido, porque éste
se cerrará. Desde abajo del apoyapiernas, levante la cubierta del mecanismo para tener acceso a las
tuercas mariposa de ajuste de tensión de reclinación. Las tuercas mariposa de tensión están ubicadas
hacia el frente del mecanismo, una a cada lado (F
el respaldo del mecanismo son sujetadores y no afectan la tensión.
2. Ajuste la tensión de reclinación girando las tuercas mariposa en aumentos de ¼ de vuelta hasta
alcanzar el ajuste deseado. Ajuste ambas tuercas mariposa por igual.
• Una persona más alta o más pesada puede elegir aumentar la tensión de reclinación
apretando las tuercas mariposa en sentido horario.
• Una persona de contextura más pequeña puede elegir disminuir la tensión de reclinación
aflojando las tuercas mariposa en sentido contrahorario.
3. Cierre el apoyapiernas. Pruebe el ajuste nuevo de la tensión de reclinación y realice más ajustes
si es necesario.
4. Repita estas instrucciones para personalizar cada asiento reclinable en su sofá móvil o grupo modular.
IGURA 1). Las tuercas mariposa ubicadas hacia
FIGURA 1
Cubierta del
mecanismo
Tuerca mariposa
de tensión de
reclinación
Resorte
de tensión
36
37
Page 20

Instrucciones de operación del sofá cama Guía para la ubicación del mobiliario
PELIGRO
• No se siente ni se recueste sobre el colchón del sofá cama excepto cuando está completamente
extendido. Nunca cierre la unidad con una persona o animal dentro de ella.
ADVERTENCIA
• No se siente ni ponga más peso del normal en la cabecera del colchón. Un peso excesivo
en esta zona puede hacer que la superficie para dormir se levante e incline hacia atrás.
Instalación del sofá cama modular eléctrico
1. Retire todos los almohadones sueltos. Agarre la manija ubicada en el centro de la base y muévala
hacia arriba (F
2. Retroceda y tire del mecanismo del sofá cama hasta la primera posición extendida. Cuando alcance
esta posición, las patas de soporte centrales se apoyarán en el piso (F
3. Agarre el centro de la pata delantera de una pieza. Jale y baje la pata delantera al piso (F
Característica adicional
El sofá cama tiene una posición de la cabecera para ver televisión. Para elevar la cabecera, párese
al costado del sofá cama y tire hacia arriba la parte de la cabecera del mecanismo del sofá. Tire
hacia arriba nuevamente para desenganchar el mecanismo trabable y bajar la cabecera a su
posición original (F
IGU RA 1).
IGU RA 4).
– Para reducir el riesgo de lesiones graves o muerte:
– Para reducir el riesgo de lesiones:
IGU RA 2).
IGU RA 3).
ADVERTENCIA
• Asegúrese que el sillón, respaldo y apoyapiernas tengan suficiente espacio para su
operación. Coloque tapetes y mesas de forma que el apoyapiernas pueda extenderse
sin que haga contacto con los mismos.
Unidades reclinables
Para colocar la unidad reclinable a una distancia adecuada de la pared, reclínela completamente
dejando un mínimo de 5 cm (2") de espacio entre la parte superior del respaldo y la pared (F
Coloque las mesas y alfombras sueltas a distancia para poder extender completamente el apoyapiernas
sin roces ni interferencias. Si algo interfiere con el apoyapiernas, puede que éste no se cierre
completamente (FIGURA 2). Si el apoyapiernas no se cierra completamente, podría saltar a la posición
extendida inesperadamente y causar lesiones. Algunas unidades tienen tornillos niveladores
ajustables que pueden elevarse para evitar el roce y la interferencia con las alfombras sueltas;
vea las Instrucciones de armado y las Instrucciones de ajuste para obtener más detalles.
En la F
IGURA 3 se muestra el espacio libre adecuado para una alfombra suelta.
Asegúrese de que las mesas y demás elementos estén a una distancia segura para evitar interferencias
con el funcionamiento del apoyapiernas. La ubicación inadecuada de una mesa podría hacer que el
ocupante del sillón quede atrapado en la unidad (como se muestra en la FIGURA 4). Debe haber suficiente
espacio libre para poder extender completamente el apoyapiernas antes de cerrarlo.
FIGURA 1
– Para reducir el riesgo de lesiones graves:
F
IGURA 2
IGU RA 1).
IGURA 1
F
FIGURA 3
38
F
IGURA 2
IGURA 4
F
5 cm (2”) “Mín.”
F
IGURA 3
Interferencia con las alfombras
puede causar que el apoyapiernas
permanezca abierto
FIGURA 4
Espacio libre
adecuado
39
Page 21

Instrucciones de limpieza del portavasos
Instrucciones de cuidado y limpieza del portavasos
El terminado en el portavasos puede ser dañado durante su uso o limpieza. Se recomienda que
sea utilizado un mantel protector para reducir la probabilidad de daños, y que se sigan las
instrucciones de limpieza.
Use agua y jabón suave, por ejemplo detergente para vajillas, para limpiar los portavasos. Seque
inmediata y minuciosamente con un paño limpio y suave para mantener el acabado.
El uso de limpiadores ásperos y abrasivos no está recomendado y deben evitarse.
Notas
40
41
Page 22

Félicitations!
Vous êtes maintenant le fier propriétaire d'un
moderne meuble de La-Z-Boy.
MD
Table des matières
Règles de sécurité importantes.................................... 44-45
MD
Réglage des patins du canapé inclinable Reclina-Way
..............46
Vous venez d’acheter un des meubles
rembourrés les plus perfectionnés de l’industrie
du meuble, fruit de plus de 80 ans d’expérience
dans la fabrication de meubles de qualité.
La-Z-Boy est fière de sa gamme de produits
et de son savoir-faire. Nous savons que
vous ressentirez la même fierté quand vous
profiterez du confort et de l’allure de votre
nouveau mobilier.
Fonctionnement du canapé inclinable avec repose-jambes
à 3 réglages Reclina-Way
MD
.............................................. 47
Réglage de la tension d’inclinaison du canapé
inclinable Reclina-Way
Montage des meubles inclinables La-Z-Time
Motion-Modulars
MD
...................................................................50-53
MD
.............................................48-49
MD
et La-Z-Time
Réglage de la tension du repose-jambes des meubles
inclinables La-Z-Time
MD
et La-Z-Time Motion-ModularsMD.....54-55
Réglage de la tension d’inclinaison des meubles inclinables
La-Z-Time
MD
et La-Z-Time Motion-ModularsMD...................56-57
Fonctionnement du canapé-lit..........................................58
Comment disposer vos meubles.......................................59
Instructions de nettoyage du porte-gobelet.......................60
Notes.............................................................................61
IMPORTANT
Bien lire les instructions avant d’utiliser votre mobilier
La-Z-Boy
42
MD
. À conserver pour usage ultérieur.
43
Page 23

Règles de sécurité importantes
Important : bien lire les instructions avant l’utilisation.
Règles de sécurité importantes
Important : bien lire les instructions avant l’utilisation.
DANGER
• Pour prévenir la suffocation, garder les sacs de plastique loin des enfants.
• Ne pas s'asseoir ou s'allonger sur le matelas du canapé-lit, sauf quand il est en pleine extension.
Ne jamais fermer l'unité alors qu’une personne ou un animal se trouve à l'intérieur.
AVERTISSEMENT
• Garder vos meubles rembourrés loin des flammes ou des cigarettes allumées. Ils peuvent brûler
rapidement en présence de gaz toxique et de fumée épaisse.
• Une supervision étroite est nécessaire quand ce produit est utilisé par des enfants
ou des personnes handicapées.
• Vous asseoir lentement sur le meuble. Pour éviter qu’il bascule, ne pas lancer votre poids contre
le dossier. Y aller lentement quand vous vous inclinez ou remettez en position verticale, et vous
assurer qu’il n’y a pas d’enfant ou d’animal de compagnie à proximité.
• Ce produit compte plusieurs pièces mobiles et peut causer des blessures graves s’il n’est pas utilisé
correctement. Garder les mains, les doigts et toute autre partie du corps loin du mécanisme. Pour
réduire le risque de coincer la tête ou d’autres blessures, éloigner les enfants et les animaux
des ouvertures et des pièces mobiles qui se trouvent dans le meuble ou autour de celui-ci.
• Seul l'occupant doit faire fonctionner le meuble. Ne jamais tenter d'ouvrir le repose-jambes
en tirant dessus.
• Ne pas se tenir debout, s'asseoir ou mettre de poids excessif sur les bras, le dossier
ou le repose-jambes déployé.
• Pour sortir du meuble en toute sécurité et pour éviter de trébucher, relever le dossier et fermer
le repose-jambes.
• Ne pas utiliser ce produit s'il est endommagé. Ne pas utiliser d'accessoires ou de pièces de substitution.
• Ce produit est exclusivement réservé à un usage résidentiel intérieur.
• Prévoir un parcours sans obstructions pour faire fonctionner le fauteuil, le dossier et le repose-jambes.
Placer les tables et les carpettes assez loin pour que le repose-jambes puisse s’ouvrir complètement
sans frottement ni obstruction.
• Ce produit n’est pas conçu pour servir de dispositif de santé.
• Ne pas faire fonctionner le meuble avant d’avoir installé et bloqué le dossier.
• Déplacer le meuble avec soin. Avant de le soulever, bloquer le mécanisme pour l'empêcher de s'ouvrir
ou de bouger soudainement. Ne jamais déplacer le meuble par le mécanisme, le repose-jambes,
la poignée, le dossier inclinable ou la base pivotante. Déconnecter les modules. Ne saisir solidement
que les pièces inamovibles.
• Ne pas s’asseoir ni mettre de poids excessif sur la tête du matelas. Cela peut faire basculer
le matelas vers l’arrière.
• Ce meuble est doté d’un réglage de tension pour le mécanisme d’inclinaison, préréglé en usine.
Vous pouvez personnaliser ce réglage. Pour éviter de faire basculer le meuble et pour en assurer
la stabilité, ne jamais faire fonctionner le meuble quand les écrous à oreilles qui règlent la tension
sont complètement desserrés (voir les instructions touchant le réglage de la tension d’inclinaison).
– Pour réduire le risque de blessures graves ou de mort :
– Pour réduire le risque de brûlures, d'incendie
ou de blessures graves :
• Garder les mains, les bras et autres parties du corps loin de l’aire ouverte entre le dossier incliné et
le dossier vertical d’un canapé ou modulaire inclinable. Cet endroit doit en tout temps demeurer libre
pour permettre un mouvement sans obstructions et prévenir les blessures possibles quand un dossier
incliné retourne à sa position verticale.
• L'utilisation de ce produit nécessite une force suffisante pour retourner le dossier en position verticale
et fermer le repose-jambes. Le fait de choisir les paramètres de tension maximale pourrait rendre
difficiles le retour du dossier en position verticale et la fermeture du repose-jambes.
MD
• Ne pas utiliser les meubles La-Z-Boy
pendant que le véhicule est en mouvement. Ce meuble n’est pas conçu pour protéger son occupant
lors d’un accident. Bien fixer le meuble pendant que le véhicule est en mouvement pour prévenir
les blessures ou les dommages lors d’un arrêt soudain.
• Ne pas placer de récipients contenant des boissons chaudes dans les porte-gobelets. Le meuble peut
se déplacer et les boissons peuvent se déverser et blesser l’occupant. Ne pas placer de récipients
surdimensionnés ou sans couvercle dans les porte-gobelets.
• Si vous donnez ce produit à quelqu’un d’autre, lui donner aussi ce manuel d’instructions.
AVIS
• Le mécanisme sera endommagé si on force le repose-jambes à se refermer à partir de
re
ou 2eposition. Ouvrir le repose-jambes jusqu’à la 3eposition avant de le refermer.
la 1
• Ne pas déplacer les unités alors qu'elles sont jointes les unes aux autres. L'objectif du système
de crochets de verrouillage consiste à relier les unités et les empêcher de se séparer tandis
qu'elles se trouvent au sol. Le système de crochets ne fournit pas un soutien structurel adéquat
afin de déplacer des unités reliées.
• Certains meubles sont munis de porte-gobelets. S’assurer d’empêcher les déversements de
boissons, qui pourraient endommager le revêtement.
– Pour réduire le risque d’endommager le produit :
dans un véhicule récréatif (ou autre véhicule en mouvement)
44
Conserver ces instructions
Conserver ces instructions
45
Page 24

Réglage des patins du canapé inclinable Reclina-Way
MD
Fonctionnement du canapé inclinable
avec repose-jambes à 3 réglages Reclina-Way
MD
AVERTISSEMENT
• Prévoir un parcours sans obstructions pour faire fonctionner le fauteuil, le dossier et
le repose-jambes. Placer les tables et les carpettes assez loin pour que le repose-jambes
puisse s’ouvrir complètement sans frottement ni obstruction.
Pour régler les patins
Vous assurer que les patins sont réglés à une hauteur qui offre un parcours libre pour
faire fonctionner le repose-jambes.
Chaque patin est fixé à la traverse par un contre-écrou et une rondelle-frein sur la fixation du
module et un contre-écrou sur le bas de la traverse.
1. Pour prolonger le patin, desserrer le contre-écrou du haut en le tournant dans le sens
horaire. Tourner le contre-écrou du bas à la hauteur désirée, dans le sens horaire.
2. Resserrer le contre-écrou du haut en le tournant dans le sens antihoraire.
3. Répéter les étapes 1 et 2 pour chaque patin, au besoin.
4. Répéter cette marche à suivre au besoin pour mettre le canapé de niveau.
– Pour réduire le risque de blessures graves :
Contre-écrou du haut
AVERTISSEMENT
• Prévoir un parcours sans obstructions pour faire fonctionner le fauteuil, le dossier et
le repose-jambes. Placer les tables et les carpettes assez loin pour que le repose-jambes
puisse s’ouvrir complètement sans frottement ni obstruction.
• Pour sortir du meuble en toute sécurité et pour éviter de trébucher, relever le dossier
et fermer le repose-jambes.
-- Pour réduire le risque de blessures graves :
AV IS – Pour réduire le risque d’endommager le produit :
• Le mécanisme sera endommagé si on force le repose-jambes à se refermer à partir de
re
ou 2eposition. Ouvrir le repose-jambes jusqu’à la 3eposition avant de le refermer.
la 1
Pour faire fonctionner le repose-jambes
MD
1. Votre fauteuil ou canapé inclinable Reclina-Way
3 positions pour personnaliser votre confort. Tourner simplement la manette dans le sens antihoraire
pour contrôler le repose-jambes (F
3 positions idéales. La 1
peu plus ouverte pour regarder la télé (F
complète. (F
jusqu’à l’ouverture complète, puis la tourner dans le sens horaire jusqu’à la position entièrement fermée.
2. Vous pouvez incliner le dossier quand le repose-jambes est ouvert ou fermé. Pour vous incliner,
exercer une pression sur le dossier. Pour que le dossier reprenne la position verticale, transférer
votre poids vers l’avant.
3. Remettre le dossier à la verticale et fermer le repose-jambes avant de vous lever.
IGURE 4). Pour refermer le repose-jambes, tourner la manette dans le sens antihoraire
re
IGU RE 1). Vous pouvez vous arrêter dans n’importe laquelle des
est légèrement ouverte pour la lecture détendue (FIGURE 2). La 2eest un
IGU RE 3). La 3
FIGURE 1
POSITION
FERMÉE
est muni d’un repose-jambes verrouillable en
e
est entièrement ouverte pour une détente
IGURE 2
F
RE
POSITION
1
Contre-écrou du bas
Patin réglable
Rondelle-frein
Traverse
de base
46
F
IGURE 3
E
POSITION 3EPOSITION
2
IGURE 4
F
47
Page 25

Réglage de la tension
d’inclinaison du canapé inclinable Reclina-Way
MD
Réglage de la tension
d’inclinaison du canapé inclinable Reclina-Way
MD
AVERTISSEMENT
• Ce meuble est doté d’un réglage de tension pour le mécanisme d’inclinaison, préréglé
en usine. Vous pouvez personnaliser ce réglage. Pour éviter de faire basculer le meuble
et pour en assurer la stabilité, ne jamais faire fonctionner le meuble quand les écrous
à oreilles qui règlent la tension sont complètement desserrés (voir les instructions
touchant le réglage de la tension d’inclinaison).
– Pour réduire le risque de blessures :
AV IS – Pour réduire le risque d'endommager le produit :
• Vous assurer que le repose-jambes de chaque meuble est fermé avant de faire basculer
vers l’avant et de régler la tension.
• Ne pas resserrer complètement les écrous à oreilles. Les ressorts ne doivent pas être
complètement comprimés après le réglage. Le cas échéant, tourner l’écrou à oreilles
au moins un demi-tour pour éviter d’endommager le mécanisme de tension des ressorts.
• Ne pas desserrer complètement les écrous à oreilles. Le ressort ne doit pas glisser sur
le boulon après le réglage. Le cas échéant, tourner les écrous à oreilles au moins un
demi-tour après que le ressort cesse de glisser sur le boulon.
• Régler les deux écrous à oreilles à égalité.
Instructions touchant le réglage
Vous pouvez régler la tension du mécanisme d’inclinaison pour convenir à votre taille.
1. Faire basculer doucement le canapé inclinable vers l’avant pour qu’il repose sur les bras et
le dessus du dossier. Repérer les écrous à oreilles, soit un de chaque côté, vers l’arrière du
canapé, sous chaque siège inclinable (F
2. Régler la tension en tournant les écrous à oreilles par quarts de tour jusqu’à ce que le réglage
voulu soit atteint.
• La personne plus grande ou plus lourde peut choisir d’augmenter la tension d’inclinaison
en resserrant les écrous à oreilles dans le sens horaire.
• La personne plus petite peut choisir de réduire la tension d’inclinaison en desserrant
les écrous à oreilles dans le sens antihoraire.
2. Remettre le meuble dans la position verticale. Faire l’essai du nouveau réglage. Répéter au besoin.
IGU RE 1).
FIGURE 1
Écrou à
oreilles
Ressort
de tension
48
49
Page 26

Montage des meubles inclinables
La-Z-Time
MD
et La-Z-Time Motion-Modulars
MD
Montage des meubles inclinables
La-Z-Time
MD
et La-Z-Time Motion-Modulars
MD
AVERTISSEMENT
• Ne pas faire fonctionner le meuble avant d’avoir installé et bloqué le dossier.
1. Installer les dossiers au besoin (certains meubles sont offerts avec le dossier installé).
• Coucher le dossier sur le siège. Soulever légèrement le dossier et aligner les fixations
du dossier avec celles de la charpente (F
• Coucher le dossier sur la charpente en vous assurant que les fixations du dossier
et de la charpente sont bien engagées.
• Pour vous assurer que le dossier est installé correctement, soulever le revêtement rembourré
du dossier pour confirmer visuellement que les deux jeux de fixations du dossier et de
la charpente sont engagés (F
• Si vous êtes incapable d’installer correctement le dossier, communiquer avec votre détaillant
La-Z-Boy
• Bloquer les fixations en poussant sur les leviers de blocage avec un tournevis (F
• Bien tirer le revêtement du dossier vers le bas et presser fermement le ruban de fixation du
revêtement du dossier sur le ruban de fixation au bas de la traverse arrière (F
MD
pour obtenir de l’aide.
AVERTISSEMENT
• Prévoir un parcours sans obstructions pour faire fonctionner le fauteuil, le dossier et
le repose-jambes. Placer les tables et les carpettes assez loin pour que le repose-jambes
puisse s’ouvrir complètement sans frottement ni obstruction.
2. Disposer les meubles dans l’endroit voulu.
3. Des patins réglables sont prévus sur les unités comportant des traverses de base en métal. S'assurer
d'ajuster les patins à une hauteur permettant le fonctionnement dégagé du repose-jambes (se reporter
à Comment disposer vos meubles).
• Chaque patin est fixé à la traverse de base au moyen d'un contre-écrou et d'une rondelle-frein sur
le dessus du support de fixation avant ou de la traverse de base, et d'un contre-écrou sur la partie
inférieure de la traverse de base (F
situé sur la partie supérieure du support de fixation avant ou sur la traverse de base.
• En retenant le contre-écrou supérieur, tourner le patin vers la droite pour abaisser l'unité ou vers
la gauche pour la soulever.
• Serrer le contre-écrou inférieur sur la traverse de base, puis serrer le contre-écrou supérieur sur
la rondelle au-dessus du support de fixation avant. S'assurer les deux contre-écrous sont bien serrés
pour empêcher la fixation de tourner sur la traverse de base.
• Répéter cette étape pour chaque patin ajustable, le cas échéant.
4. L'assemblage du canapé à mouvement ou de la chaise est terminé. S'il s'agit de l'assemblage d'unités
modulaires, passer à la page suivante.
-- Pour réduire le risque de blessures :
IGU RE 1).
IGU RE 2).
IGU RE 3).
IGU RES 1 et 4).
-- Pour réduire le risque de blessures graves :
IGURE 5, unité modulaire mobile montrée). Desserrer le contre-écrou
FIGURE 1
IGURE 3
F
Fixation
du
dossier
IGURE 5
F
Rondelle-frein
Support de
fixation
Ruban de fixation
Contre-écrou
du haut
Ruban de fixation
Fixation de
la charpente
Loquet
verrouillable
Loquet
verrouillé
Fixation
du
dossier
F
IGURE 2
F
IGURE 4
Contre-écrou
du bas
Patin réglable
Traverse
50
de base
51
Page 27

Montage des meubles inclinables
1"
1"
La-Z-Time
Les unités modulaires mobiles avec traverses de base en métal disposent d'un support à l'arrière et
d'un support en « U » à l'avant, à droite (en position assise) des unités modulaires sans accoudoir
droit, ainsi que deux goujons avec tiges filetées à gauche (en position assise) des unités modulaires
sans accoudoir gauche (F
Les unités modulaires mobiles avec pattes de bois disposent d'un support de montage latéral à
l'arrière et d'un support en « U » à l'avant, à droite (en position assise) des unités modulaires sans
accoudoir droit, ainsi que deux goujons filetés à gauche (en position assise) des unités modulaires
sans accoudoir gauche (F
5. Utiliser une clé Torx T-30 pour desserrer les goujons filetés d'environ 2,5 cm (1 po), cette
mesure peut varier selon le tissu et le style (F
gauche (en position assise) des unités modulaires sans accoudoir gauche.
6. Pour commencer, placer les unités devant être fixées les unes à côté des autres, à environ 5 cm (2 po)
d'intervalle. Positionner l'unité avec goujons filetés légèrement derrière l'unité avec supports de
fixation. Séparer le devant des unités à raccorder, à environ 15,2 cm (6 po) d'intervalle. Faire glisser
l'arrière de l'appareil avec les goujons filetés vers l'unité comportant les supports de fixation, et ce,
en alignant les goujons filetés avec le support arrière. Tirer l'unité avec goujons filetés vers l'avant
pour l'engager dans le support arrière.
MD
et La-Z-Time Motion-Modulars
IGU RE 1).
IGU RE 2).
IGU RE 3). Les goujons filetés sont situés du côté
MD
La-Z-Time
FIGURE 1
Support de traverse
arrière
Support de traverse
en « U » avant
Montage des meubles inclinables
MD
et La-Z-Time Motion-Modulars
Support
du goujon
MD
Goujon
fileté
AVERTISSEMENT
• L'avant de l'appareil doit être soulevé pour engager le support avant. Veuillez demander de
l'aide si vous êtes incapable de soulever au moins 25,8 kg (57 lb).
• Gardez les pieds éloignés de l'unité lors de l'abaissement.
-- Pour réduire le risque de blessures graves :
AVISO – Pour réduire le risque d'endommager le produit :
• Soulever la traverse de base. Ne pas soulever en utilisant le rembourrage ou la partie
inférieure du repose-jambes.
7. Soulever le devant de l'unité avec goujon fileté d'environ 7,6 cm (3 po) du sol, l'aligner sur
l'unité avec support de fixation. Abaisser délicatement le goujon fileté dans le support
de fixation avant (F
NOTE: En raison des variations dans le rembourrage et le style, la longueur du goujon fileté peut
devoir être ajustée pour s'intégrer dans les supports de fixation ou contrôler l'écart entre les unités.
Desserrer ou serrer les goujons filetés pour assurer un dégagement adéquat.
8. Continuer à relier les unités modulaires jusqu'à ce qu'elles aient toutes bien été jointes.
IGU RE 4). Gardez les pieds éloignés de l'unité lors de l'abaissement.
AVISO – Pour réduire le risque d'endommager le produit :
• Ne pas déplacer les unités alors qu'elles sont jointes les unes aux autres. L'objectif
du système de crochets de verrouillage consiste à relier les unités et les empêcher de
se séparer tandis qu'elles se trouvent au sol. Le système de crochets ne fournit pas un
soutien structurel adéquat afin de déplacer des unités reliées.
9. Toutes les unités modulaires doivent être déconnectées afin de déplacer le groupe modulaire en
toute sécurité. Pour séparer les unités, soulever l'unité modulaire de gauche (en position assise)
(avec goujons filetés) d'environ 7,6 cm (3 po) afin de dégager l'avant du support de fixation,
déplacer le devant de l'unité et la retourner sur le sol. Faire glisser l'unité avec goujons filetés
vers l'arrière afin de dégager le support arrière.
FIGURE 2
Support de
montage
latéral arrière
Support latéral
en « U » avant
F
IGURE 3
Goujon
fileté
Support
du goujon
Unités à
base
Goujon
fileté
Unités à
pattes
IGURE 4
F
Support de traverse en
« U » avant
Unités à
base
Goujon
fileté
Support latéral en
« U » avant
Unités à
pattes
52
53
Page 28

Réglage de la tension du
repose-jambes des meubles inclinables La-Z-Time
et La-Z-Time Motion-Modulars
MD
MD
Réglage de la tension du
repose-jambes des meubles inclinables La-Z-Time
et La-Z-Time Motion-Modulars
MD
MD
AVERTISSEMENT
• L'utilisation de ce produit nécessite une force suffisante pour retourner le dossier en
position verticale et fermer le repose-jambes. Le fait de choisir les paramètres de
tension maximale pourrait rendre difficiles le retour du dossier en position verticale
et la fermeture du repose-jambes.
Instructions pour régler la tension du repose-jambes
1. Vous tenir debout à côté du meuble inoccupé et tirer la manette pour ouvrir le repose-jambes.
Vous assurer de ne pas vous appuyer ni exercer de pression sur le repose-jambes ouvert car il
pourrait se refermer. Sous le repose-jambes, soulever le revêtement du mécanisme pour repérer
les roulettes de réglage de la tension. Elles se trouvent devant le mécanisme, une de chaque côté.
(F
IGU RE 1). Chaque roulette a trois réglages de tension.
2. Ces roulettes sont préréglées en usine à la position du centre (F
tension et un soutien moyens.
3. La personne plus grande ou plus lourde peut choisir d’augmenter la tension du repose-jambes pour
un soutien accru. Pour augmenter la tension du repose-jambes, tourner les roulettes de réglage
vers le haut et vers l’avant de l’inclinable (F
réglées à la même position.
4. La personne plus petite peut choisir de réduire la tension du repose-jambes pour que ce dernier
se referme plus facilement. Pour diminuer la tension du repose-jambes, tourner les roulettes de
réglage vers le bas et vers l’arrière de l’inclinable (F
être réglées à la même position.
5. Refermer le repose-jambes et faire l’essai du nouveau réglage. Recommencer au besoin.
6. Répéter ces étapes pour personnaliser tous les modules inclinables de votre canapé inclinable
ou ensemble modulaire.
– Pour réduire le risque de blessures :
IGU RE 2). Cette position offre une
IGU RE 3). Les deux roulettes de réglage doivent être
IGU RE 4). Les deux roulettes de réglage doivent
FIGURE 1
Roulette
de réglage
de la tension
du reposejambes
Emplacement des roulettes réglables,
une de chaque côte
FIGURE 2
FIGURE 3
Tension moyenne du repose-jambes
FIGURE 4
Tension maximale du repose-jambes
Tension minimale du repose-jambes
54
55
Page 29

Réglage de la tension d’inclinaison
des meubles inclinables La-Z-Time
et La-Z-Time Motion-Modulars
MD
MD
Réglage de la tension d’inclinaison
des meubles inclinables La-Z-Time
et La-Z-Time Motion-Modulars
MD
MD
AVERTISSEMENT
• Ce meuble est doté d’un réglage de tension pour le mécanisme d’inclinaison, préréglé
en usine. Vous pouvez personnaliser ce réglage. Pour éviter de faire basculer le meuble
et pour en assurer la stabilité, ne jamais faire fonctionner le meuble quand les écrous
à oreilles qui règlent la tension sont complètement desserrés (voir les instructions
touchant le réglage de la tension d’inclinaison).
• L'utilisation de ce produit nécessite une force suffisante pour retourner le dossier en
position verticale et fermer le repose-jambes. Le fait de choisir les paramètres de
tension maximale pourrait rendre difficiles le retour du dossier en position verticale
et la fermeture du repose-jambes.
– Pour réduire le risque de blessures :
AV IS – Pour réduire le risque d'endommager le produit :
• Ne pas resserrer complètement les écrous à oreilles. Les ressorts ne doivent pas être
complètement comprimés après le réglage. Le cas échéant, tourner l’écrou à oreilles
au moins un demi-tour pour éviter d’endommager le mécanisme de tension des ressorts.
• Ne pas desserrer complètement les écrous à oreilles. Le ressort ne doit pas glisser sur
le boulon après le réglage. Le cas échéant, tourner les écrous à oreilles au moins un
demi-tour après que le ressort cesse de glisser sur le boulon.
• Régler les deux écrous à oreilles à égalité.
Instructions pour régler la tension d’inclinaison
1. Vous tenir debout à côté du meuble inoccupé et tirer la manette pour ouvrir le repose-jambes.
Vous assurer de ne pas vous appuyer ni exercer de pression sur le repose-jambes ouvert car il
pourrait se refermer. Sous le repose-jambes, soulever le revêtement du mécanisme pour repérer
les écrous à oreilles qui servent à régler la tension. Ils se trouvent devant le mécanisme, un de
chaque côté. (F
des fixations et n’ont aucun effet sur la tension.
2. Régler la tension en tournant les écrous à oreilles par quarts de tour jusqu’à ce que le réglage
voulu soit atteint. Les écrous doivent être réglés à la même tension.
• La personne plus grande ou plus lourde peut choisir d’augmenter la tension d’inclinaison
en resserrant les écrous à oreilles dans le sens horaire.
• La personne plus petite peut choisir de réduire la tension d’inclinaison en desserrant les écrous
à oreilles dans le sens antihoraire.
3. Refermer le repose-jambes. Faire l’essai du nouveau réglage d’inclinaison et recommencer au besoin.
4. Répéter ces étapes pour personnaliser tous les modules inclinables de votre canapé inclinable
ou ensemble modulaire.
IGU RE 1). Les écrous à oreilles qui se trouvent à l’arrière du mécanisme sont
FIGURE 1
Revêtement
du mécanisme
Écrou à oreilles
pour régler
linclinaison
Ressort
de tension
56
57
Page 30

Fonctionnement du canapé-lit Comment disposer vos meubles
DANGER
• Ne pas s'asseoir ou s'allonger sur le matelas du canapé-lit, sauf quand il est en pleine extension.
Ne jamais fermer l'unité alors qu’une personne ou un animal se trouve à l'intérieur.
AVERTISSEMENT
• Ne pas s’asseoir ni mettre de poids excessif sur la tête du matelas. Cela peut faire
basculer le matelas vers l’arrière.
Configuration de votre canapé-lit modulaire mobile
1. Retirer tous les coussins amovibles. Saisir la poignée au centre du tablier et soulever
vers le haut, puis vers vous (F
2. Reculer en tirant le mécanisme vers vous à la 1
alors bien en place au sol (F
3. Saisir le centre du pied avant monopièce. Tirer vers le haut et abaisser le pied avant
vers le sol (F
Caractéristique supplémentaire
Le canapé-lit est doté d’une position d’appuie-tête télé. Pour le relever, vous tenir debout à côté
du canapé-lit et tirer la partie de tête du mécanisme vers le haut. Tirer encore vers le haut pour
désactiver le mécanisme de verrouillage et remettre l’appuie-tête dans sa position d’origine (F
IGU RE 3).
– Pour réduire le risque de blessures graves ou de mort :
– Pour réduire le risque de blessures :
IGU RE 1).
IGU RE 2).
re
position. Les pieds du centre sont
IGURE 4).
AVERTISSEMENT
• Prévoir un parcours sans obstructions pour faire fonctionner le fauteuil, le dossier et
le repose-jambes. Placer les tables et les carpettes assez loin pour que le repose-jambes
puisse s’ouvrir complètement sans frottement ni obstruction.
Meubles inclinables
Pour placer votre meuble inclinable à une bonne distance du mur, incliner entièrement le meuble en
laissant au moins 5 cm (2 po) entre le dessus du dossier entièrement incliné et le mur (F
Placer les tables et carpettes assez loin pour permettre au repose-jambes de s’ouvrir sans frottement
ni obstruction. Sinon, le repose-jambes peut ne pas se fermer complètement (F
produit, le repose-jambes peut s’ouvrir soudainement et blesser quelqu’un. Certains meubles peuvent
être élevés au moyen de patins réglables pour empêcher les carpettes de frotter ou d’obstruer le
mouvement. Voir les instructions touchant le montage et le réglage. Voir la F
correcte de la carpette.
Vous assurer que les tables et autres articles sont assez loin pour ne pas gêner le repose-jambes.
Une table mal placée pourrait coincer l’occupant dans le meuble, tel qu’il est illustré à la FIGURE 4.
Il faut qu’il y ait assez de jeu pour que le repose-jambes soit entièrement ouvert avant d’être refermé.
FIGURE 1
-- Pour réduire le risque de blessures graves :
IGU RE1).
IGU RE 2). Si cela se
IGU RE 3 pour la distance
F
IGURE 2
IGURE 1
F
FIGURE 3
58
F
IGURE 2
IGURE 4
F
Min. 5 cm
(2 po)
F
IGURE 3
La carpette empêche le
repose-jambes de se refermer.
FIGURE 4
Distance
correcte
59
Page 31

Instructions de nettoyage du porte-gobelet
Instructions d’entretien et de nettoyage du porte-gobelet
L’apprêt du porte-gobelet peut être endommagé durant l’utilisation ou le nettoyage. Il est
recommandé d’utiliser un sous-verre pour réduire les risques de dommages, et de respecter
les instructions de nettoyage.
Utiliser de l’eau et un savon doux, comme un savon à vaisselle, pour nettoyer les porte-gobelets.
Sécher immédiatement et complètement avec un linge propre et doux pour préserver l’apprêt.
L’utilisation d’un nettoyant fort ou abrasif n’est pas recommandée et doit être évitée.
Notes
60
61
 Loading...