

LAVAZZA LB COMPACT Instructions Manual
Bedienungsanleitung
Leggere attentamente
Le istruzioni
read the instructions
carefuLLy
Lire attentivement
Le mode d’empLoi
BedienungsanLeitung Bit te
aufmerksam durchLesen
Leer atentamente
Las instrucciones
Ler atentamente
as instruções
de instructies
aandachtig Lezen
Instrucciones de empleo
Instruções de utilização
Istruzioni per l’uso
Instructions
Mode d’emploi
Gebruiksaanwijzing
LB COMPACT
Made in Italy
CONGRATULAZIONI!
Gentile Cliente, ci congratuliamo per aver scelto la macchina LB COMPACT e la ringraziamo
per la fiducia accordataci.
Prima di mettere in funzione la macchina, consigliamo di leggere attentamente le istruzioni
per l’uso che spiegano come utilizzarla, pulirla e mantenerla in perfetta efficienza. Le auguria-
mo la preparazione di tanti ottimi caffè grazie a Lavazza!
CONGRATULATIONS!
Dear Cu stomer,
we are glad that you bought the LB COMPACT machine: thank you very much for trusting our
company.
Prior to get the machine working, we recommend that you should read through the instructions
for use which explain how to use, clean and keep the machine in perfect working order. We wish
you will make and enjoy so many cups of coffee thanks to your new Lavazza machine!
FELICITATIONS !
Cher Client, nous tenons à vous féliciter pour avoir choisi la machine LB COMPACT et vous re-
mercions pour la confiance que vous nous avez accordée.
Avant de mettre en service la machine, nous conseillons de lire attentivement les instructions d’uti-
lisation qui fournissent les explications sur l’utilisation, le nettoyage et la conservation en parfait
état de marche. Nous vous souhaitons une bonne préparation d’excellents cafés grâce à Lavazza!
GRATULATION!
Lieber Kunde, wir beglückwünschen Sie, dass Sie die Maschine LB COMPACT gewählt haben
und bedanken uns für das uns geschenkte Vertrauen.
Bevor Sie die Maschine in Betrieb nehmen, bitten wir Sie, die Gebrauchsanweisung aufmerk-
sam durchzulesen, in der ihr Gebrauch, Reinigung und perfekte Instandhaltung erklärt ist. Wir
wünschen Ihnen die Zubereitung vieler ausgezeichneter Tassen Kaffee dank Lavazza!
¡ENHORABUENA!
Estimado Cliente: le damos nuestra más sincera enhorabuena por haber elegido LB COMPACT
y le agradecemos por depositar su confianza en nosotros.
Antes de poner en funcionamiento la máquina, le aconsejamos leer atentamente las instruc-
ciones de empleo que explican cómo utilizarla, limpiarla mantenerla en perfecto estado de
funcionamiento. Sólo nos queda desearle ¡muchos deliciosos cafés gracias a Lavazza!
CONGRATULAÇÕES!
Prezado Cliente, nos congratulamos consigo por haver escolhido a máquina LB COMPACT e
lhes agradecemos pela confiança.
Antes de colocar a máquina função, aconselhamos de ler com muita atenção as instruções para
o uso que explicam como utiliza-la, limpa-la e conserva-la em perfeita eficiência. Desejamos-
-lhes a preparação de muitos e bons cafés graças a Lavazza!
GEFELICITEERD!
Beste klant, wij feliciteren u met uw keuze van het toestel LB COMPACT en danken u voor
getoonde vertrouwen in ons.
We bevelen aan om, voordat u het toestel in gebruik neemt, de gebruiksaanwijzingen aandachtig te
lezen. De aanwijzingen leggen uit hoe u het toestel het beste kunt gebruiken, schoonmaken en per-
fect efficiënt houden. We wensen dat u vele kopjes heerlijke koffie zult bereiden dankzij Lavazza!
SICUREZZA
Destinazione d’uso:
IT
Questo apparecchio è destinato ad essere utilizzato nelle applicazioni domestiche e similari quali:
– nelle zone per cucinare riservate al personale nei negozi, negli uffici e in altri ambienti professionali;
– nelle fattorie;
– utilizzo da parte di clienti di alberghi, motel e altri ambienti a carattere residenziale;
– negli ambienti tipo bed and breakfast.
È vietato qualunque utilizzo improprio (non descritto nelle presenti istruzioni). È vietato apportare modifi-
che tecniche. L’apparecchio può essere utilizzato da bambini di età non inferiore a 8 anni e da persone con
ridotte capacità fisiche, sensoriali o mentali, o prive di esperienza o della necessaria conoscenza, purché
sotto sorveglianza oppure dopo che le stesse abbiano ricevuto istruzioni relative all’uso sicuro dell’appa-
recchio e alla comprensione dei pericoli ad esso inerenti. I bambini non devono giocare con l’apparecchio.
Tenere l’apparecchio e il suo cavo fuori dalla portata di bambini di età inferiore agli 8 anni.
La pulizia e la manutenzione destinata ad essere effettuata dall’utilizzatore non deve essere effettuata da
bambini senza sorveglianza.
Ubicazione:
Sistemare la macchina per caffè in un posto sicuro, dove nessuno possa rovesciarla o venirne ferito. Non
tenere la macchina a temperatura inferiore a 4°C poiché il gelo potrebbe danneggiarla. Non usare la mac-
china per caffè all’aperto. Non posare la macchina su superfici molto calde e/o nelle vicinanze di fiamme
libere.
Alimentazione di corrente:
Collegare la macchina per caffè soltanto ad una presa di corrente adeguata. La tensione deve corri-
spondere a quella indicata sulla targhetta della macchina.
Cavo d’alimentazione:
Non usare la macchina per caffè se il cavo d’alimentazione è difettoso. Se il cavo d’alimentazione è dan-
neggiato, esso deve essere sostituito dal costruttore o dal suo servizio di assistenza tecnica, in modo da
prevenire ogni rischio. Non far passare il cavo d’alimentazione per angoli e su spigoli vivi, sopra oggetti
molto caldi e proteggerlo dall’olio. Non portare o tirare la macchina per caffè tenendola per il cavo. Non
estrarre la spina tirandola per il cavo; non toccarla con le mani bagnate. Evitare che il cavo d’alimentazione
cada liberamente da tavoli o scaffali.
Pericolo di folgorazione:
Non mettere mai a contatto dell’acqua le parti sotto tensione e/o corrente.
Questo apparrecchio non deve essere immerso nell’acqua.
Protezione d’altre persone:
Tenere i bambini sotto supervisione, per evitare che giochino con l’apparecchio. I bambini non si
rendono conto del pericolo connesso agli elettrodomestici. Non lasciare alla loro portata i materiali
utilizzati per imballare la macchina.
3
IT
SICUREZZA
Pericolo d’ustioni:
Non toccare le parti calde (gruppo portacapsula, etc.) subito dopo l’uso dell’apparecchio. Durante
l’erogazione della bevanda prestare attenzione ad eventuali schizzi di liquido caldo.
Pulizia:
Prima di pulire la macchina, è indispensabile scollegare la spina dalla presa di corrente ed aspettare
che la macchina si raffreddi. Non immergere la macchina nell’acqua! È severamente vietato cercare
d’intervenire all’interno della macchina. Sostituire l’acqua nel serbatoio dopo 3 giorni di inutilizzo.
Per evitare di danneggiare l’apparecchio non utilizzare detergenti alcalini per la pulizia, bensì un
panno morbido e un detergente delicato.
Custodia della macchina:
Quando la macchina rimane inutilizzata per un periodo prolungato, staccare la spina dalla presa e
custodirla in luogo asciutto e non accessibile ai bambini. Proteggerla dalla polvere e dallo sporco.
Riparazioni / Manutenzione:
Nel caso di guasti, difetti o sospetto di difetto dopo una caduta, staccare subito la spina dalla presa.
Non mettere in funzione una macchina difettosa. Soltanto i Centri di Assistenza Autorizzati possono
effettuare interventi e riparazioni. Nel caso di interventi non eseguiti a regola d’arte, si declina ogni
responsabilità per eventuali danni.
Serbatoio acqua:
Immettere nel serbatoio soltanto acqua fresca potabile non gasata. Non mettere in funzione la mac-
china se non c’è acqua a sufficienza nel serbatoio.
Vano capsule:
Nel vano capsule devono essere inserite solo capsule Lavazza BLUE; non inserire le dita o qualsiasi
altro oggetto. Le capsule sono da usarsi una sola volta.
Smaltimento della macchina a fine vita:
INFORMAZIONE AGLI UTENTI: il simbolo del cassonetto barrato riportato sull’apparecchiatura o sulla
sua confezione indica che il prodotto alla fine della propria vita utile deve essere raccolto separata-
mente dagli altri rifiuti.
L’utente dovrà, pertanto, conferire l’apparecchiatura giunta a fine vita agli idonei centri di raccolta
differenziata dei rifiuti elettrici ed elettronici.
L’adeguata raccolta differenziata per l’avvio successivo dell’apparecchiatura dismessa al riciclaggio, al
trattamento e allo smaltimento ambientalmente compatibile contribuisce ad evitare possibili effetti
negativi sull’ambiente e sulla salute e favorisce il reimpiego e/o riciclo dei materiali di cui è composta
l’apparecchiatura.
Lo smaltimento abusivo del prodotto da parte dell’utente comporta l’applicazione delle sanzioni
amministrative previste dalla normativa vigente.
4

Leva caricamento capsula
Gruppo comandi
PREDISPOSIZIONE MACCHINA
IT
Coperchio serbatoio
Serbatoio
Vaschetta raccogli gocce/
capsule esauste
Griglia poggia tazze
(regolabile)
Interruttore generale
5
IT
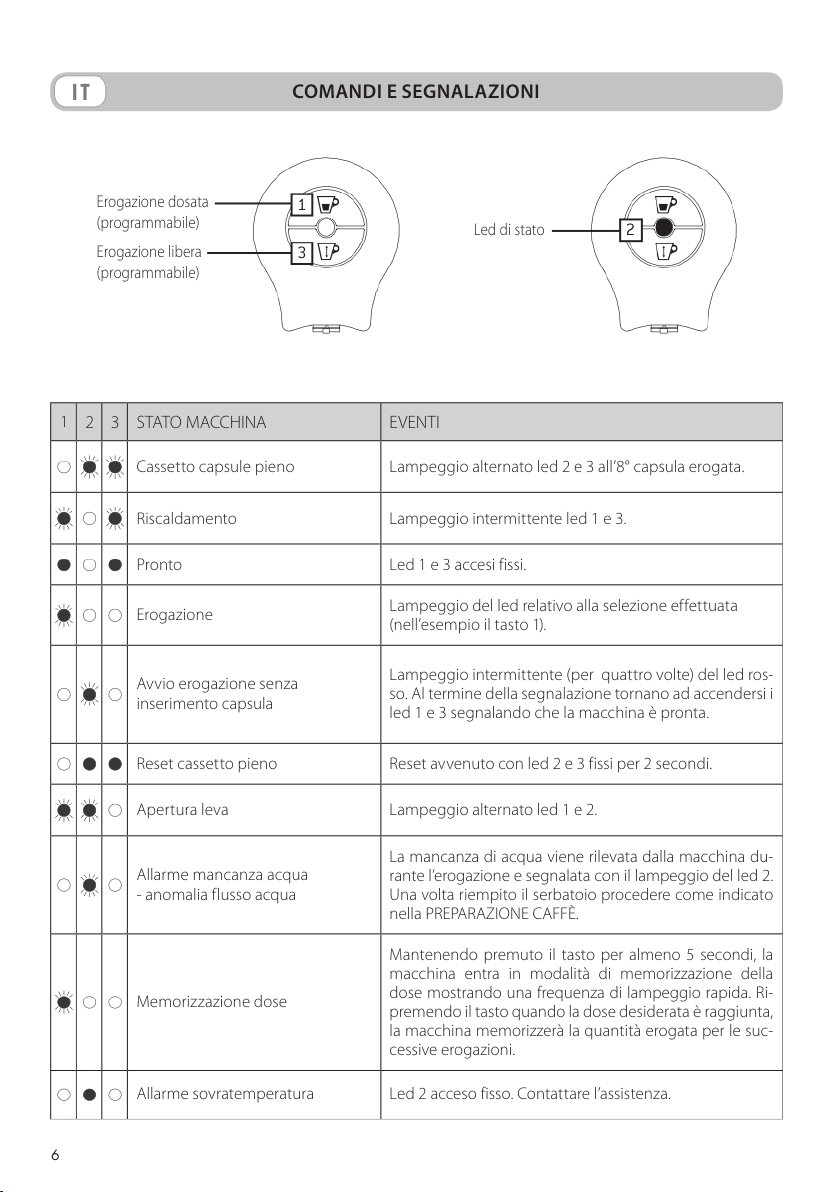
COMANDI E SEGNALAZIONI
Erogazione dosata
(programmabile)
Erogazione libera
(programmabile)
1
2 3 STATO MACCHINA EVENTI
Cassetto capsule pieno Lampeggio alternato led 2 e 3 all’8° capsula erogata.
Riscaldamento Lampeggio intermittente led 1 e 3.
Pronto Led 1 e 3 accesi fissi.
Erogazione
Avvio erogazione senza
inserimento capsula
Reset cassetto pieno Reset avvenuto con led 2 e 3 fissi per 2 secondi.
1
3
Led di stato
Lampeggio del led relativo alla selezione effettuata
(nell’esempio il tasto 1).
Lampeggio intermittente (per quattro volte) del led ros-
so. Al termine della segnalazione tornano ad accendersi i
led 1 e 3 segnalando che la macchina è pronta.
2
2
Apertura leva Lampeggio alternato led 1 e 2.
Allarme mancanza acqua
- anomalia flusso acqua
Memorizzazione dose
Allarme sovratemperatura Led 2 acceso fisso. Contattare l’assistenza.
6
La mancanza di acqua viene rilevata dalla macchina du-
rante l’erogazione e segnalata con il lampeggio del led 2.
Una volta riempito il serbatoio procedere come indicato
nella PREPARAZIONE CAFFÈ.
Mantenendo premuto il tasto per almeno 5 secondi, la
macchina entra in modalità di memorizzazione della
dose mostrando una frequenza di lampeggio rapida. Ri-
premendo il tasto quando la dose desiderata è raggiunta,
la macchina memorizzerà la quantità erogata per le suc-
cessive erogazioni.
PREDISPOSIZIONE MACCHINA
IT
Non si assumono responsabilità per eventuali
danni in caso di:
– Imp iego errato o non conforme agli scopi
previsti.
– Riparazioni eseguite presso centri di assi-
stenza non autorizzati.
– Manomissione del cavo di alimentazione.
– Manomissione di qualsiasi componente
della macchina.
– Impiego di pezzi di ricambio e accessori
non originali.
– Problemi legati alla presenza di calcare.
– Stoccaggio al di sotto di 4° C.
– Utilizzo al di sotto di 5° C.
– Utilizzo al di sopra di 40° C.
– Utilizzo di capsule diverse dalle Lavazza
BLUE.
In questi casi viene a decadere la garanzia.
AVVIAMENTO MACCHINA
Posizionare la macchina su una sup erficie pia-
na e stabile, lontano da acqua, fiamme e fonti
di calore. La macchina accesa non deve mai
essere coperta da strofinacci o altro.
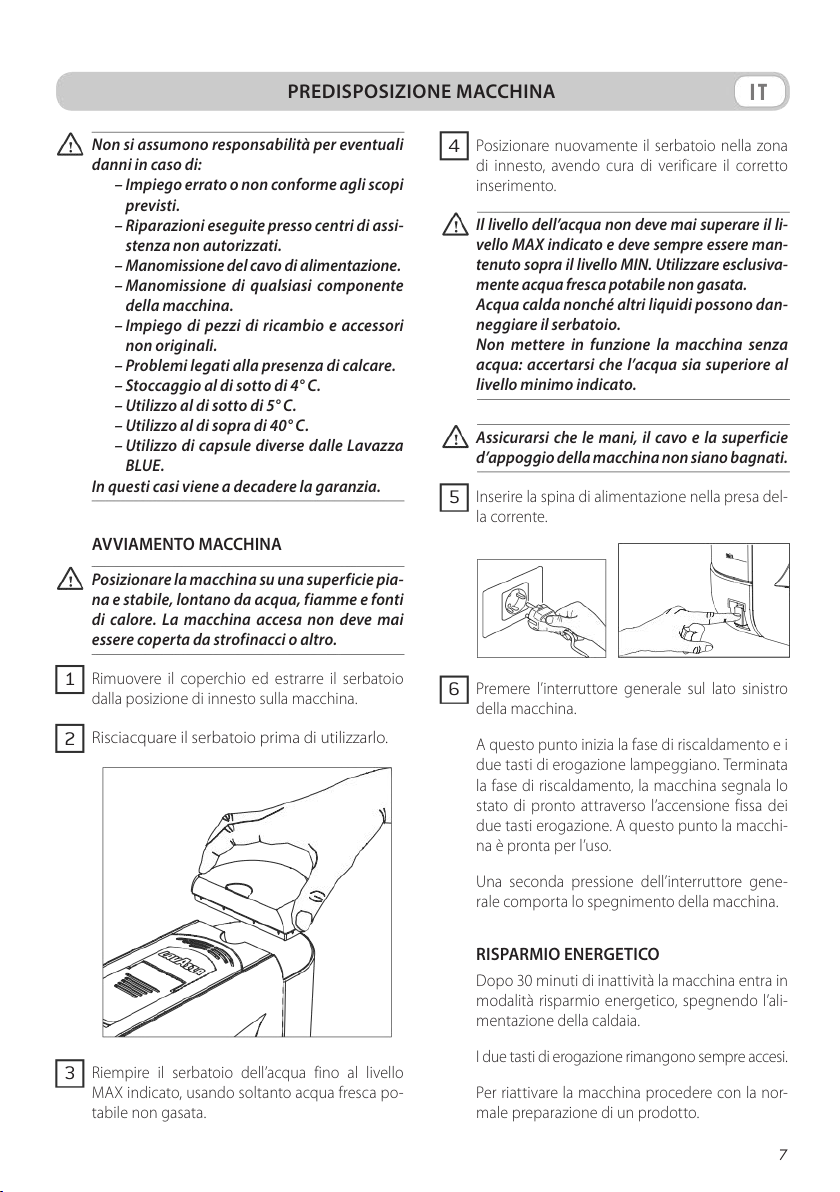
Rimuovere il coperchio ed estrarre il serbatoio
1
dalla posizione di innesto sulla macchina.
Risciacquare il serbatoio prima di utilizzarlo.
2
Posizionare nuovamente il serbatoio nella zona
4
di innesto, avendo cura di verificare il corretto
inserimento.
Il livello dell’acqua non deve mai superare il li-
vello MAX indicato e deve sempre essere man-
tenuto sopra il livello MIN. Utilizzare esclusiva-
mente acqua fresca potabile non gasata.
Acqua calda nonché altri liquidi possono dan-
neggiare il serbatoio.
Non mettere in funzione la macchina senza
acqua: accertarsi che l’acqua sia superiore al
livello minimo indicato.
Assicurarsi che le mani, il cavo e la superficie
d’appoggio della macchina non siano bagnati.
Inserire la spina di alimentazione nella presa del-
5
la corrente.
Premere l’interruttore generale sul lato sinistro
6
della macchina.
A questo punto inizia la fase di riscaldamento e i
due tasti di erogazione lampeggiano. Terminata
la fase di riscaldamento, la macchina segnala lo
stato di pronto attraverso l’accensione fissa dei
due tasti erogazione. A questo punto la macchi-
na è pronta per l’uso.
Riempire il serbatoio dell’acqua fino al livello
3
MAX indicato, usando soltanto acqua fresca po-
tabile non gasata.
Una seconda pressione dell’interruttore gene-
rale comporta lo spegnimento della macchina.
RISPARMIO ENERGETICO
Dopo 30 minuti di inattività la macchina entra in
modalità risparmio energetico, spegnendo l’ali-
mentazione della caldaia.
I due tasti di erogazione rimangono sempre accesi.
Per riattivare la macchina procedere con la nor-
male preparazione di un prodotto.
7
IT
PREDISPOSIZIONE MACCHINA
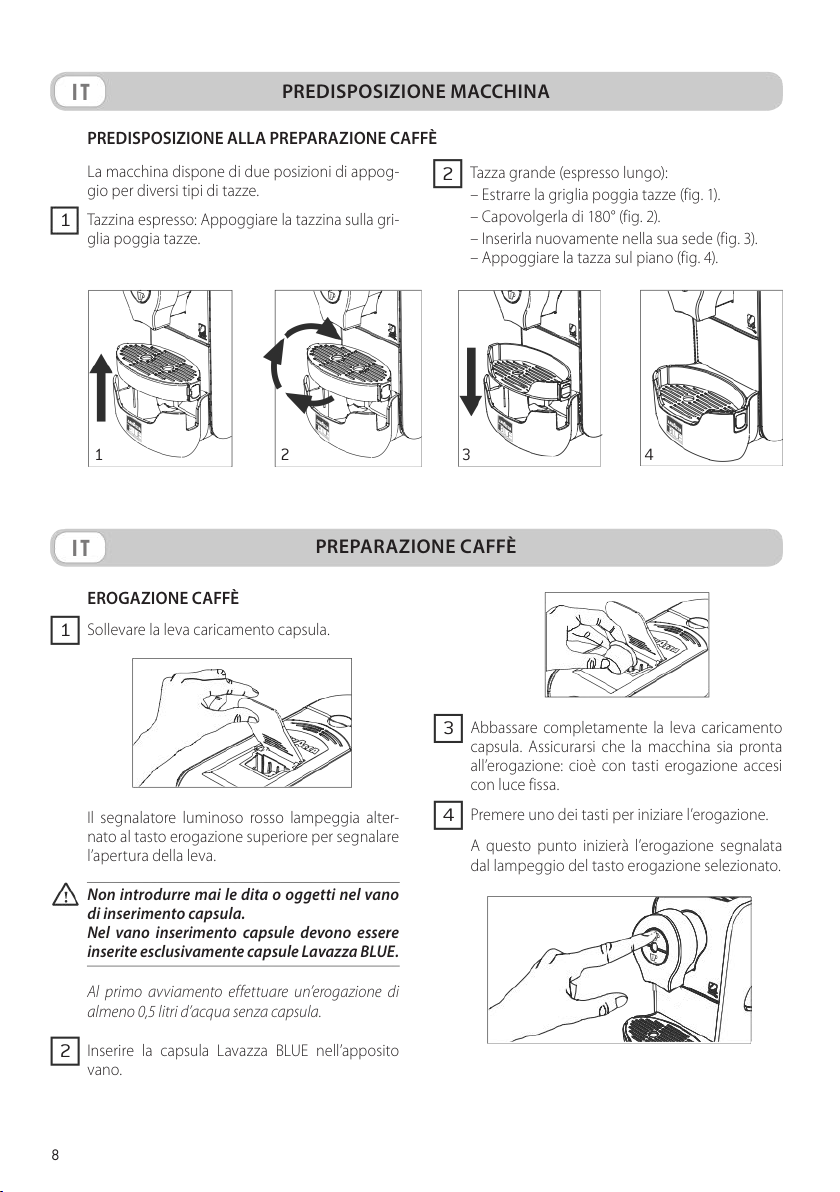
PREDISPOSIZIONE ALLA PREPARAZIONE CAFFÈ
La macchina dispone di due posizioni di appog-
gio per diversi tipi di tazze.
Tazzina espresso: Appoggiare la tazzina sulla gri-
1
glia poggia tazze.
Tazza grande (espresso lungo):
2
– Estrarre la griglia poggia tazze (fig. 1).
– Capovolgerla di 180° (fig. 2).
– Inserirla nuovamente nella sua sede (fig. 3).
– Appoggiare la tazza sul piano (fig. 4).
21
IT
PREPARAZIONE CAFFÈ
EROGAZIONE CAFFÈ
Sollevare la leva caricamento capsula.
1
Il segnalatore luminoso rosso lampeggia alter-
nato al tasto erogazione superiore per segnalare
l’apertura della leva.
Non introdurre mai le dita o oggetti nel vano
di inserimento capsula.
Nel vano inserimento capsule devono essere
inserite esclusivamente capsule Lavazza BLUE.
Al primo avviamento effettuare un’erogazione di
almeno 0,5 litri d’acqua senza capsula.
Inserire la capsula Lavazza BLUE nell’apposito
2
vano.
3
Abbassare completamente la leva caricamento
3
capsula. Assicurarsi che la macchina sia pronta
all’erogazione: cioè con tasti erogazione accesi
con luce fissa.
Premere uno dei tasti per iniziare l’erogazione.
4
A questo punto inizierà l’erogazione segnalata
dal lampeggio del tasto erogazione selezionato.
4
8

PREPARAZIONE CAFFÈ
IT
Nel caso del tasto espresso dosato,
l’erogazione si fermerà automaticamente al rag-
giungimento della quantità preimpostata (vedi
paragrafo: programmazione dose).
Nel caso del tasto erogazione libera,
una volta raggiunta la quantità desiderata di
caffè in tazza premere nuovamente il tasto per
terminare l’erogazione.
Durante l’erogazione del caf fè il tasto si accenderà
in modalità lampeggiante. Ad erogazione avve-
nuta il tasto resterà acceso prima in modalità lam-
peggiante e successivamente in modalità acceso
fisso, segnalando lo stato di macchina pronta. Nel
caso di erogazioni in sequenza particolarmente
lunghe, lo stato di macchina pronta potrebbe
essere preceduto da una fase di riscaldamento
segnalata dal lampeggio dei due tasti erogazione.
PROGRAMMAZIONE DOSE
La tastiera propone due tasti.
Il tasto superiore è associato alla dose espresso,
impostazione iniziale di fabbrica circa 40 ml.
Il tasto inferiore è invece dedicato alla dose
libera come impostazione di fabbrica, rego-
labile quindi dall’utente stesso. Anche la dose
associata a questo tasto può comunque essere
programmata.
Come programmare le dosi:
Sollevare la leva caricamento capsula. Il segna-
1
latore luminoso rosso lampeggia alternato al tasto
erogazione superiore.
Chiudere la leva.
3
Selezionare e mantenere premuto per 5 secondi
4
il tasto inferiore. La macchina entra in modalità
programmazione.
5 secondi
Nel momento in cui la macchina entra in modalità
programmazione l’intermittenza del led del tasto
selezionato diventa più veloce (frequenza doppia).
A questo punto si può rilasciare il tasto di sele-
5
zione e attendere il raggiungimento della dose
desiderata.
Premere il tasto lampeggiante per fermare l’ero-
6
gazione e memorizzare la dose.
RIMOZIONE CAPSULE USATE
Operazione da effettuarsi tassativamente a
macchina accesa.
Un lampeggio alternato del tasto di erogazione
inferiore e del led centrale indicherà che il cas-
setto capsule usate è pieno ed occorre estrarlo,
svuotarlo e reinserirlo.
Estraendo il cassetto per almeno 5 secondi,
la macchina azzera il conteggio delle capsule
contenute. La conferma dell’azzeramento è evi-
denziata dall’accensione contemporanea del led
centrale e del tasto inferiore per 2 secondi.
Inserire la capsula.
2
9
IT
MANUTENZIONE E PULIZIA
Prima di eseguire operazioni di pulizia assi-
curarsi sempre che la presa elettrica sia scol-
legata ed attendere il raffreddamento della
macchina.
Non lasciare l’acqua nel circuito e nel serbatoio per
più di 3 giorni, se questo dovesse accadere svuota-
re, sciacquare e riempire nuovamente il serbatoio
con acqua fresca, quindi effettuare un’erogazione
(senza capsula) prima di erogare il caffè o una be-
vanda.
Svuotare e pulire il cassetto raccogli gocce ogni
uno/due giorni, o comunque quando è pieno.
Non utilizzare forni (a microonde o tradizionali) per
asciugare la macchina o sue parti. Non utilizzare
detergenti alcalini, solventi, alcool o sostanze ag-
gressive.
Non immergere la macchina in acqua.
Salvo specifiche indicazioni tutti i componenti non
smontabili (esclusi quelli elettrici) della macchina
vanno lavati utilizzando panni o spugne non abra-
sive inumiditi in acqua fredda o tiepida.
Non utilizzare la lavastoviglie per il lavaggio dei
componenti.
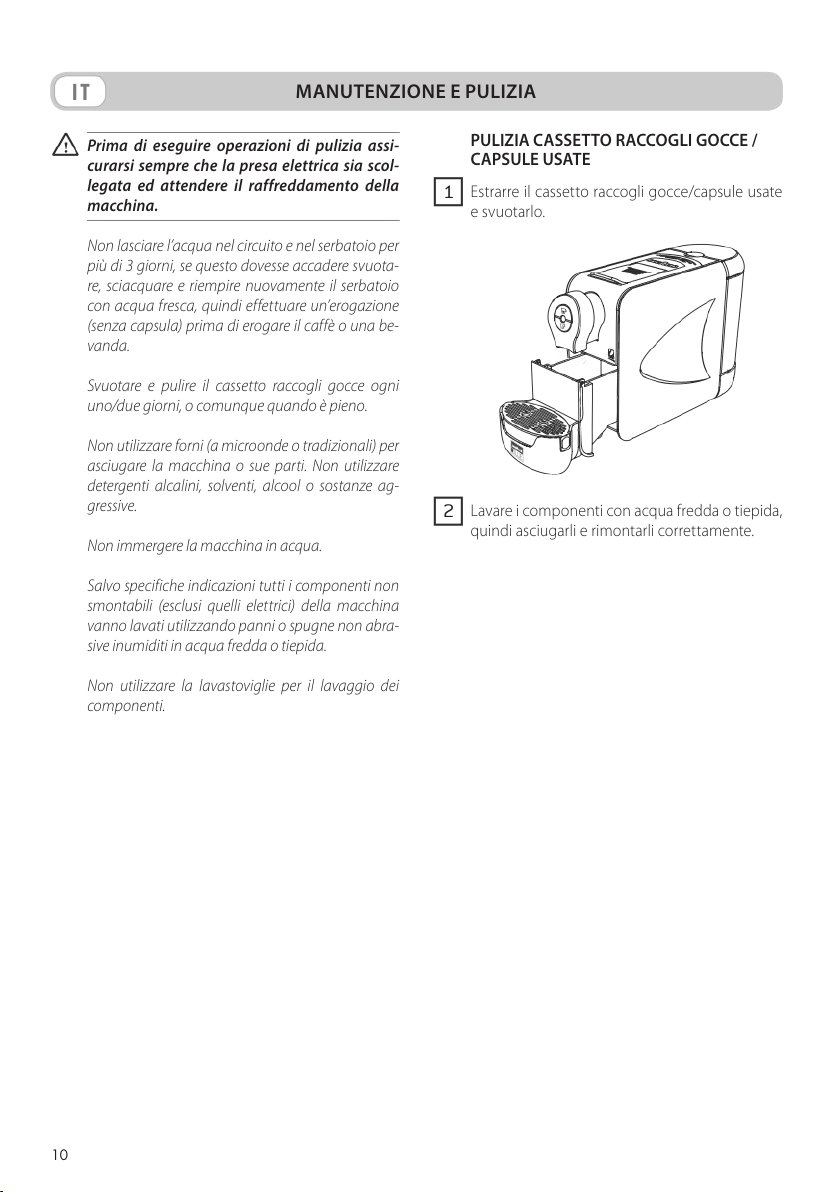
PULIZIA CASSETTO RACCOGLI GOCCE /
CAPSULE USATE
Estrarre il cassetto raccogli gocce/capsule usate
1
e svuotarlo.
Lavare i componenti con acqua fredda o tiepida,
2
quindi asciugarli e rimontarli correttamente.
10
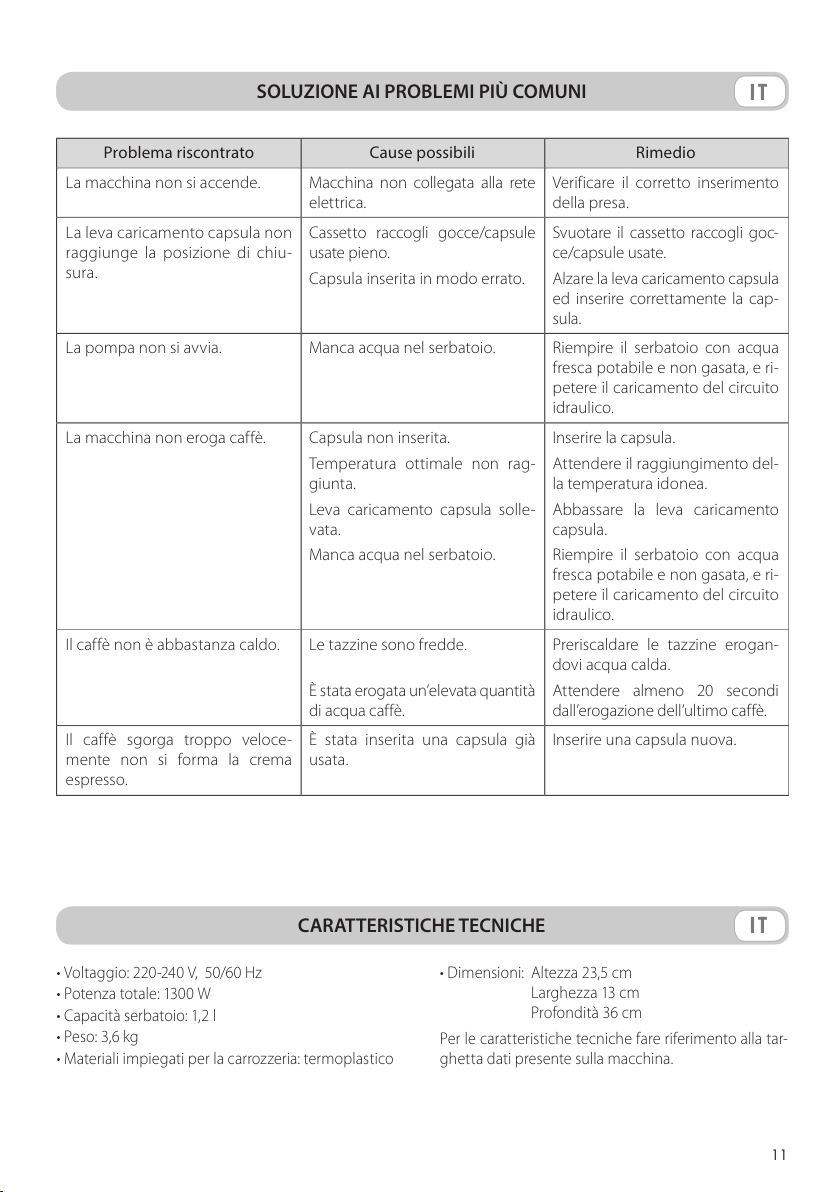
SOLUZIONE AI PROBLEMI PIÙ COMUNI
Problema riscontrato Cause possibili Rimedio
La macchina non si accende. Macchina non collegata alla rete
elettrica.
La leva caricamento capsula non
raggiunge la posizione di chiu-
sura.
La pompa non si avvia. Manca acqua nel serbatoio. Riempire il serbatoio con acqua
La macchina non eroga caffè. Capsula non inserita.
Il caffè non è abbastanza caldo. Le tazzine sono fredde.
Il caffè sgorga troppo veloce-
mente non si forma la crema
espresso.
Cassetto raccogli gocce/capsule
usate pieno.
Capsula inserita in modo errato.
Temperatura ottimale non rag-
giunta.
Leva caricamento capsula solle-
vata.
Manca acqua nel serbatoio.
È stata erogata un’elevata quantità
di acqua caffè.
È stata inserita una capsula già
usata.
Verificare il corretto inserimento
della presa.
Svuotare il cassetto raccogli goc-
ce/capsule usate.
Alzare la leva caricamento capsula
ed inserire correttamente la cap-
sula.
fresca potabile e non gasata, e ri-
petere il caricamento del circuito
idraulico.
Inserire la capsula.
Attendere il raggiungimento del-
la temperatura idonea.
Abbassare la leva caricamento
capsula.
Riempire il serbatoio con acqua
fresca potabile e non gasata, e ri-
petere il caricamento del circuito
idraulico.
Preriscaldare le tazzine erogan-
dovi acqua calda.
Attendere almeno 20 secondi
dall’erogazione dell’ultimo caffè.
Inserire una capsula nuova.
IT
CARATTERISTICHE TECNICHE
• Voltaggio: 220-240 V, 50/60 Hz
• Potenza totale: 1300 W
• Capacità serbatoio: 1,2 l
• Peso: 3,6 kg
• Materiali impiegati per la carrozzeria: termoplastico
IT
• Dimensioni: Altezza 23,5 cm
Larghezza 13 cm
Profondità 36 cm
Per le caratteristiche tecniche fare riferimento alla tar-
ghetta dati presente sulla macchina.
11
EN
SAFETY RECOMMENDATION
Purpose of appliance:
This appliance is intended to be used in household and similar applications such as:
– staff kitchen areas in shops, offices and other working environments;
– farm houses;
– by clients in hotels, motels and other residential type environments;
– bed and breakfast type environments.
Any improper use, not provided for by these instructions, is strictly forbidden. Likewise, no techni-
cal modification must be made. The machine may not be used by children under 8 years of age or
persons with physical, sensory or mental impairment, or lacking the necessary experience, unless
supervised or after being instructed in the safe use of the machine and understanding the potential
dangers. Do not let children play with the machine. Keep the machine and its mains lead out of the
reach of children under 8 years of age.
The necessary cleaning and maintenance must not be carried out by children if not under direct
supervision.
Installation site:
Place the coffee machine in a safe place, where nobody may overturn it or be injured by it. Do not
keep the machine at a temperature below 4°C (39,2°F) as freezing may damage it. Do not use the
coffee machine outdoors. Do not place the machine on very hot surfaces or close to flames.
Power Supply:
Only connect the coffee machine to a suitable socket. The voltage must correspond to that indi-
cated on the machine’s label.
To disconnect appliance, turn the main switch to “off“ then remove plug from wall outlet.
Power Cord:
Do not use the coffee machine if the power cord is defective. Should the power cord be damaged,
have it replaced by the manufacturer or the relevant service centre, in order to prevent any risk. Do
not pass the power cord around corners, over sharp edges or over hot objects and keep it away from
oil. Do not use the power cord to carry or pull the coffee machine. Do not pull out the plug by pulling
on the power cord or touch it with wet hands. Do not let the power cord hang freely from tables or
shelves.
Caution! – Danger of electric shocks:
Never allow the live parts and/or the parts where current flows to come into contact with water!
Do not immerse the machine in water.
Protection for Other People:
Prevent children from playing with the machine. Children are not aware of the risks related to electric
household appliances. Do not leave the machine packaging materials within the reach of children.
12
SAFETY RECOMMENDATION
Danger of Burns:
Do not touch the hot parts (capsule-holder, etc.) just after using the machine. Be careful of hot
liquid spurting while the coffee is issuing from the spout.
Cleaning:
Before cleaning, unplug the machine and let it cool down. Do not immerse the machine in water! It
is strictly forbidden to tamper with the internal parts of the machine. Change the water in the tank
if not used for 3 days. To prevent damage to the appliance do not use alkalinecleaning agents when
cleaning, use a soft cloth and a mild detergent.
Storing the Machine:
If the machine is to remain inactive for a long time, unplug it and store it in a dry place out of reach
of any children. Keep it protected from dust and dirt.
Servicing / Maintenance:
In case of failure, problems or a suspected fault resulting from the falling of the machine, immedi-
ately remove the plug from the socket. Do not attempt to operate a faulty machine. Servicing and
repairs may only be carried out by authorized service centers. All liability for damages resulting
from work not carried out by professionals is declined.
Water tank:
Fill the tank only with fresh, non-sparkling, drinking water. Do not operate the machine if there is
not enough water in the tank.
EN
Pod compartment:
Only Lavazza BLUE pods shall be fitted into the pod compartment: do not put your fingers or any
other object inside the compartment. Pods shall be used once only.
Machine disposal at the end of its operational life:
INFORMATION FOR THE USER: the symbol of the crossed-out wheeled bin on the appliance or its
packaging indicates that the product must be disposed of separately from other waste at the end
of its operational life.
The user must therefore take the appliance to be disposed of to an appropriate separate collection
centre for electrical and electronic equipment.
Appropriate separate collection for the dismantled appliance being subsequently sent out for recy-
cling, treatment and for environmentally friendly disposal, contribute to the prevention of possible
negative effects on the environment and on human health, and encourage recycling of the materi-
als the appliance is made of.
Specific administrative sanctions provided for by current regulations will be applied for illicit dis-
posal of the product by the user.
13
EN
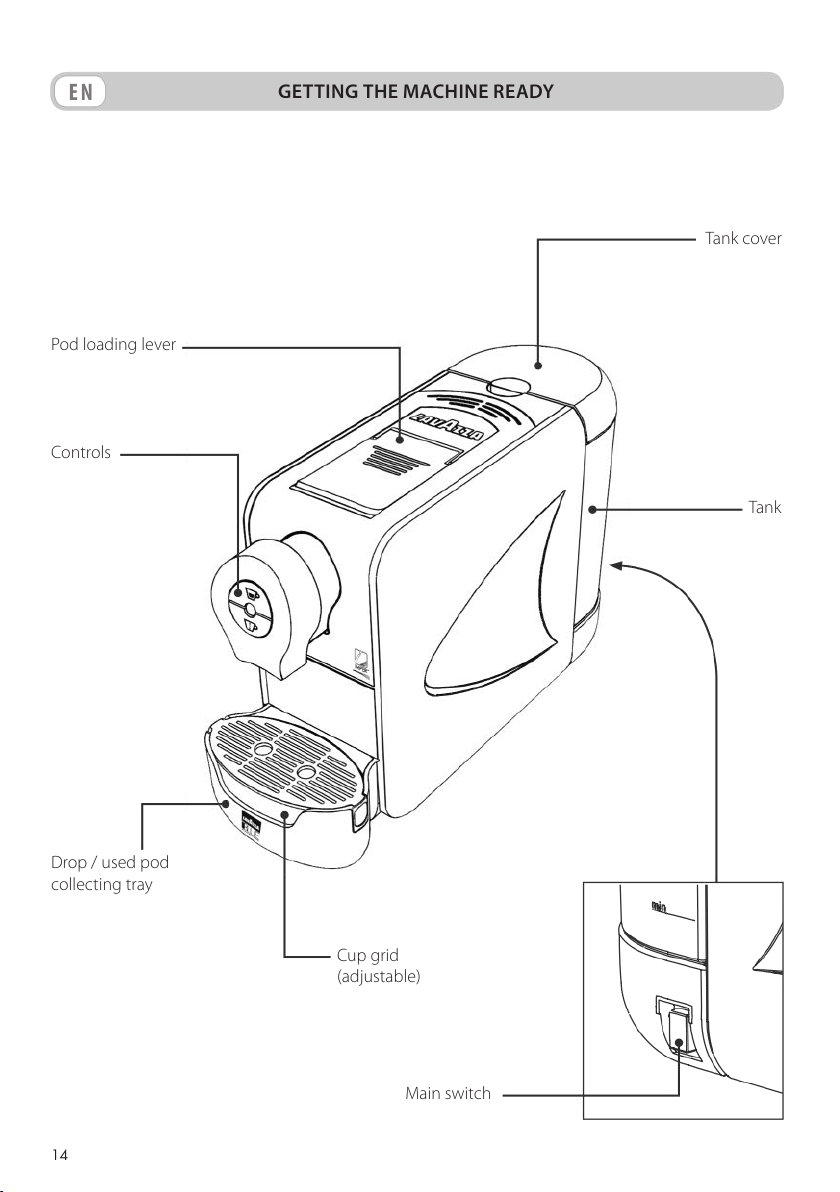
Pod loading lever
Controls
GETTING THE MACHINE READY
Tank cover
Tank
Drop / used pod
collecting tray
14
Cup grid
(adjustable)
Main switch
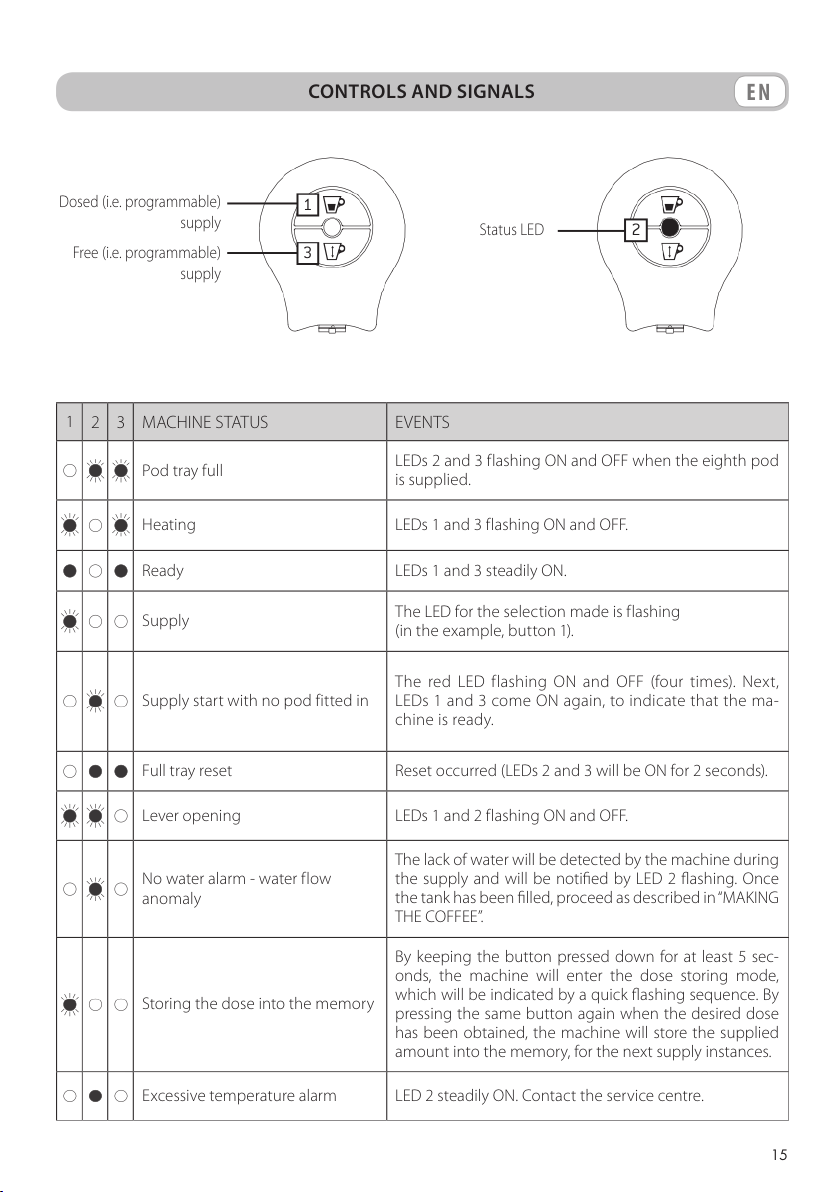
CONTROLS AND SIGNALS
EN
Dosed (i.e. programmable)
supply
Free (i.e. programmable)
supply
1
2 3 MACHINE STATUS EVENTS
Pod tray full
Heating LEDs 1 and 3 flashing ON and OFF.
Ready LEDs 1 and 3 steadily ON.
Supply
Supply start with no pod fitted in
Full tray reset Reset occurred (LEDs 2 and 3 will be ON for 2 seconds).
1
3
Status LED
LEDs 2 and 3 flashing ON and OFF when the eighth pod
is supplied.
The LED for the selection made is flashing
(in the example, button 1).
The red LED flashing ON and OFF (four times). Next,
LEDs 1 and 3 come ON again, to indicate that the ma-
chine is ready.
2
2
Lever opening LEDs 1 and 2 flashing ON and OFF.
No water alarm - water flow
anomaly
Storing the dose into the memory
Excessive temperature alarm LED 2 steadily ON. Contact the service centre.
The lack of water will be detected by the machine during
the supply and will be notified by LED 2 flashing. Once
the tank has been filled, proceed as described in “MAKING
THE COFFEE”.
By keeping the button pressed down for at least 5 sec-
onds, the machine will enter the dose storing mode,
which will be indicated by a quick flashing sequence. By
pressing the same button again when the desired dose
has been obtained, the machine will store the supplied
amount into the memory, for the next supply instances.
15
EN
GETTING THE MACHINE READY
The manufacturer will not be responsible for any
damage due to th e following:
– Improper use or any other use not provided
for.
– Repairs made by unauth orized service centr es.
– Power cord tam pering.
– Machine component tampering.
– Use of spare parts and accessories other than
the genuine ones.
– Troubles caused by limestone.
– Storing at a temperature of less than 4° C
(39,2°F).
– Using the machine at a temperature of less
than 5° C (41°F);.
– Using the machine at a temperature of more
than 40° C (104°F);.
– Using pods othe r than the Lavazza BLUE one s.
In the above cases, the product warranty will be
null and void.
GETTING THE MACHINE TO WORK
Place the machine onto a stable, flat surface,
far from water and heat sources. The machine
shall never be covered with cloths or any other
object when it is working.
Remove the cover and take the tank out of the
1
engaging position on the machine.
Rinse the tank before use
2
.
Place the tank again in the engaging area, taking
4
care to check the proper engagement.
The water level shall never exceed the MAX lev-
el and shall always be above the MI N mark. Use
only fresh, drinkable and non-effervescent wa-
ter, hot water or any other fluid that might
damage the tank.
Do not start the machine when water has not
been filled; moreover, make sure that the wa-
ter level is above the minimum level shown.
Make sure that your hands as well as the cord
and the machine supporting surfaces are not
wet.
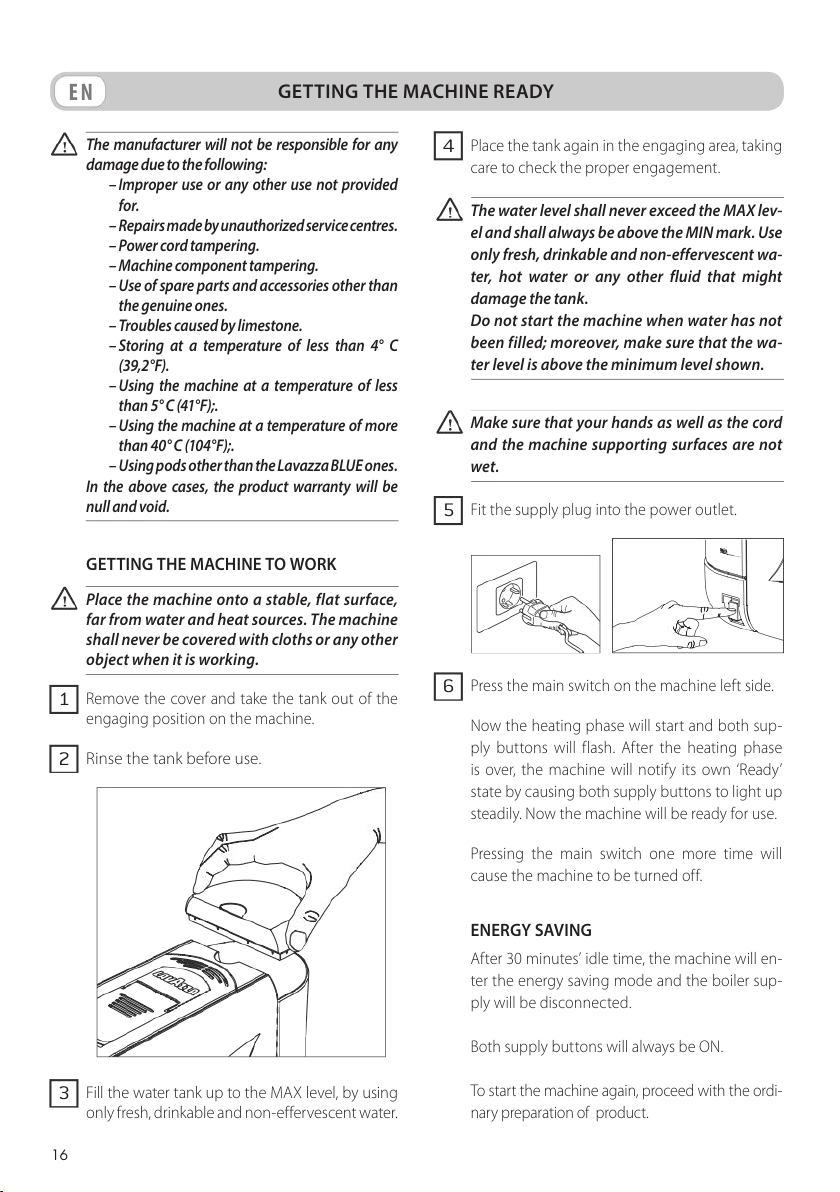
Fit the supply plug into the power outlet.
5
Press the main switch on the machine left side.
6
Now the heating phase will start and both sup-
ply buttons will flash. After the heating phase
is over, the machine will notify its own ‘Ready’
state by causing both supply buttons to light up
steadily. Now the machine will be ready for use.
Fill the water tank up to the MAX level, by using
3
only fresh, drinkable and non-ef fervescent water.
16
Pressing the main switch one more time will
cause the machine to be turned off.
ENERGY SAVING
After 30 minutes’ idle time, the machine will en-
ter the energy saving mode and the boiler sup-
ply will be disconnected.
Both supply buttons will always be ON.
To start the machine again, proceed with the ordi-
nary preparation of product.
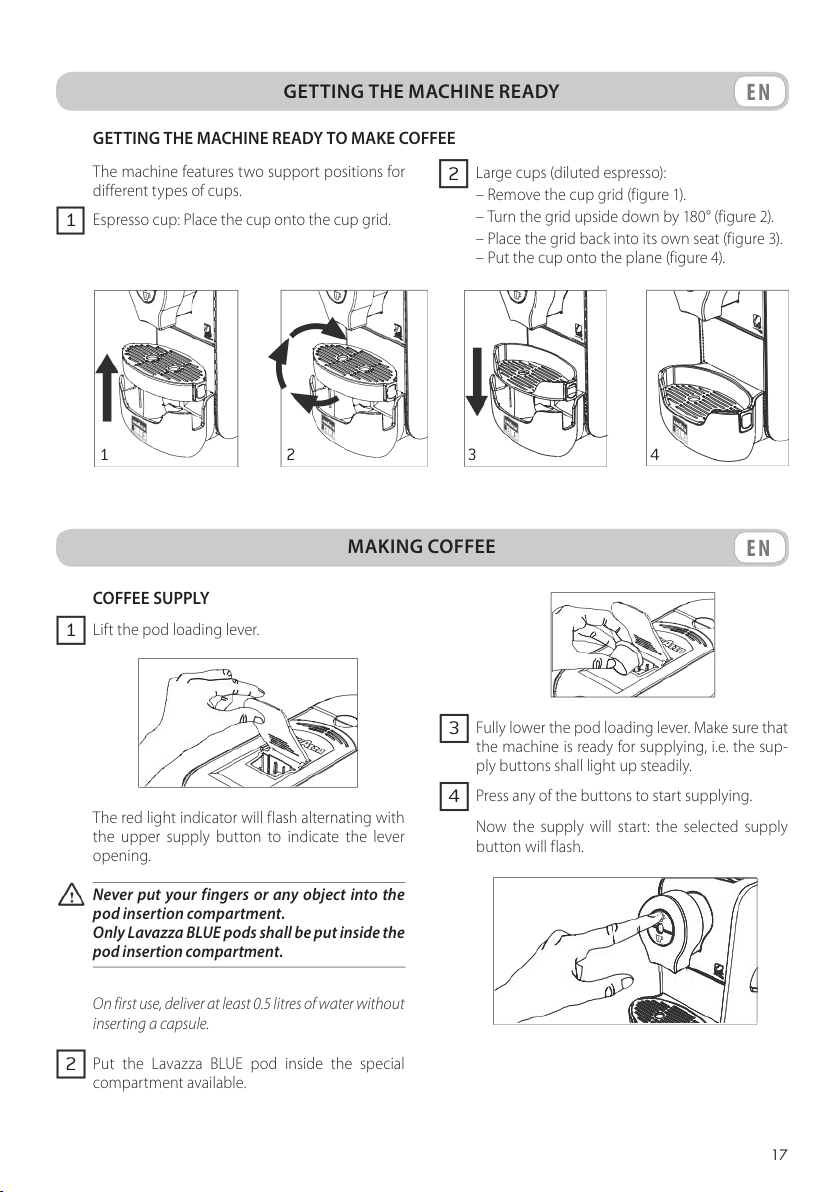
GETTING THE MACHINE READY
GETTING THE MACHINE READY TO MAKE COFFEE
The machine features two support positions for
different types of cups.
Espresso cup: Place the cup onto the cup grid.
1
Large cups (diluted espresso):
2
– Remove the cup grid (figure 1).
– Turn the grid upside down by 180° (figure 2).
– Place the grid back into its own seat (figure 3).
– Put the cup onto the plane (figure 4).
EN
21
COFFEE SUPPLY
Lift the pod loading lever.
1
The red light indicator will flash alternating with
the upper supply button to indicate the lever
opening.
Never put your fingers or any object into the
pod insertion compartment.
Only Lavazza BLUE pods shall be put inside the
pod insertion compartment.
On first use, deliver at least 0.5 litres of water without
inserting a capsule.
3
MAKING COFFEE
Fully lower the pod loading lever. Make sure that
3
the machine is ready for supplying, i.e. the sup-
ply buttons shall light up steadily.
Press any of the buttons to start supplying.
4
Now the supply will start: the selected supply
button will flash.
4
EN
Put the Lavazza BLUE pod inside the special
2
compartment available.
17
EN
MAKING COFFEE
In case of the dosed espresso button,
the supply will stop automatically when the pre-
set amount is reached (refer to the “Dose pro-
gramming” paragraph).
In case of the free supply button,
press the button again once the desired amount
of coffee is found in the cup, to stop the coffee
supply.
The button will light up and f lash when the coffee
is supplied. After the coffee has been supplied,
the button will remain ON, i.e. it will fort flash and
then light up steadily, to indicate the machine
ready status. In case of quite long repeated supply
instances, the machine ready status might come
after a heating phase (in this case, both supply
buttons will flash).
DOSE PROGRAMMING
The keypad has two buttons.
The upper button is for the espresso dose (facto-
ry-set amount: approximately 40 ml).
The lower button is for the free dose as factory-
set, i.e. able to be set by the user themselves. The
dose associated with this button can in any case
be programmed, too.
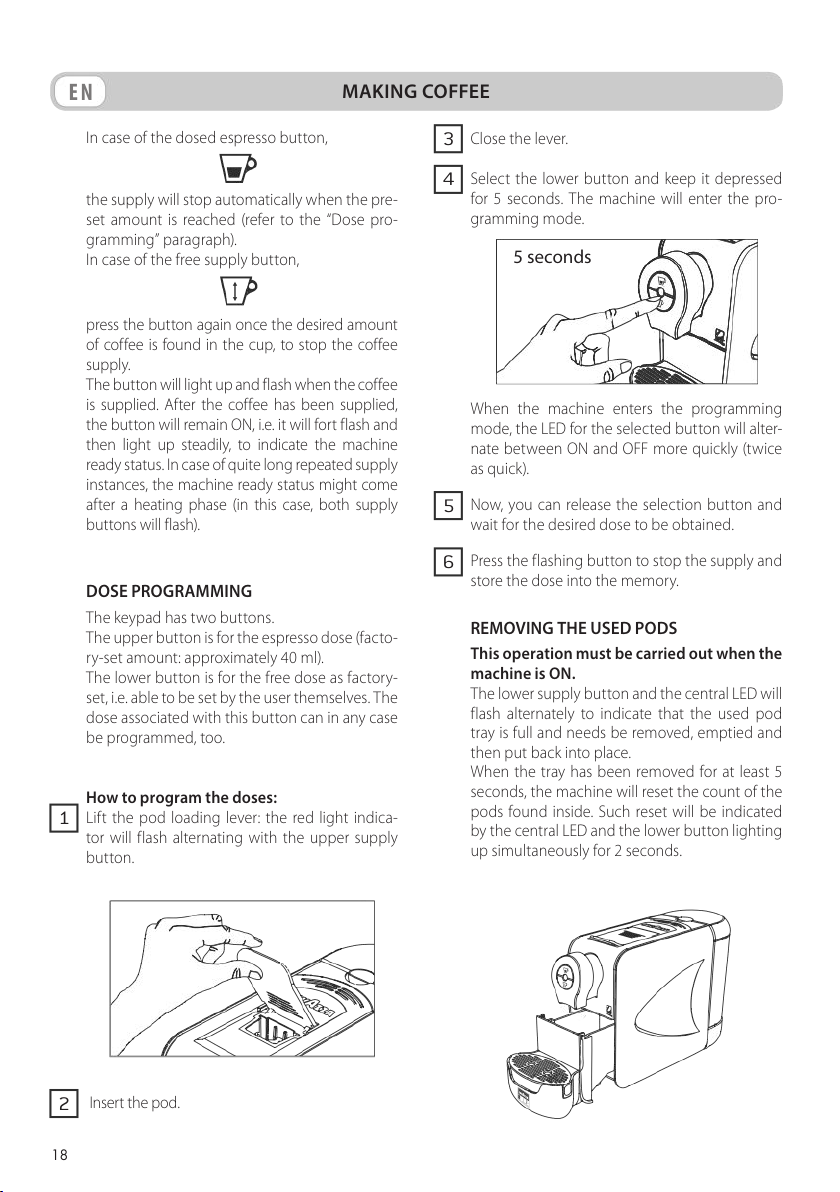
How to program the doses:
Lift the pod loading lever: the red light indica-
1
tor will flash alternating with the upper supply
button.
Close the lever.
3
Select the lower button and keep it depressed
4
for 5 seconds. The machine will enter the pro-
gramming mode.
5 seconds
When the machine enters the programming
mode, the LED for the selected button will alter-
nate between ON and OFF more quickly (twice
as quick).
Now, you can release the selection button and
5
wait for the desired dose to be obtained.
Press the flashing button to stop the supply and
6
store the dose into the memory.
REMOVING THE USED PODS
This operation must be carried out when the
machine is ON.
The lower supply button and the central LED will
flash alternately to indicate that the used pod
tray is full and needs be removed, emptied and
then put back into place.
When the tray has been removed for at least 5
seconds, the machine will reset the count of the
pods found inside. Such reset will be indicated
by the central LED and the lower button lighting
up simultaneously for 2 seconds.
18
2
Insert the pod.
MAINTENANCE AND CLEANING
EN
Prior to carrying out the cleaning operations,
make sure that the supply plug has been dis-
connected from the mains and, also, wait for
the machine to cool.
Do not leave water in the tank and water circuit for
more than 3 days. If this is the case, drain the tank
and circuit, rinse it and refill it with fresh water, then
carry out a delivery without capsule before making
any coffee or other beverage.
Empty and clean the drop collecting tray once
every one or two days or, in any case, when it is full.
Do not use ovens (microwave or traditional ones) to
dry the machine (or any part of the same). Do not
use alkaline cleaners, solvents, alcohol or aggressive
substances.
Do not dip the machine into water.
All of the machine components that cannot be
removed (except for the electric ones) shall, unless
otherwise specified, be washed by means of non-
abrasive cloths or sponge moistened with cold or
warm water.
Do not use a dishwasher to clean the components.
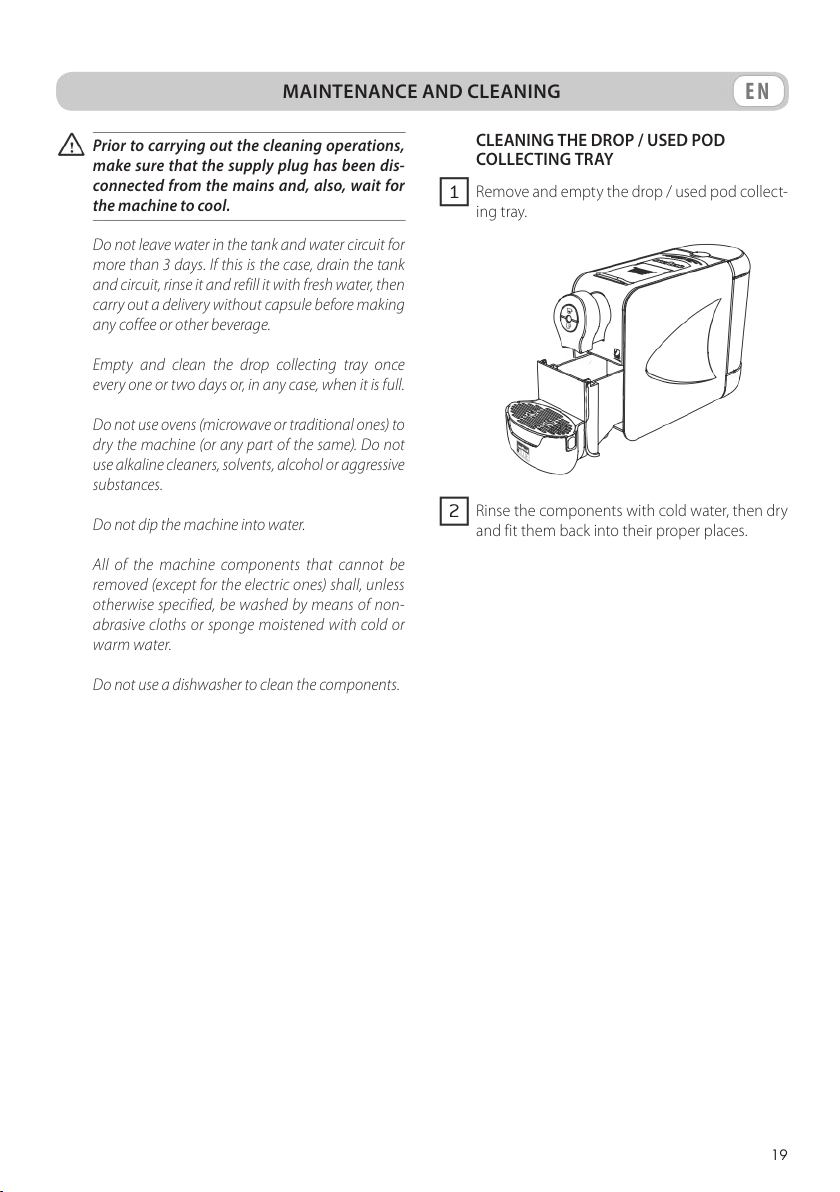
CLEANING THE DROP / USED POD
COLLECTING TRAY
Remove and empty the drop / used pod collect-
1
ing tray.
Rinse the components with cold water, then dry
2
and fit them back into their proper places.
19

EN
Problem Possible cause Solution
Machine won’t turn on. The machine has not been con-
The pod loading lever does not
reach the closing position.
Pump won’t start. Water is lacking in the tank. Fill the tank with fresh, drinkable
Machine won’t supply coffee. The pod has not been put in.
Coffee is not hot enough. The cups are cold.
Coffee pours out too quickly and
the espresso cream cannot be
obtained.
TROUBLESHOOTING
Verify that the plug has been cor-
nected to the power mains.
The drop / used pod collecting
tray is full.
The pod has been put in wrongly.
The optimum temperature has
not been reached.
The pod loading lever has been
lifted.
Water is lacking in the tank.
Too much coffee water has been
supplied.
A used pod has been put in. Put a new pod in.
rectly put into the socket.
Empty the drop / used pod col-
lecting tray.
Lower the pod loading lever and
correctly put the pod in.
and non-ef fervescent water, then
charge the hydraulic circuit again.
Put the pod in.
Wait until a suitable temperature
is reached.
Lower the pod loading lever.
Fill the tank with fresh, drinkable
and non-ef fervescent water, then
charge the hydraulic circuit again.
Pre-heat the cups by supplying
hot water to them.
Wait at least 20 seconds after the
last coffee has been supplied.
EN
• Voltage: 220-240 V, 50/60 Hz
• Overall output: 1,300 W
• Tank capacity: 1.2 l
• Weight: 3.6 kg / 7.9 lb
•
Materials used for the framework: thermoplastic
materials
20
TECHNICAL FEATURES
• Dimensions: Height: 23.5 cm / 9.2 in
Width: 13 cm / 5.1 in
Depth: 36 cm / 14,1 in
The technical features are shown on the data plate
found on the machine.
SECURITE
Destination d’emploi:
Cet appareil est destiné à être utilisé dans les applications ménagères et similaires, telles que:
– dans les zones servant de cuisine, réservées au personnel, dans les magasins, dans les bureaux et dans
d’autres milieux professionnels;
– dans les usines;
– utilisation par les clients des hôtels, motels, et autres endroits à caractère résidentiel;
– dans les pièces de type bed and breakfast.
Toute utilisation impropre (non décrite dans les présentes instructions) est interdite. Il est interdit d’appor-
ter des modifications techniques. L’appareil peut être utilisé par des enfants à partir de 8 ans ou par des
personnes avec des capacités physiques, sensorielles ou mentales réduites ou encore par des personnes
inexpérimentées ou ne possédant pas les connaissances nécessaires, à condition qu’elles soient surveillées
ou qu’elles aient reçu des consignes relatives à l’utilisation de l’appareil en toute sécurité et aux risques qu’il
comporte. Les enfants ne doivent pas jouer avec l’appareil. Tenir l’appareil et son câble loin de la portée des
enfants de moins de 8 ans.
Les opérations de nettoyage et de maintenance de l’appareil du ressort de l’utilisateur ne doivent pas être
exécutées par des enfants sans surveillance.
Emplacement:
Ranger la machine à café dans un endroit sûr pour éviter tout risque de renversement ou de blessures. Ne
pas garder la machine au-dessous de 4°C puisque le gel pourrait l’endommager. Ne pas utiliser la machine à
café en plein air. Ne pas placer la machine sur des surfaces très chaudes et/ou à proximité d’une flamme nue.
Alimentation du secteur:
Ne brancher la machine à café que sur une prise de courant appropriée. La tension doit corres-
pondre à celle indiquée sur la plaquette de la machine.
Câble d’alimentation:
Ne pas utiliser la machine à café si le câble d’alimentation est défectueux. Si le câble d’alimentation
est endommagé, il doit être remplacé par le constructeur ou par son service d’assistance technique,
afin d’éviter tout risque. Ne pas faire passer le câble d’alimentation sur des arêtes (vives) ou sur des
objets très chauds. Le protéger contre l’huile. Ne pas transporter ou tirer la machine à café par son
câble. Ne pas retirer la fiche en la tirant par le câble. Ne pas la toucher avec les mains mouillées.
Éviter que le câble d’alimentation ne pende librement des tables ou des étagères.
Danger d’électrocution:
Ne jamais mettre en contact de l’eau avec les parties sous tension et/ou courant.
Ne pas plonger l’appareil dans l’eau.
Protection des autres personnes:
Garder les enfants sous supervision, afin d’éviter qu’ils ne jouent avec l’appareil. Les enfants ne se
rendent pas compte des risques liés aux électroménagers. Les matériaux utilisés pour l’emballage
de la machine doivent être gardés hors de la portée des enfants.
FR
21
 Loading...