

LAVAZZA LB 2500 PLUS, EP 2500 plus Instructions For Use Manual
Istruzioni per l’uso - Instructions for Use - Guide d’utilisation
Gebrauchsanleitung - Instrucciones de uso
Instruções para utilização - Gebruiksinstructies
Leggere attentamente le istruzioni - Read all instructions carefully - Veuillez lire attentivement les instructions
Bitte lesen Sie die gesamte Gebrauchsanweisung aufmerksam durch - Lea atentamente las instrucciones
Leia cuidadosamente todas as instruções - Neem alle instructies zorgvuldig door
ISTRUZIONI ORIGINALI - ORIGINAL INSTRUCTIONS - INSTRUCTIONS ORIGINALES - ALLGEMEINE ANWEISUNGEN - INSTRUCCIONES ORIGINALES - INSTRUÇÕES ORIGINAIS - ORIGINELE INSTRUCTIES
LB 2500 PLUS
Congratulazioni!
Gentile Cliente, ci congratuliamo per aver scelto la macchina espresso Lavazza LB 2500 PLUS e la
ringraziamo per la fiducia accordataci. Prima di mettere in funzione la macchina, consigliamo di
leggere attentamente le istruzioni per l’uso che spiegano come utilizzarla, pulirla e mantenerla in
perfetta efficienza. Non ci resta che augurarle la preparazione di tanti ottimi caè grazie a Lavazza!
IT
Pagina
1
Herzlichen Glückwunsch!
Sehr geehrter Kunde wir gratulieren Ihnen zum Kauf der Espressomaschine Lavazza LB 2500 PLUS
und bedanken uns für Ihr Vertrauen, das Sie uns entgegengebracht haben. Vor Inbetriebnahme der
Maschine raten wir Ihnen die Betriebsanleitungen sorgfältig zu lesen, die Ihnen erklären wie sie zu
benutzen, zu reinigen und in einem perfekten Zustand zu halten ist. Wir wünschen Ihnen, dass Sie
dank Lavazza viele ausgezeichnete Tassen Kaee zubereiten werden!
DE
Seite
55
¡Enhorabuena!
Estimado Cliente le damos nuestra más sincera enhorabuena por haber elegido la máquina
espresso Lavazza LB 2500 PLUS y le agradecemos por depositar su confianza en nosotros. Antes
de poner en funcionamiento la máquina, le aconsejamos leer atentamente las instrucciones de
empleo que explican cómo utilizarla, limpiarla y mantenerla en perfecto estado de funcionamiento.
Sólo nos queda desearle ¡muchos deliciosos cafés gracias a Lavazza!
ES
Página
73
Parabéns!
Prezado Cliente, parabéns por ter escolhido a máquina expresso Lavazza LB 2500 PLUS e
agradecemos a confiança dada. Antes de usar a máquina, aconselhamos ler atentamente as
instruções de uso, que explicam como utilizá-la, limpá-la e mantê-la perfeitamente eficiente.
Depois disso, desejamos que prepare tantos ótimos cafés com a Lavazza!
Pagina
??
PT
Página
91
Gefeliciteerd!
Geachte Klant, wij feliciteren u met de keuze van het espressoapparaat Lavazza LB 2500 PLUS en
danken u voor het getoonde vertrouwen in ons. Wij raden u aan, voordat u het apparaat in gebruik
neemt, deze instructies aandachtig te lezen. In deze gebruiksaanwijzing wordt namelijk uitgelegd
hoe u het apparaat het beste kunt gebruiken, schoonmaken en onderhouden. Tot slot wensen wij
dat u nog vele heerlijke koffie zult bereiden danzij Lavazza!
NL
Pagina
109
Congratulations!
Dear Customer, we would like to congratulate you on your choice of the Lavazza LB 2500 PLUS
espresso machine and thank you for choosing us. Before using the machine we would advise you
to closely read the instruction booklet, which explains how to use it, clean it and keep it in proper
working condition. All that remains is for us to wish you all the best in preparing many excellent
Lavazza coees!
EN
Page
19
Félicitations!
Cher Client, nous vous félicitons d’avoir choisi la machine pour espresso Lavazza LB 2500 PLUS,
et nous vous remercions de votre confiance. Avant de faire fonctionner la machine, nous vous
conseillons de lire attentivement le mode d’emploi qui explique comment l’utiliser, la nettoyer et la
maintenir en excellent état. Il ne nous reste qu’à vous souhaiter de préparer beaucoup d’excellents
cafés grâce à Lavazza!
FR
Page
37
È importante leggere attentamente le istruzioni contenute nel presente libretto.
Carefully read the instrctions in this booklet.
Il est important de lire attentivement ce mode d’emploi.
Bitte die Gebrauchsanweisung in diesem Heft sowie.
Es importante leer atentamente las instrucciones del presente manual.
É importante ler com atenção as istruções contidas no presente manual.
Het is van belang zorgvuldig de in deze handleiding.

1
IT
SICUREZZA
DESTINAZIONE D’USO
Questo apparecchio è destinato ad essere utilizzato
nelle applicazioni professionali.
È vietato qualunque utilizzo improprio (non descritto nelle presenti istruzioni).
È vietato apportare modiche tecniche.
Questo apparecchio può essere utilizzato da bambini a partire dagli 8 anni se attentamente sorvegliati o istruiti all’uso dell’apparecchio in modo sicuro e
se ne comprendono i pericoli connessi.
Pulizia e manutenzione non devono essere eseguite da bambini a meno che non siano di età superiore agli 8 anni e controllati.
Tenere l’apparecchio e il suo cavo fuori dalla portata
di bambini di età inferiore agli 8 anni.
Questo apparecchio può essere utilizzato da persone con ridotte capacità siche, sensoriali o mentali,
o mancanza di esperienza e di conoscenza se attentamente sorvegliate o istruite all’uso dell’apparecchio in modo sicuro e se ne comprendono i pericoli connessi. I bambini non devono giocare con
l’apparecchio.
UBICAZIONE
Sistemare la macchina per caè in un posto sicuro,
su una supercie piana, orizzontale e stabile, dove
nessuno possa rovesciarla o venirne ferito.
Non tenere la macchina a temperatura inferiore a 4
°C poiché il gelo potrebbe danneggiarla.
Non usare la macchina per caè all’aperto.
Non posare la macchina su superci molto calde
e/o nelle vicinanze di amme libere.
Utilizzare la macchina a temperatura ambiente.
ALIMENTAZIONE
Collegare la macchina per caè soltanto ad una presa di corrente adeguata.
La tensione deve corrispondere a quella indicata
sulla targhetta della macchina.
CAVO ALIMENTAZIONE
Non usare la macchina per caè se il cavo d’alimentazione è difettoso o danneggiato.
In tali casi deve essere sostituito immediatamente.
Non far passare il cavo d’alimentazione per angoli
e su spigoli vivi, sopra oggetti molto caldi e proteggerlo dall’olio.
Non portare o tirare la macchina per caè tenendola per il cavo.
Non estrarre la spina tirando il cavo; non toccare la
spina con le mani bagnate.
Evitare che il cavo d’alimentazione cada liberamente da tavoli o scaali.
PERICOLO DI FOLGORAZIONE
Non mettere mai a contatto dell’acqua le parti sotto
corrente.
Assicurarsi che le mani, la macchina, il cavo e la supercie d’appoggio della macchina non siano bagnati.
PROTEZIONE D’ALTRE PERSONE
Tenere i bambini sotto supervisione, per evitare che
giochino con l’apparecchio.
I bambini non si rendono conto del pericolo connesso agli elettrodomestici.
Non lasciare alla loro portata i materiali utilizzati per
imballare la macchina.
PERICOLO D’USTIONI
Non toccare le parti calde (gruppo porta capsula,
etc.) subito dopo l’uso dell’apparecchio.
Durante l’erogazione della bevanda prestare attenzione ad eventuali schizzi di liquido caldo.
PULIZIA
Prima di pulire la macchina, è indispensabile staccare la spina dalla presa di corrente ed aspettare che la
macchina si rareddi.
Non immergere la macchina nell’acqua! È severamente vietato cercare d’intervenire all’interno della
macchina.
Non utilizzare per scopi alimentari l’acqua presente
nel serbatoio.
CUSTODIA DELLA MACCHINA
Quando la macchina rimane inutilizzata per un
periodo prolungato, staccare la spina dalla presa
e custodirla in luogo asciutto e non accessibile ai
bambini.
Proteggerla dalla polvere e dallo sporco.
RIPARAZIONI / MANUTENZIONE
Nel caso di guasti, difetti o sospetto di difetto dopo
una caduta, staccare subito la spina dalla presa.
Non mettere in funzione una macchina difettosa.
Soltanto i Centri di Assistenza Autorizzati possono
eettuare interventi e riparazioni.
Nel caso di interventi non eseguiti a regola d’arte, si
declina ogni responsabilità per eventuali danni.

2
IT
SICUREZZA
SERBATOIO ACQUA
Immettere nel serbatoio soltanto acqua fresca potabile non gasata.
Non mettere in funzione la macchina se l’acqua non
supera almeno il livello minimo indicato sul serbatoio.
VANO CAPSULE
Nel vano capsule devono essere inserite solo capsule compatibili; non inserire le dita o qualsiasi altro
oggetto.
Le capsule sono da utilizzare una sola volta.
SMALTIMENTO DELLA MACCHINA A FINE
VITA
INFORMAZIONE AGLI UTENTI: ai sensi dell’art. 13
del Decreto Legislativo 25 luglio 2005, n. 151 “Attuazione delle Direttive 2002/95/CE, 2002/96/CE e
2003/108/CE, relative alla riduzione dell’uso di sostanze pericolose nelle apparecchiature elettriche
ed elettroniche, nonché allo smaltimento dei riuti”
e successive modiche.
Il simbolo del cassonetto barrato riportato sull’apparecchiatura o sulla sua confezione indica che il
prodotto alla ne della propria vita utile deve essere
raccolto separatamente dagli altri riuti.
L’utente dovrà, pertanto, conferire l’apparecchiatura giunta a ne vita agli idonei centri di raccolta
dierenziata dei riuti elettronici ed elettrotecnici,
oppure riconsegnarla al rivenditore al momento
dell’acquisto di una nuova apparecchiatura di tipo
equivalente, in ragione di uno a uno.
L’adeguata raccolta dierenziata per l’avvio successivo dell’apparecchiatura dismessa al riciclaggio, al
trattamento e allo smaltimento ambientalmente
compatibile contribuisce ad evitare possibili eetti negativi sull’ambiente e sulla salute e favorisce il
reimpiego e/o riciclo dei materiali di cui è composta
l’apparecchiatura.
Lo smaltimento abusivo del prodotto da parte
dell’utente comporta l’applicazione delle sanzioni
amministrative previste dalla normativa vigente.

3
IT
INDICE GENERALE
Queste istruzioni d’uso si riferiscono alla macchina con versione rmware 1.0 e successive.
SICUREZZA .......................................................................................................................................1
DESTINAZIONE D’USO ........................................................................................................................................................................................................1
UBICAZIONE..............................................................................................................................................................................................................................1
ALIMENTAZIONE .................................................................................................................................................................................................................... 1
CAVO ALIMENTAZIONE ...................................................................................................................................................................................................... 1
PERICOLO DI FOLGORAZIONE ....................................................................................................................................................................................... 1
PROTEZIONE D’ALTRE PERSONE ................................................................................................................................................................................... 1
PERICOLO D’USTIONI...........................................................................................................................................................................................................1
PULIZIA ........................................................................................................................................................................................................................................ 1
CUSTODIA DELLA MACCHINA .......................................................................................................................................................................................1
RIPARAZIONI / MANUTENZIONE ..................................................................................................................................................................................1
SERBATOIO ACQUA ..............................................................................................................................................................................................................2
VANO CAPSULE .......................................................................................................................................................................................................................2
SMALTIMENTO DELLA MACCHINA A FINE VITA ................................................................................................................................................. 2
INDICE GENERALE ...........................................................................................................................3
COMPONENTI ...................................................................................................................................4
MESSAGGI A DISPLAY STATO MACCHINA ......................................................................................4
PREDISPOSIZIONE MACCHINA .......................................................................................................5
DISIMBALLO E POSIZIONAMENTO .............................................................................................................................................................................. 5
AVVIAMENTO MACCHINA ................................................................................................................................................................................................ 5
MENU’ IMPOSTAZIONI .....................................................................................................................7
MENU’ UTENTE ........................................................................................................................................................................................................................ 7
CREDITI RESIDUI ..........................................................................................................................................................................................................................................................7
IMPOSTAZIONE DOSI ...............................................................................................................................................................................................................................................7
INSTALLAZIONE ADDOLCITORE ........................................................................................................................................................................................................................7
MENU’ IMPOSTAZIONI .........................................................................................................................................................................................................8
SCELTA LINGUA............................................................................................................................................................................................................................................................8
IMPOSTAZIONE DOSI ...............................................................................................................................................................................................................................................8
DECALCIFICAZIONE ..................................................................................................................................................................................................................................................8
DUREZZA H2O .............................................................................................................................................................................................................................................................9
DELTA TEMP ................................................................................................................................................................................................................................................................10
MODIFICA PASSWORD ......................................................................................................................................................................................................................................... 10
ENERGY SAVING .......................................................................................................................................................................................................................................................10
INNESCO POMPE ..................................................................................................................................................................................................................................................... 10
VERIFICA CARD ......................................................................................................................................................................................................................................................... 10
CONTATORE EROGAZIONI ................................................................................................................................................................................................................................. 11
CONTATORE ADDOLCITORE ............................................................................................................................................................................................................................. 11
PREPARAZIONE BEVANDE ............................................................................................................12
PREDISPOSIZIONE ALLA PREPARAZIONE DELLE BEVANDE ...................................................................................................................... 12
EROGAZIONE BEVANDE..................................................................................................................................................................................................12
ESPRESSO ..................................................................................................................................................................................................................................................................... 12
ESPRESSO LUNGO ...................................................................................................................................................................................................................................................13
ESPRESSO MACCHIATO .......................................................................................................................................................................................................................................13
BEVANDA AL GUSTO DI LATTE MACCHIATO/CAPPUCCINO ......................................................................................................................................................... 13
BEVANDE CALDE CON CAPSULA ..................................................................................................................................................................................................................13
MANUTENZIONE E PULIZIA...........................................................................................................14
PULIZIA MANUALE GRUPPO MIXER ........................................................................................................................................................................ 14
PULIZIA CASSETTO RACCOGLI GOCCE/CAPSULE USATE .......................................................................................................................... 15
DECALCIFICAZIONE CIRCUITO IDRAULICO .........................................................................................................................................................16
MESSAGGI DI ALLARME SUL DISPLAY ..........................................................................................17
MESSAGGI SUL DISPLAY DURANTE LE OPERAZIONI CON CHIP CARD.......................................18
CARATTERISTICHE TECNICHE .......................................................................................................18
4
IT
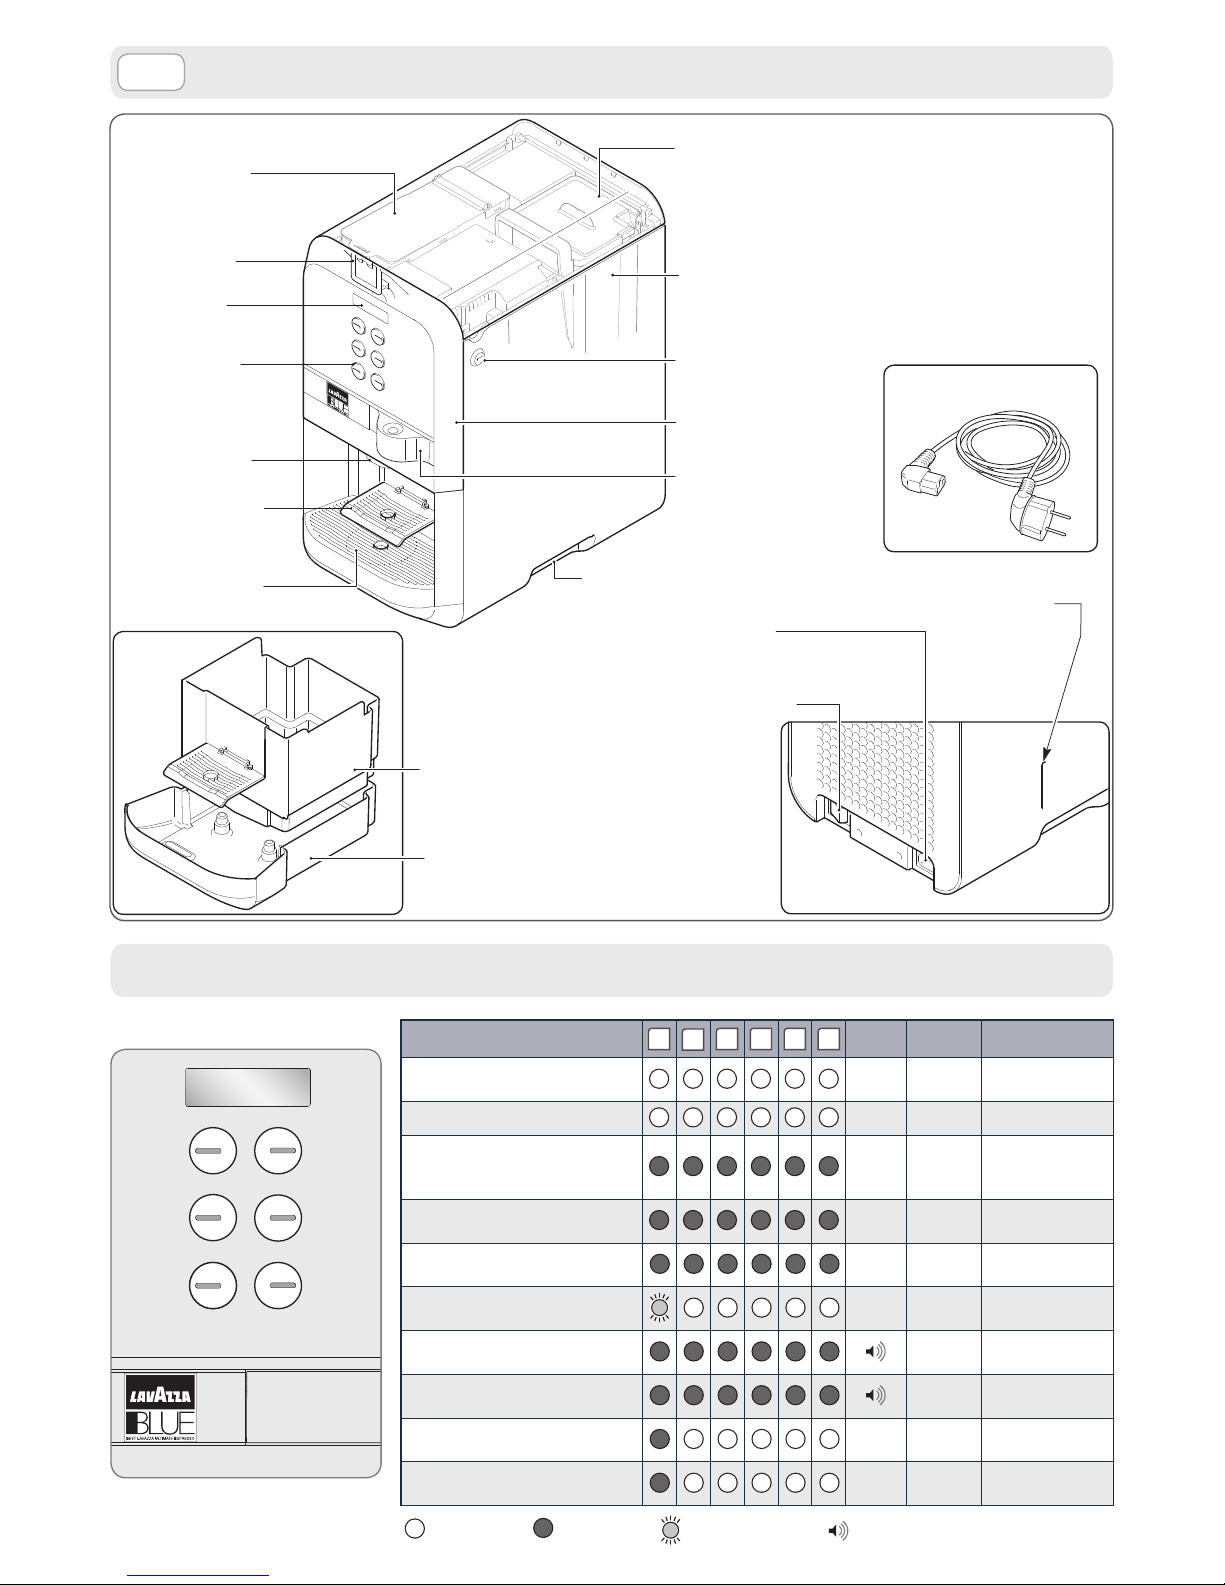
COMPONENTI
MESSAGGI A DISPLAY STATO MACCHINA
1
2
3
4
5
6
Coperchio serbatoio
solubile
Coperchio serbatoio
acqua
Cassetto caricamento
capsula
Maniglia per
la presa
Presa di
alimentazione
Interruttore
generale
Vano inserimento
chip card
Serbatoio acqua
Serratura apertura
anta vano solubile
e serbatoio acqua
Anta vano solubile
Cavo alimentazione
Serbatoio
solubile
Display
Tasti selezione
bevande
Beccuccio
erogatore
Griglia ribaltabile
per tazzina espresso
Griglia poggia
tazza grande/bicchiere
Cassetto raccogli
capsule usate
Cassetto raccogli
gocce
STATO MACCHINA
1
2
3 4
5
6
SUONO EVENTI DISPLAY
Accensione
LB 2500 PLUS
In riscaldamento
Energy Saving ENERGY SAVING
Raggiunta temperatura,
macchina pronta
LB 2500 PLUS
In riscaldamento
SELEZIONARE BEVANDA
Bevanda che richiede capsula
senza introduzione capsula
ATTENZIONE!
Inserire capsula
Cassetto inserimento
capsula aperto
LB 2500 PLUS
Inserire capsula
Prodotto selezionato
in erogazione
BEVANDA
In preparazione
Selezione bevanda con
cassetto aperto
Suono
breve
ATTENZIONE!
Inserire capsula
Erogazione terminata
Suono
prolungato
BEVANDA PRONTA
GRAZIE
Ciclo di pulizia con il prodotto
decalcicante in corso
CICLO PULIZIA IN CORSO
Ciclo di risciacquo con acqua in corso
CICLO LAVAGGIO IN
CORSO
Suono
Lampeggiante
Acceso
Spento
5
IT
PREDISPOSIZIONE MACCHINA
Cappuccino
Bevanda al gusto di
Latte macchiato
6
5
4
3
2
1
calde
Bevande
Espresso
macchiato
Espresso
lungo
Espresso
Non si assumono responsabilità per eventuali danni in caso di:
• impiegoerratoenonconformealladesti-
nazione d’uso della macchina;
• riparazionieseguitepressocentrid’assi-
stenza non autorizzati;
• manomissione del cavo di alimentazio-
ne;
• manomissione di qualsiasi componente
della macchina;
• impiegodipezzidiricambioedaccessori
non originali;
• mancatadecalcicazione;
• stoccaggioaldisottodi4°C;
• utilizzoaldisottodi5°C;
• utilizzoaldisopradi40°C;
• utilizzodicapsulenoncompatibili.
Inquesticasivieneadecaderelagaranzia.
I danni causati alla macchina a causa del-
la mancata osservazione delle indicazioni
presentisuquestolibrettononsonocopertedagaranzia.
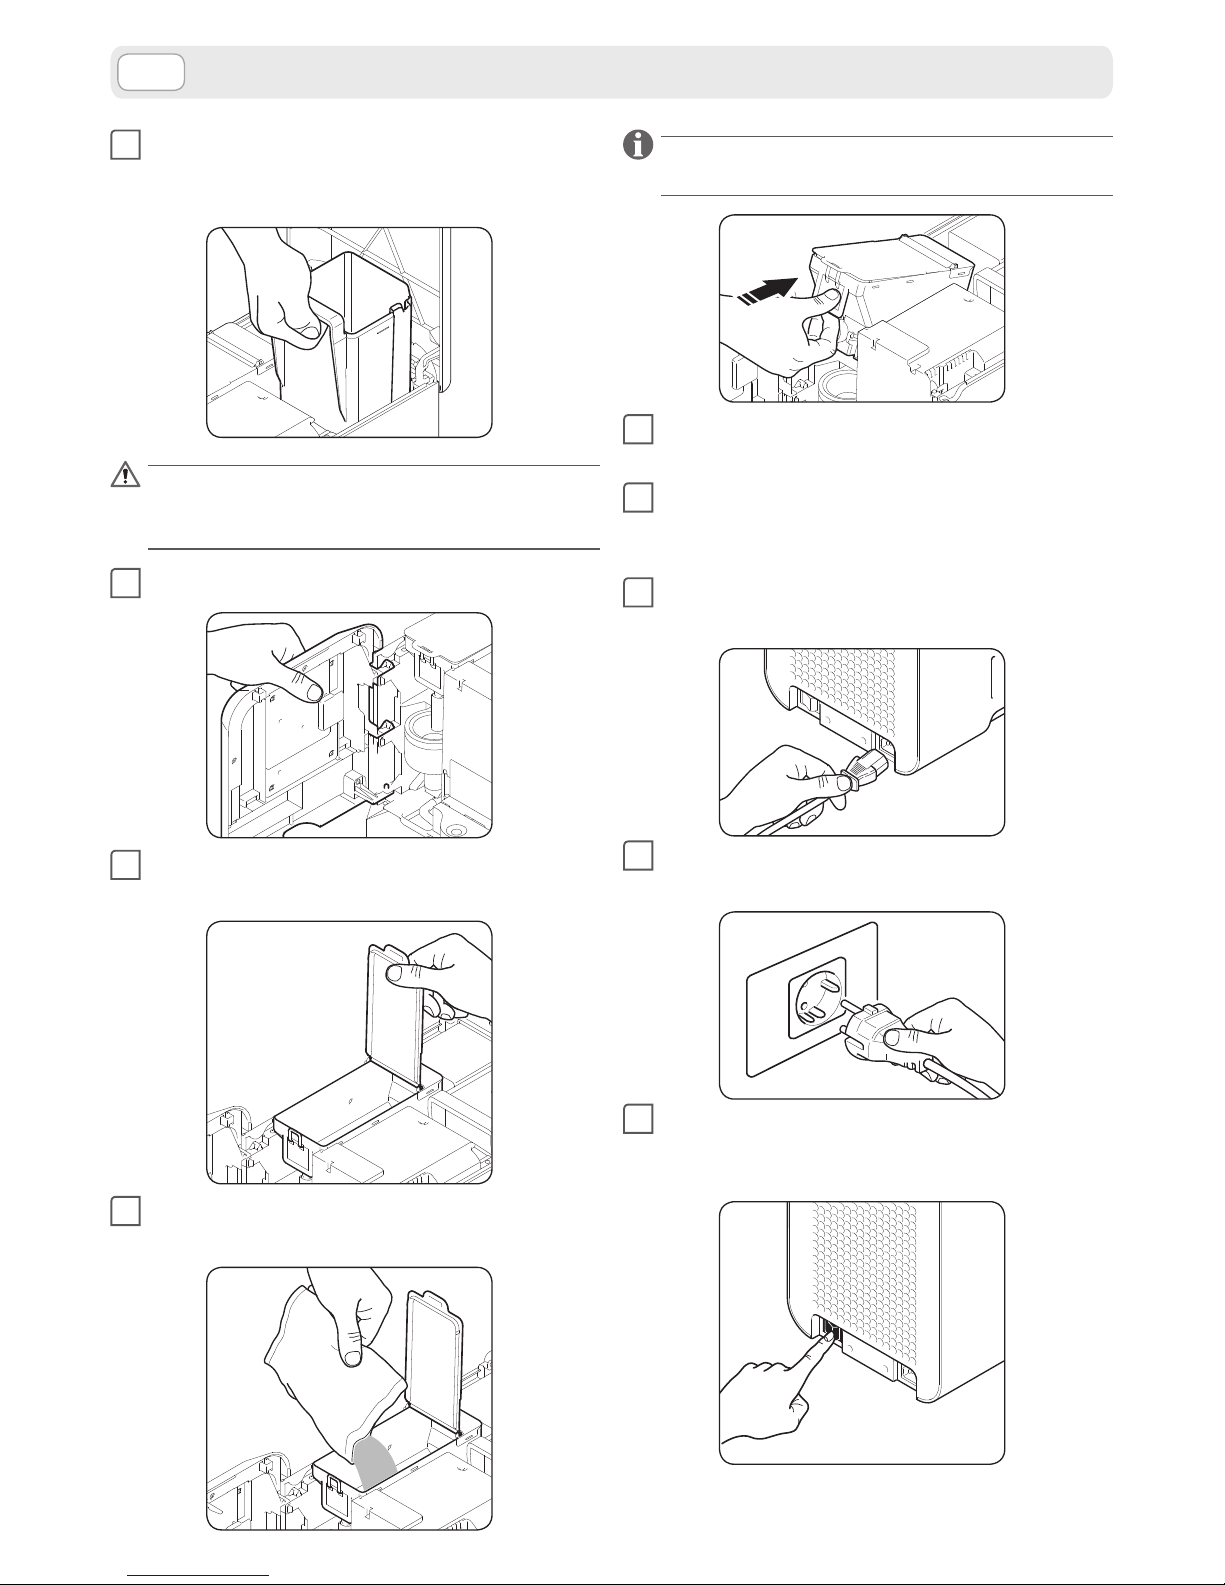
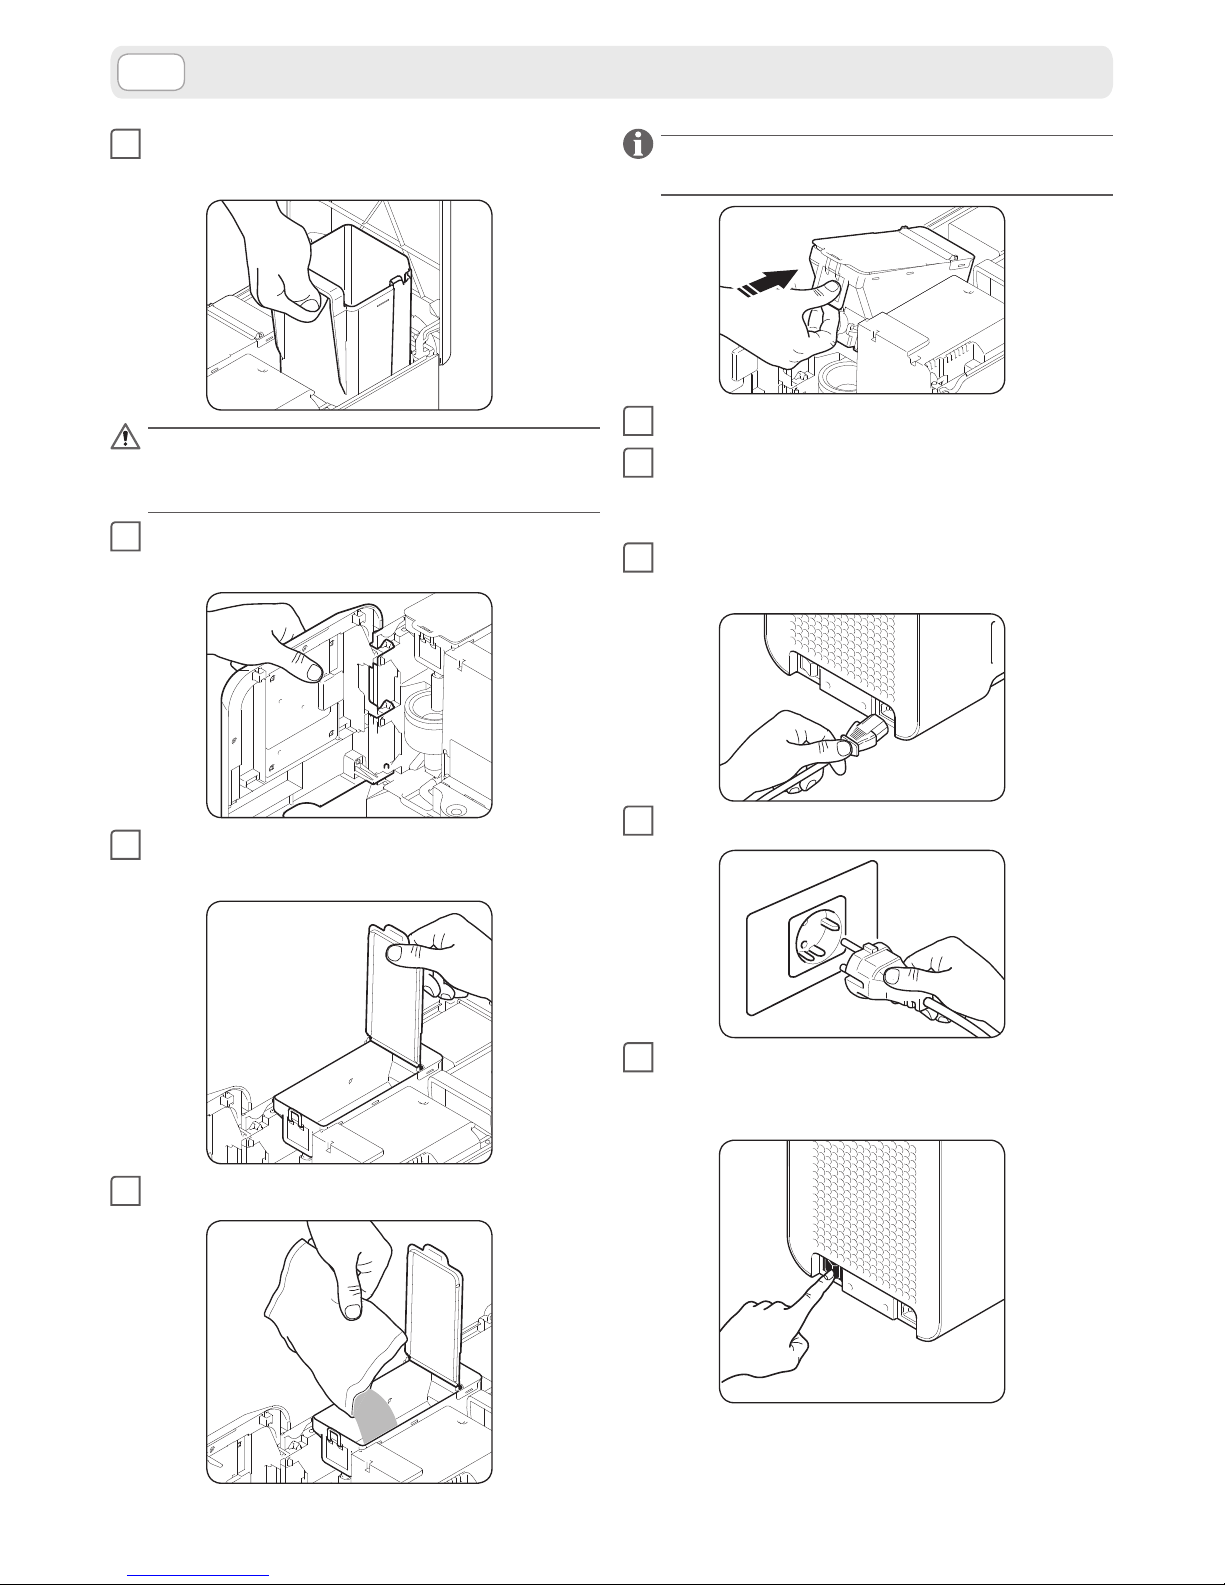
DISIMBALLO E POSIZIONAMENTO
1
Viste le dimensioni e il peso della macchina, l’e-
strazione dall’imballo, il posizionamento e la stabilizzazione vanno eettuate da due operatori.
2
Estrarre la macchina dall’imballo facendo pres-
sione sulle protezioni laterali e tirandola verso
l’alto.
3
Posizionare la macchina su una supercie
asciutta, piana, orizzontale e stabile, lontano da
acqua, amme e fonti di calore.
AVVIAMENTO MACCHINA
Il serbatoio dell’acqua è posizionato all’interno del-
la macchina. Per accedere al serbatoio è necessario
aprire lo sportello superiore il quale dispone di una
chiusura con chiave.
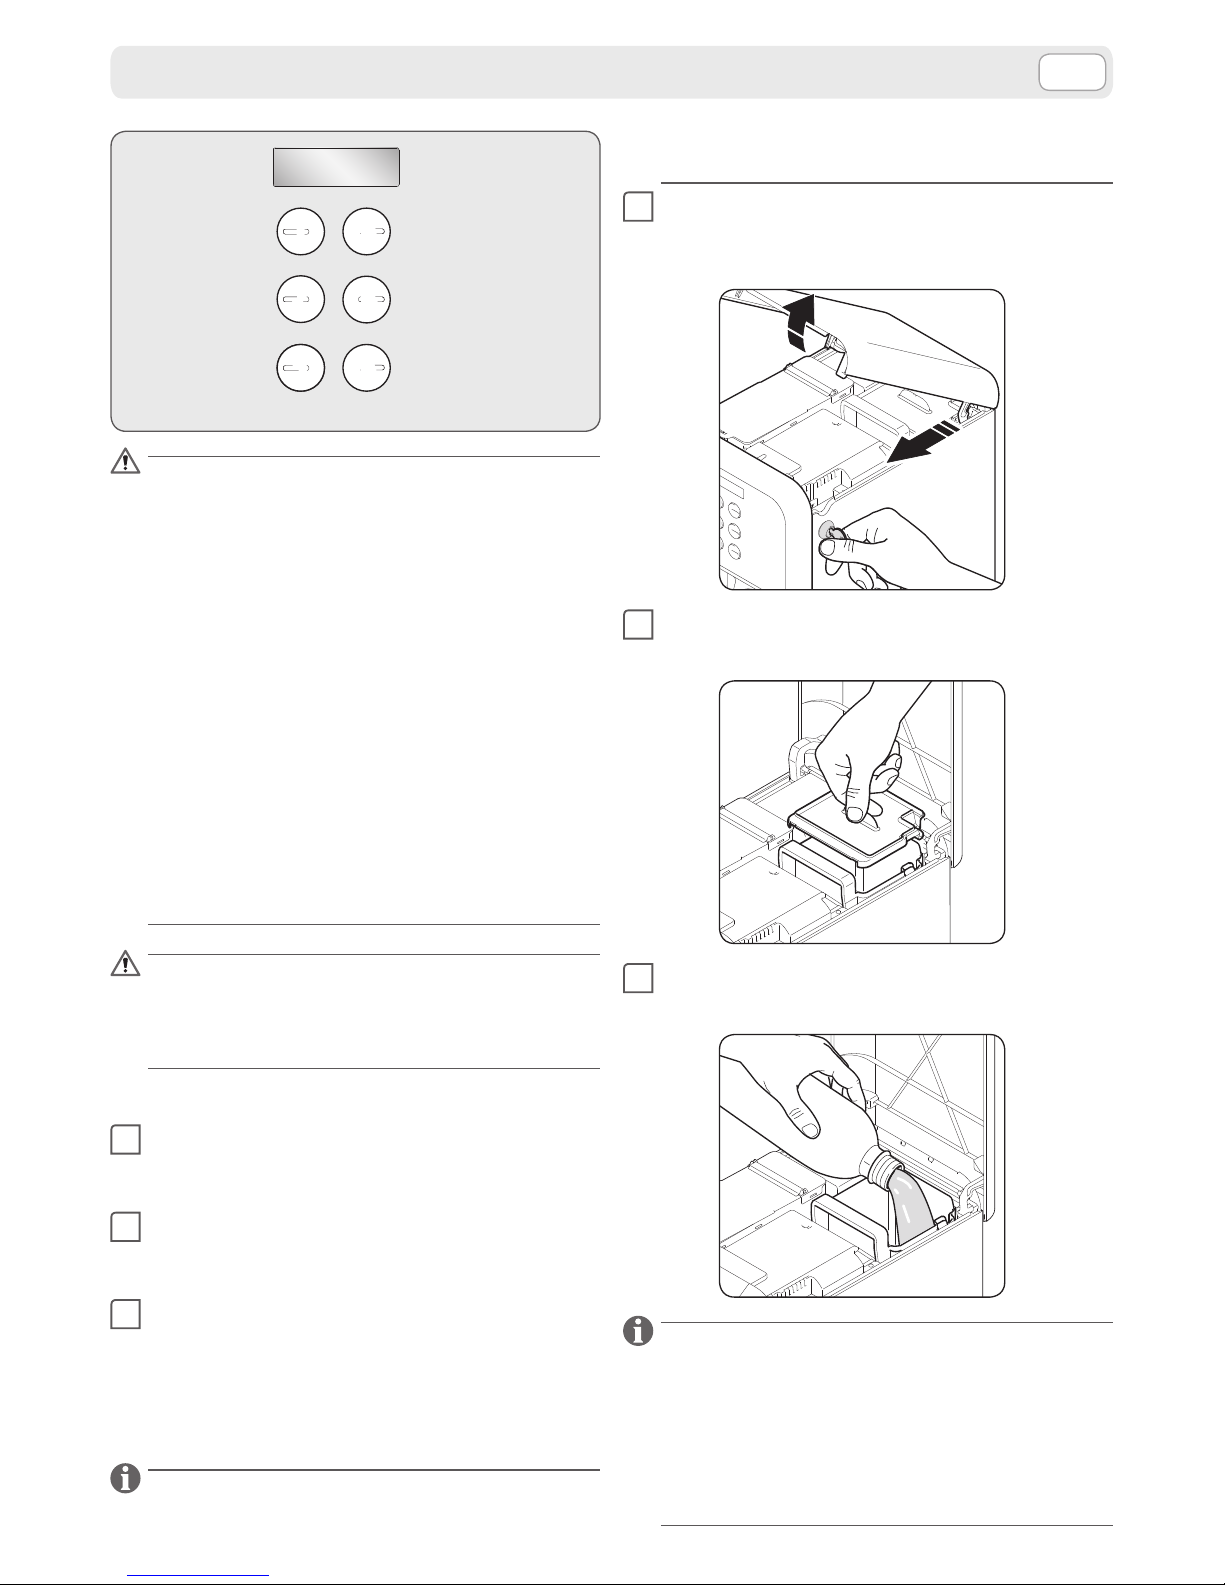
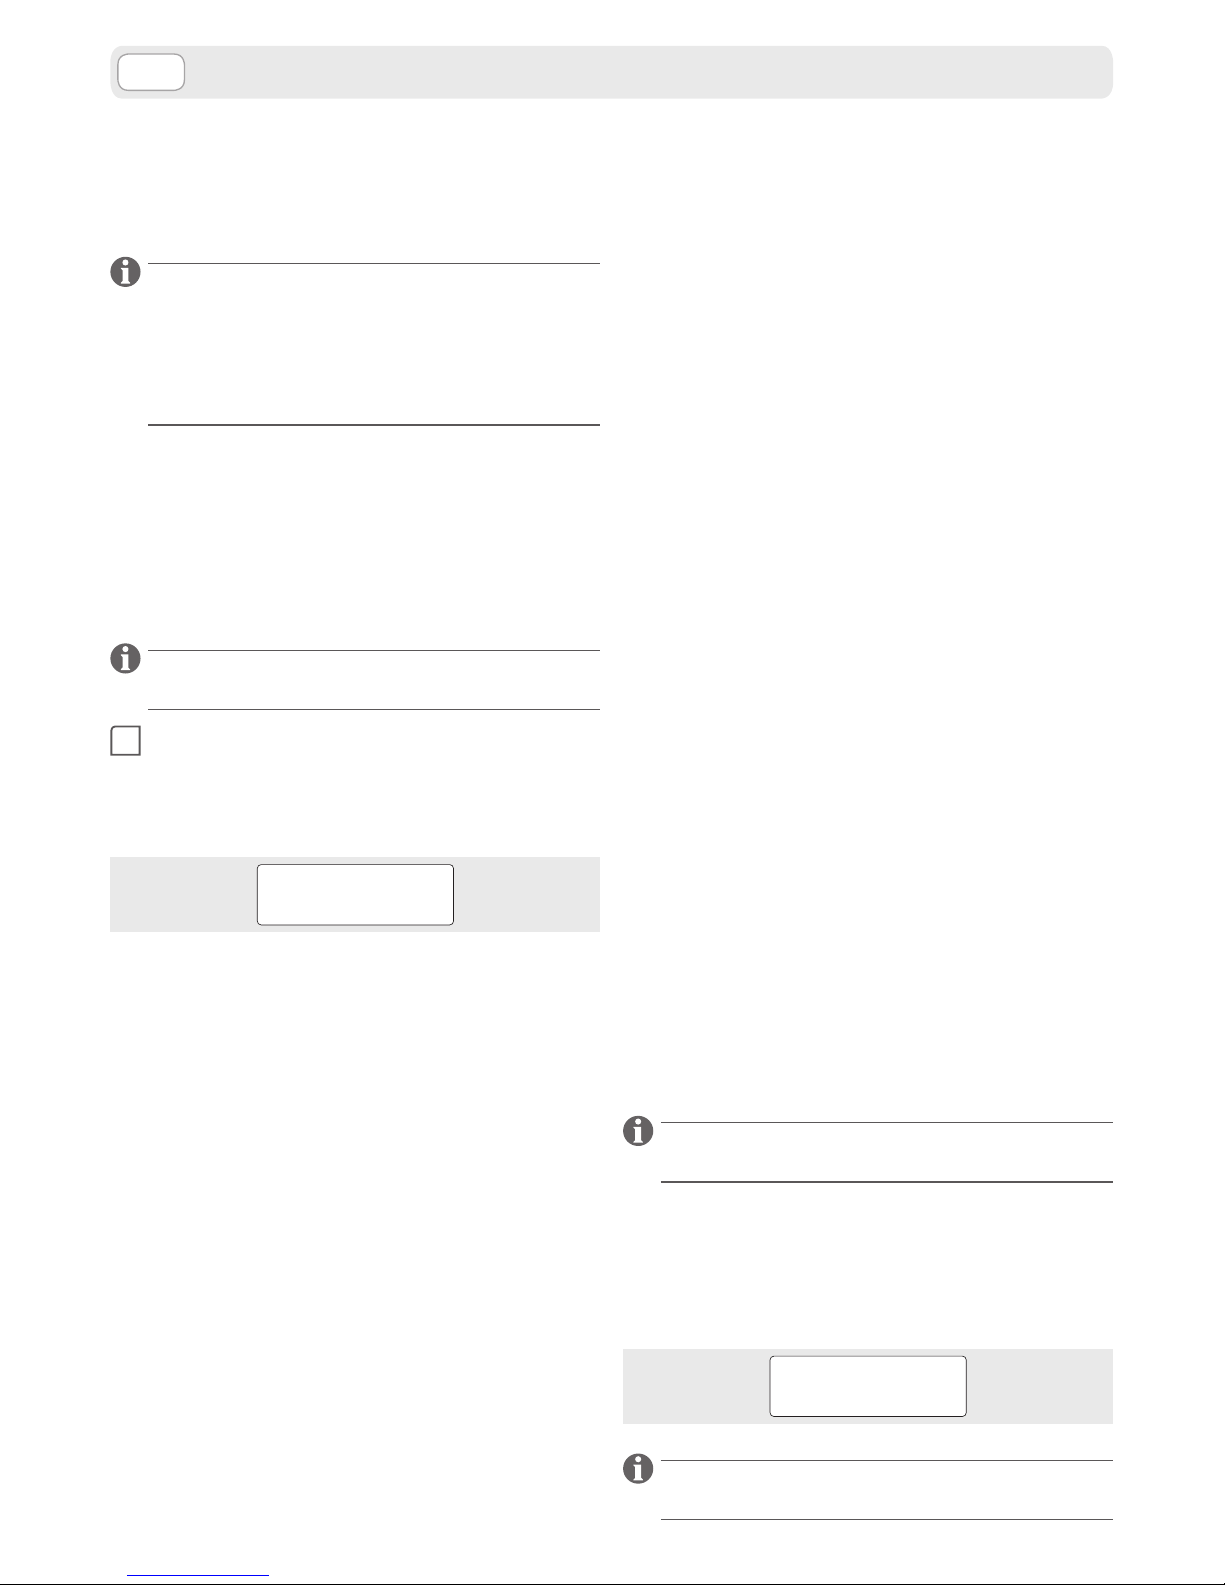
1
Ruotare la chiave in senso orario per aprire lo
sportello. Ruotare la chiave in senso antiorario
per chiudere lo sportello.
2
2
1
1
2
Sollevare e togliere il coperchio del serbatoio
acqua.
3
Riempire il serbatoio dell’acqua usando solo ac-
qua fresca potabile non gasata.
L’utilizzo di un ltro dell’acqua (accessorio opziona-
le) migliora la qualità dell’acqua e allunga la durata dell’apparecchio.
Utilizzare il ltro AquaAroma Crema Brita® per
Lavazza. Per inserire il ltro seguire il foglio di istruzioni allegato all’accessorio. Per la sostituzione del
ltro fare riferimento alle scadenze riportate sul foglio di istruzione allegato all’accessorio.
6
IT
4
È possibile, dopo aver tolto il coperchio, estrarre
il serbatoio acqua dalla macchina per riempirlo
separatamente.
Assicurarsi che le mani, la macchina, il cavo
e la supercie d’appoggio della macchina
nonsianobagnati.
5
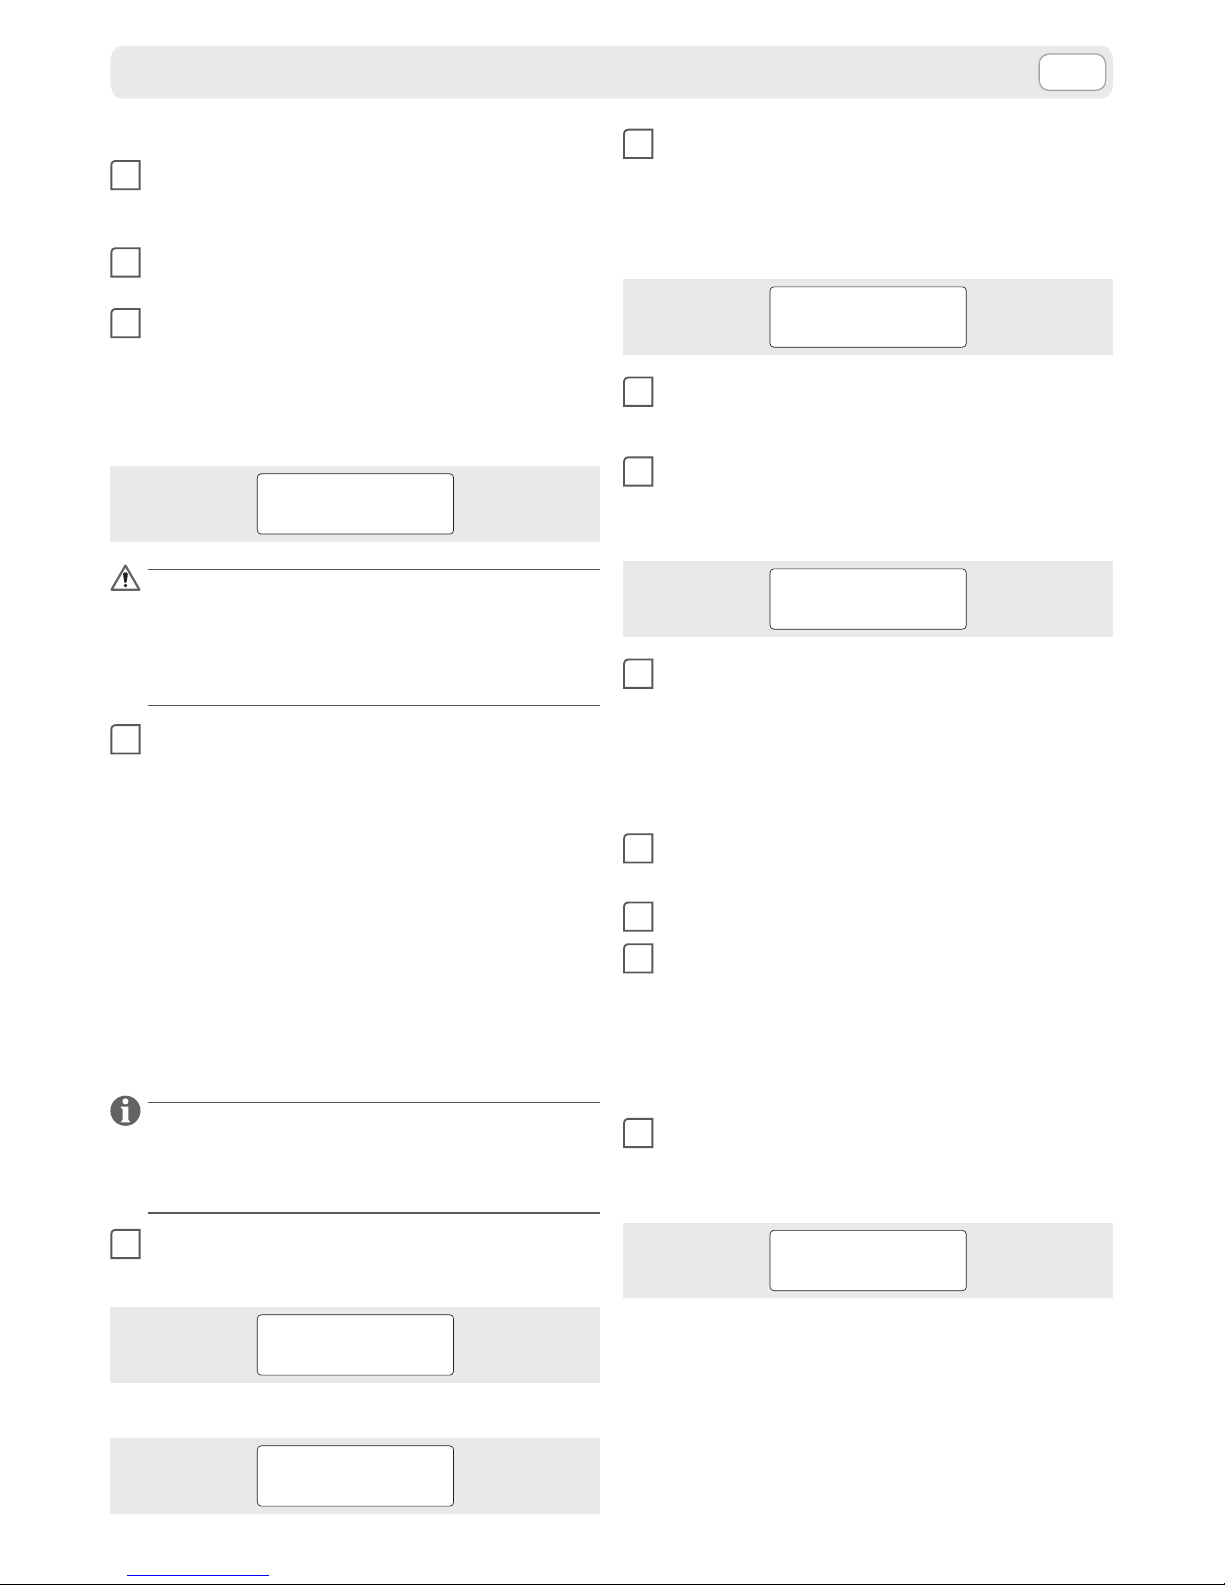
Aprire completamente l’anta vano solubile.
6
Sollevare e ruotare il coperchio del contenitore
latte solubile.
7
Aggiungere il solubile direttamente nel conte-
nitore.
Per riempire il contenitore del solubile è anche pos-
sibile rimuoverlo dalla sede completo di coperchio.
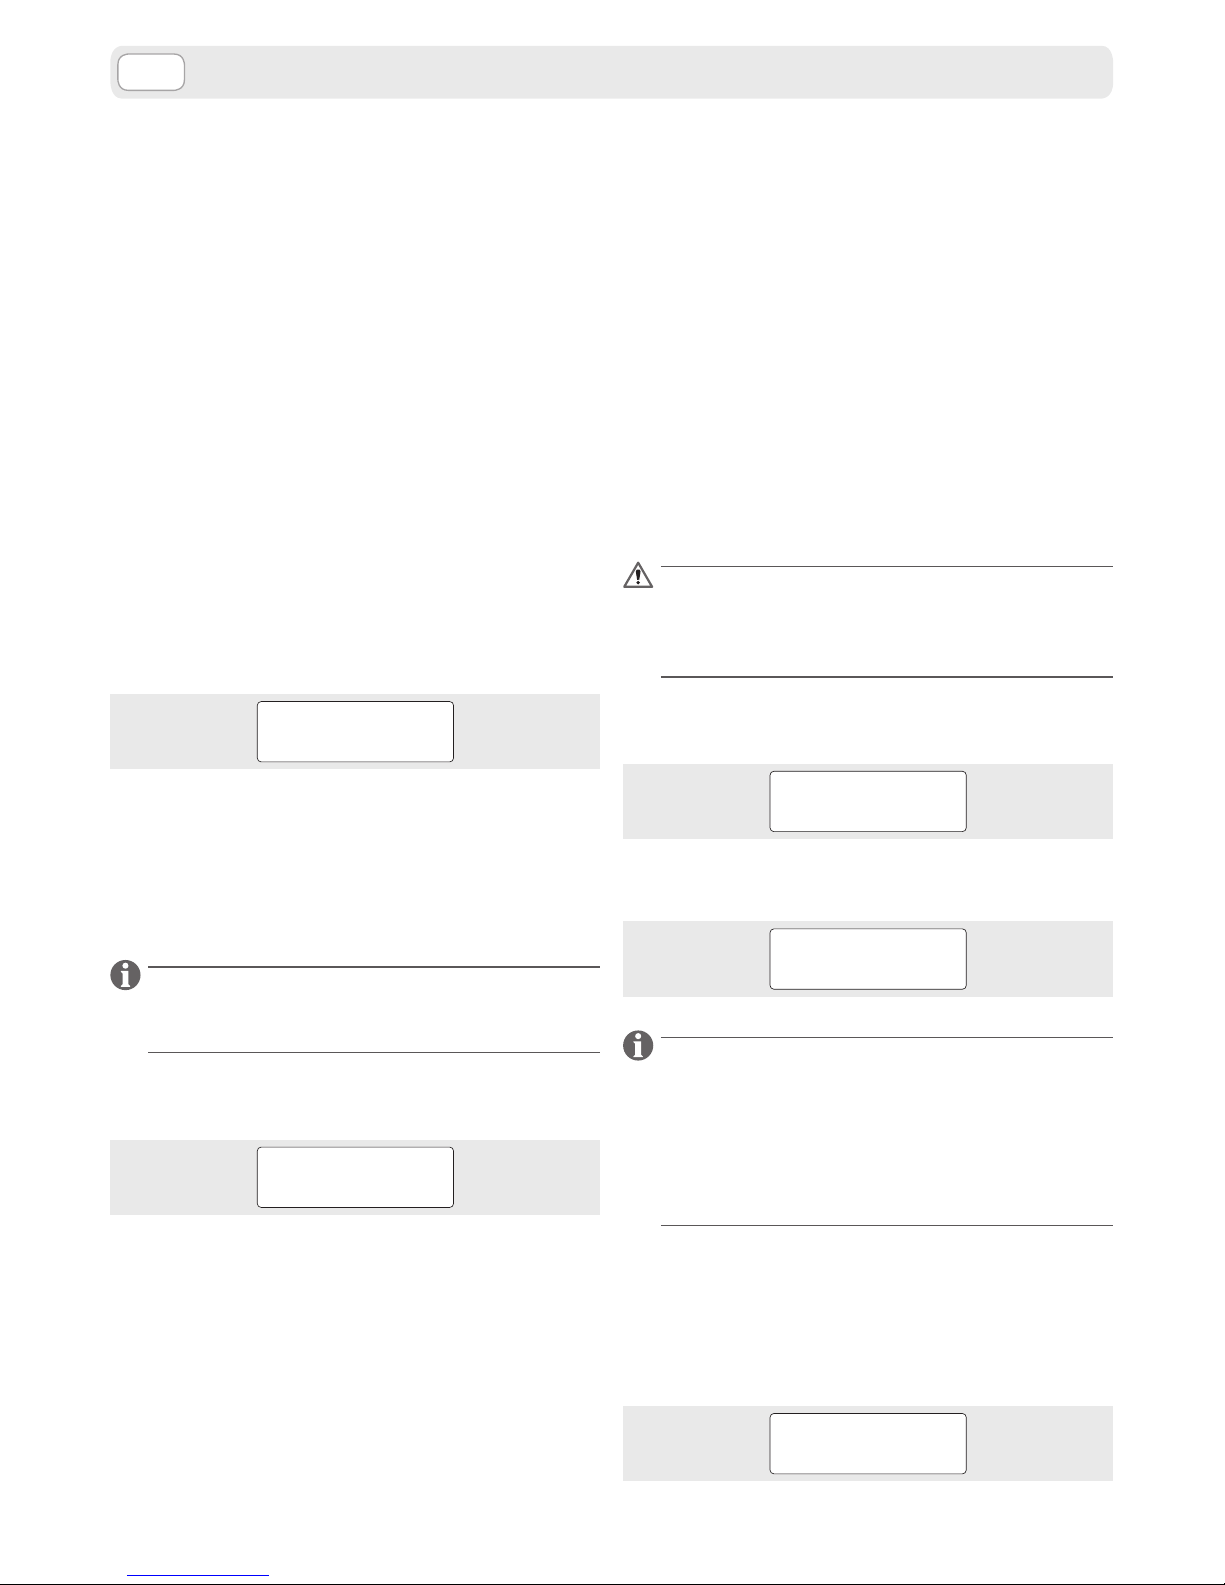
8
Riposizionare il coperchio del contenitore latte
solubile.
9
Richiudere l’anta vano solubili e quindi lo spor-
tello superiore, bloccandoli con la chiusura a
chiave.
10
Inserire la spina del cavo di alimentazione nella
presa situata sul retro della macchina.
11
Inserire la spina di alimentazione nella presa di
corrente.
12
Premere l’interruttore generale portandolo in
posizione (I). Il display segnala l’accensione della
macchina.
PREDISPOSIZIONE MACCHINA

7
IT
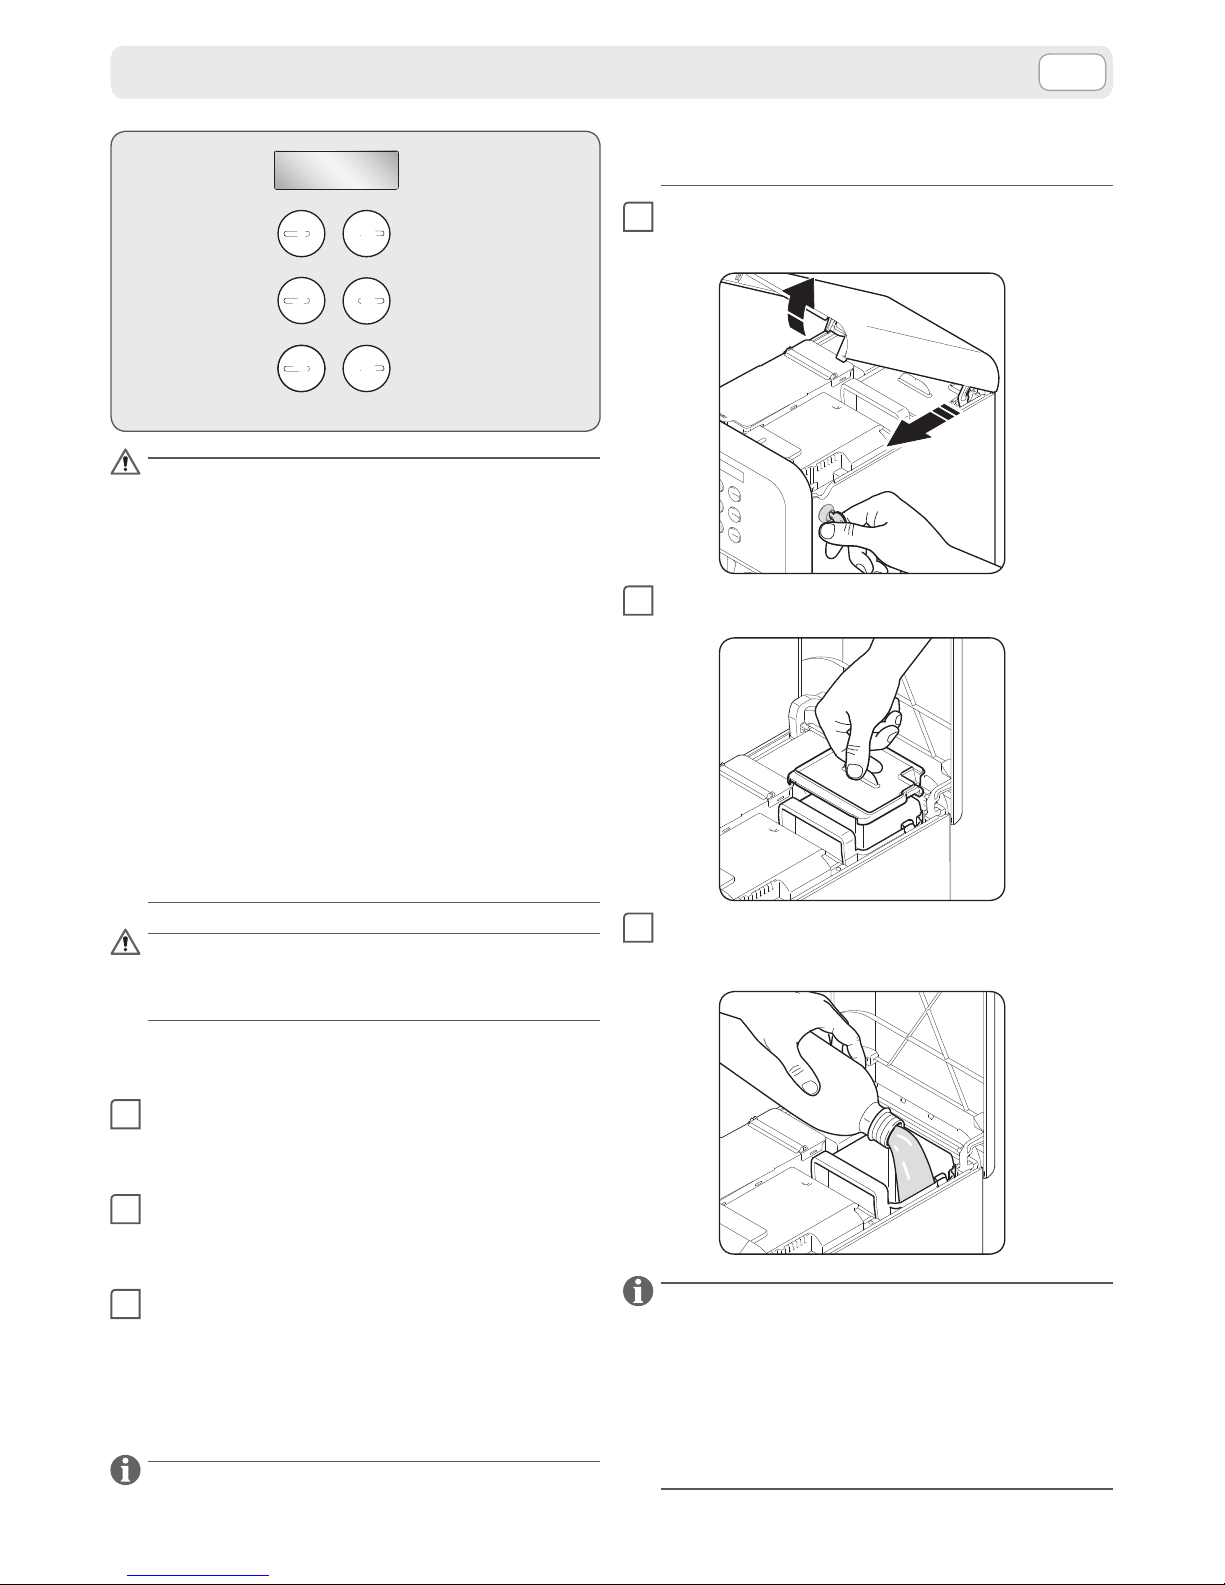
Per l’accesso e la navigazione all’interno del Menù
Impostazioni occorre far riferimento alla tastiera selezioni secondo le seguenti funzioni assegnate ad
ogni singolo tasto.
1
2
3
4
5
6
Esc
Enter
Per accedere al Menù Impostazioni occorre accendere la macchina tenendo premuto il tasto “Enter”
per circa 3 secondi. A display si potranno scorrere,
mediante i tasti 4 e 5, le seguenti voci:
➤ Menù utente
confermando con “Enter” la voce “Menù utente”
si accederà ad esso.
➤ Menù impostazioni
confermando con “Enter” la voce “Menù impo-
stazioni” verrà richiesta una password:
PASSWORD
Se non si dispone della password, sarà possibile accedere esclusivamente al menù utente.
La conoscenza della password consente invece l’accesso al menù impostazioni.
MENU’ UTENTE
1
Premere “Enter”. All’interno del menù utente è
possibile navigare, mediate i tasti 4 e 5 tra le seguenti voci.
➤ Crediti residui
➤ Impostazione dosi
➤ Installazione addolcitore
CREDITI RESIDUI
Confermando con “Enter” la voce “Crediti residui”
compare sul display l’indicazione delle erogazioni
residue ancora disponibili sulla macchina.
LAVAZZA LB PLUS
CREDITI 00050
MENU’ IMPOSTAZIONI
Agendo sul tasto “Esc” una o più volte è possibile
tornare ai livelli precedenti o uscire dal menù.
IMPOSTAZIONE DOSI
Confermando con “Enter” la voce “Impostazione
dosi” è possibile modicare, entro limiti prestabiliti, i
paramenti delle varie selezioni.
Il menù di livello inferiore infatti consente di scegliere la selezione su cui si vuole intervenire agendo sui
tasti 4 e 5.
➤ Prodotto 1
➤ . .
➤ . .
➤ Prodotto 6
La selezione di un prodotto mediante il tasto “Enter”
presenta, agendo sui tasti 4 e 5, i seguenti parametri, i cui valori di default sono:
➤ Offset pompe
(consente di intervenire sul tempo di attivazione
delle pompe)
Confermando mediante il tasto “Enter” comparirà a
display:
SET UP OK
0
È quindi possibile intervenire sul valore di default
agendo sui tasti 4 e 5.
Ogni singola pressione dei tasti incrementa o decrementa di 0,5 secondi il tempo di attivazione del
parametro su cui si sta agendo.
Nel solo caso delle pompe, se le impostazioni sono
state programmate in termini di dose, un incremento o un decremento di 0,5 corrisponde ad uno step
di aumento della dose calcolato in cc.
È poi possibile confermare la selezione mediante il
tasto “Enter”. Agendo sul tasto “Esc” una o più volte
è possibile tornare ai livelli precedenti o uscire dal
menù.
INSTALLAZIONE ADDOLCITORE
Confermando con “Enter” la voce “Installazione addolcitore” è possibile attivare o disattivare le funzioni di conteggio dei litri trattati e la visualizzazione
sul display dei relativi messaggi.
Attivare adesso
Premendo OK si visualizza il messaggio “ATTIVAZIONE IN CORSO” e la macchina eroga c.a. mezzo litro di
acqua dal beccuccio erogatore solubili.
8
IT
Da questo momento parte il conteggio dei litri in
base al quale, a seconda del limite impostato e se
abilitato, verrà visualizzato il messaggio “SOSTITUIRE ADDOLCITORE”.
È possibile utilizzare un contenitore sotto il bec-
cuccio erogatore per raccogliere l’acqua durante il
processo di attivazione del ltro. Al termine, in ogni
caso, verrà segnalato a display di vericare che il
cassetto raccogli gocce non sia troppo pieno di acqua.
Disattivare adesso
Premendo OK si visualizza il messaggio “DISATTIVATO” e vengono disattivate le funzioni di conteggio
dei litri trattati e di visualizzazione dei messaggi relativi sul display.
MENU’ IMPOSTAZIONI
Il menù di impostazioni è riservato al personale
qualicato e autorizzato.
1
Digitare la password corretta e quindi preme-
re “Enter”. La password di default è 333333. Se
viene inserita una password errata, sul display
comparirà per 3 secondi il seguente messaggio:
PW ERRATA
All’interno del menù impostazioni è possibile navigare, mediate i tasti 4 e 5, tra le seguenti voci.
➤ Scelta lingua
➤ Impostazione dosi
➤ Decalcificazione
➤ Durezza H
2
O
➤ Delta Temp
➤ Modifica password
➤ Energy saving
➤ Innesco pompe
➤ Verifica card
➤ Contatore erogazioni
➤ Contatore addolcitore
SCELTA LINGUA
Confermando con “Enter” la voce “Scelta Lingua” è
possibile modicare la lingua del menù e delle segnalazioni a display.
Il menù di livello inferiore infatti consente di scegliere la lingua desiderata agendo sui tasti 4 e 5 e
selezionarla mediante il tasto “Enter”.
➤ Italiano
➤ English
➤ Français
➤ Deutsch
➤ Espanõl
➤ Português
➤ Nederlands
Agendo sul tasto “Esc” una o più volte è possibile
tornare ai livelli precedenti o uscire dal menù.
IMPOSTAZIONE DOSI
Confermando con “Enter” la voce “Impostazione
dosi” è possibile modicare, entro limiti prestabiliti, i
parametri delle varie selezioni. Il menù di livello inferiore infatti consente di scegliere la selezione su cui
si vuole intervenire agendo sui tasti 4 e 5.
➤ Prodotto 1
➤ . .
➤ . .
➤ Prodotto 6
La selezione di un prodotto mediante il tasto “Enter”
presenta, agendo sui tasti 4 e 5, i seguenti parametri.
➤ Oset pompe
(consente di intervenire sul tempo di attivazio-
ne delle pompe)
➤ Oset TR1
(consente di intervenire sul tempo di attivazio-
ne della tramoggia).
La voce compare per tutti i prodotti ma è attiva
solo per i prodotti che richiedono il solubile.
DECALCIFICAZIONE
Nel caso sia installato il ltro addolcitore, rimuover-
lo prima di attivare il ciclo di decalcicazione.
Il ciclo di decalcicazione può essere attivato in
qualsiasi momento, anche se la macchina non lo
richiede. Confermando con “Enter” la voce “Decalcicazione” comparirà a scorrimento sul display il
seguente messaggio.
DECALCIFICAZIONE
INSERIRE PRODOTTO DECALCIFICANTE NEL SERBATOIO E
PREMERE OK
Non è più possibile erogare bevande no a quando
non viene completato il ciclo.
MENU’ IMPOSTAZIONI
9
IT
A questo punto seguire le seguenti indicazioni.
1
Riempire il serbatoio con il prodotto decalci-
cante diluito in acqua secondo le quantità riportate sulle istruzione dello stesso.
2
Posizionare un contenitore, più capiente possi-
bile, sotto il beccuccio erogatore.
3
Premere quindi “Enter”; verranno attivate le pom-
pe ed attraverso il beccuccio erogatore uirà la
soluzione decalcicante che ha eettuato la sua
azione all’interno del circuito della macchina. Sul
display comparirà il messaggio:
CICLO PULIZIA
IN CORSO
• Nonbereorischiaredifarberelasoluzio-
nedecalcicante.
• Pericolodiscottature,lasoluzionedecal-
cicantevieneerogata adaltatemperatura.
4
La macchina erogherà la quantità di soluzione
prevista. Per aumentare l’ecacia dell’azione
del prodotto decalcicante, la macchina eettua in automatico delle pause di c.a. 1 minuto.
Durante le pause a display comparirà il messaggio “VERIFICA CASSETTO-RIAVVIO AUTOM.” e,
se necessario, è possibile svuotare il contenitore
utilizzato per la raccolta della soluzione.
È comunque possibile, premendo “Enter”, in-
terrompere momentaneamente il ciclo per
consentire lo svuotamento e lo smaltimento
del contenuto del contenitore. In questo caso
premere “Enter” per riavviare il ciclo.
In caso di interruzione dell’alimentazione elettrica
durante il ciclo di decalcicazione, alla successiva
ri-accensione, la macchina si riporterà automaticamente nella condizione di partenza dello stesso.
5
Allo svuotamento del serbatoio, sul display
comparirà il messaggio:
RISCIACQUARE IL
SERBATOIO
Alternato al messaggio:
RIEMPIRE
SERBATOIO
MENU’ IMPOSTAZIONI
6
Risciacquare e lavare quindi accuratamente il
serbatoio con acqua fresca potabile.
Rabboccare poi lo stesso sempre con acqua fre-
sca, potabile e non gasata. Sul display apparirà il
messaggio:
AVVIARE
RISCIACQUO
7
Posizionare un contenitore, più capiente possi-
bile, sotto il beccuccio erogatore.
8
Premere “Enter” per avviare il risciacquo del cir-
cuito idraulico della macchina, sul display comparirà il messaggio:
CICLO LAVAGGIO
IN CORSO
9
La macchina erogherà il volume di acqua pre-
visto. E’ comunque possibile, premendo “Enter”,
interrompere momentaneamente il ciclo per
consentire lo svuotamento e lo smaltimento del
contenuto del contenitore utilizzato per la raccolta dell’acqua.
10
Riposizionare il contenitore svuotato sotto il
beccuccio erogatore.
11
Premere “Enter” per riavviare il ciclo.
12
La macchina può richiedere di riempire nuova-
mente il serbatoio in caso in cui non sia raggiunto il volume d’acqua previsto.
La segnalazione in questo caso è quella indicata
al punto 6. Ripartire quindi dal punto 8 per terminare il ciclo.
13
Quando la macchina avrà erogato il volume
d’acqua previsto, viene visualizzato il messaggio:
DECALCIFICAZIONE
COMPLETATA
E’ quindi possibile erogare nuovamente bevande
rabboccando se necessario il serbatoio con acqua
fresca, potabile e non gasata.
DUREZZA H2O
Confermando con “Enter” la voce “Durezza H2O” è
possibile inserire il dato relativo alla durezza dell’acqua tipico della locazione in cui viene installata la
10
IT
macchina.
Tale valore è misurabile attraverso le apposite strisce viranti disponibili in commercio.
Agendo sui tasti 4 e 5 è possibile inserire un valore
in un range da 5 a 50 gradi francesi.
Il valore è impostato di default a 20 gradi francesi.
Se si utilizza un ltro addolcitore impostare un valore di durezza dell’acqua in funzione del potere di
abbattimento del ltro.
DELTA TEMP
Confermando con “Enter” la voce “Delta Temp” è
possibile modicare la temperatura di lavoro della
caldaia in maniera tale da aumentare o diminuire
leggermente la temperatura del prodotto erogato.
Agendo sui tasti 4 e 5 è possibile aumentare o diminuire il valore in un range di ± 4 °C.
MODIFICA PASSWORD
Confermando con “Enter” la voce “Modica Password” compare a display:
PASSWORD
A questo punto è possibile inserire la password desiderata che deve essere composta da 6 caratteri.
Agendo sul tasto “Esc” una o più volte è possibile
tornare ai livelli precedenti o uscire dal menù.
ENERGY SAVING
La macchina è programmata per poter andare
in condizione di risparmio energia dopo un certo
tempo di inattività. Il valore pre-impostato è 2 ore.
In condizione di Energy Saving la macchina segnala
a display:
ENERGY SAVING
Per riportare la macchina in condizione pronta è
suciente premere un qualsiasi tasto di selezione.
Confermando con “Enter” la voce “Energy Saving” è
possibile scegliere, agendo sui tasti 4 e 5, tra le due
opzioni seguenti:
➤ Energy saving disattivato
➤ Energy saving attivato
È possibile selezionare l’attivazione o la disattivazione dell’Energy saving mediante il tasto “Enter”.
Agendo sul tasto “Esc” una o più volte è possibile
tornare ai livelli precedenti o uscire dal menù.
INNESCO POMPE
Confermando con “Enter” la voce “Innesco Pompe”
è possibile scegliere, agendo sui tasti 4 e 5, tra le due
opzioni seguenti:
➤ Innesco pompe attivato
➤ Innesco pompe disattivato
È possibile selezionare l’attivazione o la disattivazione della funzione mediante il tasto “Enter”.
Agendo sul tasto “Esc” una o più volte è possibile
tornare ai livelli precedenti o uscire dal menù.
La funzione di innesco pompe è eseguibile, in stato
di macchina pronta, premendo contemporaneamente i tasti 3 e 6 per almeno 3 secondi.
Prima di attivare la funzione di innesco
pompe è necessario posizionare una tazza
od un bicchiere sotto l’erogatore, sulla gri-
gliapoggiatazze.
Durante l’innesco pompe compare a display il seguente messaggio:
INNESCO
POMPE IN CORSO
A seconda dell’esito della procedura ed al termine
di essa, a display compare il seguente messaggio.
INNESCO POMPE
POSITIVO/NEGATIVO
Al primo avviamento della macchina o dopo un
prolungato inutilizzo potrebbe essere necessario
eseguire l’operazione di caricamento idraulico. La
funzione, se preventivamente attivata da menù,
viene eseguita automaticamente dalla macchina
attraverso la pressione contemporanea dei tasti 3 e
6 per almeno 3 secondi.
VERIFICA CARD
Questa funzione consente all’operatore di vericare
una chip card, indipendentemente dal suo utilizzo.
Confermando con “Enter” la voce “Verica Card”
comparirà a display il seguente messaggio.
INSERISCI CARD
MENU’ IMPOSTAZIONI
11
IT
Inserendo la chip card nell’apposita fessura della
macchina compariranno sul display le informazioni
relative ad essa.
Estrarre quindi la chip card e agire sul tasto “Esc” una
o più volte per tornare ai livelli precedenti o uscire
dal menù.
CONTATORE EROGAZIONI
Questa funzione consente di analizzare il totalizzatore delle erogazioni, le statistiche delle varie
selezioni della macchina e attivare o disattivare
la visualizzazione del contatore totale sul display.
Confermando con “Enter” la voce “Contatore erogazioni” è possibile scorrere, agendo sui tasti 4 e 5, le
seguenti voci.
➤ Tot erogazioni eseguite 000079
Confermando con “Enter” la voce “Tot eroga-
zioni eseguite” è possibile scorrere, agendo sui
tasti 4 e 5, i vari totalizzatori.
➤ Tot prodotto 1 eseguite 000027
➤ . .
➤ . .
➤ Tot prodotto 6 eseguite 000008
➤ Visualizzazione contatore
Confermando con “Enter” la voce “Visualizzazio-
ne contatore” è possibile attivare o disattivare la
visualizzazione del contatore totale sul display
della macchina al momento dell’accensione tramite l’interruttore generale.
Agendo sul tasto “Esc” una o più volte è possibile
tornare ai livelli precedenti o uscire dal menù.
MENU’ IMPOSTAZIONI
CONTATORE ADDOLCITORE
Questa funzione consente di impostare i litri trattabili dal ltro addolcitore e di visualizzare il contatore
dei litri trattati dalla sua attivazione.
Confermando con il tasto “Enter” la voce “Contatore
addolcitore” è possibile selezionare, agendo sui tasti
4 e 5, le due opzioni seguenti.
➤ Impostazione litri
Fareriferimentoalleistruzionidelltrouti-
lizzato, riportando il numero massimo di
litri trattabili indicati per la durezza dell’ac-
quaspecicadellaproprialocazione.
Non si assumono responsabilità per even-
tuali conseguenze dovute a settaggi errati
o non conformi a quanto riportato sulle
istruzionidelltroinuso.
Confermando con il tasto “Enter“ e agendo sui tasti
4 e 5 si modica il valore dei litri trattabili con il ltro
in uso, superati i quali se abilitata la funzione, sul display comparirà:
SOSTITUIRE
ADDOLCITORE
Confermare con il tasto “Enter” il valore massimo dei
litri trattabili.
➤ Litri trattati
Confermando con il tasto “Enter“ è possibile visualizzare il contatore dei litri erogati dalla macchina dal
momento dell’attivazione del ltro.
Agendo sul tasto “Esc” una o più volte è possibile
tornare ai livelli precedenti o uscire dal menù.
12
IT
PREDISPOSIZIONE ALLA PREPARAZIONE
DELLE BEVANDE
La macchina dispone di due posizioni per tazza/
tazzina.
➤ Tazzina caffè espresso: ruotare verso il basso la
griglia poggia tazzina.
➤ Tazzina grande: ruotare verso l’alto la griglia
poggia tazzina sino ad inserirla e fermarla nella
sua sede sulla parete del cassetto raccogli capsule.
All’accensione della macchina, all’uscita del menù
ed al rientro in funzione dopo lo stato di Energy saving sul display compare l’indicazione:
LB2500 PLUS
In riscaldamento
La macchina segnalerà poi la conclusione del riscaldamento e lo stato di pronto con la segnalazione:
LB2500 PLUS
PRONTA
Selezionare
bevanda
EROGAZIONE BEVANDE
Alla pressione di un tasto caè, di un tasto solubili
che necessita del caè o del tasto bevande calde
senza avere preventivamente inserito la capsula
non segue alcuna attività.
Sul display appare il messaggio:
ATTENZIONE!
Inserire capsula
L’erogazione di tutte le bevande con cialda, solo
solubili o miste può sempre essere interrotta premendo nuovamente il tasto selezionato.
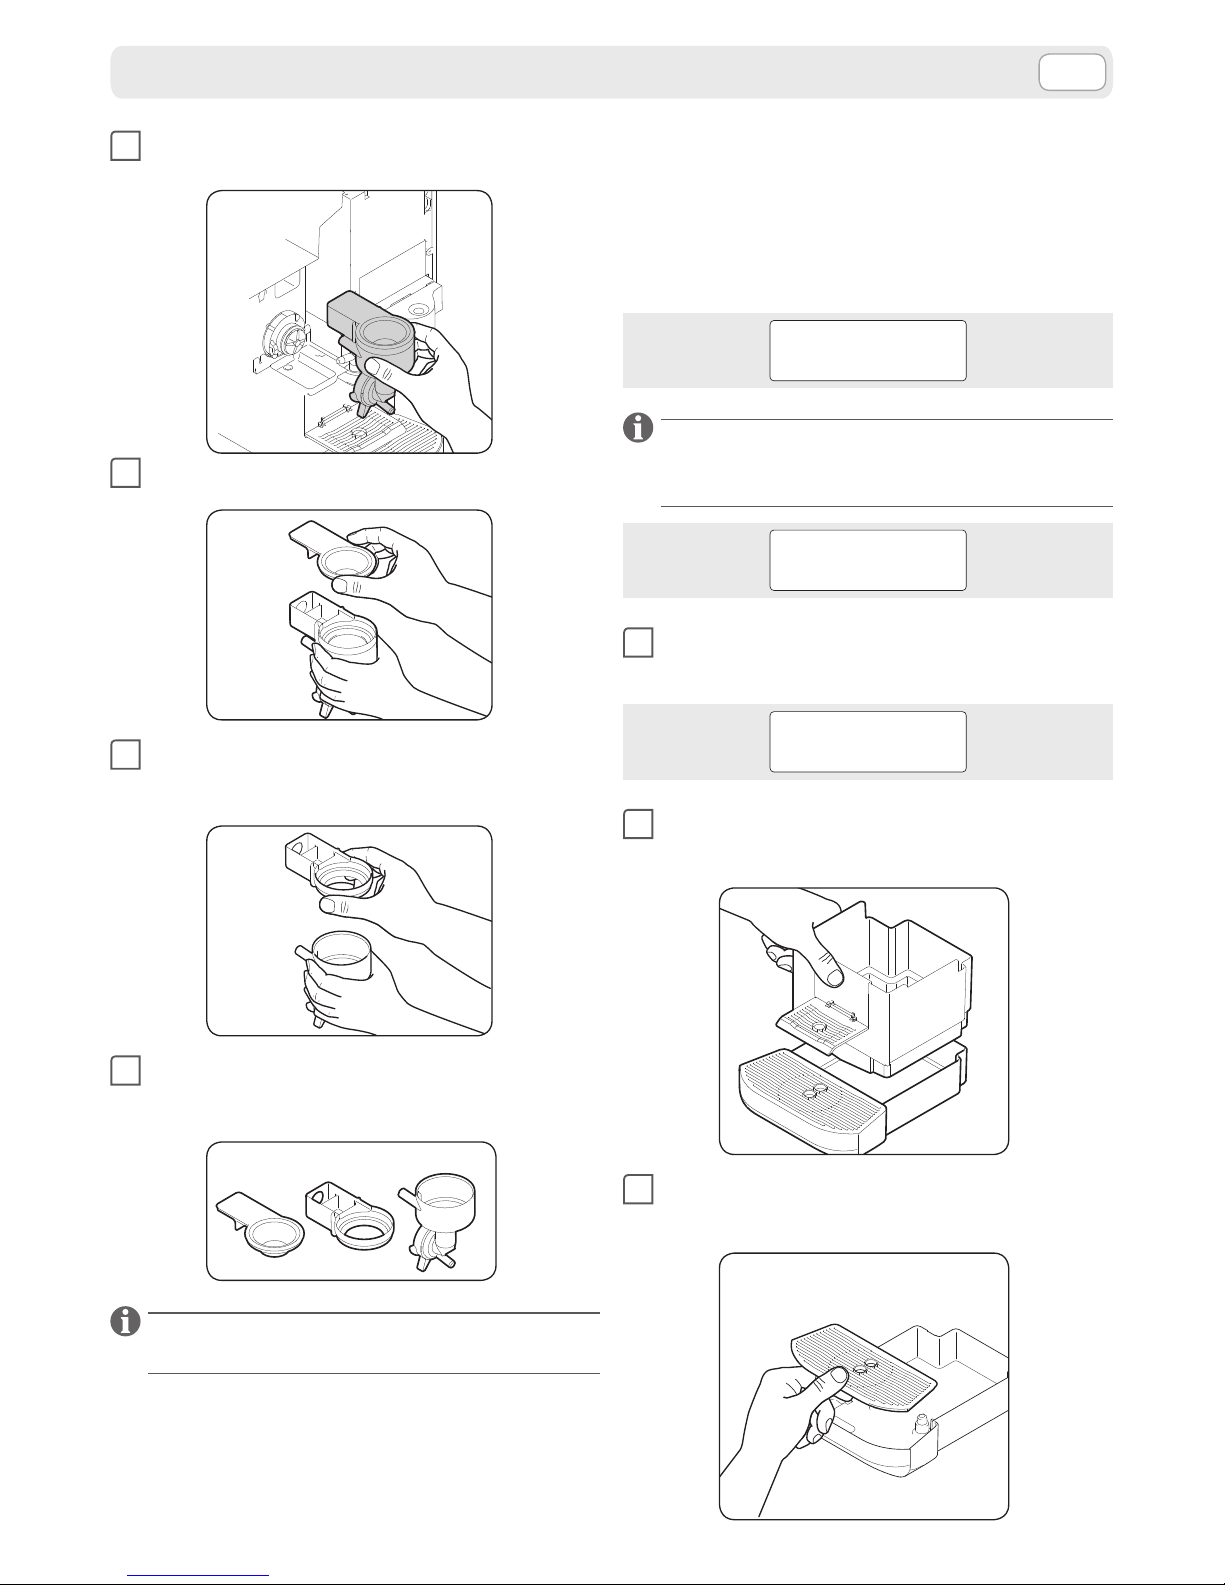
ESPRESSO
1
Ruotare verso il basso la griglia poggia tazzina.
2
Appoggiare la tazzina.
3
Aprire il cassetto inserimento capsula utilizzan-
do l’apposita presa.
Sul display comparirà il messaggio:
LB2500 PLUS
Inserire capsula
4
Inserire la capsula nell’apposita sede.
Non introdurre mai le dita od oggetti nel
vanodiinserimentocapsula.
Nel vano inserimento capsula devono esse-
re inserite esclusivamente capsule compati-
bili.Inserireunasolacapsulapervolta.
PREPARAZIONE BEVANDE
13
IT
5
Chiudere il cassetto caricamento capsula ed at-
tendere che sul display appaia il messaggio:
LB2500 PLUS
PRONTA
Selezionare
bevanda
6
Premere il tasto relativo all’ESPRESSO. Sul display
comparirà il messaggio:
Bevanda
In preparazione
7
Attendere che sul display compaia il messaggio:
Bevanda pronta
Gra zie
Il caè è pronto.
ESPRESSO LUNGO
1
Ruotare verso l’alto la griglia poggia tazzina sino
ad inserirla e fermarla nella sua sede sulla parete
del cassetto raccogli capsule.
2
Eseguire i passaggi 2, 3, 4, 5 del paragrafo
ESPRESSO.
3
Premere il tasto relativo all’ESPRESSO LUNGO.
4
Seguire il punto 7 del paragrafo ESPRESSO.
ESPRESSO MACCHIATO
1
Posizionare la tazza/bicchiere sulla griglia pog-
gia tazze.
2
Eseguire i passaggi 3, 4 e 5 del paragrafo
ESPRESSO.
3
Premere il tasto relativo all’ESPRESSO MACCHIA-
TO.
4
Seguire il punto 7 del paragrafo ESPRESSO.
BEVANDA AL GUSTO DI LATTE MACCHIATO/
CAPPUCCINO
1
Posizionare la tazza/bicchiere sulla griglia pog-
gia tazze.
2
Eseguire i passaggi 3, 4 e 5 del paragrafo
ESPRESSO.
3
Premere il tasto relativo al CAPPUCCINO o alla
Bevanda al gusto di LATTE MACCHIATO.
4
Seguire il punto 7 del paragrafo ESPRESSO.
BEVANDE CALDE CON CAPSULA
1
Posizionare la tazza/bicchiere sulla griglia pog-
gia tazze.
2
Eseguire i passaggi 3, 4 e 5 del paragrafo
ESPRESSO.
3
Premere il tasto relativo alle BEVANDE CALDE.
4
Seguire il punto 7 del paragrafo ESPRESSO.
PREPARAZIONE BEVANDE
14
IT
MANUTENZIONE E PULIZIA
Prima di eseguire operazioni di pulizia assi-
curarsi sempre che l’alimentazione elettrica sia scollegata ed attendere il rareddamento dellamacchina.
Si consiglia di risciacquare quotidianamente il ser-
batoio dell’acqua e di riempirlo con acqua fresca.
Lavare ogni giorno il beccuccio erogatore.
Svuotare e pulire il cassetto raccogli gocce ogni
due/tre giorni o comunque quando è pieno.
Non utilizzare forni a microonde o tradizionali per
asciugare la macchina o sue parti.
Mai utilizzare detergenti alcalini, solventi, alcol o
sostanze aggressive.
Non immergere la macchina in acqua.
Salvo speciche indicazioni tutti i componenti non
smontabili (esclusi quelli elettrici) della macchina
vanno lavati utilizzando acqua fredda o tiepida e
panni o spugne non abrasive.
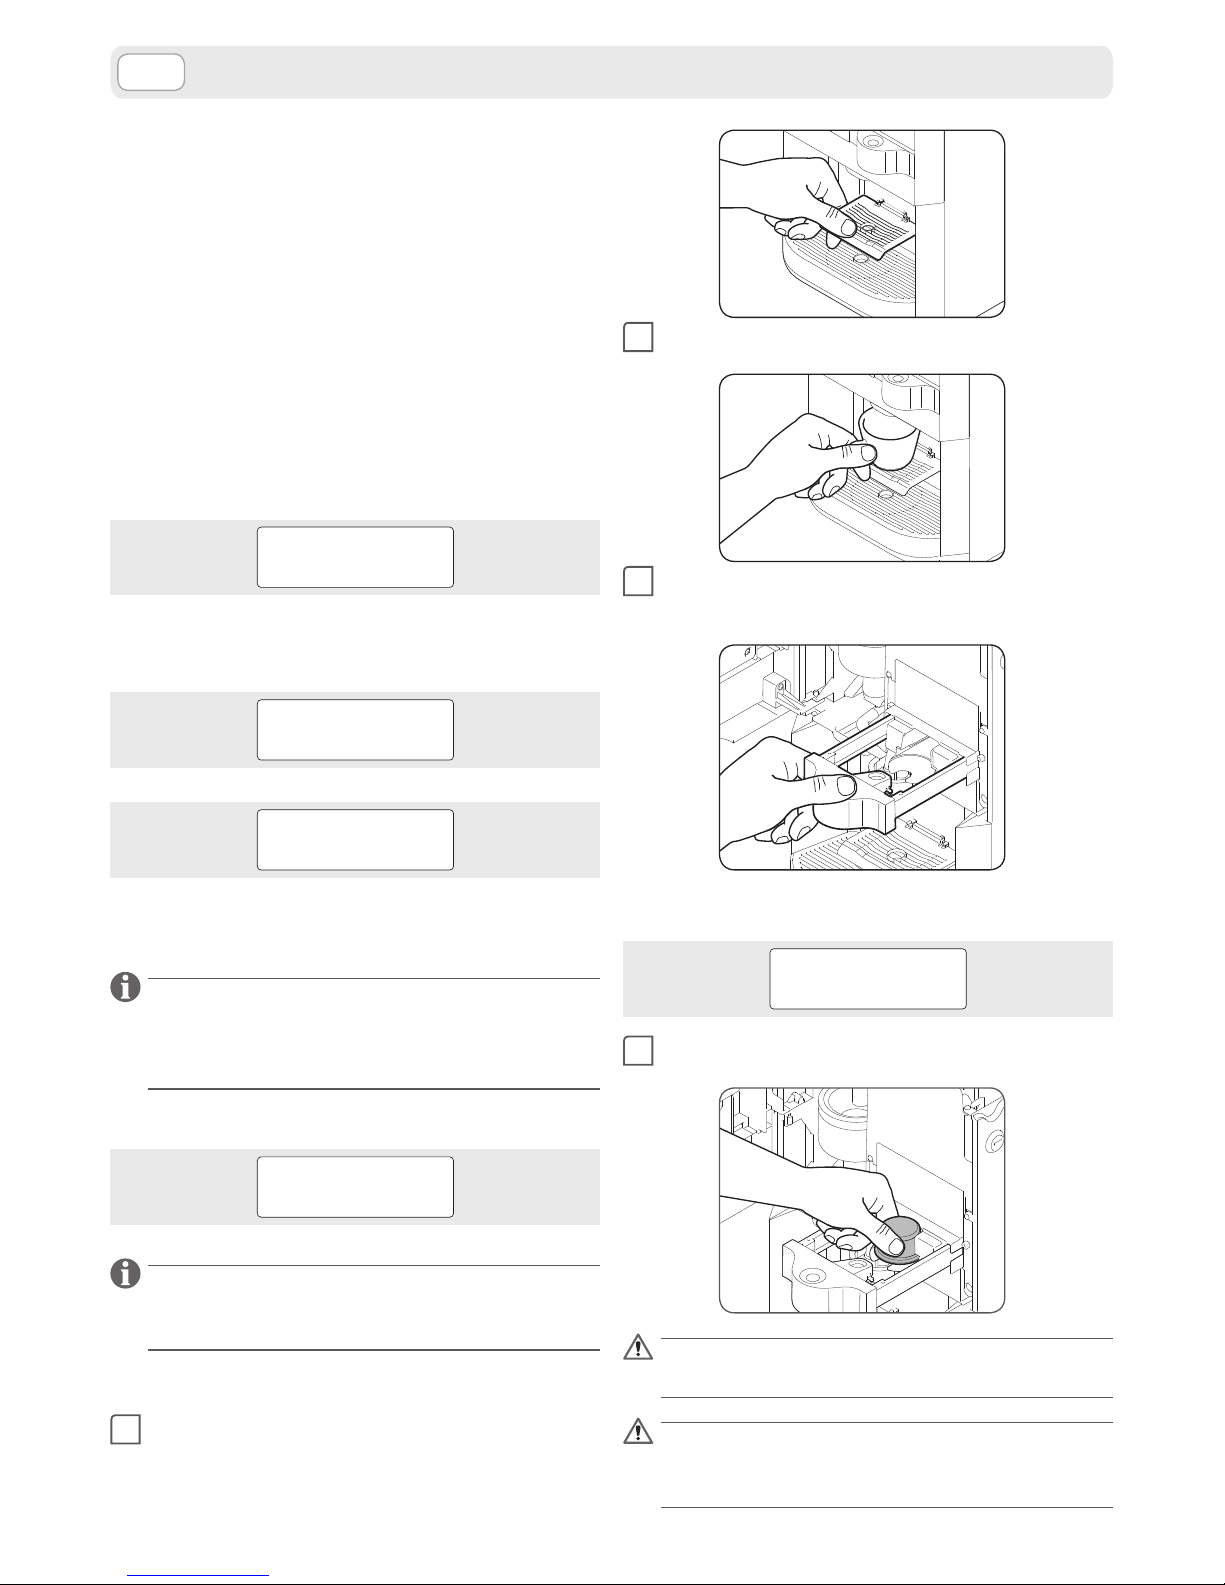
PULIZIA MANUALE GRUPPO MIXER
La macchina dispone di funzioni di pulizia auto-
matica del gruppo mixer, eseguibile attraverso la
pressione contemporanea dei tasti 1 e 4 per almeno 3 secondi.
Di default la macchina è programmata per avvisa-
re l’utente sulla necessità di esecuzione del lavaggio ogni 50 erogazioni di prodotto attraverso la
seguente segnalazione.
LAVAGGIO MIXER
RICHIESTO
La pulizia automatica può altresì essere eettuata
in ogni momento sempre utilizzando la pressione
contemporanea dei tasti 1 e 4 per almeno 3 secondi.
Durante la pulizia automatica del mixer la macchina
presenta la seguente segnalazione:
LAVAGGIO MIXER
IN CORSO
Per la pulizia manuale del gruppo mixer, seguire la
seguente procedura.
1
Spegnere la macchina.
2
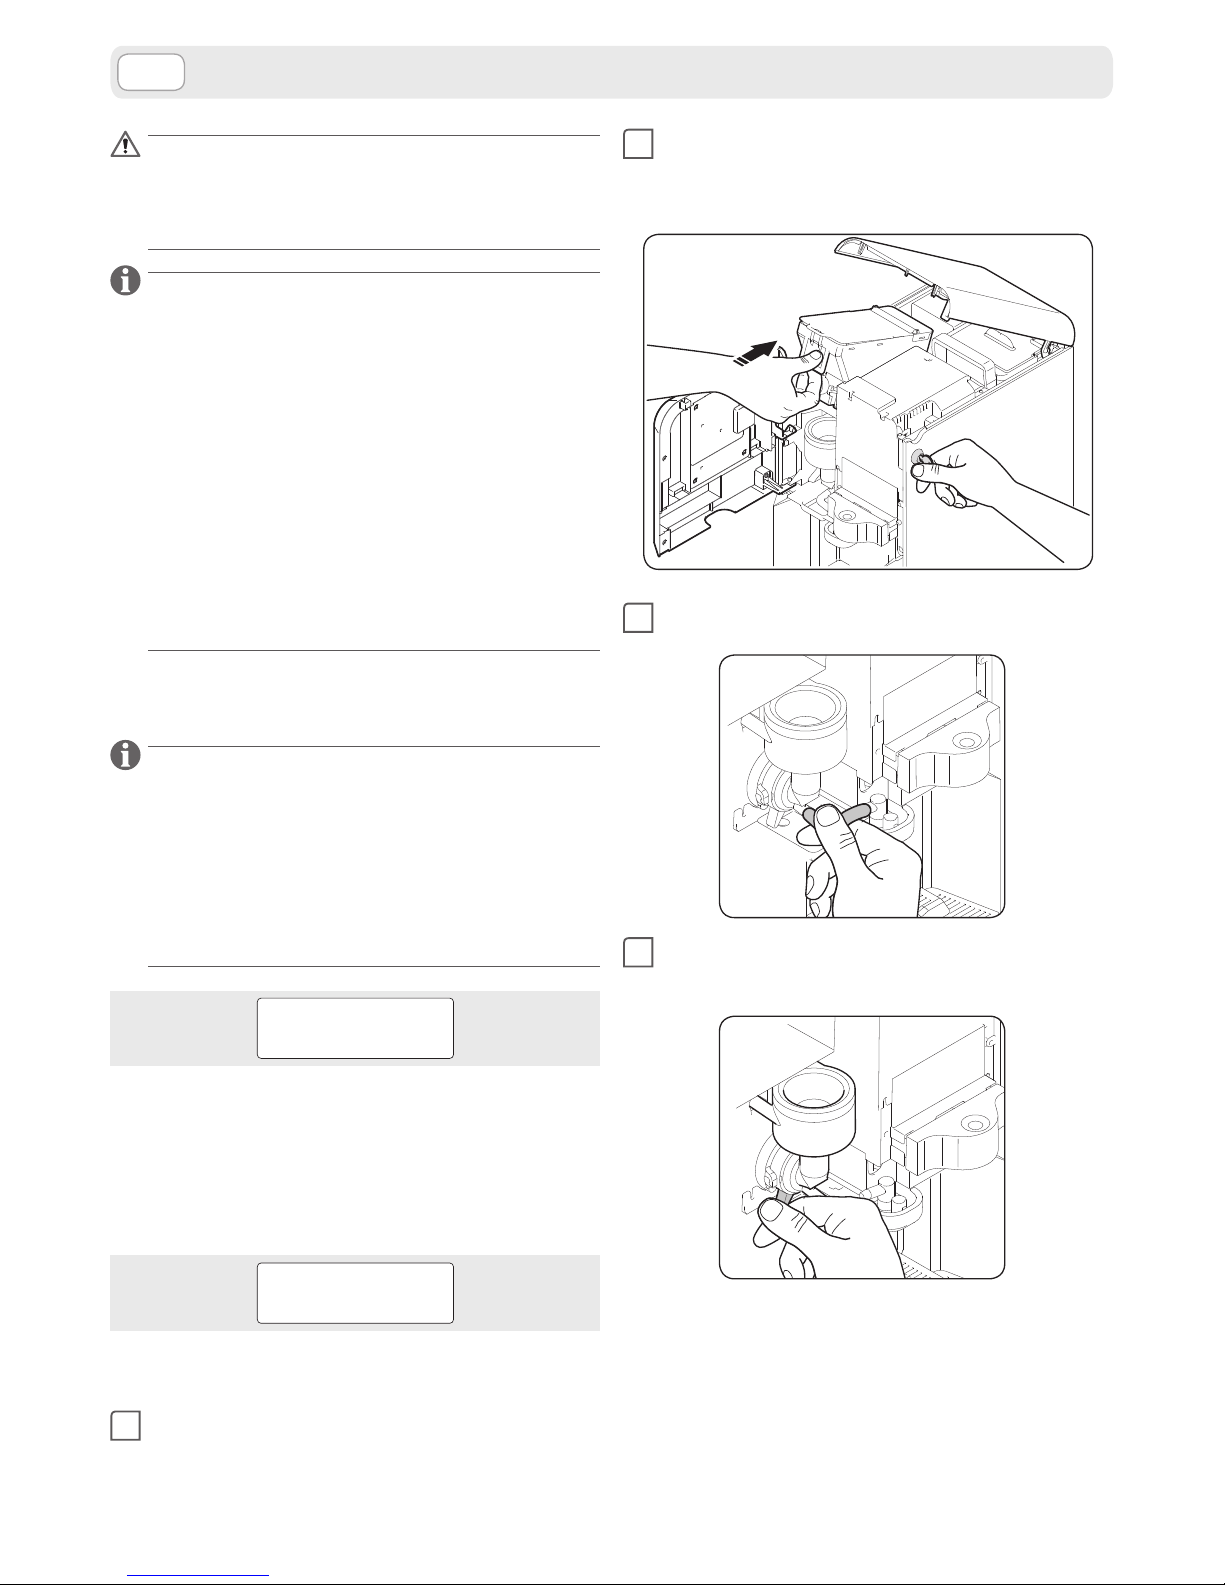
Ruotare la chiave, aprire il coperchio superiore e
l’anta del solubile.
Rimuovere il contenitore del solubile.
3
Rimuovere il tubetto uscita liquidi.
4
Sbloccare il gruppo mixer ruotando la ghiera di
tenuta in senso antiorario.
15
IT
MANUTENZIONE E PULIZIA
5
Estrarre il gruppo mixer.
6
Rimuovere la ghiera dal gruppo mixer.
7
Sganciare la parte superiore del gruppo mixer
da quella inferiore.
8
Lavare i componenti con acqua fredda o tiepi-
da, quindi asciugarli e rimontarli correttamente.
Per rimontare il gruppo mixer eseguire le operazio-
ni n qui descritte in modo inverso.
PULIZIA CASSETTO RACCOGLI GOCCE/
CAPSULE USATE
La pulizia del cassetto raccogli gocce/capsule usate deve essere eseguita regolarmente e comunque
ogni qualvolta il display mostri il seguente messag-
gio:
LB2500 PLUS
Cassetto pieno
In caso di apertura del cassetto inserimento capsu-
le quando il cassetto raccogli capsule usate è pieno,
viene segnalato sul display il seguente messaggio.
LB2500 PLUS
Svuota cassetto
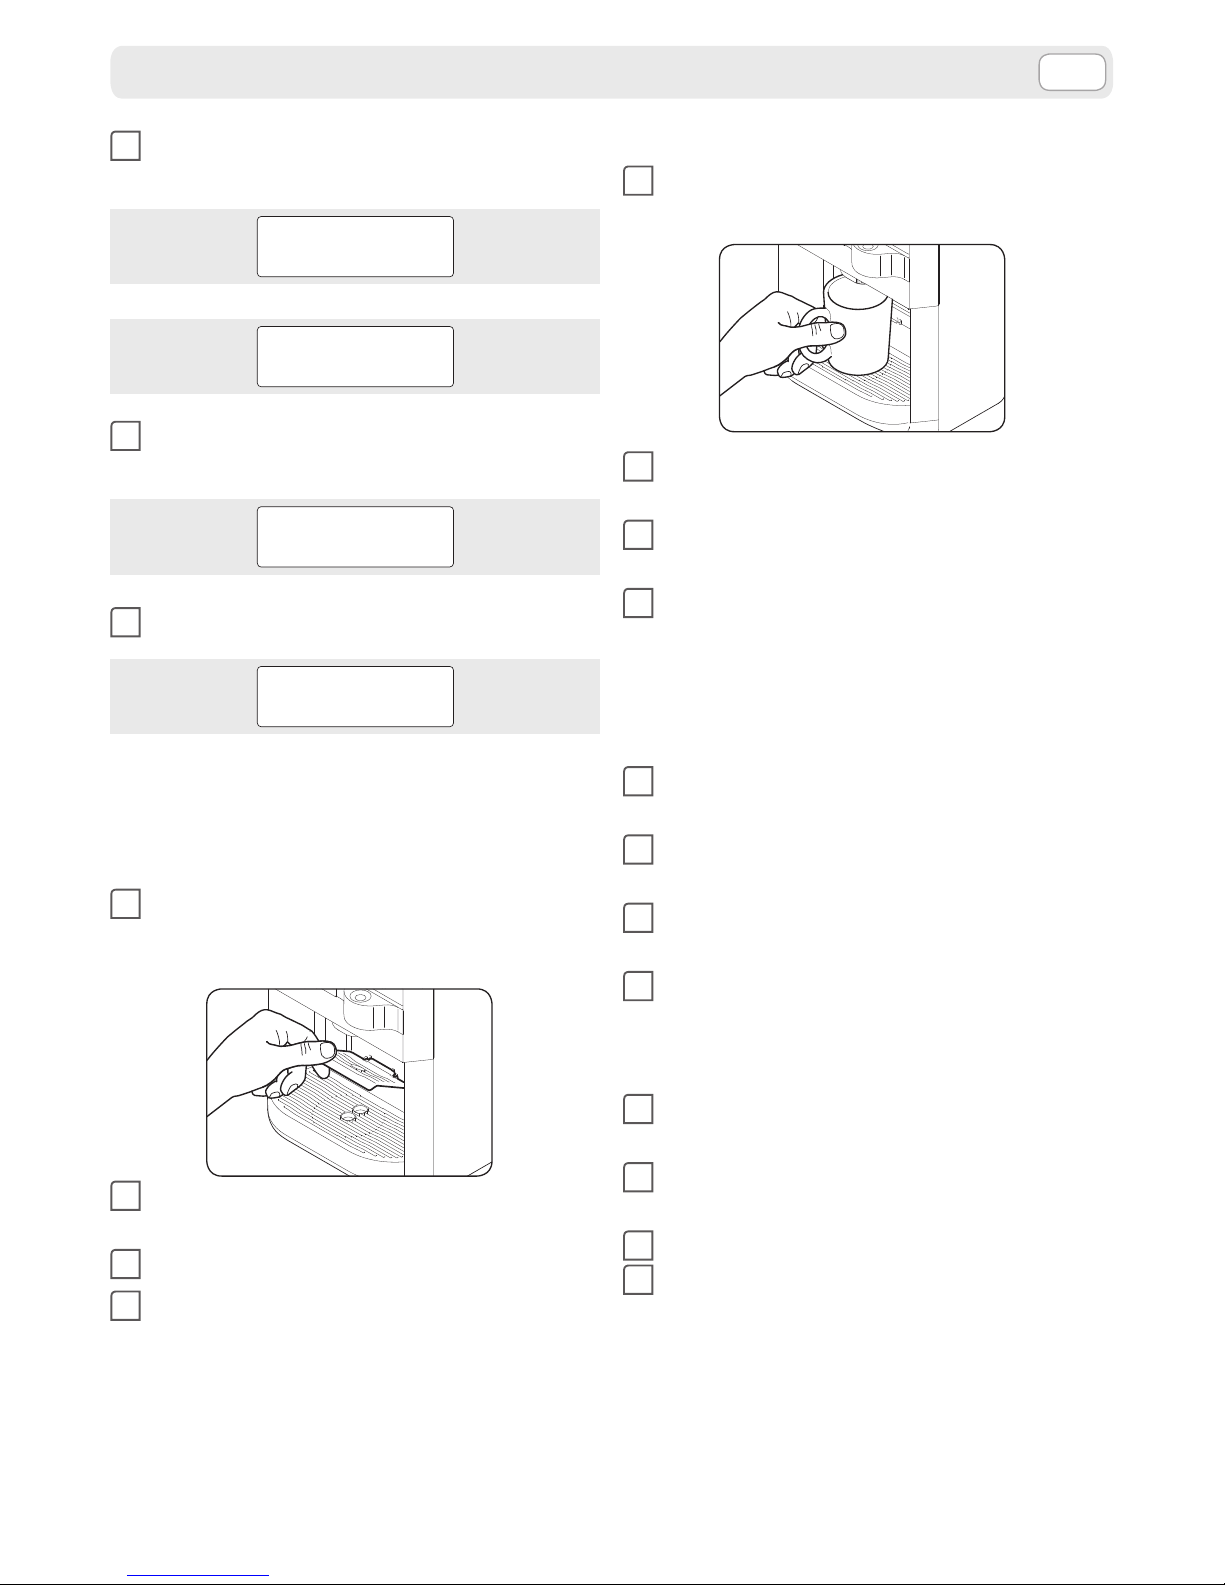
1
Estrarre il cassetto raccogli gocce/capsule com-
pleto. Il display segnala:
LB2500 PLUS
Cassetto aperto
2
Sollevare il contenitore raccogli capsule usate e
svuotarlo.
3
Estrarre la griglia poggia tazze e svuotare il cas-
setto raccogli gocce.

16
IT
MANUTENZIONE E PULIZIA
4
Lavare i componenti con acqua fredda o tiepi-
da, quindi asciugarli e rimontarli correttamente.
Nel caso in cui il cassetto non venisse riposizionato
in un tempo entro i 4 minuti interviene segnalazione acustica continua per circa 1 minuto e mezzo,
tutti i led sono spenti e a display compare la scritta
seguente.
LB2500 PLUS
Chiudere cass.
5
Richiudendo il cassetto si accendono tutti i led
e compare la scritta:
LB2500 PLUS
PRONTA
Selezionare
bevanda
DECALCIFICAZIONE CIRCUITO IDRAULICO
Il ciclo di decalcicazione viene richiesto dalla macchina “se abilitato” attraverso il messaggio, attivo
per 1 secondo ad inizio erogazione, DECALCIFICAZIONE RICHIESTA.
Questo messaggio compare dopo che la macchina
ha erogato un determinato volume di prodotto calcolato in funzione della durezza dell’acqua, impostabile come descritto nel paragrafo “Durezza H2O”.
E’ comunque possibile, attivare il ciclo di decalcicazione in qualsiasi momento, anche se la macchina
non lo richiede.
Il ciclo di decalcicazione è attivabile attraverso il
MENU IMPOSTAZIONI, seguendo la sequenza indicata nel paragrafo “Decalcicazione”.
Se attivata tale funzionalità, è anche possibile attivare il ciclo di decalcicazione attraverso la pressione contemporanea dei tasti 2 e 5 per almeno 5
secondi.
Eseguire quindi la sequenza di operazioni indicata
nel paragrafo “Decalcicazione”.
Perladecalcicazioneutilizzareesclusiva-
mente prodotti idonei e garantiti secondo
lenormevigenti.
17
IT
MESSAGGI DI ALLARME SUL DISPLAY
Display Stato macchina Eventi Rimedi
LAVAZZA LB PLUS
Cassetto pieno
Cassetto capsule usate
pieno
È possibile l’erogazione
di solubili
Svuotare cassetto e
lavarlo
LAVAZZA LB PLUS
Cassetto aperto
Apertura cassetto con
macchina in temperatura
Non è possibile eettuare
erogazioni
Chiudere il cassetto
ATTENZIONE
Mancanza acqua
Manca acqua nel
serbatoio o manca
serbatoio
Lampeggio dei tasti
selezione
Riempire il serbatoio con
acqua potabile, fresca,
non gasata
ATTENZIONE
Anta aperta
Anta solubili aperta
Non è possibile eettuare
erogazioni
Chiudere l’anta solubili
SURRISCALDAMENTO
ATTENDERE
Temperatura troppo
elevata
Non è possibile eettuare
erogazioni
Attendere
rareddamento. Se
il messaggio non
scompare, contattare
l’assistenza
ATTENDERE
RAFFREDDAMENTO
Componenti macchina in
fase di rareddamento
Non è possibile eettuare
erogazioni
Attendere
rareddamento.
Se il messaggio non
scompare, contattare
l’assistenza
CREDITO
ESAURITO
Credito esaurito
Non è possibile eettuare
erogazioni
Ricaricare il credito
TIMEOUT
EROGAZIONE
Erogazione terminata per
assenza usso acqua
Erogazione prodotto
incompleta
Eseguire la procedura
di innesco pompe. In
caso di permanenza del
messaggio o mancato
innesco contattare
l’assistenza
INSERIRE
CREDITO
Inserire credito, quando
le erogazioni sono a
pagamento e manca il
credito
Non è possibile eettuare
erogazioni
Ricaricare il credito
ALLARME
RISCALDAMENTO
Riscaldamento non
avvenuto
Non è possibile eettuare
erogazioni
Contattare l’assistenza
GUASTO
AL FLUSSIMETRO
Flussimetro guasto,
numero impulsi non
raggiunti
Non è possibile eettuare
erogazioni
Contattare l’assistenza
ALLARME
SONDA
Allarme sonda (in corto o
aperta)
Non è possibile eettuare
erogazioni
Contattare l’assistenza
INNESCO POMPE
NEGATIVO
Esito negativo
dell’innesco pompe
-
Ripetere l’operazione. In
caso di esito negativo,
contattare l’assistenza
DECALCIFICAZIONE
RICHIESTA
La macchina richiede
la decalcicazione del
circuito idraulico
E’ possibile l’erogazione di
tutti i prodotti
Eseguire il ciclo di
decalcicazione come
indicato nel capitolo
“Manutenzione e pulizia”
SOSTITUIRE
ADDOLCITORE
Il ltro addolcitore ha
esaurito la sua capacità
ltrante
E’ possibile l’erogazione di
tutti i prodotti
Sostituire il ltro
addolcitore
18
IT
MESSAGGI SUL DISPLAY DURANTE LE OPERAZIONI CON CHIP CARD
Display Eventi
NO IMPOSTAZIONI
SCHEDA VERGINE
La scheda non è inizializzata. Mancano le impostazioni
OPERAZ. NON OK
ESTRARRE LA CARD
I dati non sono congruenti
OPERAZIONE OK
ESTRARRE LA CARD
Il trasferimento dei dati è stato eettuato, si può estrarre la card
CARD IMPOSTAZ.
SCRITT. IN CORSO
Scrittura in corso su macchina da una card. Scrittura
impostazioni
CARD IMPOSTAZ.
LETTURA IN CORSO
Lettura in corso dalla macchina su una card. Lettura
impostazioni
CARD ONE TIME
TRASFER.IN CORSO
Trasferimento in corso da una card OneTime
MASTERCARD
TRASFER.IN CORSO
Trasferimento da una MasterCard
CARD PROVA
INSERITA
Conferma inserimento card prova
CARD CREDITI
INSERITA
Conferma inserimento card crediti
CARD MULTINS
CONTATORE NULLO
Verica su Multins, assenza crediti
CARD MULTINS
PREMERE TASTO 1
Con card Multins inserita premere tasto 1 per trasferire i crediti
CARD MULTINS
ANNULLAM.CREDITI
Con card Multins inserita, trasferimento annullato
TRASFERIMENTO
CREDITI xxxxx
Visualizza totale crediti trasferiti
CARD AUTOTEST
INSERITA
Conferma inserimento card autotest
CARATTERISTICHE TECNICHE
Per le caratteristiche tecniche fare riferimento alla
targhetta dati presente sulla macchina.
➤ Voltaggio: 220 - 240 V, 50/60 Hz
➤ Potenza totale: 1450 W
➤ Capacità serbatoio: 3 l
➤ Peso: 12 kg
➤ Materiali impiegati per la carrozzeria: termoplastico
➤ Capacità cassetto capsule usate: 20 capsule
➤ Dimensioni: Altezza 470 mm ; Larghezza 260 mm ;
Profondità 400 mm
➤ Conformità: 2006/42 CE - 2004/108 CE - 2006 /95
CE

19
EN
SAFETY
PURPOSE OF APPLIANCE
This appliance is designed for professional use.
Any improper use, not provided for by these instructions, is strictly forbidden.
Likewise, no technical modication must be made.
This device can be used by children, typically 8
years of age and older, if watched closely or properly trained on using the device safely and provided that they are aware of the connected dangers.
Cleaning and maintenance operations should not
be carried out by children unless older than 8 years
of age and supervised.
Keep the device and the relevant power cord out of
reach of children under 8 years of age.
This device can be used by persons with impaired
physical, sensory or mental capacities, or persons
with no practice or skill, if watched closely or properly trained on using the device safely and provided
that they are aware of the connected dangers.
Do not let children play with the device.
POSITION
Place the coee machine in a safe location, on a at,
horizontal and stable surface, where it cannot be accidentally knocked over or cause injury.
Do not store the machine at a temperature below
4 °C as it may be damaged by frost.
Do not use the coee machine outdoors.
Do not place the machine on very hot surfaces and/
or near naked ames.
Use the machine at room temperature.
POWER SUPPLY
Only connect the coee machine to a suitable
mains outlet socket.
The voltage must correspond to that shown on the
machine data plate.
POWER SUPPLY CORD
Do not use the coee machine if the power supply
cord is defective or damaged.
In such cases it must be replaced immediately.
Do not run the power cord around corners and
along sharp edges, over very hot objects and protect it from oil.
Do not move or pull the coee machine by holding
onto the cord.
Do not remove the plug by pulling the cord; do not
touch the plug with wet hands.
Avoid letting the power cord hang freely from tables or shelves.
ELECTRIC SHOCK HAZARD
Never put live parts in contact with water.
Ensure that hands, machine, power cord and the
surface under the machine are not wet.
PROTECTION OF OTHERS
Always keep children under supervision, to avoid
them playing with the equipment.
Children are unaware of the danger connected to
electric appliances.
Do not leave the materials used to package the machine within their reach.
BURN HAZARD
Do not touch hot parts (capsules holder group, etc.)
immediately after use of the equipment.
During drinks dispensing be careful of any hot liquid splashing.
CLEANING
Before cleaning the machine, the power supply
must be unplugged from the mains and the machine must be left to cool down.
Do not immerge the machine in water!
Attempting any repair work inside the machine is
strictly prohibited.
Do not use the water in the tank for food purposes.
LOOKING AFTER THE MACHINE
When the machine is not used for prolonged periods, unplug the power cord from the mains and
keep it in a dry place that is not accessible to children.
Protect from dust and dirt.
REPAIRS / MAINTENANCE
In case of faults, defects or suspicion of defect after
a fall, unplug the machine immediately.
Do not turn on a defective machine.
Any servicing and repairs must be performed only
by Authorised Service Centres.

20
EN
We decline all responsibility for any damages in
case of repairs not performed up to standard and in
a workmanlike manner.
WATER TANK
Fill the tank with only non-carbonated fresh drinking water.
Do not turn on the machine if the water does not
come above the minimum level indicated on the
tank.
CAPSULES COMPARTMENT
Only compatible capsules must be inserted into the
capsule insertion compartment; do not put your
ngers or other objects into it.
The capsules must be used once only.
SAFETY
MACHINE DISPOSAL AT THE END OF ITS
OPERATIONAL LIFE
INFORMATION FOR THE USER: Implementation of
Directives 2002/95/EC, 2002/96/EC and 2003/108/
EC, on the restriction of the use of certain hazardous
substances in electrical and electronic equipment,
and on the disposal of e-wastes, and later amendments.
The symbol of the crossed-out wheeled bin on
the appliance or its packaging indicates that the
product must be disposed of separately from other
waste at the end of its operational life.
The user must therefore take the appliance to be
disposed of to an appropriate separate collection
centre for electronic and electrotechnical equipment or take it to the dealer when buying a new
appliance of the equivalent kind (one by one).
Appropriate separate collection for the dismantled
appliance being subsequently sent out for recycling, treatment and for environmentally friendly
disposal, contribute to the prevention of possible
negative eects on the environment and on human health, and encourage recycling of the materials the appliance is made of.
Specic administrative sanctions provided for by
current regulations will be applied for illicit disposal
of the product by the user.

21
EN
GENERAL INDEX
These operating instructions refer to the machine with rmware 1.0 and later versions.
SAFETY ...........................................................................................................................................19
PURPOSE OF APPLIANCE ............................................................................................................................................................................................... 19
POSITION ................................................................................................................................................................................................................................. 19
POWER SUPPLY .................................................................................................................................................................................................................... 19
POWER SUPPLY CORD ..................................................................................................................................................................................................... 19
ELECTRIC SHOCK HAZARD ........................................................................................................................................................................................... 19
PROTECTION OF OTHERS .............................................................................................................................................................................................. 19
BURN HAZARD ..................................................................................................................................................................................................................... 19
CLEANING ............................................................................................................................................................................................................................... 19
LOOKING AFTER THE MACHINE ................................................................................................................................................................................. 19
REPAIRS / MAINTENANCE .............................................................................................................................................................................................. 19
WATER TANK ...........................................................................................................................................................................................................................20
CAPSULES COMPARTMENT .......................................................................................................................................................................................... 20
MACHINE DISPOSAL AT THE END OF ITS OPERATIONAL LIFE ................................................................................................................. 20
GENERAL INDEX ............................................................................................................................21
COMPONENTS ................................................................................................................................22
MESSAGES TO DISPLAY MACHINE STATUS ..................................................................................22
MACHINE SETUP ............................................................................................................................23
UNPACKING AND POSITIONING ................................................................................................................................................................................ 23
STARTING THE MACHINE ................................................................................................................................................................................................ 23
SETTINGS MENU ............................................................................................................................25
USER MENU ............................................................................................................................................................................................................................ 25
REMAINING CREDIT................................................................................................................................................................................................................................................25
DOSE SETTINGS........................................................................................................................................................................................................................................................ 25
WATER SOFTENER INSTALLATION ................................................................................................................................................................................................................. 25
SETTINGS MENU ................................................................................................................................................................................................................. 26
LANGUAGE CHOICE ...............................................................................................................................................................................................................................................26
DOSES SETTINGS ..................................................................................................................................................................................................................................................... 26
DESCALING ................................................................................................................................................................................................................................................................. 26
H2O HARDNESS ........................................................................................................................................................................................................................................................ 27
DELTA TEMP ................................................................................................................................................................................................................................................................28
CHANGE PASSWORD ............................................................................................................................................................................................................................................ 28
ENERGY SAVING .......................................................................................................................................................................................................................................................28
START PUMPS ............................................................................................................................................................................................................................................................ 28
CARD CHECK .............................................................................................................................................................................................................................................................. 28
DISPENSE COUNTER .............................................................................................................................................................................................................................................. 29
WATER SOFTENER COUNTER............................................................................................................................................................................................................................29
DRINKS PREPARATION ..................................................................................................................30
INITIALISING FOR DRINKS PREPARATION..............................................................................................................................................................30
DRINKS DISPENSING ......................................................................................................................................................................................................... 30
ESPRESSO ..................................................................................................................................................................................................................................................................... 30
LONG ESPRESSO ......................................................................................................................................................................................................................................................31
ESPRESSO MACCHIATO .......................................................................................................................................................................................................................................31
LATTE MACCHIATO/CAPPUCCINO FLAVOURED DRINK ..................................................................................................................................................................31
HOT DRINKS WITH CAPSULES .........................................................................................................................................................................................................................31
MAINTENANCE AND CLEANING ...................................................................................................32
MANUAL CLEANING OF MIXER GROUP ................................................................................................................................................................ 32
CLEANING OF DRIP TRAY/USED CAPSULES DRAWER .................................................................................................................................. 33
DESCALING THE HYDRAULIC CIRCUIT ................................................................................................................................................................... 34
ALARM MESSAGES ON THE DISPLAY ............................................................................................35
MESSAGES ON THE DISPLAY DURING CHIP CARD OPERATIONS ................................................36
TECHNICAL SPECIFICATIONS ........................................................................................................36

22
EN
COMPONENTS
MESSAGES TO DISPLAY MACHINE STATUS
1
2
3
4
5
6
Soluble powder
tank cover
Water tank cover
Capsules insertion
drawer
Grip handle
Power socket
General switch
Chip card insertion
compartment
Water tank
Lock for soluble
powder compartment
door and water tank
Soluble powder
compartment door
Power supply cord
Soluble powder
tank
Display
Drink selection
buttons
Nozzle
Folding espresso
cup-support rack
Large cup/glasssupport rack
Used capsules
drawer
Drip tray drawer
Sound
Flashing
On
O
MACHINE STATUS
1
2
3 4
5
6
SOUND SOUND DISPLAY
Turning on
LB 2500 PLUS
Warming up
Energy Saving ENERGY SAVING
Temperature reached,
machine ready
LB 2500 PLUS
Warming up
DRINK SELECTION
Drink requiring capsule
no capsule inserted
WARNING!
Insert capsule
Capsule insertion drawer open
LB 2500 PLUS
Insert capsule
Selected product is being dispensed
DRINK
In preparation
Drink selection with
drawer open
Short
sound
WARNING!
Insert capsule
Finished dispensing
Long
sound
DRINK READY
THANK YOU
Cleaning cycle with descaling product
in progress
CLEANING CYCLE IN
PROGRESS
Rinsing cycle with water in progress
WASHING CYCLE IN
PROGRESS
23
EN
MACHINE SETUP
Cappuccino
flavoured drink
Latte macchiato
6
5
4
3
2
1
drinks
Hot
Espresso
macchiato
Long
espresso
Espresso
We take no responsibility for any damage
caused by:
• incorrect use that is not in accordance
with the intended use of the machine;
• repairs carried out by non-authorised
service centres;
• tamperingwiththepowercord;
• tampering with any component of the
machine;
• use of non-genuine spare parts and ac-
cessories;
• failuretodescalethemachine;
• storagebelow4°C;
• usebelow5°C;
• useover40°C;
• usenon-compatiblecapsules.
Inthesecasesthewarrantywillbevoided.
Any damages caused to the machine due
to failure to follow the instructions given in
thisbookletarenotcoveredbywarranty.
UNPACKING AND POSITIONING
1
Given the size and weight of the machine, its
removal from the packaging, positioning and
stabilizing should be performed by two people.
2
Remove the machine from the packaging by
putting pressure on the side protections and
pulling upwards.
3
Position the machine on a dry, at, horizontal
and stable surface, away from water, ames and
sources of heat.
STARTING THE MACHINE
The water tank is positioned inside the machine.
To access the tank the top door must be opened
which has a key operated lock.
1
Turn the key clockwise to open the door.
Turn the key anti-clockwise to close the door.
2
2
1
1
2
Lift and remove the lid of the water tank.
3
Fill the water tank using only non-carbonated
fresh drinking water.
Use of a water lter (optional accessory) improves
water quality and extends the life of the appliance.
Use the AquaAroma Crema Brita® lter for Lavazza.
To insert the lter follow the instructions leaet that
comes with the accessory. To replace the lter, refer
to the deadlines specied on the lter instructionsheet provided with the tting.
24
EN
4
It is possible, after removing the cover, to take
the water tank out of the machine to rell it.
Ensure that hands, machine, power cord
and the surface under the machine are not
wet.
5
Open the soluble powder compartment door
completely.
6
Lift and turn the lid of the soluble milk contain-
er.
7
Add the soluble milk directly to the container.
The soluble powder container can also be removed
from its housing complete with lid in order to ll it.
8
Reposition the lid of the soluble milk container.
9
Shut the soluble powder compartment door
and then the top door, and block them by locking with the key.
10
Plug the power cord into the socket at the back
of the machine.
11
Plug the cord into the mains socket.
12
Press the main power switch bringing it into the
(I) position. The display will show the machine is
turned on.
MACHINE SETUP
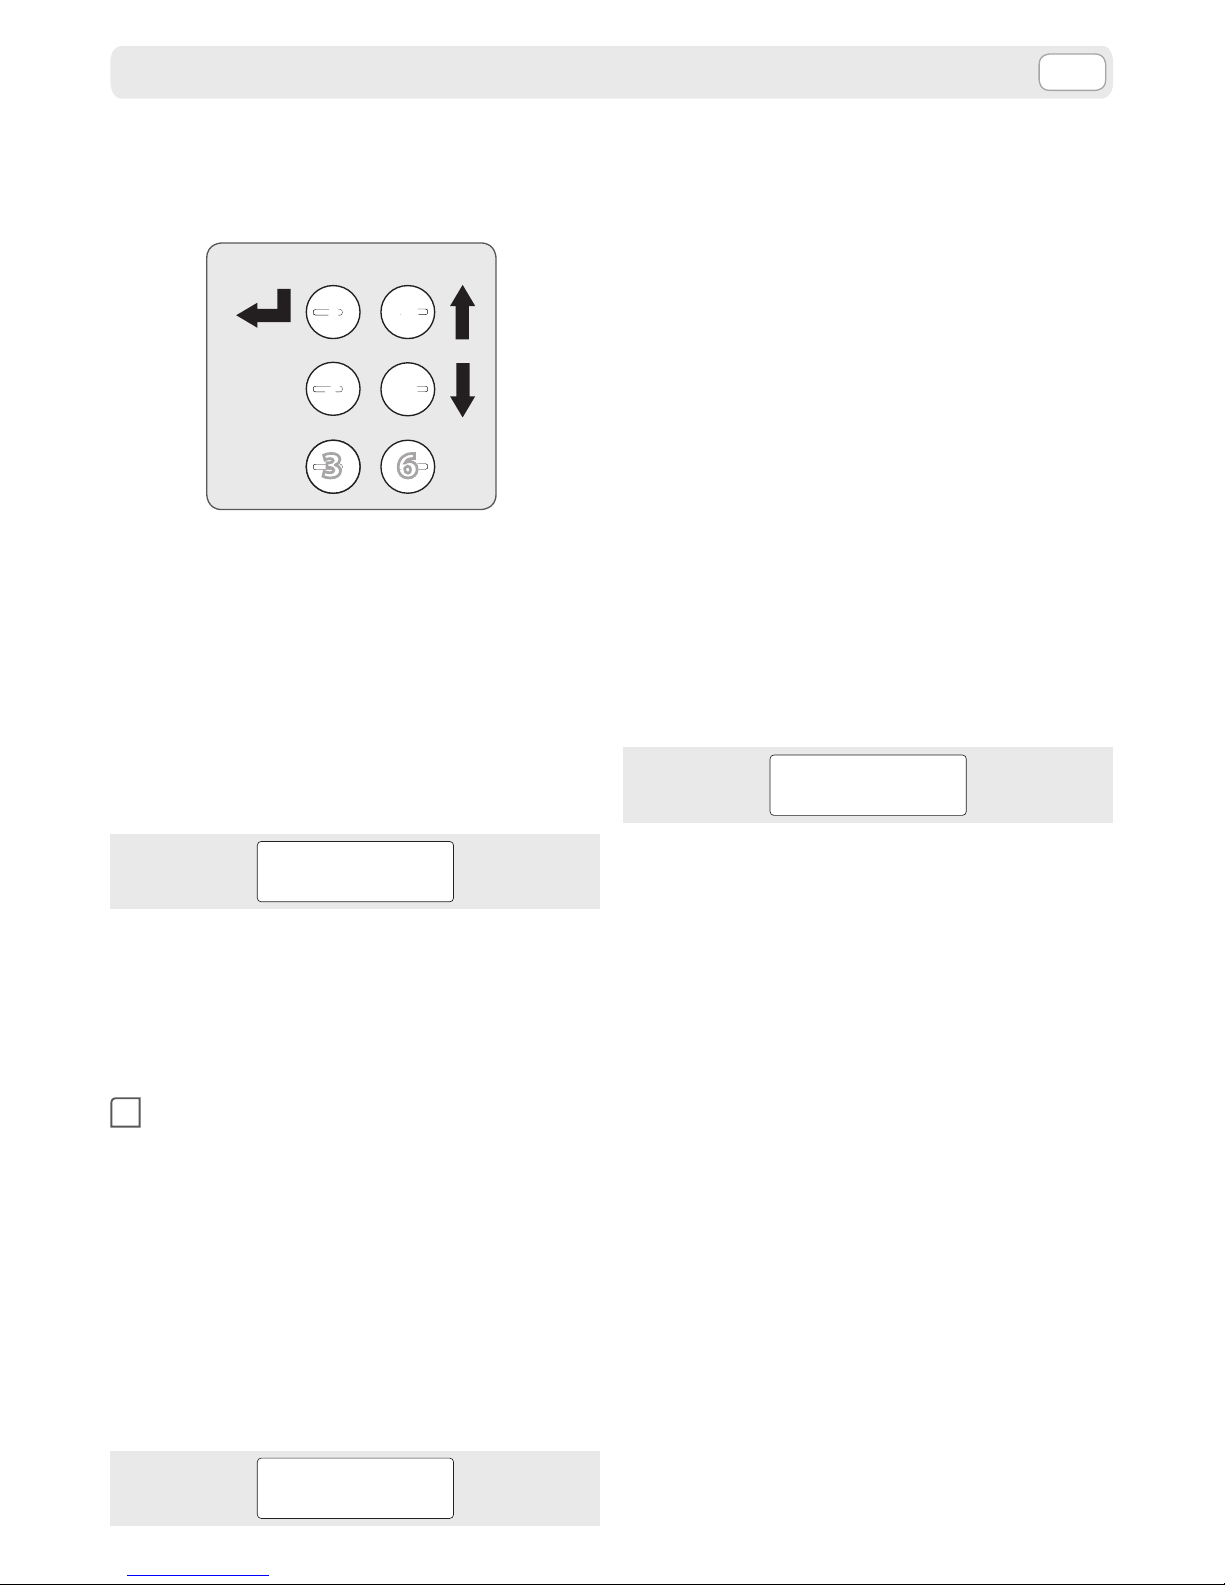
25
EN
To access and navigate the items within the Settings Menu please use the following functions on
the selection keypad which are each assigned to a
separate button.
1
2
3
4
5
6
Esc
Enter
To access the Settings Menu please start the machine by pressing and holding the “Enter” button
for approximately 3 seconds. With the keys 4 and 5
the display can be scrolled between the following
items:
➤ User menu
by conrming with “Enter” the “User Menu“ is
accessed.
➤ Settings menu
by conrming with “Enter” the “Setting Menu”
requires a password:
PASSWORD
If you do not have a password, it will only be possible to access the user menu.
Password knowledge on the other hand allows access to the settings menu.
USER MENU
1
Press “Enter”. You can navigate between the fol-
lowing items in the user menu by using buttons
4 and 5.
➤ Remaining credit
➤ Dose settings
➤ Water softener installation
REMAINING CREDIT
By conrming the “Remaining Credit” item with
“Enter”, an indication of the remaining supplies still
available from the machine will appear on the display.
LAVAZZA LB PLUS
CREDIT 00050
Press the “Esc” button one or more times to go back
to previous menu levels or to exit the menu.
DOSE SETTINGS
By conrming the “Dose Settings” item with “Enter”,
you can change, within preset limits, the dierent
selection parameters.
In fact the lower level menu allows you to choose
the selection you want to change using buttons 4
and 5.
➤ Product 1
➤ . .
➤ . .
➤ Product 6
Selection of a product with the “Enter” button, then
using the 4 and 5 buttons, gives the following parameters for which the default values are:
➤ Offset pumps
(allows you to change the pump activation time)
Conrming with the “Enter” key, the following will
appear on the display:
SET UP OK
0
You can then change the default value using the 4
and 5 buttons.
Every time you press the buttons the activation
time for the parameter you are changing increases
or decreases by 0.5 seconds.
Only in the case of the pumps, if the settings have
been programmed on the basis of dose, a 0.5 increase or decrease corresponds to a dose increase
step calculated in cc.
The selection can then be conrmed using the
“Enter” button. Press the “Esc” button one or more
times to go back to previous menu levels or to exit
the menu.
WATER SOFTENER INSTALLATION
By conrming the “Water softener installation” with
“Enter”, the functions of counting the processed litres can be activated or deactivated and the display
shows the corresponding messages.
Activate now
By pressing OK, the message “ACTIVATION IN PROGRESS” is shown and the machine dispenses approximately half litre of water from the soluble nozzle.
SETTINGS MENU
26
EN
From this moment on, the litre count starts based
on the set limit and if enabled, it will be displayed
the message “REPLACE SOFTENER”.
A container can be used under the nozzle to collect
water during the lter activation process. When nished, in each case, it will be reported on the display
to verify that the drip tray is not too full of water.
Deactivate now
By pressing OK, the message “DEACTIVATED” is
shown and the counting functions of the processed
litres and of the messages shown on the display are
deactivated.
SETTINGS MENU
The settings menu is reserved to qualied and au-
thorised personnel.
1
Type in the correct password and then press
“Enter”.
The default password is 333333. If an incorrect
password is entered, the display shows the following message for 3 seconds:
PW ERRATA
You can navigate between the following items in
the settings menu by using buttons 4 and 5.
➤ Language choice
➤ Doses settings
➤ Descaling
➤ H
2
O Hardness
➤ Delta Temp
➤ Change password
➤ Energy saving
➤ Start pumps
➤ Card check
➤ Dispense counter
➤ Water softener counter
LANGUAGE CHOICE
By conrming the “Language choice” item with
“Enter” you can change the menu and display language.
In fact the lower level menu allows you to choose
the language you want by pressing buttons 4 and 5
and making a choice using the “Enter” button.
➤ Italiano
➤ English
➤ Français
➤ Deutsch
➤ Espanõl
➤ Português
➤ Nederlands
Press the “Esc” button one or more times to go back
to previous menu levels or to exit the menu.
DOSES SETTINGS
Conrming the “Doses settings” with “Enter” the parameters of the various selections can be changed,
within the predetermined limits. In fact the lower
level menu allows you to choose the selection you
want to change using buttons 4 and 5.
➤ Product 1
➤ . .
➤ . .
➤ Product 6
The selection of a product with the “Enter” key
shows the following parameters by pressing the
keys 4 and 5:
➤ Offset pumps
(allows you to change the pump activation time)
➤ Offset TR1
(allows you to change the hopper activation
time).
The item is displayed for all the products but is
active only for the products which require soluble powder.
DESCALING
Remove the water softener lter, if installed, before
starting the descaling cycle.
The descaling cycle can be activated at any time,
including when the machine does not show it is
required. By conrming the “Descaling” item with
“Enter”, the following message will run across the
display.
DESCALING
INSERT DESCALING PRODUCT
INTO THE TANK AND PRESS OK
No more beverages can be dispensed until the cy-
cle has been completed.
SETTINGS MENU

27
EN
At this point follow the instructions.
1
Fill the tank with descaling product diluted in
water according to the quantities indicated in
the instructions.
2
Position as large a container as possible under
the nozzle.
3
Then push “Enter”; the pumps will be activated
and the descaling solution will run out through
the nozzle after executing its action inside the
machine’s circuit. The display will show the message:
CLEANING CYCLE
IN PROGRESS
• Donotdrinkorriskcausingthedescaling
solutiontobedrunk.
• Danger of scalding, the descaling solu-
tionisdispensedathightemperature.
4
The machine will dispense the amount of solu-
tion provided. To increase the eectiveness
of the descaling product, the machine automatically pauses for about 1 minute. During
the pauses, the display will show the message
“CHECK DRAWER-AUTOM. RESTART” and, if necessary, the container used to collect the solution can be emptied.
However, it is possible to temporarily pause the
cycle by pressing “Enter”, in order to allow emptying and disposing of the contents of the container. In this case, press “Enter” to reactivate the
cycle.
In case of interruption to the electrical supply dur-
ing the descaling cycle, upon being restarted again
the machine will automatically reposition itself in
the start position once more.
5
When the tank is emptied, the display will show
the message:
RINSE
TANK
Alternated with the message:
FILL
TANK
6
So proceed to carefully wash and rinse the tank
with fresh drinking water.
Then rell it with non-carbonated, fresh drink-
ing water.
The display will show the message:
START
RINSE
7
Position as large a container as possible under
the nozzle.
8
Press “Enter” to start rinsing the machine’s hy-
draulic circuit, the display will show the message:
WASHING CYCLE
IN PROGRESS
9
The machine will dispense the correct volume
of water. It is however possible to momentarily
interrupt the cycle, by pressing “Enter”, to allow
the contents of the container used to collect
the water to be emptied and disposed of.
10
Reposition the empty container under the noz-
zle.
11
Push “Enter” to restart the cycle.
12
The machine may require the tank to be relled
if the required volume of water has not been
reached.
The message in this case is the one indicated
for point 6. Start again from point 8 to complete
the cycle.
13
When the machine has dispensed the required
volume of water, the following message is displayed:
DESCALING
FINISHED
It is then possible to dispense beverages once
again, topping up the tank if necessary with noncarbonated, fresh drinking water.
H2O HARDNESS
By conrming “H2O Hardness” with “Enter” it is possible to input the data for the typical water hardness
of the location where the machine is installed.
SETTINGS MENU
28
EN
SETTINGS MENU
This value can be measured with the special colour
changing strips available on the market.
A value in a range between 5 and 50 French degrees can be input with buttons 4 and 5.
This value is set by default to 20 French degrees. If
a water softener lter is used, set a water hardness
value based on the hardness abatement capability
of the lter.
DELTA TEMP
By conrming “Delta Temp” with “Enter”, it is possible to change the working temperature of the
boiler so as to slightly increase or reduce the temperature of the dispensed product. The value can
be increased or reduced by a range of ±4 °C using
buttons 4 and 5.
CHANGE PASSWORD
By conrming the “Change Password” item with
“Enter” the display will show:
PASSWORD
At this point you can input your desired password
which must be composed of 6 characters.
You can then conrm the password using the “Enter” button. Press the “Esc” button one or more
times to go back to previous menu levels or to exit
the menu.
ENERGY SAVING
The machine is programmed to be able to go into
energy saving mode after a certain time of inactivity. The preset value is 2 hours.
In Energy Saving mode the display on the machine
shows:
ENERGY SAVING
To bring the machine back to ready mode it is sufcient to press any selection button. By conrming the “Energy Saving” item with “Enter” you can
choose between the following two options by
pressing the 4 and 5 buttons:
➤ Energy saving deactivated
➤ Energy saving activated
You can choose to activate or deactivate Energy
Saving using the “Enter” button.
Press the “Esc” button one or more times to go back
to previous menu levels or to exit the menu.
START PUMPS
By conrming the “Start pumps” item with “Enter”
you can choose between the following two options
by pressing the 4 and 5 buttons:
➤ Start pumps activated
➤ Start pumps deactivated
You can choose to activate or deactivate the function using the “Enter” button.
Press the “Esc” button one or more times to go back
to previous menu levels or to exit the menu.
The start pumps function can be executed, in machine ready mode, by pressing buttons 3 and 6 at
the same time for at least 3 seconds.
Before activating the start pumps function
acuporglassmustrstbepositionedunder
thenozzle,onthecup-supportrack.
During start pumps the display will show the following message:
START
PUMPS IN PROGRESS
According to the result of the process and at the
end of it, the display will show the following message.
START PUMPS
POSITIVE/NEGATIVE
When the machine is started for the rst time or af-
ter a prolonged period of not being used, it may be
necessary to rell the water system. The function, if
activated beforehand from the menu, is executed
automatically by the machine by pressing buttons
3 and 6 at the same time for at least 3 seconds.
CARD CHECK
This function allows the operator to check a chip
card, independently of its use. By conrming the
“Check card” item with “Enter” the display will show
the following message.
INSERT CARD
 Loading...