

LAVAZZA EP 1800 Instructions Manual
Istruzioni per l’uso
Instructions
Mode d’emploi
Bedienungsanleitung
Instrucciones de empleo
Instruções de utilização
Gebruiksaanwijzing

È importante leggere attentamente le istruzioni
contenute nel presente libretto.
Carefully read the instructions
in this booklet.
Il est important de lire attentivement
ce mode d’emploi.
Bitte die Gebrauchsanweisung
in diesem Heft sowie.
Es importante leer atentamente las instrucciones
del presente manual.
É importante ler com atenção as instruções
contidas no presente manual.
Het is van belang zorgvuldig
de in deze handleiding.

Congratulazioni!
Gentile Cliente ci congratuliamo per aver scelto la macchina espresso Lavazza EP 1800 LAVAZZA
TIME e la ringraziamo per la fiducia accordataci.
Prima di mettere in funzione la macchina, consigliamo di leggere attentamente le istruzioni per
l’uso che spiegano come utilizzarla, pulirla e mantenerla in perfetta efficienza. Non ci resta che
augurarle la preparazione di tanti ottimi espressi grazie a Lavazza!
IT
Pagina
2
Congratulations!
Dear customer, we would like to congratulate you on your choice of the Lavazza EP 1800
LAVAZZA TIME espresso machine and thank you for choosing us.
Before using the machine we would advise you to closely read the instruction booklet, which
explains how to use it, clean it and keep it in proper working condition.
All that remains is for us to wish you all the best in preparing many excellent Lavazza espressos!
Félicitations !
Cher Client, nous vous félicitons d’avoir choisi la machine pour espresso Lavazza EP 1800
LAVAZZA TIME, et nous vous remercions de votre confiance.
Avant de faire fonctionner la machine, nous vous conseillons de lire attentivement le mode
d’emploi qui explique comment l’utiliser, la nettoyer et la maintenir en excellent état.
Il ne nous reste qu’à vous souhaiter de préparer beaucoup d’excellents espresso grâce à Lavazza !
Herzlichen Glückwunsch!
Sehr geehrter Kunde wir gratulieren Ihnen zum Kauf der Espressomaschine Lavazza EP 1800
LAVAZZA TIME und bedanken uns für Ihr Vertrauen, das Sie uns entgegengebracht haben. Vor
Inbetriebnahme der Maschine raten wir Ihnen die Betriebsanleitungen sorgfältig zu lesen, die
Ihnen erklären wie sie zu benutzen, zu reinigen und in einem perfekten Zustand zu halten ist. Wir
wünschen Ihnen, dass Sie dank Lavazza viele ausgezeichnete Tassen Espresso zubereiten werden!
¡Enhorabuena!
Estimado Cliente le damos nuestra más sincera enhorabuena por haber elegido la máquina
espresso Lavazza EP 1800 LAVAZZA TIME y le agradecemos por depositar su confianza en
nosotros. Antes de poner en funcionamiento la máquina, le aconsejamos leer atentamente las
instrucciones de empleo que explican cómo utilizarla, limpiarla y mantenerla en perfecto estado
de funcionamiento. Sólo nos queda desearle ¡muchos deliciosos espressos gracias a Lavazza!
EN
Page
13
FR
Page
24
DE
Seite
35
ES
Página
46
Parabéns!
Prezado Cliente, parabéns por ter escolhido a máquina expresso Lavazza EP 1800 LAVAZZA TIME
e agradecemos a confiança dada.
Antes de usar a máquina, aconselhamos ler atentamente as instruções de uso, que explicam
como utilizá-la, limpá-la e mantê-la perfeitamente eficiente.
Depois disso, desejamos que prepare tantos ótimos expresso com a Lavazza!
Gefeliciteerd!
Geachte klant, wij feliciteren u met de keuze van het espressoapparaat Lavazza EP 1800 LAVAZZA
TIME en danken u voor het getoonde vertrouwen in ons. Wij raden u aan, voordat u het apparaat
in gebruik neemt, deze instructies aandachtig te lezen. In deze gebruiksaanwijzing wordt namelijk
uitgelegd hoe u het apparaat het beste kunt gebruiken, schoonmaken en onderhouden.
Tot slot wensen wij dat u nog vele heerlijke espresso zult bereiden danzij Lavazza!
PT
Página
57
NL
Pagina
68
1

IT
SICUREZZA
IT
Questo apparecchio è destinato ad essere utilizzato nelle applicazioni domestiche e
bienti professionali; – nelle fattorie; – utilizzo da parte di clienti di alberghi, motel e altri
È vietato qualunque utilizzo improprio (non descritto nelle presenti istruzioni). È vietato
apportare modifiche tecniche. Questo apparecchio può essere utilizzato da bambini
a partire dagli 8 anni se attentamente sorvegliati o istruiti all’uso dell’apparecchio in
vono essere eseguite da bambini a meno che non siano di età superiore agli 8 anni e
re agli 8 anni. Questo apparecchio può essere utilizzato da persone con ridotte capacità
fisiche, sensoriali o mentali, o mancanza di esperienza e di conoscenza se attentamente
sorvegliate o istruite all’uso dell’apparecchio in modo sicuro e se ne comprendono i
Sistemare la macchina per caffè in un posto sicuro, dove nessuno possa rovesciarla
o venirne ferito. Non tenere la macchina a temperatura inferiore a 4°C poiché il gelo
Collegare la macchina per caffè soltanto ad una presa di corrente adeguata. La tensione
Non usare la macchina per caffè se il cavo d’alimentazione è difettoso o danneggiato. In tali casi
to immediatamente. Non far passare il cavo d’alimentazione per angoli e
su spigoli vivi, sopra oggetti molto caldi e proteggerlo dall’olio. Non portare o tirare la macchina
per caffè tenendola per il cavo. Non estrarre la spina tirandola per il cavo; non toccarla con le
Tenere i bambini sotto supervisione, per evitare che giochino con l’apparecchio. I bambini
non si rendono conto del pericolo connesso agli elettrodomestici. Non lasciare alla loro
Non toccare le parti calde (gruppo portacapsula, etc.) subito dopo l’uso dell’apparecchio.
Durante l’erogazione della bevanda prestare attenzione ad eventuali schizzi di liquido
SICUREZZA
Destinazione d’uso:
similari quali:
– nelle zone per cucinare riservate al personale nei negozi, negli uffici e in altri am-
ambienti a carattere residenziale; – negli ambienti tipo bed and breakfast.
modo sicuro e se ne comprendono i pericoli connessi. Pulizia e manutenzione non de-
controllati. Tenere l’apparecchio e il suo cavo fuori dalla portata di bambini di età inferio-
pericoli connessi. I bambini non devono giocare con l’apparecchio.
Ubicazione:
potrebbe danneggiarla. Non usare la macchina per caffè all’aperto. Non posare la macchina su superfici molto calde e/o nelle vicinanze di fiamme libere.
Alimentazione di corrente:
deve corrispondere a quella indicata sulla targhetta della macchina.
Cavo d’alimentazione:
dovrà essere sostitui
mani bagnate. Evitare che il cavo d’alimentazione cada liberamente da tavoli o scaffali.
Pericolo di folgorazione:
Non mettere mai a contatto dell’acqua le parti sotto corrente.
Protezione d’altre persone:
portata i materiali utilizzati per imballare la macchina.
Pericolo d’ustioni:
2
caldo. Non sollevare mai la leva caricamento capsule durante l’erogazione.
SICUREZZA
SICUREZZA
IT
qua! È severamente vietato cercare d’intervenire all’interno della macchina. Non
Quando la macchina rimane inutilizzata per un periodo prolungato, staccare la
Nel caso di guasti, difetti o sospetto di difetto dopo una caduta, staccare subito la
tri di Assistenza Autorizzati possono effettuare interventi e riparazioni. Nel caso di
interventi non eseguiti a regola d’arte, si declina ogni responsabilità per eventuali
Immettere nel serbatoio soltanto acqua fresca potabile non gassata. Non mettere
in funzione la macchina se l’acqua non supera almeno il livello minimo indicato sul
Nel vano capsule devono essere inserite solo capsule compatibili; non inserire le
INFORMAZIONE AGLI UTENTI: ai
sensi dell’art. 13 del Decreto Legislativo 25 luglio 2005, n. 151 “Attuazione delle
Direttive 2002/95/CE, 2002/96/CE e 2003/108/CE, relative alla riduzione dell’uso
di sostanze pericolose nelle apparecchiature elettriche ed elettroniche, nonché
allo smaltimento dei rifiuti” e successive modifiche. Il simbolo del cassonetto
dotto alla fine della propria vita utile deve essere raccolto separatamente dagli
altri rifiuti. L’utente dovrà, pertanto, conferire l’apparecchiatura giunta a fine vita
agli idonei centri di raccolta differenziata dei rifiuti elettronici ed elettrotecnici,
parecchiatura di tipo equivalente, in ragione di uno a uno. L’adeguata raccolta
differenziata per l’avvio successivo dell’apparecchiatura dismessa al riciclaggio,
al trattamento e allo smaltimento ambientalmente compatibile contribuisce ad
go e/o riciclo dei materiali di cui è composta l’apparecchiatura. Lo smaltimento
abusivo del prodotto da parte dell’utente comporta l’applicazione delle sanzioni
IT
Pulizia:
Prima di pulire la macchina, è indispensabile staccare la spina dalla presa di corren-
te ed aspettare che la macchina si raffreddi. Non immergere la macchina nell’ac-
utilizzare per scopi alimentari l’acqua presente nel serbatoio.
Custodia della macchina:
spina dalla presa e custodirla in luogo asciutto e non accessibile ai bambini. Proteggerla dalla polvere e dallo sporco.
Riparazioni / Manutenzione:
spina dalla presa. Non mettere in funzione una macchina difettosa. Soltanto i Cen-
danni.
Serbatoio acqua:
serbatoio.
Vano capsule:
dita o qualsiasi altro oggetto. Le capsule sono da usarsi una sola volta.
Smaltimento della macchina a fine vita:
barrato riportato sull’apparecchiatura o sulla sua confezione indica che il pro-
oppure riconsegnarla al rivenditore al momento dell’acquisto di una nuova ap-
evitare possibili effetti negativi sull’ambiente e sulla salute e favorisce il reimpie-
amministrative previste dalla normativa vigente.
3
IT
IT
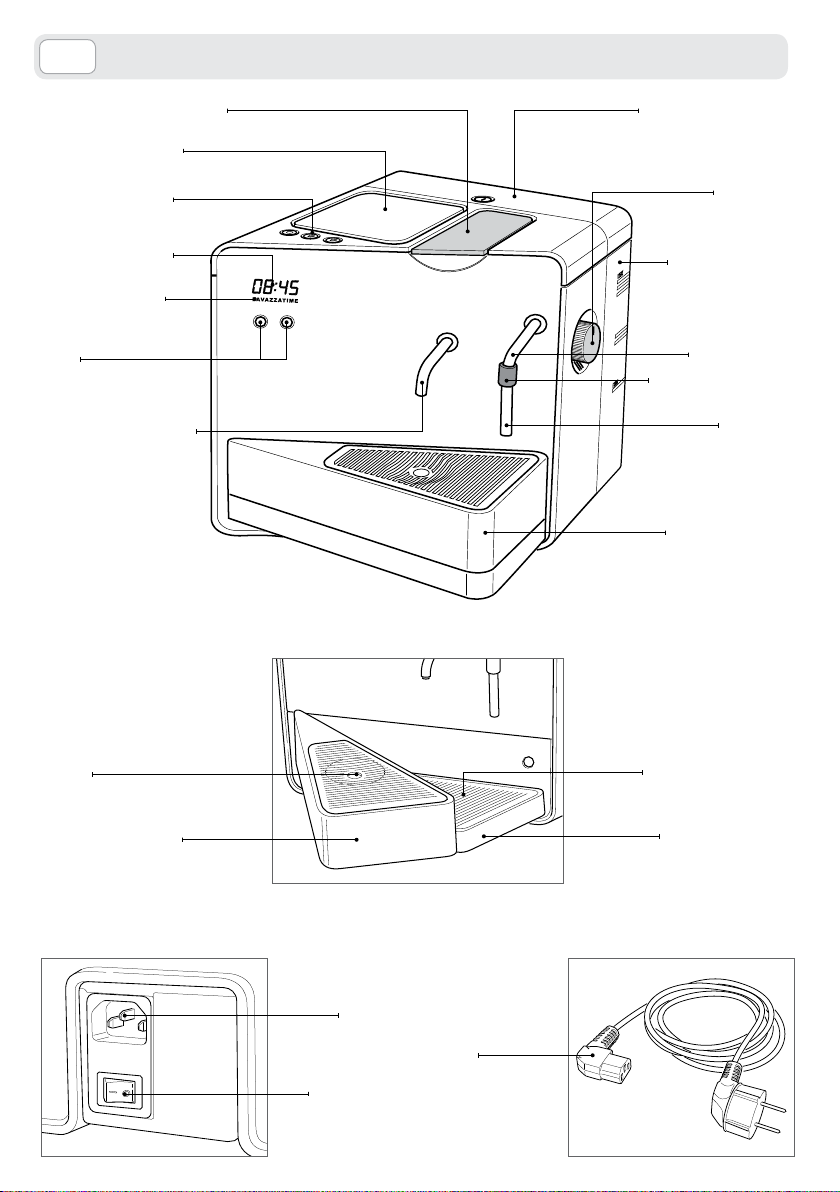
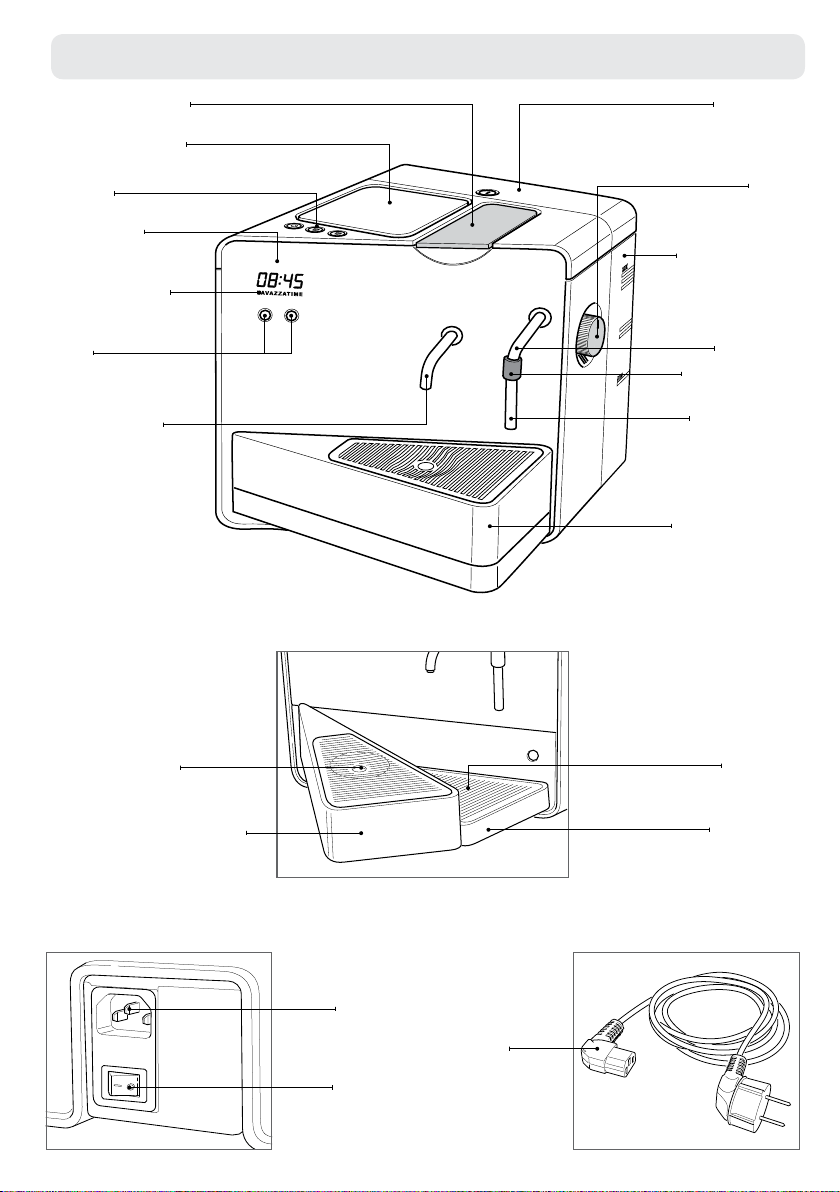
COMPONENTI
Leva caricamento cialde
Piano scalda tazze
COMPONENTI
Coperchio serbatoio
acqua con serratura
Gruppo comandi
Orologio digitale
Scritta luminosa
“LAVAZZATIME”.
Tasti
programmazione
orologio
Beccuccio erogatore
Manopola
erogazione
vapore
Serbatoio acqua
con controllo
livello acqua
Lancia vapore
Presa lancia vapore
Terminale
lancia vapore
Cassetto raccogli
gocce/cialde usate
Griglia
poggia tazzina
Cassetto superiore
raccogli gocce
4
Griglia poggia tazza
grande o bicchiere
Cassetto inferiore
raccogli gocce
Presa di
alimentazione
Cavo
alimentazione
Interruttore
generale
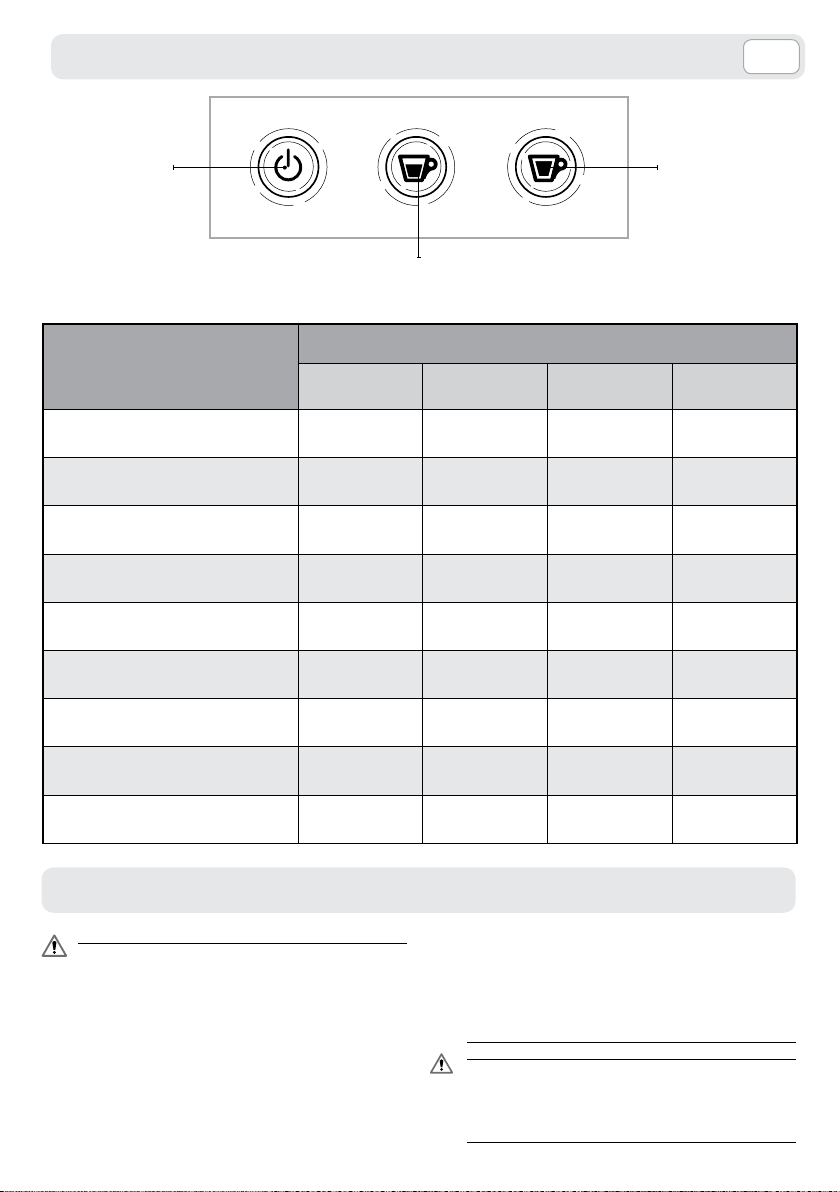
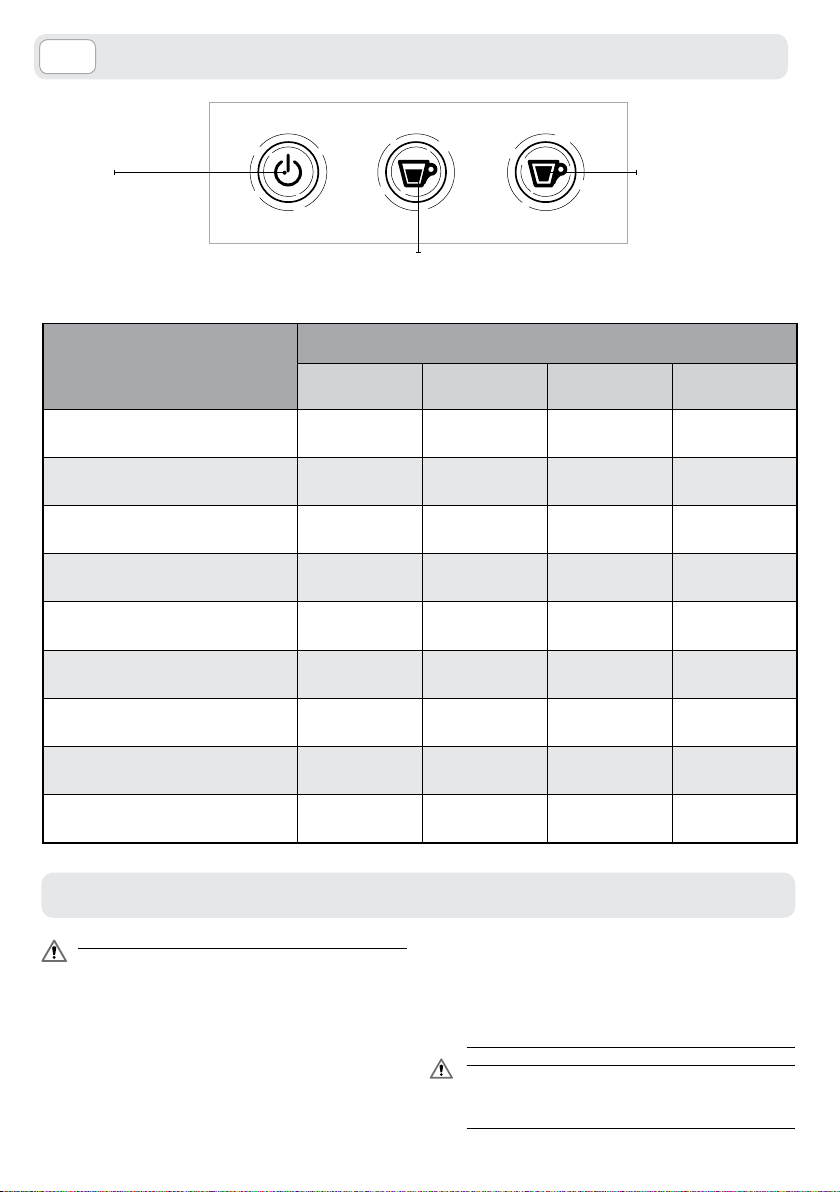
COMANDI E SEGNALAZIONI
IT
COMANDI E SEGNALAZIONI
IT
Spia accensione
STATI MACCHINA
Accensione macchina
(fase di riscaldamento)
Pronto
espresso
Modalità energy saving
Erogazione espresso
dose preimpostata
Erogazione espresso
dose libera
Erogazione
vapore
Anomalia
di funzionamento
Tasto erogazione
dose preimpostata espresso
SEGNALAZIONI
Led Rosso
(accensione)
ON OFF OFF
ON ON ON ON
OFF
ON
ON ON
ON OFF OFF ON
ON
con lampeggio
Led Rosso
espresso corto
ON
con lampeggio
ON
con lampeggio
ON
con lampeggio
Led Rosso
dose libera
ON
con lampeggio
ON ON
ON
con lampeggio
ON
con lampeggio
Tasto erogazione
dose libera espresso
Led scritta
LAVAZZATIME
ON
con lampeggio
OFF
ON
ON
con lampeggio
Leva inserimento cialde aperta
Mancanza acqua nel serbatoio
ON OFF OFF ON
ON
PREDISPOSIZIONE MACCHINA
Non si assumono responsabilità per eventuali
danni in caso di:
t JNQJFHPFSSBUPFOPODPOGPSNFBMMB
destinazione d’uso della macchina;
t SJQBSB[JPOJFTFHVJUFQSFTTPDFOUSJ
d’assistenza non autorizzati;
t NBOPNJTTJPOFEFMDBWPEBMJNFOUB[JPOF
t NBOPNJTTJPOFEJRVBMTJBTJDPNQPOFOUF
della macchina;
t JNQJFHPEJQF[[JEJSJDBNCJPFBDDFTTPSJ
non originali;
ON
con lampeggio
ON
con lampeggio
ON
t Vtilizzo sopra i 40°C e/o sotto i 15°C;
t mancata decalcificazione;
t TUPDDBHHJPJOMPDBMJBMEJTPUUPEJ¡$
t VUJMJ[[PEJDJBMEFEJõFSFOUJEBRVFMMFJOEJDBUF
*ORVFTUJDBTJWJFOFBEFDBEFSFMBHBSBO[JB
I danni causati alla macchina a causa della
mancata osservazione delle indicazioni presenti su questo libretto non sono coperte da
garanzia.
5

IT
IT
PREDISPOSIZIONE MACCHINA
PREDISPOSIZIONE MACCHINA
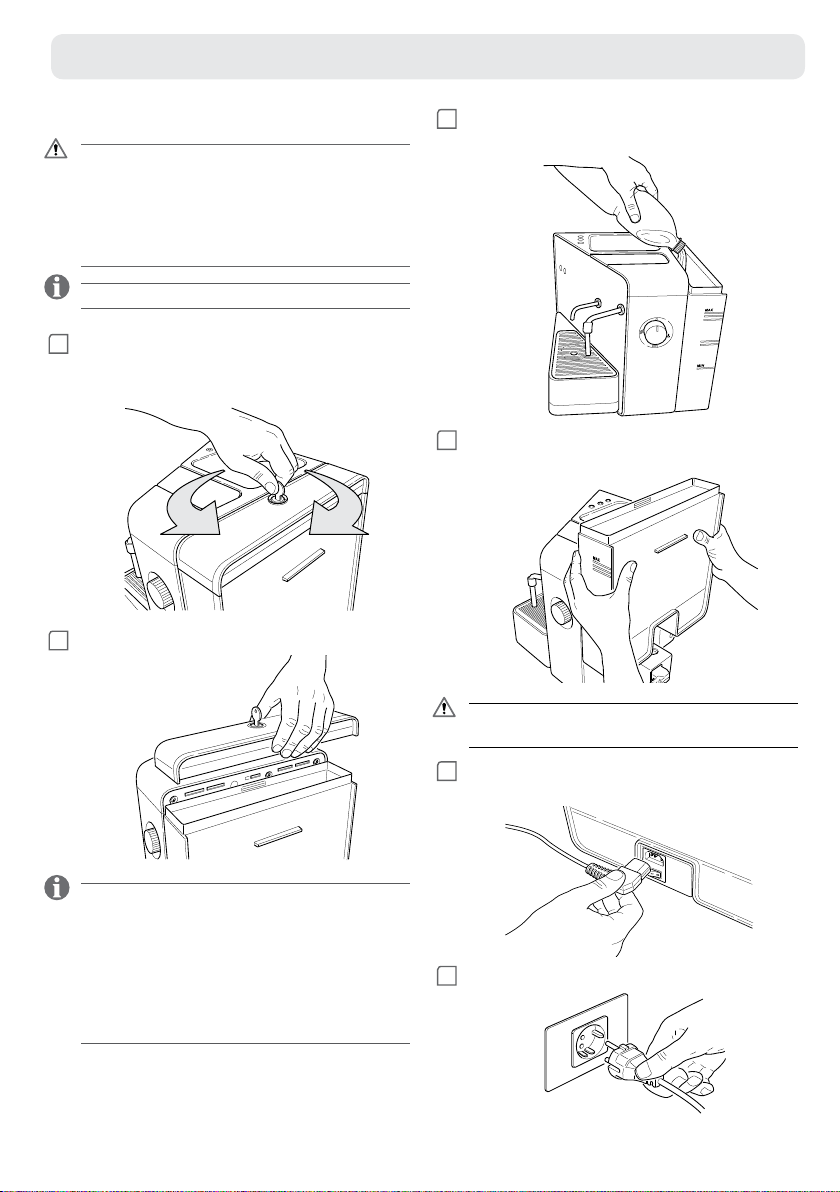
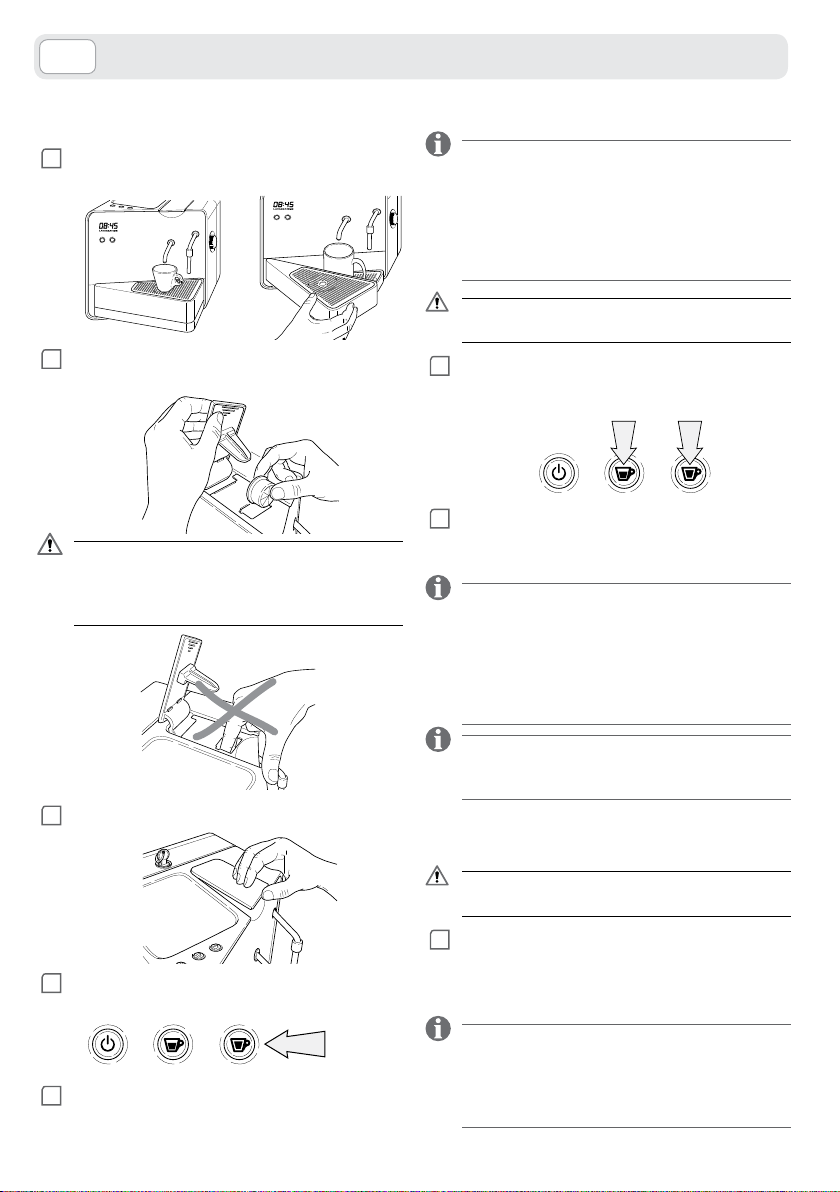
AVVIAMENTO MACCHINA
Posizionare la macchina su una superficie piana,
orizzontale e stabile, lontano da acqua, fiamme e
fonti di calore.
Scollegare l’alimentazione elettrica se presente. La
macchina accesa non deve mai essere coperta con
strofinacci o altro.
*MDPQFSDIJP EFM TFSCBUPJP EFMMBDRVB EJTQPOF
di una chiusura con chiave.
1
Ruotare la chiave in senso orario [A] per aprire il
coperchio.
Ruotare la chiave in senso antiorario [B] per
chiudere il coperchio.
3
Riempire il serbatoio dell’acqua fino al livello
MAX indicato usando solo acqua fresca potabile
non gasata.
4
È possibile, dopo aver tolto il coperchio, estrarre
il serbatoio acqua dalla macchina per riempirlo
separatamente.
AB
2
Sollevare ed estrarre il coperchio del serbatoio
acqua.
-VUJMJ[[PEJVOmMUSPEFMMBDRVBBDDFTTPSJPPQ-
[JPOBMFNJHMJPSBMBRVBMJUËEFMMBDRVBFBMMVO-
ga la durata dell’apparecchio.
6UJMJ[[BSFJMmMUSP"RVB"SPNB$SFNB#SJUB¥QFS
Lavazza. Per inserire il filtro seguire il foglio di
istruzioni allegato all’accessorio.
Si consiglia di non modificare la selezione già
impostata del filtro.
6
Assicurarsi che le mani, la macchina, il cavo e
la superficie d’appoggio della macchina non
siano bagnati.
5
Inserire la spina del cavo di alimentazione nella
presa situata sul retro della macchina.
PREDISPOSIZIONE MACCHINA
IT
PREDISPOSIZIONE MACCHINA
6
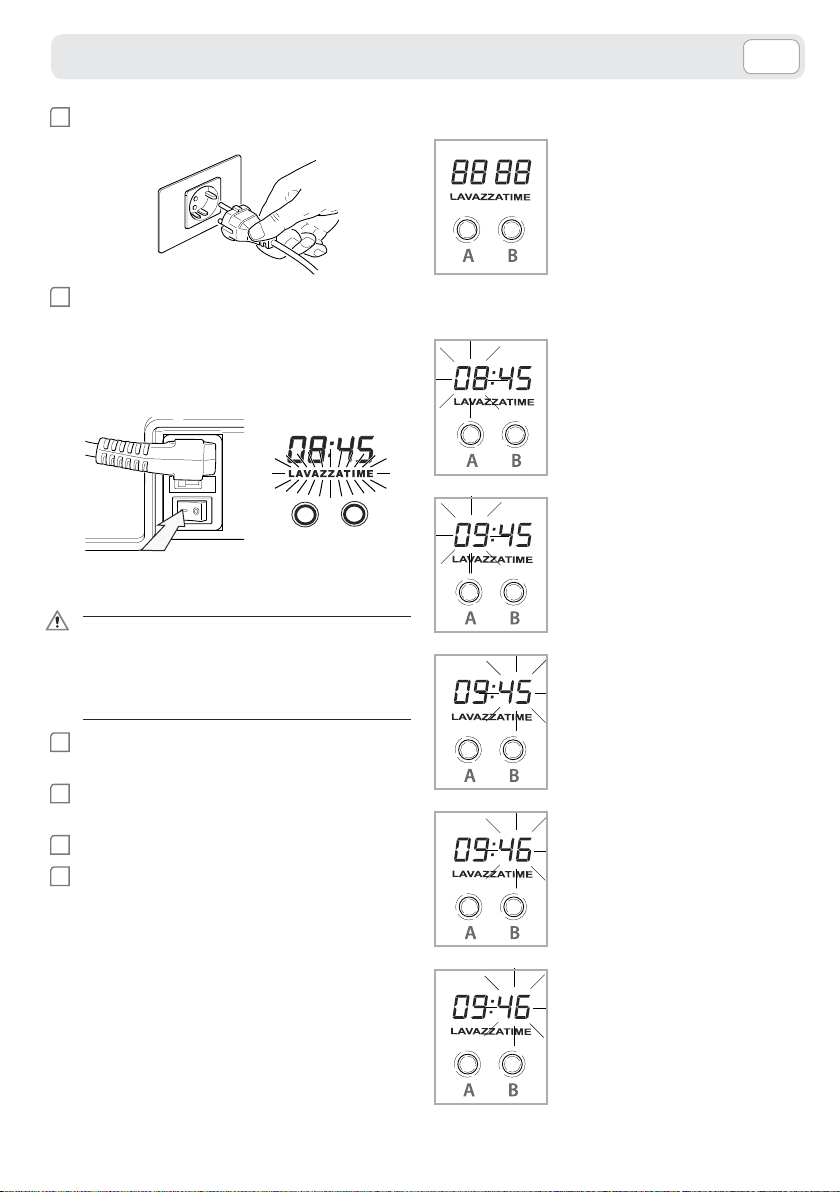
Inserire la spina di alimentazione nella presa di
corrente.
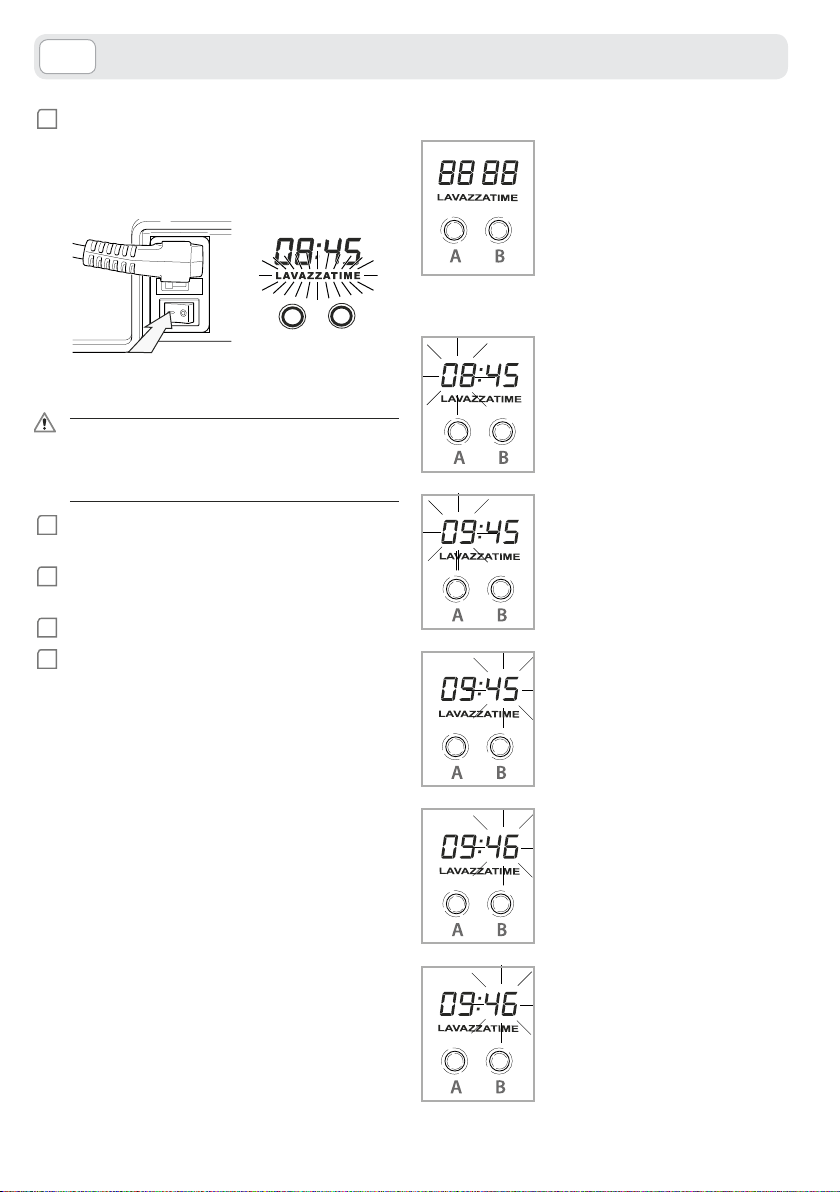
7
Premere l’interruttore generale portandolo in
posizione I. La spia accensione e l’orologio digitale si accendono (colore rosso). La scritta luminosa “LAVAZZATIME” lampeggia. L’accensione di
entrambi i tasti segnala che la macchina è pronta all’uso.
CARICAMENTO CIRCUITO IDRAULICO
Al primo avviamento della macchina, dopo
un prolungato inutilizzo o in caso di mancanza di acqua nel serbatoio, è necessario eseguire l’operazione di caricamento idraulico
come sotto riportato.
1
Posizionare un contenitore o una tazza sotto la
lancia vapore.
2
senso antiorario per attivare l’erogazione.
3
Attendere almeno 20 sec.
4
Terminare l’erogazione ruotando la manopola
in senso orario fino alla posizione di riposo e rimuovere il contenitore o la tazza.
EROGAZIONI EFFETTUATE
Premere contemporaneamente i
tasti A e B per visualizzare il numero delle erogazioni effettuate.
PROGRAMMAZIONE ORARIO
Tenere premuto per alcuni secondi
il tasto A.
Il display che indica le ore inizia a
lampeggiare.
Rilasciare il tasto A e premere ripetutamente il tasto B per impostare
l’ora.
Premere il tasto A.
Il display che indica i minuti inizia a
lampeggiare.
ni eropav enoizagore id aloponam al eratouR
Rilasciare il tasto A e premere ripetutamente il tasto B per impostare
i minuti.
IT
RISPARMIO ENERGETICO
Dopo 30 minuti di inattività la macchina va in
risparmio energetico, la scritta LAVAZZATIME
si spegne e i due tasti erogazione espresso
lampeggiano.
Per riavviare la macchina occorrerà premere uno
dei due tasti di erogazione espresso o sollevare
la leva caricamento cialde.
Premere il tasto A per terminare
l’operazione.
7
IT
IT
PREDISPOSIZIONE MACCHINA
PREDISPOSIZIONE MACCHINA
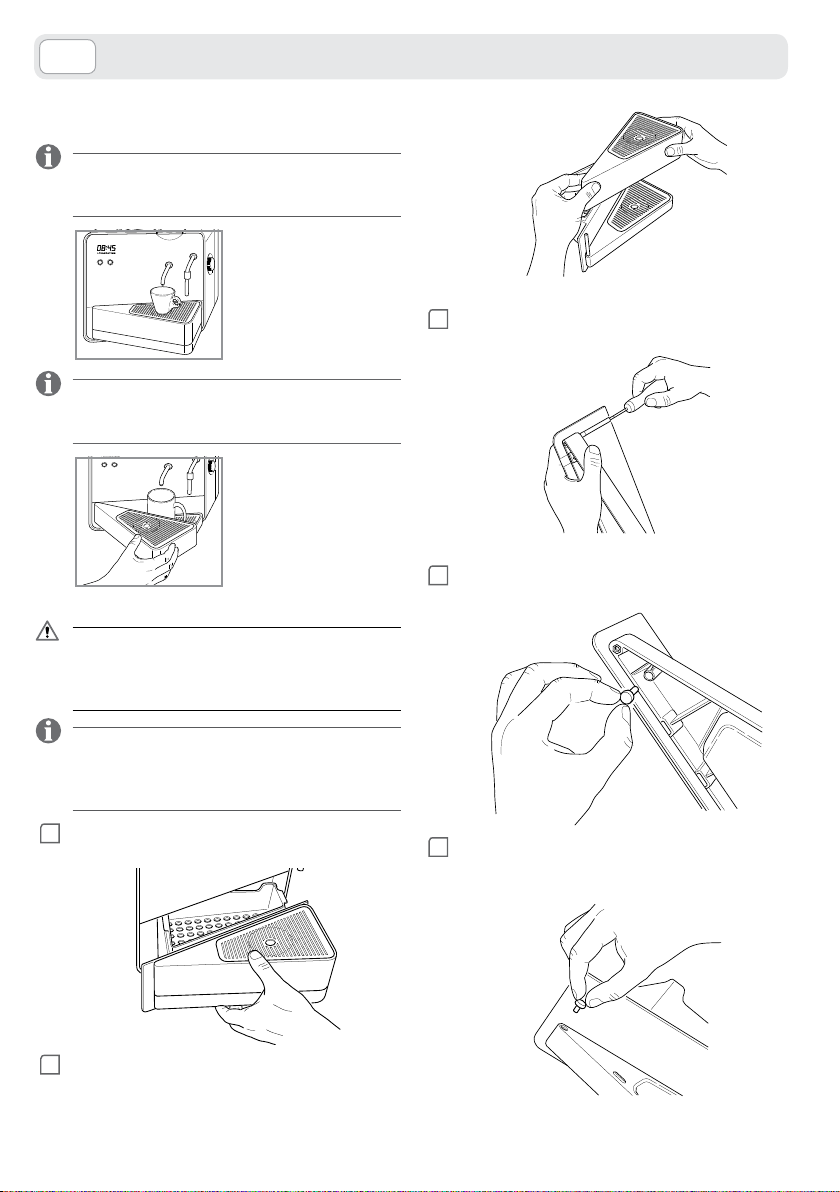
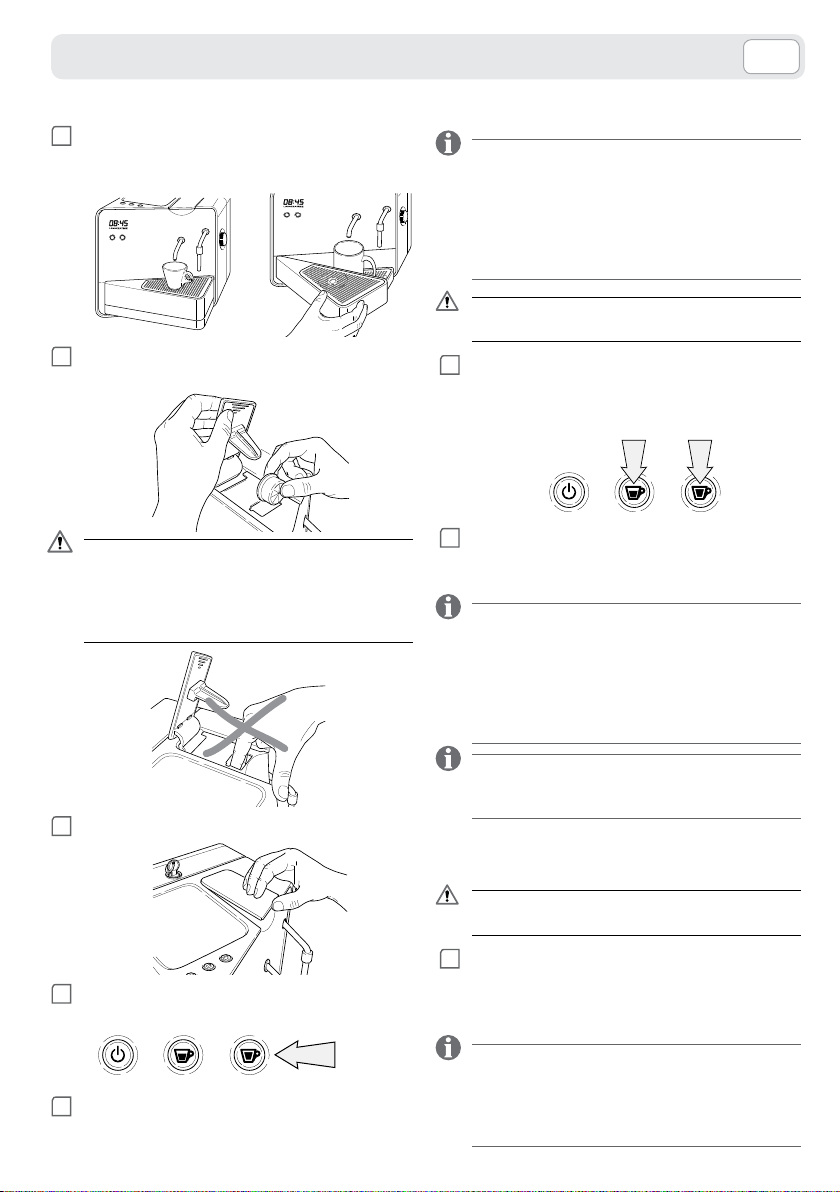
REGOLAZIONE GRIGLIA
POGGIA TAZZINA/TAZZA GRANDE
La macchina espresso dispone di due posizio-
OJMJWFMMJUB[[BUB[[JOBA,B) per la preparazione del espresso.
Posizione A
Per erogare espresso
con tazzina.
Per la corretta erogazione di un espresso utilizzan-
do una tazza occorrerà ruotare il cassetto superiore
nella posizione B.
Posizione B
Per erogare espresso
con tazza grande.
Non appoggiare tazze/tazzine o altri ogget-
ti sul cassetto superiore quando è sganciato
dalla sua sede. Al termine dell’erogazione
riporre il cassetto nella posizione iniziale.
3
Mediante un cacciavite a taglio svitare e togliere
il perno posizionato sul cassetto inferiore.
4
Estrarre dalla parte sottostante del cassetto infe-
riore, il tappo in gomma.
È possibile predisporre la macchina per l’uti-
lizzo esclusivo di tazze grandi/bicchieri rimuovendo stabilmente il cassetto superiore raccogli gocce.
1
Estrarre il cassetto raccogli gocce/cialde usate e
svuotarlo da cialde/liquidi.
2
Sfilare il cassetto superiore.
8
5
Inserire il tappo in gomma nel foro presente sul
cassetto inferiore in corrispondenza del perno
precedentemente tolto.
PREPARAZIONE ESPRESSO
IT
PREPARAZIONE ESPRESSO
desiderata di espresso.
grammata di espresso erogato (minimo 20 cc) può
Se viene memorizzata una dose inferiore ai 20 cc la
santi erogazione espresso per almeno 3 secondi.
programmato. Se viene a mancare l’alimentazione
EROGAZIONE DOSE LIBERA ESPRESSO
1
Posizionare la tazza/tazzina al centro delle griglie
in corrispondenza del beccuccio di erogazione
espresso.
2
Sollevare la leva di caricamento cialde ed inserire
la cialda nell’apposito vano.
Nel vano inserimento cialde devono esse-
re inserite esclusivamente cialde Lavazza
Espresso Point Monodose.
Non introdurre mai le dita o oggetti nel vano
di inserimento cialda.
PROGRAMMAZIONE DOSE ESPRESSO
La programmazione della dose va eseguita utiliz-
zando sempre lo stesso pulsante; qualsiasi intervento sull’altro verrà ignorato. La quantità pro-
essere modificata ripetendo la programmazione.
macchina memorizza comunque 20 cc.
Eseguire passaggi 1, 2, 3 del paragrafo
EROGAZIONE DOSE LIBERA ESPRESSO.
4
Premere e mantenere premuto uno dei due pul-
La spia accensione lampeggia. A questo punto
rilasciare il pulsante.
5
Una volta raggiunta la quantità di espresso desi-
derata interrompere l’erogazione premendo nuovamente il pulsante precedentemente utilizzato.
Se la programmazione non avviene nel tempo
massimo di 1’50” la macchina ferma l’erogazione
automaticamente, il tasto di erogazione lampeg
gia e rimane in memoria la dose dell’ultimo valore
IT
-
3
Abbassare la leva di caricamento cialda.
4
Premere il tasto erogazione dose libera per ini-
ziare l’erogazione del espresso.
5
Interrompere l’erogazione premendo nuova-
mente il tasto una volta raggiunta la quantità
durante la programmazione rimane in memoria
l’ultimo valore programmato.
Per il ripristino delle dosi come da impostazione di
fabbrica spegnere la macchina e riaccenderla tenendo premuti contemporaneamente i tasti espresso.
EROGAZIONE DOSE PREIMPOSTATA
ESPRESSO
Eseguire passaggi 1, 2, 3 del paragrafo
EROGAZIONE DOSE LIBERA ESPRESSO.
4
Premere uno dei due pulsanti erogazione
espresso (se programmato). La macchina terminerà automaticamente l’erogazione una volta
raggiunta la dose di espresso programmata.
Se durante l’erogazione di un espresso con dose
preimpostata si presentano anomalie la macchina prosegue l’erogazione in modalità dose libera
espresso. L’erogazione può essere interrotta premendo nuovamente il pulsante.
9
IT
IT
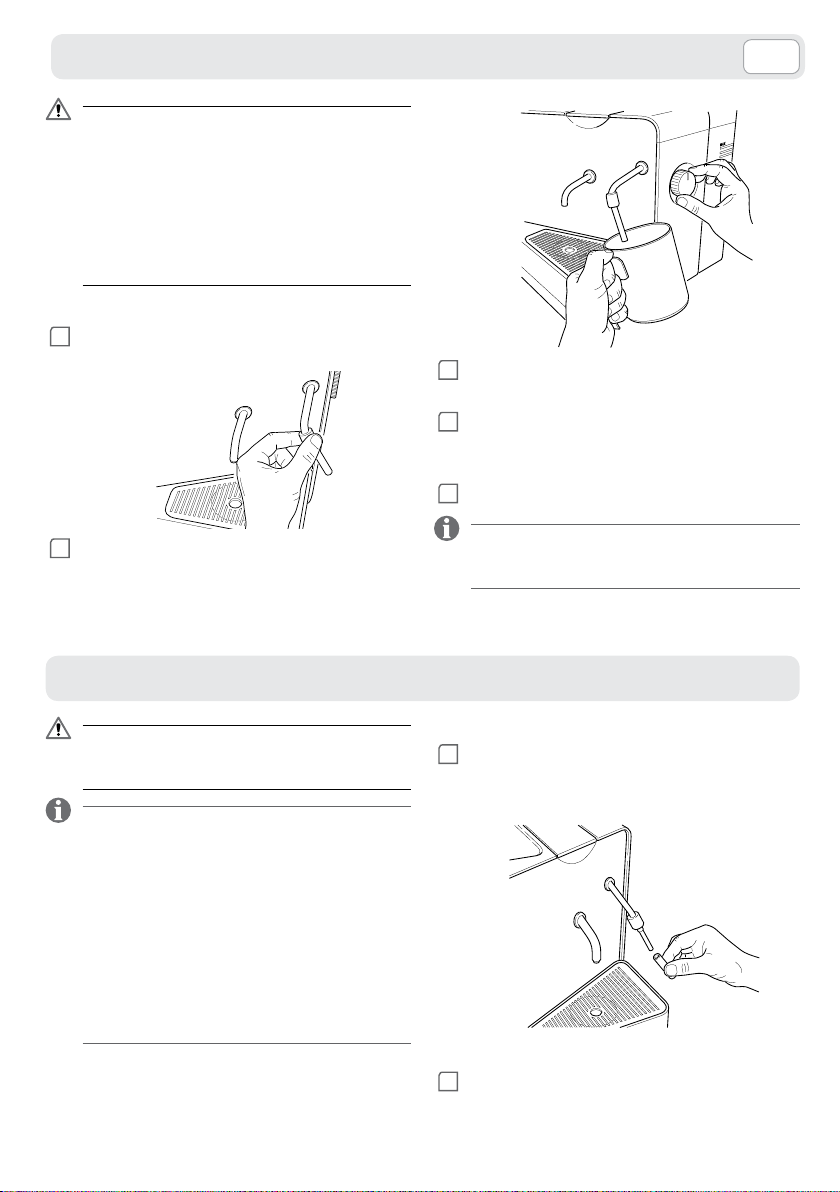
VAPORE
VAPORE
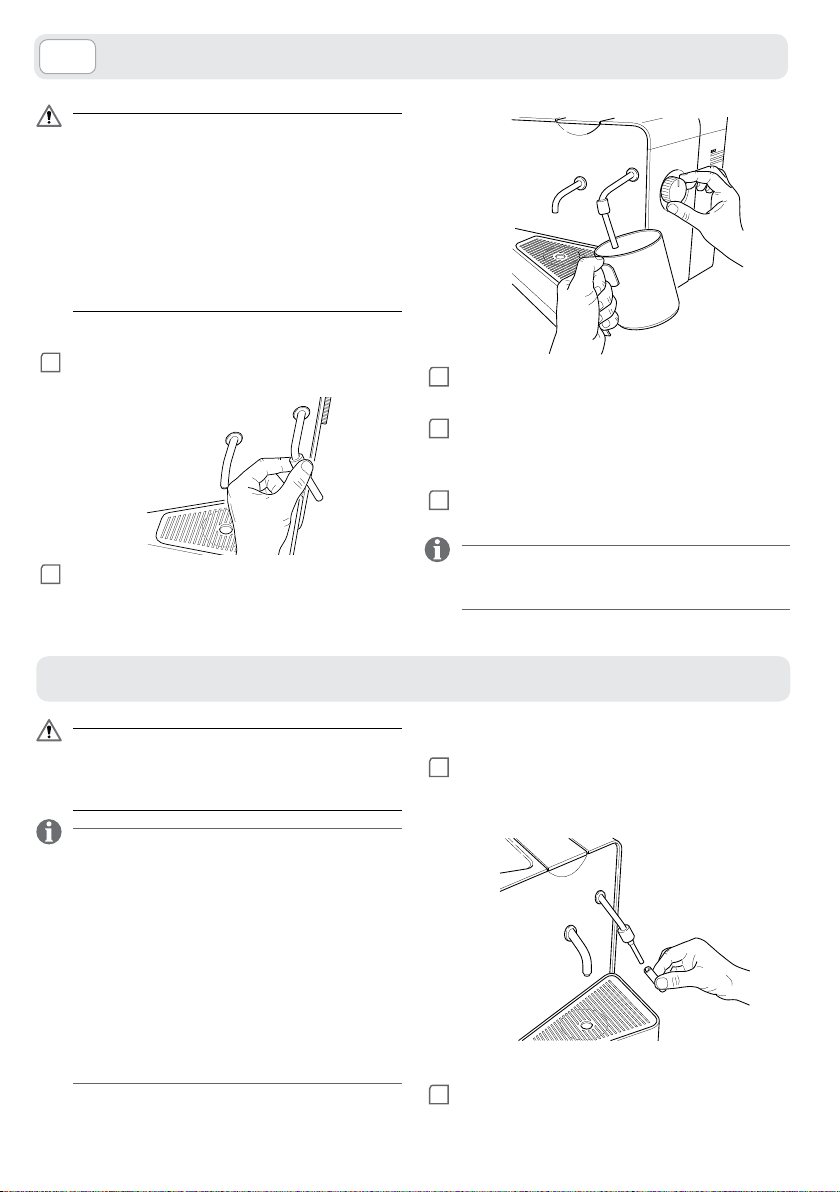
Pericolo di scottature! All’inizio dell’eroga-
zione possono verificarsi brevi spruzzi di
acqua calda. La lancia vapore può raggiungere temperature elevate: evitare di toccarla
direttamente con le mani. Utilizzare l’apposita presa per muovere la lancia. La lancia
vapore non deve essere orientata su persone
o animali. Non esporsi mai al getto di vapore.
Assicurarsi sempre che ci sia acqua sufficien
te nel serbatoio.
EROGAZIONE VAPORE
1
Ruotare la lancia vapore completamente verso
l’esterno della macchina.
2
Posizionare il contenitore o la tazza contenente
il latte sotto la lancia vapore in modo che circa
metà della lancia sia immersa nel latte.
-
3
Ruotare la manopola di erogazione vapore in
senso antiorario per attivare l’erogazione.
4
Raggiunta la quantità desiderata di schiuma
terminare l’erogazione riportando manopola di
erogazione vapore nella posizione iniziale.
5
Riposizionare la lancia vapore nella posizione ini-
ziale.
Dopo l’utilizzo della lancia vapore è necessario
azionarla a vuoto per alcuni secondi al fine di evitare incrostazioni e intasamenti.
MANUTENZIONE E PULIZIA
Prima di eseguire operazioni di pulizia assi-
curarsi sempre che l’alimentazione elettrica
sia scollegata ed attendere il raffreddamento della macchina.
Si consiglia di risciacquare quotidianamente il ser-
batoio dell’acqua e di riempirlo con acqua fresca.
Svuotare e pulire ogni due/tre giorni il cassetto
raccogli gocce, o comunque quando è pieno. Non
utilizzare forni a microonde o tradizionali per asciu
gare la macchina o sue parti.
Mai utilizzare detergenti alcalini, solventi, alcol o
sostanze aggressive. Non immergere la macchina
in acqua.
Salvo specifiche indicazioni tutti i componenti non
smontabili (esclusi quelli elettrici) della macchina
vanno lavati utilizzando acqua fredda o tiepida e
panni o spugne non abrasive.
10
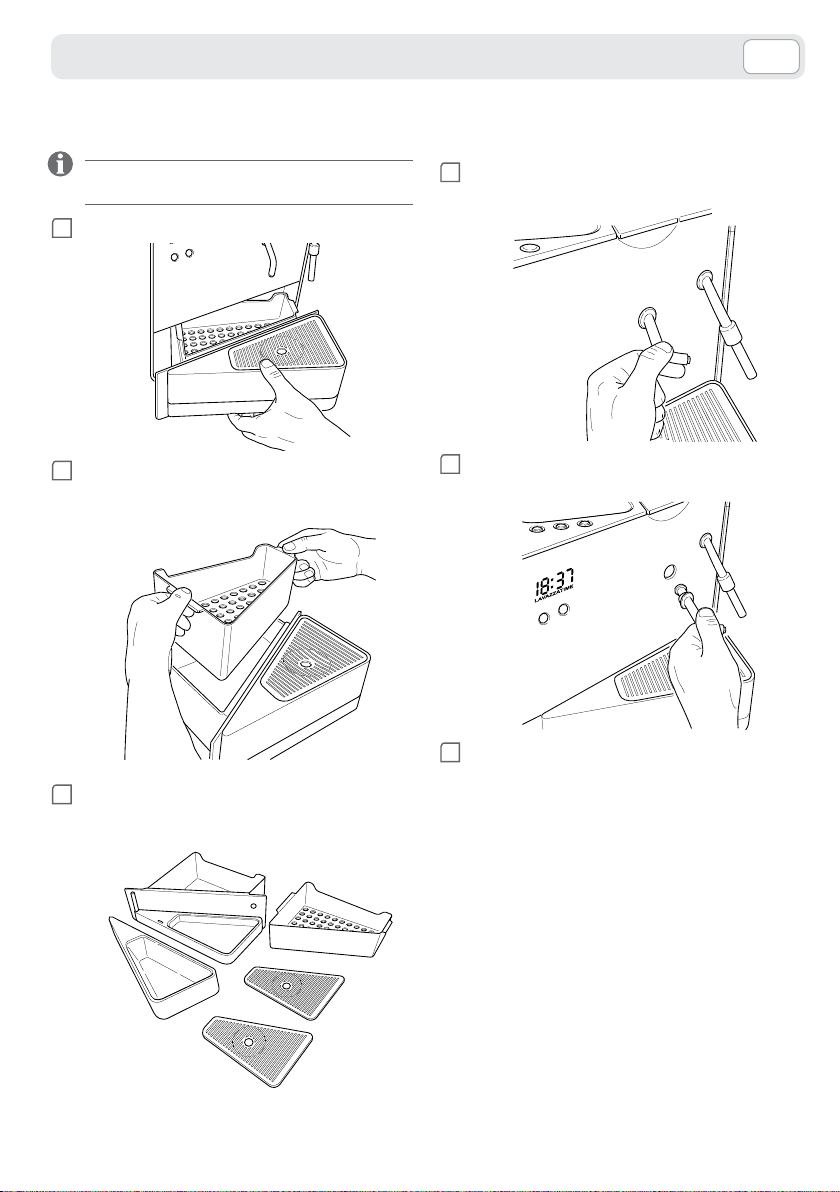
PULIZIA LANCIA VAPORE
1
Ruotare la lancia vapore verso l’esterno, sfilare
il terminale tirandolo verso il basso e lavarlo in
lavastoviglie o con acqua.
-
2
Pulire la lancia vapore con un panno umido e
reinserire il terminale sulla lancia vapore.
MANUTENZIONE E PULIZIA
IT
MANUTENZIONE E PULIZIA
IT
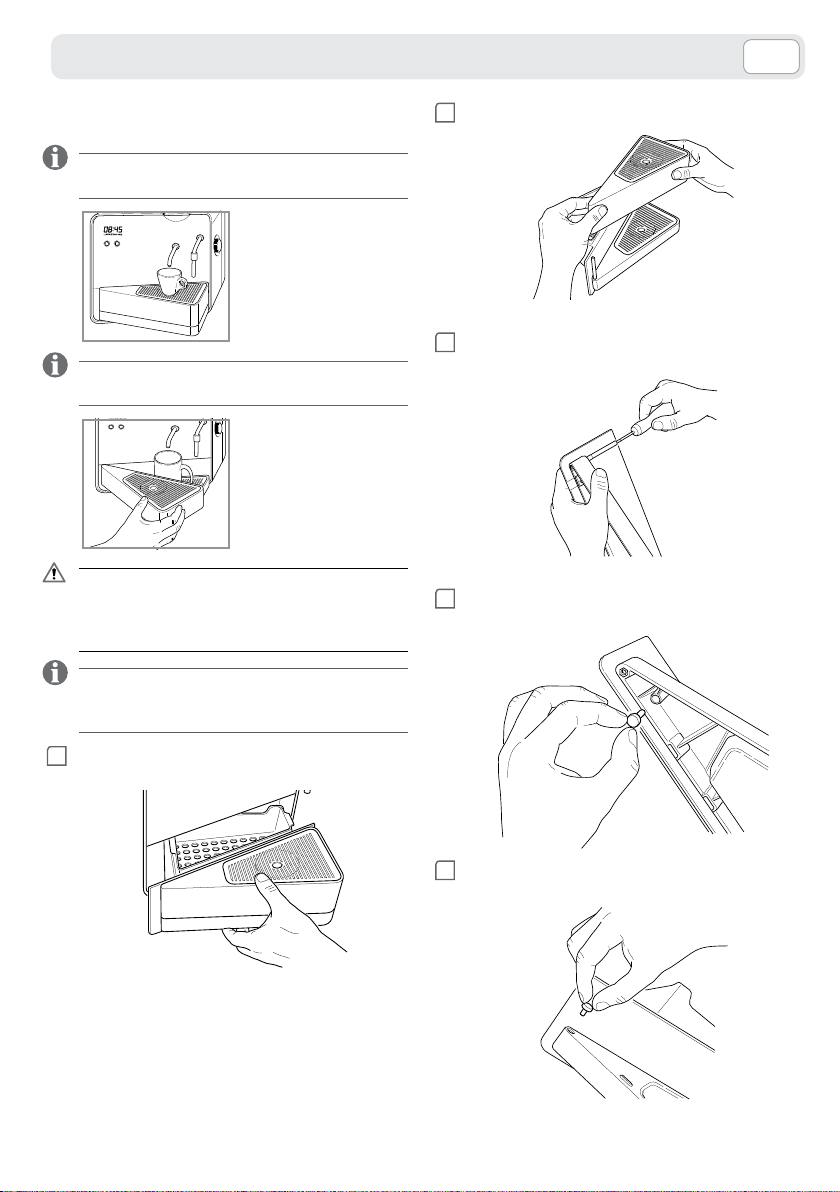
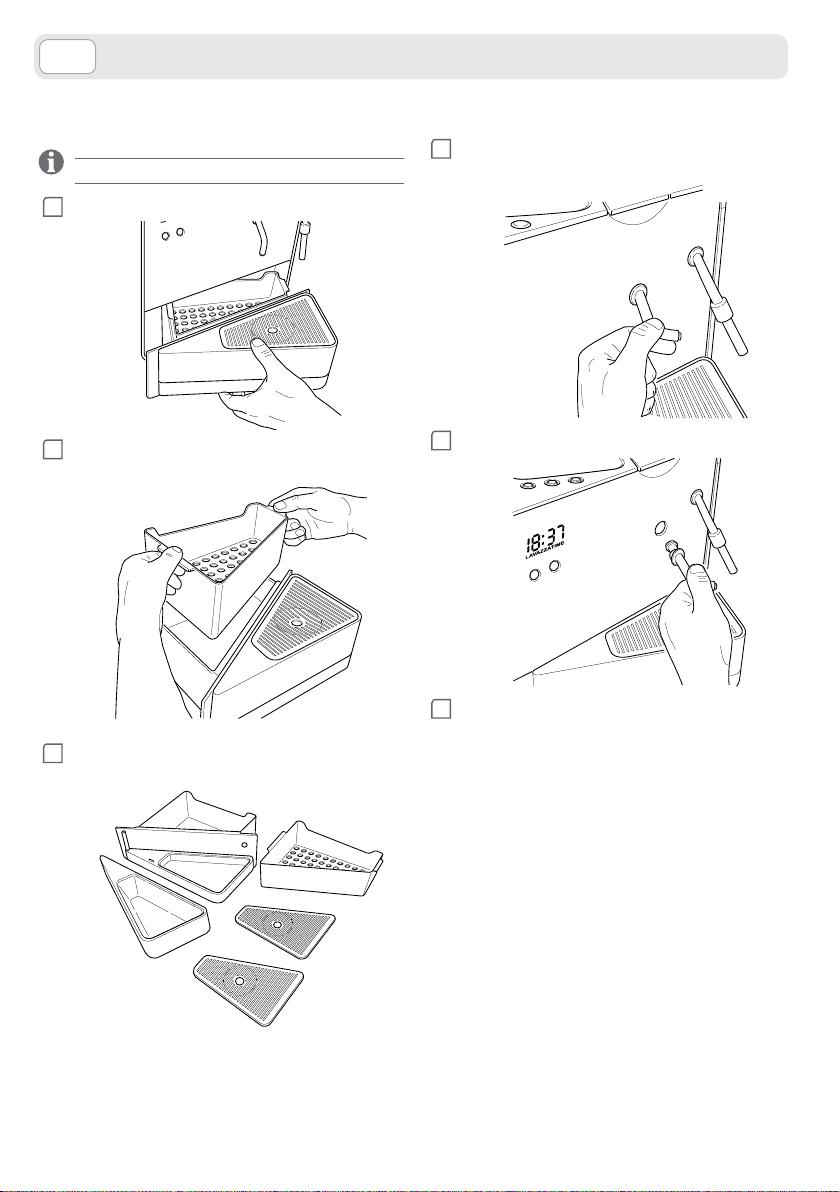
PULIZIA CASSETTO RACCOGLI GOCCE/
CIALDE USATE
Il cassetto può contenere fino ad un massimo di 25
cialde.
1
Estrarre il cassetto raccogli gocce/cialde usate.
2
Sollevare il contenitore interno e svuotarlo dalle
cialde usate. Svuotare i liquidi presenti all’interno
del cassetto.
PULIZIA BECCUCCIO EROGATORE
ESPRESSO
1
Ruotare il beccuccio erogatore in senso antiora-
rio.
2
Tirare il beccuccio erogatore sfilandolo dalla sua
sede.
3
Lavare tutti i componenti con acqua fredda o
tiepida, quindi asciugarli e rimontarli correttamente.
3
Lavare il beccuccio con acqua tiepida, quindi
reinserirlo nell’apposita sede con movimenti inversi e verificandone il corretto posizionamento.
11
IT
IT
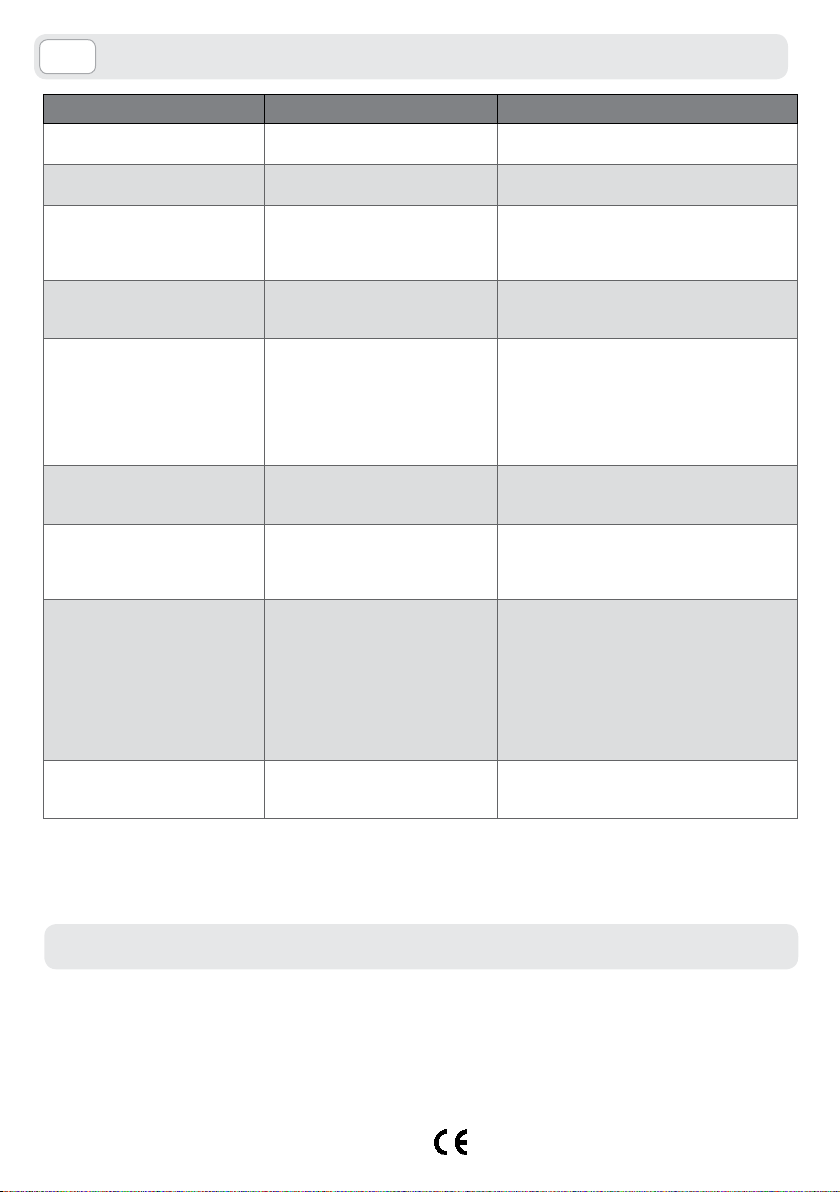
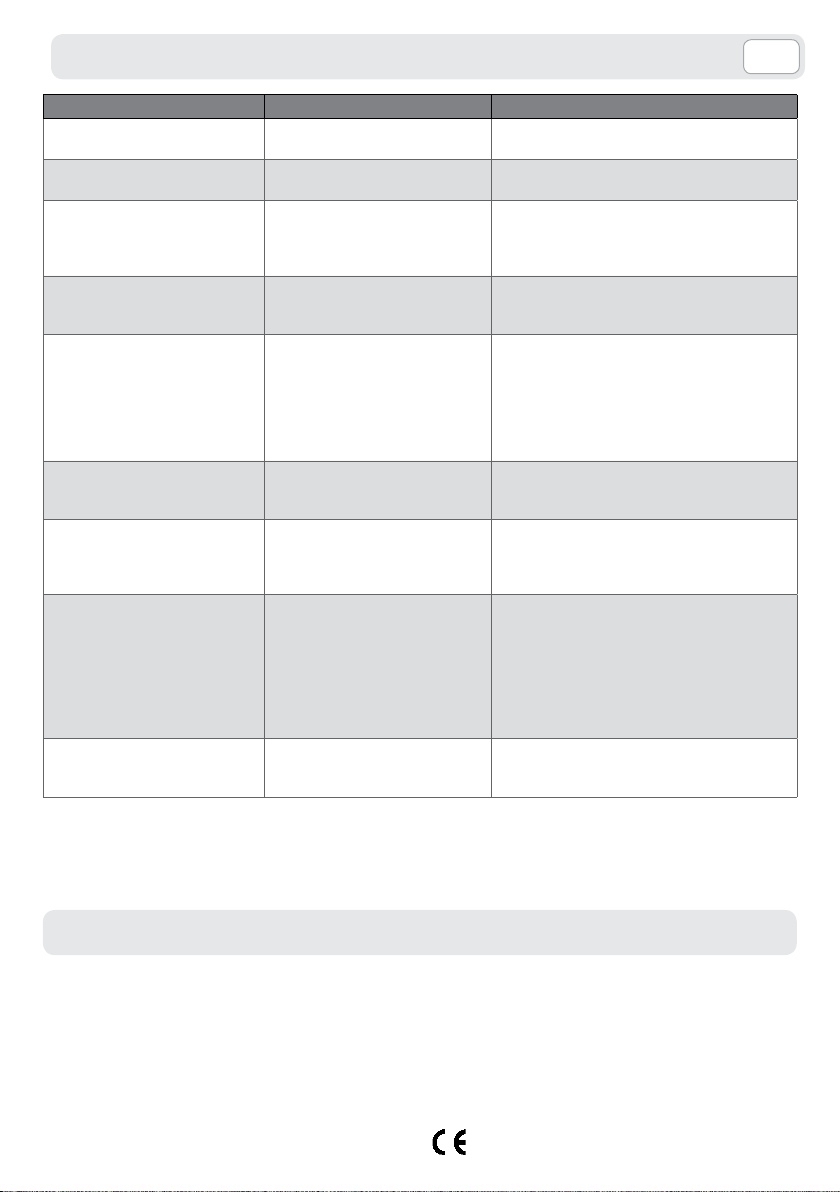
SOLUZIONI AI PROBLEMI PIÙ COMUNI
· Capacità cassetto cialde usate: circa 25 cialde monodose
2006/42 CE – 2004/108 CE – 2006 /95 CE
SOLUZIONI AI PROBLEMI PIÙ COMUNI
Problema riscontrato Cause possibili Rimedio
La macchina non si accende. » Macchina non collegata alla rete
Le spie lampeggiano
velocemente.
La leva caricamento cialda
non raggiunge la posizione di
chiusura.
La pompa è molto rumorosa. » Manca acqua nel serbatoio.
La macchina non eroga espresso. » Cialda non inserita.
L'espresso sgorga troppo
velocemente, non si forma la
crema nell’espresso.
Non si forma la schiuma del latte
o del cappuccino.
Nessuna erogazione vapore. » Lancia vapore/acqua calda
La macchina non raggiunge la
corretta temperatura (scritta
LAVAZZATIME spenta).
elettrica.
» Si è verificato un guasto. » Contattare il servizio consumatori o il centro
» Cassetto raccogli gocce/cialde
usate pieno.
» Cialda inserita in modo errato.
» Filtro non inserito correttamente.
» Temperatura di esercizio non
raggiunta.
» Leva caricamento cialda sollevata.
» Manca acqua nel serbatoio.
» Filtro non inserito correttamente.
» È stata inserita una cialda già
usata.
» Latte non adatto.
» Il latte non è abbastanza freddo.
» Tubo erogazione vapore otturato.
otturata.
» Manca acqua nel serbatoio.
» Filtro non inserito correttamente.
» Temperatura di partenza
eccessivamente bassa.
» Verificare il corretto inserimento delle prese.
assistenza.
» Vuotare il cassetto raccogli gocce/cialde
usate.
» Alzare la leva caricamento cialda ed inserire
correttamente la cialda.
» Rabboccare con acqua fresca potabile.
» Verificare inserimento del filtro Brita® (vedere
istruzioni fornite col filtro).
» Inserire cialda.
» Attendere il raggiungimento della
temperatura idonea.
» Abbassare la leva caricamento cialda.
» Rabboccare con acqua fresca potabile.
» Verificare inserimento del filtro Brita® (vedere
istruzioni fornite col filtro).
» Inserire una cialda nuova.
» Utilizzare latte fresco, parzialmente scremato.
» Usare latte a temperatura di frigorifero.
» Eseguire la pulizia del tubo vapore con un
ago e la pulizia della lancia vapore.
» Eseguire la pulizia lancia (vedi manutenzione
e pulizia); se il problema persiste, pulire
il foro dell’erogatore con un ago sottile,
assicurandosi che sia libero da ostruzioni,
poi accendere la macchina ed erogare una
piccola quantità di vapore.
» Rabboccare con acqua fresca potabile.
» Verificare inserimento del filtro Brita® (vedere
istruzioni fornite col filtro).
» Spegnere e riaccendere la macchina.
Per i guasti non contemplati dalla suddetta tabella o nel caso in cui i rimedi suggeriti non li risolvano,
rivolgersi ad un centro assistenza Lavazza.
CARATTERISTICHE TECNICHE
Per le caratteristiche tecniche fare riferimento alla targhetta dati presente sulla macchina.
· Voltaggio: 220-240 V, 50-60 Hz
· Potenza totale: 1000 W
· Capacità serbatoio: 2,7 l
· Peso: 7,2 kg
· Materiali impiegati per la carrozzeria: termoplastico
12
· Orologio digit di dimensioni 50 mm x 15 mm
· Dimensioni: Altezza 310 mm
Larghezza 300 mm
Profondità 323 mm

SAFETY RECOMMENDATION
EN
SAFETY RECOMMENDATION
EN
Purpose of appliance:
This appliance is intended to be used in household and similar applications
such as:
– staff kitchen areas in shops, offices and other working environments;
– farm houses; – by clients in hotels, motels and other residential type environ-
ments;
– bed and breakfast type environments.
This appliance is not intended for use by persons (including children) with reduced
physical, sensory or mental capabilities, or lack of experience and knowledge, unless
they have been given supervision or instruction concerning use of the appliance by
a person responsible for their safety. Children should be supervised to ensure that
they do not play with the appliance. This appliance can be used by children aged
from 8 years and above and persons with reduced physical, sensory or mental capabilities or lack of experience and knowledge if they have been given supervision
or instruction concerning use of the appliance in a safe way and understand the
hazards involved. Cleaning and user maintenance shall not be made by children
without supervision. Appliances can be used by persons with reduced physical, sensory or mental capabilities or lack of experience and knowledge if they have been
given supervision or instruction concerning use of the appliance in a safe way and
understand the hazards involved. Children shall not play with the appliance.
Location:
Place the coffee machine in a safe place, where nobody may overturn it or be
injured by it. Do not keep the machine at a temperature below 4°C (39,2°F) as
freezing may damage it. Do not use the coffee machine outdoors. Do not place
the machine on very hot surfaces or close to flames.
Power supply:
Connect the coffee machine to an adequate power supply socket. The voltage
should correspond to that indicated on the machine’s plate.
Power cable:
Do not use the coffee machine with a defective or damaged power cable. In such
cases, the defective cable must be replaced immediately. Do not pass the power
cable around sharp corners or edges or over very hot objects and protect it from oil.
Do not carry or pull the machine by its cable. Do not pull the plug by the cable. Do
not touch it with wet hands. Do not let the cable dangle freely from tables or shelves.
Danger of electrocution:
Never bring live electrical parts into contact with water.
Protection of others:
Keep children under supervision and do not allow them to play with the machine.
Children do not understand the dangers inherent in electrical appliances. Do not
leave the machine’s packing materials within reach of children.
13
EN
SAFETY RECOMMENDATION
EN
chine. Be careful of hot liquid spurting while the coffee is issuing from the spout.
Before cleaning the machine, it is essential to take the plug out of the socket and
wait until the machine has cooled down. Do not immerse the machine in water!
It is forbidden to interfere with the inner workings of the machine. Do not use
If the machine is to remain inactive for a long time, unplug it and store it in a
ised Service Centres can intervene and make repairs. In case of repairs which are
Fill the tank only with cold fresh, non-bubbly drinking water. Do not operate the
INFORMATION
FOR THE USER: Implementation of Directives 2002/95/EC, 2002/96/EC and
2003/108/EC, on the restriction of the use of certain hazardous substances in
electrical and electronic equipment, and on the disposal of e-wastes, and later
amendments. The symbol of the crossed-out wheeled bin on the appliance or
its packaging indicates that the product must be disposed of separately from
other waste at the end of its operational life. The user must therefore take the
appliance to be disposed of to an appropriate separate collection centre for
rate collection for the dismantled appliance being subsequently sent out for
recycling, treatment and for environmentally friendly disposal, contribute to
man health, and encourage recycling of the materials the appliance is made
of. Specific administrative sanctions provided for by current regulations will be
SAFETY RECOMMENDATION
Danger of burns:
Do not touch the hot parts (the capsule holder, etc,) just after using the ma-
Never raise the capsule loading lever during supply.
Cleaning:
the water in the tank for food purposes.
Care of the machine:
dry place out of reach of any children. Keep it protected from dust and dirt.
Repairs / Maintenance:
In case of malfunction, defects or suspected defects after it has been dropped, un-
plug the machine immediately. Do not operate a defective machine. Only Author-
not done up to standard, the company declines all responsibility for any damages.
Water tank:
machine if the water is not above at least the minimum level indicated on the tank.
Capsule insertion space:
Put only compatible capsules in the capsule compartment; do not put your fin-
gers or any other object inside the compartment. Pods shall be used once only.
Machine disposal at the end of its operational life:
electronic and electrotechnical equipment or take it to the dealer when buying a new appliance of the equivalent kind (one by one). Appropriate sepa-
the prevention of possible negative effects on the environment and on hu-
applied for illicit disposal of the product by the user.
14
EN
COMPONENTS
Water tank
Water tank with
Lower drop
Capsule load lever
Cup warming pad
COMPONENTS
EN
lid with lock
Controls
Digital clock
Luminous
“LAVAZZATIME”
wording.
Clock
programming
buttons
Espresso spout
dispensing knob
Steam
water-level control
Steam arm
Steam arm grip
Steam arm tip
Drop collection/
used capsule tray
Cup-support rack Large cup
or glass-support rack
Upper drop collection tray
collection tray
Power
input
Power
cable
On/off
switch
15
EN
EN
CONTROLS AND INDICATORS
accessories;
CONTROLS AND INDICATORS
On light
MACHINE STATUS
Machine on (heating up)
Espresso ready
Energy saving mode
Dispense fixed serving of espresso
Dispense espresso in free pour mode
Dispense steam
Technical problem
Free pour espresso
dispensing button
Dispensing button
for fixed servings of espresso
INDICATIONS
Red LED
(on)
ON OFF OFF ON with flashing light
ON ON ON ON
OFF
ON
ON ON
ON OFF OFF ON
ON
with flashing light
Red LED
short espresso
ON
with flashing light
ON
with flashing light
ON
with flashing light
Red LED
free pour
ON
with flashing light
ON ON
ON
with flashing light
ON
with flashing light
“LAVAZZATIME”
LED
OFF
ON
ON
with flashing light
Capsule insertion lever open
No water in the tank
MACHINE PREPARATION
Lavazza will accept no responsibility in the
event of damage caused by:
t JODPSSFDUVTFPGUIFNBDIJOFBOEVTFGPS
purposes other than which the machine
was designed;
tSFQBJSTDBSSJFEPVUBUVOBVUIPSJTFE
service centres;
t UBNQFSJOHXJUIUIFQPXFSDBCMF
t UBNQFSJOHXJUINBDIJOFDPNQPOFOUT
t VTFPGOPOPSJHJOBMTQBSFQBSUTPS
16
ON OFF OFF ON
ON
ON
with flashing light
ON
with flashing light
t Vsing above 40 ° C and / or below 15 ° C;
t UIFGBJMVSFUPEFDBMDJGZNBDIJOF
t TUPSBHFBUUFNQFSBUVSFTPGCFMPX¡$
t VTFPGDBQTVMFTEJõFSFOUUPUIPTFJOEJDBUFE
In these cases the guarantee lapses.
The damage caused to the machine follow-
ing the failure to observe the indications in
this booklet is not covered by the guarantee.
ON
MACHINE PREPARATION
EN
MACHINE PREPARATION
EN
TURNING ON THE MACHINE
Place the machine on a flat, horizontal and sta-
ble surface, well away from sources of water
and heat, and naked flames.
Unplug from electricity source where necessary.
When on, the machine should never be covered
with tea towels or similar.
The cover of the water tank has a lock and key.
1
Turn key clockwise [A] to open the cover.
Turn key anti-clockwise [B] to close the cover.
2
Lift and remove the water tank cover.
3
Fill the water tank up to the MAX level indicated
using fresh drinkable still water.
4
After removing the lid, the machine water tank
may be removed so it can be filled separately.
AB
6TJOH B XBUFS mMUFS PQUJPOBM BDDFTTPSZ JN-
QSPWFT UIF RVBMJUZ PG UIF XBUFS BOE FYUFOET
the lifetime of the machine.
6TF UIF "RVB "SPNB $SFNB #SJUB¥ mMUFS GPS
Lavazza. To insert the filter, follow the instructions sheet supplied with the accessory.
*UJT BEWJTBCMF OPUUPNPEJGZUIFFYJTUJOHmMUFS
settings.
Ensure that your hands, the machine, the ca-
ble and the machine countertop are not wet.
5
Plug the power cable into the power input on
the back of the machine.
6
Insert the plug in the power socket.
17
EN
EN
MACHINE PREPARATION
MACHINE PREPARATION
7
Press the on/off switch, moving it to position I.
The on light and the digital clock come on (red
colour). The luminous “LAVAZZATIME” wording
flashes. When both lights come on the machine
is ready for use.
LOADING THE HYDRAULIC CIRCUIT
At the first start of the machine, after a long
period of inactivity or in case of lack of water
in the tank, it is necessary to perform the hy
draulic loading as shown below.
1
Position a container or a cup under the steam
arm.
2
Turn the steam dispenser knob anti-clockwise to
begin dispensing steam.
3
Wait at least 20 seconds.
4
End the flow of steam by turning the knob clock-
wise until it is in its resting position and remove
the container or cup.
DISPENSING HISTORY
Press buttons A and B together to
see how many espressos you have
poured
SETTING THE TIME
Press and hold down button A
for a few seconds.
The display indicating the hour
begins to flash.
-
Release button A and press
button B repeatedly to set the
time.
Press button A.
The display indicating the minutes
begins to flash.
ENERGY SAVING
After 30 minutes of inactivity the machine goes
into energy saving mode, the LAVAZZATIME
wording switch off and the two espresso dis
penser buttons flash.
To turn the machine back on press one of the
two espresso dispenser buttons or lift the capsule load lever.
18
-
Release button A and press
button B repeatedly to set
the minutes.
Press button A to terminate the
operation.
MACHINE PREPARATION
EN
MACHINE PREPARATION
EN
ADJUSTING SMALL/LARGE
CUP SUPPORT RACK
The espresso machine has two positions/cup
MFWFMT"#GPSQSFQBSJOHUIFFTQSFTTP
Position A
For a regular cup of
espresso.
To correctly dispense a espresso using a mug put
the upper tray in position B.
Position B
For a large cup of
espresso.
Do not place cups/mugs or other objects on
the upper tray when it is disconnected from
its original position. After dispensing the es
presso, return the tray to its original position.
2
Remove the upper tray.
3
Use a Phillips screwdriver to remove the pin on
the lower tray
4
Remove the rubber plug from underneath the
-
lower tray
.
.
*UJTQPTTJCMFUPVTFUIFNBDIJOFFYDMVTJWFMZGPS
large cups/glasses by permanently removing
the upper drop collection tray.
1
Remove the drop collection/used capsule tray
and empty it of capsules/liquid
.
5
Insert the rubber plug in the hole in the lower
tray previously occupied by the pin
.
19
EN
EN
PREPARING ESPRESSO
PREPARING ESPRESSO
DISPENSING ESPRESSO IN FREE POUR
MODE
1
Place the cup/mug in the centre of the rack un-
der the espresso spout
2
Lift the capsule load lever and insert the capsule
in the slot
.
Only Lavazza Espresso Point Monodose cap-
sules must be introduced in the capsule slot.
Never put your fingers or any other items in
the capsule slot.
.
SETTING ESPRESSO SERVINGS
Serving quantities can be set using the same but-
ton; any use of the other button will be ignored.
The set quantity of espresso dispensed (minimum
20 cc) can be changed by repeating the programming process. If a serving of less than 20 cc is saved
to the memory, the machine will in any case memorise 20 cc.
Follow steps 1, 2, and 3 of the DISPENSING
ESPRESSO IN FREE POUR MODE paragraph.
4
Press and hold down one of the two espresso
dispenser buttons for at least 3 seconds. The on
light flashes. At this point release the button.
5
Once you have reached the desired amount of
espresso interrupt the flow by pressing the same
button as before.
If the programming operation is not completed
within 1’50” the machine automatically stops dispensing, the dispenser button flashes, and the most
recently programmed serving quantity will remain
in the memory. If there is an interruption to the
power supply during programming, the most re
cent value programmed will remain in the memory.
-
3
Lower the capsule load lever
4
Press the free pour button to begin dispensing
the espresso
5
Interrupt the flow of espresso by pressing the
.
.
button again when you have the amount of espresso you desire
20
.
To restore the original serving settings, turn off the
machine and turn it on again holding down both
espresso buttons at the same time.
DISPENSING FIXED SERVINGS OF ESPRESSO
Follow steps 1, 2, and 3 of the DISPENSING
ESPRESSO IN FREE POUR MODE paragraph.
4
Press one of the two espresso dispenser buttons
(if programmed). The machine will automatically
stop dispensing once the programmed amount
of espresso has been reached.
If there are technical problems during the dispens-
ing of a fixed serving of espresso, the machine will
proceed to dispense the espresso in free pour mode.
The flow can be interrupted by pressing the button
again.
STEAM
EN
STEAM
seconds after use to avoid the build-up of scale and
EN
Risk of burning! When first dispensed, there
may be little splashes of hot water. The
steam arm can reach high temperatures: do
not touch it directly with your hands. Use the
specific grip to move the arm. The steam arm
should not be directed at people or animals.
Do not expose yourself to jets of steam. Al
ways make sure there is sufficient water in
the water tank.
DISPENSING STEAM
1
Turn the steam arm fully so it points away from
the machine.
2
Place the container or cup holding the milk un-
der the steam arm so that around half of the arm
is immersed in the milk.
-
3
Turn the steam dispenser knob anti-clockwise to
begin dispensing steam.
4
Once you have the desired amount of steam,
interrupt the flow by returning the steam dispenser knob to its original position.
5
Return the steam arm to its original position.
Blast some steam through the steam arm for a few
possible blockages.
MAINTENANCE AND CLEANING
Before carrying out cleaning operations
make sure that the machine is unplugged
and that it has had time to cool down.
It is advisable to rinse the water tank on a daily
basis and fill it with fresh water. Empty and
clean the drop collection tray every 2-3 days, or
in any case whenever it is full. Do not use micro
wave or traditional ovens to dry the machine
or its parts. Never use alkaline detergents, solvents, alcohol or aggressive substances.
Do not immerse the machine in water. Unless otherwise specified, all components of the machine
that cannot be dismantled (aside from electrical
components) should be washed using cold or tepid
water, and non-abrasive cloths or sponges.
CLEANING STEAM ARM
1
Turn the steam arm so it faces away from the
machine, remove the tip by pulling downwards,
and wash it in a dishwasher or with water.
-
2
Clean the steam arm with a wet cloth and re-
place the tip.
21
EN
EN
MAINTENANCE AND CLEANING
MAINTENANCE AND CLEANING
CLEANING DROP COLLECTION/USED
CAPSULE TRAY
The tray can contain up to 25 capsules.
1
Remove the drop collection/used capsule tray.
2
Lift out the internal tray and empty it of the used
capsules. Drain off any liquids in the tray.
CLEANING ESPRESSO SPOUT
1
Turn the espresso spout in an anti-clockwise di-
rection.
2
Pull the espresso spout out from socket.
3
Wash all components with cold or tepid water,
dry, and reassemble correctly.
22
3
Clean the spout with lukewarm water, then re-
place it in its socket by turning clockwise. Check
it is positioned correctly.
TROUBLESHOOTING
EN
TROUBLESHOOTING
· Used capsule tray capacity: approx. 25 single-serving capsules
2006/42 CE – 2004/108 CE – 2006 /95 CE
Problem Possible causes Solution
The machine won’t switch on. » Machine not connected to
The lights flash quickly. » There is a fault. » Contact customer services or the service
The capsule load lever won’t
return to the closed position.
The pump is very noisy. » Not enough water in water tank.
The machine doesn’t dispense
any espresso.
The espresso comes out too
quickly, there is no crema in the
espresso.
No foam is formed in the milk or
cappuccino.
No steam is dispensed » Steam arm/hot water tube
The machine does not reach the
correct temperature (LAVAZZA
TIME sign off).
power source.
» The drop collection/used cap-
sule tray is full.
» Capsule inserted incorrectly.
» Filter inserted incorrectly.
» No capsule inserted.
» Required temperature not yet
reached.
» Capsule load lever up.
» Not enough water in water tank.
» Filter inserted incorrectly.
» The inserted capsule has already
been used.
» Milk not suitable.
» Milk not cold enough.
» Steam dispenser tube blocked.
blocked.
» Not enough water in water tank.
» Filter inserted incorrectly
» Starting temperature too low. » Turn off the machine and turn it on again.
-
» Check it is plugged in correctly.
centre.
» Empty the drop collection/used capsule tray.
» Lift the capsule load lever and correctly insert
the capsule.
» Fill with fresh drinkable water.
» Check that the Brita® is inserted correctly (see
instructions supplied with filter).
» Insert capsule.
» Wait until the correct temperature has been
reached.
» Lower the capsule load lever.
» Fill with fresh drinkable water.
» Check that the Brita® is inserted correctly (see
instructions supplied with filter).
» Insert new capsule.
» Use fresh, semi-skimmed milk.
» Use refrigerated milk.
» Clean the steam tube with a needle and
clean the steam arm.
» Clean the steam arm (see maintenance and
cleaning); if the problem persists clean the dis-
penser hole with a thin needle, making sure it
is free of blockages, then turn on the machine
and dispense a small quantity of steam.
» Fill with fresh drinkable water.
» Check that the Brita® is inserted correctly (see
instructions supplied with filter).
EN
For problems not covered by the above table, or in the event that the suggested solutions do not resolve the
problem, contact a Lavazza service centre
TECHNICAL SPECIFICATIONS
For technical specifications please refer to the data plate found on the machine.
· Voltage: 220-240 V, 50-60 Hz
· Total power: 1000 W
· Water tank capacity: 2.7 l
· Weight: 7.2 kg
· Materials used for machine body: thermoplastic
· Clock digit dimensions 50 mm x 15 mm
· Dimensions: Height 310 mm
Width 300 mm
Depth 323 mm
23

SECURITE
Cet appareil est destiné à être utilisé dans les applications ménagères et similaires, telles
les
Toute utilisation impropre (non décrite dans les présentes instructions) est interdite. Il est
interdit d’apporter des modifications techniques. Cet appareil peut être utilisé par des
tions nécessaires quant à l’utilisation sûre de l’appareil et s’ils comprennent les dangers
corrélés. Nettoyage et entretien ne doivent pas être exécutés par des enfants à moins
qu’il n’ait plus de 8 ans et contrôlés. Conserver l’appareil et son câble hors de la portée
des enfants de moins de 8 ans. Cet appareil peut être utilisé par des personnes avec
des capacités physiques, sensorielles ou mentales réduites, ou manque d’expérience et
de connaissance si attentivement surveillées ou après qu’ils aient reçu les informations
Ranger la machine à café dans un endroit sûr pour éviter tout risque de renversement ou de
blessures. Ne pas garder la machine au-dessous de 4° puisque le gel pourrait l’endommager.
Ne pas utiliser la machine à café en plein air. Ne pas placer la machine sur des surfaces très
mentation par des angles ni sur des arêtes vives, ni sur des objets très chauds; le protéger
de l’huile. Ne jamais transporter ni tirer la machine à café en la tenant par le câble. Ne pas
extraire la fiche en la tirant par le câble; ne jamais la toucher avec les mains mouillées.
Tenir les enfants sous surveillance, ne pas les laisser jouer avec l’appareil. Les enfants ne
se rendent pas compte du danger lié aux appareils électroménagers. Ne pas laisser à leur
FR
FR
SECURITE
Destination d’emploi :
que:
– dans les zones servant de cuisine, réservées au personnel, dans les magasins, dans
bureaux et dans d’autres milieux professionnels;
– dans les usines; – utilisation par les clients des hôtels, motels, et autres endroits à carac-
tère résidentiel;
– dans les pièces de type bed and breakfast.
enfants à partir de 8 ans si surveillés attentivement ou après qu’ils aient reçu les informa-
nécessaires quant à l’utilisation sûre de l’appareil et s’ils comprennent les dangers corrélés. Les enfants ne doivent pas jouer avec l’appareil.
Emplacement:
chaudes et/ou à proximité d’une flamme nue.
Alimentation de courant électrique:
Ne brancher la machine à café qu’à une prise de courant adéquate. La tension doit cor-
respondre à celle qui est indiquée sur la plaquette de la machine.
Câble d’alimentation:
Ne pas utiliser la machine à café si le câble d’alimentation est défectueux ou endomma-
gé. Si c’est le cas il faudra le remplacer immédiatement. Ne pas faire passer le câble d’ali-
Eviter que le câble d’alimentation ne tombe librement des tables ou des étagères.
Danger d’électrocution:
Ne jamais mettre les parties sous tension en contact avec de l’eau.
Protection d’autres personnes:
portée les matériels utilisés pour emballer la machine.
24
 Loading...