

laerdal Resusci Junior Directions For Use Manual
EN ResJun:Layout 1 14.12.2007 12:39 Side 1
Resusci Junior
ENGLISH Directions for Use
DEUTSCH Gebrauchsanweisung
FRANÇAIS Mode d’emploi
ESPAÑOL Instrucciones de utilización
ITALIANO Instruzioni per l’Uso
NEDERLANDS Handleiding
NORSK Bruksanvisning
SVENSKA Bruksanvisning
SUOMI Käyttöohje
www.laerdal.com
EN ResJun:Layout 1 14.12.2007 12:39 Side 2
Your new Resusci Junior
Thank you for purchasing the Laerdal Resusci
Junior. We know you will find this manikin to be
a reliable and long serving addition to your
training equipment. You can have confidence in
your Laerdal Resusci Junior, after all Laerdal has
been developing and manufacturing training
manikins for over 50 years. During this time
Laerdal has remained the world-wide market
leader.
As with all your training equipment it will
perform better and have a longer life span if it is
maintained properly. Laerdal manikins are
renowned world-wide for their reliability.
If you have any questions or comments on the
Laerdal Resusci Junior please contact your local
Laerdal representative who will be happy to
assist you.
Warranty:
Please see the Laerdal Global Warranty or visit
www.laerdal.com
WEEE
Waste Electrical and Electronic Equipment
This product is in compliance
with the essential requirements
of Council Directive 89 / 336 /
EEC; EMC Directive.
This appliance is mar ked according to the
European directive 2002/96/EC on Waste
Electrical and Electronic Equipment (WEEE).
By ensuring this product is disposed of correctly,
you will help prevent potential negative
consequences for the environment and human
health, which could otherwise be caused by
inappropriate waste handling of this product.
The symbol on the product, or on the
documents accompanying the product, indicates
that this appliance may not be treated as household waste. Instead it shall be handed over to the
applicable collection point for the recycling of
electrical and electronic equipment.
Disposal must be carried out in accordance with
local environmental regulations for waste
disposal.
For more detailed information about treatment,
recovery and recycling of this product, please
contact your local city office, your household
waste disposal ser vice or the Laerdal
representative where you purchased the product.
2
EN ResJun:Layout 1 14.12.2007 12:39 Side 3
Unpacking and assembly
If the manikin is stored in the carrying case it is
necessary to assemble the manikin before use.
Place the torso on a firm surface.
Pull out the hip bolt.
Push the two legs into their seats.
Fasten legs to the body by inser ting the hip bolt
through the opening in the body shell, through
the holes in the thighs and out through body shell
opening on the opposite side.
Press the bolt into its seat to avoid loosening it by
accident.
Put the shor ts and jacket on the manikin.
Training mat
All versions of Resusci Junior contain a training
mat.This has two purposes:
• Comfort and convenience for students and
instructors when practicing BLS skills on the
Resusci Junior.
• Movement of the assembled Resusci Junior
around the classroom / training venue
Repacking after use
If the manikin has been used in water, see
instructions in the section on “Water rescue”
page 6.
To store in hard case
If the SkillGuide is attached, unplug the cable and
store the SkillGuide in the soft pouch.
Take off the shor ts. Detach the legs from the
body in the following way:
Extract the hip bolt as follows:
• Exer t pressure on the protruding end of the
bolt. Continue to push to get the hip bolt
further out
• Grasp and pull out the hip bolt
When the legs have been removed, press the
bolt into its seat to avoid loosening it by accident.
Put the torso in the case, face up. Place a leg on
each side of the manikin.
Remove dirt from the training mat by wiping it
with a damp cloth. Put the training mat into the
plastic bag provided, and place on top of the
manikin.This will prevent dir t from the training
mat getting on the manikin.
ENGLISH
To use in water
If the manikin is to be used for training in water,
see the section on “Water rescue” page 6.
Manikin with SkillGuide
If you have purchased the Resusci Junior with
SkillGuide:
• Remove the SkillGuide protective cover.
• Plug the SkillGuide cable into the connector
on the right side of the manikin.
• Remove the paper tab coming from the
battery compartment on the back of the
SkillGuide.
• Press the “ON” button to begin practice.
• When transpor ting the manikin using the
training mat it is recommended that the
SkillGuide be unplugged and moved
separately.
3

EN ResJun:Layout 1 14.12.2007 12:39 Side 4
SkillGuide
Consistent and objective feedback on
performance during practice helps develop and
reinforce skills.The SkillGuide provides feedback
to the instructor and student to support the
student’s initial skill development by means of a
colour light display.
Inflation
When lung inflation volume reaches 200 ml the
green signal light will be activated. If lung inflation
volume exceeds 300 ml, an orange warning light
is activated. A red warning light indicates an
inflation that is too rapid.
Chest compression
When the breast bone area of the chest is
depressed by a minimum of 50 mm, the green
signal light is activated.
Incorrect hand position
The sensor is located under the switch cover
mounted on the chest plate. The red warning light
will be activated if the chest is compressed with
hands placed outside the recommended area.
Providing the downward pressure is exerted on
the lower half of the sternum the red light will
not activate. However, if downward pressure is
exerted on the xiphoid sternum, on the upper
half of the sternum or on the chest wall away
from the sternum the red light will activate.
To use
See Unpacking page 3.
The SkillGuide will turn “OFF” automatically if no
activity takes place for 5 minutes.
Note: if the SkillGuide is turned “ON” and the red
signal light for wrong hand position comes on the
SkillGuide is not completely plugged into the
manikin.
Power supply
The four 1.5V alkaline batteries, size C, will
provide approximately 125 hours of classroom
use.This will var y depending on user patterns and
the type of batteries.
Connection cable
This is permanently connected to the SkillGuide
and has an 8 pin male connector which is to be
connected to the manikin. The connector has
been moulded for proper orientation prior to
plugging it into the manikin’s side.
Caution
Make sure the SkillGuide is unplugged from
manikin:
• When airway is changed, or
• When internal service is carried out.
Light Indication Limits
Inflation volume: green correct 200ml
orange too much 350ml
Compression depth: green correct ≥50mm
Wrong hand position: red Pressure outside
of acceptable area
Too fast inflation red
1. Measurement tolerance in the manikin +/- 15% in normal room temperature
4
1
EN ResJun:Layout 1 14.12.2007 12:39 Side 5
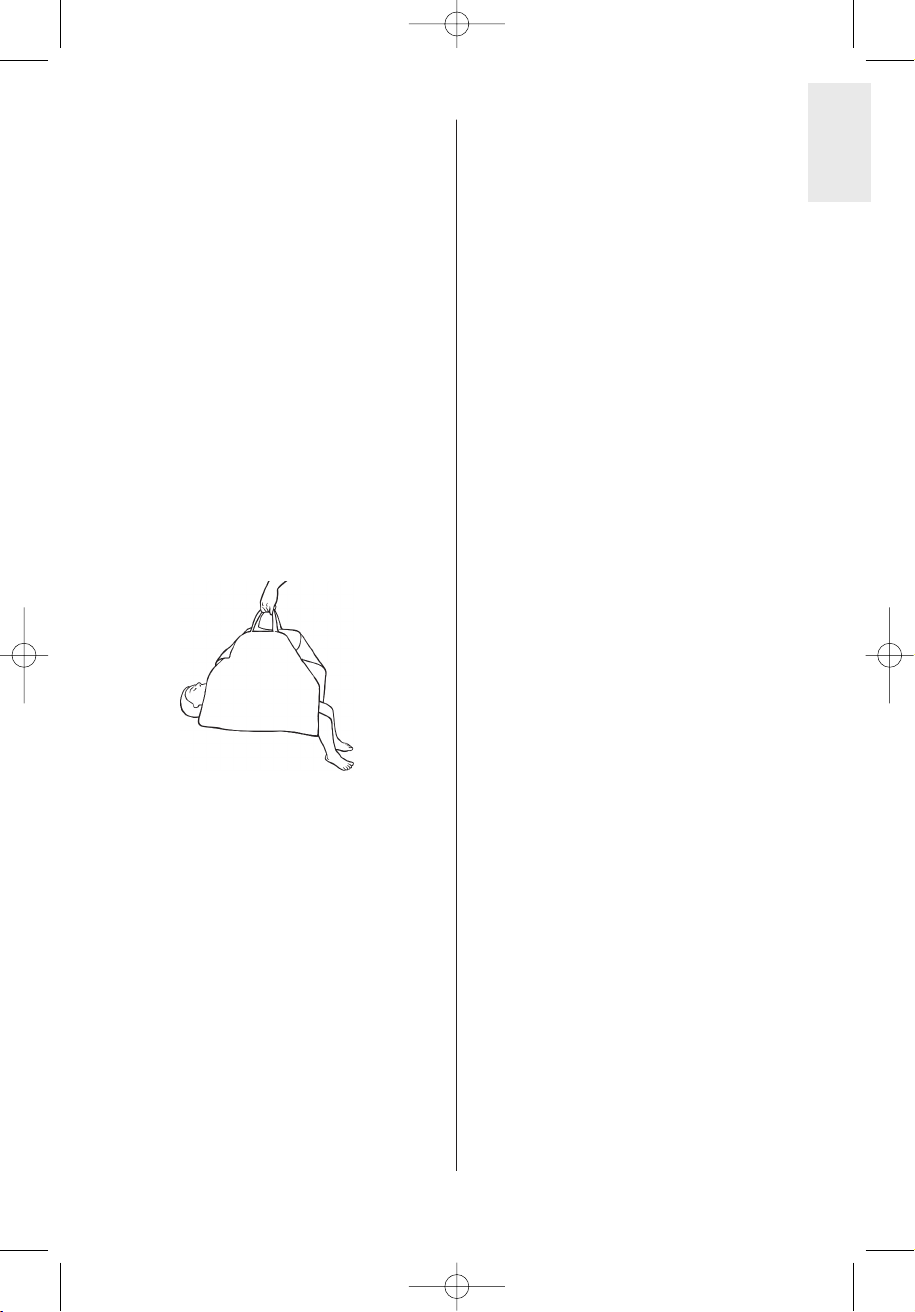
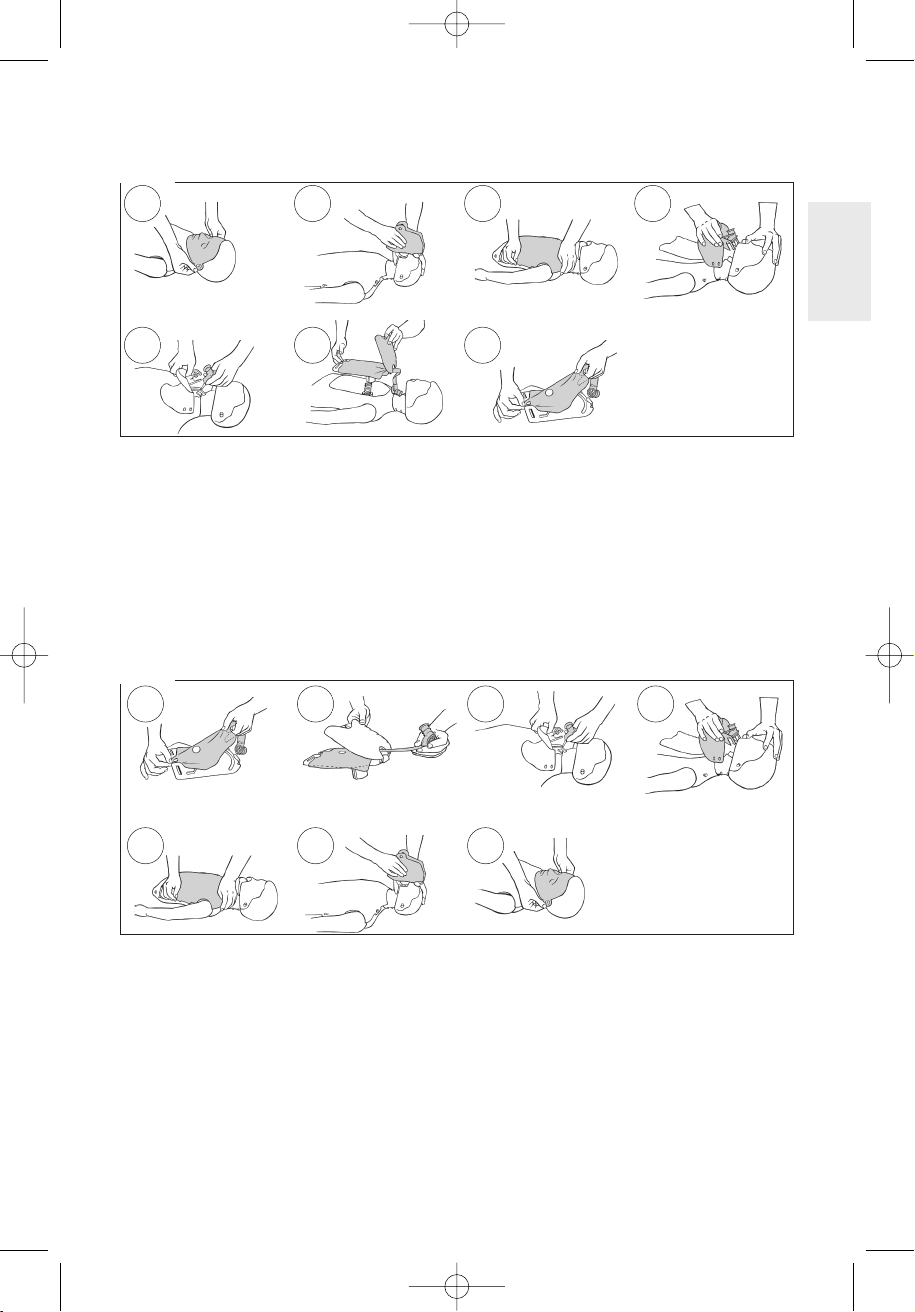
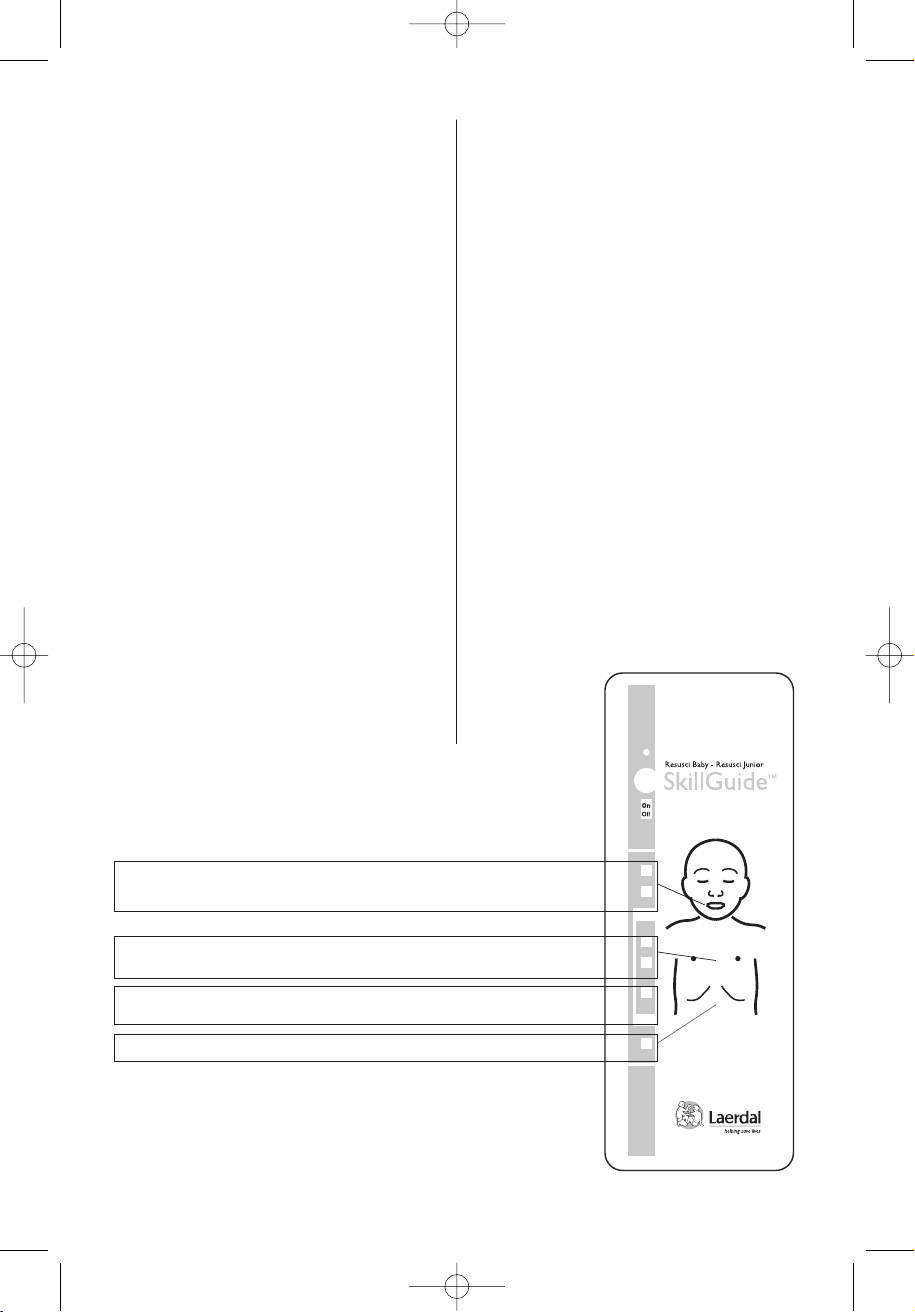
Disposable Jun io r Air way
The Junior Airway is designed for disposal after class
Fig 1
1a
2a 3a 4a
5a 6a 7a
ENGLISH
To remove (Fig. 1)
1. Detach the manikin face at each ear.
2. Lift manikin face off valve coupling.
3. Remove chest skin.
4. Lift off jaw from posts in head.
5. Remove valve.
6. Lift off rib plate.
7. Remove used airway and discard.
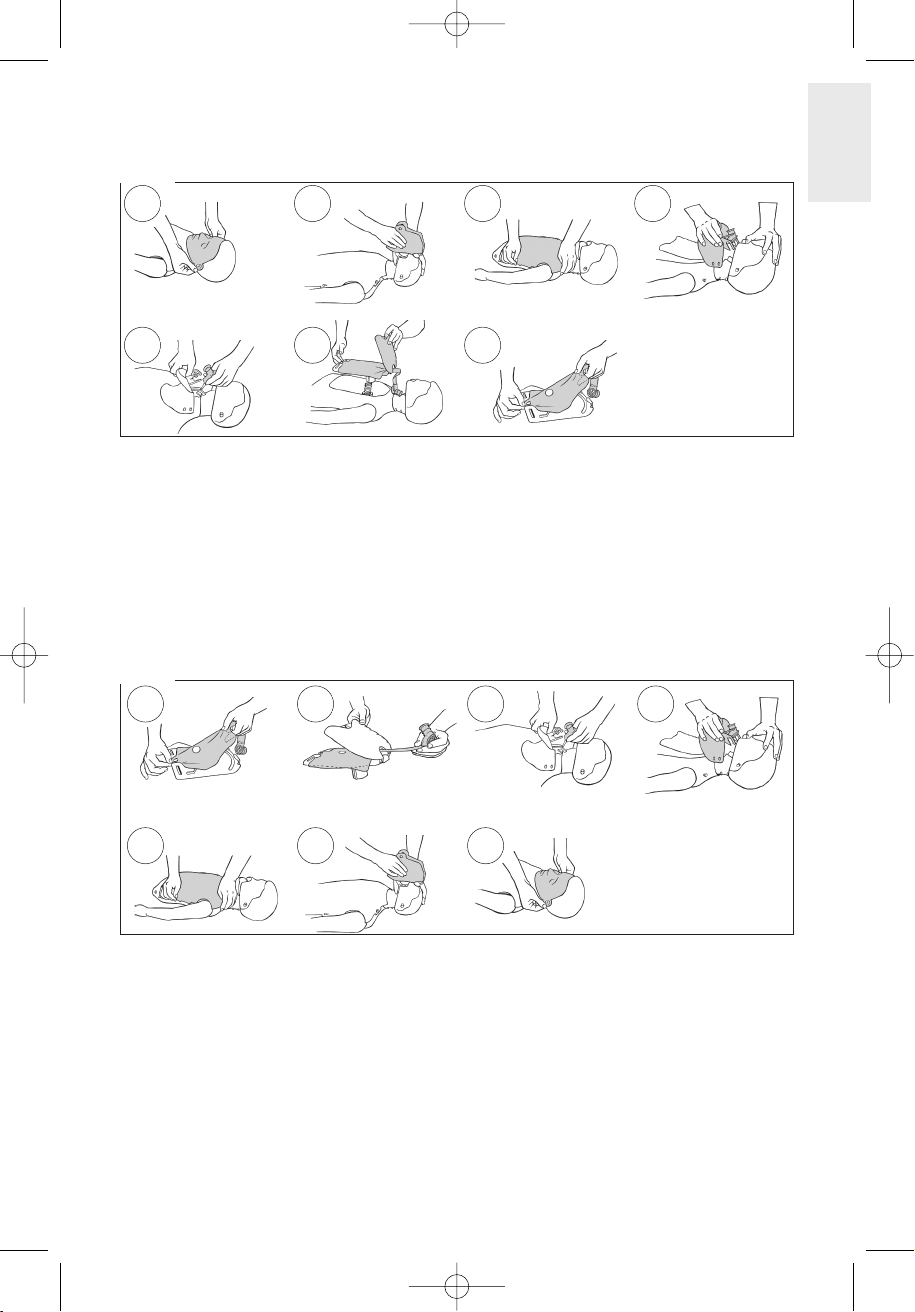
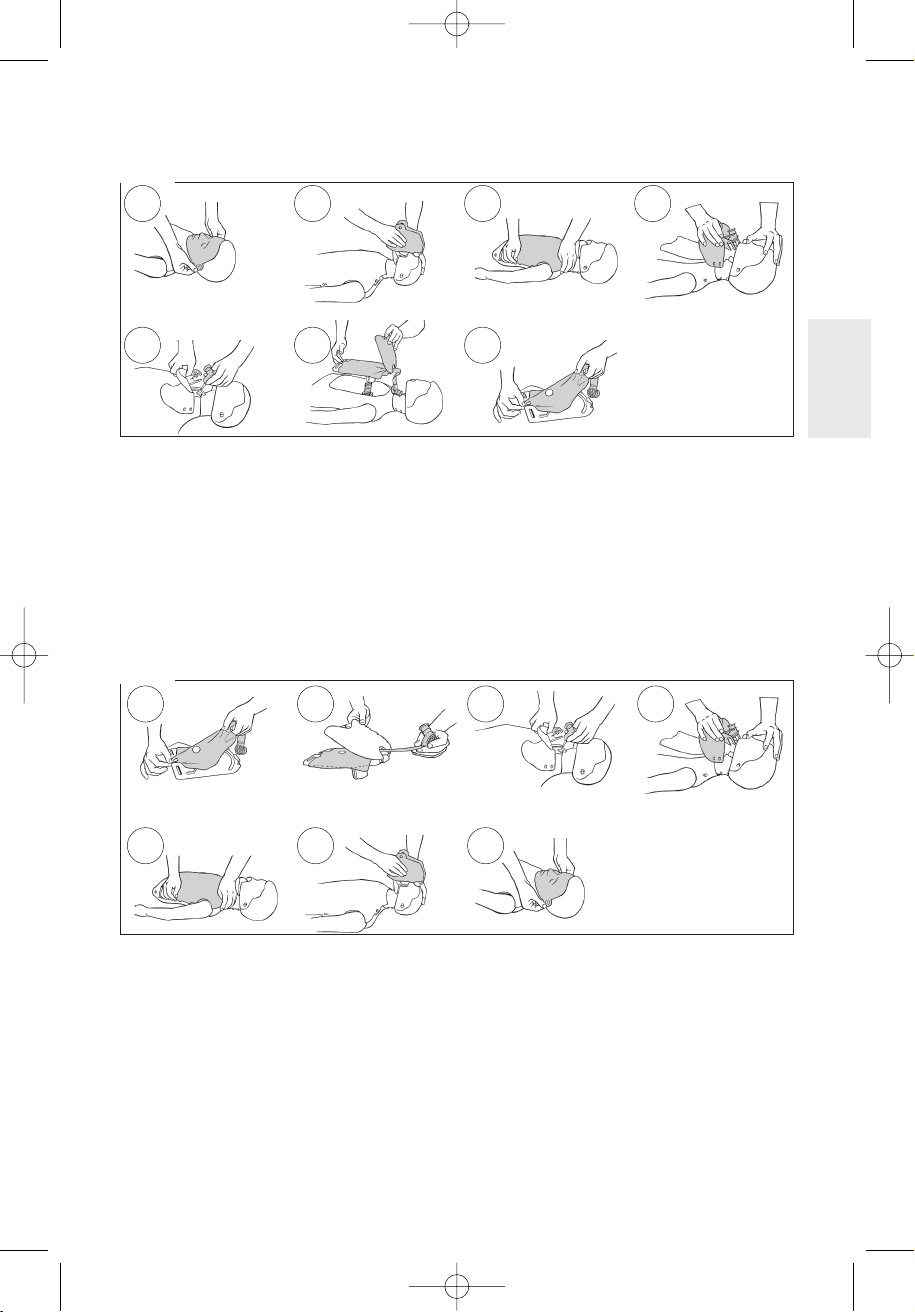
Fig 2
1b
2b 3b 4b
5b 6b 7b
Sanitation
Sanitation of Manikin Faces, see separate sheet.
General manikin cleaning
To install (Fig. 2)
1. Attach lung to hook and lay lung flat on
chest plate.
2. Pull valve through rib plate. Attach rib plate.
3. Snap valve onto jaw.
4. Reattach jaw to posts in head.
5. Fasten chest skin onto its retainers.
6. Push face coupling into airway valve.
7. Fasten face onto retainer s at each ear.
Routine disinfection of the entire manikin is not
required, but periodic cleaning of the head, torso,
chest skin and training mat is recommended.
These should be washed with a warm soapy
solution, and then rinsed with a clean damp cloth.
Proper care will maintain the appearance and
general condition of your Resusci Junior. Hand or
machine wash clothes with soap or laundr y
detergent in water 40°C. Iron with warm iron.
May also be dr y cleaned.
5
EN ResJun:Layout 1 14.12.2007 12:40 Side 6
Water rescue
The Resusci Junior manikin is designed for
training in water resuscitation and rescue
techniques. If you have purchased a water-rescue
version of the Resusci Junior it is ready to use.
An optional Water Rescue Kit (184010) is
available to make the manikin simulate, a
semi-submerged floating, unconscious victim, or a
victim that will sink to the bottom of the pool.
The manikin may be used in salt or fresh water.
CCaauuttiioonn::
The SkillGuide version of Resusci Junior must not be
used for water rescue.
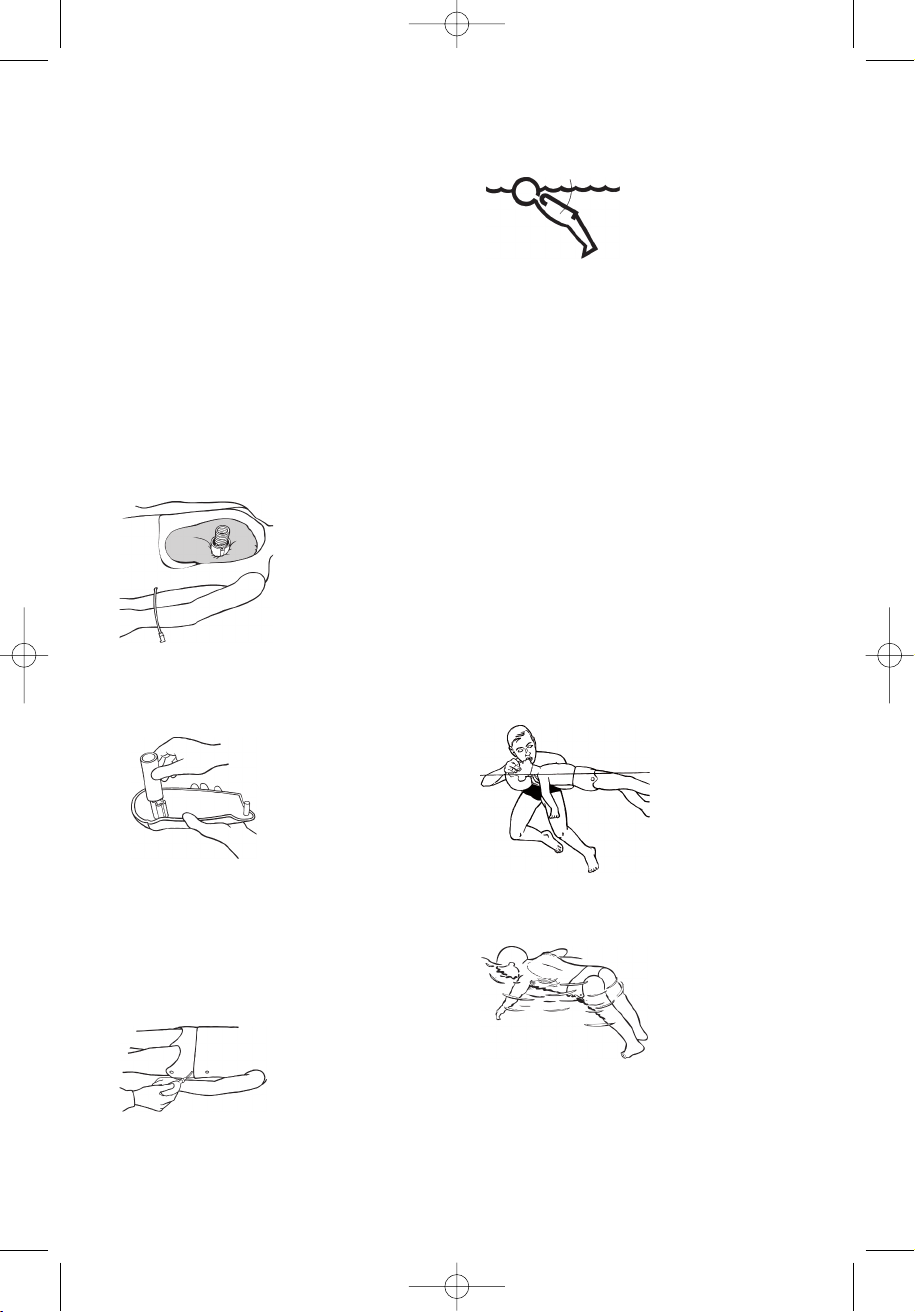
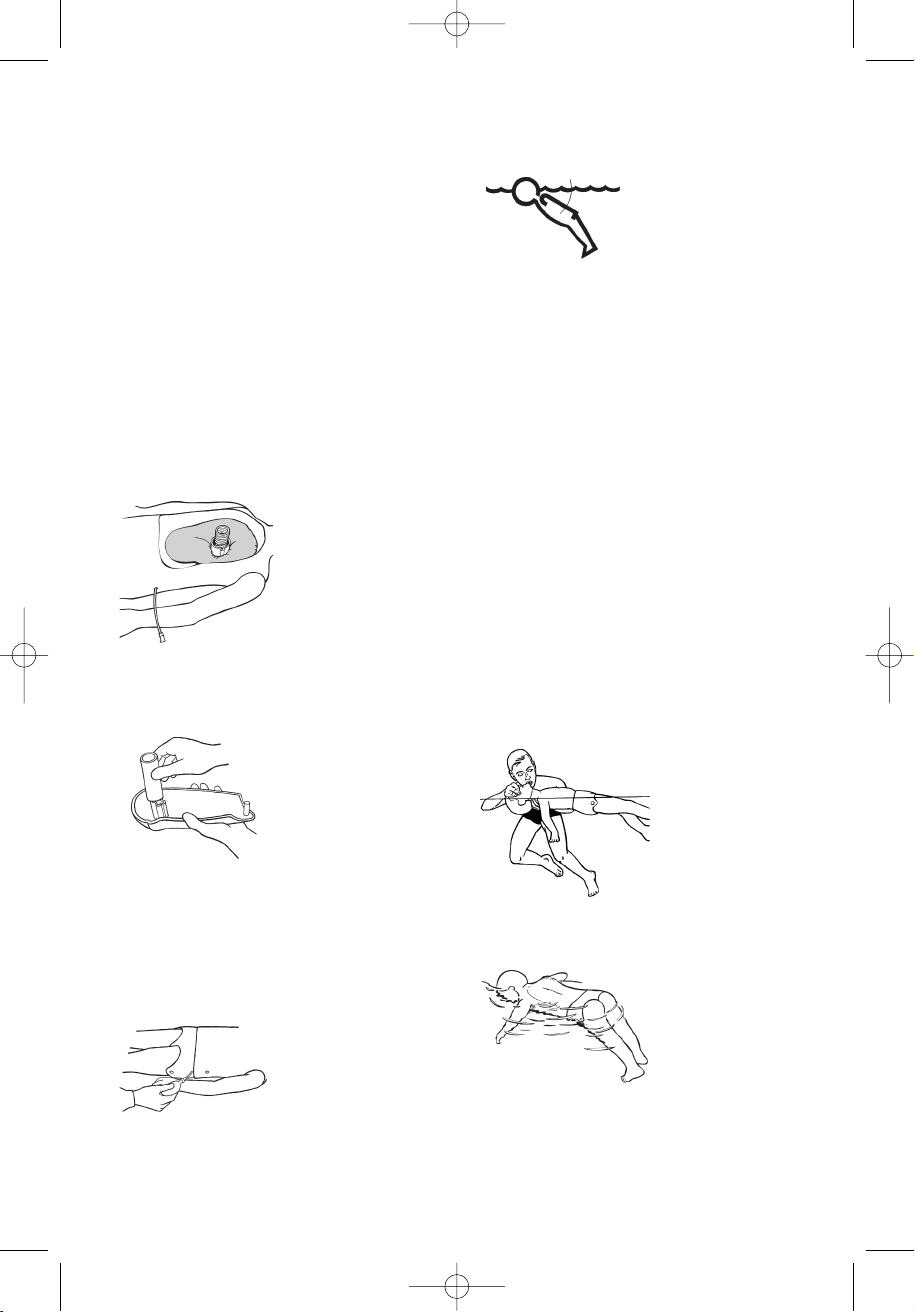
Installing the Water Rescue Kit (184010)
Mount the floatation device as follows:
Unbutton the chest skin
and lift out the chest
and lung plate assembly.
Place the floatation
device underneath the
lung plate over the
compression cylinder.
Push the tubing out
through the manikin’s
side.
Mount the weights as follows:
Undo the four screws of
each thigh. Place the
weight over the upper
cylinder piece, one
weight in each thigh.
Reassemble the thigh.
When the manikin is in
the water, you can open
the tube to evacuate air
30°
until the position is
correct, i.e. the angle
between the water and
body is 30°.
Note: After use, the floatation device is deflated by
attaching the deflation side of the pump to the
tubing and squeezing. When all the air is removed
from the floatation device, the pump bulb will not
recover from your squeeze. At this point, remove the
pump bulb and replace the stopper plug.
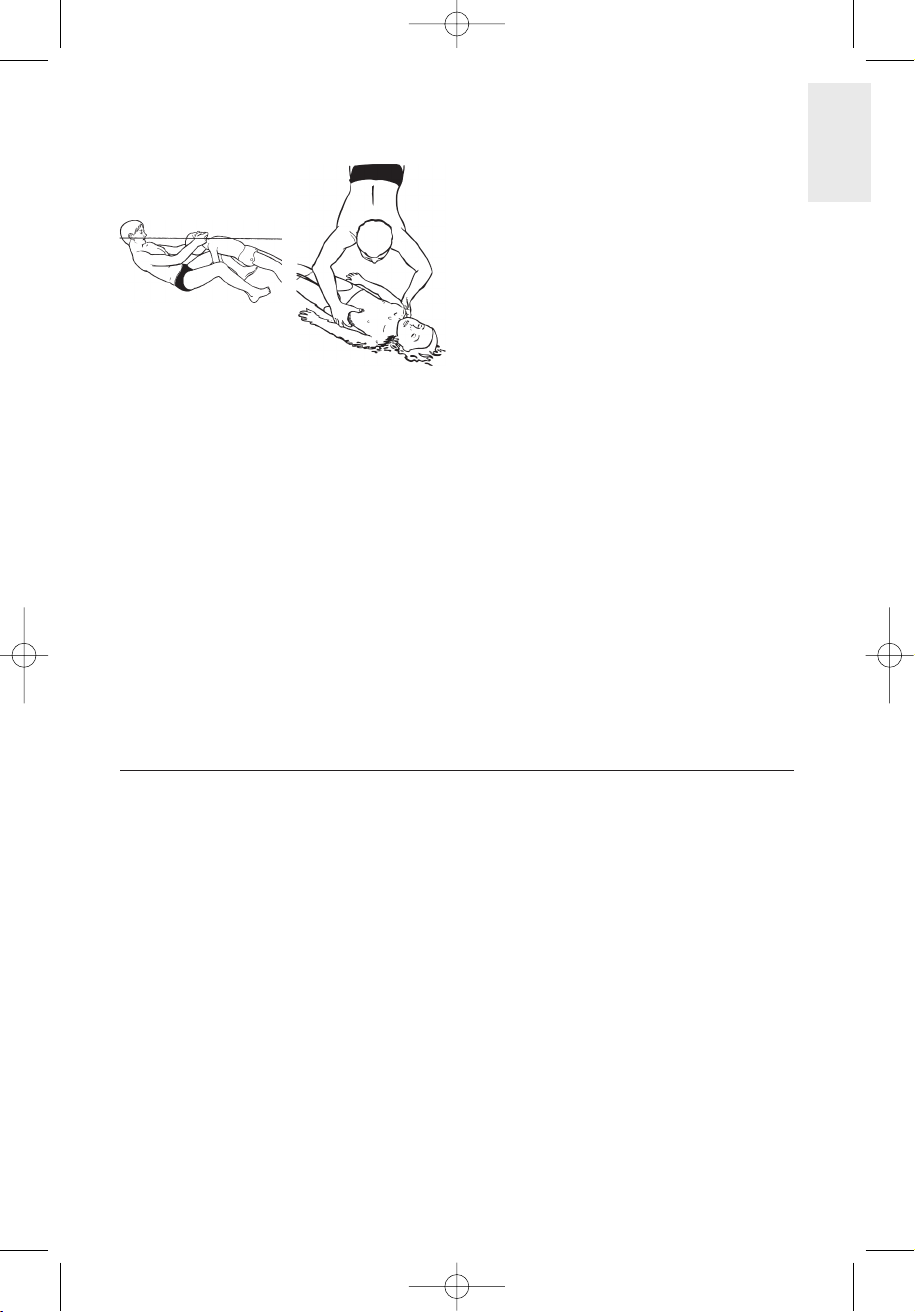
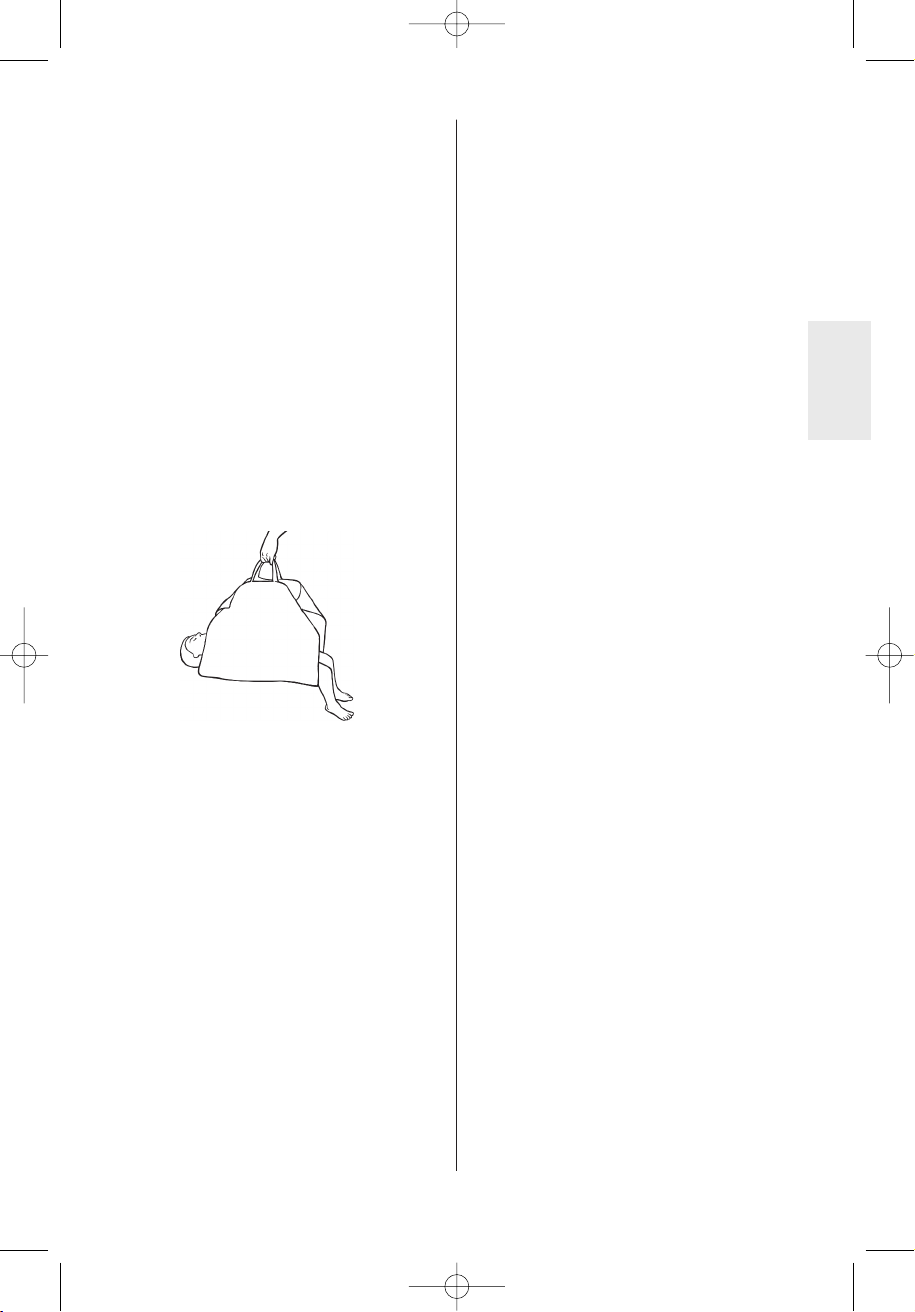
Repacking after use
After use in water, the manikin should be well
dried before being returned to storage. Removing
the manikin from the water by the arms will help
the manikin drain quickly. To further promote
gravity drainage, prop the manikin upright for a
few minutes. Use a cloth to dr y the exterior and
interior of the manikin.
The following exemplifies uses of the Resusci
Junior manikin in water rescue training programs
and lifesaving competition events.
In-water resuscitation
Rescue breathing may
be practised while
the manikin is in the
water.
Using Resusci Junior for water rescue
Now the Water Rescue Kit has been installed, the
device can be inflated or deflated without any
disassembly of the manikin.
Preparing to float:
Attach the inflation side
of the pump bulb to the
tubing and squeeze. It
requires about 18-22 full
squeezes of the pump
to inflate the device.
Pinch the tubing, remove
the pump bulb, and
insert the stopper plug.
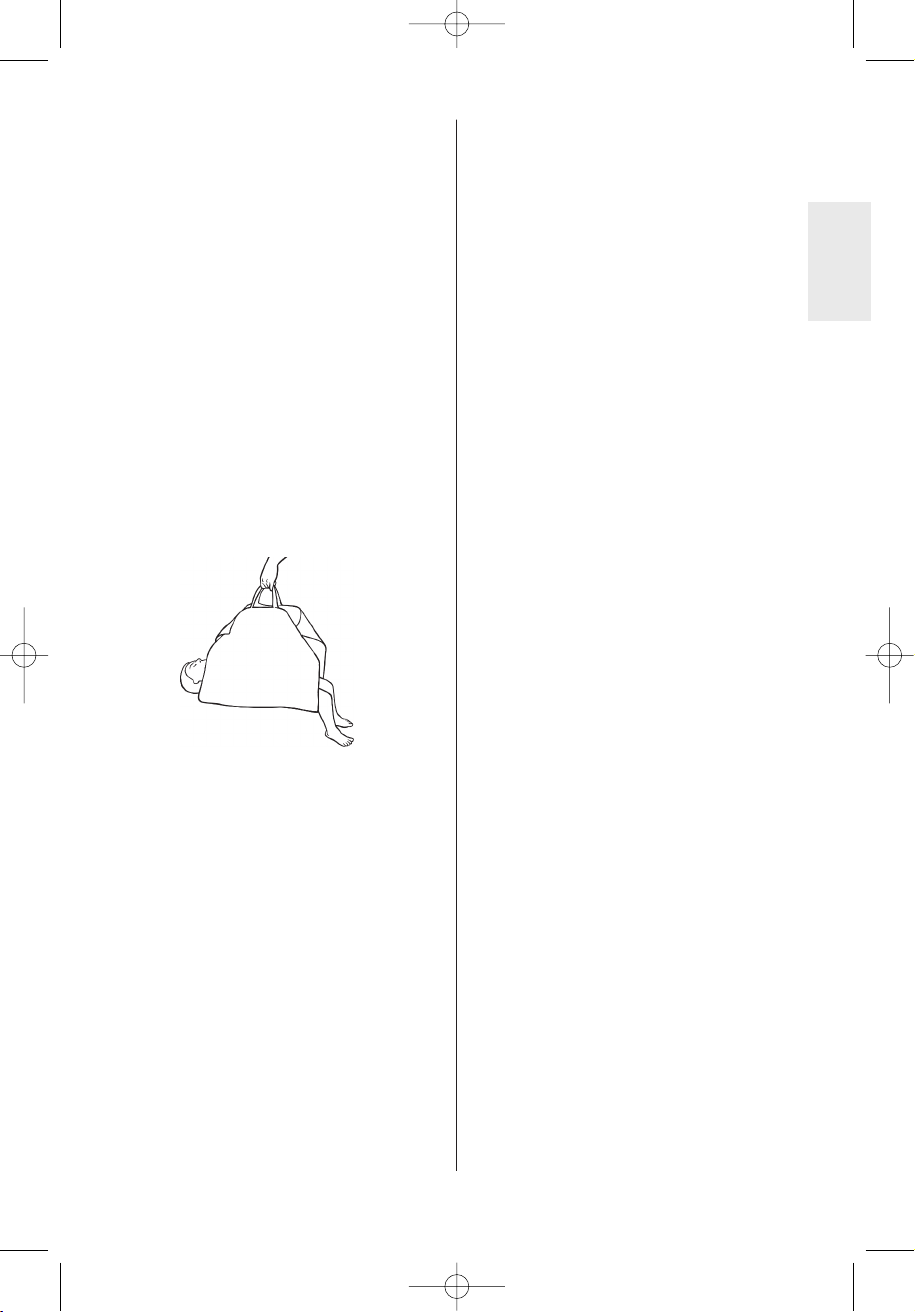
Recognition of drowning
When the floatation
device has been
inflated, the manikin
will float face down,
semi-submerged in
the water. This is a
position typical of an
unconscious person.
6
EN ResJun:Layout 1 14.12.2007 12:40 Side 7
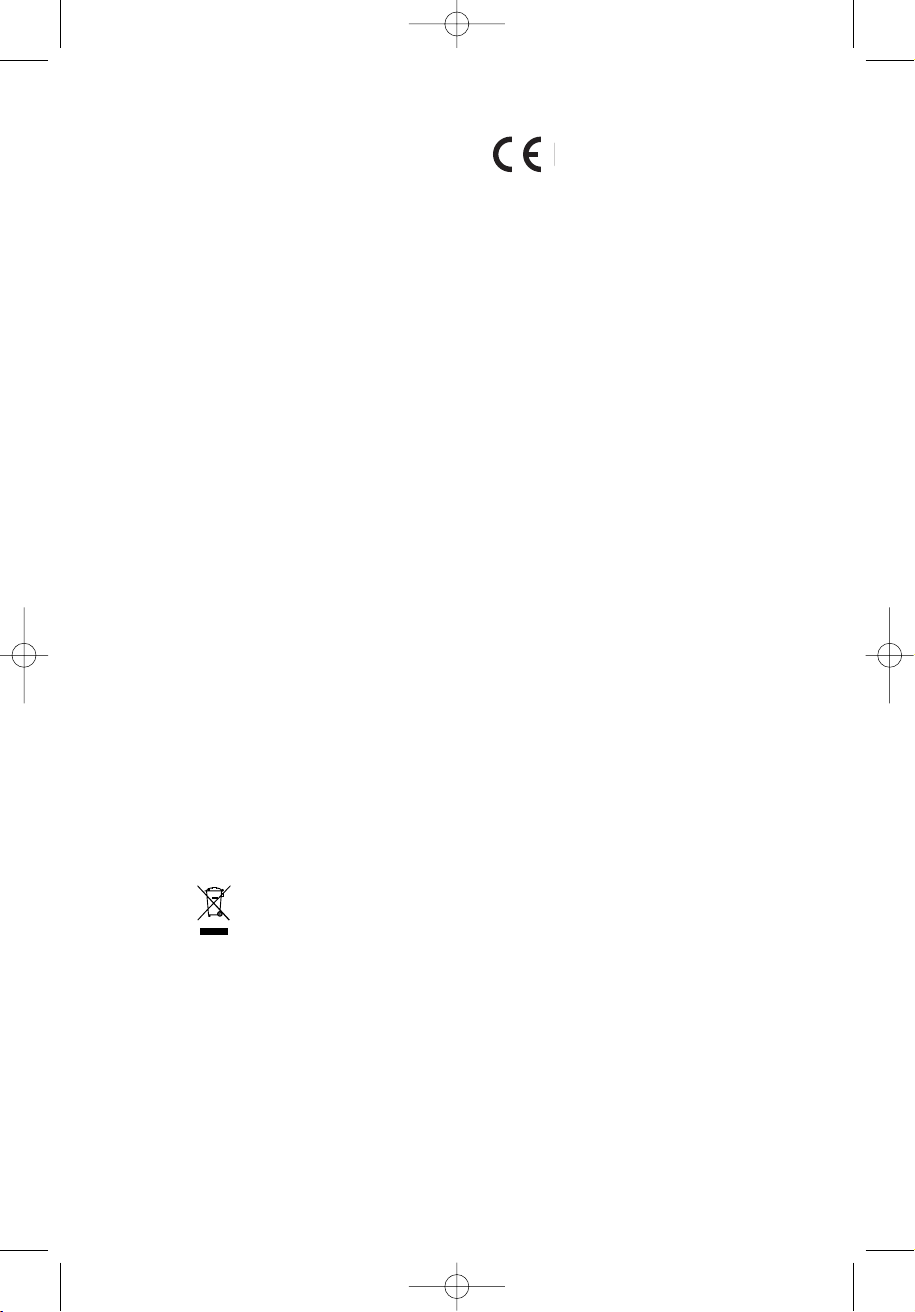
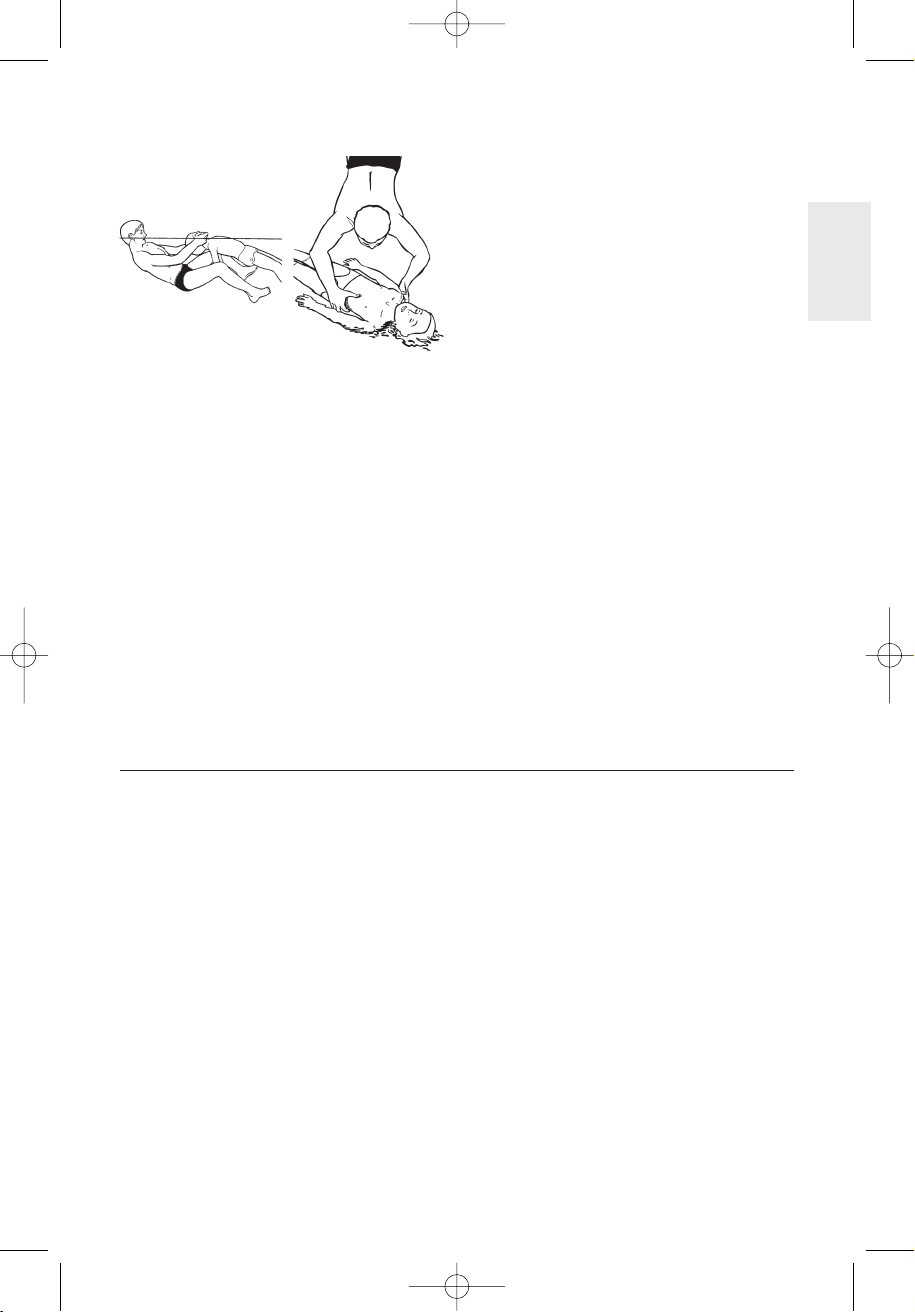
Surfacing and towing
When the floatation is
not used, the manikin will sink. Thus, the manikin
can be used for training rescue diving and
surfacing as well as realistic towing and landing
techniques.
If the manikin is dropped on its back it will
normally turn over, and sink face down to the
bottom. Water is allowed to enter through the
neck opening and through special holes in the
trunk and extremities.
ENGLISH
CCaauuttiioonn::
Make sure the Resusci Junior manikin is not
unintentionally released in deep water without the
floatation device in place. The manikin will sink to
the bottom, which might cause inconvenient rescue
operations.
Consumables
151201xx Manikin Face Shields (6 rolls)
152400 Manikin Wipes (pkg.50)
152401 Manikin Wipes (pkg.1200)
020310 Valve complete (pkg.50)
183010 Junior face (pkg.6)
183210 Airway complete (pkg.25)
183211 Airway complete (pkg.100)
183220 Filter and lung (pkg. 100)
Optional equipment
184010 Water Rescue kit
184600 Choking kit
184610 Junior Choking objects (pkg. 5)
7
DE ResJun:Layout 1 14.12.2007 12:46 Side 2
Einführung
Vielen Dank für den Kauf des Laerdal Resusci
Junior. Sie werden entdecken, daß das
Trainingsmodell ein verlässlicher und lange
währender Zusatz zu ihrer Trainingsausrüstung
sein wird. Sie können Vertrauen in ihren Laerdal
Resusci Junior haben, denn wir entwickeln und
bauen Trainingsmodelle seit über 50 Jahren.
Während all dieser Zeit ist Laerdal weltweit
marktführend geblieben.
Wie bei jeder anderen Trainingsausrüstung wird
das Modell länger halten und besser
funktionieren, wenn sie die
Instandhaltungsmassnahmen beachten. Laerdal
Trainingsmodelle sind weltweit für ihre
Funktionssicherheit bekannt.
Bei Fragen oder Kommentaren zu unseren
Produkten können Sie jederzeit mit uns Kontakt
aufnehmen.Wir helfen Ihnen gerne weiter.
Gewährleistung:
Bitten sehen Sie in die allgemeinen
Garantiebestimmungen von Laerdal. Weitere
Informationen finden Sie unter www.laerdal.de
WEEE
Übersetzt: elektrischer und elektronischer Abfall
Die Entsorgung muss gemäß den örtlichen
Bestimmungen zur Abfallbeseitigung erfolgen.
Bitte wenden Sie sich an die zuständigen
Behörden Ihrer Gemeinderverwaltung, an den
lokalen Recyclinghof für Haushaltsmüll oder an
den Händler, bei dem Sie dieses Gerät erworben
haben, um weitere Informationen über
Behandlung,Verwertung und Wiederverwendung
dieses Produktes zu erhalten.
Dieses Produkt stimmt mit den grundlegenden
Sicherheitsanforderungen der EG-Richtlinie
89/336/EEC (EMC Directive) überein.
In Übereinstimmung mit den Anforderungen der
Europäischen Richtlinie 2002/96/EG über
Elektro- und Elektronik-Altgeräte (WEEE) ist
vorliegendes Gerät mit einer Markierung
versehen.
Sie leisten einen positiven Beitrag für den
Umweltschutz und die Gesundheit des
Menschen, wenn Sie dieses Gerät einer
Sondermülldeponie zuführen. Im unsortierten
Müll könnte ein solches Gerät durch
unsachgemäße Entsorgung negative
Konsequenzen nach sich ziehen.
Auf dem Produkt oder der beiliegenden
Produktdokumentation ist folgendes Symbol
einer durchgestrichenen Abfalltonne abgebildet.
Es weist darauf hin, dass eine Entsorgung im
normalen Haushaltsabfall nicht zulässig ist.
Entsorgen Sie dieses Produkt im Recyclinghof mit
einer getrennten Sammlung für Elektro- und
Elektronikgeräte.
8
DE ResJun:Layout 1 14.12.2007 12:46 Side 3
Vorbereitungen
Bei Aufbewahrung im Transportkoffer muß
Resusci Junior vor dem Gebrauch
zusammengebaut werden.
Torso auf eine flache Unterlage legen.
Haltbolzen für die Beine aus dem Torso ziehen.
Beine in die vorgesehenen Vertiefungen stecken.
Haftebolzen in die Öffnung an der linken Seite
einführen und vollständig hineinschieben.
Festen Sitz überprüfen.
Shorts und Hemd anziehen.
Übungsmatte
Die Übungsmatte gehört zum Standardzubehör
jedes Laerdal Resusci Juniors.
• Die Übungsmatte dient als Unterlage für die
Teilnehmer und den Trainer bei HLW
Übungen am Resusci Junior.
• Außerdem kann sie als Tragematte zum
Transpor t von Resusci Junior verwendet
werden.
Wiederverpacken
Wenn Resusci Junior zur Übung im Wasser
verwendet wurde, beachten Sie bitte die
Hinweise auf Seite 12.
Aufbewahrung im Transportkoffer
Wenn SkillGuide verwendet wurde, diesen bitte
aus der Steckdose ziehen und in die Schutzhülle
verpacken.
Resusci Junior die Shor ts ausziehen. Auf das an
der rechten Seite her vorstehende Ende des
Haltebolzens drücken. Das frei werdende Ende
auf der linken Seite fassen und vollständig
herausziehen. Beine entfernen. Haltebolzen
wieder in seine Halterung zurückstecken, damit er
nicht aus Versehen verloren geht.
Den Hüftbolzen wie folgt herausziehen
• Das herausstehende Ende des Bolzens
herausdrücken. Weitermachen, bis der
Hüftbolzen ganz raus geht.
• Ziehen Sie den Hüftbolzen heraus
Wenn die Beine entfernt worden sind,drücken
Sie den Bolzen in seine Halterung, um ihn beim
Transpor t nicht zu verlieren.
Torso mit dem Gesicht nach oben in den
Transpor tkoffer legen. Beine links und rechts
neben den Torso legen.
DEUTSCH
Verwendung im Wasser
Wenn Sie Resusci Junior zur Übung im Wasser
verwenden wollen, beachten Sie bitte die
Hinweise auf Seite 16.
Resusci Junior mit SkillGuide
Wenn Sie Resusci Junior mit SkillGuide
verwenden, verfahren Sie wie folgt:
• SkillGuide aus der Schutzhülle nehmen.
• Das SkillGuide Anschlußkabel an der rechten
Seite von Resusci Junior anschließen.
• Papierstreifen aus dem Batteriefach entfernen,
das sich auf der Rückseite des SkillGuide
befindet.
• SkillGuide mit der „On" Taste einschalten.
• ZumTranspor t mit der Trainingsmatte
empfehlen wir, beim SkillGuide den Stecker
aus der Steckdose zu ziehen und diesen
separat zu tragen.
Übungsmatte mit einem feuchten Tuch reinigen
und in der Schutzhülle verpacken.Verpackte
Trainingsmatte auf den Torso legen. Dadurch wird
verhindert, daß Dreck von der Matte auf das
Übungsmodell fällt.
9

DE ResJun:Layout 1 14.12.2007 12:46 Side 4
SkillGuide
Kontinuierliches und objektives Feedback
während der Übung helfen das Gelernte zu
vertiefen und weiterzuentwickeln. Mit Hilfe des
Farbdisplays gibt die SkillGuide Signal Box dem
Trainer sowie dem Teilnehmer Feedback, um seine
Basisfähigkeiten auszubauen.
Beatmung
Wenn das Beatmungsvolumen 200ml erreicht hat,
leuchtet das grüne Signal auf.
Wenn 300ml erreicht werden, leuchtet das
orange Warnlicht auf.
Die rote Lampe zeigt ein zu schnelles Beatmen
an.
Herzdruckmassage
Bei einer Kompressionstiefe von bis zu 50 mm
leuchtet die grüne Leuchte auf.
Falsche Handposition
Der Sensor zur Erkennung einer falschen
Handposition befindet sich unter der Abdeckung,
auf der Brustplatte. Die rote LED leuchtet auf,
wenn die Handballen bei der Herzdruckmassage
außerhalb des empfohlenen Bereiches aufgelegt
werden.
Korrekter Druckpunkt: untere Brustbeinhälfte.
Falscher Druckpunkt: obere Brustbeinhälfte, über
dem Schwertfortsatz oder neben dem Brustbein.
In diesen Fällen leuchtet die rote LED auf.
Gebrauch
Siehe Auspacken Seite 9.
Wird die Übung länger als fünf Minuten
unterbrochen oder beendet, schaltet sich der
Skillguide automatisch ab.
Hinweis: Leuchtet beim Einschalten des SkillGuide
die rote LED (falsche Handposition) auf, ist der
SkillGuide nicht korrekt mit dem Resusci Junior
verbunden.
Stromversorgung
Der SkillGuide wird von vier 1,5V Alkaline
Batterien Typ C mit Strom versorgt. Diese ermöglichen einen Betrieb von ca. 125 Stunden (Diese
Zeitangabe ist vom Typ der Batterien und der
Intensität der Übungsaktivität abhängig).
Anschlußkabel
Das Anschlußkabel ist geräteseitig fest mit dem
SkillGuide verbunden. Der achtpolige Stecker paßt
in die Anschlußbuchse an der linken Seite von
Resusci Junior.
Warnhinweis
Achten Sie darauf den SkillGuide von der Steckdose
zu nehmen, wenn
• die Einmalluftwege gewechselt werden,
• oder Wartungsarbeiten durchgeführt werden.
LED Anzeige Anzeigebereiche
Beatmungsvolumen: Grün korrekt 200ml
Orange zu hoch 350ml
Herzdruckmassage: Grün korrekt ≥50mm
Falsche Handposition : Rot Herzdruckmassage außerhalb
des empfohlenen Bereiches
Zu schnelle Beatmung: Rot
1. Meßwertabweichung: +/-15% bei normaler Raumtemperatur
10
1
DE ResJun:Layout 1 14.12.2007 12:47 Side 5
Resusci Junior Einmalluftwege
Die Resusci Junior Luftwege sind nur für den einmaligen Gebrauch vorgesehen
Fig 1
1a
2a 3a 4a
5a 6a 7a
DEUTSCH
Entfernen (Fig. 1)
1a. Gesichtsteil von den Haltezapfen an den
Ohren lösen.
2a. Gesichtsteil nach vorne vom Atemventil
abnehmen.
3a. Brusthaut abnehmen.
4a. Unterkiefer nach vorne herausziehen.
5a. Atemventil entfernen.
6a. Rippenplatte abnehmen.
7a. Benutzten Luftweg entfernen und entsorgen.
Fig 2
1b
2b 3b 4b
5b 6b 7b
Reinigung und Desinfektion
Siehe separaten Teil für Reinigungsbestimmungen
Allgemeine Pflegehinweise
Einsetzen (fig. 2)
1b. Einmalluftweg am unteren Rand der
Lungenplatte einhängen und flach auflegen.
2b. Atemventil durch die Öffnung am oberen
Rand der Rippenplatte führen. Rippen- und
Lungenplatte einsetzen.
3b. Atemventil auf das Unterkieferteil setzen.
4b. Unterkiefer wieder in die dafür
vorgesehenen Stecker des Kopfteils stecken.
5b. Brusthaut an Befestigungsteilen befestigen.
6b. Gesichtsteil auf das Atemventil aufsetzen.
7b. Gesicht an den Befestigungsteilen der
Ohren befestigen.
Eine Routinedesinfektion von Resusci Junior ist
nicht erforderlich. Wir empfehlen jedoch, die gelegentliche Reinigung von: Kopf,Torso, Brusthaut
und Übungsmatte. Die Reinigung kann mit
warmem Seifenwasser erfolgen, danach mit
einem feuchten Tuch nachwischen. Eine
ordentliche Handhabung garantier t ein gutes
Aussehen und Funktionieren Ihres Resusci
Juniors. Die Bekleidung von Resusci Junior kann
bei 40 Grad gewaschen oder chemisch gereinigt
werden. Bügeln undTrocknen sind erlaubt.
11
DE ResJun:Layout 1 14.12.2007 12:47 Side 6
Wasserrettung
Der Laerdal Resusci Junior kann bei Verwendung
des optionalen Wasserrettungssatzes (Kat.Nr.: 18
40 10) auch für das Training der Wiederbelebung
im Wasser und von Rettungstechniken im Wasser
verwendet werden. DasWasserrettungsset ist
sofort einsetzbar. Der Wasserrettungsatz ermöglicht die Simulation eines bewußtlos treibenden
oder auf den Grund gesunkenen Kindes. Resusci
Junior kann in Süß- und Salzwasser verwendet
werden.
WWaarrnnhhiinnwweeiiss::
Die Version mit SkillGuide kann nicht
im Wasser verwendet werden.
Einbau der Wasserrettungssatzes (184010)
Einsetzen des Schwimmkörpers:
Brusthaut, Rippen- und
Lungenplatte entfernen.
Schwimmkörper
unterhalb der
Lungenplatte über der
Kompressionsfeder
einsetzen. Schlauch
durch die Seite nach
aussen führen.
Einsetzen der Gewichte:
Oberschenkelteile an
den vier Schrauben öffnen. Gewichte über die
zylindrischen Führungen
eines jeden
Oberschenkels stecken.
Oberschenkelteile
zuschrauben.
Wenn Resusci Junior im
Wasser treibt, kann
durch Ablassen von Luft
aus dem
30°
Schwimmkörper der
korrekte Treibwinkel von
ca. 30° eingestellt
werden..
Hinweis: Nach Gebrauch kann der Schwimmkörper
mit der Pumpe komplett entleert werden. Hierzu
wird die Pumpe mit der Entleerungs-Seite an den
Schlauch gekoppelt und gedrückt. Nach kompletter
Entleerung bläht sich der Ballon der Pumpe nicht
mehr auf. Jetzt kann der Ballon entfernt werden und
der Schlauch wieder mit dem Stopfen verschlossen
werden.
Verpacken
Nach dem Gebrauch im Wasser muß Resusci
Junior gut getrocknet werden. Resusci Junior an
den Armen aus dem Wasser ziehen. Dies erlaubt
den schnellen Abfluß des Wassers. Resusci Junior
für einige Minuten in einer aufrechten Position
halten oder anlehnen. Innen- und Außenseite
gründlich abtrocknen.
Die folgenden Beispiele beschreiben einige
Möglichkeiten der Verwendung von Resusci Junior
zum Training von Wasserrettungsübungen oder
für Wettbewerbe.
HLW im Wasser
Üben der
Atemspende am
treibenden Resusci
Junior .
Verwendung von Resusci Junior zur
Wasserrettung
Der eingebaute Schwimmkörper kann von Außen
mit Luft befüllt oder entleert werden.
Treiben lassen: Pumpe mit der Füllseite
an den Schlauch anschließen und drücken. Zur
Füllung des
Schwimmkörpers sind
ca. 18-22 Pumphübe
nötig. Pumpe entfernen
und den Schlauch mit
dem Stopfen
verschließen.
Erkennen einer bewußtlos treibenden Person
Mit gefülltem
Schwimmkörper
treibt Resusci Junior
mit dem Gesicht
nach unten im
Wasser. Diese
Position ist typisch
für bewußtlos
Treibende.
12
DE ResJun:Layout 1 14.12.2007 12:47 Side 7
Rettung
Wenn der Schwimmkörper nicht mit Luft gefüllt
ist, sinkt Resusci Junior auf den Grund. Resusci
Junior kann daher auch zu Tauchrettungsübungen
verwendet werden.
Wenn das Übungsmodell auf den Rücken gedreht
wird, wird es sich automatisch wieder umdrehen
und mit dem Gesicht nach unten sinken. Dabei ist
es normal, daß Wasser durch die Öffnungen am
Hals, am Körper und den Extremitäten eintritt.
WWaarrnnhhiinnwweeiiss
Achten Sie darauf, dass Resusci Junior nicht ohne
Schwimmkörper in tiefen Gewässern verwendet wird.
Resusci Junior wird auf den Grund sinken und
aufwendige Bergungsmaßnahmen verursachen.
DEUTSCH
Verbrauchsmaterialien
151201xx Gesichtsteile (6 rolls)
152400 Manikin Wipes (pkg.50)
152401 Manikin Wipes (pkg.1200)
020310 Ventil (pkg.50)
183010 Junior Gesichtsteil (pkg.6)
183210 Luftwege (pkg.25)
183211 Luftwege (pkg.100)
183220 Filter und Lunge (pkg. 100)
Optionale Ausstattung
184010 Wasserrettungsset
184600 Set Erbrechen
184610 Junior Fremdkörper (5 Stück pro Paket)
13

FR ResJun:Layout 1 13.12.2007 15:19 Side 2
Introduction
Nous vous remercions de votre achat d'un
Resusci Junior. Nous savons qu'il s'agit d'un
mannequin fiable qui vous rendra service
pendant longtemps. Laerdal développe des
mannequins d'enseignement depuis plus de 50
ans et reste le leader mondial dans ce domaine.
Comme toute la gamme de notre matériel
d'enseignement, votre mannequin sera plus
performant et aura une durée de vie plus longue
s'il est bien entretenu. Les mannequins Laerdal
sont réputés au niveau mondial pour leur fiabilité.
Pour toutes informations complémentaires
concernant votre mannequin Resusci Junior,
veuillez contacter le représentant local de
Laerdal.
Garantie :
Veuillez vous référer aux conditions générales de
garantie sur www.laerdal.com
WEEE
Déchets d’Equipements Electriques et
Electroniques
Produit en conformité avec la la Directive
Européenne 2002/96/CE concernant les Déchets
d’Équipements Électriques et Électroniques
(DEEE).
En procédant correctement à la mise au rebut de
cet appareil, vous contribuerez à empêcher toute
conséquence nuisible pour l’environnement et la
santé de l’homme.
Le produit est en conformité avec les
principales exigences de la directive
89/336/EEC; EMC - directive.
Le symbole présent sur l’appareil ou sur la
documentation qui l’accompagne indique que ce
produit ne peut en aucun cas être traité comme
déchet ménager. Il doit par conséquent être
remis à un centre de collecte des déchets chargé
du recyclage des équipements électriques et
électroniques.
Pour la mise au rebut, respectez les normes relatives à l’élimination des déchets en vigueur dans
le pays d’installation.
Pour obtenir de plus amples détails au sujet du
traitement, de la récupération et du recyclage de
cet appareil, veuillez vous adresser au bureau
compétent de votre commune, à la société de
collecte
14
FR ResJun:Layout 1 13.12.2007 15:20 Side 3
Déballage et montage
Si le mannequin est rangé dans la valise de
transport ou dans un carton, il faut le monter
avant de l'utiliser. Mettre le torse sur une surface
dure. Retirer l'axe au niveau des hanches. Mettre
les deux jambes en place et les fixer en insérant
l'axe dans l'ouverture prévue sur la coque du
mannequin et dans les trous situés sur les cuisses,
de façon à ce qu'il ressorte de l'autre côté.
Appuyer sur l'axe jusqu'à ce qu'il soit bien en
place. Enfiler le short et la veste.
Tapis d'entraînement
Tous les modèles du Resusci Junior sont livrés
avec un tapis d'entraînement pour deux raisons :
• la pratique de la RCP par les élèves et les
instructeurs est plus confortable et plus facile
• le déplacement du Resusci Junior assemblé
est plus facile.
Emballage après utilisation
Si le mannequin a été utilisé dans l'eau, voir les
instructions dans le paragraphe "sauvetage en
milieu aquatique".
Rangement en valise
S'ii y a un boîtier SkillGuide, débrancher le câble
et ranger le SkillGuide dans la pochette souple.
Enlever le short. Séparer les jambes du corps en
suivant les étapes ci-après :
Enlever l'axe en procédant comme suit :
• Appuyer sur l'extrémité saillante de l'axe et
pousser jusqu'à ce qu'il sorte sur le côté du
mannequin.
• Saisir l'axe et l'enlever.
Lorsque les jambes ont été enlevées, ranger l'axe
dans son logement pour éviter de le perdre par
mégarde.
Mettre le torse dans la valise, le visage tourné
vers le haut. Placer une jambe de chaque côté du
mannequin.
Nettoyer le tapis d'entraînement à l'aide d'une
serviette humide. Le ranger dans le sac en
plastique fourni puis le mettre au dessus du
mannequin afin de ne pas faire tomber de
poussière sur ce dernier.
FRANÇAIS
Utilisation dans l'eau
En cas d'utilisation du mannequin pour une
formation en piscine, se reporter au paragraphe
"sauvetage en milieu aquatique" page 18
Mannequin avec boîtier SkillGuide
En cas d'achat d'un mannequin Resusci Junior
avec boîtier SkillGuide :
• Enlever l'enveloppe de protection du
SkillGuide
• Brancher le câble SkillGuide dans le connecteur situé sur le côté droit du mannequin
• Ôter la languette de papier qui se trouve
dans le logement de la batterie au dos du
boîtier Skillguide
• Appuyer sur la touche "on" pour commencer
l'entraînement
• Lors du déplacement du mannequin avec le
tapis d'entraînement, il est recommandé de
débrancher le SkillGuide et de le tenir
séparément.
15
FR ResJun:Layout 1 13.12.2007 15:20 Side 4
SkillGuide
Des informations logiques et objectives sur la
performance réalisée pendant l'entraînement
aident à développer et à renforcer les
compétences. Le SkillGuide fournit des
informations à l'instructeur et à l'élève afin de
faire progresser les compétences initiales de
l'élève par le biais de témoins lumineux.
Insufflation
Lorsque le volume d'air insufflé dans les poumons
atteint 200ml, le voyant vert s'allume. Si le volume
d'air insufflé dépasse 300ml, le voyant avertisseur
orange s'allume. Un voyant avertisseur rouge
indique une insufflation trop rapide.
Massage cardiaque
Lorsque le sternum est déprimé d'au moins 50
mm, le voyant vert s'allume.
Position incorrecte des mains
Les détecteurs se trouvent sous un cache de
protection qui est monté sur le couvre-poitrine.
Le voyant rouge s'allume si la poitrine est
déprimée avec une position incorrecte de la
main. Si la compression est faite sur la moitié
inférieure du sternum, le voyant rouge ne
s'allumera pas. Cependant, si la compression est
faite sur l'appendice xiphoïde, sur la moitié
supérieure du sternum ou sur la cage thoracique
en dehors du sternum, le voyant rouge s'allumera.
Utilisation
cf. Déballage page 15
Le Skillguide s'éteindra automatiquement s'il n'y a
aucune activité pendant 5 minutes.
Remarque : si le SkillGuide est en position "on" et si
le voyant rouge correspondant à une position
incorrecte de la main s'allume, la prise du SkillGuide
n'est pas connectée correctement sur le mannequin.
Alimentation
Les quatre piles alcaline 1,5 V taille C permettent
d'avoir une autonomie d'environ 125 heures.
Cette durée pourra varier en fonction du modèle
et de la marque des piles utilisées.
Câble de connexion
Le câble est relié en permanence au SkillGuide et
possède une prise mâle 8 broches qui doit être
connectée au mannequin. La prise a été conçue
avec un détrompeur de manière à être
positionnée correctement lors du branchement
sur le mannequin.
Précautions
S'assurer que le SkillGuide est débranché du
mannequin:
• lors du changement des voies respiratoires
• lors d'une intervention à l'intérieur du
mannequin.
Voyant Indication Limites
Volume d'insufflation: Vert correcte 200ml
Orange trop impor tant 350ml
Amplitude de compression: Vert correcte ≥50mm
Mauvaise position de la main: Rouge En dehors de la
zone acceptable
Insufflation trop rapide: Rouge
1. Tolérance sur le mannequin : +/-15% lors d'un fonctionnement à température ambiante
16
1
FR ResJun:Layout 1 13.12.2007 15:20 Side 5
Voies respiratoires du Resusci Junior
Les voies respiratoires du Resusci Junior doivent être jetées après chaque formation.
Fig 1
1a
2a 3a 4a
5a 6a 7a
FRANÇAIS
Deménager (Fig. 1)
1. Détacher le masque du visage au niveau des
oreilles
2. Enlever le masque en le détachant du
connecteur de la valve
3. Enlever la peau du thorax
4. Soulever la mâchoire à l'intérieur de la tête
5. Enlever la valve
6. Soulever la la plaque costale
7. Jeter les voies respiratoires usagées.
Fig 2
1b
2b 3b 4b
5b 6b 7b
Hygiène
Voir la fiche séparée pour les details relatifs à l’hygiène.
Nettoyage général du mannequin
Une désinfection régulière du mannequin en entier
n'est pas nécessaire Cependant, un nettoyage
périodique de la tête, de la peau du torse et du tapis
d'entraînement doit être effectué. Nettoyer avec de
l'eau chaude savonneuse puis rincer avec un linge
Remontage (fig. 2)
1. Fixer le poumon au crochet et le poser à plat
sur la plaque de la poitrine
2. Passer la valve à travers la plaque costale.
Fixer la plaque costale
3. Fixer la valve sur la mâchoire
4. Remettre la mâchoire en place dans la tête
5. Fixer le couvre-poitrine sur les ergots prévus à
cet effet
6. Remettre le connecteur du masque sur l'embout des voies respiratoires
7. Fixer le masque sur les ergots situés au niveau
de chaque oreille.
humide et propre. Un bon entretien prolongera
la durée de vie de votre mannequin Resusci
Junior. Les vêtements peuvent être lavés soit à la
main, soit à la machine (40°C) à l’aide de savon
ou de détergent. Repasser à fer chaud. Un
nettoyage à sec est également possible.
17
 Loading...