


LCSU 4
Laerdal Compact Suction Unit 4
Español |
Indicaciones de uso |
|
|
Français |
Mode d’emploi |
|
|
Deutsch |
Bedienungsanleitung |
|
|
Italiano |
Istruzioni d’uso |
Cat. No. 880051 |
|
Nederlands |
Gebruiksaanwijzing |
||
|
|||
Português |
Instruções de utilização |
|
|
Svenska |
Bruksanvisning |
|
|
Suomi |
Käyttöohjeet |
|
|
Dansk |
Brugsvejledning |
|
|
Norsk |
Bruksanvisning |
|
|
Polski |
Wskazówki dotyczące |
|
|
|
stosowania |
|
|
Ελληνικός |
Οδηγίες χρήσης |
|
|
|
|
|
|
|
|
|
|
|
|
|
|
русский |
Инструкция по |
|
|
|
эксплуатации |
|
|
Český |
Návod k použití |
|
|
Íslenska |
Notkunarleiðbeiningar |
Cat. No. 880061 |
|
|
|
Directions for Use


Contents
1 LCSU 4 Overview |
|
|||
–– |
Important Information |
4 |
||
–– |
LCSU 4 |
- |
800 ml (Cat. No. 880051) |
4 |
–– |
LCSU 4 |
- |
300 ml (Cat. No. 880061) |
4 |
2 Description and Intended Use |
|
|
–– |
Intended Use |
5 |
–– |
Cautions and Warnings |
5 |
–– |
Limited Warranty |
5 |
3 LCSU 4 Setup |
|
|
–– Prepare the LCSU 4 for Operation |
6 |
|
–– |
Assemble 800 ml Version |
6 |
–– Operation with High Efficiency Filter Kit |
6 |
|
–– |
Assemble 300 ml Version |
7 |
4 User Instructions |
|
|
–– Check Before Each Use |
7 |
|
–– |
Power Source Options |
8 |
–– Control Panel and Indicator Symbols |
8 |
|
–– |
Suction Level Setting |
8 |
–– |
How to Operate and Adjust Suction level |
8 |
5 Battery Information |
|
|
–– |
Battery Charging |
9 |
–– |
Battery Test |
9 |
–– |
Charging Operations |
10 |
–– |
External Battery Charger |
10 |
6 |
Cleaning and Maintenance |
|
|
–– |
|
Cleaning |
11 |
–– |
|
Device Test |
11 |
7 |
Troubleshooting |
12 |
|
8 |
Main Units, Accessories and Parts |
13 |
|
9 |
Glossary of Symbols |
14 |
|
10 |
Specifications |
15 |
|
11 |
Regulatory Information |
16 |
|
3

English
1 LCSU 4 Overview
Important Information
These Directions for Use cover two versions of LCSU 4; one configured with 800 ml Canister, and one with 300 ml Canister. Unless otherwise specified, the information in these Directions for Use applies to both versions.
Important
Inspect all parts when unpacking. If there are signs of damage or parts are missing - immediately notify the seller. Do not attempt to use the LCSU 4 if parts are damaged or missing, or if the Battery has not been sufficiently charged.
LCSU 4 - 800 ml (Cat. No. 880051)
Items Included:
•LCSU 4 Main Unit
•800 ml Disposable Canister
•Patient Tube 1.8 m (6')
•AC/DC Adapter charger, w/AC Power-cord
•Battery
•Directions for Use
•Carry Bag (for 800 ml version)
•Wire Stand
•Vacuum Tube
Disposable Canister (800 ml) with Internal Filter
 Vacuum Inlet
Wire Stand
Vacuum Tube |
Patient Tube 1.8 m (6') |
|
|
|
|
|
|
|
|
Vacuum Port |
Vacuum Inlet |
||
Connector |
Connector |
||
(Canister - white) |
(LCSU 4 ) |
||
LCSU 4 - 300 ml (Cat. No. 880061)
Items Included:
•LCSU 4 Main Unit
•300 ml Disposable Canister
•Patient Tube 0.9 m (3')
•AC/DC Adapter charger, w/AC Power-cord
•Battery
•Directions for Use
•Carry Bag (for 300 ml version)
Disposable Canister |
Control Panel |
(300 ml) |
|
Internal Filter |
|
Patient Port |
Vacuum |
|
Regulator |
|
12V DC |
|
Power Input |
Battery Cover |
|
Patient Tube 0.9 m (3')
•The main suction unit is the same for both versions.
•Each version can easily be converted to the other Canister option by ordering additional parts.
•For a complete parts overview (see Chapter 8).
4

2 Description and Intended Use
Intended Use
The LCSU 4 is a portable, electrically powered, medical suction device intended for field and transport use. It is intended for intermittent operation to remove secretions, blood or vomit from a patient’s airway to allow ventilation. Higher vacuum levels are generally selected for oropharyngeal suction, and lower vacuum levels are usually selected for tracheal suctioning and the suctioning of children and infants.
Important
•Do not use this unit until you have carefully read and fully understood these Directions for Use. Contact Laerdal Medical or its authorized distributor for additional information if required.
•Federal law (USA) restricts the LCSU 4 to sale by or on the order of a physician or other licensed medical authority.
•Use only Laerdal accessories supplied directly by Laerdal Medical or one of its authorized distributors to ensure that the LCSU 4 operates satisfactorily.
 Cautions and Warnings
Cautions
•The LCSU 4 is not suitable for use in the presence of flammable liquids or gases; danger of explosion or fire.
•Do not use the LCSU 4 under environmental conditions that are outside ranges specified. This can endanger safety and adversely affect device operation.
•Ingress of suctioned material into the pump can damage and/or disable the device. If suctioning of liquid from the Canister or patient into the pump is suspected, do not use the LCSU 4. Contact Laerdal Medical or your authorized distributor for advice.
Warnings
•The LCSU 4 should only be used by persons trained in the use of medical suction equipment, and according to local protocol.
•Unauthorized service attempts, opening or tampering with the LCSU 4 or its electrical components can damage or disable the device, and will void the Limited Warranty.
Limited Warranty
The LCSU 4 comes with a two (2) year limited warranty, excluding the Canisters, Tubing systems and Battery. See “Laerdal Global Warranty” for terms and conditions, available on www.laerdal.com. The Battery is warranted for 90 days. Laerdal does not provide Service Parts for this product. Excluding the internal Battery, there are no user-serviceable/user-replaceable parts inside the LCSU 4 Main Unit.
English
5

English
3 LCSU 4 Setup
Prepare the LCSU 4 for Operation
Important
All models are shipped with the Battery inside the unit, but not connected. Connect the Battery and charge it fully before using the unit. See Charging Instructions (Chapter 5).
Assemble 800 ml Version
A |
1 |
|
2 |
|
3 |
|
|
|
|
|

 B
B
Canister Ports |
1 Secure the Lid to the |
A - Vacuum Port |
Canister. |
B - Patient Port |
|
2Place the Canister into Wire Stand.
3Ensure that the Patient Port is accessible.
4 |
4 Attach the Connector |
5 Attach the WHITE |
to the Vacuum Port |
Connector to the Vacuum |
Connector on the Suction |
Port Connector on the |
Unit. |
Canister. |
Important |
|
6 |
6Check that all Vacuum Tube connections are firmly attached.
7 |
7Attach the Patient Tube to Patient Port on the Canister.
The 800 ml Canister has an internal Filter in the Lid. The Canister is disposable and cannot be cleaned. The Filter automatically stops suction/flow when the Canister is full, or the Filter becomes saturated if the unit tips onto its side during use.
 Caution
Always use the 800 ml Canister supplied by Laerdal, which has an internal Filter. Never connect any type of Patient Tubing directly to the LCSU 4 Vacuum Inlet Port Connection. Overflow of suctioned material into the LCSU 4 pump will result in loss of suction and permanent damage to the unit. In the event of overflow, do not use the LCSU 4. Contact Laerdal Medical or your authorized distributor.
Operation with High Efficiency Filter Kit
To increase filtration efficiency the Vacuum Tube may be replaced with a High Efficiency Filter Kit (Cat. No. 886116).
Ensure Filter IN points towards the WHITE connector, and OUT towards the BLUE. For Cleaning and Maintenance, see Chapter 6.
 IN
IN
OUT 

6

3 LCSU 4 Setup
Assemble 300 ml Version
1Push the upper port connection into the Vacuum Inlet and check that the lower part of the Canister clicks in place.
2Connect the Patient Tube to the Patient Port. Ensure that all connections are secure to prevent leakage.
1 |
Important |
2 |
300mll |
250mll |
200mll |
•The 300 ml Canister is sealed, with an internal Filter. The Canister is disposable and cannot be cleaned. The Filter automatically stops suction/flow when the Canister is full, or the Filter becomes saturated if the unit tips onto its side during use.
•The 300 ml Canister (Cat. No. 886100) can also be used with the previous model LCSU 3. However, the LCSU 4 cannot be used with LCSU 3 Canisters.
•To improve the upright stability, a Wire Stand (Cat. No 886115) is offered as an Optional Accessory. This adds both a handle and a foot to the unit.
 Caution
Do not attempt to install or use LCSU 3 Canisters on LCSU 4.
Check Before Each Use
1The Unit should not be damaged.
2The Unit should be clean.
3All parts should be properly assembled (Canister, Tubes etc.).
4Perform Device Test after each reassembly (see Chapter 6).
5Check Battery level: While performing the Device Test the Battery level should not illuminate RED. If the Battery level illuminates RED, the Battery should be charged. See Charging Instructions (Chapter 5).
Important
For both models - always have an extra Canister available in case the first Canister is filled completely, or the unit becomes tipped on to its side and the Filter becomes saturated and stops the suction/flow.
Warning
If the Canister on either model fills and the shut-off mechanism activates, and you have no spare Canister ready for immediate replacement, shut off LCSU 4 and utilize alternative methods according to local protocol to clear patient’s airway. Continued efforts to suction with LCSU 4 Canister(s) filled may cause overflow that will prevent suctioning, damage the pump, void the unit warranty, and lead to prolonged downtime.
English
Cat. No. 886115
7

English
4 User Instructions
Power Source Options |
Control Panel and Indicator Symbols |
Internal Battery Operation |
ON / OFF switch |
LCSU 4 is equipped with an internal Battery, NiMH 12 volt 1.6 Ah.
If the unit is to be run on Battery power, any external power source must be unplugged.
External 12V DC Operation
DC Power-cord for connection to vehicle 12V DC is required. Plug the smaller power connector into the LCSU 4 12V DC Power Input Connection. Plug the larger connector into the vehicle 12V DC power receptacle.
External AC Operation
AC/DC Adapter Charger required. Plug the smaller DC output cord power connector into the LCSU 4 12V DC Power Input Connection. Plug the AC input line cord power connector into a grounded AC mains supply receptacle. When in use, it is normal that the AC/DC Adapter Charger becomes warm.
|
|
|
|
|
|
|
Green LED |
|
|
|
|
|
|
||||
|
|
|
|
|
||||
Suction Level Setting |
||||||||
|
|
|
|
|
|
Yellow LED |
||
|
|
|
|
|
||||
|
|
|
|
|
|
|
Red LED |
|
|
|
|
|
|
|
|
Suction Level Setting
•The Scale illuminates ‘Green’ to indicate the level of vacuum/suction strength
•The ‘Light Blue’ area indicates reduced suction levels for infants and small children
The LEDs have two brightness levels. Half illuminated indicates a halfway vacuum level, e.g., 175 is indicated by a fully illuminated 150 and a half illuminated 200 LED.
LED Indicator |
Status |
|
|
|
|
Green |
External Power is connected |
|
|
|
|
Yellow |
Battery is charging |
|
(Will go off when Battery is fully charged) |
||
|
||
|
|
|
Red |
Battery level is low |
|
|
|
 Warning
If the Low Battery symbol illuminates, immediately switch to an external power source to avoid interrupted operation. If the LCSU 4 does not receive external power, the Low Battery indicator will remain on and the unit performance will drop rapidly leading to complete LCSU 4 shutdown.
8
5 Battery Information
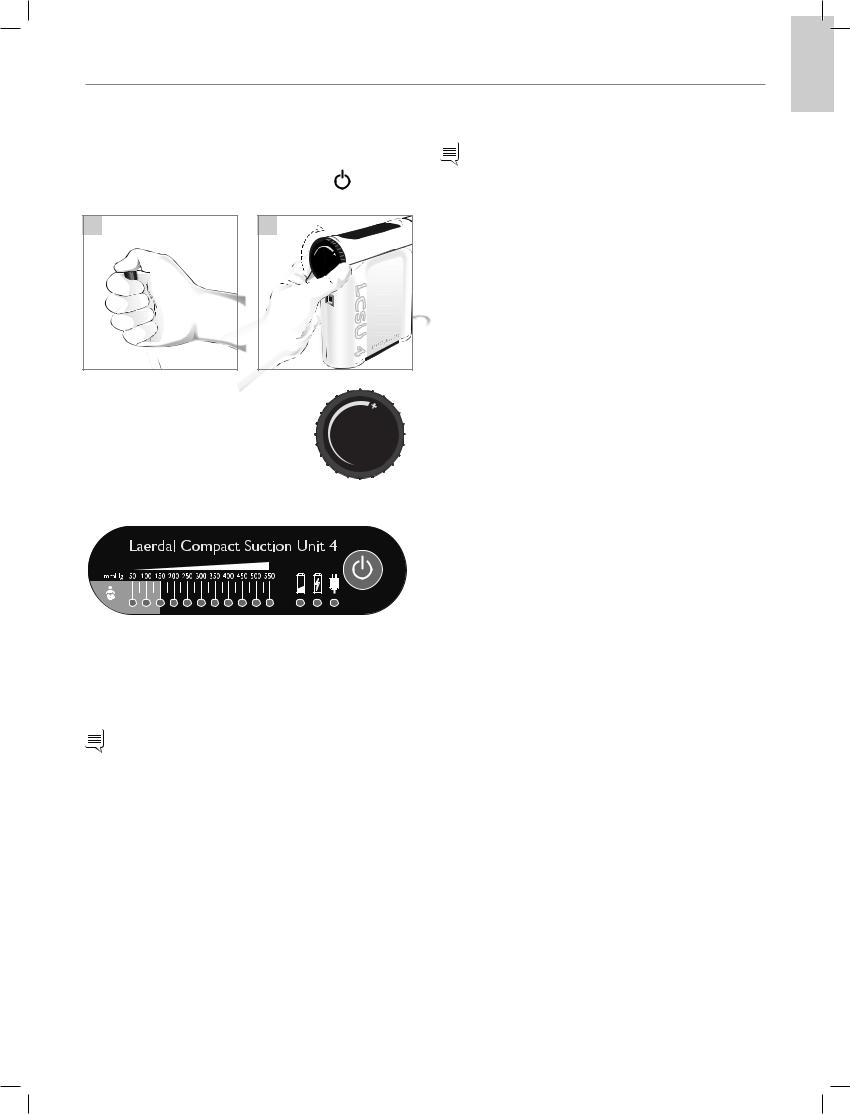
How to Operate and Adjust Suction level
1Unwind the Patient Tube (check that no kinks will obstruct flow).
2 |
Turn the unit “ON” by pressing the button ( |
). |
3 |
Block the Patient Tube. |
|
3 |
4 |
|
4 Set desired Suction Vacuum level by turning the Vacuum Regulator.
•Turn clockwise (+) to increase vacuum
•Turn counter-clockwise to decrease vacuum
5 The Vacuum level will display on the 50 – 550 mmHg scale.
Battery Charging
Important
Use only Laerdal Battery Cat. No. 886113.
 Caution
Use of other than Laerdal brand Battery may result in errors related to the Battery status indicator, reduction of the Battery operation time, failure to effectively operate LCSU 4, and/or give rise to hazards to operator and/or patient.
When in operational use
1An empty Battery must charge up to 5 hours to reach full capacity.
2Battery run time: Approximately 45 minutes of continuous operation at zero vacuum level (free flow), fully recharged.
3Always fully charge Battery - before and after each use.
To prolong Battery lifetime it is recommended to place the Battery on continuous charge. It will not harm the unit.
If continuous charging is not possible, charge Battery for minimum 24 hours once a month. Completely discharging the Battery will shorten its useful life.
When stored unused for > 3 months
•Fully charge Battery before storing
•Recharge every 3-6 months
6When the desired Vacuum level is reached; unblock and then block the Patient Tube.
Result: Unit should return to the desired level.
7Apply necessary suction therapy. If desired, a suction tip or catheter could be attached to the Patient Tube.
Important
If LCSU 4 does not maintain the desired suction performance level, refer to Troubleshooting instructions (see Chapter 7).
Battery Test
When in operational use, the Battery should be tested every 6-12 months.
1Start the test with a fully charged Battery.
2Set Max Vacuum level.
3Let the unit run for 20 minutes (free flow).
4Block the Patient Tube.
5If Vacuum level fails to reach 550 mmHg the Battery should be replaced.
After Each Use
1When finished with suctioning, let LCSU 4 run for a moment to allow all suctioned material to flow from the Patient Tube into the Canister.
2Disconnect and dispose of Canister and Patient Tube.
3Clean the exterior and any reusable parts of the LCSU 4 assembly according to instructions (see Chapter 6).
4Perform Device Test (see Chapter 6).
5Place Battery on charge (see Chapter 5).
English
9

English
5 Battery Information
Charging Operations
 Caution
Do not operate the unit for more than a few minutes if the RED Low Battery indicator is illuminated. Recharge the Battery as soon as possible.
AC/DC Adapter Charger (Cat. No. 886111)
Primarily the Battery is charged while installed within the LCSU 4 unit by using the standard AC/DC Adapter Charger.
AC/DC Adapter Charger
Power Cord
Follow the LED status on the |
|
Control Panel on the LCSU 4 and |
|
charge the Battery as necessary. |
Green LED |
|
|
|
Yellow LED |
|
Red LED |
LED Indicator |
Status |
|
|
Red LED illuminated |
Battery level low |
|
|
Yellow LED illuminated |
Charging |
|
|
Yellow LED flashes |
Battery almost charged |
|
|
Yellow LED switches off |
Battery is fully charged |
|
|
Green LED illuminated |
Connected to AC/DC |
|
|
External Battery Charger (Cat. No. 886112)
The Battery can be charged externally by removing it from the LCSU 4 unit and using the External Battery Charger.
External Battery Charger
Power cord |
LED Indicator |
|


 Battery
Connector
 Battery
An empty Battery must charge up to 5 hours to reach full capacity.
Follow the LED Indicator and charge the Battery as necessary.
LED Indicator |
Status |
|
|
LED not illuminated |
Plugs not connected |
|
|
Yellow LED flashes |
Charging is pending |
|
|
Yellow LED illuminated |
Charging |
|
|
Green LED illuminated |
Battery is fully charged (*) |
|
|
Red LED flashes |
Charge failure |
|
|
* The Battery can be left on continuous charge, even if the Green LED is illuminated. It will not harm the units.
 Caution
Do not cover the Charger. When in use, it is normal that the Charger and the Battery becomes warm.
10
6 Cleaning and Maintenance
Cleaning
 Cautions
•Disconnect the LCSU 4 from external power prior to cleaning.
•Use a minimum of liquid to prevent any electrical shock hazard. Do not immerse the LCSU 4, or allow it to stand in water or other liquids. This can damage the device and/ or cause electrical shocks resulting in injury to persons.
 Warning
Do not pump any cleaning solution or other liquids through the vacuum pump, i.e. through the Vacuum Connector. This can damage the LCSU 4.
Main Cabinet
1Disconnect from external power supply.
2Clean Cabinet surfaces by carefully wiping with a soft cloth or sponge with mild detergent. Use hand dishwashing liquid or similar that is compatible with the Material Chart (see Chapter 10).
3Dry all surfaces using a clean cloth or paper towel.
Canisters and Patient Tubes
Dispose after use.
Important
The Canisters and Patient Tubes are all disposable items. Do not attempt to clean or reuse these. Due to the risk of cross contamination, all disposable items must be replaced after each use. They are for single-patient use only.
Vacuum Tube (for 800 ml version) and Wire Stand
Wash by immersing and scrubbing in liquid detergent and water solution.
1Rinse thoroughly in pure water.
2Allow to dry. Disinfect if desired.
High Efficiency Filter Kit (for 800 ml Version)
•Filter cannot be cleaned or disinfected.
•Replace Filter immediately if contamination or discoloration is observed, or if it gets wet.
* If the unit is used on patients in areas where cross contamination is an issue, it is recommended that the Filter is replaced after each use.
Carry Bags
Wipe Bags according to instructions provided above for Main Cabinet. Do not launder.
Device Test
After each reassembly, and before returning a LCSU 4 to operational use, the Device Test should be performed:
1Start the test with a fully charged Battery
2Turn the unit “ON”
3Block the Patient Tube
4Set Suction Vacuum level to 550 mmHg
5Unblock and then Block the Patient Tube again.
6Result: Unit should return to 550 mmHg setting.
7Repeat procedure for 300 mmHg and 50 mmHg settings.
 Cautions
Do not attempt to use any LCSU 4 that has not passed the above test. If the LCSU 4 unit does not test satisfactorily, recheck all parts of the assembly and test once again. If necessary, contact Laerdal Medical or one of its authorized distributor.
Disposal
When discarding the LCSU 4, we recommend it be discarded according to local protocol.
This appliance is marked according to the European directive 2002/96/EC on Waste Electrical and Electronic Equipment (WEEE). By ensuring this product is disposed of correctly, you will help prevent potential negative consequences for the environment and human health, which could otherwise be caused by inappropriate waste handling of this product.
 The symbol on the product, or on the documents
  accompanying the product, indicates that this appliance
  may not be treated as household waste. Instead it shall be handed over to the applicable collection point for the recycling of electrical and electronic equipment. Disposal must be carried out in accordance with local environment regulations for waste disposal.
For more detailed information about treatment, recovery and recycling of this product, please contact your local city office, your household waste disposal service or the Laerdal representative where you purchased the product.
English
11

English
7 Troubleshooting
Troubleshooting
 Warning
Potential for Electrical shock. Do not attempt to open or disassemble pump or electrical accessories.
LCSU 4 will not power “ON”
1Verify that the Battery is properly installed and charged.
2Check alternative 12V DC or AC sources.
LCSU 4 runs, no Vacuum, or insufficient Vacuum
1Verify proper Canister and Tubing connections.
2Check system for leaks in Canister and Tubing connections.
3Check Canister overflow protection float (800 ml).
4Check if the Filter has been shut-off (300 ml).
Vacuum too high or too low.
Turn Vacuum Regulator to increase or reduce vacuum level.
Battery will not charge
1Verify that the Battery is installed and connected.
2Re-connect source power and observe charge (all connections).
Battery seems insufficient
1Charge the Battery for 5 hours.
2Perform the Battery Test.
Important
If the LCSU 4 condition is not resolved, contact Laerdal Medical or one of its authorized distributors for advice.
12

8 Main Unit, Accessories and Parts
Main Units, Accessories and Parts
LCSU 4 (Main Unit versions)
Cat. No. |
Item |
|
|
|
|
880051 |
LCSU 4, 800 ml |
Complete unit |
880061 |
LCSU 4, 300 ml |
Complete unit |
Consumables
Cat. No. |
Item |
Quantity |
|
|
|
886100 |
300 ml Disposable Canister w/tubing |
Qty. 1 |
886102 |
800 ml Disposable Canister w/tubing |
Qty. 1 |
886104 |
800 ml Disposable Canister w/o tubing |
Qty. 6 |
886105 |
Patient Tube 1.8 m (6’) Disposable |
Qty. 1 |
886106 |
Vacuum Tube |
Qty. 1 |
Accessories
Cat. No. |
Item |
Quantity |
|
|
|
886108 |
Wire Stand (for 800 ml) |
Qty. 1 |
886115 |
Wire Stand (for 300 ml) |
Qty. 1 |
88006005 |
Carry Bag (for 300 ml) |
Qty. 1 |
884600 |
Carry Bag (for 800 ml) |
Qty. 1 |
886111 |
AC/DC Adapter Charger w/o Power-cord |
Qty. 1 |
886112 |
External Battery Charger |
Qty. 1 |
884500 |
DC Power-cord |
Qty. 1 |
886107 |
Replacement Filter |
Qty. 10 |
886116 |
High Efficiency Filter Kit |
Qty. 1 |
English
886108 886115 886111
Spare Parts
Cat. No. |
Item |
Quantity |
886113 |
Battery, 12 V DC NiMH, Rechargeable |
Qty. 1 |
886123 |
Battery Cover (door) |
Qty. 1 |
886124 |
Rubber Feet |
Qty. 2 |
886125 |
Shoulder Strap for bags |
Qty. 1 |
886126 |
AC Power-cord US |
Qty. 1 |
886127 |
AC Power-cord EU |
Qty. 1 |
886128 |
AC Power-cord UK |
Qty. 1 |
886113 |
AC Power-cord |
886126 |
886127 |
886128 |
13

English
9 Glossary of Symbols
Product |
Definition |
Packaging |
Definition |
|
Symbols |
Symbols |
|||
|
|
|||
|
This product is in compliance with the |
|
|
|
|
essential requirements of Council Directive |
|
|
|
|
93/42/EEC Medical Device Directive, as |
|
Do not cut |
|
|
amended by Council Directive 2007/47/EC, |
|
|
|
|
class IIa |
|
|
|
D |
Single Use |
|
Fragile. Handle with care |
|
IP12 |
The degree of protection provided by the |
p |
Keep dry |
|
chassis according to IP12 |
||||
|
||||
|
|
|
||
|
|
70 °C |
|
|
h Unique product type identification |
--4040 °°FCl158 °F |
Transport storage temperature range |
||
f Serial number |
|
Humidity |
||
|
UL Classified |
|
Atmospheric pressure |
|
4NG8 |
|
|
|
|
|
Center positive polarity indicator |
|
|
|
|
Direct Current |
|
|
|
N |
Date of production |
|
|
|
|
Warning / Caution |
|
|
|
Important
Recycle
Type BF applied part
Disposal must be carried out in accordance with local environment regulations for waste disposal.
Does not contain Latex
14

10 Specifications
Power Source Options
Battery
Rechargable, NiMH 12 volt 1.6 Ah
DC Power-cord (12 V)
Dry Location Use Only
AC/DC Adapter Charger
Input: 100-240 V, 50-60 hz, 1.2 Ah
Output: +12 V, 3.4 Ah
Dry Location Use Only
External Battery Charger
Input: 110-240 V, 50-60 hz, 250 mA
Output: +18.5 V, 0.6 Ah
Dry Location Use Only
Environmental Conditions
Operating Temperature Range:
0 °C (+32 °F) – +40 °C (+104 °F)
Operating Relative Humidity: 0 - 95% (non condensing)
Operating Atmospheric Pressure:
10.2 Psi (70 kPA) – 15.4 Psi (106 kPA)
Storage & Transport Temperature: -40 °C (-40 °F ) – +70 °C (+158 °F)
Storage & Transport Relative Humidity: 0 - 95% (non condensing)
Storage & Transport Atmospheric Pressure: 7.3 Psi (50 kPA) – 15.4 Psi (106 kPA)
Physical Characteristics
Dimensions
•880051 (LCSU 4, 800 ml):
23.6cm x 19 cm x 23.6 cm (9.3" x 7.5" x 9.3")
•880061 (LCSU 4, 300 ml):
18.5cm x 26.2 cm x 8.12 cm (7.3" x 10.3" x 3.2")
Weight
•880051 (LCSU 4, 800 ml): 1.97 kg (4.35 lbs)
•880061 (LCSU 4, 300 ml): 1.53 kg (3.375lbs)
Canister Capacity
•300 ml
•800 ml
Performance
Air flow @ Vacuum Inlet
All configurations: 30 LPM (free flow) typical (May be less when running from internal battery)
Vacuum - Max.: 550+ mmHg Vacuum - Range: 50 - 550+ mmHg
Vacuum Indicator accuracy: +/- 5% of full scale
Filter Specifications
Internal Filter of the 300 ml Disposable Canister Porous plastic filter, PE material.
Internal Filter of the 800 ml Disposable Canister Aerostate HEPA rated bacterial filter. White, unfinished surface, cellulose with wet strength resin.
High Efficiency Filter Kit
With the High Efficiency Filter Kit installed the unit is in accordance with ISO 10079-1. The Kit reduces the Air flow and Battery run time. The filter is HEPA rated, hydrophobic, with an efficiency of 99.97% down to a particle size of 0.3
μm.
Filter material: PTFE 1 μm
Water entry pressure: Min. 0.20 bar/150 mmHg/2.90 psi (Flow to Canister)
Water entry pressure: Min. 0.87 bar/650 mmHg/12.57 psi (Flow to Main Unit)
Airflow resistance: Max. 0.09 bar/67 mmHg/1.30 psi at 30 LPM Air flow
Nominal Filter diameter: 60 mm
Filter housing: Translucent or transparent
Material Chart
Cabinet: |
PC |
Battery Cover: |
PC |
Vacuum Regulator: |
PC |
Bottom Cover: |
PC |
Vacuum Inlet Connector: |
TPR |
Control Panel: |
PVC |
800 ml Disposable Canister: |
GPPS |
- Lid: |
HDPE |
- Internal Filter: |
Aerostate |
Vacuum Tube: |
Silicone, K-Resin |
Vacuum Port Connector: |
TPR |
Vacuum Inlet Connector: |
PC |
High Efficiency Filter: |
PP |
Filter housing: |
K-Resin |
300 ml Disposable Canister: |
PS |
- Internal Filter: |
PE |
Patient Port: |
PP |
Patient Tube: |
PVC |
Wire Stands: |
Steel, PVC |
Electrical Requirements
100-240 VAC 50~60 Hz 1.2 A Max; 12 VDC, 3.4 Ah
English
15

English
11 Regulatory Information
International Travel
This suction unit is equipped with an AC/DC Adapter Charger allowing operation on any AC voltage (100-240 VAC, 50/60Hz). However the correct power cord must be used to connect to adapter wall power.
Regulatory Information
Classification
This product is in compliance with the essential requirements of Council Directive 93/42/EEC Medical Device Directive, as amended by Council Directive 2007/47/EC, class IIa
•Electrically powered medical suction equipment for field and transport use, according to ISO10079-1:1999
•High flow/High vacuum, 50 – 550 mmHg
•Not suitable for the use in the presence of flammable liquids or gases.
•Internally powered/class I equipment type BF, according to IEC 60601-1
•Protection class IPI2 and standard power supply
•Intermittent Operation: 30 minutes on, 30 minutes off
Certifications
IEC 60601-1 : 1988 (2nd edition); IEC 60068-2-6/IEC 60068-2-64/IEC 60068-2-27/IEC 60068-2-31; CAN/CSA-C22.2 No. 601.1-M90, 2005; UL 60601-1, EN 60601-1-2 : 2007, EN ISO 10079-1 : 2009 (Except requirement of 500 ml volume in claim 59.11.1, due to the 300 ml Canister option)
16

Índice
1 |
Descripción general del LCSU 4 |
|
–– |
Información importante |
18 |
–– |
LCSU 4 - 800 ml (Cat. nº 880051) |
18 |
–– |
LCSU 4 - 300 ml (Cat. nº 880061) |
18 |
2 |
Descripción y aplicación |
|
–– |
Aplicación |
19 |
–– |
Precauciones y advertencias |
19 |
–– |
Garantía limitada |
19 |
3 |
Instalación del LCSU 4 |
|
–– |
Preparación del LCSU 4 para su uso |
20 |
–– |
Montaje de la versión de 800 ml |
20 |
–– |
Funcionamiento con el kit de filtro de alta eficacia |
20 |
–– |
Montaje de la versión de 300 ml |
21 |
4 |
Instrucciones del usuario |
|
–– |
Comprobar antes de cada uso |
21 |
–– |
Opciones de fuente de alimentación |
22 |
–– |
Panel del control y símbolos indicadores |
22 |
–– |
Ajuste del nivel de aspiración |
22 |
–– |
Uso y ajuste del nivel de aspiración |
23 |
5 |
Información sobre la batería |
|
–– |
Cómo cargar la batería |
23 |
–– |
Comprobación de la batería |
23 |
–– |
Instrucciones de carga |
24 |
–– |
Cargador de batería externo |
24 |
6 |
Limpieza y mantenimiento |
|
|
–– Limpieza |
25 |
||
–– Comprobación del dispositivo |
25 |
||
7 |
Solución de problemas |
26 |
|
8 |
Unidades principales, accesorios y piezas |
27 |
|
9 |
Glosario de símbolos |
28 |
|
10 |
Datos técnicos |
29 |
|
11 |
Información reglamentaria |
30 |
|
Español
17

Español
1 Descripción general del LCSU 4
Información importante
Estas Indicaciones de uso sirven para las dos versiones del LCSU 4, con depósito de 800 ml y 300 ml. A menos que se especifique lo contrario, la información proporcionada en estas Indicaciones de uso sirve para ambas versiones.
Importante
Inspeccione todas las piezas al desembalar el dispositivo. Si muestran señales de daños o faltan piezas, notifíquelo inmediatamente al proveedor. No intente utilizar el LCSU 4 si faltan piezas o están dañadas, ni tampoco si la batería no se ha cargado lo suficiente.
LCSU 4 - 800 ml (Cat. nº 880051)
Artículos incluidos:
•Aspirador LCSU 4
•Depósito desechable de 800 ml
•Tubo para el paciente de 1,8 m (6’)
•Adaptador/cargador de CA/CC y cable de corriente
•Batería
•Indicaciones de uso
•Bolsa de transporte (para la versión con depósito de 800 ml)
•Soporte metálico para depósito
•Tubo de vacío
Depósito desechable (800 ml) con filtro interno
Tubo de vacío
Conector de puerto de vacío (depósito - blanco)

 Entrada de vacío
Soporte metálico para depósito
Tubo para el paciente de 1,8 m (6’)
Conector de entrada de vacío (LCSU 4)
LCSU 4 - 300 ml (Cat. nº 880061)
Artículos incluidos:
•Aspirador LCSU 4
•Depósito desechable de 300 ml
•Tubo para el paciente de 0.9 m (3’)
•Adaptador/cargador de CA/CC y cable de corriente
•Batería
•Indicaciones de uso
•Bolsa de transporte (para la versión con depósito de 300 ml)
Depósito desechable |
Panel de control |
(300 ml) |
|
Filtro interno |
|
Puerto de |
Regulador |
paciente |
de vacío |
|
Entrada de |
|
12V CC |
Tapa de la |
|
batería |
|
Tubo para el paciente de 0,9 m (3’)
•El aspirador principal es el mismo para ambas versiones.
•Las dos versiones pueden actualizarse con la opción de depósito de la otra solicitando piezas adicionales.
•En el Capítulo 8 se proporciona información detallada sobre las piezas.
18

2 Descripción y aplicación
Aplicación
El LCSU 4 es un aspirador médico eléctrico portátil para uso en transportes y en campo. Se ha diseñado para usarlo de forma intermitente para la aspiración de secreciones, sangre o vómito de la vía aérea del paciente y permitir la ventilación. Normalmente los niveles de vacío son más altos cuando se trata de aspiración orofaríngea y más bajos cuando se trata de aspiración traqueal o cuando se trata de niños y bebés.
Importante
•No utilice el aspirador hasta que no haya leído y comprendido estas Indicaciones de uso. Si necesita información adicional, póngase en contacto con Laerdal Medical o su distribuidor autorizado.
•Las leyes federales de Estados Unidos restringen la venta del LCSU 4 exclusivamente a médicos o bajo prescripción facultativa o de otra autoridad médica competente.
•Utilice exclusivamente los accesorios suministrados directamente por Laerdal Medical o cualquiera de sus distribuidores autorizados para garantizar un funcionamiento correcto del LCSU 4.
 Precauciones y advertencias
Precauciones
•El LCSU 4 no debe utilizarse en presencia de líquidos o gases inflamables ya que existe el peligro de que se produzca un incendio o explosión.
•No utilizar el LCSU 4 en condiciones medioambientales que se encuentren fuera de los límites especificados. Esto puede poner en peligro la seguridad del dispositivo y afectar negativamente a su funcionamiento.
•El acceso del material aspirado a la bomba puede dañar y/o inutilizar el dispositivo. Si sospecha que en la bomba ha entrado líquido del depósito o el paciente, no utilice el LCSU 4 y solicite asistencia a Laerdal Medical o al distribuidor autorizado.
Advertencias
•El LCSU 4 debe ser utilizado exclusivamente por personal debidamente formado en el uso de equipos médicos de aspiración y conforme a los protocolos locales.
•Si se intenta realizar un servicio no autorizado, abrir o manipular el LCSU 4 o sus componentes eléctricos, podrían producirse daños en el dispositivo o quedar inutilizado, en cuyo caso la garantía quedará anulada.
Garantía limitada
El LCSU 4 se suministra con una garantía limitada de dos (2) años, y no incluye los depósitos, el sistema de tubos ni la batería. Los términos y condiciones de la garantía se detallan en la “Garantía global de Laerdal” en www.laerdal.com. La batería se suministra con una garantía de 90 días. Laerdal no proporciona piezas de servicio para este producto. Excepto la batería interna, el aspirador LCSU 4 carece de piezas internas que pueda reparar/sustituir el usuario.
Español
19

Español
3 Instalación del LCSU 4
Preparación del LCSU 4 para su uso
Importante
Todos los modelos se envían con la batería en el interior de la unidad sin conectar. Conecte la batería y cárguela totalmente antes de utilizar el aspirador. Consulte el Capítulo 5 donde se proporcionan las instrucciones de carga.
Montaje de la versión de 800 ml
A |
1 |
|
2 |
|
3 |
|
|
|
|
|

 B
B
Puertos del depósito |
1 Fije la tapa en el depósito. |
2 Coloque el depósito en el |
A - Puerto de vacío |
|
soporte metálico. |
B - Puerto de paciente |
|
|
3Asegúrese de que el puerto del paciente queda accesible.
4 |
4Acople el conector al conector del puerto de vacío del aspirador.
 Importante
5Acople el conector BLANCO al conector del puerto de vacío del depósito.
6 |
6Compruebe que todas las conexiones del tubo de vacío están correctamente acopladas.
7 |
7Acople el tubo del paciente al puerto del paciente en el depósito.
El depósito de 800 ml posee un filtro interno en la tapa. El depósito es desechable y no puede limpiarse. El filtro detiene automáticamente la aspiración/flujo cuando el depósito está lleno o cuando el filtro se satura si, por ejemplo, el aspirador se vuelca a un lado durante su uso.
Precaución
Utilice siempre el depósito de 800 ml con filtro interno suministrado por Laerdal. No conecte ningún tubo del paciente directamente a la conexión del puerto de entrada de vacío del LCSU 4. Si el material aspirado se desborda y accede a la bomba del LCSU 4 se perderá potencia de aspiración y el aspirador sufrirá daños permanentes. Si se produce un desbordamiento del material aspirado, deje de utilizar el LCSU 4 y solicite asistencia a Laerdal Medical o al distribuidor autorizado.
Funcionamiento con el kit de filtro de alta eficacia
Para aumentar al eficacia del filtro, el tubo de vacío puede sustituirse por el kit de filtro de alta eficacia (Cat. nº 886116).
Asegúrese de que la ENTRADA del filtro queda orientada hacia el conector BLANCO y que la SALIDA queda orientada hacia el conector azul. Consulte el Capítulo 6 donde se proporcionan las instrucciones de limpieza y mantenimiento.
 Entrada
Salida 

20
3 Instalación del LCSU 4
Montaje de la versión de 300 ml
1Acople la conexión del puerto superior a la entrada de vacío y compruebe que la parte inferior del depósito se encaja correctamente haciendo un clic.
2Conecte el tubo del paciente al puerto del paciente. Asegúrese de que todas las conexiones están correctamente acopladas para evitar fugas.
1 |
Importante |
2 |
300mll |
250mll |
200mll |
•El depósito de 300 ml está sellado con un filtro interno. El depósito es desechable y no puede limpiarse. El filtro detiene automáticamente la aspiración/flujo cuando el depósito está lleno o cuando el filtro se satura si, por ejemplo, el aspirador se vuelca a un lado durante su uso.
•El depósito de 300 ml (Cat. nº 886100) puede utilizarse con el modelo anterior, el LCSU 3. Sin embargo, el aspirador LCSU 4 no admite los depósitos del aspirador LCSU 3.
•Para mejorar la estabilidad en posición vertical, está disponible opcionalmente un soporte metálico (Cat. nº 886115). Este soporte ayuda a sostener y manipular la unidad.
Precaución
No intente instalar ni utilizar depósitos del aspirador LCSU 3 en el aspirador LCSU 4.
Comprobar antes de cada uso
1La unidad no debe presentar daños.
2La unidad debe estar limpia.
3Todas las piezas deben estar correctamente montadas (depósito, tubos, etc).
4Realice una comprobación del dispositivo tras cada re-montaje (consulte el Capítulo 6).
5Compruebe la carga de la batería: Al realizar la comprobación del dispositivo, el indicador de carga de la batería no debe estar iluminado en ROJO. Si lo está, deberá cargar la batería. Consulte el Capítulo 5 donde se proporcionan las instrucciones de carga.
Importante
Para ambos modelos: disponga siempre de un depósito adicional para sustituir el primero cuando se llene totalmente o si se vuelca la unidad hacia un lado saturando el filtro y deteniendo la aspiración/flujo.
 Advertencia
Si el depósito de cualquiera de los modelos se llena, activando el mecanismo de desconexión, y no dispone de un depósito de reserva listo para sustituir inmediatamente al primero, desconecte el LCSU 4 y utilice otros métodos conformes a los protocolos locales para despejar la
vía aérea del paciente. Si al llenarse el depósito(s) del LCSU 4 se intenta seguir aspirando puede producirse un desbordamiento que impedirá seguir aspirando, dañará la bomba, anulará la garantía y provocará que el dispositivo no pueda utilizarse durante un largo periodo de tiempo.
Español
Cat. nº 886115
21

Español
4 Instrucciones del usuario
Opciones de fuente de alimentación |
Panel del control y símbolos indicadores |
Funcionamiento con la batería interna |
Interruptor de conexión/desconexión |
El LCSU 4 está equipado con una batería interna de NiMH de 12 V y 1,6 Ah.
Si va a utilizar el dispositivo con la batería, asegúrese de desconectar cualquier fuente de alimentación externa.
Funcionamiento con fuente de alimentación externa de 12V CC
Se requiere un cable eléctrico de CC para la conexión a la fuente de alimentación de 12V CC del vehículo. Enchufe el conector más pequeño en la entrada de 12 V CC del LCSU 4. Enchufe el conector más grande a la toma de 12V CC del vehículo.
Funcionamiento con fuente de alimentación externa de CA
Se requiere un adaptador/cargador de CA/CC. Enchufe el conector más pequeño del cable de salida a la entrada de 12 V CC del LCSU 4. Enchufe el conector de alimentación del cable de entrada de CA a un enchufe de suministro eléctrico de CA con toma de tierra. Cuando el adaptador/cargador de CA/CC está en uso es normal que se caliente.
|
|
|
|
|
|
|
|
LED verde |
|
|
|
|
|
|
|
||||
|
|
|
|
|
|
||||
Ajuste del nivel de aspiración |
|||||||||
|
|
|
|
|
|
LED amarillo |
|||
|
|
|
|
|
|||||
|
|
|
|
|
|
|
|
LED rojo |
|
|
|
|
|
|
|
|
|
||
Ajuste del nivel de aspiración
•La escala se ilumina en color verde para indicar el nivel de vacío/fuerza de aspiración.‘
•La zona de color azul claro indica una fuerza de aspiración reducida para niños pequeños y bebés.‘
Los LED se iluminan con dos niveles de brillo. Cuando la iluminación es más débil indicará que el nivel de vacío está a la mitad, es decir, si el nivel es de 175, se indicará con el LED de 150 totalmente iluminado y el LED de 200 con una iluminación más débil.
Indicador LED Estado
Verde |
Fuente de alimentación externa conectada |
Batería en carga
Amarillo (se apagará cuando la batería esté totalmente cargada)
Rojo |
Nivel de batería bajo |
 Advertencia
Si se ilumina el indicador de nivel de b atería bajo, conecte inmediatamente una fuente de alimentación externa para evitar que la unidad deje de funcionar. Si no se conecta el LCSU 4 a una fuente de alimentación externa, el indicador de nivel de batería bajo seguirá iluminado y el rendimiento de la unidad descenderá rápidamente hasta la desconexión total del LCSU 4.
22

5 Información sobre la batería
Uso y ajuste del nivel de aspiración
1Desenrolle el tubo del paciente (compruebe que el tubo no esta retorcido para evitar obstrucciones del flujo).
2 |
Pulse el botón ( |
|
) ra conectar el aspirador. |
|
|||
|
|||
3 |
Bloquee el tubo del paciente. |
||
3 |
4 |
4 Ajuste el nivel de vacío de aspiración girando el regulador de vacío.
•Gire el regulador a la derecha (+) para aumentar el vacío
•Gire el regulador a la izquierda para disminuir el vacío
5El nivel de vacío se mostrará en la escala de 50–550 mmHg.
6Una vez haya ajustado el nivel de vacío deseado, desbloquee y vuelva a bloquear el tubo del paciente.
7Resultado: La unidad debería volver al nivel ajustado.
8Realice los procedimientos de aspiración necesarios. Si lo desea, puede acoplar una cánula de succión o catéter al tubo del paciente.
Importante
Si el LCSU 4 no mantiene el nivel de aspiración ajustado, consulte las instrucciones para solucionar problemas que se proporcionan en el Capítulo 7.
Después de cada uso
1Una vez haya terminado con el procedimiento de aspiración, permita que el LCSU 4 siga funcionando unos momentos para que todo el material que haya en el tubo del paciente se deposite en el interior del depósito.
2Desconecte y deseche el depósito y el tubo del paciente.
3Limpie el exterior y cualquier pieza reutilizable del LCSU 4 del modo indicado en las instrucciones de limpieza que se proporcionan en el Capítulo 6.
4Realice una comprobación del dispositivo (consulte el Capítulo 6).
5Ponga a cargar la batería (consulte el Capítulo 5).
Cómo cargar la batería
 Importante
Utilice exclusivamente una batería Laerdal Cat. Nº 886113.
 Precaución
El uso de una batería de otra marca que no sea Laerdal puede provocar que el indicador de carga de batería ofrezca información errónea, que se reduzca el tiempo de funcionamiento con batería, que el LCSU 4 funcione correctamente y/o que se produzcan situaciones de riesgo para el operario y/o el paciente.
Cuando la unidad está en uso
1La batería sin carga debe cargarse durante cinco horas para que quede completamente cargada.
2Tiempo de funcionamiento con la batería: unos 45 minutos de forma continua a nivel de vacío cero (flujo libre), totalmente recargada .
3Cargue siempre totalmente la batería, antes y después de cada uso.
Para prolongar la vida útil de la batería se recomienda mantener la batería en carga continua. Esto no afectará negativamente a la unidad. Si no es posible mantener la batería en carga continua, realice como mínimo una carga durante 24 horas una vez al mes. Si la batería se descarga por completo se reducirá su vida útil.
Cuando la unidad se va a almacenar durante > 3 meses
•Cargue completamente la batería antes de almacenar la unidad
•Recárguela cada 3-6 meses
Comprobación de la batería
Cuando la unidad se utiliza normalmente, la batería debería comprobarse cada 6-12 meses.
1Inicie la comprobación con una batería totalmente cargada.
2Ajuste el máximo nivel de aspiración.
3Deje que la unidad funcione durante 20 minutos (flujo sin obstrucciones).
4Bloquee el tubo del paciente.
5Si el nivel de vacío no alcanza 550 mmHg debería sustituir la batería.
Español
23

Español
5 Información sobre la batería
Instrucciones de carga
 Precaución
No utilice la unidad más de unos minutos cuando se ilumine el indicador ROJO de nivel de batería bajo. Recargue la batería lo antes posible.
Adaptador/cargador de CA/CC (Cat. nº 886111)
La batería se carga normalmente instalada en el LCSU 4 con el adaptador/cargador estándar de CA/CC.
Adaptador/cargador de CA/CC.
Cable de alimentación
Compruebe los LED de estado |
|
|
del panel de control del LCSU |
|
|
4 y cargue la batería cuando sea |
LED verde |
|
necesario. |
||
LED amarillo |
||
|
||
|
LED rojo |
Indicador LED |
Estado |
|
|
|
|
LED rojo iluminado |
Nivel de batería bajo |
|
|
|
|
LED amarillo iluminado |
Carga en curso |
|
|
|
|
LED amarillo parpadeante |
Batería casi cargada |
|
|
|
|
LED amarillo apagado |
Batería totalmente cargada |
|
|
|
|
LED verde iluminado |
Conectado a una fuente de |
|
alimentación de CA/CC |
||
|
||
|
|
Cargador de batería externo (Cat. nº 886112)
The Battery can be charged externally by removing it from the LCSU 4 unit and using the External Battery Charger.
|
Cargador externo |
Cable de red |
Indicador LED |
|
|
|
Conector |
|
batería |
 Batería
Una bateria agotada debe cargarse 5h, para capacidad total.
Siga las señales del indicador:
Indicador LED |
Estado |
|
|
LED no iluminado |
no conectado |
|
|
LED Amarillo parpadeante |
necesita carga |
|
|
LED Amarillo iluminado |
cargando |
|
|
LED verde iluminado |
carga completada* |
|
|
LED rojo iluminado |
problema en la carga |
|
|
*la batería puede dejarse en carga incluso con el indicador verde encendido. No dañará la unidad.
 Precaución!
No cubra el cargador durante la carga, para evitar recalentamiento.
24

6 Limpieza y mantenimiento
Limpieza
 Precauciones
•Desconecte el LCSU 4 de la fuente de alimentación externa antes de limpiarlo.
•Utilice la mínima cantidad de líquidos posible para evitar cualquier riesgo de sufrir descargas eléctricas. No sumerja el LCSU 4 ni lo deje en agua ni en cualquier otro líquido. Esto dañará el dispositivo y/o se producirán descargas eléctricas que provocarán lesiones personales.
 Advertencia
No bombee ningún tipo de solución de limpieza ni cualquier otro líquido a través de la bomba de vacío, es decir, a través del conector de vacío. Esto puede dañar el LCSU 4.
Exterior del aspirador
1Desconecte la unidad de la fuente de alimentación externa.
2Limpie las superficies cuidadosamente con una esponja o paño suave humedecido en una solución de agua y
detergente suave. Utilice jabón líquido para las manos o un limpiador similar que sea compatible conforme a la Tabla de materiales que se proporciona en el Capítulo 10.
3Seque todas las superficies con un paño limpio o un rollo de papel.
Depósitos y tubos del paciente
Deséchelos tras su uso.
Importante
Los depósitos y los tubos del paciente son artículos desechables. No intente limpiarlos ni reutilizarlos. Debido al riesgo de contaminación cruzada todos los artículos desechables deben sustituirse tras cada uso. Se trata de artículos de uso con un solo paciente.
Tubo de vacío (para la versión de 800 ml) y soporte metálico
Lávelos sumergiéndolos y frotándolos en una solución de agua y detergente líquido.
1Enjuáguelos minuciosamente con agua limpia.
2Deje que se sequen. Desinféctelos si lo considera necesario.
Kit de filtro de alta eficacia (para la versión de 800 ml)
•El filtro no puede limpiarse ni desinfectarse.
•Sustituya el filtro inmediatamente si observa suciedad o decoloración, o si se humedece.
* Si se utiliza el aspirador con pacientes en zonas con riesgo de contaminación cruzada, se recomienda sustituir el filtro tras cada uso.
Bolsas de transporte
Limpie las bolsas de transporte del modo indicado en las instrucciones de limpieza del exterior del aspirador. No las lave.
Comprobación del dispositivo
Tras cada remontaje y antes de volver a utilizar el LCSU 4, deberá realizar una comprobación del dispositivo:
1Inicie la comprobación con una batería totalmente cargada.
2Conecte la unidad.
3Bloquee el tubo del paciente.
4Ajuste el nivel de vacío de aspiración en 550 mmHg.
5Desbloquee y vuelva a bloquear el tubo del paciente.
6Resultado: la unidad debería volver al ajuste de 550 mmHg.
7Repita este procedimiento realizando un ajuste en 300 mmHg y 50 mmHg.
 Precauciones
No intente utilizar un LCSU 4 que no haya pasado la comprobación descrita anteriormente. Si el LCSU 4 no supera la prueba correctamente, vuelva a comprobar todas las piezas y repita el procedimiento. Si es necesario, solicite asistencia a Laerdal Medical o a cualquiera de sus distribuidores autorizados.
Eliminación
Cuando vaya a desechar el LCSU 4, recomendamos que se haga del modo indicado en los protocolos locales.
Este aparato se ha marcado conforme a la Directiva europea 2002/96/CE sobre Residuos de Aparatos Eléctricos y Electrónicos (WEEE, por sus siglas en inglés). Al asegurarnos de que este producto se elimina correctamente, ayudaremos a evitar posibles consecuencias negativas en el medio ambiente y en la salud humana provocadas por una gestión inadecuada de los residuos de este producto.
El símbolo que aparece en el producto, o en los
documentos que lo acompañan, indica que éste no debe
 tratarse como un residuo doméstico. En su lugar, deberá llevarse al punto de recogida correspondiente para el reciclaje de aparatos eléctricos y electrónicos.
La eliminación se deberá realizar de acuerdo con la normativa medioambiental local sobre eliminación de residuos.
Para información más detallada sobre el tratamiento, recuperación y reciclaje de este producto, contacte con la oficina pertinente de su localidad, el servicio de recogida de basuras o con el representante de Laerdal al que adquirió el producto.
Español
25

Español
7 Solución de problemas
Solución de problemas
 Advertencia
Riesgo potencial de descargas eléctricas. No intente abrir ni desmontar la bomba ni los accesorios eléctricos.
El LCSU 4 no se conecta
1Compruebe que la batería está correctamente instalada y cargada.
2Compruebe la fuente de alimentación de CA o alternativamente la de 12V CC.
El LCSU 4 funciona pero el vacío es insuficiente o inexistente
1Compruebe que los tubos y el depósito se han conectado correctamente.
2Compruebe si las conexiones de los tubos y el depósito presentan fugas.
3Compruebe válvula flotante de protección contra desbordamiento (800 ml).
4Compruebe si el filtro se ha desconectado (300 ml).
Vacío deficiente o excesivo
Gire el regulador de vacío para aumentar o reducir el nivel de vacío.
La batería no se carga
1Compruebe que la batería está correctamente instalada y conectada.
2Vuelva a conectar la fuente de alimentación y observe si carga (todas las conexiones).
La batería parece ser insuficiente
1Cargue la batería durante cinco horas.
2Realice una comprobación de la batería.
Importante
Si no soluciona el problema que presenta el LCSU 4, solicite asistencia a Laerdal Medical o a un distribuidor autorizado.
26

8 Unidades principales, accesorios y piezas
Unidad principal, accesorios y piezas
LCSU 4 (versiones de la unidad principal)
Cat. nº |
Artículo |
|
|
|
|
880051 |
LCSU 4, 800 ml |
Unidad completa |
880061 |
LCSU 4, 300 ml |
Unidad completa |
Consumibles
Cat. nº |
Artículo |
Cantidad |
|
|
|
886100 |
Depósito desechable 300 ml con tubos |
Cant. 1 |
886102 |
Depósito desechable 800 ml con tubos |
Cant. 1 |
886104 |
Depósito desechable 800 ml sin tubos |
Cant. 6 |
886105 |
Tubo para el paciente de 1,8 m (6') desechable |
Cant. 1 |
886106 |
Tubo de vacío |
Cant. 1 |
Accessories
Cat. nº |
Artículo |
Cantidad |
|
|
|
886108 |
Soporte metálico (para depósito de 800 ml) |
Cant. 1 |
886115 |
Soporte metálico (para depósito de 300 ml) |
Cant. 1 |
88006005 |
Bolsa de transporte (para la versión con depósito de 300 ml) |
Cant. 1 |
884600 |
Bolsa de transporte (para la versión con depósito de 800 ml) |
Cant. 1 |
886111 |
Adaptador/cargador de CA/CC sin cable de corriente |
Cant. 1 |
886112 |
Cargador de batería externo |
Cant. 1 |
884500 |
Cable de corriente CC |
Cant. 1 |
886107 |
Filtro de reserva |
Cant. 10 |
886116 |
Kit de filtro de alta eficacia |
Cant. 1 |
Español
886108 886115 886111
Spare Parts
Cat. nº |
Artículo |
Cantidad |
886113 |
Batería, 12 V CC NiMH, recargable |
Cant. 1 |
886123 |
Tapa de la batería |
Cant. 1 |
886124 |
Pies de goma |
Cant. 2 |
886125 |
Correa para el hombro, para las bolsas |
Cant. 1 |
886126 |
Cable de alimentación de CA, EE UU |
Cant. 1 |
886127 |
Cable de alimentación de CA, UE |
Cant. 1 |
886128 |
Cable de alimentación de CA, Reino Unido |
Cant. 1 |
886113 |
Cable de alimentación |
886126 |
886127 |
886128 |
27

Español
9 Glosario de símbolos
Producto |
Definición |
Embalaje |
Definición |
|
Símbolos |
||||
|
|
|
||
|
El producto cumple los requisitos esenciales de |
|
|
|
|
la Directiva del Consejo 93/42/CEE, directiva |
|
No cortar |
|
|
sobre dispositivos médicos, modificada por la |
|
||
|
|
|
||
|
Directiva del Consejo 2007/47/CE, clase IIa |
|
|
|
D |
Un sólo uso |
|
Frágil. Manipular con cuidado |
|
IP12 |
El grado de protección proporcionado por el |
p |
Mantener seco |
|
chasis ha superado la prueba IP12 |
||||
|
||||
|
|
|
||
|
|
158 °F |
Rango de temperaturas de almacenamiento |
|
|
|
70 °C |
|
|
h |
Identificación única de tipo de producto |
--4040 °°FCl |
durante el transporte |
|
f |
Número de serie |
|
Humedad |
|
|
Clasificado por UL |
|
Presión atmosférica |
|
4NG8 |
|
|
|
|
|
Indicador de polaridad, centro positivo |
|
|
|
|
Corriente continua |
|
|
|
N |
Fecha de fabricación |
|
|
|
|
Advertencia/precaución |
|
|
Importante
Reciclar
Componente aplicado de tipo BF
La eliminación se deberá realizar de acuerdo con la normativa medioambiental local sobre eliminación de residuos.
No contiene látex
28

10 Datos técnicos
Opciones de fuente de alimentación
Batería
Recargable, NiMH 12 V 1.6 Ah
Cable de corriente CC (12 V)
Usar exclusivamente en zonas secas
Adaptador/cargador de CA/CC Entrada: 100-240 V, 50-60 hz, 1,2 Ah Salida: +12 V, 3,4 Ah
Usar exclusivamente en zonas secas
Cargador externo
Entrada: 110-220v, 50-60 Hz, 250 mA Salida: +18,5v, 0,6Ah
Solo para uso en lugares secos
Condiciones ambientales
Rango de temperaturas de trabajo: 0 °C (+32 °F) – +40 °C (+104 °F)
Humedad relativa de funcionamiento: 0 - 95% (no condensante)
Presión atmosférica de funcionamiento: 10,2 Psi (70 kPA) – 15,4 Psi (106 kPA)
Temperatura de almacenamiento y transporte: -40 °C (-40 °F ) – +70 °C (+158 °F)
Vacío, máx.: 550+ mmHg Vacío, rango: 50 - 550+ mmHg
Precisión del indicador de vacío: +/- 5% de la escala completa
Datos técnicos del filtro
Filtro interno del depósito desechable de 300 ml Filtro de plástico poroso, material de PE.
Filtro interno del depósito desechable de 800 ml
Filtro antibacteriano Aerostate HEPA. Blanco, superficie sin acabado, celulosa con resina resistente a la humedad.
Kit de filtro de alta eficacia
Con el kit de filtro de alta eficacia instalado la unidad es conforme a la norma ISO 10079-1. El kit reduce el flujo de aire y la duración de la batería. Filtro HEPA, hidrofóbico, con una eficacia del 99,97% para partículas de hasta 0.3 μm de tamaño.
Material del filtro: PTFE 1 μm
Presión de entrada de agua: mín. 0,20 bares/150 mmHg/2,90 psi (flujo al depósito)
Presión de entrada de agua: mín. 0,87 bares/650 mmHg/12,57 psi (flujo a la unidad principal)
Resistencia al flujo de aire: máx. 0,09 bares/67 mmHg/1,30 psi con un flujo de aire de 30 LPM
Diámetro nominal del filtro: 60 mm Carcasa del filtro: translúcida o transparente
Humedad relativa durante el almacenamiento y transporte: 0 - 95% (no condensante)
Presión atmosférica durante el almacenamiento y transporte: 7,3 Psi (50 kPA) – 15,4 Psi (106 kPA)
Características físicas
Dimensiones
•880051 (LCSU 4, 800 ml):
23.6cm x 19 cm x 23.6 cm (9.3" x 7.5" x 9.3")
•880061 (LCSU 4, 300 ml):
18.5cm x 26.2 cm x 8.12 cm (7.3" x 10.3" x 3.2")
Peso
•880051 (LCSU 4, 800 ml): 1.97 kg (4.35 lbs)
•880061 (LCSU 4, 300 ml): 1.53 kg (3.375lbs)
Capacidad del depósito
•300 ml
•800 ml
Rendimiento
Flujo de aire en entrada de vacío
Todas las configuraciones: típica de 30 LPM (flujo libre). Tal vez menos cuando se ejecuta desde la batería interna.
Tabla de materiales
Caja: |
PC |
Tapa de la batería: |
PC |
Regulador de vacío: |
PC |
Tapa inferior: |
PC |
Conector de entrada de vacío: |
TPR |
Conector de vacío: |
PVC |
Depósito desechable de 800 ml: |
GPPS |
- Tapa: |
HDPE |
- Filtro interno: |
Aerostate |
Tubo de vacío: |
silicona, resina K |
Conector de puerto de vacío: |
TPR |
Conector de entrada de vacío: |
PC |
Kit de filtro de alta eficacia: |
PP |
Carcasa del filtro: |
resina K |
Depósito desechable de 300 ml: |
PS |
- Filtro interno: |
PE |
Puerto de paciente: |
PP |
Tubo del paciente: |
PVC |
Soporte metálico: |
acero, PVC |
Requisitos eléctricos
100-240 V CA 50~60 Hz 1,2 A máx.; 12 V CC, 3,4 Ah
Español
29

Español
11 Información reglamentaria
Desplazamientos internacionales
Este aspirador está equipado con un adaptador de CA/CC que permite su funcionamiento en cualquier fuente de alimentación de CA (100-240 V CA, 50/60Hz). Sin embargo, deberá utilizarse el cable de corriente adecuado para conectar el adaptador a la toma de la pared.
Información reglamentaria
Clasificación
El producto cumple los requisitos esenciales de la Directiva del Consejo 93/42/CEE, directiva sobre dispositivos médicos, modificada por la Directiva del Consejo 2007/47/CE, clase IIa
•Aspirador médico eléctrico portátil para uso en transportes y en campo conforme a la norma ISO10079-1:1999
•Flujo alto/vacío alto, 50 – 550 mmHg
•No debe utilizarse en presencia de líquidos o gases inflamables.
•Alimentación interna/equipo de clase I tipo BF conforme a IEC 60601-1
•Protección IPI2 y sistema de alimentación estándar
•Funcionamiento intermitente: 30 minutos conectado, 30 minutos desconectado
Certificaciones
IEC 60601-1: 1988 (2ª edición); IEC 60068-2-6/IEC 60068-2-64/IEC 60068-2-27/IEC 60068-2-31; CAN/CSA-C22.2 No. 601.1- M90, 2005; UL 60601-1, EN 60601-1-2: 2007, EN ISO 10079-1: 2009 (excepto el requisito de volumen de 500 ml en 59.11.1, debido a la opción de depósito de 300 ml)
30
 Loading...