

La Crosse Technology WS-8017U-OAK, WS-8017U Instruction Manual
• Indoor temperature display
WS-8017U
• Outdoor temperature display via 433MHz transmission
ATOMIC CLOCK WITH OUTDOOR WIRELESS TEMPERATURE
Instruction Manual
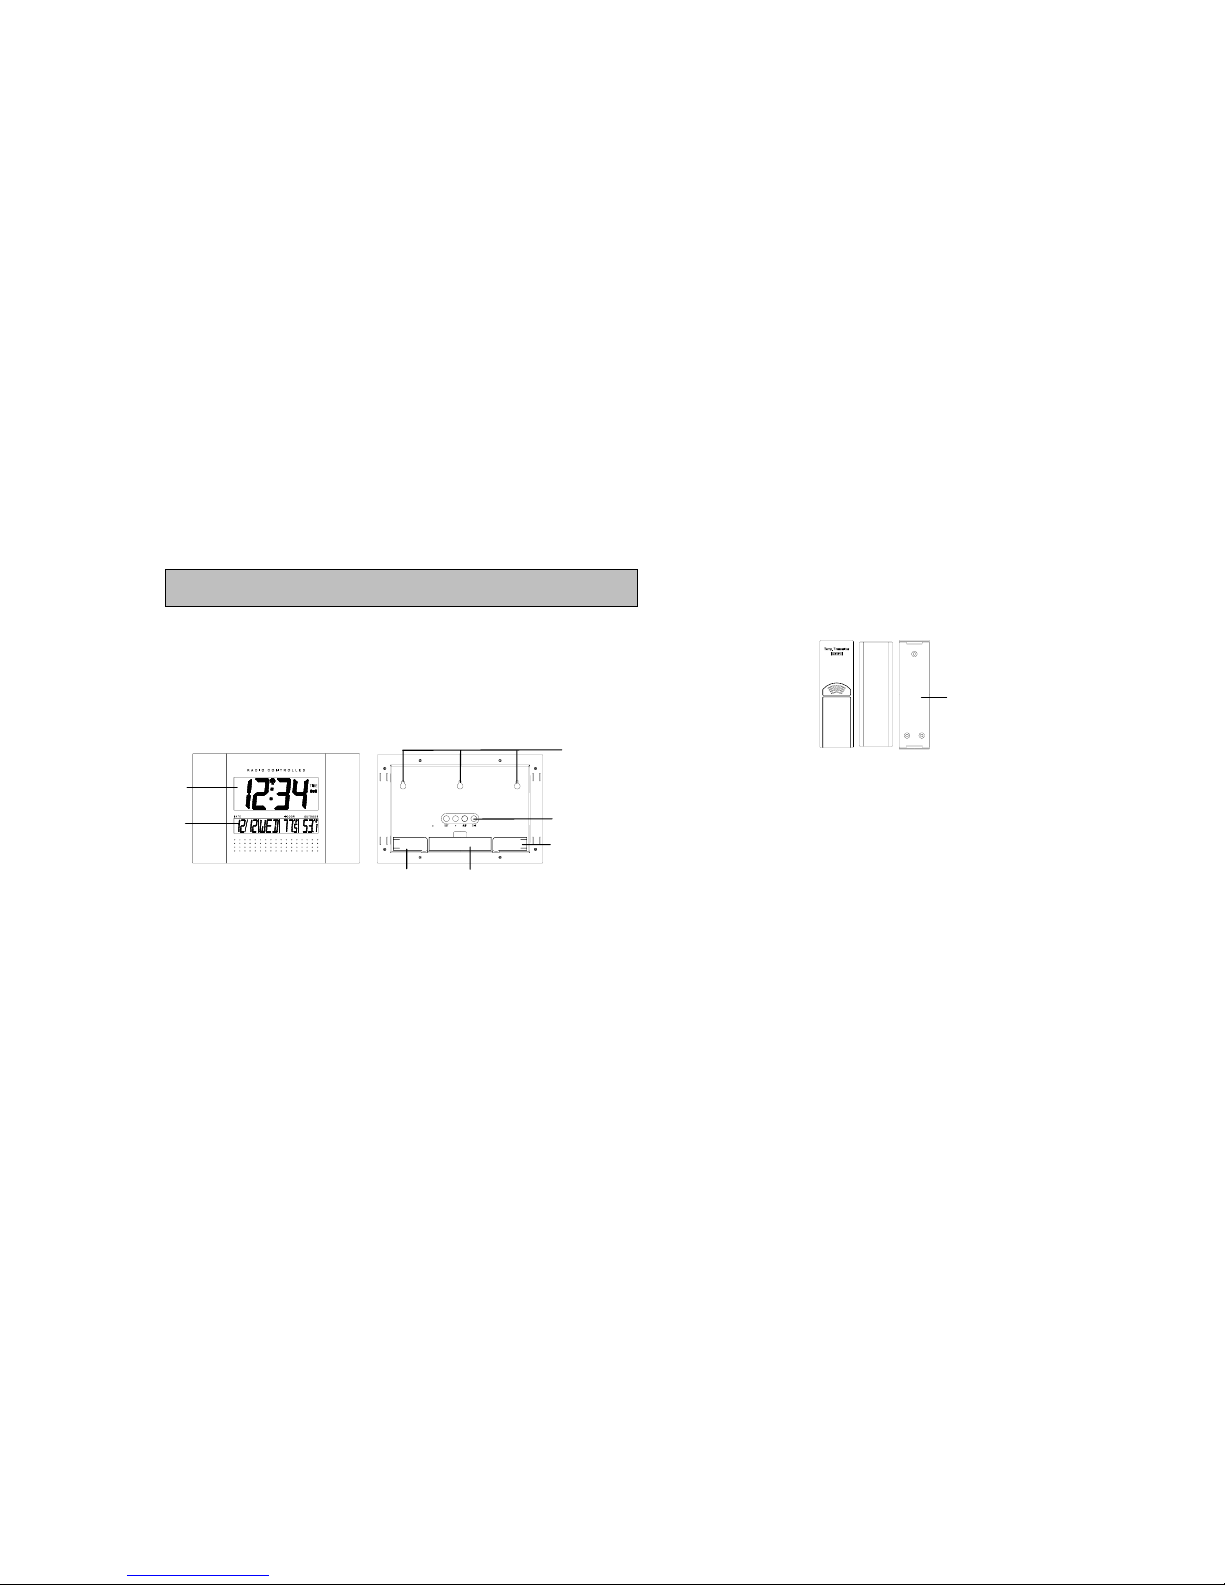
Holder
Hanging holes
Battery cover
LCD1
display
LCD2
display
Foldable stand
Foldable stand
• Wall mount or freestanding
OUTDOOR TEMPERATURE TRANSMITTER:
INTRODUCTION:
Congratulations on purchasing this state-of-the-art Atomic Clock as an example of superior design
and engineering. Providing WWVB radio-controlled time, date, time zone, indoor and outdoor
temperature display, this innovative clock is ideal for home or office use. Operation of this product is
simple and straightforward. By reading this operating manual, the user will however receive a better
understanding of the Atomic Clock together with the optimum benefit of all its features.
FEATURES:
ATOMIC CLOCK:
• Remote transmission of outdoor temperature to the Atomic clock by 433 MHz signals
• Wall mounting case
TO INSTALL AND REPLACE BATTERIES IN THE ATOMIC CLOCK
The Atomic Clock uses 2 x AA, 1.5V batteries. To install and replace the batteries, please follow the
steps below:
1. Insert finger or other solid object in the space at the bottom center of the battery compartment
and lift up to remove the cover.
2. Insert batteries observing the correct polarity (see marking).
3. Replace compartment cover.
Function keys
DO NOT SET THE CLOCK.
• WWVB Radio controlled time with manual time setting
TO INSTALL AND REPLACE BATTERIES IN THE TEMPERATURE TRANSMITTER
• 12/24 hour time display
The transmitter uses 2 x AA,1.5V batteries. To install and replace the batteries, please follow the
steps below:
• Time display: hour, minute, second
• Alarm setting with snooze function
1. Remove the cover.
• Calendar display
2. Insert the batteries, observing the correct polarity (see marking).
• Weekday display (3 languages to choose from: English, French and Spanish)
3. Replace the battery cover on the unit.
• Time zone setting
Alkaline batteries are recommended for use in both units. Avoid using rechargable batteries.
• Daylight savings time ON/OFF option (DST)
• ºC or ºF temperature display selectable

To display the alarm time in normal mode display
Alkaline batteries are recommended for use in both units. Avoid using rechargable
batteries.
To exit the setting modes
ATOMIC CLOCK LCD SCREEN DESCRIPTIONS
The Atomic Clock's LCD is divided into 2 sections and once the batteries are inserted, all the
segments will light up briefly before displaying the information for time, date, indoor and outdoor
temperatures.
Do not set the clock until the outdoor temperature is displayed.
1. Place batteries in the outdoor transmitter first, then into the atomic clock. DO NOT
PRESS ANY BUTTONS FOR 10 MINUTES.
Indoor temperature or seconds display
Weekday or seconds display
2. After the 10 minutes both the Indoor and Outdoor areas on your clock should have a
temperature showing. If not, remove both sets of batteries, wait 5 minutes and repeat step one.
3. After the clock receives the outdoor temperature, set your time zone using the manual
settings below. The default time zone is Eastern Standard Time.
4. After the clock receives the outdoor temperature the WWVB time code reception will
automatically start. This reception typically takes between 5-10 minutes in good conditions. If
after 10 minutes the WWVB time has not been received, use the SET key to manually enter the
set mode and change either the time or date in order to activate the WWVB reception (see
manual settings below). The clock will then automatically attempt to receive the WWVB time
from 12:00 am through 6:00 am each day (attempts WWVB reception every full hour within this
time frame). When this is successful, the received time will override the manually set time. The
date is also updated with the received time (Please refer to notes on “Radio controlled time”
and “Manual time setting”).
Note:
In the event of changing batteries of the unit ensure that the batteries do not spring free from the
contacts. Always wait at least 5 minutes after removing the batteries before reinserting, otherwise
start up and transmission problems may occur.
FUNCTION KEYS
The Atomic Clock has four easy to use keys:
SET key : To enter into the set mode for the following functions: time zone, DST ON/OFF
(daylight saving time), language, hour, minute, year, month, day, weekday, 12/24
hour, ºC or ºF temperature display
+ key : To toggle between the second, temperature or weekday display
To change any values in manual set mode
ALM key : To enter into the alarm set mode
To set the alarm ON/OFF
SNZE key : To activate the snooze function during alarm
Outdoor temperature display
Date
A
larm icon
Radio reception icon
WWVB time
MANUAL SETTINGS
Note:
If the Atomic Clock has already successfully received the WWVB time signal and displays the
correct time and date, then the Manual settings can be omitted.
After completion of the above described procedures in “Setting up” the manual setting modes can
be entered by pressing and holding the SET key for 3 seconds. The following settings can now be
programmed:
• Time zone setting
DST ON/OFF •
•
•
•
•
Language display setting
Manual time setting
Year setting
Month setting
SETTING UP:

LANGUAGE SETTING
•
•
•
•
Date setting
Weekday setting
The weekdays can be displayed in LCD1 with the pre-set languages: US English, French and
Spanish.
12/24 hour time display setting
1. Set the desired language for the weekday display in LCD 2 by use of the + key.
ºC or ºF setting
2. Press and release the SET key to enter the mode “Manual Time Setting”.
TIME ZONE SETTING
MANUAL TIME SETTING
After entering the manual setting mode as described above, the time zone can be set between the –1
to –12 hour or Greenwich Mean Time (GMT) range in LCD2. To do this:
In case the Atomic Clock is not able to detect the WWVB-signal (disturbances, transmitting distance,
etc.), the time can be manually set. The clock will then work as a normal Quartz clock.
OR
Note:
In 12 hours mode the time will be displayed with an additional “PM” for the time from 12:00 noon until
11:59.
1. The time zone (LCD2) will start flashing (Default setting "-5h“). Select the desired time zone by
pressing and releasing the + key.
1. The hour digits will start flashing on LCD1. Set the desired hours by pressing and releasing the
+ key followed by pressing the SET key.
Note: The time zones from –4 to –10 hours will be displayed with 3 characters abbreviations:
2. Now the minute digits will start flashing. Set the desired minutes by pressing and releasing the
+ key . If the + key is held, the units will increase by 5.
• -4 ATL (Atlantic time),
• -5 EST (Eastern time; default time zone),
3. Press and release the SET key to move to the “Year Setting”.
• -6 CST (Central time),
Note:
• -7 MST (Mountain time),
The unit will still try and receive the signal every day despite it being manually set. When it does
receive the signal, it will change the manually set time into the received time. During reception
attempts the WWVB tower icon will flash. If reception has been unsuccessful, then the WWVB tower
icon will not appear but reception will still be attempted the following hour.
• -8 PST (Pacific time),
• -9 ALA (Alaska time),
• -10 HAW (Hawaii time).
• "GMT” will be displayed if set to GMT (0).
WWVB time reception takes place from 12:00 am through 6:00 am each day (attempts WWVB
reception every full hour within this time frame). When the time signal is received for example at 1:00
am, the Skyscan Atomic Clock will not attempt to receive the WWVB signal for the remaining hours
until 6:00 am. Therefore, the next signal attempt will take place between 12:00 am and 6:00 am the
next day. The other times WWVB reception takes place, are upon setup and after manual time set
exiting mode. Reception is generally not possible during daylight hours due to the interference of the
sun.
2. Press and release the SET key to enter the “DST Setting“.
DST SETTING (daylight saving time)
1. The ON digit will start flashing on LCD1. Set the DST ON or OFF by pressing the + key.
2. Press and release the SET key to enter the “Language Setting“.
Note:
The DST default is “ON”, meaning that the WWVB will automatically change the time according to
Daylight Saving Time in the spring and fall. For areas that do not recognize DST changes (Arizona
and parts of Indiana) turn the DST “OFF”.
YEAR SETTING
The year can be selected sequentially from 2000 to 2049 and will then start over again (default
setting 2000). Only the last 2 digits of the year will be visible on LCD2 .
1. The year digits will start flashing on LCD1. Select the desired year by use of the + key.
 Loading...