

La Crosse Technology WS9611, WIRELESS 868 MHz WEATHER CLOCK Instruction Manual
44
WIRELESS 868 MHz WEATHER CLOCK
Instruction Manual
INTRODUCTION:
Congratulations on purchasing this fancy Weather Clock with wireless 868MHz transmission
of outdoor temperature and display of indoor temperature and humidity. It is further acting as
a DCF-77 radio controlled clock with calendar display and alarm clock function. In addition,
sunrise/ sunset/ sun duration time as well as the moon phase are shown. With the totally 15
different weather forecast icons featured by "Weather man", users can easily observe the
forecast weather condition and will no longer worry the sudden weather change. This
innovative product is ideal for use in the home or office.
« Instant Transmission+» is the up and coming state
-of-
the-art new wireless
transmission technology, exclusively designed and developed by LA CROSSE
TECHNOLOGY.
“IT +” offers you an immediate update of all your outdoor data measured from the
transmitters: follow your climatic variations in real-time!
45
FEATURES:
The Weather Clock
•
DCF-77 Radio controlled time with manual setting options
•
DCF Time reception ON/OFF
•
12/24 hour display
•
Hour, minute and second time display
•
Calendar (weekday, date, month and year)
•
Time zone option (-2h to +5h)
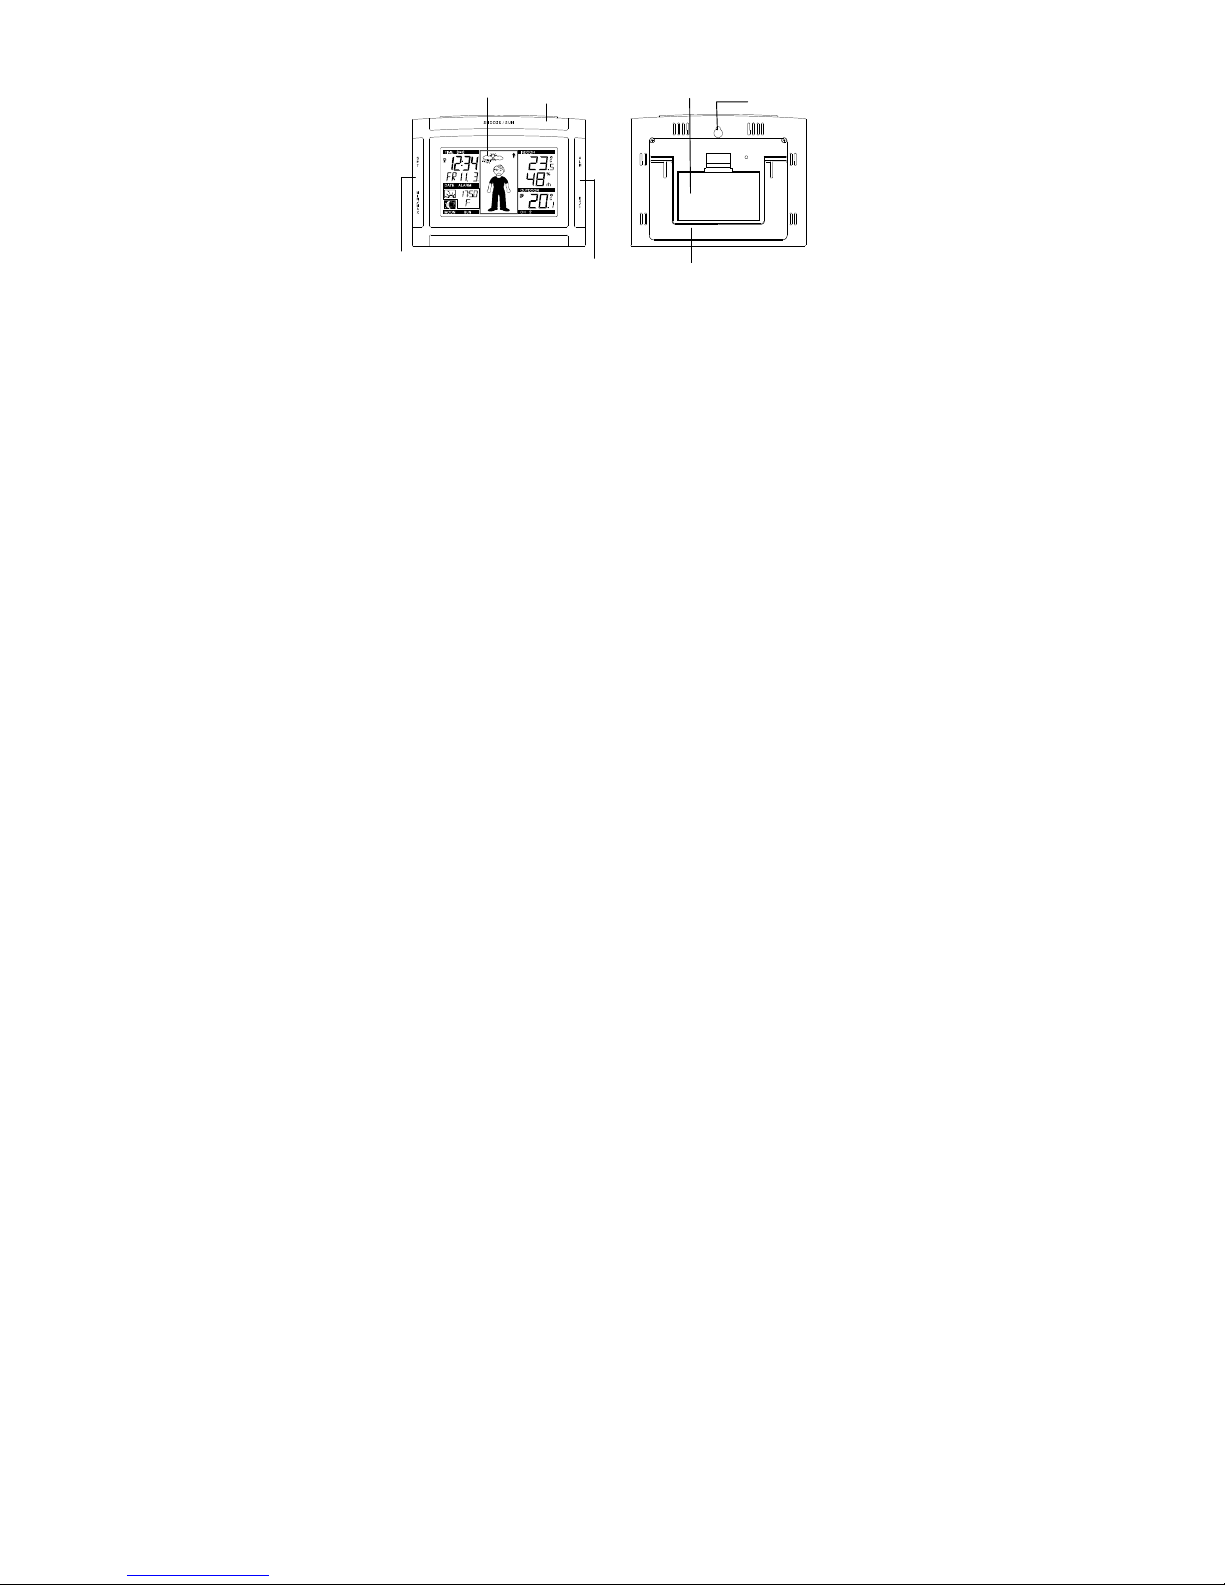
Foldout stand
Battery compartment cover
Function keys
LCD display
Function keys
Hanging hole
Function key

46
•
Alarm with snooze function
•
Snooze setting
•
Weather forecasting with 15 easy-to-read weather forecast signs featured by "Weather
man"
•
Weather forecasting icon sensitivity setting
•
Temperature display in degrees Celsius (°C) or Fahrenheit (° F) selectable
•
Indoor and outdoor temperature display with MIN/MAX recording
•
Indoor humidity reading displayed as RH% with MIN/MAX recordings
•
All MIN/MAX temperature recordings show date and time received
•
All MIN/MAX recordings can be reset
•
Display of sunrise time, sunset time and sun duration in 39 cities
•
12 Moon phases display throughout the year
•
Can take up to three outdoor transmitters
•
LCD contrast setting
•
Low battery indicator
•
LED backlight
•
Table standing/ Wall mounting

47
The Outdoor Temperature Transmitter
•
Remote transmission of outdoor temperature to Weather Clock
by 868 MHz
•
Shower proof casing
•
Wall mounting case (Mounting at a sheltered place. Avoid
direct rain and sunshine)
SETTING UP :
When one transmitter is used
1. First, insert the batteries into the Temperature transmitter. (see “Install and replace
batteries in the Temperature transmitter“).
2. Immediately after and within 45 seconds, insert the batteries into Weather Clock (see
“Install and replace batteries in the Weather Clock”). Once the batteries are in
place, all segments of the LCD will light up briefly. Following the time as 0:00 and the
"Weather man" icon will be displayed. If these are not displayed after 60 seconds,
remove the batteries and wait for at least 10 seconds before reinserting them.
3. After inserting the batteries, the Weather Clock will start receiving data from the
transmitter. The outdoor temperature and the signal reception icon should then be

48
displayed on the Weather Clock. If this does not happen after 3 minutes, the batteries
will need to be removed from both units and reset from step 1.
4. In order to ensure sufficient 868 MHz transmission however, this should under good
conditions be a distance no more than 100 meters between the final position of the
Weather Clock and the transmitter (see notes on “Positioning” and “868 MHz
Reception”).
5. Once the remote temperature has been received and displayed on the Weather Clock,
the DCF time (radio controlled time) code reception is automatically started. This
takes typically between 3-5 minutes in good conditions. If after 10 minutes, the DCF
time has not been received, press the SET key to manually enter a time initially.
When more than one transmitter is used
1. User shall remove all the batteries from the Weather Clock and transmitters and wait
for 60 seconds if setting has been done with one transmitter before.
2. Insert the batteries to the first transmitter.
3. Within 25 seconds of powering up the first transmitter, insert the batteries to the
Weather Clock. Once the batteries are in place, all segments of the LCD will light up
briefly. Following time as 0:00 and the Weather man icon will be displayed. If they are
not shown in LCD after 60 seconds, remove the batteries and wait for at least 60
seconds before reinserting them.
4. The outdoor temperature from the first transmitter (channel 1) should then be
displayed on the Weather Clock. Also, the signal reception icon will be displayed. If
this does not happen after 2 minutes, the batteries will need to be removed from both
units and reset from step 1.

49
5. Insert the batteries to the second transmitter as soon as the outdoor temperature
readings from the first transmitter are displayed on the Weather Clock.
Note: User shall insert the batteries into the second transmitter within 10 seconds of
reception of the first transmitter.
6. The outdoor data from the second transmitter and the "channel 2" icon should then be
displayed on the Weather Clock. If this does not happen after 2 minute, the batteries
will need to be removed from all the units and reset from step 1.
7. Insert the batteries to the third transmitter as soon as the "channel 2" icon and outdoor
data are displayed on the Weather Clock. Then within 2 minutes, the channel 3
outdoor data from the third transmitter will be displayed and the channel icon will shift
back to "1" once the third transmitter is successfully received. If this is not happen,
user shall restart the setting up from step 1.
Note:
•
User shall insert the batteries into the third transmitter within 10 seconds of reception of
the second transmitter.
•
And user may require to check the displayed readings on the Weather Clock against
those shown on the transmitters in order to recognise the Channel No. of each
transmitter.
8. In order to ensure sufficient 868 MHz transmission however, this should under good
conditions be a distance no more than 100 meters between the final position of the
Weather Clock and the transmitter (see notes on “Positioning” and “868 MHz
Reception”).

50
IMPORTANT:
Transmission problems will arise if the setting for additional sensors is not followed as
described above. Should transmission problems occur, it is necessary to remove the
batteries from all units and start again the set-up from step 1.
9. Once the remote temperature has been received and displayed on the Weather Clock,
the DCF time (radio controlled time) code reception is automatically started. This
takes typically between 3-5 minutes in good conditions.
If after 10 minutes, the DCF time has not been received, press the SET key to manually
enter a time initially.
Note:
Daily DCF reception is done at 02:00 and 03:00 every day. If the reception at 03:00 is not
successful, then at 04:00 and 05:00 and 06:00 there are other tries, until one is successful. If
the reception at 06:00 is still not successful, then the next try takes place at 02:00 next day.
If reception is successful, the received time will override the manually set time. The date is
also updated with the received time. (Please refer also to notes on “DCF-77 Radio
Controlled time” and “Manual Time Setting”)
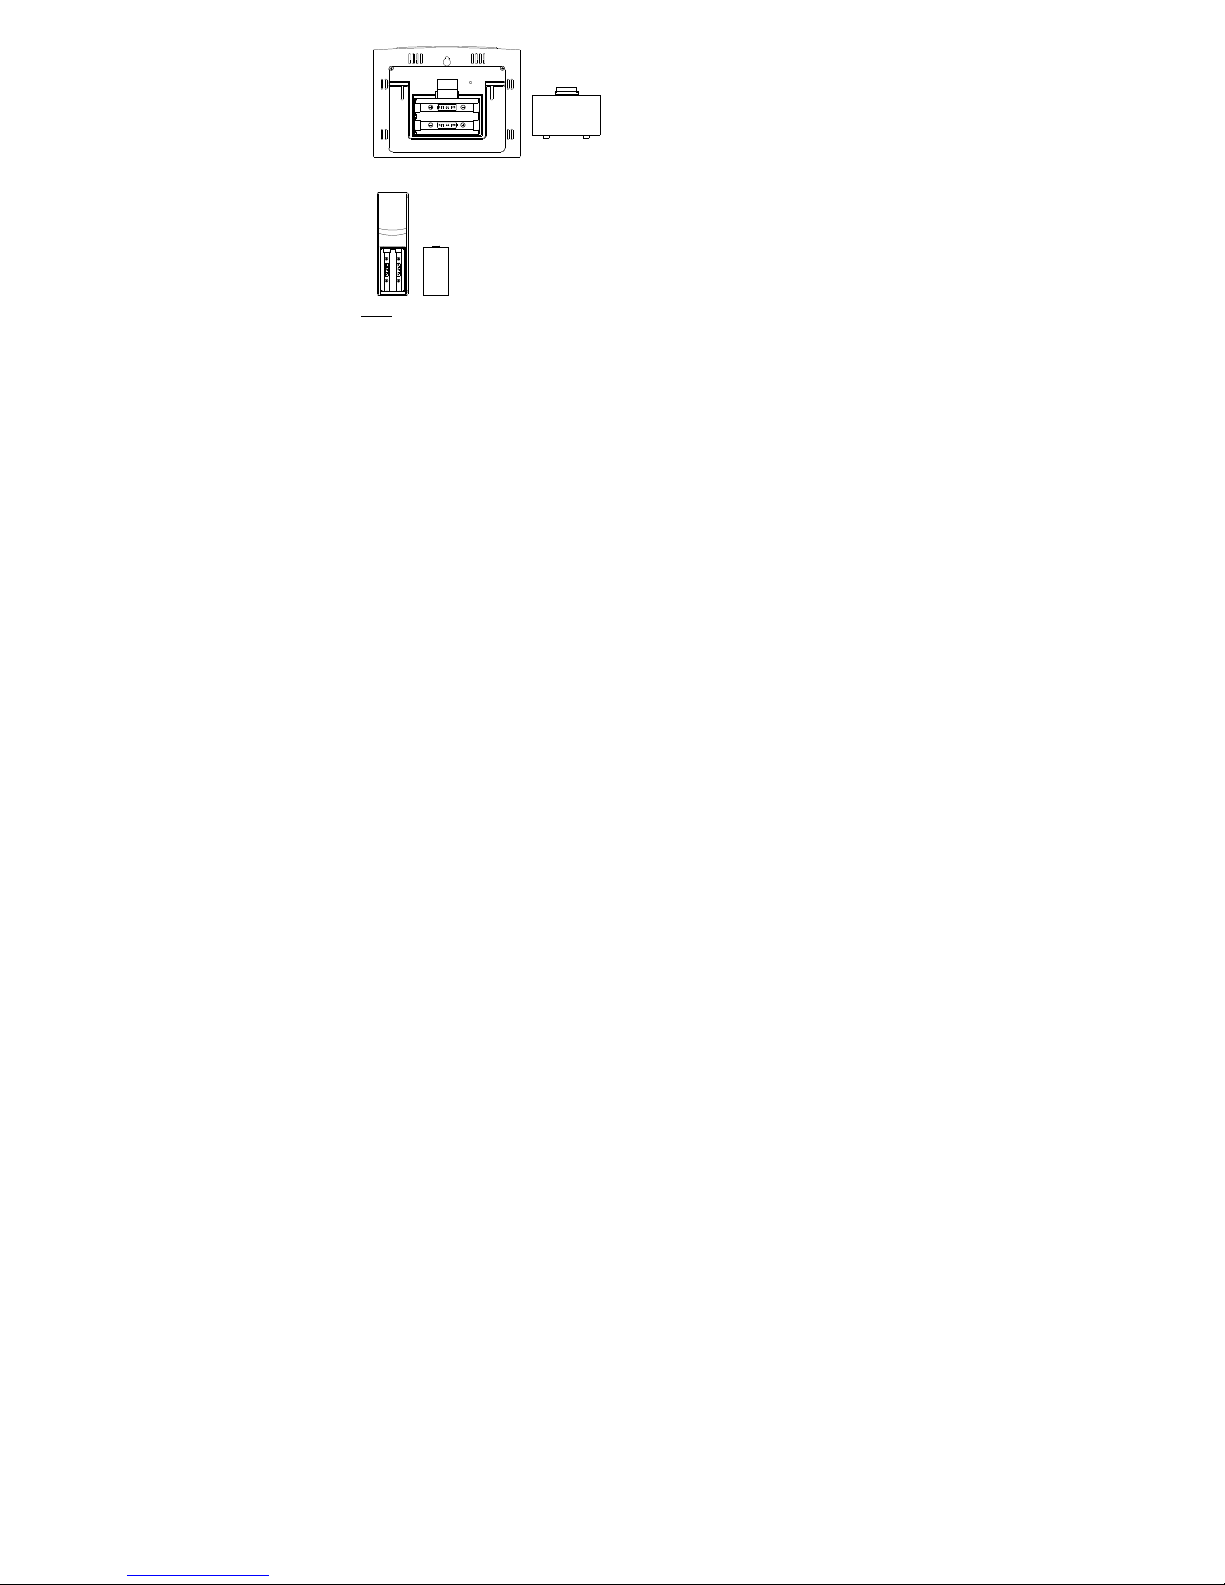
INSTALL AND REPLACE BATTERIES IN THE WEATHER CLOCK
The Weather Clock uses 2 x AA, IEC LR6, 1.5V batteries. To install and replace the
batteries, please follow the steps below:
51
1. Remove the cover at the back of the
Weather Clock.
2. Insert batteries observing the correct
polarity (see marking).
3. Replace compartment cover.
INSTALL AND REPLACE BATTERIES IN THE TEMPERATURE TRANSMITTER
The Temperature Transmitter uses 2 x AA, IEC LR6, 1.5V battery. To
install and replace the batteries, please follow the steps below:
1. Remove the battery compartment cover at the back of the
transmitter.
2. Insert the batteries, observing the correct polarity (see marking).
3. Replace the battery compartment cover on the unit.
Note:
In the event of changing batteries in any of the units, all units need to be reset by following
the setting up procedures. This is because a random security code is assigned by the
transmitter at start-up and this code must be received and stored by the Weather Clock in
the first 3 minutes of power being supplied to it.
52
BATTERY CHANGE:
It is recommended to replace the batteries in all units regularly to ensure
optimum accuracy of these units (Battery life See Specifications below).
Please participate in the preservation of the environment. Return used
batteries to an authorised depot.
FUNCTION KEYS:
Weather Clock:
The Weather Clock has five easy to use function keys.
SET key
MIN/MAX key
ALM key
CH/+ key
SNOOZE/SUN key

53
SET key (Setting):
•
To enter the set mode for the following functions: LCD contrast, Time zone, Time
Reception ON/OFF, 12/24 hour display, Manual time, Year, Date, Sunrise/ Sunset city
location, Snooze time duration, °C/°F, and Weather forecast sensi tivity settings.
•
To toggle between the display of "Weekday + date + month", "Second", "Alarm time",
and "Date + month + year"
•
To press and hold for 3 seconds to reset at the same time the maximum/ minimum
temperature and humidity records of indoor and the currently selected outdoor channel
(will reset all records to current level)
•
To stop the alarm
•
To switch on the backlight
MIN/ MAX
•
To toggle between the maximum/ minimum outdoor temperature and maximum/
minimum indoor temperature and humidity data
Note: The Time/date shown is corresponding to MIN/MAX temperature data.
•
To stop the alarm
•
To switch on the backlight
ALM key (alarm)
•
Press for about 3 seconds to enter the Alarm setting mode
•
To activate/ deactivate the alarm
•
To stop the alarm

54
•
To switch on the backlight
CH/ + key
•
To toggle between the Outdoor transmitters 1, 2 and 3 (if more than 1 transmitter is
used)
•
To adjust LCD contrast, time zone, Time Reception ON/OFF, 12/24 hour display, hour,
minute, year, month, day, snooze time duration, °C/ °F and weather f orecasting icon
sensitivity in setting modes
•
To adjust the alarm time in alarm setting mode
•
To stop the alarm
•
To switch on the backlight
SNOOZE/ SUN key
•
To activate the snooze function for the alarm
•
To toggle between the sunrise time, sunset time, sun duration in the Sun display
•
To exit manual setting mode and alarm setting mode
•
To switch on the backlight

55
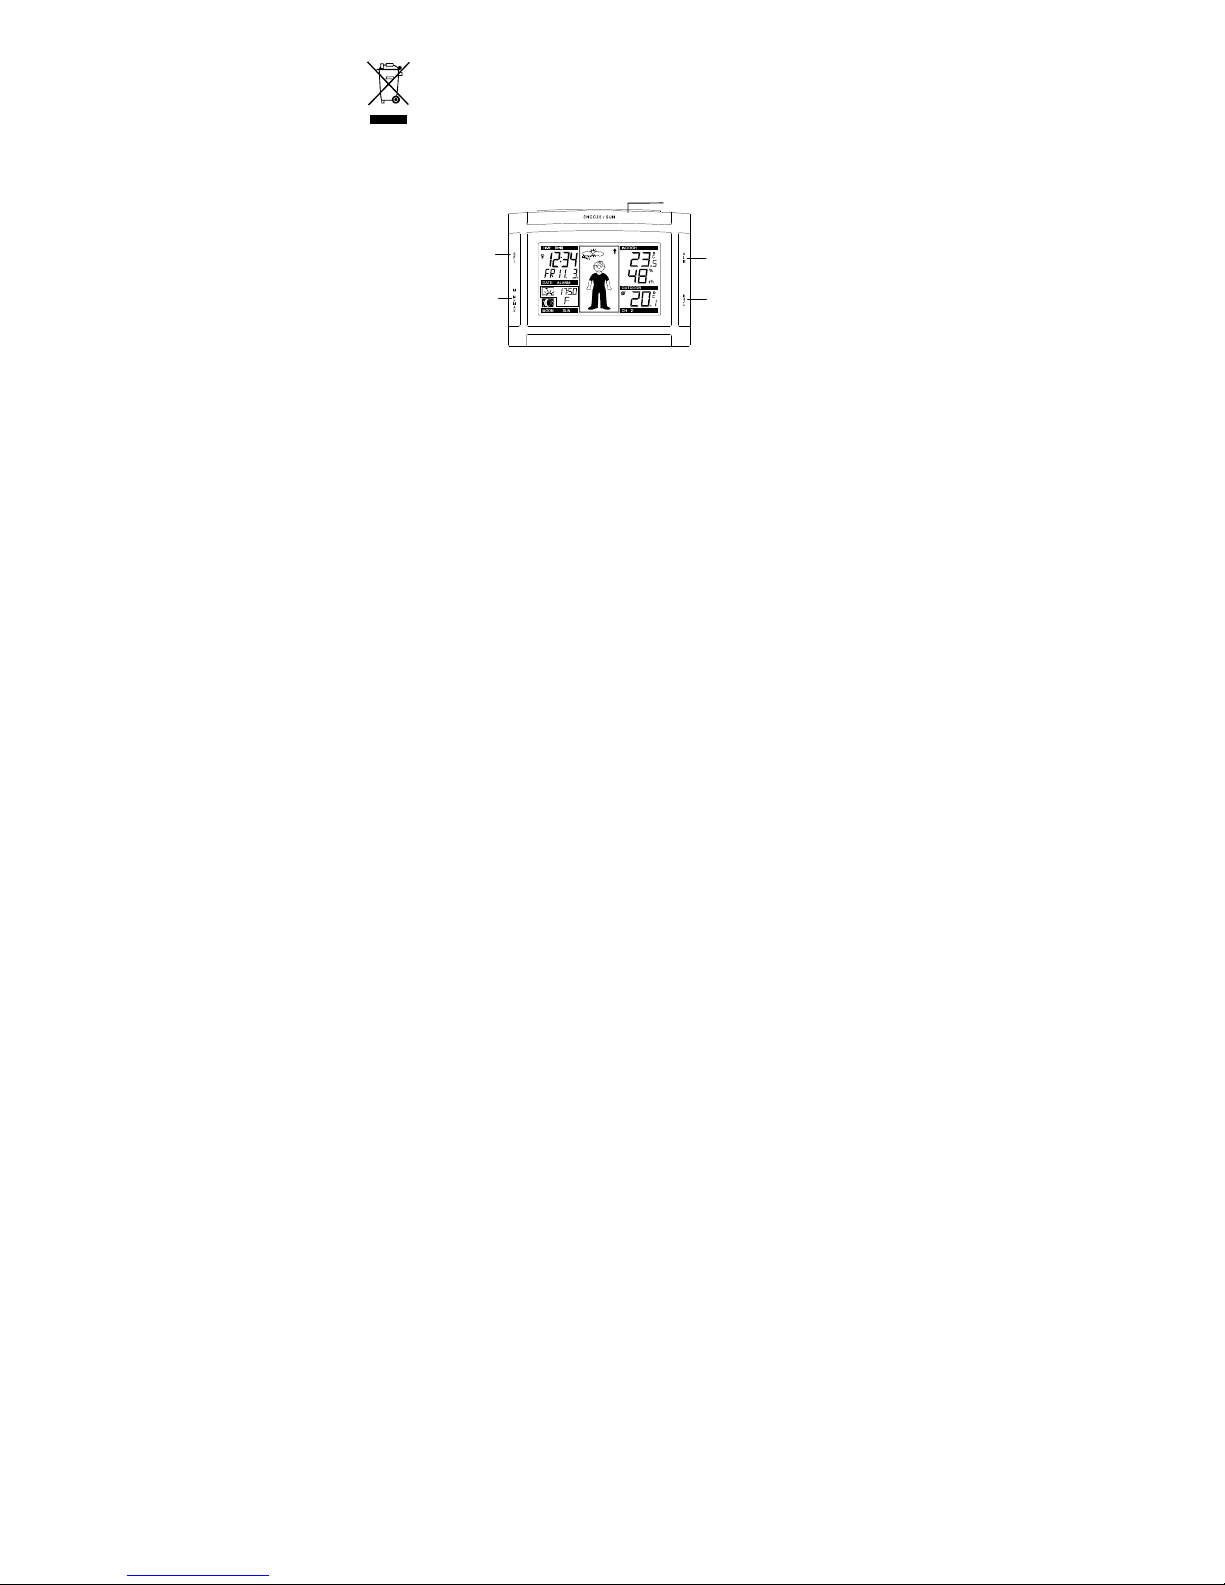
LCD SCREEN:
*When the signal from the transmitter is successfully received by the Temperature Station,
this icon will be switched on. (If not successful, the icon will not be shown on the LCD). User
Indoor relative
humidity %
Weather
tendency icon
DCF Tower
icon (for time
reception)
Time
Calendar
Weather forecast
icon (Weather boy)
Indoor
temperature
Outdoor
temperature
Outdoor
reception
signal*
Number showing
transmitter unit
Alarm icon
Moon phase
display
Sunrise/Sunset
display
Transmitter low
battery icon
Weather station low
battery icon
 Loading...