

Page 1

WD Manual
A wiki work in progress
PDF generated using the open source mwlib toolkit
see http://code.pediapress.com/ for more information
Page 2
Weather Display Manual
Weather Display Manual
2
Page 3
Weather Display Manual
3
Copyright © 1999-2006 Brian Hamilton
Page 4

Weather Display Manual
Introduction
→ About This Site
→ About Weather Display
→ Purchase or Register Weather Display
Station Setup
→ Quick Start
→ Daily reset Time
→ Starting: When and How
→ Weather Station Selection
4
→ Calibration
→ Logs and Logging
→ Forecasts and Icons
→ Replacing Weather Display's Weather Icons
→ Setting & Tracking Station Location
→ Connecting to Internet
→ Viewing WD data remotely
→ Customize your screens
→ Using and setting up custom screens
→ Solar Sensor Setup
→ Direct web cam capture
→ Using a web cam image from another web cam program
→ Using a web cam image from another web cam program, step by
step guide
→ All Day Video Setup
→ Summary image/ weather icons setup
→ Update to Newer Weather Display Release
Page 5

Weather Display Manual
→ Uninstall Weather Display
→ Setting up to use TAPR
Obtaining Data from Other Sources
→ PC Time Synchronization
→ Getting Weather Reports and Metar Data
→ NOAA US County and Zone Codes
→ Using Metar Data instead of a real weather station
→ Setting up the MESOMAP
Providing Data to Other Sources
→ Sharing Data with Others (APRS, Wunderground, etc. )
5
→ Sending Routine Weather Reports
→ Sending Weather Warnings
→ Creating a Weather Web Page
→ Creating a Weather WML Page
→ Using Custom Tags
→ Posting WebCam Images to a Web Page
→ Weather Talker and Telephony
→ Using XML to show weather data on any web page
→ Weather Display Custom Tag Reference
Reference
→ Frequently Asked Questions (FAQ)
→ Weather Display Software Hints & Tips
→ Troubleshooting
Weather Primers
→ Information on Heat Index
→ Information on Apparent Temperature
Page 6

Weather Display Manual
→ Glossary
6
Weather Display Forum
[1]
External links
[1] €http:/ / www. weather-watch. com/ smf/ index. php
Source: http:/ / wiki. weather- watch. com/ index. php? title=Weather_ Display_
Manual&oldid=2645
Principal Authors: ANONIPEDITS:0, WikiSysop
Page 7

About This Site
1 Introduction
About This Site
Purpose•••To explain, to those interested, the underlying design philosophy for these Wiki
Help pages. The original, self imposed, objectives are:
• €Page content should be maintainable by any Weather Display forum user who has useful
material to add.
• €No assumptions should be made about the user's computer platform or the Web tools
available thereon. While the default for Weather Display is the Microsoft® Windows
operating system, other operating systems are supported. If your content is for Linux,
etc. denote that at the top of the content.
• €Graphics should be lightweight, or sized as small as possible, to reduce download times.
Remember, not everyone has a broadband connection.
• €Page appearance should be consistent from page to page.
• €Links to external Web sites, where appropriate, are encouraged.
7
Unlike a static Web page, Wiki's can be edited by anyone who registers. If you see an error,
or have content to add, you're encouraged to participate.
Source: http:/ / wiki. weather- watch. com/ index. php? title=About_ This_ Site&oldid=1952
Principal Authors: ANONIPEDITS:0
About Weather Display
Weather Display provides more than 3,500 weather enthusiasts a way to get the more from
their weather stations.
Not only does it support a huge range of stations from all major manufacturers, but it's also
complete with features and options. Features include:
• €Highly customizable
• €Support for most major weather stations
• €Real time, auto scale, and graph history graphing
• €FTP uploads of the weather data to your Web page, pager, and e-mail notifications of
extreme conditions
• €Uploads to weather collection services such a Weather Underground, Weather For You,
CWOP, AWEKAS, Anything Weather, and WEDAAL
• €Web downloads, METAR/Synop e-mails
• €Averages/extreme/climate/NOAA reports
• €Direct Web Cam capture
• €Web Cam uploading
• €Animated Web cam images
• €Grouped file uploads
• €FTP downloads
Page 8

About Weather Display
• €Decoded METAR downloads
• €APRS output (Internet and direct COM ports)
• €WAP for wireless data users
• €Weather dials
• €Weather voice
• €Weather answer phone
• €Dallas 1 wire sensors (lightning counter, solar sensor, barometer sensor, and extra
temperature/humidity sensors with any weather station)
• €Labjack to add extra temperature or humidity sensor to your existing weather station
(USB)
• €... and lots more!
You can also use Weather Display to provide near real-time viewing of your weather data on
the Internet using the Weather Display Live add-on.
Weather Display is compatible with Microsoft® Windows 95/NT/98/2000/ME/XP/VISTA and
now Linux.
Weather Display
Copyright © 1999ƒ2006 Brian Hamilton
8
Brian Hamilton
2 Marshall Road
RD4
Waiuku
New Zealand
Phone: +64 (0)9 2351377
E-mail: info@weather-display.com
Source: http:/ / wiki. weather- watch. com/ index. php? title=About_ Weather_
Display&oldid=2617
Principal Authors: ANONIPEDITS:0
Purchase or Register Weather Display
Trial Period
When you first download Weather Display it is fully working application. A screen at start
up reminds to purchase and register the software.
There is a trial period of 30 days, during which time you can use all of the features of
Weather Display. After the 30 days, Weather Display will not longer function. You can still
register Weather Display after the expiration of the trial period by providing the
registration number of your application. Your data collected during the the trial usage of
Weather Display is saved.
Page 9

Purchase or Register Weather Display
Converting Trial to Registered Version
When payment is received, Brian will provide you with the necessary registration code
which you can then use in a separate application that will turn all of the functionality of
Weather Display back on.
This utility is located at: http:/ / www. weather-display. com/ downloadfiles/ wdregistration.
[1]
exe
Purchasing Registered License
Weather Display is only US$70 for a lifetime registration, which includes all future updates.
You can pay the registration fee in five major world currencies.
CLICK HERE TO PURCHASE USING THE SECURE LIVE CREDIT CARD WORLD PAY
SERVER
Notes on Using World Pay
• €The charging merchant Tokaanuskihire will appear on your credit card bill.
• €Diner's Club or American Express are not currently accepted.
[2]
9
• €When you get to the shop, click on Buy 1 Now, then place an order without an account.
There is no need for you to enter a valid postal address. However, please fill in Other
beneath Outside US with some information, even though in italics, and don't worry
about the Outside US drop down window if you are registering from the United States.
• €A valid e-mail address is important. The program author doesn't receive your credit card
information, as it is all processed by World Pay.
• €The license price is quoted in New Zealand Dollars. For example, NZ$105 is
approximately US$73 (depending on current exchange rates). You can select the
currency of your choice, and then apply the exchange rate so you know exactly how much
you will be charged. The whole process is live, and you should get your registration
within one day.
• €When confirmation of your payment is received a registration code will be e-mailed to
you. You enter the registration codeinto the lower box on the registration display, and
then click OK. Please e-mail Brian your registration key after you have purchased the
software. The registration code is case sensitive.
• €Customers in Germany, please purchase via http:/ / www. weather-display. de
[3]
.
External links
[1] €http:/ / www. weather-display. com/ downloadfiles/ wdregistration. exe
[2] €http:/ / tokaanuskihire. co. nz/ Merchant2/ merchant. mv?Screen=CTGY&
Store_Code=Tokaanuskihire& Category_Code=wm918
[3] €http:/ / www. weather-display. de
Source: http:/ / wiki. weather- watch. com/ index. php? title=Purchase_ or_ Register_
Weather_ Display&oldid=2618
Principal Authors: ANONIPEDITS:0
Page 10

Quick Start
2 Station Setup
Quick Start
Purpose
This document is designed to get Weather Display up and running with your weather
Station equipment in the shortest possible time.
This Quick Start does not address all your questions „ only those required to get a basic
Weather Display setup in operation so that you can view the weather information collected
by your weather station.
Minimum system requirements
• €Microsoft® Windows 95 operating system
• €An Intel 486 or higher CPU or AMD equivalent
• €32 MB RAM
• €6 MB hard drive space for initial setup, then approximately 10 MB additonal per month
for data
• €800x600 screen resolution with 256 color depth
• €A compatible weather station and serial (RS-232) cable with one free COM port on your
computer
10
Downloading Weather Display
1. €On the Weather Display Web site
php Version History].
1. €To download the latest release, in the left navigation bar, click the [http:/ / www.
weather-display. com/ inframe. php?text=Download& inframe=download. php
Downloads].
1. €Click Download next to Main Weather Display install file.
2. €When prompted, click Save, and then specify a folder location where to save the
Weather Display install program.
3. €When the download completed, browse to the folder you specified in step 4, and
then double-click the Weather Display .exe file.
4. €Follow the instructions on your screen to complete the installation.
5. €At the end of the installation wizard, click Finish. If you leave the Launch
Weather Display check box selected, Weather Display launches with the new
version.
Note•••If you are upgrading the software, your weather data is not modified or deleted.
However, you should make regular backup of your data, especially before updating the
software. Make sure you stop Weather Display before upgrading. In Weather Display, on
the Exit menu, click Save and Exit. Make sure all of the Weather Display applications,
such as RealTime FTP do not appear in the Windows task bar notifications area.
[1]
, click [http:/ / www. weather-display. com/ history.
Page 11

Quick Start
Language
Once the program has loaded, the first thing you want to do is to choose your language
preference.
• €On the Setup menu, point to Language, and then click your language choice.
English is the default language. You can choose from English, German, Italian, Spanish,
or French.
Weather Station Type
1. €On the main Weather Display window, click Control Panel, and then under Station
Settings, click Station Type & Settings.
2. €Click the tab the corresponds to the weather station equipment you have.
You might need to further define your weather station equipment or configure options
specific to the model.
COM port
Obviously, you have to connect your weather station to the computer that runs Weather
Display. On the rear of most computers there is at least one serial port connectors. Connect
an appropriate serial (RS-232) cable between the serial connector of your choice. If the
connector is labeled on your computer, note its name, usually COM1 or COM2. It is not
common for these to be labeled.
11
You then need to configure Weather Display to use the correct COM port corresponding to
the connector you have used.
1. €On the Setup menu, select COM Port Settings.
2. €Select the the appropriate COM port, and then click OK. The Weather Display title bar
now displays the COM port you selected.
Unfortunately, if you're not sure which COM port you're using, the trial-and-error method is
the fastest for most people. Start with COM1. If that doesn't work, then change to COM2,
then COM3, etc.
At the bottom of the window, below the time display, there are two small square boxes „
Data Received, and Data Quality. When you start Weather Display, they should be red.
When you have correctly selected your weather station and COM port, these two boxes will
appear green. It might take up to 15 seconds or more before data is received. The upper
(Data Received) box blinks each time data is received from your weather station. The
lower (Data Quality) box should remain green. If the two boxes do not respond, verify your
COM and station selections, and make sure your cables are tightly fastened on both ends.
COM port tips
COM2 is usually a 25-pin male plug, so you may need a 9-pin to 25-pin adaptor. Reset to
use COM1. Make sure if a modem is on COM4, it uses a different IRQ setting.
Page 12

Quick Start
Units
1. €On the main Weather Display window, click Control Panel, and then click Units &
Other Settings.
2. €Under Log file units, select Metric units or USA units.
Selecting USA changes the date format from d/m/y to m/d/y. The setting will persist each
time the program loads.
3. €For Program Settings, you can set Wind speed, Temperature, Rainfall, Baromter
and Date format. You can also add a Beafort speed display and specify the number of
decimal places to be used for rainfall.
4. €Under Internet Settings, you can set Wind speed, Temperature, Rainfall,
Baromter and Date format. Internet settings are used when uploading your data to
the Internet, for example, your Web site.
5. €Under Other settings, specify your Height above sea level. The other settings in this
section can be left at their defaults during initial setup.
6. €Click OK to save your settings.
Important•••Do not change log file units after you select the units for the first time.
Changing units a second time can cause logging problems.
12
Colors
If you have problems with the default colours, you will have to make some changes.
1. €On the Weather Display main window, click Control Panel.
2. €Under Station Settings, click Colours.
3. €Make the changes you want.
4. €Click OK.
Screen display on startup
1. €On the Setup menu, click Advanced Settings.
2. €On the Program tab, under StartUp Commands, select the Start in center of
screen check box, and then click OK.
Rain
Weather Display stores its own rainfall totals separate from the weather station.
1. €On the Weather Display main window, click Control Panel.
2. €Under Station Settings, click Offsets & Initial Rain.
3. €Then select the amount for today's rain, yesterday's rain, monthly rain, and yearly
rainfall.
4. €Click OK.
Note•••For US units, the equivalent amount in inches is displayed. Click on Yes to set these
amounts. If you are just increasing the amount, then that amount is added on to any
previous numbers entered. If you are only updating the offsets, make sure you close the
window with the X in the window top right hand corner when you have this set.
Page 13

Quick Start
Humidity
To adjust humidity offsets, do the following:
1. €On the Weather Display main window, click Control Panel.
2. €Under Station Settings, click Offsets & Initial Rain.
3. €Under Humidity Offset, select the check boxes for the options you want.
Note•••For the WMR-968 you should select the Set 98% as 100% check box and enter a
and Slope factor of 1.
Barometer
For the barometer, Weather Display uses the raw pressure value from your weather station.
You need to set a pressure offset. This number is in hPa. There is a conversion for US units
(inches). The offset is absolute. For example, if you want to adjust the barometer, and you
want the pressure to increase by 1 hPa, then the offset must be 1 hPa higher.
You need to set the offset until the pressure shown in Weather Display matches the Mean
Sea Level Pressure (MSLP) for your location at that point in time. You can find the MSLP
from a nearby Weather Service facility or airport. Some local newspapers might also have
this information. You might need to fine tune over a period of time; your pressure reading
needs to be similar to your nearest official weather station at the same time of day„ideally
done in light winds/clear weather when there is a large high pressure covering in your area.
13
External links
[1] €http:/ / www. weather-display. com
Source: http:/ / wiki. weather- watch. com/ index. php? title=Quick_ Start&oldid=2022
Principal Authors: ANONIPEDITS:0
Daily reset Time
Purpose•••To ensure your station's observations conform with international agreements for
start and end of the day.
Daily reset
You can choose either a 12 Midnight reset (default) or 9 a.m. reset (used in Australia, New
Zealand ,and a number of other countries). The Norwegian Meteorological Institute uses
06:00 UTC to reset rain and 18:00 UTC for temperature and wind.
• €Under the Setup, click Values Reset Time.
At either 12 Midnight or 9 a.m., the daily high/low data will be reset, as well as, yesterday's
rain total.
Page 14

Daily reset Time
Fine tune reset times
You can also fine tune the reset times if you need to.
1. €Under Setup, click Display Units.
2. €Set Hour to reset daily high/low values (temperature, wind), Hour to reset daily
rain (n.b. 24-hour clock - e.g. 1600 for 4 p.m.), and month to reset the yearly rain (to
match your rain season).
Source: http:/ / wiki. weather- watch. com/ index. php? title=Daily_ reset_
Time&oldid=2614
Principal Authors: ANONIPEDITS:0
Starting: When and How
When Weather Displays Runs
Weather Display is designed to run all the time, 24 hours a day, 7 days a week. If you want
Weather Display to start when your computer starts, on the Setup menu, point to Start
When Windows Starts, then click Yes. You can also copy a shortcut to Weather Display
into the Windows Startup folder.
14
If you don't want to start Weather Display up automatically, a shortcut to the program is
placed on your Windows desktop and on the Windows Start menu via the installer.
How Weather Display Appears
• €Full Screen•••The default condition. Note under Setup, point to Full Screen When
Larger Than 800x600, and then click Yes.
• €Minimized•••On the Setup menu, point to Start Minimized, and then click Yes.
• €Hidden•••On the Setup menu, point to Start Hidden, and then click Yes.
• €Service•••On the Setup menu, point to Start When Windows Starts, and then click
Start as a service under NT/2000.
Note•••There have been problems reported when attempting to run Weather Display as a
service. Microsoft Windows Server 2003 is not supported.
Source: http:/ / wiki. weather- watch. com/ index. php? title=Starting:_ When_ and_
How&oldid=1963
Principal Authors: ANONIPEDITS:0
Page 15

Weather Station Selection
Weather Station Selection
General
1. €On the main Weather Display window, click Control Panel.
2. €Under Station Settings, click Station Type & Settings.
3. €Click the tab that corresponds to your station type.
Depending on the weather station type you select, there might be further options to
configure. When you have selected the appropriate model of station and click Close, you
are returned to the main Weather Display window. The Weather Display title bar displays
the weather station type you selected.
Initial setup for specific brands (if required)
Some brands of weather stations require additional configurations. See the list below for
specifics.
Dallas 1-wire setup
15
Use the station selection window to check that it has correctly identified your buttons.
1. €On the main Weather Display window, click Control Panel.
2. €Under Station Settings, click Station Type & Settings.
3. €Click the Dallas/AAG 1 tab.
On the setup page, you can also see the additional temperature sensor and the humidity
sensor/temperature readings (if you have one).
Dallas 1-wire station owners also need to set up the wind direction buttons. Click on View,
Setup Dallas 1-Wire Wind Direction And Rain to do this. If you have an ini.txt file that was
created by Weather 204 and the create list program provided by Dallas Semi, then you can
import that file to set the wind direction and rain/wind ibuttons. Next check that the
windspeed ibutton ROM ID has been correctly identified. If not, check what was reported
under View, WS2000/WMR900H/Dallas 1-wire Data Information. You can change the ROM
ID if it is wrong, and then click Save. If you have an extra temperature sensor, then the
ROM ID for it should be displayed here as well.
Davis setup
You do not have to configure the COM port release times unless you want to let Davis
Weather Link gain access to the weather station at some point to download data from the
Davis Datalogger. Davis owners also need to select their rain gauge resolution type.
You also need to select the data logger baud rate. The full version is for when you have a
rain gauge, humidity sensor, etc. In Weather Display, the wireless WMII is the same as the
WMII Full Version.
ELV/Conrad/WS2000/WS7000, Lacrosse, or WMR900h
These are all the same type of weather station. These stations all require you to do
additional initial setup.
1. €On the main Weather Display windows, click View.
2. €Under the Station Setup/Data Reports click WS2010-13/WS2500/ WMR900H
/Dallas 1-wire Data Information. Next set the outdoor temperature sensor to use. Choose
from the list once you have some sample data. Click on get data to get a sample to check
Page 16

Weather Station Selection
that you have the correct sensor. Also set the logging interval to 5 minutes.
Click on Set Names to allocate names to the sensors to appear with the data in this
window. You can also allocate a temperature/humidity sensor to use as your soil sensor, and
have it displayed on the main Weather Display screen above the wind speed dial.
Ultimeter
Make sure your weather station console is in datalogging mode at all times. Check this
after your restart Weather Display. If you have a U2000 that was manufactured before
2001, you might need to choose the No average speed in the data check box. You can
also choose whether you have a humidity sensor or rain gauge.
WMR-918H
A WMR-918H is actually a WMR-968. Try selecting the WMR-968 station type.
WS3600
You don't need to use Heavy Weather.
1. €Exit Heavy Weather.
2. €On the main Weather Display window, click Control Panel.
3. €Under Station Settings, click Station Type & Settings.
4. €Click the ELV/La Crosse/2010-13/WS2310/Hyundai/WS2500/WS2700/WS3600
tab.
5. €Select La Crosse WS2310/WS2310/WS2315/ELV/Conrad
WS2300/WS2310/WS2315/Hyundai WS05 etc.
6. €Click Close.
7. €On the Control Panel dialog box, under Station Settings, click COM Port.
8. €Select the COM port number, and then click OK.
9. €Open the settings file open3600.conf and make sure that the COM port number is set
correctly.
10. €On the main Weather Display window, click Exit, and then click Save and Exit.
11. €Start Weather Display.
16
Each minute the program fetch3600.exe runs and produces a log file called out3600.txt.
Make sure there is data in the file and that the time and date matches that of the console.
To get missing data when Weather Dispay starts, do the following:
1. €On the main Weather Display window, click Control Panel.
2. €Under Station Settings, click Data Logger.
3. €Click on Extract data at start up so that it displays ON.
Then the missing data will be logged to out23002.txt by the program histlog3600.txt.
Vaisala WXT510
Use the standard mode where the WXT-510 transmitts all data automatically in formatted
ASCII to its COM port using the additional setup software/hardware tool sold by Vaisala.
Source: http:/ / wiki. weather- watch. com/ index. php? title=Weather_ Station_
Selection&oldid=2057
Principal Authors: ANONIPEDITS:0
Page 17

Calibration
Calibration
You should attempt to calibrate your weather station to improve the accuracy of your
weather observations. Weather Display provides a set of offsets which allow you to tune
your data. For example, if you know that your outdoor temperature sensor always reads
1oC high you can set an offset for this so that Weather Display uses and stores the correct
value.
To adjust the offsets for your weather station, do the following:
1. €On the Weather Display main menu, click Control Panel.
2. €Under Station Settings, click Offsets & Initial Rain.
Offsets are available for:
• €Barometer
• €Temperature
• €Humidity (Inside and Outside)
• €Wind Speed
• €Wind Direction
• €Rainfall
• €Time of Day
17
Enter offset values as necessary. You can also set your month-to-date and year-to date rain
data here, as Weather Display stores the rain totals independently from data stored in your
weather station. Click Yes to save your entries.
Source: http:/ / wiki. weather- watch. com/ index. php? title=Calibration&oldid=1969
Principal Authors: ANONIPEDITS:0
Logs and Logging
General
Logging of data is on by default, to a log file, updated every minute. These logfiles can be
found under the folder logfiles in the wdisplay directory.
For the month of may 2001, the name of the log file is: 52001lg.txt
There is also 52001lg2.txt, this is for soil temperature (if you have it) and for the daily
high/low temperatures
Go to the Setup menu and select "log file recording" for options, including having a comma
separated log file (.csv extensions) for use with excel or other spreadsheets. You can even
have weather display produce a custom log file, using the variable tags as found in the file
owntemplate.txt , or see the section custom web page in this help
The log file is created every minute. Once you select the units you want, don't change them
again!. You can see the averages/maximum/minimums by selecting view/ view averages for
month (i.e month to date). Reset log file will do this in the next minute (i.e blank the data).
Importing log files
You can import log files produced by other software. Go to Action menu and select "Import
log files from other software", and chose the correct software.
Page 18

Logs and Logging
For the Davis log files, you need to import the file called download.txt , produced by
Weather link. The 32 bit weather display conversion is for if the automatic conversion for
first time upgrade from version 7.39 was not successful.
If the 32 bit conversion when upgrading from 7.39 to 7.4+ does not work correctly, then
you can convert the log files one at a time using the option "convert weather display log
files to graphs". Custom log files
You can create a log files of your own design using WD's custom tags. First create a file
called "customtext.txt" in your "webfiles" directory. Then add custom tags as described on
the Custom Tags page.
Go to Setup menu and select "Log file recording", then select "Produce a custom text file,
then select "yes". And finally return to select "update frequency" and select an appropriate
interval.
Here is a sample "customtext.txt":
%date%,%time%,%dayrn%,%baro%,%temp%,%hum%,%dew%,%avgspd%,%dirdeg%,%indoortemp%,%indoorhum%,%indoordewfaren%
And here is the "customtextout.txt" that WD creates:
18
12/24/2002,10:31 AM,0.00 in.,29.628 in.,27.6 °F,48,10.5 °F,9.7 mph,330 °,71.1,38,44.2
Source: http:/ / wiki. weather- watch. com/ index. php? title=Logs_ and_
Logging&oldid=1651
Principal Authors: ANONIPEDITS:0
Forecasts and Icons
Weather Display uses a number of different methods to determine which current weather
icon will be displayed, e.g.
• €Weather Display's analysis of the weather default
• €WM918/WMR918/VP/La Crosse 2310 forecast icon
• €Weather Display's interpretation of downloaded METAR reports
• €User specified thresholds for fog, rain, snow
• €User selection
WM918/WMR918 forecast icon
If you set this to display, the icon that appears on the programs screen will be the forecast
icon from the station. This icon will also be used in the summary.gif file.
If you select "Do not display", then it will not be visible at all.
If you select "Auto update", then you can have the icon updated via input daily weather, or
have it updated from a downloaded METAR (see the section → Getting Weather Reports and
Metar Data).
Weather Display's interpretation of METARs
Weather Display can extract the "Conditions" phrase from a downloaded METAR. If you
have ticked "Coded" instead of "Decoded", it will use the 2 letter condition codes in the
METAR, e.g. RN for rain, and use that to determine the icon to be displayed.
1. €Click Setup, Summary Image/Icon Setup.
Page 19

Forecasts and Icons
2. €In approximately the middle of the left side of the page, there is a group of selection
boxes for METAR reports. Click those boxes that support your preferences.
3. €Click OK.
4. €Click on Setup, Setup FTP/.../METAR.
5. €Click the FTP/METAR Download tab.
6. €In the METAR Download group in the lower half of the page, find and click the box
labelled Use this METAR for ....
7. €Click OK.
Make sure you have a METAR name selected that is in the list of METARs to download, that
you have download times set, and that the switch is ON (green).
User specified thresholds
You may select the thresholds for Weather Display to use to determine if current conditions
suggest the use of the Snow, Fog, or Windy icons.
You can get Weather Display to override the METAR report if you tick that option in the
METAR icon setup, i.e. if you record rain or strong winds, then Weather Display will update
the icon regardless of what is included in the METAR reports. This is a good idea if the
METAR you are using is from an airport that is some distance away. Also some METARs are
only updated every hour, so the conditions could have changed since the last METAR was
produced.
19
1. €Click on Setup, Summary Image/Icon Setup.
2. €Approximately one-third of the way down the page, find and set the desired threshold.
3. €Click OK.
Note•••If you have a solar sensor, you can get the icon updated from that (see the solar
sensor setup).
User selection
1. €Click the Input Daily Weather menu.
2. €Click an icon of your choice.
3. €Click the box labelled Use this image as the icon,....
4. €Click OK.
This selection may be made at any time to represent the current weather. Such a selection
is immediately effective, and remains so until changed by the user, or user selection is
revoked.
If you cannot find a suitable icon, go to the section Replacing WD's weather icons or see the
link on the Weather Display download page.
Source: http:/ / wiki. weather- watch. com/ index. php? title=Forecasts_ and_
Icons&oldid=2008
Principal Authors: ANONIPEDITS:0
Page 20

Replacing Weather Display's Weather Icons
Replacing Weather Display's Weather
Icons
Weather Display will use the icons listed below to replace its built-in defaults.
1. €Create a folder called myicons, as a subfolder of Weather Display (i.e
c:\wdisplay\myicons or c:\My Programs\Weather Display\myicons).
2. €Create a set of icons in this directory and name them as follows:
• €cloudynight.gif
• €clearnight.gif
• €mainlyfine.gif
• €nightrain.gif
• €nightsnow.gif
• €nightovercast.gif
• €nightheavyrain.gif
• €sunny.gif
• €rain.gif
• €overcast.gif
• €partlycloudy.gif
• €fog.gif
• €lightrain.gif
• €heavyrain.gif
• €snow.gif
• €snowshowers.gif
• €sleetshowers.gif
• €sleet.gif
• €windy.gif
• €snowshowers2.gif (snow showers)
• €thundershowers.gif
• €thundershowers2.gif
• €thunderstorms.gif
• €showers2.gif (showers and fine intervals)
• €rain2.gif (rain)
• €cloudy2.gif (cloudy)
• €partlycoudy.gif (cloudy periods)
Thanks to Phillip Middlemiss, you can click here to download
[1]
a set of icons.
20
Page 21

Replacing Weather Display's Weather Icons
External links
[1] €http:/ / weatherdisplay. de/ english/ download/ icons. zip
Source: http:/ / wiki. weather- watch. com/ index. php? title=Replacing_ Weather_ Display's_
Weather_ Icons&oldid=1942
Principal Authors: ANONIPEDITS:0
Setting & Tracking Station Location
Setting Fixed Station Lattitude & Longitude
Purpose: This information is used to predict Sun & Moon rise and set times, and may be
required by activities your weather information is sent to.
Click on the Setup menu. Then click on "Sun/Moon Rise/Set ...". Enter Latitude and
Longitude data. (note: there is a link on the APRS setup page to obtain your Latitude &
Longitude if you have difficulty finding it on a map.) Make sure you use a negative number
for the southern hemisphere for latitude, and if you are west of GMT (i.e west of the
UK/England), ie. You live in the USA] then have a negative number for the longitude. There
will appear either a setting sun or a rising sun. Setting Fixed Station Elevation
21
Purpose: This information is used to predict Cloud heights, and may be required by
activities your weather information is sent to.
Click on the Setup menu. Then click on "Display Units Options / Reset times/ ...". In the
"Other Options" section, enter station height above sea level (feet). Tracking a moving
Station using GPS
Purpose: Provide a means for mobile weather stations (e.g. strom chasers, fishermen) to
report weather together with their current location.
Click on the Setup menu and select "GPS Data capture". Click the tab for Com port settings.
Select those settings appropriate for you GPS receiver. 4800,8N1 are the normal settings
for NMEA receivers. Select / deselect DTR, RTS ( in my case both OFF ), Some units will
require them to be ON to provide power, some require they be OFF. Turn Switch On (
Green ), then click the START button.
You should see "NMEA GPS" appear ( flashing ) in the Status
Click on the "Satellites" or "NMEA GPS" tab to see the results.
Currently the receiver must provide a NMEA data stream. If your's does not, here's a link
for a translator unit
Source: http:/ / wiki. weather- watch. com/ index. php? title=Setting_ &_ Tracking_ Station_
Location&oldid=1655
Principal Authors: ANONIPEDITS:0
Page 22
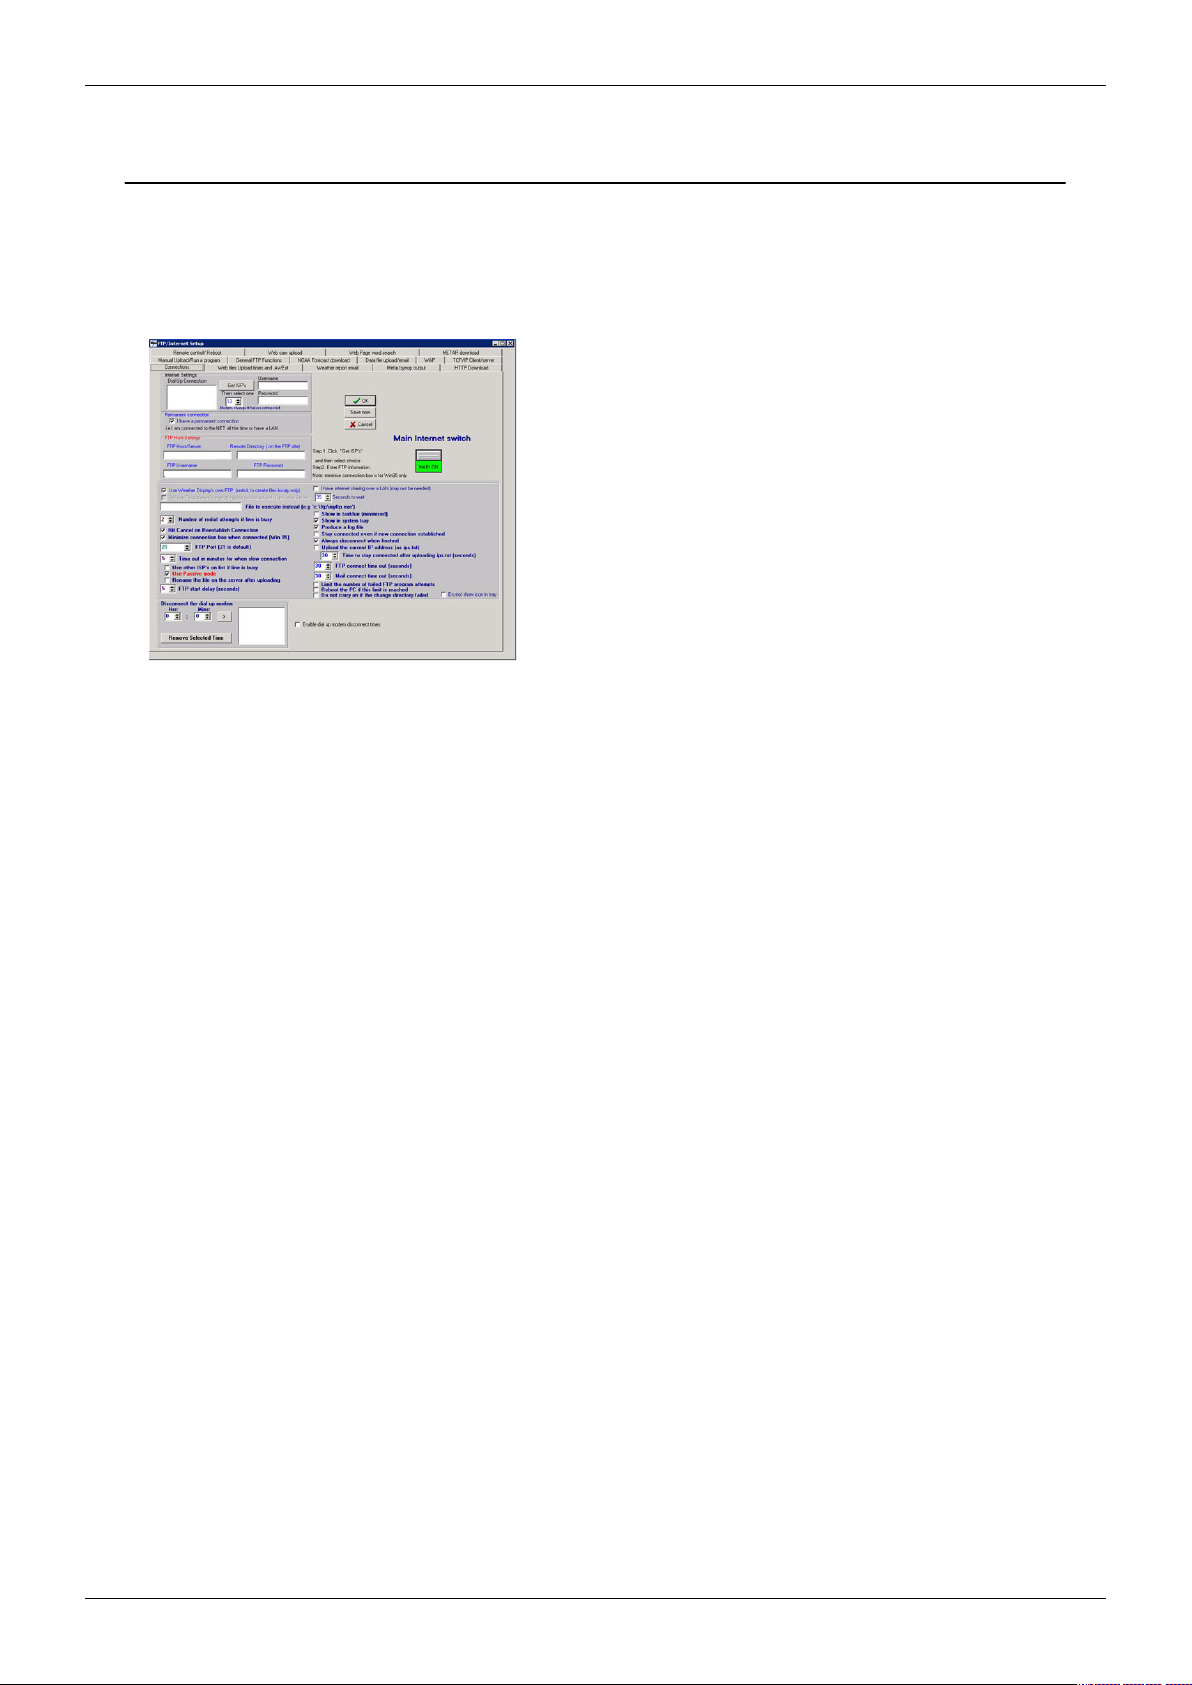
Connecting to Internet
Connecting to Internet
Getting Started
1. €On the main Weather Display window, click Control Panel.
2. €Under Web Site Configurations, click FTP Connections METAR/NOAA FTP.
3. €Click the Connections tab.
22
Dial- up networking to your Internet ISP
This is the more normal case when the WD machine gets its Internet access from a modem
directly connected to it.
1. €Under Internet Settings, click Get ISP's.
2. €Select the ISP you want to connect to (there most likely will only be one) from the list.
3. €The Username and Password text boxes should auto-complete with your information.
If you configured dial-up networking without the password saved , you will be prompted
to enter your password. This is the same password as you would normally enter when you
connect to the Internet.
4. €Continue with the All Setups section below.
Persistent (always on) connection to the Internet
This is if you are using ISDN, DSL, or cable modem broadband Internet service. It also
applies to those with dial-up modems which are connected at all times to your ISP.
1. €Under Permenant Connections, select the I have a permenant connection check
box.
2. €Continue with the All Setups section below.
Note•••Do not select the I have Internet sharing over a LAN check box.
Page 23

Connecting to Internet
All Setups
1. €For future debugging, select Produce a log file. If you want to view the last log file
produced, on the main Weather Display window, click View, and then under Logs, click
FTP Log. All of the current day's FTP Internet connections will be displayed. Tthe most
recent entries are at the end of the log.
2. €Select the Hit Cancel on reestablish connection is suggested.
3. €Minimize connection box when connected (Win 95) applies only if you are using
Microsoft Windows 95.
4. €You should not change the FTP Port from the default of 21, unless specified by your
ISP.
5. €If your FTP connection is very slow, the specified number in Time out in minutes for
when a slow connection denotes the number of minutes before Weather Display will
stop the FTP attempt. 5 minutes should be adequate.
6. €Do not select the Use other ISP's on list if line is busy check box unless you have
configured more than one ISP/FTP server.
7. €For some configurations, the normal FTP mode will work, but if you are using a
hardware or software firewall you might encounter problems. If a connection appears to
hang and you have a firewall, try selecting the Use Passive Mode check box. You might
also have to make changes to the firewall to let Weather Display access the Internet. You
should consult the documentation for your firewall for instructions on how to allow a
program to access the Internet.
8. €Rename the file on the server after uploading is not supported by some FTP
servers, including many Windows-based servers. Do not select this check box unless you
know your FTP server supports this functionality.
9. €Click the Main Internet Switch to toggle between MAIN OFF and MAIN ON. You
must use MAIN ON to enable the FTP functionality of Weather Display.
10. €Click OK.
23
Weather Display is now configured to use the Internet, but does not generate any Internet
activity by itself.
Notes
• €If you don’t want Weather Display to run its own FTP program, for example, because you
are using a Weather display on a local server, then clear the Use Weather Display's
own FTP check box, and you can enter in the File to execute instead text box a .bat
file for Weather Display to execute to copy the files to the detination location. You can
select the location of where to produce the files under the Tab Files, and then click Set
Web files location.
• €If you want Weather Display to perform other functions, such as send data to
Wunderground or download METARs, etc., then select the Still use ftpupd.exe for
everything but normal uploads check box. This check box is enabled only when you
clear the Use Weather Display's own FTP check box.
• €If you want Weather Display to update a Web page on the Internet, for example, your
Web home page, then you must set up the FTP Host/Server, FTP Username, and FTP
Password, using the server information and credentials provided by your Internet
service provider (ISP). If you leave the Remote Directory text box blank, then the files
are uploaded to your account's default folder on the FTP server. The Remote Directory
can be the most tricky part to get correct, as you need to get the placement of any
Page 24

Connecting to Internet
needed "/" exactly correct. Your ISP should be able to assist you if you encounter
problems.
Source: http:/ / wiki. weather- watch. com/ index. php? title=Connecting_ to_
Internet&oldid=1994
Principal Authors: ANONIPEDITS:0
Viewing WD data remotely
Weather Display can be used to display data from your station on other PCs connected to
your LAN or across the Internet. This allows the weather station to be connected to a PC
which is not in the desired viewing location but is on the same LAN or connected to the
Internet.
General definitions
• €If a PC is the source of the data, i.e. the PC with the weather station attached to it, it is
called the Server.
• €If a PC is a viewer of the data, i.e. a PC without a weather station attached to it, it is
called the Client.
24
Follow the steps in the Server or Client paragraphs below. When completed, all data
collected from the weather station by the Server PC will be broadcast on the LAN. This
broadcast data will be received by all client PCs and will be displayed on their Weather
Display screens.
Viewing Weather Display data across a LAN
Server
At the PC where the weather station is connected:
1. €Click on Setup, Setup FTP/Internet/...
2. €Click on the tab labelled "TCP/IP Client/Server".
3. €Click the button at the upper left side labelled "Server Enabled".
4. €You may also want to click the button labelled "Show indoor temp/hum on client".
5. €Click OK.
Client
At each PC where the weather data is to be viewed:
1. €Install Weather Display on the machine.
2. €Follow the procedures in → Quick Start but choose a station type of "Stationless". You
do not need to select a COM port, nor do you have to enable FTP.
3. €Click on Setup ,Setup FTP/Internet/...
4. €Click on the tab labeled "TCP/IP Client/Server".
5. €Click the button at the middle left side labelled "Client Enabled".
6. €You may also want to click the button labelled "Show indoor temp/hum on client".
7. €Click OK.
Page 25

Viewing WD data remotely
Viewing Weather Display data across the Internet
Follow these instructions to view the data on a (Client) PC with an Internet connection
where the weather station is connected to another PC which is not on your local LAN, but
does have an internet connection.
1. €Click on Setup, Setup FTP/Internet/...
2. €Click on the tab labelled "TCP/IP Client/Server".
3. €Click the button at the middle left side labelled "Client Enabled".
4. €You may also want to click the button labelled "Show indoor temp/hum on client".
5. €Click on the box in the lower left corner labelled "The data is from over the internet".
6. €Fill in the URL of the station supplying the data.
7. €Fill in your LAN's PROXY information if appropriate.
8. €Click OK.
"Client Viewer" at LAN sites
The Client Viewer provides an alternative method of viewing WD data.
You can configure Weather Display to create a clientraw.txt file, either locally on a server,
or sent by FTP to your web/ftp server. By default the file is created/sent every 3 seconds,
but you can change this under Web Files Setup.
25
Alternatively the file can be created/sent at the times you select under the advanced
internet setup (Customize Internet File Creation). For this option, you need to tick to
"Update this file" under Setup, Internet Setup, Client/Server. You do not need to have
Weather Display set up as a client or server to have this file updated by simply ticking that
option.
When the file is being uploaded, you can use the free client viewer to view the weather
data, updated every 3 seconds (or as defined). You need to set the viewer to use the data
from over the Internet in the setup, and enter the URL of the clientraw.txt file. The
alternative is to use a fixed IP address of the PC that is acting as you Weather Display
server, i.e. the PC with the weather station attached to it.
Source: http:/ / wiki. weather- watch. com/ index. php? title=Viewing_ WD_ data_
remotely&oldid=1792
Principal Authors: ANONIPEDITS:0
Customize your screens
You can change the colour of the text and background colour in parts of Weather Dispay to
jazz up the display and/or have background images loaded. You can also enable or disable
portions of the display to suit your tastes.
Colour
Click on Setup, General and Colour/Misc/Tide/etc, and select Setup Colours. Or you can
right mouse click on the main graph, and select Setup Colours.
Buttons are grouped by the part of Weather Display they effect, and are labelled for the
specific item they control.
Page 26

Customize your screens
Some screens let you set the background as an image file (BMP, JPG or GIF), e.g. the trends
image, summary image, etc.
You can also set the colours of the graph lines as well.
Note: Using more than 256 colours in your Windows settings gives the best results.
If your looking to use a black background for the main screen, make sure you have disabled
skins (Setup - Skins - No). It's a limitation with the result being any dialogs opened from the
main window will have black label text on black backround (ie you won't see any text).
For the weather dials page, i.e View, Dials, a black background and light green numbers
looks cool.
Displaying LCD numbers
All
Click on Setup, General and colour/misc/tide etc.
Wind Speed
Click on "Show the LCD Number". Select "Yes" or "No" as desired.
All other values
26
Click on "Use LCD numbers for current conditions". Select "Yes" or "No" as desired.
Daily Alarm LEDs
Click on Setup, General and colour/misc/tide etc. Click on "Show the daily high/low LED
alarms". Select "Yes" or "No" as desired.
Source: http:/ / wiki. weather- watch. com/ index. php? title=Customize_ your_
screens&oldid=2608
Principal Authors: ANONIPEDITS:0
Using and setting up custom screens
Purpose: You can create your very own custom screen (up to 10 if you purchase an extra
license, otherwise you have 3 to play with!) Use
See under view, custom screen (and select which custom screen number to use/setup/view).
Once in the screen, right mouse click on the background, and there you can hide/show the
objects
Click and hold on an object with the left mouse button to move a object.
Right mouse click on a object to choose to increase or decrease the size of that object.
You can also set the background image or colour of the whole screen.
You can also resize the whole window , and that new size will be remembered. Advanced
You can even set up to use custom tags (right mouse click on the custom tag ,and then you
can set the colour,font and the custom tag to use). Also, you can even use mesomap station
data (if you have set up the mesomap stations), and thereby display other weather stations
in your area weather data, live!
You can also set a image as say a downloaded satellite image/rain radar or a web cam
image (right mouse click on the default weather display banners). There is even a web page
window, where you can set it to any internet URL. Note , before hiding this web window if
Page 27
Using and setting up custom screens
you dont want to use it, leave it in the middle of your window working area.
Source: http:/ / wiki. weather- watch. com/ index. php? title=Using_ and_ setting_ up_
custom_ screens&oldid=1659
Principal Authors: ANONIPEDITS:0
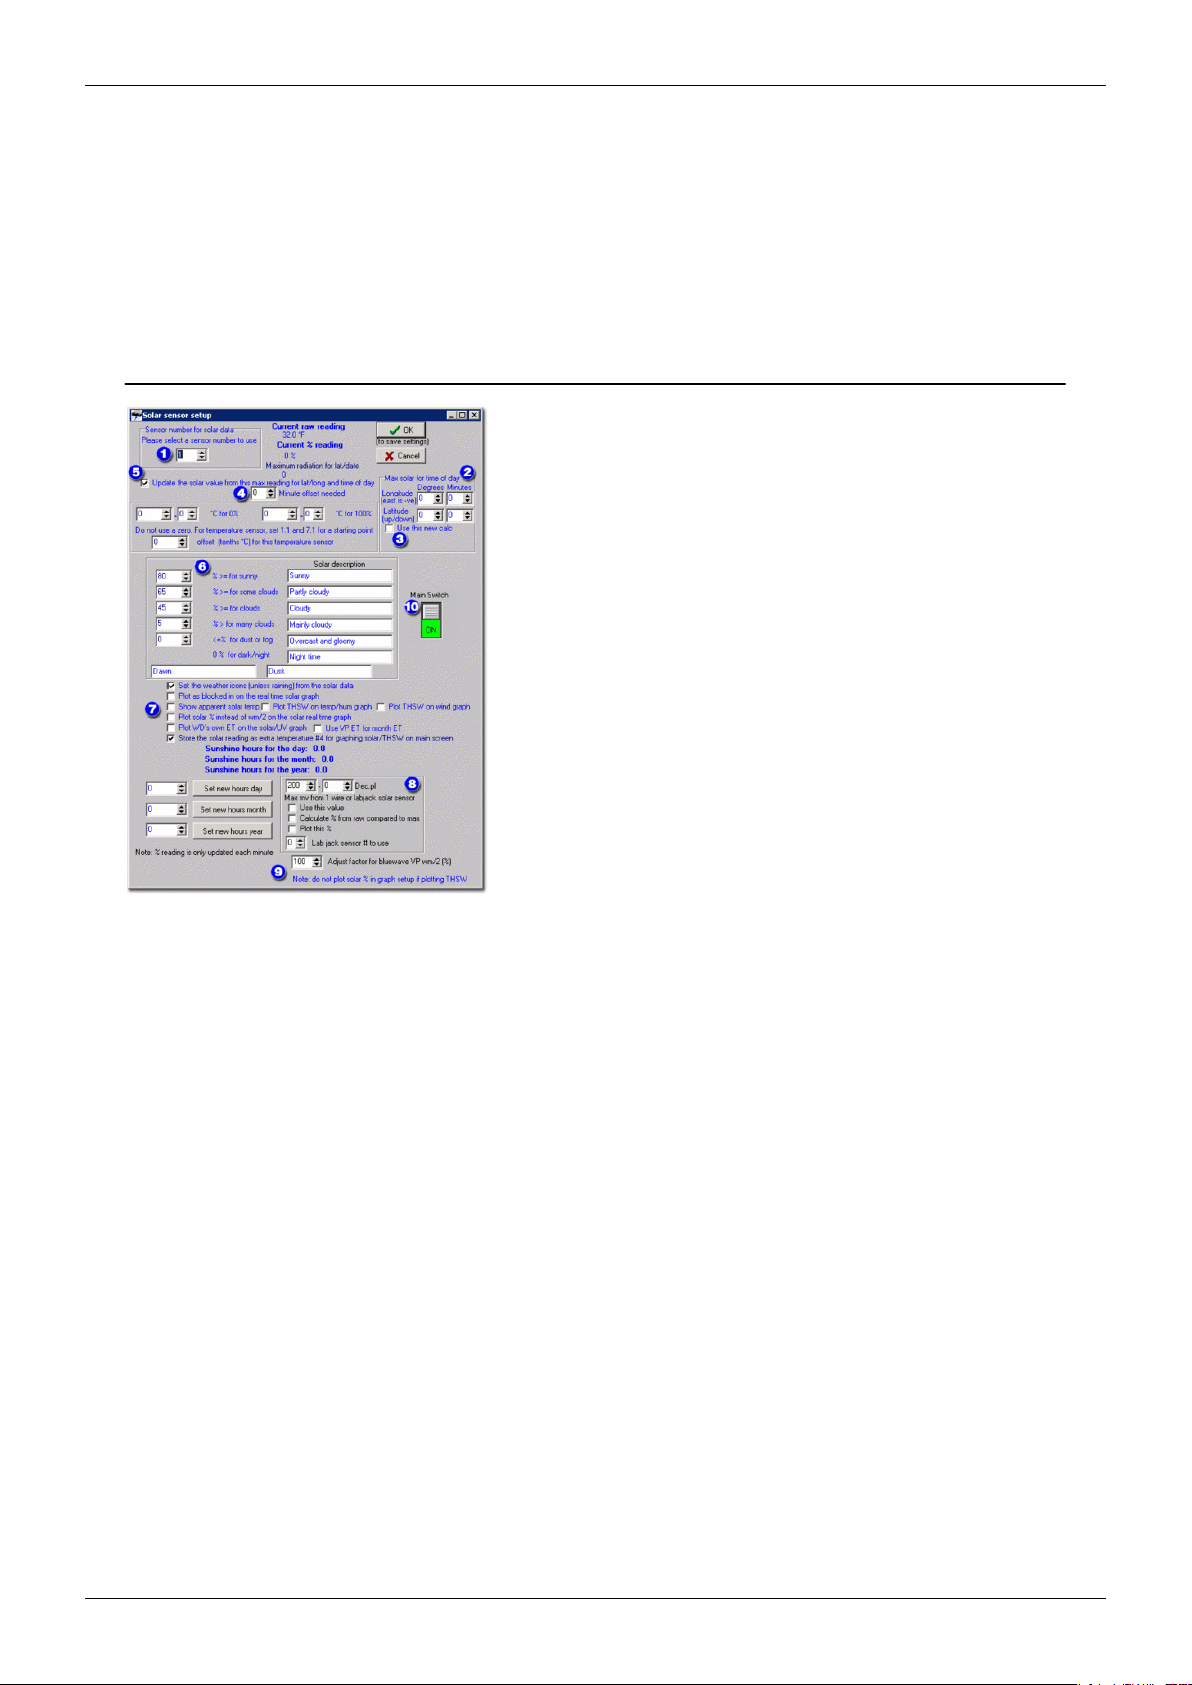
Solar Sensor Setup
27
1. €Select the sensor number your weather station uses for solar readings.
2. €Make sure you enter your latitude and longitude correctly here. Latitude is the up or
down from the equator and anything in the Southern hemisphere is negative. Logitude is
east or west of the Greenwich merian and negative is east of Greenwich.
3. €Select the Use this new calc check box.
4. €Make sure the Minute offset needed is always zero. You should never ever need to
change this value.
5. €Select the Update solar value from this max reading for lat/long and time of day
check box.
6. €The boxes for solar description and the percentage thresholds should be left as default
at this time. After you have your initial readings, you can return to this dialog box and
make necessary adjustments.
7. €There are two check boxes that should be selected„Set the weather icons (unless
raining) from the solar data and Store the solar reading as extra temperature #4
for graphing solar/THSW on main screen.
8. €The last box is used to setup a 1-wire solar sensor or LabJack and should not be
modified if you are using a VP sensor. This box will appear if you add any 1-wire
instrument to your setup, whether or not it is a solar sensor.
9. €At the bottom of the dialog box, leave the Adjust factor for bluewave VP wm/2 (%) at
100% if you have an original Davis solar sensor. You should not need to change the value
unless you are using a sensor from another vendor, your sensor has been modified, or
Page 28
Solar Sensor Setup
your sensor has drifted out of calibration. You should only compare values at or close to
solar Noon for your location on a very clear and sunny day.
10. €Make sure you click on the Main Switch so that it is in the green ON position.
11. €Click OK to save your settings and close the dialog box.
Source: http:/ / wiki. weather- watch. com/ index. php? title=Solar_ Sensor_
Setup&oldid=2052
Principal Authors: ANONIPEDITS:0
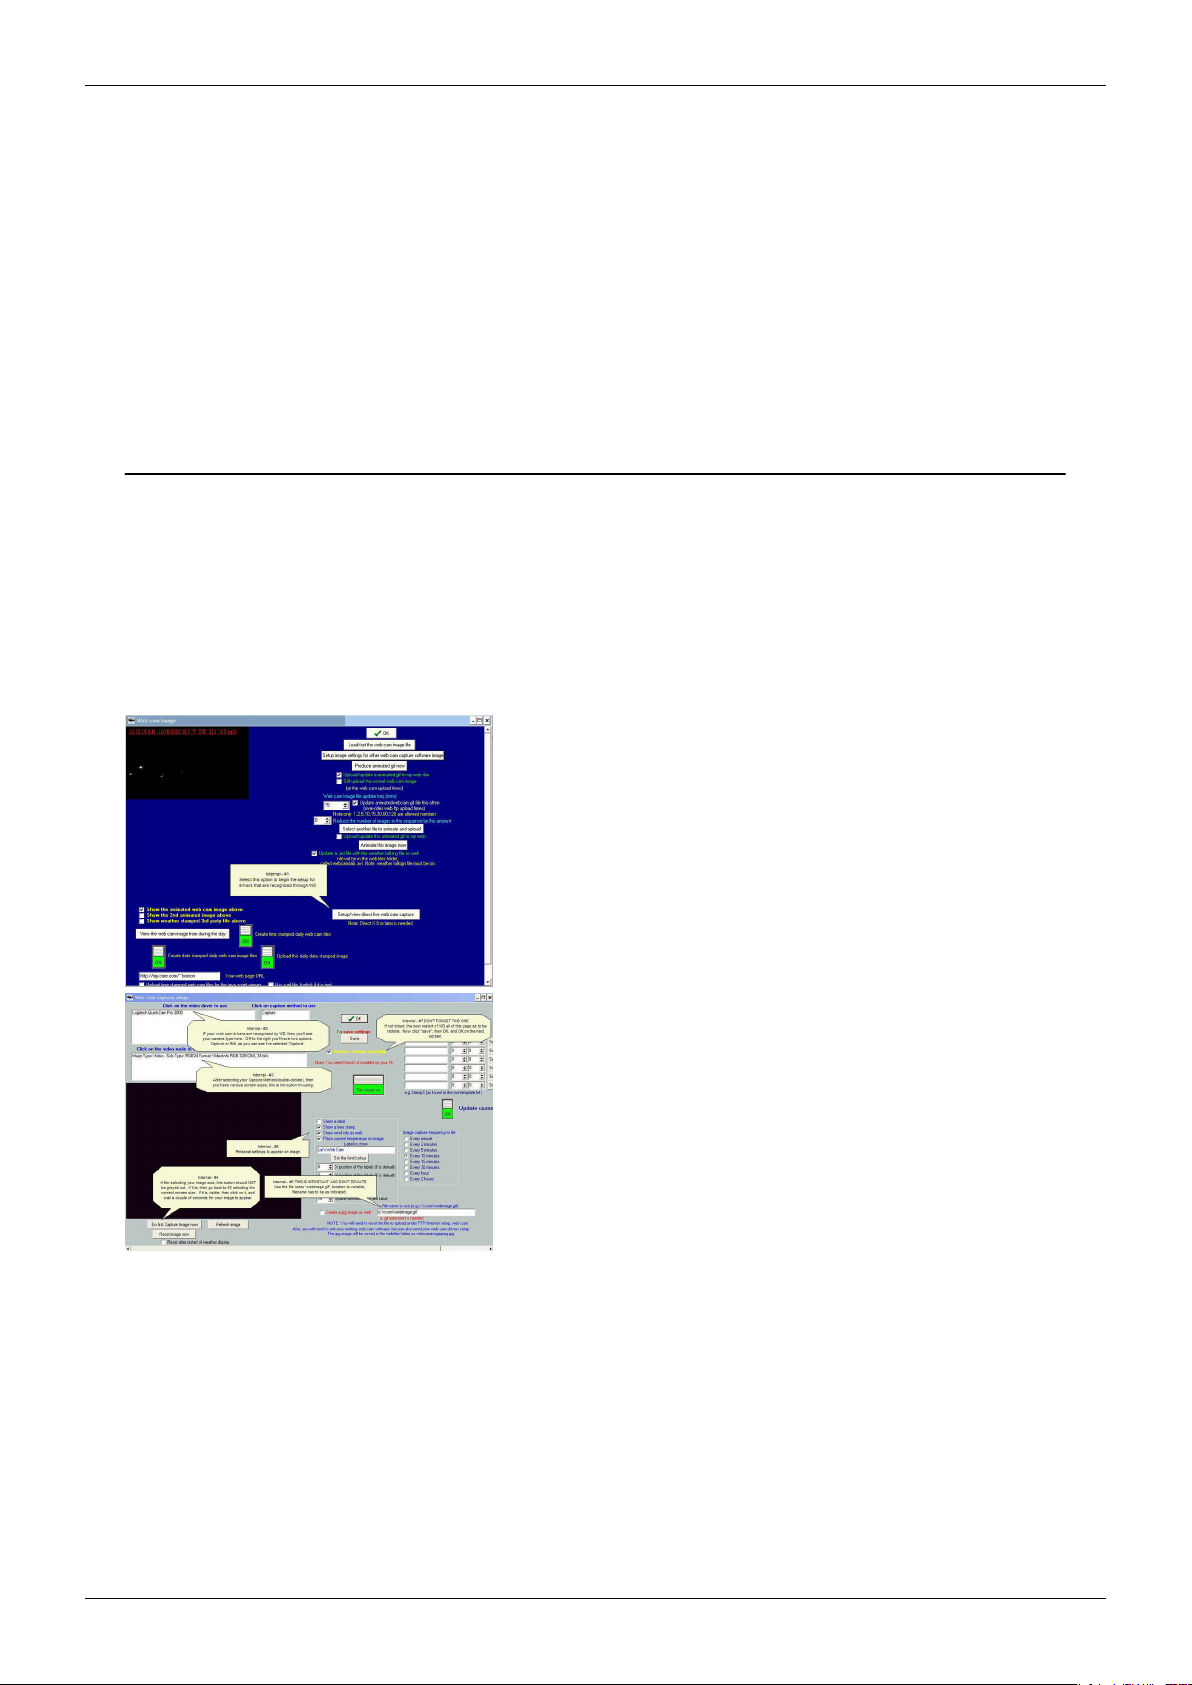
Direct web cam capture
1. €On the main Weather Display Window, click Control Panel.
2. €Under Web Site Configuration, click Web Cam.
3. €Click Setup/view direct live web cam capture (Internal - #1 in the screen shot)
4. €Follow the screen shots below.
5. €Optional settings are your choice from here, this shows how to get Weather Display
recognizing your camera and captured file.
28
Note these screen shots are outdated.
Source: http:/ / wiki. weather- watch. com/ index. php? title=Direct_ web_ cam_
capture&oldid=2031
Principal Authors: ANONIPEDITS:0
Page 29

Using a web cam image from another web cam program
Using a web cam image from another
web cam program
Graphics based info...needs Wiki conversion
Source: http:/ / wiki. weather- watch. com/ index. php? title=Using_ a_ web_ cam_ image_
from_ another_ web_ cam_ program&oldid=1661
Principal Authors: ANONIPEDITS:0
Using a web cam image from another web cam program, step by step guide
Graphics based info...needs translating to Wiki format
29
Source: http:/ / wiki. weather- watch. com/ index. php? title=Using_ a_ web_ cam_ image_
from_ another_ web_ cam_ program,_ step_ by_ step_ guide&oldid=1662
Principal Authors: ANONIPEDITS:0
All Day Video Setup
Bold textThis page is obsolete
The alldayvideo part has been replaced to the main software under 'control panel'
I'd love to update the page, but i do not understand the logic of that menu, while the
description of the buttons seem logic the actions do not always correspond to what they
suggest. I hope someone with more experience will exactly describe what setting are
required for what function, so this wiki page may be updated then.--Gert 09:46, 30
November 2007 (UTC)
This article will help you get started with the all day video feature in Weather Display.
The all day video compiles your Web cam images into an almost seamless video display for
entire day.
For a nice example, click here
First, make sure your Web camera is working properly and that your files are saved
correctly. This feature uses the jpgwebcam.jpg images, so make sure these are being
created and saved properly before you start.
[1]
.
More than 1,000 images will be used to make the video. To keep the many images from
cluttering your webfiles folders, you might want to consider creating a new folder in the
Weather Display folder named webcam. Change the Web cam settings so that images are
saved in this new folder location. You should decide now if you want to make this change
and complete the changes before proceeding.
The followiung image illustrates the options necessary for saving the files.
1. €On the Weather Display main window, click Control Panel.
Page 30
All Day Video Setup
2. €Under Web Site Configurations, click Web Cam.
3. €Click Setup/view direct live web cam capture.
4. €On the File Settings tab see the following options:
Make sure Every minute is selected.
Download the Microsoft® Windows Media Encoder 9 Series
[2]
.
After you have downloaded the file, execute it to run the setup.
In Weather Display, you need to make time stamped files.
1. €On the Weather Display main window, click Control Panel.
2. €Under Web Site Configurations, click Web Cam.
3. €On the Time stamped files setup tab, then click the "Time Stamped Files Setup" tab.
30
Make sure, the produce every minute check box is selected.
Hidden Feature•••Select the Show the floating web cam image from the graph mouse
position (hold left mouse button) and Use a jpg image for the Web image at graph
time check boxes. After your video has been produced, when you are viewing your main
window in Weather Display, while your mouse is over the upper right graph (baro/wind),
hold down your left mouse button, and move the mouse back and forth over the graph, your
video will appear in a pop-up window and show the video move in time as you move your
mouse back and forth.
1. €Click the Current Web Cam Image/Main Settings tab.
2. €Click Setup/View Direct Live Web Cam Capture.
3. €Click the Create All Day Video tab.
If you select the check boxes shown above, you will be create video for the entire day day,
and it be uploaded every hour.
You can view the video during the day up until the last hour.
Page 31

All Day Video Setup
After sunset, the entire day's video will appear. You can select the other check boxes to set
additional options.
The text at the bottom of the screen shot above, tells you the fodler used, and the image
used, etc. Make sure this corresponds with your setup.
After completing the last section, click Save, and then Close. The Current Web Cam
Image/Main Settings tab appears.
• €Click the Load/Set The Web Cam Image File.
You should see your Web cam image on the left and the file name should appear under
the button.
Your video is created around seven minutes after the top of the hour. Look in your Weather
Display folder for the alldayvideo folder. You should begin to see images amassing in the
folder. Scroll down to the bottom of the folder, and you should see a several Windows
Media files. One will be videolastday.mpeg. That is your original large file video. Also, you
will see videolastday.wmv. This is the compressed file that will be uploaded to your Web
site. The video is uploaded automatically after it is created each hour.
Tweaks on how to improve the the video quality of the .wmv file
[3]
31
External links
[1] €http:/ / images. weather-watch. com/ faqs/ snowmanfaq/ alldayvideo/ daymovie. wmv
[2] €http:/ / www. microsoft. com/ windows/ windowsmedia/ 9series/ encoder/ default. aspx
[3] €http:/ / www. weather-watch. com/ smf/ index. php/ topic,13620. msg93393. html#new
Source: http:/ / wiki. weather- watch. com/ index. php? title=All_ Day_ Video_
Setup&oldid=2603
Principal Authors: ANONIPEDITS:0
Summary image/ weather icons setup
Page 32

Summary image/weather icons setup
Title for Weather Summary image• • • Enter your station name here, and you can change
the font/colour using the buttons
Show the summary image on the Web page• • • Select this if you want the summary.gif
image to appear on your Weather Display default Web page
Update image, but dont show on page• • • This could be useful if you still want the
summary.gif file uploaded via FTP to your Web page for others to link to, but not actually
shown on your Weather Display default Web page.
Use the WM918/WMR918/WMR968/Davis VP/La Crosse 2310 forecast icon for
updating the icons• • • Only applies to the specified weather stations, and so you can set
the main page Icon to the forecast icon provided by this weather station
Show the WM918/WMR918/WMR968/Davis VP/La Crosse 2310 forecast icon on
summary image as well• • • Only applies to the specified weather stations, and so you can
set the summary image Icon to the forecast icon provided by this weather station
Snow Icon temperature threshold• • • Rain (or melted snow) recorded when the
temperature is below this value (°C), a snow Icon will appear instead of a rain icon
(however using METAR update will override this)
32
Have sunrise/set or moon as separate image• • • If you have this selected, then the
weather Icon will still be visible on the summary image, with the moon or sunrise/set icon
to the right of it (this makes the summary.gif file then wider at nighttime, so do not include
any width= and height= html commands if you are creating your own weather page)
Show the icons on the main screen• • • Normally selected, but if you clear, then a blank
area will appear where there is normally an icon
Show no icons at all• • • Normally not selected, use this to not have the weather icon on
the summary image either
Show the moon icon (at night time)• • • Normally selected, this will show the moon icon
(current phase is displayed) on the summary image. Note, make sure you have set the
lat/long correctly under view, sun/moon
Show the estimated cloud base• • • This number (feet or meters, select under setup,
units), shows the estimated cloud height (but clouds do not actually have to appear at this
height), and you must also enter your altitude, under setup, units (this is used in the
calculation, which is based on your stations dew point). It is not the height above your
station, but the height above sea level.
Icon update by downloaded METAR• • • If you want the weather icons to be updated and
match a chosen METAR you have Weather Display downloading (see under setup,
FTP/Internet setup, FTP download/METAR), then select this (use the downloaded METAR to
update the icon)
Use coded instead of decoded to update the icons• • • Normally not selected, this option
uses some of the abbreviations for weather conditions instead of the description in the
METAR.
Include extra weather conditions from downloaded METAR• • • A good idea to have
this selected: the text description of the weather conditions appears on the summary image,
under the icon
But leave the icon to be updated by your station weather• • • Not normaly selected,
with this option, the weather conditions text can still be displayed (as per previous), but the
Page 33

Summary image/weather icons setup
icon is determined by your stations rain record or wind strength, etc. Note, if under input
daily weather, you have selected use this image as the icon, then that icon will override all
icons.
Show the METAR image on the Web page• • • With this selected, a separate image
appears on the default Weather Display Web page next to the summary image, and shows
the METAR conditions. (you can change the colour, change the background etc of this
image...view the image to see these options, under view, METAR image)
Your stations rain/wind/fog overrides the METAR• • • With this selected, if the METAR
weather conditions show rain, but you have not recorded rain (for the minutes to check
back for rain), then a rain icon will not be displayed). Also, conversely, if your station has
recorded rain, but the METAR does not have any mention of rain, then a rain icon will be
shown. This also applies to the windy, fog, haze and mist icons.
Upload loacalweather.gif and weatherbanner.gif• • • These are 2 separate simply
versions of the summary image, and by selecting this, they will be FTP'd (or updated if
running a server and you have cleared use weather display ftpupd.exe, under the
connections setup in the ftp/internet setup) to your Web site, where you can link to them,
etc.
33
Show Webcam as icon on banner• • • If you have selected , use the Web cam image as the
icon (as long as you have selected a Web cam image file, under view, Web cam), then the
Web cam image will also be displayed on the localweather.gif and weatherbanner.gif
images (and the summary image weather icon will be the Web cam image if you have option
selected)
Show on main• • • If you have selected to use the Web cam image as the icon (select the
file under view, Webcam), then selecting this option will show the Web cam image on the
main screen (great for if you have setup to create a animated Web cam image, and you then
select that file as the Web cam file (animatedWebcam.gif)
Animate this Web cam image• • • If you have a animatedWebcam.gif as the Web cam
image (setup Weather Display to produce a animated Web cam image , under view,
Webam), then to still display the animation sequence for the Webcam icon on the summary
image, you need to select this check box (note, the file size of the summary.gif file increases
with this option)
Only show this Web cam image during the day time• • • If you have selected to use a
Web cam image as the icon, then it will only be visible during the daytime if you select this
option (daytime/night is calculated from the lat/long you have setup under view, sun moon).
Show this Web cam image as separate image• • • With this option, you can still have the
weather icon (which is either updated by your stations rain/wind or from a downloaded
METAR or manually via input daily weather (by selecting use this image as the icon),
displayed, as the Web cam image will be to the right of this weather icon.
Show border• • • Normally selected, this will display a border just inside from the outside
edge of the summary image
Use jpg (and not gif) type image• • • A slight gain can be achieved and is useful for if you
have the Web cam image as a icon, but the image file size is larger, but the animated
summary image (for the use of the animated Web cam image) will not work.
Do not show the weather icon if it is the default party cloudy icon• • • Normally not
selected.
Page 34

Summary image/weather icons setup
Show windchill• • • The current windchill number will be displayed. Note: you can also
have he beaufort scale number displayed, see under setup, units
Use 640x480 size• • • Not normally selected, if you enable this, you may need to adjust the
font sizes
Choose a background image• • • You can have a image as the background image for the
summary image, and then select to show that image (show this image)
Show this image day and night• • • Applies to the background image, and so it will be
visible all the time (normally selected, but if you have the background image as a Web cam
image, maybe clear this check box.)
This is a static image• • • Select this normally for the background image, unless you have
chosen a Web cam image, which you want Weather Display to update the summary image
background image with the latest Web cam image (that you have chosen as the summary
image background image)
Fog icon temperature threshold• • • If your stations temperature is less than or equal to
this temperature (°C), AND your stations humidity is greater or equal to the humidity
threshold you have set (and , under setup, offsets, you can select to set a 97% humidity
reading as 100%), then the FOG icon will be displayed/chosen.
34
Wind speed threshold for windy icon• • • If your stations wind speed (set the threshold in
knots, see under units, offsets, for the conversion formula) is above this threshold, then a
windy icon will be displayed/set.
Threshold for snow melt• • • Not normally used (i.e set at 50). If you set this to say 2 (°C),
and rain (i.e snow melt) is recorded, and the current temperature is greater than this
setting, then the snow melt icon is displayed, and the current conditions text will not
mention any rain (and instead will show the text for dry (note, use the set names for
thresholds button to set the names/descriptions for each weather condition)
Minute to check back for rain to set the icon• • • Normally set at 10 (minutes)...i.e any
rain recorded in this time will result in a rain icon (the amount recorded in that time
interval also fine tunes the icon (i.e light rain, rain, heavy rain, etc, as per the thresholds
listed in the threshold names setup)...unless you are using the METAR to update the icon
and have not selected my stations rain/wind/fog overrides the METAR.
Minutes to check back for recent rain to set the icon• • • Normally set at 5
(minutes)...this will change the weather description to recent rain, but the icon will not
update to a rain icon. Note, this is the period of time, in minutes selected, PRIOR to the
minutes selected for time to check back for rain.
Minutes to check back for its stopped raining• • • Normally set at 30 (minutes)...this
will change the weather description to Stopped raining, but the icon will not update to a
rain icon, if any rain has been recorded in the time period allocated (minutes) from the
current time, if no rain has been recorded for the above 2 thresholds.
Source: http:/ / wiki. weather- watch. com/ index. php? title=Summary_ image/ weather_
icons_ setup&oldid=1972
Principal Authors: ANONIPEDITS:0
Page 35

Update to Newer Weather Display Release
Update to Newer Weather Display
Release
Weather Display is frequently updated. New releases are typically available several times a
week. Use the following instructions and hints to update your Weather Display software.
Download the latest software
1. €On the Weather Display Web site
php Version History].
1. €To download the latest release, in the left navigation bar, click the [http:/ / www.
weather-display. com/ inframe. php?text=Download& inframe=download. php
Downloads].
On the Downloads page, there are several options. For this FAQ, only the main Weather
Display download for Windows 98/2000/ME/XP is discussed.
There are three different downloads for Weather Display available „ Main Weather
Display install file, Weather Display with error/crash debug code debug, and
Weather Display zip of the main .exe file.
[1]
, click [http:/ / www. weather-display. com/ history.
35
Note Upgrading the software does not modify or delete your weather data. However, you
should make regular backup of your data, especially before updating the software.
Install the latest software
The best way to update your version is by using the first link, Main Weather Display
install file. This download includes everything in Weather Display including the Weather
Display FTP software.
1. €In Weather Display, on the Exit menu, click Save and Exit. Make sure all of the
Weather Display applications, such as RealTime FTP do not appear in the Windows task
bar notifications area.
2. €Click Download next to Main Weather Display install file.
3. €When prompted, click Save, and then specify a folder location where to save the
Weather Display install program.
4. €When the download completed, browse to the folder you specified in step 3, and then
double-click the Weather Display .exe file.
5. €Follow the instructions on your screen to complete the installation.
6. €At the end of the installation wizard, click Finish. If you leave the Launch Weather
Display check box selected, Weather Display launches with the new version.
If you are requested to run the Debug version of Weather Display by the program author,
substitute the second link, Weather Display with error/crash debug code debug, in
step 2 above. The debug version contains extra diagnostic information that can be used by
the software developer to troubleshoot specific issues. You should only use this version
when requested.
The third item, Weather Display zip of the main .exe file is a compressed file of updated
items within Weather Display. This file does not include any updates for the Weather
Display FTP program. After downloading, in Weather Display, on the Exit menu, click Save
and Exit. Locate your downloaded .zip file, and extract the file to the folder that Weather
Page 36

Update to Newer Weather Display Release
Display is installed (usually c:\wdisplay or c:\Program Files\wdisplay). Re-start Weather
Display.
Notes
• €If you are using the WDMYSQL or clientraw.txt update utilities, make sure they are
completely shut down before beginning the software upgrade. If these applications are
running, they will appear as icons on the Windows task bar notifications area.
• €It is a good idea to keep an archive folder of Weather Display program downloads. If you
encounter a problem with a new version, you can go back to an older version by following
the steps above.
External links
[1] €http:/ / www. weather-display. com
Source: http:/ / wiki. weather- watch. com/ index. php? title=Update_ to_ Newer_ Weather_
Display_ Release&oldid=1995
Principal Authors: ANONIPEDITS:0
36
Uninstall Weather Display
These instructions are for removing Weather Display from Microsoft® Windows 98, 2000,
or XP.
The Add/Remove Programs feature of Windows will not remove Weather Display from
your computer. Do the following:
1. €New in recent versions of WD, there is now a file called unwise.exe, simply run that.
2. €Make sure Weather Display is completely shut down. You can use Task Manager to
make sure there are not copies of WDisplay.exe running.
3. €In Windows, click Start, and then click Run.
4. €Type regedit.exe, and then click OK.
5. €Expand HKEY_CURRENT_USER and locate wdisplayftp.ini.
6. €Right-click the wdisplayftp.ini entry, and then click Delete.
7. €In Windows, click Start, and then click My Computer.
8. €Browse to the c:\ drive and then open your Windows folder. This is typically the
Windows or winnt folder.
9. €Right-click on the file wdisplay.ini, and then click Delete.
10. €Delete the folder WDisplay or Weather Display, including all subfolders, from the c:\
or c:\Program Files folder.
Source: http:/ / wiki. weather- watch. com/ index. php? title=Uninstall_ Weather_
Display&oldid=2486
Principal Authors: ANONIPEDITS:0
Page 37

Setting up to use TAPR
Setting up to use TAPR
TAPR (Tucson Amateur Packet Radio) http:/ / www. tapr. net/ has a number of 1-wire
weather sensor kits available: X1W-1, X1W-4, X1W-4 and T-238+MODEM2, which provide
temperaure, humidity, barometer, radiation, lightning and rain sensors or interfaces thru
the Dallas 1-wire system.
Programming X1W-1 Barometer
1) In W-D, select "Control Panel", "Dallas 1-wire" then "Main/save setup". 2) Select the
ROM-id for the Barometer and copy it to the clip-board. 3) Move to "Barometer setup" 4)
Paste the Barometer ROM-id in the "Bray-Jennings Barometer ROM-id" space. 5) Check off
"I have a barometer (Bray-Jennings or AAG)". 6) Fill in the blanks (see drawing):
a) High Baro = 31.60
b) Low Baro = 25.69
c) High Voltage = 9.75
d) Low Voltage = 1.75
37
7) Click "Set". 8) Return to "Main/save setup" and click "save/reset" and "Close". 9) After
about a five minute delay, the barometer will start.
Source: http:/ / wiki. weather- watch. com/ index. php? title=Setting_ up_ to_ use_
TAPR&oldid=2491
Principal Authors: ANONIPEDITS:0
Page 38

PC Time Synchronization
3 Obtaining Data from Other
Sources
PC Time Synchronization
You can configure Weather Display to synchronize the time on your computer with an
Internet time source. Synchronization ensures that the weather observations from your
station have the same time and date as others around the world.
1. €On the main Weather Display window, click Control Panel.
2. €Under Station Settings, click Offsets & Initial Rain.
3. €Select the Sync the time every 6 hours at 30 minutes past the hour, over the
Internet check box.
4. €To synchronize the clock immediately, click Sync time now.
38
Alternatively, you can use a clock offset, which is added/subtracted every hour if your
computer clock loses/gains time at a known rate.
• €Enter a number of seconds in the PC Clock adjust per hour (seconds) box.
Note•••Weather Display does not use the time from weather station consoles.
Source: http:/ / wiki. weather- watch. com/ index. php? title=PC_ Time_
Synchronization&oldid=2032
Principal Authors: ANONIPEDITS:0
Getting Weather Reports and Metar Data
You can obtain governmental weather data data for use with your station. This data may be
used either as the sole input source, or to complement data obtained by your own weather
station. The data is obtained from the NOAA service, based in USA.
To configure Weather Display to collect data from other sources, click on Setup, Setup
FTP/Internet/..., FTP/METAR download. Forecasts and warnings are downloaded using
anonymous FTP, whereas the METARS are download by a faster HTTP download method.
There are 3 sections to this setup page:
• €Times to Download
• €Weather Reports /Warnings
• €METAR Downloads
Download times
These times apply to both warning/forecast downloads and Metar downloads.
Weather Reports and Warnings
Page 39

Getting Weather Reports and Metar Data
First, use your web browser to visit the NOAA site and determine the specific file for the
area of interest to you. You can select files for different locations to use in Weather
Display's setup for state or zone forecasts, etc.
Fill in the blank fields on this page with the host name, directory, and file name to be
downloaded.
If you wish, you may click on the "#2 setup" button to specify a second set of warnings or
forecasts to be downloaded.
Agencies in other countries also provide similar services, e.g. BOM in Australia.
METARS
METAR downloads are the easiest to setup. Just select a nearby airport/station from the
list, so that it is added to the list on the right hand side, or enter it into the space provided
and click on the '>' button. You must include the file extension '.txt' at the end of the 4
letter station ID code, e.g. EGNH.txt
If you want to use one of these METARs to update Wundeground, or to update your weather
icon, or to appear as extra text on the summary image, select that metar, so that it appears
in the bottom edit box, and then tick "Use this metar for local sky conditions (and
wunderground)".
39
Note: You don’t need a web/FTP server or homepage to download METAR or
forecasts/warnings.
If you want to have the METAR or forecast/warning visible on your web page, then you
need to tick "Include these text files on my web page".
You can select the location where the files are downloaded to (double click), and then to
view each file click on View, Downloaded METARs. If you have ticked "Use this METAR for
local sky conditions", when you click on the weather icon on the Weather Display screen,
the METAR will appear in a summarized form (and this image will appear on your web site).
Note: If you want to make sure that the METAR on your web site is always up to date,
download it just before your web page is updated. The Weather Display FTP program can
carry out multiple agenda items at the same time. Make sure you turn the switches ON (so
they are green) for either the METAR or forecast/warning download.
Finally, use the Test button to see if the METAR you have choosen is actually available.
Note: As with all setup pages in the FTP setup, nothing is saved to be used by Weather
Display until you click OK or TEST.
Source: http:/ / wiki. weather- watch. com/ index. php? title=Getting_ Weather_ Reports_
and_ Metar_ Data&oldid=1787
Principal Authors: ANONIPEDITS:0
Page 40

NOAA US County and Zone Codes
NOAA US County and Zone Codes
It's often useful when working with NOAA information to know your County and Zone code
numbers. The following maps will help you locate your zone.
NOAA Zone Map
The following contains all United States zones:
This file is an ASCII "dump" in pipe ("|") delimited form, of a "master" shapefile maintained
by AWIPS GIS Map Group (AGMG) for the maintenance of County, Public Forecast Zones,
CWA boundaries, and Time zones. Each record represents a single polygon within the
master file. Multiple polygons may exist for the same zone/county that contain the same
attributes, but the lat and lon fields will be different as they are the centroid of the polygon.
No attempt has been made to remove these seemingly duplicate entries from this text file.
In addition, the coastal and offshore marine zone shapefiles are also "dumped" to this file.
County-Public Forecast Zones Correlation file (CONUS/OCONUS)
File Specifications
[1]
[2]
40
Naming Convention: bp ddmmyy.dbx.
File Type: Text, delimited by pipes ("|")
Source: NWSI 10-507
Field name Type Width,Dec Description
STATE character 2
ZONE character 3 [zzz] Zone number
CWA character 3 County Warning Area, from WSOM C-47
NAME character 254 Zone name, from WSOM C-11
STATE_ZONE character 5 [sszzz] For Public Zones, state+zone number
COUNTYNAME character 24 County name
FIPS character 5 [ssccc] FIPS Code
TIME_ZONE character 2 [tt] Time zone assignment (DOT)
FE_AREA character 2 Geographic area of county
LAT numeric 9,5 Latitude of Centroid [decimal degrees]
[3]
, NWSI 10-503, FIPS Pub 6-4
[ss] State abbrev (US Postal Standard or Marine Zone two
letter prefix)
For Marine Zones,
complete zone id
[4]
[5]
[6]
TD
LON numeric 10,5 Longitude of Centroid [decimal degrees]
Page 41

NOAA US County and Zone Codes
External links
[1] €http:/ / www. weather. gov/ mirs/ public/ prods/ maps/ pfzones_list. htm
[2] €http:/ / www. weather. gov/ geodata/ catalog/ wsom/ data/ bp04ja06. dbx
[3] €http:/ / www. nws. noaa. gov/ directives/ 010/ 01005007a/ pd01005007a. pdf
[4] €http:/ / www. itl. nist. gov/ fipspubs/ fip6-4. htm
[5] €http:/ / www. itl. nist. gov/ div897/ pubs/ fip6-4. htm
[6] €http:/ / www. weather. gov/ geodata/ catalog/ county/ html/ county. htm#fe_abbrevs
Source: http:/ / wiki. weather- watch. com/ index. php? title=NOAA_ US_ County_ and_
Zone_ Codes&oldid=1986
Principal Authors: ANONIPEDITS:0
Using Metar Data instead of a real weather station
41
You can collect weather data from a nearby official (METAR) source and use it as input to
Weather Display.
Follow the instructions here → Quick Start to setup Weather Display, but use a station type
of "Stationless". No COM port selection is needed.
Follow these instructions → Connecting to Internet to establish an internet connection.
1. €Make sure the main Internet FTP switch is ON (green).
2. €Make sure that the Client/Server option is turned off.
3. €On the Setup menu, select "Setup FTP/Internet/..." and click on the "Download METAR"
tab.
4. €In the lower right of the screen there is a text box labeled "Use this METAR station ID",
enter a file name consisting of the id code of the METAR station you wish to use followed
by ".TXT", e.g. KAUG.TXT, or KWVL.TXT. For those using the USA NOAA site, the file
name must be all CAPS (other sites may differ).
5. €Click the "<" symbol to have the file name copied into the list box in the lower right
corner.
6. €Click the two boxes with labels beginning with "Use this METAR...".
7. €Click the red "OFF" button on the right so that it becomes a green "ON" button.
8. €Enter the schedule for collecting data into the form in the upper left.
9. €Click OK.
Source: http:/ / wiki. weather- watch. com/ index. php? title=Using_ Metar_ Data_ instead_
of_ a_ real_ weather_ station&oldid=1783
Principal Authors: ANONIPEDITS:0
Page 42

Setting up the MESOMAP
Setting up the MESOMAP
Graphics basd info...needs converting to Wiki format
Source: http:/ / wiki. weather- watch. com/ index. php? title=Setting_ up_ the_
MESOMAP&oldid=1671
Principal Authors: ANONIPEDITS:0
42
Page 43

Sharing Data with Others (APRS, Wunderground, etc.)
4 Providing Data to Other Sources
Sharing Data with Others (APRS,
Wunderground, etc. )
You can send weather observations from your station to a third party for use by the public,
or other Governmental or non-governmental forecasting agencies.
The following procedure applies to:
• €Anything Weather
• €APRS/CWOP
• €Weather for you/Ham Weather
• €Weather Underground
For all of the following you must have an Internet connection. Follow this link Connecting
to the Internet to set that up now if you haven't already done so.
43
1. €Make sure Weather Display's main internet switch is ON in FTP/Internet Setup,
Connections Setup.
2. €On the Setup, Control Panel click "Setup Wunderground or Weather For You icons".
3. €Select the service you wish to set up.
4. €Click on the link to go to the sign up page, and note any ID, password, or other
information assigned to you.
5. €When you get your assigned station ID and password, etc, return to the setup screen
and enter the details.
6. €Select the times to upload the data
7. €Turn the switch ON (so it shows green)
8. €Try a test by clicking on Test. You should be able to see your data when you click on
view data.
You can select the cloud type to include in the data, or you can include the weather
conditions from a METAR you have downloaded and selected (see the section on → Getting
Weather Reports and Metar Data).
Source: http:/ / wiki. weather- watch. com/ index. php? title=Sharing_ Data_ with_ Others_
(APRS,_ Wunderground,_ etc. )&oldid=1793
Principal Authors: ANONIPEDITS:0
Page 44

Sending Routine Weather Reports
Sending Routine Weather Reports
You can configure Weather Display to send a routine weather report to a set of email
addresses on a user specified schedule. Two separate groups of addresses, each with their
own schedule, may be set up.
1. €Make sure the main internet switch is ON in FTP/Internet Setup, Connections Setup.
2. €Click on "Setup" in the menu bar, then control panel.
3. €Click on "Weather Report Email".
4. €Find the input field labeled "Enter email address". Enter you own email address (you
can remove it later if you like).
5. €Click on the button labeled ">".
6. €You may import your Warning email address list by clicking on the button labeled
"Import List From Warning List".
7. €In the appropriate boxes, enter your station name, i.e. FredsBackYard, your email
address, and the name of the email server you use. Also enter any necessary User ID and
Password.
8. €Click the Red Switch on the right. It should turn to green, indicating Report email is
now enabled.
9. €Click on the button labeled "Test". Wait a minute or so, and check your incoming email.
You should have received a report from Weather Display.
10. €Return to the input field labelled "Enter email address". For each address you wish to
send the report to, enter the complete address and click on the button labeled ">". At
this point you may remove your own address, but it is recommended that you leave it in
the list so that you can see what the other addressees are receiving.
11. €Find the group labeled "Weather Report Times" on the left side of the page.
12. €Set up the time(s) for the report and click on the button labeled ">". You may have as
many times in the list as you wish, but the same list of times applies to each day that you
select.
44
You may add one or more attachments to the report. For example, you could attach the
NOAA (or equivalent) forecast if you are currently downloading it. You could also attach
your webcam image. Be cautious though, not all addressees will appreciate receiving too
much material.
Custom reports
You can create your own report design using Weather Display's custom tags. You might
create a custom report if you prefer to receive other informat than that provided in the
default Weather Display report format.
1. €Using a text editor, create a file named "customweatherreport.txt" in your
"wdisplay/webfiles" directory.
2. €In this file, layout whatever format you like using the methods described in → Using
Custom Tags.
3. €Go to Setup menu and select "Setup FTP/Internet/..."
4. €Click the tab labeled "Weather Report Email"
5. €Click the red button at the bottom labelled "Use a custom report ...". The button will
turn green.
Here is a sample "customweatherreport.txt":
Page 45

Sending Routine Weather Reports
Weather at Ladd Rd, Mercer, ME as of %time%, %formateddate%
Current radar & additional information available at: http:/ / personalpages. tdstelme. net/
~flaplant/
Forecast: see attachment
Weather (NOAA): %weatherreport%
Weather (PC): %weathercond%
Temperature: %tempinusa%
High: %hightempinusa% at %maxtempt%
Low: %lowtempinusa% at %mintempt%
Humidity: %hum%
High: %highhum% at %highhumt%
Low: %lowhum% at %lowhumt%
Rain today: %dayrn%
This month: %monthrn%
This year: %yearrn%
45
Days with no rain: %dayswithnorain%
Snow today: %snowtodayin.% inches
This month: %snowmonthin.% inches
This winter: %snowseasonin.% inches
Average Wind: %avgspd% from %dirlabel% (windchill = %windch%)
Gusts: %gstspd% at %maxgstt%
Barometer: %baro% %pressuretrendname%
High: %highbaro% at %highbarot%
Low: %lowbaro% at %lowbarot%
Sunrise: %sunrise% moonrise: %moonrise%
Sunset: %sunset% moonset: %moonset%
This report is sent automatically at 8:00AM & 7:00PM daily,
by Weather Display version %wdversion%,
based on a Davis WeatherMonitor II
This is an example of an email that Weather Display would create using that format:
Weather at Ladd Rd, Mercer, ME as of 08:03 AM, DATE: 24 December 2002
Current radar & additional information available at: http:/ / personalpages. tdstelme. net/
~flaplant/
Forecast: see attachment
Weather (NOAA): - --- Weather (PC): - Dry
Temperature: 25.5 °F
High: 29.5 °F at 01:39 AM
Low: 25.5 °F at 08:02 AM
Humidity: 57
Page 46

Sending Routine Weather Reports
High: 86 at 00:00 AM
Low: 55 at 07:14 AM
Rain today: 0.00 in.
This month: 2.15 in.
This year: 37.95 in.
Days with no rain: 3
Snow today: 0.00 inches
This month: 5.51 inches
This winter: 17.32 inches
Average Wind: 3.0 mph from NNW (windchill = 25.5 °F)
Gusts: 2.0 mph at 05:44 AM
Barometer: 29.571 in. Rising
High: 29.574 in. at 08:02 AM
Low: 29.376 in. at 00:00 AM
Sunrise: 07:12 moonrise: 18:55
46
Sunset: 16:05 moonset: 09:45
This report is sent automatically at 8:00AM & 7:00PM daily,
by WeatherDisplay version 9.38c,
based on a Davis WeatherMonitor II
Source: http:/ / wiki. weather- watch. com/ index. php? title=Sending_ Routine_ Weather_
Reports&oldid=1785
Principal Authors: ANONIPEDITS:0
Sending Weather Warnings
Weather Display can run a program, play a sound, send an e-mail message, or notify a
pager when certain local threshold conditions, that you have selected, are met.
Make sure the Main Internet switch is ON in the Connections setup in the FTP/Internet
setup.
General
1. €On the main Weather Display window, click Control Panel.
2. €Click Setup weather warning email.
3. €Set the threshold settings. They are Metric based, and kts for windspeed, but the
equivalent US units conversion are displayed. To covert from kmh from kts, use the
formula of 1.85 kmh for each 1 knot of wind.
You can easily get to this page by clicking on the alarm LED on the main weather display
page. If this is flashing, then a warning has occurred, and then click on reset alarm LEDs to
stop the flashing.
Page 47

Sending Weather Warnings
E- mail message warnings
1. €Next, if you want to send weather warning e-mail messages to someone, add the
recipient's e-mail address to the list. After typing the e-mail address, click >.
2. €Type your weather station name, your name, your e-mail address.
3. €Set up your e-mail settings that you use with your Internet service provider (ISP). If
necessary, change the port number of the SMTP outgoing mail server, however, port 25
is the most common.
4. €Make sure you turn the switch to ON, in the top right-hand corner to enable the
weather warning e-mails.
5. €Click Test to send a test report.
You can also add extra text to the e-mail message.
Warning to a pager
You can send an e-mail message to a pager with the information contained in the subject of
the e-mail message.
There are a few settings here (bottom left hand corner) to note:
47
• €If going to a numeric pager, then you need to select the e-mail to a numeric pager
check box, so no special characters (like % and oC) are included. You also need to type
the e-mail address to of the numeric pager. If you don’t want anything to appear in the
body of the e-mail message, then selec the Use email subject line only for message
check box. This is needed for a SMS e-mail service. If your station name is too long to fit
in the SMS limited space, then enter a new shorter station name.
• €If you have a list of e-mail addresses for the weather report e-mail message (see later in
this help, and see under FTP setup, weather report/reboot), and you want to send the
same people a weather warning e-mail message, click on import list from weather report
list.
Execute a program on a warning condition
You can have any other .exe or .bat file on your computer run at the same time. Just include
the full path name.
Play a sound file on a warning condition
If you want a sound to be played when a weather warning event has occurred, then just
name a .wav file (either record one, or use a existing sound file (i.e a .wav file ) on your PC,
but you need to rename the sounds, and have them located where weather display is
installed (c:\wdisplay is the default location).
The sound file names you need to have are:
• €rainin6hourswarning.wav -- For the rain in 6 hours threshold being exceeded.
• €rainin1hourwarning.wav -- For the rain in 1 hour threshold being exceeded.
• €pressurechangewarning.wav -- For the pressure change in 1 hour being exceeded.
• €maxavwindspeedwarning.wav -- For the maximum average windspeed threshold being
exceeded.
• €lowavwindspeedwarning.wav -- If the threshold is not zero, then this warning will be
activated when the average windspeed goes below the setting you have chosen.
Page 48

Sending Weather Warnings
• €rainrecorded.wav -- each time rain is recorded, this sound will be played (to get the
washing off the line!).
Note•••Any threshold will only be set off at a maximum rate of once per hour and the low
temperature threshold gets reset (so it can be set off again) when the temperature next
goes above that setting.
The following is a complete list of all sound files that Weather Display can use:
• €firstrain.wav
• €pressurechangewarning.wav
• €tempchangewarning.wav
• €rainin1hourwarning.wav
• €rainin6hourswarning.wav
• €maxtemperaturewarning.wav
• €mintemperaturewarning.wav
• €lowavwindspeedwarning.wav
• €maxindoortempwarning.wav
• €minindoortempwarning.wav
• €frostwarning.wav
• €wm918battery.wav
• €wmr918battery.wav
• €minwetbulb.wav
• €mildewwarning.wav
• €maxindoorhumwarning.wav
• €mintempextrawarning.wav
• €maxtempextrawarning.wav
• €mintempextrawarning.wav
• €mintempextrawarning.wav
• €minwindchillwarning.wav
• €maxbarowarning.wav
• €minbarowarning.wav
• €maxheatwarning.wav
• €speeddirwarning.wav
• €dirtime.wav
• €maxavwindspeedwarning.wav
48
Source: http:/ / wiki. weather- watch. com/ index. php? title=Sending_ Weather_
Warnings&oldid=2005
Principal Authors: ANONIPEDITS:0
Page 49

Creating a Weather Web Page
Creating a Weather Web Page
Purpose: Create a web page(s) for use on either the local LAN or at a public WEB site. Also
to transmit that page(s) to the web server. Let WD Create the page(s)
* Click "Setup" in the menu bar, then control panel.
* Click "then, Web files/web page setup".
* Click the tab labeled "Web Files setup #1".
To set the name of the file that will be uploaded to your web page, and be part of the URL,
enter that under weather station filename.
No spaces, but you can use - or _ and don't include '.html' or '.htm'. The file name will have
'.htm' put on the end of it automatically. You may click the "Use .html instead of .htm", if
you prefer that option.
If you are uploading a web cam file (the file name must remain static; see Help topic for
web cam to setup this up), then add in the title of the web cam image that you want to
appear on the web page (e.g. mybackyard).
49
If you want a wallpaper /background image to appear on the web site, then you enter the
name of the wallpaper or image (jpg or ..gif only), but this file must be on your FTP server.
You can have WD upload it to the server (see the "manual upload" tab), or use another FTP
program.
Title of Web page: This will appear on people's bookmark of your URL, on the browser
window, and on the Table title on the web page.
Special status message: use this as a quick and easy way to let people know the status of
the weather station.
The real time graph upload is the one you can see under view, real time graph (or right
mouse click on the graph in weather display to see this option)
Right mouse clicking on most of the screen in weather display gives you some popup
options, and a left mouse click will also go straight to some screens.
Tick the screen shot option to have the weather display screen, as you see it now, appear on
the web page. You can change the colour of the screen shot; see the button to set screen
shot colour (this is independent from the colour you have selected for normal viewing).
The upload time stamped 24 hour graph files option is useful if you want to limit the
amount of web server space weather display uses (i.e. un-tick this option to limit the file
space used).
Tick don't show indoor temperature/humidity on web page if you don't want these values to
appear on the screen shot (some weather station types do not have indoor
temperature/humidity anyway).
If you only want some images/dials on your web page, and no table, then you can tick that
option.
The upload daily high/low pressure is to upload and include on your web page the daily
high/low extremes (see under view, or click the extreme conditions section on the weather
display screen to see this image).
There are additional selections available at the tab labeled "Web Files #2".
Page 50

Creating a Weather Web Page
You can create links to other web sites, and a email to yourself link. Click on "reset" to reset
these links to start over if you make a mistake.
You can change the back ground colour and cell spacing of the web table. Using WD images
in your own web page(s)
If you already have web pages of your own, you can include WD images within them.
* Click "Setup" in the menu bar.
* Click "Control panel, web files/web page setup"
* Click the tab labeled "Web Files setup#1".
As described in the section "Let WD Create the page(s)", select the images of your choice.
Then tick that option to have them produced, and tick to upload them (un-tick this option of
you are running on a web server). Customizing the Summary image
* Click "Setup" in the menu bar.
* Click "Then control panel,Summary Image / Icon Setup".
The summary image is the first image that appears on the default web page.
Enter a title for this image ( I have entered Awhitu for my location, see http:/ /
weather-display. com/ windy/ otherdat. htm for my weather page.)
50
You can have the summary.gif file updated and uploaded, but not shown on the web page if
you want.
If you are downloading a METAR (see the METAR download section), then tick include
extra METAR info to have a separate METAR image produced (which you can view in
weather display by clicking on the weather icon).
The snow icon temperature threshold is to set the temperature at which weather display
decides you are having snow when precipitation is recorded.
If you don't have the WM918 forecast icon selected, then the weather icon that appears on
the summary image is based on either the one you have chosen under input daily weather,
or based on the rain in the last 10 minutes, or if below 10oC and over 97% humidity, then it
will be a foggy icon, or if over 30 kts average speed, then it will be a windy icon. You can
even have the weather conditions reported in the chosen downloaded METAR to update the
icon. You can select the background colour, text colour (i.e for the words wind speed, and
the Title colour). Hopefully soon I will get the chosen font to be selected properly.
Half an hour before and half an hour after sun set /sunrise (please set up the sun moon
settings correctly first -- see view, sun moon; enter here your latitude/longitude).
If you don't want this off to one side, and instead want it to appear where the weather icon
is, then tick don't have sunrise/set as a separate image.
After half an after sun set, the current phase of the moon will appear. If you have the above
mentioned option ticked, it will replace the current weather icon instead of appearing to the
side.
Click on the weather icon in weather display to see the summary image at any time.
If you don't want this weather icon to appear on the screen shot on the web page, then tick
don't show the icons on the main screen (useful if your PC screen colour is only set to 16
colours). Sending the page(s) to the web server
Page 51

Creating a Weather Web Page
* Click "Setup" in the menu bar.
* Click "Control panel,Setup FTP / Internet / ...".
* Click the tab labeled "Web File Upload Times".
Also, make sure you set up the FTP server details in the connections setup, and you turn on
the Main internet switch as well. Next you will want to select the times that your web page
is updated under Upload times.
If you want the files updated/uploaded every minute, then tick Update every minute. The
daily averages/extreme files are updated at the times specified, and you can set these to
update at a more convenient time. The actual averages/extreme files are updated at either
5 minutes past midnight (if you have the midnight reset time selected), or 5 minutes past
9am (if you have 9am reset time selected) (see under setup, reset times), regardless of the
time you set for when the files are updated to your web page. If you untick do daily uploads
of averages/extreme, then the files will neither be created or uploaded.
Further refinement of file creation time is possible: Click "Setup" in the menu bar; Click
"Customize the Internet File Creation FTP Schedule". Create your own custom page(s)
If you are unfamiliar with web page creation, you might want take a look at this site for a
good introduction. (Yeah, I know it says it's for kids, but it's all there, and well done too!)
51
Create a text file called wxlocal.html in the folder that contains Weather Display’s web files
(default is c:\wdisplay\webfiles). This will be your weather web page that Weather Display
will upload to your web site.
Create your HTML template using the special tags found on the "using Custom Tags" page.
Weather Display will replace these tags with the appropriate weather data (in the units you
have chosen) and then weather display will create a new file called wx.html and upload it,
leaving the original intact.
If you want to upload another file, then call it wxlocal2.html It will upload as wx2.html
(even if use normal file name selected). You can have up to 30 pages this way! You could
also use the customise internet and file creation setup to set times to update and times to
upload the wxlocal.html and wx.html file respectively, and you can also change the remote
filename there too (dont forget to set times to create and also set times to upload all other
files needed on the customise file creation and setup screen too)
Now go to the "Setup" menu. Click on "“Setup ftp / internet / ...". Select the tab labeled
"custom web page”.
Use the various checkboxes and buttons on this page to suit your needs. Click the red OFF
button to make it a Green ON button. Click the "Test" button to have WD create the
corresponding WX.htm files. If the resulting file is what you want, click OK.
You can refine the update and upload times using "Customize the Internet file creation / ftp
schedule" option in the Setup menu.
Here is a sample of how to use WD's custom tags:
<table border="1">
%formateddate% at %time%
<tr><td colspan="3">
<tr><th>Temperature
<td>Current: %tempinusa%
<td>Min: %lowtempinusa% at %mintempt%
Page 52

Creating a Weather Web Page
<tr><td>
<td>( %tempchangehour% )
<td>Max: %hightempinusa% at %maxtempt%
<tr><td colspan="3">
<tr><th>Wind
<td>Current: %avgspd%
<td>from %dirdeg% ( %dirlabel% )
<tr><td>
<td>Average
<td>Max %maxavgspd% at %maxavgspdt%
<tr><td>
<td>Gusts
<td>Max %maxgst% at %maxgstt%
<tr><td colspan="3">
<tr><th>Rain
<td>Today: %dayrn%
<td>This month: %monthrn%
<tr><td>
<td>
<td>This year: %yearrn%
<tr><td>
<td>
<td>days without: %dayswithnorain%
<tr><td colspan="3">
<tr><th>Snow
<td>Today: %snowtodayin.% in.
<td>This month: %snowmonthin.% in.
<tr><td>
<td>
<td>This winter: %snowseasonin.% in.
<tr><td colspan="3">
<tr><th>Barometer
<td>Current: %baro%
<td>Min: %lowbaro% at %lowbarot%
<tr><td>
<td>%pressuretrendname% ( %trend% )
52
Page 53

Creating a Weather Web Page
<td>Max: %highbaro% at %highbarot%
<tr><td colspan="3">
<tr><td colspan="3" align="center">
Weather data collected using Davis Weather Monitor
II<br/>
and displayed using Weather Display %wdversion%
</table>
And this is what you will get:
as of 31 December 2002 at 6:00 pm Temperature Current: 11.7 °F Min: 11.7 °F at 7:50 PM
( -4.0 °F/last hr ) Max: 27.0 °F at 12:42 PM Wind Current: 0.0 mph from 331 ° ( NNW )
Average Max 11.3 mph NNE at 11:19 AM Gusts Max 21.0 mph NNW at 11:08 AM Rain
Today: 0.00 in. This month: 0.18 in. This year: 0.18 in. days without: 1 Snow Today: 0.00 in.
This month: 12.99 in. This winter: 34.25 in. Barometer Current: 29.267 in. Min: 29.264 in.
at 7:41 PM Falling ( -0.024 in./hr ) Max: 29.619 in. at 00:04 AM Weather data collected
using Davis Weather Monitor II and displayed using Weather Display 9.43
53
Source: http:/ / wiki. weather- watch. com/ index. php? title=Creating_ a_ Weather_ Web_
Page&oldid=2647
Principal Authors: ANONIPEDITS:0, WikiSysop
Creating a Weather WML Page
Wireless Application Protocol (WAP) provides a way for delivering Web-like pages on mobile
devices. WML is the language used to create pages to be displayed in a WAP browser.
Turn on WAP file creation
1. €On the main window in Weather Display, click Control Panel.
2. €Click FTP & Connections METAR/NOAA FTP.
3. €Click WAP tab.
1. €Under Set up, type your weather station location name. For example, type Anywhere
Weather.
Page 54

Creating a Weather WML Page
2. €Type your home page Web address. For example, type http://www.example.com.
3. €Select the Nokia and/or USA format check boxes.
Make sure the Use my own custom WAP file check box is not selected.
4. €Click Create WAP directory for first time.
5. €Click Test and then verify the WAP file (index.wml) is created in the webfiles folders.
6. €Enter a schedule for WAP uploads.
7. €Click on the red Off button so that it becomes green and the label changes to On.
8. €Click OK to save settings and return to the main Weather Display window.
Create custom WML files
Make sure the default .wml file is being created.
1. €Return to the WAP screen as described above.
2. €Select the Use my own Custom WAP file' check box.
3. €Use the index.wml file, located in the folder webfiles, as a starter. Rename the file
waplocal.txt.
Note•••Make sure you do not accidentlaly reaname the file as waplocal.txt.txt.
At the scheduled times, this file will be read and a new index.wml created using that
format as a guide.
54
Replace actual weather conditions numbers with a custom tag. If you want to add other
information, add an appropriate label and its custom tag. ("indoor temperature:
%indoorhum%).
More information about using custom tags can be found on the → Using Custom Tags page.
A simple WAP page might look like the following:
<?xml version='1.0'?>
<!DOCTYPE wml PUBLIC '-//WAPFORUM//DTD WML 1.1//EN'
'http://www.weather-display.de/DTD/wml_1.1.xml'>
<wml>
<head>
</head>
<card id="Weather-Display" title="Weather-Display">
<p>
CURRENT WEATHER REPORT FROM: LaddRd<br/>
6:23:57 PM 12/25/2002<br/>
Temperature: %temp%<br/>
Windspeed: %avgspd%<br/>
Gustspeed: %gstspd%<br/>
Direction: %dirlabel% %dirdeg%<br/>
Barometer: %baro%<br/>
Humidity: %hum% percent<br/>
Dew point: %dew%<br/>
Today's rain: %dayrn%<br/>
Maximum temperature: %maxtemp% at %maxtempt%<br/>
Minimum temperature: %mintemp% at %mintempt%<br/>
Maximum gust today: %maxgst% at %maxgstt%<br/>
%time% %date%<br/>
Page 55

Creating a Weather WML Page
<a href="http://personalpages.tdstelme.net/~flaplant/weather/wx.html">Home</a> <br/>
<a href="http://www.weather-display.com/wap/index.wml">Created by
Weather-Display</a>
</p>
</card>
</wml>
The <br/> is optional and intended to force each entry onto a new line.
Source: http:/ / wiki. weather- watch. com/ index. php? title=Creating_ a_ Weather_ WML_
Page&oldid=2028
Principal Authors: ANONIPEDITS:0
Using Custom Tags
Purpose This material is for users who wish to produce a custom document containing
calculated data produced by Weather Display. No specialized knowledge is required for
their use, though it may be for the document in which they are placed (i.e. a web page
requires knowledge of HTML).
55
You only need to use the ones you want. e.g. Current Temperature %temp% (Heat Index
%heati%)
The Tags have been arranged into broad categories for ease of identification - this is no way
implies any order of precedence.
The following is a complete list of tags and their corresponding parameters.
General OR Non Weather Specific/SUN/MOON
========================================
%customscreenownlabelusethistag% Use this tag for a title/description
label on the custom screen
%loadfile%..................Loads a text file into this location, e.g
%loadfile%c:\wdisplay\webfiles\test.txt# the # is needed at the end of
the full path and file name
%loadfile1% ................uses only the 1st line in the file
%time% .....................current time
%date% .....................current date
%sunrise% ..................sun rise time (make sure you have the
correct lat/lon
in view/sun moon)
%sunset% ...................sunset time
%dayornight%................If day time, its says Day, if night time,
its says, Night (based on your sunrise/sunset)
%moonrise% .................moon rise time
%moonset% ..................moon set time
%moonage%...................current age of the moon (days since new
moon)
%moonphase%.................Moon phase %
%marchequinox%..............March equinox date
Page 56

Using Custom Tags
%junesolstice%..............June solstice date
%sepequinox%................September equinox date
%decsolstice%...............December solstice date
%moonperihel%...............Next Moon perihel date
%moonaphel%.................Next moon perihel date
%moonperigee%...............Next moon perigee date
%moonapogee%................Next moon apogee date
%newmoon%...................Date/time of the next/last new moon
%nextnewmoon%...............Date/time of the next new moon for next
month
%firstquarter%..............Date/time of the next/last first quarter
moon
%lastquarter%...............Date/time of the next/last last quarter
moon
%fullmoon%..................Date/time of the next/last full moon
%suneclipse%................Next sun eclipse
%mooneclipse%...............Next moon eclipse date
%easterdate%................Next easter date
%chinesenewyear%............Chinese new year
%pesachdate%................Pesach date
%weathercond% ..............current weather conditions, based on your
data
%weatherreport% ............current weather conditions from selected
METAR
%metar/report=%NZAA.MET Insert downloaded METARS or weather
reports/warnings.
Please replace NZAA.MET with the file name
downloaded.Note: use
56
and
html tags before and after this custom tag
%extrametarlabel% ..........extra METAR label from the metar.gif
%metarcloudreport% .........cloud METAR label from the metar.gif
%statusmessage% ............special status message
%warningemailalarm%.........For the warning email custom email (what
warning was exceeded)
%NOAAEvent%.................if you have setup the Noaa warning system
(if nor warning, then it will be NO CURRENT ADVISORIES)
%wdversion%.................Weather Display version number you are
running
%inputdailyweather%.........The text you enter for current weather
conditions
%formateddate%..............Date with "January", for example, in it
%current alarm flashing%....What it says - for the weather warning....
%time-minute%...............Current minute
%time-hour%.................Current hour
Page 57

Using Custom Tags
%date-day%..................Current day
%date-month%................Current month
%date-year%.................Current year
%utctime-minute%............UTC Current minute
%utctime-hour%..............UTC Current hour
%utcdate-day%...............UTC Current day
%utcdate-month%.............UTC Current month
%utcdate-year%..............UTC Current year
%cloudheightfeet%...........Estimated cloud base height, feet, (based
on dew point, and you height above sea level...enter this under setup)
%cloudheightmeters%.........Estimated cloud base height, metres, (based
on dew point, and you height above sea level...enter this under
setup)
%stationaltitude%...........Station altitude, feet, as set in the units
setup
%stationlatitude%...........Latitude (from the sun moon rise/set setup)
%stationlongitude%..........Longtitude (from the sun moon rise/set
setup)
%stationname%...............Station name, from noaa setup, or clientraw
real time ftp
%noaacityname%..............City name,from the noaa setup (in the
av/ext setup)
%noaastatename%.............State name, from the noaa setup
57
%windowsuptime% ............Windows up time
%freememory% ...............amount of free memory on the pc
%timeofnextupdate%..........Time of next Update/Upload of the weather
data to your web page (based on the web table update time)
%Startimedate%..............Time/date WD was started
%Startime%..................Just the time of when started
%Stardate%..................Just the date of when started
%5dayforecastday1%..........Forecast from the 5 day forecast graphic
image from a downloaded NOAA zone forecast file (which must be first
selected),,,,repeat up to day 8
%rawdataheader%.............Raw weather data for first line of web for
sharing raw data with others
%hoursofpossibledaylight%...Total hours/minutes of possible daylight
for today
%seaconditions% The expected local sea conditions based on the BFT
average windspeed
%heatcolourword%............How hot/cold it feels at the moment, based
on the humidex, used with the conditionscolour.jpg image (which is
updated with the gizmo.gif)
%filenamewapgraph%..........The current minute stamped .wbmp graph for
use with a custom wap page (temp/hum graph)
%filenamewapgraph2%.........The current minute stamped .wbmp graph for
use with a custom wap page (baro/wind graph).
Page 58

Using Custom Tags
i.e use this code:
WapSeer Control
WapSeer Control
%batteryvolts%..............Rain wise 2000/Weather Hawk/ battery level
%iconnumber%................Current icon number
US Navy
=======
%usnavycloudheight1%........Cloud height from the ceilometer, feet
%usnavycloudheight2%........Cloud height from the ceilometer, feet
%usnavycloudheight3%........Cloud height from the ceilometer, feet
%usnavycloudtype1%..........Cloud type
%usnavycloudtype2%..........Cloud type
%usnavycloudtype3%..........Cloud type
%watertempcelsius%..........Water temperature, oC
%watertempfaren%............Water temperature, oF
%visibility%................Visibility (miles)
Averages/Extreme
================
%monthtodateavtemp%.........Average temperature so far for the month
%monthtodateavtempcelsius%..Average temperature so far for the month,
celsius always
%monthtodateavhum%..........Average humidity so far for the month
%monthtodateavdp%...........Average dew point so far for the month
%monthtodateavdpcelsius%....Average dew point so far for the month,
celsius always
%monthtodateavbaro%.........Average barometer so far for the month
%monthtodateavbaromb%.......Average barometer so far for the month, mb
(hPa) always
%monthtodateavspeed%........Average windspeed so far for the month
%monthtodateavspeedkts%.....Average windspeed so far for the month,
knots always
%monthtodateavspeedms%......Average windspeed so far for the month, m/s
always
%monthtodateavspeedkmh%.....Average windspeed so far for the month, kmh
always
%monthtodateavgust%.........Average gustspeed so far for the month
%monthtodateavgustkts%......Average gustspeed so far for the month,
knots always
%monthtodateavgustms%.......Average gustspeed so far for the month, m/s
always
%monthtodateavgustkmh%......Average gustspeed so far for the month, kmh
always
%monthtodateavdir%..........Average direction so far for the month
%monthtodateavdirword%......Average direction so far for the month, in
words
%monthtodatemaxgustdirword%.Max gust direction in words.
58
Page 59

Using Custom Tags
%monthtodatemaxgustdirdeg%..Max gust direction in Degrees.
%monthtodatemaxtemp%........Maximum temperature so far for the month
%monthtodatemaxtempcelsius%.Maximum temperature so far for the month,
celsius always
%monthtodatemintemp%........Minimum temperature so far for the month
%monthtodatemintempcelsius%.Minimum temperature so far for the month,
celsius always
%monthtodatemaxhum%.........Maximum humidity so far for the month
%monthtodateminhum%.........Minimum humidity so far for the month
%monthtodatemaxdp%..........Maximum dew point so far for the month
%monthtodatemaxdpcelsius%...Maximum dew point so far for the month,
celsius always
%monthtodatemindp%..........Minimum dew point so far for the month
%monthtodatemindpcelsius%...Minimum dew point so far for the month,
celsius always
%monthtodatemaxbaro%........Maximum barometer so far for the month
%monthtodatemaxbaromb%......Maximum barometer so far for the month, mb
(hpa) always
%monthtodateminbaro%........Minimum barometer so far for the month
%monthtodateminbaromb%......Minimum barometer so far for the month, mb
(hpa) always
%monthtodatemaxwind%........Maximum av speed so far for the month
%monthtodatemaxwindms%......Maximum av speed so far for the month, m/s
always
%monthtodatemaxwindkts%.....Maximum av speed so far for the month,
knots always
%monthtodatemaxwindkmh%.....Maximum av speed so far for the month, kmh
always
%monthtodatemaxgust%........Maximum max gust so far for the month
%monthtodatemaxgustms%......Maximum max gust so far for the month, m/s
aways
%monthtodatemaxgustkts%.....Maximum max gust so far for the month,
knots aways
%monthtodatemaxgustkmh%.....Maximum max gust so far for the month, kmh
aways
59
%last24houravtemp%..........Average temperature last 24 hours
%houraveragetemp%...........Average temperature for the hour (put the
hour number immediatly after this tag,and then the month and then the
year numbers
e.g %houraveragetemp%08032003 for the average temperature for 8am
(use a 24 hour clock) (hour preceding that, for the month of March
2003)
%houraveragehum%............Same thing, but for humidity
%last24houravbaro%..........Average barometer last 24 hours
%tempfortimedate%...........Actual temperature for the hour (put the
hour number immediatly after this tag,and then the month and then the
Page 60

Using Custom Tags
year numbers
%daysTmax<0C%...............Days where the maximum temperature did
not go over 0oC (current month)
%daysTmax>30C%..............Days where the maximum temperature went
over 30oC
%daysTmax>25C%..............Days where the maximum temperature went
over 25oC
%daysTmin<0C%...............Days where the minimum temperature went
below 0oC
%daysTmin<-15C%.............Days where the minimum temperature went
below -15oC
%daysTmax>40C%..............Days where the maximum temperature went
over 40oC
%daysTmaxyear<0C%...........Days where the maximum temperature did
not go over 0oC (current month) ****year to date
%daysTmaxyear>30C%..........Days where the maximum temperature went
over 30oC
%daysTmaxyear>25C%..........Days where the maximum temperature went
over 25oC
%daysTminyear<0C%...........Days where the minimum temperature went
below 0oC
%daysTminyear<-15C%.........Days where the minimum temperature went
below -15oC
%daysTmaxyear>40C%..........Days where the maximum temperature went
over 40oC
60
%hddmonth%..................Heating degree days month to date
%cddmonth%..................Cooling degree days month to date
%hddday%....................Heating degree days ,today
%cddday%....................Cooling degree days ,today
%cddyear%...................Cooling degree days year to date (slow)
%hddyear%...................Heating degree days year to date (slow)
%raindifffromav%............Difference between the current month to
date rainfall and the average rainfall for the month (total for the
current month)
%raindifffromavyear%........Difference between the current year to date
and the average for the year to date (includes current month as total)
(from your entered averages)
Tags from the daily averages/extreme page (month to date) (note that
will still need to be enabled)
=========================================
%averagesextdata1%
" " i.e in the same data sequence as that appears on
Page 61

Using Custom Tags
the averages/extreme page (e.g february2003.htm)
the last 31 are the rain for the day of the month
(blank if no rain that day)
%averagesextdata66%
%averagetempfordaytimeofyearfromyourdata%..The average temperature for
the day you would expect from your data records for that day (updates
at midnight and midday)
%maxtempfordaytimeofyearfromyourdata%.....Max temperature to be
expected for the day from your data records (you need t 2 years of
data)
%mintempfordaytimeofyearfromyourdata%....The minimum of above
%maxtempfortodayfromyourdata%............The maximum temperature
reached for this day, from your data records
%mintempfortodayfromyourdata%............The minimum temperature
reached for this day, from your data records
%yearmaxtempfortodayfromyourdata%........The year the above reading was
reached
%yearmintempfortodayfromyourdata%
61
%WUmaxtemp%...............Todays average max temperature from the
selected Wunderground almanac station
%WUmintemp%...............Todays average min temperature from the
selected Wunderground almanac station
%WUmaxtempr%..............Todays record max temperature from the
selected Wunderground almanac station
%WUmintempr%..............Todays record min temperature from the
selected Wunderground almanac station
%WUmaxtempryr%............Year that it occured
%WUmintempryr%............year that it occured
%currentmonthtodatefilename%....The filename, of the current
averages/extreme web file (e.g April2004.htm)
%dropdownlist%...................Creates the drop down list selection
%maxtempweek%.........Max temp over the last week
%mintempweek%.........Min temp over the last week
%maxbaroweek%.........Max baro over the last week
%minbaroweek%.........Min baro over the last week
%maxhumweek%..........Max hum over the last week
%minhumweek%..........Min hum over the last week
%maxwindweek%.........Max wind (average) over the last week
%maxgustweek%.........Min gust over the last week
Page 62

Using Custom Tags
%maxtempweekday%.....Day of max temp over the last week
%mintempweekday%.....Day of min temp over the last week
%maxbaroweekday%.....Day of max baro over the last week
%minbaroweekday%.....Day of min baro over the last week
%maxhumweekday%......Day of max hum over the last week
%minhumweekday%......Day of min hum over the last week
%maxwindweekday%.....Day of mMax wind (average) over the last week
%maxgustweekday%.....Day of min gust over the last week
%avtempweek%..........Average temp over the week
%avhumweek%...........Average hum over the week
%avbaroweek%..........Average baro over the week
%avwindweek%..........Average wind over the week
%avgustweek%..........Average gust over the week
%rainforweek%............total rain over the last 7 days (from graph
data)
62
Temperature/Humidity
====================
Current:
--------
%temp% .....................temperature
%tempnodp% .................temperature, no decimal place
%dewnodp%...................dew point, no decimal place
%hum% ......................humidity
%dew% ......................dew point
%heati% ....................current heat index
%heatinodp% ................current heat index,no decimal place
%maxtemp% ..................today's maximum temperature
%maxtempnodp% ..............today's maximum temperature, no decimal
place
%maxtempt% .................time this occurred
%mintemp% ..................today's minimum temperature
%mintempnodp% ..............today's minimum temperature, no decimal
place
%mintempt% .................time this occurred
%windch% ...................current wind-chill
%windchnodp% ...............current wind-chill, no decimal place
%minwindch% ................minimum wind-chill
%minwindcht% ...............time this occurred
%maxwindchill% .............maximum wind-chill
%maxwindchillt% ............time this occurred
%highhum% ..................high humidity
%highhumt% .................time this occurred
%lowhum% ...................low humidity
%lowhumt% ..................time this occurred
Page 63

Using Custom Tags
%indoortemp% ...............indoor temperature
%indoorhum% ................indoor humidity
%maxdew% ...................high dew point
%maxdewt% ..................time this occurred
%mindew% ...................low dew point
%mindewt% ..................time this occurred
%maxheat% ..................high heat index
%maxheatt% .................time this occurred
%minheat% ..................low heat index
%minheatt% .................time this occurred
%avtempsince6amUSA%.........Average temperature since 6am in oF
%avtempsince6am%............Average temperature since 6am in oC
%avtempsince6pmUSA%.........Average temperature since 6pm in oF
%avtempsince6pm%............Average temperature since 6pm in oC
%tempinmetric% .............outdoor temperature always in metric (even
if US units selected)
%dewinmetric% ..............dew point always in metric
%heatindexinmetric% ........heat index always in metric
%windchillinmetric% ........wind chill always in metric
%maxheatinmetric% ..........maximum heat always in metric
%minheatinmetric% ..........minimum heat always in metric
%maxhighdewinmetric%........maximum dew point always in metric
%minlowdewinmetric%.........minimum dew point always in metric
%maxhighchillinmetric%......maximum high windchill always in metric
%minlowchillinmetric%.......minimum low windchill always in metric
%wetbulb%...................Current wet bulb reading
%tempinusa%.................Temperature in oF
%dewinusa%..................Dew point temperature in oF
%hightempinusa%.............Today's high temp in oF
%lowtempinusa%..............Today's low temp in oF
%indoortempinmetric%........Indoor temperature always in oC
%dewchangelasthour%.........Dew point change last hour
%tempchangelasthourmetric%..Temperature change last hour always in
metric
%tempchangelasthourfaren%...Temperature change last hour always in
faren
%wholeroundedtempcelcius%...Temperature rounded to whole number,
celsius
%wholeroundedtempfaren%.....Temperature rounded to whole number, faren
%humchangelasthour%.........Humidity change last hour
%maxindoortemp%.............Maximum indoor temperature
%maxindoortempcelsius%......Maximum indoor temperature, celsius always
%minindoortemp%.............Minimum indoor temperature
%minindoortempcelsius%......Minimum indoor temperature, celsius always
%maxindoortempt%............Time of Maximum indoor temperature
%minindoortempt%............Time of Minimum indoor temperature
%watertempcelsius%..........US Navy water temperature, celsius
63
Page 64

Using Custom Tags
%watertempfaren%............US Navy water temperature, faren
%visibility%................US Navy visibility reading (miles)
%soiltemp%..................Current soil temperature
%apparenttemp%..............Apparent temperature
%apparentsolartemp%.........Apparent temperature in the sun (you need a
solar sensor)
%apparenttempc%.............Apparent temperature, °C
%apparentsolartempc%........Apparent temperature in the sun, °C (you
need a solar sensor)
%apparenttempf%.............Apparent temperature, °F
%apparentsolartempf%........Apparent temperature in the sun, °F (you
need a solar sensor)
%extratemp1%................Extra temperature sensor 1 (change through
to 8)
%indoordewfaren%............Indoor dew point (oF)
%indoordewcelsius%..........Indoor dew point (oC)
%humidexfaren%..............Humidex value in oF
%humidexcelsius%............Humidex value in oC
%maxtemplast24hours%........The maximum temperature in the last
immediate 24 hours
%mintemplast24hours%........The minimum temperature in the last
immediate 24 hours
%maxtemplast24hourst%.......Time/date of the maximum temperature in the
last immediate 24 hours
%mintemplast24hourst%.......Time/date of the minimum temperature in the
last immediate 24 hours
%blackglobe%................Black globe temperature from Environdata
weather master 2000 station (oC)
%THI%.......................Heat stress calculation (oC)
%HLI%.......................Heat stress load (used with Cattle), gust
windspeed used (oC)
%HLIavwind%.................Heat stress load (used with Cattle),
average windspeed used (oC)
%THIf%......................Heat stress calculation (oF)
%HLIf%......................Heat stress load (used with Cattle), gust
windspeed used (oF)
%HLIavwindf%................Heat stress load (used with Cattle),
average windspeed used (oF)
%maxindoorhum%..............Maximum indoor humidity
%minindoorhum%..............Minimum indoor humidity
%dailyhighindoorhumtime%....Time of maximum indoor humidity
%dailylowindoorhumtime%.....Time of minimum indoor humidity
%airdensity%................Current air density, kg/m3
%abshum%....................Absolute humidity, kg/m3
%generalextratemp1%.........If using non standard extra temperature
sensors, but will work for any station
%generalextratemp2%
64
Page 65

Using Custom Tags
%generalextratemp3%
%generalextratemp4%
%generalextratemp5%
%generalextratemp6%
%generalextratemp7%
%wetbulbdiff%...............Difference between the wet bulb temperature
and the outdoor temperature
%maxsoiltemp%...............Maxium daily soil temperature (either you
have set a extra temperature sensor as soil or its a VP soil
temperature)
%maxsoiltemp%...............Minimum daily soil temperature
%soiltempincelsius%.........Soil temperature oC (no matter what units
selected in WD)
%feelslike%.................Shows heat index or humidex or windchill
(if less than 16oC)
%feelslikedp%...............same, but shows it with a decimal place
%dailyhitemp12%.............Hi temperature since 6am (to 6pm (resets
then)
%dailylotemp12%.............Low temperature since 6am (to 6pm (resets
then)
%nightlyhitemp12%...........HI temperature since 6pm (till 6am, resets
then)
%nightlylotemp12%...........Low temperature since 6pm (till 6am, resets
then)
65
Yesterday:
----------
%tempchangehour%............Temperature change in the last hour
%maxdewyest%................Yesterday's max dew point
%maxdewyestt%...............Time of yesterday's max dew point
%mindewyest%................Yesterday's min dew point
%mindewyestt%...............Time of yesterday's min dew point
%maxhumyestt%...............Time of yesterday's max humidity
%minhumyest%................Yesterday's min humidity
%minhumyestt%...............Time of yesterday's min humidity
%maxchillyest%..............Yesterday's max windchill
%maxchillyestt%.............Time of yesterday's max windchill
%minchillyest%..............Yesterday's min windchill
%minchillyestt%.............Time of yesterday's min windchill
%maxheatyest%...............Yesterday's max heatindex
%maxheatyestt%..............Time of yesterday's max heatindex
%minheatyest%...............Yesterday's min heatindex
%minheatyestt%..............Time of yesterday's min heatindex
%maxtempyest%...............Yesterday's max temperature
%maxtempyestt%..............Time of yesterday's max temperature
%mintempyest%...............Yesterday's min temperature
%mintempyestt%..............Time of yesterday's min temperature
Page 66

Using Custom Tags
%maxindoortempyest%.........Yesterday's Maximum indoor temperature
%minindoortempyest%.........Yesterday's Minimum indoor temperature
%maxindoortempyestt%........Time of yesterday's Maximum indoor
temperature
%minindoortempyestt%........Time of yesterday's Minimum indoor
temperature
Trends:
-------
%tempchange24hour%..........Temperature change in the last 24 hours
(from the trends, includes units)
%barochange24hour%..........Barometer change in the last 24 hours (from
the trends, includes units)
%humchange24hour%...........Humdidity change in the last 24 hours (from
the trends, includes units)
%windchange24hour%..........Wind change in the last 24 hours (from the
trends, includes units)
%dewchange24hour%...........Dew change in the last 24 hours (from the
trends, includes units)
%rainchange24hour%..........Rain change in the last 24 hours (from the
trends, includes units)
%temp24hoursago%............The temperature 24 hours ago
%baro24hoursago%............The barometer 24 hour ago
%maxtempyrago%..............Maximum temperature this day 1 year ago (if
you have that data)
%maxtempyrago%..............Minimum temperature this day 1 year ago (if
you have that data)
66
Wind
====
Current:
--------
%avgspd% ...................average wind speed (current)
%avnodp% ...................current average wind speed, no dec. place.
%avnodpmph% ................current average wind speed, no dec. place.,
mph always
%gstspd% ...................current/gust wind speed
%gustnodp% .................current/gust wind speed, no dec. place.
%gustnodpmph% ..............current/gust wind speed, no dec. place.,
mph always
%dirdeg% ...................wind direction (degrees)
%dirlabel% .................wind direction (NNE etc)
%dirlabeldutch%.............wind direction (NNE etc), Dutch
%winddirinwords%............Wind direction in words
%winddirinwordsdutch%.......Wind direction in words, Dutch
Page 67

Using Custom Tags
%maxgst% ...................today's maximum wind speed
%maxgstnodp% ...............today's maximum wind speed, no dec. place
%maxgstwords%............... " " " ", with words, i.e
westerly (i.e for telephone)
%maxgstdirectionletter%.....Max Gust direction, i.e. W
%maxavgdirectionletter%.....Max Averge direction, i.e. W
%maxgstt% ..................time this occurred
%maxavgspd% ................maximum average wind speed
%maxavgspdt% ...............time this occurred
%maxgsthr% .................maximum gust last hour
%maxgsthrt% ................time this occurred
%maxgustlastimediatehour%...Maximum gust for the last prior 1 hour
period
%maxgustlastimediatehourtime% time that the max gust last prior 1 hour
occured
%maxgustlastimediatehourdir% Direction from Max gust last prior 1 hour
period
%maxgustlastimediatehourdirword% Direction from Max gust last prior 1
hour period, in words
%maxgustlastimediate10%.....Maximum gust for the last immediate 10
minute period
%maxgustlastimediate15%.....Maximum gust for the last 10 to 15 minutes
%maxgustlastimediate30%.....Maximum gust for the last 15 to 30 minutes
%maxgustlastimediate60%.....Maximum gust for the last 30 to 60 minutes
%maxgustlastimediate120%....Maximum gust for the last 60 to 120 minutes
%avwindlastimediate10%......Average wind for the last immediate 10
minute period
%avwindlastimediate15%......Average wind for the last 10 to 15 minutes
%avwindlastimediate30%......Average wind for the last 15 to 30 minutes
%avwindlastimediate60%......Average wind for the last 30 to 60 minutes
%avwindlastimediate120%.....Average wind for the last 60 to 120 minutes
%avdirlastimediate10%.......Average dir wind for the last immediate 10
minute period
%avdirlastimediate15%.......Average dir wind for the 10 to 15 minutes
%avdirlastimediate30%.......Average dir wind for the 15 to 30 minutes
%avdirlastimediate60%.......Average dir wind for the 30 to 60 minutes
%avdirlastimediate120%......Average dir wind for the 60 to 120 minutes
%avdir10minute% ............average ten minute wind direction (degrees)
%avtenminutewind% ..........average ten minute wind speed
%1mingustwind% .............maximum gust in the last minute
%max1minuteavwind% .........maximum 1 minute average wind speed (since
the reset time)
%avspeedinmetric% ..........current average wind speed always in knots
%gustspeedinmetric% ........current gust speed always in knots
%avspeedinkmh% .............current average wind speed always in kmh
%gustspeedinkmh% ...........current gust speed always in kmh
%beaufortnum% ..............Beaufort wind force number
67
Page 68

Using Custom Tags
%currbftspeed%..............Current Beaufort wind speed
%todaygustspeedinmetric%....Today's maximum gust in knots
%maxgustlasthourinmetric%...Maximum gust last hour in knots
%10minavspeedinmetric%......Average 10 minute speed in knots
%10minavspeedinkmh%.........Average 10 minute speed in kmh
%maxavspeedinkts%...........Maximum daily average speed in kts
%maxgustlasthourkts%........Maximum gust imeediate last hour in kts
%maxgustlastmininkts%.......Maximum gust last minute in kts
%max1minavspeedlast12hrs%...Maximum 1 mintue average speed in kts last
12 hours
%maxdailygustinkts%.........Maximum daily gust in kts
%windgaugepointer%..........Create your own windspeed dial (will
replace this with avwindpoint1 for 1 kt speed, etc
%gustgaugepointer%..........Create your own windspeed dial (will
replace this with gustwindpoint1 for 1 kt speed, etc
%10minuteavspeedbft%........10 minute average speed, in bft number
%windinmph%.................Average wind in mph always
%gustinmph%.................Gust wind in mph always
%curdir10minutelabel%.......Current average 10 minute wind direction
label (i.e NNE)
%currentavtenminutewindms%..Current average 10 minute windspeed in m/s
%highavtenminutewind%.......Highest average 10 minute windspeed in the
last 12 hours (in the units you have selected)
%highavtenminutewindms%.....Highest average 10 minute windspeed in the
last 12 hours, m/s
%highavtenminutewindkts%....Highest average 10 minute windspeed in the
last 12 hours,knots
%highavtenminutewindkmh%....Highest average 10 minute windspeed in the
last 12 hours,kmh
%todaygustspeedinm/s%.......Today's maximum gust in m/s
%maxgustlasthourinm/s%......Maximum gust last hour in m/s
%10minavspeedinm/s%.........Average 10 minute speed in m/s
%maxavspeedinm/s%...........Maximum daily average speed in m/s
%maxgustlasthourm/s%........Maximum gust immediate last hour in m/s
%maxgustlastmininm/s%.......Maximum gust last minute in m/s
%todaygustspeedinkmh%.......Today's maximum gust in kmh
%max1minavspeedlast12hrsm/s%...Maximum 1 mintue average speed in kts
last 12 hours
%maxdailygustinm/s%.........Maximum daily gust in m/s
%maxdailygustinmph%.........Maximum daily gust in mph
%windruntodatethismonth%....Wind run to date this month
%windruntodatethisyear%.....Wind run to date this year
%windruntoday%..............Wind run today
%bftspeedtext%..............Beaufort scale in text (i.e Fresh Breeze)
%bftspeedtext10%............Beaufort scale in text (i.e Fresh Breeze),
based on 10 minute average
%last24houravdir%...........Last 24 hours average direction
68
Page 69

Using Custom Tags
%last24houravdirword%.......Last 24 hours average direction in words
%last24houravdirday%........Average direction so far for today (from
midnight)
%last24houravdirwordday%....Average direction in words for today (from
midnight)
Yesterday:
----------
%maxgustyest%...............Yesterday's max gust speed
%maxgustyestnodir%..........Yesterday's max gust speed, no direction
%maxgustyestt%..............Time of yesterday's max gust speed
%maxaverageyest%............Yesterday's max average speed
%maxaverageyestnodir%.......Yesterday's max average speed, no direction
%maxaverageyestt%...........Time of yesterday's max average speed
Baromometer
===========
Current:
--------
%baro% .....................barometric pressure
%trend% ....................amount of change in the last hour
%highbaro% .................high pressure
%highbarot% ................time this occurred
%lowbaro% ..................low pressure
%lowbarot% .................time this occurred
%pressurechangein3hour% ....pressure change in the last 3 hours
%pressurechangein6hour% ....pressure change in the last 6 hours
%pressurechangein12hour% ...pressure change in the last 12 hours
%pressurechangein24hour% ...pressure change in the last 24 hours
%pressuretrendname% ........pressure trend (i.e. "falling"), last hour
%pressuretrendname3hour% ...pressure trend (i.e. "falling"), last 3
hours
%maxbaroinmetric%...........maximum pressure always in metric
%minbaroinmetric%...........minimum pressure always in metric
%baroinusa%.................Current barometer reading in inches.
%baroinusa2dp%..............Current barometer reading in inches, 2
decimal places only.
%baroinmetric%..............Current barometer reading in metric.
%baroinkpa%.................Current baro in kpa
%currentpressureinmb%.......Current barometer always in mb (hpa is the
same value);
%pressurechangehourinmb%....Pressure change last hour in mb
%pressurechange3hourinmb%...Pressure change last 3 hours in mb
%pressurechange6hourinmb%...Pressure change last 6 hours in mb
%pressurechange12hourinmb%..Pressure change last 12 hours in mb
%pressurechange24hourinmb%..Pressure change last 24 hours in mb
69
Page 70

Using Custom Tags
%baroininches2dp%...........Pressure in inches to decimal places only
%vpforecasttext%............Forecast text from the Davis VP
%vapourpressure%............Vapour pressure (kpa)
%forecasticonword%..........Words for the forecast icon
Yesterday:
----------
%maxbaroyest%...............Yesterday's max barometer
%maxbaroyestt%..............Time of yesterday's max barometer
%minbaroyest%...............Yesterday's min barometer
%minbaroyestt%..............Time of yesterday's min barometer
%maxhumyest%................Yesterday's max humidity
Rain
====
Current:
--------
%dayrn% ....................today's rain
%dayrnusa% .................today's rain, in inches
%monthrn% ..................rain so far this month
%yearrn% ...................rain so far this year
%hourrn% ...................rain in the last hour
%maxrain/minlasthour% ......maximum rain per minute in the last hour
%maxrain/hourlast6hours% ...maximum rain per hour in the past 6 hours
%totalrainlast3hours%.......Total rain last 3 hours
%totalrainlast6hours%.......Total rain last 6 hours
%totalrainlast24hours%......Total rain last 24 hours
%currentmonthaveragerain%...Your average monthly rain you have entered
(current month)
%currentmonthaveragetemp%...Your average monthly temperature you have
entered (current month)
%dayswithnorain%............Consecutative days with no rain
%dayswithrain%..............Days with rain for the month
%dayswithrainyear%..........Days with rain for the year
%rainduration%..............Current rain episode duration, minutes
%todayraininmm%.............Today's rain in mm
%monthraininmm%.............Monthly rain in mm
%yearlyraininmm%............Yearly rain in mm
%rainlasthourmm%............Rain last hour in mm
%rainlast3hourmm%...........Rain last 3 hours in mm
%rainlast6hourmm%...........Rain last 6 hours in mm
%rainlast10min%.............Rain last hour in mm
%maxrain/minlasthourmm%.....Maximum rain per minute last hour in mm
%maxrain/hourlast6hoursmm%..Maximum rain per hour last 6 hours in mm
%timeoflastrain%............Time that the last rain tip was recorded.
%dateoflastrain%............Date that the last rain tip was recorded
70
Page 71

Using Custom Tags
(not retrospective)
%currentrainrate%...........Current rain rate, mm/min(or in/min)
%currentrainratehr%.........Current rain rate, mm/hr (or in./hr)
%maxrainrate%...............Max rain rate,for the day, mm/min (or
in./min)
%maxrainratehr%.............Max rain rate,for the day, mm/hr (or in.mm)
%maxrainratetime%...........Time that occurred
%raincurrentweek%...........Total rain last 7 days
%maxrain/hourlastmonthtodate% Max rain for hour month to date
Yesterday:
----------
%ystdyrain% ................yesterday’s rain
%yesterdayrain%.............Yesterday rain
%yesterdayrainmm%...........Yesterday rain in mm always
Over the last Week
------------------
%rainonmonday%.............Rain on monday
%rainontuesday%............Rain tuesday
%rainonwedensday%..........Rain on wedensday
%rainonthursday%...........Rain on thursday
%rainonfriday%.............Rain on friday
%rainonsaturday%...........Rain on saturday
%rainonsunday%.............Rain on sunday
71
Fire Weather
============
%FWIffmc%...................Fire weather index fine fuel moisture code
%FWIbui%.................... " " " build up index
%FWIisi%.................... " " " initial spread index
%FWIdmc%.................... " " " duff moisture code
%FWIdc%..................... " " " drought code
%FWIfwi%.................... " " " fire weather index
Sunshine/Solar/ET
=================
%Currentsolardescription%...Current cloud cover based on the solar
sensor
%sunshinehourstodatemonth%..Sunshine hours from the solar sensor
%sunshinehourstodateyear%.. " " " " " "
%sunshinehourstodateday%... " " " " " "
%sunshineyesterday%..........Yesterday sunshine hours
%VPsolar%.................. Solar energy number (W/M2)
%VPuv%......................UV number
%VPet%......................Evaportranspiration (daily)
%VPetmonth%.................Evaportranspiration (month to date)
Page 72

Using Custom Tags
%highsolar%.................Daily high solar (for Davis VP and Grow
stations)
%lowsolar%..................Daily low solar (for Davis VP and Grow
stations)
%highuv%....................Daily high UV (for Davis VP stations)
%lowuv%.....................Daily low UV (for Davis VP stations)
%currentsolarpercent%.......Current solar percent for stations with a
temperature solar sensor (like the dallas 1 wire)
%currentwdet%...............The current evapotranspiration rate
calculated by WD every minute
%yesterdaywdet%.............The final reading at midnight of WD's ET
%yesterdaydaviset%..........The final reading at midnight of Davis ET
%etcurrentweek%.............ET total for the last 7 days
%raincurrentweek%...........Total rain last 7 days
%growsolar%.................Current solar reading from a Davis Grow
station
%hoursofpossibledaylight%...Total hours/minutes of possible daylight
for today
%daylengthyesterday%........Yesterdays' reading (updated at 11:46pm)
%highsolartime%.............Time that the daily high solar occured
%lowsolartime%..............Time that the daily low solar occured
%highuvtime%................Time that the daily high UV occured
%lowuvtime%.................Time that the daily low UV occured
%highsolaryest%.............Yesterday's high solar
%highsolaryesttime%.........Time of yesterday's high solar
%highuvyest%................Yesterday's high UV
%highuvyesttime%............Time of yesterday's high UV
%maxsolarfortime%...........Max solar expected for the time of day
%sunshinehoursinlastwholehour% Sunshine hours in the last immediate
full hour
%sunshinehoursinlast10%.....Sunshine hours last 10 minutes (fraction of
hour)
%burntime%..................Time (minutes) to burn (normal skin) at the
current UV rate, from the Davis VP with UV sensor
%THSW%......................Current Davis THSW index
(temperature/humdidity/solar/wind) . You need a solar sensor, and have
the solar setup.
%hiTHSW%....................Hi THSW today
%loTHSW%....................Lo THSW today
72
VP soil temp/moisture/extra temperature/humidity
==================================================
%VPsoilmoisture%............Davis VP soil moisture
%VPsoilmoisture2%...........Davis VP soil moisture, # 2 sensor
%VPsoilmoisture3%...........Davis VP soil moisture, # 3 sensor
%VPsoilmoisture4%...........Davis VP soil moisture, # 4 sensor
Page 73

Using Custom Tags
%VPsoiltemp%................Davis VP soil temperature #2
%VPsoiltemp2%...............Davis VP soil temperature #3
%VPsoiltemp3%...............Davis VP soil temperature #4
%VPextratemp1%..............Davis VP extra temperature #1
%VPextratemp2%..............Davis VP extra temperature #2
%VPextratemp1hi%............Davis VP extra temp 1 daily high
%VPextratemp1lo%............Davis VP extra temp 1 daily low
%VPextratemp2hi%............Davis VP extra temp 2 daily high
%VPextratemp2lo%............Davis VP extra temp 2 daily low
%VPextrahum1%...............Davis VP extra humidity #1
%VPextrahum2%...............Davis VP extra humidity #2
%VPleaf%....................Davis VP leaf wetness
%VPleaf2%...................Davis VP leaf wetness, # 2 sensor
%VPleaf3%...................Davis VP leaf wetness, # 3 sensor
%VPleaf4%...................Davis VP leaf wetness, # 4 sensor
%hiVPleaf%..................Davis VP leaf wetness, daily high (#1
sensor)
%loVPleaf%..................Davis VP leaf wetness, daily low
%hiVPsoilmoisture%..........Davis VP soil moisture, daily high
%loVPsoilmoisture%..........Davis VP soil moisture, daily low
%leafminlast10min%..........Minutes last 10 minutes leaf wetness was
above zero
%leafminlast60min%..........Minutes last 60 minutes leaf wetness was
above zero
%vpconsolebattery%..........The Console battery, volts
%vpreception%...............The recpetion of the data from the ISS
status,Total packets received, Total packets missed, Number of
resynchronizations, The largest number of packets in a row that were
received., and the number of CRC errors detected.
%vpreception2%..............The current % reception
73
WS2000/WMR900h/La crosse 2010-13 data logger
============================================
%ws2000sen1t%...............Temperature of sensor 1 for the
WS2000/WMR900h or La Crosse station . Change the 1 to any number up to
9
%ws2000sen1h%...............Humidity of sensor 1 for the WS2000/WMR900h
or La Crosse station . Change the 1 to any number up to 8
%hiws2000sen1t%.............Daily high Temperature of sensor 1 for the
WS2000/WMR900h or La Crosse station . Change the 1 to any number up to
9
%lows2000sen1t%.............Daily low temperature of sensor 1 for the
WS2000/WMR900h or La Crosse station . Change the 1 to any number up to
9
%hiws2000sen1h%.............Daily high humidity of sensor 1 for the
WS2000/WMR900h or La Crosse station . Change the 1 to any number up to
9
Page 74

Using Custom Tags
%lows2000sen1h%.............Daily low humidity of sensor 1 for the
WS2000/WMR900h or La Crosse station . Change the 1 to any number up to
9
%hiws2000sen1ht%............Time of daily high humidity (1 to 9)
%lows2000sen1ht%............Time of daily low humidity (1 to 9)
%hiws2000sen1tt%............Time of daily high temperature (1 to 9)
%lows2000sen1tt%............Time of daily low temperature (1 to 9)
Record Readings
===============
%recordhightemp%............All time record high temperature
%recordlowtemp%.............All time record low temperature
%recordwindgust%............All time record high wind gust
%recordwindspeed%...........All time record high average speed
%recorddailyrain%...........All time record daily rain
%recordlowchill%............All time record low windchill
%recordlowchillhour%........All time record low windchill, hour
%recordlowchillminute%......All time record low windchill, minute
%recordlowchillday%.........All time record low windchill, day
%recordlowchillmonth%.......All time record low windchill, month
%recordlowchillyear%........All time record low windchill, year
%recordhighbaro%............All time record high barometer
%recordlowbaro%.............All time record low barometer
%recorddailyrainday%........Day of record daily rain
%recorddailyrainmonth%......Month of record daily rain
%recorddailyrainyear%.......Year of record daily rain
%recordlowbaroday%..........Day of record low baro
%recordhighbaroday%.........Day of record high baro
%recordlowbaromonth%........Month of record low baro
%recordhighbaromonth%.......Month of record high baro
%recordlowbaroyear%.........Year of record low baro
%recordhighbaroyear%........Year of record high baro
%recordlowtempday%..........Day of record low temperature
%recordhightempday%.........Day of record high temperature
%recordlowtempmonth%........Month of record low temperature
%recordhightempmonth%.......Month of record high temperature
%recordlowtempyear%.........Year of record low temperature
%recordhightempyear%........Year of record high temperature
%recordhighgustday%.........Day of record high wind gust
%recordhighgustmonth%.......Month of record high wind gust
%recordhighgustyear%........Year of record high wind gust
%recordhighavwindday%.......Day of record high wind average speed
%recordhighavwindmonth%.....Month of record high wind average speed
%recordhighavwindyear%......Year of record high wind average speed
%recordhighheatindex%.......Record high heat index
%recordhighheatindexday%....Record high heat index day
74
Page 75

Using Custom Tags
%recordhighheatindexday%....Record high heat index month
%recordhighheatindexyear%...Record high heat index year
%coldestnightonrecord%......Coldest night on record (6pm to 6am)
%coldestdayonrecord%........Coldest day on record (6pm to 6am)
%warmestnightonrecord%......Warmest night on record (6am to 6pm)
%warmestdayonrecord%........Warmest day on record (6am to 6pm)
%recordhighdew%.............Record high dew point
%recordhighdewday%..........Record high dew point, day
%recordhighdewmonth%........Record high dew point, month
%recordhighdewyear%.........Record high dew point, year
%recordlowdew%..............Record low dew point
%recordlowdewday%...........Record low dew point, day
%recordlowdewmonth%.........Record low dew point, month
%recordlowdewyear%..........Record low dew point, year
%recordhighhum%.............Record high humidity
%recordhighhumday%..........Record high humdidity, day
%recordhighhummonth%........Record high humidity, month
%recordhighhumyear%.........Record high humdiity, year
%recordlowhum%..............Record low humidity
%recordlowhumday%...........Record low humdity, day
%recordlowhummonth%.........Record low humdity, month
%recordlowhumyear%..........Record low humdity, year
%recordhighsolar%...........Record high solar
%recordlhighsolarday%.......Record high solar, day
%recordhighsolarmonth%......Record high solar, month
%recordhighsolaryear%.......Record high solar, year
%recordhighuv%..............Record high uv
%recordlhighuvday%..........Record high uv, day
%recordhighuvmonth%.........Record high uv, month
%recordhighuvyear%..........Record high uv, year
%recordhighsoil%............Record high soil temp
%recordlowsoil%.............Record low soil temp
%recordhighsoilday%.........Record high soil temp ,day
%recordlowsoilday%..........Record low soil temp, day
%recordhighsoilmonth%.......Record high soil temp ,month
%recordlowsoilmonth%........Record low soil temp, month
%recordhighsoilyear%........Record high soil temp ,year
%recordlowsoilyear%.........Record low soil temp, year
%recordlowgrass%............Record low grass temp
%recordlowgrassday%.........Record low grass temp, day
%recordlowgrassmonth%.......Record low grass temp, month
%recordlowgrassyear%........Record low grass temp, year
%recordhighthsw%............Record high THSW
%recordlowthsw%.............REcord low THSW
%recordhighwindrun%.........Record high wind run
%recordhighwindrunday%......Record high wind run, day
%recordhighwindrunmth%......Record high wind run, month
75
Page 76

Using Custom Tags
%recordhighwindrunyr%.......Record high wind run, year
%recordhighrainmth%.........Record high rain total for month
%recordhighrainmthmth%......Record high rain for, month
%recordhighrainmthyr%.......Record high rain for, year
for current month to date:
%mrecordhightemp%............All time record high temperature
%mrecordlowtemp%.............All time record low temperature
%mrecordwindgust%............All time record high wind gust
%mrecordwindspeed%...........All time record high average speed
%mrecorddailyrain%...........All time record daily rain
%mrecordlowchill%............All time record low windchill
%mrecordlowchillhour%........All time record low windchill, hour
%mrecordlowchillminute%......All time record low windchill, minute
%mrecordlowchillday%
%mrecordlowchillmonth%.......All time Record low windchill month
%mrecordlowchillyear%
%mrecordhighbaro%............All time record high barometer
%mrecordlowbaro%.............All time record low barometer
%mrecorddailyrainday%........Day of record daily rain
%mrecorddailyrainmonth%......Month of record daily rain
%mrecorddailyrainyear%.......Year of record daily rain
%mrecordlowbaroday%..........Day of record low baro
%mrecordhighbaroday%.........Day of record high baro
%mrecordlowbaromonth%........Month of record low baro
%mrecordhighbaromonth%.......Month of record high baro
%mrecordlowbaroyear%.........Year of record low baro
%mrecordhighbaroyear%........Year of record high baro
%mrecordlowtempday%..........Day of record low temperature
%mrecordhightempday%.........Day of record high temperature
%mrecordlowtempmonth%........Month of record low temperature
%mrecordhightempmonth%.......Month of record high temperature
%mrecordlowtempyear%.........Year of record low temperature
%mrecordhightempyear%........Year of record high temperature
%mrecordhighgustday%.........Day of record high wind gust
%mrecordhighgustmonth%.......Month of record high wind gust
%mrecordhighgustyear%........Year of record high wind gust
%mrecordhighavwindday%.......Day of record high wind average speed
%mrecordhighavwindmonth%.....Month of record high wind average speed
%mrecordhighavwindyear%......Year of record high wind average speed
%mrecordhighheatindex%.......Record high heat index
%mrecordhighheatindexday%....Record high heat index day
%mrecordhighheatindexday%....Record high heat index month
%mrecordhighheatindexyear%...Record high heat index year
%mcoldestnightonrecord%......Coldest night on record (6pm to 6am)
%mcoldestdayonrecord%........Coldest day on record (6am to 6pm)
76
Page 77

Using Custom Tags
%mwarmestnightonrecord%......Warmest night on record (6pm to 6am)
%mwarmestdayonrecord%........Warmest day on record (6am to 6pm)
%mrecorddailyrainday%........Day of record daily rain
%mrecordhighdew%.............Record high dew point
%mrecordhighdewday%..........Record high dew point, day
%mrecordhighdewmonth%........Record high dew point, month
%mrecordhighdewyear%.........Record high dew point, year
%mrecordlowdew%..............Record low dew point
%mrecordlowdewday%...........Record low dew point, day
%mrecordlowdewmonth%.........Record low dew point, month
%mrecordlowdewyear%..........Record low dew point, year
%mrecordhighhum%.............Record high humidity
%mrecordhighhumday%..........Record high humdidity, day
%mrecordhighhummonth%........Record high humidity, month
%mrecordhighhumyear%.........Record high humdiity, year
%mrecordlowhum%..............Record low humidity
%mrecordlowhumday%...........Record low humdity, day
%mrecordlowhummonth%.........Record low humdity, month
%mrecordlowhumyear%..........Record low humdity, year
%mrecordhighsolar%...........Record high solar
%mrecordlhighsolarday%.......Record high solar, day
%mrecordhighsolarmonth%......Record high solar, month
%mrecordhighsolaryear%.......Record high solar, year
%mrecordhighuv%..............Record high uv
%mrecordlhighuvday%..........Record high uv, day
%mrecordhighuvmonth%.........Record high uv, month
%mrecordhighuvyear%..........Record high uv, year
%mrecordhighsoil%............Record high soil temp
%mrecordlowsoil%.............Record low soil temp
%mrecordhighsoilday%.........Record high soil temp ,day
%mrecordlowsoilday%..........Record low soil temp, day
%mrecordhighsoilmonth%.......Record high soil temp ,month
%mrecordlowsoilmonth%........Record low soil temp, month
%mrecordhighsoilyear%........Record high soil temp ,year
%mrecordlowsoilyear%.........Record low soil temp, year
%mrecordlowgrass%............Record low grass temp
%mrecordlowgrassday%.........Record low grass temp, day
%mrecordlowgrassmonth%.......Record low grass temp, month
%mrecordlowgrassyear%........Record low grass temp, year
%mrecordhighthsw%............Record high THSW
%mrecordlowthsw%.............REcord low THSW
%mrecordhighwindrun%.........Record high wind run
%mrecordhighwindrun%.........Record high wind run
%mrecordhighwindrunday%......Record high wind run, day
%mrecordhighwindrunmth%......Record high wind run, month
%mrecordhighwindrunyr%.......Record high wind run, year
%mrecordhighrainmth%.........Record high rain for month
77
Page 78

Using Custom Tags
m%recordhighrainmthmth%......Record high rain for month, month
m%recordhighrainmthyr%.......Record high rain for month, year
for current year to date:
%yrecordhightemp%............All time record high temperature
%yrecordlowtemp%.............All time record low temperature
%yrecordwindgust%............All time record high wind gust
%yrecordwindspeed%...........All time record high average speed
%yrecorddailyrain%...........All time record daily rain
%yrecordlowchill%............All time record low windchill
%yrecordlowchillhour%........All time record low windchill, hour
%yrecordlowchillminute%......All time record low windchill, minute
%yrecordlowchillday%
%yrecordlowchillmonth%
%yrecordlowchillyear%
%yrecordhighbaro%............All time record high barometer
%yrecordlowbaro%.............All time record low barometer
%yrecorddailyrainday%........Day of record daily rain
%yrecorddailyrainmonth%......Month of record daily rain
%yrecorddailyrainyear%.......Year of record daily rain
%yrecordlowbaroday%..........Day of record low baro
%yrecordhighbaroday%.........Day of record high baro
%yrecordlowbaromonth%........Month of record low baro
%yrecordhighbaromonth%.......Month of record high baro
%yrecordlowbaroyear%.........Year of record low baro
%yrecordhighbaroyear%........Year of record high baro
%yrecordlowtempday%..........Day of record low temperature
%yrecordhightempday%.........Day of record high temperature
%yrecordlowtempmonth%........Month of record low temperature
%yrecordhightempmonth%.......Month of record high temperature
%yrecordlowtempyear%.........Year of record low temperature
%yrecordhightempyear%........Year of record high temperature
%yrecordhighgustday%.........Day of record high wind gust
%yrecordhighgustmonth%.......Month of record high wind gust
%yrecordhighgustyear%........Year of record high wind gust
%yrecordhighavwindday%.......Day of record high wind average speed
%yrecordhighavwindmonth%.....Month of record high wind average speed
%yrecordhighavwindyear%......Year of record high wind average speed
%yrecordhighheatindex%.......Record high heat index
%yrecordhighheatindexday%....Record high heat index day
%yrecordhighheatindexday%....Record high heat index month
%yrecordhighheatindexyear%...Record high heat index year
%ycoldestnightonrecord%......Coldest night on record (6pm to 6am)
%ycoldestdayonrecord%........Coldest day on record (6am to 6pm)
%ywarmestnightonrecord%......Warmest night on record (6pm to 6am)
%ywarmestdayonrecord%........Warmest day on record (6am to 6pm)
78
Page 79

Using Custom Tags
%yrecorddailyrainday%........Day of record daily rain
%yrecordlowchillmonth%
%yrecordlowchillday%
%yrecordhighdew%.............Record high dew point
%yrecordhighdewday%..........Record high dew point, day
%yrecordhighdewmonth%........Record high dew point, month
%yrecordhighdewyear%.........Record high dew point, year
%yrecordlowdew%..............Record low dew point
%yrecordlowdewday%...........Record low dew point, day
%yrecordlowdewmonth%.........Record low dew point, month
%yrecordlowdewyear%..........Record low dew point, year
%yrecordhighhum%.............Record high humidity
%yrecordhighhumday%..........Record high humdidity, day
%yrecordhighhummonth%........Record high humidity, month
%yrecordhighhumyear%.........Record high humdiity, year
%yrecordlowhum%..............Record low humidity
%yrecordlowhumday%...........Record low humdity, day
%yrecordlowhummonth%.........Record low humdity, month
%yrecordlowhumyear%..........Record low humdity, year
%yrecordhighsolar%...........Record high solar
%yrecordlhighsolarday%.......Record high solar, day
%yrecordhighsolarmonth%......Record high solar, month
%yrecordhighsolaryear%.......Record high solar, year
%yrecordhighuv%..............Record high uv
%yrecordlhighuvday%..........Record high uv, day
%yrecordhighuvmonth%.........Record high uv, month
%yrecordhighuvyear%..........Record high uv, year
%yrecordhighsoil%............Record high soil temp
%yrecordlowsoil%.............Record low soil temp
%yrecordhighsoilday%.........Record high soil temp ,day
%yrecordlowsoilday%..........Record low soil temp, day
%yrecordhighsoilmonth%.......Record high soil temp ,month
%yrecordlowsoilmonth%........Record low soil temp, month
%yrecordhighsoilyear%........Record high soil temp ,year
%yrecordlowsoilyear%.........Record low soil temp, year
%yrecordlowgrass%............Record low grass temp
%yrecordlowgrassday%.........Record low grass temp, day
%yrecordlowgrassmonth%.......Record low grass temp, month
%yrecordlowgrassyear%........Record low grass temp, year
%yrecordhighthsw%............Record high THSW
%yrecordlowthsw%.............REcord low THSW
%yrecordhighwindrun%.........Record high wind run
%yrecordhighwindrun%.........Record high wind run
%yrecordhighwindrunday%......Record high wind run, day
%yrecordhighwindrunmth%......Record high wind run, month
%yrecordhighwindrunyr%.......Record high wind run, year
%yrecordhighrainmth%.........Record high rain for year
79
Page 80

Using Custom Tags
%yrecordhighrainmthmth%......Record high rain for year, month
%yrecordhighrainmthyr%.......Record high rain for year, year
Dallas 1 Wire , Note: Now supports up to 10 for the tags (also labjack
hi/lo temperature readings use these tags too)
==============
%dallasextratemp1%..........Dallas 1 wire current extra temp sensor
temperature
%dallasextratemp2%..........Dallas 1 wire current 2nd extra temp sensor
temperature
%dallasextratemp3%..........Dallas 1 wire current 3rd extra temp sensor
temperature
%dallasextratemp4%..........Dallas 1 wire current 4th extra temp sensor
temperature
%dallasextratemp5%..........Dallas 1 wire current 5th extra temp sensor
temperature
%dallasextratemp6%..........Dallas 1 wire current 6th extra temp sensor
temperature
%dallasextratemp7%..........Dallas 1 wire current 7th extra temp sensor
temperature
%dallasextratemp8%..........Dallas 1 wire current 8th extra temp sensor
temperature
%dallasextratemp9%..........Dallas 1 wire current 9th extra temp sensor
temperature
%dallasextratemp10%..........Dallas 1 wire current 10th extra temp
sensor temperature
80
%dallasextratemp1low%.......Dallas 1 wire low extra temp sensor
temperature
%dallasextratemp2low%.......Dallas 1 wire low 2nd extra temp sensor
temperature
%dallasextratemp3low%.......Dallas 1 wire low 3rd extra temp sensor
temperature
%dallasextratemp4low%.......Dallas 1 wire low 4th extra temp sensor
temperature
%dallasextratemp5low%.......Dallas 1 wire low 5th extra temp sensor
temperature
%dallasextratemp6low%.......Dallas 1 wire low 6th extra temp sensor
temperature
%dallasextratemp7low%.......Dallas 1 wire low 7th extra temp sensor
temperature
%dallasextratemp8low%.......Dallas 1 wire low 8th extra temp sensor
temperature
%dallasextratemp9low%.......Dallas 1 wire low 9th extra temp sensor
temperature
Page 81

Using Custom Tags
%dallasextratemp10low%.......Dallas 1 wire low 10th extra temp sensor
temperature
%dallasextratemp1high%......Dallas 1 wire high extra temp sensor
temperature
%dallasextratemp2high%......Dallas 1 wire high 2nd extra temp sensor
temperature
%dallasextratemp3high%......Dallas 1 wire high 3rd extra temp sensor
temperature
%dallasextratemp4high%......Dallas 1 wire high 4th extra temp sensor
temperature
%dallasextratemp5high%......Dallas 1 wire high 5th extra temp sensor
temperature
%dallasextratemp6high%......Dallas 1 wire high 6th extra temp sensor
temperature
%dallasextratemp7high%......Dallas 1 wire high 7th extra temp sensor
temperature
%dallasextratemp8high%......Dallas 1 wire high 8th extra temp sensor
temperature
%dallasextratemp9high%......Dallas 1 wire high 9th extra temp sensor
temperature
%dallasextratemp10high%......Dallas 1 wire high 10th extra temp sensor
temperature
81
%dallasextratemp1lowtime%...Dallas 1 wire low time extra temp sensor
temperature
%dallasextratemp2lowtime%...Dallas 1 wire low time of 2nd extra temp
sensor temperature
%dallasextratemp3lowtime%...Dallas 1 wire low time of 3rd extra temp
sensor temperature
%dallasextratemp4lowtime%...Dallas 1 wire low time of 4th extra temp
sensor temperature
%dallasextratemp5lowtime%...Dallas 1 wire low time of 5th extra temp
sensor temperature
%dallasextratemp6lowtime%...Dallas 1 wire low time of 6th extra temp
sensor temperature
%dallasextratemp7lowtime%...Dallas 1 wire low time of 7th extra temp
sensor temperature
%dallasextratemp8lowtime%...Dallas 1 wire low time of 8th extra temp
sensor temperature
%dallasextratemp9lowtime%...Dallas 1 wire low time of 9th extra temp
sensor temperature
%dallasextratemp10lowtime%...Dallas 1 wire low time of 10th extra temp
sensor temperature
%dallasextratemp1hightime%..Dallas 1 wire high time of extra temp
sensor temperature
Page 82

Using Custom Tags
%dallasextratemp2hightime%..Dallas 1 wire high time of 2nd extra temp
sensor temperature
%dallasextratemp3hightime%..Dallas 1 wire high time of 3rd extra temp
sensor temperature
%dallasextratemp4hightime%..Dallas 1 wire high time of 4th extra temp
sensor temperature
%dallasextratemp5hightime%..Dallas 1 wire high time of 5th extra temp
sensor temperature
%dallasextratemp6hightime%..Dallas 1 wire high time of 6th extra temp
sensor temperature
%dallasextratemp7hightime%..Dallas 1 wire high time of 7th extra temp
sensor temperature
%dallasextratemp8hightime%..Dallas 1 wire high time of 8th extra temp
sensor temperature
%dallasextratemp9hightime%..Dallas 1 wire high time of 9th extra temp
sensor temperature
%dallasextratemp10hightime%..Dallas 1 wire high time of 10th extra temp
sensor temperature
82
%dallasextrahum%............Dallas 1 wire current humidity
%dallasextrahumhigh%........Dallas 1 wire humidity high
%dallasextrahumlow%.........Dallas 1 wire humidity low
%dallasextrahumhightime%....Dallas 1 wire humidity high time
%dallasextrahumlowtime%.....Dallas 1 wire humidity low time
%dallasextrahum2%...........Dallas 1 wire 2nd extra humidity
%dallasextrahum2high%.......Dallas 1 wire 2nd humidity high
%dallasextrahum2low%........Dallas 1 wire 2nd humidity low
%dallasextrahum2hightime%...Dallas 1 wire 2nd humidity high time
%dallasextrahum2lowtime%....Dallas 1 wire 2nd humidity low time
%dallasextrahum3%...........Dallas 1 wire 3rd extra humidity
%dallasextrahum3high%.......Dallas 1 wire 3rd humidity high
%dallasextrahum3low%........Dallas 1 wire 3rd humidity low
%dallasextrahum3hightime%...Dallas 1 wire 3rd humidity high time
%dallasextrahum3lowtime%....Dallas 1 wire 3rd humidity low time
%dallasextrahum4%...........Dallas 1 wire 4th extra humidity
%dallasextrahum4high%.......Dallas 1 wire 4th humidity high
%dallasextrahum4low%........Dallas 1 wire 4th humidity low
%dallasextrahum4hightime%...Dallas 1 wire 4th humidity high time
%dallasextrahum4lowtime%....Dallas 1 wire 4th humidity low time
%dallassolarvolts%..........Volts from a dallas 1 wire solar sensor
%barometertemperature%......Temperature from a Bray/Jennings or AAG
barometer
%dallashumtemp%.............Current Dallas 1 wire humidity sensor
temperature
%highdallashumtemp%.........Daily high " " " " " "
Page 83

Using Custom Tags
%lowdallashumtemp%..........Daily low " " " " " "
%highdallashumtempt%........Time of Daily high " " " " "
"
%lowdallashumtempt%.........Time of Daily low " " " " "
"
%dallashumtemp2%.............Current Dallas 1 wire humidity sensor
temperature #2
%highdallashumtemp2%.........Daily high " " " " " "
%lowdallashumtemp2%..........Daily low " " " " " "
%highdallashumtempt2%........Time of Daily high " " " " "
"
%lowdallashumtempt2%.........Time of Daily low " " " " "
"
%dallashumtemp3%.............Current Dallas 1 wire humidity sensor
temperature #3
%highdallashumtemp3%.........Daily high " " " " " "
%lowdallashumtemp3%..........Daily low " " " " " "
%highdallashumtempt3%........Time of Daily high " " " " "
"
%lowdallashumtempt3%.........Time of Daily low " " " " "
"
83
%dallashumtemp4%.............Current Dallas 1 wire humidity sensor
temperature #4
%highdallashumtemp4%.........Daily high " " " " " "
%lowdallashumtemp4%..........Daily low " " " " " "
%highdallashumtempt4%........Time of Daily high " " " " "
"
%lowdallashumtempt4%.........Time of Daily low " " " " "
"
Lightning counts
================
%lighteningcountlasthour%...Lightening count last immediate hour
%lighteningcountlastminute%...Lightening count last minute
%lighteningcountlast5minutes%..Lightening count 5 minutes
%lighteningcountlast12hour% ..Lightening count last 12 hours
%lighteningcountlast30minutes% ..Lightening count last 30 minutes
%lighteningcountlasthournextstorm%...Lightening count last immediate
hour, from the nextstorm integration
%lighteningcountlastminutenextstorm%...Lightening count last minute
%lighteningcountlast12hournextstorm% ..Lightening count last 12 hours
%lighteningcountlast30minutesnextstorm% ..Lightening count last 30
minutes
Page 84

Using Custom Tags
%lighteningcount%...........Lightening counts since noon
%lighteningcountmonth%......Lightening counts this month
%lighteningcountnoon%.......Lightening counts since noon (the correct
one)
%lighteningcountlasttime%...Time of last count
%lighteningcountmidnight%.. Lightening counts since midnight
WMR918/68
===============
%Solar%.....................WMR918/68 and WS2000 Solar sensor
%wmr918/68extrahum%.........WMR918/68 extra sensor #1 humidity
%wmr918/68extrahum2%........WMR918/68 extra sensor #2 humidity
%wmr918/68extrahum3%........WMR918/68 extra sensor #3 humidity
%wmr918/68extratemp%........WMR918/68 extra sensor #1 temperature
%wmr918/68extratemp2%.......WMR918/68 extra sensor #2 temperature
%wmr918/68extratemp3%.......WMR918/68 extra sensor #3 temperature
%wmr918/68extratemphigh%....WMR918/68 extra sensor #1 high temperature
%wmr918/68extratemphigh2%...WMR918/68 extra sensor #2 high temperature
%wmr918/68extratemphigh3%...WMR918/68 extra sensor #3 high temperature
%wmr918/68extrahumhigh%.....WMR918/68 extra sensor #1 high humidity
%wmr918/68extrahumhigh2%....WMR918/68 extra sensor #2 high humidity
%wmr918/68extrahumhigh3%....WMR918/68 extra sensor #3 high humidity
%wmr918/68temphightime%.....WMR918/68 extra sensor #1 temperature high
time
%wmr918/68temphightime2%....WMR918/68 extra sensor #2 temperature high
time
%wmr918/68temphightime3%....WMR918/68 extra sensor #3 temperature high
time
%wmr918/68extratemplow%.....WMR918/68 extra sensor #1 low temperature
%wmr918/68extratemplow2%....WMR918/68 extra sensor #2 low temperature
%wmr918/68extratemplow3%....WMR918/68 extra sensor #3 low temperature
%wmr918/68extrahumlow%......WMR918/68 extra sensor #1 low humidity
%wmr918/68extrahumlow2%.....WMR918/68 extra sensor #2 low humidity
%wmr918/68extrahumlow3%.....WMR918/68 extra sensor #3 low humidity
%wmr918/68templowtime%......WMR918/68 extra sensor #1 temperature low
time
%wmr918/68templowtime2%.....WMR918/68 extra sensor #2 temperature low
time
%wmr918/68templowtime3%.....WMR918/68 extra sensor #3 temperature low
time
%wmr918/68extrahumhightime%.WMR918/68 extra sensor #1 high humidity
time
%wmr918/68extrahumhigh2time%.WMR918/68 extra sensor #2 high humidity
time
%wmr918/68extrahumhigh3time%.WMR918/68 extra sensor #3 high humidity
84
Page 85

Using Custom Tags
time
%wmr918/68extrahumlowtime%..WMR918/68 extra sensor #1 low humidity time
%wmr918/68extrahumlow2time%.WMR918/68 extra sensor #2 low humidity time
%wmr918/68extrahumlow3time%.WMR918/68 extra sensor #3 low humidity time
%wmr918/68tempbat3%.........Battery status of the extra temp hum #3
%wmr918/68tempbat2%.........Battery status of the extra temp hum #2
%wmr918/68tempbat1%.........Battery status of the extra temp hum #1
%wmr918/68tempbat%..........Battery status of the temp hum sensor
%wmr918/68consbat%..........Battery status of the console
%wmr918/68rainbat%..........Battery status of the rain gauge
%wmr918/68windbat%..........Battery status of the wind sensor
Snow
=====
%snowseasonin.%.............Snow for season you have entered under
input daily weather, inches
%snowmonthin.%..............Snow for month you have entered under input
daily weather, inches
%snowtodayin.%..............Snow for today you have entered under input
daily weather, inches
%snowseasoncm%..............Snow for season you have entered under
input daily weather, cm
%snowmonthcm%...............Snow for month you have entered under input
daily weather, cm
%snowtodaycm%...............Snow for today you have entered under input
daily weather, cm
%snowyesterday%.............Yesterdays' snow
%snowheight%................Estimated height snow will fall at
85
Download metars
================
%downloadedmetar1extrasky%.Sky conditions
%downloadedmetar1sky%......More sky conditions
%downloadedmetar1cloud%....Cloud conditions or weather
%downloadedmetar1press%....Barometer reading
%downloadedmetar1humi%.....Humidity reading
%downloadedmetar1dewp%.....Dew point reading
%downloadedmetar1temp%.....Temperature reading
%downloadedmetar1tempcelsius%.....Temperature reading in celsius
%downloadedmetar1wind%.....Wind readings (speed and direction)
%downloadedmetar1location%.Metar name and time stamp
%downloadedmetar1vis%......Visibility
%downloadedmetar1name%.....Just the metar name. (1st 10 metars only)
%downloadedmetar1time%.....Just the time of update.(1st 10 metars only)
Page 86

Using Custom Tags
%downloadedmetar1rainlasthour% Rain in the last hour (if its
available)
%downloadedmetar1windonly%..Shows just the windspeed only (1st 10
metars only)
%downloadedmetar1dironly%...Shows direction in letter (1st 10 metars
only)
%downloadedmetar1dironlydir%.. Shows dir in degrees.(1st 10 metars
only)
Repeat this for up to 50 downloaded airport metars (i.e
%downloadedmetar2location% for the next one)
%metar/report=%NZAA.MET Insert downloaded METARS or weather
reports/warnings.
Please replace NZAA.MET with the file name
downloaded.Note: use
and
86
html tags before and after this custom tag
and also note you can use the tag to add
other text files to your page too, if those files are in the metar
download dir
%5dayforecastday1%..........Forecast from the 5 day forecast graphic
image from a downloaded NOAA zone forecast file (which must be first
selected),,,,repeat up to day 8
%5dayforecastdayday1%.......Day (i.e Monday, tuesday, etc)...Forecast
from the 5 day forecast graphic image from a downloaded NOAA zone
forecast file (which must be first selected),,,,repeat up to day 8
%5dayforecasttimestamp%.....The heading and time stamp from the NOAA
downloaded forecast.
Note, for XML, use the format %d5ayforecastday1%
%downloadedmetarrainlasthour% Rain in the last hour from the main
downloaded metar (if it is in the metar)
Current weather warning/forecast from input daily weather
---------------------------------------------------------
%dailywarning/forecast%
GPS
---
%gpslat% IF you have a GPS unit setup in weather display
%gpslong%
%wapstationname%......Station name for the WAP
Page 87

Using Custom Tags
Tags for using comma decimal place
----------------------------------
%temp,%..................Current temperature
%windch,%................Current windchill
%heati,%.................Current heat index
%dew,%...................Current dew point
%currentpressureinmb,%...Current barometer reading (mb/hpa)
%avgspd,%................Average windspeed
%gstspd,%................Current (gust) speed
%dayrn,%.................Today's rain
%hourrn,%................Rain last hour
%monthrn,%...............Month to date rain
%yearrn,%................Year to date rain
%yesterdayrain,%.........Yesterday's rain
%customscreenownlabelusethistag%
----------------------------------------------------------
Mesomap stations data (If you have setup and are using the mesomap
feature)
----------------------------------------------------------
%mesomaptemp1%
%mesomaphum1%
%mesomapdew1%
%mesomapspeed1%
%mesomapgust1%
%mesomapdir1%
%mesomapbaro1%
%mesomaprain1%
%mesomaptime1%
%mesomaptemp2%
%mesomaphum2%
%mesomapdew2%
%mesomapspeed2%
%mesomapgust2%
%mesomapdir2%
%mesomapbaro2%
%mesomaprain2%
%mesomaptime2%
%mesomaptemp3%
%mesomaphum3%
%mesomapdew3%
%mesomapspeed3%
%mesomapgust3%
%mesomapdir3%
%mesomapbaro3%
%mesomaprain3%
87
Page 88

Using Custom Tags
%mesomaptime3%
%mesomaptemp4%
%mesomaphum4%
%mesomapdew4%
%mesomapspeed4%
%mesomapgust4%
%mesomapdir4%
%mesomapbaro4%
%mesomaprain4%
%mesomaptime4%
%mesomaptemp5%
%mesomaphum5%
%mesomapdew5%
%mesomapspeed5%
%mesomapgust5%
%mesomapdir5%
%mesomapbaro5%
%mesomaprain5%
%mesomaptime5%
%mesomaptemp6%
%mesomaphum6%
%mesomapdew6%
%mesomapspeed6%
%mesomapgust6%
%mesomapdir6%
%mesomapbaro6%
%mesomaprain6%
%mesomaptime6%
%mesomaptemp7%
%mesomaphum7%
%mesomapdew7%
%mesomapspeed7%
%mesomapgust7%
%mesomapdir7%
%mesomapbaro7%
%mesomaprain7%
%mesomaptime7%
%mesomaptemp8%
%mesomaphum8%
%mesomapdew8%
%mesomapspeed8%
%mesomapgust8%
%mesomapdir8%
%mesomapbaro8%
%mesomaprain8%
%mesomaptime8%
%mesomaptemp9%
88
Page 89

Using Custom Tags
%mesomaphum9%
%mesomapdew9%
%mesomapspeed9%
%mesomapgust9%
%mesomapdir9%
%mesomapbaro9%
%mesomaprain9%
%mesomaptime9%
%mesomaptemp10%
%mesomaphum10%
%mesomapdew10%
%mesomapspeed10%
%mesomapgust10%
%mesomapdir10%
%mesomapbaro10%
%mesomaprain10%
%mesomaptime10%
%mesomaptemp11%
%mesomaphum11%
%mesomapdew11%
%mesomapspeed11%
%mesomapgust11%
%mesomapdir11%
%mesomapbaro11%
%mesomaprain11%
%mesomaptime11%
%mesomaptemp12%
%mesomaphum12%
%mesomapdew12%
%mesomapspeed12%
%mesomapgust12%
%mesomapdir12%
%mesomapbaro12%
%mesomaprain12%
%mesomaptime12%
%mesomaptemp13%
%mesomaphum13%
%mesomapdew13%
%mesomapspeed13%
%mesomapgust13%
%mesomapdir13%
%mesomapbaro13%
%mesomaprain13%
%mesomaptime13%
%mesomaptemp14%
%mesomaphum14%
%mesomapdew14%
89
Page 90

Using Custom Tags
%mesomapspeed14%
%mesomapgust14%
%mesomapdir14%
%mesomapbaro14%
%mesomaprain14%
%mesomaptime14%
%mesomaptemp15%
%mesomaphum15%
%mesomapdew15%
%mesomapspeed15%
%mesomapgust15%
%mesomapdir15%
%mesomapbaro15%
%mesomaprain15%
%mesomaptime15%
%mesomaptemp16%
%mesomaphum16%
%mesomapdew16%
%mesomapspeed16%
%mesomapgust16%
%mesomapdir16%
%mesomapbaro16%
%mesomaprain16%
%mesomaptime16%
%mesomaptemp17%
%mesomaphum17%
%mesomapdew17%
%mesomapspeed17%
%mesomapgust17%
%mesomapdir17%
%mesomapbaro17%
%mesomaprain17%
%mesomaptime17%
%mesomaptemp18%
%mesomaphum18%
%mesomapdew18%
%mesomapspeed18%
%mesomapgust18%
%mesomapdir18%
%mesomapbaro18%
%mesomaprain18%
%mesomaptime18%
%mesomaptemp19%
%mesomaphum19%
%mesomapdew19%
%mesomapspeed19%
%mesomapgust19%
90
Page 91

Using Custom Tags
%mesomapdir19%
%mesomapbaro19%
%mesomaprain19%
%mesomaptime19%
%mesomaptemp20%
%mesomaphum20%
%mesomapdew20%
%mesomapspeed20%
%mesomapgust20%
%mesomapdir20%
%mesomapbaro20%
%mesomaprain20%
%mesomaptime20%
%mesomaptemp21%
%mesomaphum21%
%mesomapdew21%
%mesomapspeed21%
%mesomapgust21%
%mesomapdir21%
%mesomapbaro21%
%mesomaprain21%
%mesomaptime21%
%mesomaptemp22%
%mesomaphum22%
%mesomapdew22%
%mesomapspeed22%
%mesomapgust22%
%mesomapdir22%
%mesomapbaro22%
%mesomaprain22%
%mesomaptime22%
%mesomaptemp23%
%mesomaphum23%
%mesomapdew23%
%mesomapspeed23%
%mesomapgust23%
%mesomapdir23%
%mesomapbaro23%
%mesomaprain23%
%mesomaptime23%
%mesomaptemp24%
%mesomaphum24%
%mesomapdew24%
%mesomapspeed24%
%mesomapgust24%
%mesomapdir24%
%mesomapbaro24%
91
Page 92

Using Custom Tags
%mesomaprain24%
%mesomaptime24%
%mesomaptemp25%
%mesomaphum25%
%mesomapdew25%
%mesomapspeed25%
%mesomapgust25%
%mesomapdir25%
%mesomapbaro25%
%mesomaprain25%
%mesomaptime25%
%mesomaptemp26%
%mesomaphum26%
%mesomapdew26%
%mesomapspeed26%
%mesomapgust26%
%mesomapdir26%
%mesomapbaro26%
%mesomaprain26%
%mesomaptime26%
%mesomaptemp27%
%mesomaphum27%
%mesomapdew27%
%mesomapspeed27%
%mesomapgust27%
%mesomapdir27%
%mesomapbaro27%
%mesomaprain27%
%mesomaptime27%
%mesomaptemp28%
%mesomaphum28%
%mesomapdew28%
%mesomapspeed28%
%mesomapgust28%
%mesomapdir28%
%mesomapbaro28%
%mesomaprain28%
%mesomaptime28%
%mesomaptemp29%
%mesomaphum29%
%mesomapdew29%
%mesomapspeed29%
%mesomapgust29%
%mesomapdir29%
%mesomapbaro29%
%mesomaprain29%
%mesomaptime29%
92
Page 93

Using Custom Tags
%mesomaptemp30%
%mesomaphum30%
%mesomapdew30%
%mesomapspeed30%
%mesomapgust30%
%mesomapdir30%
%mesomapbaro30%
%mesomaprain30%
%mesomaptime30%
%mesomaptemp31%
%mesomaphum31%
%mesomapdew31%
%mesomapspeed31%
%mesomapgust31%
%mesomapdir31%
%mesomapbaro31%
%mesomaprain31%
%mesomaptemp32%
%mesomaphum32%
%mesomapdew32%
%mesomapspeed32%
%mesomapgust32%
%mesomapdir32%
%mesomapbaro32%
%mesomaprain32%
%mesomaptemp33%
%mesomaphum33%
%mesomapdew33%
%mesomapspeed33%
%mesomapgust33%
%mesomapdir33%
%mesomapbaro33%
%mesomaprain33%
%mesomaptemp34%
%mesomaphum34%
%mesomapdew34%
%mesomapspeed34%
%mesomapgust34%
%mesomapdir34%
%mesomapbaro34%
%mesomaprain34%
%mesomaptemp35%
%mesomaphum35%
%mesomapdew35%
%mesomapspeed35%
%mesomapgust35%
%mesomapdir35%
93
Page 94

Using Custom Tags
%mesomapbaro35%
%mesomaprain35%
%mesomaptemp36%
%mesomaphum36%
%mesomapdew36%
%mesomapspeed36%
%mesomapgust36%
%mesomapdir36%
%mesomapbaro36%
%mesomaprain36%
%mesomaptemp37%
%mesomaphum37%
%mesomapdew37%
%mesomapspeed37%
%mesomapgust37%
%mesomapdir37%
%mesomapbaro37%
%mesomaprain37%
%mesomaptemp38%
%mesomaphum38%
%mesomapdew38%
%mesomapspeed38%
%mesomapgust38%
%mesomapdir38%
%mesomapbaro38%
%mesomaprain38%
%mesomaptemp39%
%mesomaphum39%
%mesomapdew39%
%mesomapspeed39%
%mesomapgust39%
%mesomapdir39%
%mesomapbaro39%
%mesomaprain39%
%mesomaptemp40%
%mesomaphum40%
%mesomapdew40%
%mesomapspeed40%
%mesomapgust40%
%mesomapdir40%
%mesomapbaro40%
%mesomaprain40%
94
%mesomapmaxtempclient1% *** available from clientraw.txt data source
%mesomapmaxtempclient2%
%mesomapmaxtempclient3%
Page 95

Using Custom Tags
%mesomapmaxtempclient4%
%mesomapmaxtempclient5%
%mesomapmaxtempclient6%
%mesomapmaxtempclient7%
%mesomapmaxtempclient8%
%mesomapmaxtempclient9%
%mesomapmaxtempclient10%
%mesomapmaxtempclient11%
%mesomapmaxtempclient12%
%mesomapmaxtempclient13%
%mesomapmaxtempclient14%
%mesomapmaxtempclient15%
%mesomapmaxtempclient16%
%mesomapmaxtempclient17%
%mesomapmaxtempclient18%
%mesomapmaxtempclient19%
%mesomapmaxtempclient20%
%mesomapmintempclient1%
%mesomapmintempclient2%
%mesomapmintempclient3%
%mesomapmintempclient4%
%mesomapmintempclient5%
%mesomapmintempclient6%
%mesomapmintempclient7%
%mesomapmintempclient8%
%mesomapmintempclient9%
%mesomapmintempclient10%
%mesomapmintempclient11%
%mesomapmintempclient12%
%mesomapmintempclient13%
%mesomapmintempclient14%
%mesomapmintempclient15%
%mesomapmintempclient16%
%mesomapmintempclient17%
%mesomapmintempclient18%
%mesomapmintempclient19%
%mesomapmintempclient20%
%mesomapfeelslikeclient1%
%mesomapfeelslikeclient2%
%mesomapfeelslikeclient3%
%mesomapfeelslikeclient4%
%mesomapfeelslikeclient5%
%mesomapfeelslikeclient6%
%mesomapfeelslikeclient7%
%mesomapfeelslikeclient8%
%mesomapfeelslikeclient9%
%mesomapfeelslikeclient10%
95
Page 96

Using Custom Tags
%mesomapfeelslikeclient11%
%mesomapfeelslikeclient12%
%mesomapfeelslikeclient13%
%mesomapfeelslikeclient14%
%mesomapfeelslikeclient15%
%mesomapfeelslikeclient16%
%mesomapfeelslikeclient17%
%mesomapfeelslikeclient18%
%mesomapfeelslikeclient19%
%mesomapfeelslikeclient20%
History data
------------
%temp0minuteago% ****this one is needed for all the others to work
%wind0minuteago%
%gust0minuteago%
%dir0minuteago%
%hum0minuteago%
%dew0minuteago%
%baro0minuteago%
%rain0minuteago%
96
%temp1minuteago%
%wind1minuteago%
%gust1minuteago%
%dir1minuteago%
%hum1minuteago%
%dew1minuteago%
%baro1minuteago%
%rain1minuteago%
%temp2minuteago%
%wind2minuteago%
%gust2minuteago%
%dir2minuteago%
%hum2minuteago%
%dew2minuteago%
%baro2minuteago%
%rain2minuteago%
%temp3minuteago%
%wind3minuteago%
Page 97

Using Custom Tags
%gust3minuteago%
%dir3minuteago%
%hum3minuteago%
%dew3minuteago%
%baro3minuteago%
%rain3minuteago%
%temp4minuteago%
%wind4minuteago%
%gust4minuteago%
%dir4minuteago%
%hum4minuteago%
%dew4minuteago%
%baro4minuteago%
%rain4minuteago%
97
%temp5minuteago%
%wind5minuteago%
%gust5minuteago%
%dir5minuteago%
%hum5minuteago%
%dew5minuteago%
%baro5minuteago%
%rain5minuteago%
repeat up to
%temp120minuteago%
%wind120minuteago%
%gust120minuteago%
%dir120minuteago%
%hum120minuteago%
%dew120minuteago%
%baro120minuteago%
%rain120minuteago%
You can also link to the following image files that are uploaded by
Weather
Display, according to the options selected under FTP setup, files e.g.
Page 98

Using Custom Tags
(Name of your station)dial.gif .dials image
(Name of your station).gif ..screen shot or default graph
48hourgraph.gif .............updated daily with the averages/extreme
72hourgraph.gif .............updated daily with the averages/extreme
alltimerecords.gif........... " " " " " "...i.e the
all time records to date image, uploaded daily with the
averages/extreme upload
curr24hourgraph.gif..........The current last 24 hour graph
curr48hourgraph.gif..........The current last 48 hour graph
curr72hourgraph.gif..........The current last 72 hour graph
dailyhighlowbaroetc.gif .....daily high/low pressure/humidity and
wind-chill low image
dailyhighlowyest.gif ........yesterday's daily high/low
pressure/humidity and wind-chill low image
dirplot.gif..................The wind direction distribution image
energy.gif...................Wind energy/hours
extrarealtimegraph.gif.......The extra real time graph file
fwigraph.gif ................fire weather index graph (if selected)
largedisplay.gif.............If selected under the files section
localweather.gif.............a smaller summary image
metar.gif....................The metar you have selected to update the
summary.gif image or wunderground
monthtodate.gif .............graph of month to date
summary.gif .................summary image, with icon
sunmoonimage.jpg ............sun/moon rise/set times image
weatherbanner.gif............another banner
weekgra.gif .................weekly graph
windtempraintrend11.gif......Month to date temp/wind and rain trend
column chart. The number is the current month (i.e november)
windtempraintrend.gif........Current " "
yesterday.gif ...............yesterday's 24 hour graph
vprealtimegraph.gif..........Davis VP solar and uv graph (if upload
extra sensor graph is enabled)
animatedwebcam.gif...........If you have that setup
animatedhttpfile.gif........." " " " "
raindetail.gif...............Rain for the last 7 days and the graph of
the rain to date for the year. (updated/uploaded with the daily
averages/extreme upload)
forecasticon.gif ............The icon you can see visible on the WD
screen
forecasticonstation.gif......The icon that the weather station has
visible
conditionscolour.jpg.........colour coded image with description of the
feels like weather
cloudheight.gif..............A graphical representation of the cloud
height
98
Page 99

Using Custom Tags
If you have produce dial files ticked, then you also have these
individual dials to insert on your web page:
raindial.gif ................the rain dial
raintoday.gif ...............the rain today dial
rainrate.gif ................the rain rate dial
humdial.gif .................the humidity dial
gustdial.gif ................the wind speed gust dial
averagedial.gif .............the average speed dial
directiondial.gif ...........the wind direction dial
barodial.gif ................the barometer dial
dewdial.gif .................the dew point dial
tempdial.gif ................the temperature dial
wetbulbdial.gif .............the wetbulb dial
solardial.gif................if you have a solar sensor
uvdial.gif...................for a Davis VP
raintodaytank.gif............If you have set to produce and upload rain
tank option (in the custom web page setup)
rainyeartank.gif
rainmonthtank.gif
99
Using your own icons (they will replace forecasticon.gif, which is
uploaded automatically:
Just create a folder called myicons, as a subdirectory for where
Weather Display is (i.e c:\wdisplay\myicons\sunny.gif )
Then name them as follows:
cloudynight.gif
clearnight.gif
mainlyfine.gif
nightrain.gif
nightsnow.gif
nightovercast.gif
nightheavyrain.gif
sunny.gif
rain.gif
overcast.gif
partlycloudy.gif
fog.gif
lightrain.gif
heavyrain.gif
snow.gif
snowshowers.gif
sleetshowers
sleet.gif
windy.gif
snowshowers2.gif (snow showers)
Page 100

Using Custom Tags
thundershowers.gif
thundershowers2.gif
thunderstorms.gif
showers2.gif (showers and fine intervals)
rain2.gif (rain)
cloudy2.gif (cloudy)
partlycoudy.gif (cloudy periods)
If you want to upload another file, then call it wxlocal2.html. It will upload as wx2.html
(even if use normal file name selected). You can have up to 40 pages this way!
Source: http:/ / wiki. weather- watch. com/ index. php? title=Using_ Custom_
Tags&oldid=2648
Principal Authors: ANONIPEDITS:0, WikiSysop
Posting WebCam Images to a Web
100
Page
Purpose: Weather Display can FTP your web cam file (either captured directly by weather
display or by another webcam program) to your web site. General
Click on "Setup" in the menu bar, then control panel. Click on "Setup
FTP/internet/reboot/METAR/etc". Then click on the Tab labeled "Web cam".
Then click on choose a web cam file, and select the file to FTP. Then set the times to
upload, and turn the switch ON, on that page.
If you want it uploaded to a different directory , then enter that directory name, and tick
that option.
If you do not want weather display to automatically insert the image in the default web
page, then tick "don't display image on web page".
Note that if you have ticked "let me manage datahtm2.txt" in the web file setup, then you
will have to add the link yourself to the image to the datahtm2.txt file, which is located in
the folder web files.
Finally, click on "Test" to see an upload. If all is as you want it, click on OK to save the
settings.
Note: The main internet switch under connections also needs to be ON, and you will need
the appropriate FTP settings entered in the connection setup win
Source: http:/ / wiki. weather- watch. com/ index. php? title=Posting_ WebCam_ Images_ to_
a_ Web_ Page&oldid=1683
Principal Authors: ANONIPEDITS:0
 Loading...