

Page 1
Model: 724-1710
Instruction Manual
DC: 122014
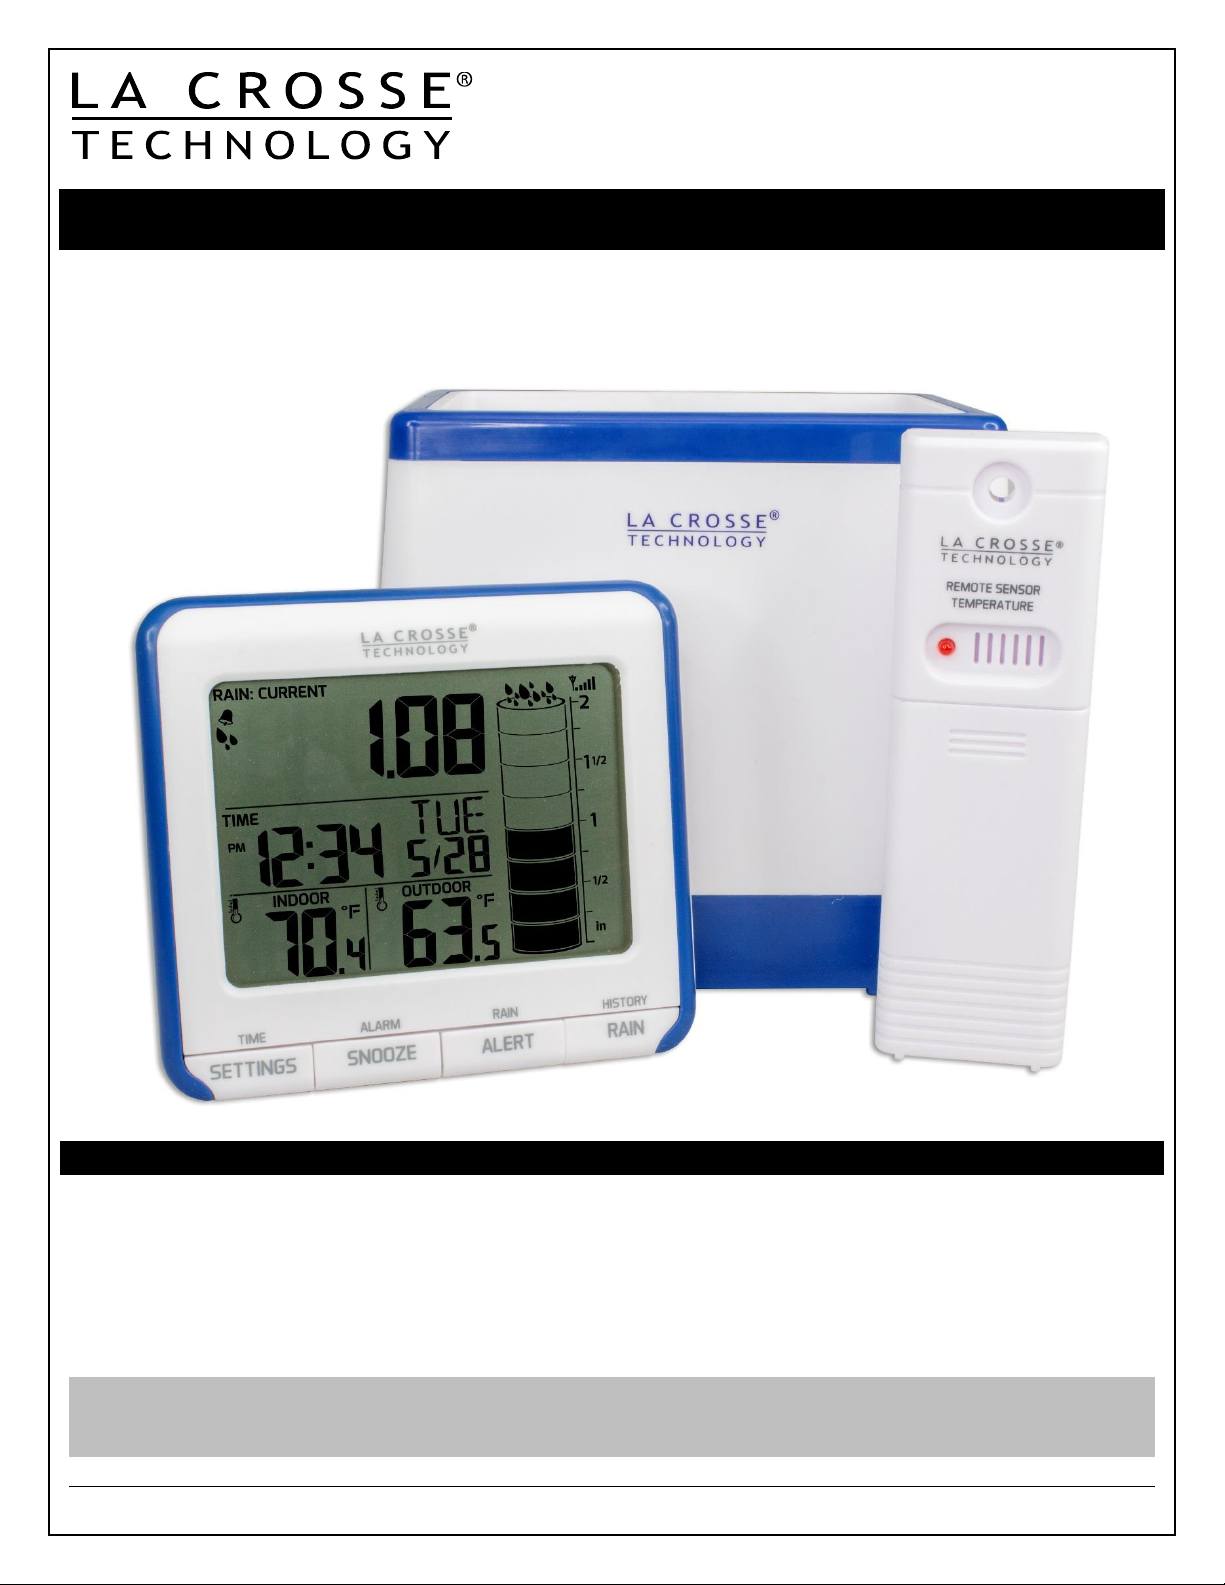
Wireless Rain Station
La Crosse Technology®, the world leader in atomic time and weather instruments, introduces a
Wireless Rain Station featuring a self-emptying rain bucket, outdoor temperature and
customizable rain alerts. Records rain history up to 365 days.
Quick Setup
Step 1: Insert 2 “AA” LR6 batteries (not included) into the TX17T Temperature sensor.
Observe the correct polarity.
Step 2: Insert 2 “AA” LR6 batteries (not included) into the TX17R Rain sensor.
Observe the correct polarity. (See instructions on page 3).
Step 3: Insert 2 “AA” LR6 batteries (not included) into the 724-1710 rain station.
Observe the correct polarity.
Restart: If dashes are displayed for outdoor temperature or rain after 3 minutes, remove the
batteries from both sensors and the rain station, then press any button 20 times. After 15
minutes, start again at step 1.
Model: 724-1710 www.lacrossetechnology.com/support Page | 1
Page 2
Table of Contents
Quick Setup ............................................................................................................................................... 1
Features ..................................................................................................................................................... 3
Install batteries in the Rain Station and Sensors .................................................................................... 3
Sensor Mounting and Placement ............................................................................................................. 4
Rain Station Placement ............................................................................................................................ 5
Buttons ...................................................................................................................................................... 5
SETTINGS Button (Time) ............................................................................................................................ 5
SNOOZE Button (Alarm) ............................................................................................................................. 5
ALERT Button (Rain) ................................................................................................................................... 5
RAIN Button (History) .................................................................................................................................. 5
▲ Button (Daily History, Clear) .................................................................................................................... 5
▼ Button (TX Search) ................................................................................................................................. 5
LCD Screen ................................................................................................................................................ 6
Set 12/24, Calendar, Time, Language, °F/°C, Rain Unit of Measure .............................................. 7
12/24 Hour Time Format ............................................................................................................................. 7
Set Calendar (Year, Month, Date)................................................................................................................ 7
Set Time (Hour, Minutes) ............................................................................................................................. 7
Language for Weekday Display ................................................................................................................... 7
Fahrenheit/Celsius ...................................................................................................................................... 8
Rainfall Unit of Measure (inches/millimeters) ............................................................................................... 8
Set Time Alarm .......................................................................................................................................... 8
Disarm Time Alarm ...................................................................................................................................... 8
Alarm Snooze ............................................................................................................................................. 8
Rain Readings ........................................................................................................................................... 9
Clear Current Rainfall Readings ................................................................ .............................................. 9
Rainfall Daily History Records (up to 365 days) ................................................................................... 10
History Records One Day at a Time .......................................................................................................... 10
History Records Date Search ................................................................ .................................................... 10
Clear Rainfall Daily History Records ..................................................................................................... 11
Rainfall Alert (24 hour) ............................................................................................................................ 11
Arm/Disarm 24 hour Rainfall Alert ......................................................................................................... 11
Search for Rainfall Sensor ..................................................................................................................... 11
Search for Temperature Sensor ............................................................................................................. 12
Low Battery Icons ................................................................................................................................... 12
Specifications .......................................................................................................................................... 12
Care and Maintenance ................................................................................................ ............................ 13
Warranty Information .............................................................................................................................. 13
FCC Statement ........................................................................................................................................ 14
Model: 724-1710 www.lacrossetechnology.com/support Page | 2
Page 3

Inside View
Assembled
Blue Tabs
Battery
Compartment
Features
Rain Readings: current, 1 hour, 24 hours, 7 days, 1 month, and total since setup.
Rainfall amount (in/mm)
Animated cylinder graph corresponds with rain readings
Signal strength icon for sensor transmission
12/24 hour time (manual setting)
Calendar: day/month/date
Indoor temperature (°F/°C)
Outdoor temperature (°F/°C)
Time alarm with snooze
Low battery icon for station
Low battery icon for sensors
Customizable rain alerts (with icon)
Saves up to 365 days of rainfall records
Day display (English/Spanish/French)
Install batteries in the Rain Station and Sensors
Rain Sensor TX17R:
1. Press the white tabs on each end of the rain sensor and lift
off funnel portion.
2. The battery compartment is under the rocker. Firmly
squeeze all four blue tabs and lift battery compartment off
of base and turn upside down.
3. Insert 2 “AA” Alkaline batteries into the TX17R rain sensor.
4. Position the battery compartment over base and press down so all four blue tabs lock in
place.
5. Match the UP arrow on the front of the blue base and the DOWN arrow on the front of the
white funnel portion.
Note: It is important to match up the arrows as the rocker is offset by the antenna; the
funnel needs to center over the rocker.
6. Press the funnel portion onto the base until the white tabs lock back into place.
Model: 724-1710 www.lacrossetechnology.com/support Page | 3
Page 4
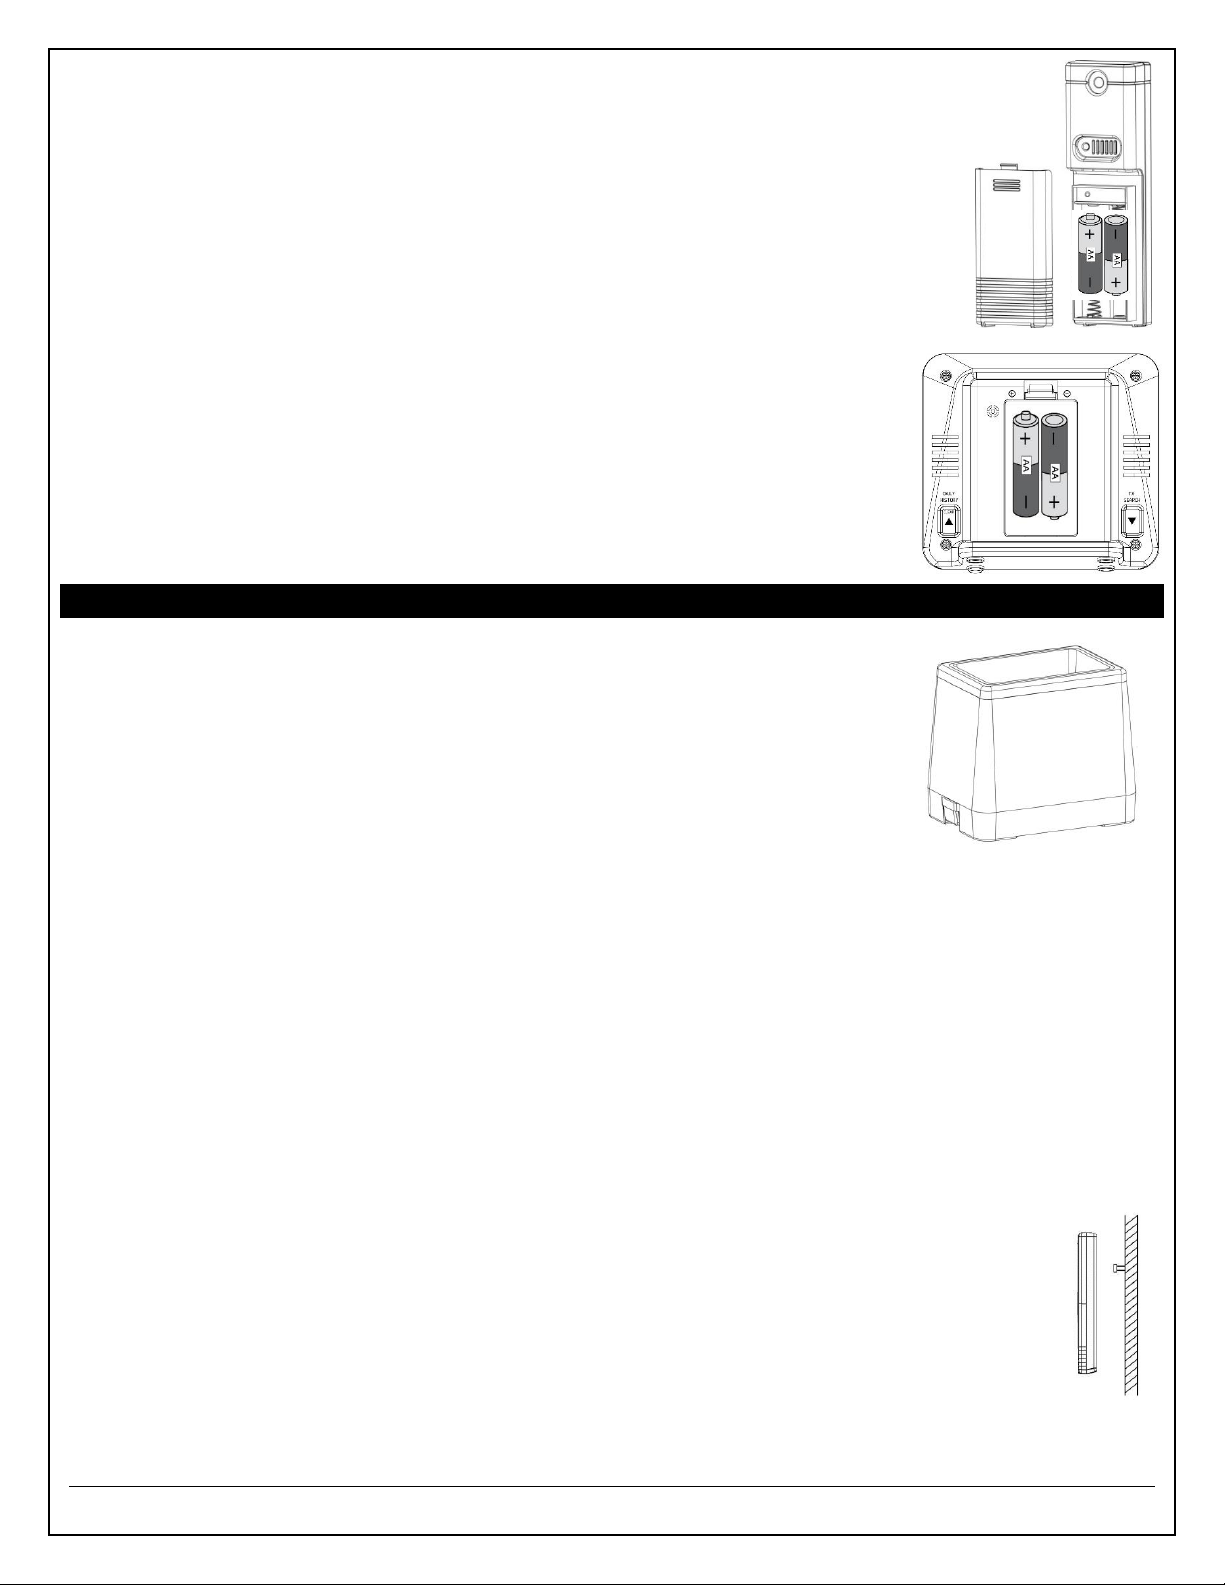
TX17T Temperature Sensor:
1. Insert 2 new AA batteries (not included) into the TX17T outdoor
temperature sensor. Observe the correct polarity.
2. The red LED will flash during transmission.
724-1710 Rain Station:
1. Insert 2 new AA batteries (not included) into the 724-1710 Rain monitor.
Observe the correct polarity.
2. Leave the rain monitor and sensors sit 5 -10 feet apart for 15 minutes
to lock in both sensors.
3. Both the temperature and the rain sensor should appear on the rain
station in the first minute.
4. Do not press buttons during the first 15 minutes.
5. You can tip the rocker of the rain sensor to simulate rain and receive a
reading to the rain station.
Sensor Mounting and Placement
Rain Sensor TX17R
Mount in an open area for a more accurate rain count.
Install the Rain sensor on a level platform that is stationary.
Insert two mounting screws (not included) through the holes in the
base of the rain sensor.
Ideally, the Rain sensor should be mounted at least 6 ft in the air
and have a direct line of sight to the display.
The rain sensor should be accessible to allow for periodic cleaning of
debris or insects.
The maximum wireless transmission range to the rain station is over 300 feet (91 meters) in
open air, not including walls or floors.
Temperature Sensor TX17T
Mount the Outdoor Sensor on a north-facing wall or in any well shaded area. Under an eave
or deck rail is preferred.
The maximum wireless transmission range to the rainstation is over 300 feet (91 meters) in
open air, not including walls or floors.
Be sure the outdoor sensor is mounted vertically.
Place the transmitter at least six feet in the air to improve signal transmission.
Option 1:
Install one mounting screw (included) into a wall leaving approximately ½ of an
inch (12.7mm) extended.
Place the transmitter onto the screw, using the hanging hole on the backside.
Gently pull the transmitter down to lock the screw into place.
Option 2:
Insert the mounting screw through the front of the transmitter and into the wall.
Tighten the screw to snug (do not over tighten).
Model: 724-1710 www.lacrossetechnology.com/support Page | 4
Page 5
Rain Station Placement
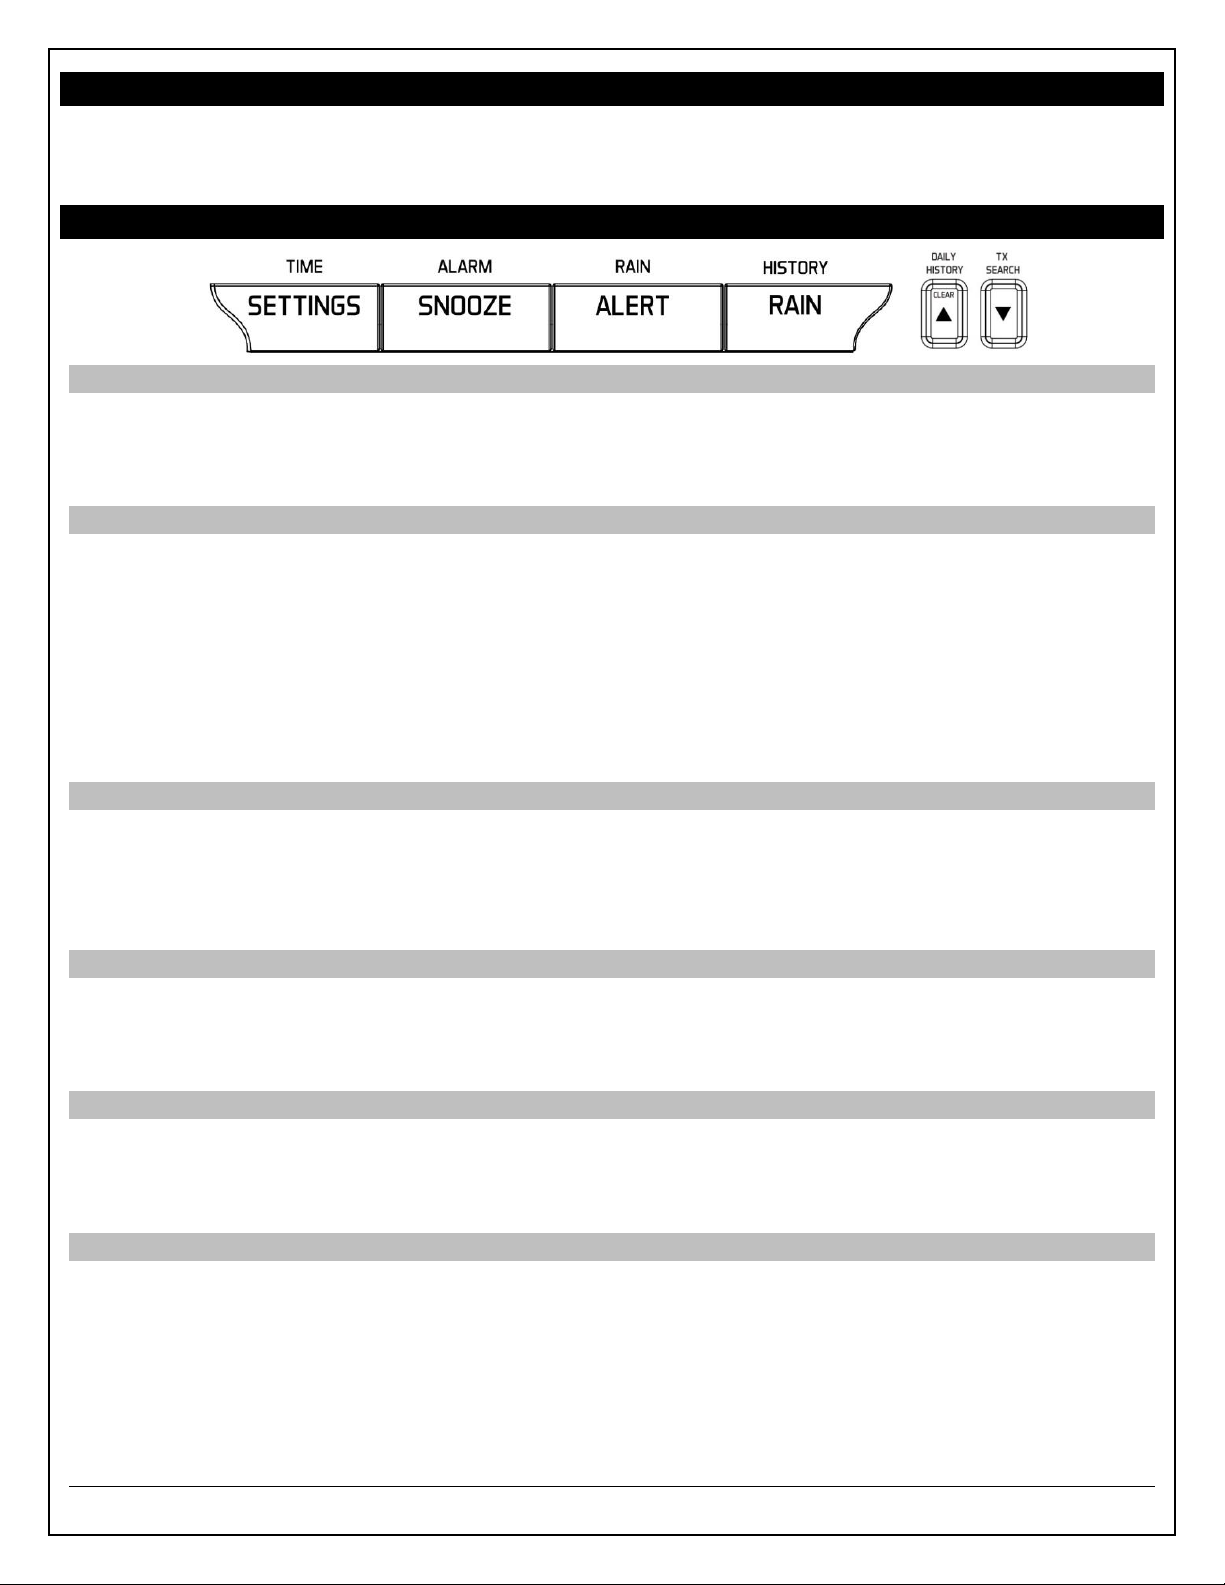
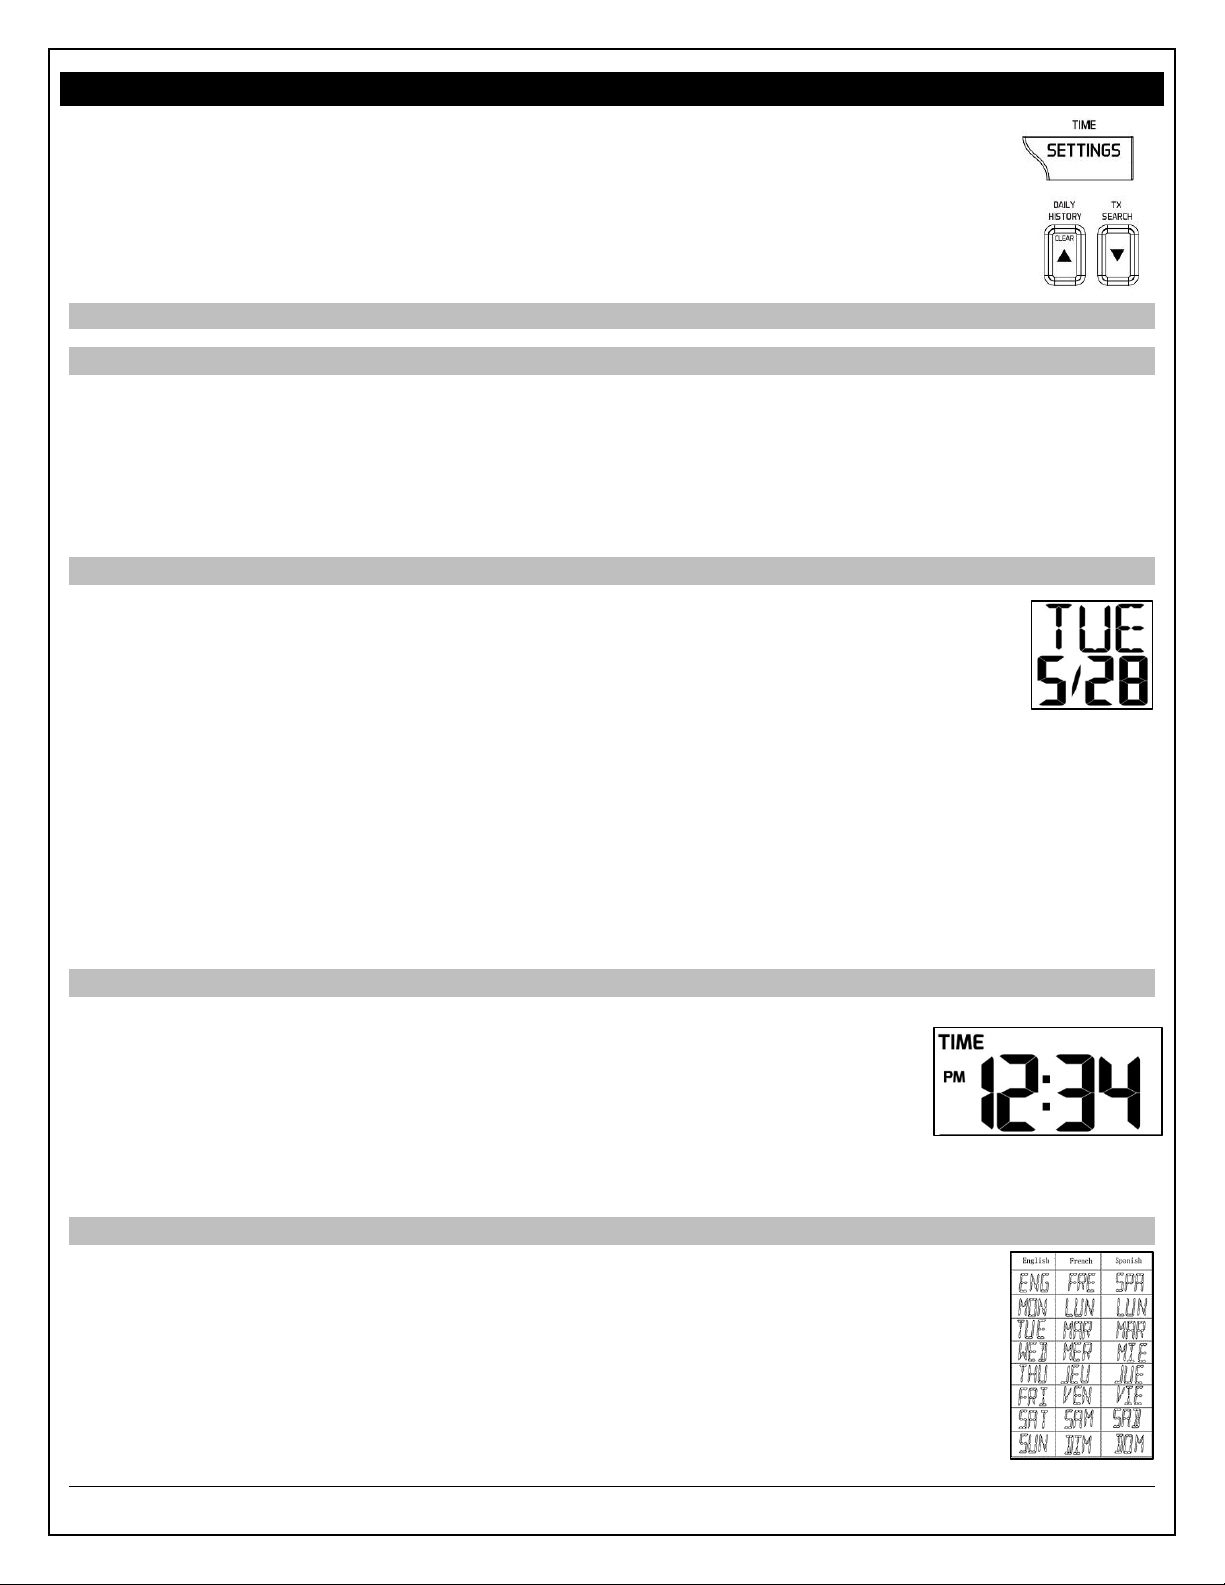
Front Buttons
Back Buttons
Place the rain station at least six feet from radio interference such as PCs, radios or TV sets.
Do not have wireless devices in the signal path between the sensors and the rain station.
Buttons
SETTINGS Button (Time)
Normal Mode: Hold to enter settings mode.
Settings Mode: Press to confirm a setting and move to next item.
SNOOZE Button (Alarm)
Normal Mode: Press to view Alarm time.
Alarm Mode: Hold to set Alarm time.
Press to arm/disarm alarm.
Alarm Ringing: Press to arm snooze feature for 10 minutes.
Snooze Mode: Press to exit snooze mode.
ALERT Button (Rain)
Normal Mode: Hold to enter rain alert mode.
Press to view rain alert
Alerts Mode: Press to arm/disarm rain alert
RAIN Button (History)
Normal Mode: Hold to enter settings mode.
Settings Mode: Press to confirm a setting and move to next item.
▲ Button (Daily History, Clear)
Normal Mode: Hold to enter settings mode.
Settings Mode: Press to confirm a setting and move to next item.
▼ Button (TX Search)
Normal Mode: Hold to enter settings mode.
Settings Mode: Press to confirm a setting and move to next item.
Model: 724-1710 www.lacrossetechnology.com/support Page | 5
Page 6
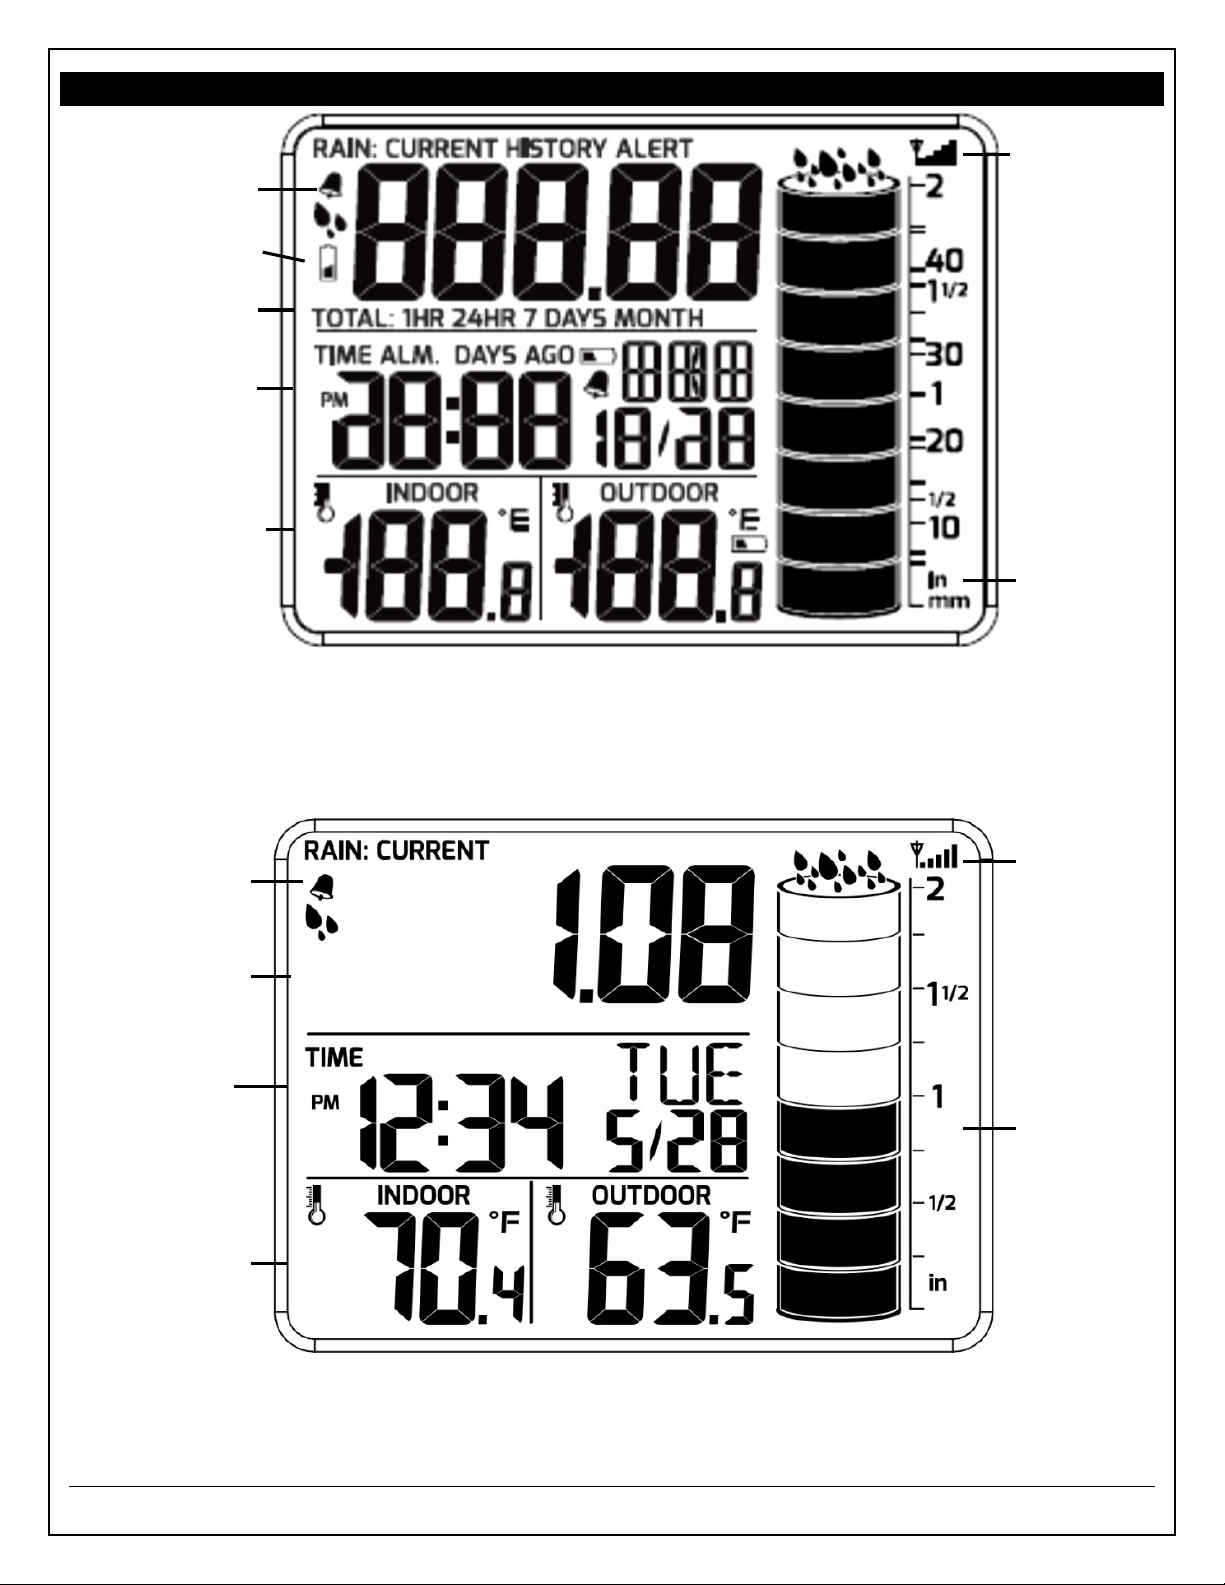
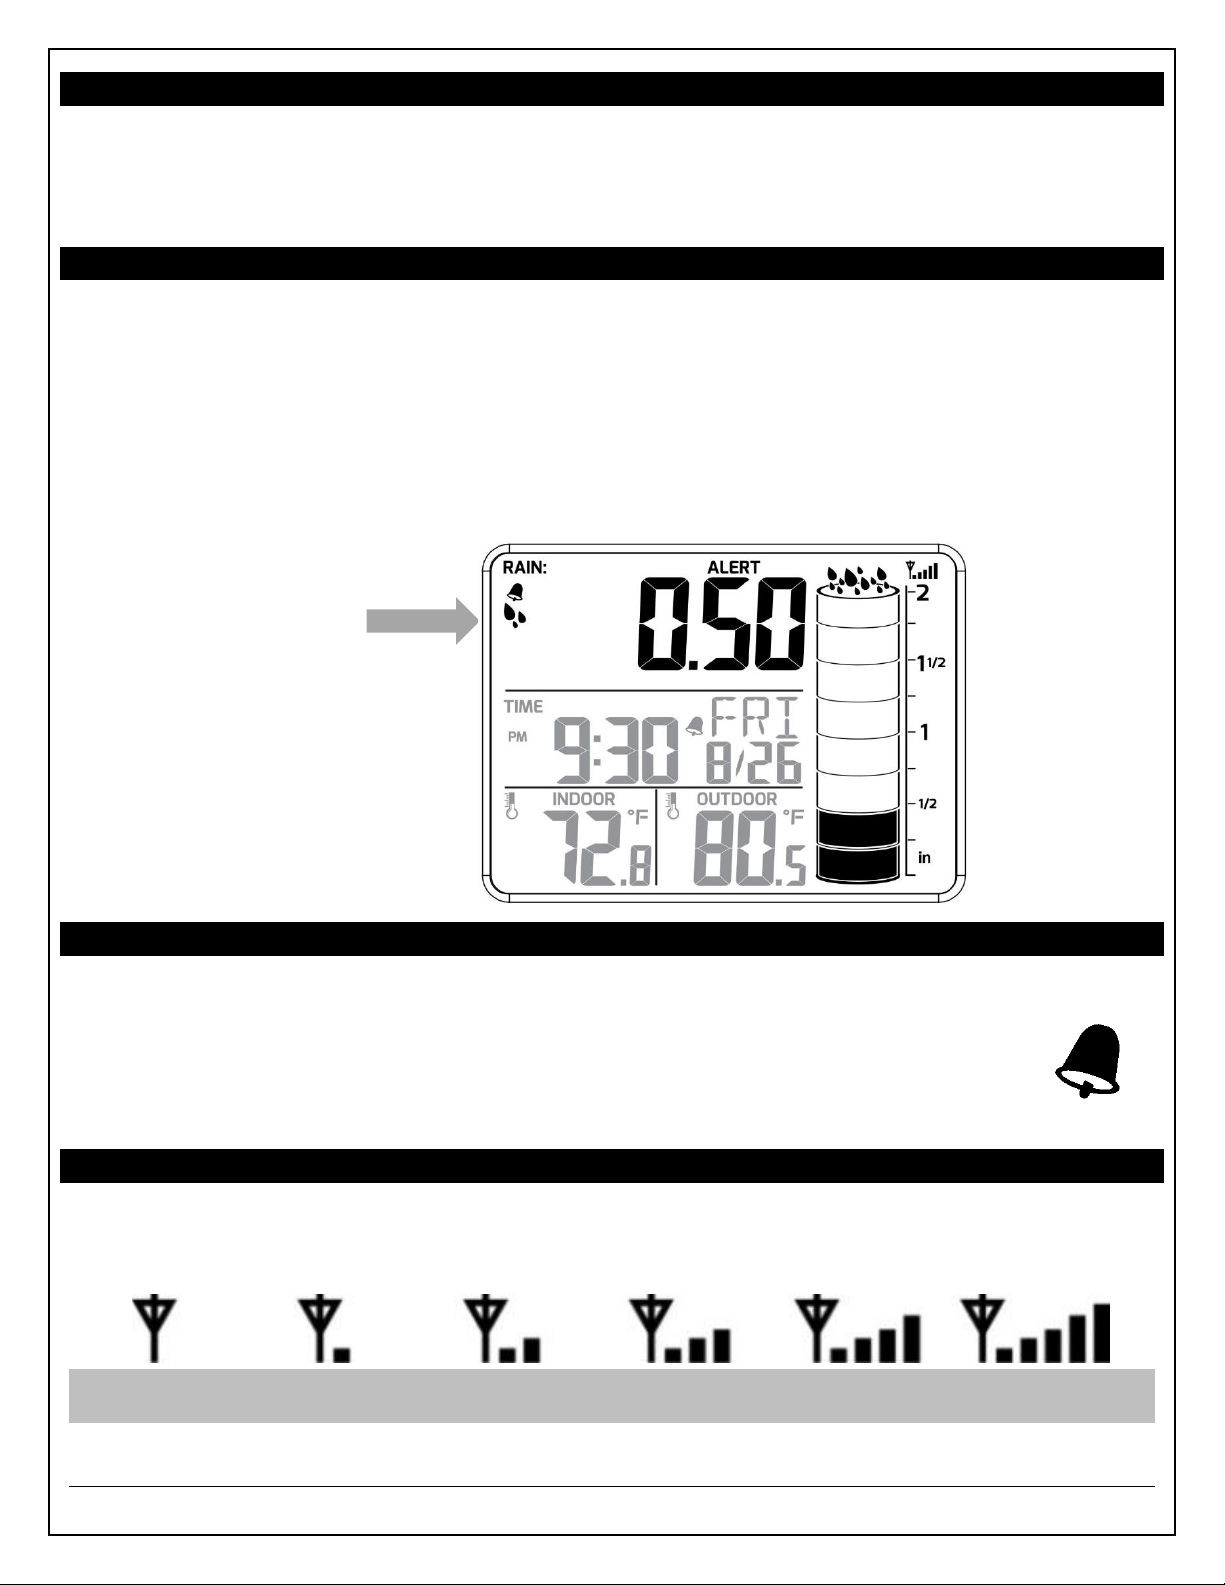
LCD Screen
Rainfall Alert (24hrs)
Rain Sensor
Low Battery Indicator
Rainfall Readings:
Current, 1HR, 24HR
7DAYS, MONTH, TOTAL
Time/Date/Day
Rainfall Daily History
(up to 365 days)
Rain Station
Low Battery Indicator
Indoor Temperature °F/°C
Outdoor Temperature °F/°C
Outdoor Sensor
Low Battery Indicator
Rain Sensor
Reception Icon
Fully populated LCD for illustrative purposes
Rainfall Cylinder
Graph (in/mm)
Normal LCD display
Rainfall Cylinder
Graph (inches)
Rain Sensor
Reception Icon
Indoor
Temperature °F/°C
Outdoor
Temperature °F/°C
Time/Date/Day
Press ▲/CLEAR button
Rainfall Daily History
(up to 365 days)
Rainfall Alert (24hrs)
Press RAIN button
to view
Rainfall Readings:
Current, 1HR, 24HR
7DAYS, MONTH, TOTAL
Model: 724-1710 www.lacrossetechnology.com/support Page | 6
Page 7
Set 12/24, Calendar, Time, Language, °F/°C, Rain Unit of Measure
Hold the SETTINGS button to enter SETTINGS mode.
Press the ▲/CLEAR and ▼ buttons (back) to adjust a value.
Press the SETTINGS button to confirm and move to next item.
Settings order:
1.12/24 hour, 2.Year, 3.Month, 4.Date, 5.Hour, 6.Minute, 7. Language
(English/Spanish/French), 8. °F/°C, 9.mm/in (millimeters or inches for rain)
Note: The rain station will default out of set mode when no buttons are pressed for 20 seconds.
12/24 Hour Time Format
The Time may be displayed in 12-hour or 24-hour format. Default is 12-hour time.
Note: When in 12-hour format AM or PM will show in front of the hour.
1. 12H will flash in the time display.
2. Press and release the ▲/CLEAR and ▼ buttons to select 24-hour time.
3. Confirm with the SETTINGS button and move to Set Calendar.
Set Calendar (Year, Month, Date)
The date default of the weather station is 1. 1. 2014.
To set the calendar:
1. The year will flash.
2. Press and release the ▲/CLEAR and ▼ buttons to set the year.
3. Press the SETTINGS button again to confirm and to enter the month setting.
4. The month will flash.
5. Press and release the ▲/CLEAR and ▼ buttons to set the month.
6. Press the SETTINGS button again to confirm and enter the date setting.
7. The date will flash.
8. Press and release the ▲/CLEAR and ▼ buttons to set the date.
9. Confirm all calendar settings with the SETTINGS button to confirm and move to Set Time
Note: The day of the week will set automatically once the year, month and date are set.
Set Time (Hour, Minutes)
To set the time manually:
1. The hour digit will flash.
2. Press and release the ▲/CLEAR and ▼ buttons to select the hour.
3. Press and release the SETTINGS button to set the minutes.
4. The minute’s digit will flash.
5. Press and release the ▲/CLEAR and ▼ buttons to select the minutes.
6. Confirm with the SETTINGS button and move to select Language.
Language for Weekday Display
The day of the week can be displayed in English, French or Spanish.
1. ENG will flash in the time display.
2. Press and release the ▲/CLEAR and ▼ buttons to select FRE (French) or SPA
(Spanish) language.
3. Confirm with the SETTINGS button and move to select Fahrenheit or Celsius
temperature display.
Model: 724-1710 www.lacrossetechnology.com/support Page | 7
Page 8
Fahrenheit/Celsius
Alarm Bell Icon
1. °F will flash.
2. Press and release the ▼ or ▲ buttons to select Fahrenheit or Celsius.
3. Confirm with the TIME SET button and exit the program menu.
Rainfall Unit of Measure (inches/millimeters)
Rainfall measurement can be in inches or millimeters. The cylinder graph will change
with the unit of measurement.
1. In (inches) will flash in the time display.
2. Press and release the ▲/CLEAR and ▼ buttons to select mm (millimeters).
3. Confirm with the SETTINGS button and exit.
Set Time Alarm
1. Press the SNOOZE button to view alarm time.
2. While in alarm mode, hold the SNOOZE button until rain station beeps, to enter alarm set
mode.
3. The alarm hour digit will flash in the time display.
4. Press and release the ▲/CLEAR and ▼ buttons to select the hour.
5. Press and release the SNOOZE button to set the minutes.
6. The minute digits will flash.
7. Press and release the ▲/CLEAR and ▼ buttons to select the minutes.
8. Confirm with the SNOOZE button and exit.
9. The bell icon will show indicating the alarm is active.
10.The bell icon will flash when the alarm is sounding.
Note: The rain station will default out of alarm set mode if no buttons are pressed for 20
seconds.
Disarm Time Alarm
The alarm automatically arms when the alarm is set.
While viewing Alarm Time, press the SNOOZE button to disarm the time alarm.
The bell icon will disappear.
Alarm Snooze
When the alarm sounds, press the SNOOZE button to silence the alarm for 10 minutes.
The snooze function may be repeated.
Hold the SNOOZE to exit snooze mode.
Press any other button to stop the alarm for one day.
Note: This station has a crescendo alarm that will sound for 2 minutes, then shut off completely.
Model: 724-1710 www.lacrossetechnology.com/support Page | 8
Page 9

Rain Readings
This detailed rain station offers rain readings with a corresponding cylinder graph.
Press and release the RAIN button to view different rain readings in the Rain Window:
CURRENT: This measures from the start of rainfall until there is no rain accumulation for 30
minutes. The display will reset to zero when no rain has fallen for 30 minutes.
1 HR: The rainfall accumulated in the last 1-hour increment. Resets to zero at the top of
each hour.
Example: If rain didn’t start until5:50, then 5:50 to 5:59 is considered within the 5:00 to
6:00 hour rain increment. The data from 6:00 to 7:00 will be the next hour.
24 HR: Based on the past 24 1-hour increments. This is a running total that changes hourly.
7 DAYS: Based on the last 7 24-hour readings. This is not a subject to the calendar. Be sure
time and date are set.
MONTH: Total rainfall from the first day of the month to last day of the month.
TOTAL: Total rainfall since powered on or reset.
Note: As time passes without rain, the 1 hour, 24 hour, and 7 day rain totals will count down to
zero.
Clear Current Rainfall Readings
1. Press the RAIN button to select the value you wish to clear.
2. Hold the ▲/CLEAR button (on back) to clear a value.
3. Each value will need to be cleared individually.
4. Clearing the current values will not change the Days Ago records.
Model: 724-1710 www.lacrossetechnology.com/support Page | 9
Page 10
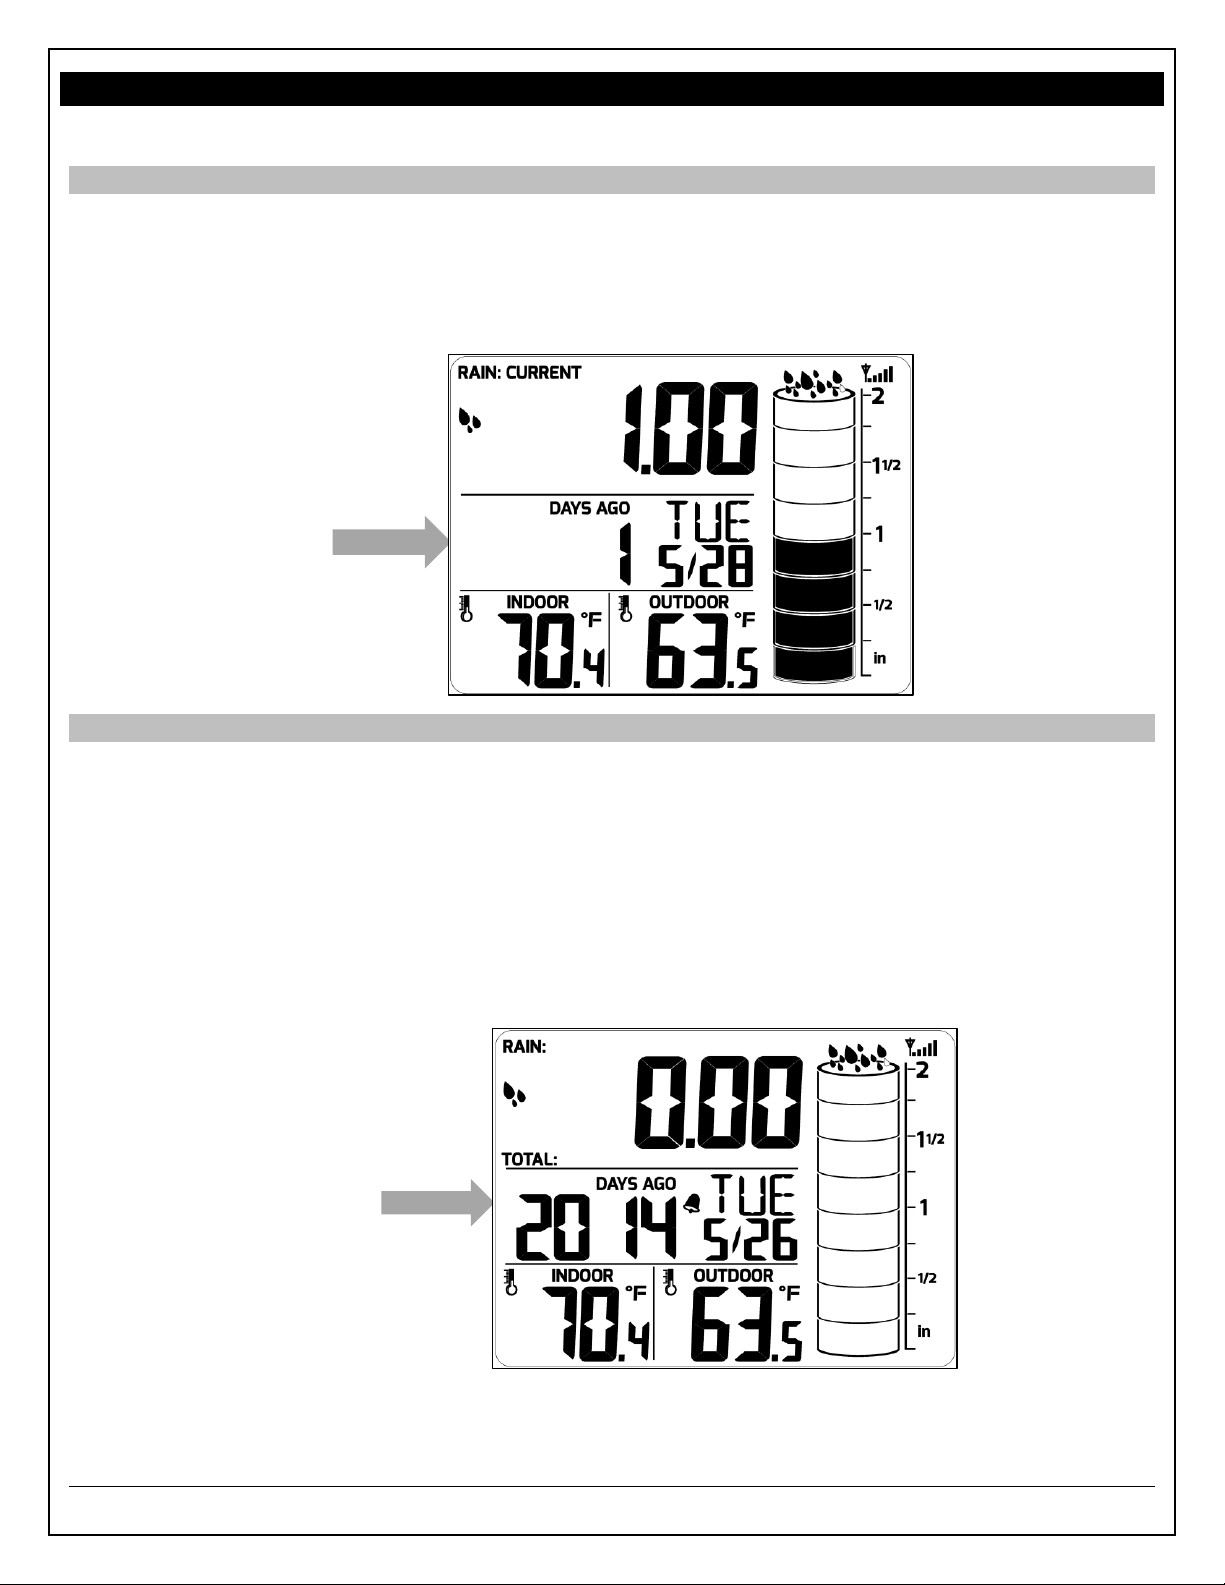
Rainfall Daily History Records (up to 365 days)
View rainfall history by toggling back one day at a time or select a date to view.
History Records One Day at a Time
1. Press the ▲/CLEAR button to view the rain history when DAYS AGO heading and the date
appear.
2. Press the ▲/CLEAR button repeatedly, to scroll back one day at a time to view the rainfall
daily record (365 days of record history maximum)
History Records Date Search
1. Press the ▲/CLEAR button to view the rain history when DAYS AGO heading and the date
appear.
2. In DAYS AGO mode, hold the▲/CLEAR button until the rain station beeps. The Year will
flash.
3. Press the ▲/CLEAR and ▼buttons to select the Year, Month and Date to view the rainfall.
4. Press SETTINGS button to confirm each setting.
Settings order: 1. Year2. Month3. Date
If no buttons are pressed for 20 seconds, the rain station will default to normal mode.
Model: 724-1710 www.lacrossetechnology.com/support Page | 10
Page 11
Clear Rainfall Daily History Records
The 365 day rain history may remain during a battery change to the rain station.
The Current, 1 hour, 24 hour, 7 days, month and total rain will be erased.
To clear these records, after inserting batteries hold the ▲/CLEAR and ▼buttons together.
Rainfall Alert (24 hour)
The rain station offers a programmable 24 hour rainfall alert.
1. Press the ALERT button to enter Rain Alert Mode.
2. In Alert mode, hold the ALERT button until the rain station beeps, to enter set mode, for the
24 hour rainfall alert.
3. Press the ▲/CLEAR and ▼buttons to adjust the alert value.
4. Press the ALERT button to confirm and exit alert mode.
5. The rainfall alert is automatically armed when set.
Arm/Disarm 24 hour Rainfall Alert
Press the ALERT button to enter Rain Alert Mode.
In alert mode, press and release the ALERT button to arm or disarm the alert.
The alert bell icon will show when armed.
When the alert value is reached, the alarm will beep for 5 seconds, then once each
minute.
Press any button to stop the alert from sounding.
Search for Rainfall Sensor
Hold the RAIN button for 5 seconds to search for the rain sensor.
The strength signal icon will animate until the sensor signal is received or for 3 minutes if no
signal is available.
Note: The Time Alarm has priority over RF (radio frequency) reception, if alarm sounding is set
for during a search.
Model: 724-1710 www.lacrossetechnology.com/support Page | 11
Page 12

Search for Temperature Sensor
Indoor
Temperature Range:
+14°F to +122°F (-10°C to 50°C)
Outdoor
Temperature Range:
-40°F to 148°F (-40°C to 70°C)
Distance:
Over 300 ft. (91 meters) RF 915MHz (open air)
Rain
Range:
Up to 99.99 inches (999.9 mm)
Distance
Over 300 ft. (91 meters) RF 915MHz (open air)
Power
Rain Station:
2-“AA”, IEC, LR6 batteries (not included)
TX17T Outdoor Sensor:
2-“AA”, IEC, LR6 batteries (not included)
TX17R Rain Sensor:
2-“AA”, IEC, LR6 batteries (not included)
Battery Life
Rain Station:
Battery life is up to12 months when using reputable battery brands
TX17T Outdoor Sensor:
Battery life is up to12 months when using reputable battery brands
for both Alkaline and Lithium batteries
TX17R Rain Sensor:
Battery life is up to12 months when using reputable battery brands
for both Alkaline and Lithium batteries
Dimensions
Rain Station:
4.27”L x 1.48”W x 3.88”H (108 x 38 x 99 mm)
TX17T Outdoor Sensor:
1.57"L x 0.79"W x 5.12"H (40 x 20 x 130mm)
TX17R Rain Sensor:
6.00”L x 5.10”W x 4.21”H (152 x 130 x 107mm)
Hold the ▼button for 5 seconds to search for the outdoor temperature sensor.
Note: The Time Alarm has priority over RF (radio frequency) reception, if alarm sounding is set
for during a search.
Low Battery Icons
A low battery icon displayed indicates low battery for the rain station, rain sensor , or
temperature sensor.
If the icon is displayed in the Outdoor Temperature section, replace batteries in the
temperature sensor.
If the icon is displayed in the Rain section, replace batteries in the rain sensor.
If the icon is displayed in the Date section, replace batteries in the wireless rain
station.
Specifications
Model: 724-1710 www.lacrossetechnology.com/support Page | 12
Page 13

Care and Maintenance
Do not mix old and new batteries
Do not mix Alkaline, Standard, Lithium or Rechargeable Batteries
Always purchase the correct size and grade of battery most suitable for the intended use.
Replace all batteries of a set at the same time.
Clean the battery contacts and also those of the device prior to battery installation.
Ensure the batteries are installed correctly with regard to polarity (+and -).
Remove batteries from equipment with is not to be used for an extended period of time.
Remove used batteries promptly.
Do not expose to extreme temperature, vibration or shock.
Clean with a soft damp cloth. Do not use solvents or scouring agents.
The product is not a toy. Keep it out of reach of children.
The product is not to be used for medical purpose or for public information. It is intended for
home use only.
The specs of this product may change without prior notice.
Improper use or unauthorized opening of housing voids warranty.
If the product is not working properly, change the batteries.
Warranty Information
La Crosse Technology, Ltd. provides a 1-year limited time warranty (from date of purchase) on
this product relating to manufacturing defects in materials & workmanship.
Before returning a product, please contact our friendly customer support with
questions or visit our online help (manuals and FAQS):
Phone: 1-608-782-1610
Online Product Support: www.lacrossetechnology.com/support
Product Registration:
www.lacrossetechnology.com/support/register
View full warranty details online at:
www.lacrossetechnology.com/warranty_info.pdf
Warranty Address:
La Crosse Technology, Ltd
2830 S. 26th St.
La Crosse, WI 54601
Protected under U.S. Patents:
5,978,738 | 6,076,044 |RE43903
Model: 724-1710 www.lacrossetechnology.com/support Page | 13
Page 14

FCC Statement
This equipment has been tested and found to comply with the limits for a Class B digital device,
pursuant to part 15 of the FCC Rules. These limits are designed to provide reasonable protection
against harmful interference in a residential installation. This equipment generates, uses and can
radiate radio frequency energy and, if not installed and used in accordance with the instructions,
may cause harmful interference to radio communications. However, there is no guarantee that
interference will not occur in a particular installation. If this equipment does cause harmful
interference to radio or television reception, which can be determined by turning the equipment
off and on, the user is encouraged to try to correct the interference by one or more of the
following measures:
Reorient or relocate the receiving antenna.
Increase the separation between the equipment and receiver.
Connect the equipment into an outlet on a circuit different from that to which the receiver
is connected.
Consult the dealer or an experienced radio/TV technician for help.
This device must not be co-located or operating in conjunction with any other antenna or
transmitter. Operation is subject to the following two conditions:
(1) this device may not cause harmful interference, and
(2) this device must accept any interference received, including interference that may cause
undesired operation.
Caution!
The manufacturer is not responsible for any radio or TV interference caused by unauthorized
modifications to this equipment. Such modifications could void the user authority to operate the
equipment.
All rights reserved. This manual may not be reproduced in any form, even in part, or duplicated
or processed using electronic, mechanical or chemical process without the written permission of
the publisher. This booklet may contain errors or misprints. The information it contains is
regularly checked and corrections are included in subsequent editions. We disclaim any
responsibility for any technical error or printing error, or their consequences.
All trademarks and patents are recognized.
Model: 724-1710 www.lacrossetechnology.com/support Page | 14
 Loading...