


EKV 6800.1M
ISTRUZIONI DI USO E DI MONTAGGIO
USE AND ASSEMBLY INSTRUCTIONS INSTRUCTIONS DE MODE D'EMPLOI ET D'ENTRETIEN BEDIENUNGS-UND MONTAGEANLEITUNG
INSTRUCCIONES DE EMPLEO Y DE MONTAJE
UK
Congratulations ,
upon the wise choice you have made by purchasing the EKV 6800.1M model.
Please read the information in this manual carefully before you operate the coffee machine.
Here you will find important indications regarding your safety and the care and maintenance of the appliance that will allow you satisfactory use over a long term. Should any breakdown occur, first see the section entitled “Troubleshooting”. Often it is possible to repair small failures independently, thereby avoiding the costs of repairs.
This machine has been built in conformity with the directives EEC 89/392, EEC 89/336, EEC 73/23, EEC 89/109 and subsequent amendments.
The quality and reliability of this product are guaranteed by the fact that it has been built according to the UNI EN ISO 9001: 2000 COMPANY QUALITY SYSTEM.
With best wishes.
Küppersbusch
ENGLISH
TECHNICAL CHARACTERISTICS
WEIGHT |
52 Kg |
114 Lb |
WEIGHT |
63 Kg |
139 Lb |
|
1800 W |
1800 W |
|
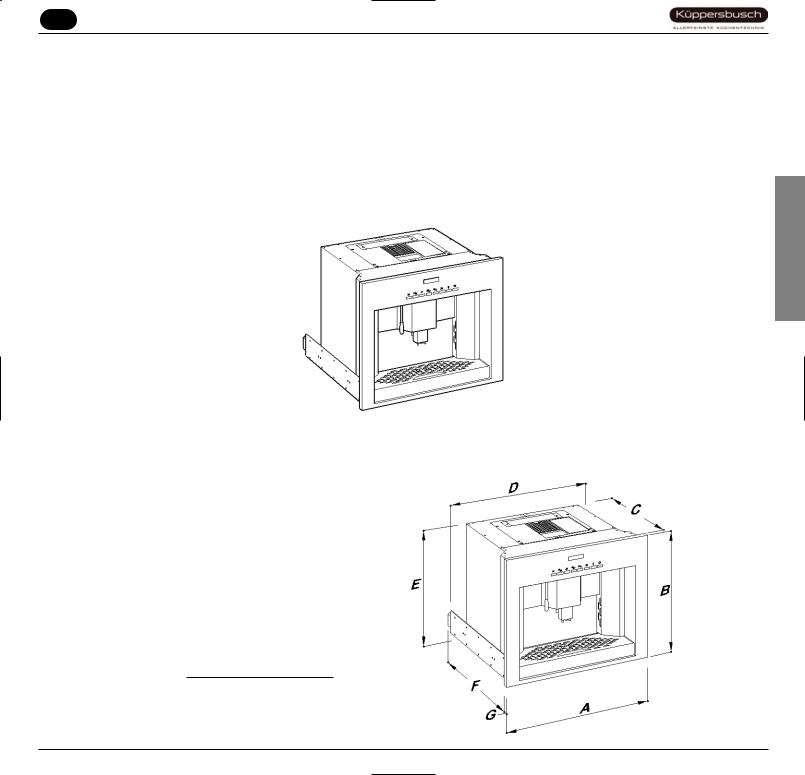
A 596 mm |
A 23,47 inc |
|
B 462 mm |
B 18,1 9 inc |
|
C 442 mm |
C 17,4 inc |
|
D 562 mm |
D 22,13 inc |
|
E 445 mm |
E 17,52 inc |
|
F 546,5 mm |
F 21,52inc |
|
G 20 mm |
E 0,08inc |
Rel. 00 - 2006 |
EKV 6800.1M |
35 |
|

ENGLISH
UK
|
INDEX |
|
|
TECHNICAL CHARACTERISTICS |
. . . . .35 |
1. |
DESCRIPTION . . . . . . . . . . . . . . . |
. . . . .37 |
1.1 |
KEYBOARD DESCRIPTION (Standard configuration) . . .38 |
|
1.2 |
MICROBAR INTERNAL DESCRIPTION . . . . . . |
. . . . . . .38 |
2. |
SAFETY INSTRUCTIONS . . . . . . . |
. . . . .39 |
3. |
TRANSPORT AND HANDLING . . . . |
. . . .41 |
3.1 |
MACHINE IDENTIFICATION . . . . . . . . . . . . . |
. . . . . .41 |
3.2 |
TRANSPORT . . . . . . . . . . . . . . . . . . . . . . . . . |
. . . . . .41 |
3.3 |
HANDLING . . . . . . . . . . . . . . . . . . . . . . . . . . . |
. . . . . .41 |
4. |
PRELIMINARY OPERATIONS . . . . . |
. . . .42 |
4.1 |
FILLING THE APPLIANCE . . . . . . . . . . . . . . |
. . . . . .42 |
4.2MACHINE INSTALLATION
|
(VERSION FOR DIRECT CONNECTION) . . . . . . . . . . |
42 |
4.3 |
SWITCHING ON . . . . . . . . . . . . . . . . . . . . . . . . . . . . |
43 |
4.4 |
SWITCHING OFF . . . . . . . . . . . . . . . . . . . . . . . . . . . |
44 |
5.ASSEMBLY INSTRUCTIONS FOR
QUALIFIED PERSONS . . . . . . . . . . . . . . .45
5.1 INSTRUCTIONS FOR BUILT-IN ASSEMBLY . . . . . . . .45
5.2 EKV 6800 .1M BUILT-IN UNIT DIMENSIONS . . . . . . .45 5.3 BUILT-IN INSTALLATION . . . . . . . . . . . . . . . . . . . . .45 5.4 NUMBER OF SPACER PLATES . . . . . . . . . . . . . . . . . .46 5.5 DISASSEMBLY . . . . . . . . . . . . . . . . . . . . . . . . . . . . . .46 5.6 TECHNICAL DATA . . . . . . . . . . . . . . . . . . . . . . . . . . .47
6.ADJUSTMENTS TO BE MADE
BY A QUALIFIED TECHNICIAN ONLY . .48
6.1 GRINDING ADJUSTMENT . . . . . . . . . . . . . . . . . . . . .48
6.2CAPPUCCINO MAKER AIR ADJUSTMENT
(foam amount and density . . . . . . . . . . . . . . . . . . . .48
6.3MILK FLOW ADJUSTMENT
(Temperature adjustment) . . . . . . . . . . . . . . . . . . . .48
7. USE . . . . . . . . . . . . . . . . . . . . . . . . . . . .49
7.1 STANDARD CONFIGURATION . . . . . . . . . . . . . . . . .49 7.2 SWITCHING ON . . . . . . . . . . . . . . . . . . . . . . . . . . . . .49 7.3 SWITCHING OFF . . . . . . . . . . . . . . . . . . . . . . . . . . . .49
7.4 HEIGHT-ADJUSTABLE COFFEE DISPENSER . . . . . . . .50 7.5 HOW TO MAKE COFFEE . . . . . . . . . . . . . . . . . . . . . .50 7.6 HOW TO MAKE 2 COFFEES . . . . . . . . . . . . . . . . . . .50
7.7PREPARING DECAFFEINATED COFFEE IN POWDER 51
7.8 PREPARING LONG COFFEE . . . . . . . . . . . . . . . . . . . . .51
7.9 HOW TO MAKE CAPPUCCINO . . . . . . . . . . . . . . . . .51 7.10 DISPENSING HOT WATER . . . . . . . . . . . . . . . . . . . . . .52
8. PROGRAMMING . . . . . . . . . . . . . . . . . . .53
8.1 LEGENDA . . . . . . . . . . . . . . . . . . . . . . . . . . . . . . . . . .53 8.2 PROGRAMMING . . . . . . . . . . . . . . . . . . . . . . . . . . . . .53 8.3 EXITING PROGRAMMING . . . . . . . . . . . . . . . . . . . . .54
8.4PROGRAMMING CYCLE
USER MODE . . . . . . . . . . . . . . . . . . . . . . . . . . . . . . . .54
8.5PROGRAMMING CYCLE
TECHNICIAN MODE . . . . . . . . . . . . . . . . . . . . . . . . . . .56
9.SPECIAL MACHINE
SCALING FUNCTIONS . . . . . . . . . . . . . .60
9.1RESETTING THE CLEANING FILTRE
LITRE COUNTER . . . . . . . . . . . . . . . . . . . . . . . . . . . .60 9.2 RESETTING WASHING CYCLES . . . . . . . . . . . . . . . .60
9.3 RESETTING MACHINE PARAMETRES . . . . . . . . . . .60
9.4 HANDLING MANUAL COFFEE DELIVERY GROUP’ . .60
10. CLEANING AND MAINTENANCE . . . . . .61
10.1 CLEANING THE OUTSIDE OF THE MACHINE . . . . . .61
10.2CLEANING THE DELIVERY UNIT
AND THE MILK FOAMER . . . . . . . . . . . . . . . . . . . . . .62
10.3REINSTATING AN INTERRUPTED
WASHING CYCLE . . . . . . . . . . . . . . . . . . . . . . . . . . .63 10.4 CLEANING THE MILK FOAMER . . . . . . . . . . . . . . . .63
11. STANDARD SETTING TABLE . . . . . . . . |
64 |
12. MACHINE FUNCTIONS MESSAGES . . . .65
13.MACHINE BLOCK
ALARM MESSAGES . . . . . . . . . . . . . . . .67
36 EKV 6800.1M
UK
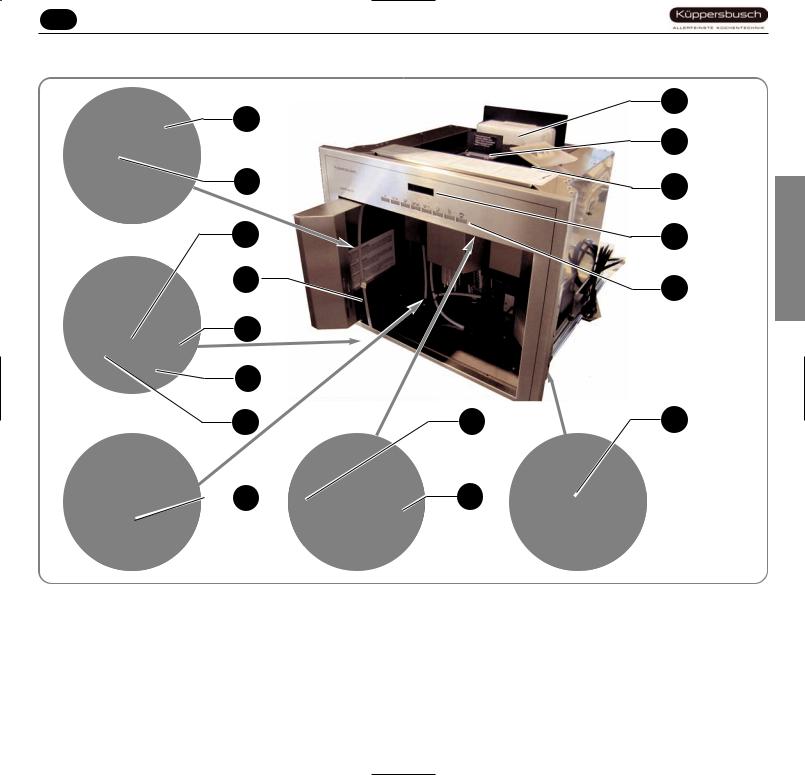
DESCRIPTION
16
1
15
2
3
5 |
|
|
6 |
|
|
7 |
9 |
11 |
8 |
|
|
Fig. 1
valve |
7 |
Drawer for coffee grounds |
13 |
Display |
suction tube |
8 |
Hot water pipe |
14 |
Coffee bean container |
dispenser |
9 |
LED lighting key |
15 |
Ground coffee container |
container compartment |
10 |
ON/OFF key |
16 |
Water tank |
coffee cup compartment |
11 |
Outer door release |
|
|
grille |
12 |
Control panel |
|
|
|
|
|
|
|
|
|
|
|
|
ENGLISH
EKV 6800.1M 37
ENGLISH
UK
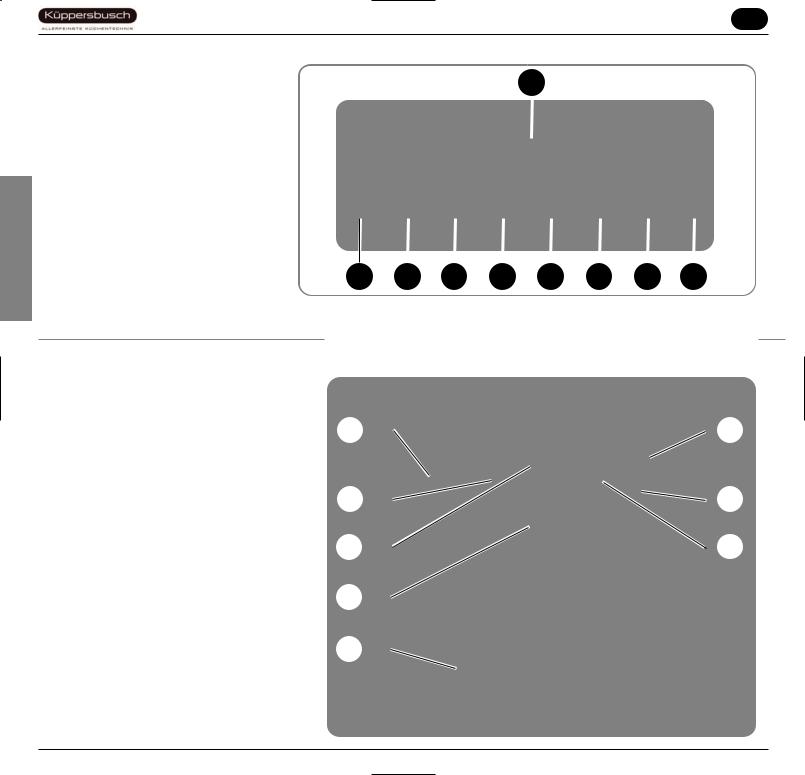
1.1 KEYBOARD |
|
DESCRIPTION |
|
(Standard configuration) |
9 |
KEY
1 1 Espresso key
2 2 Espressos key
3 1 White coffee key
42 White coffees key
5Decaffeinated coffee, Wash cycle
6Long coffee
7Hot water dispensing
8Cappuccino
9 LCD display |
Fig. 2 |
|
1.2 EKV 6800. 1M INTERNAL DESCRIPTION
KEY |
|
1 |
|
|
|
|
|
6 |
|||
1 |
Microswitch for outer door |
|
|
|
|
|
|
|
|
||
|
|
|
|
|
|
|
|
|
|
||
|
|
|
|
|
|
|
|
||||
2 |
Inside door open |
|
|
|
|
|
|
|
|
||
3 |
Cappuccino maker air adjustment |
|
|
|
|
|
|
|
|
|
|
|
2 |
|
|
|
|
|
7 |
||||
4 |
Cappuccino maker with tubes |
|
|
|
|
|
|
||||
|
|
|
|
||||||||
5 |
Outer door open |
|
|
|
|
|
|
|
|
|
|
6 |
Ground coffee conveyor |
|
|
|
|
|
|
|
|
|
|
|
3 |
|
|
|
|
|
8 |
||||
7 |
Infusion group |
|
|
|
|
|
|||||
|
|
|
|
||||||||
8 |
Rating plate |
|
|
|
|
|
|
|
|
|
|
|
|
|
|
|
|
|
|
|
|
|
|
|
|
|
|
|
4 |
|
|
|
|
|
|
|
|
|
|
|
|
|
|
|
|
|
|
|
|
|
|
|
|
|
|
|
|
|
|
|
|
|
|
|
|
|
|
|
|
|
|
|
|
|
|
|
5 |
|
|
|
|
|
Fig. 3 |
|
|
|
|
|
|
|
|
|
|
||
|
|
|
|
|
|
|
|
|
|
|
|
|
|
|
|
|
|
|
|
|
|
|
|
38 EKV 6800.1M
UK
2. SAFETY INSTRUCTIONS
Parts of the packaging can be harmful to children. Danger of suffocation! Keep packaging out of the reach of children.
After unpacking, make sure the appliance is complete. In case of doubts,
RISK OF POLLUTION
Before connecting the appliance make sure the rating Fig. 4
plate data correspond with the mains. This plate is on the front panel at the top right hand side of the appliance. The appliance must be installed by qualified technicians in accordance with current standards and manufacturer’s instructions.
The manufacturer is not liable for any damage caused due to failure to ground the system. For the electrical safety of the appliance, it is necessary to equip the system with the proper grounding. This must be car-
ried out by a qualified electrician who must ensure that the electric power of the system is sufficient to absorb the maximum power input stated on the plate.
Fig. 5
In particular you must ensure that the size of the wiring cables is sufficient to absorb power input.
The use of adapters, multiple sockets or extensions is strictly forbidden. If they prove necessary, call a fully qualified electrician.
The machine must be installed according to the local standards in force with regard to plumbing systems. For this reason, the plumbing connections must be carried out by a qualified technician.
This appliance must only be used as described in this handbook. The manufacturer shall not be liable for any damage caused due to improper, incorrect and unreasonable use.
Basic rules must be observed when using any electric appliance.
CAUTION
RISK OF ELECTRIC SHOCK
Fig. 6
•do not use the appliance when barefoot;
•do not use extensions in bath or shower rooms;
•do not pull the supply cord out of the socket to disconnect it from the mains;
•do not leave the appliance exposed to atmospheric agents (rain, sun, etc.);
•do not let the appliance be used by children, unauthorised staff or staff who have not read and fully
ENGLISH
EKV 6800.1M 39
ENGLISH
UK
understood the contents of this handbook.
Before servicing the appliance, the authorised technician must first switch off the appliance and remove the plug.
Fig. 7
To clean the appliance, set the machine to the “0” energy level, that is, “WITH THE MACHINE SWITCHED OFF AND THE PLUG REMOVED FROM THE MAINS” and follow the instructions in this handbook.
If the appliance breaks down or fails to work properly, switch it off. Any intervention is strictly forbidden. Contact qualified experts only.
Repairs should only be made by the manufacturer or authorized service centres. Only original spare parts must be used. Failure to observe the above, could make the appliance unsafe.
For installation, the qualified electrician must fit an omnipolar switch in accordance with the safety regulations in force and with 3 (0,12) or more mm (in) between contacts.
To avoid dangerous overheating, make sure the supply cord is fully uncoiled.
Do not obstruct the suction and/or dissipation grilles.
The user must not replace the appliance supply cord. If the cord is damaged, switch off the appliance and have a qualified technician change the cord.
If no longer using the appliance, we recommend making it inoperative; after removing the plug from the mains electricity, cut the power supply cable.
CAUTION
RISK OF POLLUTION
Do not dispose of the machine in the environment: to dispose of the machine, use an authorised centre, or contact the manufacturer for relative information.
Fig. 8
To increase ventilation to the machine, make an opening of at least 300 x 100 mm in the back of the housing.
CAUTION
RISK OF INTOXICATION
gent residues may then be left inside the delivery group.
CAUTION
RISK OF BURNS OR SCALDING
steam. Do not touch the nozzle immediately after use.
Fig. 9
CAUTION
RISK OF CUTTING
his/her hands inside the container.
40 EKV 6800.1M
UK
3. TRANSPORT AND HANDLING
3.1 MACHINE IDENTIFICATION
Always quote the machine serial number in all communications to the manufacturer,
Ftg-Nr 702 148 N 02 010000 22
Fig. 10
3.2 TRANSPORT
The machine is transported on a pallet, inside boxes which are secured to the pallet
Prior to carrying out any transport or operation, the operator must:
•put on work gloves and protective
as well as a set of overalls which must be elasticated at the wrists and ankles.
The pallet must be transported using a suitable means for lifting (e.g., forklift).
3.3 HANDLING
CAUTION
RISK OF IMPACT
OR CRASHING
During all handling operations, the operator must ensure that there are no persons, objects or property in the handling area.
The pallet must be slowly raised to a height to the loading there are no loading opera-
tions can be carried out.
Upon arrival at the destination and after ensuring that there are no persons, objects or property in the unloading area, the proper lifting equipment (e.g. forklift) should be used to lower the pallet to the ground and then to move it (at approx. 30 cm (11,8 in) from ground level), to the storage area.
CAUTION
RISK OF IMPACT
OR CRASHING
Before carrying out the following operation, the load must be checked to ensure that it is in the correct position and that, when the supports are cut, it will not fall.
The operator, who must first put on work gloves and protective footwear, will proceed to cut the supports and to storing the product. To carry out this operation, the technical characteristics of the product
must be consulted in order to know the weight of the machine and to store it accordingly.
CAUTION
RISK OF POLLUTION
ENGLISH
Fig. 11
EKV 6800.1M 41
ENGLISH
UK
4. PRELIMINARY OPERATIONS
CAUTION |
WARNING |
RISK OF
sure that no people or things are below it.
Do not dispose of packaging in the environment.
Fig. 13
• Pull the water tank up and |
|
• Remove all parts from the box of acces- |
||||
|
sories (Teflon tubes Ø 4 mm, 1 pressure |
|||||
first time, wash it with soapy |
|
|||||
|
reducing |
valve, 3 |
snap-on connectors, |
1 |
||
rinse it carefully, taking care to |
|
|||||
|
pressure |
gauge, |
1 fastening bracket, |
2 |
||
soap residues. |
|
|||||
|
threaded connectors and two gaskets). Fit |
|||||
• Fill the tank with water (this does |
|
|||||
|
the pressure gauge and 2 connectors to the |
|||||
to the version connected to the |
|
|||||
|
pressure reducing valve, as illustrated in the |
|||||
• In the same way, open the coffee |
- |
|||||
drawing here below. |
|
|||||
tainer and pour in the coffee |
- |
|
||||
|
|
|
|
|||
|
|
|
|
|||
ing the maximum level; then refit container lid.
WARNING
Switch off the machine before filling or removing the water tank.
•Partially remove the machine from its seating.
•Use the relevant bracket to fit the previously assembled pressure reducing valve to the nearest point to the water mains (see drawing below).
42 EKV 6800.1M
UK
Fig. 16
•Connect one end of the Teflon pipe (diam. 4
mm)to the machine, inserting it firmly into the snap-on connector. To make sure that the connection has been made properly, pull the tube outwards (see drawing).
•Cut the other end of the tube, first making sure that the length is sufficient to connect it to the pressure reducing valve.
Fig. 17
•After finding the arrows that
direction of the water flow in the pressure reducing valve, connect the
water outlet. Connect the remaining |
of |
the tube to the other connector |
|
of the pressure reducing valve. |
|
sure that you have shut off the stopcock,
proceed to install the connectors |
|
relevant gaskets in the mains |
|
Connect the free end of the tube to |
- |
viously fitted snap-on connector. |
|
NOTE: The maximum outlet pressure from the pressure reducing valve MUST NOT exceed 1.5 bars.
Fig. 18
WARNING
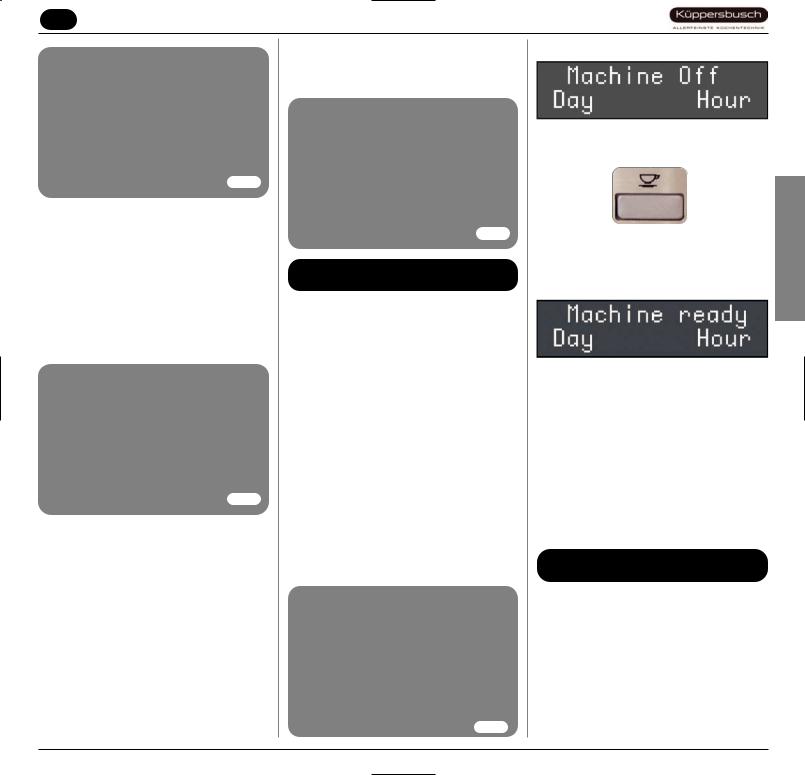
4.3 SWITCHING ON
NOTE: in case the following |
- |
n't take effect, see the |
on |
"PROBLEMS AND |
|
After the preliminary operations: |
|
•Press the machine’s main switch to “ON”.
The LCD will then light up and read as follows:
To switch the machine on definitively, press the “ENTER” key:
the machine automatically loads the heater with water and begins heating operations. When the desired temperature is reached the display will show the following message:
NOTE: the starting time is about 3 minutes. NOTA: The appliance is endowed with a secu-
rity system that will stop the machine after about 1.5 minutes of constant functioning of the pump (to avoid pump overheating). In this case, switch off the main switch of the machine and then turn it on again.
The machine is now ready to be used.
WARNING
When installing the machine for the first time or after water heater unit maintenance, press the button to dispense hot water before dispensing any coffee. repeat this operation as required and until there is an even flow of water from the nozzle.
Fig. 19
ENGLISH
EKV 6800.1M 43
ENGLISH
UK
4.4 SWITCHING OFF
To switch off the machine, proceed as follows:
•Hold the “ENTER” key down for 5 seconds with the machine switched on:
•The LCD will read as follows:
•To switch the machine off fully, press the main switch and turn it to the “OFF” position.
Fig. 20
44 EKV 6800.1M
 Loading...