


BEDIENUNGSANWEISUNG
mit Montageanweisungen
Instructions for use and installation instructions
Instructions d’utilisation et avis de montage
Gebruiksaanwijzing en montagehandleiding
EEB 6200.1
072544 K22
For your information... |
Contents |
You should carefully read the information in this manual before you use your oven. Here you will find important notes concerning safety and how to use, look after and service your appliance so that it enjoys a long service life.
Should a fault arise, please first consult chapter “What to do if trouble occurs”. You can often remedy minor faults yourself and thus save unnecessary service costs.
Please keep this manual in a safe place and pass it on to new owners for their information and safety.
The following symbols are used in this operating manual:
=The warning triangle draws your attention to risks to your health or damage that might be caused to your appliance.
Φ Here you will find useful hints and information.
Conditions of guarantee
The conditions of guarantee applicable for this product are subject to those published by the representative in the relevant country. Details regarding same may be obtained from the dealer from whom the appliance was purchased. For claims under guarantee the sales receipt must be produced.
Your appliance at a glance . . . . . . . . . . . . . . . . . . . . . . . 17 Safety instructions . . . . . . . . . . . . . . . . . . . . . . . . . . . . . 18
Connection and operation Oven
Before using the appliance for the first time . . . . . . . . . . . 18
Disposing of the packaging and the old appliance Setting the clock
Initial cleaning
Using your oven . . . . . . . . . . . . . . . . . . . . . . . . . . . . . . . 19
General
Controls and displays for the oven Symbols and operating modes Heating-up indicator and pilot light Turning the oven on and off
Oven trays Rack levels
backmobil® (acc. No. 600A)
Telescopic glide-out shelves (acc. No. 601) Fast preheating
Roasting
Recommended temperatures Roasting Baking
Baking pizza
Tips on the table “Recommended temperatures for baking” Recommended temperatures for baking
Grilling
Recommended temperatures for grilling Defrosting
Preserving
Electronic timer . . . . . . . . . . . . . . . . . . . . . . . . . . . . . . . |
24 |
Adjusting the time
Adjusting the minute minder
Automatic shut-off
Automatic On/Off function
Checking a set or remaining value
Cancelling the automatic shut-off
Cleaning and care . . . . . . . . . . . . . . . . . . . . . . . . . . . . . . 25
For all surfaces Remove caking
Please note the information for the cleaning scraper The use of oven sprays - information
Enamel Stainless steel Glass Aluminium Door sealing Buttons
Removing and installing the oven door Removing and installing the side racks Regenerating the ökotherm® catalyst
What to do if trouble occurs... . . . . . . . . . . . . . . . . . . . . . 27
Replacing the oven lamp Replacing the door sealing
Rating label . . . . . . . . . . . . . . . . . . . . . . . . . . . . . . . . . . 27 Installation instructions for fitter . . . . . . . . . . . . . . . . . . . . 28
Electrics
Installation dimensions Installation in a fitted kitchen
16 |
EEB 6200.1 |
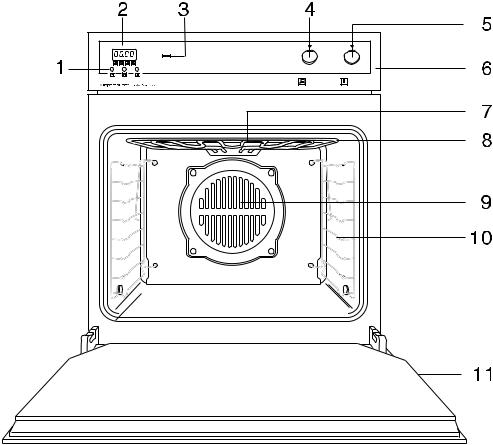
Your appliance at a glance
1 Control buttons for the timer
2 Display of the timer
3 Heating-up indicator (red)
4 Mode selector
5 Temperature control
6 Control panel
7 Grill
8 Top heat
9 Hot air fan
10 Rack levels
11 Oven door
Accessories supplied:
Gridiron
Baking tray (enamel)
Drip pan
Grilling rack with lifter
Accessories available:
Grilling rack with lifter (acc. No. 125)
Pizza stone (acc. No. 145)
Gridiron (acc. No. 124)
Roasting tray as splash guard (acc. No. 441)
Baking tray (enamel) (acc. No. 541)
Drip pan (aluminium) (acc. No. 542) Drip pan (acc. No. 543) backmobil® (acc. No. 600A)
Telescopic glide-out shelves (acc. No. 601)
Accessories available
for the telescopic glide-out shelves (acc. No. 601):
Gridiron, depressed, e.g. for large poultry (acc. No. 750)
Glass drip pan, suitable only for accessory 750 (acc. No. 751)
EEB 6200.1 |
17 |
Safety instructions
Connection and operation
■Only KÜPPERSBUSCH built-in hobs were designed and tested for use above a Küpperbusch fitted oven. No other hobs may be used.
■The appliances may only be connected to the mains, maintained and repaired by a qualified electrician according to valid safety regulations. Work carried out incorrectly places your safety at risk.
■Do not put the appliance into operation unless it has been built in!
■The surface of the oven is hot when in operation. Always keep children away!
■Make sure connection cables for electrical devices are not jammed in the oven door.
■Steam and/or pressure cleaning machines must not be used to clean the oven! This can damage the unit resulting in risk of personal injury.
■The appliance is to be used only for the preparation of food in the home.
Oven
■When carrying out repairs the appliance must be disconnected from the mains (switch off the fuse or unplug from the mains).
■The oven must not be used without the grill being inserted.
■If the grill is removed, the grill sokket is no longer protected. Treat it
like any other socket: Never wipe the socket and ensure that no water or oven spray enters it.
■Never store any objects in your oven which could cause a hazard if the oven is unintentionally switched on.
■Take special care when working in the hot oven. Use a dish cloth, oven gloves or similar.
■Be careful opening the door when the oven is hot: don’t lean over the open door straight away. As soon as you open the door, hot air and even steam will emerge through the door opening.
■The oven door must close well. In the event of damage to the hinges or to the glass pane, do not use the appliance until it has been repaired and checked by a qualified person.
■A damaged door sealing must be replaced. The oven must not be used with damaged door sealing.
■Always close the oven door completely when preparing food in the oven.
■Keep food at a distance of at least 5 cm from the grill and top heat.
Before using the appliance for the first time
Disposing of the packaging and the old appliance
Dispose of the transport packaging in such a way that it does not impact on the environment.
If the appliance is purchased in Germany, the dealer who sold you the appliance will dispose of the transport packaging for you. Recycling the pakkaging saves raw materials and reduces the amount of waste. Disposed appliances still contain useful materials. Dispose of your old appliance at a collection point for recycling useful materials. Before disposing of your old appliance ensure that it cannot be used any longer. This will prevent misuse.
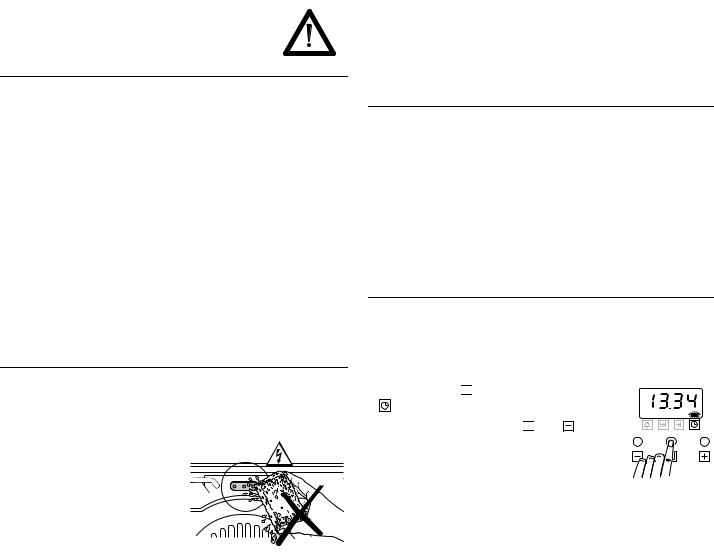
Setting the clock
Φ The oven will not function until the clock is set.
The clock must be set before the oven is used and whenever power has been disconnected to the appliance. If the clock is not set, you will see flashing the display.
– Keep pressing the 
 button until the LED over the symbol flashes.
– Enter the current time with the 

 and buttons.
Initial cleaning
–Remove foreign matter and packaging.
–Before preparing food for the first time, the appliance must be cleaned. Clean the baking trays, drip pan, gridiron etc. with a damp cloth and a little detergent.
–Heating the oven.
Close the oven door.
Heat up the oven with top heat/bottom heat at 250 °C for 60 minutes. Air the kitchen well at the same time.
18 |
EEB 6200.1 |

Using your oven
General
=Please note the safety instructions on page 18!
=Attention. Risk of overheating! If you intend to use the bottom of the oven, do not cover it with aluminium foil and do not place pots or pans
directly on it! This would cause a build-up of heat that would damage the enamel.
ΦWhen the oven is in use, it becomes hot. In order to cool the housing, the cooling fan is switched on as soon as the housing heats up. The coo-
ling fan continues to run until the housing has cooled down - even after the appliance has been switched off. The fan noises are normal running noises and not a fault.
ΦIf you are cooking a dish in the oven that contains alcohol or yeast, the Hot air convection, Intensive hot air convection and Pizza mode will result
in a vinegar smell. If you find the smell disturbing, use one of the other modes, such as Top/bottom Heat.
Controls and displays for the oven
AHeating-up indicator (red)
BFunction switch
CTemperature control
Symbols and operating modes
Switch |
Operating |
Intended for |
symbol |
mode |
|
|
|
|
0 |
Off |
|
!Lighting
#Cold air conWithout temperature setting, for gently defrosting and coo-
vection |
ling food. |
#Hot air conWith temperature setting, for roasting, baking and cooking
vection |
on several levels. |
$Top heat/BotPreheating,
|
tom heat |
baking and roasting on one level |
- |
Bottom heat |
Prebaking very moist cake |
. |
Top heat |
Browning toppings |
|
|
|
* |
Grilling |
Grilling small portions. Position the pieces of meat in the |
|
|
centre of the gridiron. |
+ |
Large area |
Grilling larger portions such as steaks, fish and sausages, |
|
grill |
but also for browning toast dishes and gratins. |
|
|
|
0 |
Intensive hot |
Baking large flat cakes with a dry topping (such as a crum- |
|
air convection |
ble topping), intensive roasting of large joints and large |
|
|
poultry such as goose or turkey. |
|
Pizza mode |
Baking bread, pizzas and moist cakes, making preserves. |
Heating-up indicator and pilot light
The heating-up indicator on the control panel will light up while the appliance is heating up and will go out as soon as the set temperature has been reached. It also comes on during operation when the oven is heated to maintain the temperature you want.
The pilot light lights up when you have selected an operation mode – the oven is operating.
Turning the oven on and off
ΦThe controls are of the pop-out type and can be countersunk in every setting. They pop out at a slight press of the finger. No settings can be
made while the controls are countersunk.
Selecting the operating mode:
– Turn the mode selector to the right.
Selecting the temperature:
–Turn the temperature control to the right.
Turning the oven off:
– Turn both switches to the “0” position.
Oven trays
Baking trays:
■Lift slightly when removing.
After baking trays are placed back into the oven, the sloping edge of the tray must point towards the oven door.
■Push the drip pan and baking tray with the two slots right at the back into the oven.
Gridiron:
■Please ensure that the catches of the racks always point towards the back (away from you).
Grilling rack with lifter to insert in the dripping pan
■ The grilling rack is inserted in the drip pan. With the lifter you can remove the grilling rack together with the drip pan from the oven. Nothing drips and you can easily serve.
Roasting tray as splash guard for roasting and grilling (accessory)
■The roasting tray is inserted in the drip pan and prevents the fat from splashing out of the drip pan.
Rack levels
You have 8 levels in the side racks. The rack levels are numbered from 0 to 7 from the bottom up. For example, the drip pan can be inserted into rack level 0.
Side racks:
Rack level 0 is the lowest possible level.
EEB 6200.1 |
19 |
 Loading...