

Kyocera FS-3540MFP, FS-3640MFP, FS-C2526MFP, FS-C2626MFP, Teaching Assistant Set Up And Operation Manual
Page 1

Teaching Assistant
HyPAS-Enabled
SETUP AND OPERATION GUIDE
July 11th, 2011
Kyocera Mita America, Inc.
Software Solutions Group
Page 2

1. Table of Contents
2. Introduction .................................................................................................................................... 4
2.1 Trademarks ................................................................................................................................... 4
2.2 Software ........................................................................................................................................ 4
2.3 This Guide ..................................................................................................................................... 4
2.4 Supported MFP Models ................................................................................................................ 5
2.5 Licensing ........................................................................................................................................ 5
3. Typical Workflow .......................................................................................................................... 6
3.1 Creating an exam .......................................................................................................................... 6
3.2 Automated Test Grading ............................................................................................................... 7
4. Operation ......................................................................................................................................... 8
4.1 Creating Tests ................................................................................................................................ 8
Changing Test Sheet Title ...................................................................................................................... 9
4.2 Grading Tests .............................................................................................................................. 10
Changing Grade Letter Percentages ................................................................................................... 12
5. Reports ............................................................................................................................................ 13
5.1 Summary Report ......................................................................................................................... 13
5.2 Detailed Report ........................................................................................................................... 15
6. Setup ................................................................................................................................................ 16
6.1 Files Required .............................................................................................................................. 16
6.2 MFP Setup ................................................................................................................................... 16
6.3 Installation on A4 Desktop MFP .................................................................................................. 16
6.4 Installation on Workgroup (A3) MFP .......................................................................................... 19
7. Configuration Options ............................................................................................................... 24
7.1 Configuring Printing Application ................................................................................................. 24
7.2 Configuring Grading Application ................................................................................................. 24
Options ................................................................................................................................................ 26
8. Troubleshooting .......................................................................................................................... 27
8.1 Unable to Print tests ................................................................................................................... 27
8.2 Unable to Scan tests for grading ................................................................................................. 27
Page 3

Page 4

2. Introduction
2.1 Trademarks
Microsoft, MS-DOS and Windows are registered trademarks of Microsoft Corporation of
either the United States or other countries.
Windows XP is a trademark of Microsoft Corporation.
Microsoft Windows Vista, Microsoft Windows 7, SharePoint and Microsoft Internet
Explorer are trademarks of the Microsoft Corporation in the U.S. and other countries.
Adobe Acrobat and Adobe Reader are trademarks of Adobe Systems, Incorporated.
Other company names and product names in this Operation Guide may be the
trademarks or registered trademarks of their respective owners. TM and ® are not
mentioned in each case in this guide.
2.2 Software
Kyocera’s Teaching Assistant is a software application for automated printing and grading of
multiple-choice exams using popular bubble-sheet forms. Teaching Assistant simplifies the task
of printing, collecting and analyzing test results for educators, while ensuring accuracy and
reducing the amount of time spent grading these important documents. Integrated with
Kyocera’s HyPAS-enabled Multifunctional Products (MFP), learning institutions can accomplish
the task of printing and grading test sheets, maximizing efficiency, saving valuable time for
educators to concentrate on students and lesson-plans. Teaching Assistant maximizes savings
for an institute by eliminating the need to order expensive pre-printed bubble sheets and by
not requiring any network resources.
2.3 This Guide
This document describes the components, functions, installation requirements and setup steps
required to deploy Teaching Assistant effectively at a school or institute.
Since Teaching Assistant offers multiple configuration options, it is essential to understand the
workflow and configuration options to deploy this solution correctly.
4
Page 5

HyPAS-Enabled MFPs
Color MFPs
TASKalfa/CS 7550ci
TASKalfa/CS 6550ci
TASKalfa/CS 5550ci
TASKalfa/CS 4550ci
TASKalfa/CS 3550ci
TASKalfa/CS 3050ci
TASKalfa/CS 552ci
TASKalfa/CS 500ci
TASKalfa/CS 400ci
TASKalfa/CS 300ci
TASKalfa/CS 250ci
B&W MFPs
TASKalfa/CS 8000i
TASKalfa/CS 6500i
TASKalfa/CS 5500i
TASKalfa/CS 4500i
TASKalfa/CS 3500i
TASKalfa/CS 520i
TASKalfa/CS 420i
TASKalfa/CS 300i
HyPAS-Capable MFPs*
Color MFPs
FS-C2526MFP
FS-C2626MFP
B&W MFPs
FS-3540MFP
FS-3640MFP
* A4 Desktop MFPs require a compatible CF-
card to be installed prior to installing
applications.
2.4 Supported MFP Models
2.5 Licensing
Teaching Assistant requires the purchase of a software license from an authorized Kyocera or Copystar
dealership.
The software can be evaluated, free of charge, during a 30 day trial period. The application will stop
working when the trial period expires and require a license key be entered to continue using the
application.
5
Page 6

3. Typical Workflow
Answer Test
Print Blank Tests
3.1 Creating an exam
When an instructor needs to create a multiple choice exam, Teaching Assistant is used to print blank
test sheets; one for each student. These blank test sheets are handed to the class at the start of the test.
Test questions could be posted on a board or handed to the students along with the test sheets.
Students write their name and fill out their student ID in the space provided. Each question is answered
by shading the corresponding bubble on the test sheet. After completing the test, students return their
marked test sheets back to the instructor.
6
Page 7
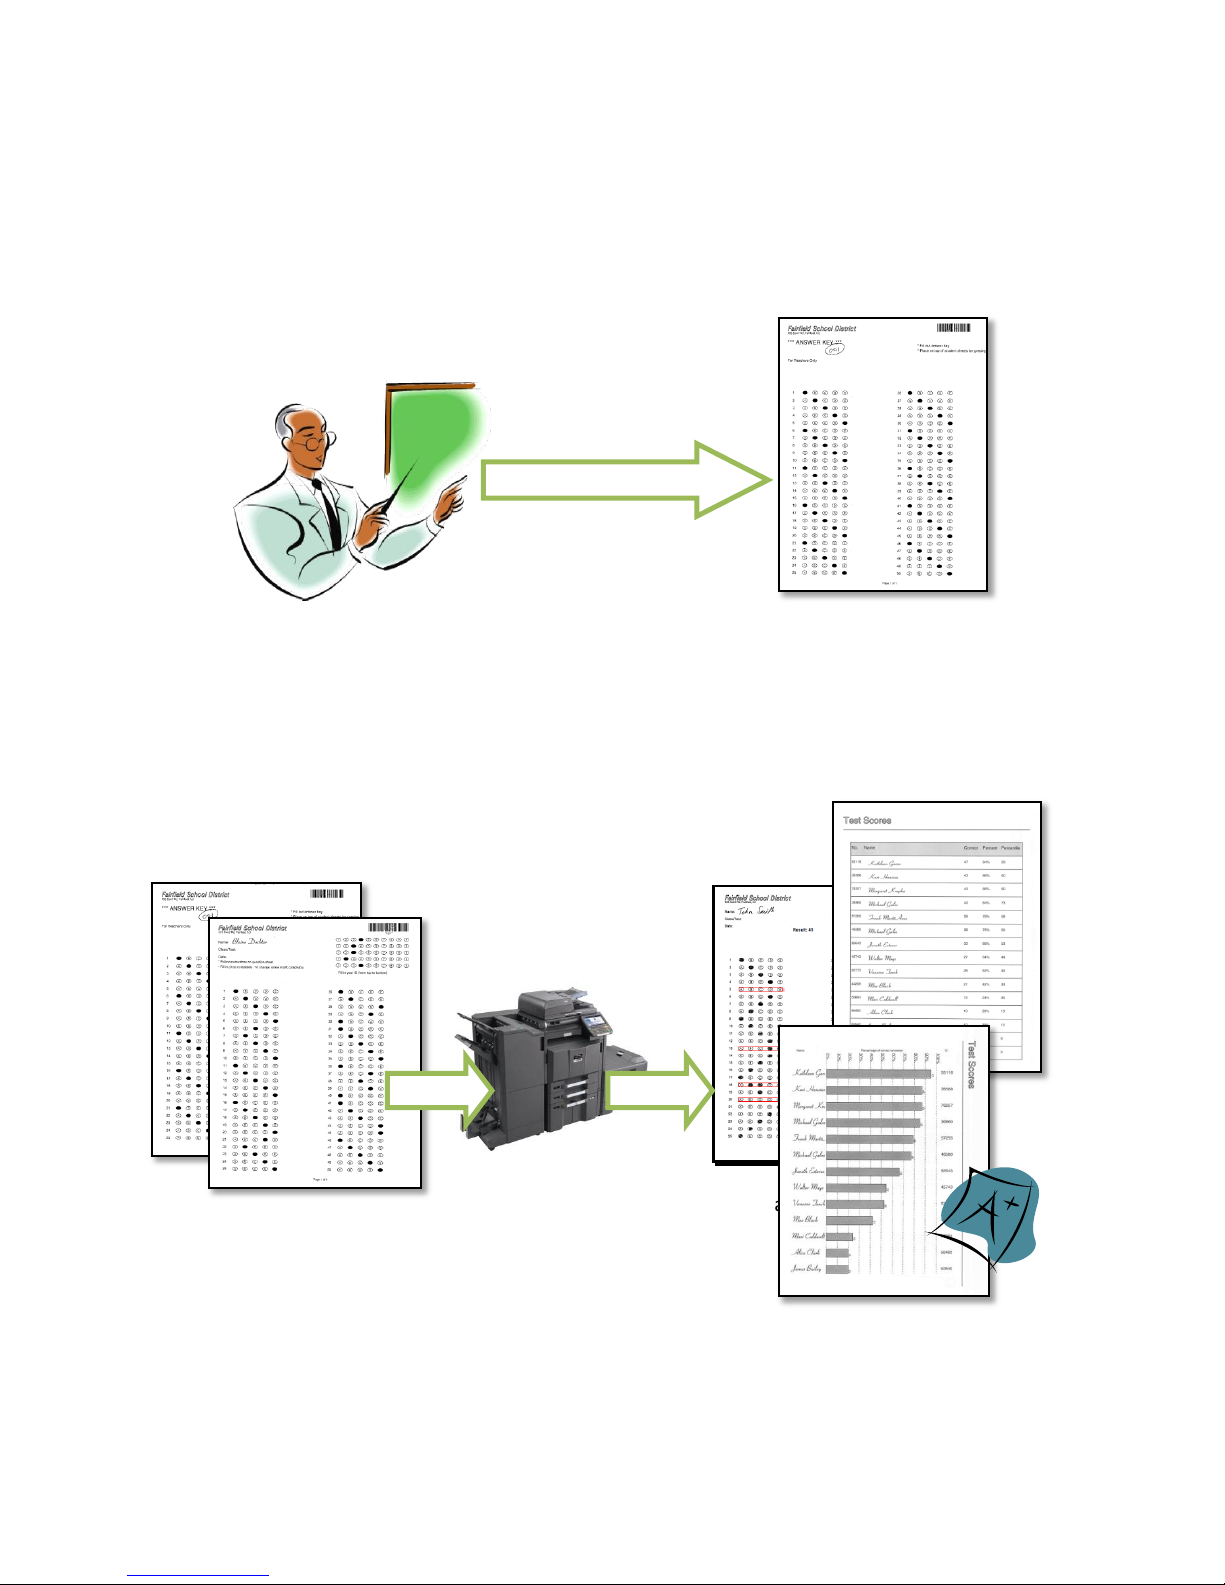
Mark Correct Answers
Scan
Print
3.2 Automated Test Grading
The instructor fills out the correct answers for each question on a designated “answer key” page, which
is also printed out along with blank test sheets.
When ready, the instructor scans all the test sheets along with the answer key at the MFP into Teaching
Assistant. Teaching Assistant scores each student’s test and prepares a report of the actual results from
each student. The report can be:
a. Printed at the MFP in summary or detailed form.
b. Sent to the instructor as a PDF in an email attachment.
c. Saved to a USB flash drive as a PDF file.
When the teacher exits the Teaching Assistant application, all the files are cleared from the MFP.
7
Page 8
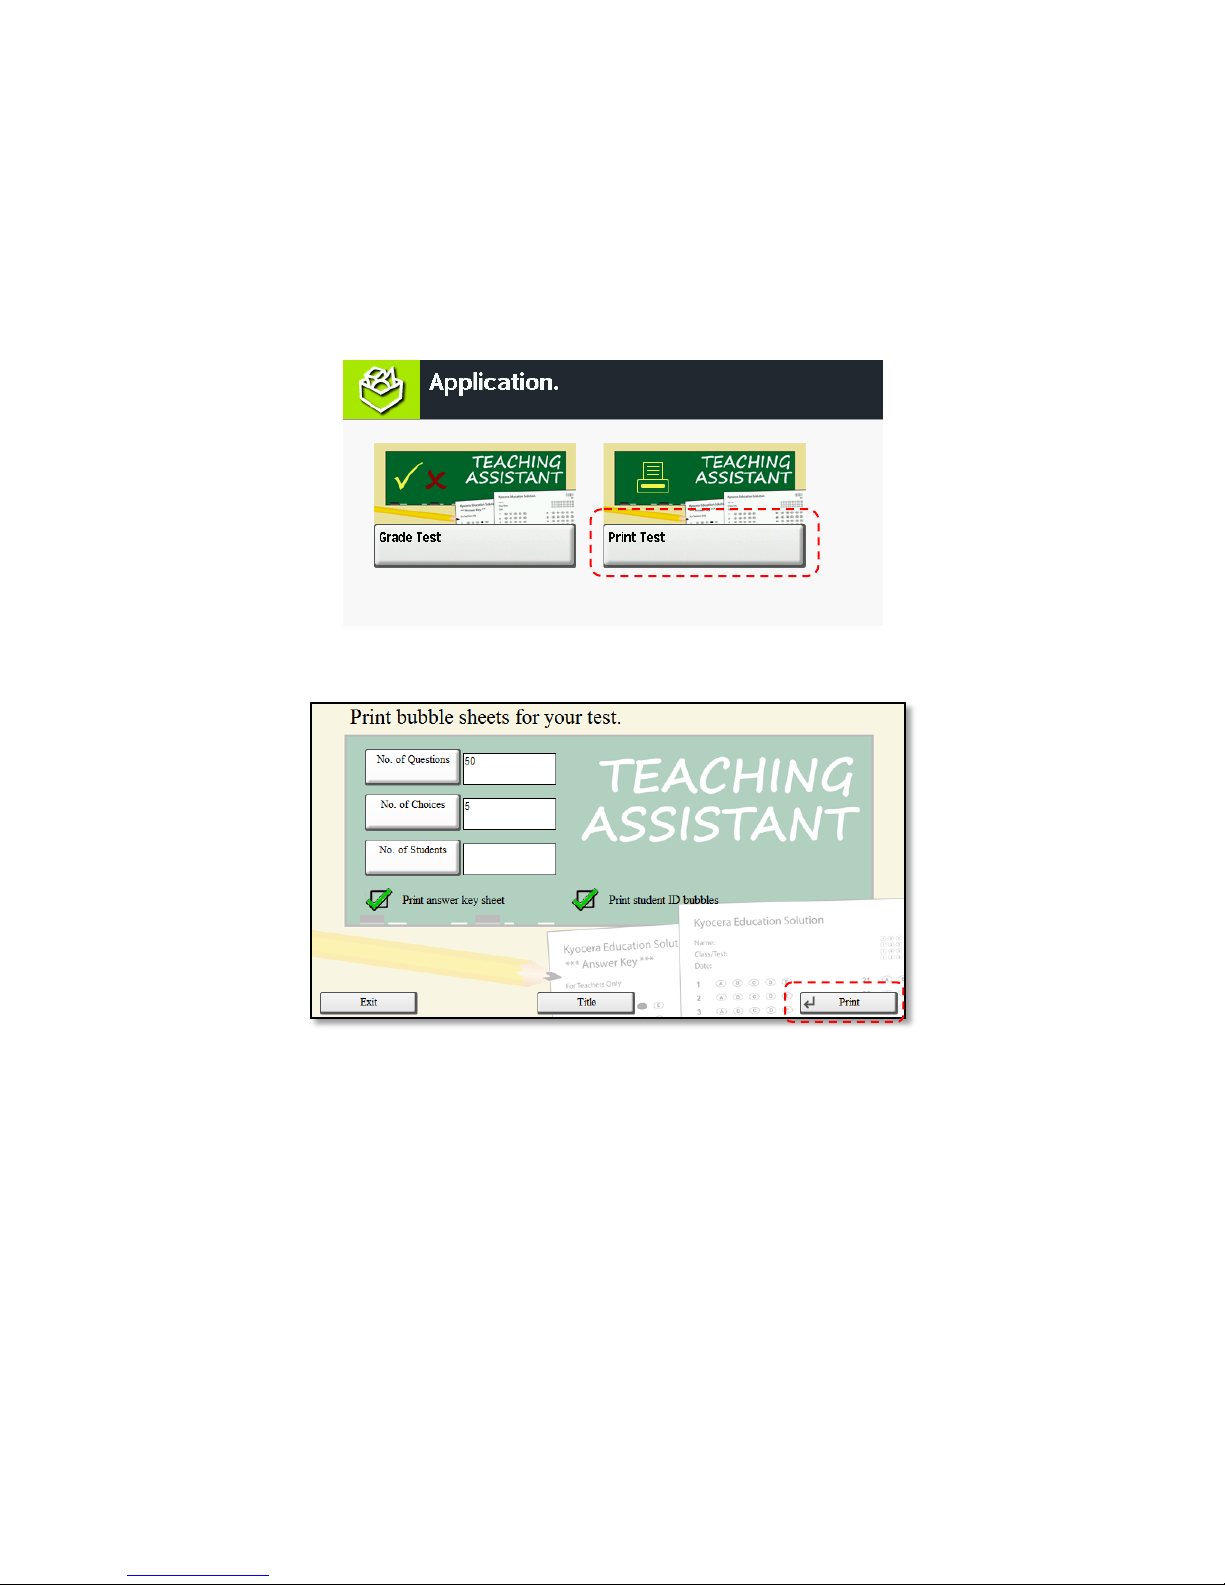
4. Operation
Teaching Assistant consists of two applications; one to print the tests, the second for automated grading
of the tests. The grading application will only support tests printed from Teaching Assistant.
4.1 Creating Tests
1. Open the Applications screen (by pressing the Application key on the panel).
2. Press ‘Print Test’ button.
3. Enter values for:
a. Number of Questions (to appear on the test); teachers can select from 2-500 questions.
b. Number of Answer Choices (for each question); teachers can designate from 2-8
choices.
c. Number of Students (taking the test); no limit is set for number of students.
4. Select other options:
a. Check ‘Print Answer Key’ if you want a blank answer key page that is required for
grading. (Default: checked)
b. Check the ‘Print Student ID bubbles’ checkbox if students are required to enter their IDs
on the answer sheets. (Default: unchecked)
5. Press Green button to start printing (or touch the Print button on the panel, or press the Enter
key on the keypad).
6. MFP will now print the blank test sheets.
8
Page 9

7. Blank sheets (excluding the answer key page) are handed out to the class, along with the
question papers.
8. Students select an answer by shading the corresponding bubble either with a pencil or pen.
Note: Bubbles must be shaded fully.
Changing Test Sheet Title
To temporarily change the test title, press the Title button. The test title can be changed to test-specific
text such as “Math Exam – 5th Grade”. The title will be printed on all test sheets and will also appear on
reports that are printed after grading.
9
Page 10

4.2 Grading Tests
1. Teacher must fill out the correct answers on the ‘Answer Key’ page. Ensure all questions are
answered.
2. Open the Applications screen (opened by pressing the Application key on the panel).
3. Press ‘Grade Test’ button.
4. Arrange the test sheets so that they are all (a) facing the same side, (b) aligned the same way.
5. Place answer key on top of the stack
6. Place all the test sheets and answer key page in the document feeder:
a. Printed side facing up
b. Long-edge of the paper in the feeder (document placed sideways).
7. Press the Green button (or, the Enter key on the keypad, or the Scan button on the panel).
8. After scanning is completed, press the Finished button on the panel (or press the enter key on
the keypad).
10
Page 11

9. After grading is completed, four options are presented for report generation.
10. Press ‘Summary’ button to print result summary.
11. Press ‘Detail’ button to print a detailed summary.
12. Press ‘Email’ button to send the report to an email address. The MFP will prompt to enter the
destination email address.
11
Page 12

(Note: SMTP settings must be configured as described in section 7.2 for this feature to work.)
13. Press ‘Save to USB’ to save the results to a USB flash drive. (Note: USB drive must be inserted in
the copier PRIOR to pressing the Save to USB button. After the files are saved, the drive must be
‘cleanly-ejected’ by pressing the ‘Remove’ button on the Job Status/cancel screen Removable
Memory tab.)
Changing Grade Letter Percentages
To temporarily change the percentage threshold for a grade letter, press the Option button prior to
grading the test. To make permanent changes, refer to section on Configuring Grading Application.
12
Page 13

5. Reports
Test Scores Table
Lists each student’s score as points, percentage and
percentile.
The No. column contains the student ID as
marked on the ID bubbles.
The Name column contains student names as
written by each student - in the student’s own
handwriting.
The table is ordered by score listing the
highest scoring student first.
After grading process is completed, Teaching Assistant will allow the instructor to either print the
reports at the MFP or export them in PDF format. Exported reports can be sent directly to an instructor
as email attachments or saved to USB flash drives.
5.1 Summary Report
Summary report enables an instructor to tell at a glance, how the students fared, how hard the test was
and which questions troubled most students. Summary reports consist of the following elements.
13
Page 14

Test Scores Chart
Bar-graph of student scores ordered by student performance. Instructors can tell at a glance which
students need help and which students performed very well.
Histogram of grades
Show the number of students who scored each grade letter: A, B, C, D and F. (Note: Grades in the
histogram report will be based on the thresholds for each letter grade set at the device.)
14
Page 15

Test Statistics
Statistics on test questions helps the instructor focus
on areas of the test that most students had difficulty
with.
Lowest and highest scores.
Average and Median scores.
List of 10 hardest and 10 easiest questions,
based on actual test results.
Detailed report is a copy of each student’s test sheet
with incorrect responses highlighted in red. The total
score is printed at the top of each page.
5.2 Detailed Report
15
Page 16

6. Setup
6.1 Files Required
TeachingAssistant.pkg
PrintBubbleSheet.pkg
6.2 MFP Setup
1. Ensure the MFP is updated to the latest available firmware level.
2. MFP must be connected to a network port and link lights must be active.
3. MFP can have at least two empty application slots (under System Menu > Applications).
4. A4 Desktop MFPs require a compatible CF-card to be installed prior to installing applications.
6.3 Installation on A4 Desktop MFP
1. Copy both .pkg files to the root of a clean USB flash drive.
2. At the MFP control panel, open System Menu/Counter >Favorites/ Application
3. Log in as Administrator when prompted. The default login name is Admin and the default
password is Admin (Note: Enter capital A when entering ‘Admin’ as both login name and
password fields are case-sensitive).
4. Press Application button.
5. Press Menu button.
16
Page 17

6. Press Add button.
7. Insert USB flash drive into copier.
8. A list showing both applications will appear.
9. Select both applications and press Install.
10. After installation, press End to return to the Applications screen.
11. Select Print Test and press Menu.
17
Page 18

12. Press Activate. Select Yes when prompted for confirmation.
13. Select Print Test and press Menu.
14. Press Activate. MFP will prompt for Activation Mode. If a license key is available, select the
Official and press Next button. Otherwise, press the Trial button for a limited-time trial
installation. If the Trial button is disabled, a license must be purchased. Please contact your
Kyocera/Copystar dealership to purchase a license key.
18
Page 19

15. If Official button is pressed, MFP will prompt for license key. Enter it using the keypad and press
the OK button.
16. After both applications are activated successfully, they can be executed from the main
Applications screen (opened by pressing the Application key on the panel).
6.4 Installation on Workgroup (A3) MFP
1. Copy both .pkg files to the root of a clean USB flash drive.
2. At the MFP control panel, open System Menu > Applications
3. Log in as Administrator when prompted. The default login name is Admin and the default
password is Admin (Note: Enter capital A when entering ‘Admin’ as both login name and
password fields are case-sensitive).
19
Page 20

4. Press Add button.
5. Insert USB flash drive into copier.
6. A list showing both applications will appear.
7. Select both applications and press Install.
8. After installation, press Close to return to the Applications screen.
20
Page 21

9. Select Print Test and press Activate. Select Yes when prompted for confirmation.
10. Select Grade Test and press Activate. MFP will prompt for license key.
11. If a license key is available, enter it using the keypad and press the Official button. Otherwise,
press the Trial button for a limited-time trial installation. If the Trial button is disabled, a license
must be purchased. Please contact your Kyocera/Copystar dealership to purchase a license key.
21
Page 22

12. After both applications are activated successfully, they can be executed from the main
Applications screen (opened by pressing the Application key on the panel).
22
Page 23

23
Page 24

7. Configuration Options
7.1 Configuring Printing Application
1. Open the Applications screen (opened by pressing the Application key on the panel).
2. Press ‘Print Test’ button.
3. After application opens, press the Title quick search button on the keypad. This will open up the
settings screen.
4. You can now edit the header text that is printed on each test sheet. Typically, these would be
changed to describe the class and test.
5. This is a temporary setting which will revert to “Kyocera Teaching Assistant” every time the
application is launched.
7.2 Configuring Grading Application
1. Open the Applications screen (opened by pressing the Application key on the panel).
2. Press ‘Grade Test’ button.
3. After application opens, press the Options button on the panel, then press the System Settings
button. This will open up the settings screen.
24
Page 25

4. The MFP displays a list of fields that need to be configured. Use the scroll bars to access all the
options.
Setting page 1
Settings page 2
25
Page 26

Grade
Value entered at the panel
Meaning
A
90
90 % and higher
B
80
80 % to 89%
C
70
70 % to 79%
D
60
60% to 69%
F - Lower than 60 %
Settings page 3
Options
Sender E-mail: The ‘From’ E-mail address used to send reports.
SMTP Server: SMTP server address for sending reports by email. Server address could be
specified as an IP Address or host-name.
SMTP Port: SMTP server port (default: 25).
Login: Account used to authenticate to SMTP server.
Password: Password used to authenticate to SMTP server.
Subject: Subject line of email message. This can be changed before sending the email.
Body: Text that will appear in the body of the email.
Grade A ~ Grade D: The percentage thresholds for each grade letter. Default limits are:
Scan User and Scan Password: MFP user account used to execute scan job. This must be a local
user account with permission to scan. This account is used only when authentication is enabled
on the MFP. The default username and password are “Admin”, “Admin” (note capital letter ‘A’).
Page Shift: Adjust this value to avoid clipping a portion of the student’s name when generating a
report. The default is set to 0. Both positive and negative values can be entered to shift the
clipping area down or up.
Test SMTP: Press the Test SMTP button to validate SMTP settings by sending a test email
message to the sender.
26
Page 27

8. Troubleshooting
© 2011 Kyocera Mita America, Inc.
Rev. 1.1
8.1 Unable to Print tests
Symptom:
In the Print Test application, when ‘Print’ button is pressed, no output is produced. After a delay, the
application exits.
Check:
Ensure the network cable is connected and link lights are active.
Check:
Job Status screen to ensure no other jobs are queued.
8.2 Unable to Scan tests for grading
Symptom:
In the Grade Test application, when ‘Scan’ button is pressed, MFP displays “Error occurred while
scanning” message.
Check:
Ensure the network cable is connected and link lights are active.
Check:
Ensure test sheets are placed properly on the document feeder.
Check:
If authentication is enabled on the MFP, ensure the values for Scan User and Scan Password (in
Application Settings) are correct.
27
 Loading...