

Page 1

Page 2

Legal Notes
T ASKalfa 620
T ASKalfa 820
CS 620
CS 820
Unauthorized reproduction of all or part of this guide is prohibited.
The information in this guide is subject to change for improvement without notice.
We cannot be held liable for any problems arising from the use of this product, regardless of the information herein.
Regarding Trademarks
• PCL is a registered trademark of Hewlett-Packard Company.
• Microsoft Windows is a registered trademark of Microsoft Corporation in the U.S. and/or other countries.
• PostScript is either a registered trademark or trademark of Adobe Systems Incorporated in the U .S. and/or other
countries.
• TrueType is a registered trademark of Apple Computer Inc.
• All other brand and product names herein are registered trademarks or trademarks of their respective companies.
Examples of the operations given in this guide support the Microsoft Windows XP printing environment. Essentially the same
operations are used for Microsoft Windows Vista, Windows Server 2008, and Windows 2000 environments.
User Interface screen captures shown in this guide may differ depending upon your printing system.
Models supported by the KX printer driver
Copyright © 2008 KYOCERA MITA Corporation
All rights reserved.
TC Rev. 8.1
Page 3

TableofContents
Chapter1Installation
Chapter2DeviceSettings
PreparingtoInstalltheDriver........................................................................................................1-1
UpgradingDriverComponents......................................................................................................1-2
ExpressInstallation.......................................................................................................................1-2
InstallingonWindowsVistaandWindowsXP.........................................................................1-2
CustomInstallation.......................................................................................................................1-4
InstallingonWindowsVistaandWindowsXPwithaUSBConnection...................................1-4
InstallingonWindowsVistaandWindowsXPwithaNetworkConnection.............................1-5
OptionalPrinterComponents........................................................................................................1-6
InstallingOptionalPrinterComponents...................................................................................1-7
InstallingthePrinterWizard..........................................................................................................1-7
InstallingonWindowsVista.....................................................................................................1-7
InstallingonWindowsXPandWindows2000.........................................................................1-8
AccessingtheDeviceSettingsTab...............................................................................................2-1
DeviceOptions..............................................................................................................................2-2
SettingDeviceOptions............................................................................................................2-2
SettingUpVirtualMailBoxes..................................................................................................2-2
AutoConfigure..............................................................................................................................2-3
EnablingAutoConfiguration....................................................................................................2-3
Memory.........................................................................................................................................2-3
SettingtheMemory.................................................................................................................2-4
RAMDisk......................................................................................................................................2-4
SettingRAMDisk....................................................................................................................2-4
AdministratorSettings...................................................................................................................2-4
JobAccounting........................................................................................................................2-4
OperationPanelMessage.......................................................................................................2-6
ShowQuickPrintTab..............................................................................................................2-6
LockSecuritySettings.............................................................................................................2-6
AdministratorPassword..........................................................................................................2-6
SNMPSettings........................................................................................................................2-7
UserSettings................................................................................................................................2-8
Identification............................................................................................................................2-9
Units........................................................................................................................................2-9
LanguagePreference..............................................................................................................2-9
PDL(PageDescriptionLanguage)...............................................................................................2-9
PDLOptions..........................................................................................................................2-10
PDF.......................................................................................................................................2-11
CompatibilitySettings.................................................................................................................2-13
MediaSourceEnumeration...................................................................................................2-14
DisableFace-UpReversePageOrder..................................................................................2-14
IgnoreApplicationCollation...................................................................................................2-14
KXDriver
i
Page 4

Chapter3QuickPrint
QuickPrintOptions.......................................................................................................................3-1
ProfileOptions..............................................................................................................................3-3
Chapter4Basic
PrinterDriverSettingsAccess.......................................................................................................4-1
ChangingtheDefaultDriverSettings............................................................................................4-1
BasicPaperSettings.....................................................................................................................4-2
SourceandMediaTypes..............................................................................................................4-2
PrintSizeandPageSize...............................................................................................................4-3
CreatingaCustomPageSize.......................................................................................................4-3
DuplexPrinting..............................................................................................................................4-4
Collation........................................................................................................................................4-5
EcoPrint........................................................................................................................................4-5
KyoceraLogo................................................................................................................................4-6
CombineSourceandMediaTypeLists.................................................................................2-15
SpecifyingPrintOptions..........................................................................................................3-1
Collation..................................................................................................................................3-2
DuplexPrinting........................................................................................................................3-2
MultiplePagesperSheet........................................................................................................3-3
SelectingProfiles.....................................................................................................................3-3
SavingaProfile.......................................................................................................................3-3
EditingaProfile.......................................................................................................................3-4
DeletingaProfile.....................................................................................................................3-4
ImportingaProfile...................................................................................................................3-4
ExportingaProfile...................................................................................................................3-5
PrintingwithCustomSizePages.............................................................................................4-3
PrintinginDuplexMode..........................................................................................................4-4
PaperOrientationforDuplexPrinting......................................................................................4-4
PrintingCollatedDocuments...................................................................................................4-5
DisplayingtheVersionInformation..........................................................................................4-6
DisplayingPlug-inInformation.................................................................................................4-6
Chapter5Layout
Chapter6Finishing
ii
Booklet..........................................................................................................................................5-1
PrintingaBooklet....................................................................................................................5-1
MultiplePagesperSheet..............................................................................................................5-2
PrintingMultiplePagesperSheet...........................................................................................5-2
Poster............................................................................................................................................5-2
PrintingaPoster......................................................................................................................5-3
Scaling..........................................................................................................................................5-4
Gutter............................................................................................................................................5-4
Staple............................................................................................................................................6-1
StaplingaPrintJob.................................................................................................................6-2
Punch............................................................................................................................................6-2
SettingPunchOptions.............................................................................................................6-2
CreatingPunchHolesforaPrintJob.......................................................................................6-3
Separation.....................................................................................................................................6-3
RotateCopies..........................................................................................................................6-3
UserGuide
Page 5

Chapter7Imaging
Chapter8Publishing
OffsetJobs..............................................................................................................................6-4
PrintQualityandCustomQuality..................................................................................................7-1
SelectingPrintQuality.............................................................................................................7-2
EcoPrint...................................................................................................................................7-2
Fonts.............................................................................................................................................7-2
FontSettings...........................................................................................................................7-2
SelectingFontSettings............................................................................................................7-3
FontSubstitution.....................................................................................................................7-3
DisablingDeviceFonts............................................................................................................7-3
Graphics........................................................................................................................................7-4
PatternScaling........................................................................................................................7-4
InversionSettings....................................................................................................................7-4
OptimizationSettings..............................................................................................................7-5
HalftoneScreen.......................................................................................................................7-5
AdjustingGrayscale......................................................................................................................7-6
TextandGraphicsEffects.............................................................................................................7-6
CoverMode..................................................................................................................................8-1
PrintingCovers........................................................................................................................8-1
CoverModeOptions................................................................................................................8-2
ChoosingCoverMedia............................................................................................................8-5
PageInsert....................................................................................................................................8-5
PrintingPageInserts...............................................................................................................8-5
PageInsertionOptions............................................................................................................8-6
TransparencyInterleaving............................................................................................................8-6
InterleavingTransparencies....................................................................................................8-7
Chapter9Job
JobStorage(e-MPS)....................................................................................................................9-1
JobStorage(e-MPS)options..................................................................................................9-2
Temporary.....................................................................................................................................9-3
StoringaTemporaryPrintJob.................................................................................................9-3
Permanent....................................................................................................................................9-3
StoringaPermanentPrintJob.................................................................................................9-3
VirtualMailBox.............................................................................................................................9-4
StoringaJobinaVirtualMailBox...........................................................................................9-4
PrintingJobsfromaVirtualMailBox.......................................................................................9-4
QuickCopy...................................................................................................................................9-4
PrintingaQuickCopyJob.......................................................................................................9-5
ReprintingaQuickCopyJob...................................................................................................9-5
ProofandHold..............................................................................................................................9-6
PrintingaProofandHoldJob..................................................................................................9-6
PrintingtheRemainingProofandHoldCopies.......................................................................9-6
PrivatePrint..................................................................................................................................9-7
StoringaPrivatePrintJob.......................................................................................................9-7
PrintingaPrivatePrintJob......................................................................................................9-7
JobStorage...................................................................................................................................9-8
StoringaJobStorageJob.......................................................................................................9-8
PrintingaJobStorageJob......................................................................................................9-9
SynergyPrintBox.........................................................................................................................9-9
StoringaJobinaSynergyPrintBox.......................................................................................9-9
PrintingJobsFromaSynergyPrintBox................................................................................9-10
KXDriver
iii
Page 6

Chapter10Advanced
FormGallery...............................................................................................................................9-10
StoringanImageintheFormGallery....................................................................................9-10
JobName....................................................................................................................................9-11
Don’tUseApplicationName..................................................................................................9-11
OverwriteJobName..............................................................................................................9-11
SelectingaJobName...........................................................................................................9-11
Prologue/Epilogue.......................................................................................................................10-1
SelectingaPrologue/EpilogueFile........................................................................................10-1
EditingaPrologue/EpilogueCommandFile..........................................................................10-2
DeletingaPrologue/EpilogueFile.........................................................................................10-2
AssigningaPrologue/EpilogueFile.......................................................................................10-2
UnassigningPrologue/EpilogueFiles....................................................................................10-2
SpecifyingtheInsertionPoint................................................................................................10-2
Watermark..................................................................................................................................10-3
AddingorEditingaWatermark..............................................................................................10-3
PageSelectionforWatermark...............................................................................................10-4
SecurityWatermark....................................................................................................................10-5
AddingorEditingaSecurityWatermark................................................................................10-5
AdjustingSecurityWatermarkCalibration.............................................................................10-6
PageSelectionforSecurityWatermark.................................................................................10-7
LockingtheSecurityWatermarkSettings..............................................................................10-8
ConfiguringStatusMonitor..........................................................................................................10-8
SettingStatusMonitorPreferences.......................................................................................10-9
EMFSpooling...........................................................................................................................10-10
EnablingClientProfile...............................................................................................................10-10
Chapter11Profiles
SavingaProfile...........................................................................................................................11-1
EditingaProfile...........................................................................................................................11-2
DeletingaProfile.........................................................................................................................11-2
ImportingaProfile.......................................................................................................................11-2
ExportingaProfile.......................................................................................................................11-3
Glossary...................................................................................................................................................................v
Index.........................................................................................................................................................................ix
iv
UserGuide
Page 7

PreparingtoInstalltheDriver
1Installation
Aprinterdriverisanapplicationthatmanagescommunicationbetweenaprinter
andyourcomputer.Onceinstalled,theprinterdriversettingsmustbe
configuredintheprinterPropertiesandPrintingPreferences.
ThesefeaturesareavailableintheInstallationprocess:
ExpressInstallationonpage1-2
CustomInstallationonpage1-4
InstallingOptionalPrinterComponentsonpage1-7
InstallingthePrinterWizardonpage1-7
Note:InWindowsVista,WindowsXP,andWindows2000,youmustbe
loggedinwithadministratorrightstoinstalltheKXDriver.IfyouconnectaUSB
(UniversalSerialBus)cablebeforeKXdriverinstallation,itisstrongly
recommendedthatyoucanceltheFoundNewHardwareWizardandinstallthe
softwarethroughtheProductLibraryCDmenu.BrowsingtheCDand
installingeachdriverseparatelyisnotrecommended.
Thissectiondescribestheinitialstepstotakebeforeyouinstalltheprinter
driver,andbasedonyouroperatingsystem,thenextprocedureyoucanfollow.
Turnonthecomputerandtheprinter.TheWindowsFoundNewHardware
1
Wizardappears.ClickCancel.
InserttheProductLibraryCDintotheCDdrive.
2
Aftertheinstallationwizardbegins,theMainMenuappears.
Note:IftheProductLibrarySoftwareInstallationWizardfailstostartafter
insertingtheProductLibraryCDintotheCDdrive,useWindowsExplorerto
locateSetup.exeonthelocaldriveanddouble-clicktoopen.
ClickViewLicenseAgreementtoreadthelicenseagreement.
3
ClickAccepttoproceed.
4
Tobegintheinstallation,clickInstallSoftware.
5
Note:IftheWindowsSecuritywarningdialogboxappearsatanypoint
duringtheinstallationprocess,clickInstallthisdriversoftwareanyway.
TheInstallerwizardappears.ClickNext.
6
KXDriver
1-1
Page 8

Installation
UpgradingDriverComponents
Theinstallationdiffersbasedonyouroperatingsystemandconnectionmethod.
Selectyouroperatingsystemandconnectionmethodfromthefollowinglistand
proceedtothereferencepagetocontinuetheinstallation.
ExpressInstallation
InstallingonWindowsVistaandWindowsXPonpage1-2
CustomInstallation
InstallingonWindowsVistaandWindowsXPwithaUSBConnectiononpage
1-4
InstallingonWindowsVistaandWindowsXPwithaNetworkConnectionon
page1-5
Note:KPrintinstallsaclientportmonitorthatletsWindowsTCP/IPprintfrom
anynetworkcardconnectedtoKyoceraprintingsystems.KPrintsupportsLPR
andIPPprinting.FortheKPrintInstallationinstructions,refertoyourProduct
LibraryCD.KPrintusesastand-aloneinstaller.
Iftheinstallationwizarddetectsnewerdrivercomponents,theWelcomepage
appears.Ifolderdrivercomponentsaredetected,theWelcomepageis
bypassed,andtheSoftwareComponentUpgradepageappears.
Choosethecomponenttoupgrade.ClickNext.
1
Confirmyourupgradesettings.Tostarttheupgrade,clickUpgrade.
2
Whentheupgradecompletes,clickNext.TheInstaller—InstallationMethod
3
pageappears.
ExpressInstallation
ExpressmodeappliestodriverinstallationforaUSBornetworkconnection
only.TheinstallationwizarddiscoversKyoceraprintersthatareturnedon,and
connectedbyUSBandnetworkcable.InCustomMode,youareabletoselect
theinstallationpackagesandspecifytheport.
InstallingonWindowsVistaandWindowsXP
Thissectiondescribesthequickinstallationprocedureofthedriversoftwareon
WindowsVistaandWindowsXP.
EnsurethatyourprinterandcomputerareturnedonandconnectedbyUSB,or
1
networkcable.
OntheInstallationMethodpage,clickExpressMode,andclickNext.
2
TheDiscoverPrintingSystempageopenstosearchforyourprinter.If
3
Discoverdoesnotfindyourprintingsystem,amessageappears.Removeand
reinserttheUSBornetworkcable,andensureitisconnectedproperly.Click
Refreshtoretrythediscovery.Ifthesystemstillcannotfindyourprinter,contact
yoursystemadministrator.
IfDiscoveryfindsyourprinter,clicktheprinternametoselectit.
1-2
UserGuide
Page 9

Note:IftheFoundNewHardwareWizarddialogboxappears,clickCancel.
IftheHardwareInstallationwarningdialogboxappears,clickContinue
Anyway.
SelectUsehostnameforportnametouseahostnamefortheStandard
4
TCP/IPport.IftheinstallationwizardstilldisplaystheIPaddress,contactyour
systemadministrator.(NotavailablewithaUSBconnection.)
ClickInformationifyouwanttoopenadialogboxwithdetailsaboutIP
5
Address,HostName,PrinterModel,Contact,Location,andSerialNumber.
ClickOK.ClickNext.(NotavailablewithaUSBconnection.)
OnthePrinterSettingspage,youcanassignanametotheprintingsystem.
6
ThisisthenamethatappearsinWindowsPrintersandFaxesandinthe
printerlistinapplications.
Youcanalsochoosetosharethisprinterwithothersorsetthisprinterasthe
defaultprinter.Makeyourselections,andthenclickNext.
OntheConfirmSettingspage,clickInstallifthesettingsarecorrect.Click
7
Backtocorrectthesettings.
Installation
TheInstallationCompletedpageappearsdisplayingtheinstallationdetails.
8
Printatestpage
Thisselectionverifiesaconnectionwiththeprinterandcreatesaprintoutof
theinstalleddrivercomponents.
ShowQuickPrintTab
Thisselectionletsyoudefinebasicprintoptionsintogroupprofilesthatcan
beaccessedeasily.TheShowQuickPrinttaboptionalsoappearsinthe
AdministratorSettingsintheDeviceSettingstab.
EnableStatusMonitor
TheStatusMonitordisplayssystemstatusmessagesonyourcomputer
screenduringprintingtasks.TheStatusMonitorbuttonappearsonthe
Advancedtab.
DeviceSettings
SelectDeviceSettingstoopentheDeviceSettingstabwhereyoucan
chooseinstalledoptionsforyourprintingsystem.(InWindowsVista,orwith
aUSBconnection,theDeviceSettingscheckboxisnotdisplayed).
Whentheinstallationcompletessuccessfully,clickFinishtoexittheinstallation
wizardandreturntotheProductLibraryCDmenu.
Softwareinstallationfailuresgeneratethefollowingmessage:
Oneormoresoftwareinstallationshavefailed.
ClickFinish,andretrytheinstallation.Ifthesamemessageappearsagain,
contactyoursystemadministrator.
Theinstallationoftheprinterisnowcomplete.Ifprompted,restartyour
computer.
KXDriver
1-3
Page 10

Installation
CustomInstallation
CustomModeisanoptiontocustomizedriverfeaturesandinstallutilities.You
canspecifytheprinterport,fonts,andtheutilitiesyouwanttoinstall.
PrinterdriversthatshipwithWindowsoperatingsystemsarecalledminidrivers.
TheminidriverisavailableseparatelyforPCLandKPDLandprovidesbasic
supportforyourprinter.Minidriverfunctionalityisnotdocumentedinthisuser
guide.
InstallingonWindowsVistaandWindowsXPwithaUSB Connection
Thissectiondescribesthecustominstallationprocedureofthedriversoftware
onWindowsVistaandWindowsXPusingaUSBconnection.
Ensurethatyourprinterandcomputerareturnedonandconnectedusinga
1
USBcable.
OntheInstallationMethodpage,selectCustomMode.
2
TheDiscoverPrintingSystempageappearsdisplayingDiscoverselected.
3
Youcanusethisoption,ortheCustomselectoption.
WiththeDiscoveroption,youcanletthesystemfindallthedevicesavailable
fordriverinstallation.Ifyouusethisoption,proceedtostep4.
WiththeCustomselectoption,youcanchoosetheprintingsystemandprinter
porttoinstall.Proceedtostep6.
IfDiscoverdoesnotfindyourprintingsystem,amessageappears.Ensurethat
yourprinterisproperlyconnectedbythecorrectcableandisturnedon,and
thenclosethemessagebox.RemoveandreinserttheUSBcabletoyour
computerandretrythediscovery.Contactyoursystemadministratorifthe
systemcannotfindyourprinter.
IfDiscoverfindsoneormoreUSBprintingsystems,selectyourmodelfromthe
4
list.ClickNext.
OntheCustomInstallationpage,selectthedriverandsoftwarepackagesyou
5
wanttoinstallfromtheDriverandUtilitytabs,andclearthosenotintendedfor
installation.ClickNext.Proceedtostep9.
OnthePrintingSystempage,selectyourmodel,andthenclickNext.
6
OnthePrinterPortpage,selecttheportconnectedtoyourprintingsystem.
7
ClickNext.
OntheCustomInstallationpage,selectthedriverandsoftwarepackagesyou
8
wanttoinstallfromtheDriverandUtilitytabs,andclearthosenotintendedfor
installation.ClickNext.
OnthePrinterSettingspage,youcanassignanamefortheprintingsystem.
9
ThisnameappearsinWindowsPrintersandFaxesandintheprinterlistsin
applications.Youcanalsochoosetosharethisprinterwithothersorsetthis
printerasthedefaultprinter.Makeyourselections,andthenclickNext.
1-4
UserGuide
Page 11

OntheConfirmSettingspage,clickInstallifthesettingsarecorrect.Click
10
Backtocorrectthesettings.
Note:IftheHardwareInstallationwarningdialogboxappears,click
ContinueAnyway.
TheInstallationCompletedpageappearsdisplayingtheinstallationdetails.
11
Printatestpage
Thisselectionverifiesaconnectionwiththeprinterandcreatesaprintoutof
theinstalleddrivercomponents.
ShowQuickPrintTab
Thisselectionletsyoudefinebasicprintoptionsintogroupprofilesthatcan
beaccessedeasily.TheShowQuickPrinttaboptionalsoappearsinthe
AdministratorSettingsintheDeviceSettingstab.
EnableStatusMonitor
TheStatusMonitordisplayssystemstatusmessagesonyourcomputer
screenduringprintingtasks.TheStatusMonitorbuttonappearsonthe
Advancedtab.
Whentheinstallationcompletessuccessfully,clickFinishtoexittheinstallation
wizardandreturntotheProductLibraryCDmenu.
Softwareinstallationfailuresgeneratethefollowingmessage:
Installation
Oneormoresoftwareinstallationshavefailed.
ClickFinish,andretrytheinstallation.Ifthesamemessageappearsagain,
contactyoursystemadministrator.
Theinstallationoftheprinterisnowcomplete.Ifprompted,restartyour
computer.
InstallingonWindowsVistaandWindowsXPwithaNetwork Connection
Thissectiondescribesthecustominstallationprocedureofthedriversoftware
onWindowsVistaandWindowsXPusingaNetworkconnection.
Ensurethatyourprinterandcomputerareconnectedtoanetwork.
1
OntheInstallationMethodpage,selectCustomMode.
2
TheDiscoverPrintingSystempageappearsdisplayingDiscoverselected.
3
ForanExpressInstallation,youcanletDiscoverfindyourprintingsystem,
andproceedwiththestepsinExpressInstallation.Otherwise,youcanchoose
Customselect,andclickNexttocontinuewithacustominstallation.
OnthePrintingSystempage,selectthemodel,andthenclickNext.
4
OnthePrinterPortpage,selecttheportconnectedtoyourprintingsystem,or
5
addaportconnectedtoyoursystembyclickingAddPort.ClickNext.
KXDriver
1-5
Page 12

Installation
OntheCustomInstallationpage,selectthedriverandsoftwarepackagesyou
6
wanttoinstallfromtheDriverandUtilitytabs,andclearthosenotintendedfor
installation.ClickNext.
OnthePrinterSettingspage,youcanassignanamefortheprintingsystem.
7
ThisnameappearsinWindowsPrintersandFaxesandintheprinterlistsin
applications.Youcanalsochoosetosharethisprinterwithothersorsetthis
printerasthedefaultprinter.Makeyourselections,andthenclickNext.
OntheConfirmSettingspage,clickInstallifthesettingsarecorrect.Click
8
Backtocorrectthesettings.
Note:IftheHardwareInstallationwarningdialogboxappears,click
Continue.
TheInstallationCompletedpageappearsdisplayingtheinstallationdetails.
9
Printatestpage
Thisselectionverifiesaconnectionwiththeprinterandcreatesaprintoutof
theinstalleddrivercomponents.
ShowQuickPrintTab
Thisselectionletsyoudefinebasicprintoptionsintogroupprofilesthatcan
beaccessedeasily.TheShowQuickPrinttaboptionalsoappearsinthe
AdministratorSettingsintheDeviceSettingstab.
EnableStatusMonitor
TheStatusMonitordisplayssystemstatusmessagesonyourcomputer
screenduringprintingtasks.TheStatusMonitorbuttonappearsonthe
Advancedtab.
DeviceSettings
SelectDeviceSettingstoopentheDeviceSettingstabwhereyoucan
chooseinstalledoptionsforyourprintingsystem.(TheDeviceSettings
checkboxappearsonlywithWindowsXP.)
Whentheinstallationcompletessuccessfully,clickFinishtoexittheinstallation
wizardandreturntotheProductLibraryCDmenu.
Softwareinstallationfailuresgeneratethefollowingmessage:
OptionalPrinterComponents
1-6
Oneormoresoftwareinstallationshavefailed.
ClickFinish,andretrytheinstallation.Ifthesamemessageappearsagain,
contactyoursystemadministrator.
Theinstallationoftheprinterisnowcomplete.Ifprompted,restartyour
computer.
Youcanexpandthefunctionalityofyourprinterdriverbyinstallingoptional
components:CommonProfiles,Plug-InModulesandDeviceSettings.
Commonprofilescontaindriversettingsforperformingcommontaskslike
two-sidedprintingandprintingtotransparencies.Plug-inmodulesare
specializedfeaturessuchasOutputtoPDFandSecurityWatermark.Device
SettingsincludestheSNMPSettingsfeatureforthisdriver.
UserGuide
Page 13

InstallingthePrinterWizard
InstallingOptionalPrinterComponents
OntheProductLibraryCDmenu,selectAdvancedTools.
1
OntheAdvancedToolspage,selectOptionalPrinterComponents.
2
Selectaprinter,andclickNexttoinstalloptionalcomponents.
3
OnallSelectpages,chooseyourcomponents,andclickNext.
4
OntheConfirmSettingspage,ifthedisplayedsettingsarecorrect,click
5
Install.ClickBacktocorrectanysettings.
ThePrinterComponentsInstallationCompletedpageappears.ClickFinish.
6
Whenyouhavecompletedinstallingprintersandoptionalcomponents,if
prompted,restartyourcomputer.
Installation
TheAddPrinterWizarddisplaysaseriesofscreensthatguideyouthrough
printerinstallation.Youarepromptedtomakeinstallationchoicesoneach
screen.
InstallingonWindowsVista
ThissectiondescribeshowtoinstallaprinterdriverusingtheAddPrinter
WizardinWindowsVista.
ClicktheStarticonintheWindowstaskbaratthebottomofthescreen.
1
IntheStartwindow,clickControlPanel.
2
IntheControlPanelwindowundertheHardwareandSoundcategory,click
3
Printer.
InthetoolbaratthetopofthePrinterswindow,clickAddaprinter.
4
TheAddPrinterWizardappears.Thewizardprovidesyouwithstepbystep
5
driverinstallationinstructions.ClickeitherAddalocalprinterorAdda
network,wirelessorBluetoothprinter.Followtheinstructionsoneachpage,
thenclickNexttoproceedtothenextpage.
Note:IftheWindowsSecuritywarningdialogboxappears,clickInstallthis
driversoftwareanyway.
Thelastpageofthewizardappearswithamessagethatyou’vesuccessfully
6
addedtheprinteryouselected.Installationoftheprinterdriverisnowcomplete.
ClickPrintatestpageifyouwanttoproducesampleprintoutputfromthe
newlyinstalledprinter.ToclosetheAddPrinterWizard,clickFinish.
KXDriver
1-7
Page 14

Installation
InstallingonWindowsXPandWindows2000
ThissectiondescribeshowtoinstallaprinterdriverusingtheAddPrinter
WizardonWindowsXPandWindows2000.
ClickStartintheWindowstaskbar,andclickControlPanel.
1
ClickPrintersandFaxestoopenthePrintersandFaxeswindow.
2
ClickAddaprinterinthewindowareaontheleft.
3
Note:TheAddPrinterWizardcanalsobestartedbyclickingAddprinterin
theFilemenuofthePrintersandFaxeswindow.
TheAddPrinterWizardappears.Thewizardprovidesyouwithstepbystep
4
driverinstallationinstructions.Followtheinstructionsoneachpage,andthen
clickNexttoproceedtothenextpage.
Note:IftheFoundNewHardwareWizardpageappears,clickCancel.Ifthe
HardwareInstallationwarningdialogboxappears,clickContinueAnyway.
WhentheCompletingtheAddPrinterWizardpageappears,installationof
5
theprinterdriverisnowcomplete.ToclosetheAddPrinterWizard,clickFinish.
Ifprompted,restartyourcomputer.
1-8
UserGuide
Page 15
2DeviceSettings
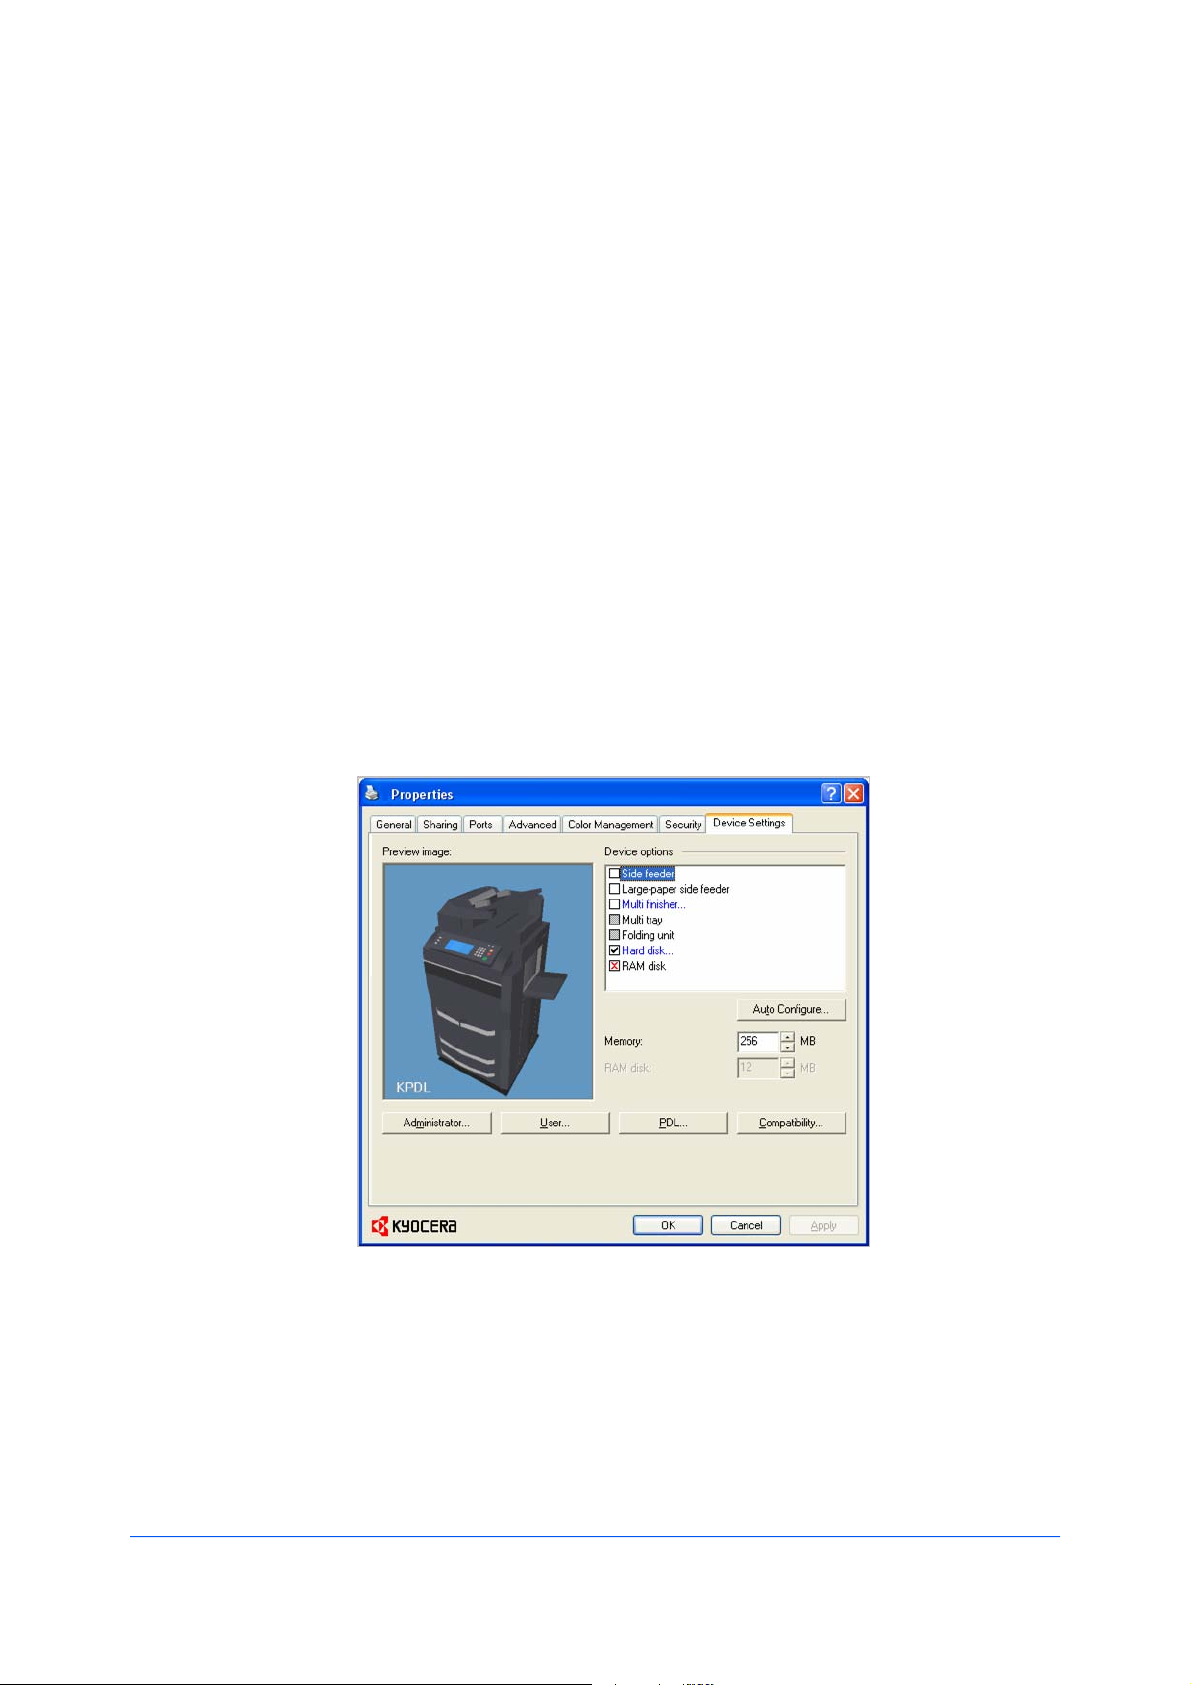
IntheDeviceSettingstab,youcanselectinstalledprintingsystemoptionsso
theassociatedfeaturescanbeusedwiththeprinterdriver.Youcanalsomatch
thememorysettinginthedriverwiththememoryinstalledinyourprinting
system,whichletsthedrivermanagefontdownloadsmoreefficiently.
Administrator,User,PDL(PageDescriptionLanguage),andCompatibility
settingscanalsobeselected.
ThesefeaturesareavailableintheDeviceSettingstab:
DeviceOptionsonpage2-2
AutoConfigureonpage2-3
Memoryonpage2-3
AdministratorSettingsonpage2-4
UserSettingsonpage2-8
PDL(PageDescriptionLanguage)onpage2-9
CompatibilitySettingsonpage2-13
AccessingtheDeviceSettingsTab
TheDeviceSettingstabcanbeaccessedfromthePrintersandFaxes
(WindowsXP),orPrinters(WindowsVista)folder.
ClickStart>PrintersandFaxes(WindowsXP),orclickStart>Control
1
Panel,anddouble-clickPrinters(WindowsVista).
Right-clicktheprintericon,andclickProperties.
2
KXDriver
2-1
Page 16

DeviceSettings
ClicktheDeviceSettingstab.
3
DeviceOptions
Optionaldevicesextendthecapabilitiesofyourprintingsystemforsource,
finishing,andjobstorage.
Inaclient/serverenvironment,thisfeatureisunavailabletoaclientloggedinas
arestricteduser.
SettingDeviceOptions
Youcansettheprinterdrivertomatchtheoptionaldevicesinstalledonyour
printingsystem.
InthePrinterPropertiesdialogbox,clicktheDeviceSettingstab.
1
InDeviceSettings>Deviceoptions,selectthecheckboxesforallinstalled
2
devices.
SettingUpVirtualMailBoxes
VirtualmailboxesmustbesetupintheDeviceSettingstabinordertousethe
VirtualmailboxfeatureintheJobtab.
Installaharddiskintheprintingsystem.
1
IntheDeviceSettingstab,underDeviceoptions,selectHarddisk.If
2
necessary,cleartheRAMdiskcheckbox.
-ORIfHarddiskisalreadyselected,double-clickthebluetext.
IntheHardDiskSettingsdialogbox,clickNew.
3
AnewMailboxnameandVirtualoutputtraynumberappear.
Ifdesired,changethenameandnumberintheMailboxnameandVirtual
4
outputtrayboxes.Thenamelengthcanbeupto31characters,andnumber
mustbewithinarangeof1to255.
ClickOKintheHardDiskSettingsandPropertiesdialogboxes.
5
ThenewmailboxnameappearsintheVirtualMailboxSelectiondialogbox
whenprinting.
•YoucanremoveaVirtualmailboxbyselectingitintheDefinednameslist
andclickingDelete.
•YoucanimportaVirtualmailboxlistbyclickingImportandbrowsingfora
validVirtualMailboxlistfile(.CSV).
•YoucansavetheVirtualmailboxlist(.CSV)inyourcomputerornetworkby
clickingExport.Asavedlistcanbeimportedintoanotherprinterdriver.
2-2
UserGuide
Page 17

DeviceSettings
AutoConfigure
AutoConfiguredetectsthedevicesinstalledontheprintingsystemifitis
connectedoveranetwork.Whenyourcomputerisconnectedtotheprinting
systemthroughaTCP/IPport,theAutoConfigurebuttonappearsinthe
DeviceSettingstab.AutoConfigureupdatestheDeviceoptionslist,and
previewimagestokeeptheprinterdriverconsistentwiththeprintingsystem
configuration.
NotallinstalleddevicesaredetectedbyusingAutoConfigure.Before
selectingOKintheDeviceSettingstab,checkthesettingstomakesurethat
theyarecorrect.
Note:ThedefaultsettingforWindowsXPServicePack2isfortheWindows
FirewalltobesettoOn.Thesettingcanbechangedtoallowcommunication
betweentheprintingsystemandyourcomputer.IntheWindowsSecurity
Alertdialogbox,clickUnblock.
SilentAutoConfigure
SilentAutoConfigurecheckstheprintingsystemevery10minutesfor
changesinoptionaldevicesormemory.Whenachangeisdetected,thedriver
isautomaticallyupdatedwiththenewsettings.SilentAutoConfigureis
availableonlyforWindowsVistaOSforprintingsystemsconnectedtoa
network.
Inaclient/serverenvironment,thisfeatureisunavailabletoaclientloggedinas
arestricteduser.
EnablingAutoConfiguration
TheAutoConfigurebuttoncanbeusedtodetectallavailabledeviceoptions
whentheprintingsystemisconnectedtoanetworkthroughaTCP/IPport.
Verifythatalloptionaldevicesareattachedtotheprintingsystem,andthatitis
1
poweredonandreadytoprint.
IntheDeviceSettingstab,clickAutoConfigure.
2
InWindows2000andWindowsXP,thedriversettingsareupdated
immediately.
InWindowsVista,theAutoConfiguredialogboxopens.SelectfromAuto
configureoptions:
AutoConfigureNow
Clickthebuttonatanytimetoretrievethecurrentsettingsfromtheprinting
system.Itisrecommendedtodothiswhenthedriverisfirstinstalledand
whenSilentautoconfigurationisturnedoff.
Silentautoconfiguration
Selecttoletthedriverchecktheprintingsystemevery10minutesforany
changesinoptionaldevicesormemory.Whenachangeisdetected,the
driverisautomaticallyupdatedwiththenewsettings.
Memory
Memoryistheamountofstandardandoptionalmemoryinstalledintheprinting
system.Tomaximizethedownloadingofprintingsystemfonts,thedrivermust
besettomatchthetotalprintingsystemmemory.
KXDriver
2-3
Page 18

DeviceSettings
SettingtheMemory
Bydefault,theMemorysettingmatchesthestandardmemoryintheprinting
system.Ifoptionalmemoryisinstalled,setthememoryintheprinterdriverto
matchthetotalamountofmemory.
InstalloptionalDIMMmemoryintheprintingsystem.
1
InDeviceSettings>Memory,selecttheamountofinstalledmemory.
2
YoucanusetheAutoConfigurefeaturetoobtainmemoryinformationfromthe
printingsystem.
RAMDisk
TheRAMdiskfunctionsasavirtualharddisk,savingprintrequestsintothe
printingsystem’smemory,ifaharddiskisnotinstalled.BecausetheRAMdisk
isvolatilememory,alldatasenttotheprintingsystemislostwhenthepoweris
turnedoff.
Note:Whenaharddiskisinstalled,theRAMdiskfeatureisinactive.
AdministratorSettings
SelectingIgnoreapplicationcollationintheCompatibilitySettingsdialog
boxletsthedrivercontrolcollation.RAMdiskcanthenincreasetheprintspeed
ofcollatedmultiplecopiesbysendingtheprintjobjustonce.
Inaclient/serverenvironment,thisfeatureisunavailabletoaclientloggedinas
arestricteduser.
SettingRAMDisk
SettingtheRAMdiskletsyousaveprintrequestsintotheprintingsystem’s
memoryifaharddiskisnotinstalled.
InDeviceSettings>Deviceoptions>RAMdisk,selecttheRAMdisksize.
1
Attheprintingsystem'soperationpanel,turnonRAMdiskandsetitssize.
2
ThemaximumRAMdisksizedependsontheamountofinstalledmemory.
AdministratorSettingsletsyouspecifyJobaccountingIDs,anOperation
panelmessage,displaytheQuickPrinttab,selectLockSecuritySettings
andSNMPSettingsandsetapasswordtocontrolaccess.
Inaclient/serverenvironment,thisfeatureisunavailabletoaclientloggedinas
arestricteduser.
JobAccounting
Jobaccountinggivesanadministratorcontrolusageofaprintingsystem.With
Jobaccounting,youcanassignaccountIDs(identificationnumbers)tousers
ordepartments,aspecificaccountID,ormakeaccountIDinputmandatoryfor
printing.AfteraccountIDsarecreated,youcanviewfromtheprintingsystem
operationpanelthenumberofcopiesassociatedwithaspecificIDaswellas
limitthenumberofcopiesforindividualIDs.AccountIDscanbeupto8digits.
2-4
UserGuide
Page 19

Note:JobaccountingmustbesettoOnattheprintingsystem.Amaximum
of1000accountIDscanbeassignedattheprintingsystemandstoredinthe
printerdriver.
JobAccountingOptions
Jobaccountingsupportsthefollowingoptions:
UsespecificaccountID
SelectthisoptiontotracktheprintjobsofauserorgroupwithanaccountID.
ItwillsendtheaccountIDwitheachprintjob.Anadministratorcanrestricta
userorgroupfromchangingtheiraccountIDbyusingthePassword
protectadministratorsettingsintheAdministratorSettingsdialogbox.
PromptforaccountID
SelectthisoptiontotracktheprintjobsofauserorgroupwithanaccountID
aswellaspromptforanaccountID.Atthetimeaprintjobissent,theuser
willbepromptedtoenteraJobAccountingID.
PromptforaccountIDandvalidate
SelectthisoptiontopromptforanaccountIDthatissavedinthedriver.
Whensendingaprintjob,typeanaccountIDwhenprompted,thenclickOK
toprint.TheaccountIDisvalidatedagainsttheaccountIDlist.Iftyped
incorrectly,youwillbepromptedtotypeitagain.
DisplayaccountIDlist
SelectthisoptiontodisplaytheaccountIDlistatthetimeofprinting.The
printjobcanbeassignedtoauserorgroup.TheaccountIDlistisstoredin
thedriverandmorethanoneIDmustbeestablishedforthelisttoappear.
AccountIDList
SelectthisoptiontodisplaytheaccountIDtomanagetheAccountIDlist.
Add,editordeleteaccountIDsfromtheliststoredinthedriver.AccountIDs
descriptionsmatchtheuserorgroupwithanaccountID.AfteranaccountID
listiscreated,thelistcanbeexportedasagroupbysavingitasatextfile
(.CSV).ToimportanaccountIDlist,browseforanexistinglistandopenit.
DeviceSettings
PrintingwithJobAccounting
AfteraccountIDsareassignedandJobaccountingissettoOnattheprinting
system,thenumberofpagesprintedisaddedtotheselectedaccountIDtotal.
IntheDeviceSettingstab,clickAdministrator.
1
IntheAdministratorSettingsdialogbox,selectJobaccounting.
2
SelectaJobaccountingoption:
3
UsespecificaccountID
PromptforaccountID
PromptforaccountIDandvalidate
DisplayaccountIDlist
SelectAccountIDListtocreateandmanageaccountIDlists.
4
ClickOKinalldialogboxes.
5
KXDriver
2-5
Page 20

DeviceSettings
Printthedocumentfromtheapplication.
6
Forsomeoptions,whenthePrintOptionsdialogboxappears,typeorselect
7
anaccountID,andclickOK.
OperationPanelMessage
Youcanspecifysettingstodisplaythejobname,username,ordepartmentfor
thecurrentjobontheprintingsystem'soperationpanelduringprinting.The
printingsystemdefaultnamesappearunlessyousetyourownuser-defined
names.
YoucansetjobnameintheJobtab,andsettheusernameanddepartmentin
theUserSettingsdialogbox.
DisplayingtheOperationPanelMessage
Youcanselectjobinformationtodisplayontheoperationpanel.
IntheDeviceSettingstab,clickAdministrator.
1
TheAdministratorSettingsdialogboxopens.
SelecttheOperationpanelmessagecheckbox.
2
Selectfromthefollowingoptionstodisplayontheoperationpanelduring
3
printing:
Displayjobname
Displayusername
Displaydepartment
ShowQuickPrintTab
ThisoptionletsyoucontrolthedisplayoftheQuickPrinttab.Youcandefine
basicprintoptionsintogroupprofilesthatcanbeaccessedquicklyandeasily.
•WithaclearedShowQuickPrinttabcheckbox,thetabdoesnotappearin
thePrintingPreferencesdialogbox.
•WithaselectedShowQuickPrinttabcheckbox,thetabappearsinthe
PrintingPreferencesdialogbox.WhenyouselecttheShowQuickPrint
tabcheckbox,youcanalsoaccesstheothertwocheckboxes,Hideother
tabs,andSetQuickPrinttabasdefault.
•SelectingSetQuickPrinttabasdefaultopenstothistabwhenyou
accessPrintingPreferences.
•SelectingHideothertabsdisplaysonlytheQuickPrinttabtotheuser.
LockSecuritySettings
IftheSecurityWatermarkplug-inisinstalled,LockSecuritySettingsappears
intheAdministratorSettingsdialogbox.Theadministratorcanensurethata
securitywatermarkisprintedonalljobsbylockingthisfeature.
AdministratorPassword
YoucansetPasswordprotectadministratorsettingsintheAdministrator
Settingsdialogboxtopreventunauthorizedchangesinthisdialogbox.When
2-6
UserGuide
Page 21

DeviceSettings
selected,thissettingwillpromptyoutoenterapasswordandconfirmthe
password.ThispasswordprotectionblocksaccesstoJobaccounting,
Operationpanelmessage,ShowQuickPrinttab,LockSecuritySettings,
andSNMPSettings.Youmustalsosettheadministratorpasswordinthe
printingsystem'sCommandCenter.
SettingtheAdministratorPassword
InDeviceSettings>AdministratorSettings,selectPasswordprotect
1
administratorsettings.
InthePassworddialogbox,enterapassword,usingatleast4andnomore
2
than16characters.ReenterthepasswordinConfirmpasswordandclickOK.
ClearingtheAdministratorPassword
IntheDeviceSettingstab,clickAdministrator.
1
IntheEnterPassworddialogbox,typethepasswordandclickOK.
2
IntheAdministratorSettingsdialogbox,clearthePasswordprotect
3
administratorsettingscheckbox.
ClickOK.
4
SNMPSettings
SimpleNetworkManagementProtocol(SNMP)isasetofrulesthatgovernthe
managementofnetworkdevices,suchasprintingsystems.SNMPsettings
determinethelevelofsecuritywhenusingtheAutoConfigurefeature,and
preventunauthorizedprintingtotheSNMPv3printingsystem.SNMPsettings
mustbesetintheprinterdriverandintheprintingsystem’sCommandCenter.
ThefollowingSNMPoptionsareavailable:
SNMPv1/v2c
ThisoptionensuressuccessfulAutoConfigurecommunicationusingRead
communitynameandWritecommunityname.
SNMPv3
ThisoptionensuressecureAutoConfigurecommunicationusingauser
nameandpassword.Authenticationandprivacyoptionsareavailableby
selectingSettings.
Applytoothermodels
Thisoptiondisplaysalistofinstalledprintingsystemstoapplytheselected
SNMPsettings.
SNMPv3Options
YoucanselectSNMPv3optionsforsecurecommunicationwiththeprinting
system.
SNMPv3isenabledwhenanoptionalIB-23networkcardisinstalled.These
settingsmustmatchtheIB-23settings.IB-23hassettingsforbothan
authenticationpasswordandanencryptionpassword,buttheymustbothmatch
thedriverpassword.
Authentication
KXDriver
2-7
Page 22

DeviceSettings
Thisoptionprovidesanalgorithmtocheckthatatransferredfilehasarrived
intact.MessageDigest5(MD5)andSecureHashAlgorithm1(SHA1)are
hashalgorithmsusedtoauthenticatepacketdata.
MD5
Thisoptionprovidesacryptographichashfunctionwitha128–bithash
value.ItaddssecurityandprotectionagainstGatewayLoadBalancing
Protocol(GLBP)-spoofingsoftware.
SHA1
Thisoptionproducesamessagedigestthatis160bitslong.SHA1isthe
successortoMD5.
Privacy
Thisoptionusesencryptionforsecurecommunication.Itisavailableafter
youselecttheAuthenticationoption.Youmayselectoneprivacyoption.
(IB-23doesnotsupportAESencryptedcommunication.)
DES
ThisoptionusestheDataEncryptionStandardforencryption.DESturns
cleartextintociphertextviaanencryptionalgorithm.Itencryptsanddecrypts
datausing8-byteblocksanda56-bitkey.
AES
ThisoptionusestheAdvancedEncryptionStandardforencryption.AESisa
symmetricblockcipherthatcanprocessdatablocksof128bits,usingcipher
keyswithlengthsof128,192,and256bits.ItismoresecurethanDES.
SelectingSNMPSettings
SNMPsettingsinthedrivermustbesettomatchthesettingsintheprinting
system’sCommandCenter.
InDeviceSettings>Administrator,clickSNMPSettings.
1
SelectSNMPv1/v2corSNMPv3.
2
ForSNMPv1/v2c,typetheReadcommunitynameandWritecommunity
name,upto32characters,andclickOK.
ForSNMPv3,typeaUsernameupto32characters,andaPasswordfrom
8to32characters.
TosetauthenticationandprivacyoptionsforSNMPv3,clickSettings.
3
IntheSNMPv3dialogbox,selectfromtheavailableoptions.
4
ClickOKintheSNMPv3dialogbox.
5
Optional:YoucanclickApplytoothermodelsandselectfromavailable
6
models.TheSNMPsettingsareappliedtoallselectedmodels.
UserSettings
UserSettingsletsyouspecifyuseranddepartmentnames,selectthedefault
unitofmeasure,andchangethedriverdisplaylanguage.
Inaclient/serverenvironment,thisfeatureisunavailabletoaclientloggedinas
arestricteduser.
2-8
UserGuide
Page 23

Identification
IdentificationletsyouidentifyyourprintjobwithaUsernameand
Departmentname,upto31characters.TheUsernamecanbeusedtoidentify
aprintjobstoredontheharddisk.
SettingUserIdentification
YoucantypeUsernameandDepartmentinformationtobeusedwiththeJob
Storage(e-MPS)feature.
InDeviceSettings>User,typeyourpreferrednameintheUsernametext
1
box.
TypeyourdepartmentorgroupnameinDepartmenttextbox.
2
Youcantypeupto31charactersintheUsernameandDepartmenttext
boxes.
Units
YoucansetInchesorMillimetersastheunitofmeasurement.Thisisusedfor
thefollowingsettings:
DeviceSettings
•CustompagesizesettinginthePageSizesdialogboxintheBasictab.
•SpacingsettingintheWatermarkAddandEditdialogboxesinthe
Advancedtab.
•PostersettingsandGuttersettingsintheLayouttab.
SelectingaUnitofMeasurement
Youcanselectaunitfordisplayingmeasurementsintheuserinterface.
IntheDeviceSettingstab,clickUser.
1
SelectInchesorMillimeters.
2
LanguagePreference
TheLanguagepreferenceoptionspecifiestheuserinterfacelanguageofthe
DeviceSettingstabofPrinterPropertiesandalltabsofPrinting
Preferences.Availablelanguagesvarydependingonyourlocaleandyour
computersettings.
SettingLanguagePreference
Youcanselectauserinterfacelanguage.
InDeviceSettings>User,selectthedesiredlanguagefromtheSelect
1
languagelist.
PDL(PageDescriptionLanguage)
KXDriver
ClickOKintheUserSettingsandPropertiesdialogboxes.
2
APageDescriptionLanguage(PDL)specifiesthecontentsandlayoutofa
printedpage.IntheDeviceSettingstab,youcanchoosefromPCLXL,
(PrinterCommandLanguageXL),PCL5e,KPDL(anemulationofPostScript
2-9
Page 24

DeviceSettings
printing),orPDF(PortableDocumentFormat).TheprinterdefaultisPCLXL,
whichissuitableformostprintingpurposes.AfteryouselectaPDL,the
selectionappearsinthelowercornerofthePreviewimage.
InGDIcompatiblemode,vectorgraphicsarerasterizedforprintingasbitmap
images.UsetheGDIcompatiblemodeoptiontoimprovetheoutputqualityof
thegraphiccreatedbytheapplication.
Note:ToaddPDFtothelistofPDLchoices,youmustinstalltheOutputto
PDFplug-in.
Inaclient/serverenvironment,thisfeatureisunavailabletoaclientloggedinas
arestricteduser.
PDLOptions
ThePDLoptions,availableinthePDLSettingsdialogbox,areaccessedin
DeviceSettings.
PCLXL
ThemostrecentversionofHPPCLandPCL6.ThisPDLincludesPCL5e
features.PCLXLlacksbackwardcompatibilitywithearlierPCLversions,
thoughitisenhancedoverPCL5eintheseareas:
•Reducedfilesize
•Betterprintspeed
•Fasterreturntoapplication
PCL5e
•FullycompatiblewithearlierPCLversions
•Bidirectionalcommunicationsupport
•WideselectionoffontsforusewithMicrosoftWindowsapplications
•Complexgraphicsmightnotprintaswell
KPDL
KPDLisusedwhenprintingfromapplicationsthatsupportPostScript2or3.
•AnemulationofPostScriptprinting
•Stronggraphicsreproduction
•PrintspeedsmaybeslowerthanPCL5e
•RequiresmoreprintingsystemmemorythanPCL5e
•EnablesnativeTrueTypefontdownloading
•SupportsmostGraphicssettingsoptions
PDF
OutputtoPDFisaplug-inthatletsyouprintorsavedocumentsfrommultiple
sourcestoAdobePortableDocumentFormat(PDF).ThePDFformatis
independentoftheoperatingsystemandapplicationsoftwareusedtocreate
documents.
•UseasanalternativetoexistingcommercialapplicationsforcreatingPDF
documents.
2-10
UserGuide
Page 25

•DocumentssavedasPDFretaintheiroriginalappearance,andcanbe
viewedandprintedwiththefreeAdobeReaderonWindows,MacOS,and
UNIXplatforms.
•WithPDFselectedasthePDL,onlyalimitedsetofdriveroptionsisavailable.
SelectingPDLOptions
YoucanselectapagedescriptionlanguagefromPDLoptions.
InDeviceSettings>PDL,selectthedesiredpagedescriptionlanguagefrom
1
theSelectPDLlist.
SelecttheGDIcompatiblemodeoptiontoimprovetheoutputqualityof
2
graphicscreatedbyyourapplication.
SettingsisavailablewhenthePDLissettoPCLXL,KPDL,orPDF.
3
IfyouselectPCLXLasthePDL,youcanclickSettingstoopenthePCLXL
Settingsdialogbox.Disableautomediatypeswitchingcontrolshow
automaticmediaswitchingbehaveswhentheselectedpapersourceruns
outpaper.Whenselected,printingstopsuntilyouloadmorepaperofthe
samesizeandtype.Whenthecheckboxisclear,theprintingsystem
automaticallyswitchestoanotherpapersourceloadedwiththesamepage
sizeandmediatype.
IfyouselectKPDLasthePDL,youcanclickSettingstoopentheKPDL
Settingsdialogbox.SelecttheAllowdatapassthroughcheckboxto
reduceerrorswhenprintingcomplexjobsfromapplicationsthatuse
PostScriptformatting.
NotethatifyouselectAllowdatapassthrough,EMFspoolingisnot
availableintheAdvancedtab.
IfyouselectPDFasthePDL,youcanclickSettingstoopenthePDF
Settingsdialogbox.
DeviceSettings
ClickOKinthePDLSettingsdialogbox.
4
PDF
OutputtoPDFisaplug-infeaturethatletsyouprintandsavedocumentsfrom
multiplesourcestoAdobePDF.Thisfeaturecanbeusedasanalternativeto
existingcommercialapplicationsforcreatingPDFdocuments.Documents
savedasPDFretaintheiroriginalappearance,andcanbeviewedandprinted
withAdobe®Reader®onWindows,MacOS®,andUNIX®platforms.
Foradocumentusingmixedpapersizes,allpagesinthePDFusethesizeof
thefirstpage.
Note:WithPDFselectedasthePagedescriptionlanguage,onlyalimited
setofdriveroptionsareavailable.
PDFOptions
YoucanselectPDFoptionsifyouhaveinstalledtheOutputtoPDFplug-in.
ThePDFSettingsdialogboxcontainsthefollowingoptions:
PDFSettings
Embedfonts
KXDriver
2-11
Page 26

DeviceSettings
ThisoptionensuresthatdocumentfontsappearaccuratelyinthePDFfileon
screen.Thisoptionensuresaccuratereproductionbutsignificantlyincreases
thefilesize.
Compressdata
ThisoptionenablesflatcompressionforthegeneratedPDFdocument.This
optionsignificantlyreducesthefilesize.Additionalcompressionoptionsare
availablewithinAdobeAcrobat.
Security
ThisoptionappliesencryptiontothePDFdocument.ClickSettingsfor
additionalSecuritysettings.Seethenextsectionfordetails.
Printandsave
ThisoptionletsyouprintandsaveadocumentasaPDFfile.ClickSettings
foradditionalPrintandsavesettings.
SecuritySettings
Thisoptionletsyouselectanencryptionlevelandcreatepasswordsforthe
generatedPDFfile.
Thefollowingsecurityoptionsareavailable:
Encryption
Encryptionprovidespasswordprotectionsothatadocumentcannotbe
openedoralteredbyunauthorizedusers.
40-bit
ThisencryptionoptionprovideslowlevelsecurityforaPDFdocument.Itis
supportedforearlierversionsofAdobeAcrobatandAdobeReader3.0-4.x.
128-bit
ThisencryptionoptionprovideshighlevelsecurityforaPDFdocument.Itis
supportedforAdobeAcrobatandAdobeReader5.0orlater.
Passwords
Selectpasswordsforchangingsecuritysettingsandforopeninga
document.Passwordsaresupportedupto16charactersinlength.
Requirepasswordtochangesecuritysettings
TypeanOwnerpassword.WithinAdobeAcrobat,thispasswordisrequired
tochangethedocumentrestrictionsintheFiles>Properties>Security
section.
Requirepasswordtoopendocument
TypeaUserpassword.Theuserpasswordmustbeenteredatthetimethe
PDFdocumentisopened.Thispasswordmustbedifferentfromtheowner
password.
PrintandSaveSettings
ThisoptionletsyouprintandsaveadocumentasaPDFfile.
Savetofileonly
APDFfileiscreatedandsavedlocally.
Savetofileandprint
APDFfileiscreated,savedlocally,andsenttoprint.
Afteryouselectbetweenthesetwooptions,youcanchoosethefollowing
option:
Automaticallysavetodefaultfile
2-12
UserGuide
Page 27

APDFfilecanbesavedautomaticallyasadefaultfiletobeusedagain.
Youcanthenselectfromthefollowingoptions:
Replacedefaultfilename
Thisoptionletsyourenamethedefaultfilename.
Usedefaultfilename+dateandtime
Thisoptionletsyouusethedefaultnameandaddadateandtimestamp
eachtimethedocumentissaved.
Defaultfiledirectory
ThisoptionletsyoubrowsetoalocationtosaveyourPDF.
PrintingandSavingtoPDF
YoucanprintadocumentandsaveittoAdobePDF,ifyouhaveinstalledthe
OutputtoPDFplug-in.
OpenthePrintersfolder.
1
Right-clickonthedesiredprintingsystemmodel.
2
ClickProperties,thenclicktheDeviceSettingstab.
3
DeviceSettings
CompatibilitySettings
ClickPDL.
4
InthePDLSettingsdialogbox,intheSelectPDLlist,selectPDF.
5
ClickSettings.
6
InthePDFSettingsdialogbox,selectPrintandsave.
7
ClickSettings,andselectfromprintandsaveoptions.SeethePDFOptions
8
topicfordetails.
ClickOKinalldialogboxes.
9
Openandprintthedocument.
10
NameandsavethePDFfile.
11
CompatibilitySettingsletsyouspecifymediasourcevalues,disablereverse
orderprintingforface-upoutput,overridetheapplication'sCollatesetting,and
combinetheSourceandMediatypelistsintheBasictab.
Inaclient/serverenvironment,thisfeatureisunavailabletoaclientloggedinas
arestricteduser.
KXDriver
2-13
Page 28

DeviceSettings
MediaSourceEnumeration
Mediasourceenumerationsupportscompatibilityformediasourcevalues
uniquetotheprinterdriver,suchasthoseforcassettesorfeeders.Yournewly
installedprinterdrivermaintainsidenticalmediasourcesupportwiththedriverit
replaces,whetherforthisdriveroronefromanothermanufacturer.Ifmedia
sourcemacrosexistfortheolderdriver,thenthealignmentofmediasource
valuesmaintainssupportwithouttheneedtochangethemacros.
SettingMediaSources
UsetheDriverInfoutility(\Utility\DriverInfo\DrvInfo.exe),availableonthe
ProductLibraryCD,tocomparethesourcevaluesforallinstalleddrivers.
Ifthevaluesforagivenmediasourcedifferbetweenprinterdrivers,youcan
reassignanenumeratedvaluetocreateamatchbetweenthedrivers.
IntheDeviceSettingstab,selectCompatibility.
1
FromtheMediasourceenumerationlist,selectthepapersupplymethod.The
2
currentvalueislistedintheEnumeratedvaluebox.
TypeanEnumeratedvalueforthemediasource,andclickApply.Toalign
3
settingswithadifferentdriver,thisvalueshouldalignwiththoseintheother
driver.
YoucanrestorealltheoptionsinCompatibilitySettingstothedefaultby
clickingReset.
DisableFace-UpReversePageOrder
WithDisableface-upreversepageorderselected,theface-upjobproduces
thefirstpageontopandthelastpageonthebottom.
Withthecheckboxselected,face-upreversepageorderisdisabled.
Withthecheckboxcleared,thedefaultreversepageorderisenabled.
IgnoreApplicationCollation
ThisoptionbypassestheCollatesettinginsoftwareapplications,andgives
prioritytotheprinterdriversetting.
•Withthecheckboxselected,theprinterdriverCollatesettingisused.
•Withthecheckboxcleared,theapplicationCollatesettingisused.
SelectingPrinterDriverCollation
Youcanignorethecollationsettingintheapplicationandusetheprinterdriver
collationsetting.
IntheDeviceSettingstab,selectCompatibility.
1
SelectIgnoreapplicationcollation.
2
YoucanrestorealltheoptionsinCompatibilitySettingstothedefaultby
clickingReset.
2-14
UserGuide
Page 29

CombineSourceandMediaTypeLists
Youcanchangethedriver'sBasictabsothatMediatypeandSourceare
combinedintoonelist,labeledSource.Inthecombinedlist,Mediatypesare
listedfirst,followedbycassettesandMPtray.
CreatingaCombinedSourceList
YoucancombinetheSourceandMediatypelistsintheBasictab,tomake
oneSourcelist.
IntheDeviceSettingstab,selectCompatibility.
1
SelectCombinesourceandmediatypelists.
2
YoucanrestorealltheoptionsinCompatibilitySettingstothedefaultby
clickingReset.
DeviceSettings
KXDriver
2-15
Page 30

3QuickPrint
IntheQuickPrinttab,youcanapplybasicprintsettingstoprintjobs.Any
QuickPrintsettingscanbesavedasagroup,calledaprofile,andappliedto
anyprintjob.Profilessupportcommonprintingtasks.
TheAdministratorcansettheviewoftheQuickPrinttabthroughthe
Installationprocess,orAdministratorSettingsinProperties.
ThesefeaturesareavailableintheQuickPrinttab:
QuickPrintOptionsonpage3-1
ProfileOptionsonpage3-3
QuickPrintOptions
3-1
YoucansetoneormoreprintoptionsontheQuickPrinttab.Youcanalso
selectfromprofilesthathavebeensetwithpredefinedoptionsforfrequentlyrun
printjobs.
SpecifyingPrintOptions
TheuppersectionoftheQuickPrinttabhasseveraliconsthatrepresentthe
mostcommonoptionsforprintjobs.ClickontheQuickPrinticonsandcheck
boxestochangesettingsfortheprintjob.Someoftheseoptionsalsoappearon
theBasic,Layout,andImagingtabs.Thelasttabwhereyoumadeselections
affectstheselectionsyouwillseeontheotherrelatedtabs.
Orientation
Thisiconchangesbetweenportraitandlandscapeprintingformats.If
needed,checkRotatedtochangetheorientationoftheprintedpageby180
degrees.
UserGuide
Page 31

EcoPrint
ThisiconallowsforblackandwhiteprintingwithEcoPrint,orwithoutit.Click
theEcoPrinticontomaketextandgraphicsappearlighterintheprintedjob.
EcoPrintdoesnotincreaseprintspeed.
Collate
Thisiconchangestheorderingoftheprintedpages.Thepageordering
sequencecaneitherbe123,123,123,or111,222,333,andsoon.Youcan
alsoReversetheorderoftheprintedpagesbyselectingthisoption.
(ReverseisavailablewhenPrinterdefaultisnotselectedunder
DestinationintheBasictab.ReversecanbedisabledinDeviceSettings
>CompatibilitySettings.)
Printonbothsides
Thisiconchangesbetweenduplexprintingforflippingonthelongedge,
duplexprintingforflippingontheshortedge,orfornotusingduplexprinting.
Multiplepagespersheet
ThisiconchangesbetweenOff,2,and4andforthenumberofsheets
printedononepage.Formorethan4sheetsperpage,definethesesettings
inLayout>Multiplepagespersheet.
AnybasicprintoptionscanbeResettothedefaultvaluesintheQuickPrint
tab.Thisbuttononlyappearswhenitisaccessedfromanapplication’sPrint
dialogbox.
ThefollowingsectionsdescribesomeoftheQuickPrinttaboptionsinmore
detail.Collate,Duplexprinting,andEcoPrintcanalsobefoundintheBasic
andImagingtabs,andMultiplepagespersheetintheLayouttab.The
ProfilesoptionsareaccessedfromPrintingPreferences.
QuickPrint
Collation
Collateincreasesprintspeedtospecifytheorderinwhichthepagesofa
multi-copyjobareprinted.WithCollateselected,theprintjob'sdataisrendered
aspageimagesintheprintingsystem'smemoryafterithasbeendownloaded
thefirsttime.Theremainingjobcopiesareprintedfromthisstoreddata,
bypassingtheprocessofsendingdownthejob'sdatafromthecomputertothe
printingsystemwitheverycopy.
WithCollateselected,thedriverprintsthecompletejobsetbyset.WithCollate
cleared,itprintseachpagebyset.Forexample,withCollateselected,three
copiesofafive-pagedocumentoutputsaspagesonethroughfivein
succession,threetimes.Thedrivergraphicsimagedisplaysthegroupingof
collatingandnon-collatingpages.
DuplexPrinting
Duplexprintingisprintingonbothsidesofeachpage.SelectPrintonboth
sidestoenableduplexprinting.Ifitisnotselected,thentheprinterprintson
onlyonesideofeachpage.Selectingduplexmodedirectstheprintingsystem
toprintonbothsidesofapage.Theprintersystemcontainsaduplexunitthat
turnsthepaperovertoallowprintingonthereverseside.Printonbothsides
mustbeenabledtoprintonbothsidesofthecoverandinsertpages.
Fliponlongedge
Turnthelongedgeofthepagetoviewthecontent.
Fliponshortedge
Turntheshortedgeofthepagetoviewthecontent.
KXDriver
3-2
Page 32

QuickPrint
MultiplePagesperSheet
Multiplepagespersheetprintsseveralpagesonasinglesheetofpaperfor
thepurposeofreviewingthedocumentandconservingpaper.Thereadabilityof
themultiplepagesdecreasesasthenumberofpagespersheetisincreased.
YoucansetthearrangementofthepagesfromtheLayouttabaswellasprint
bordersaroundeachofthepages.
ProfileOptions
IntheProfilessection,youcanselectfromavailableprofilestoprintajob.You
canselectfrompredefinedprofiles,oryoucancreateyourownprofile,and
importprofiles.Youcanalsorearrangetheiconsandeditanddeleteprofiles.
SelectingProfiles
TheProfilesbuttonatthebottomoftheQuickPrinttabalwaysincludesa
FactoryDefaultprofilethatreturnsthedriveroptionstotheirdefaultsettings.
TheprofilescanincludeCommonProfiles,whichareinstalledasoptional
componentsthroughthePrinterInstallationWizard,andanycustomprofiles
created.FactoryDefaultandadministratorprofilescannotbemodified.
Selectaprofile.
1
Thesidepaneldisplaystheoptionsforthatprofile.
ClickApply.
2
IfanyoftheQuickPrintoptionsarenotrepresentedinthepredefinedprofile,
theQuickPrinticonwillbeunavailable.
ClickOK.
3
SavingaProfile
TheSavebuttonletsyoucreateyourownprofiles.Profilesincludeallofthe
currentsettingsinthedriver.TheProfilesbuttonappearsatthebottomofall
thetabsunderPrintingPreferences.
SettheprintingoptionsyouwantforyourprintjobbyopeningPrinting
1
Preferencesandselectingallyourdriversettings.
ClickProfiles>Save.
2
Toidentifytheprofile,typeaName(upto31characters),selectanIcon,and
3
typeaDescription(upto255characters).
ClickOKtosavetheprofile.
4
IntheSelectprofilesection,thenewlyaddedprofileisdisplayed.Inthelower
sectionoftheProfilesdialogbox,andinthesidepanel,theitemsyouentered
andselectedfortheprofilearedisplayed.
3-3
UserGuide
Page 33

ClickApplyandOKtoactivatetheselectedprofiletothecurrentprintjob,or
5
clickOKtosavetheprofile.
Note:Toresettheprinterdrivertodefaultsettings,selecttheFactoryDefault
profile,andclickApply.Thisclearsthesettingsofaselectedprofile.
EditingaProfile
TheEditbuttonletsyoumakechangestoanexistingprofile.TheFactory
Defaultprofilecannotbeedited.
ClickProfiles.
1
IntheSelectprofilesection,highlighttheprofiletobeedited,andclickEdit.
2
Anyofthethreeoptionscanbeedited:name,iconanddescription.ClickOKto
3
savetheeditedchanges.
IntheSelectprofilesection,thenewlyeditedprofileisdisplayed.Inthelower
sectionoftheProfilesdialogbox,andinthesidepanel,theitemsyouchanged
fortheprofilearedisplayed.
QuickPrint
ClickApplyandOKtoactivatetheselectedprofiletothecurrentprintjob,or
4
clickOKtosavetheprofile.
DeletingaProfile
TheDeletebuttonletsyouremoveanexistingprofile.TheFactoryDefault
profilecannotbedeleted.
ClickProfiles.
1
IntheSelectprofilesection,highlighttheprofiletobedeleted,andclick
2
Delete.
Amessageappearsconfirmingtheremovaloftheprofile.ClickYestoremove.
3
ClickOKtoclosetheProfiledialogbox.
4
ImportingaProfile
TheImportbuttonletsyouimportacopyofaprofilefromotherprinterdrivers
intoyourprinterdriver.
ClickProfiles>Import.
1
Browsefortheexistingprofile(.KXP),selectit,andclickOpen.
2
Amessageappearsifanyoftheprofilesettingsintheimportedfilearenot
availableintheexistingdriver.SelectYes,toimporttheprofile,orNo,tocancel
theimport.
IfyouselectedYesinthepreviousstep,theimportedfileappearsintheSelect
3
profilesection.Theoptionsinthatprofileappearinthelowersectionofthe
KXDriver
3-4
Page 34

QuickPrint
Profilesdialogboxandinthesidepanel.IfyouselectedNo,theimportedfile
doesnotappear.
ClickApplyandOKtoactivatetheselectedprofiletothecurrentprintjob,or
4
clickOKtosavetheprofile.
ExportingaProfile
TheExportbuttonletsyouexportacopyofaprofilefromyourprinterdriverfor
useinotherprinterdrivers.TheFactoryDefaultprofilecannotbeexported.
ClickProfiles.
1
IntheSelectprofilesection,highlighttheprofiletobeexported,andclick
2
Export.
ClickOKtoclosetheProfilesdialogbox.
3
3-5
UserGuide
Page 35

4Basic
IntheBasictab,youcanspecifythemostcommonlyusedprinterdriver
settings.
ThesefeaturesareavailableintheBasictab:
ChangingtheDefaultDriverSettingsonpage4-1
CreatingaCustomPageSizeonpage4-3
PrintinginDuplexModeonpage4-4
PrintingCollatedDocumentsonpage4-5
PrinterDriverSettingsAccess
TheprinterdriversoftwarecanbeaccessedfromthePrintdialogboxofan
application,orfromStart.Ifaccessedfromanapplication,thenchangesmade
todriversettingsremainineffectuntiltheapplicationends.Ifaccessedfrom
Start,changesaremaintainedasthedefaultprintersettings.
ChangingtheDefaultDriverSettings
TheResetbuttonisonlyavailablewhenyouaccessPreferencesor
PropertiesfromthePrintdialogboxofanapplication.Defaultdriversettings
applytoprintingjobsinitiatedfromanyapplication,buttheyareoverriddenby
settingchangesmadewithineachapplication.
ClickStart>PrintersandFaxes(WindowsXP),orclickStart>Control
1
Panel,anddouble-clickPrinters(WindowsVista).
KXDriver
4-1
Page 36

Basic
BasicPaperSettings
Right-clickonyourprintingsystemicon.
2
ClickPrintingPreferences.
3
TheBasictabcontainsseveralsettingsforbasicprintingtasks.
Printsize
Thissettingsetsthesizeoftheareathattheprinterprintsto,regardlessof
theactualpapersizethatisusedbytheprintingsystem.
Source
Thissettingspecifiesthecassetteortraythattheprintingsystemdraws
paperfrom.Unlessyouareusingacustompapertype,youcanleaveitset
toAutosourceselection.
Mediatype
ThissettingselectstheSourcebasedonthetypesofmediathatare
specifiedintheprintingsystem.Ingeneral,youcanleaveitsettoAuto
mediaselection.
Destination
Thissettingspecifieswhichoutputtrayisusedfortheprintjoboutput.
Orientation
Thissettingspecifiesthepaperorientationoftheprintjob.IfRotatedis
selected,theprintjoborientationisrotated180degrees.
Numberofcopies
Thissettingspecifiesthenumberofcopiestoprint.Forcollatingmultiple
copies,selectCollate.
Printonbothsides
Thissettingenablesduplexprinting.
EcoPrint
Thissettingmakestheentireimage,textandgraphics,appearlighterinthe
printedjob.EcoPrintdoesnotincreaseprintspeed.
SourceandMediaTypes
4-2
Note:Someapplicationsmayoverrideprintsettingsmadeinthedriver.
Usuallytheapplicationcanbesettofollowthesettings.InMicrosoftWord
2007,ensurethatDefaulttrayinOptionsissettoUseprintersettings.
IntheBasictab,Sourcespecifieswhichtrayorcassettetheprinterusesfora
printingjob.ThedefaultisAutosourceselection,whichinstructstheprinterto
searchforthemediarequestedbytheapplicationortheprinterdriver.Ifthe
selectedtrayorcassetteemptiesduringaprintjob,thentheprintersearchesfor
anothersource,andcontinuesthejob.
Mediatypeinstructstheprintertosearchforthetypeofpaperormediathatis
requestedbytheapplicationortheprinterdriver.Thechoicesshownmay
changedependingontheselectioninSource.Youcanusethedefault,Auto
mediaselection,Customtypeorothermediatypes.IfAutomediaselection
isselected,thentheprintersearchesforanothertrayorcassetteusingthe
samemedia.
UserGuide
Page 37

TransparenciesmustbeprintedusingtheMPtray,andlabelsandenvelopes
requiretheMPtray.Ensurethepaperisproperlyloadedbyfollowingthe
instructionsoutlinedintheprintingsystem'sOperationGuide.
Note:SourceandMediatypeareseparateitemsinthedialogbox,butcan
becombinedusingtheCombinesourceandmediatypelistssettingin
CompatibilitySettings.Iftheyarecombined,Mediatypeisnotavailableon
theBasictab.Tochangethissetting,openDevicesettings>Compatibility
SettingsandcleartheCombinesourceandmediatypelistsselection.
PrintSizeandPageSize
PrintSizecontrolstheoutputpagesizeofthedocument.Tousethissetting,
ensurethatthePageSizesettingmatchesthepagesizesettinginyour
application.IfthePrintSizeisdifferentfromthepagesizeinyourapplication,
theneachpagewillbeenlargedorreducedtomatchthePrintSize.The
percentagevalueshowninbracketsindicatesthesizeofthePrintSizesetting
relativetothePageSizesetting.IfthePageSizedoesnotmatchthepagesize
settingintheapplication(thesizeoftheoriginal),then,inmostcases,thePrint
Sizeisignoredandthedocumentprintsoutbasedonitsoriginalsize.
CreatingaCustomPageSize
Basic
Tousecustompagesizes,theymustbecreatedandaddedtothePrintsize
list.Thedriversupportsamaximumoftwentycustomsizes.
IntheBasictab,clickPageSizes.
1
ClickNew.
2
AdefaultcustomnameappearsintheNamebox.Enteranameforyourcustom
3
pagesize.
Typeorselectvaluesfortheheightandwidth.Thevaluesautomaticallyadjustif
4
theyexceedtheallowablelimits.
Whendone,clickApply.
5
ThecustompagesizeappearsinthePrintsizelist,whichisusedforenlarging
andreducingthesizesofprints.
TodeleteacustompagesizefromthePageSizesdialogbox,selectthename
ofthecustompagesizeandclickDelete.
PrintingwithCustomSizePages
Youcanprintoncustom-sizedpages(orothermediasuchastransparencies)
byperformingthesesteps:
Inyourapplication,selectPrintfromtheFilemenu.
1
FromthePrintdialogbox,openPrintProperties.
2
IntheBasictab,selectthenameofyourcustompagesizeinthePrintSizelist.
3
KXDriver
4-3
Page 38

Basic
FromtheSourcelist,selecttheMPtrayforthecustompagesize.ClickOKto
4
returntothePrintdialogbox.ClickOKtostartprinting.
DuplexPrinting
Duplexprintingisprintingonbothsidesofeachpage.SelectPrintonboth
sidestoenableduplexprinting.Ifitisnotselected,thentheprinterprintson
onlyonesideofeachpage.Selectingduplexmodedirectstheprintingsystem
toprintonbothsidesofapage.Theprintersystemcontainsaduplexunitthat
turnsthepaperovertoallowprintingonthereverseside.Printonbothsides
mustbeenabledtoprintonbothsidesofthecoverandinsertpages.
Fliponlongedge
Turnthelongedgeofthepagetoviewthecontent.
Fliponshortedge
Turntheshortedgeofthepagetoviewthecontent.
PrintinginDuplexMode
IntheBasictab,selectPrintonbothsides.
1
SelecteitherFliponlongedge(toreadpagesasabook)orFliponshort
2
edge(toreadpagesasatabletboundatthetop).
PaperOrientationforDuplexPrinting
Youcanselecthowthepagewillbeturnedwhenitisprintedinduplexmode:
Onlongedge
Pagesturnonthelongeredgeofthepaper.
Onshortedge
Pagesturnontheshorteredgeofthepaper.
Fliponlongedge
4-4
UserGuide
Page 39

Basic
Fliponshortedge
Collation
Collateincreasesprintspeedtospecifytheorderinwhichthepagesofa
multi-copyjobareprinted.WithCollateselected,theprintjob'sdataisrendered
aspageimagesintheprintingsystem'smemoryafterithasbeendownloaded
thefirsttime.Theremainingjobcopiesareprintedfromthisstoreddata,
bypassingtheprocessofsendingdownthejob'sdatafromthecomputertothe
printingsystemwitheverycopy.
WithCollateselected,thedriverprintsthecompletejobsetbyset.WithCollate
cleared,itprintseachpagebyset.Forexample,withCollateselected,three
copiesofafive-pagedocumentoutputsaspagesonethroughfivein
succession,threetimes.Thedrivergraphicsimagedisplaysthegroupingof
collatingandnon-collatingpages.
PrintingCollatedDocuments
Whenprintingmultiplecopiesofamultipagedocument,theprintercan
assemblethepagesofeachcopyinnumericalorder.
Inyourapplication,openthePrintdialogboxandclickProperties.
1
SelecttheCollatecheckbox.
2
TypeorselectthenumberofcompletesetsintheNumberofcopiesbox.
3
Whenprintingusingthecollateoption,specifythenumberofcopiestoprint.
Thedocumentpagecountmustnotexceedtheprintertraycapacity.
ClickOKtoreturntothePrintdialogbox,andclickOKtobeginprinting.
4
EcoPrint
EcoPrintmakestheentireimage,textandgraphics,appearlighterinthe
printedjob.EcoPrintdoesnotincreaseprintspeed.
KXDriver
4-5
Page 40

Basic
KyoceraLogo
TheKyoceralogoonthebottomportionofanyscreenopensadialogboxthat
displaysthedriverversionnumberanddriverplug-ininformation.
ThesefeaturesareavailableinthedialogboxaccessedthroughtheKyocera
logo:
DisplayingtheVersionInformationonpage4-6
DisplayingPlug-inInformationonpage4-6
RemovingaPlug-inonpage4-6
DisplayingtheVersionInformation
ClickVersiontoviewthefollowingdriverinformation:
•FileName
•Version
•Description
•Date
•Manufacturer
•Comments
DisplayingPlug-inInformation
ClickPlug-intoviewthefollowingdriverinformation:
•Module
•Description
•Version
RemovingaPlug-in
Youcanremoveaninstalledplug-infromthedriver.Whenremoved,theplug-in
featureswillnotappearinthedriverinterface.
ClickStart>PrintersandFaxes(WindowsXP),orclickStart>Control
1
Panel,anddouble-clickPrinters(WindowsVista).
Right-clickthedesiredprintericon.
2
SelectProperties.
3
SelecttheDeviceSettingstab.
4
ClicktheKyoceralogotoopentheAboutdialogbox.
5
ClickPlug-intoopenthePlug-inInformationdialogbox.
6
Selectaplug-inmodulefromthelistandclickDelete,thenYes.
7
ClickOKinalldialogboxes.
8
4-6
UserGuide
Page 41

5Layout
IntheLayouttab,youcanarrangedocumentdataonprintedpageswithout
affectingtheoriginaldocument.
ThesefeaturesareavailableintheLayouttab:
PrintingaBookletonpage5-1
PrintingMultiplePagesperSheetonpage5-2
PrintingaPosteronpage5-3
Scalingonpage5-4
Booklet
Bookletprintsatwo-pagelayoutonbothsidesofeachsheetofpaper.Youcan
foldandbindthebookletinthecenter.Foldedbookletsarehalfthesizeofthe
selectedpaper.Forexample,ifyouselectLetterinBasic>Paper>Printsize,
theprintedoutputcanbefoldedintoa5.5x8.5inch-sizebooklet.
WhenBookletisselected,otheroptionssuchasMultiplepagespersheet,
Poster,andScalingareunavailable.
Adifferentpapersourcecanbeselectedforthebookletcover.Toincludea
coveronthebooklet,selectthePublishingtab,thenselectCovermode.
PrintingaBooklet
Bookletprintingrequiresthatyouchooseleftedgebindingorrightedgebinding
asinthefollowing:
KXDriver
5-1
Page 42

Layout
MultiplePagesperSheet
Fromtheapplication'sFilemenu,clickPrint,thenclickPreferencesor
1
PropertiestoopenthePropertiesdialogbox.
ClicktheLayouttab,thenselectBooklet,andoneofthetwobindingoptions.
2
LeftEdgeBinding
Thisselectionprintstextthatreadsfromlefttoright.
RightEdgeBinding
Thisselectionprintstextthatreadsfromrighttoleft.
ClickOKtoreturntothePrintdialogbox.
3
ClickOKtobeginprinting.
4
Multiplepagespersheetprintsseveralpagesonasinglesheetofpaperfor
thepurposeofreviewingthedocumentandconservingpaper.Thereadabilityof
themultiplepagesdecreasesasthenumberofpagespersheetisincreased.
YoucansetthearrangementofthepagesfromtheLayouttabaswellasprint
bordersaroundeachofthepages.
PrintingMultiplePagesperSheet
Thissectiondescribesselectingandprintinganarrangementofpagesona
singlesheetofpaper.
IntheLayouttab,selectMultiplePagespersheet.
1
InPagespersheet,selectthenumberofpagestoprintoneachsheetofpaper.
2
Ifyouwanttoprintaborderaroundeachpage,selectPrintborders.
3
IntheLayoutlist,selectthehorizontaldirectionthepagesshouldflow.
4
ClickOKtoreturntothePrintdialogbox.
5
ClickOKtobeginprinting.
6
Poster
UsePostertoprintadocumenttoasizethatislargerthanthepaperyour
printercansupport.Youcanprintaposter,orbanner,upto25timeslargerthan
theoriginaldocument.Segmentsoftheposterdocumentareprintedonseveral
sheetsofpaperandwiththeassistanceofpostersettings,youcanreassemble
thesheetseasilytocreateaposter.
UseSheetsperpagetoselectthepostersizeinrelationtotheoriginal
documentsize.Eachoptionshowsthenumberofsheetstobeprintedandthe
maximumpostersize.
5-2
UserGuide
Page 43

Note:TheSheetsperpagedisplaystheunitofmeasurementininchesor
millimeters.TochangetheUnitssetting,openthePrintersandFaxesfolder,
right-clickyourprinter.ClickProperties>DeviceSettings>User.
UsePosterSettingstoselectoptions,inanycombinationtomakeiteasierto
createaposter.Theseoptionsprintvisualcuesonthepostersheetsthat
providehelpincroppingandassemblingthepages.
Overlapedges
Thisselectionduplicatestheedgesofdocumentdataonadjoiningsheets.
Posterappearanceisimprovedwhentheedgesoverlapslightly.Selectthe
checkbox,thentypeorselectavaluebetween0.00and1.20inches(0.0
and30.4mm).Thisoptionreducesthefinalpostersizeslightly.
Printcropmarks
Thisselectionprintsaborderattheedgesofeachpostersheet.Youcan
cropeachsheetontheborderbeforeassemblingthesheets.Thisoption
ensuresthatdataonadjoiningsheetsmatchesprecisely.
Printassemblymarks
Thisselectionprintsnumbersattheedgesofeachsheet,matchingnumbers
onadjoiningsheets.Assembleeachsheetedgetothesamenumberededge
onanothersheet.
UsePrintformattoprintaproofsheet,alongwiththeposter,toguideyouin
assemblingtheprintedpostersheets.
Posterpages
Thisselectionprintsallofthesheetstobeassembledasaposter.
Proofsheet
Thisselectionprintsalltheposterpagesononesheetwithmarkingsthat
displaythesheetassembly.
Posterpagesandproofsheet
Thisselectionprintsallpostersheetsandaone-pageproofsheet.
Layout
PrintingaPoster
Toprintaposterorbanner,followthesesteps:
IntheLayouttab,selectPoster.
1
InSheetsperpage,selectthepostersize.Eachoptiondescribesthenumber
2
ofsheetsittakestorepresentonefinishedposterpage.
ClickPosterSettingstoselectoptionsinanycombination.Theseoptions
3
ensureaprecisereassemblyofthepagestocreatetheposter.
InPrintformat,selectoneoftheoptionsforafinishedprintformat.
4
ClickOKtoreturntothePrintdialogbox.
5
ClickOKtobeginprinting.
6
KXDriver
5-3
Page 44

Layout
Scaling
UseScalingtoincreaseordecreasethetextandgraphicsonapage.Youcan
alsoselectaguttersettingthatenlargesthemarginstoaccommodateaneasier
assemblyofthepagesintoabooklet.ScalingisnotavailablewhenBooklet,
PosterorMultiplepagespersheetisselected.
IntheLayouttab,underScaling,typeorselectapercentagebetween20to
500.Scalingadjustsproportionatelytheheightandwidthofthepage.Alower
percentagereducesthepageandahigherpercentageenlargesthepage.
Gutter
Tocreateagutterinadocument,clickGutter.Basedonthepagesizeandprint
sizespecifiedintheBasictab,agutterincreasestheblankspaceononeside
ortwosidesoftheprintedpagebyscalingdowntextandgraphics.For
applications(suchasMicrosoftWord)thatdonotdependontheprinterdriver
forpagesize,usetheapplication’sPageSetupdialogboxtospecifythesizes
ofthemixedpagesinyourdocument.
5-4
UserGuide
Page 45

6Finishing
IntheFinishingtab,youcanspecifydocumentfinishingfeaturessuchas
punchingholesandstapling.
ThesefeaturesareavailableintheFinishingtab:
Stapleonpage6-1
Punchonpage6-2
Separationonpage6-3
Staple
TheStaplefeatureisavailableonprintingsystemswithanoptionalfinishing
deviceinstalled.
Afterinstallation,optionalequipmentmustbeselectedintheprinterdriverinthe
DeviceSettingstab.
Note:StapleandSeparationfeaturescannotbeusedtogether.
IfPrinterdefaultisselectedastheDestinationintheBasictab,theselection
ofanoptionintheFinishingtabresultsintheautomaticselectionofa
destinationcompatiblewiththatfinishingoption.Thedestinationis
automaticallyupdatedtothefirstavailableoutputtraythatsupportstheselected
finishingoption.
StapleselectstheDestinationautomatically.IftheFinishingoptionsare
changed,theDestinationselectionisnotaffected.
KXDriver
6-1
Page 46

Finishing
StaplingaPrintJob
TheStaplefeatureintheFinishingtabenablesyoutocreatestapled
documentsets.YoumustfirstselectafinisherunderDeviceoptionsinthe
DeviceSettingstab.StaplewillmakeSeparationandTransparency
interleavingunavailable.Themaximumnumberofsheetsdependsuponthe
finishermodelandtheselectedPagesizeorMediatype.TheGutterfeatures
enablestoincreasethetopandleftmarginstoaccommodatethelocationofthe
staples.
IntheFinishingtab,selectStaple.
1
IntheStaplefeature,selectPositionandCount.Twooptionsareavailablefor
2
count:Allsheetstoamaximumof50andeverynumberofpagessothateach
numbersetisstapledseparately.
ClickOKtoreturntothePrintdialogbox.
3
ClickOKtostartprinting.
4
Punch
ThePunchfeatureplacespunchesalongtheedgeoftheprintedpagessothat
thepagescanbeboundtogetherorplacedinabinder.
Punchisavailablewhenamulti-finisherisselectedinDeviceoptionsinthe
DeviceSettingstab.Whenyouselectthecheckboxforafinishingdevice
showninblueintheDeviceoptionslist,thePunchUnitSettingsdialogbox
appears.Ifthedevicelistingisalreadyselected,double-clicktheoptiontoopen
thePunchUnitSettingsdialogbox.
PunchcannotbeusedwhenBookletisselectedintheLayouttab.
SettingPunchOptions
BeforeusingthePunchoptionintheFinishingtab,youmustsetpunchoptions
intheDeviceSettingstab.TheselectedoptionisavailableunderPunchinthe
Finishingtab.
IntheDeviceSettingstab,underDeviceoptions,selectMultifinisher.Orif
1
alreadyselected,double-clickthebluetext.
Dependingonthepunchunitattached,selectoneoption:
2
None
NopunchoptionavailableintheFinishingtab.
2hole
2holeoptionavailableintheFinishingtab.
2&3hole
2holeand3holeoptionsavailableintheFinishingtab(inchesbased).
2&4hole
2holeand4holeoptionsavailableintheFinishingtab(metricbased).
ClickOK.
3
6-2
UserGuide
Page 47

CreatingPunchHolesforaPrintJob
ThefinishingdevicemustsupportthePunchfeature.
AvailablepunchoptionsaresetintheDeviceSettingstabanddependonthe
punchunitinstalledonthedeviceandselected.
Fromtheapplication’sPrintdialogbox,openProperties.
1
IntheBasictab,underDestination,selectaface-uporface-downfinishing
2
tray.
SelecttheFinishingtab,andclickPunch.
3
Selectthenumberofholepunches:2or4hole(metric),or2or3hole(inches).
4
ClickSettings,andselectthesettingforpunchposition:Left(sideofthepage),
5
Right(sideofthepage),orUpper(topedge,inthecenterofthepage)
Theprintjobwillbepunchedbythefinishingdeviceanddeliveredtotheoutput
tray.
Finishing
Separation
TheSeparationfeaturestacksprintjobssothatoneprintjobcanbe
distinguishedfromanother.
SelectRotatecopiestoprinteachcopyofaprintjobatrightangles.
SelectOffsetjobstophysicallyshifteachprintjobintheoutputtray.Toensure
consistentoffsetstacking,allusersprintingtothesameprintingsystemshould
selectOffsetjobsasthedefaultsetting.
RotateCopies
Rotatecopiesstackseachcopyofaprintjobatarightangleintheoutputtray.
Thisfeaturerequiresthefollowing:
PapersizeselectionsarelimitedtoLetter,A4,16K,orB5(JIS).
Theselectedpapersizemustbeloadedintotwopapersources,one
horizontallyandonevertically.
Theprintjobmustcontainmultiplepagesandbespecifiedtoprintmultiple
copies.
RotatingCopies
Rotatecopiesstackseachcopyofaprintjobatrightangles.
IntheBasictab,underDestination,selectanoptionthatisnotafinishingtray,
1
forexample:Toptray(face-down).
Selectanumberofcopiesgreaterthan1.
2
ClicktheFinishingtab,thenselectSeparation>Rotatecopies.
3
ClickOKtoreturntothePrintdialogbox.
4
KXDriver
6-3
Page 48

Finishing
ClickOKtostartprinting.
5
OffsetJobs
TheOffsetjobsfeaturephysicallyshiftseachprintjobintheoutputtray.
Toensureconsistentoffsetstacking,allusersprintingtothesameprinting
systemshouldselectOffsetjobsasthedefaultsetting.
OffsettingJobs
TheOffsetjobsfeaturerequiresafinishingdevicetobeselectedunderDevice
optionsintheDeviceSettingstab.ItdoesnotworkwithStaplefeature.
IntheBasictab,underDestination,selectaface-downfinishingtray.
1
OpentheFinishingtab,thenselectSeparation>Offsetjobs.
2
ClickOKtoreturntothePrintdialogbox.
3
ClickOKtostartprinting.
4
6-4
UserGuide
Page 49
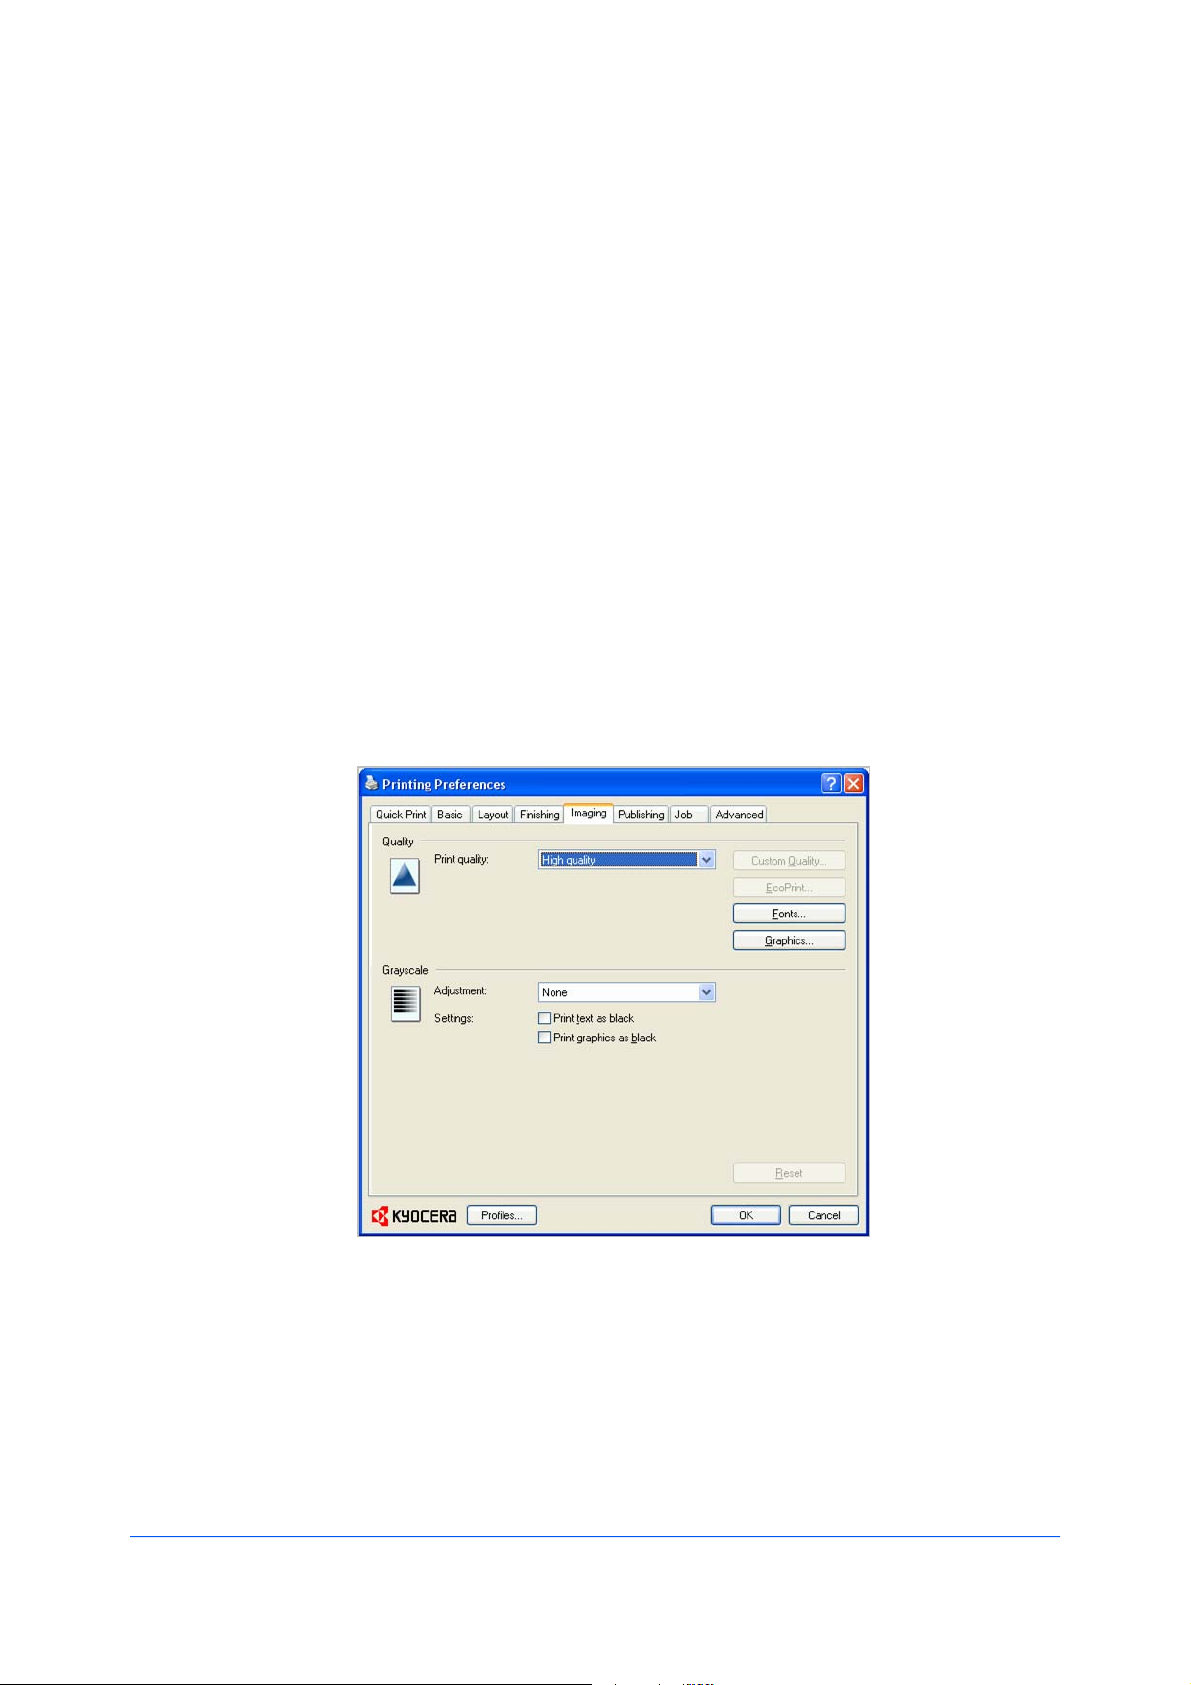
7Imaging
IntheImagingtab,youcanmanageprintqualityandgrayscalesettings.
ThesefeaturesareavailableintheImagingtab:
PrintQualityandCustomQualityonpage7-1
EcoPrintonpage7-2
Fontsonpage7-2
Graphicsonpage7-4
PatternScalingonpage7-4
InversionSettingsonpage7-4
OptimizationSettingsonpage7-5
HalftoneScreenonpage7-5
AdjustingGrayscaleonpage7-6
TextandGraphicsEffectsonpage7-6
PrintQualityandCustomQuality
Printqualityletsyousettheresolutionfortheprintjob.Resolutionisa
measurement,indotsperlinearinch(dpi),thatdescribesthesharpnessand
clarityofprintedtextandimages.CustomQualityletsyousetamorerefined
resolutionfortheprintjob.
KXDriver
7-1
Page 50

Imaging
SelectingPrintQuality
IntheImagingtab,selectaPrintqualityfromthelist.Thenumberof
selectionsinPrintqualitydependsonthenumberofresolutionssupportedby
theprintingsystem.
Highquality,Proof,Draft
Selectoneofthesesettingstoprintfromthehighesttothelowestprint
resolution.ProofisunavailablewhenPCL5eisselectedasthePDL.
Custom
CustomletsyouchooseasettingforCustomQualityandEcoPrint.
SelectingCustomwithoutEcoPrintresultsinadefaultsettingtothehighest
printingsystemresolution.
ClickCustomQualitytoopenasettingsdialogboxwithselectionsfora
morerefinedresolution:ResolutioncanbesettoFast1200,600dpi,or
300dpi.Kyoceraimagerefinementsmoothestheedgesoftextandvector
graphicsandcanbesettoOn,orOff.
EcoPrint
EcoPrintisavailablewithCustomselectedfromtheImaging>PrintQuality
list.
EcoPrintchangestonersaturation,makingtheentireimage,textandgraphics,
appearlighterintheprintedjob.Theactualamountoftoneruseddependson
theprintingsystemmodel,thetypeofdataprinted(text,graphics,orboth).
SelectOn,orOfftousethisfeature.
EcoPrintisalsoavailableintheQuickPrintorBasictabs.
Fonts
Acomputerfontisadatafilecontainingasetofglyphs(visualrepresentations
oftextualelements),characters,orsymbols.Commontermsforfontsare:
Bitmapfontsdefineeachcharacterasapatternofpixels(thesmallest
resolvablerectangularareasofanimage).Suchfontsarenoteasilyscalable
anddistortwhenreducedorenlarged.
Outlinefonts,incontrasttobitmapfonts,aredefinedasasetof
mathematicallinesandcurves.Anoutlinefontismoreeasilyscalable
(designedtodisplayandprintclearlyatanypointsize)thanabitmapfont.
Nativefontsarethebasicororiginalfontsinstalledwiththecomputer
operatingsystem.TrueTypefontsarethenativefontsusedbyWindows.
TrueTypefontsareatypeofscalableoutlinefonts.TrueTypehaslongbeen
themostcommonformatforfontsonWindows.
Systemfontsaretheprimaryfontsusedbytheoperatingsystem.Theyare
typicallyaccessedthroughanapplicationinterfaceorthroughacommonfont
dialogbox.
Devicefontsarestoredeitherpermanentlyortemporarilyintheprinting
systemmemory.
FontSettings
TheFontssettingsdialogboxletsyouspecifyhowTrueTypefontsaresentto
theprintingsystem.Thechosenmethodaffectsthespeedandqualityofthe
printjob:
Downloadasoutlines
7-2
UserGuide
Page 51

Thismethodisbestsuitedforlargedocumentsorprintjobsusingmultiple
fontsandfontsizes.Printspeedsarefasterbecauseoftheoptimization
featuresinthissetting.Therepetitionofsimilarfontdatasenttotheprinting
systemisreduced,therebyincreasingtheprintspeed.Printspeedisnot
increasedwhenusingAsianfontssuchasJapanese,Chinese,andKorean,
becauseofthelargeamountoffontinformationusedfortheseparticular
fonts.
Allownativedownload
Thismethodimprovestextqualityandincreasesprintspeedbyconverting
TrueTypefontstoAdobeType42fontformat.Thisfeatureisavailablewhen
KPDLisselectedinDeviceSettings>PDL>SelectPDL.
Downloadasbitmaps
Downloadingfontsasbitmapsprovidesmoredetail,howeveritcreateslarge
filesizes.Thisisbestsuitedforprintjobswithuser-definedfonts,verysmall
fonts(pointsize1-4),orAsianfonts.
Substitutewithdevicefonts
Systemfontsanddevicefontsareautomaticallymatchedbasedontypeface
name.Matchingaspecificdevicefontwithasystemfontisdesirableunder
thesecircumstances:
Toincreaseprintspeedandefficiency.
Tochangeafontfoundthroughoutalargedocument.Thisselection
replacestheoldfontwiththedesiredfont.
Imaging
Note:GDIcompatiblemodedoesnotsupportSubstitutewithdevice
fonts.
SelectingFontSettings
ClickFontstoopentheFontSettingsdialogbox.
1
SelectoneofthemethodsforsendingTrueTypefonts,andthenclickOK.
2
FontSubstitution
Fontsubstitutionistheprocessofusingonefontinplaceofanotherwhenthe
intendedfontisnotavailabletoaprintingsystem.Fontsubstitutionmaybe
criticalforoutputofdocumentstoprintingsystemsthatarenotwellsupported
byalargefontinventory.
IntheImagingtab,clickFonts>Substitutewithdevicefonts>Fontsto
opentheFontSubstitutiondialogbox.
TheSystemfontslistshowsthefontsinstalledonyourcomputer.Theprinting
systemfontsarelistedintheAvailabledevicefontslist.Selectthesystem
font,andthentheavailabledevicefonttobesubstituted.Ifthedevicefontdoes
nothavesimilarfontcharacteristicstothesystemfont,characterspacinginthe
documentmayappearincorrect.
DisablingDeviceFonts
Insomecases,theprintingsystemsubstitutesfontsevenifyousendthe
TrueTypefontsasoutlinefontsorbitmapimages.SelectDisabledevicefonts
topreventsubstitutionofdevicefontsforTrueTypefonts.
Thisoptionalsoimprovesportabilityofprintabledata.(Ifcleared,devicefonts
maynotmatchwhensenttoadifferentprintingsystem.)
KXDriver
7-3
Page 52

Imaging
SomeAdobeapplicationshavedevicefontlimitations.Toovercomethese
limitations,selectDisabledevicefonts.Devicefontsarenormallyvisibleinthe
applicationfontlistsasprintericonsnexttothefontname,unlessthereare
equivalentsystemfonts,inwhichcasethe“TT”TrueTypeiconremains.
IntheImagingtabclickFontstoopentheFontssettingsdialogboxand
accesstheDisabledevicefontscheckbox.
Graphics
Graphicsarepictorialrepresentationsofinformation.Graphicscanbefunctional
(charts,diagrams)orartistic(drawings,photographs).GraphicsSettingslet
youselectpatternscaling,inversion,optimization,andhalftoneoptionsforyour
printedgraphics.
Note:SomeoptionsareavailableonlywhenaspecificPDLisselected.
IntheImagingtab,clickGraphicstoopentheGraphicsSettingsdialogbox.
1
Inthedialogbox,selectfromPatternscaling,Inversionoptions,
2
Optimization,andHalftoneScreen,andthenclickOKtosaveyourselections.
PatternScaling
Patternscalingisafeaturethatcanhelpimprovevisualcompatibilitybetween
screenandprintoutput.Graphicsobjects,suchasashapeorapath,often
includepatternsandfillsthatarecomposedofcollectionsofprinteddots.A
patternisaplannedorrandomrepetitionofcolors,shapes,lines,values,and
texturestocreateavisualarrangement.Afillistheapplicationofacoloror
grayscaletoagraphicsobject.Ifprintedpatternsandfillsdonotmatchthe
appearanceofthatonthescreen,usePatternscalingtoselectadifferent
densityofprinteddots.
Auto(defaultsetting)
Thissettingprintspatternsandfillstomatchtheon-screenappearance.
Coarse
Thissettingprintspatternsandfillswiththefewestnumberoflines,patterns,
ordots.CoarseisthesameasAutowhenPCLXLorPCL5eisselectedin
DeviceSettings>PDL>SelectPDL.
Medium
Thissettingprintspatternsandfillswithagreaternumberoflines,patterns
ordotsthantheCoarsesetting.MediumisthesameasAutowhenKPDLis
selectedinDeviceSettings>PDL>SelectPDL.
Fine
Thissettingprintspatternsandfillswiththegreatestnumberoflines,
patterns,ordots.Printedpatternsandfillsmayappearmoredensethanthe
on-screenappearance.
InversionSettings
Inversionistheoppositeofthenormalorder,arrangement,orpositionofan
imageorprintedcontent.InversionoptionsareavailablewhenKPDLis
selectedinDeviceSettings>PDL>SelectPDL.
Reverseimage
7-4
UserGuide
Page 53

Thissettingprintsimageslikeaphotonegative,reversingblackandwhite
areasoftheimage.
Mirrorprint
Thissettingprintsthepagecontentbackwards,asitwouldappearinamirror
image.
OptimizationSettings
Optimizationisaprocessormethodologyofimprovingaprintingsystem's
functionoreffectiveness.
IntheImagingtabclickGraphicstoopentheGraphicssettingsdialogbox
andaccesstheOptimizationsettings.ThesettingsareavailablewhenKPDLis
selectedinDeviceSettings>PDL>SelectPDL.
Fastprinting
Thissettingincreasesprintspeedanddecreasesspoolsize.Itdelivers
imagesinbinaryformat.Itcanbeusedformosteverydayprintingneeds.
Documentportability
ThissettingcreatesaPostScriptfileinASCIItextencoding.Unlikethebinary
formatcreatedinFastprinting,theASCIItextcreatedwiththisselection
canbeedited.
Imaging
HalftoneScreen
HalftoneScreenletsanexperienceduserprintdifferentshadesofgrayasare
foundinphotographs.Shadesareproducedbyprintingdotsofvarioussizes
andshapes,andbyspacingthemcloserorfartherapart.Shadingcanalsobe
adjustedbythenumberofrowsofdata,theangleoftherows,andtheshapeof
thedata.
HalftoneScreenisavailablewhenKPDLisselectedasthePDL.Itis
unavailableifGDIcompatiblemodeisselectedinthePDLSettingsdialog
box.
SettingtheHalftoneScreen
HalftoneScreenprovidesameanstoapplyshadesofgraytoblackandwhite
printedoutput.
IntheImagingtab,selectGraphics>GraphicsSettings>HalftoneScreen.
1
CleartheUseprinter'sdefaultsettingscheckbox.
2
Settheavailableoptionstothedesiredvalues:
3
Ink
Inkliststhehalftonescreensavailable.Thisoptionisgrayedoutand
permanentlysettoblackforblackandwhiteprinters.
Frequency
Frequencydisplaysthenumberofrowsofdotsperinchorcentimeter.Set
therangefrom2.0to999.9,andselectlines/inchorlines/cm.
Angle
Thisoptionsetstheangleatwhichrowsarealigned.Settherangefrom-180
to180degrees.
Shape
KXDriver
7-5
Page 54

Imaging
Selecttheshapeofthehalftonedot:
Ellipse:Resistsopticaljump,whichiswhenareasofanimagethatshould
besmoothsuddenlybecomedarker.Anellipseshapeprovidesasmoother
gradationoftones.SelectEllipseforimageswithdarkareas.
Round:Resistsmoiréformationanddotgain.Moiréformationisan
unintendedpatternthatoccurswhentwoormorecolorsareprintedatthe
wrongangles.Thecorrectanglesdependonthenumberofcolorsbeing
printed.Dotgainiswhenthehalftonedotsincreasewhenprinted,causinga
moirépattern.SelectRoundforimageswithlighttintsandhighlightedareas.
Line:Usedforspecialeffect.SelectLinetochangetheeffectbyselectinga
differentangle.
Increaseaccuracyofscreens
Selectthisoptionforbetterprintquality,possiblyincreasingprinttime.
AdjustingGrayscale
ThegrayscaleadjustmentsettingschangetheBrightnessandContrastof
graphics.Thesesettingsareusefulifgraphicimagesareprintingtoolight,too
gray,ortoodark.Textremainsunaffected.
IntheImagingtab,underAdjustment,selectCustom.
1
ApreviewimageintheAdjustmentSettingsdialogboxillustratesany
brightnessandcontrastchanges.
TextandGraphicsEffects
DragtheBrightnesssliderrighttolighten,orlefttodarkenthegraphicimages
2
oftheprintjob.
Youcanalsochangebrightnessbyenteringanumericvalueinthetextboxat
theright.Thebrightestsettingis+100;thedarkestis-100.Zeroisthedefault
mid-levelsetting.Adjustingbrightnessisusefulwhengraphicimagesare
printingtoodarkortoolight.Textremainsunaffected.
DragtheContrastsliderrightorlefttoincreaseordecreasetheproportionof
3
lighttodarkinthegraphicimagesoftheprintjob.
Ahighcontrastsettingdecreasesthegrayscalespectrum,makinglightgrays
lighteranddarkgraysdarker.Alowcontrastsettingincreasesthegrayscale
spectrum,makinglightgraysdarkeranddarkgrayslighter.
Youcanalsochangecontrastbyenteringanumericvalueinthetextboxatthe
right.Thehighestcontrastsettingis+100;thelowestis-100.Zeroisthedefault
mid-levelsetting.Adjustingcontrastisusefulifgraphicimagesareprintingtoo
gray,ortooblackandwhite.Textremainsunaffected.
Printtextasblack
Thisoptionprintsallcolortextasblack.Itproducesfasterprintingofcolor
textbyreducingtheamountofdatasenttotheprinter.Inblackandwhite
printers,itincreasesthedetailforlight-coloredtextprinted.Whitetextand
imagecolorsareunaffected.
Printgraphicsasblack
Thisoptionprintsallcolorgraphicsandtextwithblack,ratherthan
grayscale.ThisfeatureisimplementedforCADapplications.
7-6
UserGuide
Page 55
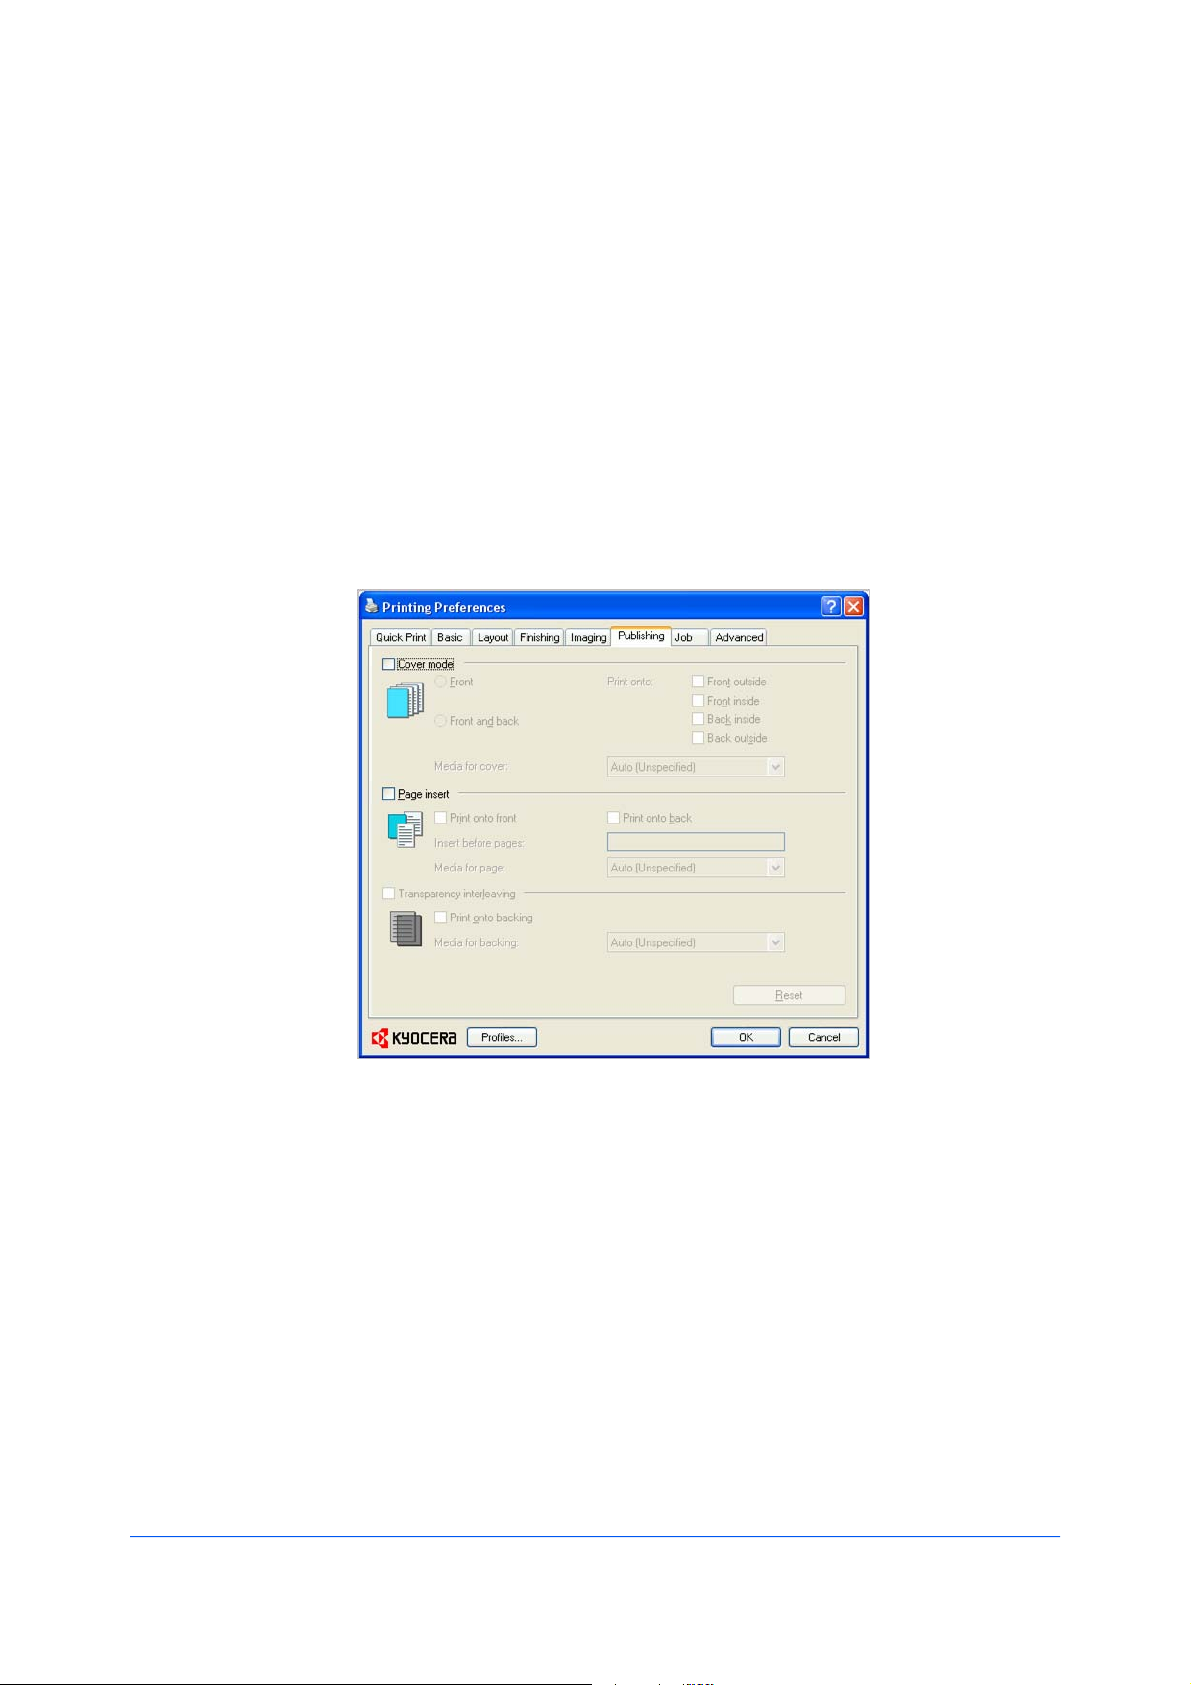
8Publishing
InthePublishingtab,youcancreatecovers,inserts,andaddtransparencies
foraprintjob.
ThesefeaturesareavailableinthePublishingtab:
PrintingCoversonpage8-1
ChoosingCoverMediaonpage8-5
PrintingPageInsertsonpage8-5
InterleavingTransparenciesonpage8-7
CoverMode
Covermodeisafeatureforaddingcoverpagesforthefrontandbackofyour
document.Youcanprintoncoverpagesofadifferentweightorcolorthanthe
maindocument.Thesourceofthecoverpaperisspecifiedbyadjustingthe
MediaforcoversettingsinthePublishingtab.
PrintonbothsidesmustbeselectedintheBasictabinordertoprintusingthe
FrontinsideorBackoutsideoptions.
AlthoughCovermodeandPageinsertmaybeusedsimultaneously,they
cannotbeusedwithTransparencyinterleaving.
PrintingCovers
InthePublishingtab,selectCovermode.
1
KXDriver
8-1
Page 56

Publishing
SelectFront,Frontandback,orthePrintontooptionstospecifywhattypeof
2
coverstoprint.
SelecttheMediaforcovertospecifywhattypeofpaperorothermediatouse
3
forthecovers.
CoverModeOptions
CheckBoxSelectionCoverInsertionType
FrontInsertsablankfrontcover.
FrontPrintsontheoutsidesurfaceofthe
Frontoutside
frontcover.
FrontPrintsontheinsidesurfaceofthefront
Frontinside
8-2
cover.
—continued
UserGuide
Page 57

CheckBoxSelectionCoverInsertionType
Front
Printsontheoutsideandinside
surfacesofthefrontcover.
Frontoutside
Frontinside
Publishing
Frontandback
Frontandback
Frontoutside
Insertsblankfrontandbackcovers.
Printsontheoutsidesurfaceofthe
frontcoverandinsertsablankback
cover.
Frontandback
Printsontheinsidesurfaceofthefront
coverandinsertsablankbackcover.
Frontinside
—continued
KXDriver
8-3
Page 58

Publishing
CheckBoxSelectionCoverInsertionType
Frontandback
Printsonbothsidesofthefrontcover
andinsertsablankbackcover.
Frontoutside
Frontinside
Frontandback
Backinside
Frontandback
Backoutside
Printsontheinsidesurfaceofthe
backcoverandinsertsablankfront
cover.
Printsontheoutsidesurfaceofthe
backcoverandinsertsablankfront
cover.
Frontandback
Printsonbothsidesofthebackcover
andinsertsablankfrontcover.
Backinside
Backoutside
—continued
8-4
UserGuide
Page 59

CheckBoxSelectionCoverInsertionType
Frontandback
Frontoutside
Frontinside
Backinside
Backoutside
Printsonbothsidesofthefrontand
backcovers.
ChoosingCoverMedia
IntheMediaforcoverlist,selectthemediatypeorsourcecassetteforthefront
1
andbackcovers.
Whenyouchoosethemediatype,asourcecassettematchingthatmediatype
isautomaticallyselected.
Publishing
ClickOKtoreturntothePrintdialogbox.
2
ClickOKtostartprinting.
3
PageInsert
APageinsertisapreprintedpageorapageofadifferentpapertypethatis
insertedatspecifiedpointsinaprintjob.Theinsertedpagecanalsobeprinted
onduringtheprintjob.Bothsidesofthepageinsertcanbeprintedonbyusing
theduplexunit.
AlthoughthePageinsertandCovermodeoptionscanbeusedtogether,
neitherofthemcanbeusedwithTransparencyinterleaving.
PrintingPageInserts
Thereareseveralwaystoarrangepageinserts:youcanprintonone,both,or
neitherside.SelectthePageinsertcheckbox.Selecttheoptioncorresponding
toyourdesiredpagearrangement.Toprintonboththefrontandbackofthe
insertedpage,selectthePrintontofrontandPrintontobackcheckboxes.
KXDriver
8-5
Page 60

Publishing
PageInsertionOptions
CheckBoxSelectionPageInsertionType
PageinsertInsertsablankpagebeforethe
secondpage.
PageinsertPrintsonthefrontsideoftheinserted
Printontofront
page.
PageinsertPrintsonthebacksideoftheinserted
Printontoback
Pageinsert
Printontofront
Printontoback
page.
Printsonbothsidesoftheinserted
page.
TransparencyInterleaving
8-6
Transparencyinterleavinginsertsabackingsheetbetweenprinted
transparencies.Thebackingsheet,alsoknownasaninterleaf,helpskeep
UserGuide
Page 61

transparenciescleanandpreventsthemfromclingingtogether.Thisfeatureis
onlyavailablewhenprintingontransparenciessuppliedfromtheMPtray.You
canprintthesamecontentonthebackingpagesasonthetransparencies.
TransparencyinterleavingcannotbeusedtogetherwithCovermodeorPage
insert.
InterleavingTransparencies
IntheBasictab,intheMediatypelist,selectTransparency.IftheSourceand
1
Mediatypelistshavebeencombined(byaselectionintheDeviceSettings
tab,intheCompatibilitySettingsdialogbox),Mediatypedoesnotappear.
Instead,intheSourcelistselectAuto(Transparency).
ClickthePublishingtab.
2
InthePublishingtab,selecttheTransparencyinterleavingcheckbox.To
3
printthetransparencycontentontheinsertedpagesaswell,selectthePrint
ontobackingcheckbox.
IntheMediaforbackinglist,selecttheMediatypeofthebackingsheetorthe
4
Sourcepapercassette.WhenyouchoosetheMediatype,theSource
cassettewherethatmediaisloadedisautomaticallyselected.
Publishing
Theprintingsystem'soperationpanelpromptsyoutoloadtransparenciesinto
5
theMPtray,and,ifnecessary,loadbackingpaperintotheselectedcassette.
ClickOKtobeginprinting.
6
KXDriver
8-7
Page 62

9Job
IntheJobtab,youcanstoreprintjobsinthememoryinstalledintheprinting
system.YoucanalsoselectaJobnametousewithJobstoragefeatures.You
canusethistabtosetorchangethedefaultsettingsthatapplywhenyouprinta
documentfromaWindowsapplication.
ThesefeaturesareavailableintheJobtab:
Temporaryonpage9-3
Permanentonpage9-3
VirtualMailBoxonpage9-4
QuickCopyonpage9-4
ProofandHoldonpage9-6
PrivatePrintonpage9-7
JobStorageonpage9-8
SynergyPrintBoxonpage9-9
FormGalleryonpage9-10
JobNameonpage9-11
JobStorage(e-MPS)
9-1
Jobstorage(e-MPS)offersasetofoptionsforsavingprintjobsinprinting
systemmemory,sothatyoucanprintorreprintthemlater.Printjobscaneasily
bereprintedlaterusingtheprintingsystem’soperationpanel,andprintingof
sensitivedocumentscanberestrictedtoapprovedusers.Aportionofthe
printingsystem'smemorycanbedesignatedasaRAMdiskforstoringprintjob
UserGuide
Page 63

datatemporarily,oryoucaninstallaharddiskforlargercapacityand
permanentstorage.
E-MPSisamultitiersolutionthatprovidesadvancedprintmanagement,directly
fromthedesktop.Bystoringajobintheprintingsystem,youcanprintitfrom
theoperationpanelwithoutsendingitagainfromthecomputer.
TousetheJobstorage(e-MPS)features,youmustsetaUsernameinthe
UserSettingsdialogbox,availableintheDeviceSettingstab.
JobStorage(e-MPS)options
StorageAccesscodeWhenjobisWhenjobisOperation
locationrequiredprinteddeletedfrompanele-MPS
memorylocation
TemporaryHarddiskNoWhensentWhenharddiskNone
fromtheisfullandolder
computer;ittemporaryjobs
canbehavebeen
reprinteddeleted
PermanentHarddiskNoWhensentWhenmanuallyNone
fromthedeleted
computer;it
canbe
reprinted
VirtualmailHarddiskNoWhenprintedWhenprintede-MPS/Print
boxfromoperationVMBDataTray
panel
QuickcopyHarddiskorNoWhensentWhenprintinge-MPS/Quick
RAMdiskfromthesystemisCopy
computerturnedoffor
harddiskisfull
ProofandholdHarddiskorNoOnecopywhenWhenprintinge-MPS/Quick
RAMdiskjobissent;systemisCopy
remainingturnedoff
copieslater
PrivateprintHarddiskYesWhenaccessWhenprintinge-MPS/
codeisenteredsystemisPrivate/Stored
atoperationturnedoffor
panelafterprinting
JobstorageHarddiskOptionalWhenprintedWhenmanuallye-MPS/
fromoperationdeletedPrivate/Stored
panel
SynergyprintCopiermemoryNoWhenprintedWhenmanuallyDocument
boxfromoperationdeletedManagement/
panel(underSynergy
print
box)Document
Printing
FormgalleryCopiermemoryNoWhenprintedWhenmanuallyDocument
fromoperationdeletedManagement/
panelBoxEditing/
PrintForm
Job
KXDriver
9-2
Page 64

Job
Temporary
UseTemporarytoprintjobsandsavethemontheharddisk.Whenthehard
diskbecomesfull,Temporaryjobsarereplacedbeginningwiththeoldestjobs.
Ifyoudonotwantjobstoberemoved,selectthePermanentoption.
SelectingTemporaryasastorageoptionincreasesprintspeedonamultiple
copyjob.Thefirstcopyofthejobisrenderedonce,thenallsubsequentcopies
areprintedattheratedspeedoftheprintingsystem.
TemporaryjobscanbereprintedbyinstallingandusingtheKM-NETVIEWER
utility,availableontheProductLibraryCD.
StoringaTemporaryPrintJob
Youcanprintajobandstoreittemporarilyontheharddisk.
Fromtheapplication'sFilemenu,clickPrint,thenclickPreferencesor
1
PropertiestoopenthePropertiesdialogbox.
IntheJobtab,selectJobstorage(e-MPS).
2
SelectTemporary.
3
ClickOKinalldialogboxes.
4
Permanent
UsePermanenttoprintjobsandsavethemontheharddisk.Jobsaresaved
whentheharddiskbecomesfullandcanonlyberemovedmanually.
SelectingPermanentasastorageoptionincreasesprintspeedonamultiple
copyjob.Thefirstcopyofthejobisrenderedonce,thenallsubsequentcopies
areprintedattheratedspeedoftheprintingsystem.
AlistofPermanentjobscanbeprintedattheprintingsystem'soperationpanel.
SetaJobnameandUsernametohelpyoufindthejobsinthePermanent
CodeJobList.
PermanentjobscanbereprintedbyinstallingandusingtheKM-NETVIEWER
utility,availableontheProductLibraryCD.
StoringaPermanentPrintJob
Youcanprintajobandstoreitontheharddiskuntilitisremovedmanually.
Fromtheapplication'sFilemenu,clickPrint,thenclickPreferencesor
1
PropertiestoopenthePropertiesdialogbox.
IntheJobtab,selectJobstorage(e-MPS).
2
SelectPermanent.
3
ClickOKinalldialogboxes.
4
9-3
UserGuide
Page 65

VirtualMailBox
Virtualmailboxletsyousendprintjobstoelectronicmailboxesratherthan
physicalmailboxes.CreatingtheVirtualmailboxintheprinterdriveralso
createsitontheharddisk.AfterjobsaresenttoaVirtualmailbox,theycanbe
printedfromtheprintingsystem'soperationpanel.Jobsaresaveduntiltheyare
printedandthenareremovedfrommemory.Youcancreateupto255mail
boxesintheHardDiskSettingsdialogboxintheDeviceSettingstab.
ThemaindifferencebetweenVirtualmailboxandSynergyprintboxisthata
jobsenttoaVirtualmailboxisdeletedassoonasitisprinted,whileajobsent
toaSynergyprintboxisstoredpermanentlyinprintingsystemmemory.
StoringaJobinaVirtualMailBox
YoucanstoreprintjobsinaVirtualmailboxwhereitisheldforprinting.
Fromtheapplication'sFilemenu,clickPrint,thenclickPreferencesor
1
PropertiestoopenthePropertiesdialogbox.
IntheJobtab,selectJobstorage(e-MPS).
2
SelectVirtualmailbox(VMB),thenclickSelection.
3
Job
Selectamethodforchoosinganoutputtray:
4
SelectoneormoretraysintheDefinednameslist.
SelectPromptforMailboxID.WhenyouclickOKinthePrintdialogbox,
selectoneormoretraysfromtheVirtualMailboxSelectiondialogboxthat
appears.IfVirtualmailboxisusedrepeatedly,thisoptionletsyouselect
trayseasilywithoutopeningtheJobtabforeveryprintjob.
ClickOKinalldialogboxes.
5
PrintingJobsfromaVirtualMailBox
YoucanprintallaccumulatedjobsfromaVirtualmailbox.
Attheprintingsystem'soperationpanel,pressthePrinterkey.
1
Onthescreen,touche-MPS.
2
TouchPrintVMBDataTray.
3
Usetheupanddownarrowstoselectthedesiredtray,thentouchPrinting.
4
QuickCopy
QuickcopyisaJobstorage(e-MPS)optionthatprintsallcopiesofaprintjob
andstoresthejobtemporarilyontheharddiskforreprintinglater.Thisfeatureis
availablewhenaharddiskisinstalledandselectedintheDeviceSettingstab.
Quickcopyisusefulforprintingthejobagainlaterinthedaywhenyouneed
additionalcopiesatshortnotice.Youcansetthenumberofadditionalcopies
KXDriver
9-4
Page 66

Job
andprintthejobfromtheprintingsystem’soperationpanelwithoutsendingthe
jobagainfromthecomputer.
ThenumberofQuickcopyorProofandholdjobsthatcanbestoredissetat
theprintingsystem’soperationpanel,toamaximumof50jobs.Whenthe
designatednumberofjobsisreached,olderjobsarereplacedbynewjobs.All
Quickcopyjobsarestoredontheharddiskafterprintingbutaredeletedwhen
theprintingsystemisturnedoff.Youcanmanuallydeleteajobattheoperation
panel.
Warning:AprintjobcanreplaceajobontheharddiskhavingthesameUser
nameandJobname.Topreventthis,selectUsejobname+dateandtime
underOverwritejobname.
PrintingaQuickCopyJob
Withaharddiskinstalled,Quickcopyletsyouprintadocumentandsaveitin
theprintingsystemuntilthejobismanuallydeletedortheprintingsystemis
turnedoff.
Fromtheapplication'sFilemenu,clickPrint,thenclickPreferencesor
1
PropertiestoopenthePropertiesdialogbox.
IntheJobtab,selectJobstorage(e-MPS).
2
SelectQuickcopy.
3
ClickOKinalldialogboxes.
4
Forexample,useQuickcopywhenyouprintcopiesforameetinglaterinthe
day.Ifyoulearnatthelastminutethatadditionalcopiesareneeded,youcan
printthemquicklyusingtheprintingsystem'soperationpanelwithoutsending
thejobagainfromyourcomputer.
ReprintingaQuickCopyJob
YoucanreprintaQuickcopyjobfromtheprintingsystem’soperationpanel
withoutsendingthejobagainfromyourcomputer.
Attheprintingsystem'soperationpanel,pressthePrinterkey.
1
Onthescreen,touche-MPS.
2
TouchQuickCopy.
3
TouchtheupanddownarrowstoselecttheUsername,thentouchNext.
4
TouchtheupanddownarrowstoselecttheJobname,thentouchNext.
5
Touchplusorminustoselectthenumberofcopies.
6
TouchPrintingtoprintthejob.
7
9-5
UserGuide
Page 67

ProofandHold
Job
ProofandholdisaJobstorage(e-MPS)optionthatprintsonecopyofaprint
jobsothatyoucanproofitbeforeprintingtheremainingcopies.Thisfeatureis
availablewhenaharddiskisinstalledintheprintingsystemandselectedinthe
DeviceSettingstab.
Aftertheproofcopyisprintedandchecked,remainingcopiescanbeprinted
fromtheprintingsystem’soperationpanelwithoutsendingthejobagainfrom
thecomputer.Ifdesired,youcanchangethenumberofcopiesprinted.
Note:ProofandholdisnotavailableforsomeapplicationssuchasMicrosoft
Excel.
ThenumberofProofandholdorQuickcopyjobsthatcanbestoredissetat
theprintingsystem’soperationpanel,toamaximumof50jobs.Whenthe
designatednumberofjobsisreached,olderjobsarereplacedbynewjobs.All
Proofandholdjobsarestoredontheharddiskafterprintingbutaredeleted
whentheprintingsystemisturnedoff.Youcanmanuallydeleteajobatthe
operationpanel.
Warning:AprintjobcanreplaceajobontheharddiskhavingthesameUser
nameandJobname.Topreventthis,selectUsejobname+dateandtime
underOverwritejobname.
PrintingaProofandHoldJob
Proofandholdletsyouprintonecopyofamulticopyjobtoproofbefore
printingtheremainingcopies.Thejobisstoredontheharddisk,orRAMdisk
untiltheprintingsystemisturnedofforthejobismanuallydeleted.
Fromtheapplication'sFilemenu,clickPrint,thenclickPreferencesor
1
PropertiestoopenthePropertiesdialogbox.
ClicktheBasictab,andselectthenumberofcopiestobeprinted.
2
ClicktheJobtabandselectJobstorage(e-MPS).
3
ClickProofandhold,andclickOKinbothdialogboxestoprint.
4
PrintingtheRemainingProofandHoldCopies
Aftertheproofcopyhasbeenreviewed,youcanprinttheremainingcopiesfrom
theprintingsystem’soperationpanelwithoutsendingthejobagainfromyour
computer.
Attheprintingsystem'soperationpanel,pressthePrinterkey.
1
Onthescreen,touche-MPS.
2
TouchQuickCopy.
3
TouchtheupanddownarrowstoselecttheUsername,thentouchNext.
4
TouchtheupanddownarrowstoselecttheJobname,thentouchNext.
5
KXDriver
9-6
Page 68

Job
PrivatePrint
Touchplusorminustoselectthenumberofcopies.
6
TouchPrintingtoprintthejob.
7
Privateprintjobsaresavedontheharddiskforprintinguntilafour-digit
Accesscodeisentered.Whentheharddiskreachesmaximumcapacityanda
newjobissenttobestored,theoldeststoredjobisreplacedbythenewjob.
Privateprintjobsaredeletedwhentheprintingsystemisresetorpoweredoff.
Ifyoudonotwantthejobdeleted,selecttheJobstoragefeature.
Whensendingasensitivedocumenttotheprintingsystem,ausermusttypea
four-digitAccesscode,whichisattachedtotheprintjobalongwiththeJob
nameandUsername.ThejobisnotprinteduntilauserenterstheAccess
codeattheprintingsystem’soperationpanel.Afterthejobisprinted,itis
removedfromprintingsystemmemory.
ThenumberofPrivateprintjobsthatcanbestoredislimitedonlybythe
storagecapacityoftheharddisk.Youcanmanuallydeleteajobatthe
operationpanel.
Warning:AprintjobcanreplaceajobontheharddiskhavingthesameUser
nameandJobname.Topreventthis,selectUsejobname+dateandtime
underOverwritejobname.
StoringaPrivatePrintJob
Privateprintletsyoustoreadocumenttemporarilyinprintingsystemmemory
withoutprinting,andprotectitwithanAccesscode.Thejobisstoredonthe
harddiskuntilitisprintedormanuallydeleted.
Fromtheapplication'sFilemenu,clickPrint,thenclickPreferencesor
1
PropertiestoopenthePropertiesdialogbox.
IntheJobtab,selectJobstorage(e-MPS).
2
SelectPrivateprint.
3
IntheAccesscodebox,typefournumbers.
4
ClickOKinbothdialogboxestoprint.
5
PrintingaPrivatePrintJob
YoucanprintaPrivateprintjobbyenteringtheaccesscodeattheprinting
system’soperationpanel.Thejobisprintedandimmediatelydeletedfromthe
harddiskorRAMdiskmemory.
Attheprintingsystem'soperationpanel,pressthePrinterkey.
1
Onthescreen,touche-MPS.
2
TouchPrivate/Stored.
3
9-7
UserGuide
Page 69

Job
TouchtheupanddownarrowstoselecttheUsername,thentouchNext.
4
TouchtheupanddownarrowstoselecttheJobname,thentouchNext.
5
Touchplusorminustoselectthenumberofcopies.
6
TouchPrinting.
7
UsethenumerickeypadtoentertheAccesscode.
8
TouchEntertoprintthejob.
9
JobStorage
JobstorageisaJobstorage(e-MPS)optionthatletsyoustoreaprintjob
permanentlyontheharddiskforprintinglater.Youalsohavetheoptionof
protectingtheprintjobfromunauthorizedprintingbyusinganAccesscode.
ThisfeatureisavailablewhenaharddiskisinstalledandselectedintheDevice
Settingstab.
Jobstorageisusefulforjobsthatneedtobeavailableforprintingatanytime,
eveniftheprintingsystemhasbeenturnedoffandturnedonagain.Job
storagejobscanonlyberemovedmanuallyfromprintingsystemmemory.
Ifdesired,youcanattachafour-digitAccesscodetoaJobstoragejob,so
thatyoucanprintajobwithoutanyoneelseseeingit,orrestrictprintingto
approvedusers.Whentheaccesscodeisused,thejobisnotprinteduntila
userprintsitattheprintingsystem’soperationpanel.Afterthejobisprinted,it
remainsinprintingsystemmemory.
ThenumberofJobstoragejobsthatcanbestoredislimitedonlybythe
storagecapacityoftheharddisk.Youcanmanuallydeleteajobatthe
operationpanel.
Warning:AprintjobcanreplaceajobontheharddiskhavingthesameUser
nameandJobname.Topreventthis,selectUsejobname+dateandtime
underOverwritejobname.
StoringaJobStorageJob
Jobstorageletsyoustoreadocumentpermanentlyinprintingsystemmemory
withoutprinting,andgivesyoutheoptiontoprotectitwithanAccesscode.
Thisjobremainsontheharddiskuntilitismanuallydeleted.
Fromtheapplication'sFilemenu,clickPrint,thenclickPreferencesor
1
PropertiestoopenthePropertiesdialogbox.
IntheJobtab,selectJobstorage(e-MPS).
2
SelectJobstorage.
3
Ifyouwanttorestrictaccesstoyourdocument,selectAccessCodeandtype
4
fournumbersinthebox
KXDriver
9-8
Page 70

Job
ClickOKinbothdialogboxestoprint.
5
PrintingaJobStorageJob
YoucanprintaJobstoragejobattheprintingsystem’soperationpanel.The
jobremainsstoredforfutureprintingontheharddisk.
Attheprintingsystem'soperationpanel,pressthePrinterkey.
1
Onthescreen,touche-MPS.
2
TouchPrivate/Stored.
3
TouchtheupanddownarrowstoselecttheUsername,thentouchNext.
4
TouchtheupanddownarrowstoselecttheJobname,thentouchNext.
5
Touchplusorminusselectthenumberofcopies.
6
SynergyPrintBox
TouchPrinting.
7
IfanAccesscodewasset,usethenumerickeypadtoentertheAccesscode.
8
TouchEntertoprintthejob.
9
Synergyprintboxletsyoucombinecopierdocumentsandprintjobsfrom
variousapplicationsintoonedocument.Thecombineddatacanbestoredina
virtualprintboxandprintedtogether.Jobsaresortedandstoredintheprinting
system'smemoryratherthaninphysicalvirtualmailboxesattachedtothe
printingsystem.
Thereare100availableprintboxes,andeachprintboxcanholdupto999
pages.Synergyprintboxusesprintingsystemmemoryanddoesnotrequirea
harddiskorsettingupaRAMdisk.
TheprimarydifferencebetweenVirtualmailboxandSynergyprintboxisthat
ajobsenttoaVirtualmailboxisdeletedassoonasitisprinted,whereasajob
senttoaSynergyprintboxisstoredpermanentlyinprintingsystemmemory.
StoringaJobinaSynergyPrintBox
AjobsenttoaSynergyprintboxcanbecombinedandprintedtogetherwith
otherprintjobsandcopierdocuments.
Fromtheapplication'sFilemenu,clickPrint,thenclickPreferencesor
1
PropertiestoopenthePropertiesdialogbox.
IntheJobtab,selectJobstorage(e-MPS).
2
SelectSynergyprintbox(SPB).
3
9-9
UserGuide
Page 71

IntheSPBIDbox,typeaprintboxnumberfrom1through100.
4
Youcangiveanametotheprintjob,oracceptadefaultnamegeneratedbythe
5
printingsystem.Togiveitacustomname,underJobname,selectCustom,
andthentypeanameinthetextbox.
ClickOKinalldialogboxes.
6
PrintingJobsFromaSynergyPrintBox
PrintjobsandcopierdatastoredinaSynergyprintboxcanbecombinedand
printedtogether.
Attheprintingsystem'soperationpanel,presstheDocumentManagement
1
key.
UnderSynergyPrintBox,touchDocumentPrinting.
2
UnderSelectboxNo.,touchtheboxnumber.Usetheupanddownarrowsto
3
displaythedesirednumber.Oryoucantypethe3-digitnumberusingthe
numerickeypad,andtouchEnter.
Job
OntheDocumentPrintingscreen,youcantouchOrderofindicationto
4
changetheorderofthedisplayeddocuments.OntheOrderofindication
screen,sortbydateorbyname,thentouchClose.
TouchPrintoncealldatatoprinttheboxcontents.
5
FormGallery
Formgalleryletsyoustoreupto100frequently-usedformsorimagesinthe
printingsystem’smemoryforeasyaccessandretrieval.Tostoreanimage,
senditfromyourcomputerorscanitattheprintingsystem.Attheoperation
panel,youcanmodifyimageinformationandprintordeleteanimage.Astored
formcanbecombinedwithanimagescannedinattheprintingsystem.Form
Galleryusesprintermemoryanddoesnotrequireaharddiskorsettingupa
RAMdisk.
TouseFormgallery,selectHighqualityintheImagingtab;orselectFast
1200intheCustomQualitySettingsdialogbox,accessedfromtheImaging
tab.FormgalleryisunavailablewhenPCL5eisselectedinthePDLSettings
dialogbox,accessedfromtheDeviceSettingstab.
StoringanImageintheFormGallery
StoringimagesintheFormgalleryletsyouusethemasanoverlayinthe
FormsOverlaymode.
Fromtheapplication'sFilemenu,clickPrint,thenclickPreferencesor
1
PropertiestoopenthePropertiesdialogbox.
IntheJobtab,selectJobstorage(e-MPS).
2
SelectFormgallery.
3
KXDriver
9-10
Page 72

Job
Youcangiveanametotheprintjob,oracceptadefaultnamegeneratedbythe
4
printingsystem.Togiveitacustomname,underJobname,selectCustom,
andthentypeanameinthetextbox.
ClickOKinalldialogboxes.
5
JobName
AJobnameisauniqueidentifierforeachprintjob.Ithelpsyoufindandprint
yourjobfromtheprintingsystem’soperationpanel.Whenyousendaprintjob
usingoneoftheJobstorage(e-MPS)options,youcanassignacustomname
tothejoborusethenameoftheapplicationfile.
ForMicrosoftWordandPowerPoint,youcanchoosetoincludeoromitthe
applicationnamefromtheapplicationdefinedJobname.Youcanalsoensure
thatjobsinprintingsystemmemoryarenotreplacedbynewjobshavingthe
sameJobname.
Don’tUseApplicationName
Don’tuseapplicationnameisanoptiontoremovetheapplicationnamefrom
thejobnameintheoperationpanelmessageandinjobstoragefeatures.By
selectingDon'tuseapplicationname,thefilenameyouchooseappears
clearlyinthejoblist.ThisfeatureisapplicableonlywhenprintingfromMicrosoft
WordorPowerPoint.
OverwriteJobName
Overwritejobnameisanoptiontoensurethatasavedprintjobisnotreplaced
inprintingsystemmemorybyanewjobhavingthesameJobname.Ifauser
sendstwoprintjobswiththesameUsernameandJobname,thesecondjob
replacesthefirstjobwithoutanyprompt.Topreventthis,Overwritejobname
canautomaticallychangetheJobnamebyaddingthedateandtimethejobis
sent.Thisfeaturealsohelpsyoutotrackwhenprintjobsweresentfromthe
computer.
TheselectedoptionappliestoaJobnamewitheitherApplicationdefinedor
Customselected.Overwritejobnameoptionsinclude:
Replaceexistingfile
Thisoptionletsthecurrentprintjobreplaceanexistingjobinprintingsystem
memory,ifajobwiththesameUsernameandJobnameexists.
Usejobname+dateandtime
ThisoptionaddsthecurrentdateandtimetotheendoftheJobname,inthe
format:mmddyyhhmmss.
SelectingaJobName
YoumustselectaJobnametousewithJobstorage(e-MPS)features,sothat
youcanfindyourjobinthejoblistdisplayedontheprintingsystem’soperation
panel.TheselectedJobnameissavedwiththeprintjobwhenthejobissentto
printingsystemmemory.
IntheJobtab,selectJobstorage(e-MPS).
1
UnderJobname,selectaname:
2
Applicationdefined
9-11
UserGuide
Page 73

ThisoptionusesthenameoftheapplicationdocumentastheJobname.
ForMicrosoftWordorPowerPointdocuments,selectingDon’tuse
applicationnameremovesthenameoftheapplicationsothatonlythe
documentnameappearsastheJobname.
Custom
Thisoptionusesauniquenameforeachjob.Typeanameinthebox,upto
79characters.
SelectanOverwritejobnameoptionincaseajobalreadyexistsinprinting
3
systemmemorywiththesameJobname:
Replaceexistingfile
IfajobwiththesameUsernameandJobnameexists,thecurrentprintjob
replacesanexistingjobinprintingsystemmemory.
Usejobname+dateandtime
AddsthecurrentdateandtimetotheendoftheJobname,intheformat:
mmddyyhhmmss
Job
KXDriver
9-12
Page 74

10Advanced
IntheAdvancedtab,youcanchoosespecialfeaturesthatextendthe
capabilitiesoftheprintingsystem.
ThesefeaturesareavailableintheAdvancedtab:
Prologue/Epilogueonpage10-1
Watermarkonpage10-3
SecurityWatermarkonpage10-5
ConfiguringStatusMonitoronpage10-8
EMFSpoolingonpage10-10
EnablingClientProfileonpage10-10
Prologue/Epilogue
ThePrologue/Epiloguefeatureenablesausertoinsertacommandfileatthe
beginningofaprintjoborattheend.Thecommandfile,preparedinatext
editor,utilizesprogrammingcommandsfromtheprinterresidentPRESCRIBE
language.TheProductLibraryCDincludesaPRESCRIBEcommand
languagereferenceguide.Acommandfileisasetofinstructionstheprinting
systeminterpretstoproduceagivenoutput.Forexample,a
Prologue/Epiloguecommandfilemaycontainamacrothatplacesagraphic
objectsuchasalogoatthetopofaletterheaddocument.
SelectingaPrologue/EpilogueFile
APrologue/Epiloguefilemustbeavailableonyoursystembeforeitcanbe
addedtoaprintjob.Tocreatethisfile,useatexteditorlikeNotepad.
10-1
UserGuide
Page 75

InthePrologue/Epiloguedialogbox,selectaPrologue/Epiloguefiletoinsert
intotheprintjob.(Ifnofilenamesarevisibleinthelist,youmustclickAddto
browseforfilesonyourcomputerornetworktoaddtothelist.)Afterthefileis
selected,insertionpointoptionswillbeenabled.
EditingaPrologue/EpilogueCommandFile
InthePrologue/Epiloguedialogbox,selectacommandfilenamefromthelist,
1
andthenclickEdit.MicrosoftNotepadopensforeditingthetextfile.
Makeyourchangestothefile.
2
Savethefile,andexitMicrosoftNotepad.
3
Note:Editingandsavingacommandfileoverwritesthecontentsofthe
existinglocalornetworkfile.
DeletingaPrologue/EpilogueFile
InthePrologue/Epiloguedialogbox,selectaPrologue/Epiloguefilename
1
fromthelist,andthenclickDelete.
Advanced
Inthedeleteconfirmationbox,clickYestoaccept.
2
Note:Onlythefilenameisremovedfromthecommandfilelist.Thefileitself
isnotdeleted,butremainsonthenetworkorlocalcomputer.
AssigningaPrologue/EpilogueFile
InthePrologue/Epiloguedialogbox,selectaPrologue/Epiloguefilename
1
fromthelist.
UnderInsertionPoint,selectaplacetoinsertthePrologue/Epiloguefile.
2
UnassigningPrologue/EpilogueFiles
WhenyoudesignateaPrologue/Epiloguefileasunassigned,youare
removingitfromtheprintjob.Itremainsinthelist.Unassignedselectionsare
usefulwhenthelistcontainsseveralPrologue/Epiloguefiles,andyouwantto
usesomebutnotothers.
InthePrologue/Epiloguedialogbox,selectaPrologue/Epiloguefilename
1
fromthelist.
UnderInsertionPoint,selectUnassigned.
2
SpecifyingtheInsertionPoint
Theinsertionpointisthelocationintheprintjobwheretheselected
Prologue/Epiloguefileisprocessedbytheprintingsystem.Eachfileinthelist
canbeassignedtooneinsertionpoint.WithaPrologue/Epiloguefileselected
inthelist,chooseoneinsertionpointoption:
Unassigned
KXDriver
10-2
Page 76

Advanced
ThisoptiondoesnotinserttheselectedPrologue/Epiloguefileintotheprint
job.Thisisusefulifthelistcontainsseveralfiles,andyouwanttoinsert
somebutnotothers.
Beginningoftheprintjob
Endoftheprintjob
TheStartofthepageandEndofthepageinsertionpointoptionsare
availableonlywhenPCL5eisselectedasthePageDescriptionLanguage
(PDL).
Startofthepage
Endofthepage
WithStartofthepageorEndofthepageselected,chooseoneofthe
followingpageoptions:
Onlyonoddpages
Onlyonevenpages
Pages
Thisoptioninsertsthefileintospecifiedpages.Inthetextbox,type
individualpagenumbersseparatedbycommas,orapagerangeseparated
byahyphen.
IfthePagesoptionisselectedandyouclickOKwithoutenteringany
numbers,youarepromptedtospecifypagenumbers.
Watermark
Watermarksarerecognizableimagesorpatternsthatcanbeplacedonapage
orthroughoutadocument.Youcanchooseoneofthestandardwatermarksor
createyourowntext.Thepreviewareaattheleftofthedialogboxshowshow
thewatermarkappearsonapage.Thisisusefulformakingadjustmentstothe
appearanceandlocationofthewatermark.
AddingorEditingaWatermark
Youcancreateanewwatermarkthatdisplaysyourchosentext.Anywatermark
canbeedited,thoughalimitednumberofoptionscanbechangedfordefault
watermarks.
IntheAdvancedtab,clickWatermark.
1
IntheWatermarkdialogbox,clickAddtocreateauserdefinedwatermark;or
2
underSelectwatermark,selectadefaultorcustomwatermarkandclickEdit.
UnderWatermarkname,typeaname,upto39characters.Adefault
3
watermarkcannotberenamed.
UnderWatermarktext,typeyourpreferredtext.Thisoptionisnotavailable
4
wheneditingadefaultwatermark.
Selectthedesiredfont,style,size,andcountofthetext.
5
Selectthecolorofthewatermarkfromthedrop-downlist.Theoptionsavailable
6
areshadesofgrayandblack.
10-3
UserGuide
Page 77

SelectthePositionofthewatermarkwithoneofthefollowingoptions.
7
Centered[default]
Thisoptionplacesthecenterofthewatermarktextinthecenterofthepage.
Userdefined
Thisoptionletsyoumanipulatethexandycoordinateboxestomovethe
textaroundthepage.
Youcanalsochangethepositionbyclickingthepositionbuttonatthebottomof
thepreviewarea.Clickandholdasyoudragthepointertomovethewatermark
image.
SelecttheAngleofthewatermarkwithoneofthefollowingoptions.
8
Diagonal[default]
Thisoptionplacesthewatermarktextatthedefaultangleonthepage.
Userdefined
Thisoptionletsyoutypeadegreevaluefortheangle.Anangleismeasured
indegrees,from0to360.
Youcanalsochangetheanglebyclickingtheanglebuttonatthebottomofthe
previewarea.Clickandholdasyoudragthepointertomovethewatermark
image
Advanced
TheRotatearoundcentercheckboxatthebottomfarrightofthedialogbox
9
determinesthemethodofrotationforthewatermark.YoumustselectUser
definedinbothPositionandAngletoenablethisoption.SelectRotate
aroundcentertopositionthewatermarktextwiththecenterofthetextasits
axis,andclearittopositionthewatermarktextwiththeleftendofthetextasits
axis.
Inalldialogboxes,clickOK.
10
PageSelectionforWatermark
ThePageSelectionoptionforWatermarkenablesyoutochoosethelocation
forwatermarksinyourdocument.
IntheAdvancedtab,clickWatermark.
1
IntheWatermarkdialogbox,underSelectwatermark,chooseadefaultor
2
customwatermarktoprint.
UnderPageselection,choosepagesforprintingthewatermark:
3
Allpages
Thisoptionprintsthewatermarkoneachdocumentpage.
Firstpageonly
Thisoptionprintsthewatermarkonthefirstdocumentpage.
Allpagesexceptfirstpage
Thisoptionprintsthewatermarkonallpagesafterthefirstpage.
Onlyonspecifiedpages
Thisoptionprintsthewatermarkonpagenumberstypedinthebox.
KXDriver
10-4
Page 78

Advanced
Printontofrontoutsidecover
Thisoptionprintsthewatermarkonthefrontcover.Itisavailablewhen
CovermodeisselectedinthePublishingtab.IfCovermodeandFront
outsidearebothselectedinthePublishingtab,Printontofrontoutside
coverisselectedautomatically.
Inalldialogboxes,clickOK.
4
SecurityWatermark
TheSecurityWatermarkisaplug-infeaturethatprintsanearlyinvisibleimage
ortextagainstabackgroundpattern.Thesecuritywatermarkappearsonly
whentheprintedpageisphotocopied.Thishelpstoidentifyprintedpagesthat
shouldnotbephotocopied,ortodistinguishbetweenoriginalprintsand
photocopies.Sixstandardsecuritywatermarksareavailableastextorimage,
andyoucancreatecustomsecuritywatermarktext.
AnotablefeatureofSecurityWatermarkistheDocumentguardpattern,
whichpreventsthedocumentfrombeingphotocopied,scanned,faxed,or
printedfrommemory.Ifascan,fax,orprintfrommemoryisattempted,the
processisstoppedandanerrormessageappearsontheprinter'soperation
panel.
TheOptionalComponentsWizardontheProductLibraryCDoffersthe
opportunitytoinstalltheSecurityWatermarkplug-infollowinginstallationof
theprinterdriver.
SecurityWatermarkappearsintheAdvancedtabafterselectingDevice
Settings>PDL>SelectPDL>PCLXL.
Theadministratorcanensurethatasecuritywatermarkisprintedonalljobsby
selectingDeviceSettings>Administrator>LockSecuritySettings.
SelectingSecurityWatermarksetsthesedriverfeaturestothefollowing
values:
•WatermarkintheAdvancedtabissettoOff.
•ResolutionintheImagingtabissetto600dpi.
•KIRintheImagingtabissettoOff.
•EcoPrintinImaging>QualityissettoOff.
•AdjustmentSettings(BrightnessandContrastissetto0)inImaging>
Grayscale>Custom.
Thereverseisalsotrue.Ifthesefeaturesarechanged,thentheSecurity
WatermarkselectionissettoNone,andcannotbeused.
AddingorEditingaSecurityWatermark
Youcancreateanewsecuritywatermarkthatdisplaystextbutnotanimage.
Anysecuritywatermarkcanbeedited,thoughalimitednumberofoptionscan
bechangedfordefaultsecuritywatermarks.
IntheAdvancedtab,clickSecurityWatermark.
1
IntheSecurityWatermarkdialogbox,clickAdd,tocreateanewwatermark;or
2
underSelectsecuritywatermark,selectadefaultorcustomsecurity
watermarkandclickEdit.
10-5
UserGuide
Page 79

ForSecuritywatermarkname,typeanameupto39characters.Adefault
3
securitywatermarkcannotberenamed.
ForSecuritywatermarktext,typetextorleaveblank.Thisoptionisnot
4
availablewheneditingadefaultsecuritywatermark.Selectfromthefollowing
options:
None
Thisoptionleavesthelineblank.
Userdefined
Thisoptioninsertsyourtextupto39characters.
Allotheroptionsdisplaydate,time,orotherjobinformationthatisobtained
fromthecomputerorprinterdriverwhenthejobisprinted.
Selectthedesiredfont,size,style,andangleofthetext.
5
SelectPrintasfooteralsoifyouwantthefirstavailablelineofwatermarktext
6
tobeprintedatthebottomofthepage.Selectthepagepositionfromthelist.
Thisoptionisusefulbecausethesecuritywatermarkitselfisnotnormallyvisible
ontheprintedpage.
Advanced
UnderBackgroundpattern,selectadesignforthesecuritywatermark
7
background.
Standardpattern
Selectadesignforthesecuritywatermarkbackground.Thisoptionprintsthe
selectedpatternwiththewatermarktextorimage.
Documentguardpattern
Thedocumentguarddesignappearsasthesecuritywatermarkbackground.
Thisoptionpreventstheprintedpagefrombeingphotocopied,scanned,
faxed,orprintedfrommemory.Ifaphotocopyisattempted,thengraycopyis
produced.Ifascan,faxorprintfrommemoryisattempted,theprocessis
stoppedandanerrormessageappearsontheprintingsystem’soperation
panel.
SelectOutlinetomakethesecuritywatermarkappearlighterthanthe
8
backgroundinaphotocopy.Clearthecheckboxtomakethesecurity
watermarkappeardarkerthanthebackground.Theoriginalprintedpage
appearsthesamewitheitheroption.
SelectOverprintforapplicationssuchasMicrosoftPowerPointandInternet
9
Explorerwherethedocumentcontentfillstheentirepage.Thesecurity
watermarkisprintedoverthedocumentdatasothatitcanappearina
photocopy.Wheneditinganimage,orifDeviceSettings>PDLSettings>
GDIcompatiblemodeisselected,Overprintisselectedautomatically.
Adjustthecalibration.Afteradjustingcalibration,inalldialogboxesclickOK.
10
AdjustingSecurityWatermarkCalibration
Forasecuritywatermarktobeeffective,itmustbenearlyinvisibleinaprinted
pageandclearlyvisibleinaphotocopiedpage.Becauseprintingsystemsand
driversettingscanvary,youmustadjustthecalibrationbeforeprintinga
KXDriver
10-6
Page 80

Advanced
securitywatermark.Adjustingthecalibrationisalsorecommendedwhen
changingthebackgroundpattern,replacingthetonerorprintingsystem,and
afterheavyprintingactivity.
AfterallsecuritywatermarkoptionsareselectedintheAddWatermarkorEdit
1
Watermarkdialogbox,clickAdjustCalibration.
UnderPatternshadingandTextcontrast,selectinitialoptions:
2
Light,Normal,Dark
Selecttheshadingdensityofthebackgroundpattern.WhenDocument
guardpatternisselectedintheAddSecurityWatermarkorEditSecurity
Watermarkdialogbox,thisoptionisunavailableandsetatNormal.
Contrast1-9
Selectthelevelofcontrastagainstthebackgroundpattern,fromlightestto
darkest.
Theseselectionsmayneedtobechangedafterprintingasampleinthenext
step.
ClickPrintSampletoprintapagedisplayingallninecontrastoptionsagainst
3
theselectedpatternshading.Itisrecommendedtoprintasamplepageforeach
patternshadingoption.
FromtheTextContrastSheet,findthesamplewherethesecuritywatermarkis
4
mostnearlyinvisible.
IntheAdjustCalibrationdialogbox,selectoptionstomatchthesample
5
choseninstep4.
Inalldialogboxes,clickOK.
6
PageSelectionforSecurityWatermark
ThePageselectionoptionsforSecurityWatermarkdeterminewherethe
securitythewatermarkswillbeplacedintheprintjob.
IntheAdvancedtab,clickSecurityWatermark.
1
IntheSecurityWatermarkdialogbox,underSelectsecuritywatermark,
2
chooseadefaultorcustomsecuritywatermarktoprint.
UnderPageselection,choosepagesforprintingthesecuritywatermark:
3
Allpages
Thisoptionprintsthesecuritywatermarkoneachdocumentpage.
Firstpageonly
Thisoptionprintsthesecuritywatermarkonthefirstdocumentpage.
Allpagesexceptfirstpage
Thisoptionprintsthesecuritywatermarkonallpagesafterthefirstpage.
Onlyonspecifiedpages
10-7
UserGuide
Page 81

Thisoptionprintsthesecuritywatermarkonthepagenumberstypedinthe
textbox.
Printontofrontoutsidecover
Thisoptionprintsthesecuritywatermarkonthefrontcover.Thisoptionis
availablewhenCovermodeisselectedinthePublishingtab.IfCover
modeandFrontoutsidearebothselectedinthePublishingtab,Print
ontofrontoutsidecoverisselectedautomatically.
Inalldialogboxes,clickOK.
4
LockingtheSecurityWatermarkSettings
Theadministratorcanensurethatasecuritywatermarkisprintedonalljobsby
lockingtheselectedsecuritywatermark.
IntheAdvancedtab,selectsecuritywatermarkoptionsandadjustthe
1
calibration.
SelectDeviceSettings>Administrator>LockSecuritySettings.
2
IntheLockSecuritySettingsdialogbox,typea4-16characterpassword,and
3
typeagaintoconfirm.
Advanced
ConfiguringStatusMonitor
Inalldialogboxes,clickOK.
4
Tounlockthesecuritywatermark,clearLockSecuritySettingsandtypethe
password.
Tounlockthesecuritywatermarktemporarilytochangesettings,inAdvanced
>SecurityWatermark,clickUnlockandtypethepassword.Afterchangingthe
settings,thesecuritywatermarkremainslockeduntilitisunlockedinDevice
Settings>AdministratorSettings.
TheStatusMonitordisplaysprintingsystemstatusmessagesinthelowerright
cornerofthewindowduringprinting.YoucanstartaStatusMonitorforeach
supportedprintingsystem.MorethanoneStatusMonitorcanbedisplayedat
onetime.
IntheAdvancedtab,clickStatusMonitor.
1
IfyouwanttheStatusMonitorimagetoappearduringaprintjob,intheStatus
2
Monitordialogbox,selecttheStatusMonitorcheckbox.
ToviewtheprintjobstatuswithoutchangingtheStatusMonitorsetting,click
3
OpenStatusMonitor.
TheStatusMonitorimageappearsinthelowerrightcornerofyourcomputer
screen.
MovethepointerovertheStatusMonitorimagetodisplayballoon-stylestatus
4
messagescontaininginformationaboutprintingsystemactivityandtheprinter
port.
KXDriver
10-8
Page 82

Advanced
Todisplayalistofoptions,right-clicktheStatusMonitoriconinthesystem
5
tray.
•Hide/Show
SwitchbetweenhidingandshowingtheStatusMonitorimage.
Note:YoucanalsohidetheStatusMonitorimagebyright-clickingonthe
image,thenclickingHidetheStatusMonitor,orlettheStatusMonitor
closeonitsownafter5minutesifthereisnoprintingactivity.
•Configure
ToopenawebbrowsertodisplayaprinterWebpage,clickConfigure.You
canremotelyconfiguretheprintingsystemforfeaturesthatincludeprint
resolutionandsleeptimer.
Note:IfyourprinterisconnectedwithaUSBcable,clickConnecttoopen
aconfigurationtool.Youcanlocallyconfiguretheprintingsystemfor
featuresthatincludetheserialnumber,systemfirmware,andengine
firmware.
•Preferences
ToopenadialogboxwithoptionsforStatusMonitorsoundnotificationand
appearancechoices,clickPreferences.
•KyoceraOnline
ToopenaWebbrowsertotheKyoceraMitahomepageat
www.kyoceramita.com,clickKyoceraOnline.
•Exit
ToclosetheStatusMonitor,clickExit.
SettingStatusMonitorPreferences
Youcanconfigureprintingsystemalertswithaccompanyingsoundorspeechin
theStatusMonitorPreferencesdialogbox.Youcanalsochangethe
appearanceoftheStatusMonitorimage.
Right-clicktheStatusMonitoriconinthesystemtray.
1
ClicktheSoundNotificationtab.
2
ClicktheEnablesEventNotificationcheckbox.
3
SelectaneventforaStatusMonitoralert.
4
•Coveropen
•Paperjam
•Addpaper
•Sleep
•Addtoner
•Tonerlow
•Notconnected
•Printing
10-9
UserGuide
Page 83

•Printingcompleted
IntheSoundNotificationtabyoucanalsoaddsoundorspeechtoyour
5
chosenalert.
Toaddasoundfile:
CleartheUseTexttospeechcheckbox.
Thesoundfiletextboxbecomesavailable.Typethelocationofasoundfile
(.wav),orbrowsetofindafilelocatedonyourcomputer.
Toaddspeech:
SelectUseTexttospeech.
Typeyourpreferredtextinthetextbox.TheMicrosoftTexttoSpeechutility
readsyourtypedtextandplaysitbackinaspokenvoice.
Tochangethesize,placement,andtransparencyoftheStatusMonitorimage,
6
clicktheAppearancetab.
Enlargewindow
ThisoptiondoublesthesizeoftheStatusMonitorimageandtextballoons.
Alwaysontop
ThisoptionmakestheStatusMonitoralwaysappearontopofotheropen
windows.
Transparency
ThisoptionadjuststheStatusMonitortoletavariableamountof
backgroundshowthroughtheimage.Typeavaluefromzerotofiftyinthe
box.Highervaluescreategreatertransparency.Azerovaluecreatesa
completelyopaqueimage.
Advanced
EMFSpooling
EnablingClientProfile
InthePreferencesdialogbox,clickApplytosaveyoursettings,clickOKto
7
saveyoursettingsandclosethedialogbox,orclickCanceltoclosethedialog
boxwithoutsavinganysettings.
EMF(EnhancedMetaFile)isaspoolfileformatusedinprintingbytheMicrosoft
Windowsoperatingsystem.Whenaprintjobissentfromanapplication,itis
transferredtothespoolfile.Theapplicationwritestoandtheprinterdriverreads
fromthespoolfilesimultaneously.Formultipleorlargedocuments,thisquickly
returnsapplicationcontroltotheuserwhiletheprinterisstillprintingthe
document.
ToprintwithEMFspooling,intheAdvancedtabselecttheEMFSpooling
checkbox.Continuetheprintingprocessasusual.
Note:EMFspoolingisnotavailablewhenAllowdatapassthroughis
selectedintheKPDLSettingsdialogbox.
Clientprofilereferstoprofilesettingssavedonaserverandaccessedbyclients
inaclient/serverenvironment.ThisfeatureintheAdvancedtabenablesan
administratortocontrolanddistributeprofilesonaserver.Youwouldstillhave
thechoicetouseyourlocalprofilesortheserverprofiles.
KXDriver
10-10
Page 84

Advanced
CleartheEnableclientprofilecheckboxtoselectprofilesfromtheserver
toapplytoprintjobscreatedbythedriver.Serverprofilesareread-only.
SelecttheEnableclientprofilecheckboxforusingcustomprofileslocally
inthedriver.
10-11
UserGuide
Page 85

11Profiles
InProfiles,youcansaveprinterdriversettingsasaprofile.Youcanselect
multipleoptionsintheQuickPrinttabandPrintingPreferences,savethemto
aprofile,anduseallofthematoncewhenyouapplytheprofile.Amaximumof
26profilescanbeestablishedinonedriver,includingtheFactoryDefault
profile.DeviceoptionssettingsmadeintheDeviceSettingstabcannotbe
savedtoaprofile.
ThesefeaturesareavailableintheProfilesdialogbox:
SavingaProfileonpage11-1
EditingaProfileonpage11-2
DeletingaProfileonpage11-2
ImportingaProfileonpage11-2
ExportingaProfileonpage11-3
SavingaProfile
KXDriver
TheSavebuttonletsyoucreateyourownprofiles.Profilesincludeallofthe
currentsettingsinthedriver.TheProfilesbuttonappearsatthebottomofall
thetabsunderPrintingPreferences.
SettheprintingoptionsyouwantforyourprintjobbyopeningPrinting
1
Preferencesandselectingallyourdriversettings.
ClickProfiles>Save.
2
Toidentifytheprofile,typeaName(upto31characters),selectanIcon,and
3
typeaDescription(upto255characters).
11-1
Page 86

Profiles
EditingaProfile
ClickOKtosavetheprofile.
4
IntheSelectprofilesection,thenewlyaddedprofileisdisplayed.Inthelower
sectionoftheProfilesdialogbox,andinthesidepanel,theitemsyouentered
andselectedfortheprofilearedisplayed.
ClickApplyandOKtoactivatetheselectedprofiletothecurrentprintjob,or
5
clickOKtosavetheprofile.
Note:Toresettheprinterdrivertodefaultsettings,selecttheFactoryDefault
profile,andclickApply.Thisclearsthesettingsofaselectedprofile.
TheEditbuttonletsyoumakechangestoanexistingprofile.TheFactory
Defaultprofilecannotbeedited.
ClickProfiles.
1
IntheSelectprofilesection,highlighttheprofiletobeedited,andclickEdit.
2
DeletingaProfile
Anyofthethreeoptionscanbeedited:name,iconanddescription.ClickOKto
3
savetheeditedchanges.
IntheSelectprofilesection,thenewlyeditedprofileisdisplayed.Inthelower
sectionoftheProfilesdialogbox,andinthesidepanel,theitemsyouchanged
fortheprofilearedisplayed.
ClickApplyandOKtoactivatetheselectedprofiletothecurrentprintjob,or
4
clickOKtosavetheprofile.
TheDeletebuttonletsyouremoveanexistingprofile.TheFactoryDefault
profilecannotbedeleted.
ClickProfiles.
1
IntheSelectprofilesection,highlighttheprofiletobedeleted,andclick
2
Delete.
Amessageappearsconfirmingtheremovaloftheprofile.ClickYestoremove.
3
ClickOKtoclosetheProfiledialogbox.
4
ImportingaProfile
11-2
TheImportbuttonletsyouimportacopyofaprofilefromotherprinterdrivers
intoyourprinterdriver.
ClickProfiles>Import.
1
UserGuide
Page 87

ExportingaProfile
Browsefortheexistingprofile(.KXP),selectit,andclickOpen.
2
Amessageappearsifanyoftheprofilesettingsintheimportedfilearenot
availableintheexistingdriver.SelectYes,toimporttheprofile,orNo,tocancel
theimport.
IfyouselectedYesinthepreviousstep,theimportedfileappearsintheSelect
3
profilesection.Theoptionsinthatprofileappearinthelowersectionofthe
Profilesdialogboxandinthesidepanel.IfyouselectedNo,theimportedfile
doesnotappear.
ClickApplyandOKtoactivatetheselectedprofiletothecurrentprintjob,or
4
clickOKtosavetheprofile.
TheExportbuttonletsyouexportacopyofaprofilefromyourprinterdriverfor
useinotherprinterdrivers.TheFactoryDefaultprofilecannotbeexported.
ClickProfiles.
1
Profiles
IntheSelectprofilesection,highlighttheprofiletobeexported,andclick
2
Export.
ClickOKtoclosetheProfilesdialogbox.
3
KXDriver
11-3
Page 88

Glossary
A
B
C
D
AccesscodeAfour-digitcodethatyoumustenterattheprintingsystem’s
operationpaneltoprintaPrivatePrintjob.Anaccesscodecanalsobeusedwiththe
Jobstoragefeature.
AutoconfigureDevicesettingsfeaturethatqueriesaprintingsystemthroughthe
networkandautomaticallyretrievessettingsforoptionaldevicesandmemory.Driver
settingswillbeupdatedwithinformationreceivedfromthephysicalprintingsystem.
InstalleddeviceswillbedisplayedinthePreviewimage.
BookletLayoutfeaturethatprintsamulti-pagedocumentinabookletformatby
usingaduplexunit.Twopagesareprintedoneachsideofasheettocreatea
documentthatcanbereadlikeabook.Forsomemodels,finishingdevicesare
availabletofoldandstaplebooklets.
CassetteAremovableplastictraythatholdsasupplyofpaperforinputtothe
printer.
CommunitystringAtextstringthatactsasapassword.Therearetwo
communities--theReadCommunityandtheWriteCommunity.
dpiDotsper(linear)inch.Measurementthatdescribesthesharpnessandclarityof
printedtextandimages.Thehigherthedpi,themoredetailthereisintheprinted
output.
DuplexunitAdeviceforprintingtwo-sideddocuments.
E
F
G
EcoPrintImagingfeaturethatchangestonersaturation,makingtheentireimage,
textandgraphics,appearlighterintheprintedjob.Theactualamountoftonerused
dependsontheprintingsystemmodeandthetypeofdataprinted(text,graphics,or
both).EcoPrintdoesnotincreaseprintspeed.Thisfeatureisalsoavailableinthe
QuickPrintandBasictabs
e-MPSJobstorage(e-MPS)isasetofoptionsforsavingprintjobsinprinting
systemmemory,sothatyoucanprintorreprintthemlater.Printjobscaneasilybe
reprintedlaterfromtheprintingsystem’soperationpanel,andprintingofsensitive
documentscanberestrictedtoapprovedusers.
EnableClientProfileClientprofilereferstoprofilesettingssavedonaserver
andaccessedbyclientsinaclient/serverenvironment.ThisfeatureintheAdvanced
tabenablesanadministratortocontrolanddistributeprofiles.
FinisherOptionaldeviceforstapling,folding,punching,orsortingprintjobs.
GDIcompatiblemodeApagedescriptionlanguageoptionthataccurately
reproduceswhatisviewedonthescreenusingtheMicrosoftGraphicalDevice
Interface(GDI)componenttorenderthedocument.Itgeneratesdatainaraster
printingformat,creatingalargerprintablefile.
v
UserGuide
Page 89

GutterBlankspaceontheleftsideortopofaprintedpagethatcanbeincreased
byscalingdowntextandgraphics.Thissupportsstaplingandholepunching.When
usedwithDuplexprinting,theenlargedblankspacelinesupevenlyonbothsidesof
thesheet.Thelargerblankspaceiscreatedbyshiftingtheprintableareatotheright
ordownasmuchasoneinch(25.4mm).
J
K
M
JobAccountingAnaccountingsystemthatrecordsandcontrolsthenumberof
pagesprintedbyeachaccountID.AccountIDscanbeassignedattheprintingsystem
andstoredinthedriver.AfteraccountIDsareassigned,youcanusetheJob
accountingoptiontoprintintheJobaccountingmode.
JobstorageJoboptionthatstoresaprintjobpermanentlyonaharddiskfor
printinglater.Youalsohavetheoptionofprotectingtheprintjobfromunauthorized
printingbyusinganaccesscode.Thisfeatureisavailablewhenaharddiskisinstalled
andselectedintheDeviceSettingstab.
KM-NETSoftwarethatprovidesnetwork-widemanagementofprintersandcopiers.
MailboxPrintjobdestinationoptionthatdistributesprintjobstooutputtrayswhen
anoptionaldevicesuchasaSorterstacker,Documentfinisher,orMailboxisinstalled.
ComparewithVirtualMailbox.
MediasourceenumerationADeviceSettingsoptionthatmaintains
compatibilityforcassettesandfeedersbetweenolddriversandnewdriversorwhen
movingfromonemanufacturertoanother.Compatibilitycreatesasmoothtransition
forenvironmentsusingmacrosorPRESCRIBEcommandstoaccesscassettesand
feeders.
MPtraySourcetrayusedforlabels,transparencies,envelopes,andcustom
printingmedia.
O
P
OperationpanelThekeysanddisplayontheprintingsystem.Usetheoperation
paneltosetoptionssuchasmediatypeandEcoPrint,andtoprintjobsstoredonthe
harddisk.
OperationpanelmessageAnAdministratorSettingsoptiontospecifysettings
forthedisplayofthejobname,username,ordepartmentforthecurrentjobonthe
printingsystem'soperationpanelduringprinting.
OptionalPrinterComponentsOptionalPrinterComponentsincludeCommon
Profiles,Plug-InModulesandDeviceSettingsandneedtobeinstalledseparately
fromthedriverinstaller.TheyarelocatedontheProductLibraryCDintheAdvanced
Toolsmenu.
PDFTheAdobeportabledocumentformat(PDF)isindependentoftheapplication
software,hardware,andoperatingsystemusedtocreatedocuments,andalsoofthe
outputdeviceonwhichtheyaredisplayedorprinted.
PDLPageDescriptionLanguage.Thisisthelanguageusedbyyourcomputerto
telltheprintingdevicehowtoprintadocument.Availabilityofsomeprintingoptions
dependsontheselectedPDL.AvailablepagedescriptionlanguagesarePCLXL,PCL
5e,andKPDL.
KXDriver
vi
Page 90

PermanentjobstorageJoboptionthatstoresprintjobsintheprintingsystem’s
harddisk.Jobsstoredontheharddiskcanonlyberemovedbymanualdeletion,so
areprotectedfrombeingerasedwhentheprintingsystemisturnedofforreset.
Plug-inAnaccessoryprogramthatintegrateswiththeprinterdrivertoenhanceor
extendthedriver'scapabilities.
PosterLayoutfeatureforprintingadocumentinalargersizethanthemaximum
supportedbytheprintersothecumulativesheetscanbeassembledasaposter.Use
thisfeaturetoprintadocumentinalarge,eye-catchingposterformat,upto25times
largerthantheoriginaldocumentsize.
PRESCRIBEKyocera'sinternalprinterlanguageembedscommandsinto
specifiedlocationsinaprintjob.Acommandlanguageuserguideislocatedonthe
ProductLibraryCD.
PrinttextasblackPrintsallcolortextasblack.Itproducesfasterprintingofcolor
printjobsbyreducingtheamountofdatasenttotheprinter.Inblackandwhite
printing,itincreasesthedetailforlight-coloredtextprinted.Whitetextandimage
colorsareunaffected.
PrivateprintJoboptionthatsavesprintjobsontheharddiskforprintinguntila
four-digitaccesscodeisentered.Privateprintjobsaredeletedwhentheprinting
systemisresetorturnedoff.
ProfileAsetofuserdefineddriversettingsthataresavedasagroup.Oncesaved,
youcanselectaprofilebynameandapplyitssettingstoaprintjobwithoutselecting
eachfeatureindividually.
Prologue/EpilogueAdvancedfeaturethatallowsyoutoinsertamacrointo
specificlocationsintheprintjob.Anadvancedusermaychoosetousethisfeatureto
embedaPRESCRIBEcommandthatwillcallamacrotooverlayPRESCRIBEform
dataoragraphicobject,suchasalogoorasignature,ataspecificpointintheprint
job.
ProofandholdJoboptionthatprintsonecopyofaprintjobsothatyoucanproof
itbeforeprintingtheremainingcopies.Thisfeatureisavailablewhenaharddiskis
installedandselectedintheDeviceSettingstab.Aftertheproofcopyisprintedand
checked,remainingcopiescanbeprintedfromtheprintingsystem’soperationpanel
withoutsendingthejobagainfromthecomputer.
Q
QuickcopyJoboptionthatprintsallcopiesofaprintjobandstoresthejob
temporarilyonaharddiskforreprintinglater.Thisfeatureisavailablewhenahard
diskisinstalledandselectedintheDeviceSettingstab.
QuickPrinttabTheQuickPrinttabimprovesusabilitybyprovidinganeasierway
tosetprintoptions.Youcanchoosebasicsettingsorapredefinedprinterprofile,
ratherthanhavingtogotovarioustabs.QuickPrintsettingscanbecapturedina
groupcalledaprofile.Profilessupportcommonprintingtasks,savingyoufromhaving
torepeatedlyselectthesamesettings.TheAdministratorcansettheviewoftheQuick
PrinttabthroughtheInstallationprocess,orAdministratorSettingsinProperties.
R
vii
ResolutionThenumberofdotsprintedinoneinch.Higherresolutionimprovesthe
qualityofdetailedprintedimages.
UserGuide
Page 91

ReversePrintoutputoptionthatsendsaprintjobtoadestinationfromthelast
pagetothefirst.ThisoptionisunavailablewhenPrinterdefaultisselected.
RotatecopiesFinishingmodethatdrawseveryothercopyfromaseparatetray
andstackstheminacollated,multi-copyprintjob.Thefinalstackclearlydistinguishes
eachcopyhorizontallyandvertically.
S
SecurityWatermarkPlug-infeaturethataddswatermarktextandabackground
patterntoaprintjob.Thetextblendsintothebackgroundpatternmakingitnearly
invisiblewhenprinted.Thesecuritywatermarkappearsonlywhentheprintedpageis
photocopied.Asecuritywatermarkcanbeusedtohelpprotectagainstunauthorized
reproductionofdocuments,orsimplytodifferentiateoriginaldocumentsfrom
photocopies.
SeparationFinishingfeaturethatstacksprintjobsinanoutputtraysothatone
printjoborcopyisclearlydistinguishedfromanother.Offsetjobsisanavailable
separationmethod.
SNMPSimpleNetworkManagementProtocol.ThestandardTCP/IPprotocolfor
managingIPnetworkdevices,includingprintingdevices.SNMPsettingsdetermine
thelevelofsecuritywhenusingtheAutoConfigurefeature,andpreventunauthorized
printingtotheSNMPv3printingdevice.SNMPsettingsmustbesetinthe
AdministratorsettingsintheDeviceSettingstab,andintheprintingsystem’s
CommandCenter.
StatusMonitorOptionalfeaturethatdisplaysprintingsystemstatusmessagesin
thelowerrightcornerofthewindowduringprinting.Youcancustomizethe
appearanceoftheStatusMonitor,anddeterminewhatmessagesaredisplayedand
howbyselectingpreferencesandnotifications.
Synergyprintbox(SPB)Joboptionthatcombineselectronicandcopierdata
intoonedocumentandstoresitinyourchoiceofvirtualoutputprintboxes.Copier
documentsandprintjobsfromvariousapplicationscanbecombined.Thejobis
printedoutattheoperationpanelbyselectingthesynergyprintboxIDnumber.
T
TemporaryjobstorageJoboptionsthatstoresprintjobsontheprinting
system’sharddisk.Jobsareremovedfrommemorywhentheharddiskbecomesfull.
TransparencyAclearplasticpage-sizedsheetusedasaprintingmedium.
TransparencyinterleavingPublishingfeaturethatinsertsabackingsheet
betweenprintedtransparencies.Thebackingsheet,alsoknownasaninterleaf,helps
keeptransparenciescleanandpreventsthemfromclingingtogether.
V
W
KXDriver
VirtualmailboxJoboptionsthatsendsprintjobstoachoiceofvirtualoutput
trays,wheretheyaresortedandstoredintheharddiskratherthaninphysical
mailboxesattachedtotheprintingsystem.Jobsaccumulateinanumberedvirtual
outputtrayuntilprinted.Toprint,specifythevirtualoutputtraynumberusingthe
printingsystem'soperationpanel.Virtualmailboxprintjobsaredeletedafterprinting.
Atotalof255Virtualmailboxescanbeassigned.
WatermarkAdvancedfeaturethatletsyouaddsemitransparenttexttoa
document.
viii
Page 92

Addresses
KYOCERA MIT A AMERICA, INC.
Headquarters:
225 Sand Road
Fairfield, New Jersey 07004-0008
Telephone: (973) 808-8444
Fax: (973) 882-6000
New York Branch:
1410 Broadway, 23rd Floor
New York, NY 10018
Telephone: (917) 286-5400
Fax: (917) 286-5402
Northeastern Region:
225 Sand Road
Fairfield, New Jersey 07004-0008
Telephone: (973) 808-8444
Fax: (973) 882-4401
Midwestern Region:
201 Hansen Court, Ste 119
Wood Dale, Illinois 60191
Telephone: (630) 238-9982
Fax: (630) 238-9487
Western Region:
14101 Alton Parkway
Irvine, CA 92618-7006
Telephone: (949) 457-9000
Fax: (949) 457-9119
Southeastern Region:
1500 Oakbrook Drive
Norcross, Georgia 30093
Telephone: (770) 729-9786
Fax: (770) 729-9873
Southwestern Region:
2825 West Story Road
Irving, Texas 75038-5299
Telephone: (972) 550-8987
Fax: (972) 252-9786
National Operation Center &
National Training Center:
2825 West Story Road
Irving, Texas 75038-5299
Telephone: (972) 659-0055
Fax: (972) 570-5816
Latin America Region:
8240 NW 52nd Ter Ste 108
Doral, Florida 33166-7766
Telephone: (305) 421-6640
Fax: (305) 421-6666
KYOCERA MIT A CANADA, L TD.
6120 Kestrel Road, Mississauga,
Ontario L5T 1S8, Canada
Telephone: (905) 670-4425
Fax: (905) 670-8116
KYOCERA MIT A AMERICA MEXICO, S.A. DE C.V .
Av. 16 de Septiembre #407
Col. Santa Ines
Azcapotzalco M
D.F. 02130, M
Telephone: (55) 5383-2741
Fax: (55) 5383-7804
éxico,
éxico
Page 93

KYOCERA MIT A EUROPE B.V .
Hacksteen 40, 2132 MS Hoofddorp
The Netherlands
Telephone: +31.20.654.0000
Home page: http://www.kyoceramita-europe.com
Email: Info@kyoceramita-europe.com
Kyocera Mita Nederland B.V.
Beechavenue 25, 1119RA Schiphol-Rijk
The Netherlands
Telephone: +31.20.58.77.200
Kyocera Mita (UK) LTD
8 Beacontree Plaza
Gillette Way Reading Berks RG2 0BS
U.K.
Telephone: +44.1189.311.500
Kyocera Mita Italia S.p.A.
Via G. Verdi, 89/91, 20063 Cernusco s/N
Milano, Italy
Telephone: +39.02.92179.1
S.A. Kyocera Mita Belgium N.V.
Sint-Martinusweg 199-201, 1930 Zaventem
Belgium
Telephone: +32.2.720.9270
Kyocera Mita (Schweiz)
Hohlstrasse 614, 8048 Zurich
Switzerland
Telephone: +41.1.908.4949
Kyocera Mita Deutschland GMBH
Otto-Hahn-Str 12, D-40670 Meerbusch,
Germany
Telephone: +49.2159.918.0
Kyocera Mita GMBH Austria
Eduard-Kittenberger-Gasse 95,
1230 Wein
Austria
Telephone: +43.1.86338.210
Kyocera Mita Svenska AB
Esbogatan 16B 164 75 Kista
Sweden
Telephone: +46.8.546.55000
Kyocera Mita Norge
Postboks 150 Oppsal, NO 0619 Oslo
Olaf Helsetsvei 6, NO 0694 Oslo,
Norway
Telephone: +47.22.62.73.00
Kyocera Mita France S.A.
Parc Les Algorithmes Saint Aubin
91194 GIF-SUR-YVETTE
France
Telephone: +33.1.6985.2600
Kyocera Mita Espa
Edificio Kyocera, Avda de Manacor No. 2
28290 Las Matas (Madrid)
Spain
Telephone: +34.91.631.8392
Kyocera Mita Finland OY
Kirvesmiehenkatu 4, 00880 Helsinki
Finland
Telephone: +358.9.4780.5200
ña, S.A.
Kyocera Mita Danmark A/S
Ejby Industrivej 1, DK-2600 Glostrup
Denmark
Telephone: +45.5687.1100
Kyocera Mita Portugal, IDA.
Rua do Centro Cultural, 41 (Alvalade) 1700-106
Lisbon,
Portugal
Telephone: +351.21.842.9100
Kyocera Mita South Africa (PTY) LTD.
527 Kyalami Boulevard
Kyalami Business Park Midrand
South Africa
Telephone: +27.(0) 11.540.2600
Page 94

KYOCERA MIT A Corporation
Headquarters:
2-28, 1-chome, Tamatsukuri, Chuo-ku
Osaka 540-8585, Japan
Telephone: (06) 6764-3555
http://www.kyoceramita.com
Kyocera Mita Australia Pty , LTD.
Level 3, 6-10 Talavera Road, North Ryde,
N.S.W. 2113 Australia
Telephone: (02) 9888.9999
Kyocera Mita New Zealand LTD.
1-3 Parkhead Place, Albany
P.O. BOX 302 125 NHPC
Auckland, New Zealand
Telephone: (09) 415.4517
Kyocera Mita (Thailand) Corp., LTD.
9/209 Ratchada-Prachachem Road
Bang Sue, Bangkok 10800, Thailand
Telephone: (02) 586.0320
Kyocera Mita Singapore PTE, LTD.
121 Genting Lane, 3rd Level
Singapore 349572
Telephone: 67418733
Kyocera Mita Hong Kong, LTD.
11/F., Mita Centre
552-566, Castle Peak Road
Tsuen Wan, New Territories,
Hong Kong
Telephone: 24297422
Kyocera Mita Taiwan Corporation
7F-1~2, No. 41, Lane 221, Gangchi Rd.
Neihu District, Taipei, Taiwan, 114, R.O.C.
Telephone: (02) 87511560
Page 95

Rev. 8.1_081222
 Loading...