

Page 1

MULTIFUNCTIONAL DIGITAL SYSTEMS
Software
Installation Guide
Page 2

©2009 KYOCERA MITA CORPORATION All rights reserved
Page 3

Preface
Thank you for purchasing Multifunctional Digital Color Systems. This manual explains the instructions for installing client
software. Read this manual before using your Multifunctional Digital Color Systems. Keep this manual within easy reach,
and use it to configure an environment that makes best use of this equipment’s functions.
How to read this manual
Symbols in this manual
In this manual, some important items are described with the symbols shown below. Be sure to read these items before
using this equipment.
Indicates a potentially hazardous situation which, if not avoided, could result in death, serious
injury, or serious damage, or fire in the equipment or surrounding assets.
Indicates a potentially hazardous situation which, if not avoided, may result in minor or moderate
injury, p artial damage to the equipment or surrounding assets, or loss of data.
Indicates information to which you should pay attention when operating the equipment.
Other than the above, this manual also describes information th at may be useful for the operation of this equipment with
the following signage:
Describes handy information that is useful to know when operating the equipment.
Pages describing items related to what you are currently doing. See these pages as required.
Screens
y Screens on this manual may differ from the actual ones depending on the use-environment of the equipment such as
the installing status of options.
y Screens of when paper in the A/B format is used are given in this manual. If you use paper in the LT format, the display
or the order of buttons may differ from that of your equipment.
Trademarks
y The official name of Windows 2000 is Microsoft Windows 2000 Operating System.
y The official name of Windows XP is Microsoft Windows XP Operating System.
y The official name of Windows Vista is Microsoft Windows Vista Operating System.
y The official name of Windows Server 2003 is Microsoft Windows Server 20 03 Operating System.
y The official name of Windows Server 2008 is Microsoft Windows Server 20 08 Operating System.
y Microsoft, Windows, Windows NT, and the brand names and product names of other Microsoft products are
trademarks of Microsoft Corporation in the US and other countries.
y Apple, AppleTalk, Macintosh, Mac, Mac OS, Safari, TrueType, and LaserWriter are trademarks of Apple Inc. in the US
and other countries.
y Adobe, Adobe Acrobat, Adobe Reader, Adobe Acrobat Reader, and PostScript are trademarks of Adobe Systems
Incorporated.
y Mozilla, Firefox and Firefox logo are trademarks or registered trademarks of Mozilla Foundation in the U.S. and other
countries.
y IBM, AT and AIX are trademarks of International Business Machines Corporation.
y NOVELL, NetWare, and NDS are trademarks of Novell, Inc.
y Other company names and product names in this manual are the trademarks of their respective companies.
Preface 1
Page 4

Page 5

CONTENTS
Preface....................................................................................................................................... 1
Chapter 1 OVERVIEW
About the Client CD-ROM........................................................................................................ 6
For Windows.......................................................................................................................... 6
For Macintosh........................................................................................................................ 7
For UNIX/Linux...................................................................................................................... 7
Contents of Installer................................................................................................................. 8
Precautions for using Firewall Software...................................................... ... ... ... ... .... ... ... ... . 9
Downloading Software from COMMAND CENTER.............................................................. 10
Setting up NetWare Print Server.................................................. .... ... ... ... .... ... ... ... ... .... ... ... .. 14
Setting up the NetWare in NDS mode................................................................................. 15
Setting up the NetWare in NDPS mode .............................................................................. 16
Setting up the NetWare in iPrint mode................................................................................ 20
Chapter 2 RECOMMENDED INSTALLATION
Procedure for Recommended Installation ........................................................................... 28
Chapter 3 INSTALLING PRINTER DRIVERS FOR WINDOWS
Before Installation .................................................................................................................. 32
Type of printer drivers.......................................................................................................... 32
System requirements............................... ... ... ....................................... ... .... ... ... ... ... ............ 32
About installation procedure....... ... ... .... ... ... ... .... ... ... ... .... ... ... ... ... .... ... ... ... .... ... ..................... 32
Installing the Printer Drivers ........................ ... .... ... ... ... .... ... ... ....................................... ... ... .. 34
Other Installations.................................................................................................................. 48
USB printing ........................................................................................................................ 48
Point and Print..................................................................................................................... 56
IPP printing.......................................................................................................................... 57
Novell iPrint ......................................................................................................................... 70
Web Service Print................................................................................................................ 71
Uninstalling Printer Drivers................................................................................................... 76
Windows Vista/Server 2008 ................................................................................................ 76
Windows 2000/XP/Server 2003........................................................................................... 78
Chapter 4 INSTALLING PRINTER DRIVERS FOR MACINTOSH
About the Installation............................................................................................................. 80
About client software for Macintosh..................................................................................... 80
Planning for installation .............. ... ... .... ... ... ... .......................................... .... ... ... ... ...............80
Installing the Printer on Mac OS X 10.2.4 to Mac OS X 10.5.x... .... ... ... ... .... ... ... ... ... .... ... ... .. 81
Installing the Macintosh PPD file.......... ... ... ... .... ... ... ... .... ... ... ... ... .... ... ... ... .... ... ... ... ... .... ........ 81
Configuring the printer on Mac OS X 10.5.x........................................................................ 84
Configuring the printer on Mac OS X 10.4.x........................................................................ 93
Configuring the printer on Mac OS X 10.2.4 to Mac OS X 10.3.x ..................................... 102
Uninstalling the Macintosh PPD File .............. ....................................... ... .... ...................... 112
CONTENTS 3
Page 6

Chapter 5 INSTALLING PRINTER DRIVERS FOR UNIX/Linux
Setting Up the UNIX/Linux Filters ....................................................................................... 116
About UNIX/Linux filters ....... ... ... ... ... .... ... ... ....................................................................... 116
System requirements............................... ... ... .... ... ... ... .... ... ... ....................................... ... ... 116
Configuring UNIX/Linux printing using UNIX/Linux filters.................................................. 117
Setting Up the CUPS ............................................................................................................ 125
About CUPS......................................... ... ... ... ....................................... ... .... ... ................... 125
Configuring UNIX/Linux printing using CUPS.................................................................... 126
Chapter 6 INSTALLING SCAN DRIVER AND UTILITIES
Before Installation ................................................................................................................ 142
Type of scan driver and utilities......................................................................................... 142
System requirements............................... ... ... .... ... ... ... ....................................... ... ... .... ... ... 142
Installing Scan Driver and Utilities ..................................................................................... 143
Uninstalling Scan Driver and Utilities................................................................................. 147
Chapter 7 INSTALLING NETWORK FAX UTILITIES
Before Installation ................................................................................................................ 150
Type of network fax utilities............................................................................................... 150
System requirements............................... ... ... .... ... ... ... .... ... ... ....................................... ... ... 150
Installing Network Fax Utilities ........................................................................................... 151
Installing Web Service Print ................................................................................................ 156
Web Service Print.............................................................................................................. 156
Uninstalling the Network Fax Software.............................................................................. 161
Deleting the N/W-Fax driver.............................................................................................. 161
Deleting AddressBook Viewer........................................................................................... 165
Chapter 8 INSTALLING e-Filing BACKUP/RESTORE UTILITIES
Before Installation ................................................................................................................ 168
System requirements............................... ... ... .... ... ... ... ....................................... ... ... .... ... ... 168
Installing e-Filing Backup/Restore Utilities........................................................................ 169
Uninstalling e-Filing Backup/Restore Utilities............ .... ... ... ... ... .... ... ... ... .... ... ... ... ... .... ... ... 172
Chapter 9 INSTALLATION MAINTENANCE
Uninstalling Client Software................................................................................................ 174
Repairing Client Software.................................................................................................... 176
INDEX ................................................................................................................................................................... 179
4 CONTENTS
Page 7

1.OVERVIEW
This section describes the overview of the software installation.
About the Client CD-ROM........................................................................................................6
For Windows ............................................................ ... .................................. .. .......................................................6
For Macintosh................................................ ... ................................. ... ..................................................................7
For UNIX/Linux...................................... .. .................................. .................................. .. .........................................7
Contents of Installer.................................................................................................................8
Precautions for using Firewall Software................................................................................9
Downloading Software from COMMAND CENTER..............................................................10
Setting up the NetWare in NDS mode..................................................................................................................15
Setting up the NetWare in NDPS mode...............................................................................................................16
Setting up the NetWare in iPrint mode.................................................................................................................20
Page 8

1 OVERVIEW
About the Client CD-ROM
For Windows
The contents of the Client Utilities CD-ROM:
Client software installer
y [Client Utilities CD-ROM]:\Setup\Setup.exe
This is the setup program to install the printer drivers on your computer.
PCL6 printer drivers
y [Client Utilities CD-ROM]:\Client\Drivers\PCL6\W2K_XP_VISTA\<language>\
This includes the setup files to install the PCL6 printer driver on the Windows 2000/XP/Vista/Server 2003/Server 2008
for each language version by Add Printer Wizard or Plug and Play.
y [Client Utilities CD-ROM]:\Client\Drivers\PCL6\XP_VISTA_X64\<language>\
This includes the setup files to install the PCL6 printer driver on the Windows XP/Vista/Server 2003/Server 2008 64-bit
edition for each language version by Add Printer Wizard or Plug and Play.
PS3 printer drivers (PostScript)
y [Client Utilities CD-ROM]:\Client\Drivers\PS\W2K_XP_VISTA\<language>\
This includes the setup files to install the PS3 printer driver on the Windows 2000/XP/Vista/Server 2003/Server 2008
for each language version by Add Printer Wizard or Plug and Play.
y [Client Utilities CD-ROM]:\Client\Drivers\PS\XP_VISTA_X64\<language>\
This includes the setup files to install the PS3 printer driver on the Windows XP/Vista/Server 2003/Server 2008 64-bit
edition for each language version by Add Printer Wizard or Plug and Play.
XPS printer drivers
y [Client Utilities CD-ROM]:\Client\Drivers\XPS\W2K_XP_VISTA\<language>\
This includes the setup files to install the XPS printer driver on the Windows XP/Vista/Server 2003/Server 2008 for
each language version by Add Printer Wizard or Plug and Play.
y [Client Utilities CD-ROM]:\Client\Drivers\XPS\XP_VISTA_X64\<language>\
This includes the setup files to install the XPS printer driver on the Windows XP/Vista/Server 2003/Server 2008 64-bit
edition for each language version by Add Printer Wizard or Plug and Play.
The XPS printer driver can be installed on Windows Vista/Server 2008 computers, or those of Windows XP SP2,
Windows Server 2003 SP1 or later versions with XPS Essentials Pack installed.
N/W-Fax drivers
y [Client Utilities CD-ROM]:\Client\Drivers\FAX\W2K_XP_VISTA\<language>\
This includes the setup files to install the N/W-Fax driver on the Windows 2000/XP/Vista/Server 2003/Server 2008 for
each language version by Add Printer Wizard or Plug and Play.
y [Client Utilities CD-ROM]:\Client\Drivers\FAX\XP_VISTA_X64\<language>\
This includes the setup files to install the N/W-Fax driver on the Windows XP/Vista/Server 2003/Server 2008 64-bit
edition for each language version by Add Printer Wizard or Plug and Play.
AddressBook Viewer
y [Client Utilities CD-ROM]:\Client\ADRBK\PS\32\
This includes the setup files to install the AddressBook Viewer on the Windows 2000/XP/Vista/Server 2003/Server
2008.
y [Client Utilities CD-ROM]:\Client\ADRBK\PS\64\
This includes the setup files to install the AddressBook Viewer on the Windows XP/Vista/Server 2003/Server 2008 64bit edition.
Remote Scan drivers
y [Client Utilities CD-ROM]:\Client\RS\
This includes the setup files to install the Remote Scan driver.
TWAIN drivers
y [Client Utilities CD-ROM]:\Client\TWAIN\
This includes the setup files to install the TWAIN driver.
File Downloader
y [Client Utilities CD-ROM]:\Client\FD\
This includes the setup files to install the File Downloader.
6 About the Client CD-ROM
Page 9

1.OVERVIEW
WIA drivers
y This includes the setup files to install the WIA driver on the Windows XP/Vista/Server 2003/Server 2008.
For Macintosh
The contents of the Client Utilities CD-ROM:
Macintosh PPD files
y [Client Utilities CD-ROM]:MacPPD:OSX
This includes the PPD file to enable printing from Macintosh on the Mac OS X 10.2.4 to Mac OS X 10.5.x.
For UNIX/Linux
The contents of the Client Utilities CD-ROM:
Solaris filter
y [Client Utilities CD-ROM]/Admin/SolarisFilter/Usa/
This includes the Tar file for Solaris v2.6/2.7/7.8/8/9.
HP-UX filter
y [Client Utilities CD-ROM]/Admin/HP-UXFilter/Usa/
This includes the Tar file for HP-UX ver.10.20/11.x and HP-UX64 ver.11.31.
1 OVERVIEW
AIX filter
y [Client Utilities CD-ROM]/Admin/AIXFilter/Usa/
This includes the Tar file for AIX 4.3.3.
Linux filter
y [Client Utilities CD-ROM]/Admin/LinuxFilter/Usa/
This includes the Tar file for Red Hat 7.x/8.x/9.x, Red Hat Enterprise WS2, SuSE Linux 7.x/8.x/9.x, Mandrake Linux
7.x/8.x/9.x and Turbo Linux 8/10.
SCO UNIX filter
y [Client Utilities CD-ROM]/Admin/OpenUnixFilter/Usa/
This includes the Tar file for SCO UnixWare 7 and SCO OpenUNIX 8.
CUPS PPD file
y [Client Utilities CD-ROM]/Admin/CUPS/Usa/
This includes the PPD file to enable printing from CUPS.
About the Client CD-ROM 7
Page 10

1 OVERVIEW
Contents of Installer
The following software can be installed by the Installer in the Client Utilities CD-ROM.
Printer drivers
Printer drivers are software components that enable application programs to interact with this MFP. The MFP comes with
three printer drivers, PCL6, PS3 (PostScript) and XPS printer drivers. These printer drivers offer document print, layout
and assembly functions that are not available with many applications.
The XPS printer driver can be installed on Windows Vista/Server 2008 computers, or those of Windows XP SP2,
Windows Server 2003 SP1 or later versions with XPS Essentials Pack installed.
TWAIN driver
This software component enables you to import e-Filing documents into TWAIN-compliant applications.
File Downloader
This software component enables you to import e-Filing documents into your hard disk.
Remote Scan driver
This software allows you to perform scanning the originals set in the equipment remotely from a client computer and
acquire the image into the TWAIN-compliant application.
WIA driver
This software allows you to perform scanning the originals set in the equipment remotely from a client computer and
acquire the image into the WIA-compliant application.
N/W-Fax driver
The N/W-Fax driver enables you to set up send lists and send electronic documents from your PC to one or more
destinations. You print to the fax much the same way you would choose to print to a designated printer that makes using
the N/W-Fax driver quick and simple. You can select the fax properties.
AddressBook Viewer
With the AddressBook Viewer you can easily add or modify fax recipient names, fax numbers, and Internet Fax address
(e-mail address) to the address book. This utility allows you to manage recipients of the fax, select and display fax
recipients from the address book, as well as recipient fax numbers and other contact information.
8 Contents of Installer
Page 11

Precautions for using Firewall Software
When firewall software is used on Windows computers, installation may not be performed since network communication
between this equipment and the computers is blocked by firewall software.
Check if firewall software is used before installation, and follow the directions of your network administrator if it is used.
Client software required for network communications and the execution files are given as follows. Use this information for
the exception setting of the firewall software.
Individual installer: setup.exe
Launcher installer: Setup.exe
Printer driver, N/W-FAX driver: printui.exe
File Downloader: ESFileDL.exe
AddressBook View er: ABVExe.exe (for 32-bit edition), ABVExe6.exe (for 64-bit edition)
Backup/Restore Utility: ESeFBKRT.exe
y For a TWAIN driver, Remote Scan driver and WIA driver, the execution files of the corresponding application
software need to be set as exceptions.
y When Individual installer or Launcher installer is set as an exception, release the exception setting after installation.
1 OVERVIEW
Precautions for using Firewall Software 9
Page 12

1 OVERVIEW
Downloading Software from COMMAND CENTER
If the system administrator has uploaded the software to the MFP, you can download the software from COMMAND
CENTER to install them on your computer.
The following software can be downloaded from COMMAND CENTER.
y Installer for Windows
y Macintosh PPD files
y UNIX/Linux filters
y When using Windows Server 2003 that the Service Pack is installed, the installation from COMMAND CENTER
cannot be performed. In that case, please install the software in the other method.
y For instructions on how to upload the software in the equipment, please refer to the COMMAND CENTER Guide.
Downloading installer for Windows from COMMAND CENTER
In COMMAND CENTER, click the [Install Software] link at the bottom of the screen.
1
The Install Client Software page opens.
Click the [Install Client1] link to download the installer file.
2
Download the installer file on your desktop by following the prompts.
3
10 Downloading Software from COMMAND CENTER
Page 13

1.OVERVIEW
Double-click the downloaded file to extract the installer files.
4
y After extracting the downloaded file, the folders that includes WebInstaller.exe are created. In order to install
software using these files, you must run the WebInstaller.exe with an “Administrators” privilege. If you do not
have the “Administrators” privilege, you can install by entering the Administrator password.
The names of folders that includes WebInstaller.exe are followings.
- ABV32 — contains the installer for AddressBook Viewer.
- ABV64 — contains the installer for AddressBook Viewer for Windows 64-bit edition OSs.
- Drivers — contains the printer drivers and N/W-Fax driver.
- FD — contains the installer for File Downloader.
- RS — contains the installer for Remote Scan driver.
- XPS — contains the installer for XPS printer driver.
- NWFAX — contains the installer for N/W-Fax driver.
- PCL6 — contains the installer for PLC6 printer driver.
- PS3 — contains the installer for PS3 (PostScript) printer driver.
- TWAIN — contains the installer for TWAIN driver.
- WIA — contains the installer for WIA driver.
Downloading Macintosh PPD Files from COMMAND CENTER
In COMMAND CENTER, click the [Install Software] link at the bottom of the screen.
1
1 OVERVIEW
The Install Client Software page opens.
Click the [Macintosh PPD Files] link.
2
The software components list is displayed.
Downloading Software from COMMAND CENTER 11
Page 14

1 OVERVIEW
3
4
Click the File Name link that you want to download.
HS_Series.dmg.gz — Click this link to download the PPD file for Mac OS X 10.2.4 to Mac OS X 10.5.x.
Download the PPD file of your Mac OS version on your desktop by following the
prompts.
12 Downloading Software from COMMAND CENTER
Page 15

1.OVERVIEW
Downloading UNIX/Linux Filters from COMMAND CENTER
In COMMAND CENTER, click the [Install Software] link at the bottom of the screen.
1
1 OVERVIEW
The Install Client Software page opens.
Click the [Unix Filters] link.
2
The software components list is displayed.
Click the UNIX/Linux filter link that you want to install.
3
Download the UNIX/Linux tar file containing the UNIX/Linux filters on your desktop by
4
following the prompts.
Downloading Software from COMMAND CENTER 13
Page 16

1 OVERVIEW
Setting up NetWare Print Server
This equipment supports the following Novell printing services:
y NetWare 6.0/6.5 NDS mode (over IPX/SPX only)
y NetWare 6.0/6.5 NDPS mode
y NetWare 6.0/6.5 iPrint mode
This chapter provides an overview of how to set up this equipment as a Novell Network Printer, Print Server, or NDPS
Printer Agent. For more detailed information, refer to your Novell documentation.
14 Setting up NetWare Print Server
Page 17

1.OVERVIEW
Setting up the NetWare in NDS mode
The following explains how to set up a NetWare 6.0/6.5 file server with NDS so that network users can print to this
equipment from their computers, and this equipment can obtain print jobs from the NetWare server. More detail is provided
in your NetWare documentation.
Setting up the NDS with NetWare Administrator
In NetWare Administrator, select the container object to create the printer and click the
1
[Object] menu and select [Create].
The [New Object] dialog box appears.
In the [Class of new object] list, select [Print Queue] and click [OK].
2
The [Create Print Queue] dialog box appears.
Select [Directory Service Queue] and enter the name of the print queue in the [Print
3
Queue name] box.
Click the [browse] at the next to the [Print Queue Volume] box.
4
The [Select Object] dialog box appears.
1 OVERVIEW
Select the volume to create a print queue and click [OK].
5
Click [Create].
6
The print queue is created.
Click the [Object] menu and select [Create].
7
The [New Object] dialog box appears.
In the [Class of new object] list, select [Printer] and click [OK].
8
The [Create Printer] dialog box appears.
Enter the printer name, select the [Define additional properties] check box and click
9
[Create].
Display the Assignments window and click [Add].
10
The [Select Object] dialog box appears.
Select a created queue and click [OK].
11
Display the Configuration window, select [Other/Unknown] at the Printer Type drop
12
down box and click [OK].
The printer is created.
Click the [Object] menu and select [Create].
13
The [New Object] dialog box appears.
In the [Class of new object] list, select [Print Server] and click [OK].
14
The [Create Print Server] dialog box appears.
Enter the print server name, select the [Define additional properties] check box and
15
click [Create].
The print server name must be “MFP_[NIC Serial Number]”. You can find the Unit Serial Number of the equipment
on the NIC Configuration list that can be printed from the control panel.
Display the Assignments window and click [Add].
16
The [Select Object] dialog box appears.
Select a created printer and click [OK].
17
Click [OK] to close Assignments window for the print server.
18
The print server is created.
Setting up NetWare Print Server 15
Page 18

1 OVERVIEW
Setting up the NetWare in NDPS mode
This equipment supports printing over NetWare 6.0/6.5 networks run ning either the TCP/IP protocols or the IPX protocol.
For pure IP printing, this equipment takes advantage of features in NDPS (Novell Distributed Print Services).
An administrator can use either Novell Printer Gateway to set up the NetWare server in NDPS mode.
P.16 “Setting up NDPS using Novell Printer Gateway”
Setting up a NetWare environment correctly requires the presence and active cooperation of the Novell network
administrator. You must have administrator privileges on the network to create new NDPS objects.
Setting up NDPS using Novell Printer Gateway
NDPS is not like the earlier queue-based versions of NetWare printing. Instead, you use an NDPS Manager and a Printer
Agent, which control the tasks previously handled by a print queue, print server, and spooler. You can also make the
printer driver available for clients to download from Windows client computers.
Before configuring the NetWare file server in NDPS mode, please confirm followings:
y For NetWare 6.5, the Support Pack 5 and Novell Gateway version 3.00 or later with ndps3sp2c are installed.
y Make sure you have a valid IP address for this equipment and for any computers that will print to it (when used in the
TCP/IP network).
y In the equipment setup, enable TCP/IP and enter the IP address, Subnet mask, and Gateway address for this
equipment (when used in the TCP/IP network).
Setting up the NDPS with NetWare Administrator
In NetWare Administrator, select the container object to create the printer and click the
1
[Object] menu and select [Create].
The [New Object] dialog box appears.
Select [NDPS Broker] and click [OK].
2
The [Create NDPS Broker Object] dialog box appears.
If the NetWar e fi le server has been installed as supporting the NDPS service, the NDPS Broker is created as
default. In this case, you can use the default NDPS Broker.
Specify the [NDPS Broker Name] and [RMS Volume] options, and click [Create].
3
The NDPS Broker is created.
Click the [Object] menu and select [Create].
4
The [New Object] dialog box appears.
Select [NDPS Manager] and click [OK].
5
The [Create NDPS Manager Object] dialog box appears.
Specify the [NDPS Manager Name], [Resident Server], and [Database Volume] option,
6
and click [Create].
The NDPS Manager is created.
After creating the NDPS Broker and NDPS Manager, please load the NDPS Broker and
7
NDPS Manager by entering the following commands in the Console screen of the
NetWare server.
load broker [Created NDPS Broker Name]
load NDPSM [Created NDPS Manager Name]
Double-click the NDPS Broker object that you created.
8
The NDPS Broker dialog box appears.
Click [Resource Management (RMS)].
9
16 Setting up NetWare Print Server
Page 19

1.OVERVIEW
10
11
12
13
1 OVERVIEW
Click [Add Resources].
The [Manage Resources] dialog box appears.
If the [Add Resources] button is disabled, make sure that the broker is loaded. This button will be enabled only
when the broker is loaded.
Select the applicable OS icon in the [Resource Types] list, and click [Add].
The [Add Resources] dialog box appears.
Click [Browse].
The [Select Printer Driver] dialog box appears.
The [Browse] button may not be available according to the Support Pack version. If the [Browse] button is
disabled, specify “/DISABLETLSMGR” option when starting the nwadmin32.exe.
Insert the Client Utilities CD-ROM into the CD-ROM drive.
When inserting the Client Utilities CD-ROM, the installer may automatically start. Click [Cancel] to exit the installer
and continue the operation.
Locate the directory where the printer driver for your Windows version is located,
14
select the INF file.
y To install the PCL6 printer driver, locate
“[CD-ROM drive]:\Client\Drivers\PCL6\W2K_XP_VISTA\<language>”
y To install the PS3 printer driver, locate
“[CD-ROM drive]:\Client\Drivers\PS\W2K_XP_VISTA\<language>”.
When using 64-bit edition of each Windows XP/Vista/Server 2003/Server 2008, select th e following folder.
- To install the PCL6 printer driver, locate
“[CD-ROM drive]:\Client\Drivers\PCL6\XP_VISTA_X64\<language>”.
- To install the PS3 printer driver, locate
“[CD-ROM drive]:\Client\Drivers\PS\XP_VISTA_X64\<language>”.
Click [OK].
15
Returns to the [Add Resources] dialog box.
Click [OK].
16
Returns to the [Manage Resources] dialog box.
Repeat the procedure from Step 10 to Step 15 to add all printer drivers for the
17
applicable OS.
Click [OK] to close the [Manage Resources] dialog box.
18
Returns to the [NDPS Broker] dialog box.
Click [OK] to close the [NDPS Broker] dialog box.
19
Click the [Object] menu and select [Create].
20
The [New Object dialog] box appears.
Select [NDPS Printer] and click [OK].
21
The [Create NDPS Printer Object] dialog box appears.
Specify the [NDPS Printer Name] option, select [Create a New Printer Agent], and click
22
[Create].
The [Create Printer Agent] dialog box appears.
Specify the [Printer Agent (PA) Name] and [NDPS Manager Name] option. Then select
23
[Novell Printer Gateway] in the [Gateway Types] list and click [OK].
The [Warning] dialog box appears.
Setting up NetWare Print Server 17
Page 20

1 OVERVIEW
Click [OK].
24
When it finishes initializing, the [Information] dialog box appears.
Click [OK].
25
The [Configure Novell PDS for Printer Agent] dialog box appears.
Select [((NONE))] in the [Printer Type] list and select [Novell Port Handler] in the [Port
26
Handler Type] list. Then click [OK].
The [Configure Port Handler for Printer Agent] dialog box appears.
Continue the procedure according to which connection type to be used.
27
P.18 “Configuring the LPR connection in the TCP/IP network”
P.19 “Configuring the queue based connection in the IPX/SPX network”
Configuring the LPR connection in the TCP/IP network
In the [Configure Port Handler for Printer Agent] dialog box, select [Novell LPR Printer
1
Gateway (SNMP)] (or [Remote (LPR on IP)]) and click [Next].
Enter the IP address of this equipment in the [Host Address] box, and click [Finish].
2
It takes about 60 seconds to load the Printer Agent. After it finishes loading the Printer Agent, the Select Printer
Drivers dialog box appears.
Select the printer drivers to be installed in the [Printer Drivers] list at each OS tab, and
3
click [Continue].
The [Information] dialog box appears.
Click [OK].
4
It takes about 60 seconds to complete the creation of the NDPS Printer object.
Double-click the NDPS Printer object that you created.
5
y The NDPS Printer dialog box appears.
Click [NDPS Remote Printer Management].
6
Select the [Install to workstation in this container] and click [Update driver].
7
Click [OK] to close the [NDPS Printer] dialog box.
8
18 Setting up NetWare Print Server
Page 21

1.OVERVIEW
Configuring the queue based connection in the IPX/SPX network
In the [Configure Port Handler for Printer Agent] dialog box, select [Forward Jobs to a
1
Queue] and click [Next].
Enter the NDS queue name in the [Queue Name] box and the user name in the [Queue
2
User Name] box. Then click [Finish].
The [Select Printer Drivers] dialog box appears.
The NDS queue must be created.
Select the printer drivers to be installed in the [Printer Drivers] list at each OS tab, and
3
click [Continue].
The [Information] dialog box appears.
Click [OK].
4
It takes about 60 seconds to complete the creation of the NDPS Printer object.
Double-click the NDPS Printer object that you created.
5
The [NDPS Printer] dialog box appears.
1 OVERVIEW
Click [NDPS Remote Printer Management].
6
Select the [Install to workstation in this container] and click [Update].
7
Click [OK] to close the [NDPS Printer] dialog box.
8
Setting up NetWare Print Server 19
Page 22

1 OVERVIEW
Setting up the NetWare in iPrint mode
This equipment also supports the Novell iPrint.
Using the iPrint system, you can set up the printer that can be accessed using URL from client computers. The iPrint
system is based on the NDPS architecture so that you must have NDPS installed and configured in the NetWare 6.0/6.5
server.
Before configuring the NetWare file server in NDPS mode, please confirm followings:
y The NDPS Broker, NDPS Manager, and NDPS Printer must be created.
P.16 “Set ti n g up the ND PS w it h N et Ware Administrator”
y The Novell iManager must be installed.
For more information to install the Novell iManager, please see the documentation for the Novell iManager that is
provided by Novell, Inc.
In order to set up the iPrint system, the network administrator must do the following:
1. Installing iPrint
P.20 “Installing iPrint”
2. Enabling the DNS on the Printer Services Manager
P.20 “Enabling DNS on the Printer Services Manager”
3. Enabling iPrint service
P.21 “Enabling iPrint Service”
Installing iPrint
Click [Novell] in the GUI screen of NetWare and select [Install].
1
Click [Add].
2
If the iPrint/NDPS is displayed in the list, iPrint has already been installed during the installation of NetWare. In
that case, you do not have to operate the installation for iPrint.
Insert the NetWare Operating System CD-ROM into your CD-ROM drive.
3
Select the “PRODUCT.Nl” file that is located in the root of the CD-ROM, and click [OK].
4
Follow the prompts to install iPrint/NDPS.
5
Enabling DNS on the Printer Services Manager
Before enabling DNS for the Printer Services Manager, you should add the DNS name for the Printer Services Manager to
the DNS server.
After you add the DNS to the DNS server, follow the steps below to enable the DNS on the Printer Services Manager.
At the server console, enter the following syntax.
1
NDPSM <NDPS Manager Name> /dnsname=<NDPS Manager DNS Name>
20 Setting up NetWare Print Server
Page 23

1.OVERVIEW
Enabling iPrint Service
After enabling DNS on the Printer Services Manager, enable the iPrint Service using the iManager.
y To do this, iManager must be installed on your NetWare server . For information about inst alling iManager, see the
documentation for iManager that is provided by Novell, Inc.
y You must use a supported browser to access iManager. The supported browsers vary depending on the version of
iManager that you installed.
For iManager 1.5.2
- Microsoft Internet Explorer 5.5 or later (Recommended)
- Netscape 6.2 or later
For iManager 2.0.x
- Microsoft Internet Explorer 6 SP1 or later (Recommended)
- Netscape 7.1 or later
- Mozilla 1.4 or later
Enter the URL “https://<IP address>:2200” in the address bar of your browser , and click
1
the [iManager] link for the NetWare server under eDirectory iManager.
1 OVERVIEW
Enter the user name and password to log in to iManager.
2
Click [iPrint] in the Contents Panel and click [Manage Printer].
3
Select the printer that you created for the equipment.
4
Click [Client Support] and click [iPrint support].
5
Select the [Enable iPrint support] check box.
6
If you want to secure printing, select the [Enable secure printing (Require SSL/TSL and
7
user authentication)] check box.
When the [Require Security] option is enabled, users must be authenticated to eDirectory using the user name and
password.
Click [Apply] and [OK] to save settings.
8
The IPPSRVR.NLM is automatically loaded.
Setting up NetWare Print Server 21
Page 24

1 OVERVIEW
22 Setting up NetWare Print Server
Page 25

1.OVERVIEW
1 OVERVIEW
Setting up NetWare Print Server 23
Page 26

1 OVERVIEW
24 Setting up NetWare Print Server
Page 27

1.OVERVIEW
1 OVERVIEW
Setting up NetWare Print Server 25
Page 28

1 OVERVIEW
26 Setting up NetWare Print Server
Page 29

2.RECOMMENDED INSTALLATION
This section describes about the recommended installation of the Installer.
Procedure for Recommended Installation...........................................................................28
Page 30

2 RECOMMENDED INSTALLATION
Procedure for Recommended Installation
Please install the software by the recommended installation when you want to install all software on a Windows computer.
Installing the client software by recommended installation
The following describes an installation on Windows Vista. The procedure is the same when other versions of Windows are
used.
y You must log into Windows as a user who has the “Administrators” or “Power Users” privilege. You must log into
Windows as a user who has the “Administrators” privilege when using Windows XP/Vista/Server 2003/Server
2008.
y Only users with the administrator privilege can perform this. For users without the administrator privilege,
installation is possible by performing the following procedure and having the administrator privile ge temporarily.
- Double-click “Open folder to view files” in the AutoPlay menu.
- Open the “Setup” folder, right click “Setup.exe” and then select “Run as administrator”.
- Enter the administrator's password of the client computer to operate with an administrator's privilege and click
[OK].
Insert the Client Utilities CD-ROM into the CD-ROM drive.
1
If the installer does not automatically start, use the Explorer to open the “Setup” folder in the Client Utilities CDROM and double-click “Setup.exe”.
Select [I agree to the terms of the License Agreement.] and click [Next].
2
y To change the display language, select a desired language from the [Select Language] box.
y The main menu window is displayed.
Click [Recommended].
3
28 Procedure for Recommended Installation
Page 31
2.RECOMMENDED INSTALLAT ION
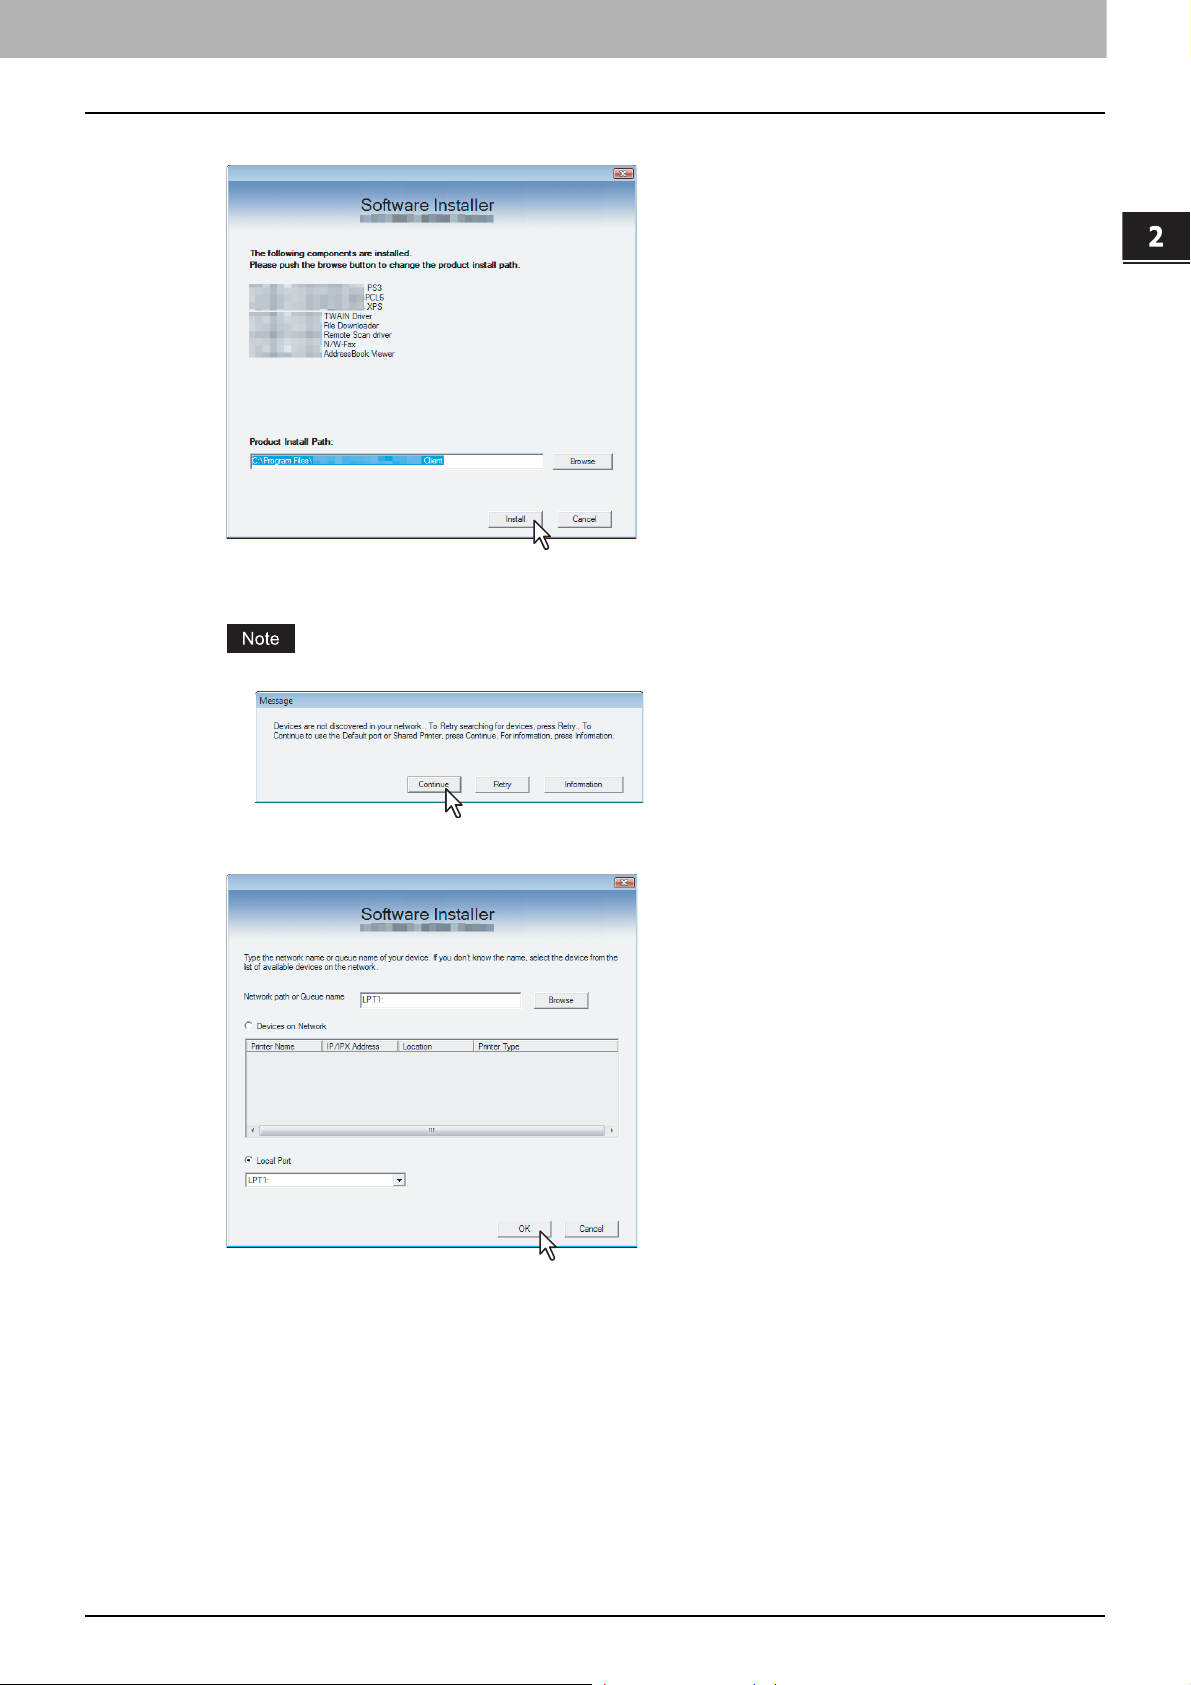
Confirm the list of the software to install and click [Install].
4
You can change the folder where AddressBook Viewer and File Downloader are installed. Click [Browse] and,
when the [Browse for folder] dialog box appears, select a folder and click [OK].
2 RECOMMENDED INSTALLATION
If the following message appears, click [Continue] to proceed with the operation.
Configure the printer port and click [OK].
5
For instructions on how to configure the printer port, please see the procedure after the step 6 in the following
section.
P.34 “Installing the Printer Drivers”
Procedure for Recommended Installation 29
Page 32

2 RECOMMENDED INSTALLATION
The installation starts.
6
y If the following message appears, click [Yes] to set the indicated printer driver to be the default printer driver,
or click [No] to not change the default printer driver.
y If the following message appears, click [Install this driver software anyway] to proceed with the installation.
When the installation is complete, click [Finish].
7
The main menu window is displayed.
The Installer may ask you to restart your computer. If it does, select “Yes, I want to restart my computer now.”
and click [Finish] to restart your computer.
Click [Exit].
8
When a message “Do you want to close HS Series software Installer” appears asking whether to finish the
installation, click [Yes].
Before using the printer driver for printing, please con figure the installed options of the equipment and
department code (if required) on the printer driver. Please refer to the Printing Guide for the instructions.
30 Procedure for Recommended Installation
Page 33

3.INSTALLING PRINTER DRIVERS FOR
WINDOWS
This section describes the instructions on how to install the printer drivers on Windows.
Before Installation..................................................................................................................32
Type of printer drivers...........................................................................................................................................32
System requirements...................................................... ... .. .................................. ... ............................................32
About installation procedure.................................................................................................................................32
Installing the Printer Drivers.................................................................................................34
Other Installations..................................................................................................................48
USB printing.........................................................................................................................................................48
Point and Print......................................... .................................. ... ................................. .......................................56
IPP printing...................................... .................................. ................................. ... ...............................................57
Novell iPrint..........................................................................................................................................................70
Web Service Print.................................................................................................................................................71
Uninstalling Printer Drivers...................................................................................................76
Windows Vista/Server 2008.................................. ... ............................................................................................76
Windows 2000/XP/Server 2003 ...........................................................................................................................78
Page 34

3 INSTALLING PRINTER DRIVERS FOR WINDOWS
Before Installation
This section will help you to plan an installation suited to your environment. Before installing the printer driver, read this
section.
When same printer drivers have been installed previously
Before updating the printer drivers, please delete the existing printer drivers.
P.76 “Uninstalling Printer Drivers”
Type of printer drivers
y PCL6 printer driver — for printing documents from general applications such as Microsoft Office.
y PS3 printer driver — for printing documents from graphical application such as Adobe Illustrator as well as general
applications such as Microsoft Office.
y XPS printer driver —for printing documents from applications developed exclusively for Windows Vista, such as
Windows Presentation Foundation (WPF). The optional memory is required to install.
The XPS printer driver can be installed on Windows Vista/Server 2008 computers, or those of Windows XP SP2,
Windows Server 2003 SP1 or later versions with XPS Essentials Pack installed.
System requirements
To install the printer drivers and other client software on a Windows workstation, the following is required.
y Display resolution
1024 x 768 dots or more
y Display color
High Color (16bit) or higher is recommended
y CPU
Pentium 133 MHz minimum (Pentium 266 MHz or faster recommended)
y Memory
The required memory size for OS.
y OS
Windows 2000 Service Pack 4
Windows XP Service Pack 1/Service Pack 2/Service Pack 3
Windows Vista Service Pack 1
Windows Server 2003 Service Pack 1/Service Pack 2
Windows Server 2008 Service Pack 1
About installation procedure
Please find the installation procedure suited to your environment from the following:
USB connection
This equipment supports the Full Speed connection. When this equipment is connected to your computer with the USB
cable, you must install the printer drivers using the Windows Plug and Play functions.
P.48 “USB printing”
Raw TCP/LPR printing
This equipment supports the Raw TCP and LPR printing via TCP/IP. When this equipment is connected to your computer
in a TCP/IP network, Raw TCP/LPR printing may be most suitable.
P.34 “Installing the Printer Drivers”
y To print with a Raw TCP connection, this equipment must be co nfigured to enable Raw TCP Print Service. Ask
your administrator if the Raw TCP Print Service is enabled.
y To print with a LPR connection, this equipment must be configured to enable LPD Print Service. Ask your
administrator if the LPD Print Service is enabled.
32 Before Installation
Page 35

3 INSTALLING PRINTER DRIVERS FOR WINDOWS
3.INSTALLING PRINTER DRIVERS FOR WINDOWS
SMB printing
This equipment can be used with an SMB printer connection that allows you to connect to this equipment using File and
Printer Sharing for Microsoft Networks service. SMB printing is the common method used to set up the printer. However,
SMB printing is not suitable for printing a large amount of documents.
SMB printing can be set up by installing the printer drivers using the Installer, and also by Point and Print.
P.34 “Installing the Printer Drivers”
P.56 “Point and Print”
It assumes using SMB printing in a small network. If you can use the Windows 2000, Windows XP, Windows Vista,
Windows Server 2003, or Windows Server 2008 as a print server, it is recommended to set up for printing via Windows
print server.
Internet connection
If you print to this equipment over the Internet, you can use IPP printing under Windows 2000, Windows XP, Windows
Vista, and Windows Server 2003. This allows you to print to this equipment from anywhere on the Internet.
P.57 “IPP printing”
To print with an IPP connection, this equipment must be configured to enable the IPP Print Service and must be
connected to the Internet. Ask your administrator if the IPP Print Service is enabled.
Novell printing
When this equipment is configured to manage printing with NetWare 5.1/6.0/6.5 over TCP/IP or IPX/SPX, you can print
through the NetWare print server from Windows 2000, Windows XP, and Windows Server 2003. In this case, install the
printer driver and set up the SMB printer connection to a print queue created in the NetWare server.
P.34 “Installing the Printer Drivers”
To print with a Novell connection, the NetWare server must be configured for printing and this equipment must be
configured to enable NetWare Print Service.
Novell iPrint
When this equipment is configured to manage iPrint with NetWare 6.0/6.5 over TCP/IP, you can print through the NetWare
print server from Windows 2000, Windows XP, and Windows Server 2003. In this case, install the printer driver using iPrint
Client from the NetWare server.
P.70 “Novell iPrint”
To print with a Novell iPrint, the NetWare server must be configured for iPrint and this equipment must be configured to
enable NetWare Print Service.
Web Service Print
When this equipment is connected in a TCP/IP network, Web Services Print can be operated at the client computer using
the function of Windows Vista.
P.71 “Web Service Print”
Web Services Print is the function of Windows Vista.
Before Installation 33
Page 36

3 INSTALLING PRINTER DRIVERS FOR WINDOWS
Installing the Printer Drivers
When you insert the Client Utilities CD-ROM into your CD-ROM drive, the installer automatically starts. You can install
printer drivers and other client software using the installer. If you want to install printer drivers as well as other client
software, this method is convenient.
Installing the printer drivers
The following describes an installation on Windows Vista. The procedure is the same when other versions of Windows are
used.
y You must log into Windows as a user who has the “Administrators” or “Power Users” privilege. You must log into
Windows as a user who has the “Administrators” privilege when using Windows XP/Vista/Server 2003/Server
2008.
y Only users with the administrator privilege can perform this. For users without the administrator privilege,
installation is possible by performing the following procedure and having the administrator privile ge temporarily.
- Double click [Open folder to view files] in the AutoPlay menu.
- Open the “Setup” folder, right-click “Setup.exe” and then select [Run as administrator].
- Enter the administrator's password of the client computer to operate with an administrator's privilege and click
[OK].
Insert the Client Utilities CD-ROM into the CD-ROM drive.
1
If the installer does not automatically start, use the Explorer to open the “Setup” folder in the Client Utilities CDROM and double-click “Setup.exe”.
Select [I agree to the terms of the License Agreement.] and click [Next].
2
y To change the display language, select a desired language from the [Select Language] box.
y The main menu window is displayed.
Click [Printer Driver].
3
34 Installing the Printer Drivers
Page 37

3.INSTALLING PRINTER DRIVERS FOR WINDOWS
Confirm the list of the software to install and click [Install].
4
3 INSTALLING PRINTER DRIVERS FOR WINDOWS
y The XPS printer driver can be installed on Windows Vista/Server 2008 computers, or those of Windows XP
SP2, Windows Server 2003 SP1 or later versions with XPS Essentials Pack installed.
y If the following message appears, click [Continue] to proceed with the operation.
Configure the printer port.
5
The procedure for configuring the printer port varies depending on the connection. Please go to the steps suited to
your connection.
P.36 “Raw TCP/LPR printing”
P.43 “SMB printing”
P.46 “Novell printing”
Installing the Printer Drivers 35
Page 38
3 INSTALLING PRINTER DRIVERS FOR WINDOWS
Raw TCP/LPR printing
When you want to configure the Raw TCP/LPR port, specify the “LPT1” port during the installation, and then configure the
Raw TCP or LPR port in each printer driver.
Before operating the following setup, check with your system administrator to make sure of the following:
- This equipment is connected to the network and turned on .
- The TCP/IP setting is correct on this equipment and your computer.
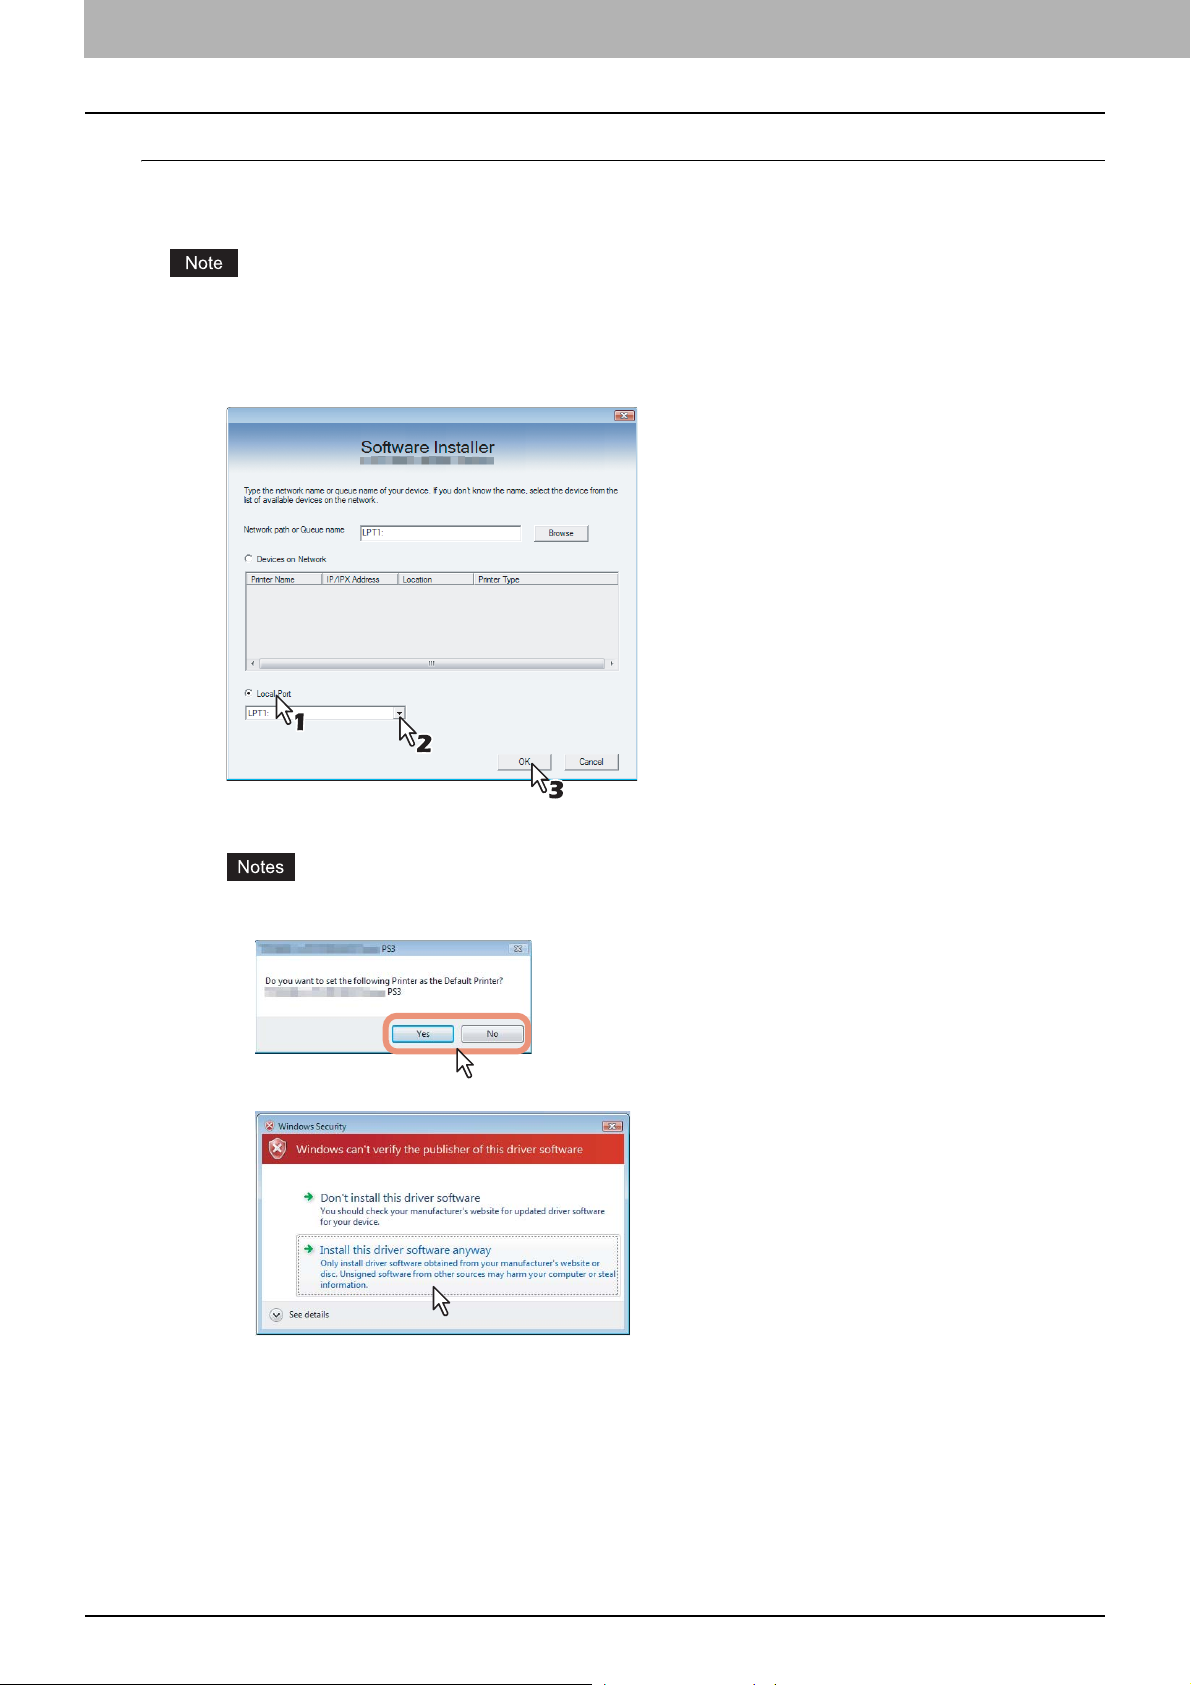
Select [Local Port] check box and select [LPT1:] in the box. Then click [OK].
6
The installation starts.
y If the following message appears, click [Yes] to set the indicated printer driver to be the default printer driver,
or click [No] to not change the default printer driver.
y If the following message appears, click [Install this driver software anyway] to proceed with the installation.
36 Installing the Printer Drivers
Page 39

3.INSTALLING PRINTER DRIVERS FOR WINDOWS
When the installation is complete, click [Finish].
7
The main menu window is displayed.
3 INSTALLING PRINTER DRIVERS FOR WINDOWS
The Installer may ask you to restart your computer. If it does, select “Yes, I want to restart my computer now.”
and click [Finish] to restart your computer.
Click [Exit].
8
When a message “Do you want to close HS Series software Installer” appears asking whether to finish the
installation, click [Yes].
Installing the Printer Drivers 37
Page 40
3 INSTALLING PRINTER DRIVERS FOR WINDOWS
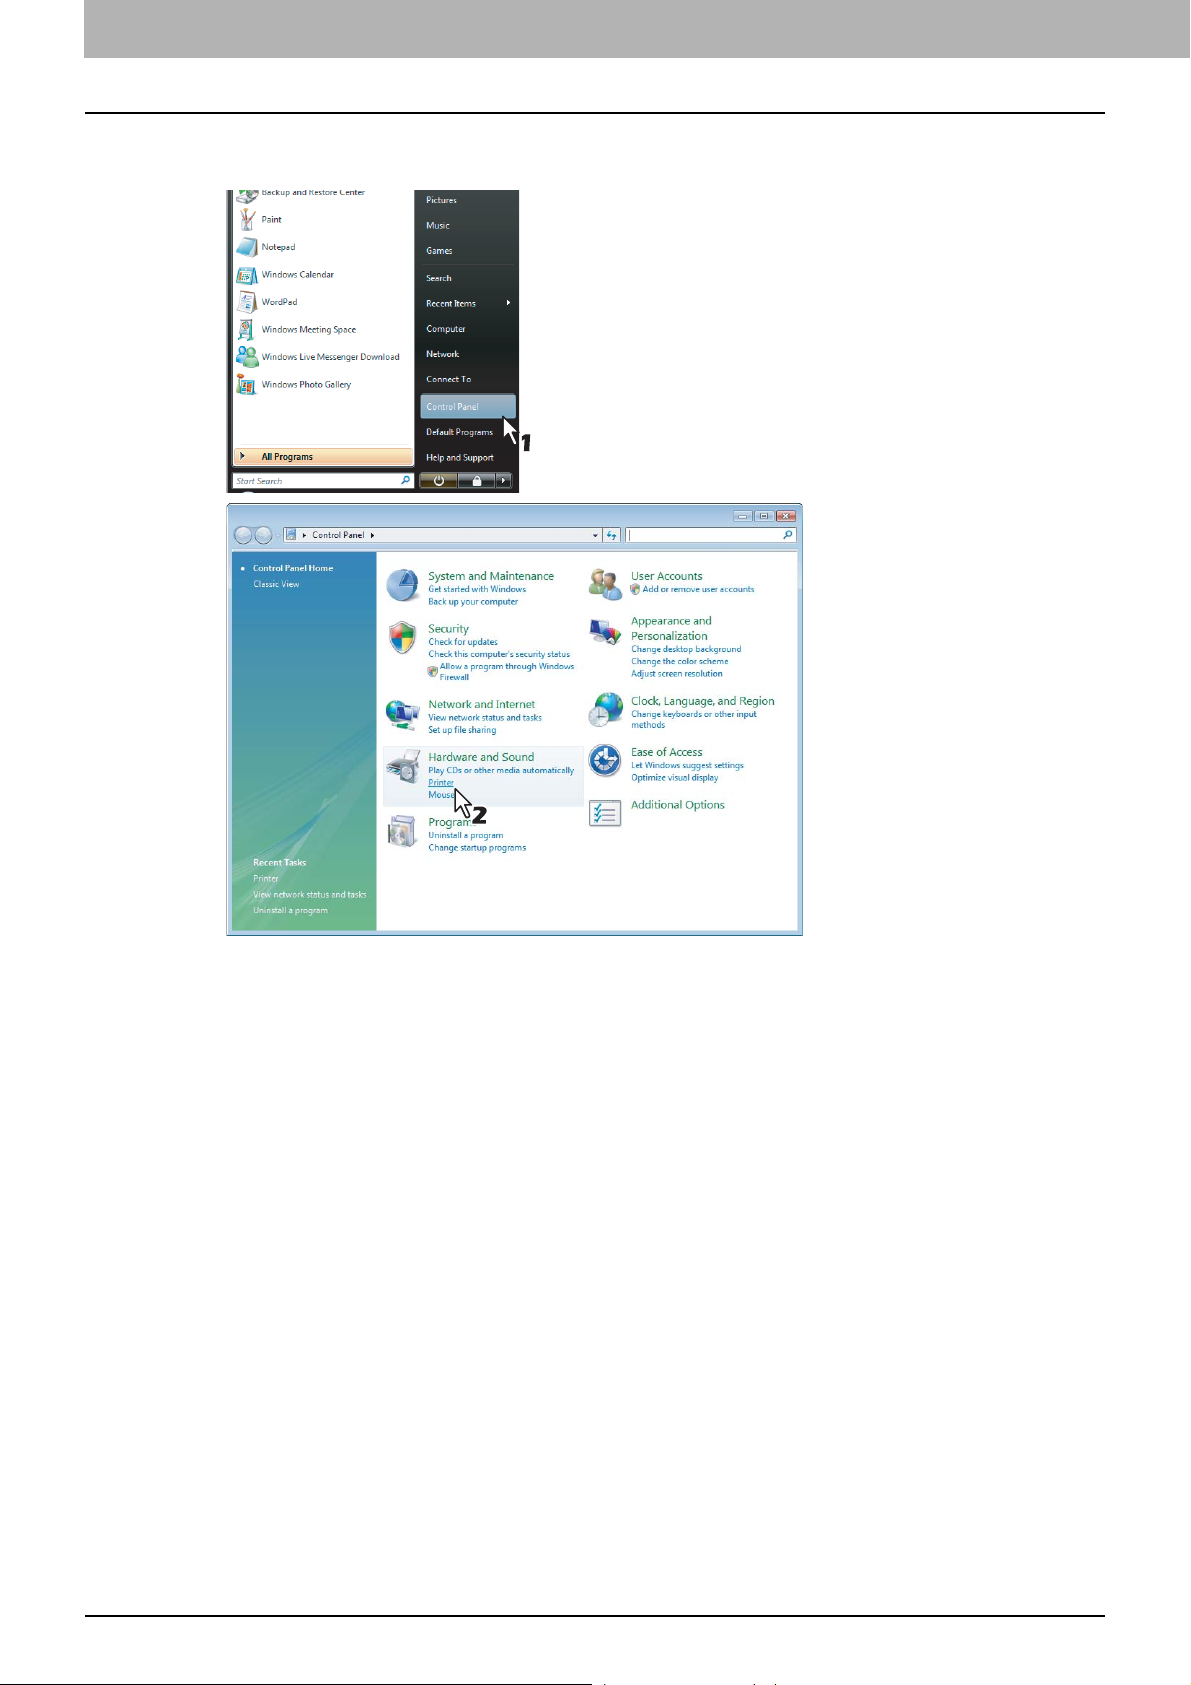
After inst alling the printer drivers, click [St art], select [Control Panel], and c lick [Printer]
9
under [Hardware and Sound] to open the Printers folder.
y If you are using the Windows 2000, click [Start], select [Settings], and click [Printers] to open the Printers folder.
y If you are using the Windows XP/2003 Server, click [Start] and click [Printers and Faxes] to open the Printers
and Faxes folder.
38 Installing the Printer Drivers
Page 41

3.INSTALLING PRINTER DRIVERS FOR WINDOWS
Select the printer driver and click the [Properties] in the [Organize] tab.
10
y The [printer driver properties] dialog box appears.
y When using Windows 2000/XP/Server 2003, select [Properties] in the [File] menu.
y When you have logged into Windows Vista/Server 2008 with a user account other than Administrator, skip to
step 11 according to the following procedure:
- Right-click on a printer driver, and select [Run as administrator] - [Properties].
- Enter the administrator’s password and click [OK].
3 INSTALLING PRINTER DRIVERS FOR WINDOWS
Click the [Ports] tab and click [Add Port].
11
The [Printer Ports] dialog box appears.
Select [Standard TCP/IP Port] and click [New Port].
12
The [Add Standard TCP/IP Printer Port Wizard] dialog box appears.
Installing the Printer Drivers 39
Page 42

3 INSTALLING PRINTER DRIVERS FOR WINDOWS
Click [Next].
13
Enter the IP address of this equipment in the [Printer Name or IP Address] box and
14
click [Next].
y If your network uses a DNS or WINS server, enter the printer name of this equipment provided from DNS or
WINS in the [Printer Name or IP Address] box.
y Enter the IPv6 address in the [Printer Name or IP Address] box when the MFP is connected in an IPv6 network.
y In the [Port Name] box, the port name is automatically entered according to the IP address or DNS name
entered in the [Printer Name or IP Address] box. When installing on Windows 2000/XP/Server 2003, “IP_” is
added in front of the IP address that is displayed in the [Port Name] box.
40 Installing the Printer Drivers
Page 43
3.INSTALLING PRINTER DRIVERS FOR WINDOWS
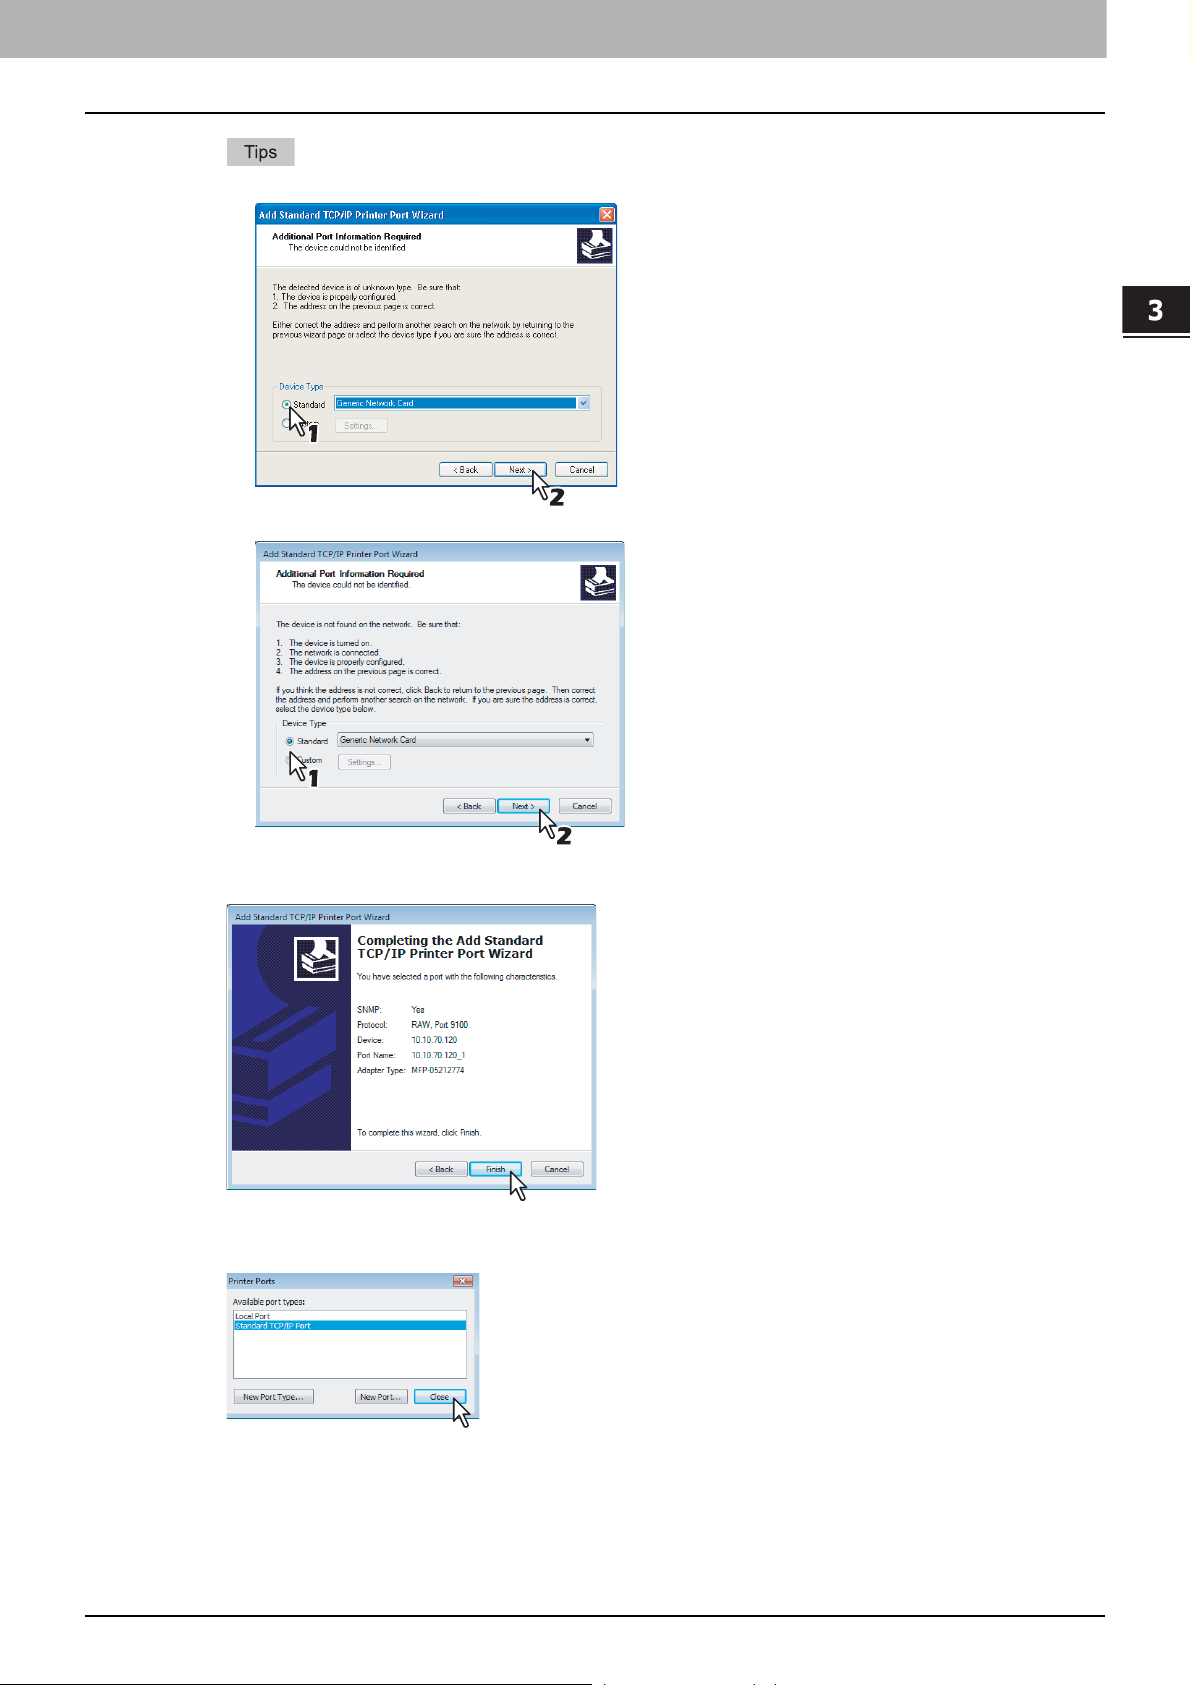
y The screen below will be displayed on Windows 2000/XP/Server 2003. Select [Standard] and click [Next].
y The screen below will be displayed on Windows Vista/Server 2008. Select [Standard] and click [Next].
3 INSTALLING PRINTER DRIVERS FOR WINDOWS
Click [Finish].
15
The screen returns to the [Printer Ports] dialog box.
Click [Close] to close the [Printer Ports] dialog box.
16
Installing the Printer Drivers 41
Page 44

3 INSTALLING PRINTER DRIVERS FOR WINDOWS
Make sure the created Raw TCP or LPR port is checked in the [Print to the following
17
port(s)] list.
When the LPD Print setting is enabled, you can also configure LPR printing. When you want to configure LPR
printing, follow the procedure below.
Click [Configure Port].
Select [LPR] at the [Protocol] group, enter “print” in the [Queue Name] box at the [LPR Settings] group, and
then click [OK].
42 Installing the Printer Drivers
Page 45

3 INSTALLING PRINTER DRIVERS FOR WINDOWS
3.INSTALLING PRINTER DRIVERS FOR WINDOWS
Click [Close].
18
Before using the printer driver for printing, please con figure the installed options of the equipment and
department code (if required) on the printer driver. Please refer to the Printing Guide for the instructions.
SMB printing
When you want to set up the SMB printing, you can automatically discover the MFP to configure the printer port.
It assumes using SMB printing in a small network. If you can use the Windows 2000, Windows XP, Windows Vista,
Windows Server 2003, or Windows Server 2008 as a print server, it is recommended to set up for printing via Windows
print server.
When the equipment is automatically found in the network, the [Devices on Network]
6
option is selected and the devices found are displayed in the list. Select the equipment
that you want to connect and click [OK].
The installation starts.
y Finding devices may take long depending on your OS or network environment.
y If the following message appears, click [Yes] to set the indicated printer driver to be the default printer driver,
or click [No] to not change the default printer driver.
y If the following message appears, click [Install this driver software anyway] to proceed with the installation.
Installing the Printer Drivers 43
Page 46

3 INSTALLING PRINTER DRIVERS FOR WINDOWS
When the equipment is not automatically found in the network, the [Message] dialog box appears. In that case,
follow the procedure below to select the network queue manually.
On the [Message] dialog box that appears, click [Continue].
Click [Browse] for the Network path or Queue name.
- Finding devices may take long depending on your OS or network environment.
The [Browse for Folder] dialog box appears. Locate this equipment in your network, select the “print” queue,
and click [OK].
- Do not select “pcl6” or “ps3” queue. These queues only accept the print job in each emulation. If you install
several printer drivers and specify one of these queues, the print job may not be printed properly due to
mismatch of the emulations between the print job and queue.
44 Installing the Printer Drivers
Page 47

3.INSTALLING PRINTER DRIVERS FOR WINDOWS
Click [OK].
When the installation is complete, click [Finish].
7
3 INSTALLING PRINTER DRIVERS FOR WINDOWS
The main menu window is displayed.
The Installer may ask you to restart your computer. If it does, select “Yes, I want to restart my computer now.”
and click [Finish] to restart your computer.
Click [Exit].
8
When a message appears asking whether to finish the installation, click [OK].
Before using the printer driver for printing, please con figure the installed options of the equipment and
department code (if required) on the printer driver. Please refer to the Printing Guide for the instructions.
Installing the Printer Drivers 45
Page 48

3 INSTALLING PRINTER DRIVERS FOR WINDOWS
Novell printing
Configure the printer port for Novell printing.
The information for connecting the NetWare server will be required.
Enter the queue name in the [Network path or Queue name] box, and click [OK].
6
For NDS/NDPS mode
Example: Root=Org, Context=dept1, queue name=mfp_queue
\\Org\mfp_queue.dept1
For Bindery mode
Example: NetWare file server name=Nwsrv, queue name=mfp_queue
\\Nwsrv\mfp_queue
The queue for this equipment should be set up by an administrator. If you do not know the queue for this
equipment, ask your administrator.
46 Installing the Printer Drivers
Page 49

3.INSTALLING PRINTER DRIVERS FOR WINDOWS
If the following message appears, click [Y es] to set the indicated printer driver to be the default printer driver, or
click [No] to not change the default printer driver.
When the installation is complete, click [Finish].
7
3 INSTALLING PRINTER DRIVERS FOR WINDOWS
The main menu window is displayed.
The Installer may ask you to restart your computer. If it does, select “Yes, I want to restart my computer now.”
and click [Finish] to restart your computer.
Click [Exit].
8
When a message appears asking whether to finish the installation, click [OK].
Before using the printer driver for printing, please con figure the installed options of the equipment and
department code (if required) on the printer driver. Please refer to the Printing Guide for the instructions.
Installing the Printer Drivers 47
Page 50
3 INSTALLING PRINTER DRIVERS FOR WINDOWS
Other Installations
The following printing environments cannot be configured by installation using the Installer. When you want to configure
the following printing environments, see the following pages for each procedure.
P.48 “USB printing”
P.56 “Point and Print”
P.57 “IPP printing”
P.70 “Novell iPrint”
P.71 “Web Service Print”
USB printing
This section describes how to set up the printer drivers when this equipment is connected with USB cable.
To set up the printer drivers for USB printing, you must install the printer drivers by Plug and Play functions instead of
installing the client software using the installer in the Client Utilities CD-ROM.
The procedure to install the printer driver for USB printing by Plug and Play differs depending on the version of Windows
used.
P.48 “Windows Vista/Server 2008”
P.51 “Windows XP/Server 2003”
P.53 “Windows 2000”
y Use a USB2.0 Hi-Speed certified cable: USB cable supporting the USB2.0 Hi-Speed mode (480 Mbps of transfer
speed) certified by the USB Implementers Forum.
y Connect the equipment with a PC directly by the USB cable. When it is connected with a PC via a USB hub, the
equipment may not be recognized.
Windows Vista/Server 2008
Installing the printer driver for USB printing by Plug and Play
You must log into Windows as a user who has the “Administrators” or “Power Users” privilege. You must log into
Windows as a user who has the “Administrators” privilege when using Windows Vista.
Power on this equipment and your computer.
1
Connect the USB cable to this equipment and your computer.
2
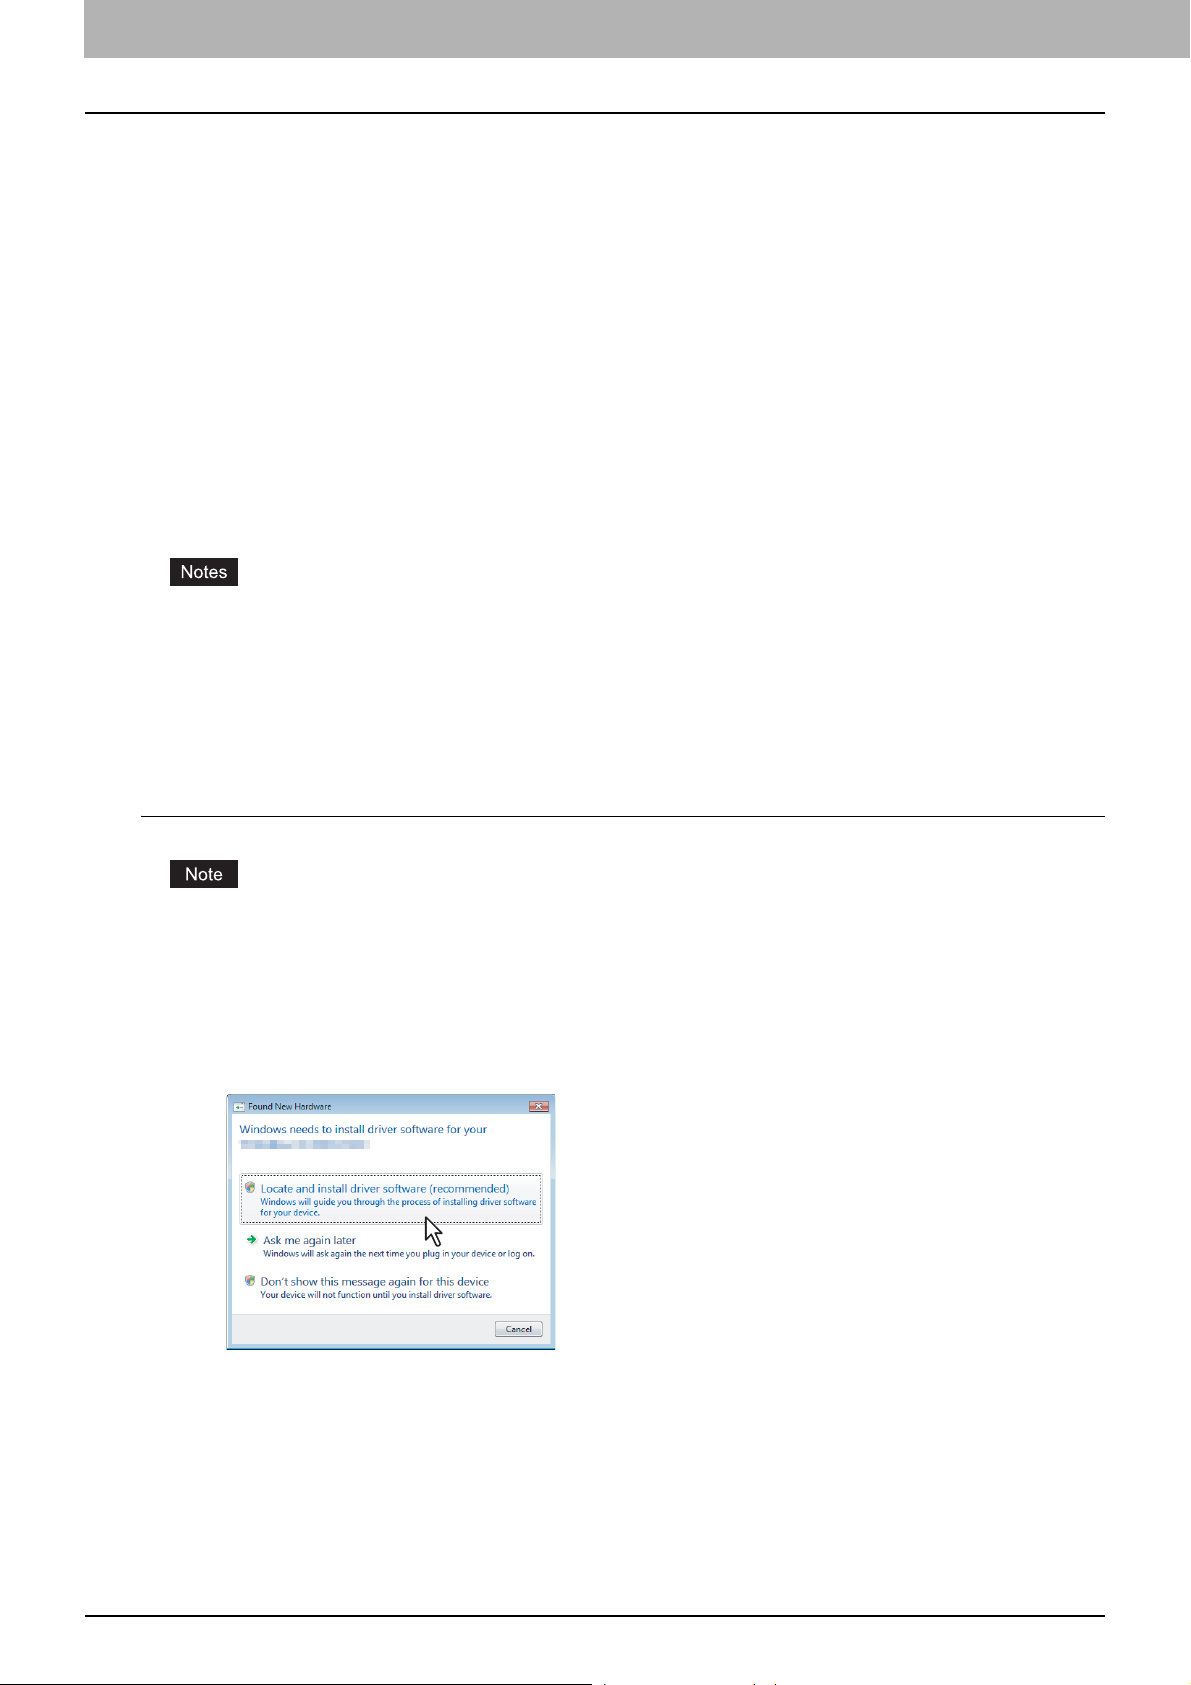
The [Found New Hardware] dialog box appears.
Click [Locate and install driver software (recommended)].
3
The [User Account Permission] dialog box appears.
Click [Continue] in the [User Account Permission] dialog box.
4
48 Other Installations
Page 51

3.INSTALLING PRINTER DRIVERS FOR WINDOWS
Click [Don’t search online].
5
Insert the Client Utilities CD-ROM into the CD-ROM drive.
6
3 INSTALLING PRINTER DRIVERS FOR WINDOWS
When inserting the Client Utilities CD-ROM, the installer may automatically start. Click [Exit] to exit the installer and
continue the operation.
Other Installations 49
Page 52
3 INSTALLING PRINTER DRIVERS FOR WINDOWS
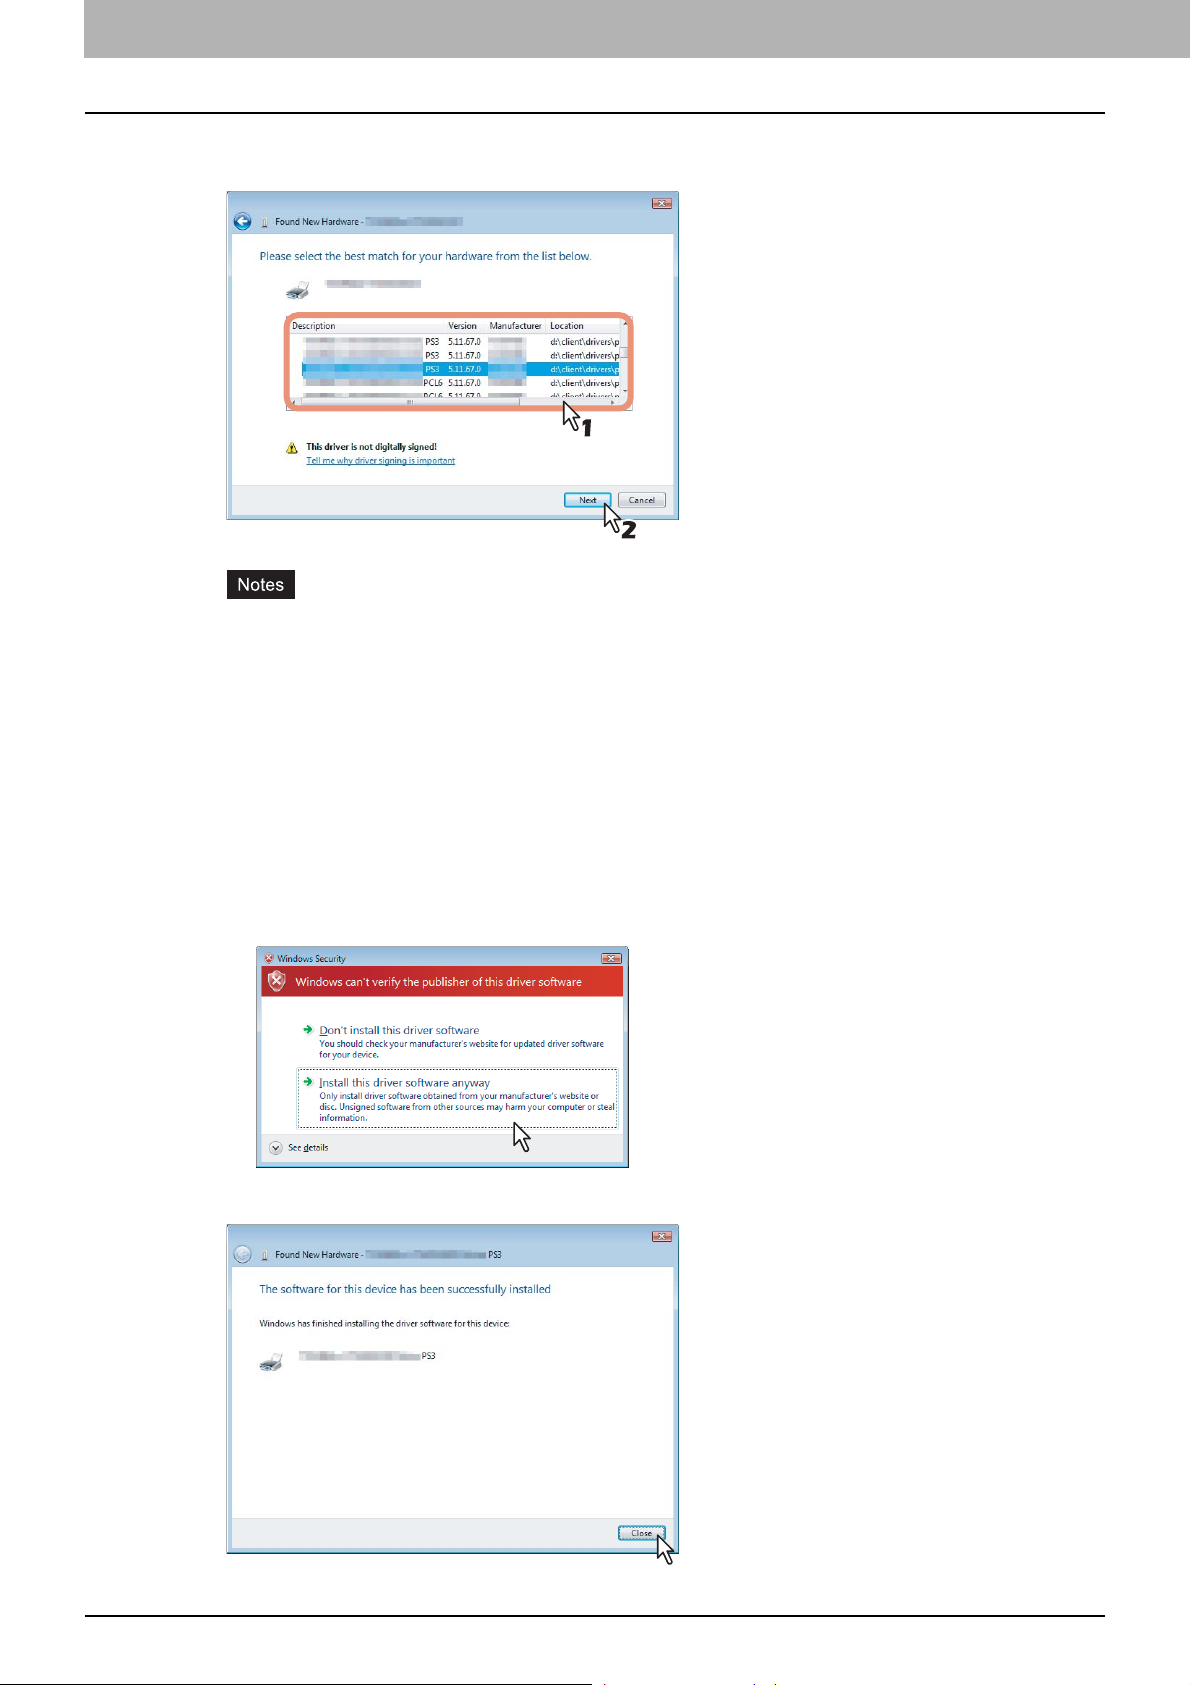
The printer drives are automatically detected and displayed in the list. Select a printer
7
driver to be installed and click [Next].
y All available drivers are listed. If a wrong driver is installed, printing may not be performed properly.
- PCL6 printer driver
[Client Utilities CD-ROM]: \Client\Drivers\PCL6\W2K_XP_VISTA\<language>\
- PS3 printer driver
[Client Utilities CD-ROM]: \Client\Drivers\PS\W2K_XP_VISTA\<language>\
- XPS printer driver
[Client Utilities CD-ROM]: \Client\Drivers\XPS\W2K_XP_VISTA\<language>\
When using Windows Vista/Server 2008 64-bit edition, select the following folder:
- PCL6 printer driver
[Client Utilities CD-ROM]: \Client\Drivers\PCL6\XP_VISTA_X64\<language>\
- PS3 printer driver
[Client Utilities CD-ROM]: \Client\Drivers\PS\XP_VISTA_X64\<language>\
- XPS printer driver
[Client Utilities CD-ROM]: \Client\Drivers\XPS\XP_VISTA_X64\<language>\
y If the following message appears, click [Install this driver software anyway] to proceed with the installation.
Click [Close].
8
50 Other Installations
Page 53

3.INSTALLING PRINTER DRIVERS FOR WINDOWS
The installation is completed.
9
Before using the printer driver for printing, please con figure the installed options of the equipment and
department code (if required) on the printer driver. Please refer to the Printing Guide for the instructions.
Windows XP/Server 2003
Installing the printer driver for USB printing by Plug and Play
You must log into Windows as a user who has the “Administrators” or “Power Users” privilege. You must log into
Windows as a user who has the “Administrators” privilege when using Windows XP/Server 2003.
Power on this equipment and your computer.
1
Connect the USB cable to this equipment and your computer.
2
The [Found New Hardware Wizard] dialog box appears.
3 INSTALLING PRINTER DRIVERS FOR WINDOWS
Select [Install from a list or specific location (Advanced)] and click [Next].
3
Select [Search for the best driver in these locations.] and select only the [Include this
4
location in the search] check box. Then click [Browse].
The [Browse For Folder] dialog box appears.
Insert the Client Utilities CD-ROM into the CD-ROM drive.
5
When inserting the Client Utilities CD-ROM, the installer may automatically start. Click [Exit] to exit the installer and
continue the operation.
Other Installations 51
Page 54
3 INSTALLING PRINTER DRIVERS FOR WINDOWS
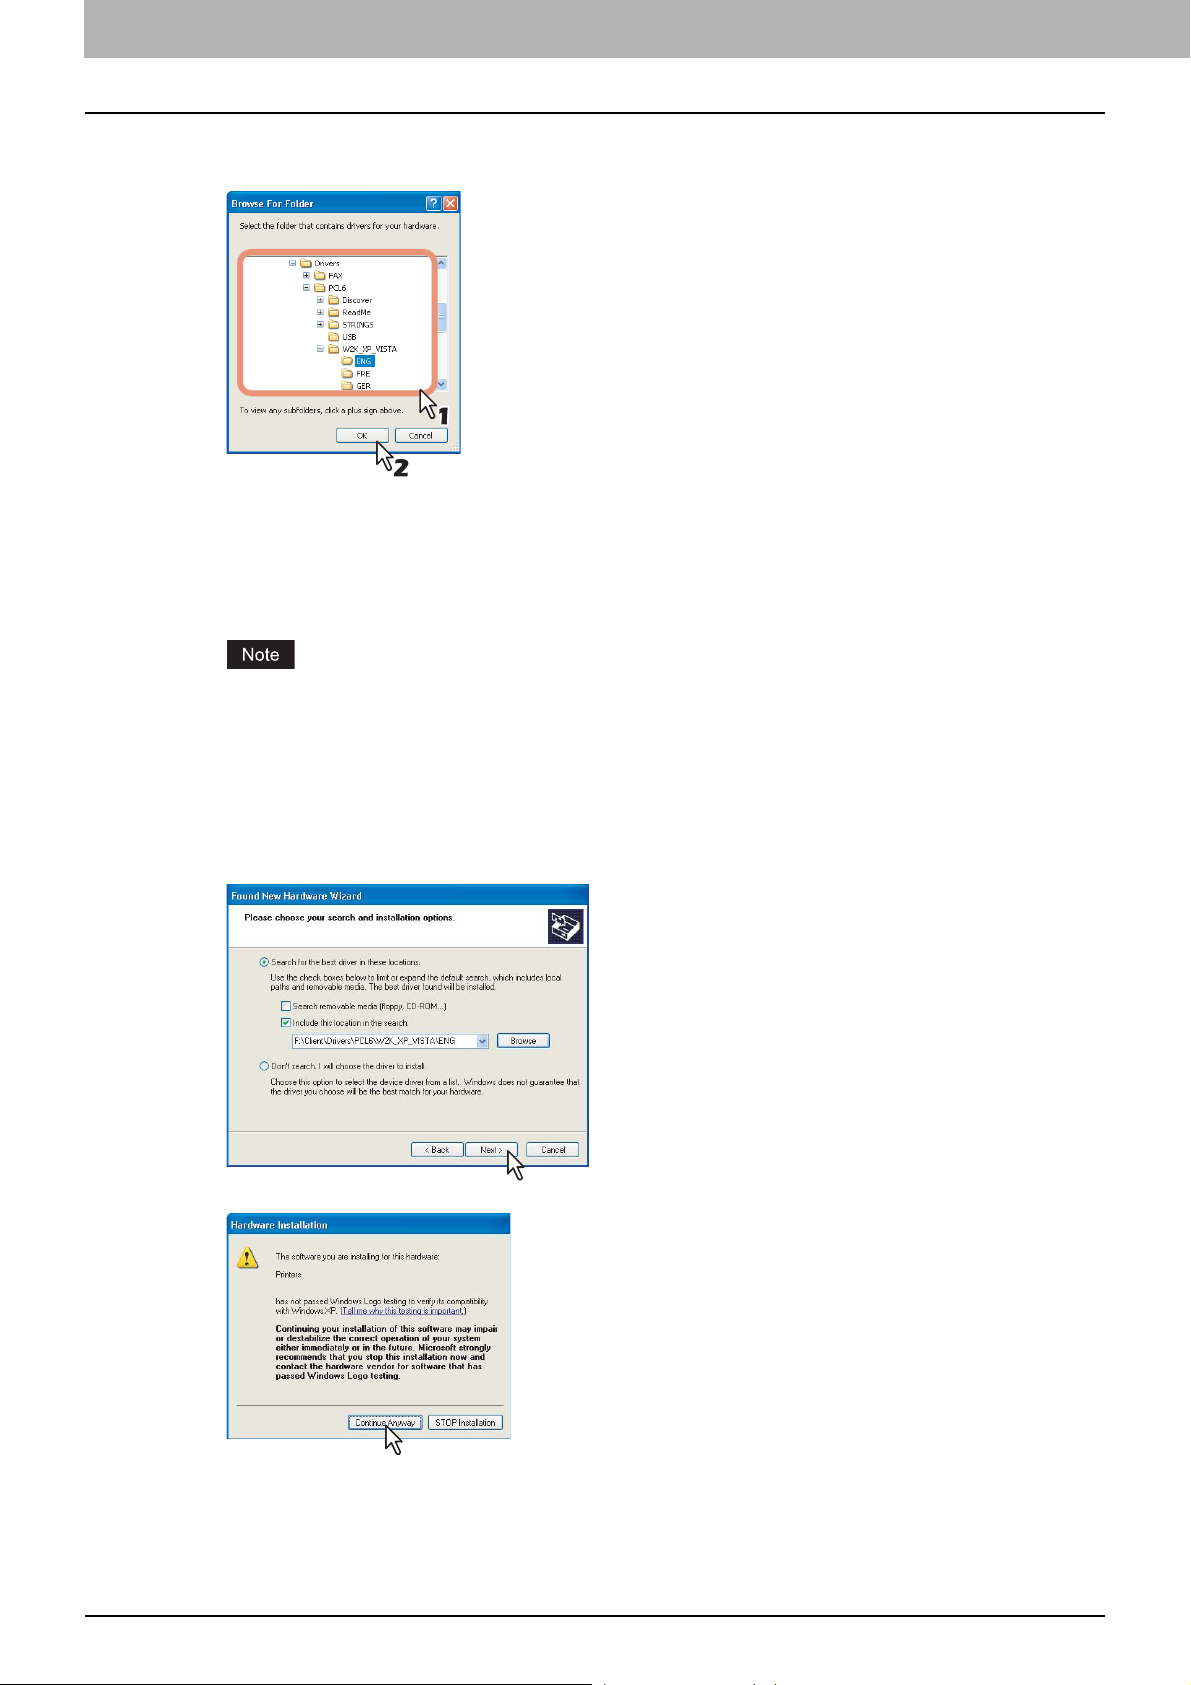
Locate the directory where the printer driver for Windows XP or Server 2003 is located
6
and click [OK].
y To install the PCL6 printer driver, locate
“[CD-ROM drive]:\Client\Drivers\PCL6\W2K_XP_VISTA\<language>”.
y To install the PS3 printer driver, locate
“[CD-ROM drive]:\Client\Drivers\PS\W2K_XP_VISTA\<language>”.
y To install the XPS printer driver, locate
“[CD-ROM drive]:\Client\Drivers\XPS\W2K_XP_VISTA\<language>”.
When using Windows XP 64-bit edition or Windows Server 2003 64-bit edition, select the following folder.
- To install the PCL6 printer driver, locate
“[CD-ROM drive]:\Client\Drivers\PCL6\XP_VISTA_X64\<language>”.
- To install the PS3 printer driver, locate
“[CD-ROM drive]:\Client\Drivers\PS\XP_VISTA_X64\<language>”.
- To install the XPS printer driver, locate
“[CD-ROM drive]:\Client\Drivers\XPS\XP_VISTA_X64\<language>”.
Click [Next].
7
y If following message appears, click [Continue Anyway] to proceed with the installation.
y It starts copying files.
52 Other Installations
Page 55

3.INSTALLING PRINTER DRIVERS FOR WINDOWS
Click [Finish].
8
The installation is completed.
9
Before using the printer driver for printing, please con figure the installed options of the equipment and
department code (if required) on the printer driver. Please refer to the Printing Guide for the instructions.
3 INSTALLING PRINTER DRIVERS FOR WINDOWS
Windows 2000
Installing the printer driver for USB printing by Plug and Play
You must log into Windows as a user who has the “Administrators” or “Power Users” privilege when using Windows
2000.
Power on this equipment and your computer.
1
Connect the USB cable to this equipment and your computer.
2
The [Found New Hardware Wizard] dialog box appears.
Click [Next].
3
Other Installations 53
Page 56

3 INSTALLING PRINTER DRIVERS FOR WINDOWS
Select [Search for a suitable driver for my device (recommended)] and click [Next].
4
Insert the Client Utilities CD-ROM into the CD-ROM drive.
5
When inserting the Client Utilities CD-ROM, the installer may automatically start. Click [Exit] to exit the installer and
continue the operation.
Select only [Specify a location] check box and click [Next].
6
Click [Browse].
7
The [Locate File] dialog box appears.
Locate the directory where the printer driver for Windows 2000 is located, select a inf
8
file, and click [Open].
y To install the PCL6 printer driver, locate
“[CD-ROM drive]:\Client\Drivers\PCL6\W2K_XP_VISTA\<language>”.
y To install the PS3 printer driver, locate
“[CD-ROM drive]:\Client\Drivers\PS\W2K_XP_VISTA\<language>”.
54 Other Installations
Page 57

3.INSTALLING PRINTER DRIVERS FOR WINDOWS
Click [OK].
9
Click [Next].
10
3 INSTALLING PRINTER DRIVERS FOR WINDOWS
It starts copying files.
Click [Finish].
11
The installation is completed.
12
Before using the printer driver for printing, please con figure the installed options of the equipment and
department code (if required) on the printer driver. Please refer to the Printing Guide for the instructions.
Other Installations 55
Page 58
3 INSTALLING PRINTER DRIVERS FOR WINDOWS
Point and Print
This section describes how to set up the printer drivers by Point and Print.
y It assumes using SMB printing by Point and Print in a small network. If you can use the Windows 2000, Windows
XP, Windows Vista, Windows Server 2003, or Windows Server 2008 as a print server, it is recommended to set up
for printing via Windows print server.
y For installing the printer driver by Point and Print, the printer driver files for Point and Print must be uploaded in the
MFP. The printer driver files can be uploaded in the MFP using the administrative function of COMMAND CENTER.
For more information about Point and Print, please ask your network administrator.
Installing the printer drivers by Point and Print
The following describes an installation on Windows Vista. The procedure is the same when other versions of Windows are
used.
To perform installation, you must log into Windows as a user who has “Administrators” or “Power Users” privilege. In
case of Windows XP/Vista/Server 2003/Server 2008, only users with the administrator privilege can perform it.
For users without the administrator privilege on Windows Vista/Server 2008, installation is possible by entering the
administrator’s password in the dialog box for changing a user account at the time of installation and having the
administrator privilege temporarily.
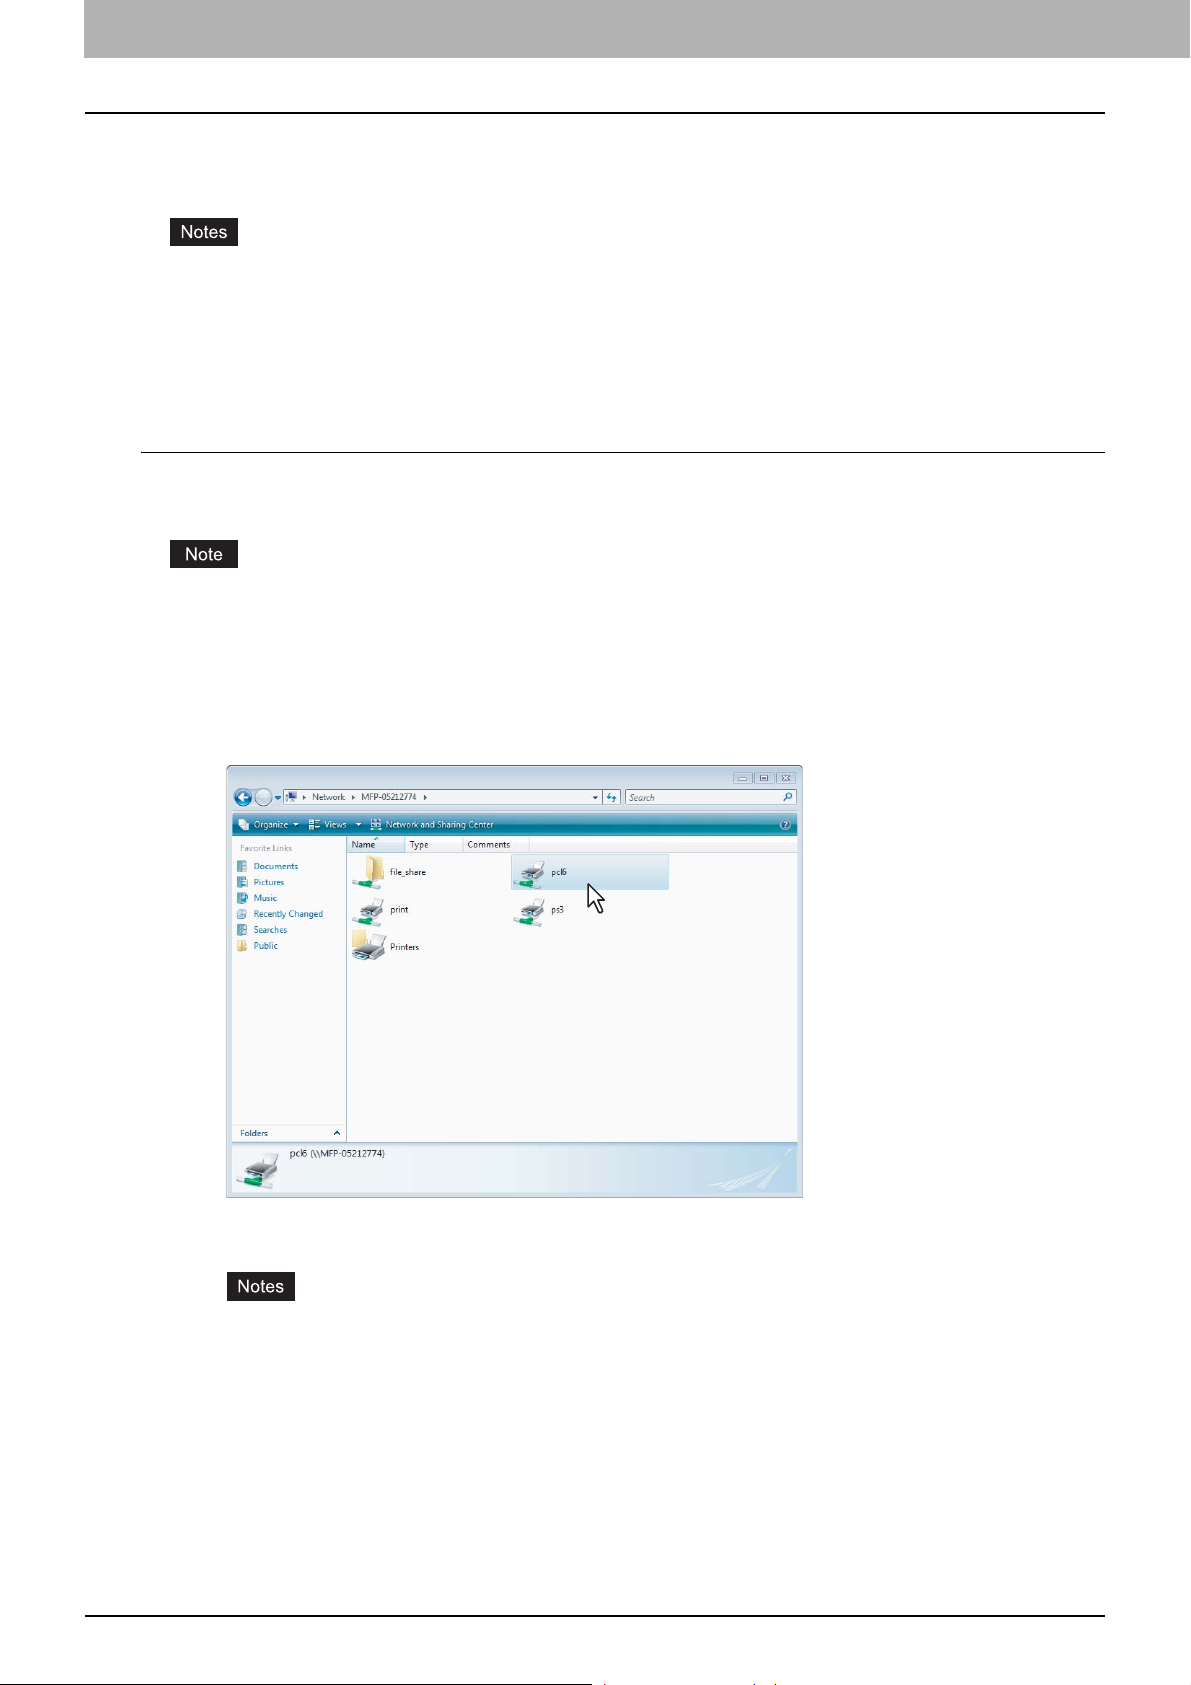
Open this equipment in the network with Windows Explorer, and double-click a queue
1
in which the printer driver should be installed (see below).
pcl6 — Double-click this queue to install the PCL6 printer driver.
ps3 — Double-click this queue to install the PS3 printer driver.
y The XPS printer cannot be installed using Point and Print from this equipment.
y Configure the SMB settings and the NetBIOS name on COMMAND CENTER when using the computer
name of the MFP.
- When the SMB settings are set using IPv4: Configure the WINS server addresses and DNS settings on
- When the SMB settings are set using IPv6: Enable the LLMNR setting or configure the DNS settings on
For instructions on how to set them on COMMAND CENTER, refer to COMMAND CENTER Guide.
56 Other Installations
COMMAND CENTER.
COMMAND CENTER.
Page 59

3.INSTALLING PRINTER DRIVERS FOR WINDOWS
y When you are installing the printer driver on Windows Vista/Server 2008, the [Printers] dialog box may
appear. in that case, click [Install driver].
y When you are installing the printer driver on Windows XP/Server 2003, the Connect to [Printers] dialog box
appears. In that case, click [Yes].
y When you are installing the printer driver on Windows 2000, the [Printers] dialog box appears. In that case,
click [Yes].
3 INSTALLING PRINTER DRIVERS FOR WINDOWS
The printer driver is installed and the print queue window appears.
2
Before using the printer driver for printing, please con figure the installed options of the equipment and
department code (if required) on the printer driver. Please refer to the Printing Guide for the instructions.
IPP printing
This section describes how to set up the printer drivers for IPP printing which is available for Internet connection.
To set up the printer drivers for IPP printing, install the printer drivers by Add Printer Wizard.
Before installing the printer driver for IPP printing, check with your system administrator to make sure of the following:
- This equipment is connected to the network and turned on .
- The TCP/IP setting is correct on this equipment and your computer.
The procedure to install the printer driver for IPP printing differs depending on the version of Windows used.
P.58 “Windows Vista/Server 2008”
P.64 “Windows 2000/XP/Server 2003”
Other Installations 57
Page 60

3 INSTALLING PRINTER DRIVERS FOR WINDOWS
Windows Vista/Server 2008
Installing the printer driver for IPP printing by Add Printer Wizard
y To perform installation, you must log into Windows as a user who has “Administrators” privilege. For users without
the administrator privilege, installation is possible by entering the administrator’s password in the dialog box for
changing a user account at the time of installation and having the administrator privilege temporarily.
y The certificate must be installed on both MFP and Windows Vista to perform IPP SSL printing from Windows Vista.
For instructions on how to install the certificate, please refer to COMMAND CENTER Guide.
Click [Start], select [Control Panel] and click [Printer] under [Hardware and Sound] to
1
open the Printers folder.
58 Other Installations
Page 61

3.INSTALLING PRINTER DRIVERS FOR WINDOWS
Click [Add a printer].
2
The [Add Printer] dialog box appears.
3 INSTALLING PRINTER DRIVERS FOR WINDOWS
Select [Add a network, wireless or Bluetooth printer.] in [Choose a local or network
3
printer] screen.
Select [The Printer that I want isn't listed.] in [Searching for available printers] screen.
4
Other Installations 59
Page 62

3 INSTALLING PRINTER DRIVERS FOR WINDOWS
Select the [Select a shared printer by name] check box, enter “http://[IP address]:631/
5
Print” in the edit box in [Find by printer name or TCP/IP address] screen.
y Enter the IP address of this equipment instead of [IP address].
Example: IP address = 192.168.1.2
http://192.168.1.2:631/Print
y Enter the IPv6 address in the [Printer Name or IP Address] box when the MFP is connected in an IPv6 network.
y If your network uses a DNS or WINS server, enter the printer name of this equipment provided from DNS or
WINS instead of [IP address].
Example: Print Server Name = Mfp-05212774
http://Mfp-05212774:631/Print
y When you connect from the Internet, enter the FQDN of this equipment provided from DNS instead of [IP
address].
Example: URL = mfp_05212774.km.com
http://mfp_05212774.km.com:631/Print
“P” for “Print” in the IPP URL must be capitalized. When you are using on Windows Vista/Server 2008, the IPP
port can be created by entering “print” (non-capitalized) in the IPP URL, but the print job cannot be sent to the
equipment. In that case, delete the IPP port and then create the IPP port correctly again.
y If the IPP Port80 Enabled option is enabled on this equipment, you can exclude the port number from the
URL. (i.e. “http://192.168.1.2/Print”)
y If the Enable SSL option for IPP Print is enabled, you must enter “https://[IP address]:[SSL port number]/
Print” in the “URL” field.
(i.e. “https://192.168.1.2:443/Print”)
60 Other Installations
Page 63

3.INSTALLING PRINTER DRIVERS FOR WINDOWS
Click [Next].
6
A dialog box appears to confirm the connection with the specified MFP. Wait until completion.
When the Authentication setting for IPP Print is enabled, the dialog box to enter a user name and password
appears. If this dialog box appears, enter the user name and password and click [OK]. For user name and
password, please ask your administrator.
3 INSTALLING PRINTER DRIVERS FOR WINDOWS
Click [Have Disk].
7
The [Install From Disk] dialog box appears.
Click [Browse].
8
The [Locate File] dialog box appears.
Insert the Client Utilities CD-ROM into the CD-ROM drive.
9
When inserting the Client Utilities CD-ROM, the installer may automatically start. Click [Exit] to exit the installer and
continue the operation.
Other Installations 61
Page 64
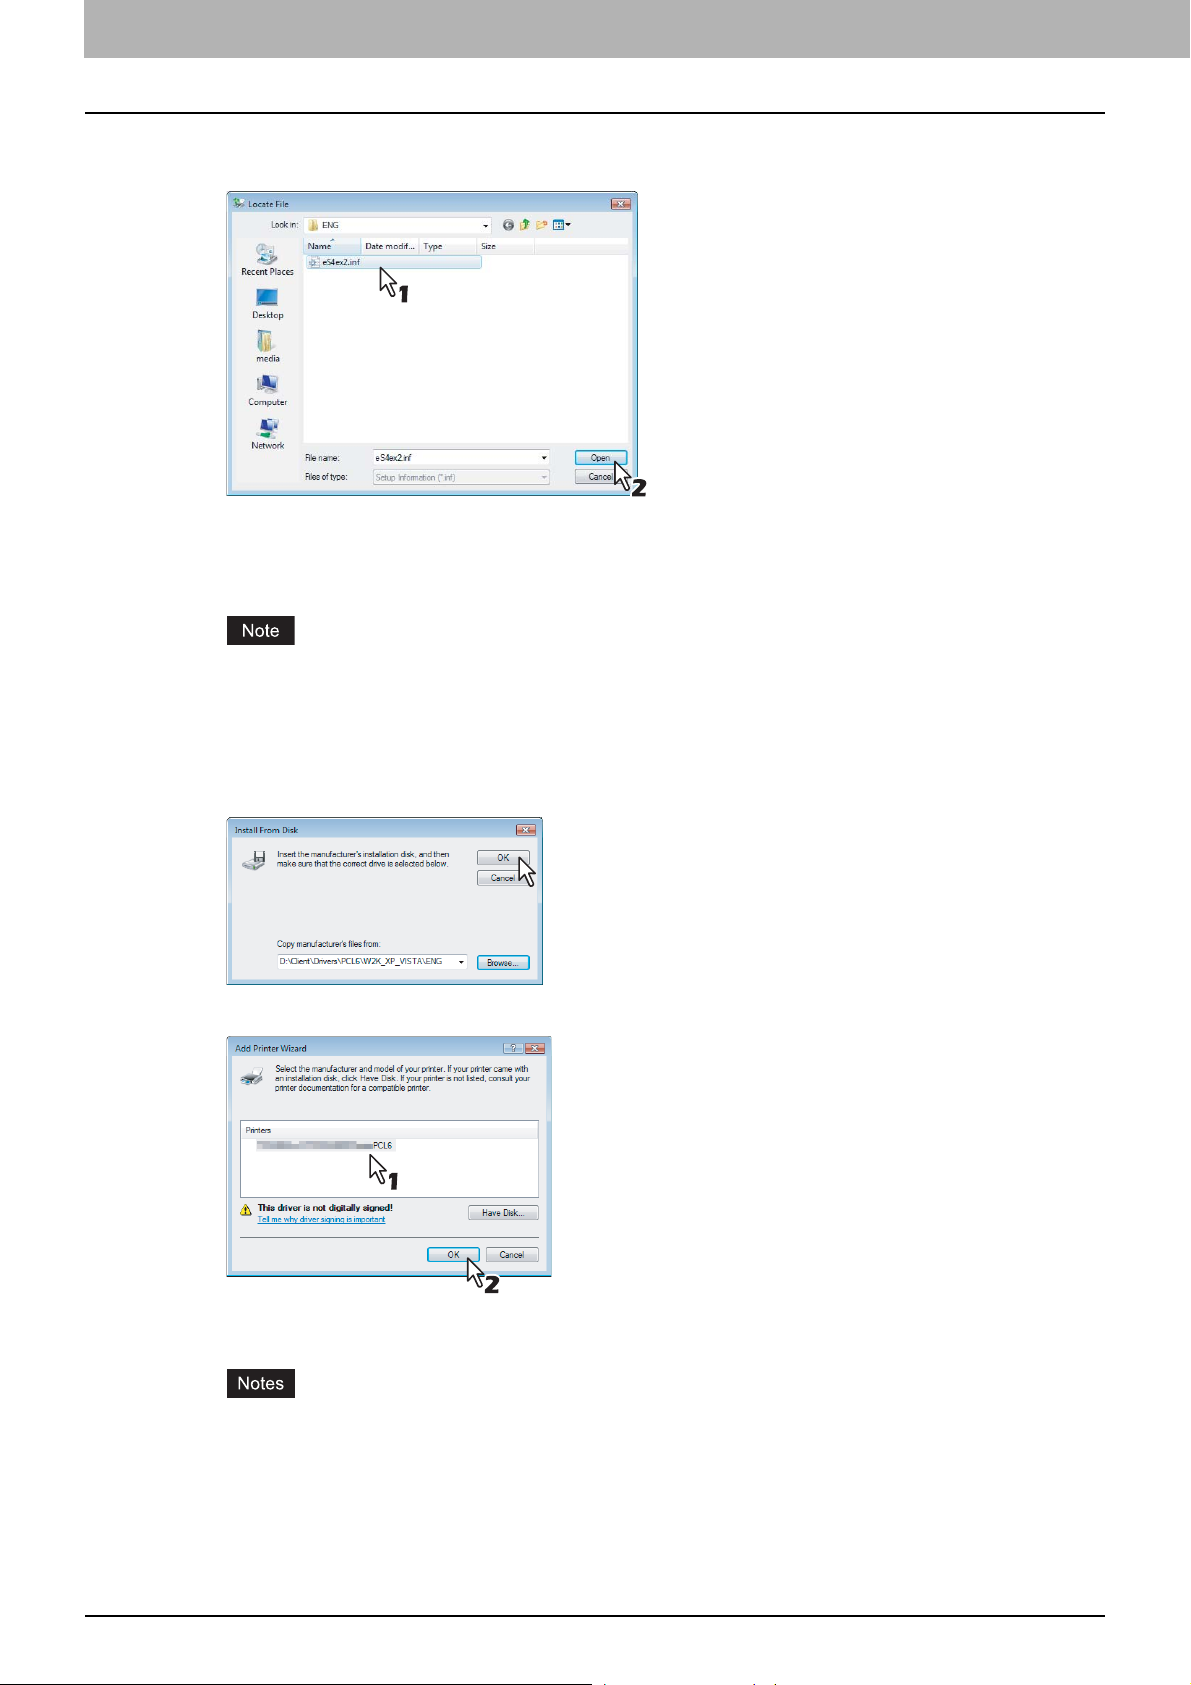
3 INSTALLING PRINTER DRIVERS FOR WINDOWS
Locate the directory where the printer driver for your Windows version is located,
10
select the inf file, and click [Open].
y To install the PCL6 printer driver for Windows Vista/Server 2008,
locate “[CD-ROM drive]:\Client\Drivers\PCL6\W2K_XP_VISTA\<language>”.
y To install the PS3 printer driver for Windo ws Vista/Server 2008,
locate “[CD-ROM drive]:\Client\Drivers\PS\W2K_XP_VISTA\<language>”.
When using Windows Vista/Server 2008 64-bit edition, select the following folder.
- To install the PCL6 printer driver, locate
“[CD-ROM drive]:\Client\Drivers\PCL6\XP_VISTA_X64\<language>”.
- To install the PS3 printer driver, locate
“[CD-ROM drive]:\Client\Drivers\PS\XP_VISTA_X64\<language>”.
Click [OK].
11
Select the printer driver and click [OK].
12
If any other printer driver(s) had already been installed on your computer, the Default Printer screen is displayed.
Continue to next step.
y If the user account control is enabled, the [Installing device driver] dialog box is displayed. Click [Continue]
to continue the installation.
y When the [Windows Security] dialog box is displayed, click [Install this driver software anyway] to continue
the installation.
62 Other Installations
Page 65
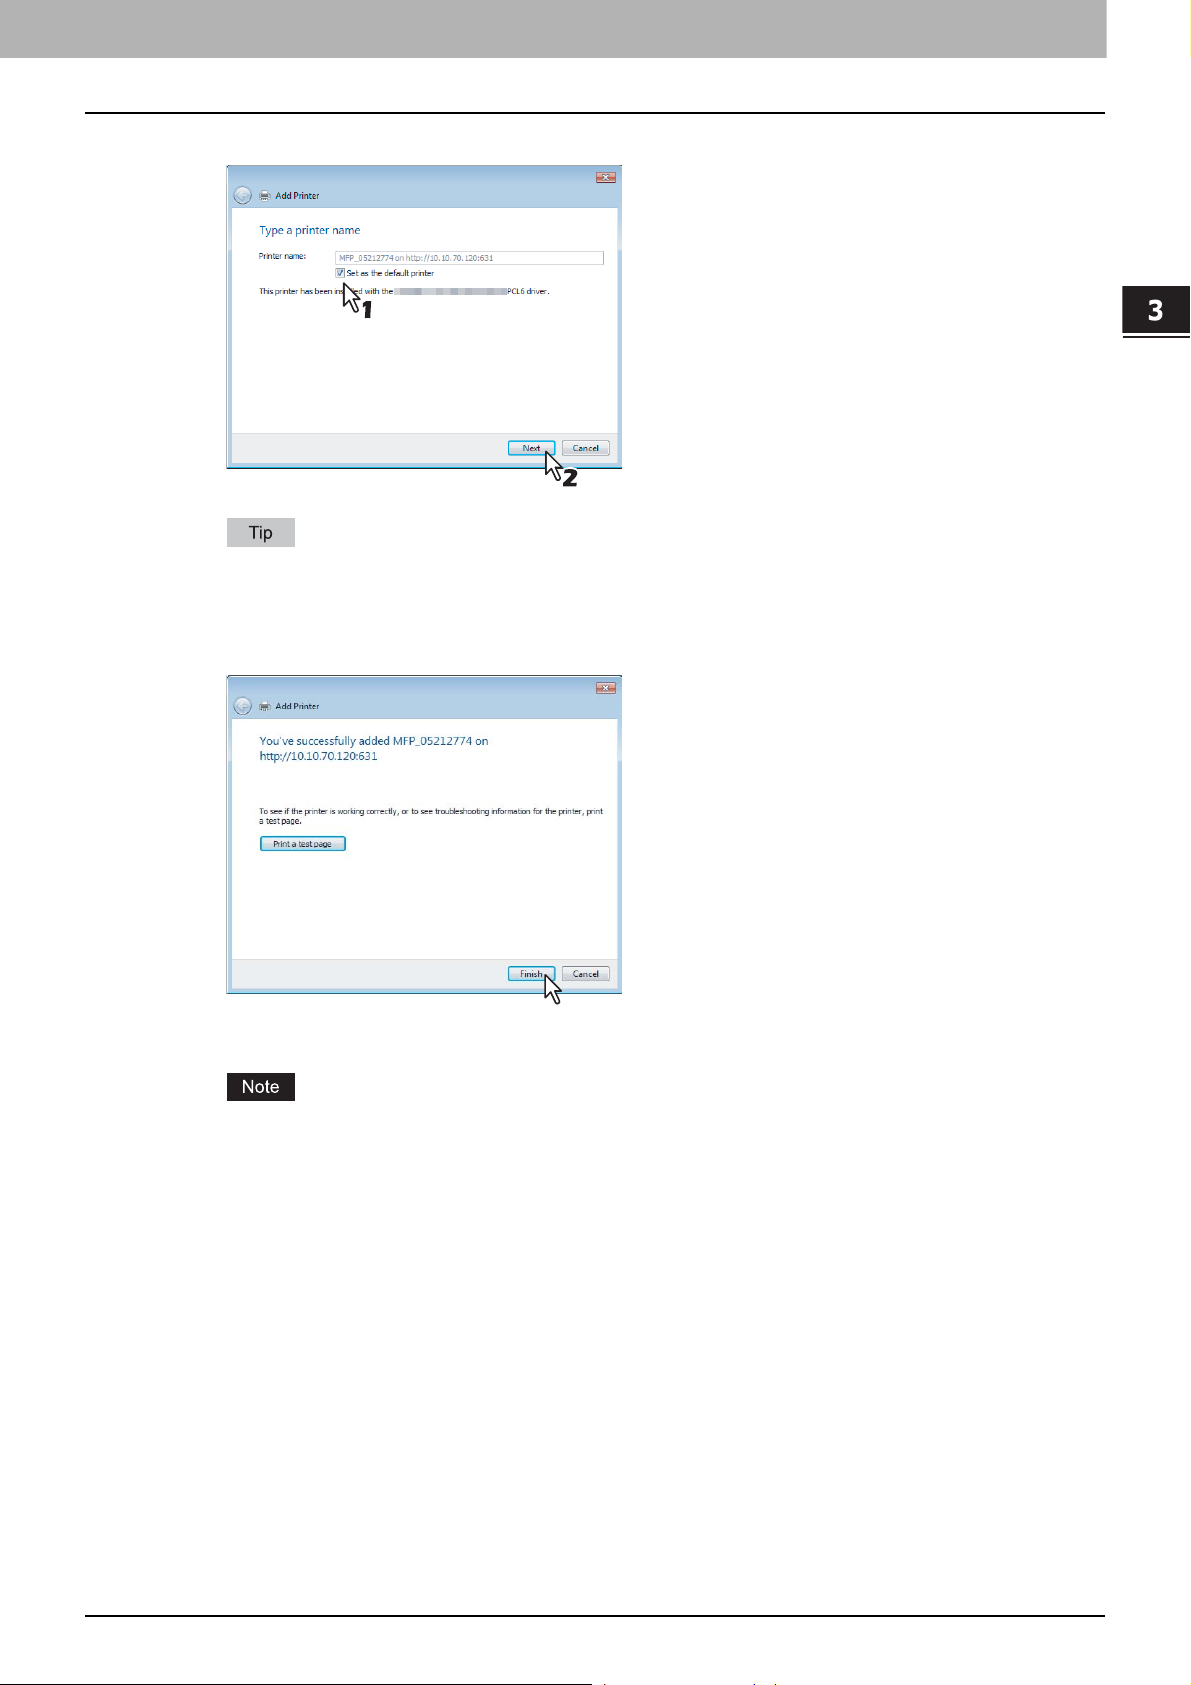
3.INSTALLING PRINTER DRIVERS FOR WINDOWS
Select whether using this printer as a default printer and click [Next].
13
If the Printer Sharing dialog box is displayed, select whether to share the equipment with other users on your
network and then click [Next].
- Change the share name or enter the location and comments as required.
3 INSTALLING PRINTER DRIVERS FOR WINDOWS
Click [Finish].
14
The printer driver is installed.
15
Before using the printer driver for printing, please con figure the installed options of the equipment and
department code (if required) on the printer driver. Please refer to the Printing Guide for the instructions.
Other Installations 63
Page 66
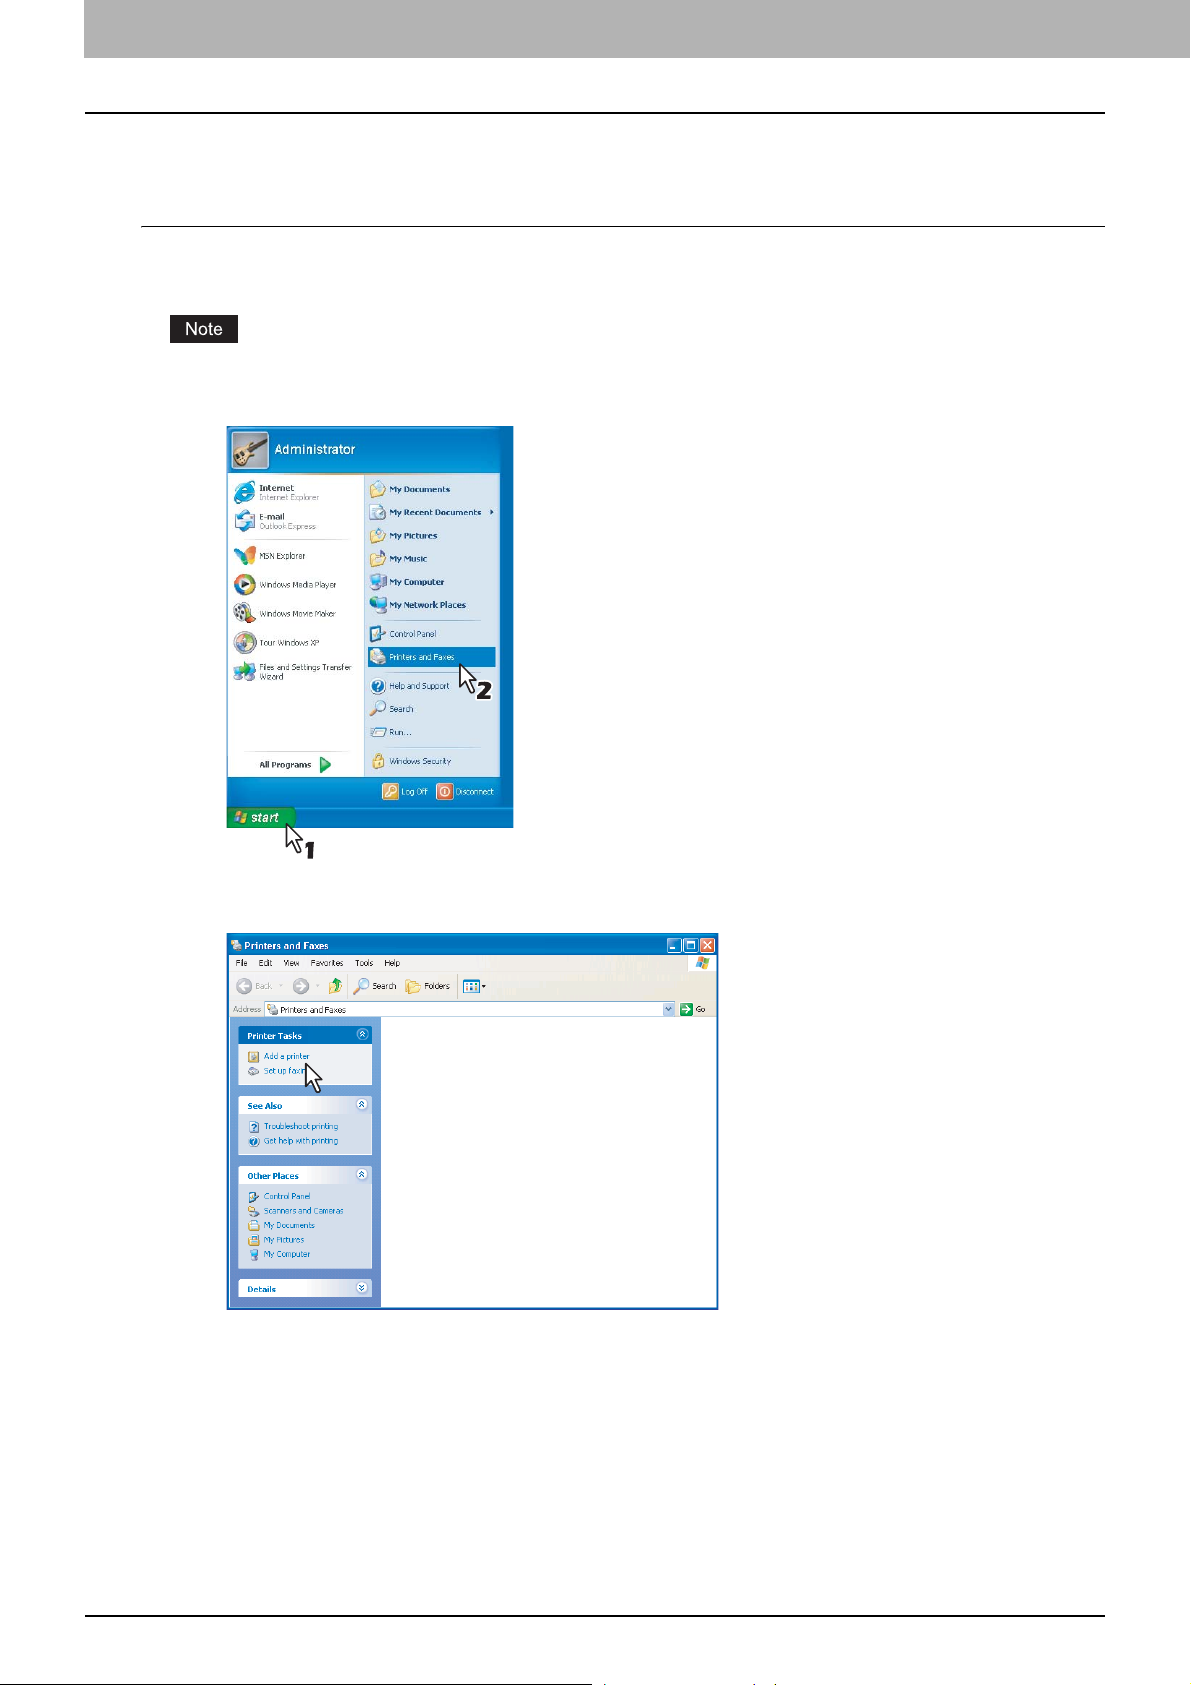
3 INSTALLING PRINTER DRIVERS FOR WINDOWS
Windows 2000/XP/Server 2003
Installing the printer driver for IPP printing by Add Printer Wizard
The following describes an installation on Windows XP . The procedure is the same when Windows 2000, Windows Server
2003 is used.
You must log into Windows as a user who has the “Administrators” or “Power Users” privilege.
Click [Start] and click [Printers and Faxes] to open the Printers and Faxes folder.
1
If you are using the Windows 2000, click [Start], select [Settings], and click [Printers] to open the Printers folder.
Click the [Add a printer] in the Printer Tasks menu.
2
y When using the Windows 2000, double-click [Add Printer] icon.
y The [Add Printer Wizard] dialog box appears.
64 Other Installations
Page 67

3.INSTALLING PRINTER DRIVERS FOR WINDOWS
Click [Next].
3
Select [A network printer, or a printer attached to another computer] and click [Next].
4
3 INSTALLING PRINTER DRIVERS FOR WINDOWS
Other Installations 65
Page 68

3 INSTALLING PRINTER DRIVERS FOR WINDOWS
Select [Connect to a printer on the Internet or on a home or office network], and enter
5
“http://[IP address]:631/Print” in the [URL] field.
y Enter the IP address of this equipment instead of [IP address].
Example: IP address = 192.168.1.2
http://192.168.1.2:631/Print
y Enter the IPv6 address in the [Printer Name or IP Address] box when the MFP is connected in an IPv6 network.
y If your network uses a DNS or WINS server, enter the printer name of this equipment provided from DNS or
WINS instead of [IP address].
Example: Print Server Name = Mfp-05212774
http://Mfp-05212774:631/Print
y When you connect from the Internet, enter the FQDN of this equipment provided from DNS instead of [IP
address].
Example: URL = mfp_05212774.km.com
http://mfp_05212774.km.com:631/Print
“P” for “Print” in the IPP URL must be capitalized. When you are using on Windows 2000/XP/Server 2003, the
IPP port can be created by entering “print” (non-capitalized) in the IPP URL, but the print job cannot be sent to
the equipment. In that case, delete the IPP port and then create the IPP port correctly again.
y If the IPP Port80 Enabled option is enabled on this equipment, you can exclude the port number from the
URL. (i.e. “http://192.168.1.2/Print”)
y If the Enable SSL option for IPP Print is enabled, you must enter “https://[IP address]:[SSL port number]/
Print” in the “URL” field.
(i.e. “https://192.168.1.2:443/Print”)
Click [Next].
6
The [Add Printer Wizard] dialog box appears.
When the Authentication setting for IPP Print is enabled, the dialog box to enter a user name and password
appears. If this dialog box appears, enter the user name and password and click [OK]. For user name and
password, please ask your administrator.
66 Other Installations
Page 69

3.INSTALLING PRINTER DRIVERS FOR WINDOWS
Click [Have Disk].
7
The [Install From Disk] dialog box appears.
Click [Browse].
8
3 INSTALLING PRINTER DRIVERS FOR WINDOWS
The [Locate File] dialog box appears.
Insert the Client Utilities CD-ROM into the CD-ROM drive.
9
When inserting the Client Utilities CD-ROM, the installer may automatically start. Click [Exit] to exit the installer and
continue the operation.
Locate the directory where the printer driver for your Windows version is located,
10
select the inf file, and click [Open].
y To install the PCL6 printer driver for Windows 2000/XP/Server 2003
locate “[CD-ROM drive]:\Client\Drivers\PCL6\W2K_XP_VISTA\<language>”.
y To install the PS3 printer driver for Windows 2000/XP/ Server 2003,
locate “[CD-ROM drive]:\Client\Drivers\PS\W2K_XP_VISTA\<language>”.
When using Windows XP/Server 2003 64-bit edition, select the following folder.
- To install the PCL6 printer driver, locate
“[CD-ROM drive]:\Client\Drivers\PCL6\XP_VISTA_X64\<language>”.
- To install the PS3 printer driver, locate
“[CD-ROM drive]:\Client\Drivers\PS\XP_VISTA_X64\<language>”.
11
Click [OK].
Other Installations 67
Page 70

3 INSTALLING PRINTER DRIVERS FOR WINDOWS
Select the printer driver and click [OK].
12
y If any other printer driver(s) had already been installed on your computer, the Default Printer screen is
displayed. Continue to next step.
y If no printer driver had been installed on your computer, the complete screen is displayed. Skip to step 14.
If the same printer driver has been installed, the following dialog box appears. If it appears, select [Replace
existing driver] and click [Next].
Select whether using this printer as a default printer and click [Next].
13
68 Other Installations
Page 71

3.INSTALLING PRINTER DRIVERS FOR WINDOWS
Click [Finish].
14
The printer driver is installed.
15
Before using the printer driver for printing, please con figure the installed options of the equipment and
department code (if required) on the printer driver. Please refer to the Printing Guide for the instructions.
3 INSTALLING PRINTER DRIVERS FOR WINDOWS
Other Installations 69
Page 72

3 INSTALLING PRINTER DRIVERS FOR WINDOWS
Novell iPrint
This section describes how to install the printer drivers for Novell iPrint.
y To set up the iPrint in the client computers, the NetWare server must be configured for iPrint first.
y Before installing the printer driver for Novell iPrint, the printer driver for Novell iPrint, please make sure the following
environments are satisfied in your computer.
- Microsoft Internet Explorer 5.0 or later or Netscape 4.76 is installed (iPrint is not supported on Netscape 6)
- JavaScript must be enabled on the web browser.
y The certificate is required to login during the Novell iPrint installation when the SSL security is enabled on the
NetWare ser v er.
Installing the printer driver for Novell iPrint
To install the printer driver for Novell iPrint on the client computer, download and install the iPrint Client and printer driver
from the NetWare server.
Start the your web browser and enter the following URL in the address bar.
1
http://<IP address or DNS for NDPS Manager>/ipp
y If you do not know the IP address or DNS for NDPS Manager, please ask your network administrator.
y If the IP address or DNS is secured using SSL, enter the URL address as following:
https://<IP address or DNS for NDPS Manager>/ipps
If the iPrint Client is not installed on your computer, you are prompted to install it.
2
Click the printer that you want to install from the list of available printers that is
3
displayed in the iPrint web page.
The selected printer driver is installed on your computer.
70 Other Installations
Page 73

3 INSTALLING PRINTER DRIVERS FOR WINDOWS
3.INSTALLING PRINTER DRIVERS FOR WINDOWS
Web Service Print
The DPWS (Device Profile for Web Services) function is supported as the WSD (Web Services on Devices) on Windows
Vista. DPWS is a network protocol to perform the plug and play function by transmitting the XML format messages
between devices.
Web Services Print is operated at the client computer using the function of Windows Vista via a network. You can
configure Web Service Print same as the Plug and Play function only by connecting the MFP in your network.
y You must log into Windows as a user who has the “Administrators” privilege.
y Web Services Print is the function of Windows Vista.
y A driver for Web Services Scanning is automatically installed as well as the client software.
y Once the printer driver is installed from the Client Utilities CD-ROM, you will no longer need the CD-ROM for the
installation of the Web Service Print because the printer driver data will remain.
y For the uninstallation procedure of the printer driver, see the following:
P.76 “Uninstalling Printer Drivers”
Installing the printer driver for Web Services Print
Web Services Print is performed using the driver equipped in Windows Vista.
Click [Start] and click [Network]
1
y The [Network] screen is displayed.
y Go to Step 5 if the Network setting is enabled.
Other Installations 71
Page 74
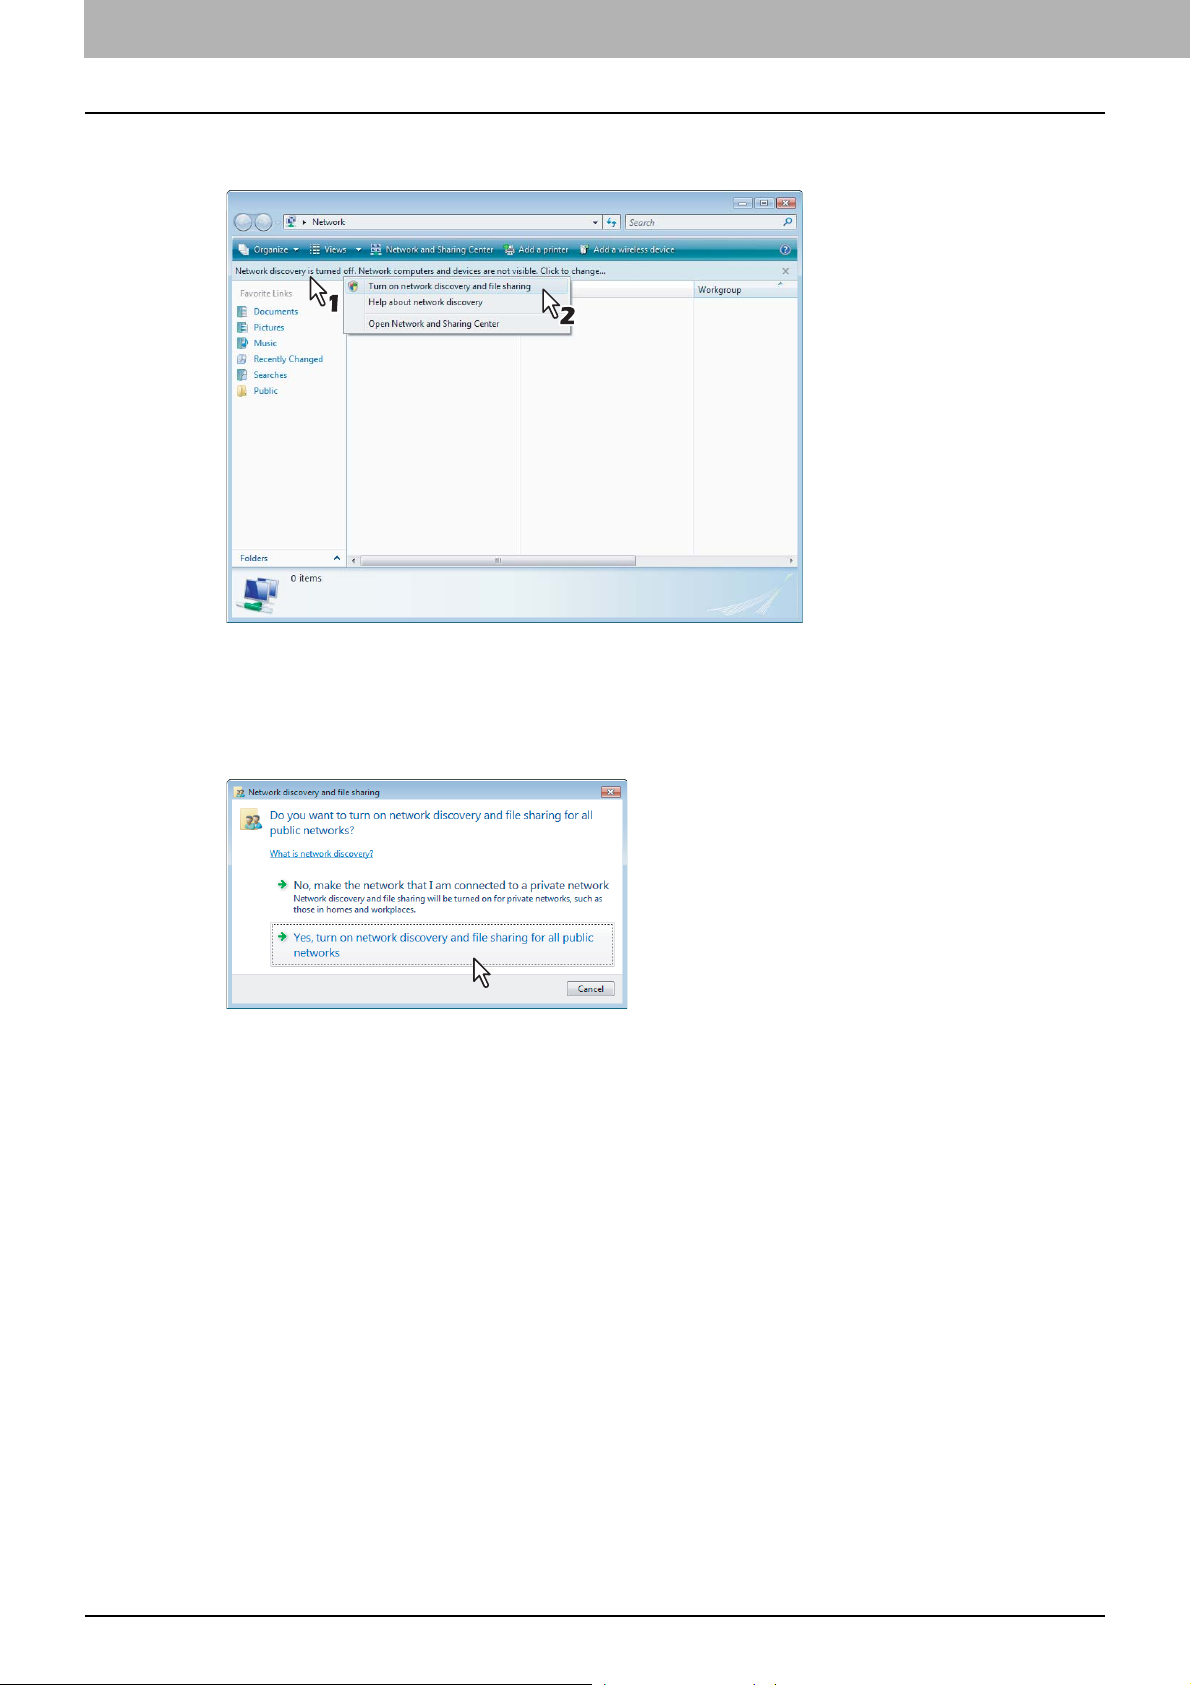
3 INSTALLING PRINTER DRIVERS FOR WINDOWS
Click [Network discovery is turned off. Network computers and devices are not visible.
2
Click to change]. Then select [Turn on network discovery and file sharing].
y The [User account control] dialog box appears.
y If the User account control is disabled, the Network discovery and file sharing screen is displayed. Go to Step 4.
Click [Continue] in the [User account control] dialog box.
3
The [Network discovery and file sharing] screen is displayed.
Click [Yes, turn on network discovery and file sharing for all public networks].
4
Connected computers and icons of the multifunction de vices are displayed in the [Network] screen.
72 Other Installations
Page 75

3.INSTALLING PRINTER DRIVERS FOR WINDOWS
Select the icon of the multifunction device of the equipment and right-click to make the
5
menu appear, then click [Install].
You can display only the multifunction devices by checking [Multifunction Devices] on the [Category] box.
3 INSTALLING PRINTER DRIVERS FOR WINDOWS
y [PnPX Device Association] is displayed on the task bar.
y If the User account control is disabled, [Found New Hardware] is displayed on the task bar.
Go to Step 8.
Click [PnPX Device Association] on the task bar.
6
The [User account control] dialog box appears.
Click [Continue] in the User account control dialog box.
7
[Found New Hardware] is displayed on the task bar.
You can check the installing status by clicking [Installing device driver software] on the lower right-hand screen.
Click [Found New Hardware] on the task bar.
8
The [Found New Hardware] dialog box appears.
Click [Locate and install driver software (recommended)].
9
The [User account control] dialog box appears.
Other Installations 73
Page 76

3 INSTALLING PRINTER DRIVERS FOR WINDOWS
Click [Continue] in the [User account control] dialog box.
10
The [Found New Hardware-Unknown Device] dialog box appears.
Click [Don’t search online].
11
Click [Browse my computer for driver software (advanced)].
12
Set the Client Utilities CD-ROM to the CD-ROM drive, click [Browse] to specify the
13
position of the CD-ROM drive and then click [Next].
When inserting the Client Utilities CD-ROM, the installer may automatically start. Click [Exit] to exit the installer and
continue the operation.
74 Other Installations
Page 77

3.INSTALLING PRINTER DRIVERS FOR WINDOWS
Select the printer driver (each language) to be installed, and then click [Next].
14
When the [Windows Security] dialog box is displayed, click [Install this driver software anyway] to continue the
installation.
3 INSTALLING PRINTER DRIVERS FOR WINDOWS
The installation is completed.
15
Other Installations 75
Page 78

3 INSTALLING PRINTER DRIVERS FOR WINDOWS
Uninstalling Printer Drivers
The following instructions describe how to uninstall the client software.
The procedure to uninstall the printer driver differs depending on the version of Windows used.
P.76 “Windows Vista/Server 2008”
P.78 “Windows 2000/XP/Server 2003”
Windows Vista/Server 2008
Deleting printer drivers
Open the Printers folder , right click on the printer to be deleted and select [delete] from
1
the menu displayed.
The following message appears, click [Yes].
2
Right click in the blank area in the [Printers] window and click [Run as administrator]
3
and then [Server Properties] in the menu displayed.
The [User Account Permission] dialog box appears.
Click [Continue].
4
The [Print Server Properties] dialog box appears.
Display the Drivers tab and select the printer drivers to be deleted. Then click
5
[Remove].
The [Remove Driver And Package] dialog box appears.
76 Uninstalling Printer Drivers
Page 79
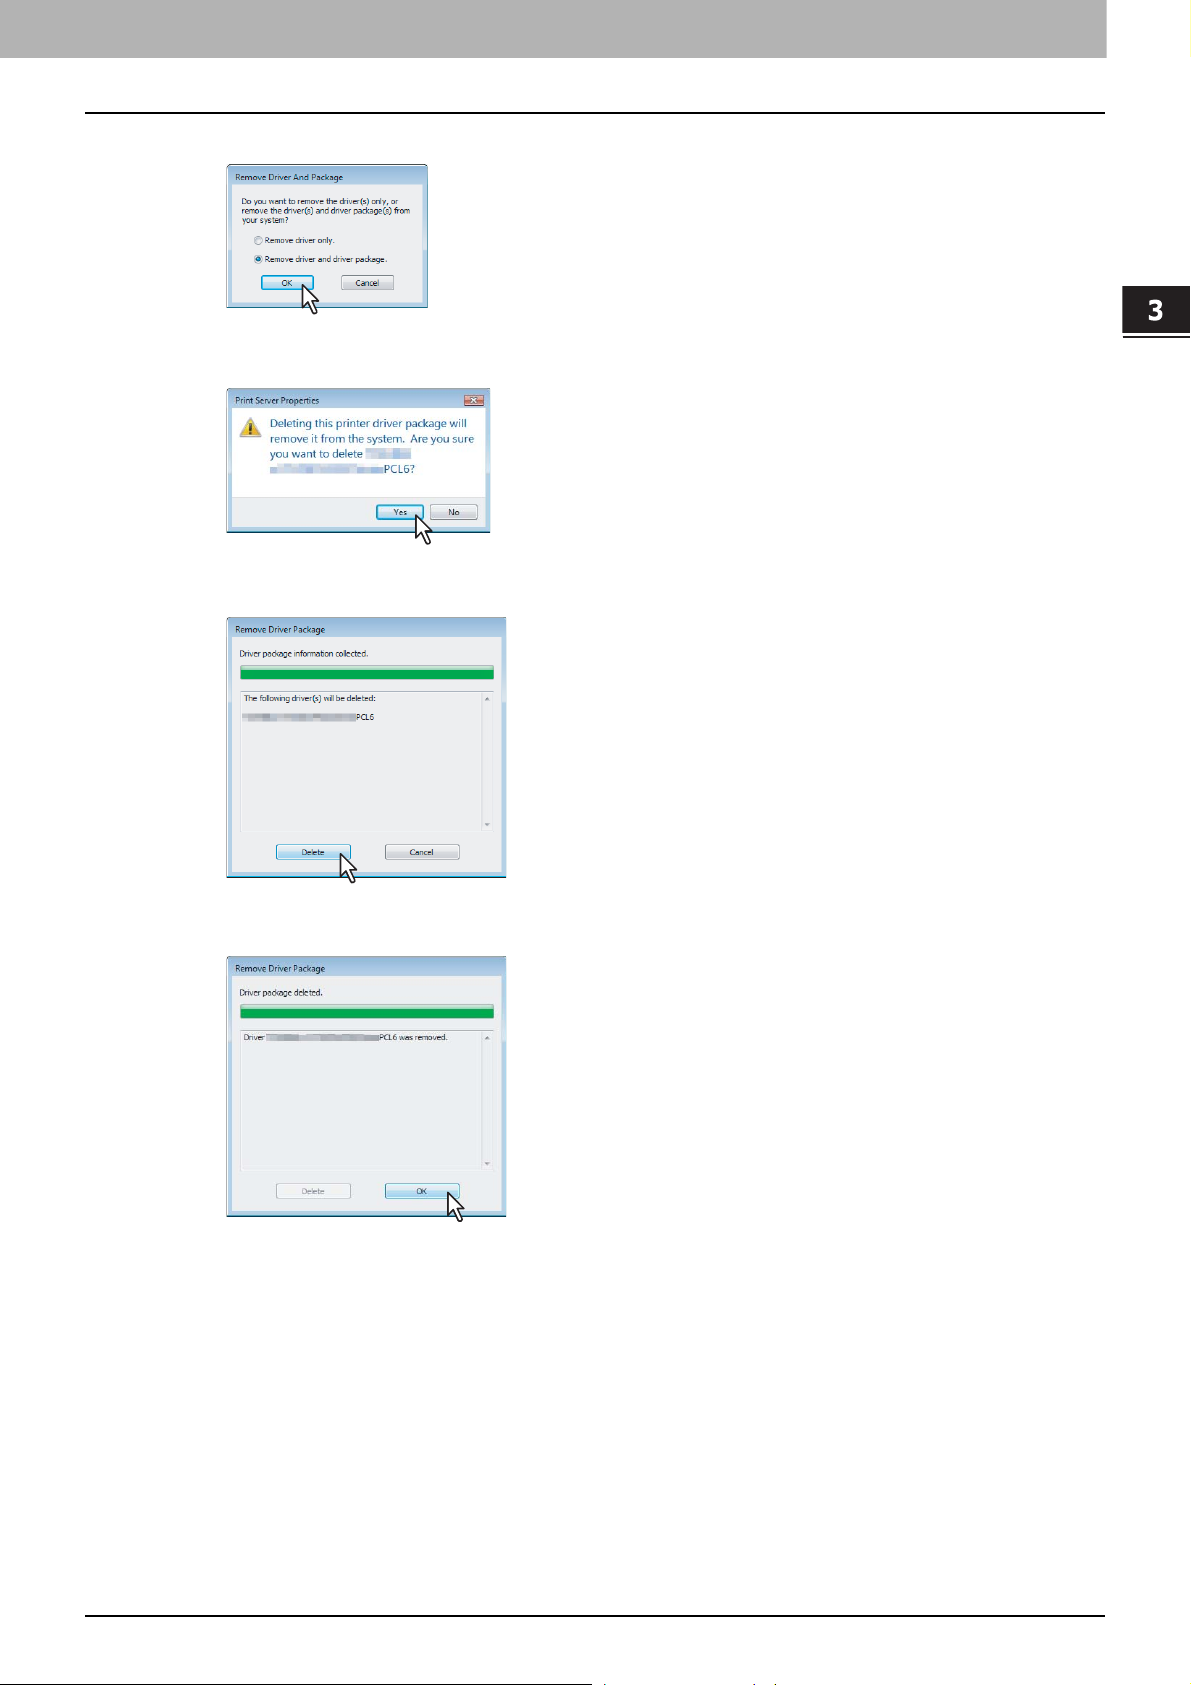
3.INSTALLING PRINTER DRIVERS FOR WINDOWS
Select [Remove driver and driver package] and click [OK].
6
The [Print Server Properties] dialog box appears.
Click [Yes].
7
The “Driver package information collected.” message is displayed.
Click [Delete].
8
3 INSTALLING PRINTER DRIVERS FOR WINDOWS
The “Driver package deleted” message is displayed.
Click [OK].
9
Close the [Print Server Properties] dialog box.
10
Uninstalling Printer Drivers 77
Page 80

3 INSTALLING PRINTER DRIVERS FOR WINDOWS
Windows 2000/XP/Server 2003
Deleting printer drivers
The following describes an installation on Windows XP . The procedure is the same when Windows 2000, Windows Server
2003 is used.
Open the Printers folder or Printers and Faxes folder, right click on the printer to be
1
deleted and select [Delete] from the menu displayed.
The following message appears, click [Yes].
2
Click the [File] menu and select [Server Properties].
3
The [Print Server Properties] dialog box appears.
Select the [Drivers] tab. Select the printer drivers that you want to delete, and click
4
[Remove].
The Print Server Properties dialog box appears.
Click [Yes].
5
The printer drivers are completely deleted.
78 Uninstalling Printer Drivers
Page 81

4.INSTALLING PRINTER DRIVERS FOR
MACINTOSH
This section describes the instructions on how to install the client software on Macintosh.
About the Installation.............................................................................................................80
About client software for Macintosh......................................................................................................................80
Planning for installation........................................................................................................................................80
Installing the Printer on Mac OS X 10.2.4 to Mac OS X 10.5.x............................................81
Installing the Macintosh PPD file..........................................................................................................................81
Configuring the printer on Mac OS X 10.5.x.........................................................................................................84
Configuring the printer on Mac OS X 10.4.x.........................................................................................................93
Configuring the printer on Mac OS X 10.2.4 to Mac OS X 10.3.x ......................................................................102
Uninstalling the Macintosh PPD File.................................................................................. 112
Page 82

4 INSTALLING PRINTER DRIVERS FOR MACINTOSH
About the Installation
Please refer to following instructions for configuring printing systems on Macintosh computers.
P.80 “About client software for Macintosh”
P.80 “Planning for installation”
P.81 “Installing the Printer on Mac OS X 10.2.4 to Mac OS X 10.5.x”
About client software for Macintosh
PostScript Printer Description file
The Macintosh PPD (PostScript Printer Description) file contains information about controller-specific features.
Information within the PPD file for Mac OS X works in conjunction with the Print Center (Mac OS X 10.2.4 to 10.2.8) or
Printer Setup Utility (Mac OS X 10.3.x to Mac OS X 10.5.x) on Mac OS X 10.2.4 to Mac OS X 10.5.x.
Planning for installation
System requirements
To install the printer drivers on a Mac OS computer, the following environment is required.
Display resolution: 1028 x 768 dots or more
OS: Mac OS X 10.2.4 to Mac OS X 10.5.x
Protocol: TCP/IP, AppleTalk (Ethernet), Bonjour
80 About the Installation
Page 83
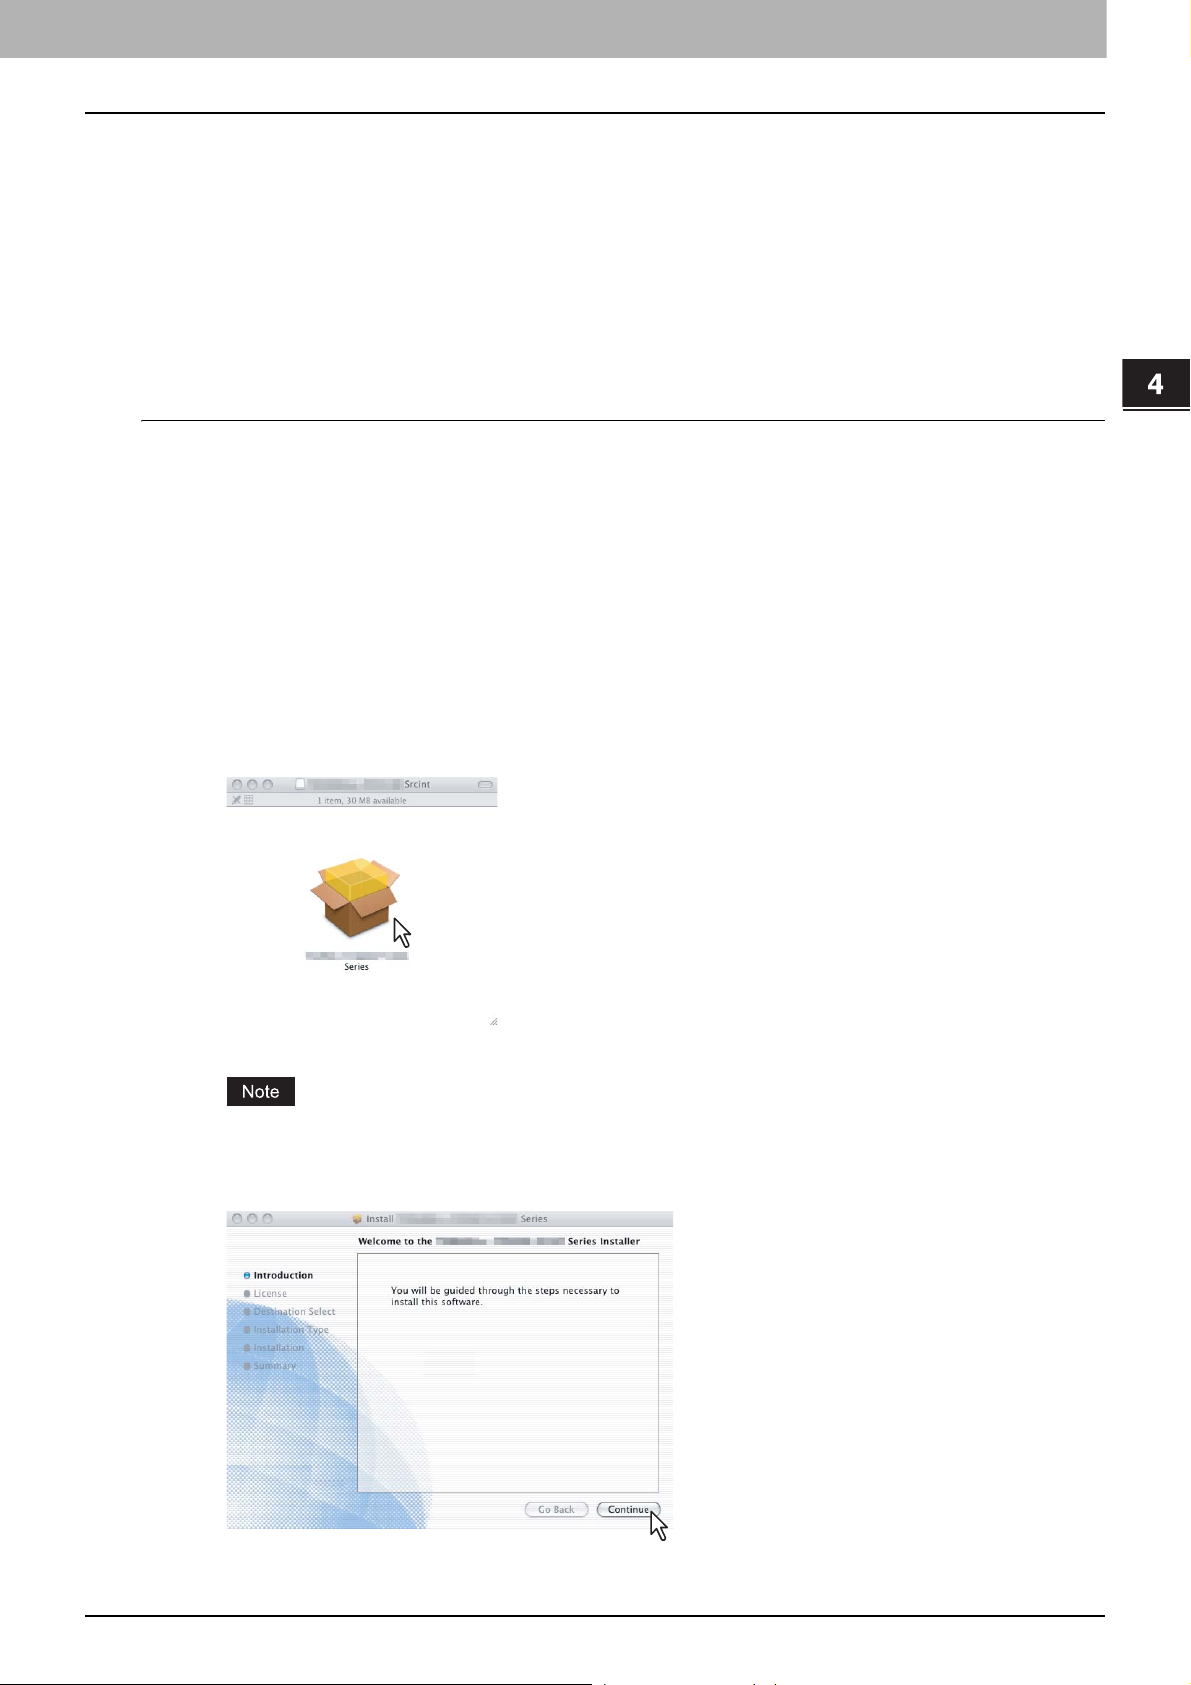
4 INSTALLING PRINTER DRIVERS FOR MACINTOSH
Installing the Printer on Mac OS X 10.2.4 to Mac OS X 10.5.x
Install and configure the printer by the following pages:
P.81 “Installing the Macintosh PPD fil e”
P.84 “Configuring the printer on Mac OS X 10.5.x”
P.93 “Configuring the printer on Mac OS X 10.4.x”
P.102 “Configuring the printer on Mac OS X 10.2.4 to Mac OS X 10.3.x”
P.110 “Configuring the installable options”
Installing the Macintosh PPD file
This equipment supports printing from Mac OS X 10.2.4 to Mac OS X 10.5.x.
Installing the PPD file to Mac OS X
The following describes an installation on Mac OS X 10.5.x. The procedure is the same when Mac OS X 10.2.4 to 10.5.x
is used.
Insert the Client Utilities CD-ROM into the CD-ROM drive and open the “MacPPD:OSX”
1
folder.
Copy the GZIP file (HS_Series.dmg.gz) to the desktop.
2
Double-click the GZIP file on the desktop.
3
y The Disk Image file (HS_Series.dmg) is extracted on the desktop.
y If the installer window appears, go to step 5.
Double-click the Disk Image file (HS_Series.dmg).
4
The installer window appears.
Double-click the icon in the installer window.
5
The welcome message is displayed.
When you install the PPD file to Mac OS X 10.2.4 to 10.2.8, the [Authenticate] dialog box appears. In that case,
enter the name and password and click [OK].
Click [Continue].
6
The [Software License Agreement] window is displayed.
Installing the Printer on Mac OS X 10.2.4 to Mac OS X 10.5.x 81
Page 84
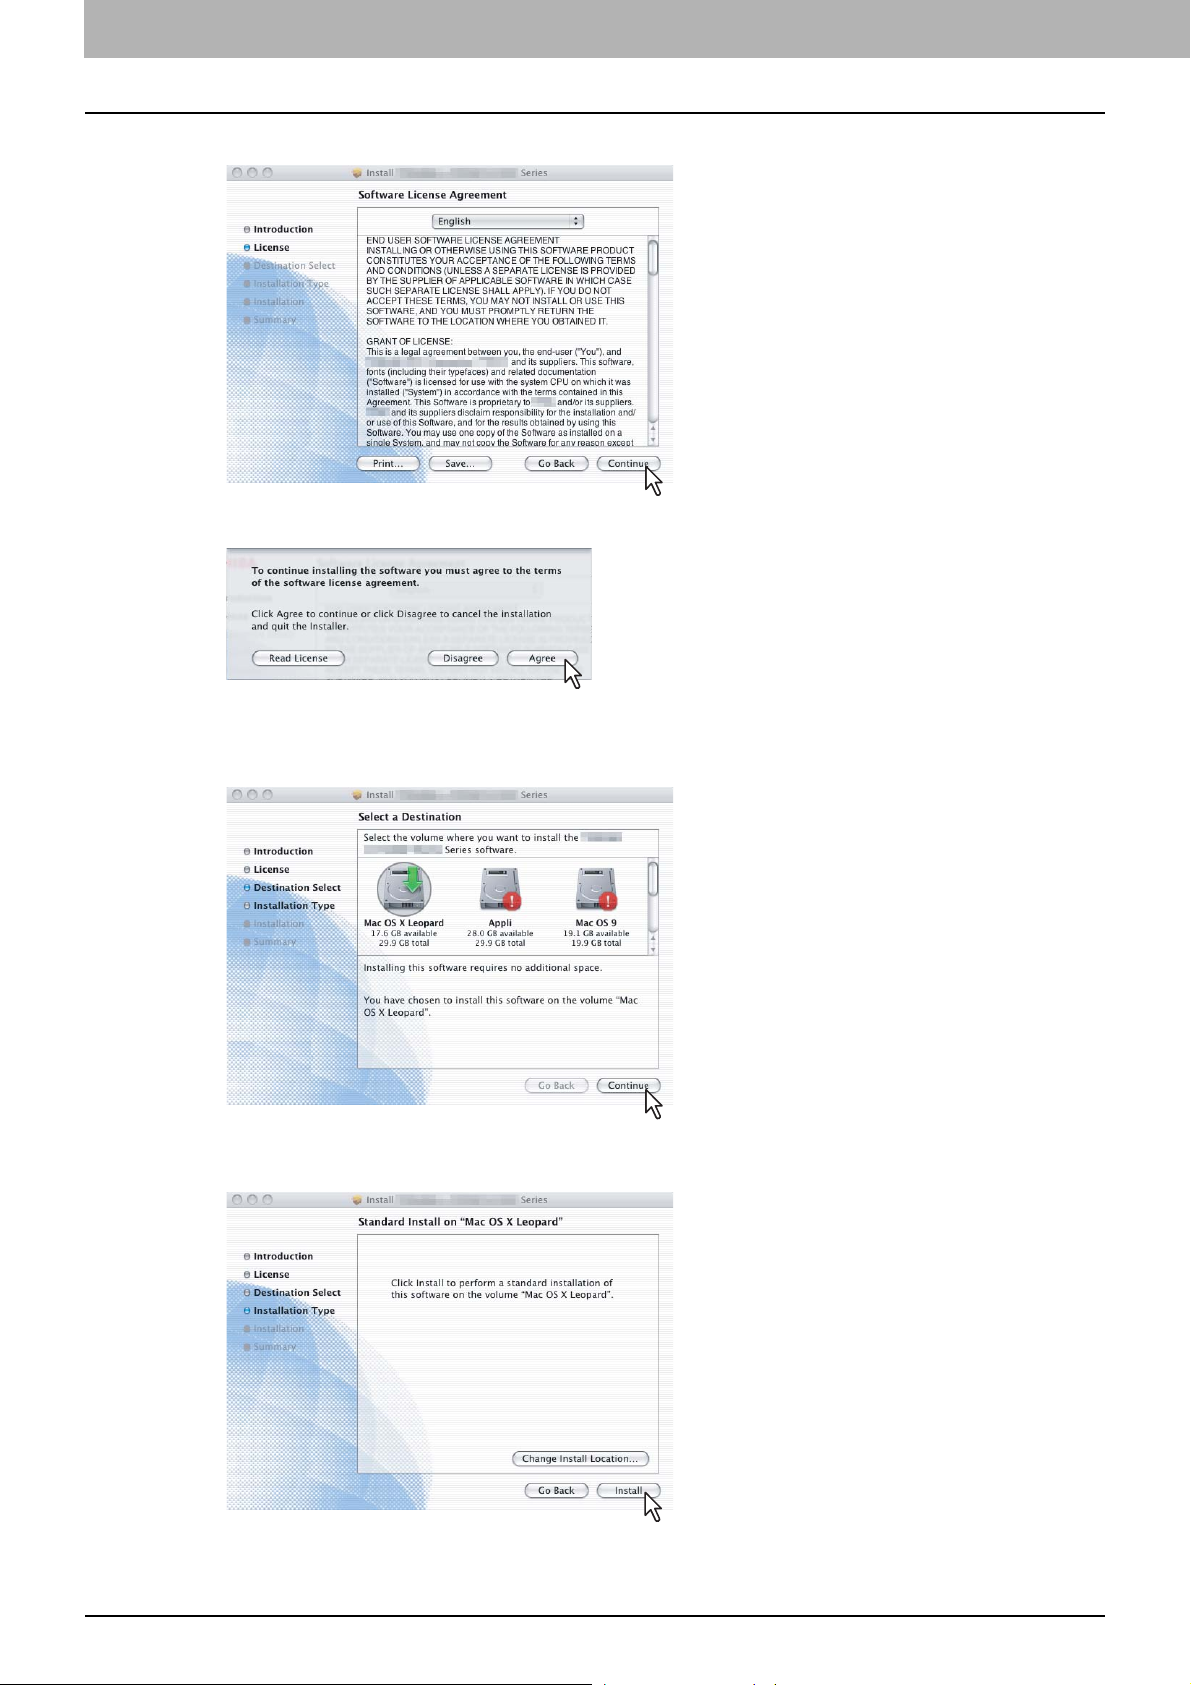
4 INSTALLING PRINTER DRIVERS FOR MACINTOSH
Click [Continue].
7
Click [Agree].
8
The [Select a Destination] window is displayed.
The Select a Destination dialog box appears by clicking [Change Install Location].
9
Select the boot disk for Mac OS X and click [Continue].
The [Standard Install] window is displayed.
Click [Install] (or [Upgrade]).
10
The [Authenticate dialog] box appears.
82 Installing the Printer on Mac OS X 10.2.4 to Mac OS X 10.5.x
Page 85
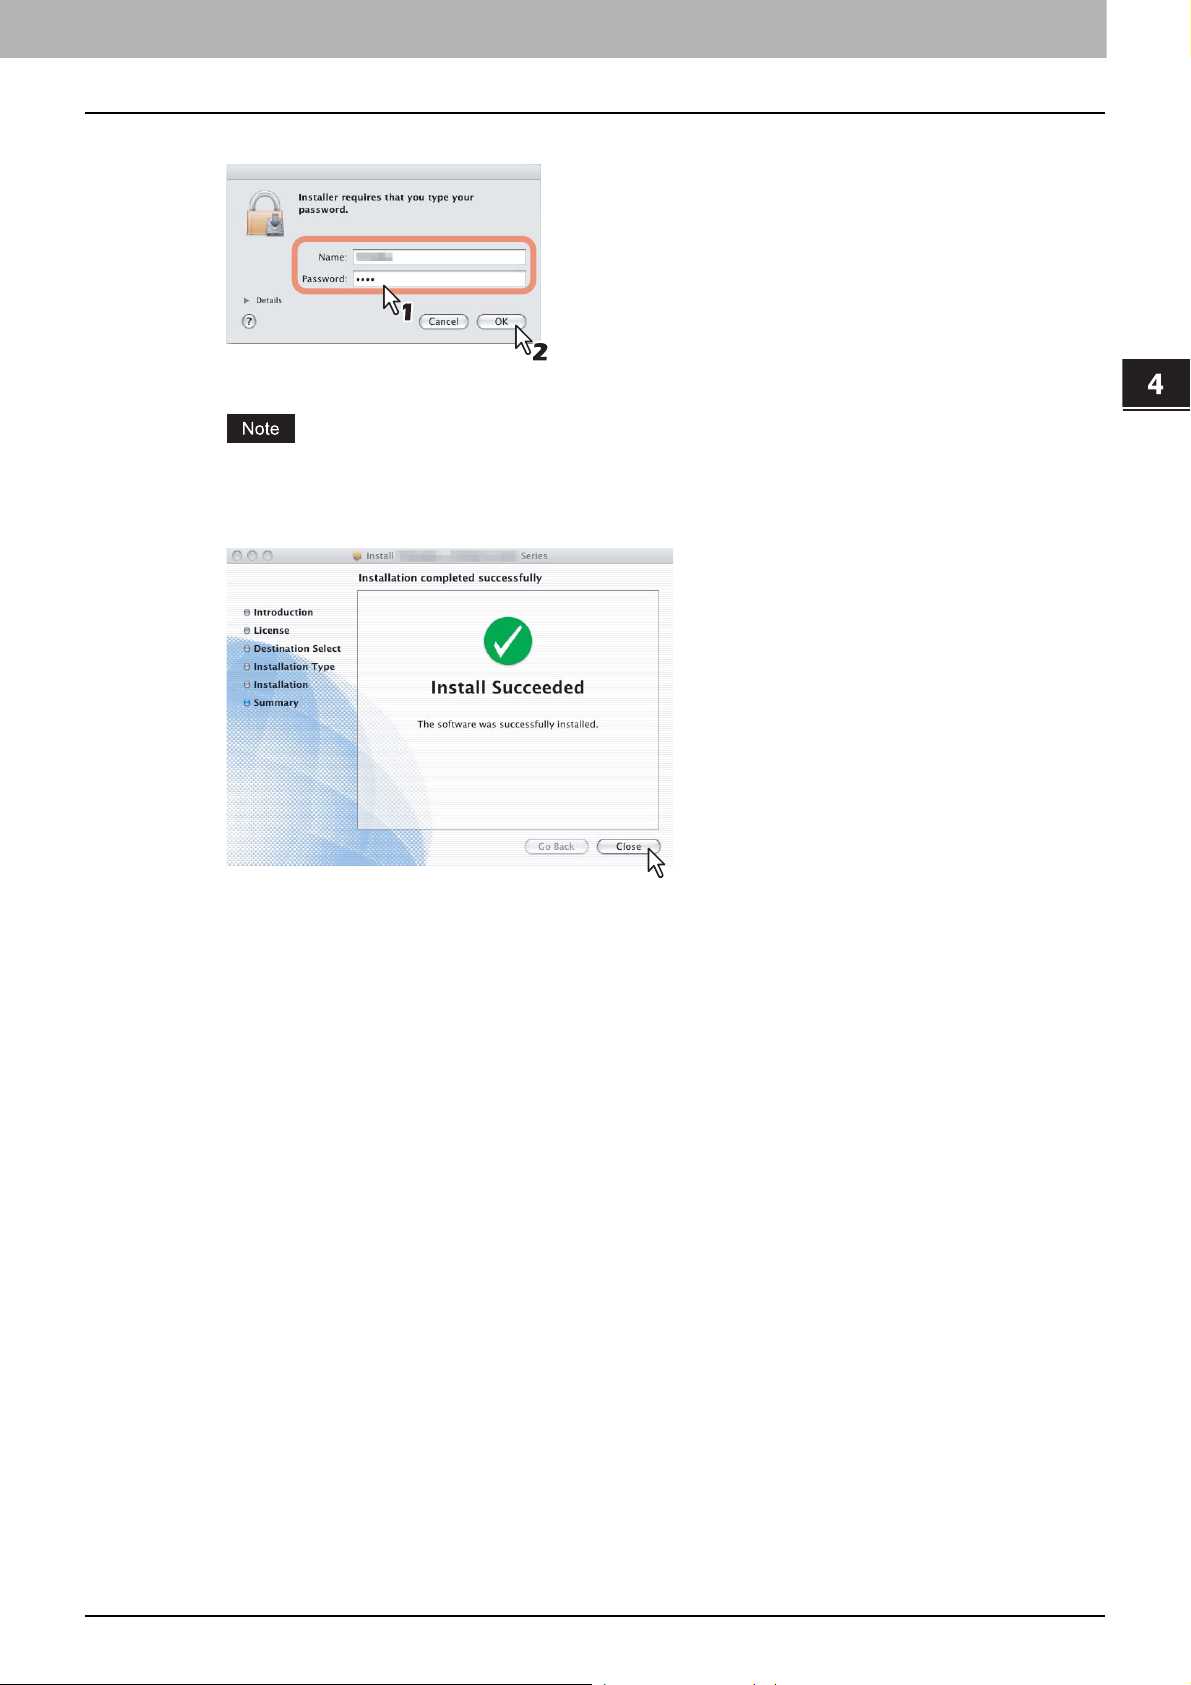
4.INSTALLING PRINTER DRIVERS FOR MACINTOSH
Enter the name and password, and click [OK].
11
It starts copying the PPD files for each language.
When you install the PPD file to Mac OS X 10.2.4 to 10.2.8, the [Authenticate] dialog box does not appear in
this step.
Click [Close] to close the installer window.
12
4 INSTALLING PRINTER DRIVERS FOR MACINTOSH
Delete the GZIP files and Installer files created on the desktop.
13
Continue the procedure for configuring the printer.
14
P.84 “Configuring the printer on Mac OS X 10.5.x”
P.93 “Configuring the printer on Mac OS X 10.4.x”
P.102 “Configuring the printer on Mac OS X 10.2.4 to Mac OS X 10.3.x”
Installing the Printer on Mac OS X 10.2.4 to Mac OS X 10.5.x 83
Page 86

4 INSTALLING PRINTER DRIVERS FOR MACINTOSH
Configuring the printer on Mac OS X 10.5.x
After you copy the PPD file to the library folder in the System Folder, you can configure the printer.
This equipment supports the following Macintosh Printing Services: LPR Printing, AppleTalk Printing, IPP Printing and
Bonjour Printing.
y LPR printing
When this equipment and your computer are connected over TCP/IP network, you can perform LPR printing from
Macintosh computer.
y AppleTalk printing
When this equipment and your computer are connected over AppleTalk network, you can perform AppleTalk printing
from Macintosh computer.
y IPP printing
When this equipment and your computer are connected over TCP/IP network, you can perform IPP printing from
Macintosh computer.
y Bonjour printing
When this equipment and your computer are connected over TCP/IP network, you can perform Bonjour printing from
Macintosh computer.
Configuring Macintosh LPR printing
Open System Preferences and click [Print & Fax].
1
Click [+].
2
84 Installing the Printer on Mac OS X 10.2.4 to Mac OS X 10.5.x
Page 87

4.INSTALLING PRINTER DRIVERS FOR MACINTOSH
Click [IP] and specify the items as described below.
3
Protocol: Line Printer Daemon - LPD
Address: <IP address or DNS name of this equipment>
Queue:print
Name: <Any Name>
Location: <Any Name>
Print Using: HS Series (or UK)
4 INSTALLING PRINTER DRIVERS FOR MACINTOSH
y In the [Name] box, the name that is entered in the [Address] box is automatically displayed.
y When you enter the IP address or DNS name of this equipment in the [Address] box, the correct PPD file is
automatically selected in the [Print Using] box. If the correct PPD is not automatically selected, select
[Select a driver to use] and select the PPD file displayed in the list.
Click [Add].
4
The [Installable Options] window appears.
Set the following options.
5
y Finisher
Not Installed — Select this if a finisher is not installed.
Multi-Position Stapler — Select this when the Finisher or Saddle Stitch Finisher is installed.
Multi-Position Stapler and Ho le Punch — Select this when the Finisher or Saddle Stitch Finisher and Hole Punch
unit are installed.
Even if you select [Not Installed] for the Finisher option during print settings. The finisher options such as
stapling and hole punching can be selected. If you select the finisher options for printing but the finisher is not
installed, finisher settings will be ignored and printing will be performed correctly.
Installing the Printer on Mac OS X 10.2.4 to Mac OS X 10.5.x 85
Page 88

4 INSTALLING PRINTER DRIVERS FOR MACINTOSH
y Drawers
LCF — Select this when the LCF is installed.
LCF is not available for some countries or regions.
y External LCF
Not Installed — Select this when no external LCF is installed.
Installed — Select this when the external LCF is installed.
Click [Continue].
6
The printer is added to the Printer List.
Configuring Macintosh AppleTalk printing
Open System Preferences and click [Print & Fax].
1
Click [+].
2
86 Installing the Printer on Mac OS X 10.2.4 to Mac OS X 10.5.x
Page 89

4.INSTALLING PRINTER DRIVERS FOR MACINTOSH
Click [Default] and select the MFP of the AppleTalk connection displayed in the list.
3
y In the [Name] box, the device name that you selected in the list is automatically displayed.
y When you select this equipment from the list, the correct PPD file is automatically selected in the [Print
Using] box. If the correct PPD is not automatically selected, select [Select a driver to use] and select the
PPD file displayed in the list.
4 INSTALLING PRINTER DRIVERS FOR MACINTOSH
Click [Add].
4
The [Installable Options] window appears.
Set the following options.
5
y Finisher
Not Installed — Select this if a finisher is not installed.
Multi-Position Stapler — Select this when the Finisher or Saddle Stitch Finisher is installed.
Multi-Position Stapler and Ho le Punch — Select this when the Finisher or Saddle Stitch Finisher and Hole Punch
unit are installed.
Even if you select [Not Installed] for the Finisher option during print settings. The finisher options such as
stapling and hole punching can be selected. If you select the finisher options for printing but the finisher is not
installed, finisher settings will be ignored and printing will be performed correctly.
y Drawers
LCF — Select this when the LCF is installed.
LCF is not available for some countries or regions.
y External LCF
Not Installed — Select this when no external LCF is installed.
Installed — Select this when the external LCF is installed.
Installing the Printer on Mac OS X 10.2.4 to Mac OS X 10.5.x 87
Page 90
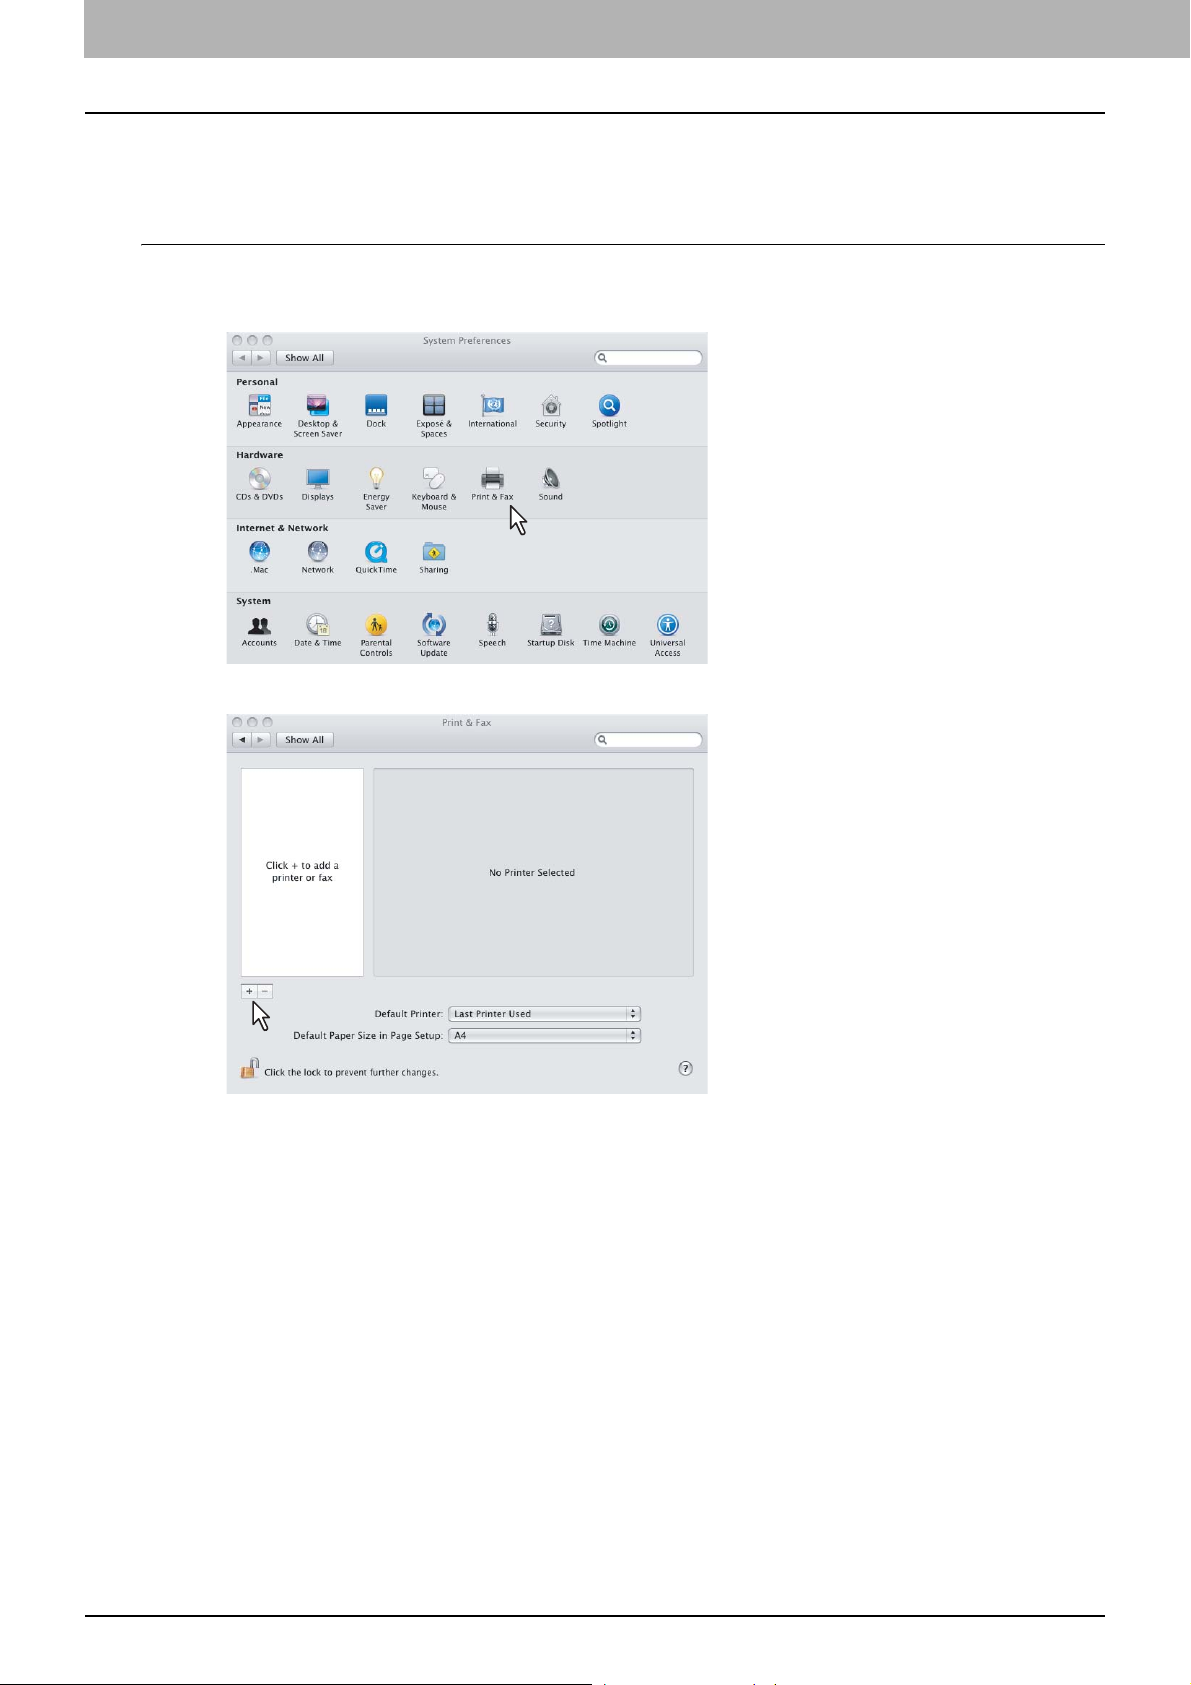
4 INSTALLING PRINTER DRIVERS FOR MACINTOSH
Click [Continue].
6
The printer is added to the Printer List.
Configuring Macintosh IPP printing
When you want to setup IPP print queue in the Mac OS X, follow the procedures below.
Open System Preferences and click [Print & Fax].
1
Click [+].
2
88 Installing the Printer on Mac OS X 10.2.4 to Mac OS X 10.5.x
Page 91

4.INSTALLING PRINTER DRIVERS FOR MACINTOSH
Click [IP] and specify the items as described below.
3
Protocol: Internet Printing Protocol - IPP
Address: <IP address or DNS name of this equipment>
Queue:Print
Name: <Any Name>
Location: <Any Name>
Print Using: HS Series (or UK)
4 INSTALLING PRINTER DRIVERS FOR MACINTOSH
y In the [Name] box, the name that is entered in the [Address] box is automatically displayed.
y When you enter the IP address or DNS name of this equipment in the [Address] box, the correct PPD file is
automatically selected in the [Print Using] box. If the correct PPD is not automatically selected, select
[Select a driver to use] and select the PPD file displayed in the list.
Click [Add].
4
y The Installable Options window appears.
Set the following options.
5
y Finisher
Not Installed — Select this if a finisher is not installed.
Multi-Position Stapler — Select this when the Finisher or Saddle Stitch Finisher is installed.
Multi-Position Stapler and Ho le Punch — Select this when the Finisher or Saddle Stitch Finisher and Hole Punch
unit are installed.
Even if you select [Not Installed] for the Finisher option during print settings. The finisher options such as
stapling and hole punching can be selected. If you select the finisher options for printing but the finisher is not
installed, finisher settings will be ignored and printing will be performed correctly.
Installing the Printer on Mac OS X 10.2.4 to Mac OS X 10.5.x 89
Page 92

4 INSTALLING PRINTER DRIVERS FOR MACINTOSH
y Drawers
LCF — Select this when the LCF is installed.
LCF is not available for some countries or regions.
y External LCF
Not Installed — Select this when no external LCF is installed.
Installed — Select this when the external LCF is installed.
Click [Continue].
6
The printer is added to the Printer List.
Configuring Macintosh Bonjour printing
Open System Preferences and click [Print & Fax].
1
Click [+].
2
90 Installing the Printer on Mac OS X 10.2.4 to Mac OS X 10.5.x
Page 93

4.INSTALLING PRINTER DRIVERS FOR MACINTOSH
Click [Default] and select the MFP of the Bonjour connection displayed in the list.
3
y In the [Name] box, the device name that you selected in the list is automatically displayed.
y When you select the equipment from the list, the correct PPD file is automatically selected in the [Print
Using] box. If the correct PPD is not automatically selected, select [Select a driver to use] and select the
PPD file displayed in the list.
4 INSTALLING PRINTER DRIVERS FOR MACINTOSH
Click [Add].
4
The [Installable Options] window appears.
Set the following options.
5
y Finisher
Not Installed — Select this if a finisher is not installed.
Multi-Position Stapler — Select this when the Finisher or Saddle Stitch Finisher is installed.
Multi-Position Stapler and Ho le Punch — Select this when the Finisher or Saddle Stitch Finisher and Hole Punch
unit are installed.
Even if you select [Not Installed] for the Finisher option during print settings. The finisher options such as
stapling and hole punching can be selected. If you select the finisher options for printing but the finisher is not
installed, finisher settings will be ignored and printing will be performed correctly.
y Drawers
LCF — Select this when the LCF is installed.
LCF is not available for some countries or regions.
y External LCF
Not Installed — Select this when no external LCF is installed.
Installed — Select this when the external LCF is installed.
Installing the Printer on Mac OS X 10.2.4 to Mac OS X 10.5.x 91
Page 94

4 INSTALLING PRINTER DRIVERS FOR MACINTOSH
Click [Continue].
6
The printer is added to the Printer List.
92 Installing the Printer on Mac OS X 10.2.4 to Mac OS X 10.5.x
Page 95
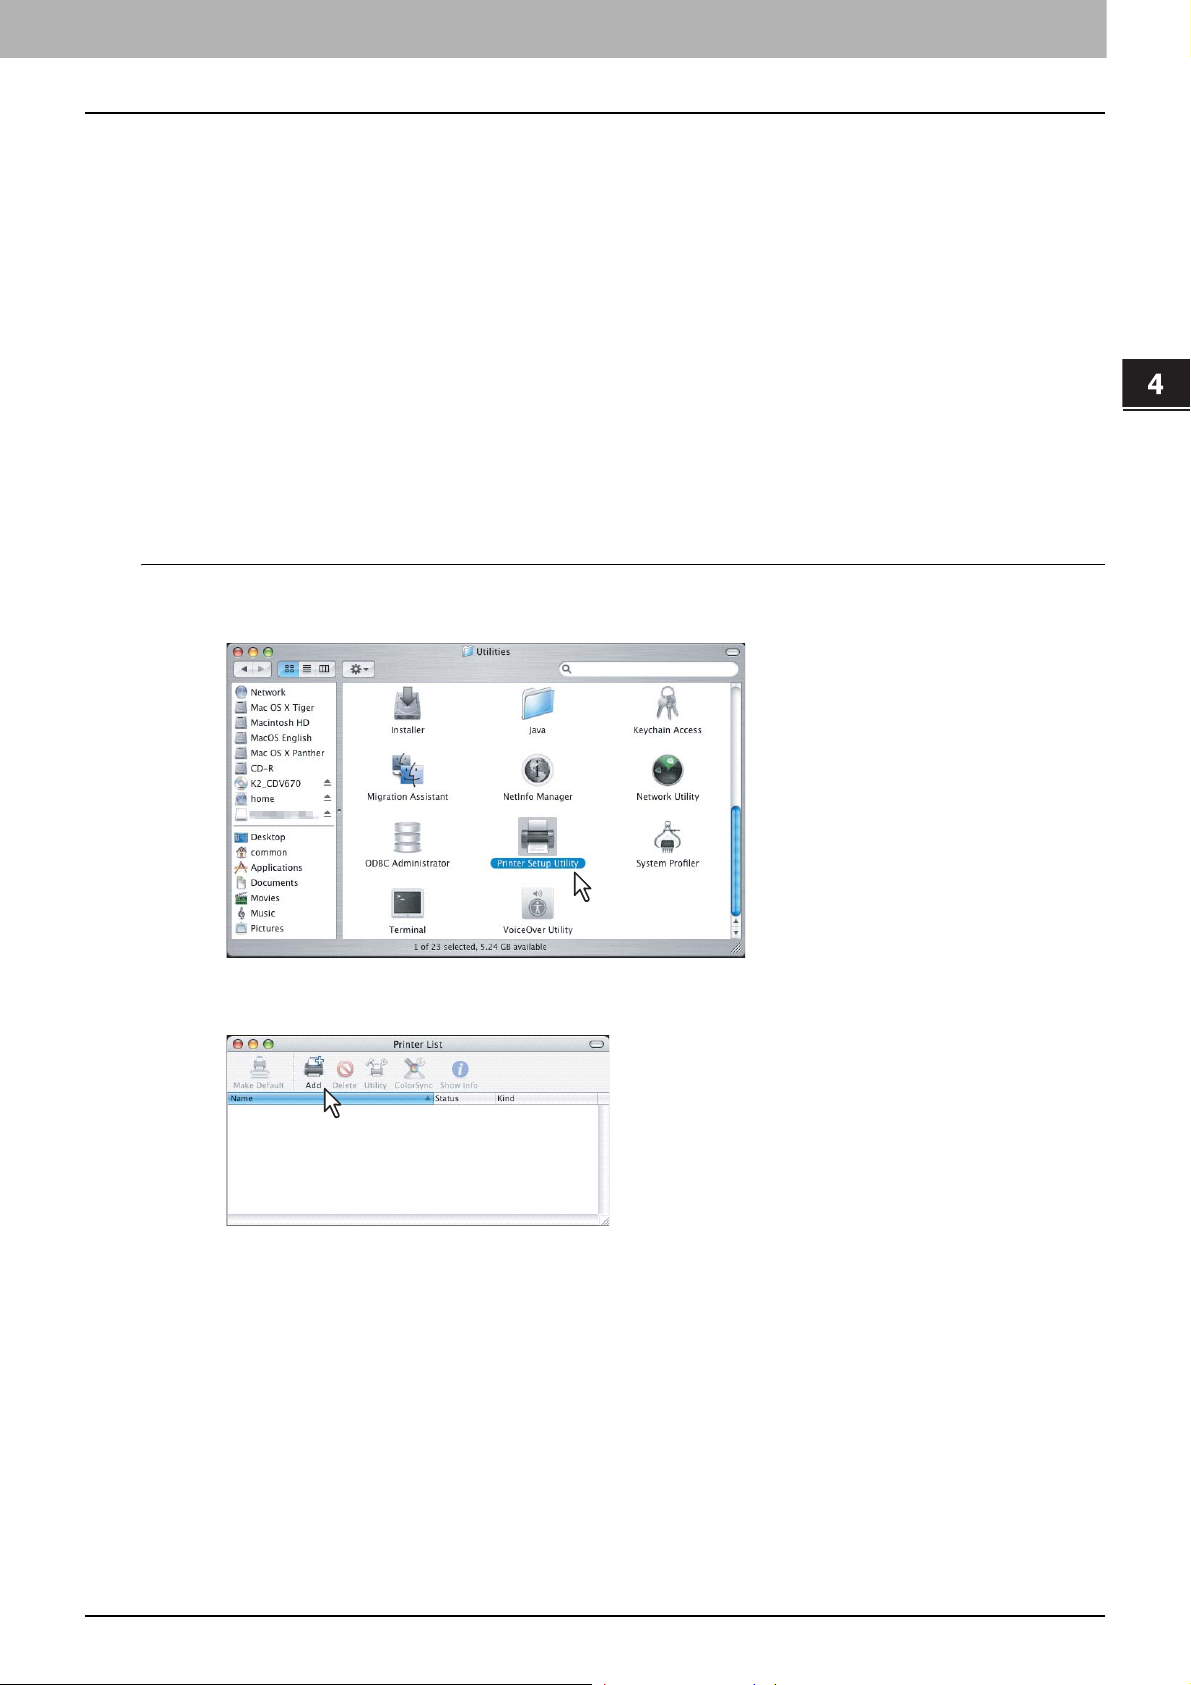
4 INSTALLING PRINTER DRIVERS FOR MACINTOSH
4.INSTALLING PRINTER DRIVERS FOR MACINTOSH
Configuring the printer on Mac OS X 10.4.x
After you copy the PPD file to the library folder in the System Folder, you can configure the printer.
This equipment supports the following Macintosh Printing Services: LPR Printing, AppleTalk Printing, IPP Printing, and
Bonjour Printing.
y LPR printing
When this equipment and your computer are connected over TCP/IP network, you can perform LPR printing from
Macintosh computer.
y AppleTalk printing
When this equipment and your computer are connected over AppleTalk network, you can perform AppleTalk printing
from Macintosh computer.
y IPP printing
When this equipment and your computer are connected over TCP/IP network, you can perform IPP printing from
Macintosh computer.
y Bonjour printing
When this equipment and your computer are connected over TCP/IP network, you can perform Bonjour printing from
Macintosh computer.
Configuring Macintosh LPR printing
Start the Printer Setup Utility located in the “Applications:Utilities” folder in the Boot
1
Disk.
The [Printer List] dialog box appears.
Click [Add].
2
Installing the Printer on Mac OS X 10.2.4 to Mac OS X 10.5.x 93
Page 96

4 INSTALLING PRINTER DRIVERS FOR MACINTOSH
Click [IP Printer] and specify the items as described below.
3
Protocol: Line Printer Daemon - LPD
Address: <IP address or DNS name of this equipment>
Queue:print
Name: <Any Name>
Location: <Any Name>
Print Using: HS Series (or UK)
y In the [Name] box, the name that is entered in the [Address] box is automatically displayed.
y When you enter the IP address or DNS name of this equipment in the [Address] box, the correct PPD file is
automatically selected in the [Print Using] box. If the correct PPD is not automatically selected, select [HS
Series] in the [Print Using] box and select the PPD file displayed in the list.
Click [Add].
4
The [Installable Options] window appears.
Set the following options.
5
y Finisher
Not Installed — Select this if a finisher is not installed.
Multi-Position Stapler — Select this when the Finisher or Saddle Stitch Finisher is installed.
Multi-Position Stapler and Ho le Punch — Select this when the Finisher or Saddle Stitch Finisher and Hole Punch
unit are installed.
Even if you select [Not Installed] for the Finisher option during print settings. The finisher options such as
stapling and hole punching can be selected. If you select the finisher options for printing but the finisher is not
installed, finisher settings will be ignored and printing will be performed correctly.
94 Installing the Printer on Mac OS X 10.2.4 to Mac OS X 10.5.x
Page 97
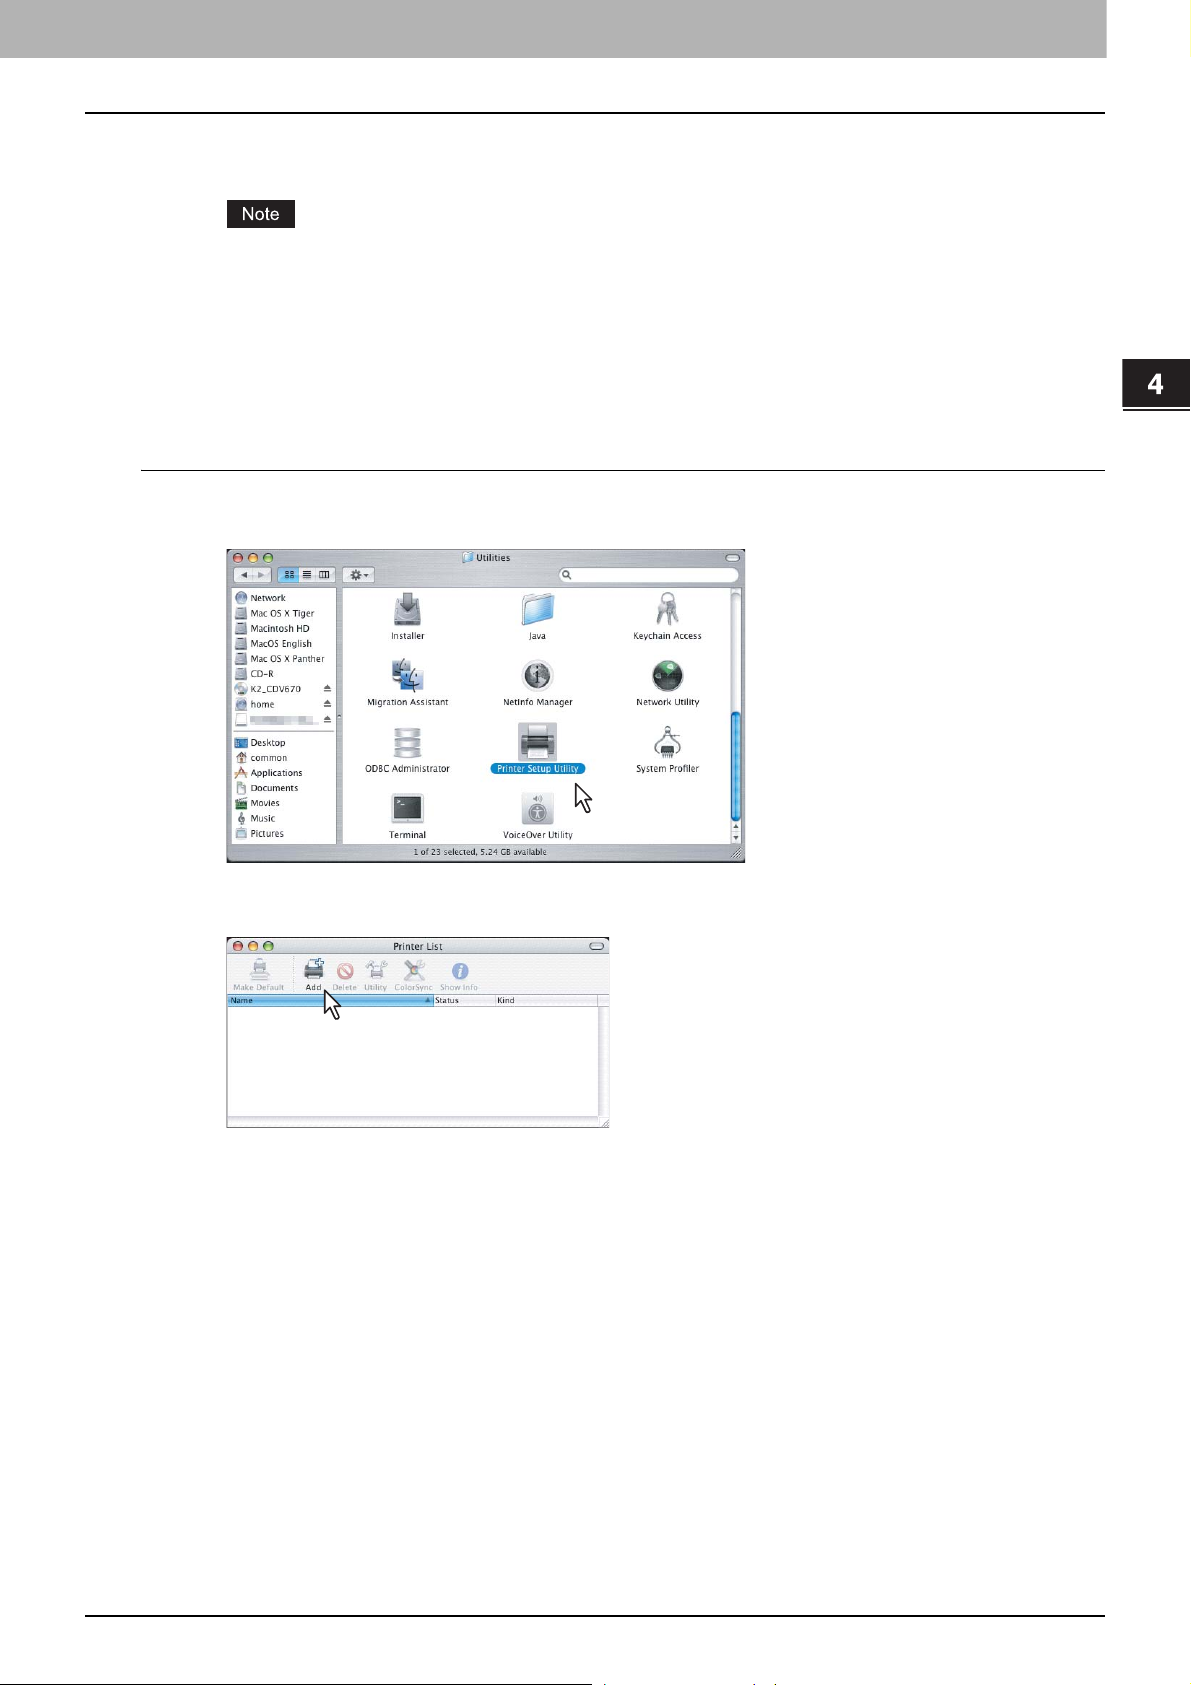
4.INSTALLING PRINTER DRIVERS FOR MACINTOSH
y Drawers
LCF — Select this when the LCF is installed.
LCF is not available for some countries or regions.
y External LCF
Not Installed — Select this when no external LCF is installed.
Installed — Select this when the external LCF is installed.
Click [Continue].
6
The printer is added to the Printer List.
Configuring Macintosh AppleTalk printing
Start the Printer Setup Utility located in the “Applications:Utilities” folder in the Boot
1
Disk.
4 INSTALLING PRINTER DRIVERS FOR MACINTOSH
The [Printer List] dialog box appears.
Click [Add].
2
Installing the Printer on Mac OS X 10.2.4 to Mac OS X 10.5.x 95
Page 98

4 INSTALLING PRINTER DRIVERS FOR MACINTOSH
Click [Default Browser] and select the equipment of the AppleTalk connection
3
displayed in the list.
y In the [Name] box, the name that is entered in the [Address] box is automatically displayed.
y When you select the equipment in the list, the correct PPD file is automatically selected in the [Print Using]
box. If the correct PPD is not automatically selected, select [HS Series] in the [Print Using] box and select
the PPD file displayed in the list.
Click [Add].
4
The [Determining Installable Options] window appears.
Click [Configure] while the window is displayed.
5
The [Installable Options] window appears.
96 Installing the Printer on Mac OS X 10.2.4 to Mac OS X 10.5.x
Page 99
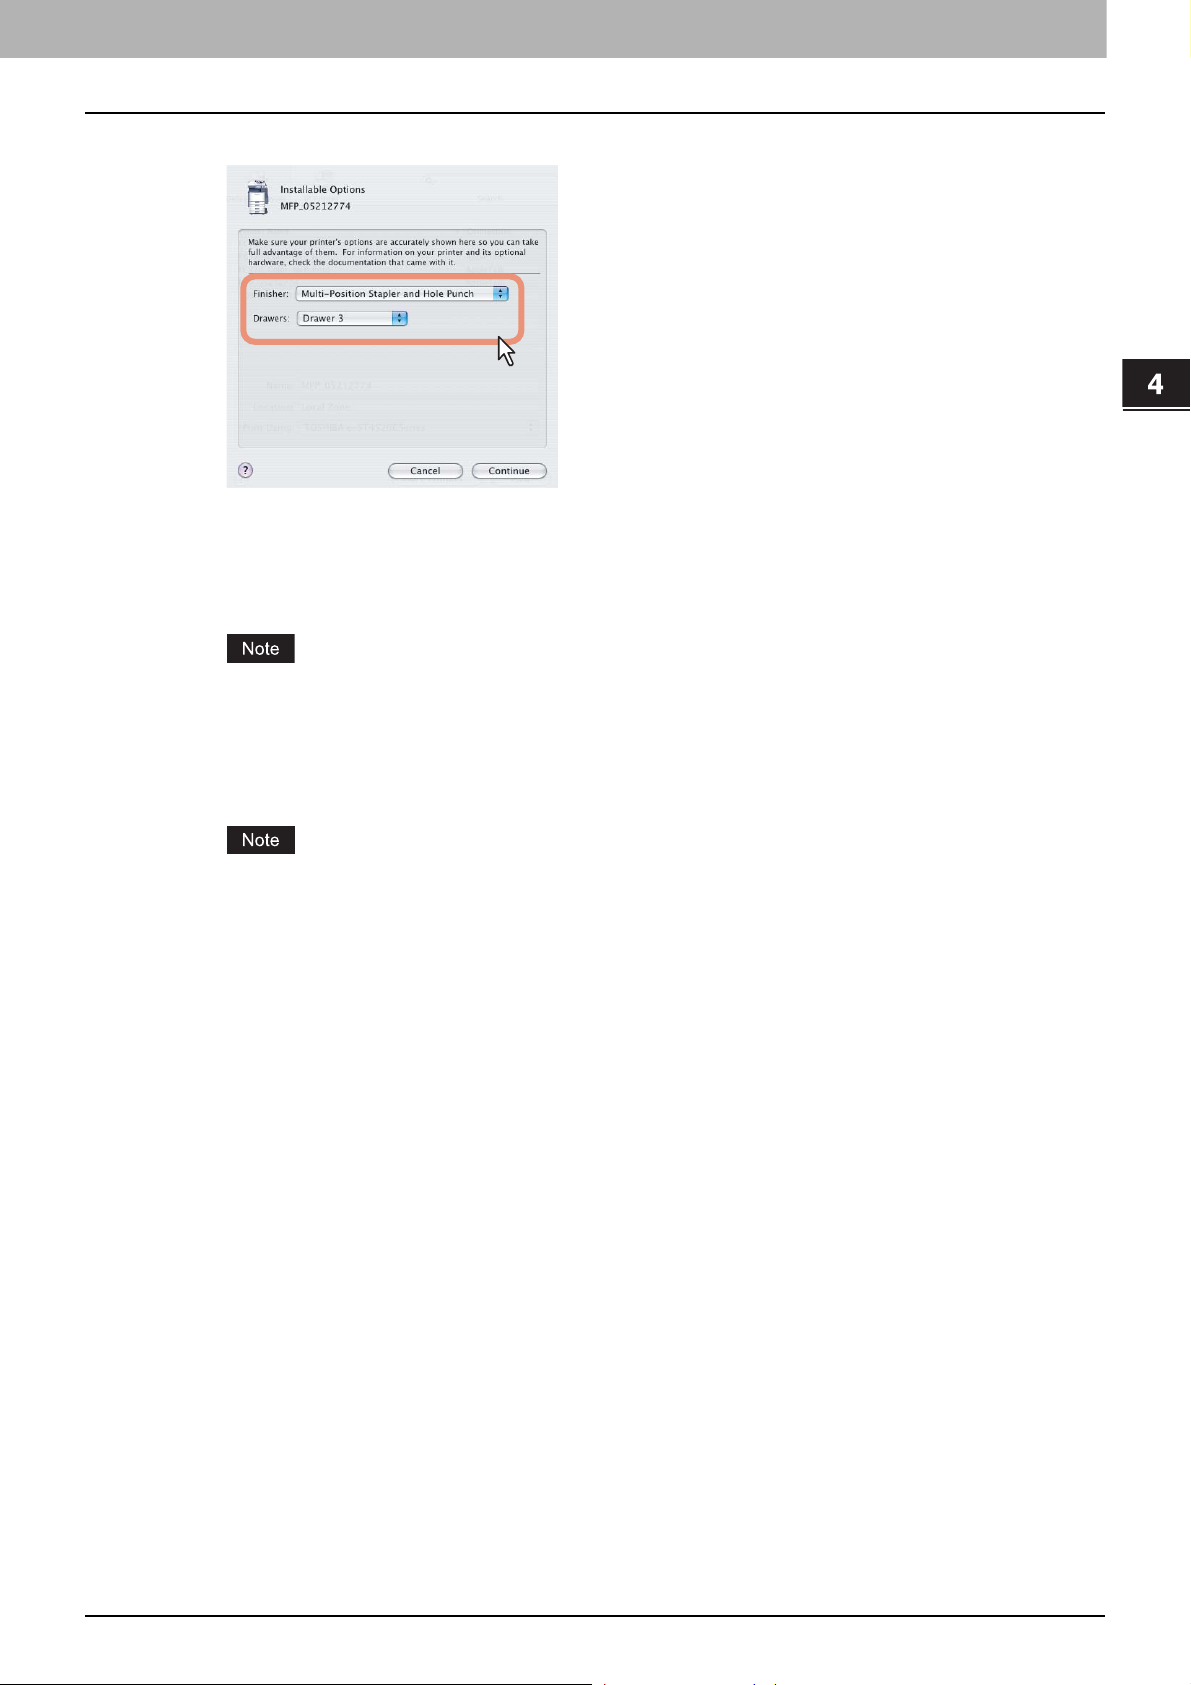
4.INSTALLING PRINTER DRIVERS FOR MACINTOSH
Set the following options.
6
y Finisher
Not Installed — Select this if a finisher is not installed.
Multi-Position Stapler — Select this when the Finisher or Saddle Stitch Finisher is installed.
Multi-Position Stapler and Ho le Punch — Select this when the Finisher or Saddle Stitch Finisher and Hole Punch
unit are installed.
4 INSTALLING PRINTER DRIVERS FOR MACINTOSH
Even if you select [Not Installed] for the Finisher option during print settings. The finisher options such as
stapling and hole punching can be selected. If you select the finisher options for printing but the finisher is not
installed, finisher settings will be ignored and printing will be performed correctly.
y Drawers
LCF — Select this when the LCF is installed.
LCF is not available for some countries or regions.
y External LCF
Not Installed — Select this when no external LCF is installed.
Installed — Select this when the external LCF is installed.
Click [Continue].
7
The printer is added to the Printer List.
Installing the Printer on Mac OS X 10.2.4 to Mac OS X 10.5.x 97
Page 100

4 INSTALLING PRINTER DRIVERS FOR MACINTOSH
Configuring Macintosh IPP printing
When you want to setup IPP print queue in the Mac OS X, follow the procedures below.
Start the Printer Setup Utility located in the “Applications:Utilities” folder in the Boot
1
Disk.
The [Printer List] dialog box appears.
Click [Add].
2
Click [IP Printer] and specify the items as described below.
3
Protocol: Internet Printing Protocol - IPP
Address: <IP address or DNS name of this equipment>
Queue:Print
Name: <Any Name>
Location: <Any Name>
Print Using: HS Series (or UK)
y In the [Name] box, the name that is entered in the [Address] box is automatically displayed.
y When you enter the IP address or DNS name of this equipment in the [Address] box, the correct PPD file is
automatically selected in the [Print Using] box. If the correct PPD is not automatically selected, select [HS
Series] in the [Print Using] box and select the PPD file displayed in the list.
98 Installing the Printer on Mac OS X 10.2.4 to Mac OS X 10.5.x
 Loading...