


Version A1
Request Operator’s Guide

Version A1

Request Operators Guide
Contents
Introduction ............................................................................................................................................... 1
Request Installation .................................................................................................................................. 2
Installation ......................................................................................................................................... 2
Windows Driver Access ................................................................................................... 2
CD Installation ................................................................................................................... 3
First Time Run ..................................................................................................................... 3
Master Password ............................................................................................................... 3
Connection to Printers ................................................................................................................... 4
Find Printers ........................................................................................................................ 4
Setting up the Request Client to submit to an FTP site ............................................................. 5
Other Installation Considerations ................................................................................................. 7
Prompt Setup..................................................................................................................... 7
Pen Tables.......................................................................................................................... 7
Advanced Configuration and Settings........................................................................ 7
Main Screen...................................................................................................................................... 8
Simple Printing ................................................................................................................................ 10
Function / Feature Details .................................................................................................................... 12
Folder Select ................................................................................................................................... 12
Select a folder .................................................................................................................12
Folder up .......................................................................................................................... 12
Display File types “Browse for” ..................................................................................... 12
File Select......................................................................................................................................... 13
Select a file ...................................................................................................................... 13
Recall Last File(s).............................................................................................................14
Select All...........................................................................................................................14
Unselect All ......................................................................................................................14
Job List..............................................................................................................................................15
Selected Files................................................................................................................... 15
Pen Table ......................................................................................................................... 16
Stamp ...............................................................................................................................16
Fold.................................................................................................................................... 17
File Order ..........................................................................................................................20
Key Job Settings .............................................................................................................................21
Requester .........................................................................................................................21
Job Number.....................................................................................................................21
Description ....................................................................................................................... 21
Requested Time ..............................................................................................................22
Date ..................................................................................................................................22
Enlarge / Reduce ........................................................................................................... 22
Media Type......................................................................................................................22
Pen Table ......................................................................................................................... 22
# of Copies ......................................................................................................................23
Collate..............................................................................................................................23
Cut Sheet ......................................................................................................................... 23
Advanced Job Settings ................................................................................................................ 23

Request Operators Guide
Pen Configuration ..........................................................................................................24
Advanced Settings Button............................................................................................26
Line Width Compensation ............................................................................................ 26
Vector Line Dither Pattern ............................................................................................ 27
Clip to Image Size........................................................................................................... 27
Use Round End Capping ..............................................................................................28
Turn Merge On ................................................................................................................28
Raster Photo Mode ........................................................................................................28
Raster Density Level .......................................................................................................29
Photo Dither Pattern (Raster) .......................................................................................29
Enlarge / Reduce / Force Size .....................................................................................30
Image Information ......................................................................................................... 30
Scheme ............................................................................................................................ 31
Enlarge / Reduce ........................................................................................................... 31
Roll Size ............................................................................................................................. 31
Length ...............................................................................................................................31
Rotation............................................................................................................................ 31
Ignore Force Size ............................................................................................................ 31
Nest ................................................................................................................................... 32
Margins .............................................................................................................................32
Refresh Image .................................................................................................................32
View Box ...........................................................................................................................32
Rotation............................................................................................................................ 33
Stamp – Monochrome Systems ................................................................................... 34
Stamp Schemes .............................................................................................................. 34
Use Text .............................................................................................................................34
Use Image ........................................................................................................................ 34
Current Font Area........................................................................................................... 35
Set Font .............................................................................................................................35
Stamp Placement and Margin Area .......................................................................... 35
Text Rotation – Pull down .............................................................................................. 35
Text / Graphic Gap – Text Field ................................................................................... 36
Graphic Rotation – Pull down ...................................................................................... 36
Graphic Placement – Pull down ................................................................................. 36
Merge Type – Pull down ................................................................................................36
Screening – Pull down ...................................................................................................37
Text Settings Area ...........................................................................................................37
Macro – Pull down Menu ..............................................................................................37
Graphic Image Settings Area ...................................................................................... 37
Preview Stamp ................................................................................................................38
Set Font .............................................................................................................................38
Stamp – Color Systems ..................................................................................................38
Font Color ........................................................................................................................ 38
Stamp Placement and Margin Area .......................................................................... 39
Text Rotation – Pull down .............................................................................................. 39
Text / Graphic Gap – Text Field ................................................................................... 39
Font Color ........................................................................................................................ 39
Graphic Rotation – Pull down ...................................................................................... 40
Graphic Placement – Pull down ................................................................................. 40

Request Operators Guide
Text Settings Area ...........................................................................................................40
Macro – Pull down Menu ..............................................................................................40
Graphic Image Settings Area ...................................................................................... 40
Preview Stamp ................................................................................................................41
Header Label .................................................................................................................. 41
Mirror .................................................................................................................................41
Invert .................................................................................................................................42
Quick View.......................................................................................................................42
Nested Side by Side Printing......................................................................................... 43
Printing DWF files ............................................................................................................................44
Printing PDF files.............................................................................................................................. 45
Printer Selection .............................................................................................................................46
Printer Information – Monochrome Systems ............................................................................. 46
Printer Information – Color Systems ............................................................................................46
Menu ................................................................................................................................................ 46
File......................................................................................................................................46
View .................................................................................................................................. 46
Sort.....................................................................................................................................48
Option............................................................................................................................... 48
Manage ........................................................................................................................... 52
Transfer .............................................................................................................................53
DropBox ...........................................................................................................................................54
Submitting Files for Printing – Color Systems ......................................................................................55
Print Monochrome .........................................................................................................................55
CAD - Line ....................................................................................................................................... 56
CAD - GIS......................................................................................................................................... 56
Graphics - Line ............................................................................................................................... 56
Graphics - Photo ............................................................................................................................57
Scan-to-File ..................................................................................................................................... 57
Custom Pull Down Filters...............................................................................................................58
Brightness......................................................................................................................................... 59
Color Adjustment........................................................................................................................... 59
Printing PDF files/Multipage PDF Files .........................................................................................60
Retrieve Scans.........................................................................................................................................61
Mailbox Retrieval ........................................................................................................................... 61
Empty Mailbox............................................................................................................................... 63
Appendix.........................................................................................................................................65
Technical description.................................................................................................................... 65
INI Configuration ............................................................................................................................67
Creating Productivity Reports ..................................................................................................... 71

Request Operators Guide
This information is solely for use of Personnel and Authorized Dealers. No part of this publication may be copied, reproduced or
distributed in any form without express written permission from. 2011.
- 1 -
Introduction
Request software can be used to send documents, or sets of documents, to a IPS Printer. Request can
be used from a workstation enabling users to print across a network. It has many advanced features
and powerful functions to allow customization of prints.
Using the Request software, allows the “requester” a number of adjustable options like selection of
username, job number, media type, zoom, number of copies, description of job, pen table adjustments,
time / date selection, invert, mirror, stamping, header and fold options to name a few features.
The Request package also allows configuration of the IPS. This includes scan to FTP location, accounting
to include Passwords and Usernames, as well as retrieve scanned images from IPS Mailboxes.
It is also used to configure PrintNet another submission utility that is web browser based.
The Request software is a comprehensive tool which allows access to the advanced functions and
features for the IPS.

Request Operators Guide
This information is solely for use of Personnel and Authorized Dealers. No part of this publication may be copied, reproduced or
distributed in any form without express written permission from. 2011.
- 2 -
Request Installation
Installation
Two methods are available to install the Request software on a Windows workstation.
1. Use an installed and configured Windows Driver to gain access to the Request Installer.
2. Use the Installation CD provided with the IPS (Installation software should also be located on your
local companies web site if this CD is not available, Please ensure Installer version is correct for your
IPS system!)
System Requirements
Workstation operation systems can be:
Windows XP
Windows Vista
Windows 7
Administrator access is also required to install the software.
Windows Driver Access
1. Click on “Start”, then “Printers and Fax”, and locate the Windows print Driver in the list of installed
printers. If you do not see a printer you should now use the CD Installation.
2. Right click on the driver and select “Properties”.
3. On the “Device Settings” tab will be an “INSTALL REQUEST” Button.
4. Double click on the button and follow the prompts. Please accept the default settings for easy
of configuration.

Request Operators Guide
This information is solely for use of Personnel and Authorized Dealers. No part of this publication may be copied, reproduced or
distributed in any form without express written permission from. 2011.
- 3 -
CD Installation
1. Locate the Software CD and place in disk drive.
2. Browse CD for INSTALLATION and Request.
3. Follow the prompts and select all defaults settings for easy of configuration.
First Time Run
After the software installation is complete, the application can be run from the
Desktop (icon shown) or from the “Start,” then “All Programs,” then “Programs,”
Request. It may take several minutes for the first time launch as it attempts to
find configured devices. (See Connection to Printers)
WINDOWS VISTA NOTE: In order for the Request to work properly on Windows
Vista you need to install the Request software as Admin. To do so right click on
the Request.exe and select install as Admin. After it installs you MUST run it the first time as Admin
(right click on the Shortcut created and choose Run as Admin) this sets up the proper pathing. You
should then be able to use the software without issues.
If you are still having issues try turning off User Account Control (UAC). This is done in Control Pane
under User Accounts there you will find Turn Account Control on or off.
Windows 7 Note: In order for the Request to work properly on Windows 7 it will need to be installed
as an Admin and compatibility mode will have to be set to “Run this program as and administrator”.
If there are still issues running software, User Account Control (UAC) may have to be adjusted.
Master Password
Upon starting Request for the first time it will ask for a MASTER PASSWORD. This password allows
access to the Prompt Settings (accounting) configurations. This password will be used by the
department manager or network administrator. Please key in a password noting that it will be
required in the future. Once set the password cannot be changed.
Request Operators Guide
This information is solely for use of Personnel and Authorized Dealers. No part of this publication may be copied, reproduced or
distributed in any form without express written permission from. 2011.
- 4 -
Connection to Printers
Once the Request application is installed and run for the first time, It is necessary to connect to a device.
Please ensure that the printer is plugged in and turned on, and the address IP settings configured.
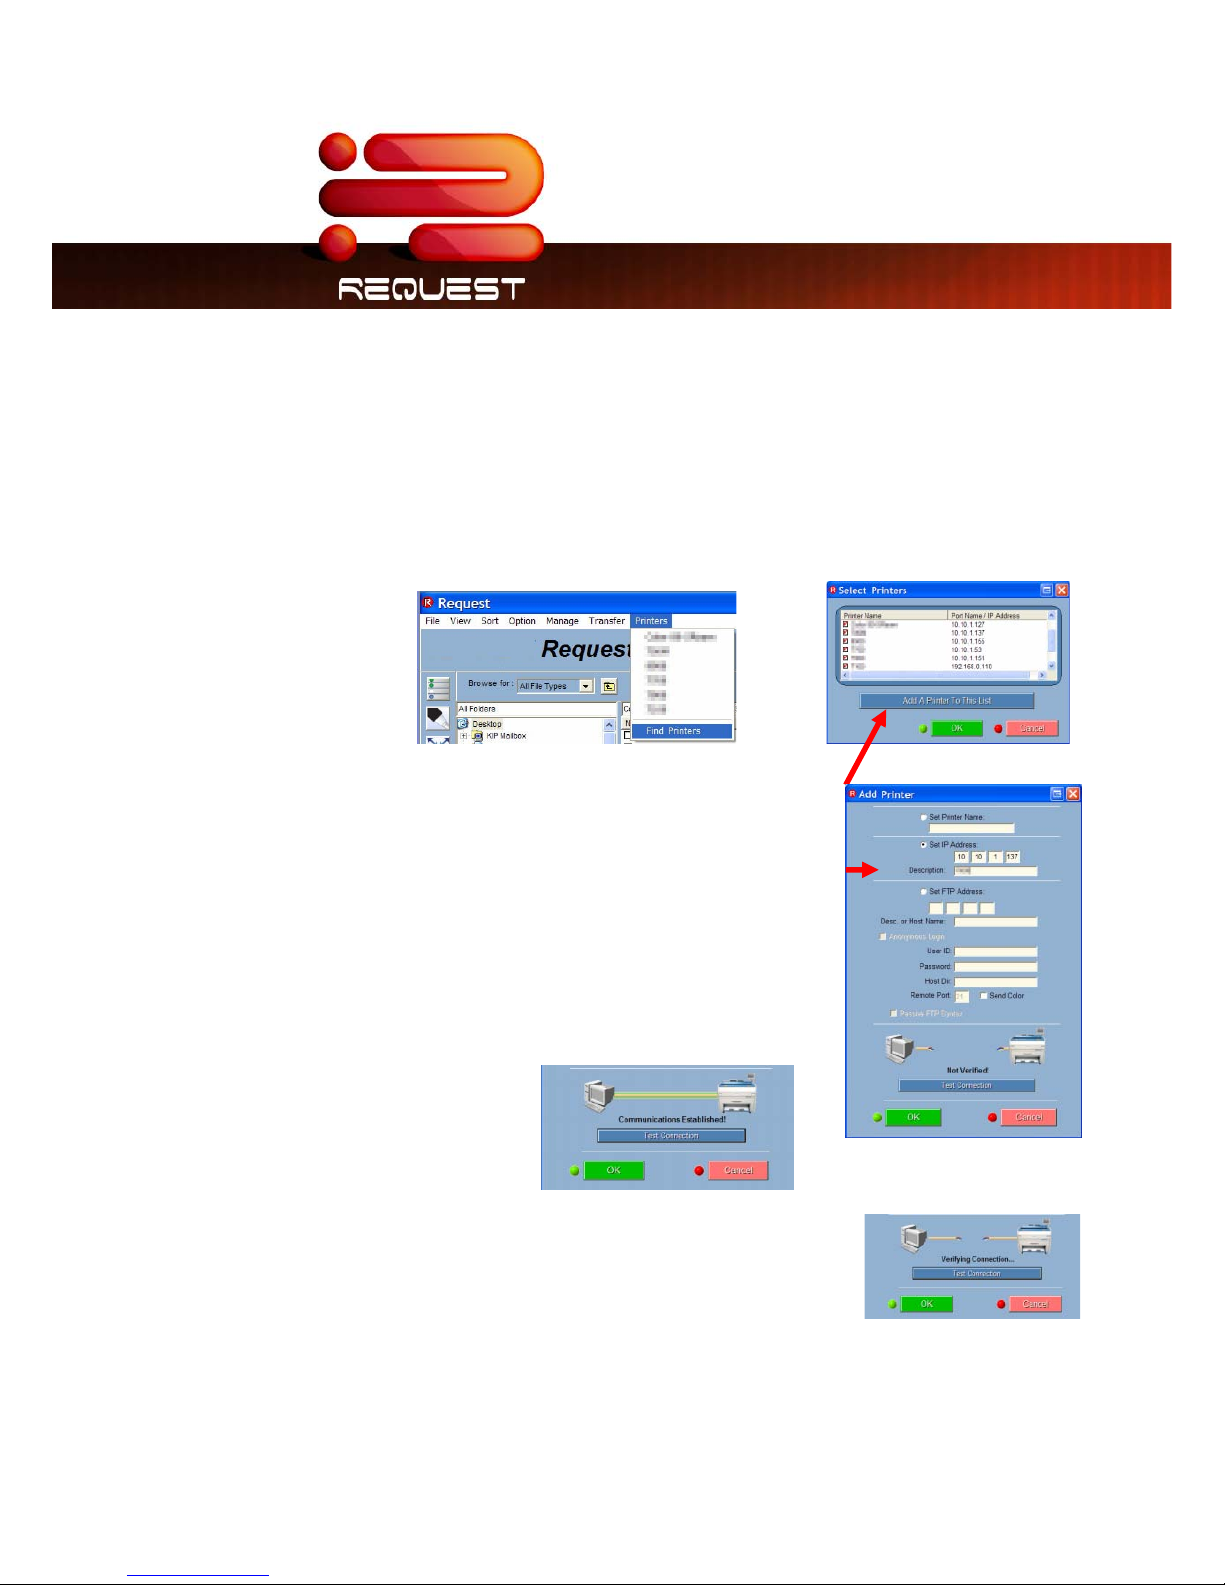
Find Printers
Using the upper menu, select “Printers” then “Find Printers”. This will search the network for any
available printers and provide a list to select from.
1. From the Select Printers window choose the Printer(s) that will
be used.
2. If the Printer is not in the list from the FIND PRINTERS window,
click ADD A PRINTER TO THIS LIST.
3. Select SET IP ADDRESS and enter the IP Address of the IPS
(recommended setup).
4. In the “Description” field, key in a friendly Printer Name that
the User can recognize .
5. TEST the connection.
Note: If the IP address is invalid, the following message is seen.

Request Operators Guide
This information is solely for use of Personnel and Authorized Dealers. No part of this publication may be copied, reproduced or
distributed in any form without express written permission from. 2011.
- 5 -
6. Click OK to return to the SELECT PRINTERS screen and ensure that the printer is selected with a
check mark.
7. Click OK again to return to Request Screen.
8. The roll information should now be seen in the lower main screen to confirm connection.
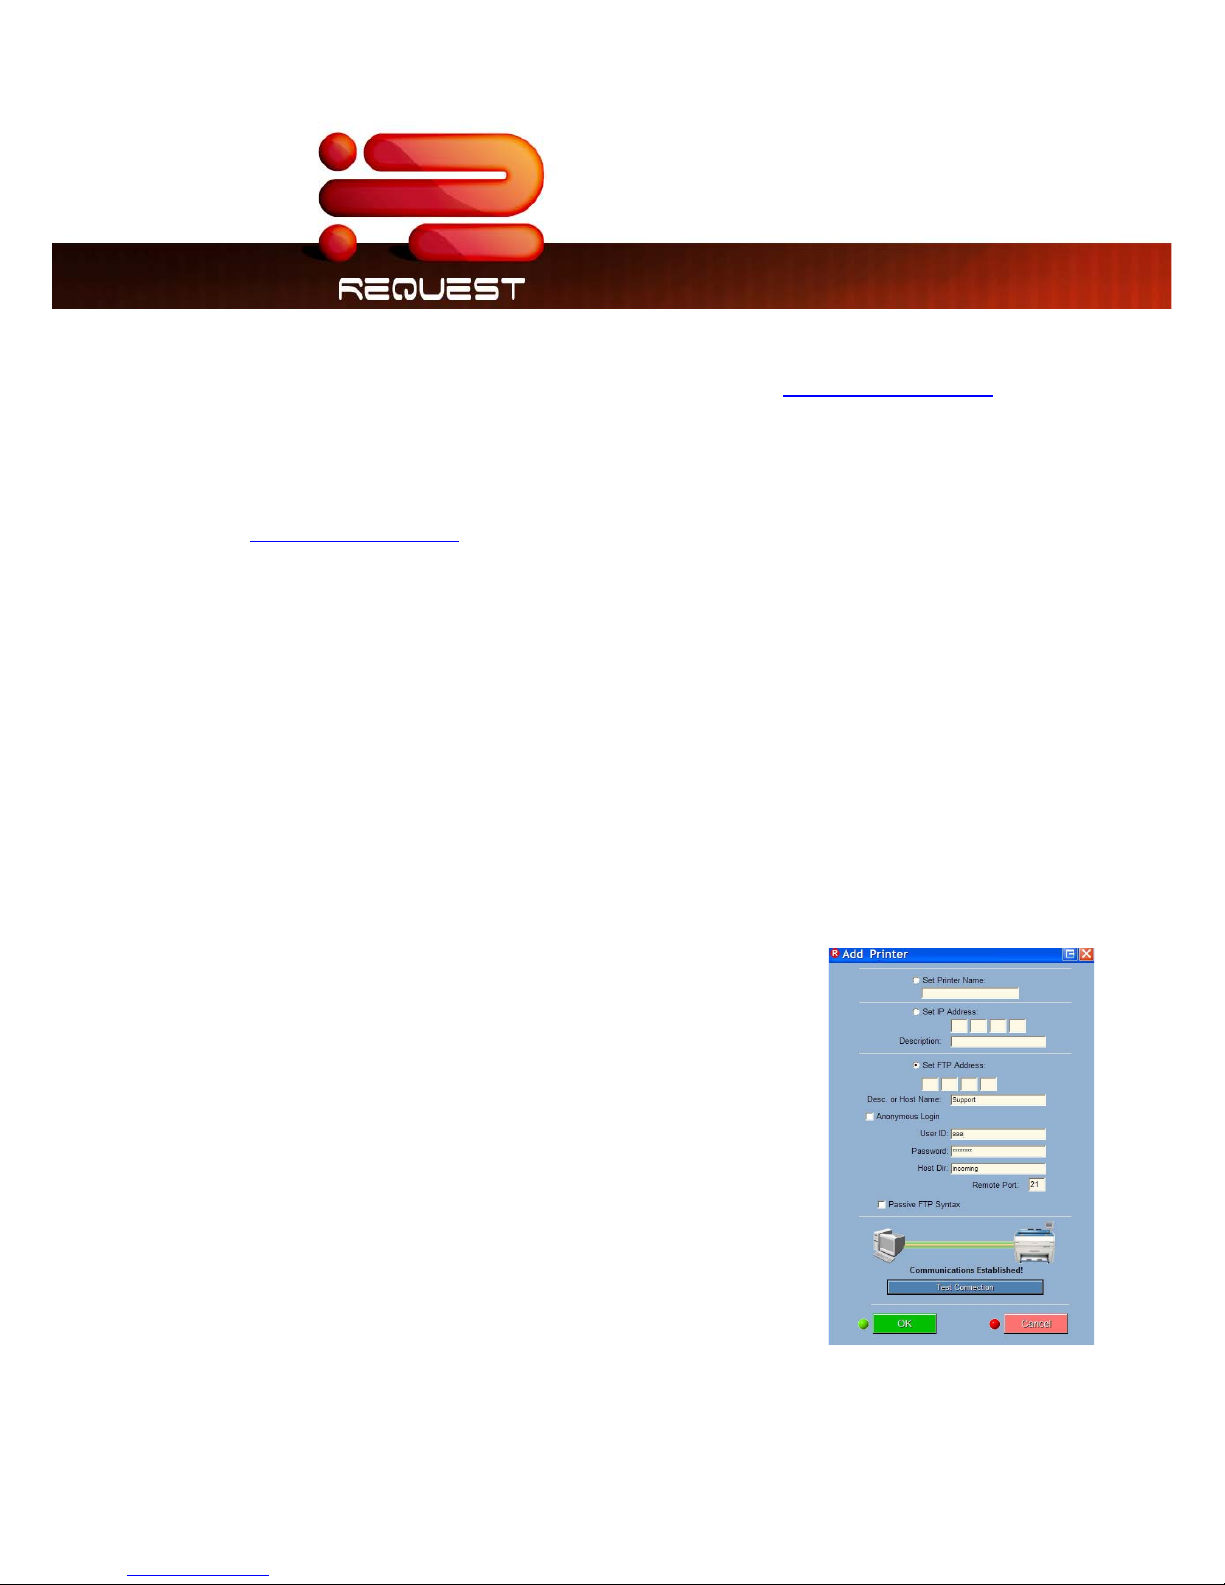
Setting up the Request Client to submit to
an FTP site
When Request is launched for the first time, it will not be configured to print to any FTP sites or printers.
1. To add an FTP site to the Request client, click OPTION, FIND PRINTERS. The SELECT PRINTERS menu
will open.
2. (Note: If there are checkboxes available on this menu,
Request has detected one or more Windows drivers installed
or shared to the local PC. Ignore them at this time.)
3. Click ADD A PRINTER TO THIS LIST.
4. The ADD PRINTER menu will open.
5. Click the SET FTP ADDRESS radio button.
6. Set IP Address: Enter the IP Address of the FTP site, which should be supplied on the FTP
Request Operators Guide
This information is solely for use of Personnel and Authorized Dealers. No part of this publication may be copied, reproduced or
distributed in any form without express written permission from. 2011.
- 6 -
Information template, provided by the Central Print Site.
7. (Note: If the FTP site is known by the name only, such as ftp.reprocompany.com
, resolve the
numerical address by pinging the FTP address. The ping will display the IP address of the FTP site.)
8. Description: Enter a description for this connection. The description entered here is what will be
displayed as the ‘title’ on the Request main screen. It is possible to enter an FTP name (such as
ftp.reprocompany.com
) in this section as well, if the numerical address is unknown.
9. User ID / Password: Enter the Username and Password for this account, which should be supplied
on the FTP Information template, provided by the Central Print Site.
There is an Anonymous Login available, but most FTP sites will not allow uploading when using an
anonymous connection. So use only when directed.
10. Central Print Site Directory: Enter the directory specified for this particular Customer, if applicable.
This info should be supplied on the FTP Information template, provided by the Central Print Site.
11. Remote Port: The default FTP port is 21, but change this number if instructed by the FTP
Information template, provided by the Central Print Site.
12. Passive FTP Syntax: Check this box if instructed by the Central Print Site.
13. Click the TEST CONNECTION button. If communication is
established, click OK to return to the SELECT PRINTERS menu. (If
communication fails, verify that the FTP IP address, username
and password are correct.)

Request Operators Guide
This information is solely for use of Personnel and Authorized Dealers. No part of this publication may be copied, reproduced or
distributed in any form without express written permission from. 2011.
- 7 -
14. Click OK at the SELECT PRINTERS menu to return to the
main Request screen.
15. Note that the Description that was entered is now part
of the Request Title; i.e. “Support Request.” The SUBMIT
button changes to FTP TRANSFER.
Other Installation Considerations
Prompt Setup
When Request is launched for the first time there will be
a prompted to “Set Master Password”. If Accounting is
going to be used it is important to set the MASTER
PASSWORD at this time. This will stop any unwanted
changes to the software by unauthorized users.
If accounting is not going to be used and no password is
necessary select “OK” to continue.
Pen Tables
1. Pen widths and page sizing are usually part of today’s plot files. If older languages are used
please ensure that a pen table is created for the installation requirements.
2. Raster and Hybrid files are quite common. Please see the “Advanced” button under “Pen
Table” for any customization required. The final result on the print may be your best guide
when establishing desired settings.
Advanced Configuration and Settings
The Request Application is customizable. For advanced customizations please see the Appendix
6.0 - INI Configuration. Please note that any syntax errors in the INI will cause issue with Request.
Modification of the INI is to be performed with great caution.

Request Operators Guide
This information is solely for use of Personnel and Authorized Dealers. No part of this publication may be copied, reproduced or
distributed in any form without express written permission from. 2011.
- 8 -
Main Screen
2
3
4
5
6
1
7
9
12
11
10
Request Operators Guide
This information is solely for use of Personnel and Authorized Dealers. No part of this publication may be copied, reproduced or
distributed in any form without express written permission from. 2011.
- 9 -
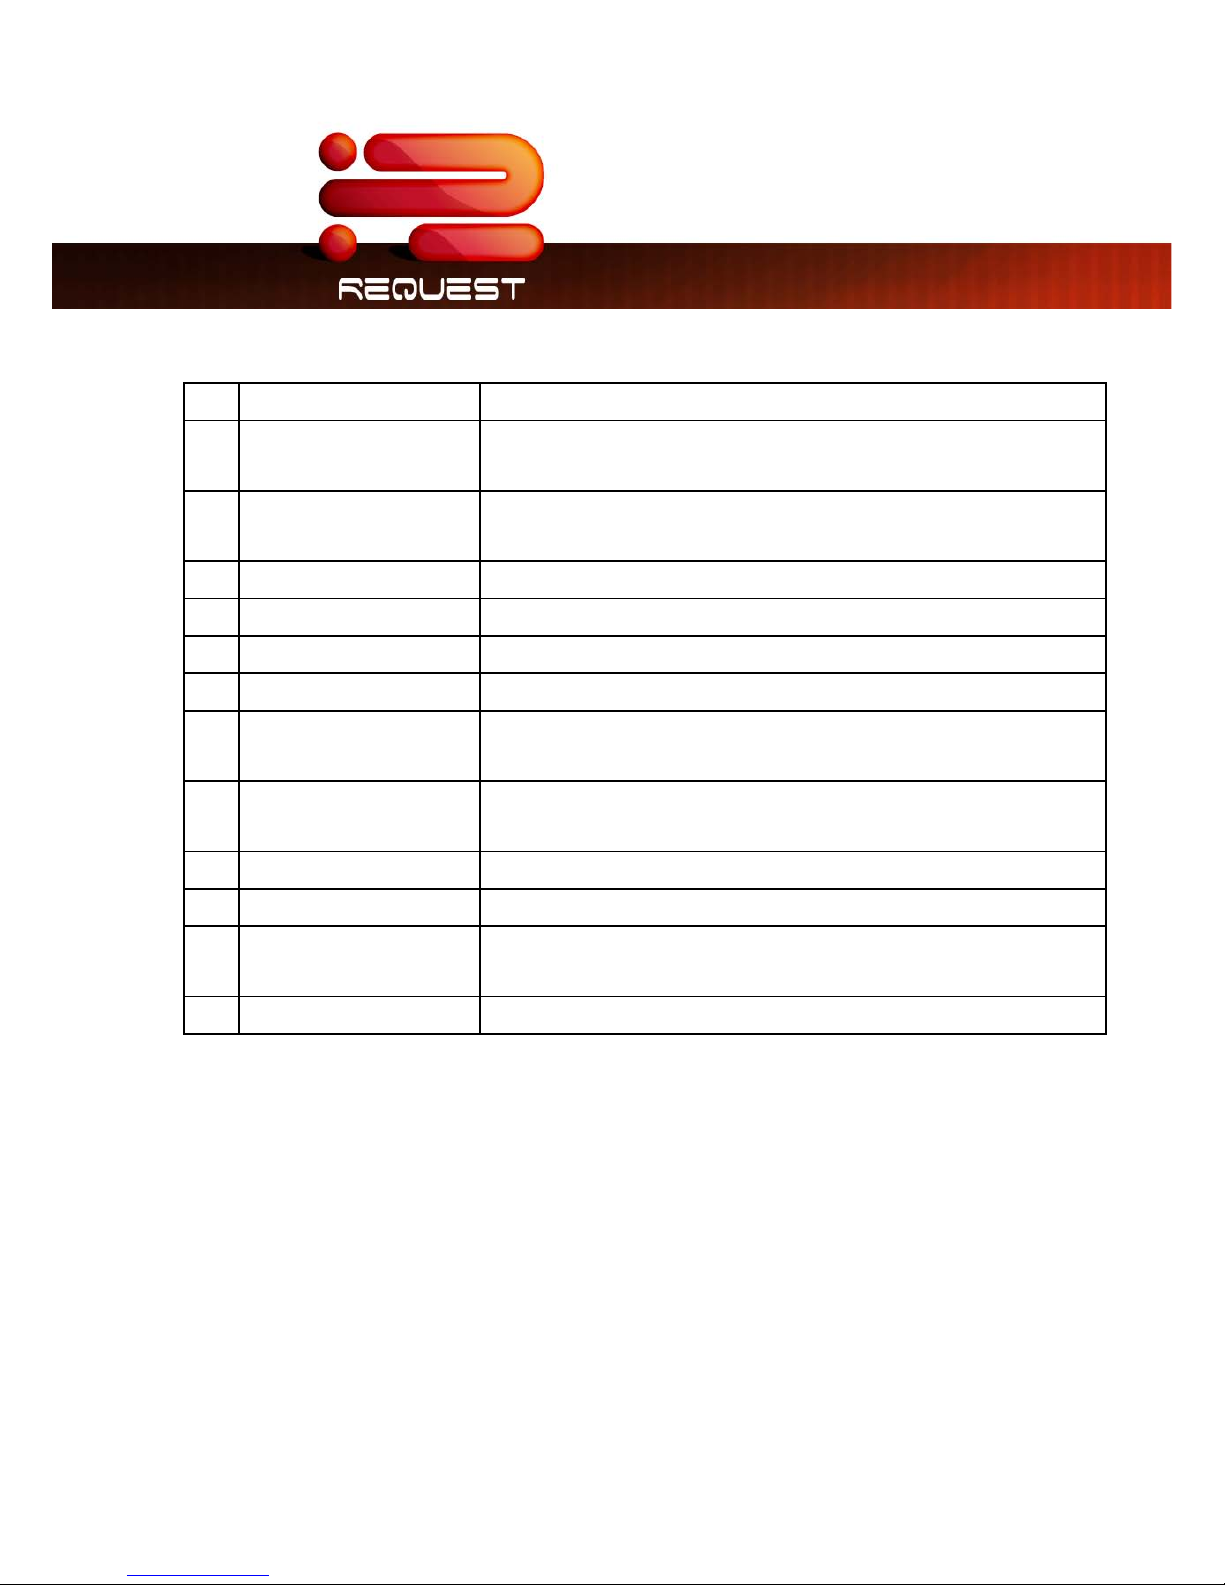
NO. NAME FUNCTION
1 Printer Selection
Click on the “name” to select the printer you wish to print to if more
than one device installed.
2 Menu
Menu for functions in the GUI and configuration of the software /
system.
3 Folder Select Use this region to select the folder you wish to print files from.
4 File Select Displays the files in a folder to allow selection.
5 Submit After file selection and adjustments, sends job for printing.
6 Key Job Settings This area allows the key details to be applied to a job, if so needed.
7 Pre -View
Files can be pre-viewed prior to printing. Click on this area to pre-
view a file.
8 Printer / Job Info
Displays current printer roll information or status as well as basic job
/ file information
9 Job List Displays files for printing and any function applied to the file
10 Dropbox For drag and drop function of file selection
11 Advanced Job Settings
Allows advanced job and print configurations, such as Zoom,
Stamp, Fold, and Pen Control and 2 Up Printing.
12 Version Number Displays the current version of the Software

Request Operators Guide
This information is solely for use of Personnel and Authorized Dealers. No part of this publication may be copied, reproduced or
distributed in any form without express written permission from. 2011.
- 10 -
Simple Printing
The following describes how to make a basic job submission to the printer.
1. Click on the “ Request” icon on your Desk Top
2. Or from the “Start” button click on:
a. Programs
b.
c. Request
3. Browse to the folder where the files you
wish to print are located on your local PC
or on the network (usual Windows mouse
functions for folder selection).
4. The files in the selected folder will appear
in the right pane. Click on the file(s) to print
which will be shown with a “check mark” in
the box beside the file.

Request Operators Guide
This information is solely for use of Personnel and Authorized Dealers. No part of this publication may be copied, reproduced or
distributed in any form without express written permission from. 2011.
- 11 -
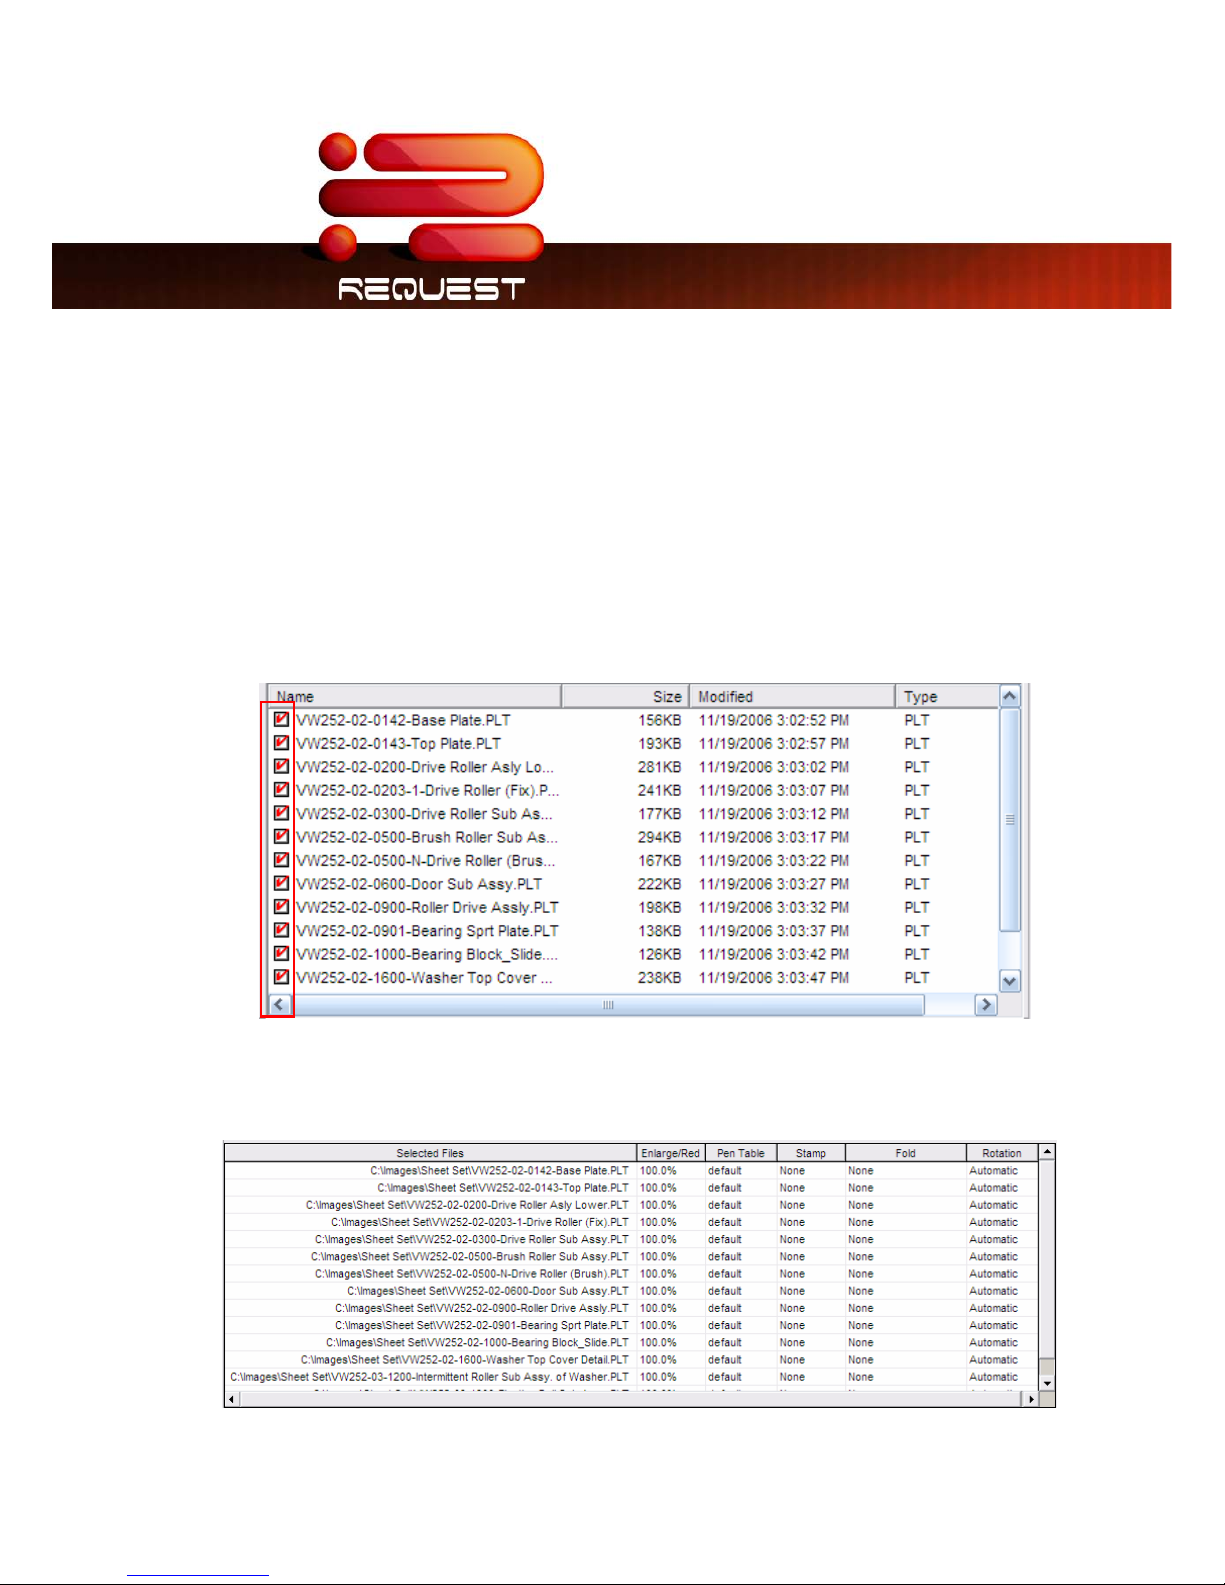
5. The files selected will now also be shown in the lower box noting any zoom, pen, stamp and fold
to be applied.
Note: If advanced features are turned on (this is done in the options pull down) this will allow for
the customization of the job ticket and the Enlarge/reduce column will be shown.
6. Complete any Key Job Settings that may be
required such as user name, zoom, media type,
collation and number of copies / sets.
7. Press the Submit Print Job button.
8. The files selected will be printed.
NOTE:
Later in this manual, descriptions of custom settings which you may wish to apply to prints are
detailed. Custom settings should be configured prior to selection of the files.

Request Operators Guide
This information is solely for use of Personnel and Authorized Dealers. No part of this publication may be copied, reproduced or
distributed in any form without express written permission from. 2011.
- 12 -
Function / Feature Details
Folder Select
Select a folder
a. Using the mouse to select a drive letter, computer or other
location on the PC or network where the files to be printed are
located.
b. Click once to view the files within displayed in the
file region in the right pane.
Folder up
The Folder Up icon takes you to the next higher folder in the folder structure.
Display File types “Browse for”
Request can be configured to only display files that are printable in the
File Select area or to display all file types. The Configured Types are set
by the administrator. Please see the INI Configuration for details on
how to set this feature’s function at the end of this manual.
Request Operators Guide
This information is solely for use of Personnel and Authorized Dealers. No part of this publication may be copied, reproduced or
distributed in any form without express written permission from. 2011.
- 13 -
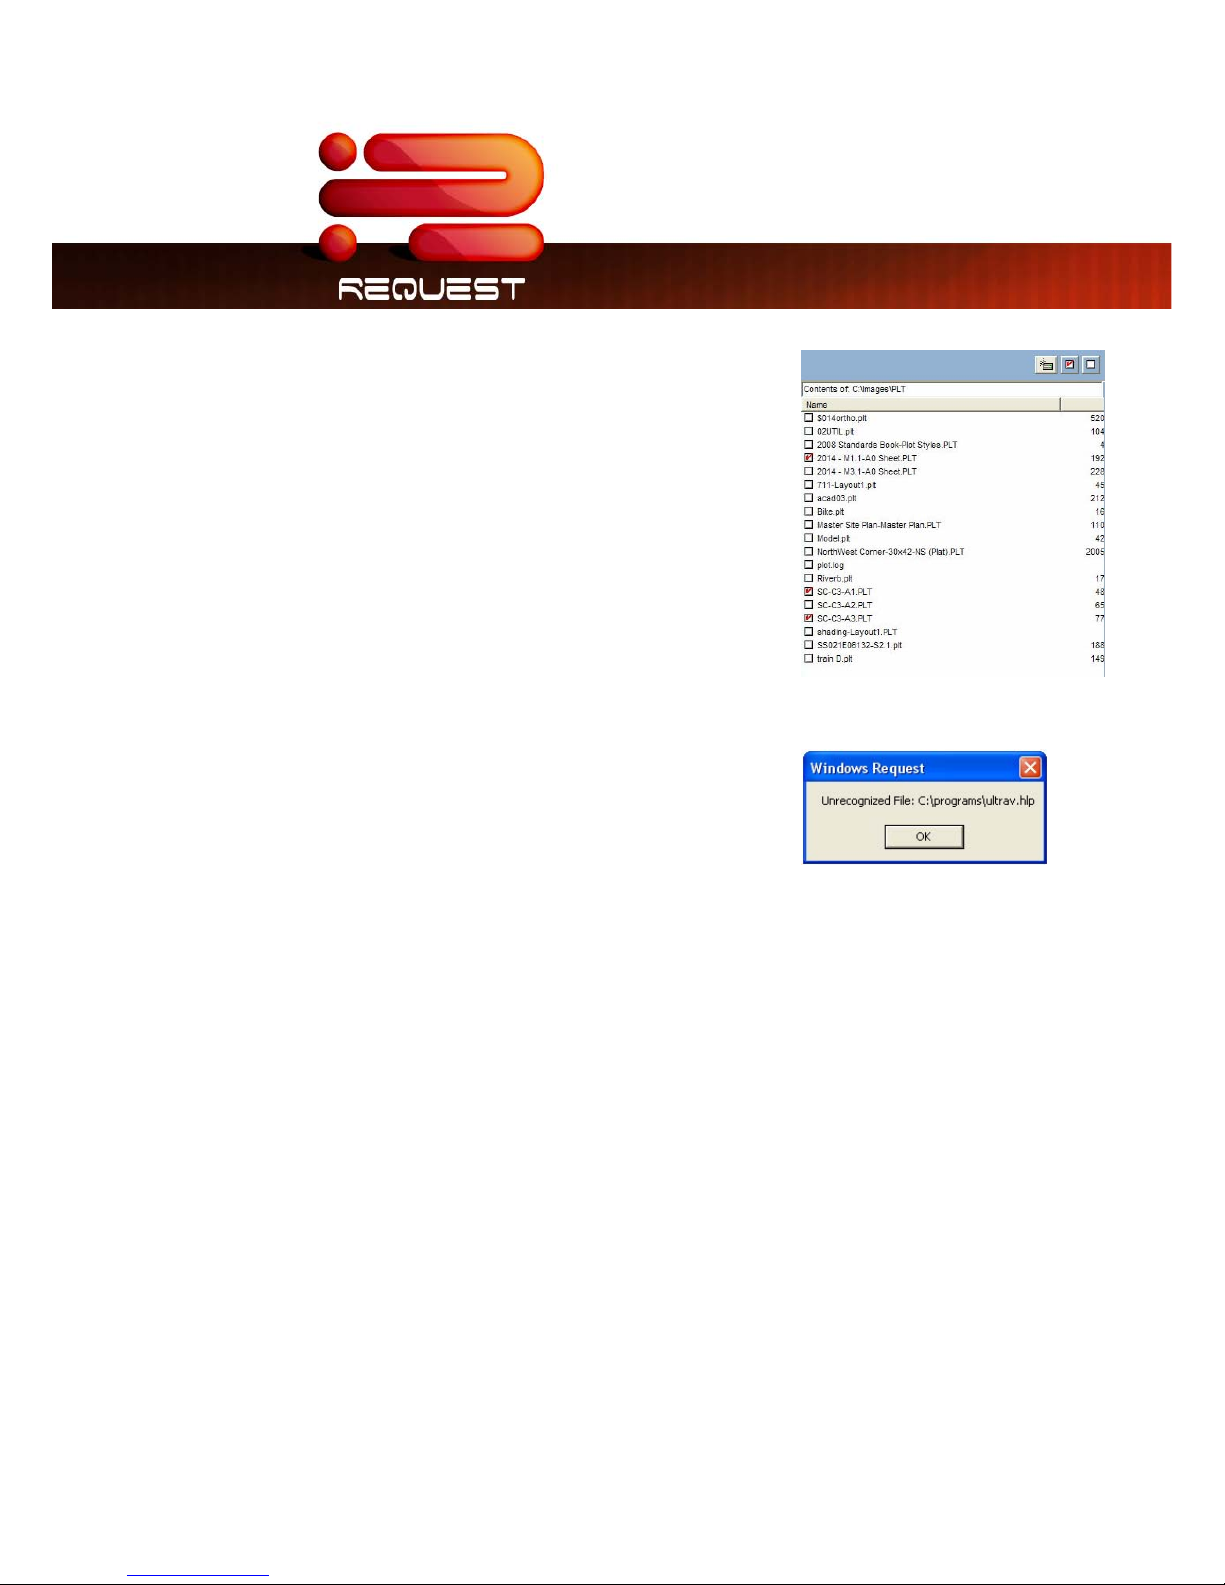
File Select
Select a file
a. After selection of the folder which contains the files for
printing, files within the folder will be displayed in this area.
The details of the file are also noted, such as size type and
date modified.
Note: This area can be resized within the region provided.
b. Click on the file to be printed: a red Check will indicate that
they are selected.
c. If an invalid file is selected, which cannot be printed, a
note box will appear. (in this case a .hlp file cannot be
printed)
File types which can be selected are:
HPGL/2 formats (.plt, .hpg, .gl2, .000, .rtl, .906, .907, etc.)
HPGL formats
HP-RTL formats
Autodesk DWF (.dwf)
Adobe Portable Document Format (.pdf)*
Postscript (.ps)*
Encapsulated Postscript (.eps)*
TIFF Group 4 (.tif)
CALS Group 4 (.cal)
PCX Monochrome (.pcx)
Intergraph (.cit)
JPEG (.jpg)
Computer Graphics Metafile (.cgm)*
Government Group 4 (.c4)
ASCII File formats (.txt, et cetera)
Format (.tlc)

Request Operators Guide
This information is solely for use of Personnel and Authorized Dealers. No part of this publication may be copied, reproduced or
distributed in any form without express written permission from. 2011.
- 14 -
All file formats that are registered to their respective companies. * Requires an Option
These are some of the most common file extensions. If the file extension differs and the file still
remains a valid type, it will print. That is a .plt file can be renamed .xyz and as long as the structure
remains intact the file will print.
Note: Proprietary file types such as drawing files from AutoCAD (.dwg) and Microstation (.dgn)
cannot be printed.
Recall Last File(s)
The last file(s) sent to be printed (after you press the Submit Button) can be
recalled with this button. This allows quick resubmission if required for
additional changes and sets.
Select All
This button selects all files in the current folder.
Unselect All
This button deselects all files in the current folder

Request Operators Guide
This information is solely for use of Personnel and Authorized Dealers. No part of this publication may be copied, reproduced or
distributed in any form without express written permission from. 2011.
- 15 -
Job List
Selected Files
Once selected all files to be printed are listed here. It includes the file name (with location structure),
pen table, stamp and fold pattern to be applied to each file. This region allows further settings to be
applied to the selected file(s).
Note: This area can be resized within the region provided.
Enlarge / Reduce / Enhanced Scaling
Using Request 6.5 and above, it is possible to scale images to a paper size that is not locked to a
particular roll size.
For instance, if you have an architectural “D-Size” original that is 36 inches wide and 24 inches long
and wanted to scale this to an engineering “A-Size” that is 12 inches wide and 9 inches long, you
simply have to select the image and then choose A Size from the Enlarge/Reduce column in the
selected files area.
Other zoom settings can be applied from the Advanced Job Settings.

Request Operators Guide
This information is solely for use of Personnel and Authorized Dealers. No part of this publication may be copied, reproduced or
distributed in any form without express written permission from. 2011.
- 16 -
Note: To apply settings to all selected files choose the settings prior to selecting the files.
Pen Table
Pen type and styles can be applied to vector or hybrid files. They can include pen widths, raster
density, junctions, etc. Please see the Pens Configuration section for greater details.
The name of the applied pen table is displayed here and can be changed prior to printing.
a. Click on the “pen Table” of the file you wish to change
b. A drop down arrow will appear
c. Select a predetermined pen table.
Note: to apply Pen table settings to all selected files choose the
setting prior to selecting the files.
Stamp
Stamps (or watermarks) can be applied to any printed document. Details on Stamp creation and
editing are available in the Stamp section on page. The name of the applied stamp is displayed
here and can be changed prior to printing.
a. Click on the Stamp of the file you wish to change
b. A drop down arrow will appear
c. Select a predetermined stamp.
Request Operators Guide
This information is solely for use of Personnel and Authorized Dealers. No part of this publication may be copied, reproduced or
distributed in any form without express written permission from. 2011.
- 17 -
Note: to apply a stamp setting to all selected files choose the stamp setting prior to
selecting the files.
Fold
Request 6.5 has simplified the method in which folding parameters are defined within a print set.
Within Request, it is only necessary to select the fold packet style or leave the settings configured for
Controller to allow the printer software determine the best fold packet for the desired original.
1. Within Request, begin by selecting the files to be printed by browsing on the network or local PC
and clicking on the file; a red checkmark will signify that the image has been selected.
2. Once all images have been selected, they will appear in the selected files area at the bottom
of the Request screen.

Request Operators Guide
This information is solely for use of Personnel and Authorized Dealers. No part of this publication may be copied, reproduced or
distributed in any form without express written permission from. 2011.
- 18 -
x If you wish to select the same fold pattern (packet) for all images in a desired print set, simply
select the Fold header at the top of the list and then click on the fold button to choose the
desired packet type.
3. Select the fold icon to browse for the list of available fold packet types.
x The packet list is generated by the IPS software at the printer and is configured through PrintNet.
Eject and Fold 500 – Fan Fold is static and cannot be modified. Selecting Eject is the same as
setting the fold parameters to None.
x Use folder settings already configured on printer is an automatic setting and will choose fold
packet type(s) based on settings that are configured on the IPS. This is considered an
“automatic” setting and will require the least amount of user intervention when folding.
4. The selected files area will update with any fold parameters that have been selected.

Request Operators Guide
This information is solely for use of Personnel and Authorized Dealers. No part of this publication may be copied, reproduced or
distributed in any form without express written permission from. 2011.
- 19 -
Note: It is possible to utilize different fold packets for different originals.
1. Select each file that is to have a different fold by clicking on the top most file and dragging the
mouse cursor down to select. Selected files will change to white on black letters.
2. Click on the Fold button icon to choose the desired fold packet from the list
3. The change in fold type will be reflected in the Selected Files area.
Request Operators Guide
This information is solely for use of Personnel and Authorized Dealers. No part of this publication may be copied, reproduced or
distributed in any form without express written permission from. 2011.
- 20 -
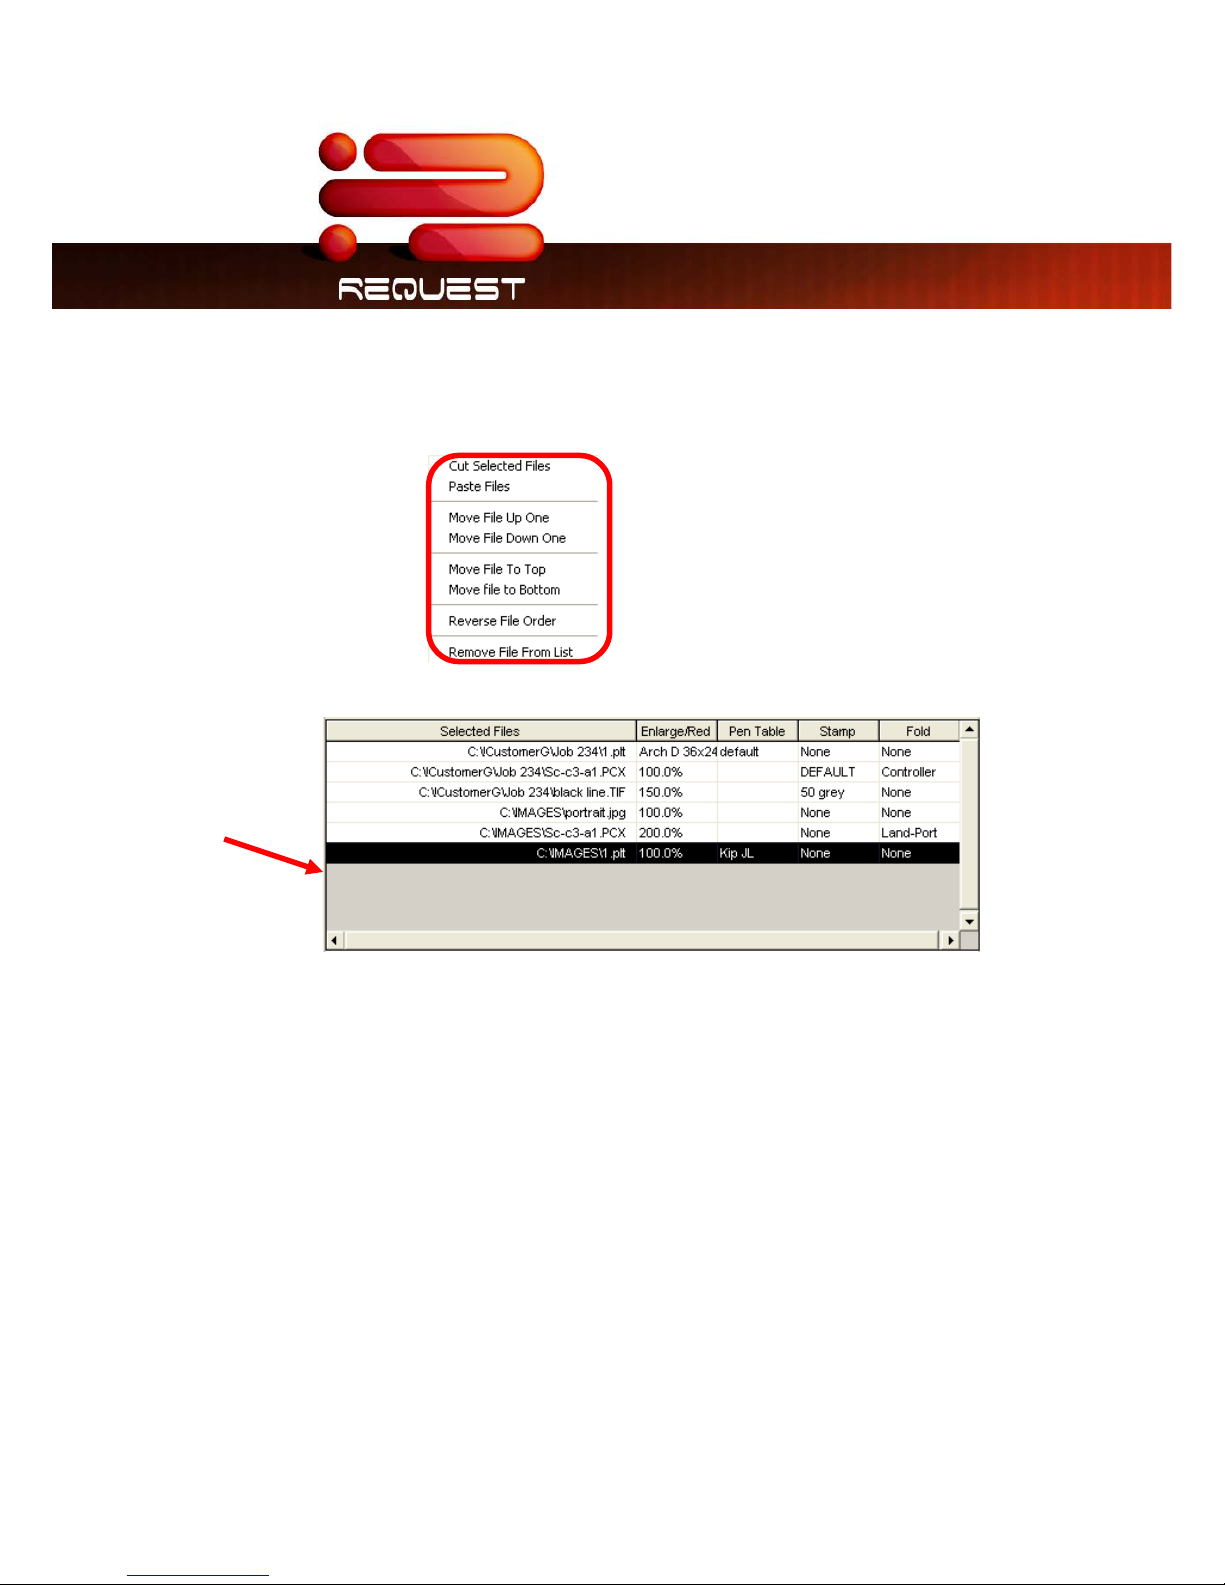
File Order
File print order, and removal can be performed in the JOB list Area. After files have been selected
“right click” in the Job List area.
A menu will appear.
To perform some of the functions in the menu, a file(s) will need to be selected,
a. Cut Selected Files
This is a tool to remove the selected files.
b. Paste Files
This function is used to ‘Add’ new files between files in the selected files area.
c. Move File Up One
Select a file to move up one in the selected files area.
d. Move File Down One
Select a file to move down one in the selected files area.
e. Move File to Top
Select a file to move up to the top in the selected files area.
f. Move File to Bottom
Select a file to move down to the bottom in the selected files area.
g. Reverse File Order
This tool reverses the entire job list in the selected files area.
 Loading...