

Page 1
Page 2

ii 82-G1669-1EN , Rev. 002
FCC Notice:
This device complies with part 15 of the FCC rules.
Operation is subject to the following two conditions:
(1) This device may not cause harmful interference,
and (2) this device must accept any interference
received, including interference that may cause
undesired operation.
Caution:
The user is cautioned that changes or modifications
not expressly approved by the party responsible for
compliance could void the warranty and users’
authority to operate the equipment.
Note:
This equipment has been tested and found to comply
with the limits for a Class B digital device, pursuant to
part 15 of the FCC Rules. These limits are designed to
provide reasonable protection against harmful
interference in a residential installation. This
equipment generates, uses and can radiate radio
frequency energy and, if not installed and used in
accordance with the instructions, may cause harmful
interference to radio communications. However, there
is no guarantee that interference will not occur in a
particular installation. If this equipment does cause
harmful interference to radio or television reception,
which can be determined by turning the equipment
off and on, the user is encouraged to try to correct
the interference by one or more of the
following measures:
• Reorient or relocate the receiving antenna.
• Increase the separation between the
equipment and receiver.
• Connect the equipment into an outlet on a
circuit different from that to which the receiver
is connected.
• Consult the dealer or an experienced radio/TV
technician for help.
FCC Radiation Exposure Statement:
To comply with the FCC RF exposure
compliance requirements, this device must not be
co-located or operating in conjunction with any other
antenna or transmitter.
Industry Canada Notice
Operation is subject to the following two conditions:(1)
this device may not cause interference, and (2) this
device must accept any interference, including
interference that may cause undesired operation of the
device. The term “IC:” before the radio certification
number only signifies that Industry Canada technical
specifications were met. This product meets the
applicable Industry Canada technical specifications of
the RSS210.
Kyocera is a registered trademark of Kyocera
Corporation. The Bluetooth word mark and logos are
owned by the Bluetooth SIG, Inc. and any use of such
marks by Kyocera Wireless Corp. is under license. All
other marks are held by their respective owners.
Copyright © 2007 Kyocera Wireless Corp.
All rights reserved.
Page 3

Rearview Mirror Car Kit with Bluetooth Wireless Technology iii
CONTENTS
Package Contents. . . . . . . . . . . . . . . . . . . . . . . . . . . . . . . . . . . . . . . . . . . . . . . . . . . . . . . 2
Installation . . . . . . . . . . . . . . . . . . . . . . . . . . . . . . . . . . . . . . . . . . . . . . . . . . . . . . . . . . . . 4
Step-by-step installation instructions. . . . . . . . . . . . . . . . . . . . . . . . . . . . . . . . . . . . . . . . . 4
Powering up . . . . . . . . . . . . . . . . . . . . . . . . . . . . . . . . . . . . . . . . . . . . . . . . . . . . . . . . . . . 4
Pairing . . . . . . . . . . . . . . . . . . . . . . . . . . . . . . . . . . . . . . . . . . . . . . . . . . . . . . . . . . . . . . . 5
Using the wireless rear view mirror . . . . . . . . . . . . . . . . . . . . . . . . . . . . . . . . . . . . . . . . . . 6
FAQ . . . . . . . . . . . . . . . . . . . . . . . . . . . . . . . . . . . . . . . . . . . . . . . . . . . . . . . . . . . . . . . . . 7
Troubleshooting . . . . . . . . . . . . . . . . . . . . . . . . . . . . . . . . . . . . . . . . . . . . . . . . . . . . . . . . 9
Page 4

Page 5
Rearview Mirror Car Kit with Bluetooth Wireless Technology 1
REAR VIEW MIRROR CAR KIT
WITH BLUETOOTH
®
WIRELESS TECHNOLOGY
The Rear View Mirror Car Kit with Bluetooth Wireless Technology (“wireless rear view mirror”)
has an innovative structural and functional design that allows it to be used as either a car kit/speakerphone
or a headset.
Once you have completed the easy installation of your new wireless rear view mirror, (instructions are
provided onpage 4), you can answer, end, reject, redial, place calls, or adjust the speaker volume with
the simple press of a button.
The wireless rear view mirror also supports voice dialing. This enables you to dial your favorite contacts
without taking your eye off the road, or touching your phone.The wireless rear view mirror complies with
Bluetooth wireless technology version 1.2 and supports both the Headset Profile and Hands-free Profile.
Page 6

2 82-G1669-1EN, Rev. 002
Features
• Compatible with GSM, CDMA, TDMA, and
WCDMA Bluetooth technology-enabled phones
• Anti-glare rear view mirror
• 12-digit Caller ID (if supported by your
mobile phone)
• Telephone number announcement of
incoming calls
• Optional ring or voice tones
• Digital noise and echo suppression system
• Two-way conversation
• High power amplifier and speaker
• Directional high sensitivity microphone
• Voice dialing, redial, and audio transfer
functionality
• Automatic re-connect
• Mute button
• Easy set up and operation
• Modern elegant design
• Optimal sound clarity
• Surge prevention circuit
• Upgradeable firmware
Package Contents
• Rear view Mirror Car Kit with Bluetooth
Wireless Technology
• Power Adapter Cable
• User’s Manual
Page 7

Rearview Mirror Car Kit with Bluetooth Wireless Technology 3
Part Descriptions
• D.C. Power Input connects through your vehicle’s
12 volt power supply.
• USB Firmware Upgrade Port
• Speaker
• 12 digit Caller ID Indicators
• LED Indicators four LEDs light during handsfree use
• Bluetooth LED Link twinkles when in pairing mode.
• Light on appears when in wireless mode.
• VOL - adjusts the speaker volume down. Also
used for making ringtone changes.
• VOL + adjusts the speaker volume up. Also
used during initial set up and pairing process.
• SEND controls answer, talk, redial, voice dialing,
and pairing re-activation.
•END controls end, reject, and audio transfer.
•Mute the speaker to allow private conversation
with optional earphone
(not included).
•EARplug to connect the optional earphone
(not included).
Page 8

4 82-G1669-1EN, Rev. 002
Installation
Installation is as easy as inserting the power adapter
cable into your vehicle’s 12 volt power supply and
clipping the wireless rear view mirror over the
existing rear view mirror.
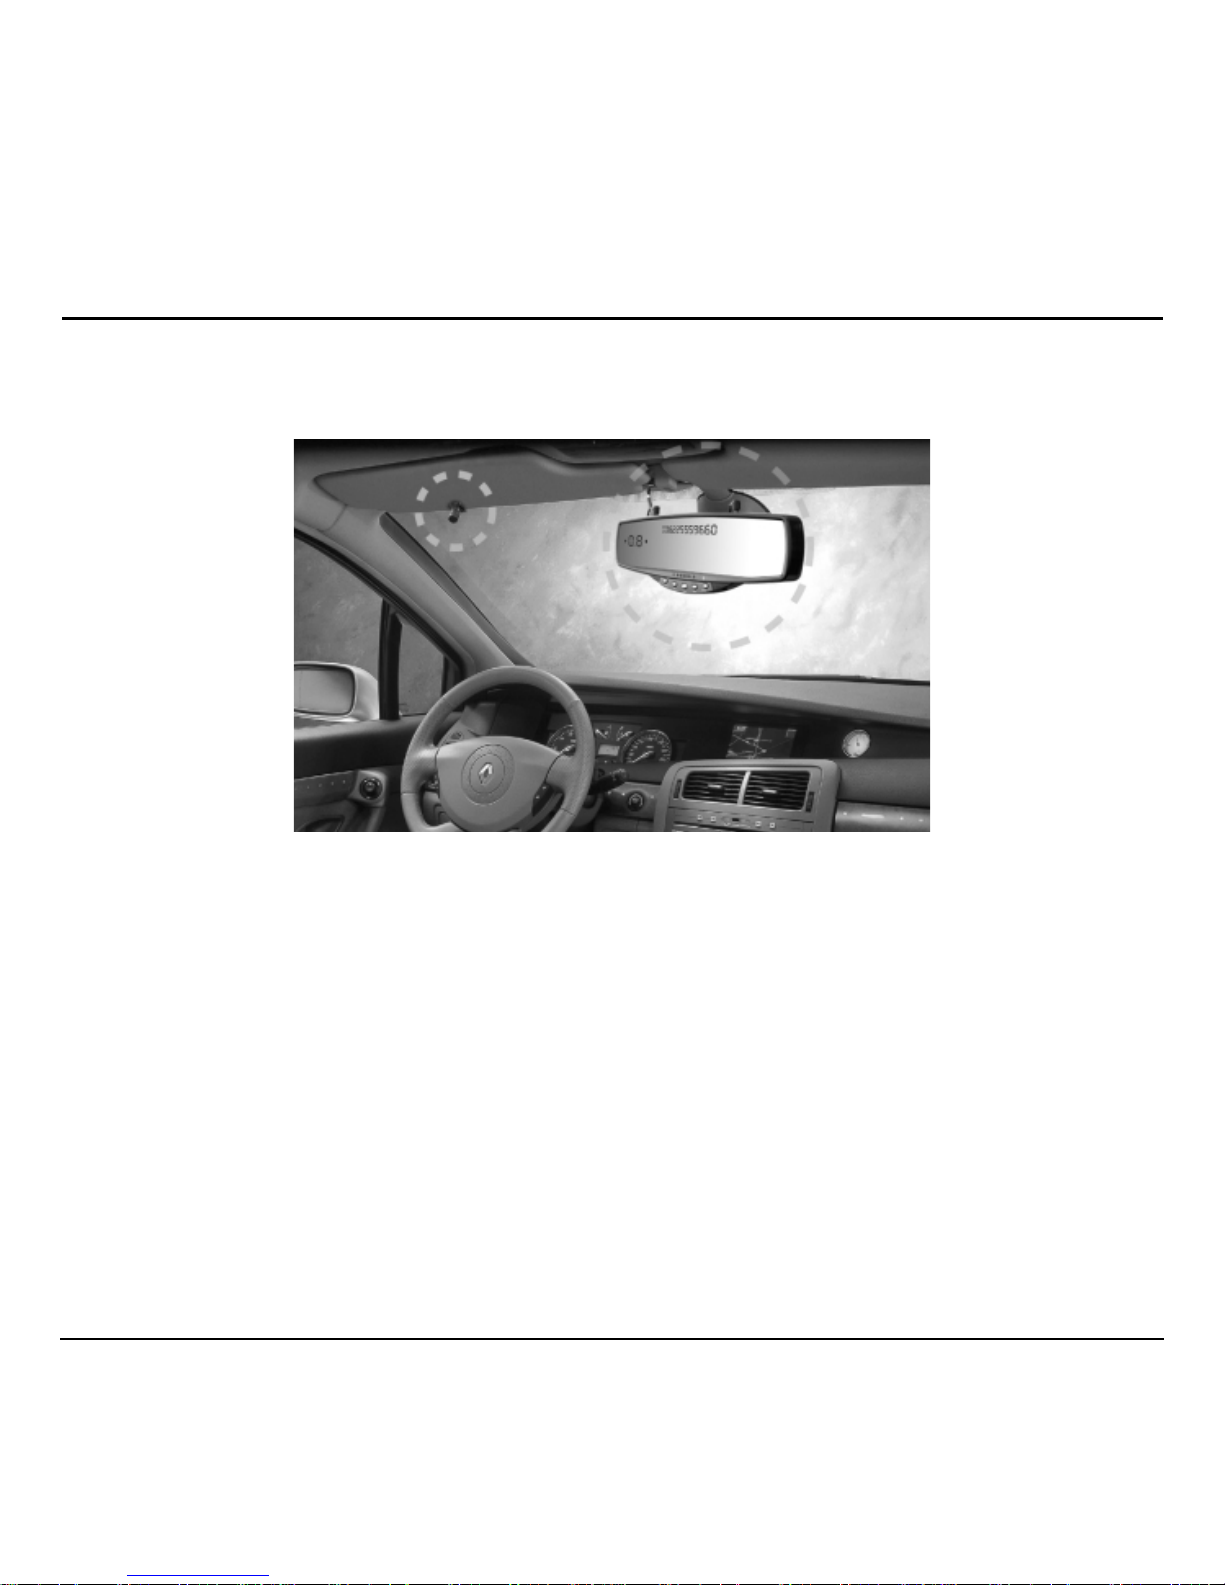
Step-by-step installation
instructions
1. On the back of the wireless rear view mirror
there are two pairs of clips. Place the bottom
pair of clips on the underside of the car’s original
rear view mirror. Lift the unit so that the bottom
clips extend. This allows the top clips to be fixed
in position on top of the car’s original rear view
mirror, and held securely until the unit is in
place. Adjust the fitted unit to your preference
for clear rear-view vision.
2. Select a suitable position for the microphone.
The front or back of the vehicle sun visor is
usually adequate. The microphone may be
moved by detaching, rotating, and re-attaching
it to the correct side of the visor.
3. Ensure that there is distance between the
microphone and the visor.
Note: For optimal communication, it is highly
recommended that the front side of the
microphone (where there are more holes), be
placed directly facing the operator.
4. Insert the power jack of the power adapter
cable in its respective socket on the wireless rear
view mirror.
The power lead should be secured and hidden
into the vehicle’s interior, using the seals or joins
around the door’s A-Frame, and under the
dashboard. Ensure enough cable is left to
connect to the 12 volt power supply.
Note: Please ensure that the microphone and
power cable do not interfere with safe operation of
your vehicle.
Powering up
Once the unit has been installed, it will power up
automatically when the power source is enabled (by
turning on the car or inserting the adapter into the
vehicles 12 V power socket).
Page 9

Rearview Mirror Car Kit with Bluetooth Wireless Technology 5
Pairing
The wireless rear view mirror supports both
HandsFree and Headset profiles. The default
profile is HandsFree. You only need to pair the
device with your cell phone once. Subsequently, the
unit will pair automatically.
Up to four cell phone’s pairing information can be
stored in the wireless rear view mirror.
• The oldest phone number will be removed when
pairing a fifth phone (the memory is full).
• The pairing priority will be given to the most
recent paired cellular phone.
• To change the pairing priority, try to connect to
the wireless rear view mirror from the cell
phone. (Refer to “Cell phone pairing mode” on
page 5.)
Pairing in Hands-Free mode
1. With the power ON, press for six seconds.
2. You will hear a second beep tone,
indicating that the unit is ready for initial
pairing operations.
Pairing HF appears on the mirror.
Pairing in Headset mode
1. With the power ON, press for six seconds.
2. You will hear a second beep tone, indicating
that the unit is ready for initial pairing
operations.
3. Press again for six seconds.
4. You will hear a second beep tone, indicating
that the unit is ready to be paired with the
headset.
Pairing HS appears on mirror.
Note: The Headset mode does not support
Caller ID, voice dialing, or reject call.
Cell phone pairing mode
1. Browse your cell phone menu and find the
connectivity and/or wireless connection section.
2. On your cell phone, search for a new HandsFree
device, and allow the phone to find the wireless
rear view mirror.
Note: Refer to your cell phone’s user guide for
the correct procedure for connecting a new
wireless device. The code for the wireless rear
view mirror should appear on the screen:
MHF-R220BT or MHF-R330BT.
Note: Repeat pairing process if the code does
not appear on the cell phone screen.
3. Select the device and press the appropriate key
on the cell phone indicating that you want to
connect in the HandsFree mode. The green LED
will flash. The cellular phone should prompt for
a pin code.
4. Enter the wireless rear view mirror pin
code:
1234.
5. Pairing is now complete.
– Paired appears on the mirror.
– The green LED illuminates when pairing
is successful.
Note: Once pairing has been completed between
your cellular phone and the wireless rear view
mirror, both profiles (Headset and HandsFree) will
be automatically recognized whenever you turn
on your vehicle.
Page 10

6 82-G1669-1EN, Rev. 002
Connection tips
• If your cell phone battery charge is low, the
wireless connection may occasionally be lost.
To maintain good connectivity ensure that your
phone battery has an adequate charge.
• If pairing operations fail:
a. Delete the item from the paired list on your
phone.
b. Reset both the phone and the handsfree
device by powering them off and back on.
c. Re-pair the two devices.
• If a connection is not established after pairing,
manually connect from the cell phone.
• To re-establish a connection after pairing:
a. Press briefly.
b.
Press and hold for 5 seconds The
handsfree unit will re-connect automatically
thereafter.
Using the wireless rear
view mirror
Warning: For your safety, it is highly recommended
that the vehicle is parked in a safe place when
plugging into the earphone.
Note: Please note that it is possible that the
wireless rear view mirror buttons might not operate
according to the instructions in this user guide if
your phone has an unusual wireless interface. In this
case, please reset both the wireless rear view mirror
and cell phone.
Page 11

Rearview Mirror Car Kit with Bluetooth Wireless Technology 7
FAQ
If... You should... The mirror displays...
There is no wireless connection Press to reactivate the pairing link.
No Phone
You would like to make a
handsfree call
Enter the phone number on the
cellular phone, and press on the
rear view mirror.
Note: If there is no sound on the speaker
of the rear view mirror, press and hold
for three seconds. It will then switch from
the cellular phone to HandsFree.
Calling
You would like to redial the last
number dialed
Press .
Calling
A call is in progress
Calling
The microphone has been muted
Secret
There is an incoming call and you
want to answer
Press
Accept Call
There is an incoming call and you DO
NOT want to answer
Press
Drop Call
You want to change ringtones or
switch to a voice announcement
Press and hold for five seconds. ELOD 1 [or 2,3, or 0]
You are in a conversation and you
want to end the call
Press
Drop Call
You are in a conversation and you
want to adjust the volume
Press and buttons. VOL up or Vol Dn
You are in a handsfree conversation
and you want to switch to the phone
Press and hold for three seconds
Call Trans
You are on the cell phone and want to
switch back to handsfree
Press and hold for three seconds
Call Trans
Page 12

8 82-G1669-1EN, Rev. 002
You are on the speakerphone and
would like to switch to a private
conversation
Plug an earphone (not included) into the
earphone jack of the wireless rear view
mirror
You are in a call and another call
comes in which you want to answer.
Note: This function only works if the
service provider offers call waiting.
Double click to connect to the second
call.
Redial
You would like to dial a call using
voice dialing
Note: Voice dialing is only possible if
your cellular phone has voice dialing
capability. Each cellular phone type
has a distinct phone menu, so you
may need to refer to your
manufacture’s instructions.
Press and hold for two seconds.
Announce name after a beep.
Voice Dial
If... You should... The mirror displays...
Page 13

Rearview Mirror Car Kit with Bluetooth Wireless Technology 9
Troubleshooting
No indication from unit
There is a chance the power cable plug is not
correctly seated in the 12 volt power supply. This
may block proper connection. Remove the power
cable, and then reinsert it to ensure it is fitted and
connected properly.
Problem during pairing
Repeat pairing processes according to the pairing
sections in this guide.
Still experiencing problem
Turn off the cellular phone and separate the battery
from the cell phone for approximately five seconds
Note: In some instances, this action clears up any
potential bugs built up in the cell phone software
that can hinder proper pairing.
Repeat pairing process as outlined earlier in
this guide.
To o l o u d
Adjust the volume to your preferred sound level by
pressing the relevant volume switch.
Note: Each type of wireless technology enabled
mobile phone has different function buttons.
Though highly unusual, it may be possible that the
functions operate differently with your specific
phone model.
Callers are complaining about
hearing noise
Check that the microphone is secured firmly in place
and is not creating vibration or noise. Also check
and adjust the microphone accordingly to ensure
that it is facing towards to the user’s face.
Page 14

10 82-G1669-1EN, Rev. 002
Kyocera Wireless Corp. (“KYOCERA”) offers you a
limited warranty that the enclosed product or
products (the “Product”) will be free from defects in
material and workmanship for a period that expires
one year from the date of sale of the Product to
you, provided that you are the original end-user
purchaser of the Product and provided that your
purchase was made from an authorized supplier.
Transfer or resale of a Product will automatically
terminate warranty coverage with respect to that
Product. This limited warranty is not transferable to
any third party, including but not limited to any
subsequent purchaser or owner of the Product. This
limited warranty is applicable only to end users in
the United States and Canada.
KYOCERA shall, at its sole and absolute discretion,
either repair or replace a Product (which unit may
use refurbished parts of similar quality and
functionality) if found by KYOCERA to be defective
in material or workmanship, or if KYOCERA
determines that it is unable to repair or replace such
Product, KYOCERA shall refund the purchase price
for such Product, provided that the subject Product
(i) is returned, with transportation prepaid, to a
KYOCERA authorized service center within the one
year warranty period, and (ii) is accompanied by a
proof of purchase in the form of a bill of sale or
receipted invoice which evidences that the subject
Product is within the one year warranty period
(“Proof of Purchase”). After the one year warranty
period, you must pay all shipping, parts and
labor charges.
This limited warranty does not cover and is void
with respect to the following: (i) any Product which
has been improperly installed, repaired, maintained
or modified; (ii) any Product which has been
subjected to misuse (including any Product used in
conjunction with hardware electrically or
mechanically incompatible or used with accessories
not approved by KYOCERA), abuse, accident,
physical damage, abnormal operation, improper
handling, neglect, exposure to fire, water or
excessive moisture or dampness or extreme changes
in climate or temperature; (iii) any Product operated
outside published maximum ratings; (iv) cosmetic
damage; (v) any Product on which warranty stickers
or Product serial numbers have been removed,
altered, or rendered illegible; (vi) cost of installation,
removal or reinstallation; (vii) signal reception
problems (unless caused by defects in material and
workmanship); (viii) damage the result of fire, flood,
acts of God or other acts which are not the fault of
KYOCERA and which the Product is not specified to
tolerate, including damage caused by mishandling,
shipping and blown fuses; (ix) consumables (such as
fuses); or (x) any Product which has been opened,
repaired, modified or altered by anyone other than
KYOCERA or a KYOCERA authorized service center.
USE ONLY KYOCERA APPROVED ACCESSORIES
WITH KYOCERA PHONES. USE OF ANY
UNAUTHORIZED ACCESSORIES MAY BE
DANGEROUS AND WILL INVALIDATE THE PHONE
WARRANTY IF SAID ACCESSORIES CAUSE
DAMAGE OR A DEFECT TO THE PHONE.
CONSUMER LIMITED WARRANTY
Page 15

Rearview Mirror Car Kit with Bluetooth Wireless Technology 11
KYOCERA SPECIFICALLY DISCLAIMS LIABILITY FOR
ANY AND ALL DIRECT, INDIRECT, SPECIAL,
GENERAL, PUNITIVE, EXEMPLARY, AGGRAVATED,
INCIDENTAL OR CONSEQUENTIAL DAMAGES, EVEN
IF ADVISED OF THE POSSIBILITY THEREOF,
WHETHER FORESEEABLE OR UNFORESEEABLE OF
ANY KIND WHATSOEVER, INCLUDING BUT NOT
LIMITED TO LOSS OF PROFITS, UNANTICIPATED
BENEFITS OR REVENUE, ANTICIPATED PROFITS
ARISING OUT OF USE OF OR INABILITY TO USE ANY
PRODUCT (FOR EXAMPLE, WASTED AIRTIME
CHARGES DUE TO THE MALFUNCTION OF A
PRODUCT) OR CONTRIBUTION OR INDEMNITY IN
RESPECT OF ANY CLAIM RELATED TO A PRODUCT.
REPAIR OR REPLACEMENT OF A DEFECTIVE
PRODUCT OR REFUND OF THE PURCHASE PRICE
RELATING TO A DEFECTIVE PRODUCT, AS
PROVIDED UNDER THIS WARRANTY, ARE YOUR
SOLE AND EXCLUSIVE REMEDIES FOR BREACH OF
THE LIMITED WARRANTY, AND SUBJECT TO THIS
WARRANTY, THE PRODUCTS ARE APPROVED AND
ACCEPTED BY YOU “AS IS”. KYOCERA MAKES NO
OTHER WARRANTIES, REPRESENTATIONS OR
CONDITIONS OF ANY KIND, ORAL OR VERBAL,
EXPRESS OR IMPLIED, STATUTORY OR OTHERWISE,
WITH RESPECT TO THE PRODUCTS, INCLUDING
BUT NOT LIMITED TO ANY IMPLIED WARRANTY OR
CONDITION OF MERCHANTABILITY OR FITNESS FOR
A PARTICULAR PURPOSE OR AGAINST
INFRINGEMENT OR ANY IMPLIED WARRANTY OR
CONDITION ARISING OUT OF TRADE USAGE OR
OUT OF A COURSE OF DEALING OR COURSE OF
PERFORMANCE. NO DEALER, DISTRIBUTOR, AGENT
OR EMPLOYEE IS AUTHORIZED TO MAKE ANY
MODIFICATION OR ADDITION TO THIS WARRANTY.
Some jurisdictions do not allow the exclusion or
limitation of incidental or consequential damages,
or allow limitations on how long an implied
warranty lasts, so the above limitations or exclusions
may not apply to you. This limited warranty gives
you specific legal rights, and you may also have
other rights which vary from jurisdiction
to jurisdiction.
For warranty service information, please call the
following telephone number from anywhere in the
continental United States and Canada:
1-800-349-4478 or 858-882-1401; or contact
KYOCERA at the following address:
10300 Campus Point Drive, San Diego, California,
92121-1582, USA, Attention: Technical Support.
DO NOT RETURN YOUR PRODUCTS TO THE
ABOVE ADDRESS
. Please call or write for the
location of the Kyocera Wireless Corp. authorized
service center nearest you and for procedures for
obtaining warranty service.
 Loading...