

Page 1
Page 2

User’s Guide for QCP 860, QCP 1960, and QCP 2760 Thin Phones™
This manual is based on the production versions of the QCP 860, QCP 1960, and QCP 2760 Thin Phones.
The products and equipment described in this documentation are manufactured under one or more of the
following U.S. patents.
4,901,307 5,056,109 5,099,204 5,101,501 5,103,459
5,107,225 5,109,390 5,193,094 5,228,054 5,257,283
5,265,119 5,267,261 5,267,262 5,280,472 5,283,536
5,289,527 5,307,405 5,309,474 5,337,338 5,339,046
5,341,456 5,383,219 5,392,287 5,396,516 D356,560
5,408,697 5,414,728 5,414,796 5,416,797 5,426,392
5,437,055 D361,065 5,442,322 5,442,627 5,452,473
5,461,639 5,469,115 5,469,471 5,471,497 5,475,870
5,479,475 5,483,696 5,485,486 5,487,175 5,490,165
5,497,395 5,499,280 5,504,773 5,506,865 5,509,015
5,509,035 5,511,067 5,511,073 5,513,176 5,515,177
5,517,323 5,519,761 5,528,593 5,530,928 5,533,011
5,535,239 5,539,531 5,544,196 5,544,223 5,546,459
5,548,812 5,559,881 5,559,865 5,561,618 5,564,083
5,566,000 5,566,206 5,566,357 5,568,483 5,574,773
5,574,987 D375,740 5,576,662 5,577,022 5,577,265
D375,937 5,588,043 D376,804 5,589,756 5,590,069
5,590,406 5,590,408 5,592,548 5,594,718 5,596,570
5,600,754 5,602,834 5,602,833 5,603,096 5,604,459
5,604,730 5,608,722 5,614,806 5,617,060 5,621,752
5,621,784 5,621,853 5,625,876 5,627,857 5,629,955
5,629,975 5,638,412 5,640,414 5,642,398 5,644,591
5,644,596 5,646,991 5,652,814 5,654,979 5,655,220
5,657,420 5,659,569 5,663,807 5,666,122 5,673,259
5,675,581 5,675,644 5,680,395 5,687,229 D386,186
5,689,557 5,691,974 5,692,006 5,696,468 5,697,055
5,703,902 5,704,001 5,708,448 5,710,521 5,710,758
5,710,768 5,710,784 5,715,236 5,715,526 5,722,044
5,722,053 5,722,061 5,722,063 5,724,385 5,727,123
5,729,540 5,732,134 5,732,341 5,734,716 5,737,687
5,737,708 5,742,734 D393,856 5,748,104 5,751,725
5,751,761 5,751,901 5,754,533 5,754,542 5,754,733
5,757,767 5,757,858 5,758,266 5,761,204 5,764,687
5,774,496 5,777,990 5,778,024 5,778,338 5,781,543
5,781,856 5,781,867 5,784,406 5,784,532 5,790,589
5,790,632 5,793,338 D397,110 5,799,005 5,799,254
5,802,105 5,805,648 5,805,843 5,812,036 5,812,094
5,812,097 5,812,538 5,812,607 5,812,651 5,812,938
5,818,871 5,822,318 5,825,253 5,828,348 5,828,661
5,835,065 5,835,847 5,839,052 5,841,806 5,842,124
5,844,784 5,844,885 5,844,899 5,844,985 5,848,063
5,848,099 5,850,612 5,852,421 5,854,565 5,854,786
5,857,147 5,859,612 5,859,838 5,859,840 5,861,844
5,862,471 5,862,474 5,864,760 5,864,763 5,867,527
5,867,763 5,870,427 5,870,431 5,870,674 5,872,481
5,872,774 5,872,775 5,872,823 5,877,942 5,878,036
5,870,631 5,881,053 5,881,368 5,884,157 5,884,193
5,884,196 5,892,178 5,892,758 5,892,774 5,892,816
5,892,916 5,893,035 D407,701 5,898,920 5,903,554
5,903,862 D409,561 5,907,167 5,909,434 5,910,752
5,911,128 5,912,882 D410,893 5,914,950 5,915,235
5,917,708 5,917,811 5,917,812 5,917,837 5,920,284
5,920,834 D411,823 5,923,650 5,923,705 5,926,143
5,926,470 5,926,500 5,926,786 5,926,786 5,930,230
5,930,692 Other patents pending.
FCC/IC Notice
This device complies with part 15 of the FCC rules. Operation is subject to the following two conditions: (1)
this device may not cause harmful interference, and (2) this device must accept any interference received,
including interferenc e that may caus e unde si red o perati on .
Copyright © 2000 Kyocera Wireless Corp. All rights reserved. Portions of the document are Copyright ©
1998 QUALCOMM Incorporated.
Page 3

Welcome
This user’s guide explains how to use Kyocera Wireless Corp’s QCP 860, QCP 1960, and
QCP 2760 Thin Phones™. In addition to making and receiving calls, you can also use
your Thin Phone to:
■ send and receive pages
■ access voice mail
■ search the Internet
For more detailed instructions on how to send and receive pages, access voice mail, and
search the Internet, contact your service provider.
Page 4

Page 5

Page 6

Contents
Welcome . . . . . . . . . . . . . . . . . . . . . . . . . iii
Quick Start . . . . . . . . . . . . . . . . . . . . . . . 3
Quick menu reference . . . . . . . . . . . . 4
Getting to Know Your Phone . . . . . . . 5
Safe operating instructions. . . . . . . . 5
About your phone model . . . . . . . . . 5
Keys on your phone. . . . . . . . . . . . . . 6
Icons on the screen. . . . . . . . . . . . . . . 7
Using Smart Keys. . . . . . . . . . . . . . . . 7
Turning the phone on and off . . . . . 8
About standby mode. . . . . . . . . . . . . 8
Viewing your phone number. . . . . . 8
Using keyguard . . . . . . . . . . . . . . . . . 8
Locking the phone . . . . . . . . . . . . . . . 8
Setting the banner . . . . . . . . . . . . . . . 9
Charging the batteries. . . . . . . . . . . . 9
Adding an external battery. . . . . . . 10
Accessories . . . . . . . . . . . . . . . . . . . . 11
Making and Receiving Calls . . . . . . . 13
Redialing calls. . . . . . . . . . . . . . . . . . 13
Service provider features . . . . . . . . 14
Adjusting the volume . . . . . . . . . . . 15
Setting the ringer type. . . . . . . . . . . 15
Setting the backlight . . . . . . . . . . . . 16
Phone Book . . . . . . . . . . . . . . . . . . . . . . 17
Saving a number . . . . . . . . . . . . . . . 17
Saving a name with a number . . . . 17
Entering pauses and hyphens . . . . 19
Dialing from the phone book. . . . . 20
Changing the phone book. . . . . . . . 21
Searching the phone book. . . . . . . . 21
Voice Mail, Pages, and Text Messages 23
Types of messages . . . . . . . . . . . . . . 23
Alerts . . . . . . . . . . . . . . . . . . . . . . . . . 23
Voice mail . . . . . . . . . . . . . . . . . . . . . 23
Pages and text messages. . . . . . . . . 24
Internet and Data Capabilities . . . . . 25
Accessing the Internet. . . . . . . . . . . 25
Using the Internet browser. . . . . . . 26
Navigating in the browser . . . . . . . 26
Receiving Net Alerts . . . . . . . . . . . . 27
Sending or Receiving Data . . . . . . . . 29
Data and voice transmissions. . . . . 29
Setting up a data connection . . . . . 29
Receiving data or fax calls . . . . . . . 29
Menus . . . . . . . . . . . . . . . . . . . . . . . . . . .31
Menu items . . . . . . . . . . . . . . . . . . . 31
Caring for Your Phone . . . . . . . . . . . . .35
Phone . . . . . . . . . . . . . . . . . . . . . . . . 35
Antenna . . . . . . . . . . . . . . . . . . . . . . 35
Battery. . . . . . . . . . . . . . . . . . . . . . . . 35
Troubleshooting tips. . . . . . . . . . . . 36
Where to find help . . . . . . . . . . . . . 37
Safety Information . . . . . . . . . . . . . . . .39
Radio Frequency (RF) energy . . . . 39
Driving safely . . . . . . . . . . . . . . . . . 40
Index . . . . . . . . . . . . . . . . . . . . . . . . . . . .43
User’s Guide for QCP 860, QCP 1960, and QCP 2760 Thin Phones 1
Page 7

2 Contents
Page 8
Quick Start
To turn on your phone
■ Press or until the icon appears on the screen. The phone enters standby mode
(its idle state).
To unlock your phone
■ If your phone is locked, press or under [UNLOCK] and enter your lock code.
The default lock code is usually either 0000 or the last four digits of your phone number.
To charge your battery
■ Plug the AC Adaptor or Global Travel Charger into the phone and into a wall outlet.
To make a call
1. Turn on the phone.
2. Dial the number on the keypad, then press or .
To answer a call
■ When the phone rings, press or to answer. In standby mode, press any key
except , or , or the volume keys.
To end a call
■ Press .
pwr
END
END
SEND
SEND
pwr
TALK
TALK
To save a number in the phone book
1. Enter the number you want to save.
2. Press or under [SAVE] and follow the directions on the screen.
To speed dial a phone number
1. Enter a memory location from the phone book.
2. Press or .
SEND
TALK
To redial the last number called
■ Press or .
SEND
TALK
User’s Guide for QCP 860, QCP 1960, and QCP 2760 Thin Phones 3
Page 9
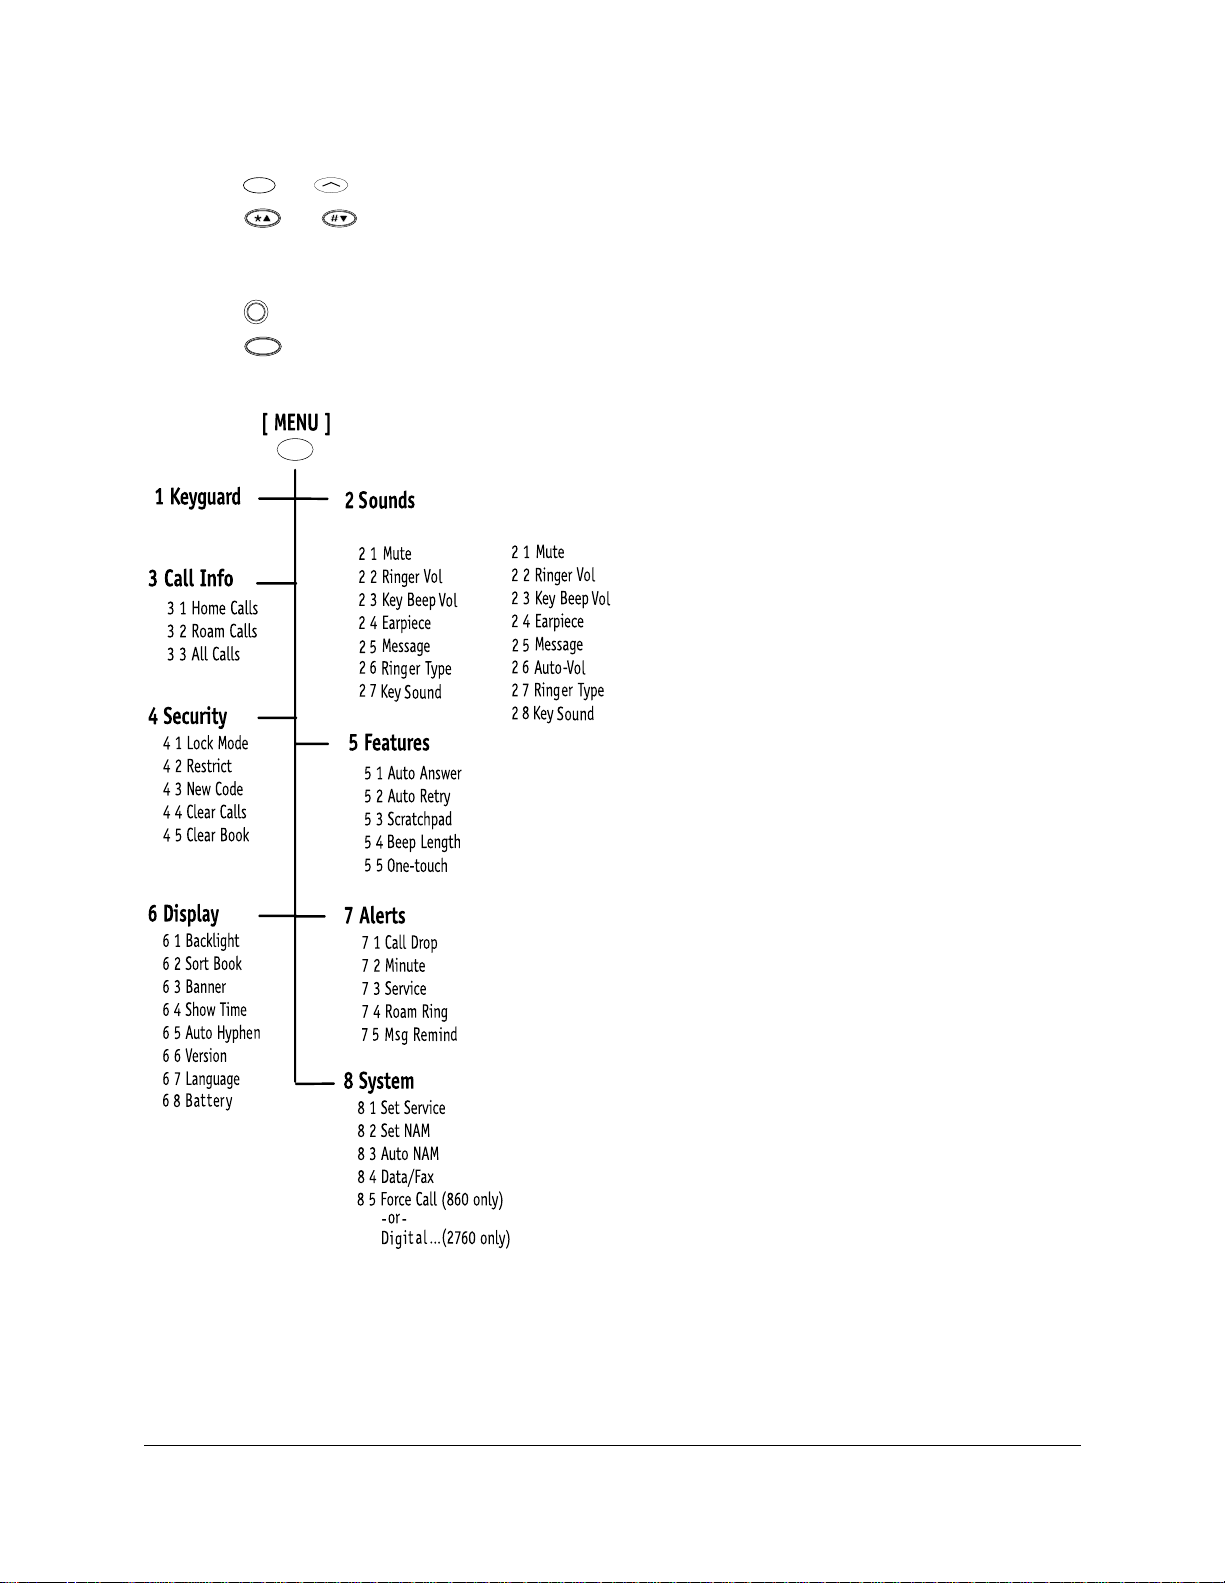
Quick menu reference
■ Press or under [MENU] to enter the menu structure.
■ Press or or the volume keys to scroll up or down through the menus.
■ Enter the menu and menu item number (such as 6 3 for Display > Banner) to open a
menu item.
■ Press to return to the previous menu level without saving changes.
■ Press to exit the menus.
C
END
QCP 860 and 1960
QCP 2760
4 Quick Start
Page 10

Getting to Know Your Phone
Safe operating instructions
Read these cautions before you use the phone.
If you have a pacemaker, keep the phone at least six inches (15 centimeters) away from
your chest. If your phone is too close to a pacemaker, its radio frequency (RF) energy
may interfere with the pacemaker. If you have any reason to suspect a problem, turn off
your phone immediately. (See page 39 for more information.)
If you carry your phone in a pocket or purse, activ ate th e keyg uar d to pr ev ent accident al
keypresses. Press or under [MENU], then press . (See page 8 for details.)
Only use Kyocera Wireless Corp. approved accessories with Kyocera Wireless Corp.
phones. Use of any unauthorized accessories may be dangerous and will invalidate the
phone warranty if the accessories cause damage to the phone.
About your phone model
This user’s guide covers three models of QCP Thin Phones:
■ QCP 860: dual-mode CDMA digital and analog cellular service (at 800 MHz)
■ QCP 1960: CDMA digital PCS service (at 1900 MHz)
■ QCP 2760: dual-band CDMA digital PCS (at 1900 MHz) and analog cellular service
(at 800 MHz)
1
User’s Guide for QCP 860, QCP 1960, and QCP 2760 Thin Phones 5
Page 11
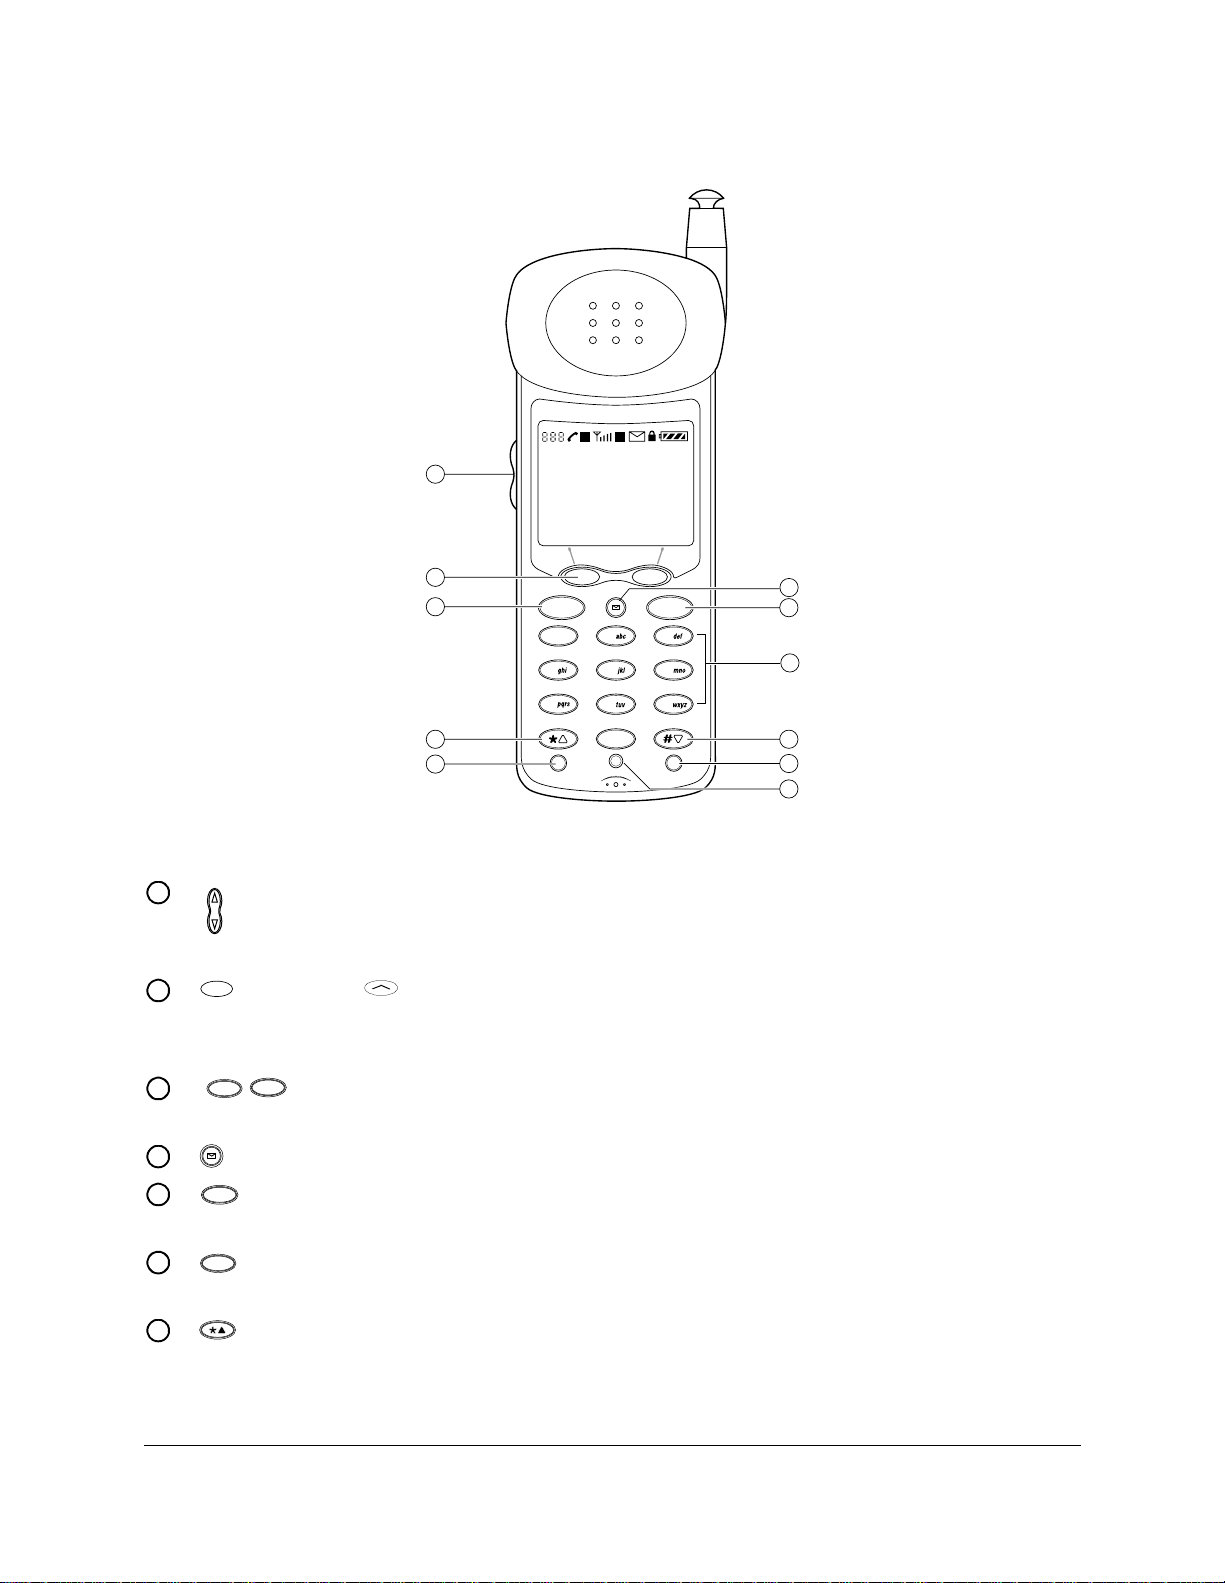
Keys on your phone
D R
1
2
3
Kyocera Wireless
Apr 20 Thu
8:43 am
[ MENU ] [ BOOK ]
QCP-860
SEND END
1
2
3
4
5
6
8
7
9
4
5
6
7
8
Note: This illustration applies to only the
QCP 860 and QCP 1960.
Press the Volume keys to adjust the ringer and earpiece volume. You also use
1
0
C
pwr
ι
pwr
9
10
11
S029_01A
these keys to move the cursor when you are editing numbers or scrolling
through menus.
2
(860/1960) (2760) Smart Keys™ change function based on the screen you
are using. The word above each key identifies its current function. In standby
mode, the Smart Keys are [MENU] and [BOOK].
TALK
3
SEND
The key you press to make a connection may be labeled Send or Talk.
Press this key to start a call, answer a call, or redial the last dialed number.
Press the envelope to open text messages, pages, and voice mail notifications.
4
END
5
Press End to end a call or to silence the ringer during an incoming call. Press
this key at any time to exit the current screen and return to standby mode.
6
Use the keypad to enter digits, letters, and punctuation marks, or to select
1
menu options.
7
Press Scroll Up to scroll through menus and screens. When editing text, press
it to move the cursor to the left.
6 Getting to Know Your Phone
Page 12
8
Press Information to see your phone number or enter punctuation marks and
ι
pauses.
9
Press Scroll Down to scroll through menus and screens. When editing text,
press it to move the cursor to the right.
pwr
10
11
(860/1960) (2760) Press and hold Power to turn the phone on or off.
Press Clear once to erase the last character. Press and hold to erase all
C
characters. In menus, press this key to return to the previous menu level.
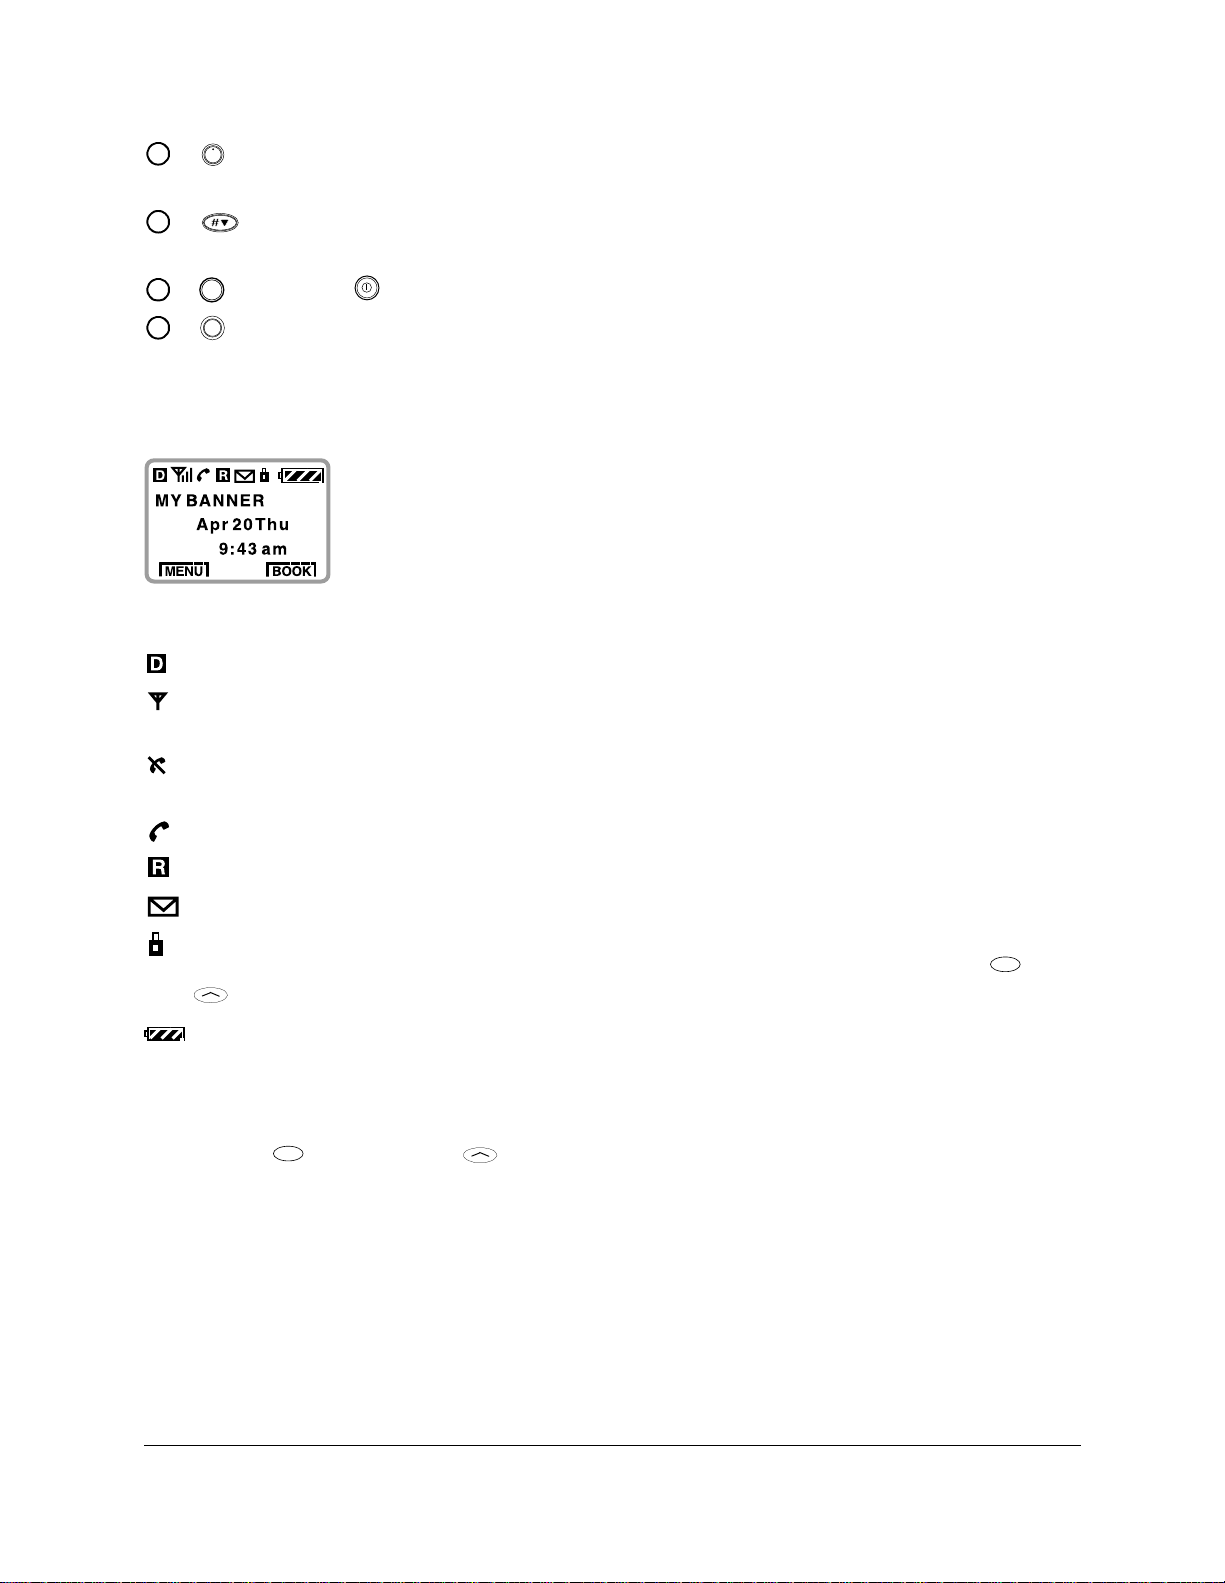
Icons on the screen
Your phone has a five-line screen. On the top line, the following icons appear:
Digital Mode means the phone is operating in CDMA digital mode.
Signal Strength shows current signal strength. The more lines you see, the stro nger
the signal. When this icon appears, you can make and receive calls.
No Signal means the phone is not receiving a signal from the system. You cannot
make or receive calls. Wait a little longer or move to an open area.
On Call means a call is in progress.
Roaming means the phone is outside of its home area.
Envelope indicates a text message, voice mail, or a page.
Padlock indicates your phone is operating with enhanced CDMA voice privacy (if
available from your service provider). When this icon appears over the left or
key, keyguard is on.
Battery Charge shows how much power remains in the battery. The more black
bars you see, the greater the charge. (For more information, see page 9.)
Using Smart Keys
Smart Keys (860/1960) or (2760) are the two unlabeled keys below the screen.
(See the diagram on page 6.) Smart Keys change function based on the screen you are
using. The word above each Smart Key identifies its current function. In standby mode,
the Smart Keys are [MENU] and [BOOK]. Once you press either key, other words may
appear.
User’s Guide for QCP 860, QCP 1960, and QCP 2760 Thin Phones 7
Page 13

Turni ng the pho ne on and off
SEND
To turn the phone on
■ Hold down or for about a second. “Searching...” appears on the screen until the
pwr
phone locates a signal, then appears on the screen. (See page 7 for information on all
the screen icons.)
Once your phone is on, it enters standby mode (the phone’s idle state).
To turn the phone off
■ Hold down or until “Powering Off” appears.
pwr
About standby mode
When the phone is turned on and ready to send or receive calls, it is in standby mode (its
idle state). From standby mode, you can dial a phone number, save it in the phone book,
or find it in the phone book if it is already there. Press at any time to return to
standby mode.
END
Important—If you press while on a call, you end the call. To view the date and time
during a call, press .
C
END
Viewing your phone number
■ From standby mode, press . Your phone number appears.
ι
Using keyguard
Keyguard protects your phone against accidental keypresses when the phone is turned
on. You can answer calls by pressing or whether keyguard is turned on or not.
TALK
To turn keyguard on
Turn keyguard on in one of these ways:
■ Press and hold or under [MENU] for about two seconds.
- or -
■ Press or under [MENU], then press . appears above the left Smart Key.
1
To turn keyguard off
1. Press or under .
2. Press .
1
Locking the phone
You can lock your phone using your four-digit lock code. When the phone is locked, you
can only call emergency numbers or receive incoming calls.
To lock the phone
1. Press or under [MENU].
2. Choose Security.
3. Enter your four-digit lock code.
4. Choose Lock Mode.
8 Getting to Know Your Phone
Page 14
5. Press or under [NEXT] to scroll through these settings: on power up, now
(resets to never when you unlock), and never.
6. Press or under [OK] to select the setting you want to use.
To unlock the phone
■ To unlock the phone, press or under [UNLOCK] and enter your lock code.
Setting the banner
The banner is a 12-character display that appears on the screen during power up and
standby.
To change the banner
1. Press or under [MENU].
2. Select Display.
3. Select Banner.
4. (Optional) If a banner exists, press or under [EDIT].
5. Enter the characters you want to appear in the banner (for example, your name).
Enter characters the same way you do for the phone book. (See “Saving a name with
a number” on page 17.)
6. Press or under [SAVE] to save the banner.
Charging the batteries
Your phone comes with a rechargeable internal lithium ion (LiIon) battery, which you do
not need to remove to charge.
This LiIon battery is partially charged when you receive the phone. Fully charge the
battery as soon as you can to maximize talk time. If the charge falls too low, the phone
turns off without saving any functions in progress.
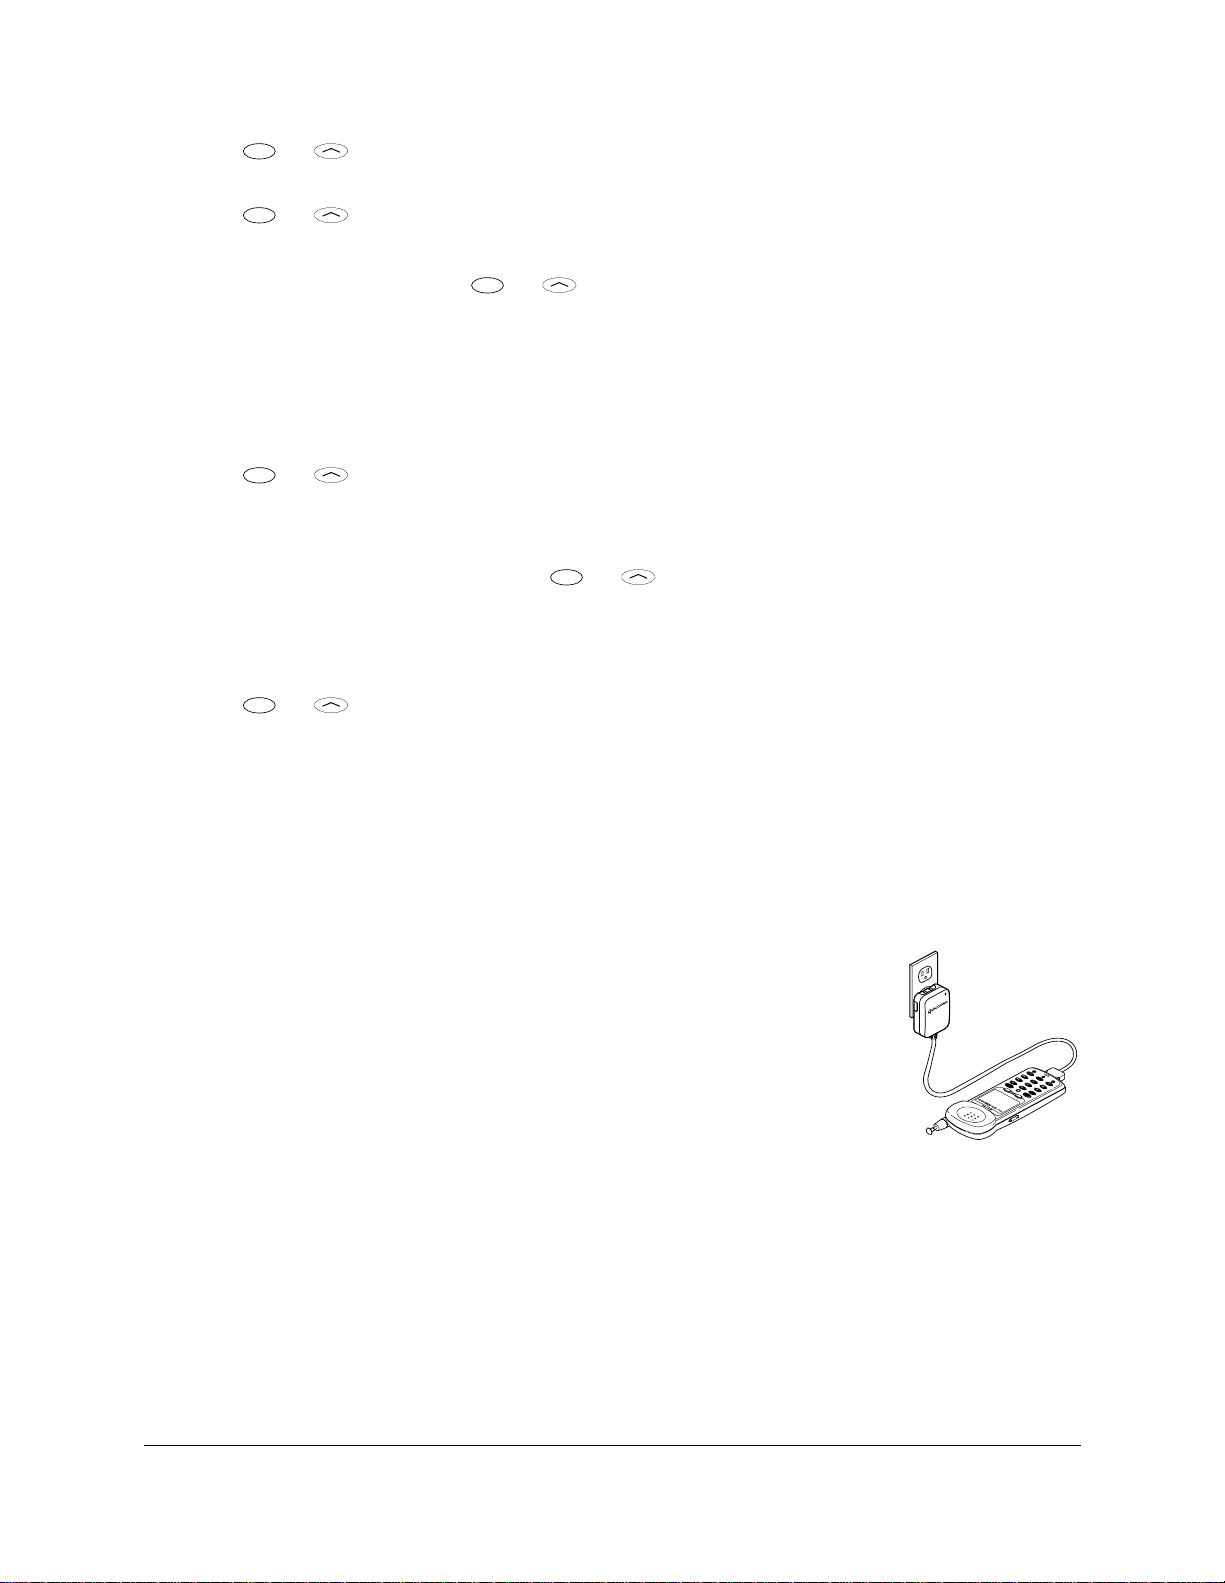
Your phone may come with either an AC Adaptor or a Global Travel
Charger (like the example shown here).
Plug the charger into the phone and into a wall outlet to charge the
battery. The quickest way to charge the battery is to turn the phone off
while it is connected to the charger.
While the battery is charging, the icon continues to scroll. Do not use
your phone while it is charging.
If you have attached an external battery to the phone, the AC Adaptor or Global Travel
Charger rechar ges the internal battery first (to a level of 90%), then r echarges the ex ternal
battery (to 90%). The charger then tops off the internal battery and external battery to
100%. However, it is not necessary to wait until all batteries reach 100% before using
your phone.
pwr
C
9
0
6
ι
8
3
5
END
7
2
4
1
SEND
[ BOOK ]
QCP-860
8:43 am
[ MENU ]
Apr 20 Thu
R
-- QUALCOMM --
D
S029_
Note—While you are using an AC Adaptor, the phone will not make analog calls.
User’s Guide for QCP 860, QCP 1960, and QCP 2760 Thin Phones 9
Page 15
Adding an external battery
You can purchase an external battery that s naps onto the back o f the phone to extend th e
talk and standby times. (See “Accessories” on page 11.)
To attach an external battery
1. Insert the two teeth on the battery into the corresponding holes on the back of the
phone.
2. Move the top of the battery towards the phone until it latches into place.
To remove an external battery
1. Push the button on the top of the battery cartridge to disengage the battery.
2. Pull the battery away from the phone.
Caution—It is illegal in some areas to dispose of LiIon batteries in household or business
trash. Contact your nearest Kyocera Wireless Corp. Service Center for safe disposal
options. Do not handle a damaged or leaking LiIon battery.
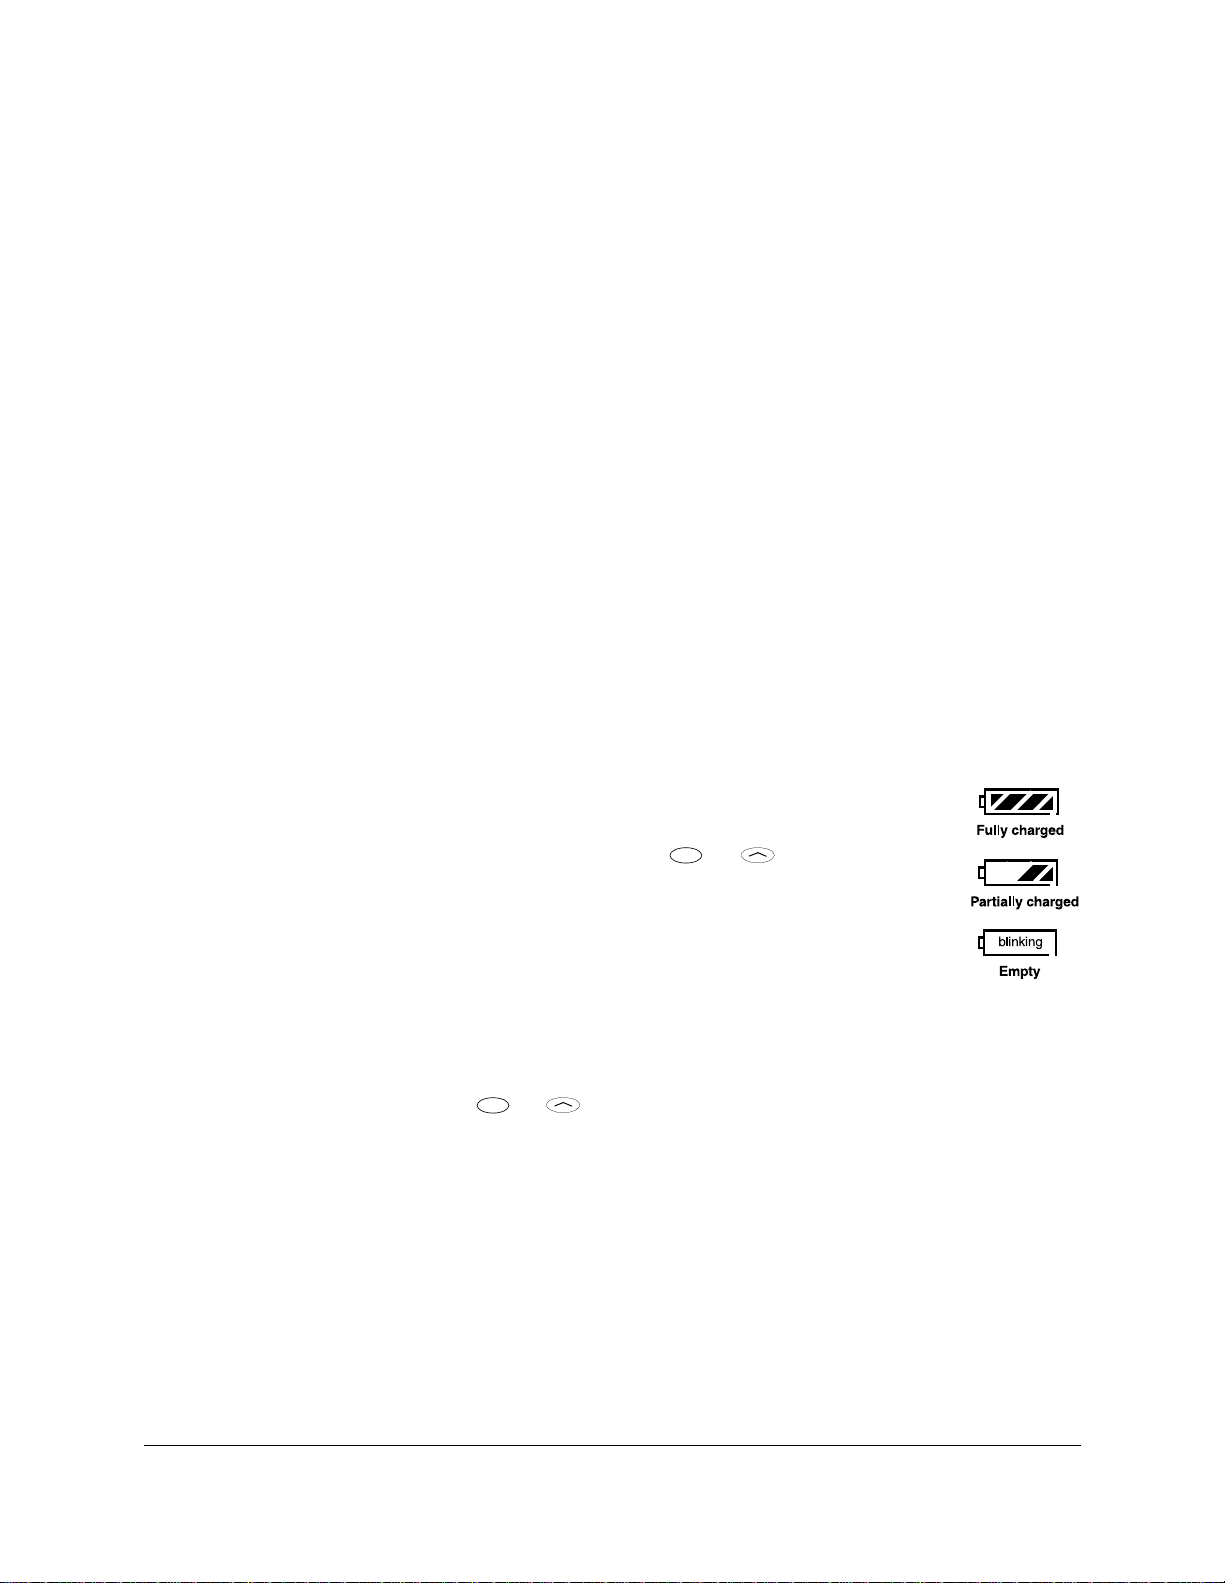
Battery power levels
The phone uses all the power in the external battery before it uses the internal battery.
The battery icon tracks only one battery at a time. It reflects the charge level of an
attached external battery as long as that battery has a charge. Otherwise, it tracks the
internal battery level.
The more black bars there are in the icon, the greater the charge.
When your battery is very low , the screen icon blinks, the phone beeps, and a
message alerts you to the low battery level. Press or under [OK] to
acknowledge the message.
Tip—To reduce drain on your battery, set the backlight to “always off.” (See
“Display” on page 33.) (See page 35 for more tips on using the battery.)
Hot swapping
If the external battery runs out of power during a call, the internal battery takes over
automatically so you do not lose the call. This process is called hot swapping. A low
battery message appears. Press or under [OK]. The battery icon then displays the
status of the internal battery.
If the internal battery power falls low during a call, snap on an external battery. The
phone uses the external battery without dropping the call. The battery icon displays the
charge level of the external battery.
Note—The external battery does not charge the internal battery.
10 Getting to Know Your Phone
Page 16

Accessories
Accessories for your phone may include a Hands-free Car Kit, Hands-free Headset,
leather case, desktop charger, external battery, and more.
To find out what accessories are available, visit the place where you bought your phone
or an authorized Kyocera Wireless Corp. service center. You can also call (800) 211-1537
(510) 683-4004 or visit our Web site at
http://www.kyocera-wireless.com/store
User’s Guide for QCP 860, QCP 1960, and QCP 2760 Thin Phones 11
Page 17

page intentionally left blank
12 Getting to Know Your Phone
Page 18

Making and Receiving Calls
Your phone must be turned on before you can use it. (See “Turning the phone on and
off” on page 8.) When the phone is off, incoming calls go to voice mail if available. (See
page 23.)
To make a call
1. Press the numbers on the keypad to dial a number.
2. Press or .
SEND
To answer a call
■ Press any key except , , , or the volume keys.
To end a call
■ Press to end a call.
END
Redialing calls
Your phone keeps a recent history list of the last 10 calls. This includes both incoming
and outgoing calls.
To redial the last number you dialed
■ When your phone is in standby mode, press or until “CALLING...” appears.
TALK
END
pwr
SEND
TALK
Tip—If you are not sure what mode your phone is in, press to return to standby
END
mode.
To redial from the recent history list
1. Press or under [BOOK].
2. Press or under [CALLS]. The recent history list appears.
3. Press or or the volume keys to scroll through the list.
4. Press or to dial the number.
SEND
TALK
-orPress or under [VIEW] to see more information about the call, and press
TALK
or to redial. (See “Phone Book” on page 17.)
Types of calls in the list
The recent history list contains the following types of calls:
Called By—Incoming calls (if caller ID service is available). Call To—Phone numbers you dialed. Missed—Unanswered incoming calls (if caller ID service is available). This call type
does not include call attempts made when the phone was off.
SEND
Call Waiting—Incoming calls that occurred while you were on another call (if call
waiting service is available).
User’s Guide for QCP 860, QCP 1960, and QCP 2760 Thin Phones 13
Page 19

Three-Way Calling—A call in which three parties participate (if three-way calling is
SEND
available). Added—Any phone numbers you added during a call using the scratchpad feature. (See
page 32.)
Duplicate calls appear once on the list. Calls are considered duplicates only if they have
the same number and the same call type, such as Called By.
To edit the recent history list
1. Press or under [BOOK].
2. Press or under [CALLS]. The recent history list appears.
3. Press or or the volume keys to sc roll thr ough the list an d select the entry yo u
want to edit.
4. Press or under [VIEW].
5. Press to delete existing numbers, then enter new numbers. (See page 17 for details
C
on entering text.)
6. Press or under [SAVE].
Service provider features
Your service provider may offer extra features like caller ID, three-way calling, call
forwarding, and call waiting. Your Kyocera Wireless Corp. phone supports all of these
options if they are activated on your phone. Contact your service provider for details.
Caller ID
Caller ID displays the phone number of the person calling you. If that number has been
saved in your phone book, the caller’s name also appears.
Three-way calling
Three-way calling allows three parties to participate in the same phone conversation.
To set up a three-way call
1. Dial the first party. You may need to press or to put the first party on hold.
SEND
2. Dial the second number and press or .
3. When the second party answers, press or again. If one of the other two parties
SEND
hangs up, you and the remaining party stay connected. If you hang up, all three parties are
disconnected.
TALK
TALK
TALK
Call forwarding
Some service plans allow you to forward calls to another phone number. To do this, you
typically press plus a numerical code, then enter the forwarding number and press
SEND
TALK
or . The phone beeps and confirms your calls were forwarded. Consult your
service provider for details.
14 Making and Receiving Calls
Page 20

Call waiting
When you are on a call and another call comes in, you hear two beeps. The screen shows
the caller’s phone number if it is available.
1. Press or to switch to the incoming call. The previous caller is placed on hold.
2. Press or to change from one caller to the other. If you press , both calls are
SEND
SEND
TALK
TALK
END
disconnected.
Adjusting the volume
To silence the ringer
1. When the phone rings, press or use the volume keys to silence the ringer. The
screen reads “RING ER SILENC ED,” then “INCOMING CALL.”
2. Press or to answer the call after silencing the ringer.
SEND
TALK
To mute or unmute a call
1. During a call, hold or under [MENU] for about two seconds. “MUTE” flashes
on the screen. The other party will not hear anything you say.
2. To unmute the call, hold or under [MENU] again.
To adjust the earpiece volume
■ During a call, press the volume keys to adjust the volume up or down.
END
To adjust the ringer volume
■ In standby mode, press the volume keys to adjust the ringer volume.
To use the automatic volume feature
The QCP 2760 Thin Phone has an automatic volume feature, which is not available on
QCP 860 and QCP 1960 Thin Phones. When you turn it on, your phone automatically
adjusts the earpiece volume on CDMA digital calls (when appears on the screen)
based on ambient noise level and the level of the caller’s voice. The volume is not
adjusted on analog calls.
1. Place a call from a quiet environment.
2. Press the volume keys to set the volume to a comfortable level.
3. Press or under [MENU]. Press 2 6 to choose Sounds >
Auto-Vol. On future calls, the phone uses this setting to adjust the volume.
Setting the ringer type
1. Press or under [MENU].
2. Choose Sounds > Ringer Type.
On QCP 860 and QCP 1960 Thin Phones, press 26; on QCP 2760 Thin Phones, press
27.
3. Press or under [NEXT] to cycle through the settings. Each ring plays
automatically.
4. Press or under [OK] to select the setting you want.
User’s Guide for QCP 860, QCP 1960, and QCP 2760 Thin Phones 15
Page 21

Setting the backlight
To save battery power, do not set the backlight to always on.
1. Press or under [MENU].
2. Press 6 1 to select Backlight.
3. Press to cycle thr ough the optio ns: always on , always of f, 10 se conds, 30 sec onds,
10 sec + call, or 30 sec + call. (The “+ call” options cause the light to remain on for the
duration of the call.) A check mark shows which option is selected.
4. Press or under [OK] to select the option you want.
16 Making and Receiving Calls
Page 22

Phone Book
The phone book stores phone numbers in “memory locations.” Your phone has 99
memory locations. Each location holds a phone number up to 32 digits long and a name
up to 12 characters long.
Tip—When you save a number in the phone book, include its area or long distance code.
That way, you can dial the number from anywhere. If it’s a local number, you pay only
local rates.
The phone automatically sorts entries by memory location number. To sort the entries
alphabetically, open the menu and select Display > Sort Book (62).
Saving a number
1. In standby mode, enter the phone number you want to save.
2. Press or under [SAVE]. The Enter Name: screen appears.
3. Enter a name to go with the number. To enter letters using the keypad, see “Saving a
name with a number” on page 17.
4. Press or under [SAVE] to save the name. The memory location screen appears.
5. Do one of the following:
■ To assign the first available memory location number, press or under
[SAVE]. The Make Secret? screen appears.
■ To assign a specific number, enter a memory location.
QCP 860
QCP 1960
QCP 2760
Enter a number between 01 and 99.
Enter a number between 01 and 199.
If that number is already assigned, the existing entry appears.
Next, press or under [SAVE] to save this memory location or press or
under [NEXT] to select a different /location. The Make Secret? screen appears.
6. Press or under [NEXT] to cycle through the options:
■ No—The number appears in the phone book and history list.
■ Yes—The name is visible but the phone number is hidden. You cannot view or edit
it unless you enter the lock code. (See page 21.)
7. Press or under [OK]. A confirmation message appears; you have saved the entry.
Saving a name with a number
You can enter any combination of letters, numbers, and punctuation marks in the Enter
Name: screen. (To open this screen, see page 17.)
1. Press the key with the letter or number you want. Press the key once for the first
letter, twice for the second letter, and so on.
User’s Guide for QCP 860, QCP 1960, and QCP 2760 Thin Phones 17
Page 23

After you have cycled through the letters, the key number appears. For example, if
6
1
you press twice, the letter B appears. If you press it four times, the number 2
2
appears.
Two seconds after you choose a character, the cursor moves one space to the right.
2. To move the cursor manually, press or .
3. To delete characters, press .
C
Tip—Press to enter a space between a first and last name.
To change cases
By default, letters start out in upper case. You can “shift” from upper case to lower case
in two ways when [A->a] or [a->A] appears on the screen above s or .
■ Hold down the key for the letter you want to enter for about two seconds. For
example, to enter an e, press and hold . Then press twice. The key is shifted
3 3
to lower case for one letter only.
Example—To enter the name Ann, press once to enter the capital A. When the
2
cursor moves to the next space, press two times and hold it down for about two
seconds. Repeat to enter the second n.
■ Press or under [A->a] to change to lower case. The [A->a] Smart Key changes to
[a->A]. The letters remain shifted to lower case until you press or under [a->A] to
return to upper case.
To enter punctuation
1. When you enter names, press the key to cycle through these common
punctuation marks:
.,–
’ @:?/1
2. To open a list of punctuation marks, press . There are three screens of characters, each
ι
matched to a key.
3. Use or or the volume keys to scroll between the screens.
4. With the correct screen visible, press the appropriate number to enter
each punctuation mark.
5. To exit the list without entering a punctuation mark, press .
C
Special characters
Your phone supports English, French, Portuguese, and Spanish. If you
select the English display, the number keys enter the letters printed on the
keys. If you select another language, you can also enter letters with
accents, cedillas, circumflexes, and other marks.
1. Press or under [MENU], then press 67to open the Display >
Language menu.
2. Press or under [NEXT] to cycle through the languages.
18 Phone Book
Page 24

3. When the correct language appears, press or under [OK].
4. Press the keys in the charts below to enter special characters.
French
Key Characters
2
3
4
6
8
A À Â B C Ç 2
D E Ë È É Ê F 3
G H I Ï Î 4
M N O Ô Œ 6
T U Ü Ú V 8
Portuguese
Key Characters
2
3
4
6
8
A À Á Â B C Ç 2
D E È É Ê F 3
G H I Í 4
M N O Ò Ó Ô Õ 6
T U Ü Ú V 8
Spanish
Key Characters
2
3
4
6
8
A Á B C 2
D E É F 3
G H I Í 4
M N Ñ O Ó 6
T U Ü Ú V 8
Note—To enter these characters as lower-case letters, see page 18.
Entering pauses and hyphens
You can insert pauses and manual hyphens along with numbers in your phone book.
Pauses are useful for dialing numbers like voice mail or any numbers that require a
security code or credit card number.
There are two kinds of pauses:
■ Timed pauses are two seconds long.
■ Hard pauses cause the phone to stop dialing until you press or under
[RESUME].
By default, your phone enters hyphens using the North American numbering plan. If
you insert a manual hyphen, the automatic hyphenation for that number is suspended.
Pauses and manual hyphens count towards the 32 character limit.
User’s Guide for QCP 860, QCP 1960, and QCP 2760 Thin Phones 19
Page 25

To enter a pause or hyphen
1. Start entering the number.
2. Press to insert a pause or manual hyphen.
ι
3. Press one of the following keys:
1
to insert a hard pause
to insert a timed pause
2
3
to insert a manual hyphen
4. Enter the rest of the numbers and the name as usual.
Dialing from the phone book
To find a memory location
1. Press or under [BOOK].
2. Press or or the volume keys to scroll through the phone book until you see
the entry you want to call. You can also search for the entry by name or number. (See
page 21.)
To speed dial a numb er
■ Enter the memory location number and press or .
SEND
To dial from a memory location
1. Press or under [BOOK].
2. Press or or the volume keys to scroll through the entries.
3. When the cursor appears beside the phone number or name, press or to
place the call.
TALK
SEND
TALK
One-touch dialing
Use this feature to call numbers without pressing or . If one-touch dialing is not
SEND
TALK
active on your phone, press or under [MENU] and press 55 to open the Fe atur es
> One Touch menu. Select Enabled to activate it.
To use one-touch dialing
1. From standby mode, enter the memory location number.
2. Hold down the last digit until you see the message “Calling...” along with the phone
book data.
To edit a number before dialing
You can change a number from the phone book or recent history list right before dialing.
For example, you may want to add the area or long distance code for when you dial
outside your home system.
1. Recall the number from the phone book or recent history list.
2. Press or under [VIEW].
3. Press a digit to start editing. Add or delete numbers as you wish.
20 Phone Book
Page 26

4. To save the edited number, press or under [SAVE]. If you do not save the
number, the changes only apply to the current call.
5. Press or to dial the number.
SEND
TALK
Changing the phone book
To edit a phone book entry
You can change the number, name, and memory location of any phone number. You can
also make numbers secret.
While editing, press or under [SAVE] or [OK] to skip a screen without changing
anything, or to accept your changes and move to the next step.
1. Press or under [BOOK].
2. Press or or the volume keys to go to the entry you want to edit.
3. Press or under [VIEW] to see details of the entry.
4. Press or under [EDIT]. The number appears. To edit secret entries, first enter your
secret code.
5. Edit the phone number using , the digit keys, and the volume keys to move the
cursor.
6. Press or under [SAVE].
C
7. Edit the name and press or under [SAVE].
8. Edit the memory location and press or under [SAVE].
9. Save the entry as secret or non-secret. Press or under [OK]. A confirmation
message appears; you have saved your changes.
To erase a phone book entry
1. Press or under [BOOK].
2. Go to the entry you want to erase.
3. Press or under [VIEW] to see details of the entry.
4. Press or under [ERASE], then press or under [OK]. “-ERASED-”
appears.
Note—If the entry is secret, you must enter your four-digit lock code.
Searching the phone book
To scroll through the phone book
1. Press or under [BOOK].
2. Press or or the volume keys to scroll through the list.
To search by name
1. Press or under [BOOK].
2. Press or under [NAME].
User’s Guide for QCP 860, QCP 1960, and QCP 2760 Thin Phones 21
Page 27

3. Enter the first letter(s) of the name, and press or under [FIND]. The screen
shows the first entry beginning with that letter. Name search is not case-sensitive.
To search by phone number
1. From standby mode, enter three consecutive digits of the number.
2. Press or under [FIND]. If more than one phone number contains those digits, the
phone lists them all. Press or or the volume keys to scroll through the list.
3. Press or to dial the number.
SEND
TALK
To search by memory location
1. Press or under [BOOK].
2. Enter the memory location number.
3. Press or under [FIND].
22 Phone Book
Page 28

Voice Mail, Pages, and Text Messages
Depending on the service provider, your phone may offer messaging features such as
voice mail, paging, and text messaging.
Types of messages
Voice mail—With voice mail, calls automatically go to your voice mail when your phone
is turned off or when you don’t answer. When you receive a message, the voice mail
system sends a notification to your phone. You must call your voice mail service to hear
the message, since it is stored on their system and not on your phone.
Page/Msg—When a caller enters a number instead of a voice message, it appears on your phone as a numeric page. Some service providers can also send preset text messages. If you have email service for your phone, email may appear as a text message. You can view pages and text messages on your phone screen.
Alerts
When you receive voice mail or pages, your phone alerts you in several ways:
■ “Page/Msg” or “Voice Mail” appears. An asterisk (*) marks urgent messages.
■ The icon appears. The icon blinks if the message is urgent.
■ Four beeps sound. To turn off the beep, open the menu and select Sounds > Message
(2 5).
■ A single reminder beep sounds every five minutes. To turn the reminder beep on or
off, open the menu and select Alerts > Msg Remind (75).
Memory
Your phone can store up to 700 bytes of messages (approximately 22 messages of 16
characters each). When the available memory falls below 25% of the total memory, the
phone beeps and displays “WARNING! Message Memory is almost FULL. New
message is rejected.”
When the phone runs out of memory, it beeps and displays “Msg memory is full. Last
msg rejected.” It does not accept any new messages. Remember to erase old messages to
make more memory available.
Voice mail
Each voice mail notification erases the previous notification. It does not erase the actual
message in your voice mail.
To listen to your voice mail
1. When and “Voice Mail” appear, press and hold for about two seconds. The
phone automatically dials your service provider’s callback number.
If your service provider has not set the callback number, press to return to
standby mode and dial your service.
User’s Guide for QCP 860, QCP 1960, and QCP 2760 Thin Phones 23
END
Page 29

2. Follow the recorded prompts to listen to your message.
SEND
SEND
To erase voice mail notifications
Erasing voice mail notification does not erase the messages on your voice mail system.
1. After viewing the notification, press or under [RESET] to delete it.
2. Press or under [YES].
Pages and text messages
To view a new page or text message
1. When and “Page/Msg” appear, press .
2. Scroll to the Page/Msg line. Press or under [OK]. The first new message opens.
To view old pages or text messages
1. Press to display the list.
2. Scroll to the Old Msg line. Press or under [OK]. The first old message opens.
3. Press or under [VIEW].
To dial a callback number
1. After viewing the message, press or .
2. If the message includes a callback number, press or again to dial it.
TALK
SEND
TALK
To save a callback number
1. After viewing the message, press or .
2. Press or under [SAVE] to save the number in the phone book.
TALK
To erase a page or text message
1. After viewing the message, press or under [ERASE].
2. Press or under [YES].
To erase old page information
1. Press to display the list.
2. Scroll down to the Erase Old line. Press or under [OK]. The message “Erase old
page count to zero?” appears.
3. Press or under [YES].
To turn Auto-Delete on or off
When Auto-Delete is on and memory is full, old text messages are deleted as new
messages come in.
1. Press to display the list.
2. Scroll down to the Auto-Delete line. Press or under [OK]. The “Auto-Delete
Old Page/Msg” screen appears.
3. Press or under [ON] or [OFF].
24 Voice Mail, Pages, and Text Messages
Page 30

Internet and Data Capabilities
Your QCP 860, QCP 1960, or QCP 2760 Thin Phone™ is capable of
browsing the Internet and handling data such as email or fax transmission.
This guide explains how to use these capabilities.
Be aware, however, that Internet and data capabilities are dependent on
your service provider. Check with your service provider for their
availability in your area and for billing charges.
Internet browser
You can use your phone to browse the Internet if you have obtained phone
Internet services from your service provider and if over-the-air Internet access is
available in your area. For details, see “Accessing the Internet” below.
Data capability
You can connect your phone to your computer with the Kyocera Wireless Corp. Data
Cable (available separately) and use the phone line for email, Internet access, or fax
transmission, if these services are available from your service provider. For details, see
“Sending or Receiving Data” on page 29.
Accessing the Internet
About Internet services
If you have purchased Internet service from your service provider, hundreds of Web
pages are available to you on your phone, including stock quotes, weather, news
headlines, telephone directories, travel, sports, and entertainment.
You may also have access to personal information such as email, your calendar, or a
personal address book. Your service provider determines which applications you can
use and will notify you when new applications become available. These applications are
designed to work seamlessly with your phone. They download quickly and fit on your
phone screen.
You can also browse sites on the World Wide Web. However, some pages may take a
long time to download or may contain too much text to read easily. Not all Web pages
will be formatted properly.
Your phone can also support Internet messages called Net Alerts. For more information,
see “Receiving Net Alerts” on page 27. To learn more about the features of your Internet
browser, contact your service provider.
When you sign up for Internet service, your service provider may give you access to a
personal configuration W eb page wher e you can edit some phone browser settings from
your computer. For example, you could format the home page on your browser and
assign bookmarks to favorite pages.
User’s Guide for QCP 860, QCP 1960, and QCP 2760 Thin Phones 25
Page 31

Using the Internet browser
END
To start the browser
1. Make sure your phone is on. Then press . The message screen appears.
2. Press or under [NET]. The phone connects to the Internet.
After an introductory screen, the phone shows your Internet browser home
page.
Your service provider determines what appears on the home page.
Check with your service provider to see if you can edit your home
page from your computer.
To use browser applications
1. From the home page, use and (or the volume keys) to scroll through the list
of applications.
2. Press or under [OK] to start the desired application.
3. To open the browser menu at any time, press .
4. To return to your home page from any other location, press .
If you press on your home page, you exit from the browser.
END
To exit the browser
■ From the home page, press to exit the browser and return to standby mode.
■ From any location , press an d hold for about two sec onds to exit the br owser and
END
return to standby mode. This method saves the URL (Web site) that you were using last.
ι
END
Navigating in the browser
You can use the keys on your phone to navigate in the browser.
Keys
Use the volume keys to scroll up and down.
END
C
Press End once from the home page to exit the browser. Press it once
from any other screen to return to the home page. Press and hold End
for about two seco nds fr om any locat ion to exit the br ows er and re turn
to standby mode, saving the last URL you visited.
Press Up to scroll up or to move the cursor left during text entry.
Press Down to scroll down or to move the cursor right during text
entry.
Press Clear to return to the previous screen. When you are entering
text, press Clear to erase the last character. If the cursor is at the
beginning of a line, press Clear to r et urn to the previous line or screen.
26 Internet and Data Capabilities
Page 32

ι
Press Information to open the Browser settings menu. Press the
number keys to select the menu options. You can create and use
bookmarks, return to your home page, configure the browser settings,
and more.
1
Use the number keys to select menu items or enter digits and letters.
When entering letters, press and hold keys to shift from upper to
lowercase.
Press a Smart Key to accept a selection (as shown by the word above
the Smart Key).
Status indicators
The phone displays key words and icons to show status.
WORKING—The browser is searching for Internet service.
RECEIVING—The browser is on a call to a Web site and downloading data. You may be
billed for this time. The call remains active for a few seconds after your phone
receives the information. Once a page has been downloaded, you can look at that
page for any length of time without incurring additional phone charges. However, as
soon as you follow a link or press or under [OK] to submit an entry, the
phone makes a new call for which you may be billed.
SENDING—The phone is sending data to an application. When you enter data on a screen
and press or under [OK] to accept it, the phone sends the data.
The padlock icon indicates a secure Web page where it is safe to enter confidential
data, such as a credit card number. Data encryption makes a secure page safer than
using your cordless phone at home.
The on call icon means you are browsing and may incur phone charges. You cannot
receive voice calls when this icon is displayed. The Internet browser is designed to
minimize billable time. Contact your service provider for details about how you are
billed for your Internet calls.
Arrows in the lower-right corner show that there is additional information above or
below the current list. Use and (or the volume keys) to see it.
Receiving Net Alerts
If your service provider offers over-the-air Internet access, you may receive Net Alerts on
your phone.
Net Alerts are Internet messages such as stock quote alerts, traffic updates, or email.
They are different from pages and text messages because the information in Net Alerts is
stored on the Web, not on your phone.
When you receive a Net Alert, your phone alerts you in several ways:
■ The icon appears.
■ A “Net Alert” message appears on the screen.
■ The phone beeps four times.
User’s Guide for QCP 860, QCP 1960, and QCP 2760 Thin Phones 27
Page 33

Note: To turn off the beep, press or under [MENU] and select Sounds >
Message (2 5).
To view new Net Alerts
1. Press to open the message screen.
2. Scroll to the Net Alerts line.
An asterisk (*) before the Net Alerts line shows that you have new Net Alerts.
3. Press or under [OK].
The Net Alerts screen lis ts the incoming alerts. Asterisks appear beside items that you have not
yet read.
4. Use and to scroll through the list.
5. Press or under [VIEW] to open the desired alert. The phone launches the
Internet browser.
28 Internet and Data Capabilities
Page 34

Sending or Receiving Data
Some service providers allow you to connect your phone to your computer and use the
phone line for email, Internet access, or fax transmission.
■ Digital mode: T o receive data in CDMA digital mode, you can connect your phone to
a computer using a Kyocera Wireless Corp. data cable (available separately). See
“Setting up a data connection” on page 29.
■ Analog mode: To receive data in analog mode, you can purchase the Kyocera
Wireless Corp. Data on the Go® PC Fax/Modem Card to install in your computer.
To purchase these accessories, con tact your service provider or visit the Kyocera Wireless
Corp. web site at
http:\\kyocera-wireless.com/store
Data and voice transmissions
Before using your phone to send or receive data, be aware of the following
considerations.
Due to infrastructu re (network ) limitations, th ere may b e times when yo ur phone cann ot
determine if an incoming CDMA digital call contains voice or data/fax information.
Check with your service provider to see if both voice and data/fax signals are
supported. If the network cannot distinguish between voice and data/fax calls, and you
are expecting a data call, you can set the phone to data mode.
Important—When the phone is in data mode, you cannot receive incoming voice calls.
Setting up a data connection
Follow these steps to set up a CDMA data connection.
1. With your phone turned off, plug the flat connector on one end of the data cable into
the port on the bottom of the phone.
2. Plug the serial connector on the other end of the data cable into the serial port on
your computer.
3. Turn on your computer.
4. Press or to turn on the phone.
5. Open a communications software package on your computer.
6. To send or receive faxes and email or to access the Internet, follow the directions that
pwr
came with the communications software.
Receiving data or fax calls
If you are expec ting a data or fax call, f o llow thes e steps to pu t yo u r pho ne in data m ode.
1. Press or under [MENU].
2. Press 8 4 to select System>Data/Fax.
3. Press or under [NEXT] to cycle through the settings.
User’s Guide for QCP 860, QCP 1960, and QCP 2760 Thin Phones 29
Page 35

4. Press or under [OK] when you see the setting you want.
■ Off (the recommended setting) leaves the phone in standard mode. Incoming voice
calls are always allowed. Incoming data calls are accepted if the network structure
correctly identifies them to the phone.
■ Fax for next call tells the phone to receive the next call in fax mode.
■ Data for next call tells the phone to receive the next call in data mode.
■ Fax until power OFF tells the phone to receive all calls in fax mode until the phone
power is turned off.
■ Data until power OFF tells the phone to receive all calls in data mode until the
phone power is turned off.
30 Sending or Receiving Data
Page 36

Menus
Menus are using to check or change your
phone settings.
Each menu except Keyguard contains a
secondary list of menu items. Selecting
Keyguard turns keyguard on. Selecting any
other menu opens a list of menu items.
To enter the menu structure
1. Press or under [MENU]. A list of the
menus appears.
2. Press or or the volume keys to
scroll through the menu list. You must
provide your lock code to open the Security
menu.
3. Press the number of the menu item you
want to open.
To select a menu item
1. Press or under [NEXT] to cycle
through the options.
QCP 860 and 1960
QCP 2760
2. To select an option, press or under
[OK]. A check mark appears beside the selected
option.
To return
■ Press once to return to the previous
C
menu without saving changes.
-orPress once to return to standby mode without saving changes.
END
Menu items
1 Keyguard disables the keypad to protect your phone against accidental keypresses.
(See “Using keyguard” on page 8.)
2 Sounds enables you to adjust volume settings. Different menu items appear if your
phone is attached to the Hands-free Car Kit or the Hands-free Headset.
21Mute switches the microphone on and off during a call. (See “To mute or unmute a
call” on page 15.)
2 2 Ringer Vol adjusts ringer volume.
2 3 Key Beep Vol adjusts key beep volume.
2 4 Earpiece adjusts earpiece volume.
User’s Guide for QCP 860, QCP 1960, and QCP 2760 Thin Phones 31
Page 37

2 5 Message adjusts the incoming message alert beep.
On QCP 860 or QCP 1960 phones
2 6 Ringer Type sets the sound of the incoming call alert.
2 7 Key Sound sets the sound of keypresses to either tones or clicks.
On QCP 2760 phones
26Auto-Vol sets the automatic volume control on or off. When Auto-Vol is on, the phone
adjusts the earpiece volume based on ambient noise. (For setup procedures, see
page 15.)
2 7 Ringer Type sets the sound of the incoming call alert.
2 8 Key Sound sets the sound of keypresses to either tones or clicks.
3 Call Info displays the number and duration of calls (measured in minutes and
seconds).
3 1 Home Calls displays the duration of all calls you made in your home system (that is,
not roaming) since the last reset.
3 2 Roam Calls displays the duration of all calls you made outside your home system
since the last reset.
3 3 All Calls displays the duration of all calls you have made on your phone.
34Rent Time appears only if the phone is rented.
4 Security allows you to lock your phone. To open the Security menu, enter your four-
digit lock code. The default lock code is usually either 0000 or the last four digits of
your phone number. If you forget your lock code, call your service provider.
4 1 Lock Mode activates a security lock using your lock code. You can only call
emergency numbers or receive incoming calls.
4 2 Restrict limits your outgoing calls to emergency numbers, designated service
provider numbers, and numbers in the phone book. You may answer calls and view
or dial the phone book numbers, but you cannot erase, add, or edit any numbers.
43New Code allows you to change your lock code.
4 4 Clear Calls erases the recent history list.
4 5 Clear Book erases the entire phone book. There is no undo feature.
5 Features
5 1 Auto Answer
sets the phone to automatically answer after two rings. This feature is
useful in combination with the Hands-free Car Kit.
5 2 Auto Retry redials failed calls up to five times. Auto retry works when the system is
busy or unavailable, not when the phone line is busy.
5 3 Scratchpad lets you add phone numbers to the recent history list during a call
without sounding key beeps. It is only active during calls. Press or under
[ADD] to save entry.
32 Menus
Page 38

5 4 Beep Length sets key beep length.
55One-Touch enables dialing by pressing a single key. (See “One-touch dialing” on
page 20.)
6Display sets options controlling the appearance of the screen.
6 1 Backlight illuminates the phone screen and keypad. You can set how long the
backlight remains on. Select “always off” to extend the battery’s charge. Note—The phone’s backlight is not on when it is attached to accessories, except for the
Hands-free Car Kit.
6 2 Sort Book sorts phone book entries alphabetically or by location number.
6 3 Banner lets you enter te xt ( up to 12 ch aracter s ) t o appear o n th e screen during powe r
up and standby.
6 4 Show Time displays the date and time during standby mode.
6 5 Auto Hyphen hyphenates phone numbers according to the North American
numbering plan.
66Version displays the software version and product model of your phone. Press or
under [MORE] for more information, such as your electronic serial number
(ESN).
6 7 Language sets the language for the phone. (See page 18.)
68Battery displays the current charge level of each battery and indicates which battery
is currently in use.
7Alerts control how the phone notifies you of calls and messages.
7 1 Call Drop causes the phone to beep and show a message when a call is dropped.
7 2 Minute causes the phone to beep ten seconds before each minute during a call. This
helps you track your phone use.
73Service tells the phone to beep when a network parameter changes. For instance, it
beeps if you move out of your service area or if the call changes from digital to analog
service.
7 4 Roam Ring assigns a distinct ring to incoming calls that occur when you are outside
your service area.
7 5 Msg Remind sets the automatic voice mail message reminder beep on or off. When
Msg Remind is on, the phone beeps every five minutes when you have a voice mail
message that you have not yet acknowledged. When you acknowledge the message,
the Msg Remind beep stops until you get a new voice mail message.
8 System allows you to set network options.
8 1 Set Service determines which signals your phone will accept.
■ Automatic (the recommended setting) accepts any system the phone service
provides.
User’s Guide for QCP 860, QCP 1960, and QCP 2760 Thin Phones 33
Page 39

■ No Roaming prevents you from making or receiving calls outside your home
service area.
■ The QCP 860 Thin Phone has two other options, A Side and B Side. They refer to the
two cellular blocks. By selecting one block, you prevent your phone from operating
on the other block.
8 2 Set NAM sets your Number Assignment Module (NAM) correctly for your current
area if you have phone accounts with multiple service providers. For instance, if you
travel frequently between two cities, you might have a phone account set up in each
city. When you are in City A, use this menu item to change to your City A account. If
you do not have a NAM in City A, then all your phone calls would be roaming calls
and would incur higher charges.
8 3 Auto NAM allows the phone to switch to one of the programmed NAMs when it
detects the appropriate network signal. Leave the setting at “off” unless you have
accounts with more than one service provider.
84Data/Fax determines whether the phone can receive both voice and data calls, or just
data calls.
■ The off setting allows both if your phone network can distinguish between voice
and data.
■ Fax for next call forces the next call into fax mode.
■ Data for next call forces the next call into data mode. The “next call” modes
automatically reset to off after a fax or data call is received or after 10 minutes if a
call is not received in that time.
■ Fax until power OFF forces the phone into fax mode.
■ Data until power OFF forces the phone into data mode. The “until power off”
settings remain until you reset the menu to off or turn off the phone.
8 5 Force Call (on QCP 860 Thin Phones only) forces the phone into analog mode until
the end of the next incoming or outgoing call, or for the next ten minutes.
-or-
85Digital (on QCP 2760 Thin Phones only) sets the phone to operate in digital mode,
analog mode, or both.
34 Menus
Page 40

Caring for Your Phone
pwr
Use the following guidelines to optimize the performance and life of your phone,
antenna, and battery.
Phone
■ Do not let unauthorized personnel install or service your phone or accessories.
Faulty installation or service may be dangerous, and will invalidate your warranty.
■ Only use Kyocera Wireless Corp. approved accessories with Kyocera Wireless
Corp. phones. Use of any unauthorized accessories may be dangerous and will
invalidate your phone warranty if the accessories cause damage or a defect to the
phone.
■ Keep the phone dry. If the phone gets wet, turn the power off immediately and
remove the external battery. Let it dry before you use it again. If the phone is
inoperable, return it to the dealer for service.
■ Treat the phone gently. Although your phone is sturdy, it is a complex piece of
hardware and can be broken. Avoid dropping, hitting, bending, or sitting on it.
■ Avoid using suntan lotion around the phone. Chemicals in suntan lotions can
damage your phone.
Resetting the phone
On rare occasions, your phone may need to be reset. If the screen seems frozen and the
keypad does not respond to keypresses, reset the phone. Resetting the phone does NOT
delete your data.
■ To reset, press or , , and or at the same time.
SEND
TALK
1
Antenna
Follow these guidelines to get the best reception possible.
■ Fully extend the antenna when you place or receive a call.
■ Do not touch the antenna while you are on a call.
■ Do not bend or twist the antenna.
■ Close the antenna when not in use.
Battery
Your phone comes with an internal LiIon battery that provides excellent talk and
standby time. Leave this battery in the phone at all times. You can check the battery
power level by opening the menu and selecting Display > Battery (6 8) while the phone
is charging.
You can safely recharge the battery at any time, even if it has a partial charge.
User’s Guide for QCP 860, QCP 1960, and QCP 2760 Thin Phones 35
Page 41

Power save mode
Your phone automatically switches to power-save mode if it has not found a signal after
about 15 minutes of searching. Power-save mode decreases the drain on the battery.
When the phone is in power-save mode, you cannot make or receive calls. “Power Save
Mode” and the No Signal icon ( ) appear on the screen.
The phone periodically rechecks for a signal. Press any key to check for service. When
the phone finds a signal, it automatically switches out of power-save mode and displays
the Signal Strength icon ( ).
Tips for improving battery performance
■ Do not disassemble or short-circuit the battery.
■ Keep the metal contacts at the base of the battery clean.
■ If you have not used an internal or external battery for more than a month, recharge it
before using it.
■ Ask your local Kyocera Wireless Corp. Service Center to replace the internal battery
when it no longer maintains a charge.
■ Do not use any battery in direct sunlight or in places with hi gh humidit y, such as the
bathroom.
■ Never dispose of any battery in or near a fire. It could explode.
■ Do not charge any battery if the temperature is below 32ºF (0ºC) or above 122ºF
(50ºC).
■ Do not store any battery in hot areas for long periods of time. Use these storage
guidelines:
under 1 month:
-4º to 140ºF (-20º to 60ºC)
over 1 month:
-4ºF to 113ºF (-20º to 45ºC)
Troubleshooting tips
What is my lock code?
The default lock code is usually either 0000 or the last four digits of your phone number .
If you forget your lock code, call your service provider.
How do I check my voice mail?
When and “V oice Mail” appear, press and hold for about two seconds. The phone
dials your service provider’s callback number. If your service provider has not set the
callback number, press to return to standby mode and dial your service.
The standby and talk times on my phone have dropped severely. Is something wrong with the battery?
To conserve battery power, make sure the backlight setting is not always on. (See
“Setting the backlight” on page 16.) . Also, analog service is a larger drain on the batt ery.
Check to see if the icon has disappeared.
36 Caring for Your Phone
END
Page 42

My ringer is off!
In standby mode, press the volume keys to adjust the ringer volume.
What is the Service Programming Code to my phone?
Your service provider can provide you with this information.
Where to find help
Your service provider
For most questions about your phone and phone service, contact your service provider
first. Your service provider’s customer support department can answer questions about
your phone, phone bill, call coverage area, and specific features (such as call forwarding
or conference calling) available to you.
Your phone documentation
If you have questions about the features of the phone, refer to this guide and other
materials provided with your phone.
Kyocera Wireless Corp. Technical Support
If you have additional questions, contact Kyocera Wireless Corp. Technical Support in
any of these ways:
■ Kyocera Wireless Corp. Web site at
http://www. kyocera-wireless.com
■ U.S. and Canada: (800) 349-4478
Before requesting support, please try to reproduce and isolate the problem. When you
contact support, be ready to provide the following information:
■ The name of your service provider
■ The actual error message or state you are experiencing
■ The steps you take to reproduce the problem
■ The Electronic Serial Number (ESN) and Part Number (MCN) of the phone. The ESN
and MCN are located on the label on the lower back of your phone. The MCN
usually starts with a 61- and is the top number while the ESN is on the bottom.
Standards and safety information
For standards and safety information, visit the Cellular Telecommunications Industry
Association (CTIA) Web site at http://www.wow-com.com or call 888-901-SAFE (toll-
free, U.S.A. only).
User’s Guide for QCP 860, QCP 1960, and QCP 2760 Thin Phones 37
Page 43

page left intentionally blank
38 Caring for Your Phone
Page 44

Safety Information
Radio Frequency (RF) energy
Your telephone is a radio transmitter and receiver. When it is on, it receives and sends
out RF energy. Your service provider’s network co nt rols the powe r of t he RF si gnal. T h is
power level can range from 0.006 watts to 0.6 watts.
Exposure to RF energy
In August 1996, the U.S. Federal Communications Commission (FCC) adopted RF
exposure guidelines with safety levels for hand-held wireless phones. These guidelines
are consistent with the safety standards previously set by both U.S. and international
standards bodies in the following reports:
■ ANSI C95.1 (American National Standards Institute, 1992)
■ NCRP Report 86 (National Council on Radiation Protection and Measurements,
1986)
■ ICNIRP (International Commission on Non-Ionizing Radiation Protection, 1996)
Your phone complies with the standards set by these reports and the FCC guidelines.
Medical devices
Pacemakers—If your portable wireless phone is too close to a pacemaker, the phone’s RF energy may interfere with the pacemaker’s operation. The Health Industry Manufacturers Association and the wireless technology research community recommend that you follow these guidelines to minimize the potential for interference.
■ Always keep the phone at least six inches (15 centimeters) away from your
pacemaker when the phone is turned on.
■ Do not carry your phone near your heart.
■ Use the ear opposite the pacemaker.
■ If you have any reason to suspect that interference is taking place, turn your phone
off immediately. Hearing aids—Some digital wireless phones may interfere with hearing aids. In the
event of such interference, you may want to consult your service provider or call the
customer service line to discuss alternatives.
Other medical devices—If you use any other personal medical device, consult the manufacturer of the device to determine if it is adequately shielded from external RF energy. Your physician may be able to help you obtain this information.
In health care facilities—Turn your phone off in health care facilities when instructed. Hospitals and health care facilities may be using equipment that is sensitive to external RF energy.
User’s Guide for QCP 860, QCP 1960, and QCP 2760 Thin Phones 39
Page 45

Potentially unsafe areas
Posted facilities—Turn your phone off in any facility when posted notices require you to do so.
Aircraft—FCC regulations prohibit using your phone on a plane that is in the air. Turn your phone off before boarding aircraft.
Vehicles—RF signals may affect improperly installed or inadequately shielded electronic systems in motor vehicles. Check with the manufacturer or its representative regarding your vehi cle. You should also consult the m anufactu rer of any e quipment t hat has been added to your vehicle.
Blasting areas—To avoid interfering with blasting operations, turn your phone off when you are in a blasting area or in areas posted “Turn off two-way radio.” Obey all signs and instructions.
Potentially explosive atmospheres—Turn your phone off when you are in any area with a potentially explosive atmosphere. Obey all signs and instructions. Sparks in such areas could cause an explosion or fire resulting in bodily injury or even death.
Areas with a potentially explosive atmospher e ar e often, but not always, clearly marked.
They include:
■ fueling areas such as gas stations
■ below deck on boats
■ transfer or storage facilities for fuel or chemicals
■ vehicles using liquefied petroleum gas, such as propane or butane
■ areas where the air contains chemicals or particles such as grain, dust, or metal
powders
■ any other area where you would normally be advised to turn off your vehicle engine
Emergency numbers
An emergency number is a special kind of speed dial number. You can dial an
emergency number any time the phone is on and receiving a signal, unless you have
activated the keyguard.
Note—You cannot program emergency numbers yourself; they must be programmed by your service provider.
Driving safely
Before you use your phone while driving, check the local laws and regulations on the use
of portable wireless phones in vehicles. Always obey them, and exercise caution while
driving.
The following guidelines are based on recommendations of the Cellular
Telecommunications Industry Association (CTIA).
40 Safety Information
Page 46

1. Get to know your wireless phone and its features, such as speed dial (page 20) and
redial (page 13).
These features help you to place your call without taking your
attention off the road.
2. When available, use a hands-free device. Add additional convenience and safety to
your wireless phone with one of Kyocera Wireless Corp.’s hands-free accessories,
such as the Hands-free Car Kit or the Hands-free Headset. For ordering information,
contact your service provider or visit our web site at
http://www.www. kyocera-wireless.com.
3. Position your wireless phone within easy reach. Be able to acce ss you r wireless phone
without removing your eyes from the road. If you get an incoming call at an
inconvenient time, let your voice mail answer it for you.
4. Let the person with whom you are speaking know you are driving. If necessary,
suspend the call in heavy traffic or hazardous weather conditions.
5. Do not take notes or look up phone numbers while driving. Jotting down a “to do” list
or scrolling through your phone book takes attention away from your primary
responsibility: driving safely.
6. Dial sensibly. If you need to make a call while moving, dial a few numbers, check the
road and your mirrors, then continue. If possible, place calls when you are not
moving or before pulling into traffic.
7. Do not engage in stressful or emotional conversations. Make people with whom you
are talking aware that you are driving. Suspend conversations that have the potential
to divert your attention from the road.
8. Use your wireless phone to call for help. Dial 9-1-1 (U.S.A.) or other local emergency
number in the case of fire, traffic accident, or medical emergencies. Remember, 9-1-1
is a free call on your wireless phone!
9. Use your wireless phone to help others in emergencies. If you see a traffic accident,
crime in progress, or other serious emergency where lives are in danger, call 9-1-1 or
other local emergency number, as you would want others to do for you.
10. Call roadside assistance or a special non-emer gency wireless assistance number
when necessary.
If you see a broken-down vehicle posing no serious hazard, a
broken traffic signal, a minor traffic accident where no one appears injured, or a
vehicle you know to be stolen, call roadside assistance or other special nonemergency wireless number.
For more information, call 1-888-901-SAFE (in the U.S.A.) or visit CTIA’s Web site at
http://www.wow-com.com.
Failure to follow these instructions may lead to serious personal injury and possible property
damage.
Air bags
If you have an air bag, DO NOT place installed or portable phone equipment or other
objects over the air bag or in the air bag deployment area. Air bags inflate with great
force. If equipment is carelessly placed or not properly installed, you or your passengers
risk serious injury.
User’s Guide for QCP 860, QCP 1960, and QCP 2760 Thin Phones 41
Page 47

page left intentionally blank
42 Safety Information
Page 48

Index
A
AC Adaptor, 9
accessories
hands free devices, 41
ordering, 11
use QUALCOMM only, 5, 35
adjusting volume, 15, 31
air bags, safety, 41
aircraft safety, 40
alerts
change in service, 33
dropped calls, 33
low power, 10
menu, 33
message, 23
minute, 33
setting volume, 31
analog mode, 29
alert, 33
forcing, 34
putting phone in analog mode, 34
setting (2760) , 34
answering calls, 6, 7
antenna, 8, 13
automatic volume feature, 15, 32
B
backing up
Clear key, 7
End key, 6
in menus, 7
backing up in browser, 26
backlight, 16, 33
banner, 9, 33
batteries
Battery menu item, 33
charge icon, 7, 10
charging, 9, 35
checking charge levels, 33
external, 9, 10
hot swapping, 10
improving performance, 36
internal LiIon, 35
memory effect, 35
power save mode, 10
reducing drain, 10
resetting phone, 36
beep length, 33
beep volume, 31
billing
change in service alert, 33
for Internet browser use, 27
minute alert, 33
roaming, 7
blasting areas, 40
browser, 26
browser settings menu, 27
C
cable, for data, 29
call forwarding, 14
Call Info menu, 32
call waiting, 15
caller ID, 14, 15
calls
call waiting, 15
dropped, 33
emergency numbers, 40
forwarding, 14
hot swapping, 10
information about, 7
muting, 31, 32
three-way, 14
touch dialing, 20
calls, data, 29
cancel out of screen, 6, 7
care and maintenance, 35–36
CDMA voice privacy, 7
changing
volume, 15
characters
case, 17
entering letters, 17
international, 18
charging batteries, 9, 35
Clear key
backing up, 26
backing up or erasing, 7
erasing, 26
standby mode, 8
connection, data, 29
credit card dialing, 19
cursor, moving, 6, 7
D
data, 29–30
connecting phone to computer, 29
data cable, 29
data for next call, 30
data until power off, 30
preparing to receive, 29
setting up connection, 29
types of servi c e s , 29
data mode, 29, 30
Data on the Go, 29
data, forcing, 34
date, show on scr een, 33
Digital menu (2760), 34
digital mode, 29
alert, 33
forcing, 34
setting (2760), 34
display
banner, 9
date and time, 33
icons, 7
Display menu, 33
driving safety, 40–41
air bags, 41
guidelines, 40
hands free devices, 41
RF energy, 40
User’s Guide for QCP 860, QCP 1960, and QCP 2760 Thin Phones 43
Page 49

dropped calls
hot swapping, 10
turning on Call Drop alert, 33
E
earpiece volume, 15, 31
editing
erasing, 7
moving the cursor, 6, 7
electronic serial number (ESN), 33
email
as net alert, 27
as short message, 23, 24
data, 29
digital mode, 34
force data mode, 34
Internet browser, 25
emergency numbers, 40
End key, 26
location, 6
standby mode, 8
ending calls, 6
entering
data from keypad, 6
data in browser, 27
letters, 17
special characters, 18
upper and lower case, 17
envelope icon, 6, 7
erasing
Clear key, 7
entire phone book, 32
pages, 24
recent history list, 32
text messages, 24
voice mail notification, 23
exiting Internet browser, 26
explosive areas, 40
external batteries
about, 9
attaching, 10
benefits, 10
removing, 10
F
fax
fax for next call, 30
fax until power off, 30
preparing to receive, 29
fax mode, 30
Features menu, 32
Force Call, 34
forcing analog mode, 34
forcing data mode, 29
forwarding calls, 14
French
characters, 18
language op t i on, 33
G
Global Travel Charger, 9
H
Hands-free Car Kit
ordering, 11
safety benefits, 41
sound options, 31
Hands-free Headset
ordering, 11
safety benefits, 41
sound options, 31
hanging up, 6, 13
hard pause, 19
headset, hands free, 41
hearing aids, 39
help, 37
home page
returning to, 26
sample, 26
hot swapping, 10
hyphens
automatic, 33
manual, 19
I
indicators on phone, 27
Information key, 7, 18, 20, 27
internal battery, 10, 35
Internet browser, 25–27
arrows, 27
billable time, 27
exiting, 26
home page, 26
navigating, 26–27
net alerts, 27
on call icon, 27
opening menus, 27
scrolling, 26
starting application, 26
status indicators, 27
types of pages, 25
using, 26
K
keyguard
menu, 31
padlock icon, 7
using, 5, 8
keypress sound
changing, 32
keys
beep length, 33
beep volume, 31
Clear, 7
End, 6
Information, 7
Message, 6
number keypad, 6
Pound (down), 7
Power, 7
Smart keys, 6
Star (up), 6
volume, 31
44 Index
Page 50

L
language
entering special characters, 18
menu option, 33
letters
changing case, 17
entering from keypad, 17
international characters, 18
LiIon batteries, 9, 10
lock code
changing, 32
erasing secret numbers, 21
locking phone, 8, 32
low battery, 9
M
making calls
call waiting, 15
forwarding, 14
hanging up, 13
no signal, 7
three-way calling, 14
medical devices and portable phones, 39
memory
low, 23
out of, 23
memory location
assigning, 17
searching by, 22
menu, browser settings, 27
menus, 31–34
Alerts, 33
backing up, 7
Call Info, 32
Display, 33
Features, 32
Keyguard, 31
Security, 32
selecting options, 6
sounds, 31
System, 33
Message key, 6
messages
alerts, 23
envelope icon, 7
Message key, 6
phone memory, 23
types of, 23
minute alert, 33
moving the cursor, 7
Star key, 6
MSG remind, 33
multiple phone accounts, 34
muting calls, 15, 31, 32
N
NAM, setting, 34
names
banner, 33
saving with number, 17
searching by, 21
navigating, 26–27
net alerts, 27
no signal icon, 7
number keypad, 6
O
on call icon, 7, 27
one-touch dialing
enabling, 33
using, 20
opening browser menu, 27
own phone number, 7
P
pacemaker
safety guidelines, 39
using phone with, 5
padlock icon, 7, 27
pages
calling back, 24
envelope icon, 7
erasing, 24
Message key, 6
saving callback number, 24
viewing, 24
see also messages
pauses, entering, 19
performance
batteries, 36
phone, 35
power save mode, 10
phone book, 17–22
entering names, 17
entering numbers, 17
erasing entire, 32
hyphens, 19
pauses, 19
searching, 21
secret numbers, 17
sorting, 21
special characters, 18
touch dialing, 20
phone numbers
searching for, 22
Portuguese
characters, 18
language opt i on, 33
Pound key, 7
Power key, 7
power save mode, 10
powering phon e on or of f, 8, 13
preparing to receive
fax or data call, 29
privacy
enhanced CDMA voice privacy, 7
secret numbers, 17
R
radio frequency, see RF energy
receiving
fax or data call, 29
Receiving status indicator, 27
receiving calls
messages, 7
no signal, 7
User’s Guide for QCP 860, QCP 1960, and QCP 2760 Thin Phones 45
Page 51

recent history list
adding numbers with scratchpad, 32
erasing, 32
redialing las t ten numbers, 13
viewing call information, 13
recharging batteries, 9, 35
redialing
auto retry, 32
last number dialed, 13
recent history list, 13
see also recent history list
resetting the phone, 36
returning to home page, 26
RF energy
about, 39
exposure, 39
medical devices, safety, 39
unsafe areas, 40
ringer
adjusting volume, 31
roaming, 33
silencing, 6, 15
type, 32
roaming
alert, 33
distinctive ring, 33
icon, 7
set service options, 33
S
safety, 39–41
air bags, 41
authorized personnel, 35
emergency numbers, 40
hands free devices, 41
keyguard, 5
medical devices, 39
pacemaker, 5
phone tips, 35
RF energy, 39
unsafe areas, 40
saving
callback number, 24
name with number, 17
number into phone book, 17
scratchpad, 32
screen
banner, 33
icons, 7
scrolling, 6, 7, 26, 27
searching the phone book, 21, 22
secret numbers, 17
secure Web page, 27
Security menu, 32
Sending status indicator, 27
serial connector, 29
service alert, 33
service area, roaming, 7
service provider features, 14, 15
data applications, 29
Internet browser, 25
setting up data connection, 29
short message services, 23–24, 27–28
signals, data, 29
silencing
mouthpiece, 31
ringer, 15
silencing microphone , 32
Smart Keys, 6, 7
software version, 33
sorting phone book, 21, 33
sounds
menu, 31
setting automatic volume, 15
Spanish
characters, 18
language opt i on, 33
standby mode
Clear key, 8
definition of, 8
End key, 8
returning to, 6, 7
viewing own phone number, 7
standby time
battery charge icon, 7
external battery, 9, 10
Star key, 6
starting Internet browser, 26
status indicators, 27
support, 37
System menu, 33
T
talk time
battery charge icon, 7
external battery, 9, 10
technical support, 37
text messages
erasing, 24
viewing, 24
three-way calling, 14
time, show on screen, 33
timed pause, 19
touch dialing
enabling, 33
using, 20
turning phone on or off, 8, 13
U
unmuting a call, 15
V
viewing
information in browser, 27
net alerts, 28
pages, 24
text messages, 24
voice mail notification, 23
voice and data signals, 29
voice mail
driving safety, 41
envelope icon, 7
erasing no ti f ication, 23
listening to, 23
Message key, 6
message reminder beep, 33
viewing notification, 23
see also messages
46 Index
Page 52

volume
adjusting, 15
earpiece, 31
key beep, 31
message alert, 32
setting auto-vol, 15
W
Web page
home page, 26
secure page, 27
Working status indicator, 27
World Wide Web, 25
User’s Guide for QCP 860, QCP 1960, and QCP 2760 Thin Phones 47
Page 53

ACN 003 893 150
48 Index
Page 54

User’s Guide for QCP 860, QCP 1960, and QCP 2760 Thin Phones 49
Page 55

80-B6676-1EN, Rev -
 Loading...