

Kyocera KM-C830 Operation Guide
Operation Guide
<Set-up Edition>
ALWAYS read this Operation Guide thoroughly before use. After reading, maintain it in good condition
and keep it together with the Operation Guide for your copier.

Trademark Information
• Novell and NetWare are registered trademarks of Novell, Inc.
• IBM and IBM PC-AT are trademarks of International Business Machines Corporation.
• PowerPC is a trademark of International Business Machines Corporation of America and other corporations.
• Adobe and Acrobat are trademarks of Adobe Systems Incorporated.
• CompactFlash and CF are trademarks of SanDisk Corporation.
All other company and product names contained in this Operation Guide are trademarks or registered trademarks of their
respective companies. The designations ™ and ® will not be used in this guide.
About this Operation Guide
This Operation Guide <Set-up Edition> is meant to be read when the Printer Board is installed in your copier and the copier is to
be used as a local printer or network printer. It contains explanations on set-up procedures for using the copier as a printer.
As the required set-up and configurations for the printer may differ depending upon the environment in use in the connected
computer, please read those sections related to your specific computer environment and perform the appropriate set-up and
configuration explained there.
The On-Line Manual for this Operation Guide contains explanations on printing, performing certain settings and configurations,
and the procedures required at your computer.
NOTE:
This Operation Guide contains information that corresponds to using both the inch and metric versions of this printer. When the difference in a
message is only one of upper- and lower-case spelling, we have listed the information as it specifically pertains to the inch version of this machine.
When there is even a slight difference in the message, we have listed the information for the inch version followed, in brackets, by the
corresponding information for the metric version.
About the On-Line Manual
The On-Line Manual is prepared as a PDF (Portable Document Format) file on the CD-ROM that is included with this product.
Adobe Acrobat Reader 4.0 software is required in order to read this On-Line Manual. Since Adobe Acrobat Reader4.0.5 is also
included on the CD-ROM, the software can be installed onto your hard disk from there.
All rights reserved. No part of this material may be reproduced or transmitted in any form or by any means, electronic or
mechanical, including photocopying, recording or by any information storage and retrieval system, without permission in writing
from the Publisher.
Legal Restriction On Copying
• It may be prohibited to copy copyrighted material without permission of the copyright owner.
• It is prohibited under any circumstances to copy domestic or foreign currencies.
• Copying other items may be prohibited.
i

IBM PROGRAM LICENSE AGREEMENT
THE DEVICE YOU HAVE PURCHASED CONTAINS ONE OR MORE SOFTWARE PROGRAMS (“PROGRAMS”) WHICH BELONG TO
INTERNATIONAL BUSINESS MACHINES CORPORATION (“IBM”). THIS DOCUMENT DEFINES THE TERMS AND CONDITIONS UNDER
WHICH THE SOFTWARE IS BEING LICENSED TO YOU BY IBM. IF YOU DO NOT AGREE WITH THE TERMS AND CONDITIONS OF THIS
LICENSE, THEN WITHIN 14 DAYS AFTER YOUR ACQUISITION OF THE DEVICE YOU MAY RETURN THE DEVICE FOR A FULL REFUND. IF
YOU DO NOT SO RETURN THE DEVICE WITHIN THE 14 DAYS, THEN YOU WILL BE ASSUMED TO HAVE AGREED TO THESE TERMS AND
CONDITIONS.
The Programs are licensed not sold. IBM, or the applicable IBM country organization, grants you a license for the Programs only in the country
where you acquired the Programs. You obtain no rights other than those granted you under this license.
The term “Programs“ means the original and all whole or partial copies of it, including modified copies or portions merged into other programs. IBM
retains title to the Programs. IBM owns, or has licensed from the owner, copyrights in the Programs.
1 . License
Under this license, you may use the Programs only with the device on which they are installed and transfer possession of the Programs and the
device to another party. If you transfer the Programs, you must transfer a copy of this license and any other documentation to the other party. Your
license is then terminated. The other party agrees to these terms and conditions by its first use of the Program.
You may not:
1) use, copy, modify, merge, or transfer copies of the Program except as provided in this license;
2) reverse assemble or reverse compile the Program; or
3) sublicense, rent, lease, or assign the Program.
2. Limited Warranty
The Programs are provided “AS IS.”
THERE ARE NO OTHER WARRANTIES COVERING THE PROGRAMS (OR CONDITIONS), EXPRESS OR IMPLIED, INCLUDING, BUT NOT
LIMITED TO, THE IMPLIED WARRANTIES OF MERCHANTABILITY AND FITNESS FOR A PARTICULAR PURPOSE.
Some jurisdictions do not allow the exclusion of implied warranties, so the above exclusion may not apply to you.
SUPPLEMENT TO AGREEMENT FOR SOFTWARE BUNDLING AND DISTRIBUTION FOR ALDC
3. Limitation of Remedies
IBM’s entire liability under this license is the following;
1) For any claim (including fundamental breach), in any form, related in any way to this license, IBM’s liability will be for
actual damages only and will be limited to the greater of ;
a) the equivalent of U.S.$25,000 in your local currency; or
b) IBM’s then generally available license fee for the Program
This limitation will not apply to claims for bodily injury or damages to real or tangible personal property for which IBM is legally liable.
IBM will not be liable for any lost profits, lost savings, or any incidental damages or other economic consequential damages, even if IBM, or its
authorized supplier, has been advised of the possibility of such damages. IBM will not be liable for any damages claimed by you based on any
third party claim. This limitation of remedies also applies to any developer of Programs supplied to IBM. IBM’s and the developer’s limitations of
remedies are not cumulative. Such developer is an intended beneficiary of this Section. Some jurisdictions do not allow these limitations or
exclusions, so they may not apply to you.
4. General
You may terminate your license at any time. IBM may terminate your license if you fail to comply with the terms and conditions of this license. In
either event, you must destroy all your copies of the Program. You are responsible for payment of any taxes, including personal property taxes,
resulting from this license. Neither party may bring an action, regardless of form, more than two years after the cause of action arose. If you
acquired the Program in the United States, this license is governed by the laws of the State of New York. If you acquired the Program in Canada,
this license is governed by the laws of the Province of Ontario. Otherwise, this license is governed by the laws of the country in which you acquired
the Program.
ii
Getting connected
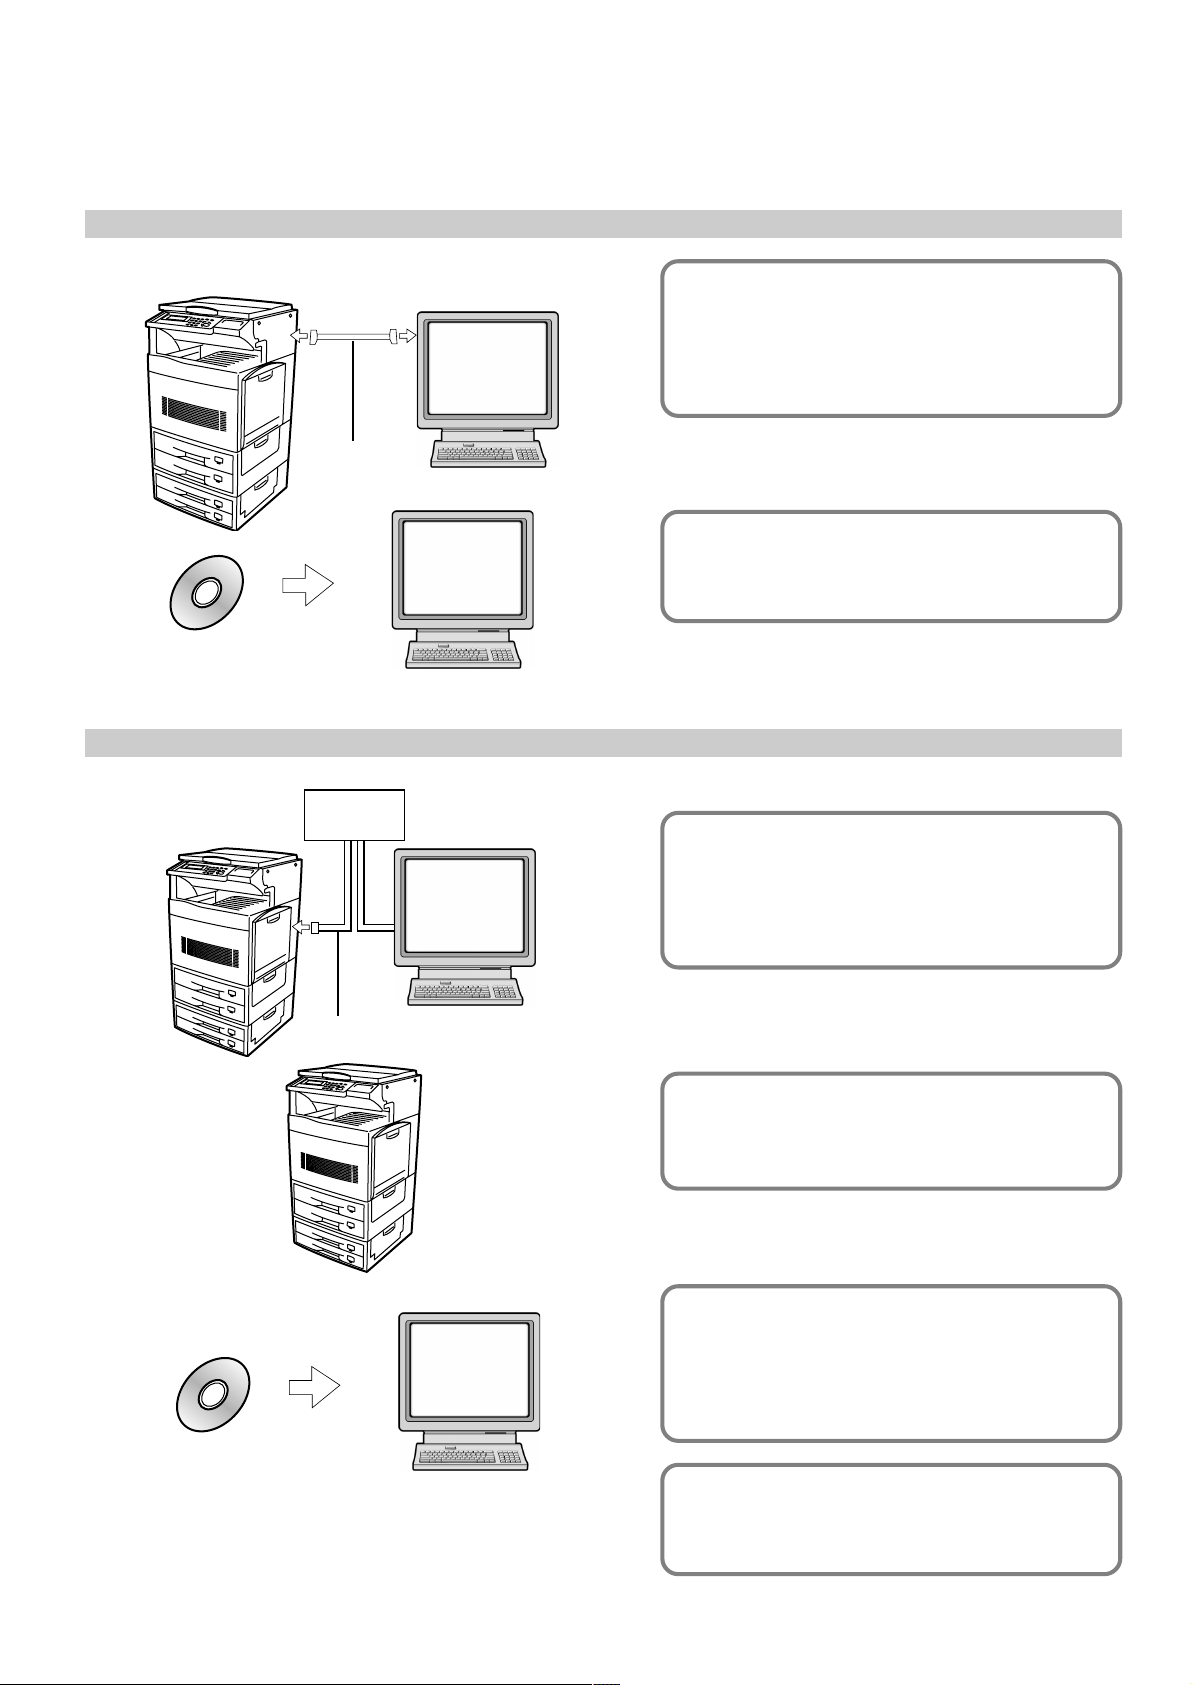
When connecting the printer directly to your computer (with a parallel or serial cable)…
1 Connecting the printer directly to
your computer with a parallel or
Parallel or
serial cable
CD-ROM
When connecting the printer to a network
<Example connection>
Hub
PC
PC
PC
serial cable ............................
Page 4
2 Installing the printer driver into your
computer...Refer to the On-Line Manual
1 Connecting a network cable
(100BASE-TX or 10BASE-T)
to the printer ..........................
Page 4
CD-ROM
Network cable
PC
2 Performing network (TCP/IP)
settings at the printer .............
Page 5
3 Making network settings from your
computer…Refer to the Quick
Configuration Guide
4 Installing the printer driver into your
computer…Refer to the On-Line Manual
iii

Table of contents
1. Preparations .............................................................................................................1
1-1 Accessories ...............................................................................................................................................1
1-2 Required items ...........................................................................................................................................1
1-3 Name of parts (main body) ........................................................................................................................ 1
1-4 Name of parts (operation panel) ................................................................................................................2
2. Set-up ........................................................................................................................ 4
2-1 Connecting the printer cable ......................................................................................................................4
2-2 Installing the software ................................................................................................................................4
2-3 Network (TCP/IP) settings ......................................................................................................................... 5
3. Troubleshooting ........................................................................................................8
3-1 Canceling printing ......................................................................................................................................8
3-2 When an error messages appears… .........................................................................................................9
3-3 Basic troubleshooting chart .....................................................................................................................13
4. Specifications .........................................................................................................14
iv
1. Preparations
1-1 Accessories
• Digital Library CD-ROM
• Network Library CD-ROM
• This Operation Guide <Set-up Edition>
• Quick Configuration Guide (for the network interface)
1-2 Required items
Be sure to prepare the cable that is appropriate to your situation as follows.
• If you are connecting the printer directly to your computer: One parallel cable (IEEE 1284 compliant, less than 1.5 m in length)
• If you are connecting the printer to a network: One network cable (100BASE-TX or 10BASE-T cable)
* When using a 100BASE-TX or 10BASE-T cable, be sure to use the shielded type of cable.
* Depending upon the area or region of purchase, the optional Network Card may be required in order to connect your printer to a network.
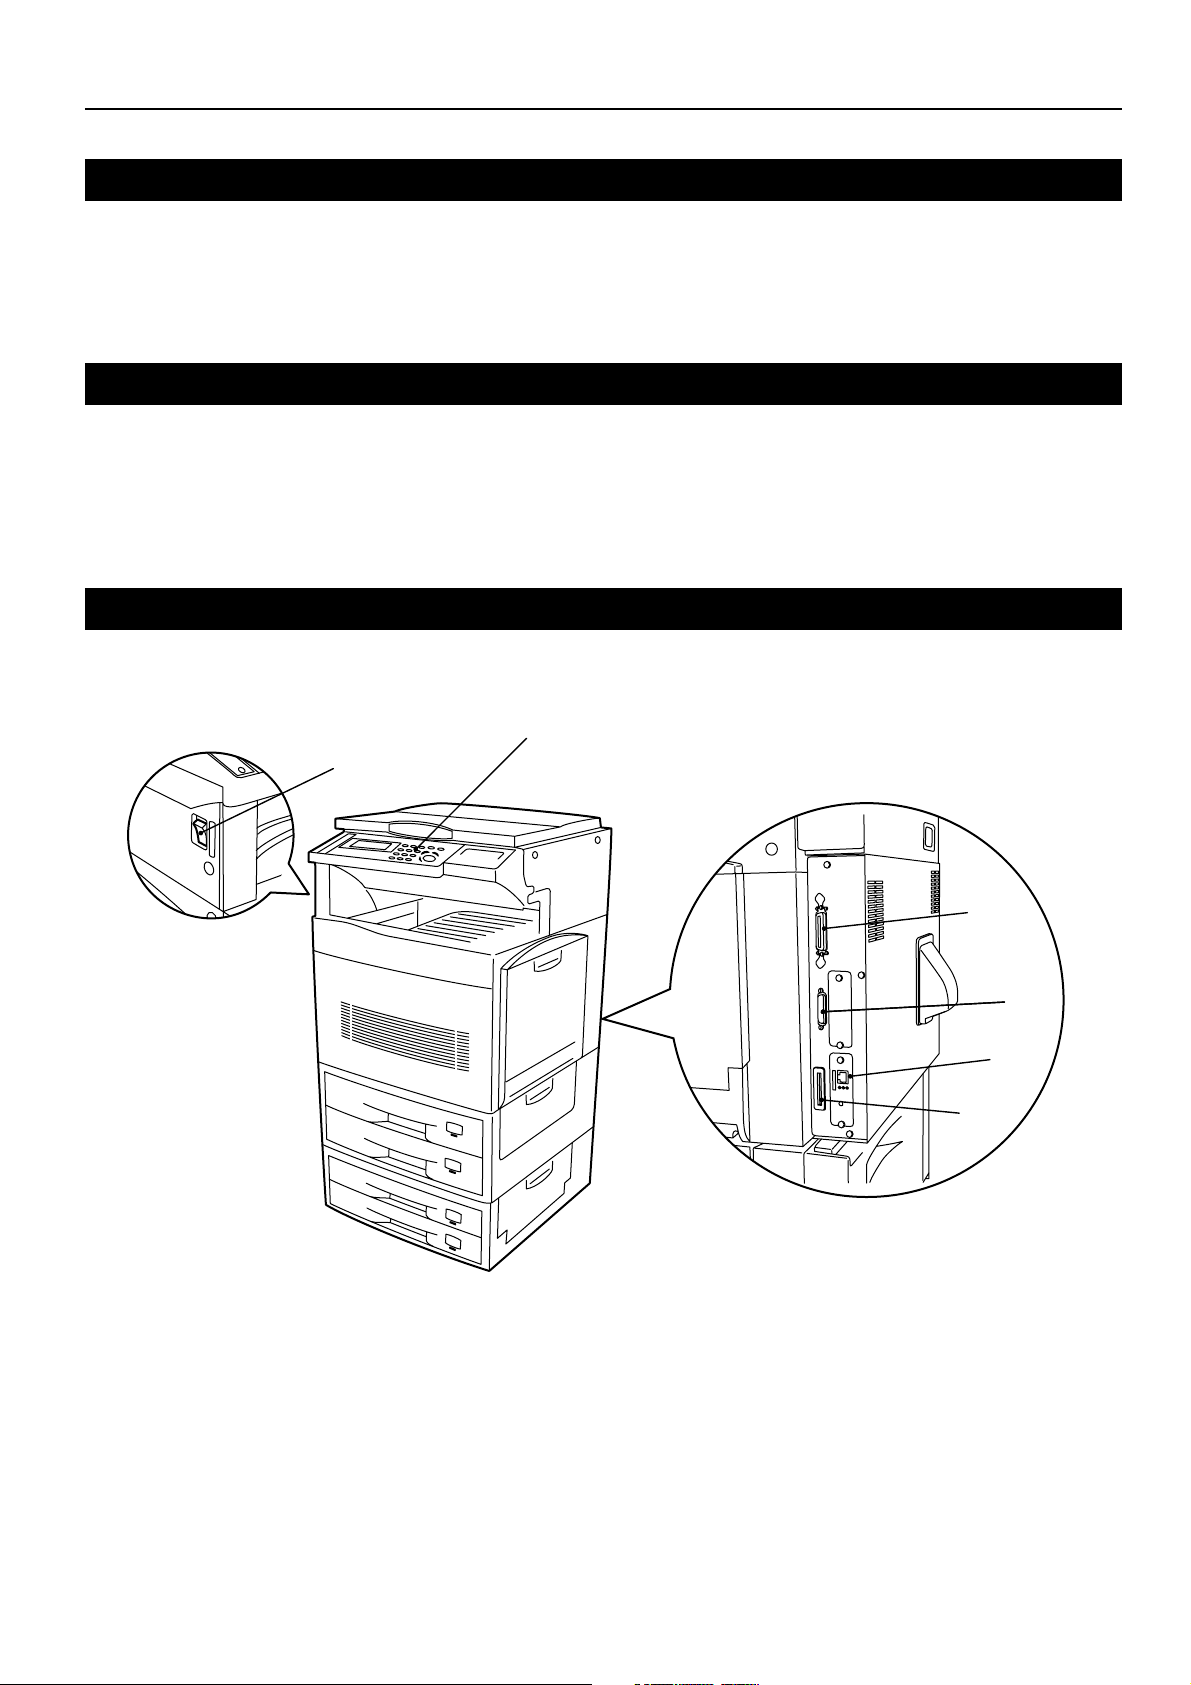
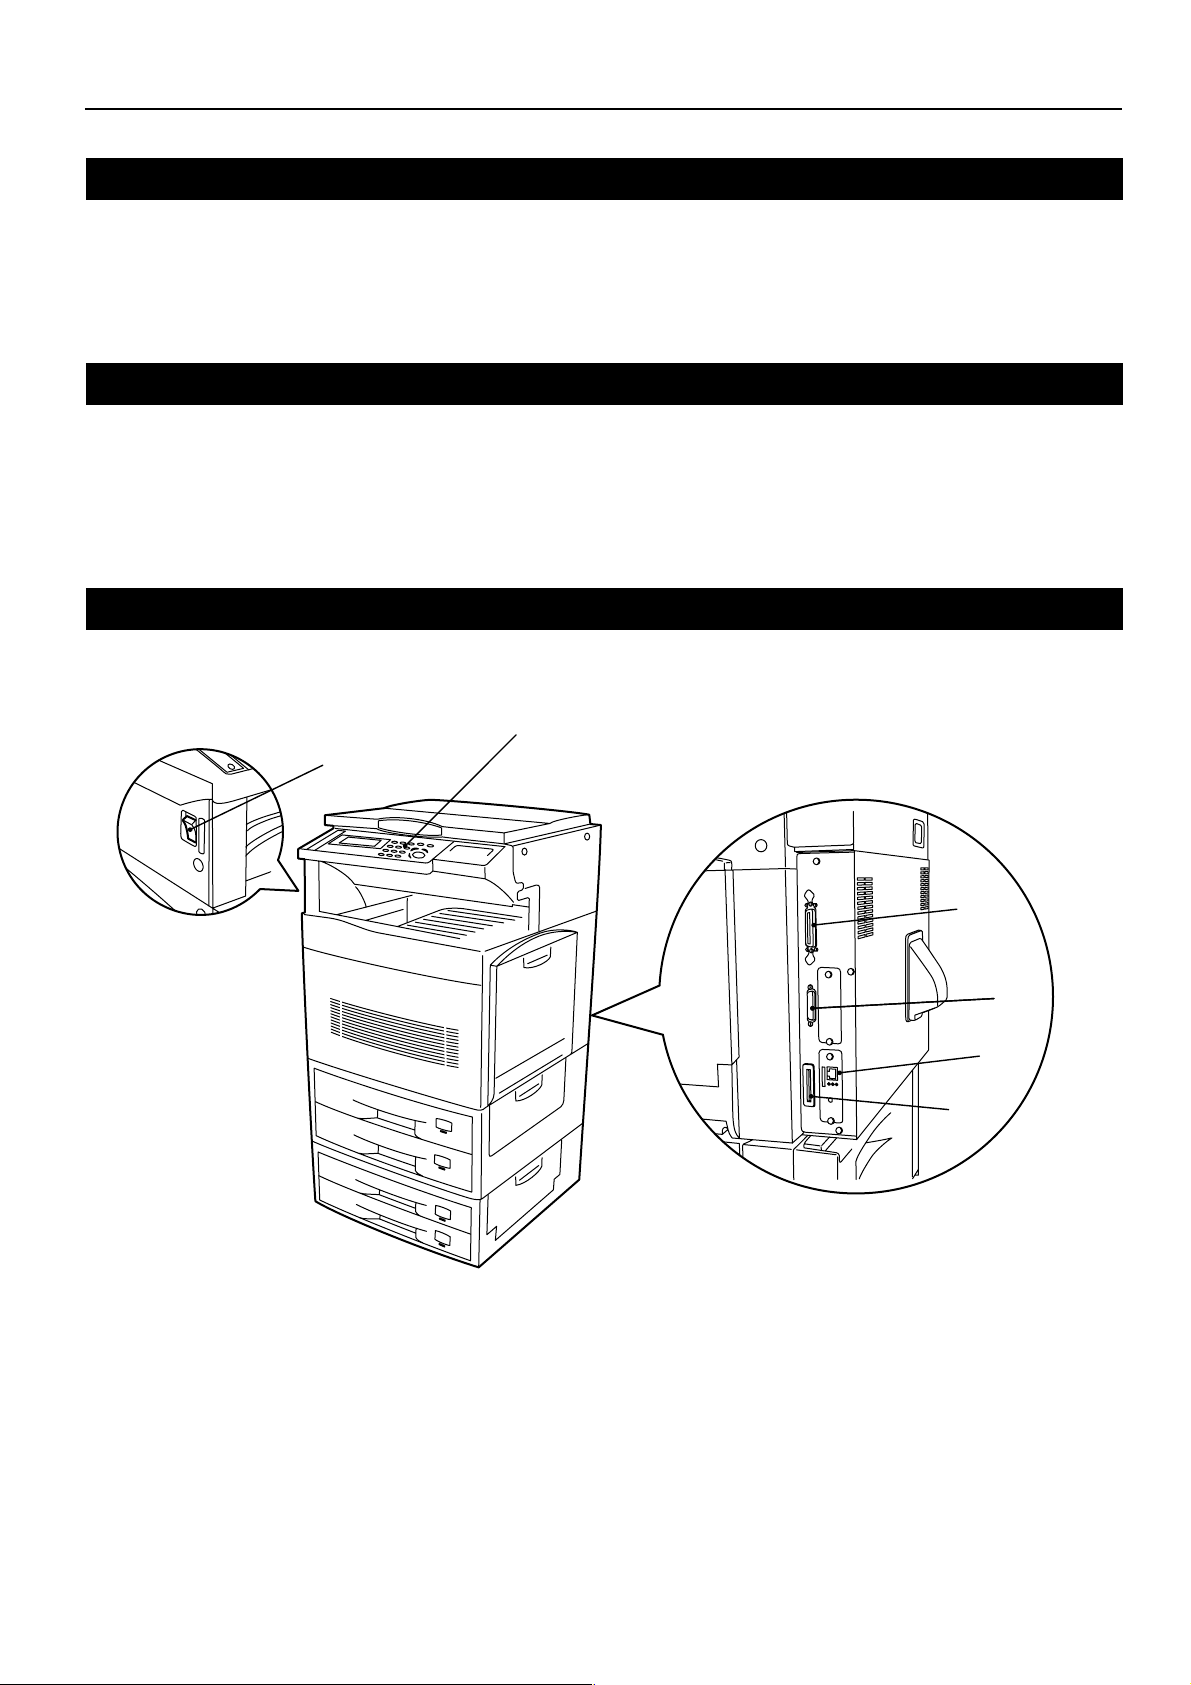
1-3 Name of parts (main body)
5
6
1
2
3
4
1 Parallel interface connector
Connect a bi-directional parallel cable here.
2 Serial interface connector
Connect a serial cable here. If you are using the optional Barcode Reader, attach it to this connector.
3 Network interface connector
Connect a 100BASE-TX or 10BASE-T cable here in order to connect the printer to a network.
* Depending upon the area or region of purchase, the optional Network Card may not be standard equipment with this printer.
* NEVER remove the Network Card.
4 Memory Card (CompactFlash) slot
Insert the optional Memory Card (CompactFlash) here.
5 Main switch
Turn this switch ON ( | ) first, prior to using the printer. Always turn this switch OFF (O) when connecting the printer cable, etc.
6 Operation panel
Use when performing settings, etc., at the printer itself.
1

1. Preparations
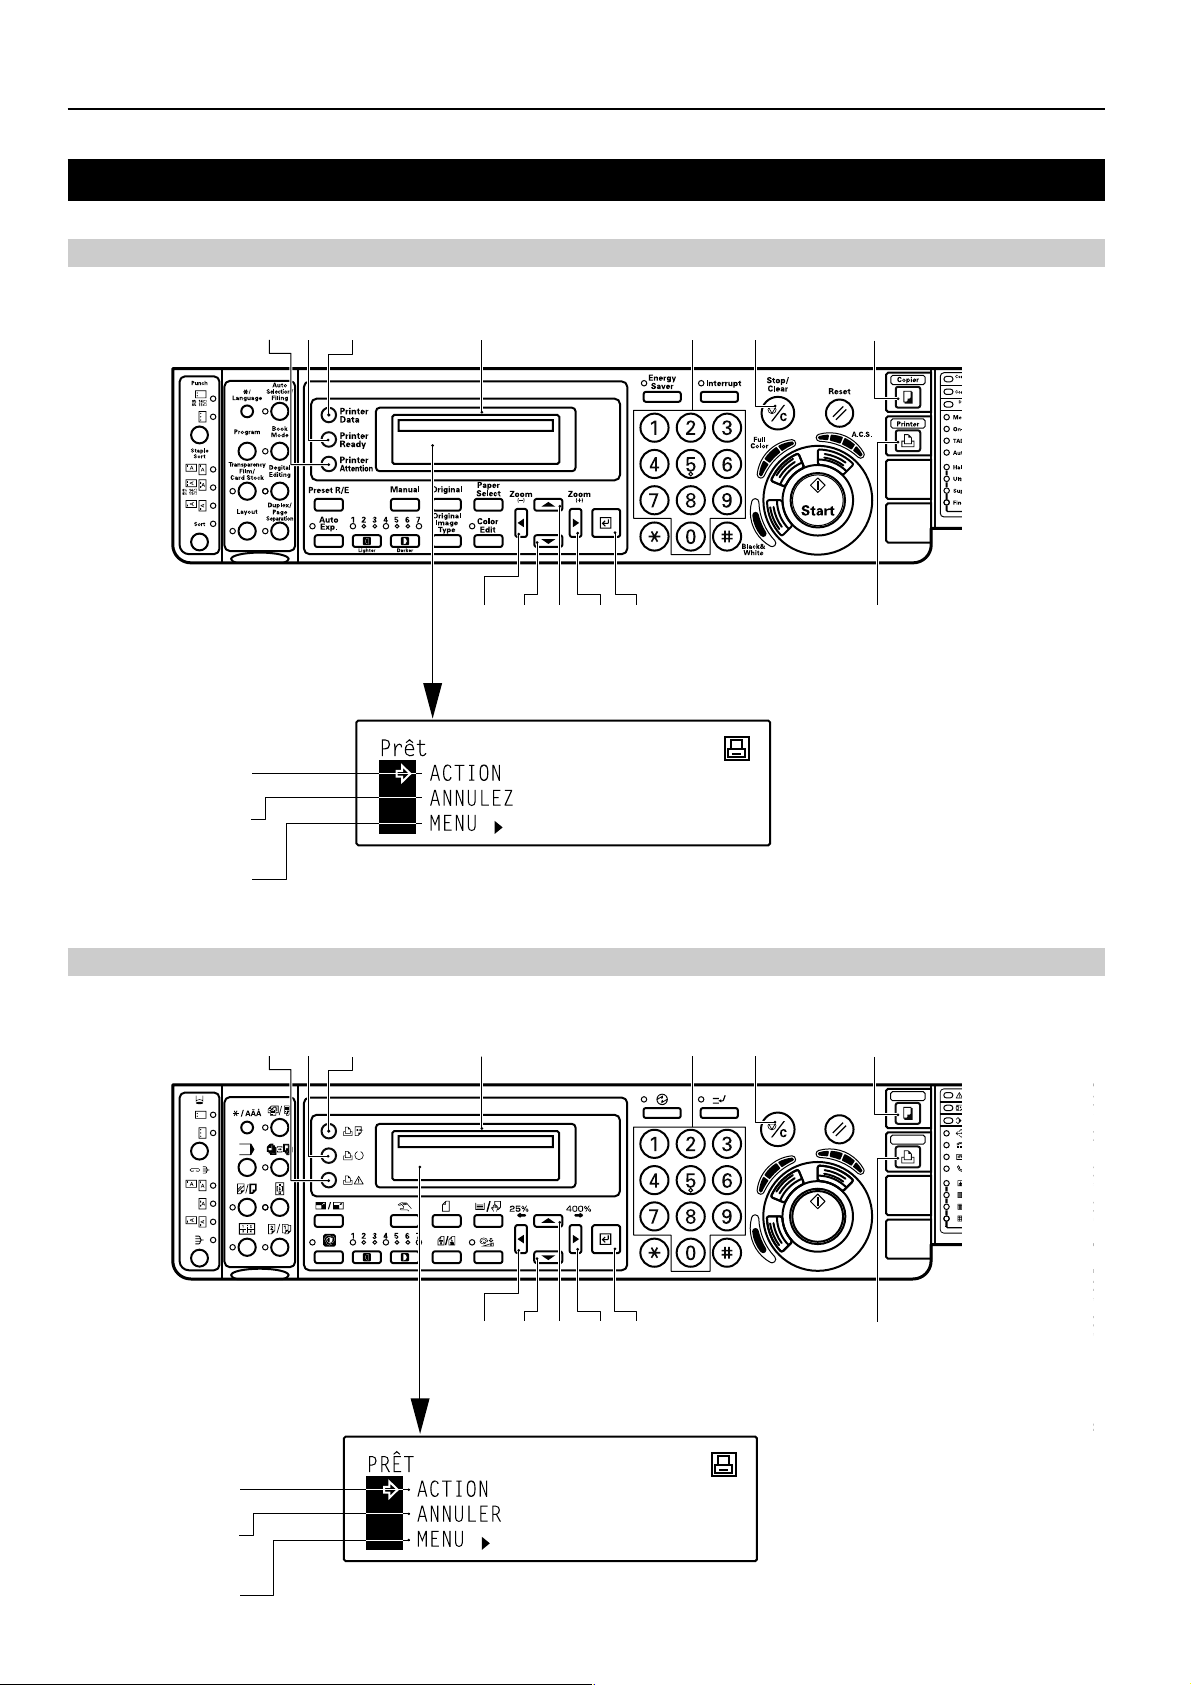
1-4 Name of parts (operation panel)
Inch specifications
#
! @ 0 8 9 2
137456
Metric specifications
$
%
^
#
! @ 0 9 2
8
137456
$
%
^
2

1 Printer key
Press this key when you want to switch to the printer mode.
2 Copier key
Press this key when you want to switch to the copier mode.
3 Enter key
Press this key when you want to register a setting.
4 M (Cursor) key
Press this key when you want to scroll up among the various
functions, settings, etc.
5 N (Cursor) key
Press this key when you want to scroll down among the various
functions, settings, etc.
6 O (Cursor left) key
Press this key when you want to scroll left during a setting
procedure.
7 P (Cursor right) key
Press this key when you want to scroll right during a setting
procedure.
8 Numeric keys
Press these keys when you want to enter a desired value directly.
9 Stop/Clear key
Press this key when you want to cancel a setting midway through
it.
0 Message display
Indicates the status of the printer as well as other settings.
! Printer Ready indicator
Indicates the status of the printer.
Lit: Printing is possible. (The printer is on-line.)
Blinking: A recoverable error has occurred or the printer is starting
up (during self-diagnosis).
Out: The printer is off-line.
@ Printer Data indicator
Indicates the status of data reception in the printer.
Lit: Data is being processed or memory is being accessed.
Blinking: The printer is receiving data.
# Printer Attention indicator
Indicates a printing error. When this indicator is lit or blinking,
press the Printer key and check the message that appears in the
message display.
Lit: A printing error has occurred. (Refer to “3-2 When an error
messages appears…” on page 9 and resolve the problem.
Blinking: The printer is starting up, or requires operator attention
such as formatting of the Memory Card, etc.
1. Preparations
● The message display in the printer mode
To enter the printer mode, press the Printer key. The message
display will change to the corresponding display for the printer
mode.
$ “GO” command
Select this command when you want to start printing, as well as
when you want to initiate the operation for form feed. This
command is also used to switch the printer on- and off-line. When
the printer is on-line, the Printer Ready indicator will be lit.
% “CANCEL” command
Select this command when you want to stop printing or you want
to clear an error message.
^ “MENU” command
Select this command when you want to change the printer default
settings.
3
2. Set-up
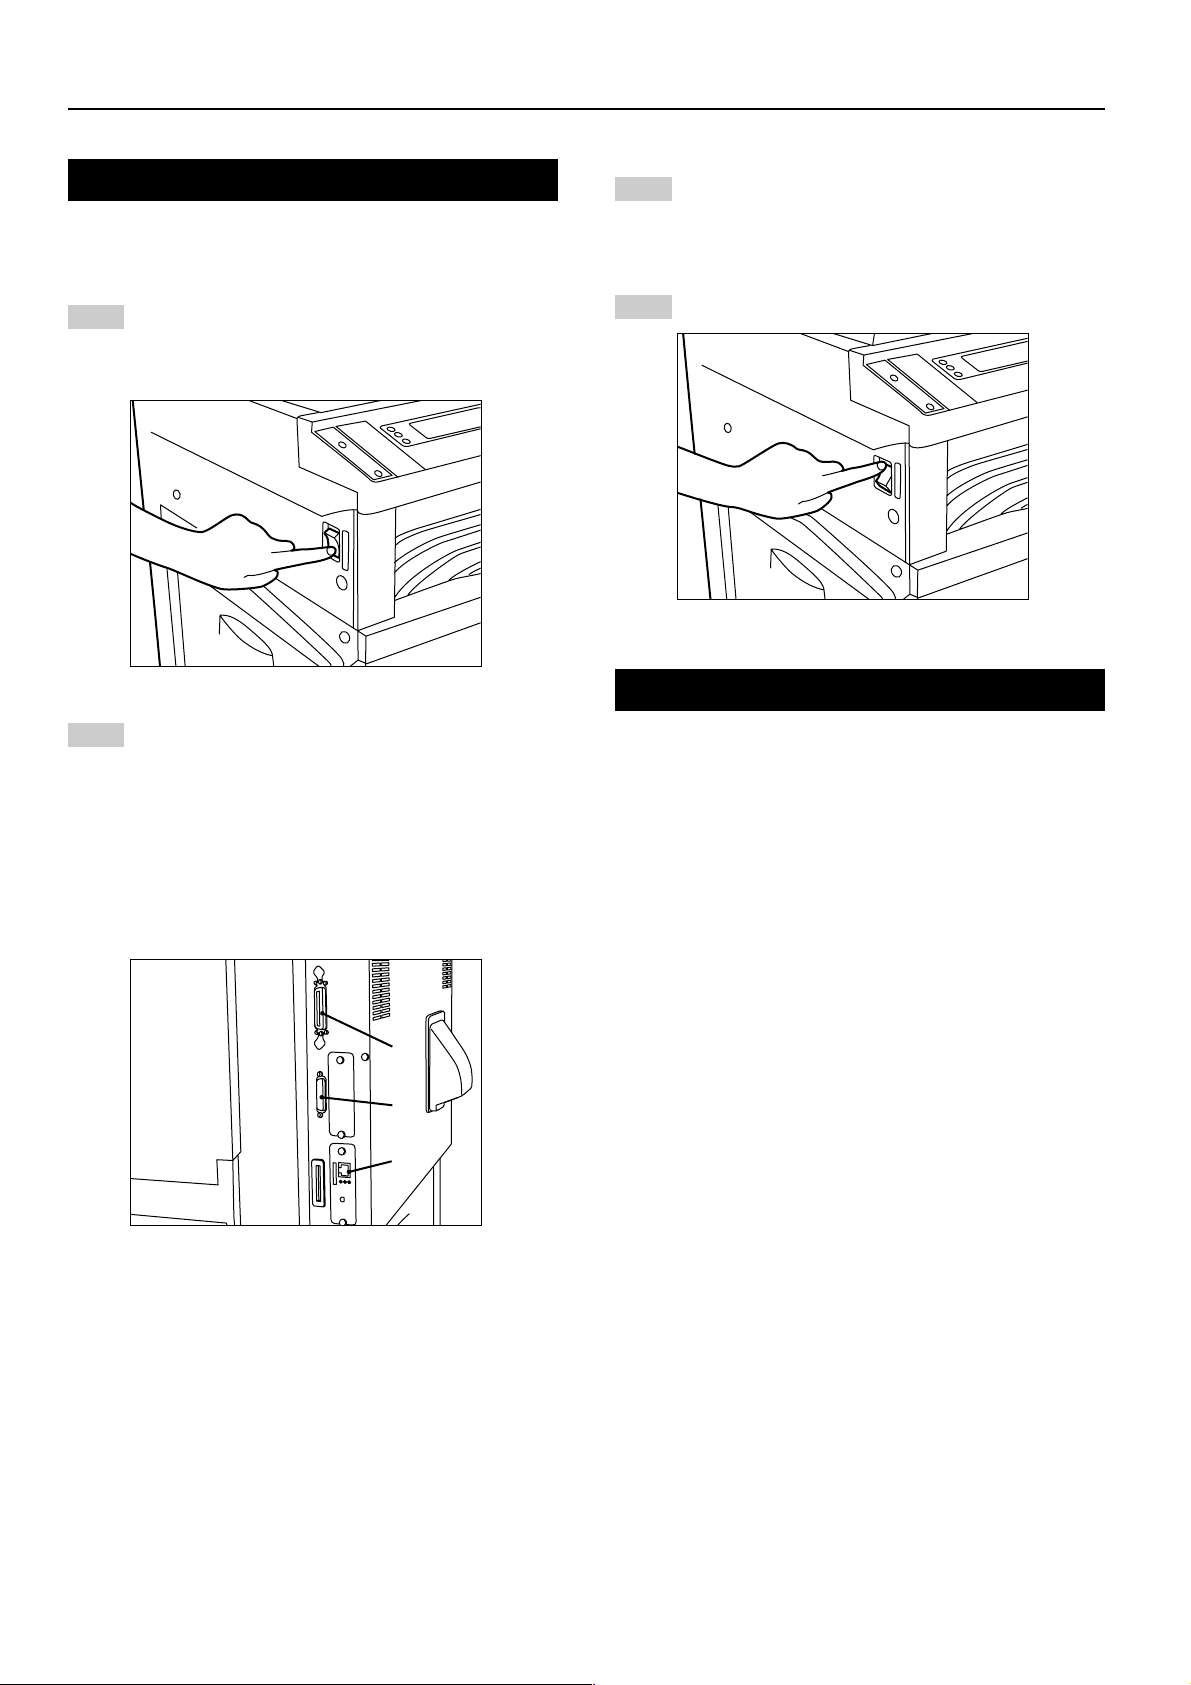
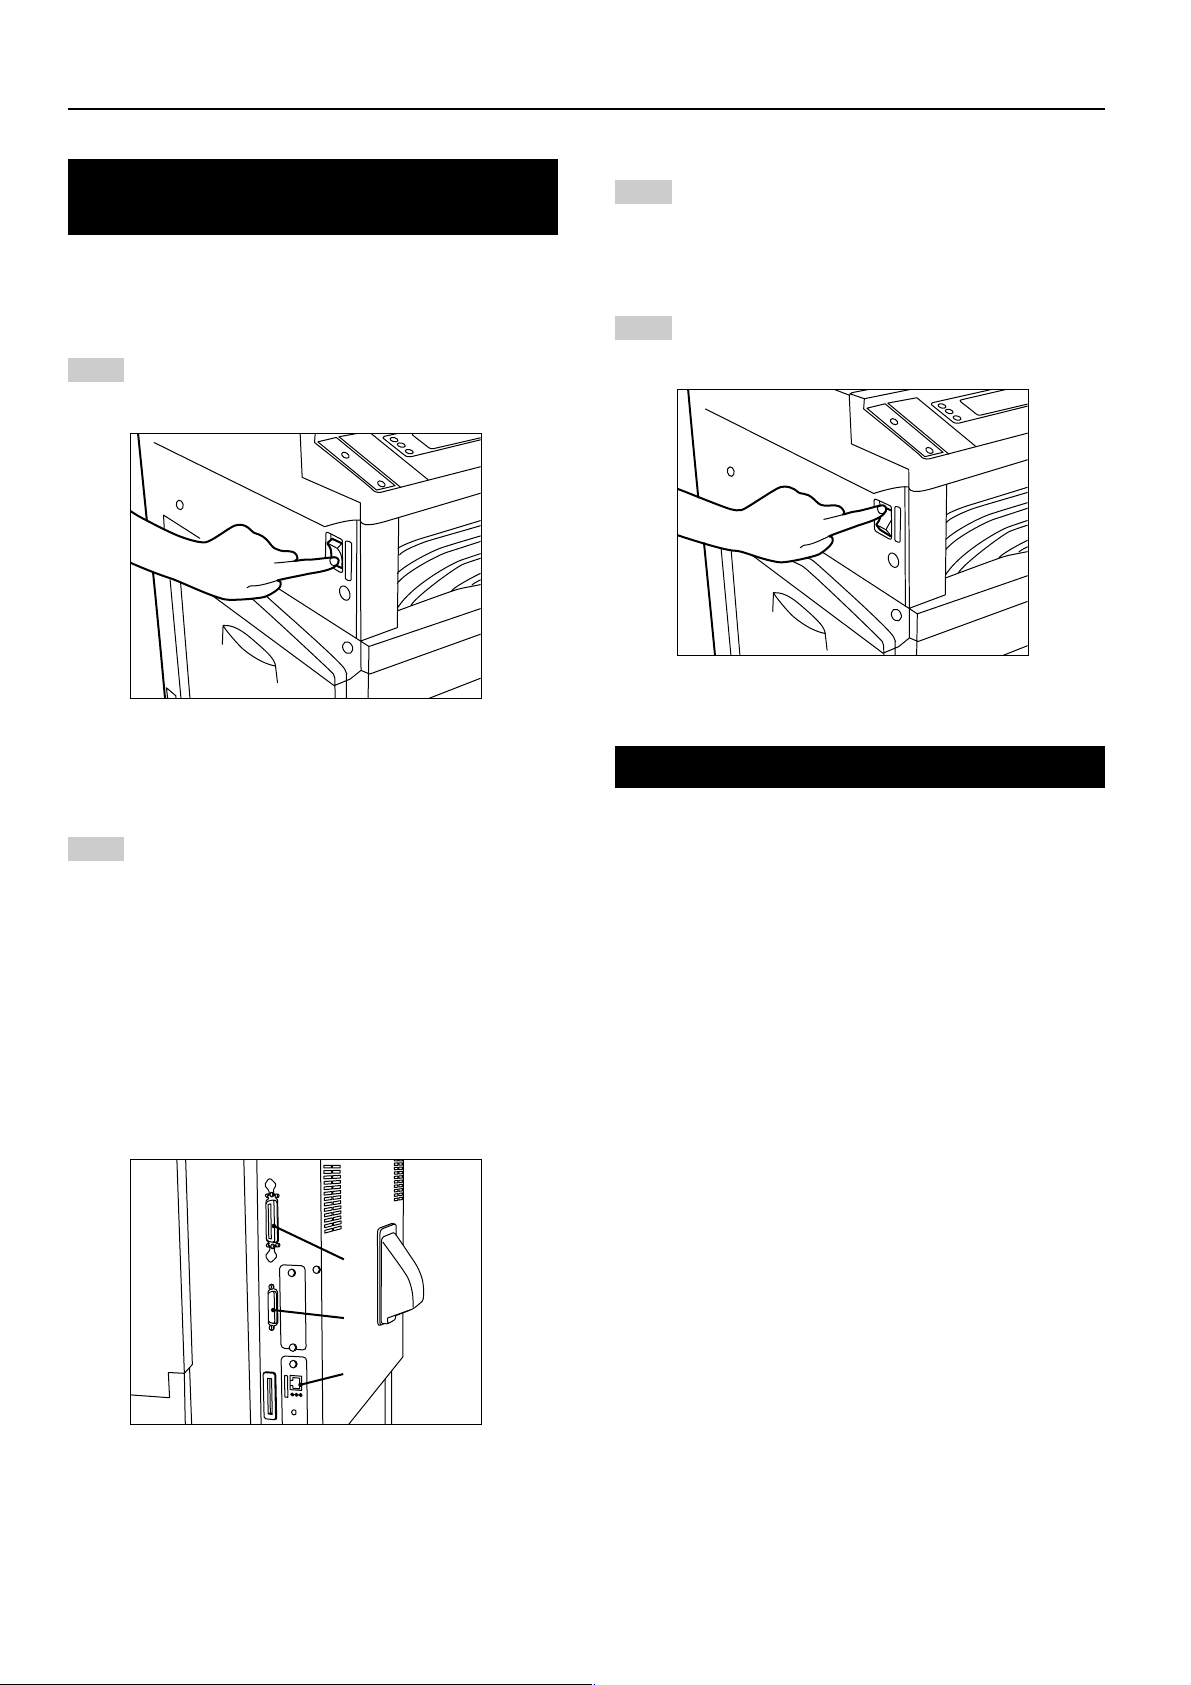
2-1 Connecting the printer cable
CAUTION: ALWAYS turn the main switch to the printer OFF (O)
1
BEFORE connecting the printer cable.
Turn the main switch located on the left side of the printer
OFF (O). If you are connecting the printer to your computer
with a parallel or serial cable, turn the power off to your
computer as well.
If you are connecting the printer to your computer with a
3
parallel or serial cable, connect the other end of the printer
cable to the connector on your computer.
If you are connecting the printer to a network, connect the
other end of the printer cable to an appropriate hub.
Turn the main switch to the printer back ON ( | ).
4
Connect the printer cable to the interface connector located
2
at the back of the right side of the printer.
The following types of interface come standard with the
printer. Be sure to connect the printer cable to the interface
connector that is appropriate to your situation.
A Parallel interface connector
B Serial interface connector
C
Network interface connector (100BASE-TX or 10BASE-T)
* If you are going to use this machine as a network printer,
perform the appropriate network settings. (Refer to “2-3
Network (TCP/IP) settings” on page 5.)
A
B
C
2-2 Installing the software
Perform the following procedure to install into your computer the
printer driver and other software that is appropriate to the operating
system in use in that computer. For information on installing the
required software, refer to the On-Line Manual that is located on the
CD-ROM that is included with this product.
4

2. Set-up
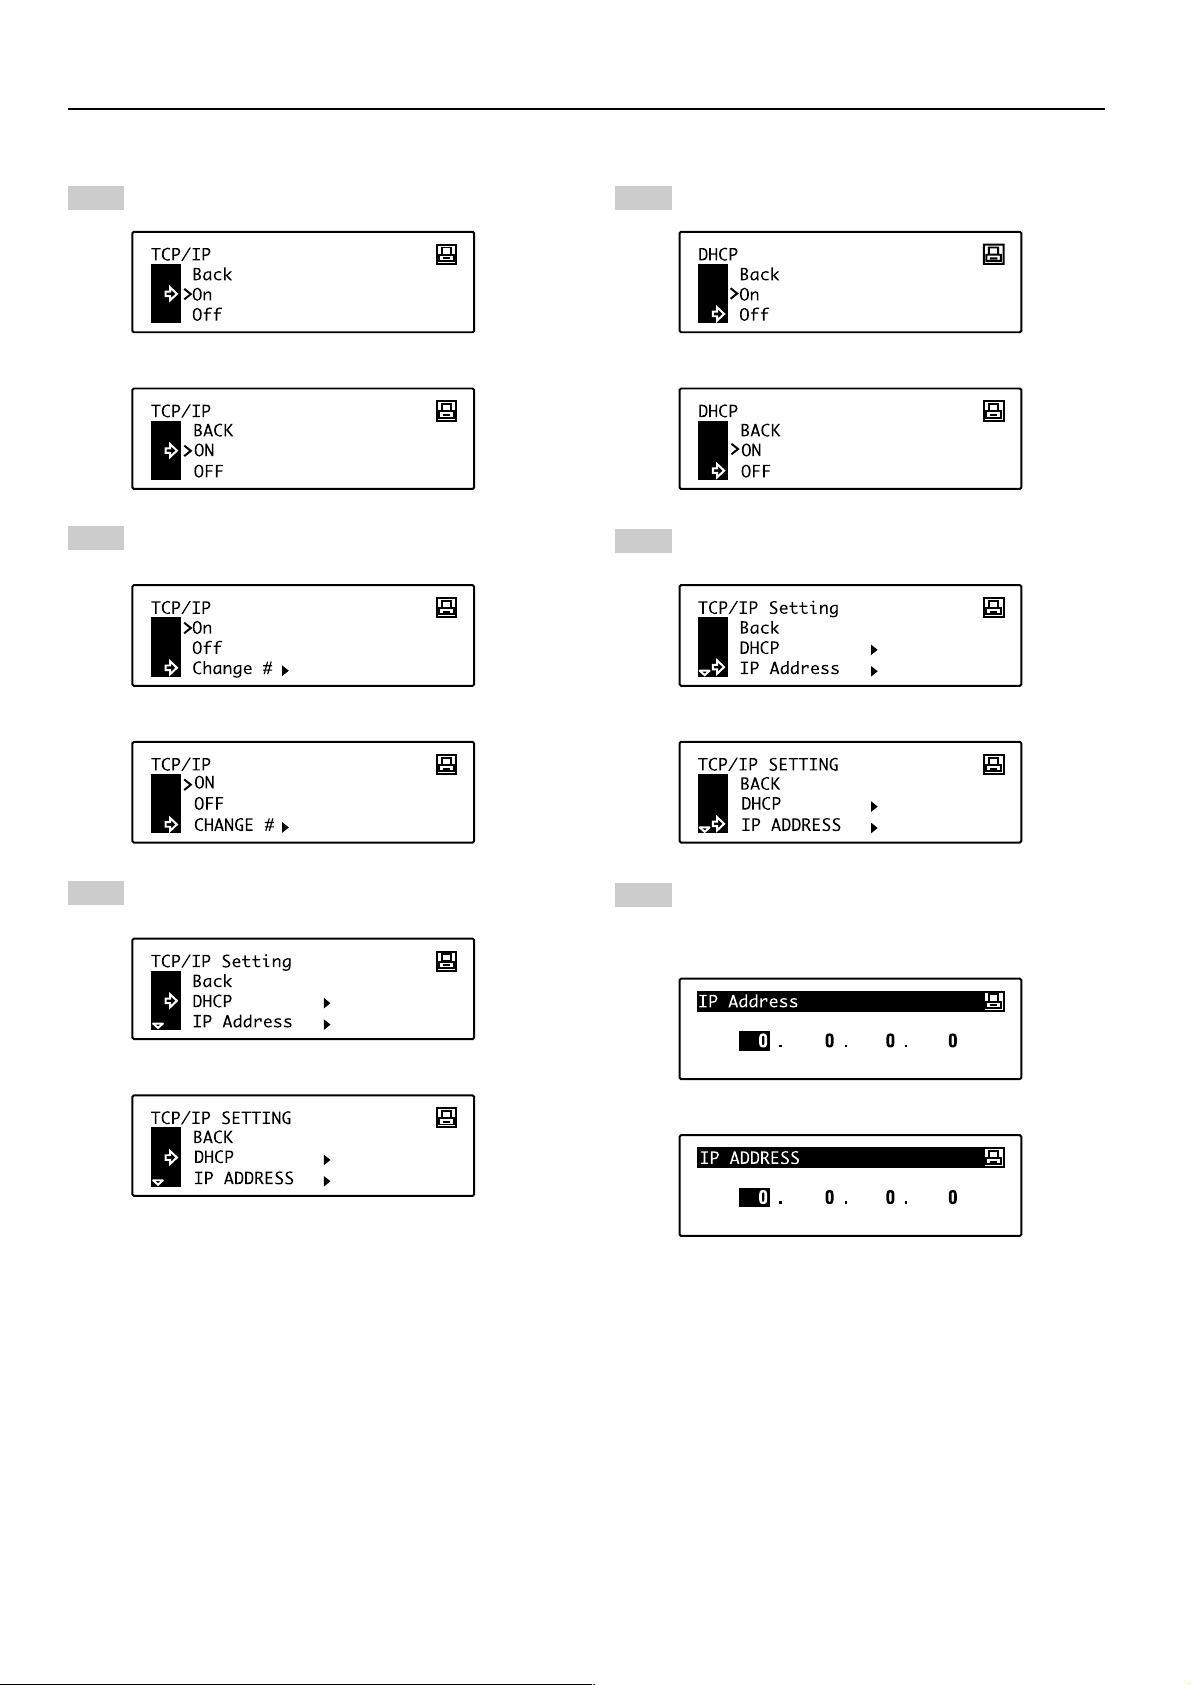
2-3 Network (TCP/IP) settings
When this machine is to be used as a network printer, it is necessary
to set the corresponding IP address for the printer.
Notes
• The IP address that should be registered here will differ depending
upon your network environment. Check with your network
administrator BEFORE performing this setting.
• If you are using a DHCP server to automatically configure the IP
address, this setting will not be necessary because DHCP server
configuration is already enabled as the factory default setting.
Press the Printer key. The machine will switch to the printer
mode.
1
Inch specification
Metric specification
Use the M and N cursor keys to select “Interface” and then
press the Enter key.
3
Inch specification
Metric specification
Use the M and N cursor keys to select “Option 1” and then
4
press the Enter key.
Inch specification
Metric specification
Use the M and N cursor keys to select “MENU” and then
2
press the Enter key.
Inch specification
Metric specification
Use the M and N cursor keys to select “TCP/IP” and then
5
press the Enter key.
Inch specification
Metric specification
5
2. Set-up
Use the M and N cursor keys to select “On” and then press
the Enter key.
6
Inch specification
Metric specification
Use the M and N cursor keys to select “Change #” and then
7
press the Enter key.
Inch specification
Metric specification
Use the M and N cursor keys to select “Off” and then press
the Enter key.
9
Inch specification
Metric specification
Use the M and N cursor keys to select “IP Address” and
10
then press the Enter key.
Inch specification
Metric specification
Use the M and N cursor keys to select “DHCP” and then
8
press the Enter key.
Inch specification
Metric specification
The numeric keys will be used to enter the IP address:
11
First, enter the first 3 digits of the IP address.
* The numbers you enter will be input into the currently
highlighted area of the display.
Inch specification
Metric specification
6

2. Set-up
Press the
the IP address into the next highlighted block.
12
Inch specification
Metric specification
Continue the same procedure for the other 2 blocks and,
13
once the IP address has been entered, press the Enter key.
Inch specification
Metric specification
PP
P cursor key and then enter the next 3 digits of
PP
Repeat steps 11 - 13 in order to enter the Subnet Mask
using the same procedure that you did for entering the IP
15
address.
Inch specification
Metric specification
Use the M and N cursor keys to select “Gateway” and then
16
press the Enter key.
Inch specification
Metric specification
Use the M and N cursor keys to select “Subnet Mask” and
14
then press the Enter key.
Inch specification
Metric specification
Repeat steps 11 - 13 in order to enter the Gateway address
using the same procedure that you did for entering the IP
17
address.
Inch specification
Metric specification
Once you are finished making all of the network settings,
press the Copier key. The machine will switch back to the
18
copier mode.
7
3. Troubleshooting
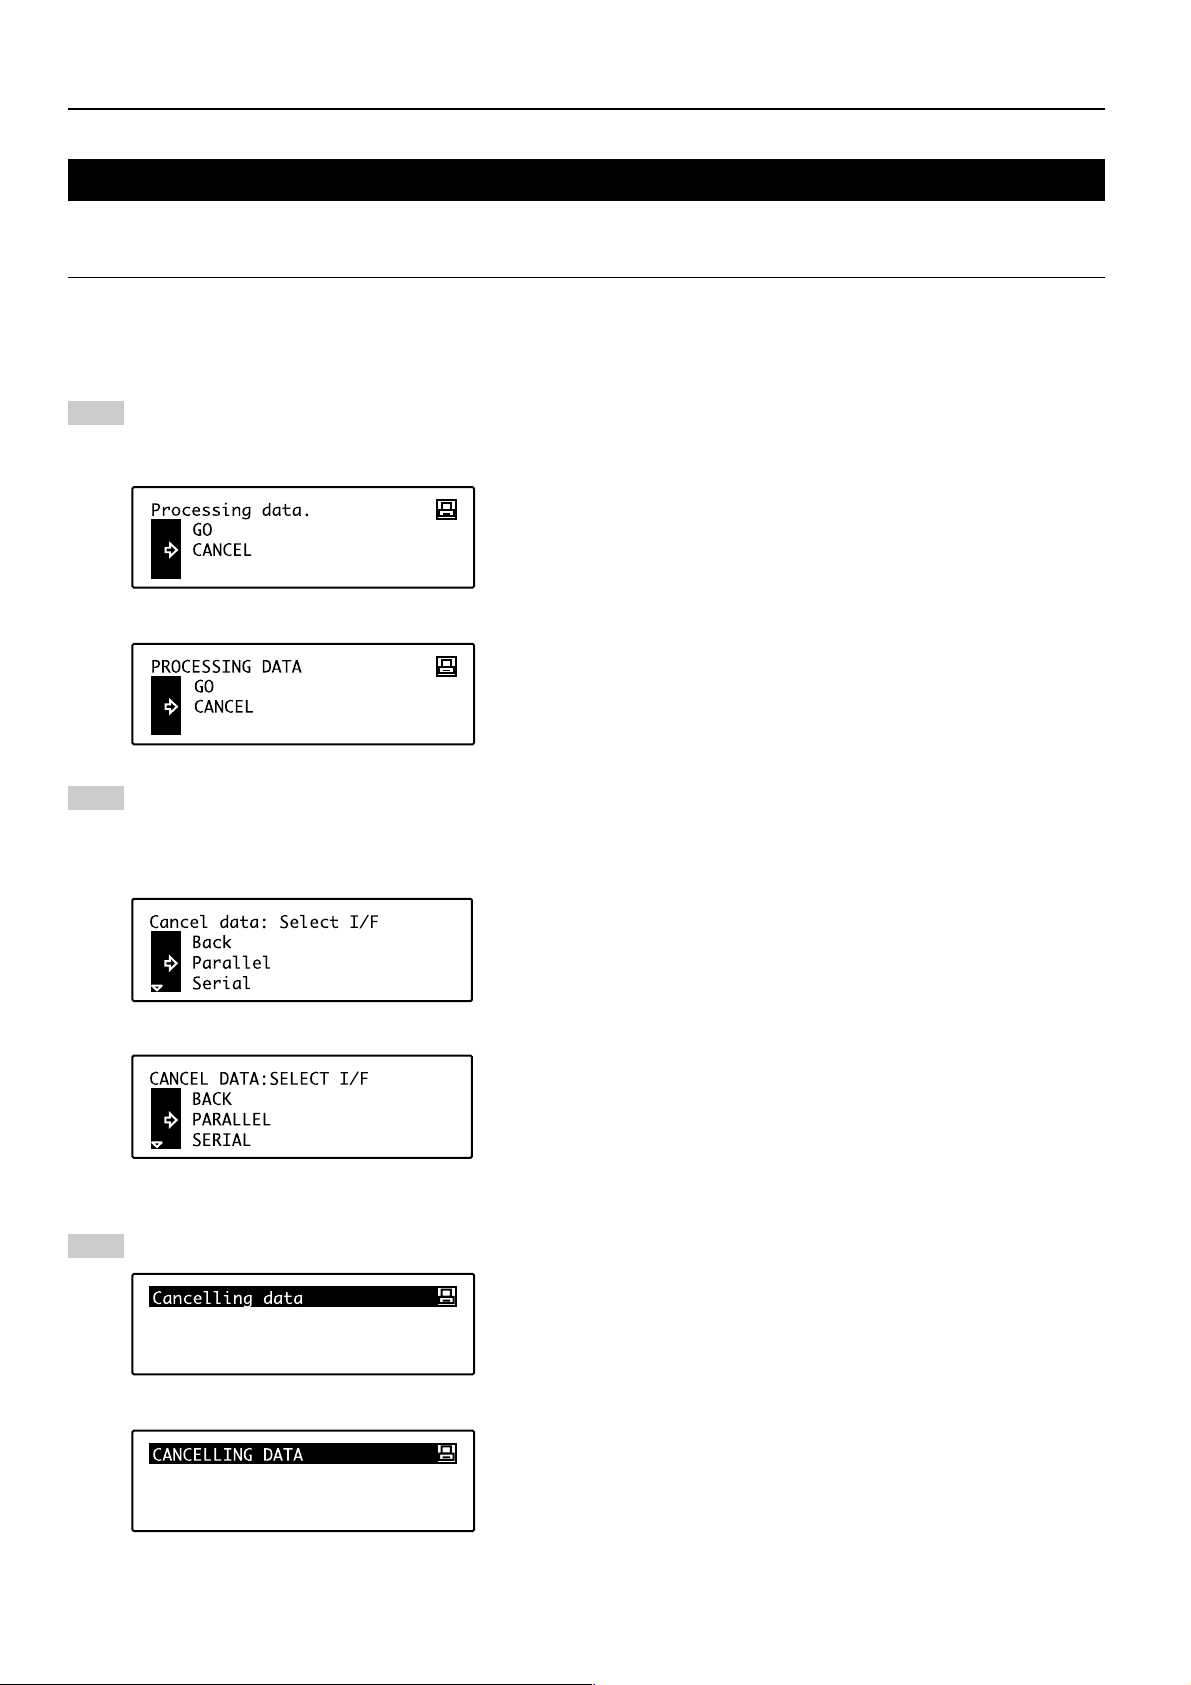
3-1 Canceling printing
Perform the following procedure when you want to stop printing or you want to clear data.
IMPORTANT!
• Always cancel the print job at your computer first. If the print job is not canceled in your computer, the data will be sent once again to the printer.
Use the M and N cursor keys to select “CANCEL” and then
press the Enter key or the Stop/Clear key. The interface
1
select screen will appear in order for you to select which
interface to cancel the print job for.
Inch specification
Metric specification
Use the M and N cursor keys to select the interface for
2
which you want to cancel the print job.
* In order to cancel printing of a Status Page or other job
that was initiated from the operation panel on the printer,
select “Current JOB”.
Inch specification
Metric specification
Press the Enter key. Printing will be canceled.
3
Inch specification
Metric specification
8
3. Troubleshooting
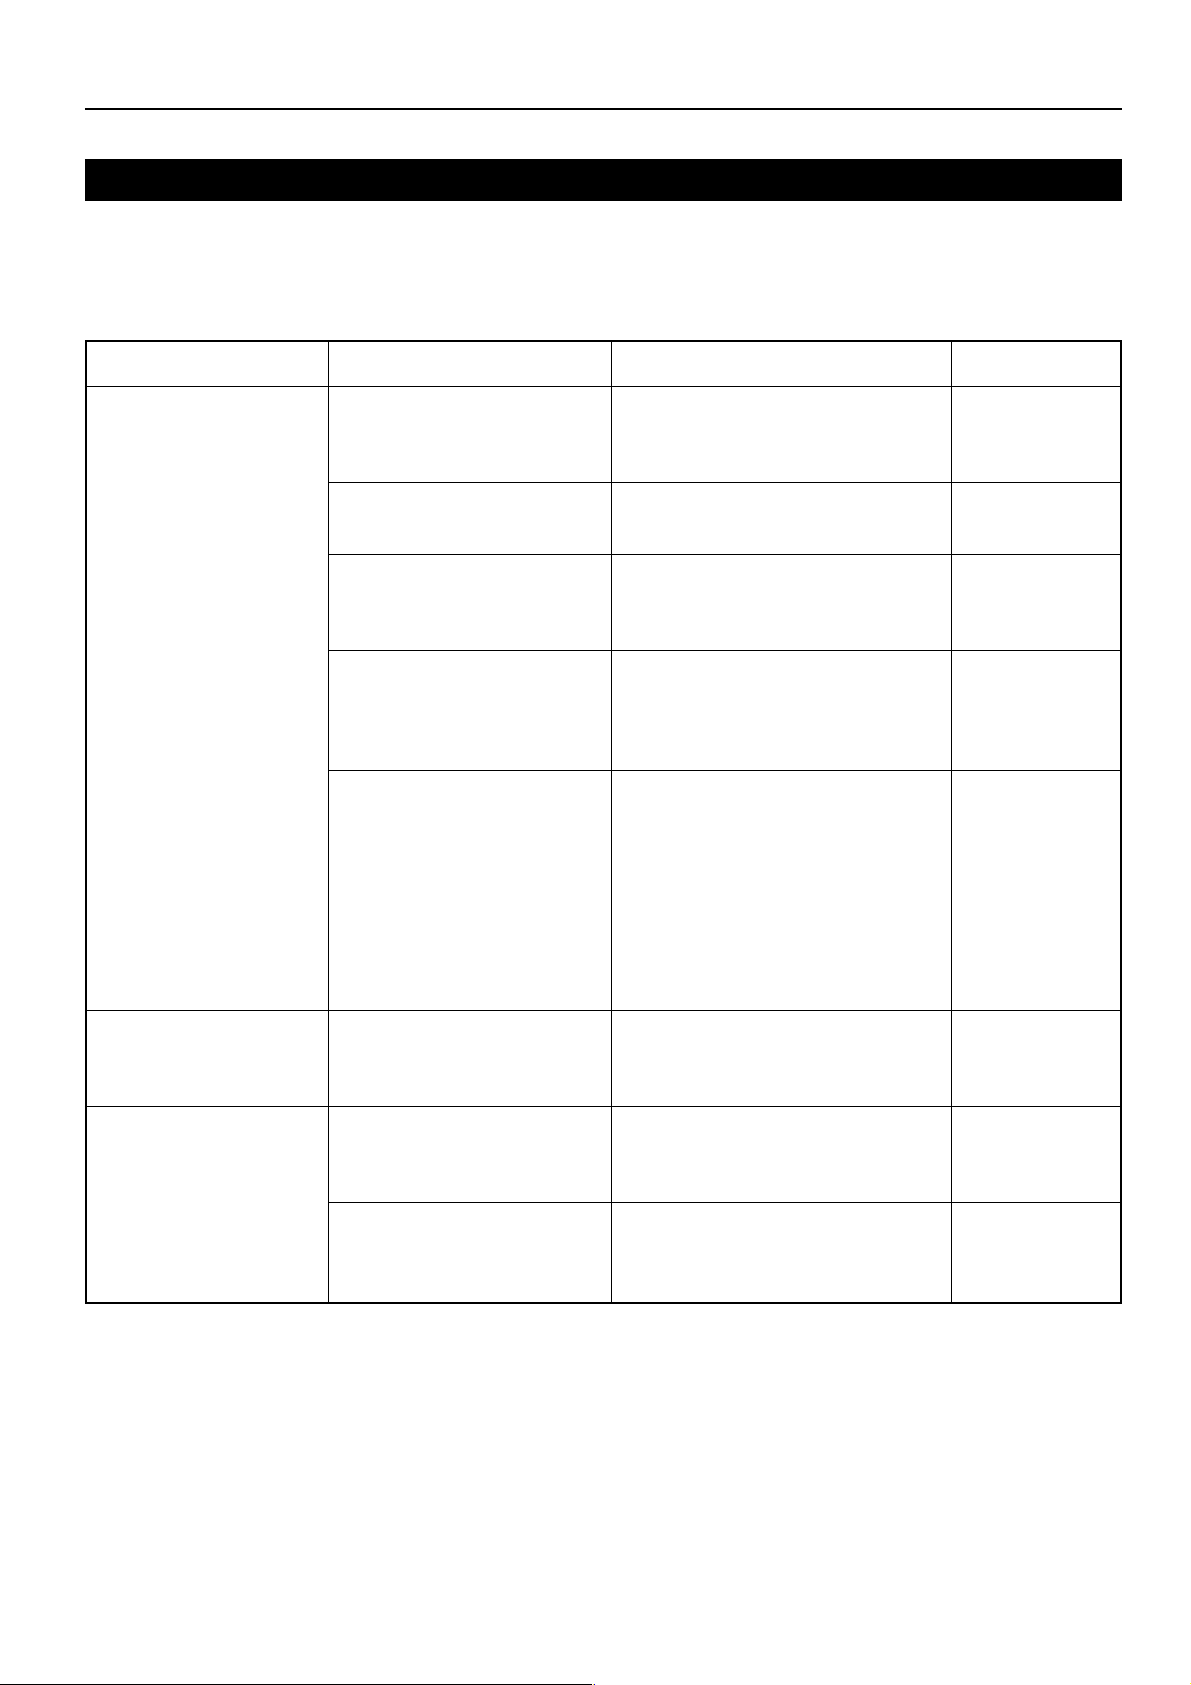
3-2 When an error message appears…
If an error message appears on the operation panel, first check the following tables for cause of the trouble and then perform the corresponding
procedure. For more detailed information, refer to the Operation Guide for your copier as well as the Operation Guide for any optional equipment
that is installed in your machine.
If “Error in printer mode” is displayed, press the Printer key. A more specific message about the error will be displayed.
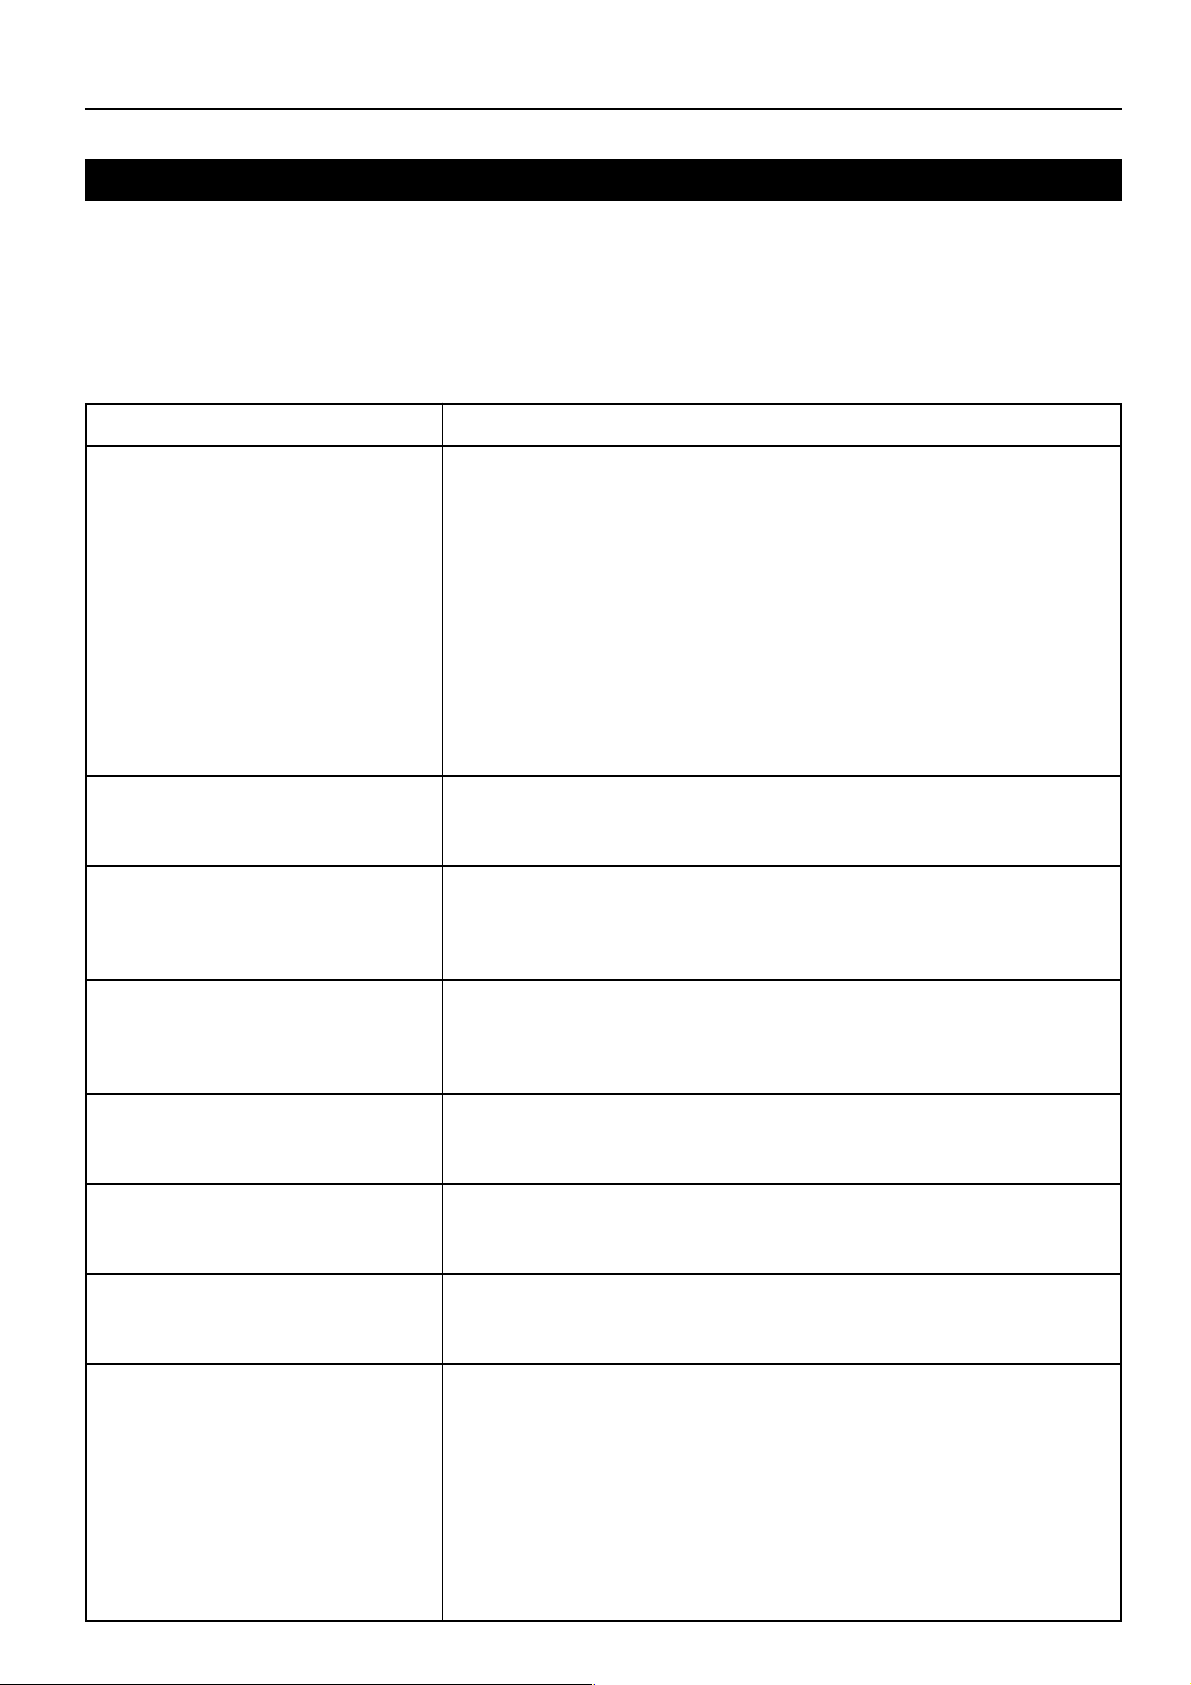
Display message
Add paper in drawer.
XX size (XXX)
ADD PAPER IN DRAWER.
XX SIZE (XXX)
Use alternative? Press GO
USE ALTERNATIVE? PRESS GO
Set paper Press GO
SET PAPER PRESS GO
Place paper in drawer.
Procedure
The size or type of paper selected for printing does not match the size or type of paper in the
drawer. Replace the paper in the drawer with that of the correct size and type.
1. If you want to switch to and print from a different drawer, press the Paper Select key until
the desired drawer is selected and then press the Enter key.
2. Otherwise, use the M and N keys to move the arrow e until it points to the desired
command and then press the Enter key.
GO: Force-prints onto the current size or type of paper.
CANCEL: Cancels the printing operation completely.
Bypass Type: Changes the type of paper to be used in the Multi-Bypass.
Use the M and N keys to move the arrow e until it points to the desired paper type and
then press the Enter key.
RESET: Resets the Printer Board. (Only printer functions will be reset.)
Displayed when the selected drawer has been changed. Use the M and N keys to select the
“On” command and then press the Enter key.
This message appear in the mode which allows you to select to have multiple copies made
but only one page printed at a time. After each sheet is printed, use the M and N keys to
select the “On” command and then press the Enter key.
The drawer has run out of paper. Add paper.
PLACE PAPER IN PAPER DRAWER.
Add staples.
ADD STAPLES.
Call service.
CALL SERVICE.
Department code mismatch
DEPARTMENT CODE MISMATCH
Exceeded print quantity limit.
EXCEEDED PRE-REGISTERED PRINTING
QUANTITY.
The finisher (option) has run out of staples. Refer to the Operation Guide for the finisher and
replenish the staples.
Trouble has occurred within the printer. Contact your service representative or an authorized
service center.
The department code you entered does not match the registered one. Check the department
code that is registered in the printer driver.
The amount of printing accomplished has exceeded the acceptable capacity as set under
copy management. In order to print further, change the copy management setting in the
printer.
9

3. Troubleshooting
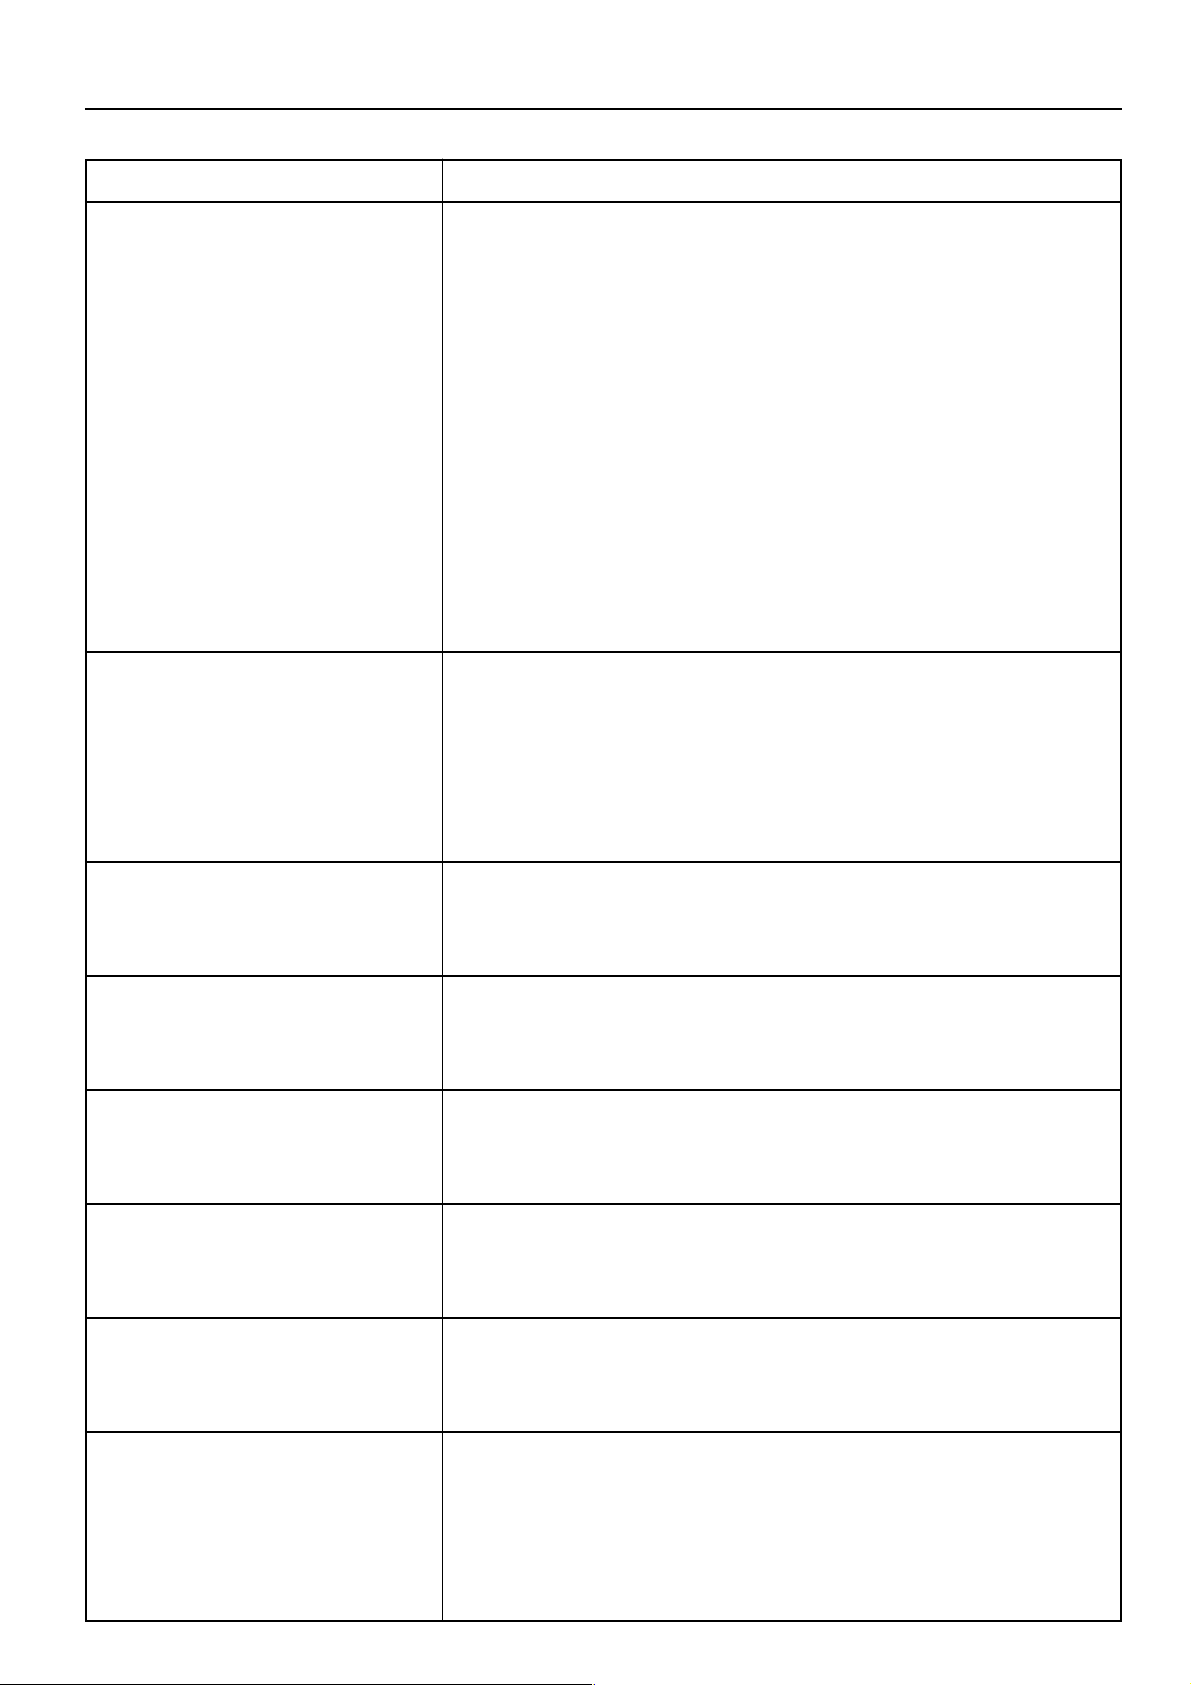
Display message
RAM disk error Press GO
RAM DISK ERROR PRESS GO
MemoryCard err Press GO
MEMORYCARD ERR PRESS GO
Procedure
Code:##
Check the error code displayed in place of ## and refer to the following.
01: Format error. Turn power OFF and ON again.
02: The RAM disk mode is OFF. Turn it ON.
03: A write error has occurred. Turn OFF write protection.
04: The RAM disk does not have enough area to store the data. Delete any unnecessary
data to make more room.
05: The selected file could not be found. Check the file name and whether it is on the RAM
disk or not.
06: There is not enough system memory. Increase memory capacity.
98: Some of the data being collated was not read. Job data is corrupt.
Code:##
Check the error code displayed in place of ## and refer to the following.
01: Format error. Reformat the memory card.
02: Memory card load error. Correctly load the memory card.
03: A write error has occurred. Turn OFF write protection.
04: The memory card does not have enough area to store the data. Delete any unnecessary
data to make more room.
05: The selected file could not be found. Check the file name and whether it is on the
memory card or not.
10
3. Troubleshooting
Display message
Hard Disk error Press GO
HARD DISK ERROR PRESS GO
KPDL error Press GO
KPDL ERROR PRESS GO
Procedure
Code:##
Check the error code displayed in place of ## and refer to the following.
01: Format error. Reformat the hard disk.
02: Hard disk load error. Correctly load the hard disk.
03: A write error has occurred. Turn OFF write protection.
04: The hard disk does not have enough area to store the data. Delete any unnecessary
data to make more room.
05: The selected file could not be found. Check the file name and whether it is on the hard
disk or not.
06: There is not enough system memory. Increase memory capacity.
20: The hard disk is loaded in the wrong slot. Load the hard disk in the correct slot.
85: An illegal name has been used for the virtual tray. Rename the tray correctly.
86: The wrong password was used for the virtual mailbox. Input the correct password.
88: Some of the data in the virtual mailbox was not read. Job data is corrupt.
97: No more jobs can be saved. The limit has been reached. Increase the number of storable
jobs and available area.
98: Some of the data in the job was not read. Job data is corrupt.
Code: ##
The current print job can not be continued. If “On” is selected under “Print KPDL Errs” in the
menu for printer-related settings, an error report will be printed out. If you want to print out
the portion of the job that has been successfully received by the printer, use the M and N
keys to select the “GO” command and then press the Enter key. If “Auto Continue” is turned
“On”, the printing operation will be restarted automatically after the amount of time specified
there.
Memory Card err Insert again
MEMORY CARD ERR INSERT AGAIN
Insert the same memory card
INSERT THE SAME MEMORY CARD
Format error Memory card
FORMAT ERROR MEMORY CARD
File not found Press GO
FILE NOT FOUND PRESS GO
Read fonts Failed
READ FONTS FAILED
Read Macro Failed
The Memory Card was removed during operation under the menu for printer-related settings.
Reinsert the Memory Card.
* BE SURE to turn the main switch OFF (O) BEFORE inserting the Memory Card.
The Memory Card could not be detected during an operation in which the printer was
reading data from that card. Reinsert the Memory Card.
* BE SURE to turn the main switch OFF (O) BEFORE inserting the Memory Card.
Initialization of the Memory Card currently inserted is necessary.
You have tried to print out a job that does not exist in the Virtual Mailbox. Use the M and N
keys to select the “On” command and then press the Enter key.
The printer failed to read the font data. Try to read the font data again.
The printer failed to read the macro. Try to read the macro again.
READ MACRO FAILED
11

3. Troubleshooting
Display message
Warning low memory
WARNING LOW MEMORY
Warning image adapt
WARNING IMAGE ADAPT
Print Overrun Press GO
PRINT OVERRUN PRESS GO
Memory Overflow Press GO
MEMORY OVERFLOW PRESS GO
Procedure
There is not enough memory. You can check how much printer memory there is by printing
out a status page. Delete any unnecessary font data and macros.
Because there is not enough memory, printing cannot be performed at the set resolution.
Either add more memory to the printer or change the resolution.
A data overrun error has occurred due to insufficient memory.
• Use the M and N keys to move the arrow e until it points to the desired command and
then press the Enter key.
GO: Continues printing.
CANCEL: Cancels the printing operation completely.
• If “Auto Continue” is turned “On”, the printing operation will be restarted automatically after
the amount of time specified there.
• Once this error message is displayed, “Page Protect” will be turned “On” automatically.
The current print job could not be completed due to insufficient memory in the printer.
• Use the M and N keys to move the arrow e until it points to the desired command and
then press the Enter key.
GO: Continues printing. The data that has already been processed will be printed out and
the remaining portion of the print job will be printed onto the following page.
CANCEL: Cancels the printing operation completely.
• If you are using a RAM disk, reduce the size of the RAM disk. If this error occurs often, it is
recommended that you install additional memory into the printer. For more detailed
information on adding memory, contact your service representative or an authorized
service center.
• If “Auto Continue” is turned “On”, the printing operation will be restarted automatically after
the amount of time specified there.
Virtual Mailbox Full
VIRTUAL MAILBOX FULL
Interface occupied
INTERFACE OCCUPIED
Opt. ROM error Press GO
OPT. ROM ERROR PRESS GO
Format error Hard Disk
FORMAT ERROR HARD DISK
Check chad box
CHECK CHAD BOX
Face-Up Tray Path Error
FACEUP TRAY PATH ERROR
There is not enough area in the virtual mailbox. Print out data in the virtual mailbox.
The selected interface is currently is use. Wait for a while and then attempt the operation
again.
A write error has occurred in the optional ROM. Use the M and N keys to select the “On”
command and then press the Enter key. The error state will be erased.
Initialize the hard disk.
Either the punch waste box is not correctly installed or it is full. Reposition or empty it as
necessary.
The side tray is closed. Printing is not possible. Open the side tray.
12
3. Troubleshooting
3-3 Basic troubleshooting chart
If you experience trouble while you are using this machine as a printer, refer to the table below to perform minor adjustments. If trouble persists,
contact your service representative or an authorized service center.
* For information in regard to general mechanical trouble with the machine, refer to the Operation Guide for your copier.
Problem
Nothing is printed out
Check point
Is the power cord loose?
Is the power ON ( | ) to the printer?
Is the printer cable appropriate and
is it connected properly?
Did you connect the printer cable
AFTER you turned the power to the
printer ON?
Is the printer off-line? (Is the Printer
Ready indicator out?)
Procedure
Connect the power cord securely to a power
source.
Turn the main switch to the printer ON ( | ).
Be sure to use a compliant printer cable and
make sure it is connected properly.
Connect the printer cable BEFORE you turn
the power to the printer ON.
Perform the appropriate procedure to light
the Printer Ready indicator and put the
printer on-line.
1 Press the Printer key. The machine will
switch to the printer mode.
2 Select the “GO” command and then
press the Enter key.
3 The Printer Ready indicator will light.
Reference page
—
4
4
—
2, 3
Text is not printed correctly
Print out is not correct
Is the printer cable appropriate and
is it connected properly?
Is the setting configuration in your
computer correct?
Is the emulation protocol setting
correct?
Be sure to use a compliant printer cable and
make sure it is connected properly.
Confirm the settings in the printer driver as
well as in the software application in use.
Check the emulation protocol setting.
4
—
—
13

4. Specifications
CPU ...................................................................PowerPC 750 (400MHz)
Printing Speed ...................................................B/W: 30 pages/min (11" x 8 1/2" / A4)
Printing Resolution .............................................600 dpi x 600 dpi
Maximum Printing Size ...................................... 11" x 17"/A3
RAM Memory Capacity ......................................Installed: 64 MB
Interface .............................................................One network interface
Installed Fonts ....................................................80 PCL/PS and 136 PS3
* Specifications are subject to change without notice.
Full Color: 8 pages/min (11" x 8 1/2" / A4)
Maximum: 256 MB (with an additional 128 MB and 64 MB (one each) of optional memory
installed)
One parallel interface (IEEE 1284 compliant)
One serial interface (RS-232C)
14

Memo
15

Memo
16
W
Guide de fonctionnement
<Édition Installation>
TOUJOURS lire entièrement ce Guide de fonctionnement avant d’utiliser l’appareil. Après l’avoir lu,
conservez ce guide dans de bonnes conditions avec le Guide de fonctionnement de votre copieur.

Informations concernant les marques déposées
• Novell et NetWare sont des marques déposées de Novell, SA.
• IBM et IBM PC-AT sont des marques de fabrique d’International Business Machines Corporation.
• PowerPC est une marque de fabrique d’International Business Machines Corporation of America et autres sociétés
commerciales.
• Adobe et Acrobat sont des marques de fabrique d’Adobe Systems Incorporated.
• CompactFlash et CF sont des marques de fabrique de SanDisk Corporation.
Tous les autres noms de sociétés ou produits contenus dans ce guide d’utilisation sont des marques de fabrique ou marques
déposées de leurs compagnies respectives. Les indications ™ et ® ne seront pas utilisées dans ce guide d’utilisation.
Tous droits réservés. Aucune partie de ce document ne peut être reproduite ou transmise sous quelque forme ou par quelque
moyen que ce soit, électronique ou mécanique, tel que par photocopie, enregistrement ou par un système quelconque de
stockage et de rappel des informations, sans l'autorisation écrite de l'éditeur.
Limitations légales relatives à la copie
• Il peut être interdit de copier des documents protégés par des droits d'auteur sans l'autorisation préalable du propriétaire des
droits d'auteur.
• Il est absolument interdit de copier des billets de banque nationaux ou étrangers.
• La copie d'autres articles peut être interdite.
i

Au sujet de ce guide d’utilisation
Ce guide d’utilisation <Édition Installation> doit être lu lorsque la plaquette d’imprimante est installée dans votre copieur et que
celui-ci sera utilisé comme imprimante locale ou imprimante de réseau. Il contient des explications concernant les procédures
d’installation pour utiliser le copieur comme imprimante.
Le réglage des paramètres et la configuration de l’imprimante étant différents selon la configuration matérielle utilisée par
l’ordinateur connecté à l’appareil, veuillez lire les sections se rapportant spécifiquement à votre configuration matérielle et
effectuer les réglages et la configuration décrits dans ces sections.
Le manuel d’assistance interactif de ce guide d’utilisation contient des explications concernant l’imprimante, certains réglages et
configurations, ainsi que les procédures devant être effectuées sur votre ordinateur.
AVIS
Ce guide d'utilisation contient des informations se rapportant à la version en pouces ainsi qu'à la version métrique des
imprimantes. Lorsqu'un message ne diffère que par l'utilisation d'une majuscule à la place d'une minuscule, nous avons indiqué
les informations se rapportant spécifiquement à la version en pouces de cet appareil. En cas de différence, même légère, dans un
message, nous avons indiqué les informations pour la version en pouces suivies, entre parenthèses, par les informations
correspondantes pour la version métrique.
Au sujet du manuel d’assistance interactif
Le manuel d’assistance interactif est enregistré sous forme de fichier FDC (format de document compatible) et se trouve dans le
CD-ROM fourni avec ce produit. Le logiciel Adobe Acrobat Reader 4.0 est nécessaire pour avoir accès au manuel d’assistance
interactif. Le logiciel Adobe Acrobat Reader 4.0.5 étant également fourni dans le CD-ROM, il est ainsi possible d’installer le logiciel
dans votre disque dur.
ii

Les connexions
Pour raccorder directement l’imprimante à votre ordinateur (avec un câble parallèle ou série)…
1 Raccorder directement l’imprimante à
PC
votre ordinateur avec un câble parallèle
Câble parallèle ou série
CD-ROM
Pour raccorder l’imprimante à un réseau
<Exemple de connexion>
Noyau
PC
PC
ou série ..................................
Page 4
2 Installation du pilote d’imprimante dans
votre ordinateur…Consultez le manuel
d’assistance interactif
1 Raccorder un câble de réseau
(100BASE-TX, 10BASE-T, etc.) à
l’imprimante ...........................
Page 4
CD-ROM
Câble de réseau
PC
2 Réglages de réseau
(protocole TCP/IP) fonctionnant
dans l’imprimante ..................
Page 5
3 Pour effectuer les réglages de réseau
sur votre ordinateur…Consultez le
Guide de configuration rapide
4 Installation du pilote d’imprimante dans
votre ordinateur…Consultez le manuel
d’assistance interactif
iii

1. Préparatifs................................................................................................................. 1
1-1 Accessoires ............................................................................................................................................... 1
1-2 Pièces nécessaires ....................................................................................................................................1
1-3 Nomenclature (corps principal) ..................................................................................................................1
1-4 Nomenclature (panneau de commande) ................................................................................................... 2
2. Installation ................................................................................................................4
2-1 Raccordement du câble d’imprimante ....................................................................................................... 4
2-2 Installation du logiciel .................................................................................................................................4
2-3 Réglages de réseau (protocole TCP/IP) ....................................................................................................5
3. Dépannage ................................................................................................................ 8
3-1 Annuler une impression .............................................................................................................................8
3-2 Lorsqu’un message d’erreur apparaît… .................................................................................................... 9
3-3 Tableau de dépannage de base ...............................................................................................................13
4. Spécifications ......................................................................................................... 14
iv
1. Préparatifs
1-1 Accessoires
• CD-ROM bibliothèque numérique
• CD-ROM bibliothèque de réseau
• Le présent guide d'utilisation <Édition Installation>
• Guide de configuration rapide (pour l'interface de réseau)
1-2 Pièces nécessaires
Veillez à utiliser le câble correspondant à vos besoins comme suit.
• Si vous raccordez directement l'imprimante à votre ordinateur: Un câble parallèle (de standard IEEE 1284, d'une longueur inférieure à 1,5 m)
• Si vous raccordez l'imprimante à un réseau: Un câble de réseau (câble 100BASE-TX ou 10BASE-T)
* Lors de l'utilisation d'un câble 100BASE-TX ou 10BASE-T, toujours choisir un câble de type blindé.
* Selon la zone ou la région d'achat de l'appareil, la carte de réseau en option peut être nécessaire au raccordement de l'imprimante à un réseau.
1-3 Nomenclature (corps principal)
6
5
1
2
3
4
1 Connecteur d’interface parallèle
Raccorder ici un câble parallèle bidirectionnel.
2 Connecteur d’interface série
Raccorder ici un câble série. Si vous utilisez une liseuse de code à barres en option, raccordez-la à ce connecteur.
3Connecteur d’interface de réseau
Raccorder ici un câble 100BASE-TX ou 10BASE-T afin de raccorder l’imprimante à un réseau.
* Selon la zone ou la région d'achat de l'appareil, la carte de réseau en option peut ne pas faire partie des accessoires standards de cette
imprimante.
* NE JAMAIS retirer la carte de réseau.
4 Compartiment pour carte de mémoire (CompactFlash)
Insérer ici la carte de mémoire (CompactFlash) en option.
5 Interrupteur principal
Mettre d’abord cet interrupteur sur marche ( | ), avant d’utiliser l’imprimante. Toujours mettre cet interrupteur sur arrêt (O) lors du raccordement
du câble d’imprimante, etc.
6 Panneau de commande
Utiliser ce panneau pour effectuer les réglages, etc., sur l’imprimante même.
1
1. Préparatifs
1-4 Nomenclature (panneau de commande)
Spécifications en pouces
#
! @ 0 8 9 2
137456
$
%
^
Spécifications métriques
#
! @ 0 8 9 2
137456
$
%
^
2

1 Touche d’imprimante
Appuyer sur cette touche pour commuter au mode d’imprimante.
2 Touche copieur
Appuyer sur cette touche pour commuter au mode copieur.
3 Touche de validation
Appuyer sur cette touche pour enregistrer un réglage.
4 Touche M (Curseur)
Appuyer sur cette touche pour faire défiler vers le haut les
diverses fonctions, réglages, etc.
5 Touche N (Curseur)
Appuyer sur cette touche pour faire défiler vers le bas les diverses
fonctions, réglages, etc.
6 Touche P (Curseur gauche)
Appuyer sur cette touche pour se déplacer vers la gauche lors
d’une procédure de réglage.
7 Touche O (Curseur droit)
Appuyer sur cette touche pour se déplacer vers la droite lors
d’une procédure de réglage.
8 Touches numériques
Appuyer sur ces touches pour entrer la valeur désirée directement.
9 Touche d’arrêt/annulation
Appuyer sur cette touche pour annuler un réglage en cours de
procédure.
0 Affichage de message
Indique l’état de l’imprimante ainsi que d’autres réglages.
! Indicateur Imprimante Prête à fonctionner
Indique le statut de l’imprimante.
Allumé: L’impression est possible. (L’imprimante est en ligne.)
Clignotant: Une erreur pouvant être corrigée est survenue ou
l’imprimante est en cours de démarrage (lors de l’autodiagnostic).
Éteint: L’imprimante est hors ligne.
@ Indicateur Données de l’Imprimante
Indique le statut de réception de données dans l’imprimante.
Allumé: Les données sont en cours de traitement ou la mémoire
est sollicitée.
Clignotant: L’imprimante reçoit des données.
# Indicateur Attention Imprimante
Indique une erreur d’impression. Lorsque cet indicateur est allumé
ou clignote, appuyer sur la touche d’imprimante et vérifier le
message apparaissant sur l’affichage de message.
Allumé: Une erreur d’impression est survenue. (Voir “3-2
Lorsqu’un message d’erreur apparaît” à la page 9 et résoudre le
problème.)
Clignotant: L’imprimante est en cours de démarrage ou nécessite
l’attention de l’utilisateur pour formater la carte de mémoire, etc.
1. Préparatifs
● Affichage de message en mode d’imprimante
Pour entrer en mode d’imprimante, appuyer sur la touche
d’imprimante. L’affichage de message changera et indiquera
l’affichage correspondant au mode d’imprimante.
$ Commande “ACTION”
Sélectionner cette commande pour démarrer l’impression ainsi
que pour engager l’opération d’alimentation de formulaire. Cette
commande peut également être utilisée pour mettre l’imprimante
en et hors ligne. L’indicateur Imprimante Prête à fonctionner sera
allumé lorsque l’imprimante est en ligne.
% Commande “ANNULEZ” (“ANNULER”)
Sélectionner cette commande pour arrêter l’impression ou pour
faire disparaître un message d’erreur.
^ Commande “MENU”
Sélectionner cette commande pour modifier les réglages par
défaut de cette imprimante.
3
2. Installation
2-1 Raccordement du câble
d’imprimante
ATTENTION: TOUJOURS mettre l’interrupteur principal de
1
l’imprimante sur arrêt (O) AVANT de raccorder le câble
d’imprimante.
Mettez l’interrupteur principal situé sur le côté gauche de
l’imprimante sur arrêt (O). Si un câble parallèle ou série est
utilisé pour raccorder votre imprimante à l’ordinateur, mettez
également votre ordinateur hors tension.
Si un câble parallèle ou série est utilisé pour raccorder votre
3
imprimante à l’ordinateur, connecter l’autre extrémité du
câble d’imprimante au connecteur de votre ordinateur.
Si l’imprimante est raccordée à un réseau, connecter l’autre
extrémité du câble d’imprimante au noyau adéquat.
Remettre l’interrupteur principal de l’imprimante sur
4
marche ( | ).
Connecter le câble d’imprimante au connecteur d’interface
2
situé à l’arrière du côté droit de l’imprimante.
Les types d’interface suivants font partie des accessoires
standards de l’imprimante. Veillez à raccorder le câble
d’imprimante au connecteur d’interface correspondant à vos
besoins.
A Connecteur d’interface parallèle
B Connecteur d’interface série
C Connecteur d’interface de réseau (100BASE-TX ou
10BASE-T)
* Lorsque cet appareil doit être utilisé comme imprimante de
réseau, effectuer les réglages de réseau adéquats. Voir “23 Réglages de réseau (protocole TCP/IP)” à la page 5.
A
B
2-2 Installation du logiciel
Effectuez la procédure suivante pour installer, sur votre ordinateur, le
pilote d’imprimante et autres logiciels nécessaires pour le système
d’exploitation utilisé par cet ordinateur. Pour plus de détails
concernant l’installation des logiciels nécessaires, consulter le
manuel d’assistance interactif se trouvant dans le CD-ROM fourni
avec ce produit.
C
4
 Loading...