

Page 1
画質調整クイックガイド
Quick Guide to Adjusting Image Quality
Manuel d’utilisation rapide pour le rélage
de la qualité de l’image
Guía rápida para ajustar la calidad de
la imagen
Kurzanleitung zur Einstellung der
Bildqualität
Guida rapida alla regolazione
della qualità dell’immagine
Page 2

はじめに
カラー画像の出力が満足できない状態の場合、本書を参考に調整をしてください。コピー画像はコピー編を、
プリント出力画像はプリンタドライバ編を参照してください。
カラーで印刷するときは、カラーコピー専用紙を使用してください。使用しない場合は、濃度、色合いなどの
印刷品質に影響が出るおそれがあります。
出力枚数が非常に多い、または少ない状態や、一枚あたりの印刷率が非常に高い、または低い状態で出力を続
けると、印刷品質に影響が出るおそれがあります。
Introduction
If you are not satisfied with the output quality of color images, refer to this manual and make adjustments
accordingly. For copy images, refer to the chapter on copies. For printer output images, refer to the chapter on
printer drivers. Make sure to use special color copying paper when printing in color. If you don’t, print qualities
such as density and hue could be affected.
If the number of copies printed is extremely large or extremely small, or if a single sheet is continuously printed
at an extremely high or extremely low print ratio, the print quality could suffer.
Introduction
Si la qualité de l’affichage des images en couleur ne vous satisfait pas, référez-vous à ce manuel et faites les
ajustements idoines. Pour la copie d’images, référez-vous au chapitre traitant des copies. Pour les images
sorties sur imprimante, référez-vous au chapitre traitant des pilotes d’imprimante. Assurez-vous d’utiliser du
papier à copier couleur spécial quand vous imprimez en couleur. Si vous ne le faites pas, les qualités
d’impression telles que la densité et la tonalité pourraient en être affectées.
Si le nombre de copies imprimées est très important ou très faible, ou si une seule feuille est imprimée en
continue à une cadence très élevée ou très faible, la qualité d’impression pourrait en pâtir.
Introducción
Si no está satisfecho con la calidad de salida de las imágenes en color, consulte este manual y realice los
ajustes necesarios. Para copiar imágenes, consulte el capítulo dedicado a las copias. Para imágenes de salida
de la impresora, consulte el capítulo sobre controladores de la impresora. Asegúrese de que utiliza papel
especial para copias en color cuando realice impresiones en colores. De no hacerlo, componentes de la calidad
de la impresión tales como la densidad y la tonalidad podrán verse afectados.
Si el número de copias que se imprimen es extremadamente grande o extremadamente pequeño, o si se
imprime una sola página continuamente a una tasa de impresión extremadamente alta o extremadamente baja,
podría verse afectada la calidad de la impresión.
Einführung
Wenn Sie mit der Ausgabequalität von Farbbildern nicht zufrieden sind, nehmen Sie die entsprechenden in
diesem Handbuch angegebenen Justierungen vor. Hinweise zum Kopieren von Bildern finden Sie im Kapitel
über das Kopieren. Hinweise zur Druckausgabe von Bildern finden Sie im Kapitel über Druckertreiber. Bitte
beachten Sie, dass beim Drucken in Farbe spezielles Farbkopierpapier verwendet werden sollte. Mit anderem
Papier könnte die Druckqualität in Dichte und Farbton vermindert werden.
Falls Sie extrem viele oder wenige Kopien drucken, oder falls ein einzelnes Blatt kontinuierlich bei extrem großen
oder kleinen Druckbild-Verhältnissen bedruckt wird, könnte die Druckqualität leiden.
Introduzione
Se la qualità delle immagini a colori ottenute non fosse soddisfacente, fare riferimento a questo manuale ed
eseguire le regolazioni necessarie. Per immagini fotocopiate, fare riferimento al capitolo Copia. Per immagini
inviate alla stampante, fare riferimento al capitolo Driver stampante. Verificare che venga utilizzata la carta
speciale per fotocopiatura a colori quando si stampa a colori. In caso contrario, si può avere un effetto negativo
sulle caratteristiche di stampa, come ad esempio la densità e la tonalità.
Se il numero di copie stampate è molto grande o molto piccolo, o se viene stampato un solo foglio in
continuazione con un rapporto di stampa molto grande o molto piccolo, la qualità di stampa può peggiorare.
日本語 コピー編 ....................................... 1
プリンタドライバ編 ................... 3
English Copying .................................... 7
Printer Driver ............................ 9
Français Copie ...................................... 13
Pilote d’imprimante................. 15
Español Copia ...................................... 19
Controlador de la impresora ... 21
Deutsch Kopieren ................................. 25
Druckertreiber ........................ 27
Italiano Copia ...................................... 31
Driver stampante .................... 33
Page 3
Quick Guide to Adjusting Image Quality (Copying)
Orig.Image Quality
Text+Photo
Print
Photo
Shortcut
Text+Pho
Photo: Fo
Print: Fo
Tex t: F or
Map: For
Tex t
Map
Ready to copy. (Full-Color)
Copying
Selecting Image Quality
Select the optimal image quality mode to match the type of original you are copying.
Text + Photo
Choose this setting when copying an original that combines text,
illustrations and photos. Each individual area is optimally processed.
Text is clearly copied and illustrations and photos are smoothly
rendered.
Ex: Presentation materials, business documents, catalogs, etc.
Photo
Choose this setting when copying a photo taken with a camera, etc. The
original photo is clearly copied.
Print
Choose this setting when copying photos printed in a catalog or
magazine in halftone dots. This setting reduces the moiré
Text
Choose this setting when copying an original that contains mainly text.
The text is clearly copied.
Ex: Business documents and materials with a lot of text
Map
Choose this setting when copying maps. Fine text and lines printed on a
background color are clearly copied.
†
effect.
English
1 Press [Function], and then [Orig. Image Quality] ([Image Quality]).
2 Choose the image quality setting that
corresponds to your original.
3 Press [Close].
† Patterns that are created by irregular distribution of halftone dots.
7
Page 4
Quick Guide to Adjusting Image Quality (Copying)
x
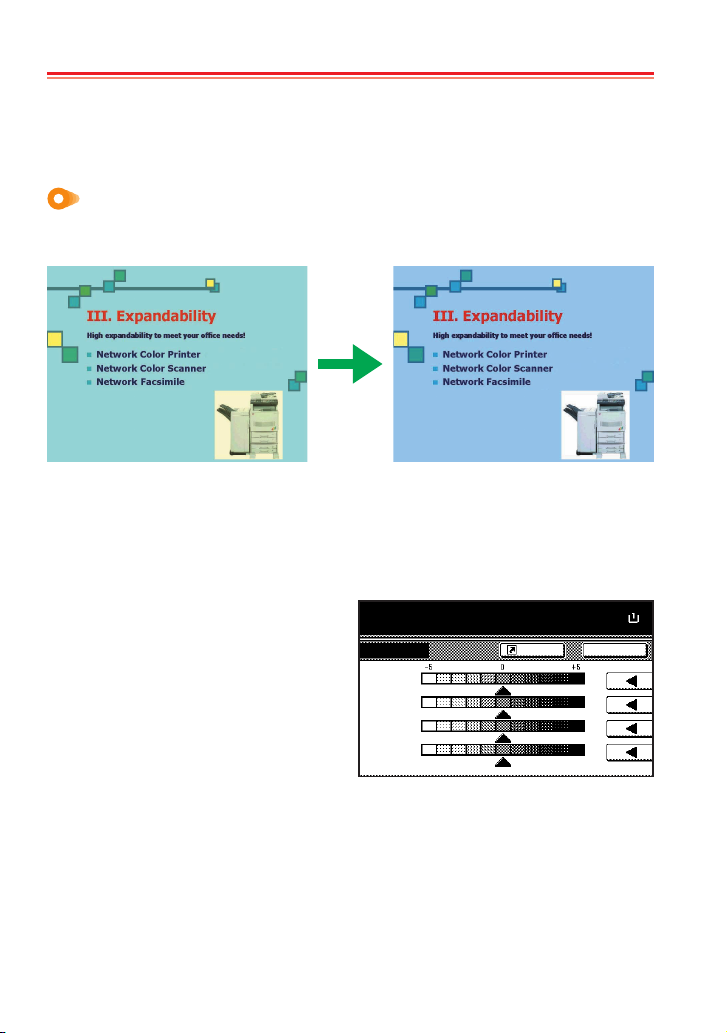
Adjusting Color Balance
This setting allows you to adjust the overall color if the whole copy seems too red or yellow.
It allows you to increase/decrease the levels of yellow, magenta, cyan and black.
Ex: In the following situation…
The entire copy seems too yellow
The color balance adjustment allows you
to adjust the copy’s overall color.
NOTE: This feature can not be used together with Auto Exposure mode (see
1 Press [Color func.] and then [Color balance] ([Colour balance]).
2 Press [On].
3 Use [O] or [P] to adjust the colors
indicated to the right (
Yellow, Black
Cyan, Magenta
).
4 Press [Close].
,
copy. (Full-Color)
Cyan
Magenta
Yellow
Black
8
Operation Guide
Paper Size
Shortcut
Back
).
100%
11
Page 5
Quick Guide to Adjusting Image Quality (Copying)
Other Functions
Adjusting Sharpness
Adjusts the strength/weakness of the image’s contours. This function allows you to clearly copy
text and lines by adjusting sharpness to [Sharpen] when the original you are copying was written
in pencil, or the text and lines are broken or unclear. You can also weaken the moiré effect by
softening the contours and adjusting sharpness to [Unsharpen]. Use this setting when copying
images with halftone dots such as photos in magazines.
One-Touch Image Quality Adjustment
Adjusts the settings to a desired image quality that matches ‘Vivid’ and ‘Dull’ images.
Hue Adjustment
Adjusts the color tone (hue). This function allows you to copy an image and change its colors by
creating a red with strong yellow tones or creating a yellow that is closer to yellow-green.
Refer to the
Advanced Operation Guide
for further details.
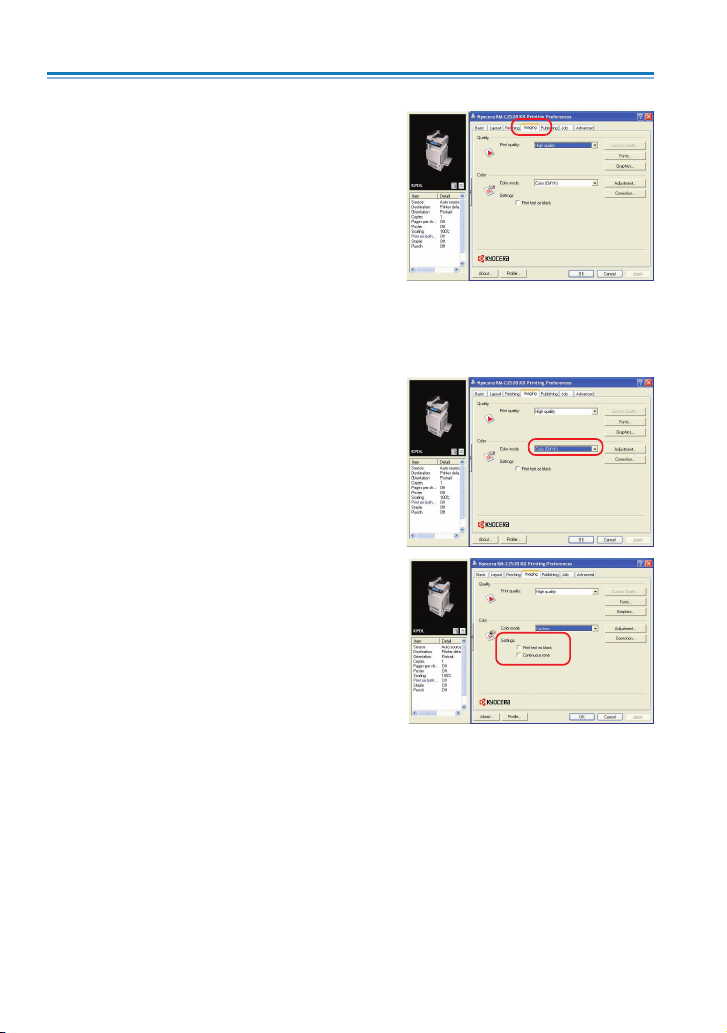
Printer Driver
You can set various color printer settings on the printer driver’s Imaging tab. The Imaging tab is
displayed as indicated below.
NOTE: These settings can also be changed from an application’s Print menu.
The following procedure uses Windows XP as an example, but other operating systems use the
same procedure.
English
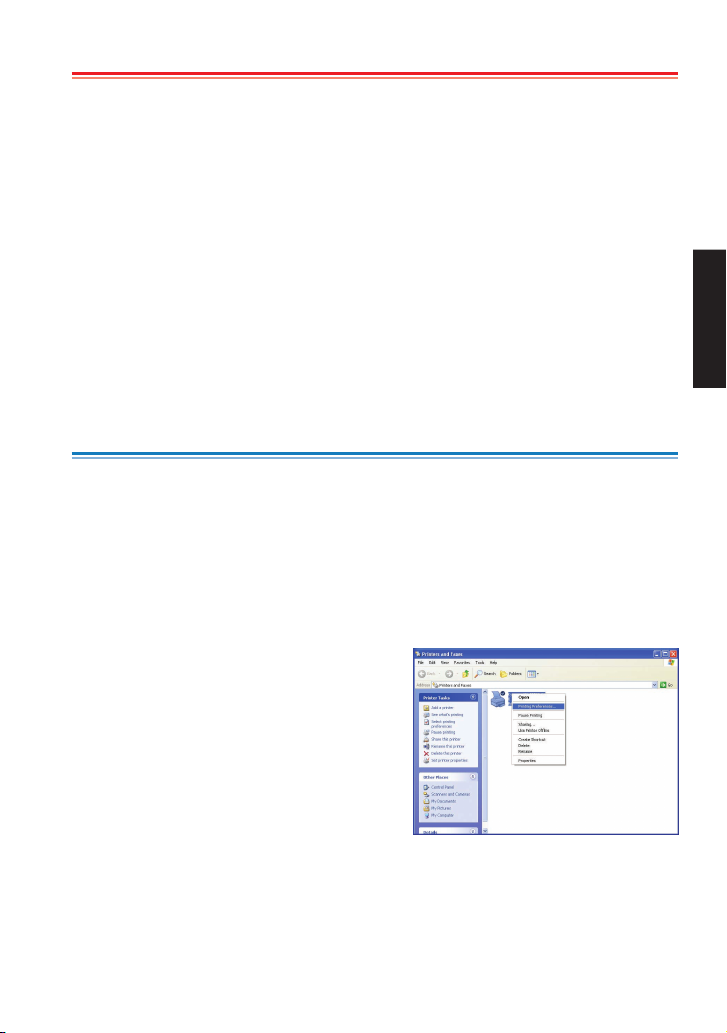
1 Click the Window’s start button. Click Printers
and Faxes to display the Printers and Faxes
screen.
2 Right-click on the icon of an available printer
shown on the Printers and Faxes screen and a
shortcut menu displays.
3 Click Printing Preferences to display the
Printing Preferences screen.
9
Page 6
Quick Guide to Adjusting Image Quality (Printer Driver)
4 Click the Imaging tab.
Color Mode
You can switch between color and monochrome printing. You can also use Custom to select
Continuous tone.
1 Select the following items from the Color mode
dropdown list.
Color (CMYK) ... Uses a four-color toner to print
text and graphics in color.
Monochrome ... Uses a black toner only to print in
black and white.
Custom ... Allows you to specify options from
Settings.
2 If you select Custom, select the following items
from Settings.
Print text as black ... If you are printing color or
gray text, the text that would normally be printed in
color or in gray is printed in black without the use of
gray scale. White text or color images and graphics
are not affected.
Continuous tone ... Pixels are rendered and
printed over a wide-ranging grayscale. This setting is
appropriate for printing photo images.
3 Once you have finished, click the OK button to save your settings.
10
Page 7
Quick Guide to Adjusting Image Quality (Printer Driver)
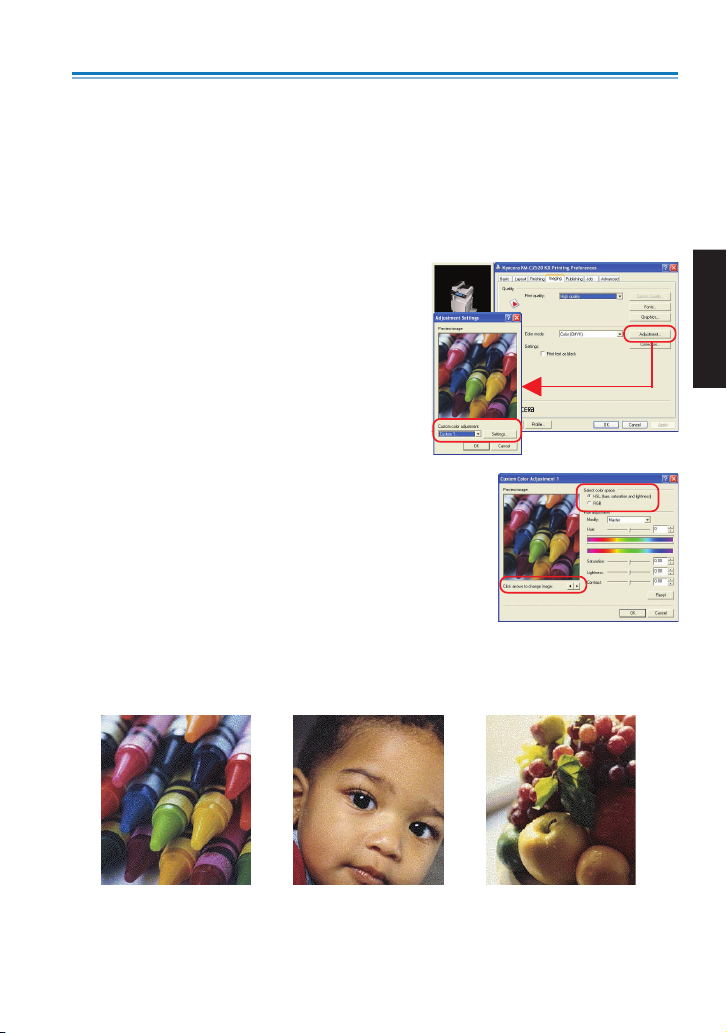
Balance Adjustment
This function allows you to adjust the color tone if you have selected Color (CMYK) in Color
mode. You can save color adjustment settings under Custom 1, 2 and 3.
Note: If you select Monochrome in Color mode, you can adjust the grayscale Brightness and
Contrast. Refer to the
monochrome print settings.
1 Select Color (CMYK) in Color mode and click the
Adjustment button. The Adjustment Settings
dialog box displays.
2 Select Custom 1, Custom 2, or Custom 3 from
the Custom color adjustment dropdown list and
click the Settings button. The Custom Color
Adjustment dialog box displays.
3 Select one of the following items from Select
color space.
HSL (hue, saturation and lightness) ... This setting allows
you to adjust the Hue adjustment (color), Saturation
(brightness), Lightness (luminosity), and Contrast
(sharpness).
RGB ... Adjusts the Red, Green and Blue balance.
Kyocera Extended Driver User Guide
for information on adjusting the
English
Click the left/right arrow buttons on Click arrows to change image and choose from one of
the three image photos. The characteristics of the colors emphasized differs in each of the
image photos, making it easy to see the degree of color adjustment.
Crayons
Saturation or RGB
adjustment
Child
Skin color and half-tone
adjustment
Fruit
Hue adjustment
11
Page 8

Quick Guide to Adjusting Image Quality (Printer Driver)
If HSL (hue, saturation and lightness) is selected.
Hue adjustment ... Use the slider to adjust the hue
balance. To adjust a specific hue, select Red, Yellow,
Green, Cyan, Blue or Magenta from the dropdown list.
You can adjust all hues as one by selecting Master. You
can also make adjustments by entering a value from
-180 to +180.
Saturation, Lightness, Contrast ... Use the slider to
adjust the color’s saturation, lightness and contrast. You
can also make adjustments by entering a value from
-10.00 to +10.00.
If RGB is selected
RGB level ... Move the various RGB sliders to adjust the
balance of the Red, Green and Blue that correspond to
monitor colors. You can also make adjustments by
entering a value from -10.00 to +10.00.
4 Once you have finished, click the OK button to save your settings.
Other Functions
Color Correction
‘Color Correction’ is a function that corrects the color space difference that exists between each
color printing system is order to maintain consistency during color reproduction among devices.
This function allows you to set the method used to make color adjustments during printing.
Color Reproduction
If you set Color Correction to Automatic, you can configure Color Reproduction settings. The
objects in the document that are to be printed are divided into images, texts and graphs to match
the Color Reproduction mode. This setting allows you to reproduce colors that are clearer and
closer to the colors displayed on the monitor.
Refer to the
Kyocera Extended Driver User Guide
for further details.
12
Page 9

Manuel d’utilisation rapide pour le réglage de la qualité de l’image (copie)
Qualité image orig.
Texte +
Photo
Imprimé
original
Photo
originale
Enregist
Texte+P
Photo:Aj
Imprime
Texte:Co
Carte:Co
Texte
Carte
Prêt à copier. (Couleur)
Copie
Sélection de la qualité de l’image
Sélectionner le mode qualité d’image optimale pour assurer qu’il y a correspondance avec le type
de document que vous copiez.
Texte + Photo
Choisissez ce réglage lors de la copie d’un original qui combine du texte,
des illustrations et des photos. Chaque zone individuelle est traitée de
manière optimale. La copie du texte est nette, le rendu des illustrations et
des photos est de bonne qualité.
Par exemple : documents de présentation, documents commerciaux,
catalogues, etc.
Photo originale
Choisissez ce réglage lors de la copie d’une photo prise avec un appareil
photo, etc. La copie de la photo originale est nette.
Imprimé original
Choisir ce réglage quand vous copiez des photos imprimées en point de
simili dans un catalogue ou un magazine. Ce réglage réduit le moirage
Texte
Choisissez ce réglage lors de la copie d’un original contenant
principalement du texte. La copie du texte est nette.
Par exemple : documents commerciaux et documents contenant de
nombreux textes
Carte
Choisissez ce réglage lors de la copie de cartes. La copie des caractères
fins et des lignes imprimées sur une couleur d’arrière-plan est nette.
†
.
Français
1 Appuyez sur [Fonction], puis sur [Qualité
d’image] ([Qualité image]).
2 Choisissez le réglage de la qualité de
l’image correspondant à votre original.
3 Appuyez sur [Fermer].
†Échantillons créés par une apparition anormale de points de trame.
13
Page 10

Manuel d’utilisation rapide pour le réglage de la qualité de l’image (copie)
x
%
Réglage de la balance des couleurs
Permet de régler la couleur générale si la totalité de la copie apparaît trop rouge ou trop jaune.
Cette fonction permet également d’augmenter/de diminuer les niveaux de jaune, magenta, cyan et
noir.
Par exemple: dans le cas suivant…
La totalité de la copie apparaît trop jaune
Le réglage de la balance des couleurs
permet de régler la couleur générale de
la copie.
REMARQUE : Cette fonction ne peut être utilisée avec le mode Auto Exposition (voir
d’utilisation de base
).
1 Appuyez sur [Fonc. Coul.], puis sur [Équilibre couleurs] ([Balance couleur.]).
2 Appuyez sur [Oui] ([Marche]).
3 Utilisez [O] ou [P] à droite pour régler les
couleurs indiquées (
Noir
).
Cyan, Magenta, Jaune
4 Appuyez sur [Fermer].
pier. (Couleur)
,
Cyan
Magenta
Jaune
Noir
14
Manuel
Format pap
100
ReveEnregist
11
Page 11

Manuel d’utilisation rapide pour le réglage de la qualité de l’image (copie)
Autres fonctions
Réglage de la netteté
Permet de régler l’épaisseur ou la finesse des contours de l’image. Cette fonction permet
d’effectuer une copie nette du texte et des lignes en réglant la netteté sur [Contours O] si l’original
copié est écrit au crayon ou si le texte et les lignes sont fracturées ou floues. Vous pouvez
également atténuer l’effet de moiré en adoucissant les contours et en réglant la netteté sur
[Contours N]. Utilisez ce réglage lors de la copie d’images composées de points de trame, telles
que des photos de magazines.
Réglage de la qualité de l’image en une pression de touche
Permet d’effectuer les réglages sur une qualité d’image souhaitée correspondant à des images
‘Vif’ et ‘Terne’.
Réglage de la teinte
Permet de régler la teinte d’une image. Cette fonction permet de copier une image et de changer
ses couleurs en créant du rouge avec des teintes jaune foncé ou en créant du jaune proche du
jaune-verdâtre.
Pour plus de détails, consultez le
Manuel d’utilisation avancée
.
Pilote d’imprimante
Vous pouvez effectuer divers réglages pour l’imprimante couleurs dans l’onglet Imagerie du pilote
d’imprimante. L’onglet Imagerie s’affiche comme suit.
REMARQUE : Ces réglages peuvent également être modifiés à partir du menu Imprimer d’une
application.
La procédure suivante utilise Windows XP à titre d’exemple, mais d’autres systèmes d’exploitation
utilisent la même procédure.
1 Cliquez sur le bouton démarrer de Windows.
Cliquez sur Imprimantes et télécopieurs pour
afficher l’écran correspondant.
2 Cliquez avec le bouton droit sur l’icône d’une
imprimante disponible affichée sur l’écran
Imprimantes et télécopieurs et un menu déroulant
apparaît.
3 Cliquez sur Options d’impression pour afficher
l’écran correspondant.
Français
15
Page 12

Manuel d’utilisation rapide pour le réglage de la qualité de l’image (pilote d’imprimante)
4 Cliquez sur l’onglet Imagerie.
Mode couleur
Vous pouvez passer de l’impression couleur à l’impression monochrome et vice-versa. Vous
pouvez également utiliser Personnalisé pour sélectionner Ton continu.
1 Sélectionnez les éléments suivants dans la liste
déroulante du Mode couleur.
Couleur (CMYK) ... Utilise un toner quatre couleurs
pour imprimer du texte et des graphiques en
couleurs.
Monochrom ... Utilise un toner noir uniquement
pour imprimer en noir et blanc.
Personnalisé ... Permet de spécifier des options
dans Paramètres.
2 Si vous choisissez Personnalisé, sélectionnez les
éléments suivants dans Paramètres.
Imprimer le texte en noir ... Si vous imprimez un
texte en gris ou en couleurs, celui-ci, qui
normalement devrait être imprimé en gris ou en
couleurs, est imprimé en noir sans avoir recours aux
nuances de gris. Les images couleurs ou du texte
blanc et les graphiques ne sont pas concernés.
Ton continu ... Les pixels sont imprimés dans une
large plage de nuances de gris. Ce réglage convient à l’impression de photos.
3 Une fois la procédure terminée, cliquez sur OK pour enregistrer vos réglages.
16
Page 13

Manuel d’utilisation rapide pour le réglage de la qualité de l’image (pilote d’imprimante)
Réglage de la balance
Cette fonction permet de régler la teinte d’une image si vous avez sélectionné Couleur (CMYK)
dans Mode couleur. Vous pouvez enregistrer les paramètres de réglage des couleurs sous
Personnalisé 1, 2 et 3.
Remarque : si vous sélectionnez Monochrom dans Mode couleur, vous pouvez régler les
nuances de gris dans Luminosité et Contraste. Pour des informations sur le réglage des
paramètres d’impression monochrome, consultez le
1 Sélectionnez Couleur (CMYK) dans Mode couleur
et cliquez sur le bouton Réglage. La boîte de
dialogue Paramètres de réglage s’affiche.
2 Sélectionnez Personnalisé 1, Personnalisé 2 ou
Personnalisé 3 dans la liste déroulante Réglage
des couleurs personnalisé et cliquez sur le bouton
Paramètres. La boîte de dialogue Réglage des
couleurs personnalisé s’affiche.
Kyocera Extended Driver User Guide
.
3 Sélectionnez l’un des éléments suivants dans Espace
chromatique.
HSL (Hue, Saturation, and Lightness) ... Permet d’effectuer
le Réglage teinte (couleur), de la Pureté (luminosité), de la
Clarté (éclat) et du Contraste (netteté).
RVB ... Permet de régler la balance du Rouge, du Vert et du
Bleu.
Cliquez sur les boutons fléchés gauche/droite en regard de Cliquez sur les flèches pour
modifier l’image et choisissez l’une des trois photos. Les caractéristiques des couleurs
mises en évidence diffèrent d’une photo à l’autre, ce qui vous permet de mieux voir le degré
de réglage des couleurs.
Crayons
Réglage de la pureté ou
RVB
Enfant
Réglage demi-teinte et ton
de chair
17
Fruits
Réglage de la teinte
Français
Page 14

Manuel d’utilisation rapide pour le réglage de la qualité de l’image (pilote d’imprimante)
Si HSL (Hue, Saturation, and Lightness) est sélectionné.
Réglage teinte ... Utilisez le curseur pour régler la
balance des teintes. Pour régler une teinte spécifique,
sélectionnez le Rouge, le Jaune, le Vert, le Cyan, le
Bleu ou le Magenta dans la liste déroulante. Vous
pouvez régler toutes les teintes à la fois en sélectionnant
Maître. Vous pouvez également effectuer des réglages
en entrant une valeur comprise entre -180 et +180.
Pureté, Clarté, Contraste ... Utilisez le curseur pour
régler la pureté, la clarté et le contraste de la couleur.
Vous pouvez également effectuer des réglages en entrant une valeur comprise entre -10.00
et +10.00.
Si RVB est sélectionné.
Niveau RVB ... Déplacez les différents curseurs RVB
pour régler la balance du Rouge, du Vert et du Bleu qui
correspond aux couleurs de l’écran. Vous pouvez
également effectuer des réglages en entrant une valeur
comprise entre -10.00 et +10.00.
4 Une fois la procédure terminée, cliquez sur OK pour enregistrer vos réglages.
Autres fonctions
Correction des couleurs
Cette fonction corrige la différence d’espace chromatique qui existe entre chaque système
d’impression couleur afin de conserver une certaine régularité lors de reproduction des couleurs
sur les différents périphériques. Cette fonction permet de définir la méthode utilisée pour effectuer
les réglages des couleurs pendant l’impression.
Reproduction des couleurs
Si vous réglez Correction des couleurs sur Automatique, vous pouvez configurer les
paramètres de Reproduction des couleurs. Les objets du document devant être imprimés sont
divisés en images, en textes et en graphiques pour correspondre au mode de Color reproduction.
Ce réglage permet de reproduire des couleurs qui sont plus nettes et plus proches des couleurs
affichées sur l’écran.
Pour plus de détails, consultez le
Kyocera Extended Driver User Guide
.
18
Page 15

Guía rápida para ajustar la calidad de la imagen (copia)
Calidad Imagen Orig.
Texto+Foto
Imprim.
origínal
Foto
origínal
Regist.
Texto+Fo
Foto :Ag
Imprimir
Texto:Co
Mapa :C
Texto
Mapa
Lista para copiar. (Color comp)
Copia
Selección de la calidad de la imagen
Seleccione el modo óptimo de calidad de imagen para el tipo de documento que está copiando.
Texto + Foto
Escoja esta opción cuando copie un original en el que hay texto,
ilustraciones y fotografías. Cada área individual se procesa de forma
óptima. El texto se copia con toda claridad, mientras que las ilustraciones
y fotografías se reproducen con la mayor fidelidad.
Ej.: materiales para presentaciones, documentos empresariales,
catálogos, etc.
Foto origínal
Escoja esta configuración cuando desee copiar una fotografía tomada
con una cámara, etc. La foto original se copia con la mayor claridad.
Imprim. origínal
Seleccione esta opción para copiar fotos impresas en un catálogo o
revista en puntos de medios tonos. Con esta opción se reduce el efecto
†
.
muaré
Texto
Elija esta configuración cuando copie un original que contiene
principalmente texto. El texto se copia con la mayor claridad.
Ej.: documentos empresariales y materiales que contengan mucho texto
Mapa
Escoja esta configuración cuando desee copiar mapas. El texto y las
líneas finas impresos en un color de fondo se copian con la mayor
claridad.
Español
1 Pulse [Función], y a continuación [Calidad
Imagen] ([Calidad de original]).
2 Escoja la configuración de calidad de la
imagen que se corresponda con su original.
3 Pulse [Cerrar].
† Motivos que se crean por la distribución irregular de los puntos de la trama.
19
Page 16

Guía rápida para ajustar la calidad de la imagen (copia)
e
x
%
Ajuste del balance de color
Esta configuración le permite ajustar el color general si la copia en su conjunto ha quedado
demasiado roja o amarilla.
Le permite aumentar/disminuir los niveles de amarillo, magenta, cian y negro.
Ej.: en la situación siguiente…
El conjunto de la copia tiene un aspecto
demasiado amarillo
El ajuste del balance del color le permite
ajustar el color general de la copia.
NOTA: Esta función no puede utilizarse con el modo de Automático Exposición (consulte la
de uso básico
).
1 Pulse [Func. Color] y a continuación [Color Balance].
2 Pulse [On].
3 Use [O] o [P] para ajustar los colores que
se indican a la derecha (
Amarillo, Negro
Cyan, Magenta
).
4 Pulse [Cerrar].
ra copiar. (Color comp)
,
Cyan
Magenta
Amarillo
Negro
Guía
Tam a ño pap
100
Vol verRegist.
11
20
Page 17

Guía rápida para ajustar la calidad de la imagen (copia)
Otras funciones
Ajuste de la nitidez
Ajusta la potencia/debilidad de los contornos de la imagen. Esta función le permite copiar con
toda claridad texto y líneas ajustando la nitidez a [Nítido] cuando el original que desee copiar esté
escrito con lápiz, o cuando el texto y las líneas estén fragmentados o no sean claros. Se puede
asimismo reducir el efecto muaré suavizando los contornos y ajustando la nitidez a [Opaco].
Utilice esta configuración al copiar imágenes con puntos de trama, como fotografías de revistas.
Ajuste de la calidad de la imagen en un solo paso
Ajusta las configuraciones de acuerdo con la calidad de ‘Intenso’ o ‘Apagado’ que se desee dar a
la imagen.
Ajuste del matiz
Ajusta el tono del color (matiz). Esta función le permite copiar una imagen y cambiar sus colores
mediante la creación de un rojo con fuertes tonos amarillos o bien creando un amarillo cercano al
amarillo verdoso.
Consulte la
Guía de uso avanzado
para ampliar la información.
Controlador de la impresora
Puede establecer diversas configuraciones de color en la pestaña Imágenes del controlador de la
impresora. Esta pestaña aparece como se indica a continuación.
NOTA: Estas configuraciones pueden cambiarse también a través del menú de Impresión de la
aplicación.
El procedimiento siguiente utiliza Windows XP como ejemplo, pero este mismo procedimiento lo
usan otros sistemas operativos.
1 Haga clic en el botón Inicio de Windows. Haga clic en
Impresoras y faxes para que aparezca la pantalla
correspondiente.
2 Haga clic con el botón derecho del ratón en el icono
de la impresora que aparezca en la pantalla
Impresoras y faxes, y aparecerá un menú
contextual.
3 Haga clic en Preferencias de impresión para que
aparezca la pantalla correspondiente.
Español
21
Page 18

Guía rápida para ajustar la calidad de imagen (controlador de impresora)
4 Haga clic en la pestaña Imágenes.
Modo de colores
Puede cambiar entre impresión en color y monocromática. También puede usar Personalizado
para seleccionar Tono continuo.
1 Seleccione los elementos siguientes de la lista
desplegable Modo de colores.
Color (CMYK) ... Utiliza un tóner de cuatro colores
para imprimir texto y gráficos en color.
Monocromático ... Utiliza un tóner para imprimir
sólo en blanco y negro.
Personalizado ... Le permite especificar opciones
en Configuración.
2 Si escoge Personalizado, seleccione los elementos
siguientes en Configuración.
Imprimir texto como negro ... Si desea imprimir
textos en color o en grises, el texto que
normalmente se imprimirá en color o en gris se
imprime en negro, sin utilizar la escala de grises.
Esto no afecta al texto en blanco ni a las imágenes
y gráficos en color.
Tono continuo ... Los píxeles se reproducen y se
imprimen sobre una escala de grises de amplio rango. Esta configuración es apropiada para
imprimir imágenes fotografiadas.
3 Cuando haya terminado, haga clic en el botón Aceptar para guardar su configuración.
22
Page 19

Guía rápida para ajustar la calidad de imagen (controlador de impresora)
Ajuste Balance
Esta función le permite ajustar el tono del color si ha seleccionado Color (CMYK) en Modo de
colores. Puede guardar las configuraciones relativas al ajuste del color en Personalizado 1, 2 y 3.
Nota: Si selecciona Monocromático en Modo de colores, puede ajustar el Brillo y el Contraste
de la escala de grises. Consulte la
utilización del controlador Kyocera) para ampliar la información acerca de las configuraciones de
impresión monocromática.
1 Seleccione Color (CMYK) en Modo de colores y
haga clic en el botón Ajuste. Aparece el cuadro de
diálogo Configuración de ajustes.
2 Seleccione Personalizado 1, Personalizado 2 o
Personalizado 3 en la lista desplegable Ajuste de
color personalizado, y haga clic en el botón
Configuración. Aparece el cuadro de diálogo
Ajuste de color personalizado.
3 Selecciones uno de los elementos siguientes de Espacio de.
Matiz, saturación y luminosidad ... Esta configuración le
permite ajustar Ajuste del matiz (color), la Saturación (brillo),
la Luminosidad (intensidad de la luz) y el Contraste (nitidez).
RGB ... Ajusta el balance entre Rojo, Verde y Azul.
Kyocera Extended Driver User Guide
(Guía completa de
Haga clic en los botones de flecha hacia izquierda/derecha en Haga clic en las flechas para
cambiar la imagen y escoja una de las tres fotografías. En cada una de las fotografías, las
características de los colores a los que se ha dado énfasis son diferentes, lo que facilita ver el
nivel de ajuste del color.
Rotuladores
Ajuste de Saturación o RGB
Niño
Ajuste de color de piel y
punto de trama
Fruta
Ajuste del matiz
23
Español
Page 20

Guía rápida para ajustar la calidad de imagen (controlador de impresora)
Si está seleccionado Matiz, saturación y luminosidad.
Ajuste del matiz ... Use el deslizador para ajustar el
balance de matiz. Para ajustar un matiz específico,
seleccione en la lista desplegable Rojo, Amarillo,
Verde, Cyan, Azul o Magenta. Puede ajustar todos los
matices como uno solo seleccionando Master. Puede
también realizar ajustes introduciendo un valor entre 180 y +180.
Saturación, Luminosidad, Contraste ... Use el
deslizador para ajustar la saturación, la luminosidad y el
contraste del color. Puede también realizar ajustes introduciendo un valor entre -10.00 y
+10.00.
Si está seleccionado RGB
Nivel RGB ... Desplace los diversos deslizadores RGB
para ajustar el balance de Rojo, Verde y Azul que se
corresponda con los colores del monitor. Puede también
realizar ajustes introduciendo un valor entre -10.00 y
+10.00.
4 Cuando haya terminado, haga clic en el botón Aceptar para guardar su configuración.
Otras funciones
Corrección de colores
‘Corrección de colores’ es una función que corrige la diferencia de espacio de color que existe
entre los distintos sistemas de impresión del color, para mantener la uniformidad durante la
reproducción del color entre unos dispositivos y otros. Esta función le permite establecer el
método utilizado para realizar los ajustes de color durante la impresión.
Reproducción de color
Si establece la Corrección de colores en Automático, puede configurar los ajustes de
Reproducción de color. Los objetos del documento que se desea imprimir se dividen en
imágenes, textos y gráficos para que se adapten al modo de Reproducción de color. Esta
configuración le permite reproducir colores que son más claros y que se parecen más a los
colores mostrados en el monitor.
Si desea más información, consulte la
utilización del controlador Kyocera).
Kyocera Extended Driver User Guide
24
(Guía completa de
Page 21

302FZ56460 Rev.1.0
2006.1
 Loading...