

Page 1

Page 2

FCC Notice:
This device complies with part 15 of the FCC rules.
Operation is subject to the following two conditions:
(1) This device may not cause harmful interference,
and (2) this device must accept any interference
received, including interference that may cause
undesired operation.
Caution:
The user is cautioned that changes or modifications
not expressly approved by the party responsible for
compliance could void the warranty and users’
authority to operate the equipment.
Note:
This equipment has been tested and found to comply
with the limits for a Class B digital device, pursuant to
part 15 of the FCC Rules. These limits are designed to
provide reasonable protection against harmful
interference in a residential installation. This
equipment generates, uses and can radiate radio
frequency energy and, if not installed and used in
accordance with the instructions, may cause harmful
interference to radio communications. However, there
is no guarantee that interference will not occur in a
particular installation. If this equipment does cause
harmful interference to radio or television reception,
which can be determined by turning the equipment
off and on, the user is encouraged to try to correct
the interference by one or more of the
following measures:
• Reorient or relocate the receiving antenna.
• Increase the separation between the equipment
and receiver.
• Connect the equipment into an outlet on a circuit
different from that to which the receiver is
connected.
• Consult the dealer or an experienced radio/TV
technician for help.
FCC Radiation Exposure Statement:
To comply with the FCC RF exposure
compliance requirements, this device must not be
co-located or operating in conjunction with any other
antenna or transmitter.
Industry Canada Notice
Operation is subject to the following two conditions:
(1) this device may not cause interference, and
(2) this device must accept any interference, including
interference that may cause undesired operation of
the device. The term “IC:” before the radio certification
number only signifies that Industry Canada technical
specifications were met. This product meets the
applicable Industry Canada technical specifications of
the RSS210.
COPYRIGHT TRADEMARK RECOGNITION
Bluetooth is a trademark of the Bluetooth SIG, Inc.
(Special Interest Group). The Bluetooth trademark is
owned by Bluetooth SIG, Inc. USA. Skype is a
trademark of Skype Limited. Toshiba is a registered
trademark of Toshiba Corporation. Windows Media
Player is either a registered trademark or trademark of
Microsoft Corporation in the United States and/or
other countries. Other product names used in this
manual are the properties of their respective owners
and are acknowledged.
Kyocera is a registered trademark of Kyocera
Corporation. The Bluetooth word mark and logos are
owned by the Bluetooth SIG, Inc. and any use of such
marks by Kyocera Wireless Corp. is under license. All
other marks are held by their respective owners.
Copyright © 2007 Kyocera Wireless Corp.
All rights reserved.
Page 3

FEDERAL COMMUNICATIONS COMMISSION (FCC)
This equipment has been tested and found to comply
with the limits for a Class B digital device, pursuant to
Part 15 of the FCC Rules. These limits are designed
to provide reasonable protection against harmful
interference in a residential installation. This
equipment generates, uses, and can radiate radio
frequency energy and, if not installed and used in
accordance with the instructions, may cause harmful
interference to radio communications. However, there
is no guarantee that interference will not occur in a
particular installation. If this equipment does cause
harmful interference to radio or television reception,
which can be determined by turning the equipment
off and on, the user is encouraged to try to correct
the interference by one or more of the
following measures:
• Reorient or relocate the receiving antenna.
• Increase the separation between the equipment
and the receiver.
• Connect the equipment onto an outlet on a circuit
different from that to which the receiver is
connected.
• Consult the dealer or an experienced radio/TV
technician for help.
Shielded interconnect cables and a shielded AC
power cable must be employed with this equipment to
ensure compliance with the pertinent RF emission
limits governing this device.
ABOUT THIS MANUAL
This manual is provided for home users to set up and
operate the GSH300 Bluetooth Stereo Headset.
Please read this manual before using the headset and
retain it for future reference.
SAFETY INFORMATION
Electronic Devices
To avoid electromagnetic interference (EMI), turn off
the headset in any place where posted notices instruct
you to do so.
Note: Most modern electrical devices are susceptible
to electromagnetic.
Interference if inadequately shielded, designed, or
otherwise configured for electromagnetic compatibility.
Aircraft
Turn off the headset when on board aircraft. The use
of Bluetooth-enabled devices could interfere with the
telecommunication system of aircraft.
Medical Instruments
If you use a medical device, such as a pacemaker,
consult the manufacturer of your medical device to
determine if it is adequately shielded from
electromagnetic interference. Your physician might
assist you in obtaining this information.
Power Adapter
Only use the supplied power adapter with
the headset.
Repair or Service
There are no user-serviceable parts in the headset.
Any attempt to modify, or remove the rechargeable
battery will void the warranty. Refer all servicing to
qualified personnel.
Page 4

iv 82-G1652-1EN, Rev. 002
CONTENTS
Getting started . . . . . . . . . . . . . . . . . . . . . . . . . . . . . . . . . . . . . . . . . . . . . . . . . . . . . . . . . . 1
Charging the battery . . . . . . . . . . . . . . . . . . . . . . . . . . . . . . . . . . . . . . . . . . . . . . . . . . . . . 2
Powering the headset on and off . . . . . . . . . . . . . . . . . . . . . . . . . . . . . . . . . . . . . . . . . . . . 3
Headset operation with a phone. . . . . . . . . . . . . . . . . . . . . . . . . . . . . . . . . . . . . . . . . . . . . 4
Music playback. . . . . . . . . . . . . . . . . . . . . . . . . . . . . . . . . . . . . . . . . . . . . . . . . . . . . . . . . .7
Listening to music on your computer . . . . . . . . . . . . . . . . . . . . . . . . . . . . . . . . . . . . . . . . . 9
Making Internet phone calls . . . . . . . . . . . . . . . . . . . . . . . . . . . . . . . . . . . . . . . . . . . . . . . . 9
Troubleshooting . . . . . . . . . . . . . . . . . . . . . . . . . . . . . . . . . . . . . . . . . . . . . . . . . . . . . . . . 12
Frequently asked questions. . . . . . . . . . . . . . . . . . . . . . . . . . . . . . . . . . . . . . . . . . . . . . . . 13
Page 5
Wireless Stereo Headset 1
Bluetooth technology
Bluetooth enabled wireless technology is a shortdistance wireless communication technology. The
range of operation between wireless devices is
about 10 meters (33 ft.). These wireless devices do
not require line of sight and can transmit through
walls and other nonmetal obstacles. Thick or
reinforced concrete can limit the range.
Getting started
Congratulations on the purchase of your new
wireless stereo headset. The headset is comfortable
to wear and easy to use.
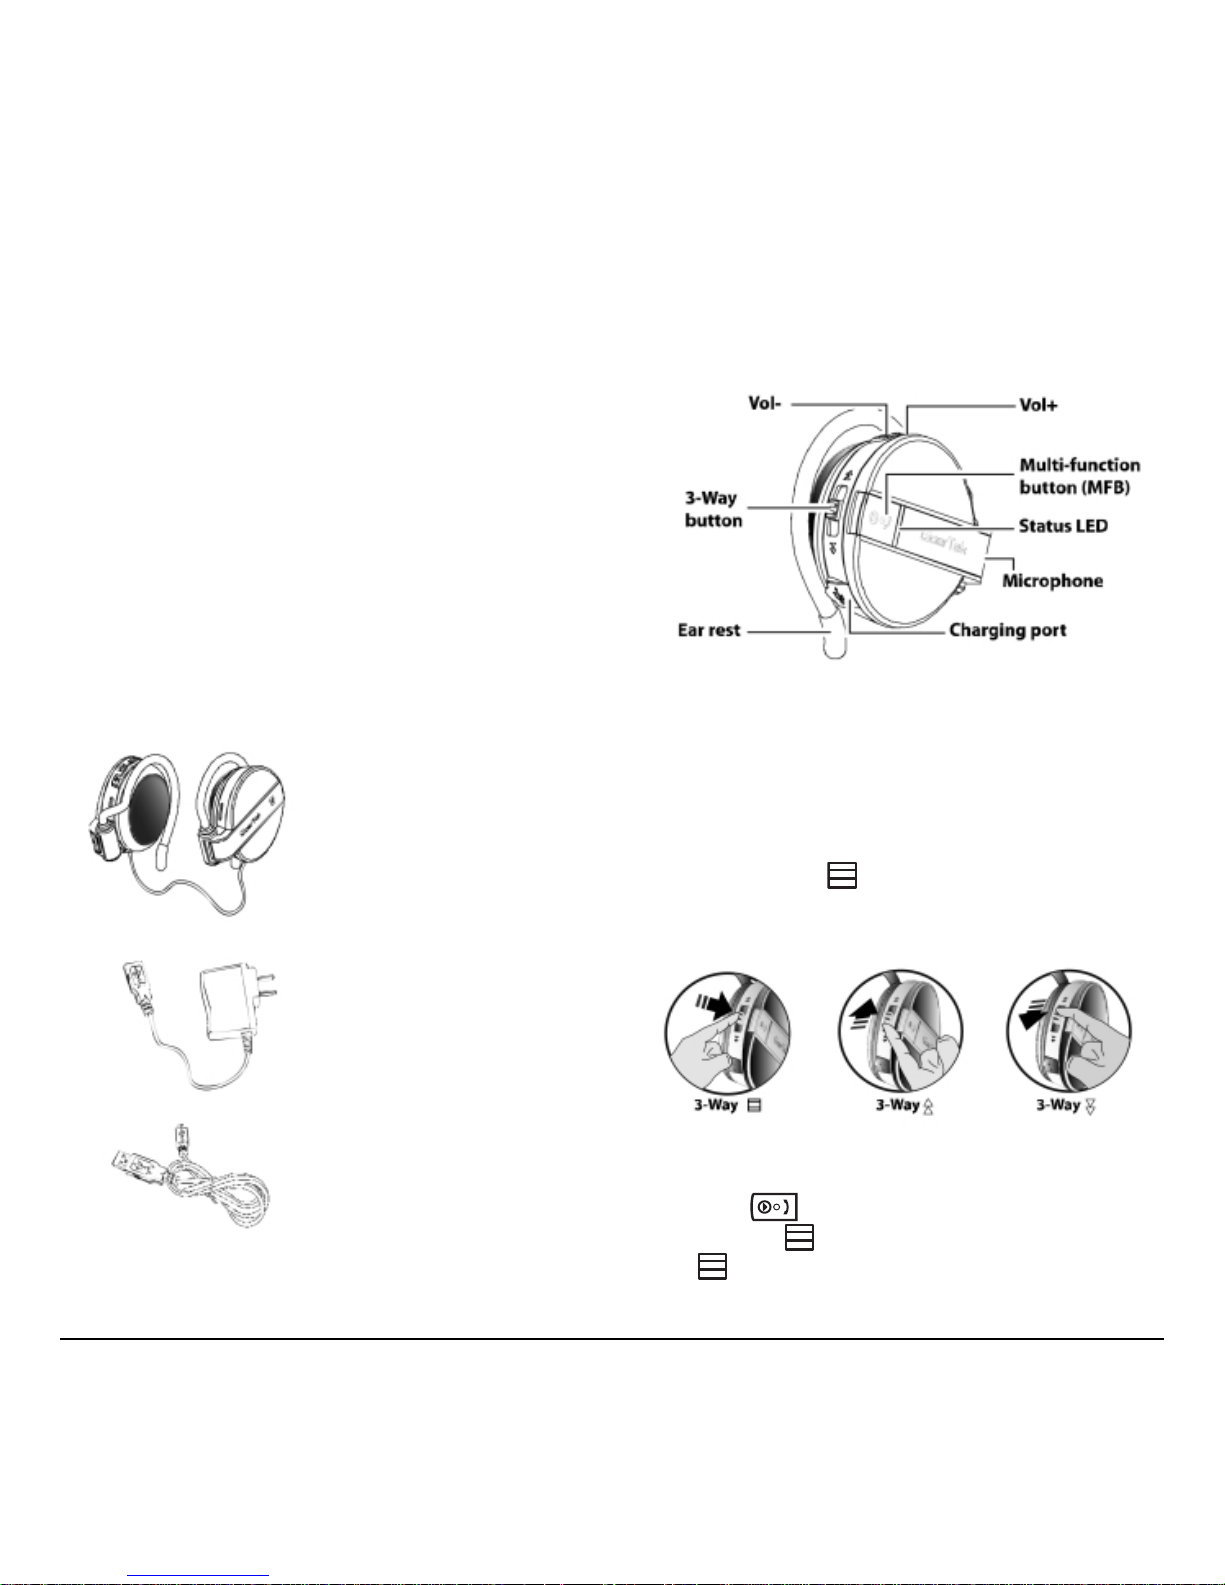
Checking the package contents
The following items are included in your package.
Identifying parts
Refer to the following illustration to identify the
parts on the headset’s right speaker. (There are no
controls on the left speaker.)
Multi-function and 3-way buttons
The multi-function button’s function varies
depending on how long the button is pressed.
• A short-press is less than one second
• A long-press is two to five seconds
The 3-way button can be pressed in the
following three ways (UP, DOWN, or IN),
shown below:
Here is an example of how button presses are
described in this manual: To turn on the headset,
long-press . To mute the microphone
volume, press
IN. To play the next song,
press DOWN.
Wireless stereo headset
USB cable AC adapter
USB cable
Page 6
2 82-G1652-1EN, Rev. 002
Important:
The 3-way button ( ) only works with
Bluetooth enabled wireless devices that support the
A2DP profile.
Status LED
Charging the battery
The wireless stereo headset has a built-in battery
which must be charged fully before you use the
headset. Charging takes about three and a half
hours. You can charge the headset using the AC
adapter or the USB connector on a computer.
When fully charged, the headset can be on standby
for up to 200 hours. You can call or listen to music
continuously for up to 14 hours.
Caution: Be sure the USB connectors are aligned
correctly and do not force the connection. Use the
USB icon on the connectors and in the illustrations
below as a guide.
When to recharge the battery
Your battery needs to be recharged when the LED
lights red when the headset is powered on.
Important: The rechargeable battery in the headset
must be disposed or recycled according to local
ordinances/regulations.
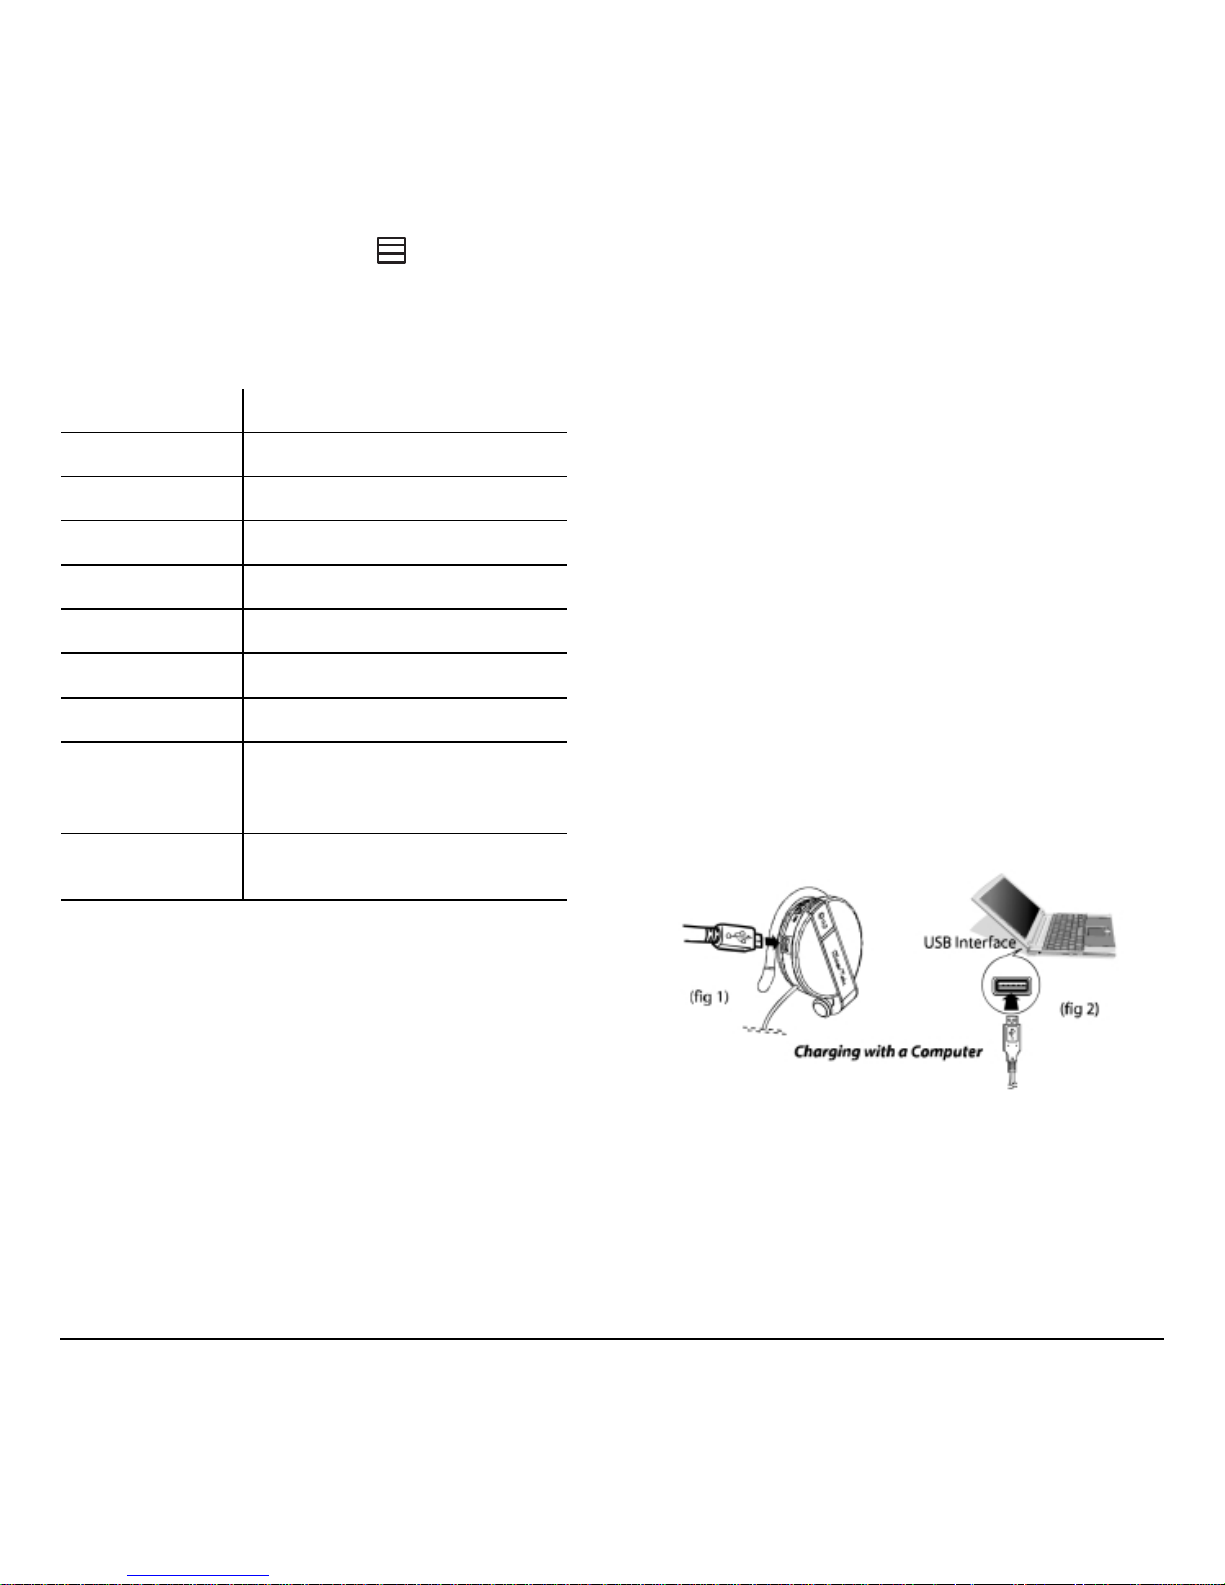
Charging with a computer
1. Open the charging port dust cover.
2. Connect the small connector on the USB cable
to the charging port on the headset (fig 1).
3. Connect the other end of the USB cable to a
USB connector on the computer. The LED
lights red (fig 2).
4. Unplug the cable when the red LED turns off.
Function LED color and status
Headset off
Off
Pairing mode
Flashes blue/red
Paired
Flashes blue 5 times
Standby
Flashes blue every 2 seconds
Making a call
Flashes blue every 2 seconds
Playing music
Flashes blue every 1 second
Switching off
Flashes red
Charging,
headset on
On steady red, blue LED
state depends on the
headset and battery state
Charging,
headset off
On steady red
Page 7

Wireless Stereo Headset 3
Charging with the AC adapter
1. Open the charging port dust cover.
2. Connect the small connector on the USB cable
to the USB charging port on the headset (fig 3).
3. Connect the other end of the USB cable to the
USB connector on the AC adapter (fig 4).
4. Plug the AC adapter into an electrical outlet.
The LED lights red (fig 5).
5. Unplug the cable when the red LED turns off.
Tip: You can use the headset while it is
charging.The LED flashes blue/red.
Wearing the headset
The headset is designed to rest comfortably on your
ears with the cable behind your neck. The speaker
unit with the controls goes over your right ear.
1. Hold the headset and push the ear rest with one
finger to extend it (fig 6).
2. Hook the ear rest over your ear and release the
speaker (fig 7).
Practice using controls
With the headset on, push DOWN with your
index finger and
UP with your middle finger.
Use your thumb to press the
and (fig 8).
Of course, you can use any method to operate the
controls. Just select a method and it will quickly
become second nature.
Powering the headset on and off
The headset LED lights to indicate operation status.
While trying out headset functions, you can put the
left speaker on and hold the right speaker to see the
controls and the LED.
Power up into standby mode
• Long-press until the LED flashes blue.
Power up into pairing mode
1. Long-press until the LED flashes red/blue.
After about 3 seconds, the LED flashes blue,
indicating that the Wireless Stereo Headset is in
standby mode.
Important: You cannot go from standby mode
to pairing mode. You must turn the headset
off, and then long-press
to enter
pairing mode.
(fig 8)
Page 8

4 82-G1652-1EN, Rev. 002
2.
Keep the button pressed until the LED flashes
red/blue. Release before it begins to
flash blue.
To turn off the headset
1. Long-press until you hear a beep.
2. Release .
The LED flashes red five times and the
headset turns off.
Headset operation with a phone
You can use the headset with most Bluetooth
enabled wireless technology devices. The headset
supports Bluetooth wireless technology handsfree
and headset profiles; however your phone may not
support all the features mentioned below.
Pairing the headset with a phone
Before you can use the headset to make calls, you
must pair the headset with your phone. Pairing creates
a secure link between your phone and the unique ID
of the headset. You only have to pair devices once.
1. Power up the headset in pairing mode, as
described in “Power up into pairing mode” on
page 3.
2. From the Bluetooth menu in your phone, search
for active devices. (Refer to your phone’s user
manual for details.)
3. When the search completes, a list of devices
found is displayed.
4. Select GSH300 and when prompted input the
default passkey (
0000).
When successfully paired, the red/blue LED on
the headset changes to flashing blue.
5. You can pair the headset with up to eight
Bluetooth wireless technology enabled devices.
When you turn on the headset, it automatically
tries to pair with the last device it was connected
to. When you pair the device with a ninth
device, the oldest-paired device is deleted.
Making, redialing, and ending calls
If your phone supports voice dialing, you can make
the call from the headset. Otherwise, you must
initiate the call from your phone.
1. Voice dialing: Short-press , then say the
voice tag.
Phone keypad: Dial the number on
the phone.
2. To end the call, short-press (or use the
end-call function on your phone).
3. To redial the last number, long-press
DOWN.
Note: If necessary, re-record your voice tags using
the microphone on the headset.
Answering a call
If you want the headset to automatically answer
incoming calls, enable this feature on your phone.
Auto answer: The headset rings on an incoming
call and you are connected automatically.
Manual answer: When the headset rings for the
incoming call, short-press
to connect.
Note: Some phones may not ring or may not
transfer a ring tone to the headset for incoming
calls. You can still take the call as described above.
Page 9

Wireless Stereo Headset 5
Call waiting and three-way calling
1. To answer a second incoming call, short-press
IN, the incoming call will be accepted and
the active call will be held.
2. To join the second call with the first, long-press
. Both calls are active.
To release all call, short-press UP.
3. To answer a second incoming call, and release
the active call, short-press .
4. To keep the active call, and release other calls,
short-press
IN.
Switching calls between headset
and phone
While you are making a call, you can switch the call
between the headset and your phone.
Headset to phone: Long-press . (Or switch
the call through your phone, if supported.) The call
switches to your phone.
Phone to headset: Long-press . (Or switch the
call through your phone if supported.) The call
switches back to the headset.
Phone to headset (when headset off): If the
headset is off during a call, turn on the headset and
short-press . The call switches to the headset.
Rejecting a call
If you do not want to take an incoming call, longpress . The incoming call is cut off.
Adjusting the volume
You can adjust the volume during a call by pressing
the volume buttons on the headset or the volume
buttons on your phone.
Press
UP to increase the volume (fig 9).
Press
DOWN to decrease the volume.
Long-press IN to mute the microphone. Longpress again to enable the microphone.
Note: Mute only affects the microphone. You can
still hear the caller; but the caller cannot hear you.
Page 10

6 82-G1652-1EN, Rev. 002
Phone functions at a glance
Phone Headset Button
Pairing
On Off Long-press until LED
flashes blue/red
Voice dialing
On On Short-press , say voice tag
Manual dialing
On On Dial the number on the phone
Switch ongoing call (phone to
headset)
Ongoing call Ongoing call Long-press
Redial
On On Long-press DOWN
End call
Ongoing call Ongoing call Short-press
Answer call
Ringing Ringing Short-press
Reject call
Ringing Ringing Long-press
Call waiting
Ongoing call; 2nd
call in
Ongoing call;
2nd call in
Short-press UP
Three-way calling
Ongoing call; 2nd
call in
Ongoing call;
2nd call in
First, short-press UP
Second, long-press
Mute
In use In use Long-press IN
Answer 2nd call
(accept waiting/holding call,
release the ongoing call)
Ongoing call; 2nd
call in
Ongoing call;
2nd call in
Short-press
Answer 2nd call
(continue ongoing call, release
waiting/holding call)
Ongoing call; 2nd
call in
Ongoing call;
2nd call in
Short-press
IN
End all calls
Ongoing call; 2nd
call in/3-way
Ongoing call;
2nd call in/3-way
Short-press DOWN
Page 11

Wireless Stereo Headset 7
Music playback
You can listen to music in high-quality stereo on
your computer or an audio player if the device
supports wireless streaming audio (through a
Bluetooth AV profile). You can purchase a Bluetooth
wireless-enabled dongle (transmitter/receiver) that
connects to the USB connector on the computer;
some models also connect to the audio-out
connector on an MP3 player or other audio device.
Pairing with a computer for
music playback
This section assumes you have already installed a
Bluetooth wireless technology USB dongle on your
computer. Before you can use the headset for music
playback with your computer, you must pair the
headset with your computer. The headset must be
turned on in pairing mode. The following
instructions are for pairing with the Toshiba
®
Bluetooth Setting utility.
1. To put the headset in pairing mode, with the
headset powered off, long-press until the
LED flashes red/blue.
2. Right-click the Bluetooth Manager icon in the
system tray and select
Service Properties
(fig 11).
3. In the Service Properties window, check AV
Remote Control Service
and click OK (fig 12).
4. Right-click the Bluetooth Manager icon in
the system tray and select
Add New
Connection
(fig 13).
5. Select the Custom Mode radio button and click
Next. The wizard searches for the device and
the following screen appears (fig 14).
Page 12

8 82-G1652-1EN, Rev. 002
6.
Select GSH300 and click Next (fig 15).
7. Under Service Class, select Audio Sink
and click
Next (fig 16).
8. Type in the default passkey (0000) and click
OK (fig 17).
9. Type a connection name such as “Music” and
click
Next (fig 18).
10. Click Finish to complete the connection.
Right-click the GSH300 icon and click
Connect. Once connected the icon changes
to a handshake (fig 19).
The new connection is shown in the Bluetooth
Settings window (fig 20).
Now you can listen to the music using Windows
Media Player. Press key to adjust the music
volume. (Re-start the computer if the buttons of
headset do not work for music playback.)
Page 13

Wireless Stereo Headset 9
Listening to music on your
computer
When listening to music you should connect to the
Music (AV) profile.
Note: If you try to use a profile that was created for
making Internet phone calls (see “Making Internet
phone calls” on page 9) to listen to music, the
stereo function of the headset will be lost, resulting
in poor sound quality.
The example below describes how to use the
headset with Windows Media Player™.
1. To turn on the headset, long-press until
the LED flashes blue.
2. If the Bluetooth Settings utility is not open,
double-click the Bluetooth Manager icon in
the system tray (fig 21).
3. Right-click the GSH300 icon and click Connect.
Once connected, the icon changes to a
handshake (fig 22).
4. Open and start playing a playlist on Windows
Media Player. (You can also press
IN to open
Windows Media Player.)
– Press on the headset to adjust
the volume
– Press IN to toggle play/pause
– Press DOWN to play the next song
– Press UP to play the previous song
– Long-press IN to stop playing; short-
press to resume play
5. To turn off the headset, long-press .
Note:
You can use the headset to listen to other
music players on your computer. However, other
players may not support the 3-way button .
Music functions at a glance
Making Internet phone calls
There are many Internet phone services (VoIP) that
let you make calls from your computer. Because
Internet calling uses a different profile than the one
set up for music, you must add a new connection
for this function.
Function... Press...
Open Player
IN
Play
IN
Pause/play
IN
Stop
Long-press IN
Next song
DOWN
Previous song
UP
Page 14

10 82-G1652-1EN, Rev. 002
Pairing with a computer for
Internet calls
Disconnect from the Music profile if connected and
turn off the headset.
(You cannot make a new connection if the headset
is connected to another profile.)
1. To put the headset in pairing mode, with the
headset turned off, long-press until the
LED flashes red/blue.
2. Right-click the Bluetooth Manager icon in the
system tray and select
Add New Connection
(fig 23).
3. Select the Custom Mode radio button and click
Next.
The wizard searches for the device and the
following screen appears (fig 24).
4. Select GSH300 and click Next (fig 25).
5. Under Service Class, select Headset and click
Next (fig 26).
6. When you hear a signal tone on the headset,
short-press
(fig 27).
7. Type a connection name such as “Phone”
and click
Next. A registration confirmation
screen appears.
Page 15

Wireless Stereo Headset 11
8.
Click Finish to complete the connection. The
new connection is shown in the Bluetooth
Settings window (fig 28).
9. Right-click the Phone icon and select Connect
(fig 29).
10. When you hear a signal tone on the headset,
short-press .
Once connected, the icon changes to a
handshake (fig 30).
Setting sound options for Skype™
Skype PC-to-PC calls are free, and there is a
per-minute charge to call normal phones. Skype can
be downloaded from http://www.skype.com. Before
you can take a Skype call through the headset, you
must configure Skype sound options.
1. Make sure you are connected to the
Skype profile.
2. On the Skype menu bar click Too ls → Options.
3. In the Options window, select Sound Devices
(fig 31).
4. Select Bluetooth from the Audio In and Audio
Out drop-down menus, and click
Save.
(If you are not connected to the headset,
Bluetooth audio will not be available under
Sound Devices.)
5. Under Skype Contacts, click Skype Test Call
to check whether the headset speakers and
microphone are working.
(Refer to “Troubleshooting” on page 12 if you
have an audio problem.)
Page 16

12 82-G1652-1EN, Rev. 002
Taking Skype calls
When taking Skype calls you must connect to the
Phone (headset) profile. If you take a call when
connected to the Music (AV) profile, the
microphone will not function (fig 32).
Note: The headset only controls volume. Use the
Skype interface for all call functions.
1. Answer or place a call with the Skype interface.
2. Press on the headset to adjust
the volume.
3. Use the Skype interface to end the call.
Troubleshooting
If you cannot get the headset to work,
try the following:
• Turn off the devices and turn them on again.
• Ensure the headset is charged.
• Ensure devices are within the 10M (30 ft.) range.
• Ensure no obstructions such as thick concrete
walls are between connecting devices.
Try the following to troubleshoot an audio problem
when connected to a computer.
1. Click Start → Control Panel.
2. In Control Panel, open Sounds and
Audio Devices.
3. Select the Audio tab and ensure your Bluetooth
wireless technology enabled device is selected
under
Sound playback and Sound recording
(fig 33).
4. Select the Voice tab and ensure your Bluetooth
wireless technology enabled device is selected
under
Voice playback and Voice recording
(fig 34)
5. Click Test hardware and follow the instructions
in the Wizard.
Page 17

Wireless Stereo Headset 13
Frequently asked questions
1. Can the headset be used with all phones?
No. It is only suitable for handsets that have the
Bluetooth Voice Gateway function built in.
2. How far is the effective range between
the headset and a bluetooth-enabled
wireless device?
The effective range (without obstruction) is 10
meters (33 feet, Class II). Thick or reinforced
concrete walls limit the range.
3. Can another Bluetooth wireless technology
enabled phone user hear my conversation?
No. Through pairing, you have created a secure
link between your phone and the headset.
4. Is pairing needed each time when I use
the headset?
No. The pairing information will be stored in
both devices even if one or both of them have
been turned off.
5. Is it necessary to reconnect the two devices
when there is an interruption on the link
between my phone and headset?
It varies by phone. Some phones can be
reconnected automatically if both devices
are within the effective distance; some must
be reconnected.
6. Why is there noise in my headset?
When the distance between your phone and
headset exceeds the effective distance,
background noise may occur. A poor signal for
your phone can also cause background noise on
the headset.
7. What should I do if the headset's sound
quality is poor?
Try adjusting the volume of your phone or the
headset. Also, check the quality of the signal for
your phone in your area.
Page 18

14 82-G1652-1EN, Rev. 002
Kyocera Wireless Corp. (“KYOCERA”) offers you a
limited warranty that the enclosed product or
products (the “Product”) will be free from defects in
material and workmanship for a period that expires
one year from the date of sale of the Product to
you, provided that you are the original end-user
purchaser of the Product and provided that your
purchase was made from an authorized supplier.
Transfer or resale of a Product will automatically
terminate warranty coverage with respect to that
Product. This limited warranty is not transferable to
any third party, including but not limited to any
subsequent purchaser or owner of the Product. This
limited warranty is applicable only to end users in
the United States and Canada.
KYOCERA shall, at its sole and absolute discretion,
either repair or replace a Product (which unit may
use refurbished parts of similar quality and
functionality) if found by KYOCERA to be defective
in material or workmanship, or if KYOCERA
determines that it is unable to repair or replace such
Product, KYOCERA shall refund the purchase price
for such Product, provided that the subject Product
(i) is returned, with transportation prepaid, to a
KYOCERA authorized service center within the one
year warranty period, and (ii) is accompanied by a
proof of purchase in the form of a bill of sale or
receipted invoice which evidences that the subject
Product is within the one year warranty period
(“Proof of Purchase”). After the one year warranty
period, you must pay all shipping, parts and
labor charges.
This limited warranty does not cover and is void
with respect to the following: (i) any Product which
has been improperly installed, repaired, maintained
or modified; (ii) any Product which has been
subjected to misuse (including any Product used in
conjunction with hardware electrically or
mechanically incompatible or used with accessories
not approved by KYOCERA), abuse, accident,
physical damage, abnormal operation, improper
handling, neglect, exposure to fire, water or
excessive moisture or dampness or extreme changes
in climate or temperature; (iii) any Product operated
outside published maximum ratings; (iv) cosmetic
damage; (v) any Product on which warranty stickers
or Product serial numbers have been removed,
altered, or rendered illegible; (vi) cost of installation,
removal or reinstallation; (vii) signal reception
problems (unless caused by defects in material and
workmanship); (viii) damage the result of fire, flood,
acts of God or other acts which are not the fault of
KYOCERA and which the Product is not specified to
tolerate, including damage caused by mishandling,
shipping and blown fuses; (ix) consumables (such as
fuses); or (x) any Product which has been opened,
repaired, modified or altered by anyone other than
KYOCERA or a KYOCERA authorized service center.
USE ONLY KYOCERA APPROVED ACCESSORIES
WITH KYOCERA PHONES. USE OF ANY
UNAUTHORIZED ACCESSORIES MAY BE
DANGEROUS AND WILL INVALIDATE THE PHONE
WARRANTY IF SAID ACCESSORIES CAUSE
DAMAGE OR A DEFECT TO THE PHONE.
CONSUMER LIMITED WARRANTY
Page 19

Wireless Stereo Headset 15
KYOCERA SPECIFICALLY DISCLAIMS LIABILITY FOR
ANY AND ALL DIRECT, INDIRECT, SPECIAL,
GENERAL, PUNITIVE, EXEMPLARY, AGGRAVATED,
INCIDENTAL OR CONSEQUENTIAL DAMAGES, EVEN
IF ADVISED OF THE POSSIBILITY THEREOF,
WHETHER FORESEEABLE OR UNFORESEEABLE OF
ANY KIND WHATSOEVER, INCLUDING BUT NOT
LIMITED TO LOSS OF PROFITS, UNANTICIPATED
BENEFITS OR REVENUE, ANTICIPATED PROFITS
ARISING OUT OF USE OF OR INABILITY TO USE ANY
PRODUCT (FOR EXAMPLE, WASTED AIRTIME
CHARGES DUE TO THE MALFUNCTION OF A
PRODUCT) OR CONTRIBUTION OR INDEMNITY IN
RESPECT OF ANY CLAIM RELATED TO A PRODUCT.
REPAIR OR REPLACEMENT OF A DEFECTIVE
PRODUCT OR REFUND OF THE PURCHASE PRICE
RELATING TO A DEFECTIVE PRODUCT, AS
PROVIDED UNDER THIS WARRANTY, ARE YOUR
SOLE AND EXCLUSIVE REMEDIES FOR BREACH OF
THE LIMITED WARRANTY, AND SUBJECT TO THIS
WARRANTY, THE PRODUCTS ARE APPROVED AND
ACCEPTED BY YOU “AS IS”. KYOCERA MAKES NO
OTHER WARRANTIES, REPRESENTATIONS OR
CONDITIONS OF ANY KIND, ORAL OR VERBAL,
EXPRESS OR IMPLIED, STATUTORY OR OTHERWISE,
WITH RESPECT TO THE PRODUCTS, INCLUDING
BUT NOT LIMITED TO ANY IMPLIED WARRANTY OR
CONDITION OF MERCHANTABILITY OR FITNESS FOR
A PARTICULAR PURPOSE OR AGAINST
INFRINGEMENT OR ANY IMPLIED WARRANTY OR
CONDITION ARISING OUT OF TRADE USAGE OR
OUT OF A COURSE OF DEALING OR COURSE OF
PERFORMANCE. NO DEALER, DISTRIBUTOR, AGENT
OR EMPLOYEE IS AUTHORIZED TO MAKE ANY
MODIFICATION OR ADDITION TO THIS WARRANTY.
Some jurisdictions do not allow the exclusion or
limitation of incidental or consequential damages,
or allow limitations on how long an implied
warranty lasts, so the above limitations or
exclusions may not apply to you. This limited
warranty gives you specific legal rights, and you
may also have other rights which vary from
jurisdiction to jurisdiction.
For warranty service information, please call the
following telephone number from anywhere in the
continental United States and Canada:
1-800-349-4478 or 858-882-1401; or contact
KYOCERA at the following address:
10300 Campus Point Drive, San Diego, California,
92121-1582, USA, Attention: Technical Support.
DO NOT RETURN YOUR PRODUCTS TO THE
ABOVE ADDRESS.
Please call or write for the
location of the Kyocera Wireless Corp. authorized
service center nearest you and for procedures for
obtaining warranty service.
 Loading...