

Page 1

1
English
Deutsch
FrançaisItalianoEspañol
We shall have no liability or responsibility to customers or any other person or
entity with respect to any liability, loss or damage caused or alleged to be caused
directly or indirectly by equipment sold or furnished by us, including but not
limited to, any interruption of service, loss of business or anticipatory profits, or
consequential damages resulting from the use or operation of the equipment or
software.
Caution
NO LIABILITY IS ASSUMED FOR ANY DAMAGE CAUSED BY IMPROPER
INSTALLATION.
Notice
The information in this manual is subject to change without notification.
Additional pages may be inserted in future editions. The user is asked to excuse
any technical inaccuracies or typographical errors in the present edition.
No responsibility is assumed if accidents occur while the user is following the
instructions in this manual.
The contents of this manual are protected by copyright. No part of this manual may
be reproduced or copied by any means without the permission of the copyright
holder.
Regarding Tradename
PRESCRIBE is a registered trademark of Kyocera Corporation.
Page 2

2
According to Council Directive 89/336/EEC and 73/23/EEC
Manufacturer’s name: Kyocera Corporation, Printer Division
Manufacturer’s address: 2-14-9 Tamagawadai, Setagaya Ward, Tokyo 158-8610, Japan
declares that the product
Product name: Hard Disk Drive Unit
Model number: HD-2 (as tested with page Printer FS-7000+ and other enhancement
optional units: PF-30, DU-31, DF-31, UF-1 and BC-1)
Conforms to the following product specifications.
EN 55 022:1994 Class B
EN 60 950:1992+A1+A2+A3+A4
The manufacturer and its merchandising companies retain the following technical documentation in
anticipation of the inspection that may be conducted by the authorities concerned.
User’s instruction that conforms to the applicable specifications
Technical drawings
Descriptions of the procedures that guarantee the conformity
Other technical information
KYOCERA ELECTRONICS EUROPE GmbH
Tetsuo Okada, President
Revised Date:
Contact in Europe
KYOCERA ELECTRONICS EUROPE GmbH
Mollsfeld 12
40670 Meerbusch, Germany
Phone: +49 21 59 918 0
Fax: +49 21 59 918 100
Declaration of Conformity
Manufacturer’s name: Kyocera Corporation, Printer Division
Manufacturer’s address: 2-14-9 Tamagawadai, Setagaya Ward, Tokyo 158-8610, Japan
declares that the product
Product name: Hard Disk Drive Unit
Model number: HD-2 (as tested with page Printer FS-7000+ and other enhancement optional
units: PF-30, DU-31, DF-31, UF-1 and BC-1)
Description of device: This Page Printer Model FS-7000+ is the 28ppm; A3 size and utilized plain
paper; laser; dry toner etc.. The printer can be equipped with several
enhancement optional units paper feeder PF-30, duplex unit DU-30, document
finisher DF-30 etc..
Page 3

3
English
Deutsch
FrançaisItalianoEspañol
Conforms to the following product specifications.
AS/NZS 3548:1995
(EN 55 022: 1994 Class B)
IEC 60 950
(EN 60 950:1992+A1+A2+A3+A4)
The manufacturer and its merchandising companies retain the following technical documentation in
anticipation of the inspection that may be conducted by the authorities concerned.
User’s instruction that conforms to the applicable specifications
Technical drawings
Descriptions of the procedures that guarantee the conformity
Other technical information
David Finn
Managing Director
Date:
Unit 8, 43-45 Herbert Street,
Artarmon NSW 2064, Australia
Phone: +61 2-9-906-8075
Fax: +61 2-9-906-8153
Declaration of Conformity
Model Number: HD-2 (as tested with Printer FS-7000+ and enhancement optional units
FP-30, DU-31, DF-31, UF-1 and BC-1)
Trade Name: Kyocera
Responsible Party: Kyocera Electronics Inc.
Address: 2301-300 Cottontail Lane,
Somerset, NJ 08873, U.S.A.
Telephone number: 732-560-3400
Fax number: 732-560-8380
Contact person for technical matter: Paul Sawchuk
Phone: 732-560-3400
Manufacturer’s name: Kyocera Corporation, Printer Division
Manufacturer’s address: 2-14-9 Tamagawadai, Setagaya Ward,
Tokyo 158-8610, Japan
This device complies with Part 15 of the FCC Rules, Operation is subject to the following two
conditions: (1) This device may not cause harmful interference, and (2) this device must accept
any interference received, including interference that may cause undesired operation.
The manufacturer and its merchandising companies retain the following technical documentation in
anticipation of the inspection that may be conducted by the authorities concerned.
User’s instruction that conforms to the applicable specifications
Technical drawings
Descriptions of the procedures that guarantee the conformity
Other technical information
KYOCERA ELECTRONICS Inc.
Charles McNulty
General Manager, Printer Division
Date:
Page 4

4
Warning
FCC Regulations state that any unauthorized changes or modifications to
this equipment not expressly approved by the manufacturer could void the
user’s authority to operate the equipment.
Note: The equipment has been tested and found to comply with the limits
for a Class B digital device, pursuant to Part 15 of the FCC Rules. These
limits are designed to provide reasonable protection against harmful
interference when the equipment is operated in a commercial environment.
The equipment generates, uses, and can radiate radio frequency energy
and, if not installed and used in accordance with the instruction manual,
may cause harmful interference to radio communications. Operation of the
equipment in a residential area is likely to cause harmful interference in
which case the user will be required to correct the interference at his own
expense.
Radio interference requirement in European countries
The optional Hard disk unit HD-2 is intended for use with the printer models FS6700/FS-7000/FS-7000+ which are type tested and categorized as a Class B
computing device in accordance with the EN55022 rules.
Device in the Class B category may cause interference to radio or television
reception particularly in a residential installation.
Page 5

5
English
Deutsch
FrançaisItalianoEspañol
Information to users:
This equipment has been tested and found to comply with the limits for a Class B
digital device, pursuant to Part 15 of FCC Rules. These limits are designed to
provide reasonable protection against harmful interference in a residential installation. This equipment generates, uses, and can radiate radio frequency energy and, if
not installed and used in accordance with the instructions, may cause harmful
interference to radio communications. However, there is no guarantee that interference will not occur in a particular installation. If this equipment does cause harmful
interference to radio or television reception, which can be determined by turning
the equipment off and on, the user is encouraged to try to correct the interference
by one or more of the following measures:
❒ Reorient or relocate the receiving antenna.
❒ Increase the separation between the equipment and receiver.
❒ Connect the equipment into an outlet on a circuit different from that to which
the receiver is connected.
❒ Consult the dealer or an experienced radio/TV technician for help.
Changes or modifications not expressly approved by the manufacturer for compliance could void the user’s authority to operate the equipment.
Contents
Precautions for Handling the Hard Disk .................................................................6
Introduction .............................................................................................................7
Names of Parts.........................................................................................................7
Installing the Hard Disk in the Printer.....................................................................8
Hard Disk Initialization (Formatting)......................................................................9
Hard Disk Operation..............................................................................................11
Virtual Mail Box (VMB) (Except for FS-7000) ....................................................17
Error Messages ...................................................................................................... 22
Specifications ........................................................................................................23
Page 6
6
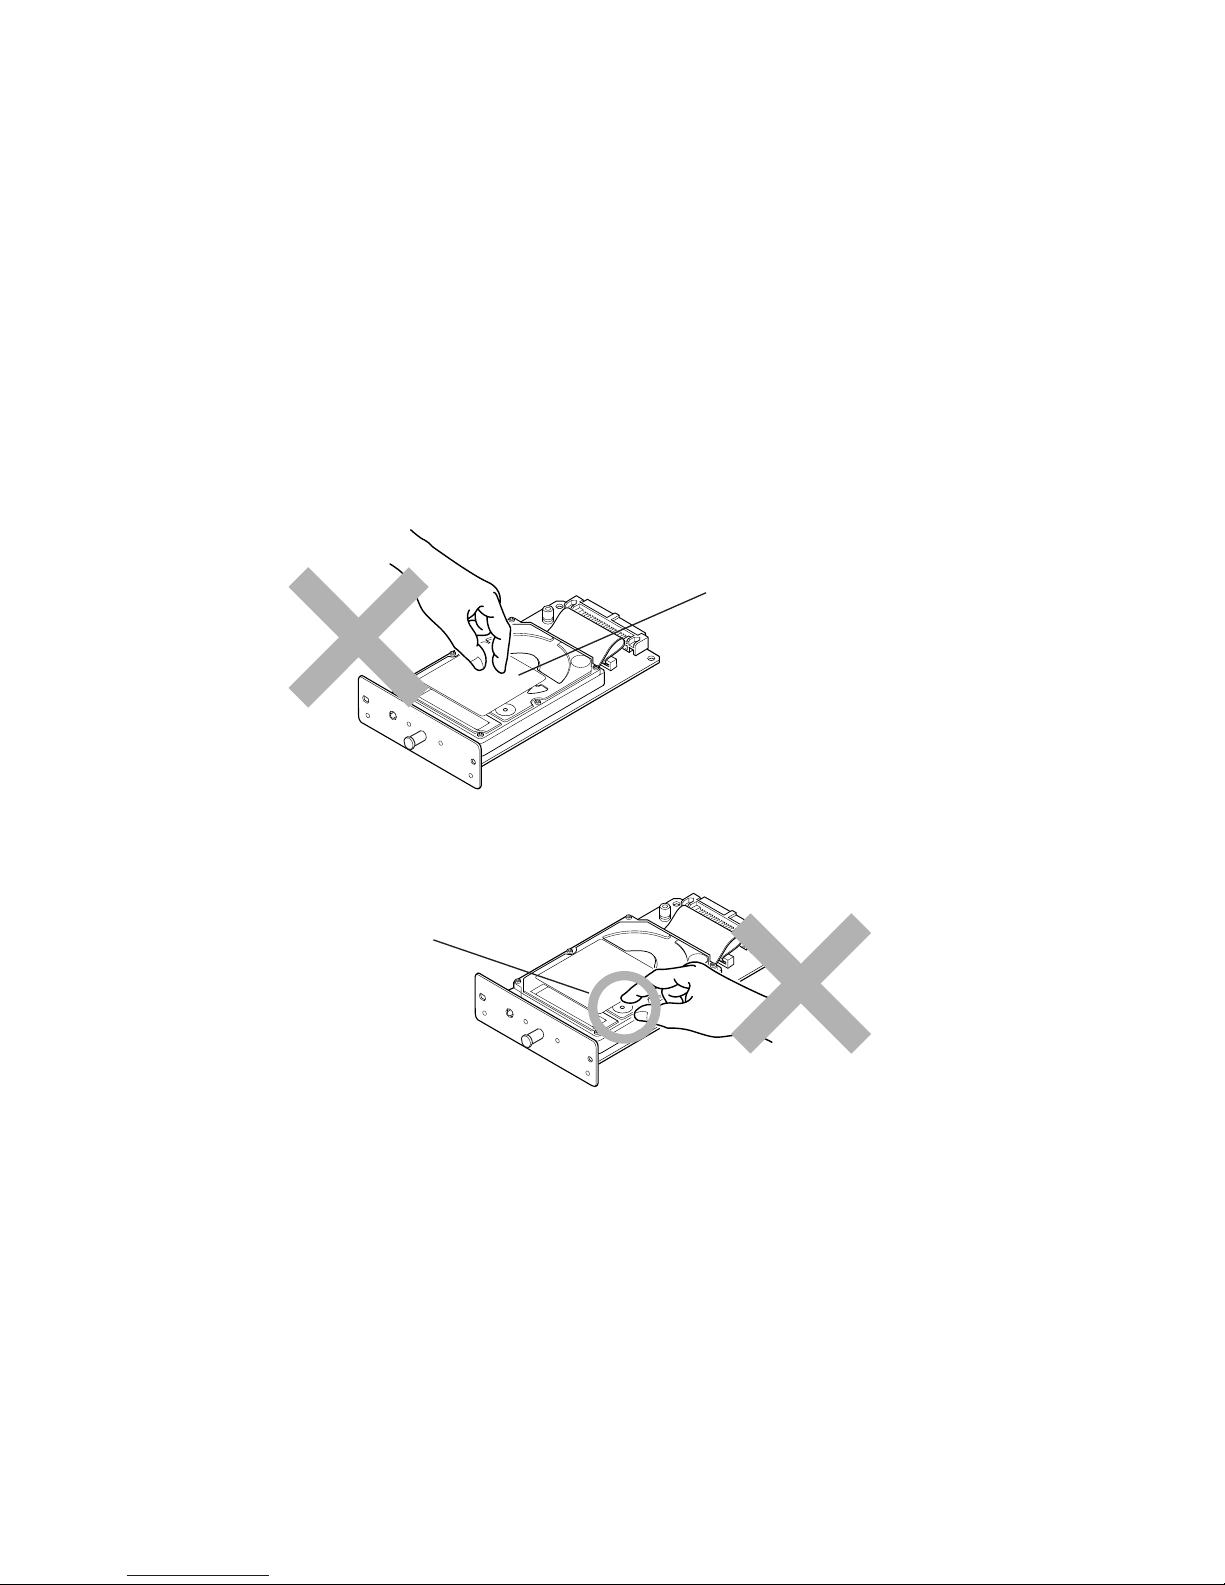
Precautions for Handling the Hard Disk
When handling the hard disk, adhere to the following precautions.
• The hard disk is delivered in an antistatic bag. To prevent any damage, briefly
touch a large metal object to ensure discharge of static electricity before
removing the hard disk from the bag.
• Never touch the hard disk’s connector section directly with hands.
• When holding the hard disk, do not contact hand with surface of the circuit
board; hold at the edges of the circuit board.
• Never apply force to the metallic portion of the hard disk’s surface.
• Do not touch the exposed portion beneath the hole in the surface with fingers.
• Do not apply undue force when installing.
Note The HD-2 hard disk should be installed by your Kyocera dealer.
Please note that Kyocera may not warrant the hard disk in case of
trouble because the customer has attempted installation by him/
herself.
Metallic surface
portion
Hole
Page 7
7
English
Deutsch
FrançaisItalianoEspañol
Introduction
The HD-2 is an optional hard disk for use with the Kyocera Page Printer FS-6700/
FS-7000/FS-7000+.
The hard disk is a precision instrument. To ensure correct use, please read this
manual thoroughly so that you understand the correct installation and operation
methods.
Packing List
HD-2 1
Instruction manual (this booklet) 1
Note To enable the use of the HD-2 hard disk, the minimum printer
memory requirement is 8 MB. However, we strongly recommend at
least 12 MB of memory when using this hard disk. Consult an
authorized Kyocera dealer or Service Center for details on the
expansion memory chip.
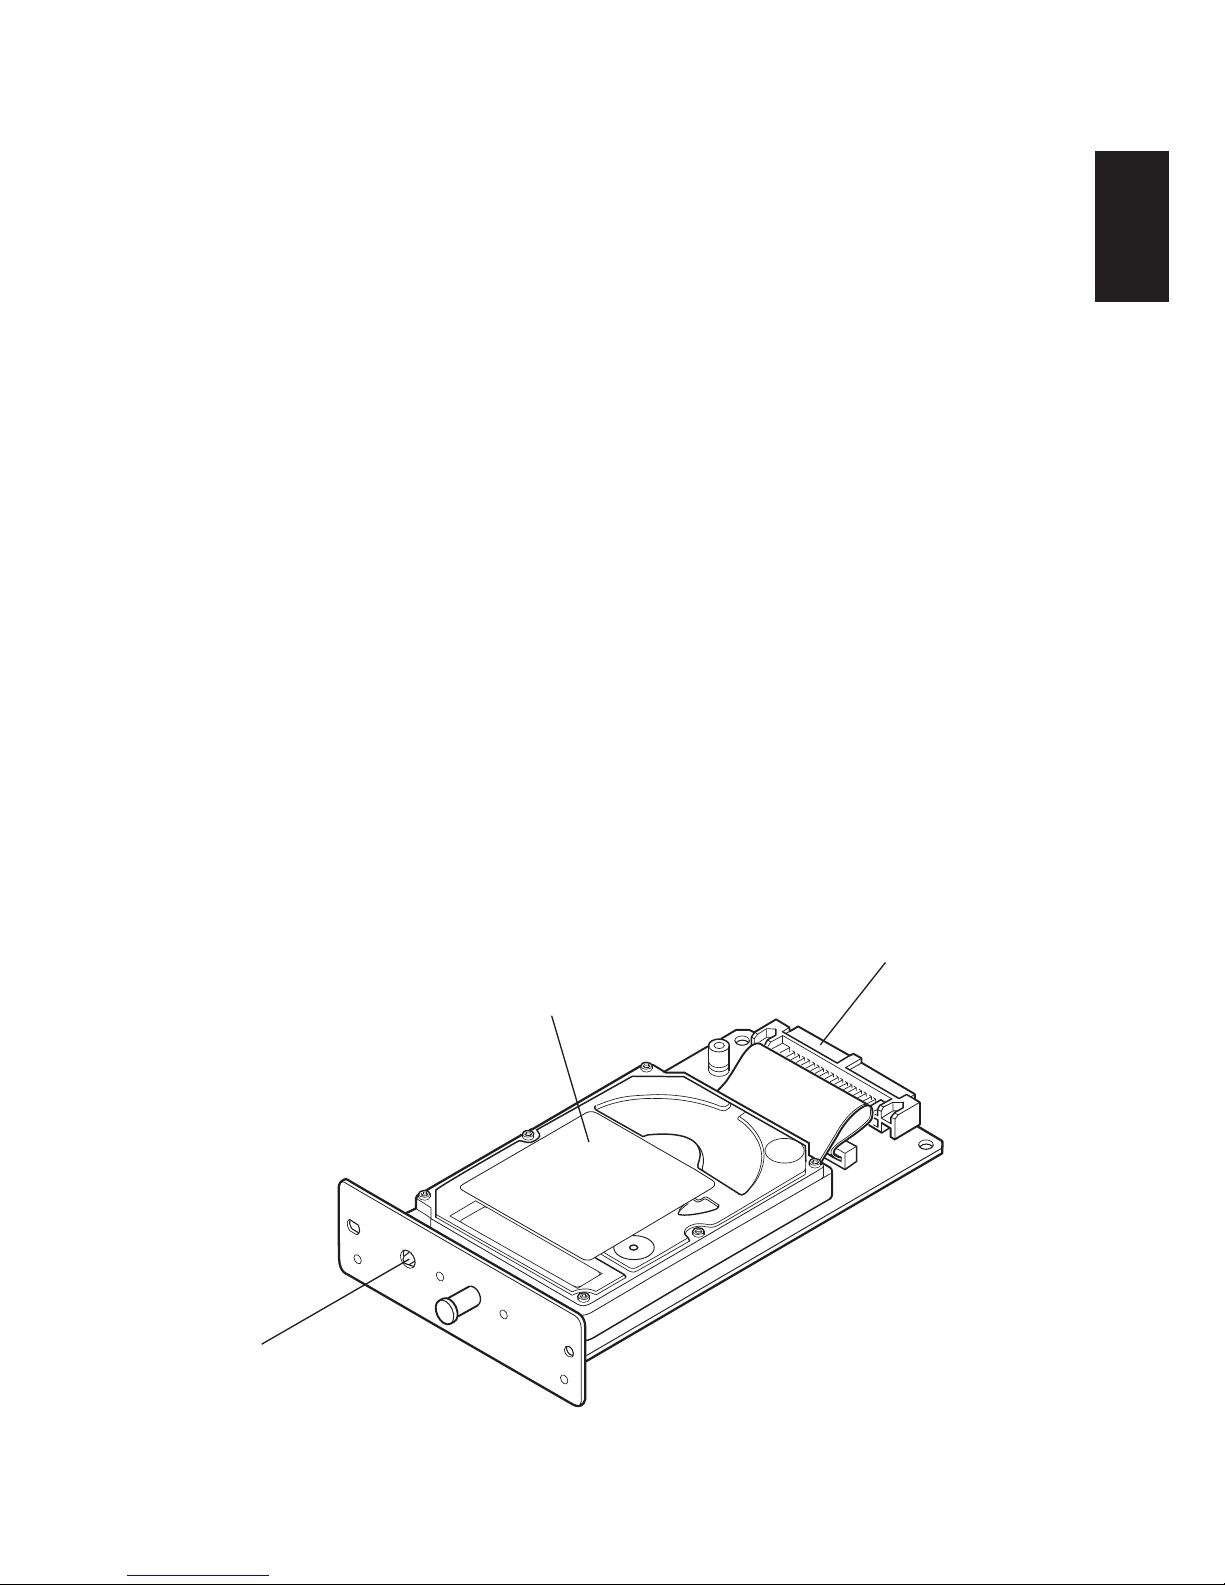
Names of Parts
Before installing the hard disk, please study the following part names. These names
are used in describing procedures for installing and using the hard disk.
Hard disk cover
Do not apply force.
Connector
Connects to the
connector inside
the printer.
Access lamp
After installation in the
printer, the lamp lights while
the hard disk is accessed.
Hard disk unit
(HD-2)
Page 8
8
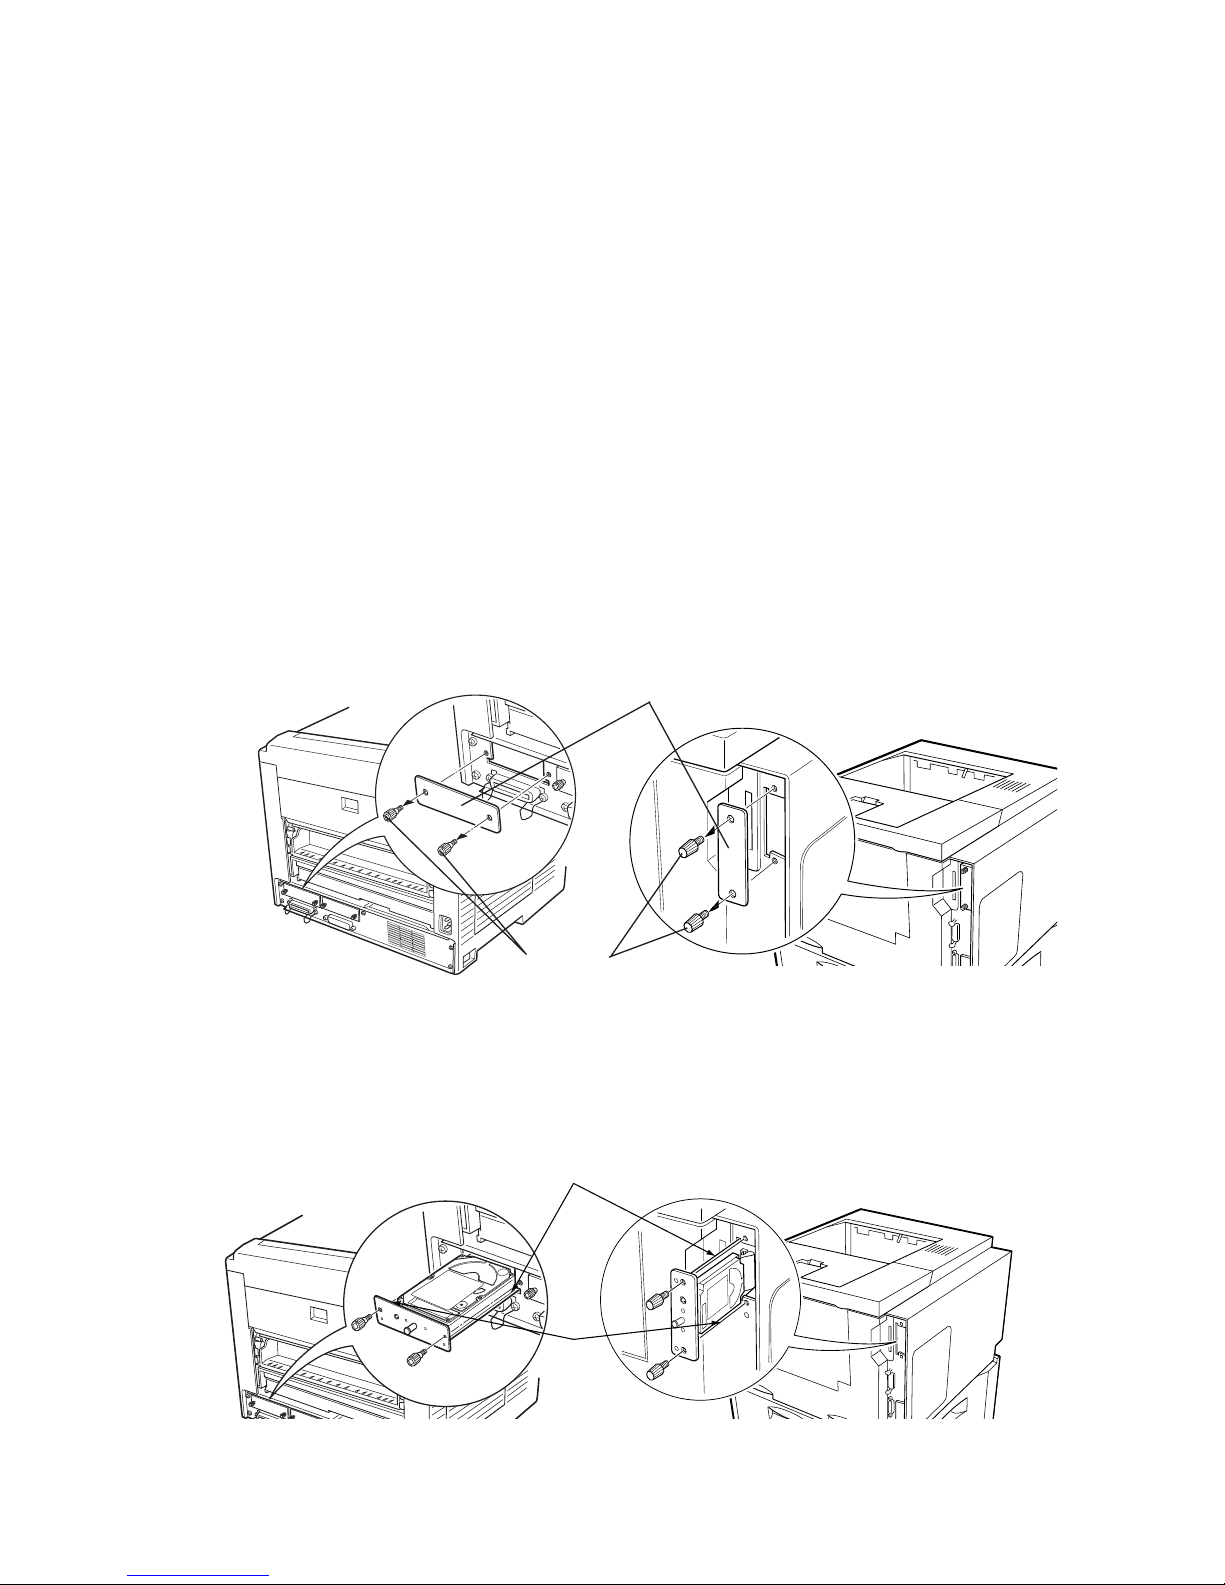
Installing the Hard Disk in the Printer
The HD-2 hard disk is installed in the location marked OPT2 on the rear panel.
CAUTION Before installing (or removing) the HD-2 hard disk, be sure to
turn off the printer’s power and disconnect the power cord
plug from the AC outlet.
It is possible to move an HD-2 hard disk that has been
installed in one printer to another printer if the printers are
the same model. However, if the HD-2 is moved to a different
model printer, data accumulated on the HD-2 will be lost.
Note that in this case, the HD-2 can still be used if it is
formatted, but the accumulated data is lost.
1. Detach the cover over the slot (OPT2) for optional devices as shown in
the illustration.
2. Remove the HD-2 from the package and insert it with care by sliding it
along the rails inside the slot in the printer as shown in the illustration.
3. After proper insertion, clamp the HD-2 using the two screws removed in
step 1 above. This completes installation of the hard disk.
Rail
Rail
Cover of the slot (OPT2) for optional devices
Screws
FS-6700 FS-7000/FS-7000+
FS-6700 FS-7000/FS-7000+
Page 9

9
English
Deutsch
FrançaisItalianoEspañol
Hard Disk Initialization (Formatting)
After installing the hard disk in the printer, the disk must to be initialized (formatted) before used. Initialization is performed from the printer’s control panel
following the installation. The initialization procedure is described in the following.
1. After confirming that the HD-2 hard disk is installed in the printer, turn
on the printer.
2. The printer’s
ATTENTION
indicator flashes for a while, and the message
display indicates Format error HARD DISK. This is the state when
the printer is turned on the first time after the hard disk has been installed.
Note Even while Format error HARD DISK is displayed, the printer
can be used for normal printing without using the hard disk.
3. Press the printer’s MODE key in this state, and use the + or – key to
display HARD DISK >.
4. When the key is pressed, >Format is displayed.
5. When the ENTER key is pressed, ? is displayed. Press the ENTER key
once more to have the printer initialize (format) the hard disk.
6. When initialization is completed, the printer’s message display changes to
indicate Ready. This completes initialization of the hard disk, which is
now ready for use.
Caution when Turning the Power OFF
To protect the hard disk, always make sure that the printer’s message display
indicates Ready before the printer is turned off.
Page 10

10
Verifying Installation of the Hard Disk
To verify that the hard disk has been correctly installed and initialized (formatted),
try to print out the printer’s status page.
1. Confirm that the printer’s
ONLINE
indicator is lit and that the message
display indicates Ready.
2. Press the STATUS key on the printer’s control panel.
3. Check the contents of the printed status page. If the Installed Options
and Option 2 items look as follows, there should be no problem.
Note The STATUS PAGE shown above may differ from the actual
printed STATUS PAGE.
Printer STATUS PAGE
Installed Options
Hard-disk drive Installed
Option 2
Hard-disk drive
Write protect OFF
Total 2097152 KB
User available 2096856 KB
Page 11

11
English
Deutsch
FrançaisItalianoEspañol
Hard Disk Operation
When the HD-2 hard disk has been correctly installed and initialized, it can be used
for the following operations.
• Reading data
• Writing data
• Deleting data
• Printing of VMB data (excluding FS-7000)
• Printing of VMB data with a password (excluding FS-7000)
• Printing of list of partitions
• Printing of VMB data lists (excluding FS-7000)
• Printing of job lists
Note The menus related to data stored on the hard disk can be selected
from the printer. Consequently, following initialization, when there
will not yet be any data on the hard disk, only the two menus
“Reading data” and “Printing of list of partitions” can be selected.
Page 12

12
The hard disk menu is added to the printer’s mode selection menu as shown below
(added menu enclosed in frame), to enable operations involving the hard disk.
The menus are explained on the following pages.
Ready
PAR 600 A3 001
Interface >
Parallel
Paper orientation
Portrait
HARD DISK >
MEMORY CARD
Mode selection menu
* These menus are displayed if
there are jobs in the virtual
mail box. They are not
displayed on the FS-7000.
Added hard disk menu
*
*
>Read data
>Write data
>Delete data
>Print VMB data
Tray
>User ID
0000
1
>List of
Partitions ?
>List of VMB
>List of JOB
Page 13

13
English
Deutsch
FrançaisItalianoEspañol
Reading Data (Partition) from the Hard Disk
Used to read data (partitions) selected from the data on the hard disk to the printer
memory.
1. Have the message display indicate >Read data.
This indication is only displayed if data are stored on the hard disk.
2. When the ENTER key is pressed, ? is displayed.
3. Each time the + key is pressed, the names of data stored on the hard disk
are displayed sequentially.
To stop data reading, press the CANCEL key.
4. When the desired data name is displayed, press the ENTER key. The
message display indicates Processing, and the selected data are read
to the printer.
When data reading and processing are completed, the message display indication
returns to Ready.
Writing Data (Partitions) to the Hard Disk
Data sent from the computer can be written to the hard disk. The written data can
be read to the printer memory by operating the keys on control panel of the printer.
Partitions read to the hard disk are automatically supplied with a name, and the
partition list can be verified by print out.
1. Have the message display indicate >Write data.
2. When the ENTER key is pressed, ? is displayed.
Page 14

14
3. When the ENTER key is pressed, the message display indication changes
to Processing. Following this, the indication changes to Waiting.
Processing Waiting
To stop data writing, press the CANCEL key.
4. In this state, the computer sends data to the printer.
Example: To send the file named TEST.TXT to the printer (DOS mode).
COPY TEST.TXT PRN
While the printer is receiving the data, the message display indication
changes to Processing. When data reception is completed, the
indication changes to Waiting.
5. After confirming that the message display indication has changed to
Waiting, press the FORM FEED key.
The printer automatically prints out the information of the data that has just been
written to the hard disk (see example below).
This enables you to check the name of the data (partition) and whether the data has
been written correctly.
Data type: Indicates the type of data (only 2 supported)
Partition name: Name of written partition (data)
Write data length: Written partition data amount (unit = byte)
Following printing, the message display indication returns to Ready.
➞
Page 15

15
English
Deutsch
FrançaisItalianoEspañol
Deleting Data on the Hard Disk
Data can be deleted one by one from the hard disk.
1. Have the message display indicate >Delete data. This indication is
only displayed if data are stored on the hard disk.
2. When the ENTER key is pressed, ? and the data name is indicated.
? and the data name is displayed.
3. Each time the + key is pressed, the names of data stored on the hard disk
are displayed sequentially.
To discontinue the operation, press the CANCEL key.
4. When the name of the data to be deleted is displayed, press the ENTER
key. The concerned data are deleted from the hard disk.
The message display indication returns to Ready.
Printing the Hard Disk Partition List
Information on all data and data sizes stored on the hard disk can be printed out for
confirmation.
1. Have the message display indicate >List of Partitions.
2. When the ENTER key is pressed, ? appears.
If you want to discontinue the printing, press the CANCEL key.
3. If the ENTER key is pressed again, printing starts.
>Delete data
? (data name)
Page 16

16
When printing is completed, the message display indication returns to Ready.
In addition, the “HARD DISK DIRECTORY STATUS LIST” can also be printed.
This list displays the directories containing download fonts, etc., when the optional
KPDL2 upgrade kit (PK-series) is installed.
Notes • When downloading fonts, permission is required from the owner
of the intellectual property rights.
• If fonts or macro data are stored on the hard disk, these headers
are automatically stored in the printer when the printer is turned
on.
• If the names of macros on the hard disk are identical with the
names of macros in the printer memory or on a memory card, the
macro data on the hard disk will not be stored in the printer. The
order of priority is as follows: printer > memory card > hard disk.
Printing Job List
This feature prints a list of jobs accumulated in the hard disk.
1. Display >List of JOB.
>List of JOB
2. Pressing the ENTER key will cause a ? to flash.
>List of JOB ?
Press the CANCEL key if you want to halt printing. The ? display will
disappear.
3. Pressing the ENTER key will cause Processing to be displayed and
the job list to be printed.
Page 17

17
English
Deutsch
FrançaisItalianoEspañol
Virtual Mail Box (VMB) (Except for FS-7000)
The Virtual Mail Box (VMB) function is a mail box function for the printer which
does not require a physical mail box to be attached to the printer. This function can
be used by attaching this hard disk unit to the printer. Once the hard disk is
attached to the printer, a HARD DISK menu will be added to the MODE SELECT
menu as shown on page 12, allowing the virtual mail box function to be used.
With a virtual mail box, unlike a physical mailbox, data sent from the computer is
stored in the HD-2 as rasterized data. This stored data accumulates in a numbered
virtual output tray. When it is time to actually print the data, it is printed by
specifying the virtual output tray number where the data is stored using the
printer’s control panel or an optional barcode reader (BC-1).
Note If all the data in a virtual output tray is printed, all data in that tray
will be deleted. If printing is halted by pressing the cancel key
during printing, data in that tray will not be deleted. Data is not
deleted unless all data in the virtual output tray is printed.
The main features of the virtual mailbox are as follows.
• Locked mailbox
Allowing a password to be set for the virtual output tray, this feature lets you
print out confidential documents.
• Multilevel mailbox
Supporting up to 255 virtual output trays, mail boxes can be allocated at the
individual level rather than by the user’s job title or group.
• Large capacity mailbox
There is no limit on the size per virtual output tray. Since the only limit is on the
total size of all trays, all of the HD-2 can be used.
Page 18

18
Outputting to a VMB
When sending data to a virtual output tray set within the HD-2, make this setting
from the printer driver. With this setting, data can be sent by specifying the desired
virtual output tray number. It is also possible to assign a name to a virtual output
tray and send data by specifying that name. (For details on this setting, please refer
to the help documentation for the printer driver.)
When data is sent by specifying a virtual output tray, printing to paper is not
performed at the time data is sent. Sent data accumulates in the virtual output trays
of the HD-2. For details on printing accumulated data, please see the next item.
Printing Accumulated VMB Data
This function prints VMB data accumulated in a virtual output tray.
1. Display HARD DISK > on the printer’s MODE SELECT menu and
press the key to display >Print VMB data Tray. The VMB tray
number will appear in the location marked by #’s below, while the VMB
tray name will appear in the location marked by %’s.
>Print VMB data
Tray###:%%%%%%%
2. Pressing the ENTER key will cause a ? to flash.
>Print VMB data
Tray###?%%%%%%%
3. Each time the + or – keys are pressed, the VMB data display will change.
Press the CANCEL key if you want to halt printing. The ? display will
disappear.
4. Display the VMB data you want to print. Pressing the ENTER key will
cause Processing to be displayed and the data will be printed.
Page 19

19
English
Deutsch
FrançaisItalianoEspañol
Printing Accumulated VMB Data with a Password
This function prints VMB data protected by a password which has accumulated in
a virtual output tray.
1. Display HARD DISK > and press the key to display >Print VMB
data Tray. The VMB tray number will appear in the location marked
by #’s below, while the VMB tray name will appear in the location
marked by %’s.
>Print VMB data
Tray###:%%%%%%%
2. Pressing the ENTER key will cause a ? to flash.
>Print VMB data
Tray###?%%%%%%%
3. Each time the + or – keys are pressed, the VMB data display will change.
Press the CANCEL key if you want to halt printing. The ? display will
disappear.
4. If a password is set for the VMB data you want to print, the message
display will change to >User ID? 00001 and the printer will standby
to accept a password. The cursor will blink in the one’s place of the
displayed number. Enter the correct password. Use the and keys to
change places and the + or – keys to change the displayed number.
Passwords from 00001 to 65535 can be entered.
5. Press the ENTER key once the correct password is entered.
Processing will be displayed and the data will be printed. If the
password was incorrect, an error message will be displayed (see page 22).
Pressing the CONTINUE key will return the printer to Ready status.
Note that the password entered here is reset (returns to 00001) when this mode is
exited.
Page 20

20
Printing VMB Accumulated Data List
This feature prints a list of VMB data accumulated in the HD-2.
1. Display HARD DISK > and press the key to display >List of
VMB.
>List of VMB
2. Pressing the ENTER key will cause a ? to flash.
>List of VMB ?
Press the CANCEL key if you want to halt printing. The ? display will
disappear.
3. Pressing the ENTER key will cause Processing to be displayed and
the VMB data list to be printed.
An actual VMB list printout will differ slightly from sample given above.
Page 21

21
English
Deutsch
FrançaisItalianoEspañol
Information regarding virtual output trays which are set will be displayed in the
virtual mail box list. A mark is shown with the bin number for virtual output
trays which contain data. If a password is set for a virtual output tray, there is no
barcode shown for that virtual output tray. Also, “FULL” will be shown for virtual
output trays for which there was an error when data was sent to them. A VMB
ERROR LOG will be printed when data from such a virtual output tray is printed.
Operations for Using a Barcode Reader
If an optional barcode reader (BC-1) is connected to the printer, it is possible to
print data within a virtual output tray using the barcode in the list. Select the
barcode for “Output (1)” in the upper right using the barcode reader and then select
the barcode for the virtual output tray you want to print. If you want to delete the
data in a tray, select “Delete (1)” also in the upper right and then select the barcode
for the virtual output tray you want to delete. Note that all data in the tray will be
deleted.
For detailed operating procedures for the barcode reader, please read the instructions included with the barcode reader.
Page 22

22
Error Messages
If any of the following error messages concerning the hard disk is shown on the
printer’s message display, please check and take remedial action as indicated in the
following table. If the trouble cannot be eliminated by taking the prescribed
actions, please contact your dealer for advice.
Remedy
Initialization (formatting) of the hard disk is required.
Initialize the hard disk.
(Refer to page 9.)
Hard disk format error.
If this error recurs even if the power has been turned off and
then on, reformat the hard disk.
The disk system is not installed. Recheck the requirements
for using the system and the devices.
Cannot write in the hard disk system because write
protection is enabled.
Disable write protection.
There is no available hard disk space.
Delete unnecessary files, etc., in order to free up space.
The specified file does not exist in the hard disk.
There is no memory available to the hard disk system.
Increase the available memory.
Formatting is not possible because host data is being
spooled on the hard disk.
Wait until the hard disk is ready, and then format.
The hard disk was installed in the incorrect slot. Reinstall
the hard disk in a different slot.
VMB: Alias error
(The alias setting was lost, or the virtual bin corresponding
to the alias does not exist.)
Set the alias again.
VMB: Password error
(There is no password specified, the password is incorrect, or
the password setting is lost.) Confirm the correct password.
VMB: An unreadable job or page was found while outputting the jobs in a virtual bin. (The job is damaged.)
VMB: A virtual bin that was specified for output does not
contain any jobs, or the virtual bin is not being used.
Confirm the bin.
MPS: The number of nonvolatile jobs reached the limit
value, and no more can be saved. Either delete some
unnecessary jobs, etc., or increase the limit.
Error Message
Format error
HARD DISK
HARD DISK error 01
Press CONTINUE
HARD DISK error 02
Press CONTINUE
HARD DISK error 03
Press CONTINUE
HARD DISK error 04
Press CONTINUE
HARD DISK error 05
Press CONTINUE
HARD DISK error 06
Press CONTINUE
HARD DISK error 10
Press CONTINUE
HARD DISK error 20
Press CONTINUE
HARD DISK error 85
Press CONTINUE
HARD DISK error 86
Press CONTINUE
HARD DISK error 88
Press CONTINUE
HARD DISK error 89
Press CONTINUE
HARD DISK error 97
Press CONTINUE
Page 23

23
English
Deutsch
FrançaisItalianoEspañol
Remedy
MPS: An unreadable page was found in a job. (The job is
damaged.)
MPS: Either a job or a page that was specified for output
does not exist.
Print out accumulated VMB data. If the VMB function is
being implemented by RAM DISK, increase the RAM DISK
capacity.
Note The power should be turned off while the printer is in the Ready
state. If it is unavoidable to turn the printer power off while the
Processing message is displayed, first make sure that the access
lamp of the hard disk unit is switched off before turning the power
off. If the access lamp does not turn off, open the printer’s front
cover to turn the access lamp off.
Specifications
Product/model name Hard disk unit/HD-2
Compatible printer Kyocera Page Printers
Capacity 2160 MB (when unformatted)
Data transfer speed 16.6 MB/sec. (Max.)
Average seek time 13 msec. (reading)/14 msec. (writing)
Average latency 7.1 msec.
Starting time 2.8 msec.
Installation Environment Conforms to the printer’s installation environment
Dimensions (H × W × D) 30 mm × 95 mm × 155 mm ( 1.81" × 3.74" × 6.10")
Weight 200 g (0.4 lbs)
Power supply From printer
Error Message
HARD DISK error 98
Press CONTINUE
HARD DISK error 99
Press CONTINUE
Virtual mail Box
Full
FS-6700 FS-7000/FS-7000+
Access lamp
Page 24

24
This page left blank intentionally.
 Loading...