

Kyocera fs 1000 plus schematic

Page printers

FS-1000/1000+ Series Combined Service Manual
C Kyocera Corporation 2001 All rights reserved. Export Edition
Notice
The information in this
manual is subject to change
without notification.
Additional pages may be
inserted in future editions. The
reader is asked to excuse any
technical inaccuracies or
typographical errors in the
present edition.
No responsibility is assumed
if accidents occur while the
service person is following the
instructions in this manual.
The contents of this manual
are protected by copyright. No
part of the manual may be
residential installation. This
equipment generates, uses,
and can radiate radio
frequency energy and, if not
installed and used in
accordance with the
instructions, may cause
harmful interference to radio
communications. However,
there is no guarantee that
interference will not occur in
a particular installation. If this
equipment does cause harmful
interference to radio or
television reception, which
can be determined by turning
the equipment off and on, the
is connected.
Consult the dealer or an
experienced radio/TV
technician for help.
Changes or modifications not
expressly approved by the
manufacturer for compliance
could void the user’s authority
to operate the equipment.
Important notice to service person
Before attempting service on
the equipment, including
disassembling, reassembling,
troubleshooting, and
adjustment, read this manual
reproduced or copied by any
means without the permission
of the copyright holder.
Information
This equipment has been
tested and found to comply
with the limits for a Class B
digital device, pursuant to Part
15 of the FCC Rules. These
limits are designed to provide
reasonable protection against
harmful interference in a
user is encouraged to try to
correct the interference by one
or more of the following
measures.
Reorient or relocate the
receiving antenna.
Increase the separation
between the equipment and
receiver.
Connect the equipment into an
outlet on a circuit different
from that to which the receiver
carefully. During performing
service, use extreme care to
avoid possible electric shock
hazard, burn, and human
injuries. Make sure the printer
is not provided with any safety
facilities other than those
primarily intended for the
safety of users.
FS-1000/FS-1000+

About the chapters
This manual contains informations pertaining to service and maintenance of the laser printers FS1000/1000+. This manual contains the following chapters:
Chapter 1: Product Information
Chapter 2: Installation/Operation
Chapter 3: Maintenance/Adjustments
Chapter 4: Operation Overview
Chapter 5: Disassembly
Chapter 6: Troubleshooting
Appendix A: Diagrams
Appendix B: Status Page
Appendix C: Interface
Contents
Contents
Contents
FS-1000/FS-1000+

REVISION HISTORY
Version Date Replaced Pages Remarks
1.00 10-May-2000 -
1.0A 25-May-2000 2-10, 3-7, 3-10, 4-5,
4-6, 4-9, 4-11, 4-21,
4-24, 5-25, 5-26, 6-9,
6-10, 6-11, A-8, B-6
1.0B 14-July-2000 5-31
2.00 1-Feb-2001 Overall revision Combined with FS-1000+ model
TO OBTAIN THE LATEST PRINTER DRIVERS AND UTILITIES, VISIT US AT OUR INTERNET HOME
PAGE: http://www.kyocera.com/w2k
FS-1000/FS-1000+

Chapter 1
Product Information

Chapter 1 Contents
1-1 Printer specifications ...................................................................................................................... 1-3
1-1-1 Specifications ............................................................................................................................ 1-3
(1) Engine ................................................................................................................................. 1-3
(2) Controller............................................................................................................................. 1-4
(3) Weight and dimensions ....................................................................................................... 1-4
(4) Power requirements ............................................................................................................ 1-5
(5) Environmental requirements ............................................................................................... 1-5
1-2 Names of parts ................................................................................................................................. 1-6
1-2-1 Name of parts ............................................................................................................................ 1-6
1-3 Safety information ........................................................................................................................... 1-7
1-3-1 Safety information...................................................................................................................... 1-7
(1) Laser safety......................................................................................................................... 1-7
(2) Laser notice......................................................................................................................... 1-7
(3) Laser caution label on the scanner unit............................................................................... 1-7
(4) CDRH regulations (U.S.A.).................................................................................................. 1-9
(5) Ozone concentration ........................................................................................................... 1-9
(6) FCC statement (U.S.A.) ...................................................................................................... 1-9
(7) Optional equipment ........................................................................................................... 1-10
(8) Important note on the interface connectors....................................................................... 1-10
(9) Canadian Department of Communications compliance statement ................................... 1-10
(10) Avis de conformité aux normes du ministère des Communications du Canada ............. 1-10
(11) ISO 7779 ......................................................................................................................... 1-10
1-4 Environmental requirements ........................................................................................................ 1-11
1-4-1 Environmental conditions ........................................................................................................ 1-11
(1) Clearance .......................................................................................................................... 1-12
(2) Places to avoid .................................................................................................................. 1-13
(3) Note on power ................................................................................................................... 1-13
(4) Removing the printer ......................................................................................................... 1-14
1-5 About the toner container ............................................................................................................. 1-15
1-5-1 Toner container ....................................................................................................................... 1-15
(1) Toner container handling................................................................................................... 1-15
(2) Toner container storage .................................................................................................... 1-16

1-1 Printer specifications
1-1-1 Specifications
(1) Engine
Item FS-1000 FS-1000+
Print method
Print speed (when printing
multiple page)
Resolution (dpi)
Smoothing
First print
(A4 or letter, 23 °C),
depends on input data
Warm-up time at 23 °C
Maximum duty cycle (A4)
Process unit life expectancy
Developing
Laser diode
Main charger
Transferring
Separation
Electrophotography laser scan
10 pages/min.
600 horizontal/600 vertical
KIR
(2,400 horizontal/600 vertical)
15 seconds or less
(42 seconds or when less
reverting from sleeping)
25 seconds
100,000 pages of printing or 3
years, whichever reached first
Mono component developer
Visible laser
Scorotorn positive charging
Negative charger roller
Curvature separation
←
12 pages/min.
←
←
←
←
←
←
←
←
←
←
Drum cleaning
Drum discharging
Fuser
Paper
Capacity of paper feed trays
(80 g/m2 [0.11 mm thickness])
Capacity of output trays
(80 g/m2 [0.11 mm thickness])
Blade
Eraser lamp (LED array)
Heat roller and press roller
Plain paper: Legal to A5
Cassette: 250 sheets,
MP tray: 50 sheets
Face-up: 30 sheets,
Face-down: 150 sheets
1-3
←
←
←
←
←
←
FS-1000/1000+
(2) Controller
Item FS-1000 FS-1000+
CPU
System ROM
Font ROM
Optional font ROM
(Dip socket)
Main (Video) RAM
Additional RAM (DIMM slot)
Host interface Parallel:
Serial :
KUIO-LV :
Page description language
Standard emulation modes
PowerPC401B2/75MHz
4 MB MASK DIMM
2 MB (16 M bit × 1)
1 MB (Optional KPDL2
Upgrade kit)
4 MB (16 M bit × 2)
Max. 132 (4 + 128) MB (16/32/
64/128 MB DIMM × 1 slot)
High-speed, bidirectional
(IEEE1284)
RS-232C/RS-422A, Max.
speed: 115.2 Kbps (optional
serial interface board IB-10E)
KUIO-LV (3.3 V)
Prescribe 2e
PCL6, Diablo 630, IBM
proprinter X24E, Epson LQ850,
←
←
←
←
←
←
←
←
←
←
←
Line printer, KPDL2 (Optional)
(3) Weight and dimensions
Item FS-1000 FS-1000+
Main unit Width:
Height:
Depth:
Weight:
37.76 cm (14.9 inches)
22.2 cm (8.7 inches)
37.45 cm (14.7 inches)
9.5 Kg (20.94 lb.)
←
←
←
←
(excl. protrusions)
FS-1000/1000+
1-4

(4) Power requirements
Item FS-1000 FS-1000+
Voltage/current US/Canada:
120 V AC ±10 %,
60 Hz ±2 %/4.4 A
Europe/Asia:
220 - 240 V AC ±10 %,
50/60 Hz ±2 %/2.2 A
Watts Normal operation:
120 V AC model: 233 W
220 - 240 V AC model: 506 W
Standby (Ready):
41 W
120 V AC model: 6 W
Sleeping:
220 - 240 V AC model: 6 W
(5) Environmental requirements
Item FS-1000 FS-1000+
Operating temperature and
humidity
Maximum altitude
10 to 32.5 °C (50 to 90.5 °F),
20 to 80 %RH
2,000 m (6,500 feet)
120 V AC ±10 %,
60 Hz ±2 %/4.9 A
220 - 240 V AC ±10 %,
50/60 Hz ±2 %/2.6 A
120 V AC model: 569 W
220 - 240 V AC model: 569 W
←
120 V AC model: 5 W
220 - 240 V AC model: 6 W
←
←
Noise emission (Excluding
peaks, measured at 1 m from
printer, as per ISO7779)
Maximum: 48 dB(A) ,
Standby: 28 dB(A)
←
1-5
FS-1000/1000+
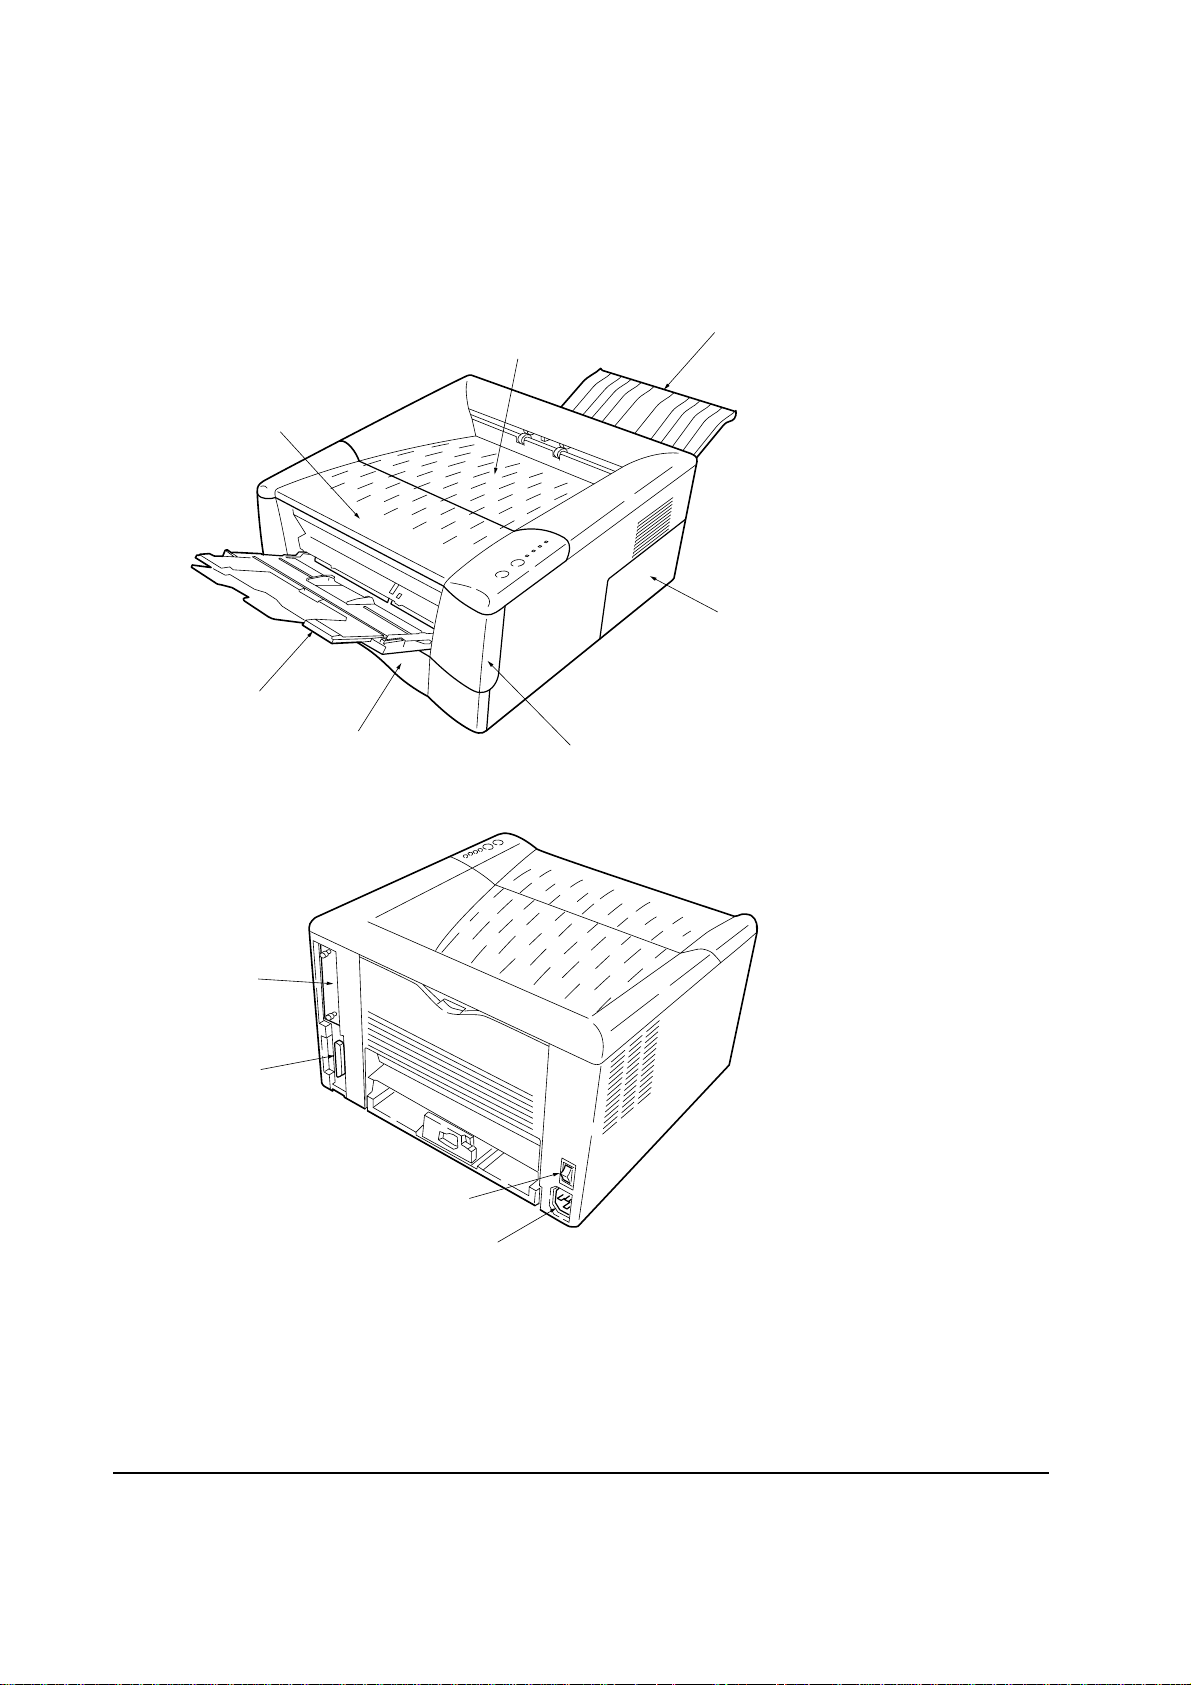
1-2 Names of parts
1-2-1 Name of parts
Top cover
MP tray
Face-up output tray
Face-down output tray
Side cover
(Expanding memory slot and
optional KPDL ROM socket inside)
Optional
interface
slot cover
Parallel
interface
connector
Cassette
Power switch
Front cover
Inlet
FS-1000/1000+
Figure 1-2-1 Name of parts
1-6

1-3 Safety information
1-3-1 Safety information
(1) Laser safety
This printer is certified as a Class 1 laser product under the U.S. Department of Health and Human
Services (DHHS) Radiation Performance Standard according to Radiation Control for Health and
Safety Act of 1968. This means that the printer does not produce hazardous laser radiation. Since
radiation emitted inside the printer is completely confined within protective housings and external
covers, the laser beam cannot escape from the printer during any phase of user operation.
(2) Laser notice
This printer is certified in the U.S. to conform to the requirements of DHHS 21 CFR Subchapter for
Class I (1) laser products, and elsewhere is certified as a Class I laser product conforming to the
requirements of IEC 825.
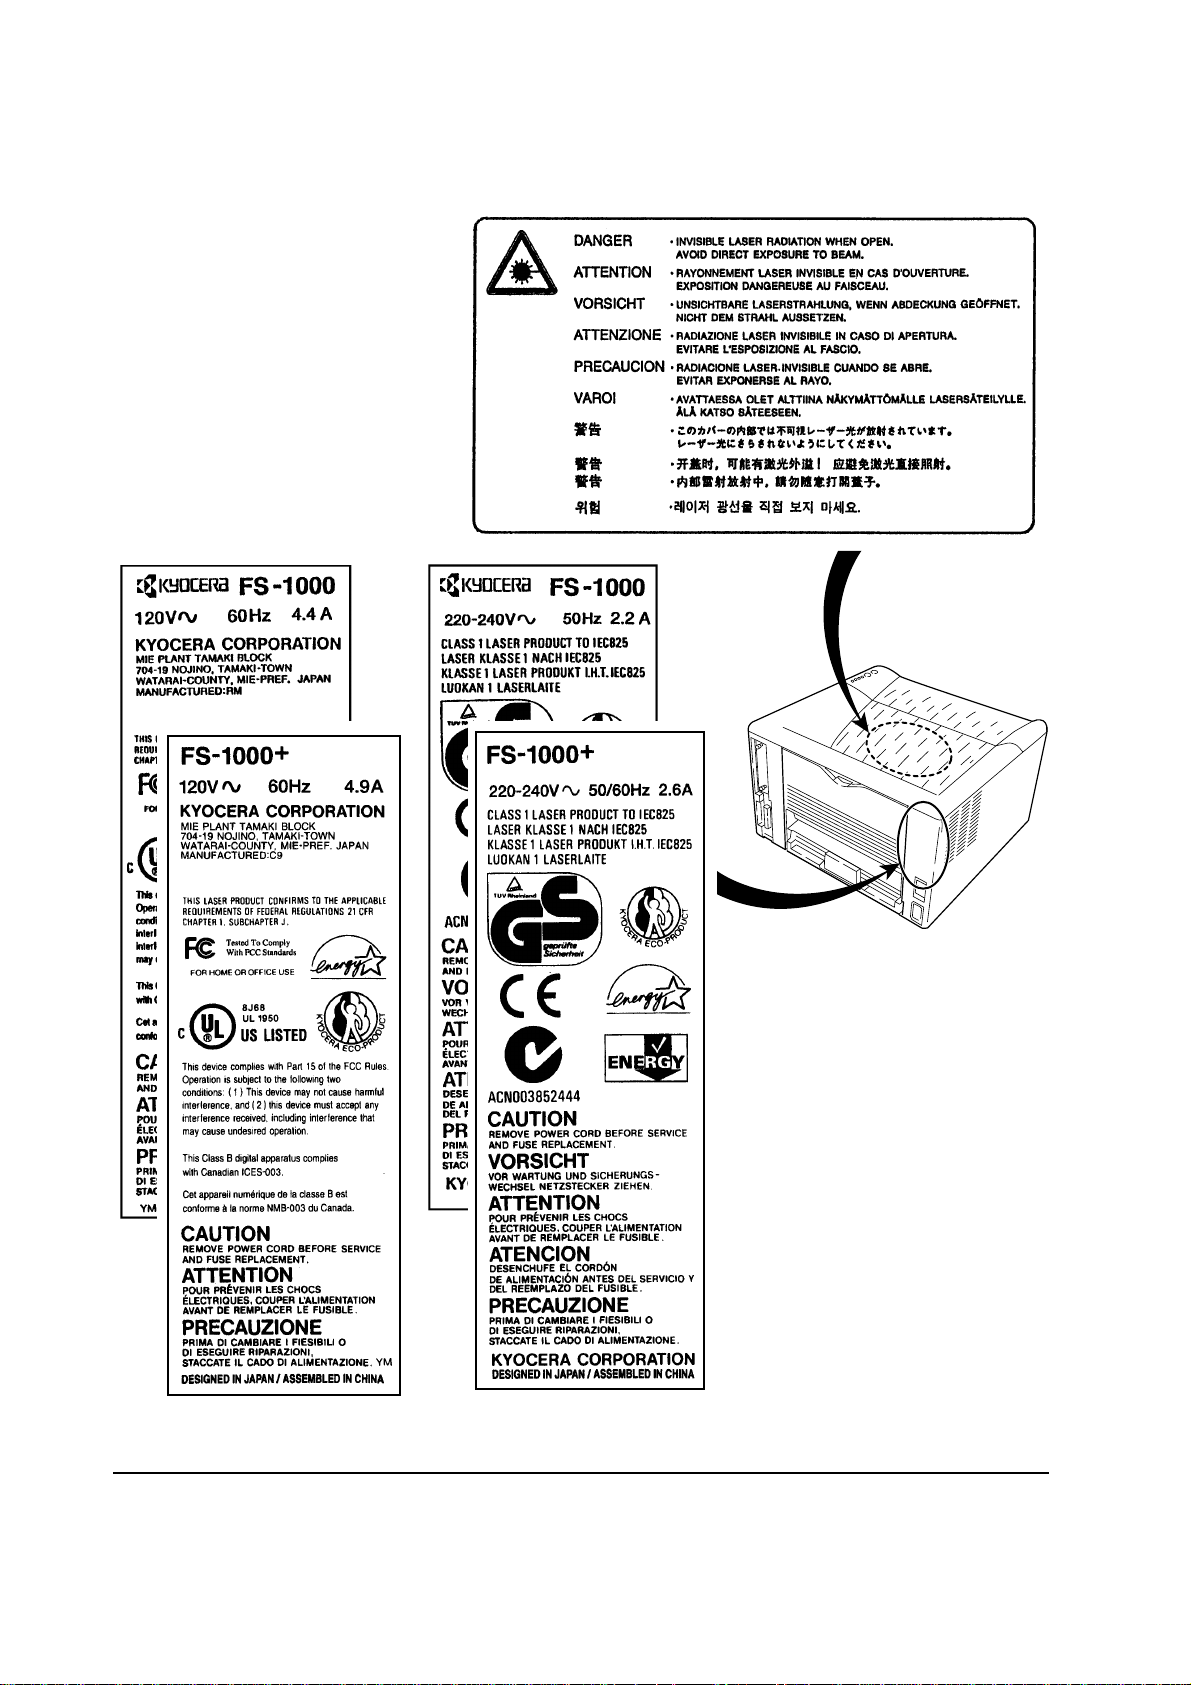
(3) Laser caution label on the scanner unit
The laser scanner unit has the following label affixed atop. Observe these cautionary statements
and figures when handling the laser scanner unit.
1-7
FS-1000/1000+
Laser radiation warning
WARNING Use of controls or adjustments or performance of procedures other than those
specified herein may result in hazardous radiation exposure.
Label on the scanner unit
(Inside the printer)
FS-1000/1000+
Label on the left cover rear side
Figure 1-3-1 Laser caution label
1-8

(4) CDRH regulations (U.S.A.)
The Center of Devices and Radiological Health (CDRH) of the U.S. Food and Drug Administration
implemented regulations for laser products on August 2, 1976. These regulations apply to laser
products manufactured after August 1, 1976. Compliance is mandatory for products marketed in
the United States. A label indicating compliance with the CDRH regulations must be attached to
laser products marketed in the United States.
(5) Ozone concentration
The printers generate ozone gas (O3) which may concentrate in the place of installation and cause
an unpleasant smell. To minimize concentration of ozone gas to less than 0.1 ppm, we recommend
you not to install the printer in a confined area where ventilation is blocked.
(6) FCC statement (U.S.A.)
This device complies with Part 15 of the FCC Rules. Operation is subject to the following two
conditions: (1) This device may not cause harmful interference, and (2) this device must accept any
interference received, including interference that may cause undesired operation.
This equipment has been tested and found to comply with the limits for a Class B digital device,
pursuant to Part 15 of the FCC Rules. These limits are designed to provide reasonable protection
against harmful interference in a residential installation. This equipment generates, uses, and can
radiate radio frequency energy and, if not installed and used in accordance with the instructions,
may cause harmful interference to radio communications. However, there is no guarantee that
interference will not occur in a particular installation. If this equipment does cause harmful
interferences to radio or television reception, which can be determined by turning the equipment
off and on, the user is encouraged to try to correct the interference by one or more of the following
measures:
• Reorient or relocate the receiving antenna.
• Increase the separation between the equipment and receiver.
• Connect the equipment into an outlet on a circuit different from that to which the receiver is
connected.
• Consult the dealer or an experienced radio/TV technician for help.
Changes or modifications not expressly approved by the manufacturer for compliance could void
the user’s authority to operate the equipment. Shielded circular cable should be used for interfacing
with the computer.
FS-1000/1000+
1-9

Any modification without prior permission may cause harmful interference.
If any modification/change is introduced to this equipment without prior permission, Kyocera as
the manufacturer cannot guarantee compliance with FCC rules.
To use equipment which does not comply with FCC rules is prohibited.
(7) Optional equipment
The printer may be optionally installed with the following units:
• PK-6 KPDL2 Upgrade kit
• IB-10E Serial interface board kit
• PF-17 Paper feeder (250 sheets)
(8) Important note on the interface connectors
Be sure to turn off printer power before connecting or disconnecting an interface cable to the
printer. For protection against static discharge which may be applied to the printer's internal
electronics through the interface connector(s), keep any interface connector which is not in use
capped using the protective cap supplied.
WARNING This equipment has been certified to comply with the limits for a Class B
computing device, pursuant to Subpart J of Part 15 of FCC Rules. Only
peripherals (computer input/output devices, terminals, etc.) certified to comply
with the Class B limits may be attached to this equipment. Operation with non-
certified peripherals is likely to result in interference to radio and TV reception.
(9) Canadian Department of Communications compliance statement
This Class B digital apparatus complies with Canadian ICES-003.
(10) Avis de conformité aux normes du ministère des Communications du Canada
Cet appareil numérique de la classe B est conforme à la norme NMB-003 du Canada.
(11) ISO 7779
Maschinenlärminformationsverordnung 3. GSGV, 18.01.1991: Der höchste Schalldruckpegel beträgt
70 dB(A) oder weniger gemäß ISO 7779.
FS-1000/1000+
1-10

1-4 Environmental requirements
1-4-1 Environmental conditions
The Environmental requirements section on page 1-5 should be observed to ensure the optimum
operation of the printer. The use of the printer in a location which does not satisfy the requirements
may result in troubles and risk shortening its service life.
The printer will work best if it is installed in a location that is:
• Level and well supported (Place the printer on a table or desk.)
• Not exposed to sunlight or other bright light (not next to an uncurtained window). Do not place
the printer on an unstable cart, stand or table.
• Near an AC wall outlet, preferably one that can be used for the printer alone. The outlet should
have a ground slot, or an adapter should be used. If you use an extension cord, the total length of
the power cord plus extension cord should be 17 feet or 5 meters or less.
• Well ventilated, not too hot or cold, and not too damp or dry (See section Environmental
requirements on page 1-5). If you install the printer where the temperature or humidity is outside
the requirements in section Environmental requirements in chapter 1, the best print quality may
not be expected and there will be an increased chance of paper jams.
• Provide a sufficient clearances around the printer to ensure ventilation and ease of access. (See
section Clearance on next page).
1-11
FS-1000/1000+
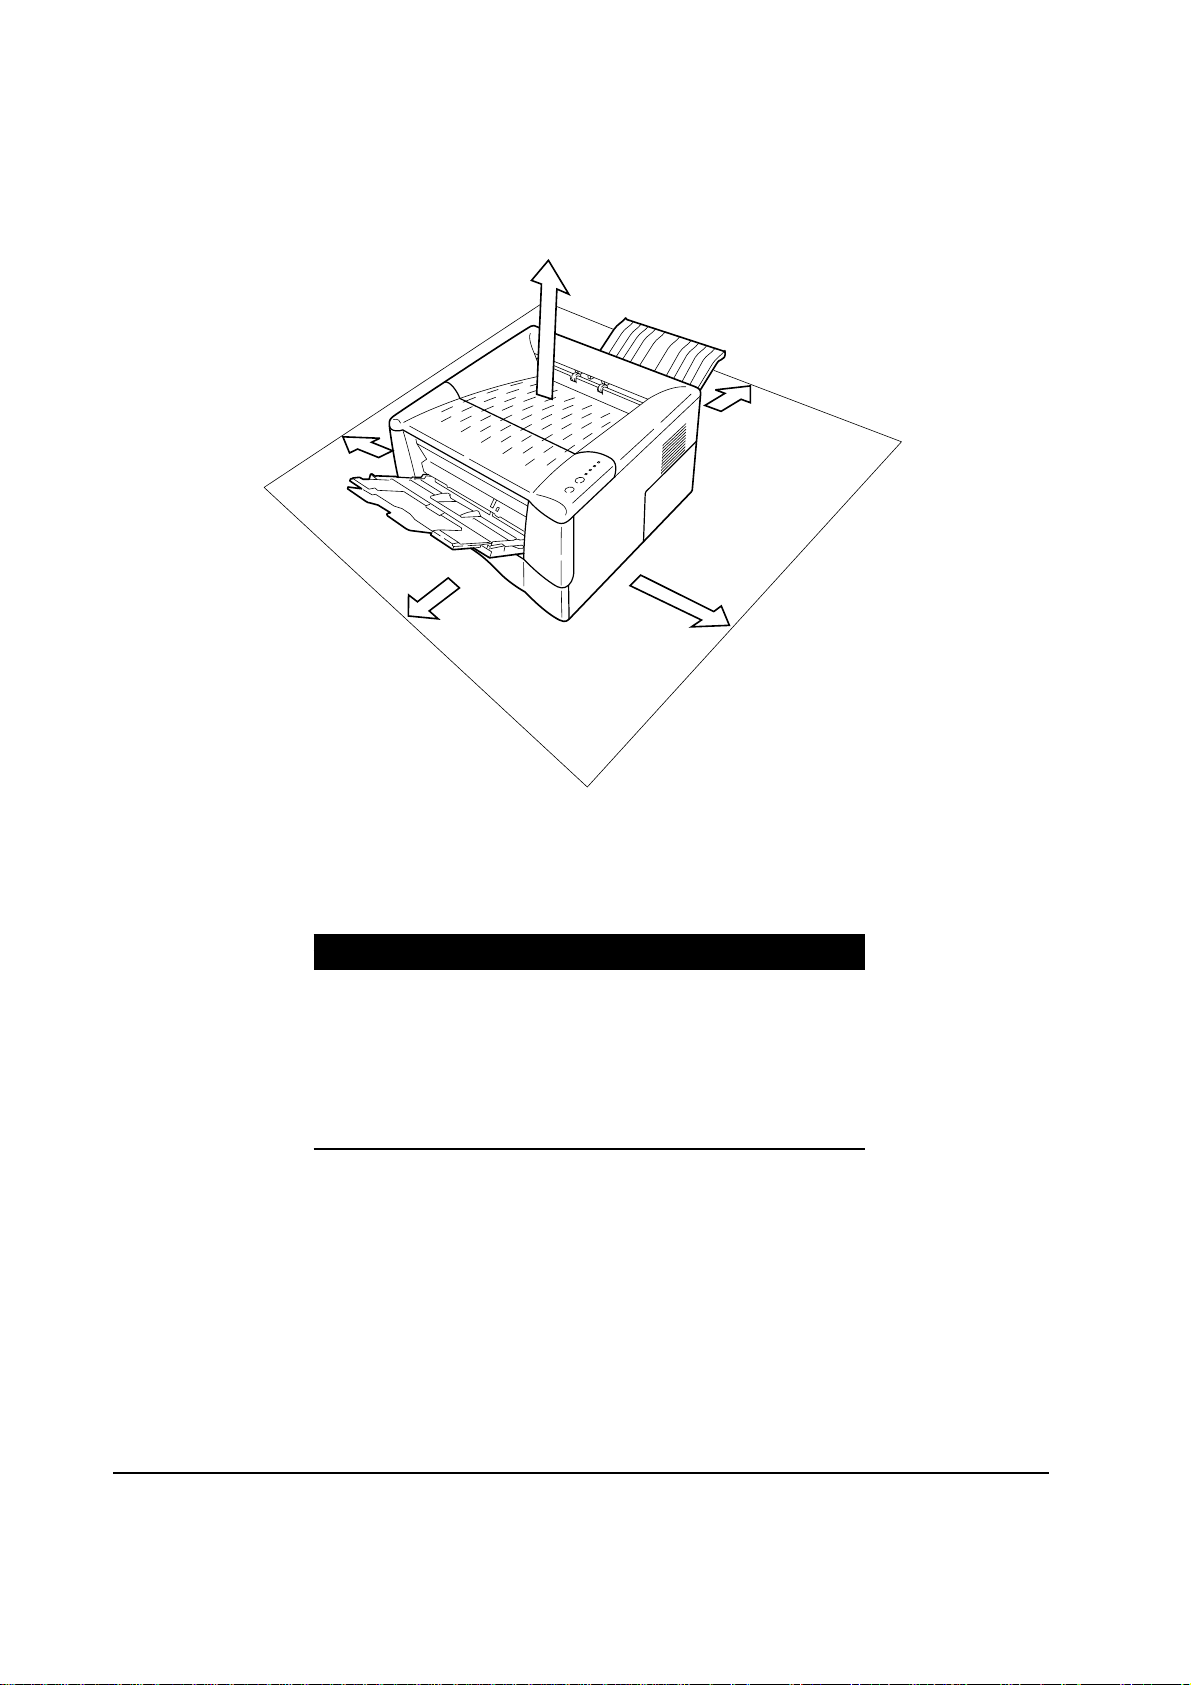
(1) Clearance
Allow the necessary minimum clearance on all sides of the printer as diagrammed below.
5
4
1
2
Figure 1-4-2 Clearance
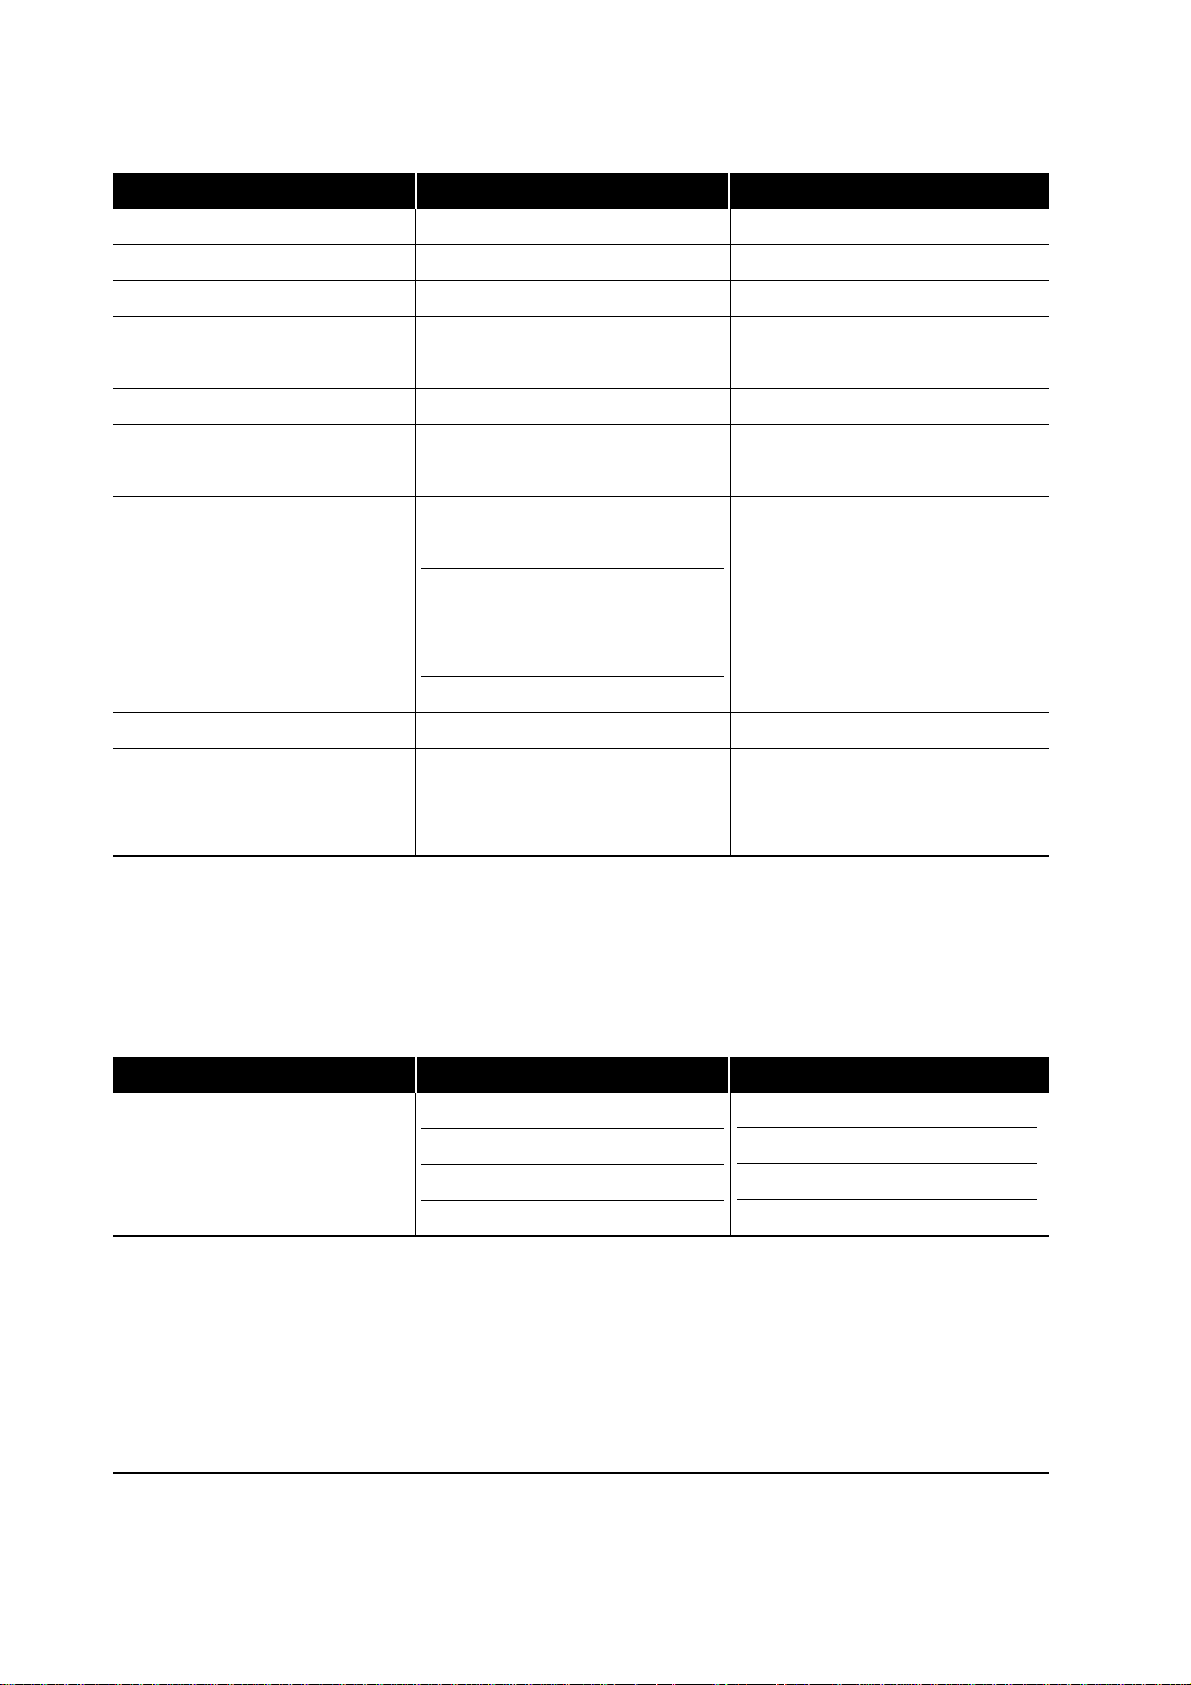
Ref. Clearance Dimensions
1 Left 25 cm (9-7/8 inches)
2 Front 50 cm (19-11/16 inches)
3 Right 25 cm (9-7/8 inches)
4 Back 40 cm (15-3/4 inches)
5 Above 30 cm (11-13/16 inches)
3
FS-1000/1000+
1-12

(2) Places to avoid
Avoid installing the printer in locations exposed to:
• Direct drafts of hot or cold air.
• Direct drafts of outside air. (Avoid locations next to outside doors.)
• Sudden temperature or humidity changes.
• Any source of high heat, such as a radiator or stove.
• Excessive dust. Dust and smoke may cause contamination on the laser scanner window, causing
print quality problem.
• Vibration.
• Ammonia fumes or other harmful fumes. (In case of fumigating the room or saturate it with
insecticide, remove the printer first.)
• Avoid greenhouse-like rooms. (Because of sunlight and humidity.)
• Avoid enclosed spaces that block ventilation.
• Avoid sites more than 6,500 feet or 2,000 meters above sea level.
(3) Note on power
Use only the power source voltage conforming to the printer’s rated power voltage. Do not use
other power sources.
• Disconnect the printer from the power source before attempting removal or replacement of an
electrical component or a printed-circuit board.
• The printer should not be connected to a power source until the instruction is given to do so
when performing tests described in this manual.
• In connecting the printer power, exercise an extreme care in handling the power supply or any
other electric parts which may give an electric shock.
• Before performing maintenance or repair, power from both the power source and the associated
peripheral devices (computer, sorter, etc.) should be disconnected, unless otherwise specified.
• To avoid possible electrical shock, extreme caution must be exercised in handling the power
cord and any other electrical part.
• An easily accessible socket outlet must be provided near the equipment.
WARNING As the disconnect device is not incorporated in the printer’s AC primary circuit,
an easily accessible socket outlet must be provided near the equipment.
1-13
FS-1000/1000+

(4) Removing the printer
Observe the following precautions in removal and transportation of the printer.
• Be sure to repack the printer in its original carton.
• Do not leave the printer, toner container, process unit and other printer modules inside a vehicle
if the outdoor temperature is more than 25 °C. As unexpectedly high temperature may develop
inside when a vehicle is parked for a long period of time, the drum, toner container, process unit
and the supplies should be removed from the vehicle. The vehicle during transportation should
be parked in the shade or with the window open to allow minimum air circulation or the adequate
air conditioning should be made.
• Should the printer be left in a vehicle, it may not be exposed to the temperature change of more
than 7 °C within 30 minutes.
• Before removing the printer to a warm place, wrap it in a blanket, etc., before crating it. Allow
approximately two to three hours after having moved after uncrated. Failure to observe the
above may result in moisture condensation which will affect the performance of the printer.
FS-1000/1000+
1-14

1-5 About the toner container
1-5-1 Toner container
The printer should use a Kyocera TK-17 toner kit. To ensure the high print quality and long service
life, the following handling precautions should apply.
CAUTION As the Ecosys printers are designed to ensure the optimum print quality when
used with Kyocera’s proprietary toner, Kyocera do not recommend to use any
refilled toner containers that may be available commercially. This is because
Kyocera have no means of control over how such refilled toner could affect the
print quality and the reliability of the printer.
(1) Toner container handling
To loosen and mix the toner inside before use, with the label side down, thoroughly shake the toner
container 1 horizontally at least five times.
1
Figure 1-5-1 Toner container handling
CAUTION Do not attempt to disassemble or refill the toner container.
1-15
FS-1000/1000+

(2) Toner container storage
The toner contained in the container is susceptible to temperature and humidity. To ensure the high
print quality, store the toner container in a place that satisfies the following environmental conditions:
Temperature: -20 to 40 °C (-4 to 104 °F)
Humidity: 15 to 90 % RH
NOTE If the toner container is removed from the printer’s developer unit, put it in a
protective bag and keep it in a dark place.
CAUTION If the printer is shipped for return, etc., do not ship it with the toner container
installed. Otherwise, toner may leak and contamination may result in the
printer.
FS-1000/1000+
1-16

Chapter 2
Installation/Operation

Chapter 2 Contents
2-1 Unpacking......................................................................................................................................... 2-3
2-1-1 Unpacking and inspection ......................................................................................................... 2-3
2-2 Installing the printer ........................................................................................................................ 2-4
2-2-1 Installing the toner container ..................................................................................................... 2-4
2-2-2 Expanding memory.................................................................................................................... 2-8
(1) Minimum memory requirements.......................................................................................... 2-8
(2) DIMM specifications ............................................................................................................ 2-8
(3) Notes on handling DIMM..................................................................................................... 2-9
(4) Installing the DIMM............................................................................................................ 2-10
(5) Testing the expansion memory ......................................................................................... 2-11
(6) Installing KPDL.................................................................................................................. 2-12
Getting access to the KPDL ROM socket............................................................................... 2-13
2-3 Using the operator panel............................................................................................................... 2-14
2-3-1 Operator panel......................................................................................................................... 2-14
2-3-2 Remote operation panel .......................................................................................................... 2-15

2-1 Unpacking
2-1-1 Unpacking and inspection
The package should contain the printer and the accessories as shown in the figure below. Remove
the printer and all the accessories from the package.
Installation manual
Printer
Toner container (TK-17)
Cleaning cloth
Kyocera digital library CD-ROM
Power cord
Figure 2-1-1 Unpacking
For unpacking, place the box containing the printer on a flat, stable surface. Remove the manuals,
toner kit, and other items located on top of the spacer and remove the spacer. Carefully remove the
printer. Obtain help from other persons if necessary.
2-3
FS-1000/1000+
2-2 Installing the printer
Installing the printer requires several steps. Proceed as follows in sequence. If the option paper
feeder is used with the printer, begin installation with connecting the printer and the paper feeder
PF-17. For details, refer to the Paper feeder PF-17 Service Manual.
2-2-1 Installing the toner container
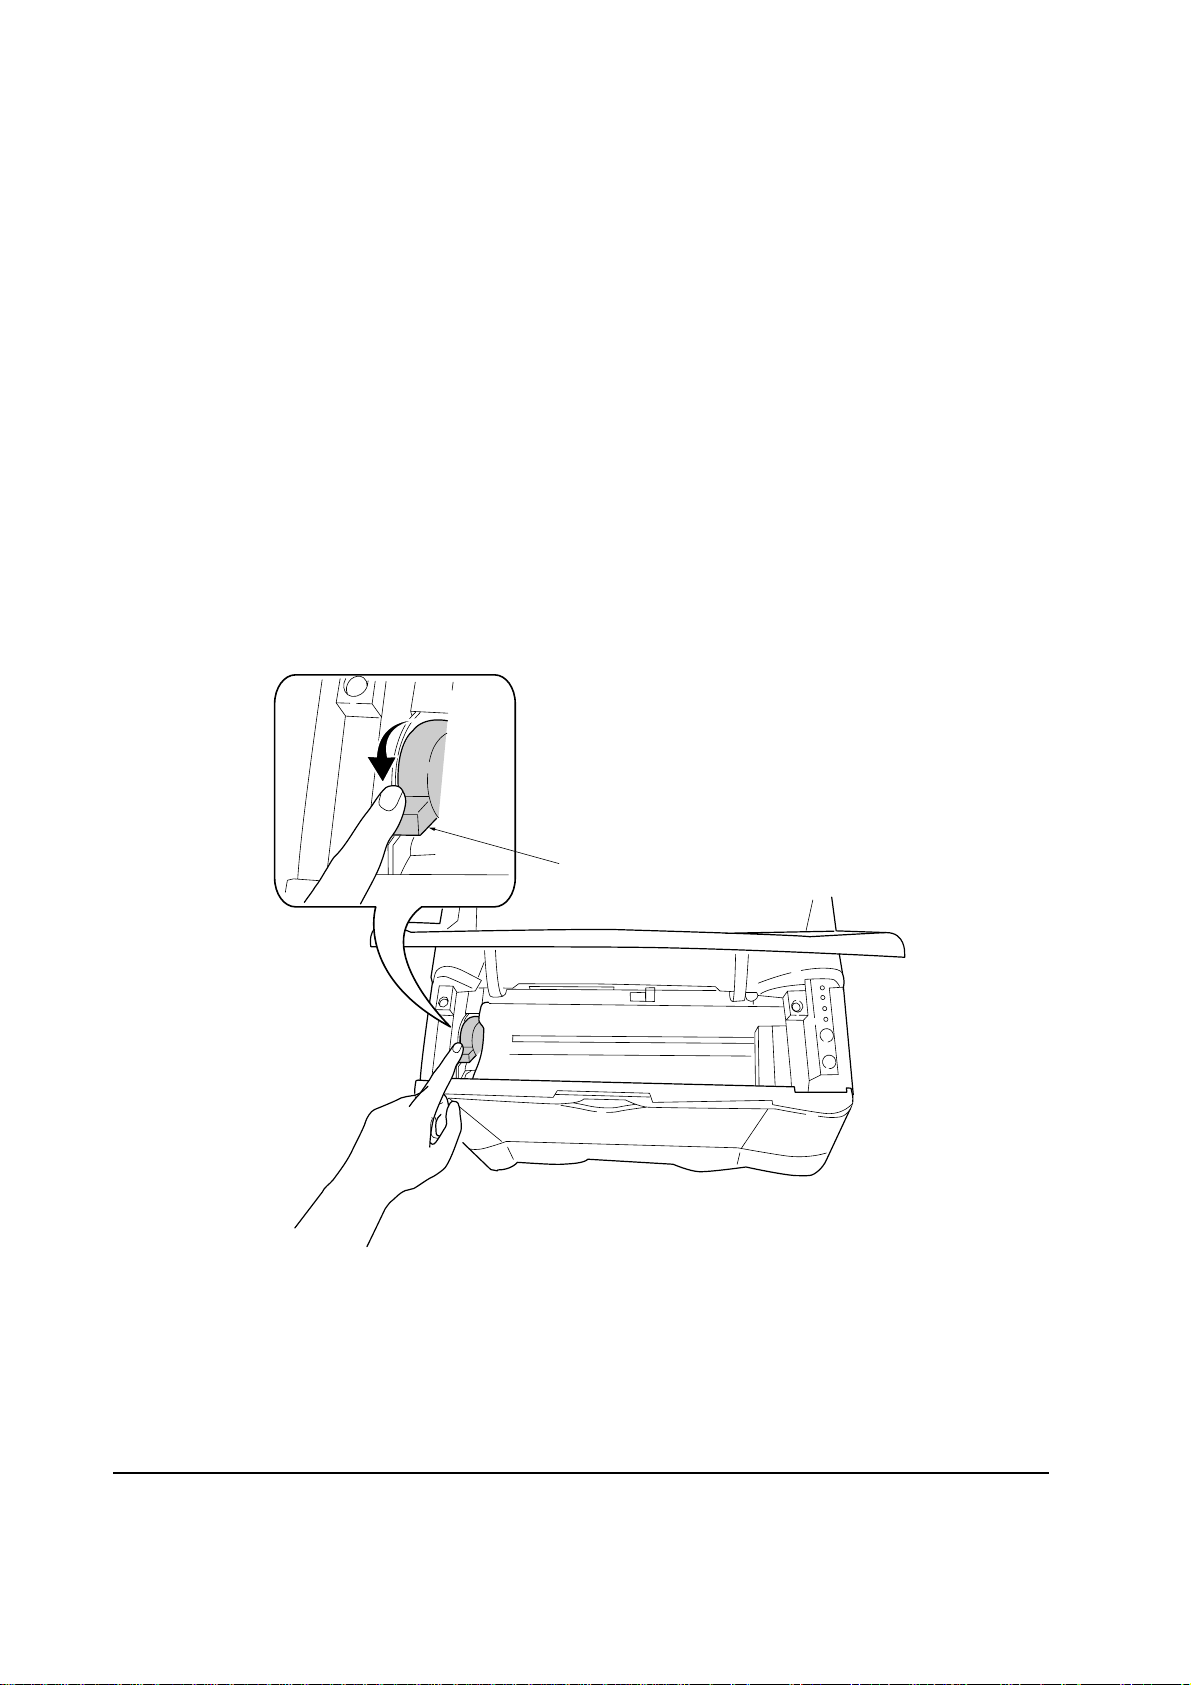
1. Open the top cover all the way.
2. Confirm that the lock lever #1 1 is in the release (forward) position. If not, pull it forward until
it is in the release position.
1
Figure 2-2-1 Confirming the lock lever #1
FS-1000/1000+
2-4
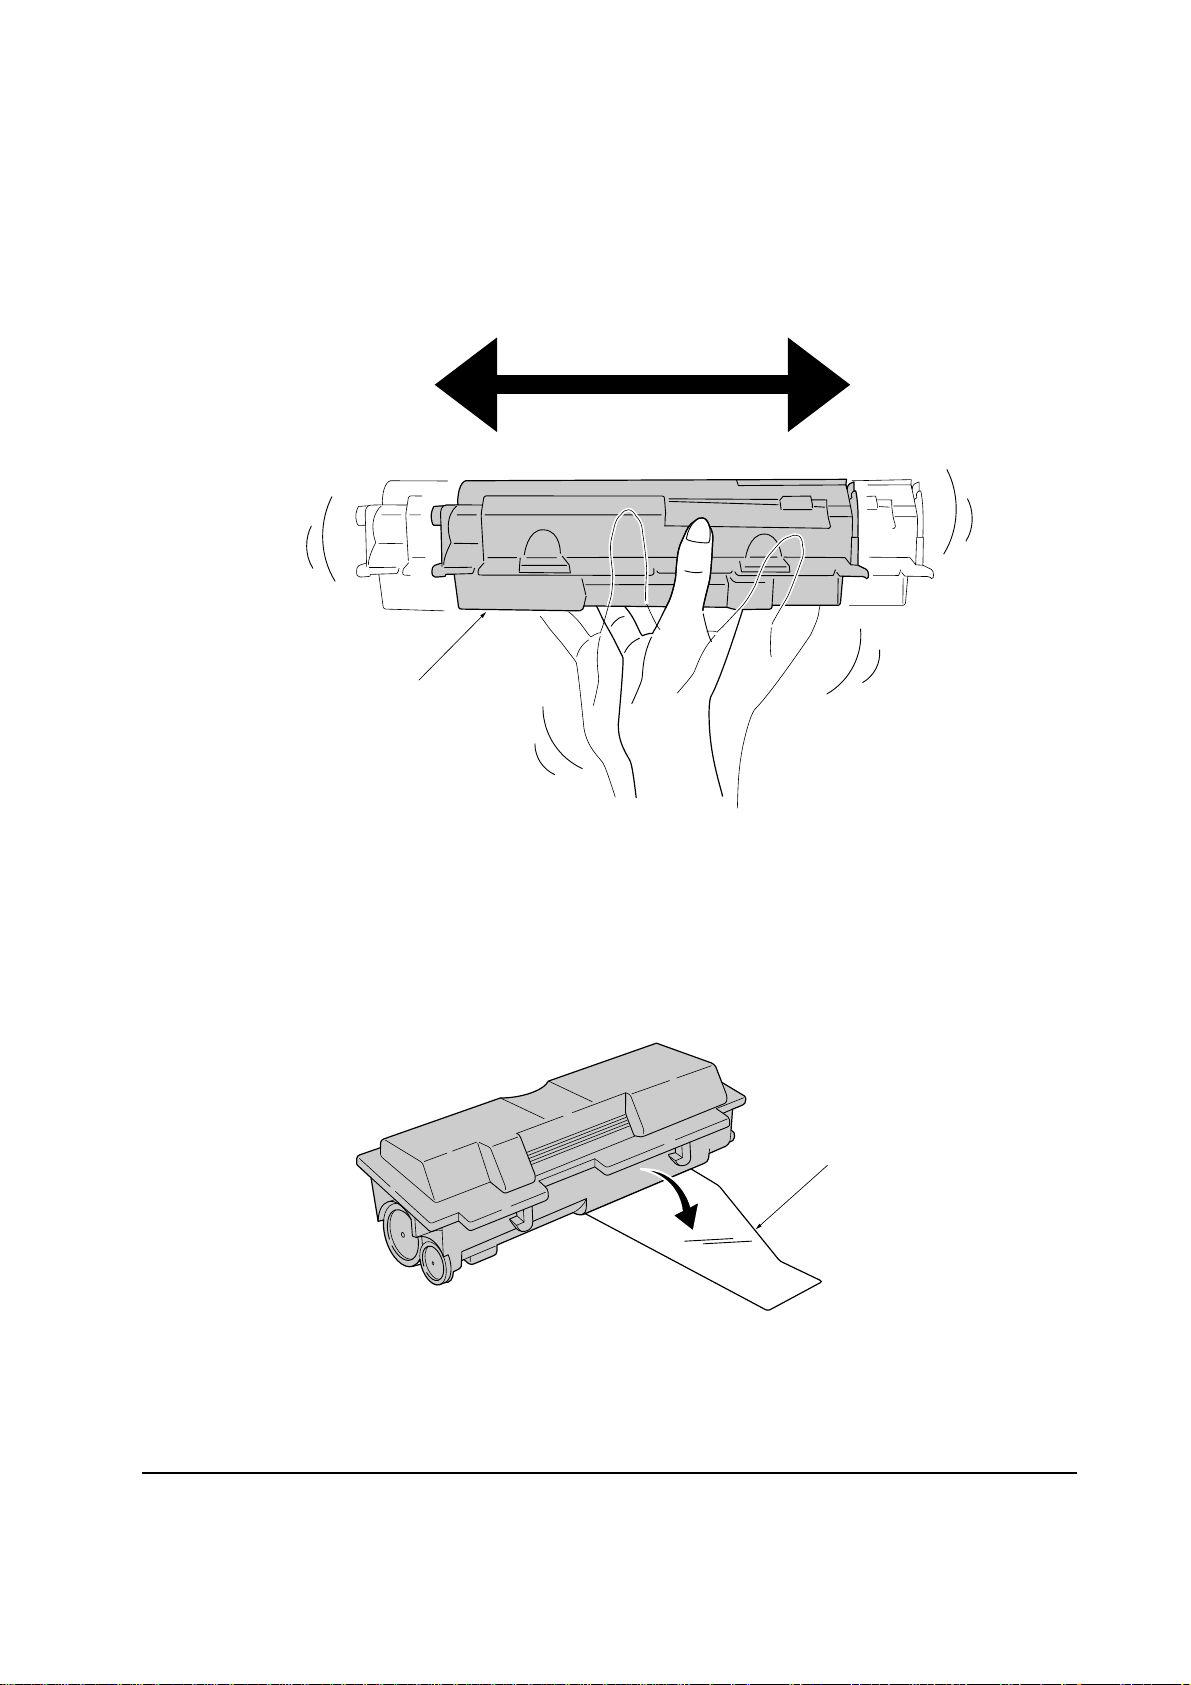
3. Take the toner container 2 from the bag. Hold it with the protective seal (orange-colored)
facing up. Shake the toner container 2 horizontally at least five times. This ensures that the
toner is evenly distributed inside.
2
Figure 2-2-2 Shaking the toner container
4. Carefully remove the protective seal 3.
Figure 2-2-3 Removing the protective seal
3
2-5
FS-1000/1000+

5. Install the toner container 2 into the printer.
6. Push firmly on the top of the toner container 2 at the positions marked [PUSH HERE].
2
FS-1000/1000+
Figure 2-2-4 Installing the toner container
2-6

7. Push the lock lever #1 1 to the lock position.
8. Close the top cover 4.
1
LOCK
UNLOCK
K
C
O
L
K
C
O
L
N
U
4
Figure- 2-2-5 Locking the toner container
NOTE The printer is shipped from the factory with no toner supplied in its developer
(Process unit). When the printer is first switched on after the toner container is
installed in the manner above, there will be a delay of several minutes before
the printer gets ready to print a job.
This delay is necessary for the printer to fill the developer reservoir with a
sufficient amount of toner to continuously support a print job. The period of
time is approximately 15 minutes.
If the toner low or replace toner indication does not go off after installing the
new toner container, take the toner container out once, shake it well, then
install again.
FS-1000/1000+
2-7

2-2-2 Expanding memory
The FS-1000/1000+ comes standard equipped with 4 MB of main memory. Printer memory can be
expanded to up to the maximum 132 MB (4 MB + 128 MB) by installing an optional DIMM (Dual
In-line Memory Module).
(1) Minimum memory requirements
Refer to the table below for minimum memory requirements in various environments.
Resolution
Printing environment 300 dpi 600 dpi
HP LaserJet 5P (factory setting) 2 MB 2 MB
HP LaserJet 5P with resource protection - 10 MB
(2) DIMM specifications
Memory size in MB 8, 16, 32, 64, 128
Number of pins 72
Access speed 80 ns or faster
Parity Without
Bus width 32 bits
FS-1000/1000+
2-8

(3) Notes on handling DIMM
Before proceeding to install DIMM, read the following notes for handling the main board and
DIMMs:
• Protect the electronics by taking these precautions:
• Before touching a DIMM, touch a water pipe or other large metal object to discharge yourself
of static electricity. While doing the work, it is recommended that you wear an antistatic wrist
strap.
• Touch the main board and DIMM only by the edges, not in the middle.
Figure 2-2-6 Handling DIMM
2-9
FS-1000/1000+
(4) Installing the DIMM
The main board of the printer is equipped with one socket for memory expansion. Expansion memory
is available in the form of DIMM (Dual In-line Memory Module).
CAUTION Take precautions that no foreign substances such as metal chips or liquid get
inside the printer during the installation process. Operation of the printer during
the presence of a foreign substance may lead to fire or electric shock.
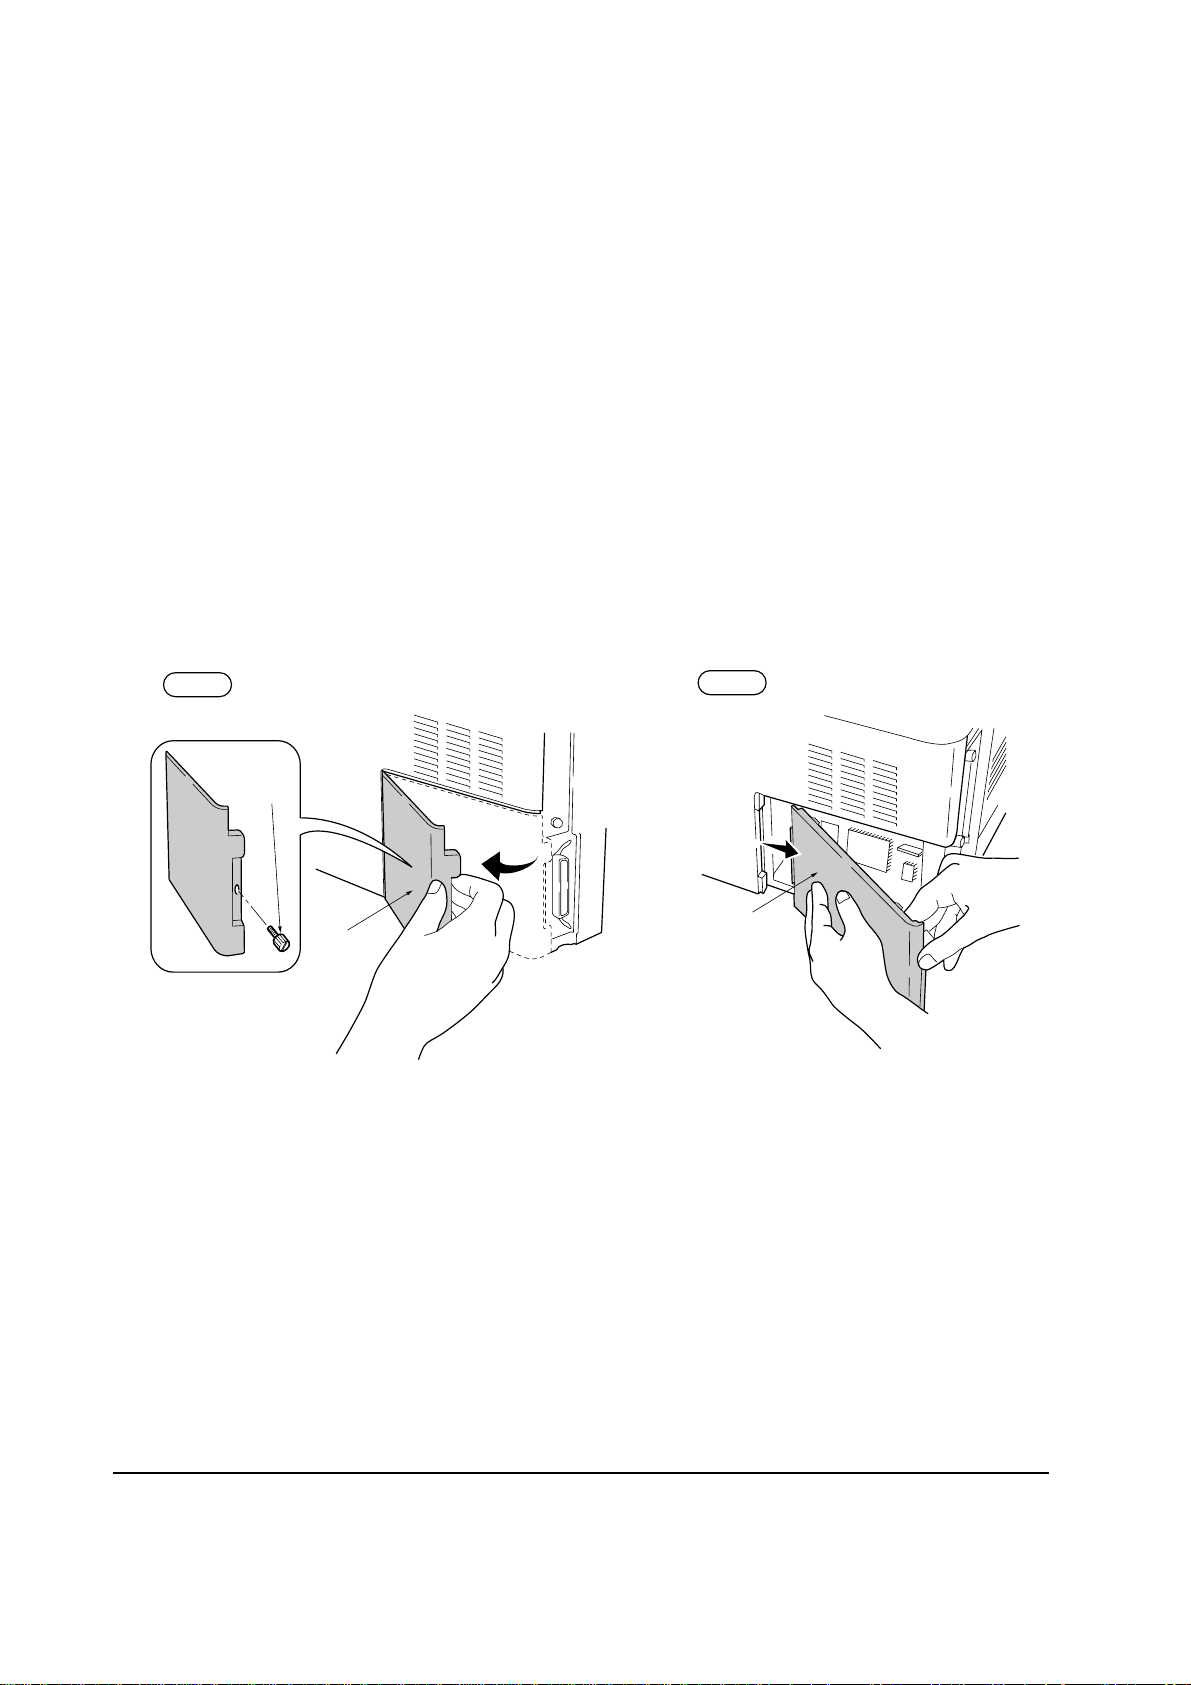
WARNING Turn the printer’s power switch off. Unplug the printer’s power cable and
disconnect the printer from the computer or the network.
Remove the side cover 1 as shown in the figure below.
Step 1
Step 2
Remove
one screw.
1
1
Figure 2-2-7 Removing side cover
FS-1000/1000+
2-10
 Loading...