

Page 1
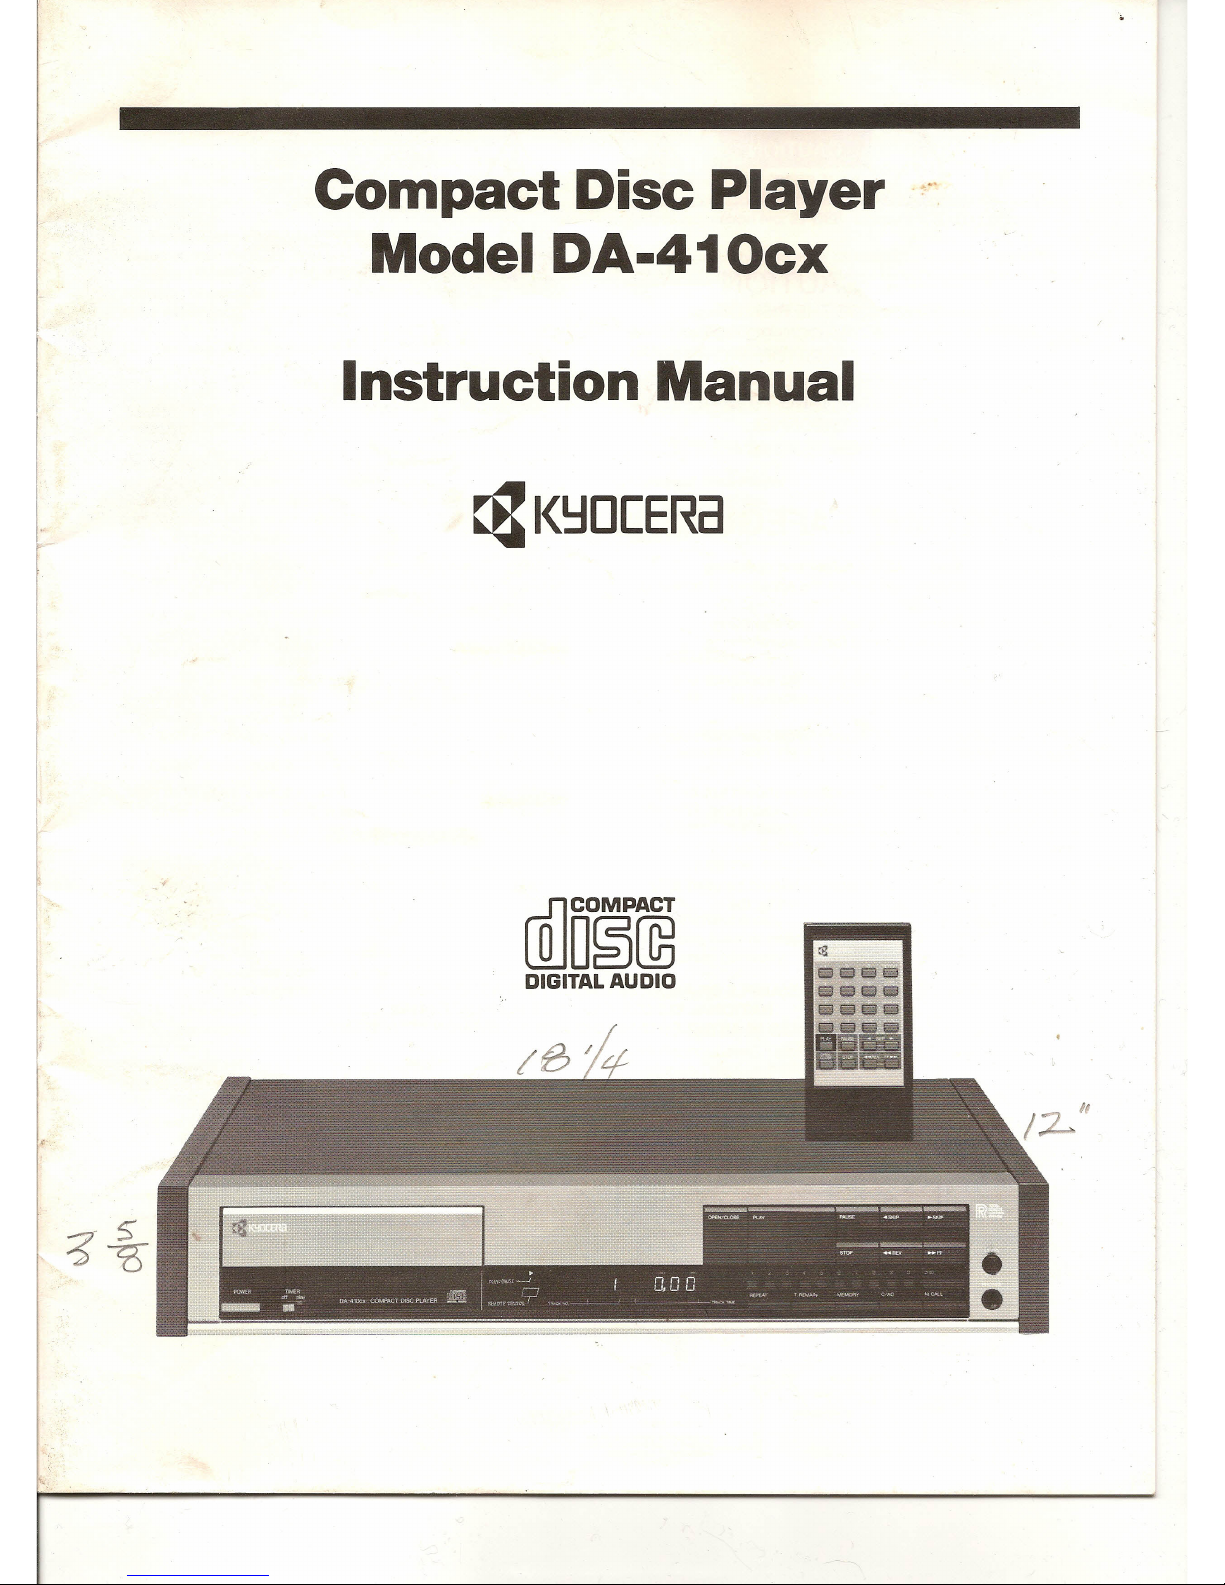
Compact Disc Player .
Model DA·410cx
Instruction Manual
~1<~O[ERa
-
'
[gJoliJ@
DIGITAL AUDIO
Page 2
--CAUTION
TO REDUCE THE RISK OF
ELECTRIC SHOCK, DO NOT
REMOVE COVER (OR BACK). NO
USER-SERVICEABLE PARTS INSIDE.
REFER SERVICING TO QUALIFIED
SERVICE PERSONNEL.
This symbol is intended to alert you of
the presence of uninsulated dangerous
voltage within the unit's enclosure that
may be of sufficient magnitude to con-
stitute a risk of electric shock to persons.
This symbol is intended to alert you of
the presence of important operating
and maintenance instructions in the
literature accompanying the unit.
WARNING
TO PREVENT FIRE OR SHOCK
HAZARD, DO NOT EXPOSE THIS
APPLIANCE TO RAIN OR MOISTURE.
IMPORTANT SAFEGUARDS
1. Read Instructions - All the safety and operating
instructions should be read before the appliance is operated.
2. Retain Instructions - The safety and operating
instructions should be retained for future reference.
3. Heed Warnings - All warnings on the appliance and in
the operating instructions should be adhered to.
4. Follow Instructions - All operating and use instructions
should be followed.
5. Water and Moisture - The appliance should not be used
near water-for example, near a bathtub, washbowl, kitchen
sink, laundry tub, in a wet basement, or near a swimming
pool.
6. Carts and Stands - The appliance should be used only
with a cart or stand that is recommended by the
manufacturer.
7. Wall or Ceiling Mounting - The appliance should be
mounted to a wall or ceiling only as recommended by the
manufacturer.
8. Ventilation - The appliance should be situated so that its
location or position does not interfere with its proper
ventilation. For example, the appliance should not be
situated on a bed, sofa, rug, or similar surface that may block
the ventilation openings; or, placed in a built-in installation,
such as a bookcase or cabinet that may impede the flow of
air through the ventilation openings.
9. Heat - The appliance should be situated away from heat
sources such as radiators, heat registers, stoves, or other
appliances (including amplifiers) that produce heat.
10. Power Sources - The appliance should be connected to
a power supply only of the type described in the operating
instructions or as marked on the appliance.
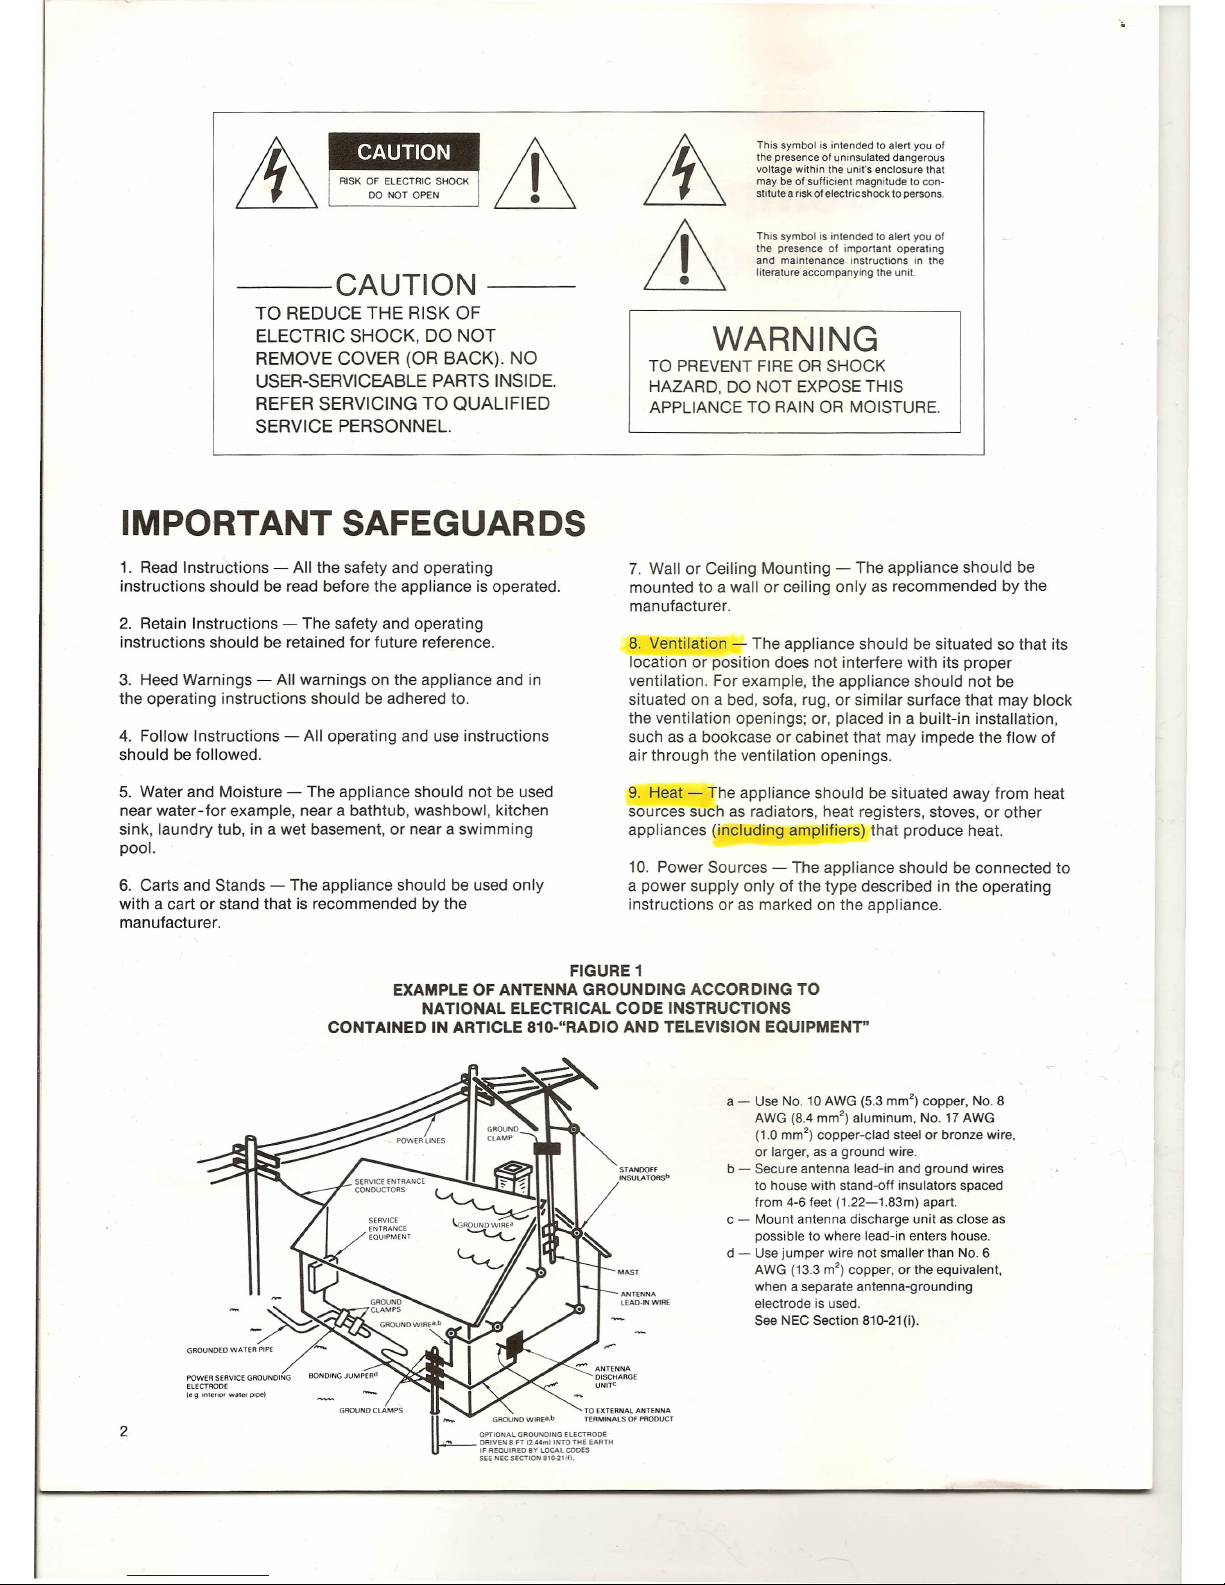
FIGURE 1
EXAMPLE OF ANTENNA GROUNDING ACCORDING TO
NATIONAL ELECTRICAL CODE INSTRUCTIONS
CONTAINED IN ARTICLE 810-"RADIO AND TELEVISION EQUIPMENT"
GROUNDED WATER PIPE
POWER SERVICE GROUNDING
ELECTRODE
le.g mtenor water pipe)
,...,. ANTENNA
DISCHARGE
UNITe
2
STANOOFF
INSULATORSb
a - Use No. 10 AWG (5.3 rnrn"} copper, NO.8
AWG (8.4 mm
2
)
aluminum, No. 17 AWG
(1.0 rnrn") copper-clad steel or bronze wire,
or larger, as a ground wire.
b - Secure antenna lead-in and ground wires
to house with stand-off insulators spaced
from 4-6 feet (1.22-1.83m) apart.
C - Mount antenna discharge unit as close as
possible to where lead-in enters house.
d - Use jumper wire not smaller than NO.6
AWG (13.3 m
2
)
copper, or the equivalent,
when a separate antenna-grounding
electrode is used.
See NEe Section 810-21 (i).
MAST
ANTENNA
LEAD·IN WIRE
Page 3
11. Grounding or Polarization - The precautions that
should be taken so that the grounding or polarization means
of an appliance is not defeated.
12. Power-Cord Protection - Power-supply cords should be
routed so that they are not likely to be walked on or pinched
by items placed upon or against them, paying particular
attention to cords at plugs, convenience receptacles, and the
point where they exit from the appliance.
13. Cleaning - The appliance should be cleaned only as
recommended by the manufacturer.
14. Power Lines - An outdoor antenna should be located
away from power lines.
15. Outdoor Antenna Grounding - If an outside antenna is
connected to the receiver, be sure the antenna system is
grounded so as to provide some protection against voltage
surges and built up static charges.
Article 810 of the National Electrical Code, ANSI/NFPA
No. 70-1984, provides information with respect to proper
grounding of the mast and supporting structure, grounding
of the lead-in wire to an antenna discharge unit, size of
grounding conductors, location of antenna-discharge unit,
connection to grounding electrodes, and requirements for
the grounding electrode. See Figure 1.
16. Nonuse Periods - The power cord of the appliance
should be unplugged from the outlet when left unused for a
long period of time.
17. Object and Liquid Entry - Care should be taken so that
objects do not fall and liquids are not spilled into the
enclosure through openings.
18. Damage Requiring Service - The appliance should be
serviced by qualified service personnel when:
A. The power-supply cord or the plug has been
damaged; or
B. Objects have fallen, or liquid has been spilled into
the appliance; or
C. The appliance has been exposed to rain; or
D. The appliance does not appear to operate normally
or exhibits a marked change in performance; or
E. The appliance has been dropped, or the enclosure
damaged.
19. Servicing - The user should not attempt to service the
appliance beyond that described in the operating
instructions. All other servicing should be referred to
qualified service personnel.
CLASS 1 LASER PRODUCT
Kyocera Corp. certifies that this equipment conforms to
DHHS regulation No. 21 CFR, Chapter 1, SubchapterJ.
Danger! Invisible laser radiation when opened and
interlock failed or defeated. Avoid direct exposure to beam.
Caution! Use of the controls or adjustments or
performance of procedures other than those specified herein
may result in hazardous radiation exposure.
In the space provided below, record the serial number of
your unit, located on the back of the cabinet.
Retain this number for future reference.
Compact Disc Player
Kyocera DA-410cx
Serial No.
Precautions
On safety
Check that the operating voltage of your unit, 120V
60Hz, accords with the voltage of your local power supply.
Dew
When a cold room is heated up or when the CD player is
moved from a cold location into a warm one, moisture may
condense on the laser pickup's lens, preventing correct
playback.
Remove the disc and leave the CD player turned on for
about one hour to evaporate the dew. Then the CD player
will operate correctly.
Power cord
To disconnect the cord pull it out by grasping the plug,
not the cord itself. Unplug the unit from the wall outlet for
prolonged nonuse periods.
Location
Do not install the unit in a location near source
generating heat, e.g. radiators, air ducts, in a place subject to
direct exposure to sunlight, dust, vibration and shock ..
Should any liquid or object fall into the cabinet, unplug
the unit immediately and have it checked by qualified
personnel.
There are no user-serviceable parts inside the unit,
therefore do not open the cabinet.
3
Page 4
Contents
Precaution/3
Installation/4
Features/4
Handing a disc/4
Connections/S
Controls and Functions/6
Basic Operation/S
Playback/8
To see the remaining playing time/9
Skipping over tracks/9
REV
and FF/9
Direct-track-call/10
Repeat playback/10
Memory Operation/11
Specifications/13
Troubleshooting/13
Servicing Information/13
Warranty/1S
Installation
Unpacking
Unpack your unit carefully. Be sure to remove the
accessories contained in the carton. After unpackinq, inspect
your unit carefully for signs of damage. If damage is found,
contact your authorized Kyocera dealer at once.
Do not throwaway the carton or associated packing
materials. They are ideal for moving, and in the event that
servicing is needed, will be required for shipment.
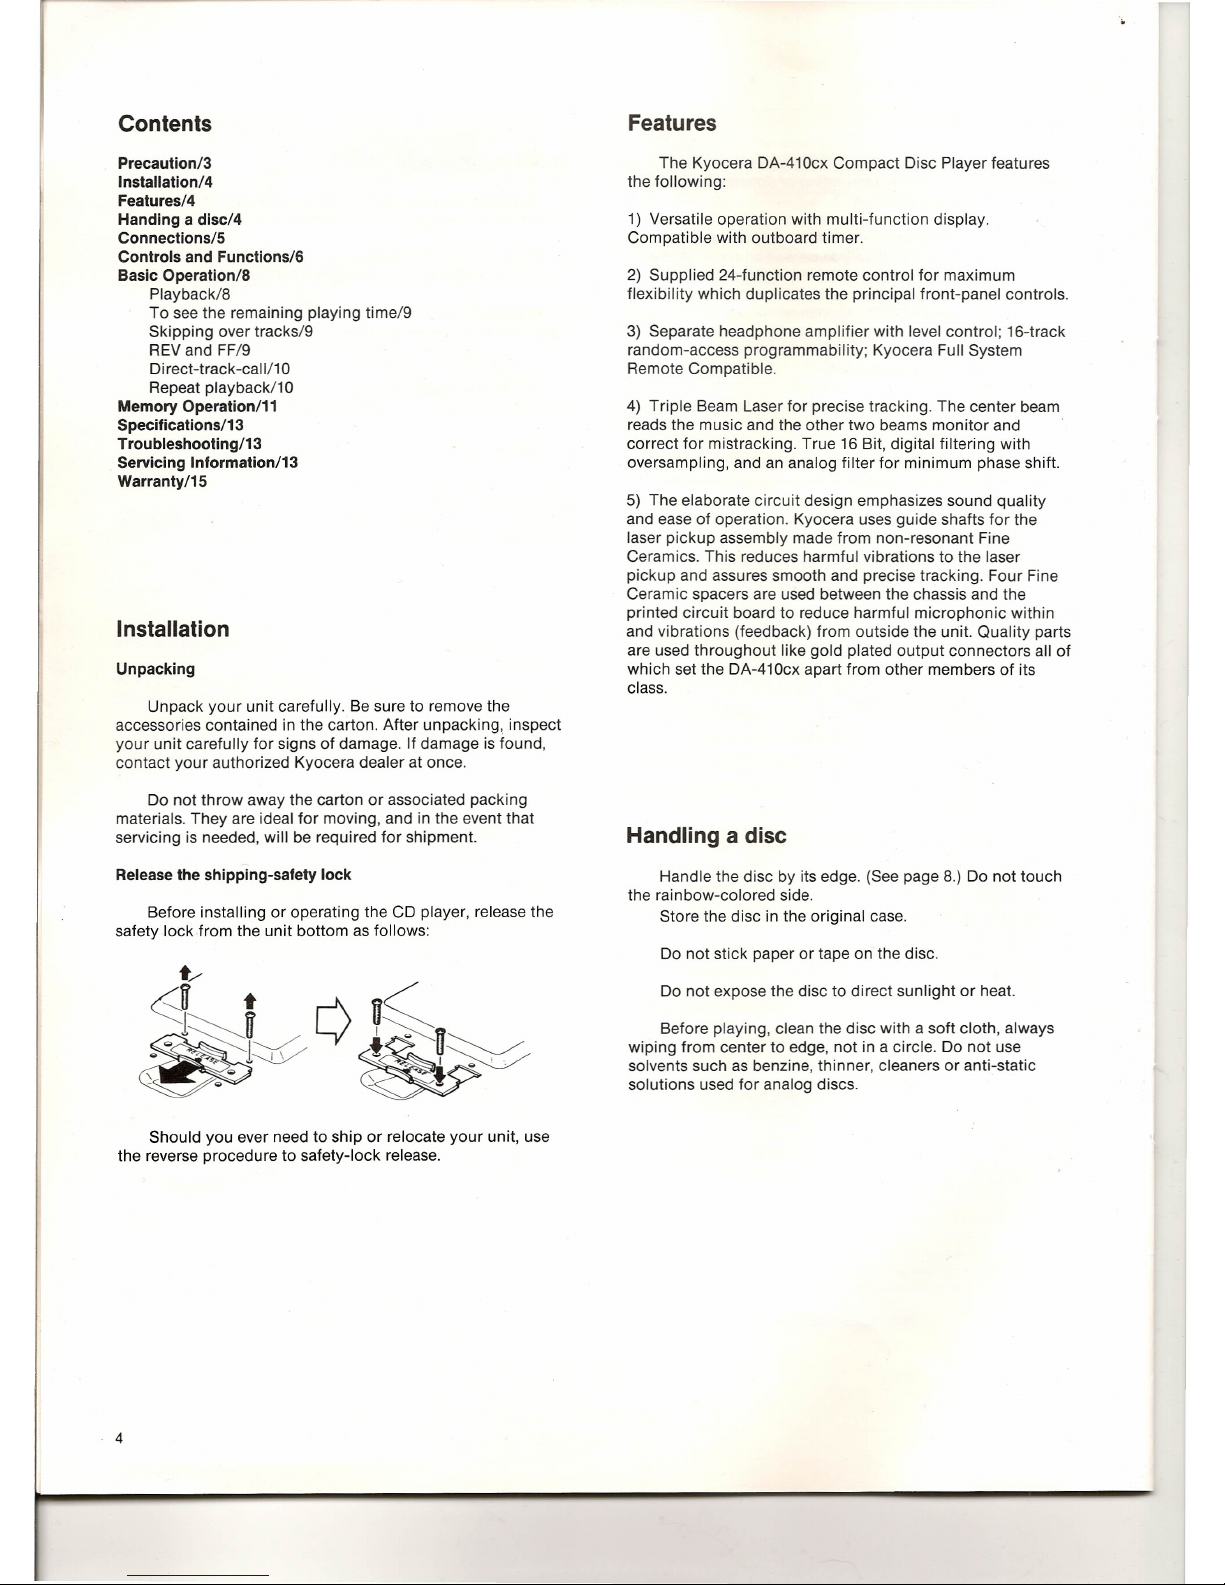
Release the shipping-safety lock
Before installing or operating the CD player, release the
safety lock from the unit bottom as follows:
Should you ever need to ship or relocate your unit, use
the reverse procedure to safety-lock release.
4
Features
The Kyocera DA-410cx Compact Disc Player features
the following:
1) Versatile operation with multi-function display.
Compatible with outboard timer.
2) Supplied 24-function remote control for maximum
flexibility which duplicates the principal front-panel controls.
3) Separate headphone amplifier with level control; 16-track
random-access programmability; Kyocera Full System
Remote Compatible.
4) Triple Beam Laser for precise trackinq. The center beam
reads the music and the other two beams monitor and
correct for mistracking. True 16 Bit, digital filtering with
oversampling, and an analog filter for minimum phase shift.
5) The elaborate circuit design emphasizes sound quality
and ease of operation. Kyocera uses guide shafts for the
laser pickup assembly made from non-resonant Fine
Ceramics. This reduces harmful vibrations to the laser
pickup and assures smooth and precise trackinq, Four Fine
Ceramic spacers are used between the chassis and the
printed circuit board to reduce harmful microphonic within
and vibrations (feedback) from outside the unit. Quality parts
are used throughout like gold plated output connectors all of
which set the DA-410cx apart from other members of its
class.
Handling a disc
Handle the disc by its edge. (See page 8.) Do not touch
the rainbow-colored side.
Store the disc in the original case.
Do not stick paper or tape on the disc.
Do not expose the disc to direct sunlight or heat.
Before playing, clean the disc with a soft cloth, always
wiping from center to edge, not in a circle. Do not use
solvents such as benzine, thinner, cleaners or anti-static
solutions used for analog discs.
Page 5
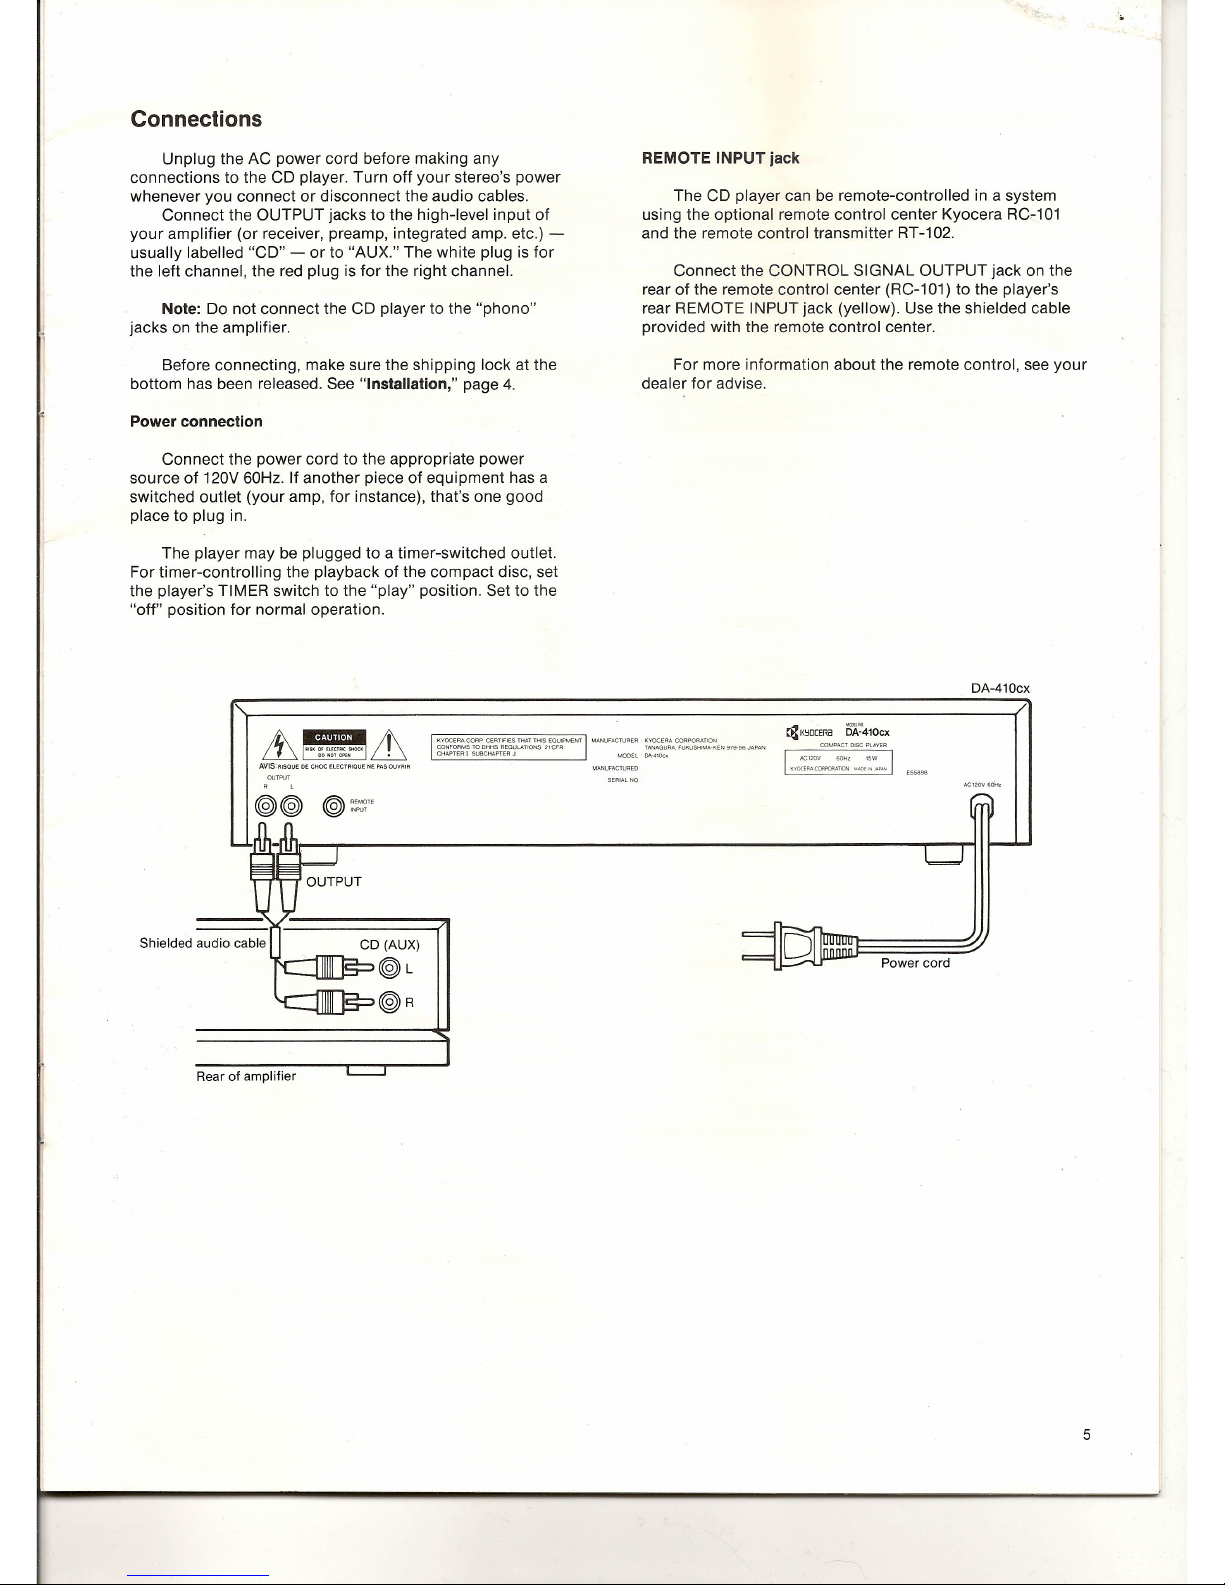
Connections
Unplug the AC power cord before making any
connections to the CD player. Turn off your stereo's power
whenever you connect or disconnect the audio cables.
Connect the OUTPUT jacks to the high-level input of
your amplifier (or receiver, preamp, integrated amp. etc.) -
usually labelled "CD" - or to "AUX." The white plug is for
the left channel, the red plug is for the right channel.
REMOTE INPUT jack
The CD player can be remote-controlled in a system
using the optional remote control center Kyocera RCc101
and the remote control transmitter RT-102.
Note: Do not connect the CD player to the "phono"
jacks on the amplifier.
Connect the CONTROL SIGNAL OUTPUT jack on the
rear of the remote control center (RC-101) to the player's
rear REMOTE INPUT jack (yellow). Use the shielded cable
provided with the remote control center.
Before connecting, make sure the shipping lock at the
bottom has been released. See "Installation," page 4.
For more information about the remote control, see your
dealer for advise.
Power connection
Connect the power cord to the appropriate power
source of 120V 60Hz. If another piece of equipment has a
switched outlet (your amp, for instance), that's one good
place to plug in.
The player may be plugged to a timer-switched outlet.
For timer-controlling the playback of the compact disc, set
the player's TIMER switch to the "play" position. Set to the
"off" position for normal operation.
DA-410cx
cg
K~O[ERa
5A:0410cx
CQMPACTOISC PLAYER
Lhttt#2;~&
AVIS'RISQUE DE CHOCElECTRIOUE NE PASOUVRIR
OUTPUT
, t,
~~~~~~1~~~PD~~~T:~~~~~:,~~IS2~g~:MENT
CHAPTER!SUBCHAPTERJ
MANUfACTURER KYOCERA CORPORATION
TI<NAGURA,FUKUSHIMA-KEN 979-56 JAPAN
MODEL DA-41Oc~
I
~,~,
eo", tsw
I
~YOCERACQRPClR./l.TJON "'O£INJANN
AC120V60Hz
CD (AUX)
(@L
(@R
Power cord
Rear of amplifier
5
Page 6

Controls and Functions
1
2
3
4
5
6
(])
8
9
10
11
12
13
14
15
~
I~
(~K~O
I
OPl::N/CLOSE
PLAY
~"~
I~""
t>SKIP
!Rl1\,'1;;.
ERa
sroe
l<l<lREV
=ff
.~
Ii
1~,,,_3
r,=-~
I
n
-,
.
.
-
~F-!FJA F;
FJ FJ ~
F; ~~l~
'.[.'
POWER
TIMER
Iillii;ill
~c;r
»
crm u
t
C;
t: . I
tc::::::=::
I®-
k:::::::;--,
~y
DA-41Ocx COMPACT DISC PLAYER
REPEAT TJ1!;MAJN MEMOI1Y
OAC
M.C~L
•••••"'-REJ.IO'.S>""""TRAO<..,.~
!
,
"~
I
~
L
I~
@
@
18
@
@)
21 22
~: The remote control duplicates these functions.
CD
Power button
Push to turn the player on and off.
CD
TIMER [off-play] switch
Set to the "play" position when timer-controlling the CD
player.
CD
Disc tray
Accommodates a compact disc with its label side up.
Opened or closed by the OPEN/CLOSE or PLAY button (and
closed by the PAUSE, and "1-0" buttons.)
@ PLAY/PAUSE indicator
Lights when playback and blinks when in PAUSE.
CD
REMOTE SENSOR
Accepts infrared command from the supplied remote control
unit.
® TRACK NO. indicator
Regularly indicates the track number to be played. Also
shows repeat mode and remaining time displaying mode.
(]) MEMORY indicator [m]
Blinks when the MEMORY button is pressed for
programming the tracks into the memory. Remains lit during
playing the programmed tracks.
CD
TRACK TIME indicator [min/sec]
Regularly shows the elapsed playing time of the track in
minutes and seconds. Also gives the message by word in
particular operating conditions ("READY," "SET DISC," etc.).
® OPEN/CLOSE button ~
Press to open and close the tray.
@ PLAY button ~
Press to start playing.
6
@
PAUSE button ~
Press to set the player in a pause ("waiting") when playing.
Playing resumes at the next press of the PAUSE button.
@
STOP button ~
Press to stop playing.
@ SKIP button ~
Used for skipping back and forth to the tracks in the disc.
Press ..•••[backward] to skip back to a previous track (or the
beginning of the present track). Press ~ [forward] to skip to
a later track.
@
REV/FF button ~
Used to continually return or advance the pickup for
listening from a desired location on the disc. Press ..•••..•••REV
[reverse] to return to any position; press FF ~ [fast
forward] to advance to any position on the disc.
For a quick return or advance, press the PAUSE button
before pressing the REV or FF buttons.
@
PHONES jack and the LEVEL control
Accepts the plug from stereo headphones for private
listening. The LEVEL control adjusts the listening level.
@
"1-0"
buttons
10 buttons for entering the tracks for playing and
programming.
@ REPEAT button ~
Press this button to repeatedly listen to the particular track
or to the entire (or memory-programmed) contents of the
disc.
@
T.REMAIN button ~
Press one time and the TRACK TIME indicator will show the
remaining playing time of the track ("rem"). Press two times
for the remaining time of the entire (or memory-
programmed) tracks ("REM").
Page 7

@ MEMORY button
[BZ£J
Lets the player enter or exit the memory mode of operation.
Refer to the "Memory Operation," page 11.
@C/AC button
[BZ£J
Press one time to cancel the preceding entry of the track
number when programming. Press two times if you wish to
erase all the programmed contents.
® M. CALL button
Press to check the contents of the memory.
@ >[greater than] 10 button
Used when entering a track number greater than "20." Press
in prior to entering the first digit of the desired track number.
Using the Remote Control
The remote control transmitter duplicates the basic
controls on the CD player. Simply aim the top of the
transmitter at the REMOTE sensor on the player front panel
and press the desired button.
Battery Installation/Replacement
The detachable back plate of the transmitter covers the
compartment to house two AA batteries. Install the batteries
as depicted in the compartment.
Do not leave the batteries in when the transmitter will
not be used for a prolonged period of time.
The following numbers refer to the main unit control
numbers.
RT-410cx REMOTE CONTROL UNIT
7
Page 8

Basic Operation
LERII
IN
I
I;:]
U~cJO
_ I _I; U
e.g The disc contains 12 tracks
and the total playing time is 43
minutes and 28 seconds.
o c rano
,-, C ,--,
.l..I ~
CCT
nlcr
_'L
I
.LJ
I
.:JL
I-'
0 C
~I
U
I ,_
11/
The tray is opening.
,- I
nee
L L U _IL
The tray is closing.
I
nnn
I U;U U
Playback commences.
8
0.
Caution on Playback Volume
Compact discs typically have very low noise and full reproduction of signal peaks. If the
playback volume is adjusted by the "background noise reference," as with conventional analog
records or tapes, a sudden high level output may result in damage to the speaker system.
Be careful not to turn up the volume control on your amplifier inadvertently.
Automatic contents/playback-time totalizer
The CD player, each time you turn on the power or close the tray, or you press the
T.REMAIN button in the "READY" mode (stop), automatically investigates how many tracks
are recorded in the disc and how long the playback time will last. The results are indicated on
the TRACK NO. and TRACK TIME indicator.
During the investigation after power-on, the player indicates the message "LEAD IN" and,
if a disc is not loaded or is loaded reversely, indicates the message "SET DISC."
Playback
1 Press the POWER button.
The total track numbers and playing time will be indicated in the TRACK NO. indicator
and TRACK TIME indicator if the disc has been loaded. If the disc has not been loaded, or has
been loaded reversely, the player indicates "SET DISC."
2 To load the compact disc, press the OPEN(lCLOSE) button to open the disc tray.
3 Hold the compact disc by the edge, with the label side facing upwards, and place it in the
tray.
4 To start playback at once, press the PLAY button.
If you want only to load the disc for later playback, press the (OPEN/)CLOSE button. The
player is now in standby, showing "READY" in the display.
For selecting the track using the "1-0" keys, refer to "Direct-track-call," page 10.
To temporarily interrupt the playback, press the PAUSE button. The PLAY/PAUSE
indicator will blink.
To release the pause, press the PAUSE button. The playback will resume from the same
part in the track.
Page 9

r,,,/,,--,,,-n
t:
I /" I
:J
f-,
c
.l.I
r
ri m /":JC
, L
/I, ,
i
L U
At forward-skipping.
C \ \
U ....l....l
At backward-skipping.
C
I I
-' L L
When the playback of the last track in the disc is completed, the player indicates the
message "FINISHED" and then reverts to "READY" (stop).
5 To interrupt playback, press the STOP button.
6 To open the disc tray, press the OPEN/CLOSE button.
To see the remaining playing time
After one time pressing the T.REMAIN button (the TRACK NO. indicates "rem"), the
TRACK TIME will show the remaining playing time of the track and count down.
Note: The per-track remaining time is not displayed for track numbers greater than "16."
The second time press of the T.REMAIN button selects the TRACK TIME to show the
remaining playing time of the entire contents of the disc.
To resume normal TRACK TIME display, press the T.REMAIN button again.
Note: During memory mode (to be discussed later), the remaining playing time is defined
over the entire length of the programmed tracks. If the programming contains track numbers
greater than 16, the total remaining time is not displayed.
Skipping Over Tracks
Use of the SKIP button allows over tracks to a desired one.
To skip to a later track, press the ~ [forward] strip of the SKIP button as many times as
desired.
•••
j .•
SKIP
~ ~SKIP
To skip to a previous track, press the .•••[backward] strip of the SKIP button similarly.
Note that the first time press places you to the beginning of the present track.
•••
I
r
_S_K_'P ~_~_S_K_'P__
The skipping can be used during a pause or stop as well. After skipping press the PAUSE
button in pause, or PLAY button in stop to resume playback.
REV and FF
To "move about" within the track, for searching the desired phrase, or solo part, for
instance, the REV and FF button should be used. While the button is pressed, the sound
volume is reduced.
For listening from an exact place in the track, note that the one short-time press of the
REV or FF buttons provides a one-second moving back or forth.
Reverse Forward
For a quick REV or FF'ing, press the PAUSE button in prior to pressing the REV or FF
buttons. .
9
Page 10

Direct-selecting "6."
C
Tr 10
U
.1..1 ,
1\
Blinking
I
TI
10
-,- .1..1 ,
1 \
=i
r:
TIIII
j
CI .1..1 ,
r,
='C
111111
_I
U U;U U
"II II III
, I -,; I U
['] II
U
III
r:
I 1; I U
II
U
III
I I; I U
10
'.
Direct-track-call
Besides the skip method as previously stated, the direct-track-call feature is the other way
to select a track number you desire.
Thanks to the "1-0" keys (also applying to the 10 keys on the remote control). the
selection of up to 99 tracks in the disc is instantaneous and foolproof.
Operation
Simply press the "1-0" keys of your desired track number to start playback, e.g. "6," while
listening to "8."
After completing playback of the track, playback of the next number follows.
To select the track number than 10, e.g. "36."
1 Press the >10 button.
2 Press the track number buttons in sequence, e.g. "3" then "6."
Note: The player will not accept a track number entry greater than the number of tracks
contained in the disc.
The player begins to play the track automatically.
To cancel the entry of the track number, press the C/AC button one time and the player
reverts to the previous mode. Make a new choice.
The direct-track-call can be used during a pause. After having called the track, press the
PAUSE button to resume play.
Repeat Playback
Use of the REPEAT button allows you to repeat the playback of one track or the entire
contents of the disc.
To repeat the desired track ["r" indicated]
While listening to the track, press the REPEAT button so that "r" is indicated in the
TRACK NO. indicator.
To repeat the entire contents of the disc
["R"
indicated]
Press the REPEAT button two times so that "R" indicator appears in the TRACK NO.
indicator.
To resume normal playback, press the REPEAT button again so "R" disappears.
Page 11

Memory Operation
Blinking
I
,-,,,/ I,
, ,-rn- ,
I
-/ I" -
Entering track "9."
Shows first
programming
Entering track "6."
c -,
'_' m
c,
Second programming
Entering track "18."
10· ~
lorn
:1;
Third programming
..
When the MEMORY button is not pressed (no sign "rn" in the display), the player performs
the normal function of playback in the original sequence of the disc, with the various auto
functions such as Skipping etc. effecting that sequence.
Available beyond this normal mode of playback, however, is the memory mode, in which
you can reprogram the sequence of the tracks contained in the disc as you please and play
them back in the new program sequence (the direct-track-call is inactive, however).
The transitions are made by the MEMORY button and acknowledged by the illumination
of the sign "m" in the display.
The programmed (new) sequence is valid until it is cancelled by the C/AC button. The ":"
sign at the extreme right of the display indicates the programming has been stored in the
memory. (You can later recall what you've programmed by simply pressing the M.CALL
button.)
MEMORY
&1
<I.,,,,,..!4, _
2
Normal mode
~3
_4
5
I
1
I
I
~
9 l-r-
'!t-6
Memory mode
6
r---
~('I+
18'2
I
rs
1"
I
I
etc.
etc.
To Program Memory
This programming procedure can be made during a pause or stop (even if the tray is
opened) as well as while playing. Even while playing, it will not interrupt listening.
1 Press the MEMORY button.
The blinking "rn" sign is shown on the display to indicate the unit's entry into the memory
mode. The player is now ready to accept the first programming.
2 Press any of the "1-0" keys you want to program, e.g. track number 9.
Track 9 is now shown on the TRACK NO. indicator and the TRACK TIME indicator shows
"1," the first programming.
Program the second memory track and beyond in the same manner as above, e.g. track
number 6,18, etc.
By simply entering the track number one by one, you can program up to 16 track
numbers.
11
Page 12

Blinking
18
m
3;
Playing programmed track
o
nn
I
:J rn
LI;'-' ';
,'-
12
To cancel the entry of a track number, press the C/AC button one time.
Press the PLAY button to play the programmed tracks. The "m" stops blinking.
To see the total playing time of the tracks you've programmed, press the T.REMAIN
button until "REM" appears on the TRACK NO. indicator.
If you wish to exit the memory mode for a later playback of the programmed tracks,
proceed to 3.
3 To complete the memory programming and exit the memory mode, press the MEMORY
button.
The sign "m" extinguishes (the sign ";" at the extreme right of the TRACK TIME remains lit
after exiting the memory mode.) and the player reverts to the previous operation.
To listen to the programmed tracks
1 Press the MEMORY button. The sign "m" illuminates and blinks in the TRACK NO. indicator.
The TRACK NO. indicator and TRACK TIME indicator shows the last-programmed track.
2 Press the PLAY button.
The playback commences with the first programmed track, e.g. 9, and continues in the
programmed sequence. After the last track has been finished, the player reverts to stop
("READY").
You can skip, REV/FF, or REPEAT in the usual manner except they affect the
programmed tracks only (you cannot direct-track-call using the keys).
To exit from the memory mode
Press the MEMORY button. The "m" disappears in the display and the player will resume to
normal playback after the playback of the present track is completed.
To rewrite or erase the programming
If you wish to create another playback sequence of the tracks of the disc, simply enter the
memory mode ("m" blinks) and follow the procedures in "To program memory," page 11.
To simply erase the track in the programming, enter the memory mode ("m" blinks) and
press the C(lAC) button one time. This erases the last programmed track in (he sequence. By
repeatedly pressing the C(lAC) button, the tracks are erased in the reverse order they were
programmed.
If you wish to erase the programmed tracks all at once, first exit the memory mode ("m"
goes off) and press the (C/)AC button two times. The ";" sign at the extreme right of the
TRACK TIME indicator should now be extinguished.
Page 13

Specifications
Format Compact disc digital audio
system
Pickup Triple beam laser
Digital-analog
conversion 16 bit linear
Filter Double oversampling digital
+
analog filter
Error correction CIRC
Frequency response ±0.5dB, 5 to 20,000 Hz
Total harmonic
distortion 0.005%
Dynamic range >95dB
Wow and flatter Unmeasurably low
Output level 2V rms
Output impedance 6000
Separation >90dB, 1kHz
SIN 95dB, IHF-A weighted
PHONES output 80mW/320
Power requirement AC 120V 60Hz
Power consumption 15W
Dimensions 18-1/8" x 3-9/16" x 12-1/8"
(460mm x 90mm x 308mm)
Weight. 11 Ibs. 40z/5.1 kg
Because Kyocera continually strives to improve its products,
specifications and features are subject to change without
notice.
Troubleshooting
The following guide is intended as an aid in correcting
basic problems encountered during use of the player.
Problem/Cause
Player won't turn on.
Power cord unplugged from outlet.
Music automatically starts at power on.
Front panel TIMER switch is set to "play." (Reset to off.)
Music never starts when PLAY is pressed. "SET DISC"
indicated.
Reverse disc loading. Contamination, scratches, finger prints
on disc.
Player will not select the desired track.
Specifying greater track number than contained in the disc.
Memory programming erased.
Disc tray opened or power disconnected.
Servicing Information
Should Kyocera product need repair, please contact
your authorized Kyocera dealer or the following on the back
cover directly:
Kyocera Electronics Inc.
100 Randolph Road, Box CN6700 Somerset, N.J. 08873-1284
Telephone: 201-560-0060
13
Page 14

i
1
I
I
I
I
I
I
I
~
I
I
1
I
I
I
I
I
L
'
7. Have you purchased one of our products before? 14.10 Yes 14-20 No
----------------X-------------------
.•
i-Year Limited Warranty Registration
Please return this card within 10 days of purchase.
Model _
Serial Number _
Purchase Date: _
Where Purchased _
Purchaser's Name: _
Address: _
To help us serve you beHer, we ask that you answer the following questions:
1. I first became interested in this product because of: (check only one)
2-1_ Newspaper Advertisement 2-6_ Electronics Catalog
2-2_ Magazine Advertisement 2·7_ Store Salesman
2-3_ TV Advertisement 2·8_ Store Display
2-4 _
Radio Advertisement
2·9 _
Product Show
2-5_ Friend's Advice 2·0_ Other: _
2. I purchased this product because of: (Check all that apply)
3-1_In-store Demonstration 7·1_ Styling
4-1_ Magazine Reviews 8·1_ Price
5-1_ Friend's Advice 9-1_ Other: _
6-1 _ Reputation for Quality
3. Sex: 10-10 Male 10·20 Female 4. Marital Status: 11-10 Married 11-20 Single
5. Age: 12-10 Under 21 12·2021-30 12-30 31-40 12-40 41-50 12-50 Over 50
6. Annual Income: 13-10 Under 15,000 13-20 15,000-25,000 13·30 25,001-35,000 13-40 Over 35,000
Detach here.
This warranty gives you specific legal rights, and you also may have other rights which
vary from state to state. Some states do not allow the exclusion or limitation of incidental
or consequential damages, so the above exclusion or limitation may not apply to you.
Return of the enclosed warranty registration is not a condition precedent to warranty
coverage and performance.
i-YEAR LIMITED WARRANTY
This
K!:IOCERa
brand equipment is warranted to be free from defects in material or
workmansh for 1 year from data of delivery. Repair (or at our option, replacement) will
therefore be made of any unit which proves to be defective during this period, provided
the unit is returned properly packed, with all transportation charges prepaid, to the store
from which it was purchased. Any repair approved hereunder will be made without charge
to the owner for parts or labor. This limited warranty extends only to the original purchaser,
is not transferable, and is limited to the purchase price of the equipment. In no event
will
K!:IOCERa
be liable for any incidental or consequential damages resulting from the
equipment or any defect.
Claims under this limited warranty must be accompanied by the original sales ticket or
shipping documents to establish date of purchase.
This limited warranty does not extend to units which have been subjected to misuse, abuse,
neglect, accident or to units that have been used in violation of operating instructions.
Equipment which, in our judgment, shows evidence of having been altered, modified or
serviced without our authorization, or which has had its serial number altered or removed,
will be ineligible for service under this limited warranty.
Page 15

~ K!:I[)[ERa
/
K~O[ERa
,
I
~
,
I
,
I
,
I
,
I
,
---------------x---------------~
K~O[ERaELECTRONICS INC.
100 Randolph Road, Box CN6700 Somerset, N.J. 08873-1284
Telephone: 201-560-0060
Detach here.
~1<~O[ERa
Kyocera Electronics Inc. 100 Randolph Road, Box CN6700 Somerset, N.J. 08873-1284 Telephone 201-560-0060
KTDA41CXXX Printed in Japan 0787SG
 Loading...