

Page 1

Advanced Operation Guide
C2525E
C3225E
C3232E
C4035E
Page 2

Page 3
i
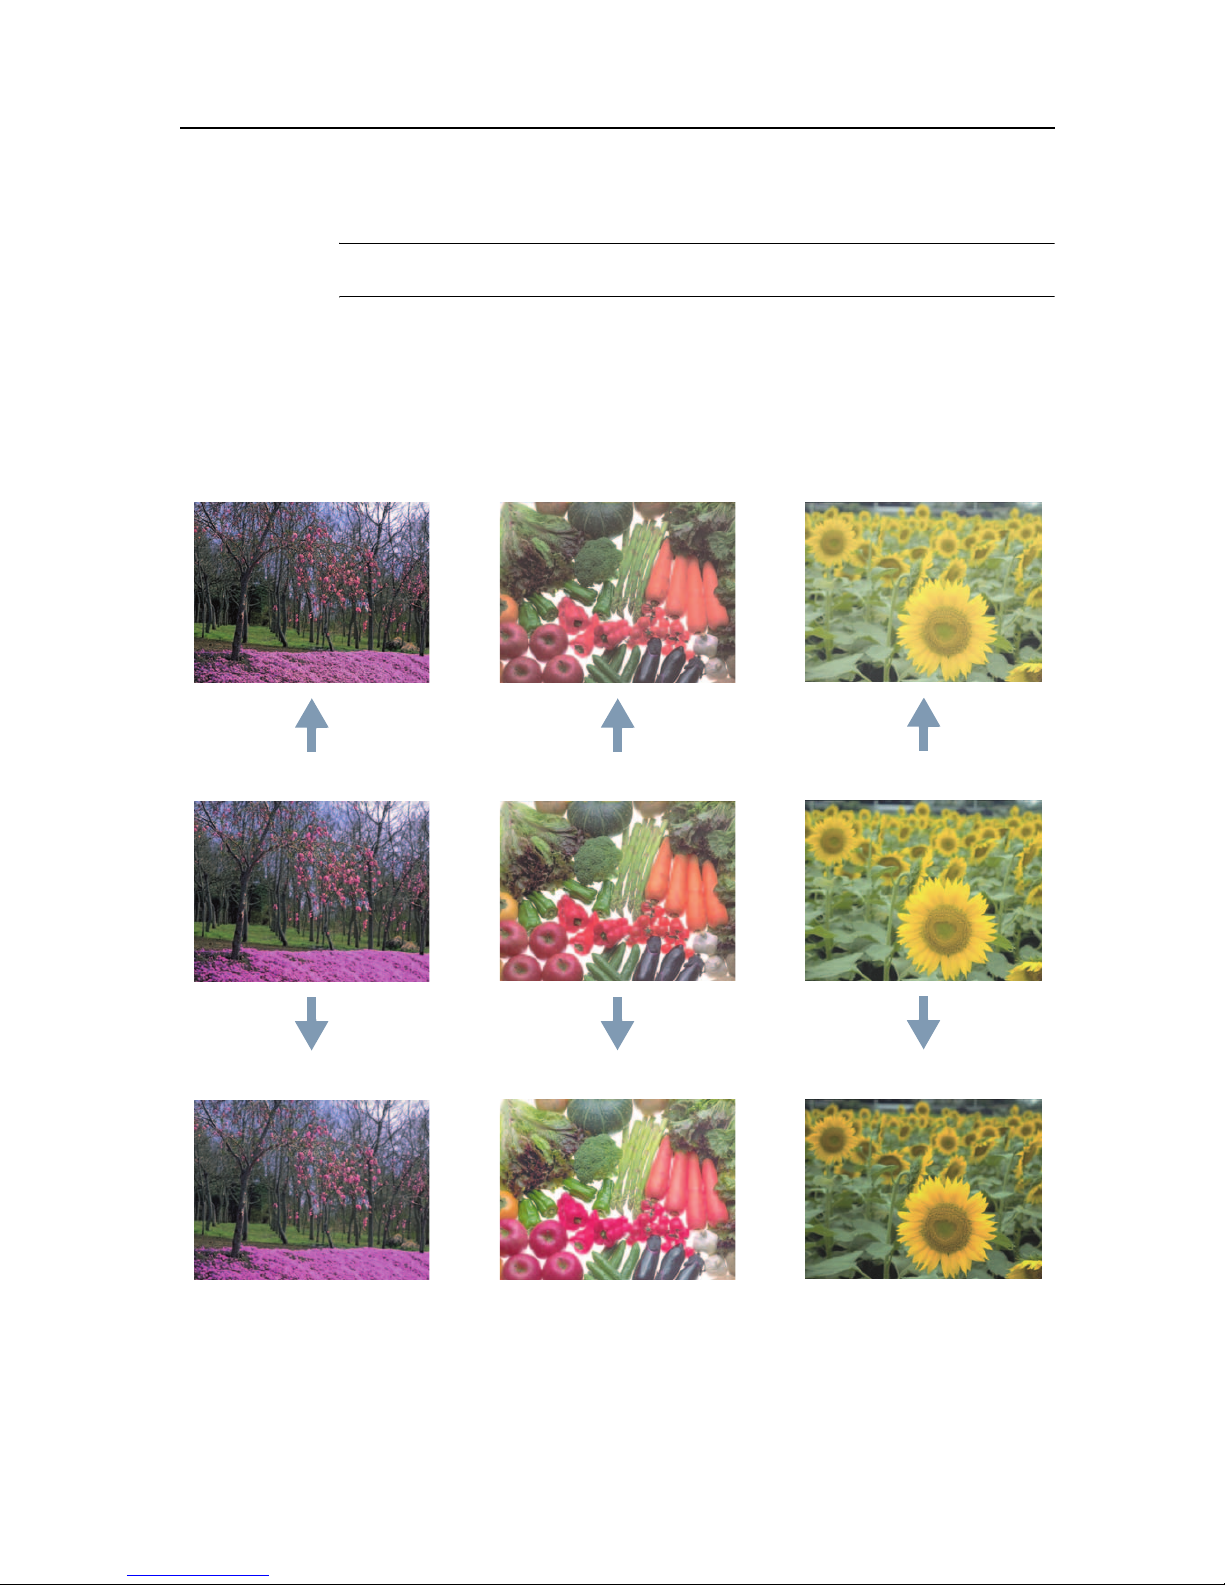
Sample of Color Setting Adjustment
This section explains the color calibration feature together with the following examples.
NOTE: To illustrate the difference between features, the copy sample colors in this document
have been modified from the actual colors output by this machine.
One touch Image Adjust
Adjust images as desired to more vivid or more dull images. (Refer to One touch Image Adjust on page 1-52 for
configuration details)
Sharp Dull Light
Original Original
Original
Smooth Vivid
Dark
Page 4
ii
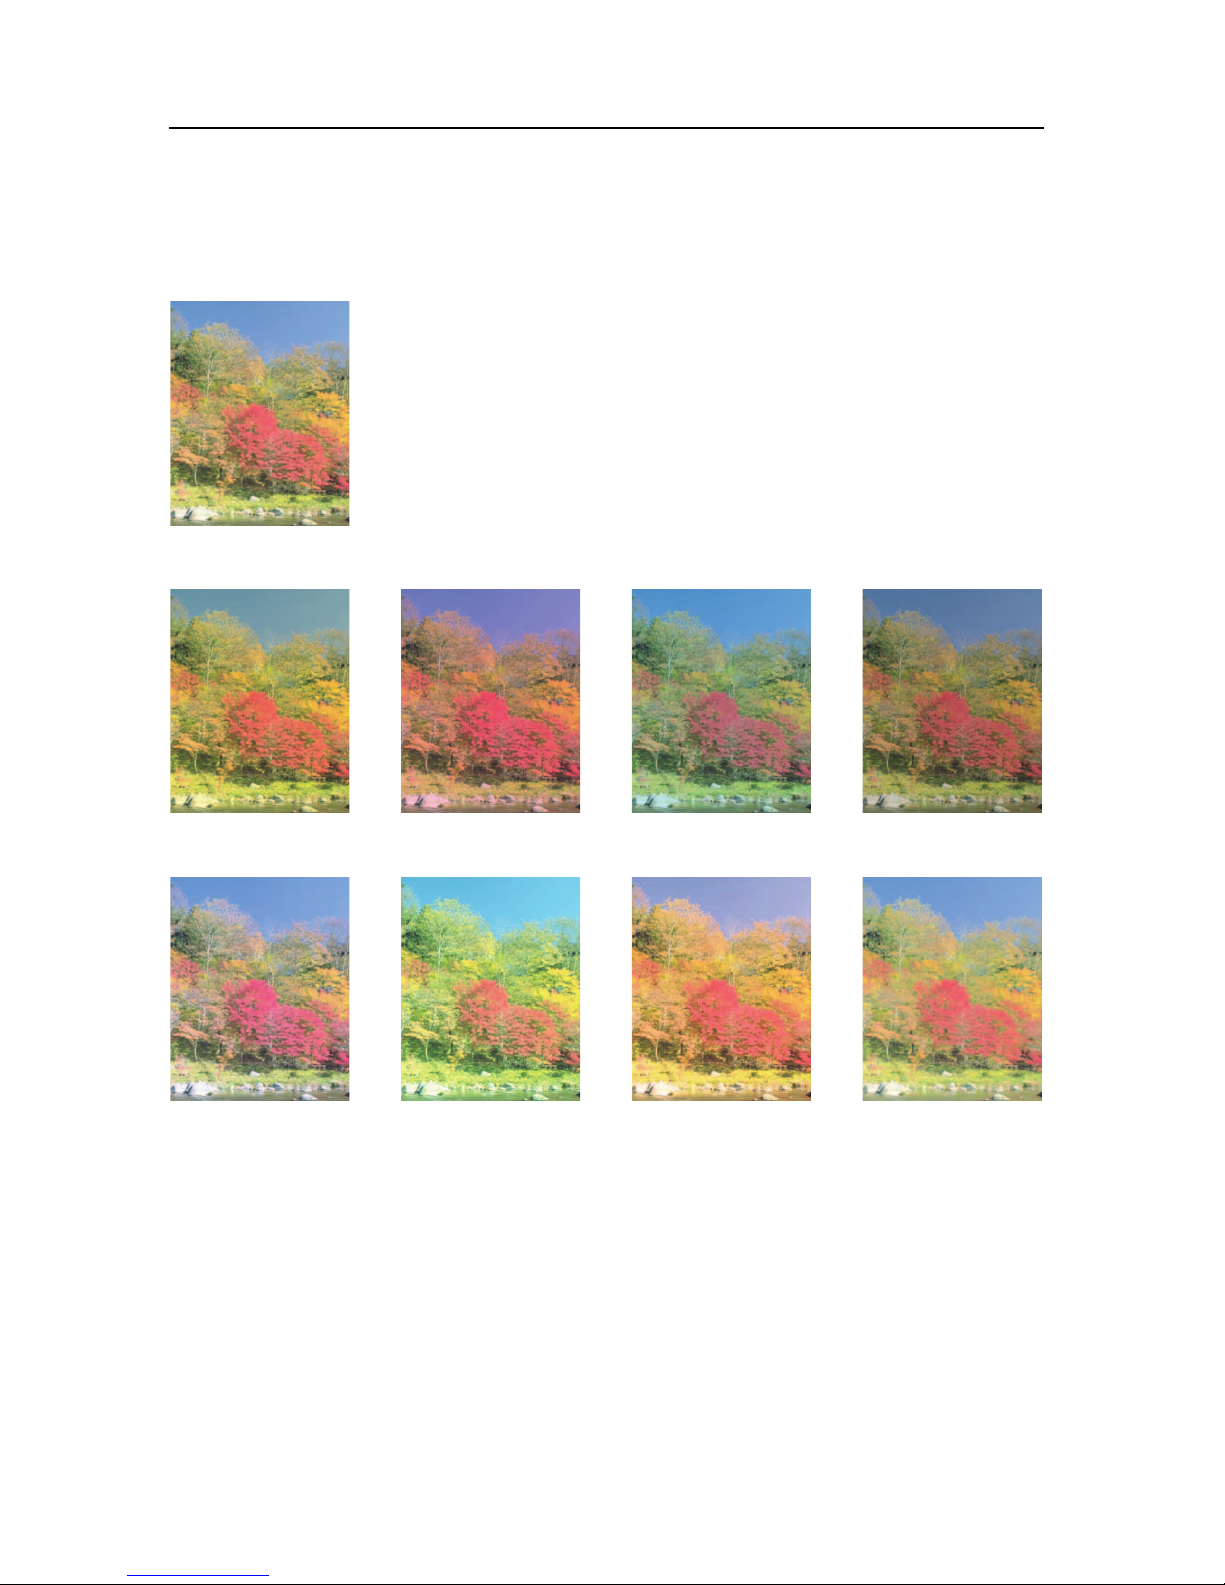
Color Balance Adjust
Adjust the strength of cyan, ma gent a, yello w, and black to make fine hu e adjust ment s. (Re fer to Color Ba lan ce Adjus t
on page 1-49 for configuration details)
Original
More Yellow More Magenta More Cyan More Black
Less Yellow Less Magenta Less Cyan Less Black
Page 5
iii
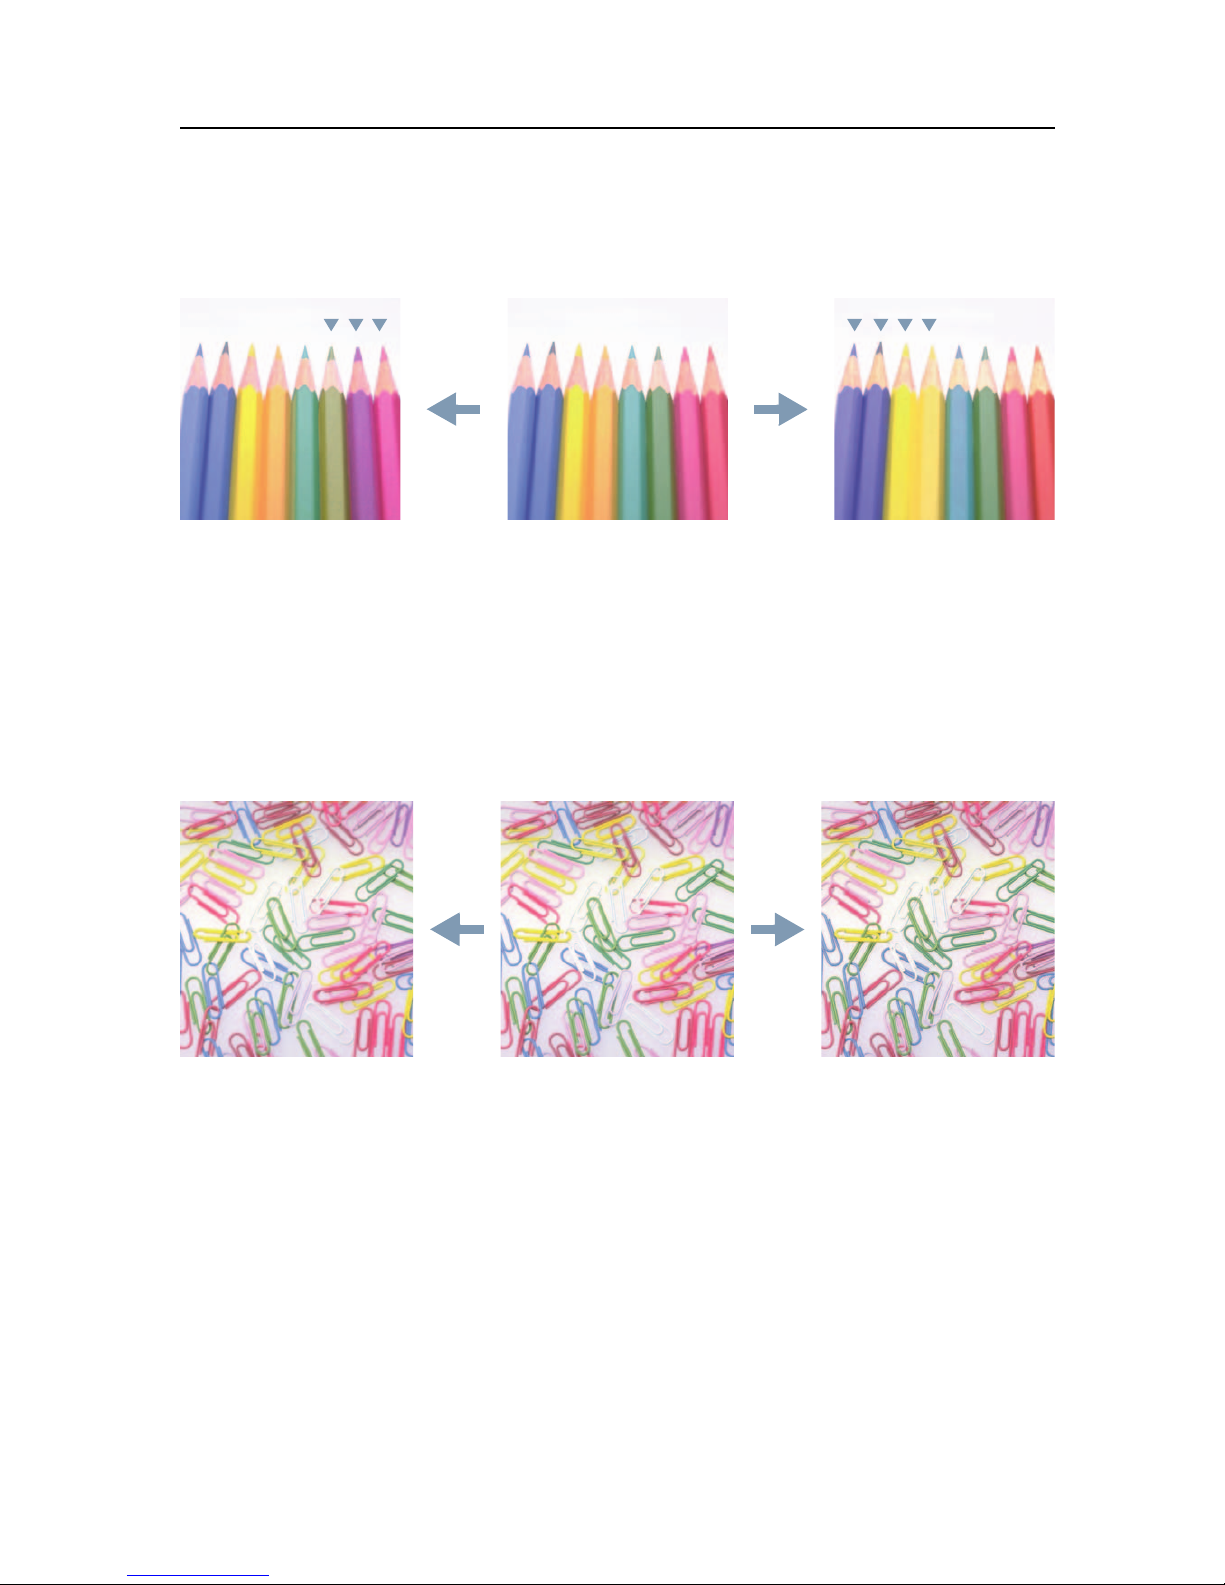
Hue Adjust
Adjust the color (hue) of images. Make adjustments such as adjusting red to a strong yellow-red or yellow to a strong
green-yellow to make more creative copies. (Refer to Hue Adjust on page 1-50 for configuration details)
Sharpness Adj ust
Adjust the sharpness of image outlines. (Refer to Sharpness Adjust on page 1-33 for configuration details)
A
djust yellow to more green, adjust
blue to more magenta... (1)
Original
Adjust yellowish-red to more yellow,
adjust bluish-cyan to more blue... (2)
Original More SharpLess Sharp
Page 6

iv
Legal and Safety Information
Please read this information before using your machine.
Regarding Traden ame s
• PRESCRIBE and ECOSYS are registered trademarks of Kyocera Corporation.
• KPDL is trademark of Kyocera Corporation.
• Windows and Windows Server are registered trademarks of Microsoft Corporation.
• Windows NT is a trademark of Microsoft Corporation.
• PCL and PJL are registered trademarks of Hewlett-Packard Company.
• Adobe, Adobe Acrobat and Adobe Reader are registered trademarks of Adobe Systems
Inc.
• PowerPC is a trademark of International Business Machines Corporation.
• CompactFlash is a trademark of SanDisk Corporation.
• This product was developed using the Tornado™ Real Time Operating System and Tools
from Wind Ri ver Systems.
• This product uses PeerlessPrintXL to provide the HP LaserJet compatible PCL 6 language
emulation. PeerlessPrintXL is a trademark of Peerless Systems Corporation, 2381
Rosecrans Ave. El Segundo, CA 90245, U.S.A.
• TrueType is a registered trademark of Apple Computer Inc.
• All resident fonts in this printer are licensed from Monotype Imaging Inc.
• Helvetica, Palatino and Times are registered trademarks of Linotype-Hell AG.
• ITC Avant Garde Gothic, ITC Bookman, ITC ZapfChancery and ITC Zapf Dingbats are
registered trademarks of International Typeface Corporation.
• This product contains UFST™ and MicroType
®
from Monotype Imaging Inc.
All other brand and product names are registered trademarks or trademarks of their respective
companies. The designations ™ and ® will not be used in this Operation Guide.
Page 7

v
IBM PROGRAM LICENSE AGREEMENT
THE DEVICE YOU HAVE PURCHASED CONTAINS ONE OR MORE SOFTWARE
PROGRAMS (“PROGRAMS”) WHICH BELONG TO INTERNATIONAL BUSINESS MACHINES
CORPORATION (“IBM”). THIS DOCUMENT DEFINES THE TERMS AND CONDITIONS
UNDER WHICH THE SOFTWARE IS BEING LICENSED TO YOU BY IBM. IF YOU DO NOT
AGREE WITH THE TERMS AND CONDITIONS OF THIS LICENSE, THEN WITHIN 14 DAYS
AFTER YOUR ACQUISITION OF THE DEVICE YOU MAY RETURN THE DEVICE FOR A
FULL REFUND. IF YOU DO NOT SO RETURN THE DEVICE WITHIN THE 14 DAYS, THEN
YOU WILL BE ASSUMED TO HAVE AGREED TO THESE TERMS AND CONDITIONS.
The Programs are license d not sold. IBM , or the a pplicable IB M coun try organizat ion, grant s you
a license for the Programs only in the country where you acquired the Programs. You obtain no
rights other than those granted you under this license.
The term “Programs” means the original and all whole or partial copies of it, including modified
copies or portions merged into other programs. IBM retains title to the Programs. IBM owns, or
has licensed from the owner, copyrights in the Programs.
1. License
Under this license, you may use the Programs only with the device on which they are installed
and transfer possession of the Programs and the device to another party. If you transfer the
Programs, you must transfer a copy of this license and any other documentation to the other
party. Your license is then terminated. The other party agrees to these terms and conditions by
its first use of the Program.
You may not:
1) use, copy, modify, merge, or transfer copies of the Program except as provided in this
license;
2) reverse assemble or reverse compile the Program; or
3) sublicense, rent, lease, or assign the Program.
2. Limited Warranty
The Programs are provid ed “AS IS.”
THERE ARE NO OTHER WARRANTIES COVERING THE PROGRAMS (OR CONDITIONS),
EXPRESS OR IMPLIED, INCLUDING, BUT NOT LIMITED TO, THE IMPLIED WARRANTIES
OF MERCHANTABILITY AND FITNESS FOR A PARTICULAR PURPOSE.
Some jurisdictions do no t al low the ex clu si on of i mp lie d w a rrant ies , s o th e above exclusion may
not apply to you.
SUPPLEMENT TO AGREEMENT FOR SOFTWARE BUNDLING AND DISTRIBUTION FOR
ALDC
3. Limitation of Remedies
IBM's entire liability under this license is the following;
1) For any claim (including fundamental breach), in any form, related in any way to this
license, IBM’s liability will be for actual damages only and will be limited to the greater of;
a) the equivalent of U.S.$25,000 in your local currency; or
b) IBM's then generally available license fee for the Program
This limitation will not apply to claims for bodily injury or damages to real or tangible personal
property for which IBM is legally liable. IBM will not be liable for any lost profits, lost savings, or
any incidental damages or other economic consequential damages, even if IBM, or its
authorized supplier, has been advised of the possibility of such damages. IBM will not be liable
for any damages cl aim ed by y ou ba sed on any third party claim. This lim itation of remedies also
applies to any developer of Programs supplied to IBM. IBM’s and the developer’s limitations of
remedies are not cumulative. Such developer is an intended beneficiary of this Section. Some
jurisdictions do not allow these limitations or exclusions, so they may not apply to you.
4. General
Y ou may terminate your license at any time. IBM may terminate your license if you fail to comply
with the terms and condition s of th is lic ens e. In eit her ev en t, yo u must destroy all your copies of
the Program. You are responsible for payment of any taxes, including personal property taxes,
resulting from this license. Ne ith er p arty ma y brin g an ac tio n, rega rdl es s of form , mor e than two
years after the cause of action arose. If you acquired the Program in the United States, this
license is governed by the laws of the State of New York. If you acquired the Program in
Canada, this license is governed by the laws of the Province of Ontario. Otherwise, this license
is governed by the laws of the country in which you acquired the Program.
Page 8

vi
Monotype Imaging License Agreement
1. “Software” shall mean the digitally encoded, machine readable, scalable outline data as
encoded in a special format as well as the UFST Software.
2. You agree to accept a non-exclusive license to use the Software to reproduce and display
weights, styles and versions of letters, numerals, characters and symbols (“Typefaces”)
solely for your own customary business or personal purposes at the address stated on the
registration card you return to Monotype Imaging. Under the terms of this License
Agreement, you have the right to use the Fonts on up to three printers. If you need to have
access to the fonts on more than three printers, you need to acquire a multi-user license
agreement which can be obtained from Monotype Imaging. Monotype Imaging retains all
rights, title and inte rest to the Sof tw are and Typefaces and no rights are granted to yo u other
than a License to use the S oftware on the terms expres sly set forth in this Agreement.
3. To protect proprietary rights of Monotype Imaging, you agree to maintain the Software and
other proprietary information concerning the Typefaces in strict confidence and to establish
reasonable procedures regulating access to and use of the Software and Typefaces.
4. You agree not to duplicate or copy the Software or Typefaces, except that you may make
one backup copy. You agree that any such copy shall contain the same proprietary notices
as those appearing on the original.
5. This License shall continue until the last use of the Software and Typefaces, unless sooner
terminated. This License may be terminated by Monotype Imaging if you fail to comply with
the terms of this License and such failure is not remedied within thirty (30) days after notice
from Monotype Imaging. When this License expires or is terminated, you shall either return
to Monotype Imaging or destroy all copies of the Software and Typefaces and
documentation as requested.
6. You agree that you will not modify, alter, disassemble, decrypt, reverse engineer or
decompile the Software.
7. Monotype Imaging wa rran t s that for ninety (90) days after delivery, the Soft ware w i ll p erfo rm
in accordance with Monotype Imaging-published specifications, and the diskette will be free
from defects in material and workmanship. Monotype Imaging does not warrant that the
Software is free from all bugs, errors and omissions.
The parties agree that all other warranties, expressed or implied, including warranties of
fitness for a particular purpose and merchantability, are excluded.
8. Your exclusive remedy and the sole lia bil ity of Monoty pe Imagi ng in conne cti on wi th the
Software and Typefaces is repair or replacement of defective parts, upon their return to
Monotype Imaging.
In no event will Monotype Imaging be liable for lost profits, lost data, or any other incidental
or consequential damages, or any damages caused by abuse or misapplication of the
Software and Typefaces.
9. Massachusetts U.S.A. law governs this Agreement.
10.You shall not sublicense, sell, lease, or otherwise transfer the Software and/or Typefaces
without the prior written consent of Monotype Imaging.
11. Use, duplication or disclosure by the Government is subject to restrictions as set forth in the
Rights in Technical Data and Computer Software clause at FAR 252-227-7013, subdivision
(b)(3)(ii) or subparagraph (c)(1)(ii), as appropriate. Further use, duplication or disclosure is
subject to restrictions applicable to restricted rights software as set forth in FAR 52.227-19
(c)(2).
12.You acknowledge that you have read this Agreement, understand it, and agree to be bound
by its terms and co ndi tio ns. N eith er party shall be bound b y a ny s t a t ement or representation
not contained i n this Agreem ent. No ch ange i n this Agreement is ef fectiv e unl ess wri tten an d
signed by properly authorized representatives of each party. By opening this diskette
package, you agree to accept the terms and conditions of this Agreement.
Page 9

vii
About this Operati on Gu ide
This Operation Guide contains the following chapters:
1 Copy Functions
Describes the full-featured copying functions of the machine.
2 Document and Output Management Functions
Explains the copier’s versatile functions for managing original documents and jobs during
copying.
3 Printer Settings
Explains how to configure the printer function.
4 Scanner Settings
Explains the scanner functions and settings that can be configured from the machine touch
panel.
5 Setting Scanner from a Web Browser
Explains the scanner settings that can be configured from a web browser.
6 Included Scanner Utilities
Introduces the scanner utilities.
7System Menu
Covers general default settings.
8 Job Accounting
Explains how to manage job accounting to share usage among various departments.
Appendix
Lists supported paper and intercompatible functions. Includes a glossary.
Page 10

viii
Included Guides
The following guides are included with this machine. Refer to the proper guide based on your
requirements.
Operation Guide
Describes how to load paper, basic copy, print and scan operations, and troubleshooting.
Advanced Operation Guide (This Guide)
Explains copying, p rintin g and scann ing fe atures in de pth, as wel l as defaul t setti ngs. T his g uide
is contained on the CD-ROM as a PDF file.
Kyocera Extended Driver User Guide
Explains how to instal l and se tup the printe r driver. This guide is contained on the CD-ROM as a
PDF file.
PRESCRIBE Commands Command Reference
Explains each command for realizing various features and controls through prescribed
commands. This guide is contained on the CD-ROM as a PDF file.
Included Printer Utilities
This product includes the foll ow in g pri nte r uti lities Install them as n ec es sary. For details, refer to
the manual included with each utility.
• KM-NET for Clients
• KM-NET for Direct Printing
•IC-Link
• KM-NET VIEWER
• KM-NET VIEWER for Web Edition
• KM-NET KPrint
•KM NET Quick Setup
Page 11

ix
Conventions in This Guide
The following conventions are used depending on the nature of the description.
Convention Description Example
Bold Indicates a message or button
displayed on the machine’s operation
panel key or a computer screen.
Press the Start key.
[Regular] Indicates touch panel key s . Press [Basic].
Italic Indicates touch pan el me ss age s. Ready to copy is displayed.
Note Indicates supplemental information or
operations for reference.
NOTE: -
Important Indicates items that are required or
prohibited so as to avoid problems .
IMPORTANT: -
Page 12
x
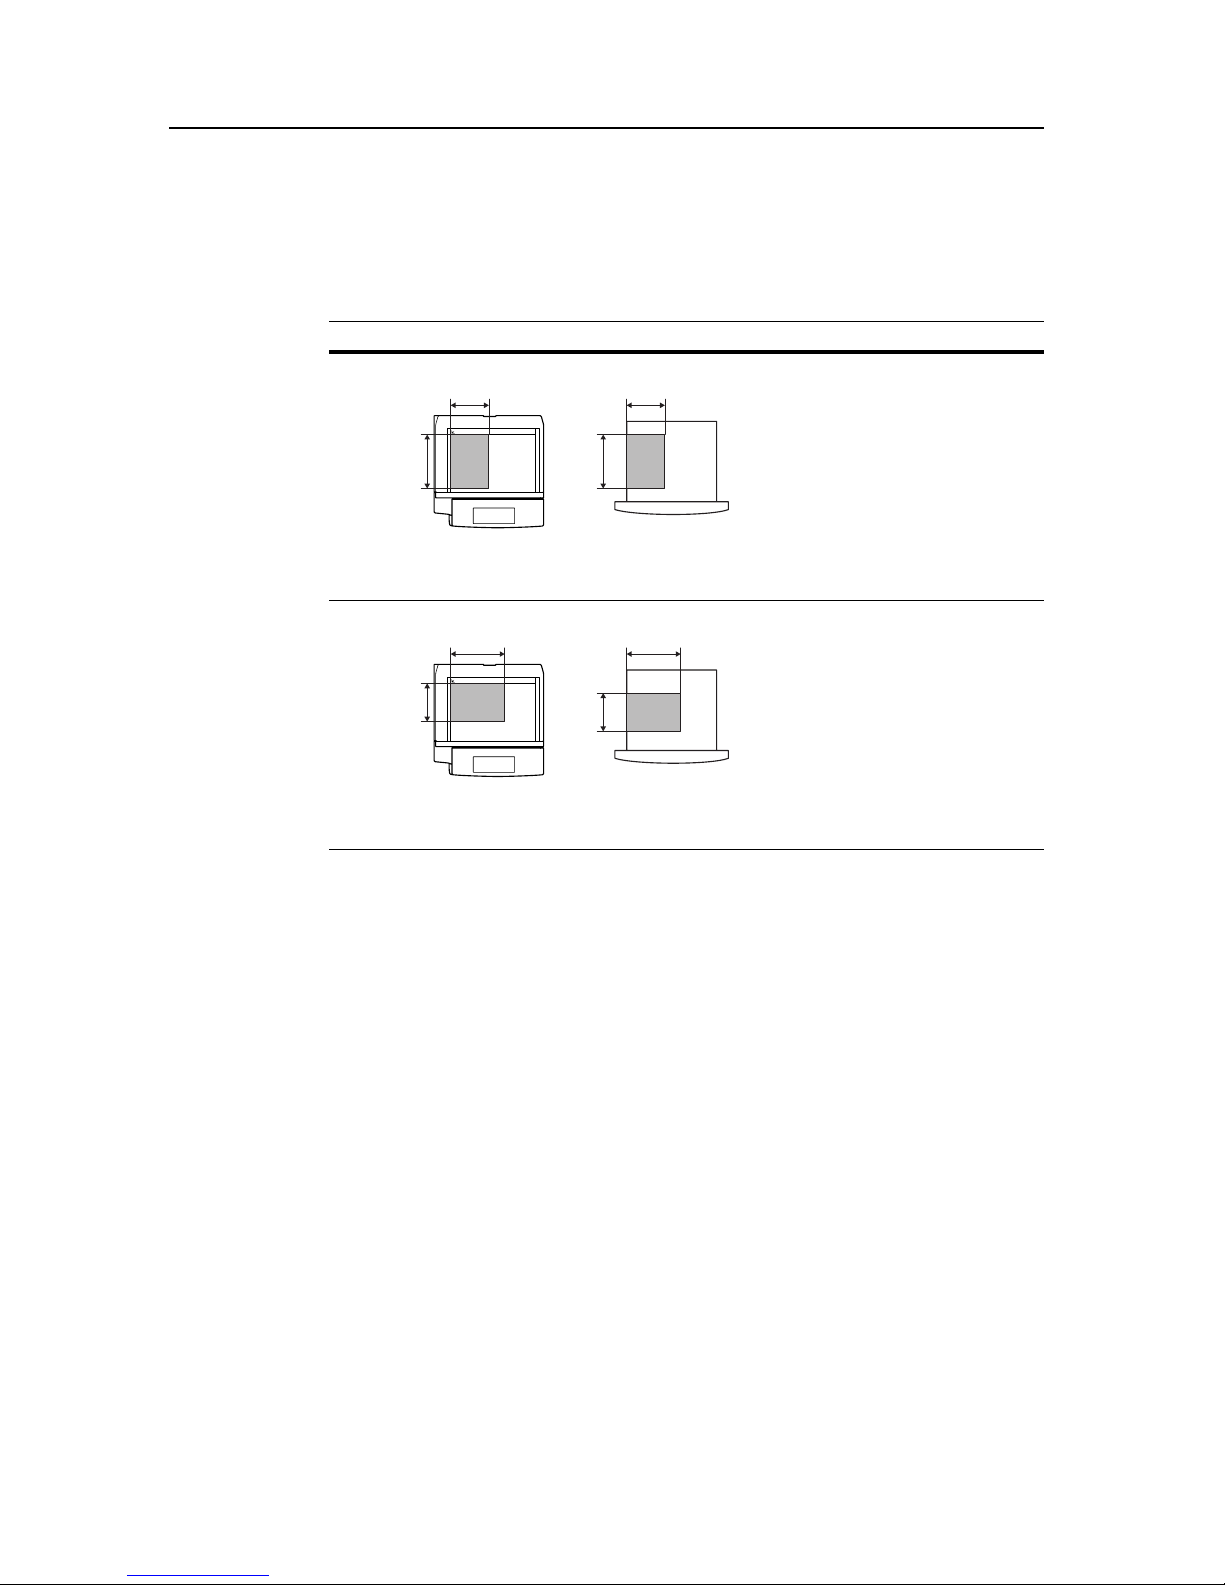
Originals and Paper Sizes
This section expl ain s the no tation used in this gu ide w h en refe rring to sizes of original s or paper
sizes.
As in A4 and B5, which may be used either in the horizontal or vertical direction, in order to
indicate the orient ation of the o riginal/p aper, horizontal orientation is indi cated by an additiona l R
character.
Set direction Indicated size
†
† The size of original/paper that can be used depends on the function and source tray. For
further details, refer to the page detailing that function or source tray.
Vertical direction
For original/paper, dimension A is longer than B.
A4, B5, A5, B6, A6, 16K
Horizontal direction
For original/paper, dimension A is shorter than B.
A4R, B5R, A5R, B6R, A6R,
16KR
B B
A A
Original Size
B B
A
A
Original Size
Page 13

xi
Contents
Sample of Color Setting Adjustment ............................................................................................................... i
One touch Image Adjust .............................................................................................................. i
Color Balance Adjust .................................................................................................................. ii
Hue Adjust ................................................................................................................................. iii
Sharpness Adjust ...................................................................................................................... iii
Legal and Safety Information ........................................................................................................................ iv
Regarding Tradenames ............................................................................................................. iv
About this Operation Guide .................................................. ..... ...... ..... ....................................................... vii
Included Guides ...................................................................... ...... ........................................... viii
Conventions in This Guide ........................................................................................................ ix
Originals and Paper Sizes .......................................................................................................... x
1 Copy Functions .............................................................................................1-1
Selecting Paper Source ......................................................................................................... 1-2
Selecting original size ............................................................................................................. 1-3
Copy Quantity ......................................................................................................................... 1-6
Orientation of Original Document ............................................................................................ 1-7
Offset Mode ............................................................................................................................. 1-9
Stapling ................................................................................................................................. 1-10
Punching ............................................................................................................................... 1-12
Combine Mode ...................................................................................................................... 1-14
Margin Mode ......................................................................................................................... 1-17
Centering Originals ............................................................................................................... 1-18
Border Erase ......................................................................................................................... 1-19
Poster .................................................................................................................................... 1-22
Page Numbering ................................................................................................................... 1-23
Cover Mode ........................................................................................................................... 1-25
Booklet from Sheets .............................................................................................................. 1-26
Booklets from Facing Pages ................................................................................................. 1-28
Memo Mode .......................................................................................................................... 1-30
Batch Scanning ..................................................................................................................... 1-32
Sharpness Adjust .................................................................................................................. 1-33
Background Exposure Adjust ................................................................................................ 1-34
Proof Copy ............................................................................................................................ 1-35
Repeat Copy ......................................................................................................................... 1-36
OHP Backing Sheet Mode .................................................................................................... 1-39
Auto Rotation ....................................................................................................................... 1-41
Selecting Output Destination ................................................................................................. 1-42
EcoPrint ................................................................................................................................. 1-43
Inverted Copying .................................................................................................................. 1-44
Mirror Copying ....................................................................................................................... 1-45
Auto Selection Mode ............................................................................................................. 1-46
Image Repeat Copy .......................................... ..... ...... ..... ...... ....................................... ....... 1-48
Color Balance Adjust ............................................................................................................. 1-49
Hue Adjust ............................................................................................................................. 1-50
One touch Image Adjust ........................................................................................................ 1-52
Color/B&W Selection ............................................................................................................. 1-53
MonoColor Copy ........................................................................... ..... ................................... 1-54
Programmed Copying .......................................................................................................... 1-55
Assigning Register Keys ....................................................................................................... 1-57
Job Build ............................................................................................................................... 1-58
2 Document and Output Management Functions .........................................2-1
Document Management Functions ......................................................................................... 2-2
Output Management Functions ............................................................................................. 2-11
Page 14

xii
3 Printer Settings ............................................................................................. 3-1
Print Status Page .................................................................................................................... 3-2
Interface Configuration .................................................. ..... ...... ....................................... .. .... 3-5
Emulation .............................................................................................................................. 3-10
Font Setting .......................................................................................................................... 3-13
Page Set Configuration ........................................................................................................ 3-17
Print Quality .......................................................................................................................... 3-21
Setting Color Mode ............................................................................................................... 3-22
Paper Handling ..................................................................................................................... 3-23
Handling Memory Devices .................................................................................................... 3-27
e-MPS Functions .................................................................................................................. 3-34
Other Settings ....................................................................................................................... 3-41
4 Scanner Settings .......................................................................................... 4-1
Setting Scanner Functions ..................................................................................................... 4-2
Scanner Default Settings ...................................................................................................... 4-12
Programmed Scanning ......................................................................................................... 4-20
Confirming Sending History .................................................................................................. 4-23
5 Setting Scanner from a Web Browser ........................................................ 5-1
Web Page Feature ................................................................................................................ 5-2
System Setting ....................................................................................................................... 5-6
Scan to PC Setting ............................................................................................................... 5-16
Send E-mail Setting .............................................................................................................. 5-20
Scan to FTP Setting ............................................................................................................. 5-25
6 Included Scanner Utilities ............................................................................ 6-1
Introducing the Scanner Utilities ..................................... ..... ........................................ ..... ...... 6-2
Scanner File Utility .................................................................................................................. 6-3
Address Editor ...................................................................................................................... 6-13
Address Book for Scanner .................................................................................................... 6-32
TWAIN Source ...................................................................................................................... 6-42
DB Assistant ......................................................................................................................... 6-49
7 System Menu ................................................................................................. 7-1
Default Settings ...................................................................................................................... 7-2
Setting MP Tray .................................................................................................................... 7-29
Registering Non-standard Sizes for Originals ...................................................................... 7-30
User Adjustment ................................................................................................................... 7-31
Setting Document Management Defaults ............................................................................. 7-38
Hard Disk Management ........................................................................................................ 7-42
Printing Reports .................................................................................................................... 7-43
Checking Total Copy Count .................................................................................................. 7-46
Character Input Method ........................................................................................................ 7-47
8 Job Accounting ............................................................................................. 8-1
Overview of Job Accounting ................................................................................................... 8-2
Managing Accounts ................................................................................................................ 8-4
Copy Count per Department ................................................................................................. 8-13
Activating and Deactivating Job Accounting ......................................................................... 8-16
Job Accounting Default Settings ........................................................................................... 8-17
Using Job Accounting .......................................... ..... ....................................... ...... ............... 8-22
9 Troubleshooting ............................................................................................ 9-1
Solving Malfunctions ............................................................................................................... 9-2
Responding to Error Messages .............................................................................................. 9-6
Page 15

xiii
Appendix ..................................................................................................... Appendix-1
Paper .......................................................................................................................... Appendix-2
Intercompatibility of Functions .................................................................................... Appendix-8
Glossary ................................................................................................................... Appendix-17
Index ................................................................................................................... Index-1
Page 16

xiv
Page 17

1-1
1 Copy Functions
This chapter covers the followi ng topi cs .
• Selecting Paper Source...1-2
• Selecting original size...1-3
• Copy Quantity...1-6
• Orientation of Original Document...1-7
• Offset Mode...1-9
• Stapling...1-10
• Punching...1-12
• Combine Mode...1-14
• Margin Mode...1-17
• Centering Originals... 1-18
• Border Erase...1-19
• Poster...1-22
• Page Numbering...1-23
• Cover Mode...1-25
• Booklet from Sheets...1-26
• Booklets from Facing Pages...1-28
• Memo Mode...1-30
• Batch Scanning...1-32
• Sharpness Adjust...1-33
• Background Exposure Adjust.. .1-3 4
• Proof Copy...1-35
• Repeat Copy...1-36
• OHP Backing Sheet Mode...1-39
• Auto Rotation...1-41
• Selecting Output Destination...1-42
• EcoPrint...1-43
• Inverted Copying... 1-44
• Mirror Copying...1-45
• Auto Selection Mode...1-46
• Image Repeat Copy...1-48
• Color Balance Adjust...1-49
• Hue Adjust...1-50
• One touch Image Adjust...1-52
• Color/B&W Selection...1-53
• MonoColor Copy...1-54
• Programmed Copying...1-55
• Assigning Register Keys...1-57
• Job Build...1-58
Page 18
Copy Functions
1-2
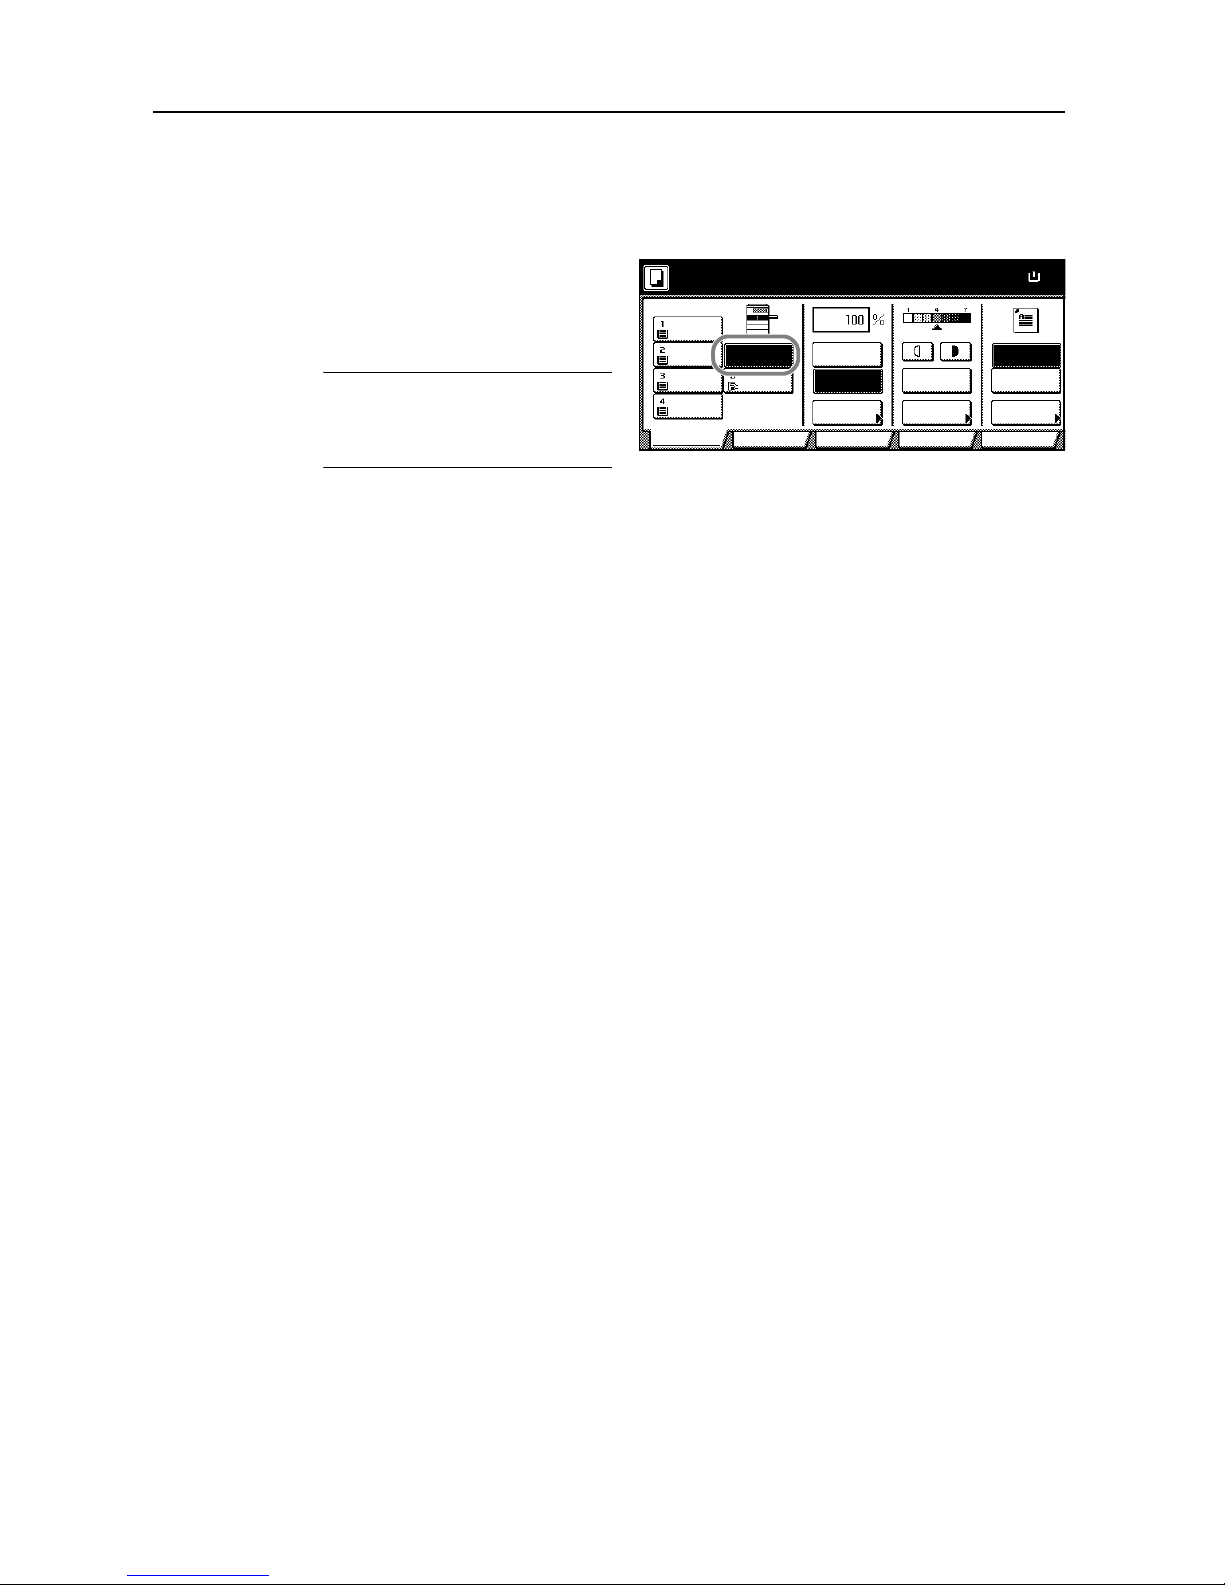
Selecting Paper Source
To select paper of different sizes, change the cassette or MP tray paper source.
Follow the steps as below to select the paper source.
1
Place the original.
When [APS] is selected, p aper matching
the size of the original will be selected
automatically.
NOTE: You may override the automa tic
paper selection default. For further
details, refer to Setting Auto Paper
Selection on page 7-5.
2
To change the paper size, press the button corresponding to the desired paper size to select that
paper source.
When using the MP tray, refer to Chapter 2 of Operati on Guide: Setting Paper T yp e and Size f or the
Cassettes and MP Tray to set the pape r size and paper type.
3
Press the Start key. Copying begins.
Paper Size
Color func.FunctionUser c h o ice
Basic
Plain
11×17"
Color
11×8½"
Plain
11×8½"
Plain
MP tray
Plain
APS
Auto %
Reduce
100%
Exposure
Auto
Staple
Staple
Lef t Top
Staple Off
100%
Exposure
/Enlarge Mode
Program
Ready to copy. ( )Full-Color
11×
8
11×8½"
Page 19
Copy Functions
1-3
Selecting original size
Specify the size of originals that will serve as the basis for scanning. Be sure to specify the original
size when copying originals of nonstandard sizes.
Select the original size from the following groups of original size.
• Standard Sizes – Select from commonly used standard sizes.
Inch models: 11 × 17", 8
1/2 ×14", 11×81/2", 8 1/2 ×11", 51/2 ×81/2", 8 1/2 ×51/2", 8 1/2 ×131/2",
8
1/2 × 13", 11 × 15", A4 and A4R
Metric models: A3, B4, A4, A4R, B5, B5R, A5, A5R, B6, B6R, A6R, Folio, 11 × 15", 11 × 8
1/2"
and 8
1/2 ×11"
• Other Standard Size s – Select from special-purpose standard sizes.
Inch models: A3, B4 , B5 , B5 R, A5 , A5R, B6, B6R, A6R, Fol io, P. Card, OUFUKU HAGAKI, 8K,
16K and 16KR
Metric models: 11 × 17", 8
1/2 ×14", 51/2 ×81/2", 8 1/2 ×51/2", 8 1/2 ×131/2", 8 1/2 × 13", Pstcard,
OUFUKU HAGAKI, 8K, 16K and 16KR
• Input Original Size – Enter the size for when not shown in the list of standard sizes.
Inch models
Vertical: 2 - 11
5/8" (1/8" increments), Horizontal: 2 - 17" (1/8" increments)
Metric models
Vertical: 50 - 297 mm (1mm increments), Horizontal: 50 - 432 mm (1 mm increments)
• Custom Size – Select entered and registered original sizes. For setting custom original sizes,
refer to Registering Non-standard Sizes for Originals on page 7-30.
Standard Size s
Follow the steps as below to specify the standard size.
1
Place the original.
2
Press [Function].
3
Press [Select Orig. Size] ([Select Size Orig.]).
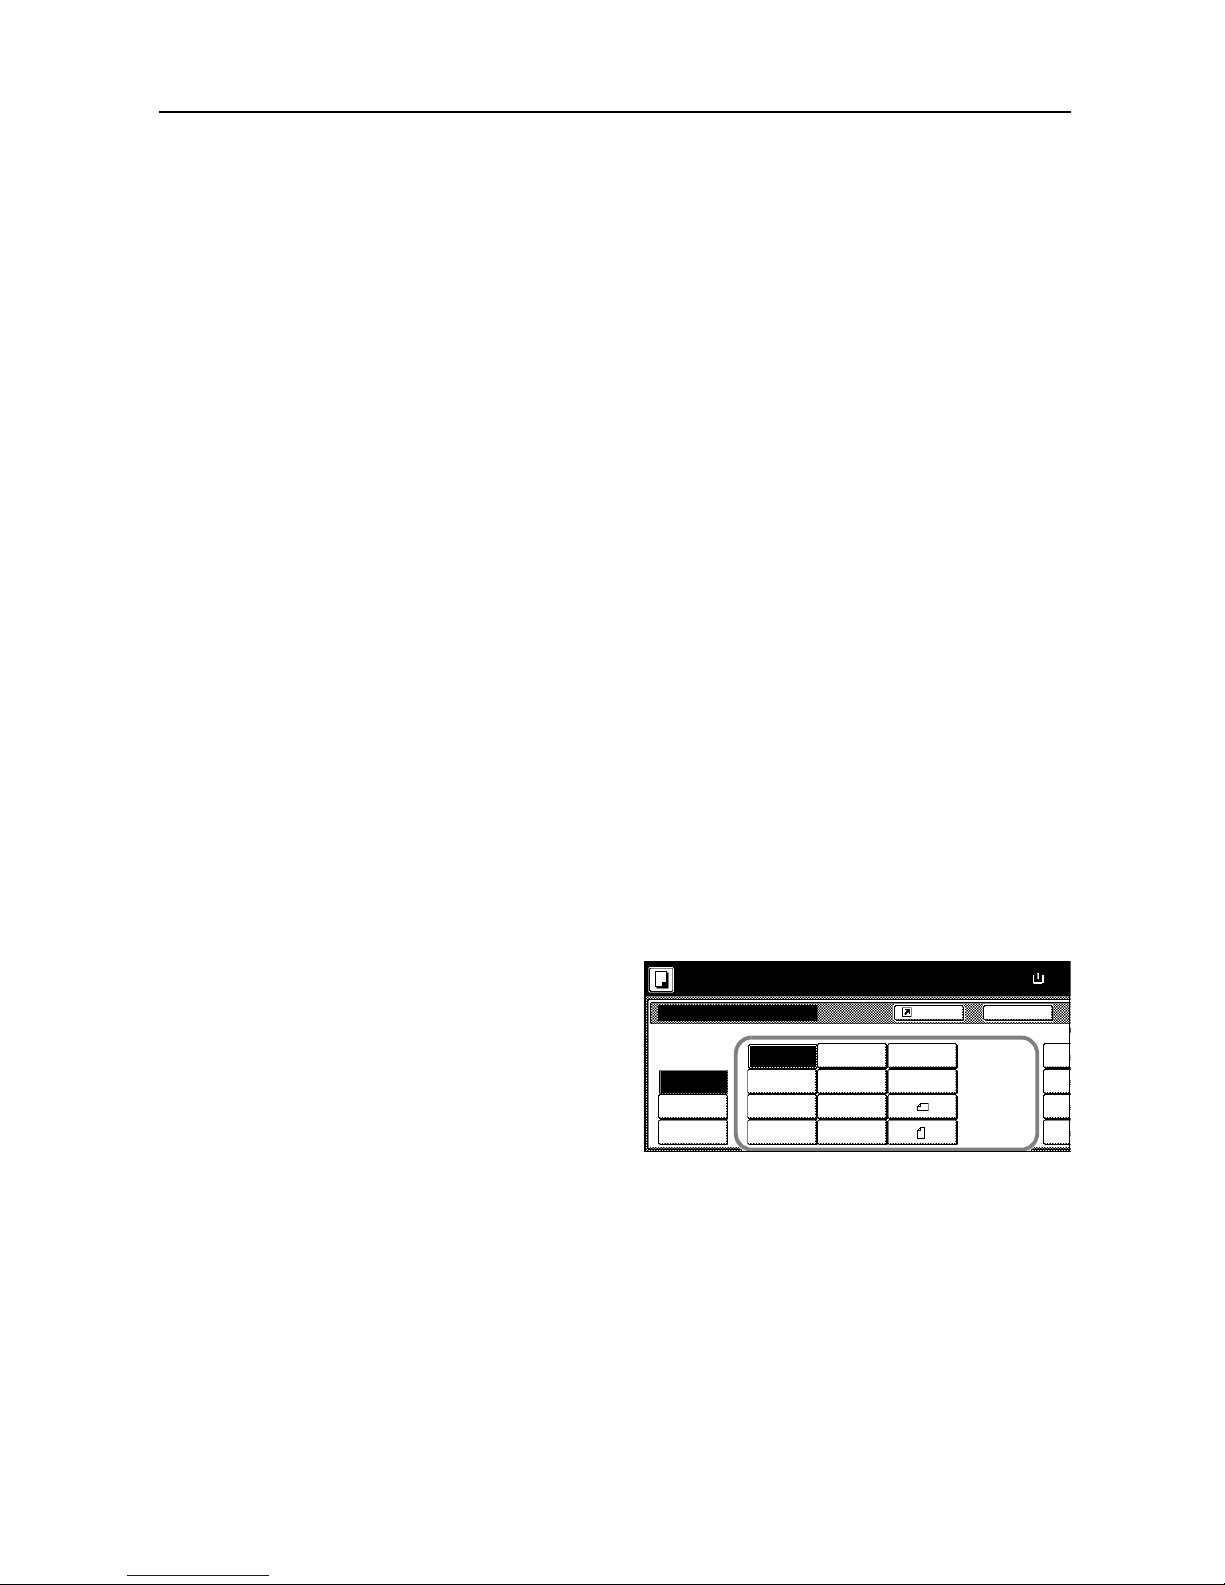
4
Select the original size.
Choose [Auto] to match the size of
placed originals automatically.
5
Press the Start key. Copying begins.
Other Standard Sizes
Follow the steps as below to specify the other standard sizes.
1
Place the original.
2
Press [Function].
3
Press [Select Orig. Size] ([Select Size Orig.]).
Select
11×8½"
8½×5½"
5½×8½"11×17"
Other
Inpu t size
Auto 8½×14"
8½×11"
11×15"
8½×13½"
8½×13"
A4
BackSele ct Orig inal Size
A4
Cust
o
stand.Size
Shortcut
Paper Size
100%
11
11/1
6
Ready to copy.
size
( )Full-Color
11×
8
11
11/1
6
11
11/1
6
11
11/1
6
Page 20
Copy Functions
1-4
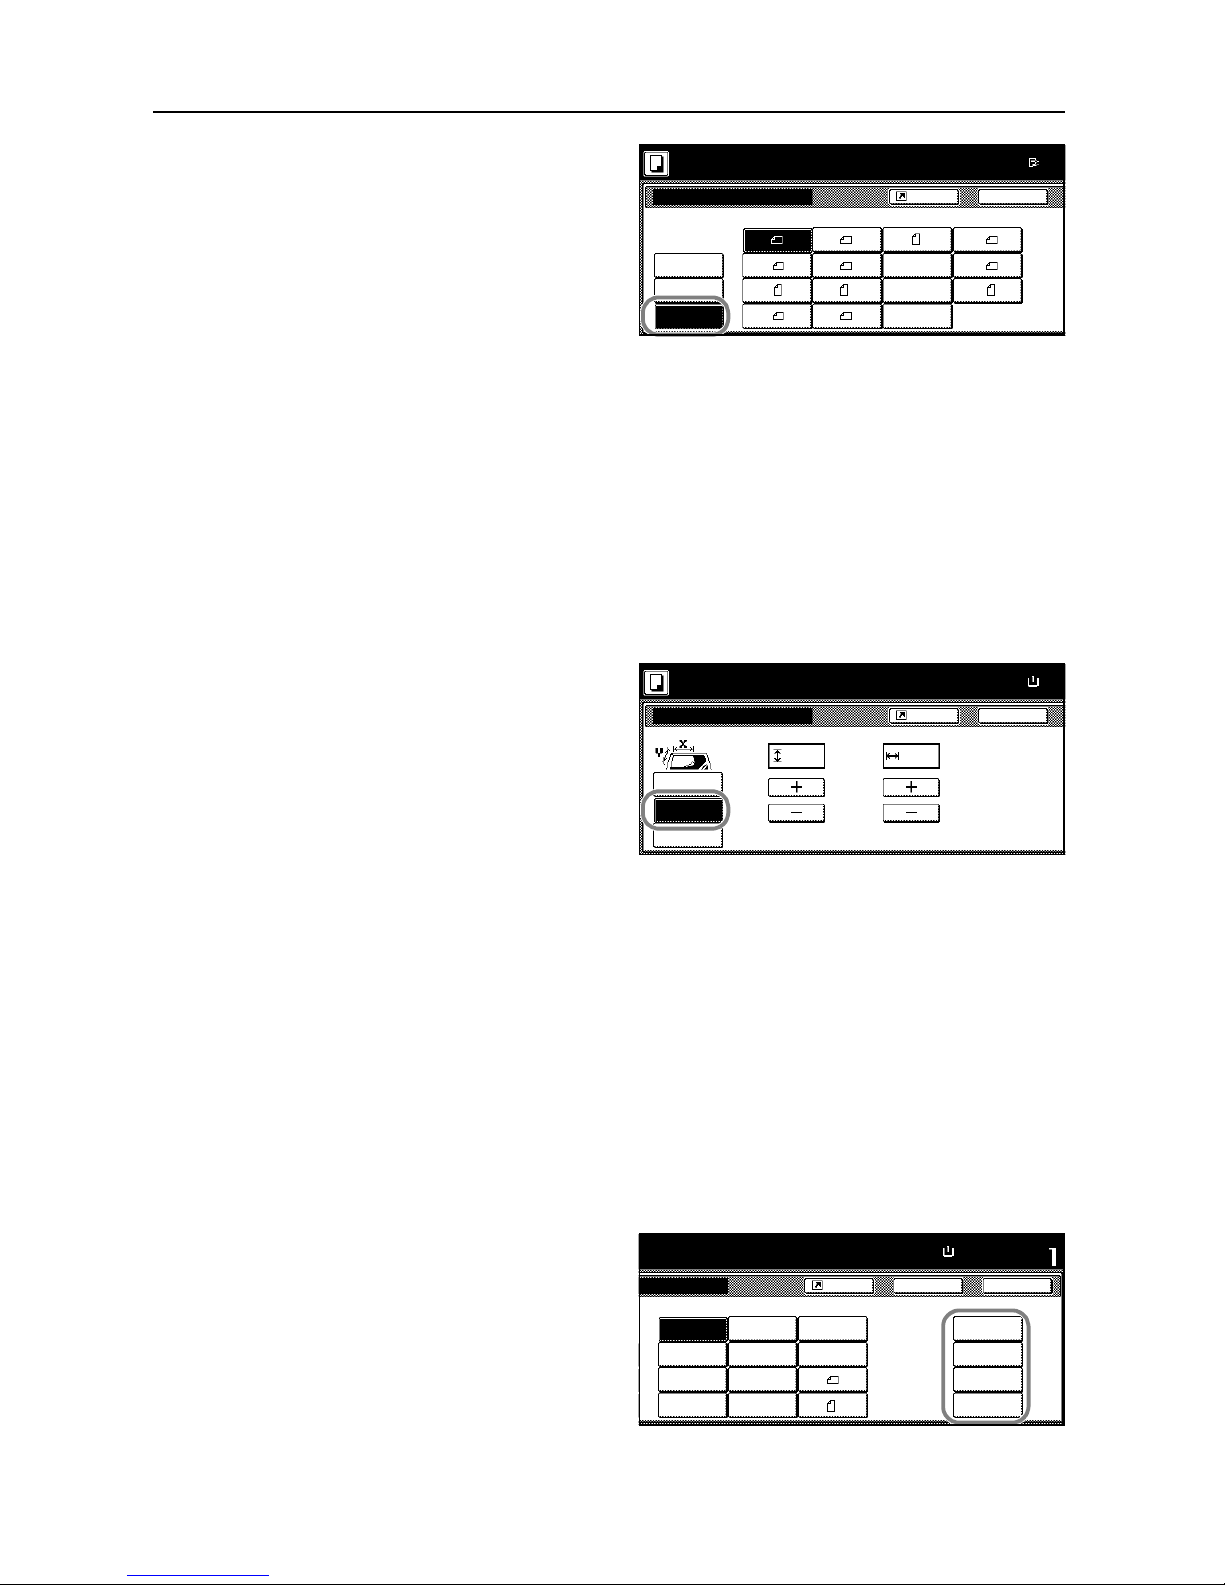
4
Press [Other stand.Size] ([Others
stand.Size]).
5
Select the original size.
6
Press the Start key. Copying begins.
Input Original Size
Follow the steps as below to enter the original size when not listed in the standard sizes.
1
Place the original.
2
Press [Function].
3
Press [Select Orig. Size] ([Select Size Orig.]).
4
Press [Input size].
5
Press [+] or [–] to set the Y (height) and X (width) sizes.
With the metric models, you may enter the size directly using the numeric keys by pressing
[#-Keys].
6
Press the Start key. Copying begins.
Custom Size
Follow the steps as below to specify one of the custom sizes.
1
Place the original.
2
Press [Function].
3
Press [Select Orig. Size] ([Select Size Orig.]).
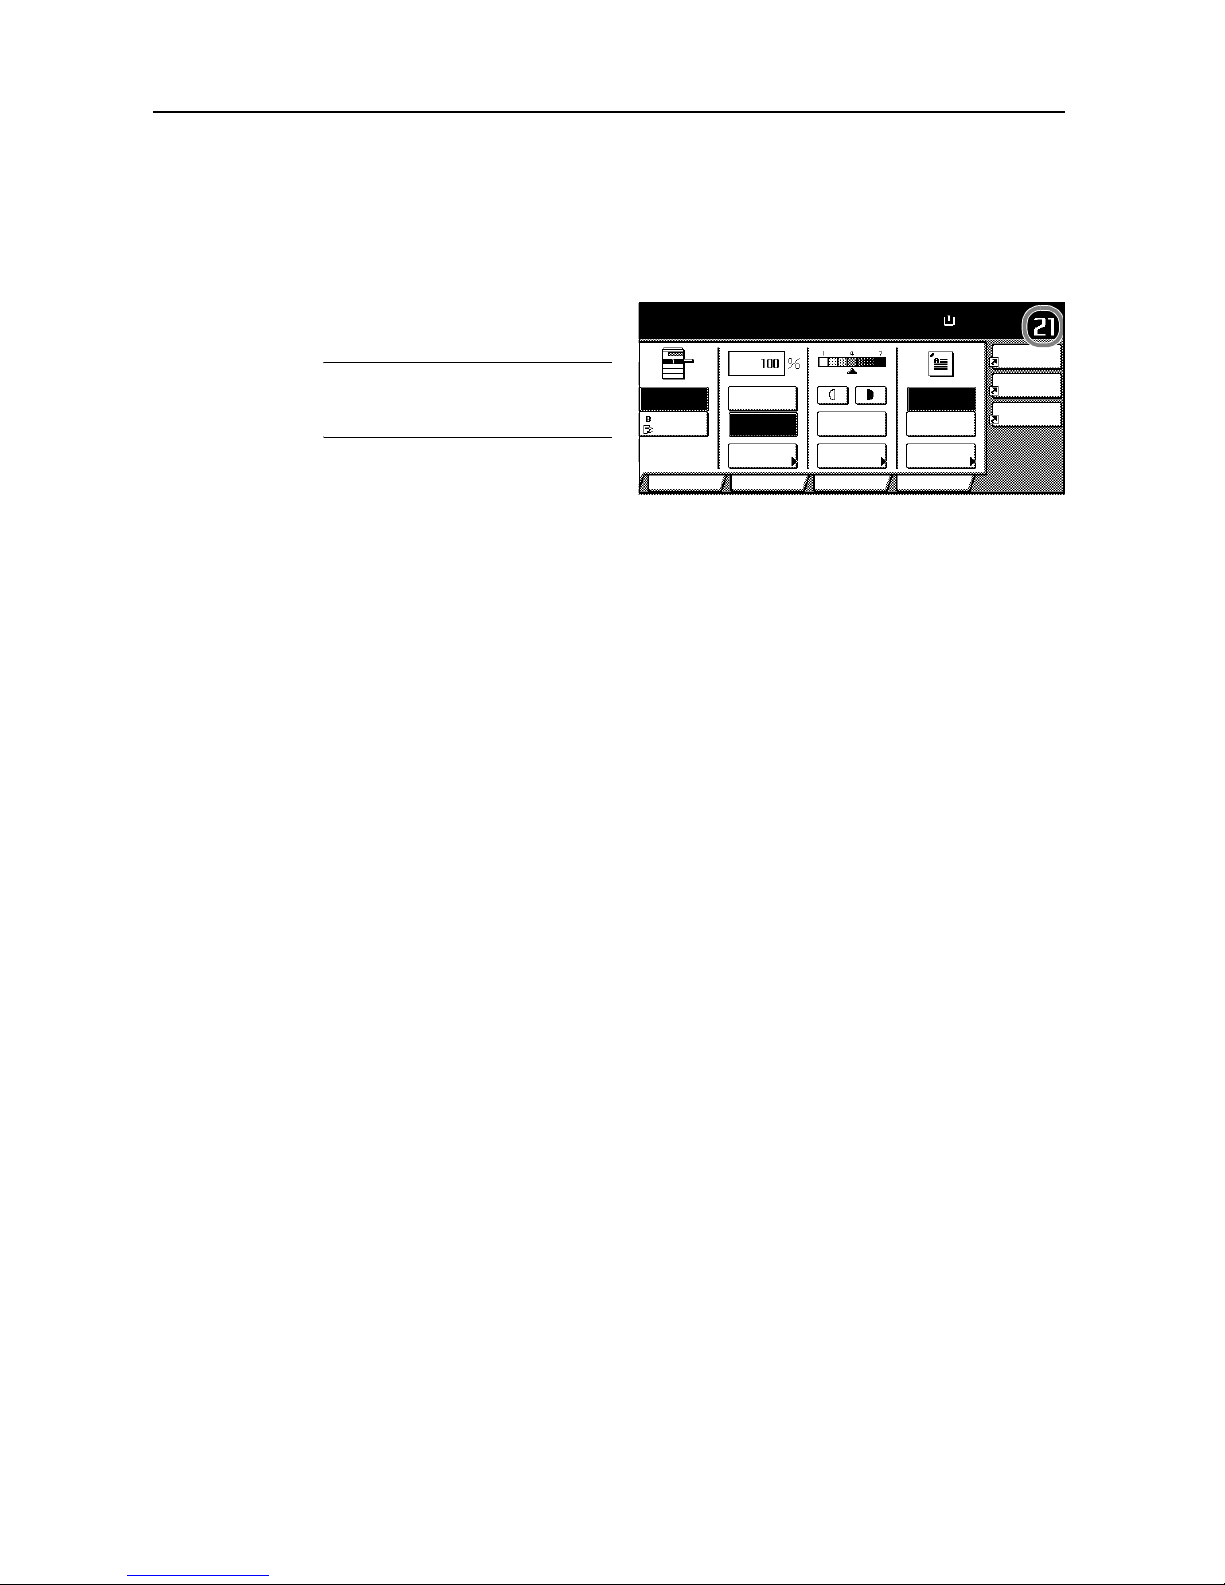
4
Select the original size from Custom
Size (Use regist).
Inpu t size A5 B5
B5
A3
Other
B4
A5
B6
B6
Folio
Back
P.Card
Select
A6
Select O rigin al Size
Paper Siz
e
Shortcut
stand.Size
100%
Ready to copy.
size
( )Full-Color
8K
16K
16K
OUFUKU
HAGAKI
11×
1
BackSe lect Orig in a l Size
Paper Size
Set origina l o n platen an
scanning range. (Y side,
Shortcut
Select
Other
Inpu t size
stand.Size
XY" "
100%
( 2~11
5/8
) ( 2~17)
Ready to copy.
size
.2 .2
( )Full-Color
11×
8
Close
11×8½"
8½×5½"
5½×8½"11×17"
Auto 8½×14"
8½×11"
11×15"
8½×13½"
8½×13"
A4
BackSize
Set
A4
Custom Size
Shortcut
Paper Size
100%
11
11/16
×16
9/16
"
to copy. ( )Full-Color
11×8½"
11
11/16
×16
9/16
"
11
11/16
×16
9/16
"
11
11/16
×16
9/16
"
Page 21

Copy Functions
1-5
5
Press the Start key. Copying begins.
Page 22
Copy Functions
1-6
Copy Quantity
Sets the number of sheets to copy. You may specify up to 999 sheets for a single copy job.
Follow the steps as below to specify the copy quantity.
1
Place the original.
2
Use the numeric keys on the operation
panel to enter the desired copy quantity.
NOTE: To clear the copy quantity,
press the Stop/Clear key. Copy
quantity will be reset to 1.
3
Press the Start key. Copying begins.
Paper Size Set
Combine
Sheet
Mar gi n/
Centering
Color func.FunctionUser c h o ice
MP tray
Plain
APS
Auto %
Reduce
100%
Exposure
Auto
Staple
Staple
Lef t Top
Staple Off
100%
Exposure
/Enlarge Mode
Erase
Program
to copy. ( )Full-Color
11×8½"
Page 23
Copy Functions
1-7
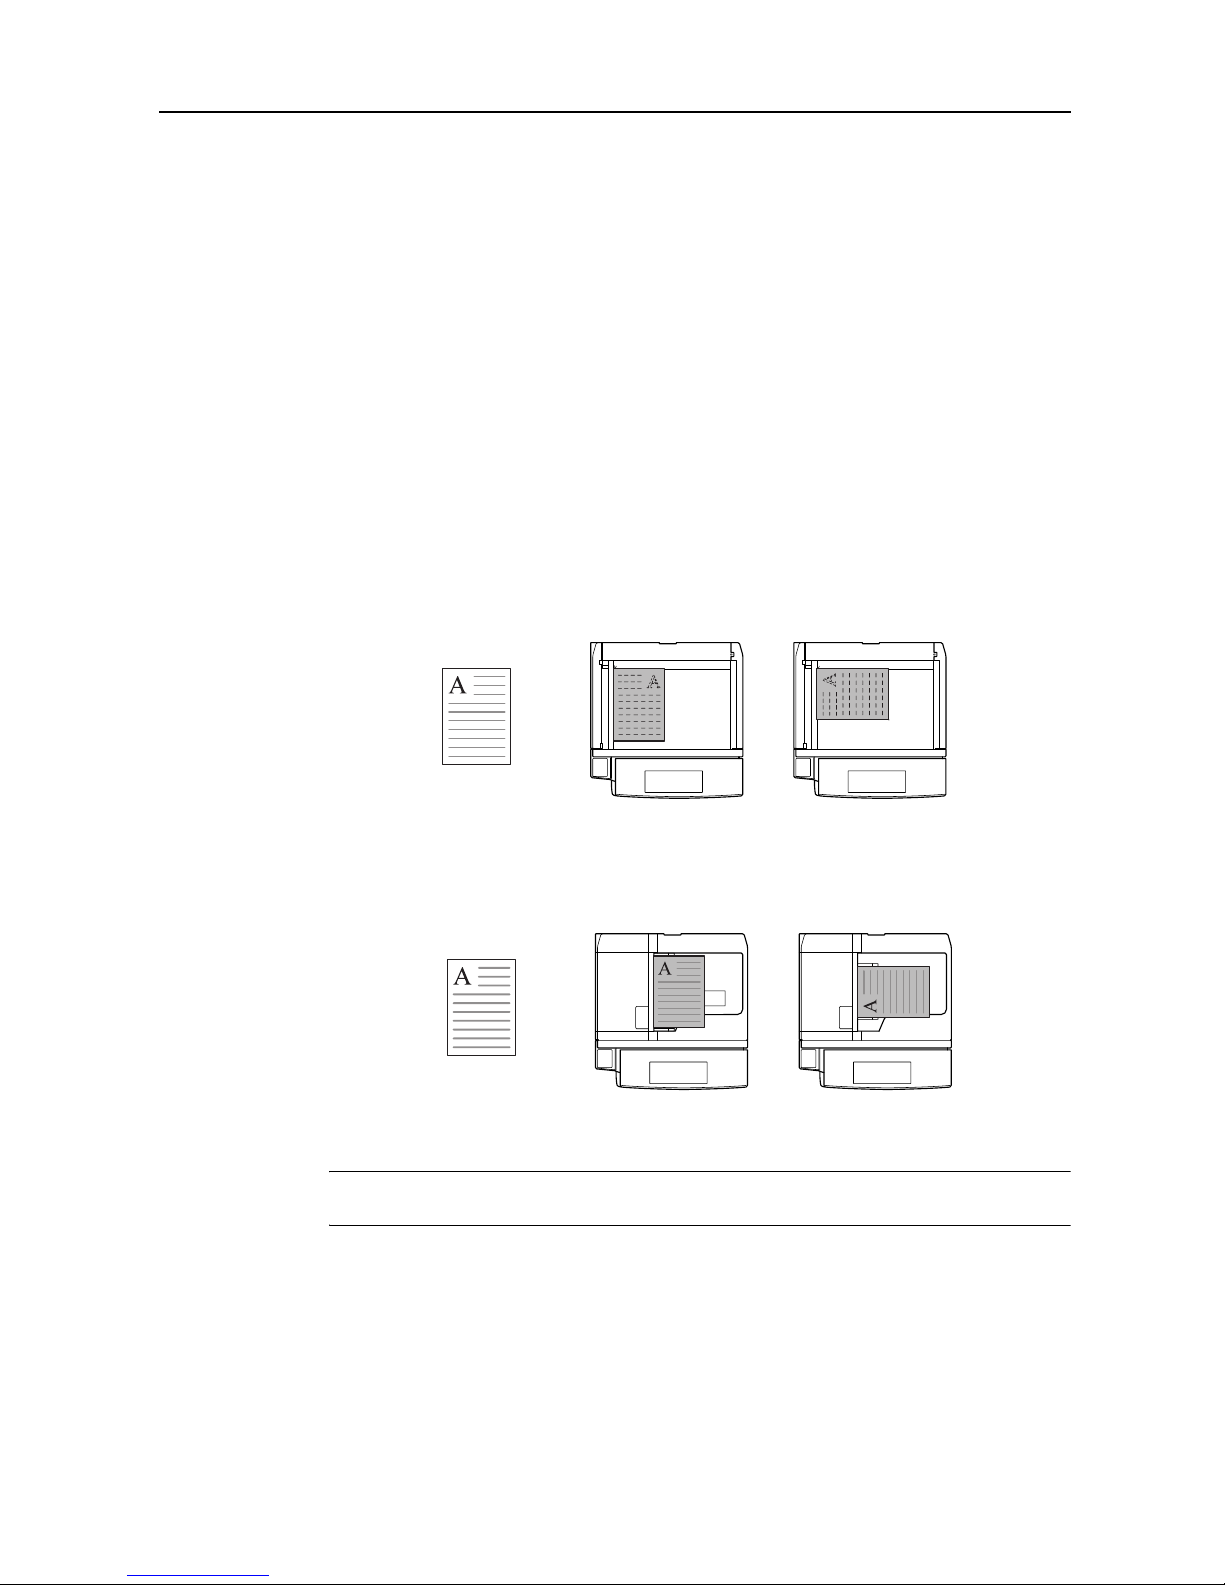
Orientation of Original Document
Orientation of the original must be specified to to use the following functions.
•Duplex Mode
• Split Mode (separate copies from two-sided originals)
• Margin Mode
• Auto Center
• Border Erase
• Combine Mode
• Memo Pages
• Page Numbering
•Booklet
• Stapling (optional feature)
• Punching (optional feature)
Placing originals on the platen
Placing originals in the optional document processor
NOTE: The default setting for the original orientation may be changed. For further details, refer to
Orientation of Original Document on page 7-20.
Follow the steps as below to specify the original orientation.
1
Place the original.
2
Press [Function] and then press [T Down].
3
Press [Orig. Set Direction].
Original [Top Edge]
([Back Edge])
[Left Top Edge]
([Left top corner])
Original [Top Edge]
([Back Edge])
[Left Top Edge]
([Left top corner])
Page 24

Copy Functions
1-8
4
According to the placed orientation of
the original, press [Top Edge] ([Back
Edge]) or [Left Top Edge] ([Left top
corner]).
5
Press [Close].
6
Configure the functions whic h require speci fication of the origin al orie nt atio n, suc h as Duplex mode.
7
Press the Start key. Copying begins.
Set
Back
Left T op
Sele ct Orig inal Image
Direction.
Top Edge
Close
ion
Paper Size
"Se lect Or ig inal Image D ir ection ." can
be shown at right side of display.
Follow the steps. If setting mode is
wro ng, incorrect cop y will resu lt.
Shortcut
100%
to copy.
Edge
( )Full-Color
11×8½"
Page 25
Copy Functions
1-9
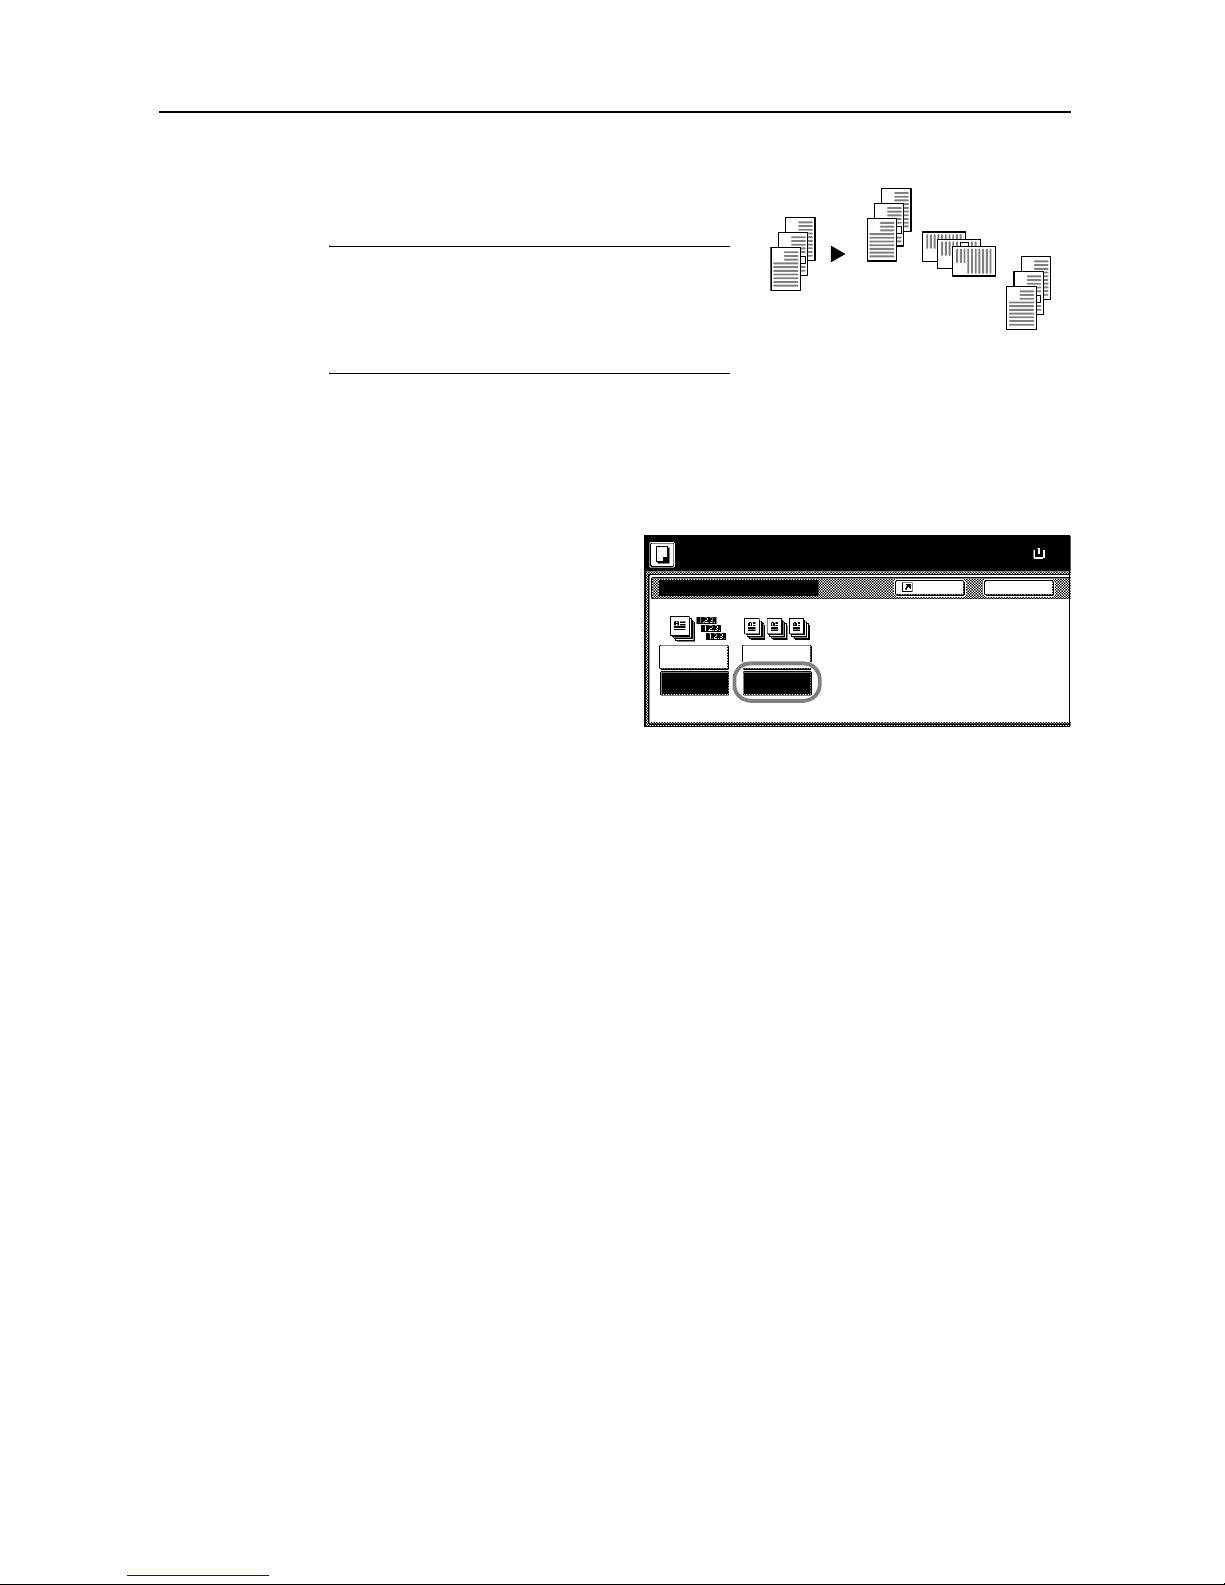
Offset Mode
Outputs printed copies such that each set is stacked
perpendicular (rota ted 90 degrees) to the previous set.
NOTE: Use of this feature re quires p aper of the sam e
size must be loaded in the different cassettes with
portrait and landscape orientations.
Only 11 × 8
1/2", A4, B5 and 16K paper sizes may be
used with Offset mode.
Follow the steps as below fo r using Offset mode.
1
Press [Function].
2
Press [Sort/Offset] ([Sort/Group] ).
3
Press [On] ([1 set] or [Output each
page]).
4
Use the numeric keys to enter the copy quantity.
5
Place the original and p ress the Start key. Copying begins.
If the original has been placed on the optional document processor, copying begins automatically.
If the original is placed on the platen, Scan next origi nal(s) is displayed. Place the next original and
press the Start key.
If all original pages have been scanned, press [Scanning finished]. Copying begins.
Copied pages are output to the output tray offset per each set.
3
2
1
3
2
1
3
2
1
3
2
1
Original Copy
Sort/Offset
Sort:Off
BackShortcut
Paper Size
Sort:On
Sort Offset
100%
Off
On
Ready to copy. ( )Full-Color
11×
8
Page 26
Copy Functions
1-10
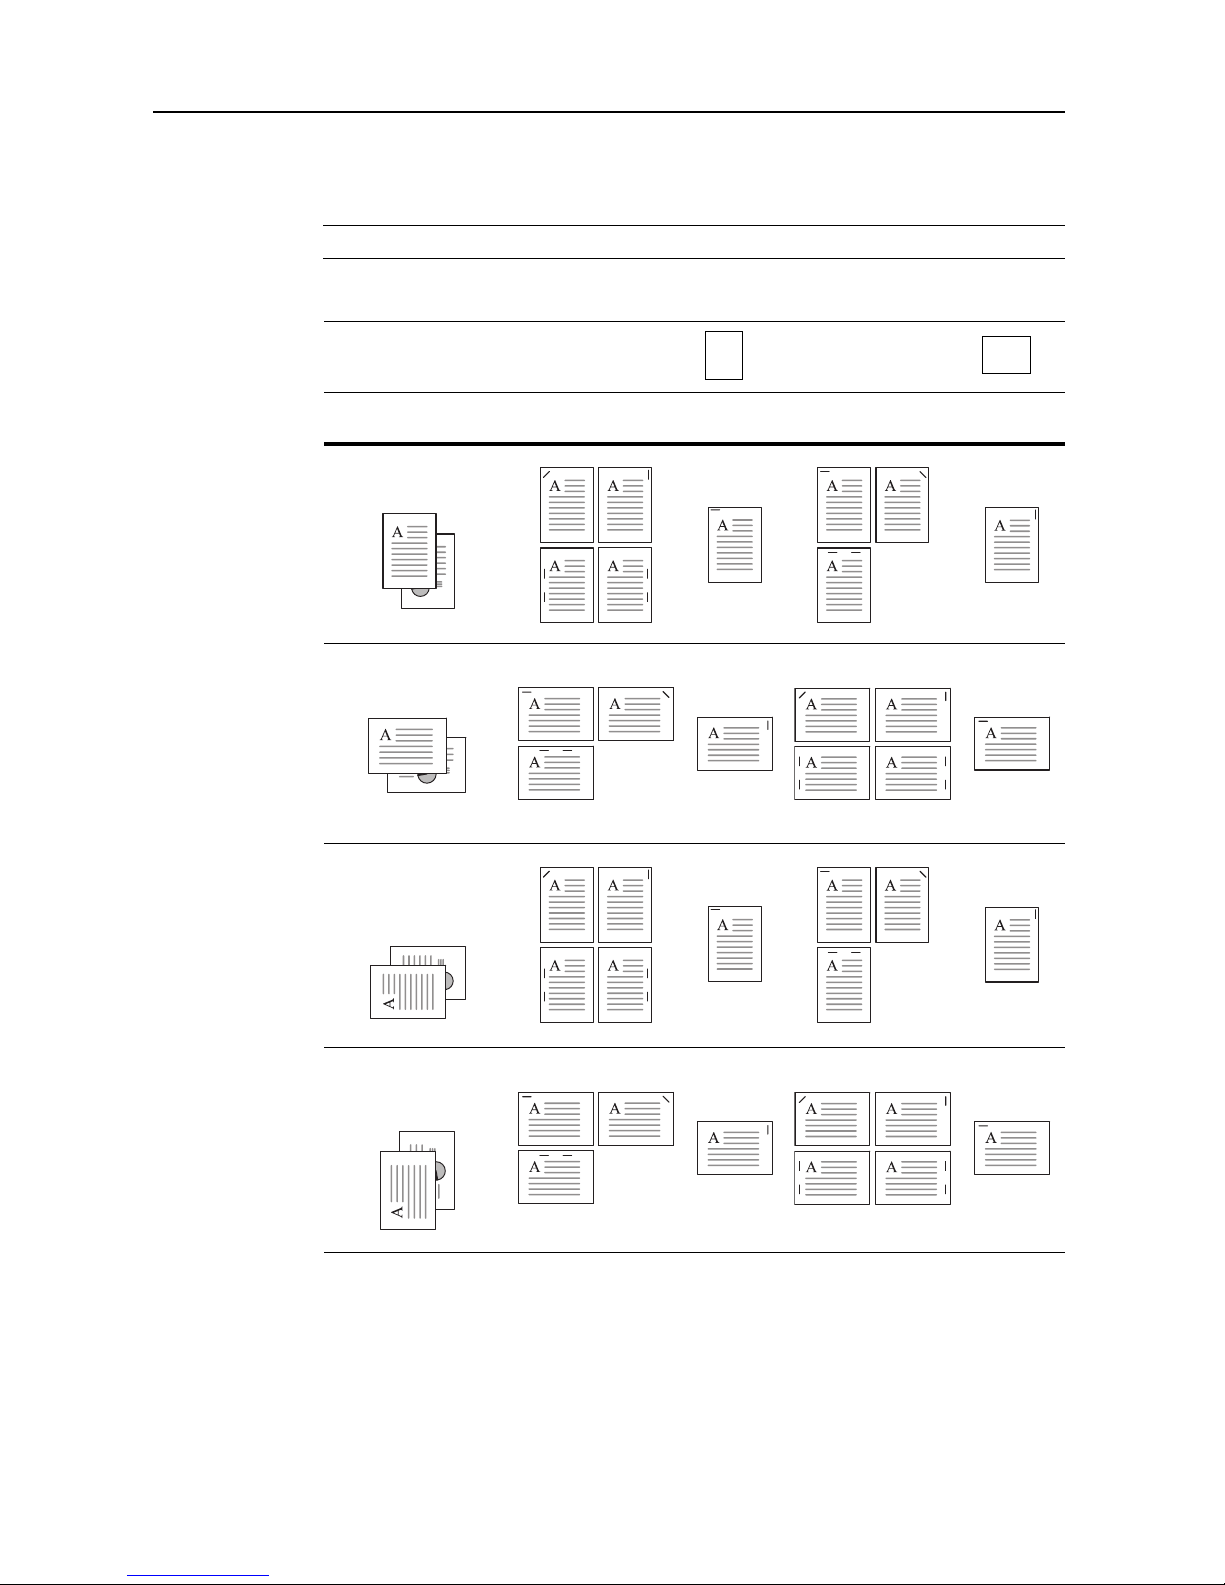
Stapling
Staples sets of copies.
NOTE: Requires the optional document finisher or 3000 sheet document finisher.
The orientations of the original and corresponding staple positions are as follows.
Follow the steps as below for stapling.
1
Press [Function] and then press [T Down].
2
Press [Staple/Punch].
Cassette Paper
Load Direction
Cassette Paper
Load Direction
3000 Sheet
Document Finisher
Document
Finisher
3000 Sheet
Document Finisher
Document
Finisher
Original Orienta tion:
Top Edge (Back Edge)
Original Orienta tion:
Top Edge (Back Edge)
Original Orienta tion:
Left T op Edge
(Left top corner)
Original Orienta tion:
Left T op Edge
(Left top corner)
Page 27

Copy Functions
1-11
3
Press [1 staple] or [2 staples].
4
Select the staple position.
5
Place the original and p ress the Start key.
If the original has been placed on the optional document processor, copying begins automatically.
If the original is placed on the platen, Scan next origi nal(s) is displayed. Place the next original and
press the Start key.
If all original pages have been scanned, press [Scanning finished]. Copying begins.
Back
Sele ct Orig inal I
Direction.
Top Edge
Staple/Punch
Paper Size
Shortcut
Off
1 staple
PositionStaple
100%
Ready to copy. ( )Full-Color
2 staples
2 holes
Off
Punch
Left s ide
Right s ide
Top side
11×
8
3 holes
Page 28
Copy Functions
1-12
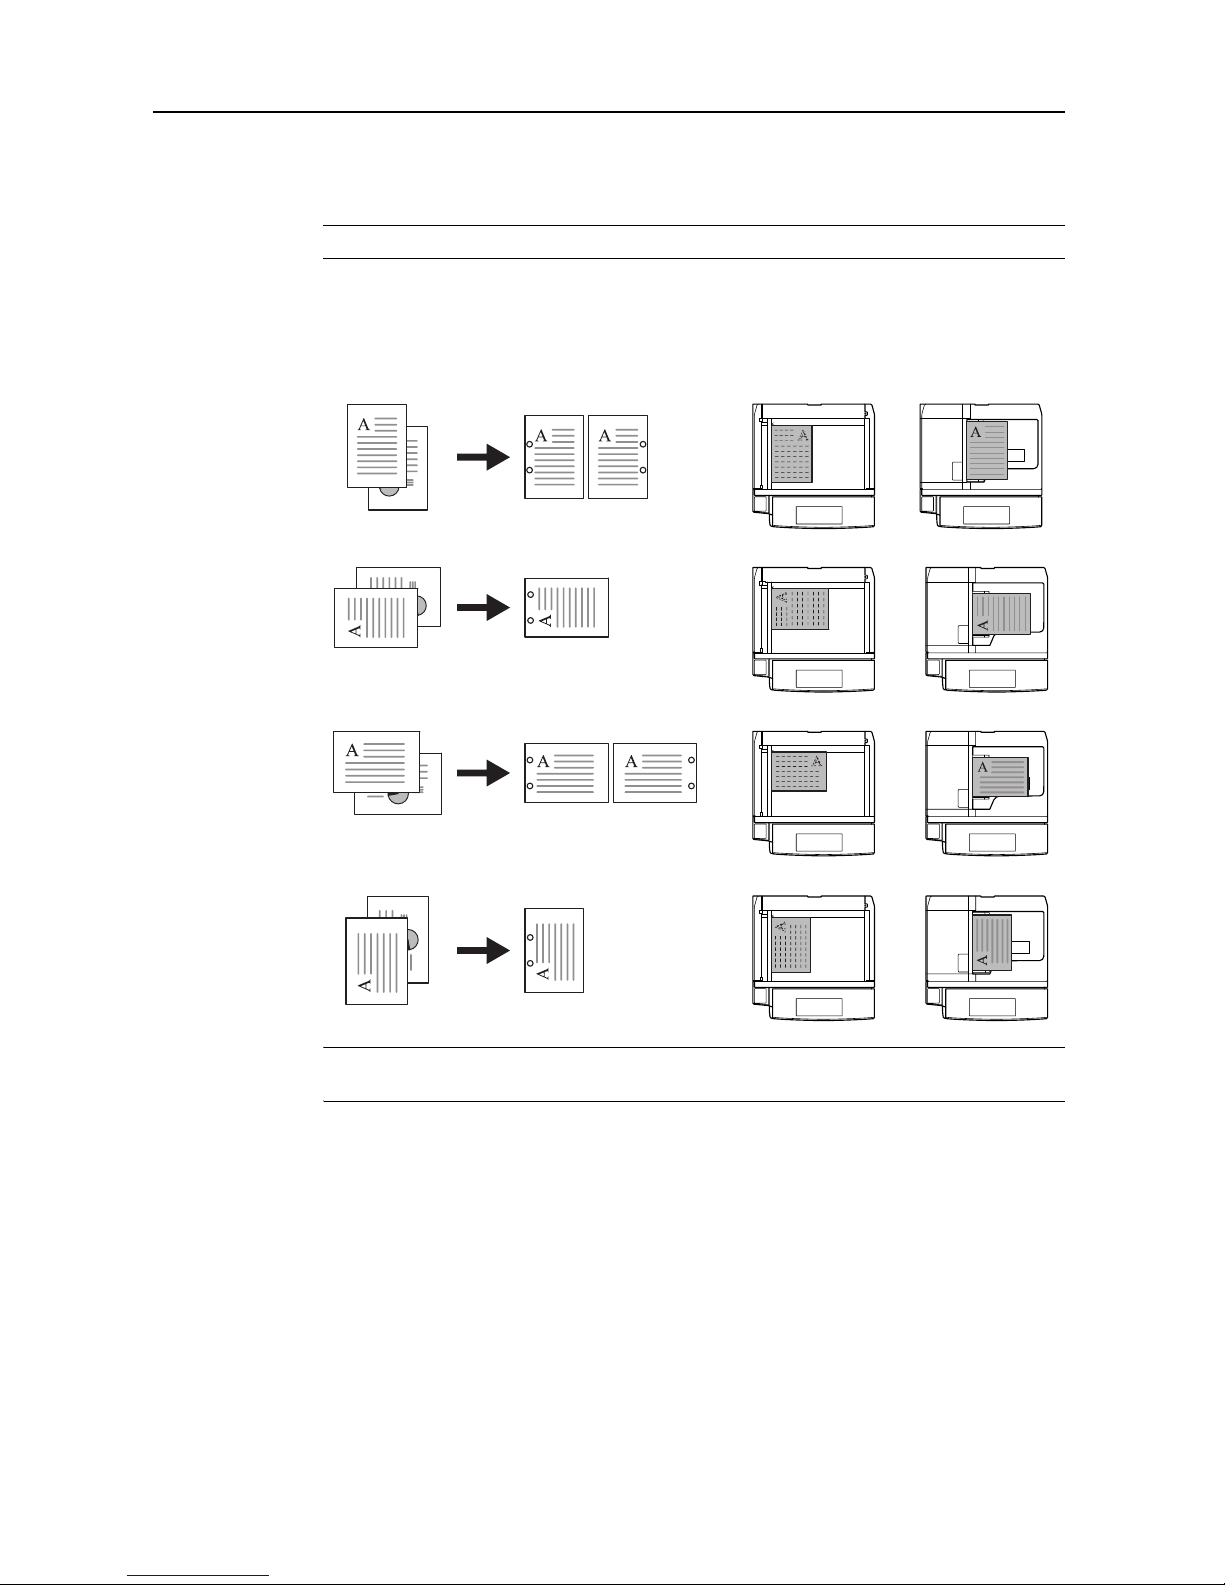
Punching
Punch holes in sets of finished copies in preparation for binding.
NOTE: Requires the optional 3000 sheet document finisher and punching unit.
The orientations of the original and corresponding punch positions are as follows.
NOTE: The inch model provides two-hole and three-hole punching. The metric model provides
two-hole and four-hole punching.
Follow the steps as below for punching.
1
Press [Function] and then press [T Down].
2
Press [Staple/Punch].
Original Copy
Document
processor
Platen
Orientation of Original
Page 29

Copy Functions
1-13
3
Press [2 holes] or [3 holes] for the inch
model. Press [2 holes] or [4 holes] for
the metric model.
4
Select the hole punch position.
5
Place the original and p ress the Start key.
If the original has been placed on the optional document processor, copying begins automatically.
If the original is placed on the platen, Scan next origi nal(s) is displayed. Place the next original and
press the Start key.
If all original pages have been scanned, press [Scanning finished]. Copying begins.
Back
Sele ct Orig inal I
Direction.
Top Edge
Staple/Punch
Paper Size
Shortcut
1 staple
Staple
100%
Ready to copy. ( )Full-Color
2 staples
Off
2 holes
Off Lef t s id e
Right s ide
Top side
Punch Position
11×
8
3 holes
Page 30
Copy Functions
1-14
Combine Mode
Images from either two or four originals are reduced and combined onto a single copy. The page
boundary of each original can be indicated by a solid or dotted line.
NOTE: Combine mode su pports 11 × 17", 11 × 8 1/2", 8 1/2 × 11" , A3, B4 , A4, A4R, B5 , B5R, 8 K and
16K paper sizes.
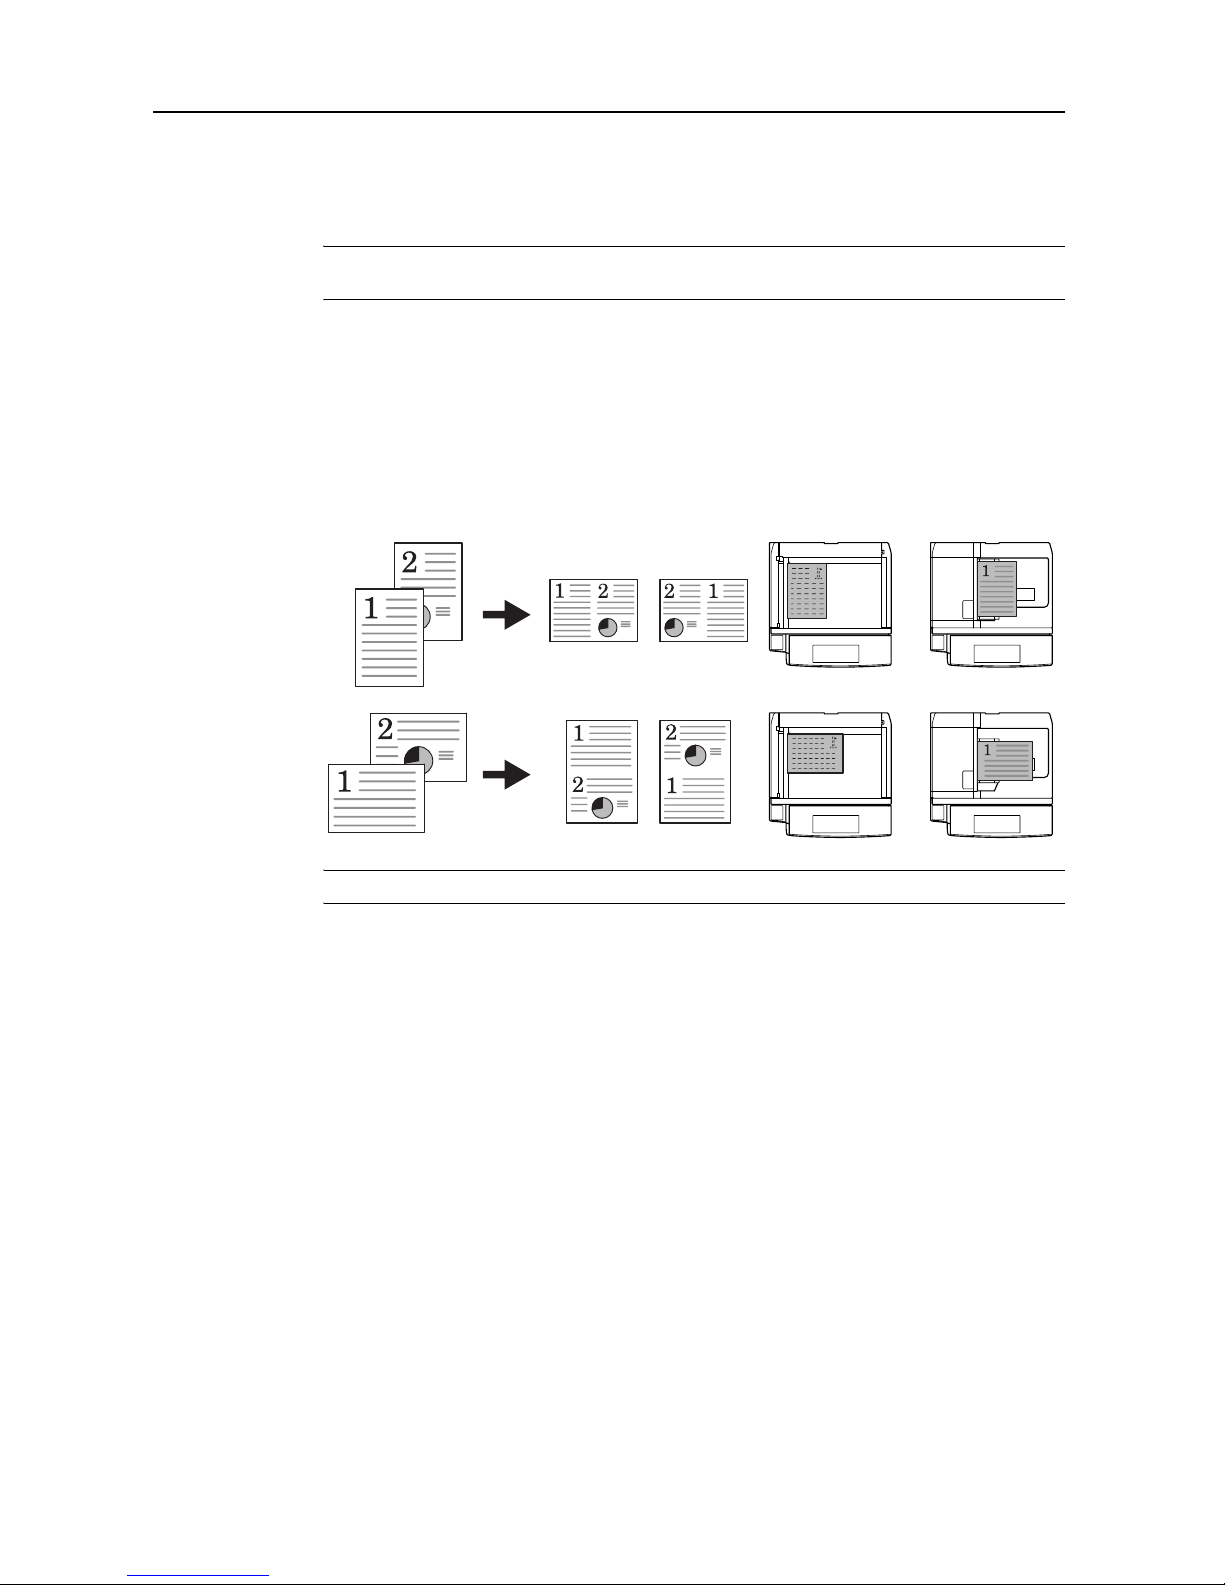
2-in-1 Mode
Copy two originals onto a single sheet. This mode can be used with Duplex mode to copy four
originals onto one sheet.
The orientations of the original and corresponding output are as follows.
NOTE: When placing the original on the platen, copy originals in the page order.
Copy Original Orientation of Original
Document
processor
Platen
Page 31

Copy Functions
1-15
4-in-1 Mode
For copying four originals onto a single sheet. This mode can be used with Duplex mode to copy
eight originals onto one sheet.
The orientations of the original and corresponding output are as follows.
NOTE: When placing the original on the platen, copy originals in the page order.
Types of Page Boundary Lines
Choose from the following options for lines to indicate page boundaries.
Follow the steps as below to combine originals.
1
Press [Function].
2
Press [Combine] ([Merge copy] ) .
Copy Original Orientation of Original
Document
processor
Platen
None DottedSolid Borders
(Cropmark)
Page 32

Copy Functions
1-16
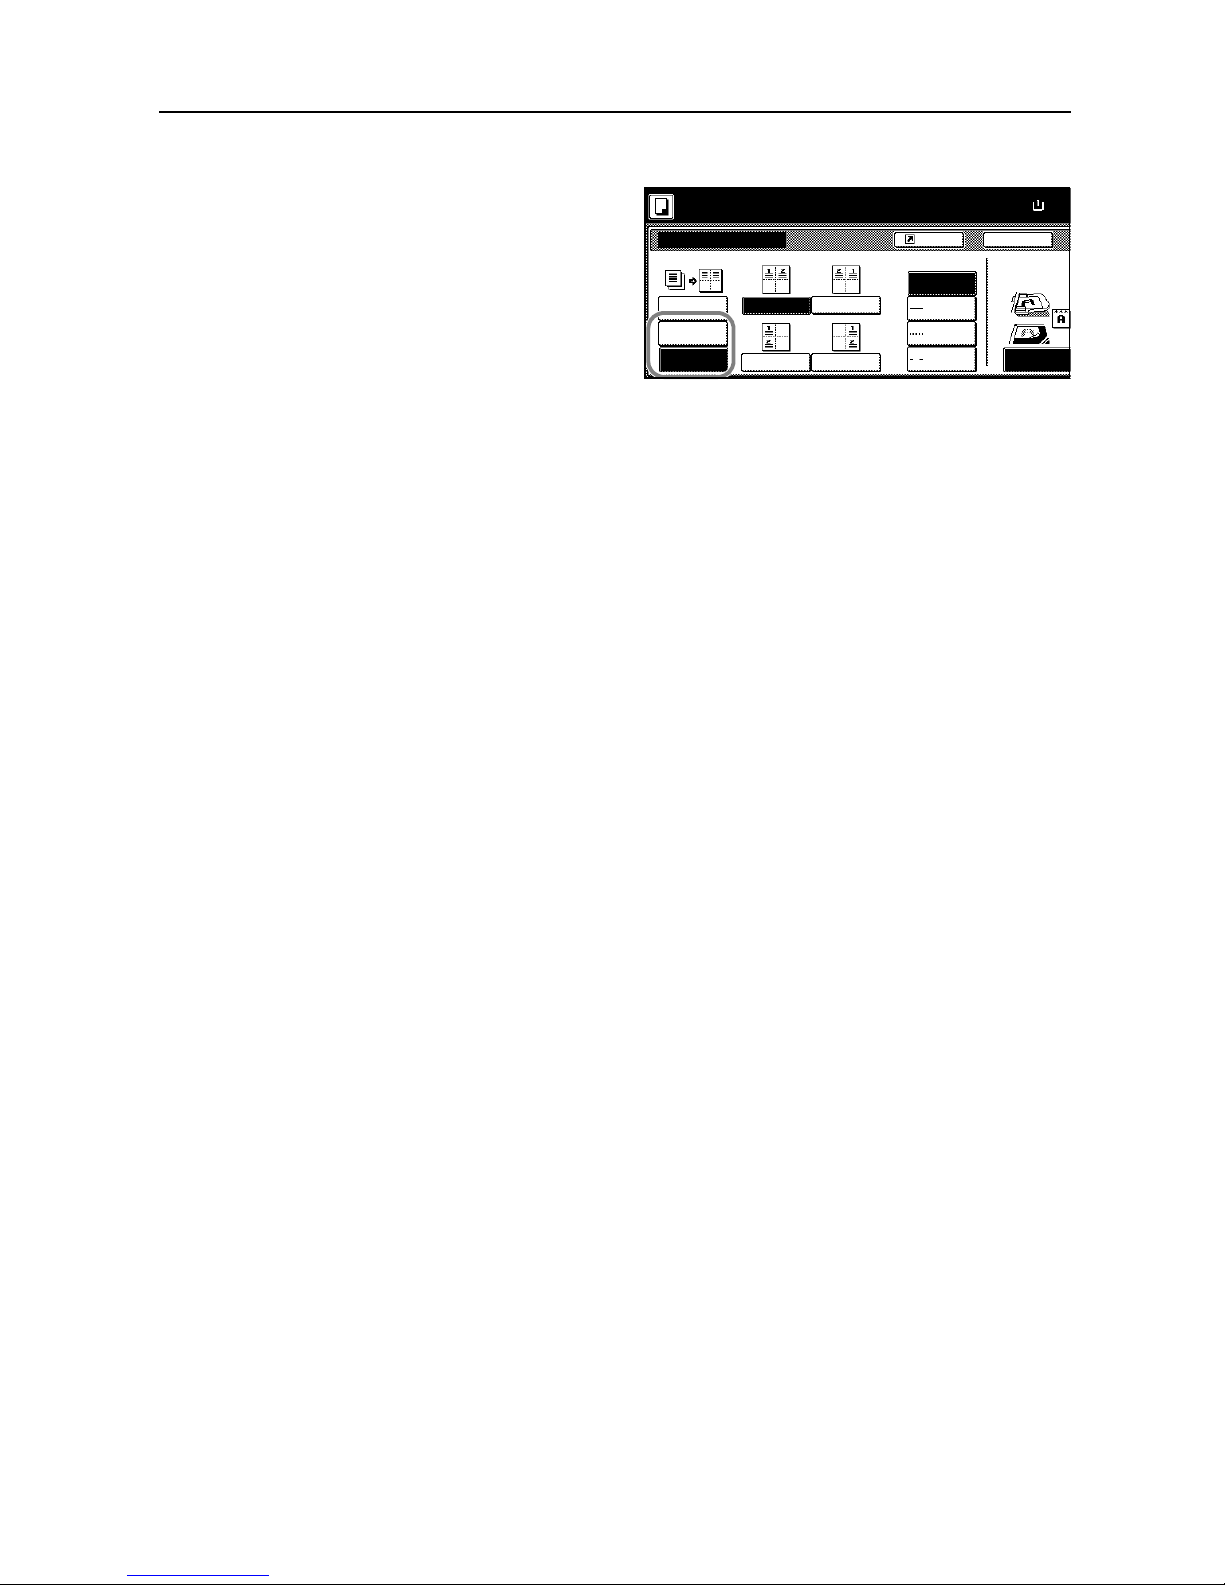
3
Press either [2 in 1] ([2-in-1]) or [4 in 1]
([4-in-1]).
4
Select desired page sequence from Layout.
5
Select the page boundary line from Border line.
6
Place the original and press the Start key.
If the original has been placed on the optional document processor, copying begins automatically.
If the original is placed on the platen, Scan next original(s) is displayed. Place the next original and
press the Start key.
If all original pages have been scanned, press [Scanning finished]. Copying begins.
Back
Sele ct Orig inal I
Off
2 in 1
Direction.
Top Edge
Combi ne
Layout
4 in 1
Paper Size
Shortcut
Border line
Solid
None
Dotted
Borders
50%
Ready to copy. ( )Full-Color
11×
8
Page 33

Copy Functions
1-17
Margin Mode
You can shift the original image to make space on the copy for binding on the left (right) or top
(bottom) side. Margin widths are as follo ws.
Margin on the Back Side
When duplexing, you can also specify the margin on the back side.
Auto – automatically sets margins to match the front side setting. When [Auto] is specified, the left
and right margins on the front are reversed on the back. In other words, when the left margin of the
front side is set to 1/2" (10 mm), the back side right margin is set to 1/2" (10 mm). The top and
bottom margin widths on the back will match those on the front.
Separate Front/Back Margins – Enables you to specify the front and back settings separately.
NOTE: You can set th e default margin width. For further details, refer to Setting Margin Defaults on
page 7-9.
Follow the steps as below to use the Margin mode.
1
Place the original so the top edge is aligned with the back or left of the platen.
2
Press [Function].
3
Press [Margin/Centering] ([Margin/Im ag .Shi f t]).
4
Press [Margin].
5
Press [S], [T], [W] or [X] to adjust the top, bottom, left and right margins.
6
For duplex copying, press [Back page margin].
7
Press [Auto] or [Front/Back margin].
[Auto] specifies the margin on the back
side automatically based on the front
margin.
For [Front/Back margin], press [S], [T],
[W] or [X] to adjust the top, bottom, left
and right margins.
8
Depending on the placed original, select [Top Edge] ([Back Edge]) or [Left Top Edge] ([Left top
corner]) from Select Ori ginal Image Direction.
9
Press the Start key. Copying begins.
Model T ype Range
Inch models 0 - 3/4" (1/8" increments)
Metric models 0 - 18 mm (1 mm increments)
Back
Sele c t Origin al I
Off
Mar gin
Direction.
Top Edge
Mar gin/Centering
Auto
Paper Size
Front page
Shortcut
Left
Back page
margin
Auto
( 0~¾)
"
"
( 0~¾)
100%
Ready to copy.
Center
.0
.
¼
( )Full-Color
11×
8
Back
Sele ct Orig inal I
m
Auto
Front/Back
Direction.
Top Edge
Back page margin
Paper Size
Back page
margin
( 0~¾)
( 0~¾)
"
"
100%
Ready to copy. Full-Color
( )
11×
8
Page 34

Copy Functions
1-18
Centering Originals
When copying onto paper larger than the original size, centers the original image on the paper.
Follow the steps as below for centering.
1
Place the original so the top edge is aligned with the back or left of the platen.
2
Press [Function].
3
Press [Margin/Centering] ([Margin/Imag.Shift]).
4
Press [Auto Center] ([Image shift]).
5
Depending on the placed original, select [Top Edge] ([Back Edge)] or [Left Top Edge] ([Left top
corner]) from Select Original Image Direction.
6
Press the Start key. Copying begins.
Back
Sele ct Orig inal I
Off
Mar g i n
Direction.
Top Edge
Mar gin/Centering
Auto
Paper Size
Shortcut
Able to cente r s canned image o n p ap er.
100%
Ready to copy.
Center
( )Full-Color
11×
8
Page 35

Copy Functions
1-19
Border Erase
Prevents the appearance of shadows from around the edges of originals.
Choose from the following Border Erase modes.
• Sheet Border Erase – Use this mode to erase black borders around the single sheet original.
• Book Border Erase – Use this mode to erase black borders around the edges and in the
middle of the original s uch as a thick books . You can specify the widths indiv idual ly to era se the
borders around the edges and in the center of the book.
• Separate Border Erase – Use this mode to specify border widths individually on all sides to
erase.
The border widths that can be set for each mode are as follows.
NOTE: You can set the default width for erasing borders. For further details, refer to Erasing
Borders on page 7-10.
Sheet Border Erase
Follow the steps as below to erase the black borders from around the edges of the single sheet
original.
1
Place the original.
2
Press [Function].
3
Press [Border Erase] ([Erase Mode ]).
Model T ype Range
Inch models 0 - 2" (1/8" increments)
Metric models 0 - 50 mm (1 mm increments)
Original Copy
Original Copy
Original Copy
Page 36

Copy Functions
1-20
4
Press [Sheet Erase] ([Border Erase]).
5
Press [+] or [–] to set the border erase width.
With metric models, you can enter the border width directly using the numeric keys afer pressing
[#-Keys].
6
Press the Start key. Copying begins.
Book Border Erase
Follow the steps as below to erase the black borders around the edges of original such as a book.
1
Place the original.
2
Press [Function].
3
Press [Border Erase] ([Erase Mode]).
4
Press [Book Erase].
5
Press [+] or [–] to set the Border (outer edges) and Center (middle) border widths.
With metric models, you can enter the border width directly using the numeric keys afer pressing
[#-Keys].
6
Press the Start key. Copying begins.
Separate Border Erase
Follow the steps as be low to erase the blac k borders speci fying the wi dth of the bord ers individ ually.
1
Place the original so the top edge is aligned with the back or left of the platen.
2
Press [Function].
3
Press [Border Erase] ([Erase Mode]).
Border Erase
Off
Sheet
BackShortcut
Paper Size
Erase
Individual
BordrErase
Book
Erase
Border
"
100%
Ready to copy.
( 0~2 )
.
¼
( )Full-Color
11×
8
Border Erase
Off
BackShortcut
Paper Size
Individual
BordrErase
Border
Sheet
Erase
Book
Erase
Center
( 0~2 )
""
100%
Ready to copy.
.
¼
.
½
( 0~2 )
( )Full-Color
11×
1
Page 37

Copy Functions
1-21
4
Press [Individual BordrErase]
([Individual Erase Mode]).
5
Depending on orientation of the placed original, select [Top Edge] ([Back Edge]) or [Left Top Edge]
([Left top corner]) from Select Original Image Direction.
6
From [Top], [Bottom], [Left] and [Right], select the desired border to adjust the border width.
7
Press [+] or [–] to set the border erase
width.
With metric models, you can enter the
border width directly using the numeric
keys afer pressing [#-Keys].
8
Press [Close]. To specify widths of other borders to erase, repeat steps 6 - 8.
9
Press the Start key. Copying begins.
Paper Size
Back
Sele c t Origin al I
Off
Shortcut
Direction.
Top Edge
Bottom
Border Erase
Left
Top
Right
Book
Erase
Individual
BordrErase
Sheet
Erase
¼" ¼"
¼" ¼"
100%
Ready to copy. ( )Full-Color
11×
8
Back
Sele c t Origin al I
Direction.
Top Edge
Individual Border Erase
Paper Size
100%
Top
( 0~2 )
"
Ready to copy.
.
¼
( )Full-Color
11×
8
Page 38

Copy Functions
1-22
Poster
For using this device to make copies larger than the
maximum paper size, use Poster mode to separate
and copy an enlarged image onto multiple pages.
The completed copies have overlapping areas. A
single large page can be created by pasting t hose
areas together.
Choose from one of the following 3 enlargement
settings.
• Copy size – The output p ape r si ze is chosen from
the following sizes. Copy is enlarged according to the selected paper size.
• Auto zoom prioirty – Specify the output zoom size from 100 to 400%. Image will be output on
the necessary number of copies for the specified zoom size.
• No. of Shts – Select number of sheets to split the image from 2, 4, or 8 sheets. Copy is
enlarged according to the selected number of pages.
NOTE: The availab le orig inal si zes are 11 × 17", 81/2 × 1 1 ", A3 and A4R. The available p aper s izes
are 11 × 17" and A3 only.
Follow the steps as below to use poster enlargement.
1
Place the original.
2
Press [Function].
3
Press [Poster].
4
Select enlargement met hod .
If [Copy size] is selected, set the output
paper size.
If [Auto zoom pri ority] is select ed, set t he
output zoom size.
If [No. of Shts] is selected, set the
number of split pages.
5
Press the Start key. Copying begins.
Model T ype Paper size
Inch models 34 × 44", 22 × 34", 17 × 22"
Metric models A0, A1, A2
Original Copy
Poster
Auto zoom
Copy
BackShortcut
Paper Size
En la rg e image t o poster size
[combine separ. pages to make a
Plea se set the orig inal in
direction.
---%
Off
No.of S h t s
priority
size
17×22"
22×34"
34×44"
Copy size
Ready to copy. Full-Color
( )
11×
1
Page 39

Copy Functions
1-23
Page Numbering
Numbers multi-pa ge orig inals in seq uentia l order. The formats of numbering includ e: [- 1 -], [P. 1], or
[1/n]. [1/n] prints the total number of pages in the place of ‘n’.
The page number will be centered at the bottom of the page.
Follow the steps as below for page numbering.
1
Place the original so the top edge is aligned with the back or left of the platen.
2
Press [Function].
3
Press [Page #] ([Page numbering]).
4
Select the page stil e from [- 1 -], [P. 1], or
[1/n].
5
To start page numbering from the page other than the first page, press [Select 1st page] ([Setting
1st page]).
6
Press [+] or [–] to select the starting
page and press [Close].
7
To specify the starting a number other than 1, press [Select start #] ([Setting Start page]).
Original [- 1 -] [P. 1] [1/n]
Paper Size
Back
Sele c t Origin al I
Off
-1-
P.1
Shortcut
Direction.
Top Edge
1/n
Star t Page # Start #
Select
start #
Page #
Select
last page
Select
1st page
Sel denominator #
Finish Pa g e #
Last page
Denominator #
Auto
100%
Ready to copy. ( )Full-Color
11×
8
BackSelect 1s t page
Top Edge
Select O rigin al
I
Direction.
Page
Paper Size
( 1~10)
100%
Ready to copy. ( )Full-Color
11×
8
Page 40

Copy Functions
1-24
8
Press [+] or [–] to select the starting
page and press [Close].
Press [# keys] ([#-Keys]) to enter with
numeric keys.
9
To specify the page to end numb ering, pres s [Select last page] ([Setting last page]).
10
Press [Manual].
11
Press [+] or [–] to select the starting page and press [Close].
12
For [1/n], to manually set the number for ‘n’, press [Select denominator #] ([Set Denomin. #]).
13
Press [Manual].
14
Press [+] or [–] to select the number for ‘n’ and press [Close].
Press [# keys] ([#-Keys]) to enter with numeric keys.
15
Depending on the placed original, select [Top Edge] ([Back Edge]) or [Left Top Edge] ([Left top
corner]) from Select Original Image Direction.
16
Press the Start key.
If the original has been placed on the optional document processor, copying begins automatically.
If the original is placed on the platen, Scan next original(s) is displayed. Place the next original and
press the Start key.
If all original pages have been scanned, press [Scanning finished]. Copying begins.
Back
Sele ct Orig inal I
Direction.
Top Edge
Select start #
Paper Size
# ke ys
( 1~999)
100%
Ready to copy. ( )Full-Color
11×
8
Back
Sele c t last pa g e
Top Edge
Sele ct Orig inal
I
Direction.
Auto
Page
Manual
Paper Size
( 0~-10 )
100%
Ready to copy. ( )Full-Color
11×
8
Back
Sele ct Orig inal I
Direction.
Top Edge
Select denominator #
Paper Size
Auto
Manual
# ke ys
( 1~999)
100%
Ready to copy. ( )Full-Color
11×
8
Page 41

Copy Functions
1-25
Cover Mode
Use a distinctive fron t and/o r ba ck cov er. Change the paper source and c opy th e first and la ge p age
of the original onto colored or thick paper.
Paper for the cover page is fed from the MP tray. To supply cover paper from a cassette, refer to
Specifying Cassette for Cover Paper on page 7-7.
For duplex copying, The cover page is also printed on both sides.
Follow the steps as below for adding covers.
1
Place the original.
2
Press [Function].
3
Press [Cover Mode].
4
Press [Front cover] or [Front Cvr + Back
Cvr].
5
Press the Start key.
If the original has been placed on the optional document processor, copying begins automatically.
If the original is placed on the platen, Scan next origi nal(s) is displayed. Place the next original and
press the Start key.
If all original pages have been scanned, press [Scanning finished]. Copying begins.
Cover sheet types Description
Front cover Copies the first page of the original onto cover sheet specified paper
as the cover page.
Front Cvr + Back Cvr Copies the first page and last page of the original onto cover sheet
paper as back and front covers.
Cover Mode
No cover
Front Cvr
Front
BackShortcut
Paper Size
Automatically adds covers to the c
o
set using paper (color or thick) fe
d
from a different cassette.
Load t h e p ap e r f o r covers in th
e
specified cassette.
100%
Ready to copy.
+ Back Cvr
cover
( )Full-Color
11×
8
Page 42

Copy Functions
1-26
Booklet from Sheets
Delivers booklet of two-sided copies with facing pages from one-sided or two-sided originals.
Booklets such as magazines can be created by folding at the center. Also, thick paper or colored
paper may be inserted as a cover page.
Paper for the cover page is fed from the MP tray. To supply cover paper from a cassette, refer to
Specifying Cassette for Cover Paper on page 7-7.
NOTE: Paper sizes available for booklet (sheet original) are limited to 11 × 17", 8 1/2 ×14",
11 × 8
1/2", 8 1/2 × 11", A3, B4, A4, A4R, B5 and B5R.
Use the optional 3000 sheet doc ument fini sher and foldi ng unit to bind&f old (stap le down the midd le
of the finished output and fold in two). For this operation, the available paper sizes are limited to
11 × 17", 8 1/2 × 14", 8 1/2 × 11", A3, B4 and A4R.
For binding on the left side
The folded copies can be read from left to right.
For binding on the right side
The folded copies can be read from right to left.
For top binding
The folded copies can be read from top to bottom.
Follow the steps as below for these booklet types.
1
Press [Function].
2
Press [Booklet].
Original Copy
Original Copy
Original Copy
Page 43

Copy Functions
1-27
3
Press [Booklet].
4
Select binding orientation for Original and Finished.
If the message Cannot copy with these settings. Modify settings according to the original and
finishing is di sp lay ed , verify that you are sel ect ing the correct origi nal o r ien t ati on (s how n at th e right
of the touch panel) and the correct settings for the original and finished copies.
5
If the optional 3000 sheet document finisher and folding unit are installed, [Saddle stitch] ([Centre
Staple]) is displayed. To set bind&fold, press [Saddle stitch] ([Centre Staple]).
Press [Bind & Fold] and press [Close].
Up to 16 sheets (64 pages) can be
processed with bind&fold.
6
To insert a cover page, press [Stitching Front Cvr] ([Stitching Front cov.]).
Press [On] and press [Close].
7
Place the original and p ress the Start key.
NOTE: When using the platen, be sure to place the originals in page order.
If the original has been placed on the optional document processor, copying begins automatically.
If the original is placed on the platen, Scan next origi nal(s) is displayed. Place the next original and
press the Start key.
If all original pages have been scanned, press [Scanning finished]. Copying begins.
Paper Size
Back
Sele c t Origin al I
Off
Booklet
1 sided
Shortcut
Direction.
Top Edge
Original
J
Booklet
Book
Left/Right
2-sided
Top/Bottom
2-sided
Finished Stitching
Off
Off
Stitching
Stitch
Saddle
Booklet
100%
2 sided mode.
Open from
right
Open from
top
Open from
left Front cvr
( )Full-Color
11×
1
BackSaddle Stitch
No cover
Bind &
Paper Size
100%
2 sided mode. ( )Full-Color
Fold
11×
1
St itching Front Cvr
Off
On
Back
Paper Size
Autom at ically adds covers in book
binding mode using paper (color
o
thick) fed from a different cassette
Load the paper for covers in th
e
sp e cified cassette.
100%
2 sided mode. ( )Full-Color
11×
1
Page 44

Copy Functions
1-28
Booklets from Facing Pages
Copies book originals to booklets consisting of two-sided copies with facing pages. Booklets such
as magazines can be created by folding at the center. Also, thick paper or colored paper may be
inserted as a cover page.
You can change the cassette set as the paper to be used for the cover page. For further details,
refer to Specifying Cassette for Cover Paper on page 7-7.
NOTE: Original sizes that can be used with Booklets from Facing Pages are limited to 11 × 17",
8
1/2 × 11", A3, B4, A4R, B5R, A5R, 8K, and output paper size is limited to 11 × 1 7", 8 1/2 ×14",
11 × 8
1/2", 8 1/2 × 11", A3, B4, A4, A4R, B5 and B5R.
Use the optional 3000 sheet doc ument fini sher and foldi ng unit to bind&f old (stap le down the midd le
of the finished output and fold in two). For this operation, the available paper sizes are limited to
11 × 17", 8 1/2 × 14", 8 1/2 × 11", A3, B4 and A4R.
Follow the steps as below for these booklet types.
1
Place the book original and press [Function].
2
Press [Booklet].
3
Press [BookJBooklet].
4
Select the original and finish ed types .
5
If the optional 3000 sheet document finisher and folding unit are installed, [Saddle stitch] ([Centre
Staple]) is displayed. To set bind&fold, press [Saddle stitch] ([Centre Staple]).
Press [Bind &
Fold] and press [Close].
Up to 16 sheets (64 pages) can be
processed with bind&fold.
6
To insert a cover page, press [Copy on front cvr] ([Copy on front cov.]).
7
Press [On] and press [Close].
Press "Start" ke y.
Back
Booklet
Set the book o
r
top side direct
Paper Size
Shortcut
Set fir st page.
Book
Booklet
Off
Book Open from
Open from
Original Finished Stitching
Off
Off
J
Booklet
Book
Left
Right
Copy on
front cvr
Saddle
Stitch
100%
right
left
11×
1
BackSaddle Stitch
No cover
Bind &
Paper Size
100%
Set first page.
Fold
Pres s "Sta rt" key.
11×
1
Copy on front cover
Off
On
Back
Paper Size
W h en selecting ON for copying o n the
fro nt co ve r, follow the instru ction .
1.Sc an f ront cover book original.
2.Start s c an book originals.
100%
Set cover page.
Press "Start" key.
11×
1
Set the book o
r
top side direct
Page 45

Copy Functions
1-29
8
Press the Start key . Scann ing of the original begins.
Scan next or iginal(s) is displayed. Place the next original and press the Start key.
If all original pages have been scanned, press [Scanning finished]. Copying begins.
Page 46

Copy Functions
1-30
Memo Mode
Makes copies with a space for adding notes. You can also copy two originals onto the same sheet
with a space for notes.
NOTE: Memo page mode supports 11 × 17", 11 × 8 1/2", 8 1/2 × 11", A3, B4, A4, A4R, B5, B5R, 8K,
16K page sizes.
Layout A
Reduces images of one original page for copying onto half of a single page, leaving the other half
blank for notes.
Layout B
Reduces images of two original pages for copying onto half of a single page, leaving the other half
blank for notes.
Types of Page Boundary Lines
Choose from the following options for lines to indicate page boundaries.
Follow the steps as below for Memo mode.
1
Press [Function] and then press [T Down].
Original Copy
Original Copy
None DottedSolid
Borders
(Cropmark)
Page 47
Copy Functions
1-31
2
Press [Memo Pages].
3
Press [Layout A] or [Layout B].
4
Select desired page sequence from Layout.
5
Select the page boundary line from Border line.
6
Place the original and p ress the Start key.
If the original has been placed on the optional document processor, copying begins automatically.
If the original is placed on the platen, Scan next origi nal(s) is displayed. Place the next original and
press the Start key.
If all original pages have been scanned, press [Scanning finished]. Copying begins.
BackMemo Page s
Solid
Manual
Paper Size
Shortcut
Layout
Layout A
Layout B
Bo rder line
Dotted
Borders
None
Off
Top Edge
Select O rigin al
I
Direction.
50%
Ready to copy. ( )Full-Color
11×
8
Page 48

Copy Functions
1-32
Batch Scanning
Scans multiple origina ls for a sin gl e copy job w ithout us ing the optional docum ent proc essor. Divide
the original into smaller sets and scan each set with the document processor. In Batch Scanning
mode, you can continue scanning originals until you press [Scanning finished].
Follow the steps as below to use batch scanning.
1
Press [Function].
2
Press [Batch Scanning].
3
Press [On].
4
Place the original and press the Start key.
Place the next original and press the Start key. Scan the remaining original pages in the same
manner.
When done, press [Scanning finished]. Copying begins.
Batch Sc anning
Off
On
Back
Paper Size
Copy images from Document Proc
e
platen for output as one job .
100%
Place origina ls then press S tart key.
Shortcut
11×
8
Page 49

Copy Functions
1-33
Sharpness Adjust
Adjust the sharpness of im age outline s. When copyin g pencile d originals with rough or brok en lines,
clear copies can be taken by adjusting sharpness toward [Sharpen]. When copying images made
up of patterned dots such as magazine phots, in which moire
†
patterns appear, edge softening and
weakening of the moire effect can be obtained by setting the sharpness toward [Unsharpen].
Refer to the sample image in Sharpness Adjust on page iii for examples of the effect of sharpn ess
adjustment.
Follow the steps below to adjust sharp ness.
1
Place the original.
2
Press [Function] and then press [T Down].
3
Press [Sharpness].
4
Press [Unsharpen] or [Sharpen] to
adjust sharpness.
5
Press the Start key. Copying begins.
† Patterns that are created by irregular distribution of halftone dots.
Sharpness
Unsharpen Sharpen
Back
Paper Size
Light:Shade on image edge.
Dark:Accent ed g es of text and f ine
Th is function is available in B&W
a
color copying.
100%
Shortcut
Ready to copy. ( )Full-Color
11×
8
Page 50

Copy Functions
1-34
Background Exposure Adjust
Lightens the background of color originals with dark
backgrounds.
NOTE: This feature is used with full color and auto
color copying. Background Exposure Adjust is
disabled during aut o color copy ing when the a b lack &
white original has been detected.
Follow the steps below to use background exposure adjust.
1
Place the original.
2
Press [Color func.] ([Colour func.]).
3
Press [Background exp.adj.].
4
Press [On].
5
Press [Lighter] or [Darker] to adjust the background darkness.
6
Press the Start key. Copying begins.
Original Copy
Background exp. adj.
Off
On
Back
Paper Size
R emoves the backgroun d of orig inals when co p ying.
Available when copying in Color or 2-color mode
100%
Shortcut
Ready to copy.
Lighter Darker
( )Full-Color
11×
8
Page 51

Copy Functions
1-35
Proof Copy
Make a test copy of a single set to verify settings before printing the remaining sets. If a problem is
found, avoid wasting paper canceling the remaining copy job.
Follow the steps below to do a Proof copy job.
1
Press [Function] and then press [T Down].
2
Press [Proof Copy] ([Test Copy]).
3
Press [On].
4
Place the original and p ress the Start key. The proof copy begins.
5
After printing a single test copy, a
confirmation screen will be displayed,
and the copier will remain in standby
mode until the job is approved or
cancelled. Check the proof copy.
If it is acceptable, press the Start key.
The remaining sets will be printed.
To change the copy quantity, press
[Change Preset] and change the copy
count.
If there is a problem with the copy, press [Cancel] to redo the copy settings.
Proof Copy
Off
On
Back
Paper Size
Proof cop y out p uts one set for pro
o
100%
Shortcut
Ready to Proof Copy. ( )Full-Color
11×
8
Output
Change
1 sided
Orig. Page
Top Edge
Job
APS
Plain
Count/Set
Color , 1 si de
Top tray
Preset
To continue to print, p re ss "Start" ke y.
To sto p and retry, press "Canc el" key.
Check proof copy.
11×8½" 11×8½"
Page 52

Copy Functions
1-36
Repeat Copy
Set Repeat Copy to en able printing a dditional sets if required after co py completi on. For confi dential
documents, co nfig ure a passcode to us e with R epe at Copy. If set, enter the corr ect passcode when
using Repeat Copy. Printing will not occur if the passcodes do not match.
NOTE: Repeat Copy jobs are erased when the main power is switched off.
Repeat Copy is not available when using document management function.
Repeat Copy is not available if the optional security kit has been installed.
It is also possible to disable Repeat Copy or configure Repeat Copy in default settings mode. For
further details, refer to Enabling Repeat Copy on page 7-10.
Preparing a Job for Repeat Copy
Configure Repeat Copy as shown below.
1
Press [Function] and then press [T Down].
2
Press [Repeat Copy].
3
Press [On].
For confidential jobs, press [# keys]
([#-Keys]) and input the passcode.
NOTE: Input the passcode 1 - 8 digits in length.
If the passcode is fo rgotten, Repe at Copy printi ng is not pos sible. Ke ep a re co rd of th e pa sscode as
needed.
4
Place the original and press the Start key. Copying begins and the job is stored as a Repeat Copy
job.
Repeat Copy Output
Press the Repeat Copy key to display the Repeat Copy list and review stored jobs. Jobs shown in
the list can be reprinted, viewed, or deleted .
Re-Printing Jobs
Follow the steps as below to reprint a Repeat Copy job.
1
Press the Repeat Copy key.
Repeat Copy
Off
On
Back
Paper Size
Modify copy allows sets to be save
to the HDD.
Using Repeat C opy func tion,
jobs can be recalled and output .
Individual passwords can be set .
100%
Shortcut
Ready to copy.
Password
# ke ys
( )Full-Color
11×
8
Page 53

Copy Functions
1-37
2
Select the job to reprint and press
[Reprint].
3
If a passcode was specified, a passcode input screen is displayed. Use the numeric keys to enter
the pass code and press [Enter].
4
Press [+] or [–], or use the numeric keys
to set the number of copies.
5
Press [Printing]. Printing begins.
Reviewing Jobs
Follow the steps as below to check the stored Repeat Copy jobs.
1
Press the Repeat Copy key.
2
Select the job to review and press [Check Details].
3
If a passcode was specified, a passcode input screen is displayed. Use the numeric keys to enter
the passcode and press [Enter].
4
Check the job details. Press [Print from
1st] ([Head Print]) to print the first page
for reviewing.
5
After reviewing the job, press [Close]. To review other jobs, repeat steps 2 to 5.
6
Press [End]. The touch panel will return to the [Basic] screen.
Repeat Copy
Registra tion
Repeat Copy
Norm. Copy
Check
Delete
Norm. Copy
Job User Original Set Type
Repri nt
Details
Stop
Printing
Set
Ch e ck Det ails / Reprint
Item
Job
Details
Copy
Top tray
User nam e
Job name
Output
Registration Date
Inpu t Source
Print size
Set
Orig. Page
Print
from 1st
11×8½"
Page 54

Copy Functions
1-38
Deleting Repeat Copy Jobs
Follow the steps as below to delete stored Repeat Copy jobs.
1
Press the Repeat Copy key.
2
Select the job to delete and press [Delete].
3
Press [Yes] to delete the selected job. To delete other jobs, repeat steps 2 and 3.
4
Press [End]. The touch panel will return to the [Basic] screen.
Page 55

Copy Functions
1-39
OHP Backing Sheet Mode
When two or three OHP transp arencies are stack ed on top of each other, static electricity may make
them difficult to handle. When using OHP Backing mode, a paper sheet is automatically inserted
between each transparency, making them easier to handle. Also, the same original page can be
copied to the backing sheet for multiple page copying.
NOTE: Never load OHP transparencies into trays or cassettes other than the MP tray.
When OHP Backing mode is set, the MP tray paper type is automatically set to Transparency.
If the optional document finisher or 3000 sheet document finisher is installed, you may need to
specify the output destination fo r finished copies. For fu rther detail s , refer to Selecting Output
Destination on page 7-22.
Backing Copy
After copying to a transparency, copies the same original image to the backing sheet paper.
(* denotes OHP film.)
Blank
Outputs a blank backing sheet after copying to a transparency. (* denotes OHP film.)
Follow the steps below for OHP Backing Sheet mode.
1
Place the original.
2
Load the transparencies into the MP tray.
IMPORTANT: Fan through the transparencies before
loading.
Up to 10 transparencies can be loaded at one time.
Be sure that paper of the same size and orientation
as the transparencies is loaded.
3
Press [Function] and then press [T Down].
4
Press [OHP Backing] ([OHP Back]).
3
3
*
3
2
1
2
2
*
1
1
*
Original Copy
3
*
3
2
1
2
*
1
*
Original Copy
Page 56

Copy Functions
1-40
5
Press [Copy] or [Blank].
6
Press the Start key. Copying begins.
OHP Backing
Off
Copy
Back
Paper Size
Insert a blank paper between pie
c
OHP film, or copy to a OHP back
p
Place the OHP f ilm
in the Multipu rp o se tray.
100%
Shortcut
Ready to copy.
Blank
( )Full-Color
11×
8
Page 57

Copy Functions
1-41
Auto Rotation
Copies the original image rotated clockwise 90 digress if set original and the paper loaded into the
cassette are the same size but different orientations.
NOTE: Set whether to enable or disable Auto Rotate mode in default settings mode. For further
details, refer to Selecting Auto Rotation on page 7-9.
Auto Rotate mode supports 11 × 8
1/2", 8 1/2 ×11", 51/2 ×81/2", A4, A4R, A5R, B5, B5R, B6R, 16K
paper sizes only.
Follow the steps as below to use Auto Rotate.
1
Press [Function] and then press [T Down].
2
Press [Auto Rotation].
3
Press [Rotate].
Auto rotation is enabled.
Auto Rotati on
No Rotate
Rotate
Back
Paper Size
When original and paper have dif
f
direction , image w ill be rota ted.
100%
Shortcut
Ready to copy. ( )Full-Color
11×
8
Page 58

Copy Functions
1-42
Selecting Output Destination
The optional job separator, document finisher, 3000 sheet document finisher or mailbox can be
specified a s copy output destinations.
NOTE: Requires the optional job separator, document finisher, 3000 sheet document finisher or
mailbox.
Change the default destination for copies in default settings mode. For further details, refer to
Selecting Output Des tin ati on on page 7-22.
Follow the steps as below to select the output destination.
1
Press [Function] and then press [T Down].
2
Press [Select of Output].
3
Select the output destination.
4
Place the original and press the Start key. Copying begins.
Paper Output Description
Top tray Outputs to the built-in output tray.
Job separator Outputs to the optional job separator.
Finisher tray Outputs to the optional document finisher tray.
Tray A Outputs to Tray A of the optional 3000 sheet document finisher.
Tray B Outputs to Tray B of the optional 3000 sheet document finisher.
Tray C Outputs to Tray C of the optional 3000 sheet document finisher.
Tray 1 - 7 Outputs to Trays 1 - 7 (1 is the upperm ost tray) of the option al mailbox.
Select of Output
Job
Top tray
Back
Paper Size
100%
separator
Shortcut
Ready to copy. ( )Full-Color
Tray A
Tray B
Tray C
Tray 1
Tray 2
Tray 3
Tray 4
Tray 5
Tray 6
Tray 7
11×
8
Page 59

Copy Functions
1-43
EcoPrint
Set EcoPrint mode to recude the energ y consume d. Use this mod e when high-qua lity copy ing is not
required (e.g., when making test copies).
NOTE: The image may appear lighter.
Follow the below steps to configure EcoPrint.
1
Press [Function] and then press [T Down].
2
Press [EcoPrint].
3
Press [On]. EcoPrint is enabled.
EcoPrint
coPrint mode saves toner.
Back
On
Close
Set
utput will be lighter.
Off
Conserve toner
consumption.
Image is ligh t.
Paper Size
Shortcut
100%
to copy. ( )Full-Color
11×8½"
Page 60

Copy Functions
1-44
Inverted Copying
Copies the black and white inverted (reversed) images of black and white originals.
NOTE: This funct ion is only av ailable for Black/White copy mode.
Follow the steps as below for Inverted copying.
1
Press [Function] and then press [T Down].
2
Press [Invert].
3
Press [On]. Inverted cop ying is enabled .
Invert
Off
On
Back
Paper Size
Cop y the scann ed im ag e with rev
e
black an d white parts.
100%
Shortcut
Ready to copy. ( )B&W
11×
8
Page 61

Copy Functions
1-45
Mirror Copying
Copies mirrored images of the original.
Follow the steps as below fo r Mirror Copying.
1
Press [Function] and then press [T Down].
2
Press [Mirror Image].
3
Press [On]. Mirror copying is enabled.
Mirr or Image
Off
On
Back
Paper Size
Creates Mirror Image of documen
t
100%
Shortcut
Ready to copy. ( )Full-Color
11×
8
Page 62

Copy Functions
1-46
Auto Selection Mode
Use the optional document processor to place o riginals of dif ferent wi dths i n one ope ration. The size
of each original page is automatically detected and each original is automatically printed to the
matching paper size or all originals printed are on the same size output paper.
NOTE: This operation requires the optional document processor.
Up to 30 sheets can be loaded in to the document processor at once for Auto Selection mode.
The following paper sizes can be used.
Inch models: 11 × 8 1/2" and 11 × 17", 8 1/2" × 14" and 81/2"×11"
Metric models: A3 and A4, B4 and B5
Mixed Finish size
Each copy is the same size as the original.
Same Finish Size
All originals are output on a single size copy.
Follow the steps as below for Auto Selection mode.
1
Place originals in document processor.
2
Press the Auto Selection key.
Original Copy
Original Copy
Page 63

Copy Functions
1-47
3
Press [Auto selection] or [Unify Size
Filing] ([Electronic Filing]).
For [Unify Size Filing] ([Electronic
Filing]), select the siz e of the first orig inal
page and press [Close] . Select the pa per
tray from the [Basic] screen.
NOTE: In order to correctly set the finished bind direction, set the size of the first page of the
original.
4
Press the Start key. Copying begins.
Au to Selection
Off
Unify Siz e
Back
Paper Size
Able to s can mix size origin a ls at
one time using Docum ent proces s
o
and copy them in unified paper si
z
100%
Filing
Shortcut
Ready to copy. ( )Full-Color
Auto
selection
1st pg . O rig
11×
8
8½×14"/
11×17"
8½×11"/
11×8½"
Page 64

Copy Functions
1-48
Image Repeat Copy
Tiles the 1 copied sheet with an original image. You
can also specify the area of the original to repeat.
NOTE: This function is only available when
Auto-Rotate (see page 1-41) is set to [Off].
Follow the steps as below to use Image Repeat Copy.
1
Place the original.
2
Press [Function] and then press [T Down].
3
Press [Image Repeat].
4
Press [Auto zoom priority].
5
Press [+] or [–] to set the zoom size.
Press [# keys] to enter with numeric keys.
6
To set the area of the original to be repeated , pre ss [O n] for Set Orig. Area and then press [Change
#].
7
Press [+] or [–] to input the area of the
original to be repeated.
With metric models, you can enter the
border width directly using the numeric
keys afer pressing [#-Keys].
Y1: Length from top left of platen to top edge of repeat
area
X1: Length from Height from top left of platen to left
edge of repeat area
Y2: Height of repeat area
X2: Width of repeat area
8
Press [Close].
9
Press the Start key. Copying begins.
Original Copy
Image Repeat
Off
Auto zoom
Back
Paper Size
100%
priority
Shortcut
Ready to copy.
# ke ys
Off
On
SetOrig.Area( 25~400)
( )Full-Color
11×
8
Set orig. dimensions
Back
Paper Size
100%
Shortcut
Ready to copy.
( 0 ~11
9/16
)( 0~16
15/16
)(
1/16
~11
5/8
)
"
.
1/16
"
.
1/16
"
.
1/16
( )Full-Color
11×
8
Page 65

Copy Functions
1-49
Color Balance Adjust
Adjust the strength of cyan, magenta, yellow, and black to make fine hue adjustments.
NOTE: This feature is used with full color and auto color copying.
This feature can not be used together with Auto Exposure mode (see Operation Guide).
This feature can not be used together with One-Touch Image Adjust mode (see page 1-52).
Refer to the sample image in Color Balance Adjust on page ii for examples of the effect of color
balance adjustment.
Follow the steps below to adjust color balance.
1
Place the original.
2
Press [Color func.] ([Colour func.]).
3
Press [Color balance] ([Colour balance]).
4
Press [On].
5
Press [W] or [X] to the right of each color to be adjusted (Cyan, Magenta, Yellow, Black) to adjust
each color .
6
Press the Start key. Copying begins.
Color bal ance
Off
On
Back
Paper Size
Cyan
100%
Shortcut
Ready to copy.
Mag enta
Yellow
Black
( )Full-Color
11×
8
Page 66

Copy Functions
1-50
Hue Adjust
Adjust the color (hue) of images. Make adjustments such as adjusting red to a strong yellow-red or
yellow to a strong green-yellow to make more creative copies.
The items that may be configured are as follows.
• All: Adjust hue for all colors.
• Yellow-Green&Blue-Magenta: Adjust color
balance for yellow and green, and blue and
magenta.
• Green-Cyan&Magenta-Red: Adjust color balance
for green and cyan, and magenta and red.
• Cyan-Blue&Red-Yellow: Adjust color balance for
cyan and blue, and red and yellow.
NOTE: This feature is used with full color and auto color copying.
This feature can not be used together with Auto Exposure mode (see Operation Guide).
This feature can not be used together with One-Touch Image Adjust mode (see page 1-52).
These adjustments are especially useful on rich color images.
Follow the steps below to use image hue adjust.
1
Place the original.
2
Press [Color func.] ([Colour func.]).
3
Press [Adjust Hue].
4
Press [All] or [Each].
When [All] is pressed, adjust hue of all
colors at once. Press [ ] or [ ] to
adjust hue.
When [Each] key is pressed, sel ec t the
color combination to adjust and press
[ ] or [ ] to adjust hue.
Yellow
Green
Blue
Red
Magenta Cyan
Adjust Hue
Off
All
Back
Paper Size
100%
Shortcut
Ready to copy.
Each
Yellow
Blue
Red
Magenta
Green
Cyan
( )Full-Color
11×
8
Adjust Hue
Off
All
Back
Paper Size
100%
Shortcut
Ready to copy.
Each
Yellow
Blue
Red
Magenta
Green
Cyan
Green-Cyan&
Magenta-Red
Cyan-Blue
Red-Yellow
Yellow-Green&
Blue-Magenta
( )Full-Color
11×
8
Page 67

Copy Functions
1-51
Example 1
Select [Yellow-Green&Blue-Magenta], and press [ ]
to adjust yellow closer to green, and blue closer to
magenta. (See page iii – Sample (1))
Example 2
Select [Cyan-Blue Red-Yellow], and press [ ] to
adjust yellow closer to red , and blue closer to cyan.
(See page iii
– Sample (2))
5
Press the Start key. Copying begins.
Yellow
Green
Blue
Red
Magenta Cyan
Yellow
Green
Blue
Red
Magenta Cyan
Page 68

Copy Functions
1-52
One touch Image Adjust
Adjust images as desired to more vivid or more dull images.
The items that may be configured are as follows: Vivid, Dull, Sharp, Smooth, Light, Dark
Refer to the sample image in One touch Image Adjust on pag e i for examples of the effect of each
setting.
NOTE: This feature is used with full color and auto color copying.
This feature can not be used together with Auto Exposure mode (see Operation Guide).
This feature can not be used together with Color Balance Adjust (see page 1-49).
Select from one of the 6 available One Touch Image Adjust types. Multiple selections are not
possible.
Follow the steps below to use One Touch Image Adjust.
1
Place the original.
2
Press [Color func.] ([Colour func.]).
3
Press [One touch image] ([Quick image]).
4
Select the image.
5
Press the Start key. Copying begins.
One touch image
Off
Viv id
Back
Paper Size
Choose yo ur favorite quality.
Vivid, Dull, Sharper
Softer,Lighter,Darker
100%
Shortcut
Ready to copy.
Dull
Sharp Dark
Light
Smooth
( )Full-ColorFull-Color
11×
8
Page 69

Copy Functions
1-53
Color/B&W Selection
Use to output a combination of color copies and black
& white copies only a few c ol or cop ies are needed and
the rest can be black & white.
NOTE: Color/B&W Selection is only available during
full color copying.
Follow the steps as below to use Color/B &W selection .
1
Place the original.
2
Press [Color func.] ([Colour func.]).
3
Press [Color/B&W selction] ([Color/B&W selctio n]).
4
Press [On].
5
Press [+] or [–] to set the number of Color (Colour) and B&W sets.
Press [# keys] to enter with numeric keys.
6
Press the Start key. Copying begins.
Original Copy
Co lo r/B&W selection
Off
On
Back
Paper Size
100%
Shortcut
Ready to copy.
# keys
( 1~499)
# keys
( 1~499)
Color Set B&W Set
( )Full-Color
11×
8
Page 70

Copy Functions
1-54
MonoColor Copy
Specify one of Cyan, Magenta, Yellow, Red, Green, or Blue, and produce copies with that color
regardless of original type.
Follow the steps as below for MonoColor Copy.
1
Place the original.
2
Press [Color func.] ([Colour func.]).
3
Press [Mono color] ([Mono colour]).
4
Select color for copying from [Cyan],
[Magenta], [Yellow], [Red], [Green] or
[Blue].
5
Press the Start key. Copying begins.
MonoColor
Off
Cyan
Back
Paper Size
On ly o n color select i o n .
100%
Shortcut
Ready to copy.
Mag enta
Yellow Blue
Green
Red
( )Cyan
11×
8
Page 71

Copy Functions
1-55
Programmed Copying
Press the program number (1 to 8) to recall the program. After registering sets of frequently used
functions as a single prog ram , yo u c an s im pl y pr ess the program number as neede d to r eca ll thos e
functions. You can also name the programs to identify them.
Registering Programs
Follow the steps as below to register a program.
1
Access the copy mode you would like to register and press [Program].
2
Press [Register].
3
Press the number (1 to 8) of th e program
to register .
4
Enter the program name and press [End].
NOTE: Refer to Character Input Method on page 7-47 for how to enter text characters.
5
Press [Yes]. The program is registered.
Using Programs to Copy
Press the number (1 to 8) of the program to use for copying.
1
Press [Program].
2
Press the button for the desired program
number (1 to 8).
3
Place the original and p ress the Start key. Copying begins using the configured program.
Editing Program Names
Follow the steps as below to edit the names assigned to registered programs.
1
Press [Program].
2
Press [Change Name].
Register pr esent setting
Select program number.
No regist rat ion
No regist rat ion
No regist rat ion
No regist rat ion
No re gistration
No re gistration
No re gistration
No re gistration
Paper Size
Color func.FunctionUser choiceBasic
Change
Delete
abc
100%
Ready to copy.
Name
Program
Reg./Delete
list a
list b
list c
list d
file 1
file 2
Register
( )Full-Color
Recall
11×
8
Page 72

Copy Functions
1-56
3
Press the number (1 t o 8) of the program
to rename.
4
Re-enter the program name and press [End]. The modified program name is saved.
NOTE: Refer to Character Input Method on page 7-47 for how to enter text characters.
Deleting programs
Follow the steps below to delete saved programs.
1
Press [Program].
2
Press [Delete].
3
Press the number (1 t o 8) of the program
to delete.
4
Press [Yes]. The program is deleted.
Registra tion name change
Select the number for chang in g n am e .
No registration
abc
list a
list b
list c
list d
file 1
file 2
Delete regist ra tion
Select the num b er of program to d elete.
No registration
abc
list a
list b
list c
list d
file 1
file 2
Page 73

Copy Functions
1-57
Assigning Register Keys
Assigns three frequently used functions listed on the [Function] screen and [Color func.] ([Colour
func.]) screen to assign keys. Functions may also be assigned from the [Basic] screen or [User
choice] screen.
Assigning Register Keys
Follow the steps as below to assign register keys.
NOTE: To assign a register key, first set Showing the Register Key on page 7-11 to [On].
1
Open the function you would like to assign.
2
Press [Shortcut] ([Register]).
NOTE: Functions in which [Shortcut]
([Register]) is displayed may be
assigned register keys.
3
Press [Register].
4
Press the number (1 to 3) to be
assigned.
5
Press [Yes]. The registered register keys will be displayed at the right of the [Basic] screen.
Deleting Register Keys
Follow the steps as below to delete Register keys.
1
Press the Register key display the assigned function.
2
Press [Shortcut] ([Register]) to display Create Shortcut (Register).
3
Press [Delete].
4
Press the number (1 to 3) y ou woul d lik e
to delete.
5
Press [Yes]. The register key is deleted.
Back
Sele c t Origin al I
Off
2 in 1
Direction.
Top Edge
Combine
Layout
4 in 1
Paper Size
Shortcut
Bo rder line
Solid
None
Dotted
Borders
50%
Ready to copy. ( )Full-Color
11×
8
Register pr esent setting
Sele ct t he num b e r of program to re giste re d .
No
Registra t.
No
Registra t.
No
Registra t.
Delete registrat io n
Sheet
Combine
Mar gin/
Select the num ber of program to delete.
Centering
Erase
Page 74

Copy Functions
1-58
Job Build
Job Build allows you to scan o riginals in several separate steps and copy at o nce. In each step of
the scanning process you can specify different settings (such as zooming and border erase) and
you can specify d iff erent ty pes o f origin als. O ther ex ampl es inclu de ins erting a blank shee t between
sets of copies from each step and specifying a front cover page during a duplexing step.
Job Build Procedure
This procedure describes how to use a job build for the following example.
Example
<Finished Copies>
Pages marked with * are blank, pages shown in gray
are colored paper.
<Originals>
NOTE: In this example, color paper to be used for the cover page is set in the MP tray and regular
paper is loaded in Cassette 1.
Open the Job Build Screen. Step 1:
1
Press the Job Build key.
Settings Common to All Step s
Sets Duplexing and Repeat Copy.
NOTE: Set Repeat Copy to increase number of sets later as needed.
Other settings not used in this example may also be configured here. For further details, refer to
Setting Functions on page 1-62.
Page 75

Copy Functions
1-59
2
Press [1 sided/2 sided]
([1-sided/2-sided]) .
3
Press [2 sided Copy] ([2-sided Copy]),
and from Finished s elect [Open fro m left]
([Left binding]) and press [Close].
4
Press [Edit] and on the next screen
press [Repeat Copy].
5
Press [On] and press [Close].
Original A Settings
For paper sele ction, set MP tray (color
paper).
6
Press [Basic]. On the ne xt sc reen, p ress
[Select Paper].
Place origina ls then pre s s Start key.
Job Build
Ready to Job build.
Select
1 sided
Original
Basic
Quality
Reduce
Top Edge
Finished
1 sided/
2 sided
Orig. Set
Direction
1 sided Copy
Edit
1 sided copy-Left
Finished page #:
Step
Auto %
-
Paper Type
/Enlarge
Offset
( )Full-Color
11×8½"
Place origina ls then pre s s Start key.
Back
Sele c t Origin al I
1 sided
2 sided
Direction.
Top Edge
1 sided/2 sided Copy
Ready to Job build.
Finished
Open from
Open from
Open from
Copy
Copy
left
right
top
( )Full-Color
Place origina ls then pre s s Start key.
Job Build
Ready to Job build.
Off
Border
Auto
Basic Quality
Page #
Top tray
Repeat
Select ofMar gin/
Off
Edit
2 sided copy-Left
Finished page #:
Step
OffOff
Select
Erase CopyOrig.Size
OutputCentering
-
( )Full-Color
Place origina ls then pre s s Start key.
BackRepeat Copy
Ready to Job build.
Modify copy allows sets to be sav
e
to the HDD.
Using Repeat Copy function,
jobs can be recalled and output .
Individual passwords can be set .
Off
On
Passw ord
# keys
( )Full-Color
Place origina ls then pre s s S tart key.
Job Build
Ready to Job build.
Select
1 sided
Original
Basic Quality
Reduce
Top Edge
Finished
1 sided/
Orig. Set
2 sided Copy
Edit
2 sided copy-Left
Finished page #:
Step
Auto %
Paper Type 2 sided
/Enlarge Direction
Offset
-
( )Full-Color
11×8½"
Page 76

Copy Functions
1-60
7
Select the MP tray and press the
[Close].
8
Place the Original A and press the Start key. Scanning of the original begins.
Step 2: Set Original A Back Side to Blank
9
Press [Print from Front page].
The back side of the page will be left
blank and copying will continue from the
next page.
Step 3: Complete th e Se tt in g s fo r Orig inal B.
Select Cassette 1 (standard paper) for
paper setting.
10
Press [Select Paper].
11
Select Cassette 1 and press [Close].
12
Place Original B and press the Start key. Scanning of the original begins.
Step 4: Complete th e Se tt in g s fo r Orig inal C
For paper selection, set MP tray (color
paper).
13
Press [Select Paper].
14
Select the MP tray and press [Close].
15
Place Original C and press the Start key. Scanning of the original begins.
BackSelect Paper
Color
11×8½"
Color
Plain
11×8½"
Plain
11×8½"
Plain
11×8½"
11×17"
Place origina ls then press S tart key.
Ready to Job build.
( )Full-Color
iginals and press start key.
Set
Cancel
1 sided
Quality
Reduce
Top Edge
Orig. Set
2 sided Copy
Edit
Insert
2 sided copy-Left
Finished pag e # :
Step
Auto %
Original
Front page
Print from
ning finished" key when starting copy.
riginal(s).
1 sided/
Next copy page: Rear
finished
Scanning
Type 2 sided
/Enlarge Direction
-
page
Page 77

Copy Functions
1-61
Step 5: Leave Back Side of Original C Blank
16
Press [Print from Front page].
The back side of the page will be left
blank and copying wi ll con tin ue fro m th e
next page.
Step 6: Complete the Settings for Original D
Select Cassette 1 (standard paper) for
paper setting.
17
Press [Select Paper].
18
Select Cassette 1 and press [Close].
19
Place the Original D and press the Start key. Scanning of the original begins.
Step 7: Specify Blank Colored Paper for the Back Cover
For paper sele ction, set MP tray (color
paper).
20
Press [Select Paper].
21
Select the MP tray and press [Close].
22
Press [Insert page] ([I nsert bl ank p age ]).
23
All originals have been scanned. Press [Scanning finished]. Printing begins.
24
If there are no problems with the output, use Repeat Copy to produce additional copies as
necessary. For further details, refer to Repeat Copy on page 1-36.
This completes the steps for the above operation.
iginals and press start key.
Set
Cancel
1 sided
Quality
Reduce
Top Edge
Orig. Set
2 sided Copy
Edit
Insert
2 sided copy-Left
Finished pag e # :
Step
Auto %
Original
Front page
Print from
ning finished" key when starting copy.
riginal(s).
1 sided/
Next copy page: Rear
finished
Scanning
Type 2 sided
/Enlarge Direction
-
page
iginals and press start key.
Set
Cancel
1 sided
Quality
Reduce
Top Edge
Orig. Set
2 sided Copy
Edit
Insert
2 sided copy-Left
Finished pag e # :
Step
Auto %
Original
Rear page
Print from
ning finished" key when starting copy.
riginal(s).
1 sided/
Next copy page: Front
finished
Scanning
Type 2 sided
/Enlarge Direction
-
page
Page 78

Copy Functions
1-62
Setting Functions
This section explains the copying functions available when using Job Build.
Select Paper
Select the paper size.
1
Press [Basic]. On the nex t screen , press
[Select Paper].
2
Select the MP tray or a cassette and press [Close].
Original Type
Select the origina l ty pe a cc ord ing to ty pe of o r igi na l be ing sc an ned . The following original ty pe s are
available.
1
Press [Basic]. On the next screen, press [Original Type].
2
Select [1 sided] ([1-sided]), [2 sided] ([2-sided]) or [Book].
When selecting [ 2 sid ed], c heck the bindi ng di rection and be s ure th at the or iginals are placed in t he
correct orientation.
When selecting [Book], be sure that the binding direction is correct.
NOTE: [2 sided] ([2-sided]) is displayed when the optional document processor is installed.
3
Press [Close].
1 sided/2 sided Copying
Select either [1 sided Copy] ([1-sided Copy]) or [2 sided Copy] ([2-sided Copy]) for the finish type.
1
Press [Basic]. On the next screen, press [1 sided/2 sided] ([1-sided/2-sided]).
NOTE: 1 sided/2 sided copy selection is common to all steps. It may only be configured as the first
step.
2
Press [1 sided Copy] ([1-sided Copy]) or [2 sided Copy] ([2-sided Copy]) and from Finished select
the binding direction.
Place origina ls then press S tart key.
Job Build
Ready to Job build.
Select
1 sided
Original
Basi c
Quality
Reduce
Top Edge
Finished
1 sided/
2 sided
Orig. Set
Direction
1 sided Copy
Edit
1 sided copy-Left
Finished pag e # :
Step
Auto %
-
Paper Type
/Enlarge
Offset
( )Full-Color
11×8½"
Original T ype Description
1 sided (1-sided) Single sided sheet original.
2 sided (2-sided) 2-sided sheet original.
Book Magazine or book originals with facing pages.
Page 79

Copy Functions
1-63
3
Check the orientation of the original.
NOTE: Incorrec t copying may oc cur if the original is not placed correctly.
4
Press [Close].
Finish
Set the Finish options. The following settings are available.
• Offset (Group) – Each completed set is rotated 90 degrees to the next before stacking.
• Stapling – Use the optional document finisher or 3000 sheet document finisher to staple the
completed copies.
• Bind and Staple – U se the opt ion al 3000 sheet document finis he r an d fo ldi ng u ni t to b in d&fol d
(fold the finished copy in half and staple).
• Punching – Use the 3000 sheet document finisher and punching unit to hole punch the
completed copies.
1
Press [Basic]. On the next screen, press [Finished].
NOTE: Finish settings are common for all steps. It may only be configured as the first step.
2
For finishing, press [On] ([1 set]). For further details, refer to Offset Mode on page 1-9.
For stapling, press [Staple Mode] and complete the settings. For further deta il s, refe r to Stapling on
page 1-10.
For punching, press [Punch Mode] and complete the settings. For further details, refer to Punching
on page 1-12.
For center margin stapling, press [Saddle Stitch] ([Centre Staple]). Press [Bind &
Fold].
3
Check the orientation of the original.
NOTE: Incorrec t copying may oc cur if the original is not placed correctly.
4
Press [Close].
Reducing/Enlarging
Select the desired magnification.
1
Press [Basic]. On the next screen, press [Reduce/Enlarge].
2
Select the desired magnification.
For instructions on reducing/enlarging, refer to Reducing/Enlarging in Chapter 3 of Operation
Guide.
3
Press [Close].
Original Orientation
Check the orientation of the original.
1
Press [Basic]. On the next screen, press [Orig. Set Direction].
2
Select [Top Edge] ([Back Edge]) or [Left Top Edge] ([Left top corner]).
Page 80

Copy Functions
1-64
NOTE: Incorrect copying may occur if the original is not placed correctly.
3
Press [Close].
Exposure Level
Set the copy exposure. The setting items are as follows.
1
Press [Quality] and on the next screen
press [Exposure Mode].
2
Select [Auto] or [Manual].
If [Manual] is selected, press [Lighter] or [Darker] to adjust the contrast.
3
Press [Close].
Original Image Quality
Specify the Image Quality based on the original type.
1
Press [Quality] and on the next screen, press [Orig. Image Quality] ([Image Quality]).
2
Select the image quality. For further details on image quality, refer to Setting Image Quality in
Chapter 3 of Operation Guide.
3
Press [Close].
EcoPrint
Set EcoPrint to save toner consumption.
1
Press [Quality] and on the next screen press [EcoPrint].
NOTE: EcoPrint is a common setting to all steps. It may only be configured as the first step.
2
Press [On]. EcoPrint is enabled.
3
Press [Close].
Color Balance Adjust
Adjust the strength of cyan, magenta, yellow, and black to make fine hue adjustments.
1
Press [Quality] and on the next screen press [Color balance] ([Colour balance]).
Item Description
Auto Automatically adjusts copy contrast.
Manual Manually adjust the copy contra st.
Place origina ls then press S tart key.
Job Build
Ready to Job build.
Density 4
Exposure
Text + Photo
Orig.Image
Basi c
Quality
Adjust Hue
Off
Color
EcoPrint
Sharp
-ness
Off
Edit
1 sided copy-Left
Finished pag e # :
Step
Off
-
Mode Qual i ty
balance
Off
( )Full-Color
Page 81

Copy Functions
1-65
2
Press [On] to adjust each color. For further details, refer to Color Balance Adjust on page 1-49.
3
Press [Close].
Hue Adjust
Adjust the color (hue) of images.
1
Press [Quality] and on the next screen press [Adjust Hue].
2
Press [All] or [Each] to adjust the hue. For further details, refer to Hue Adjust on page 1-50.
3
Press [Close].
Sharpness Adjust
Adjust the sharpness of image outlines.
1
Press [Quality] and on the next screen press [Sharpness].
2
Press [Unsharpen] or [Sharpen] to adjust the setting. For further details, refer to Sharpness Adjust
on page 1-33.
3
Press [Close].
Border Erase
Prevents the appearance of shadows from around the edges of originals. The setting items are as
follows.
1
Press [Edit] and on the next screen
press [Border Erase] ([Erase Mode]).
2
Press [Sheet Erase] ([Border Erase]) or [Individual BordrErase] ([Individual Erase Mode]) and
specify the border width to erase. For further details, refer to Border Erase on page 1-19.
3
Press [Close].
Selecting original size
Specify the size of the original.
1
Press [Edit] and on the next screen press [Select Orig.Size] ([Select Size Orig.]).
2
Set the original size. For further details, refer to Selecting original size on page 1-3.
3
Press [Close].
Item Description
Sheet Eras e (Border Erase) Erase black b orders around the single sheet original.
Individual BordrErase
(Individual Erase Mode)
Specify border widths individually on all sides to erase.
Place origina ls then pre s s S tart key.
Job Build
Ready to Job build.
Off
Border
Auto
Select
Basic Quality
Page #
Top tray
Mar gin/
Repeat
Copy
Select of
Output
Off
Edit
1 sided copy-Left
Finished page #:
Step
Off
-
Erase Orig.Size
Centering
Off
( )Full-Color
Page 82

Copy Functions
1-66
Repeat Copy
Specify Repeat Copy as follows. Simply complete this setting once as an initial step.
1
Press [Edit] and on the next screen press [Repeat Copy].
NOTE: Repeat Copy setting is common to all steps. It may only be configured as the first step.
2
Press [On] to activate Repeat Copy. For further details, refer to Repeat Copy on page 1-36.
3
Press [Close].
Margin/Centering
Set margin (blank borders) and centering options.
1
Press [Edit] and on the next screen press [Margin/Centering] ([Margin/Imag.Shift]).
NOTE: Margin/Centering setting is common to all steps. It may only be configured as the first step.
2
Press [Margin] or [Auto Center] ([Image shift]). For further details, refer to Margin Mode on
page 1-17 and Centering Originals on page 1-18.
3
Press [Close].
Page Numbering
Specify page numbering in the sequence of originals as follows.
1
Press [Edit] and on the next screen press [Page #] ([Page numbering]).
NOTE: Page numbering configuration is common to all steps. It may only be configured as the first
step.
2
For further details about page numbering, refer to Page Numbering on page 1-23.
3
Press [Close].
Selecting Output Destination
The optional job separator, document finisher, 3000 sheet document finisher or mailbox can be
specified a s copy output destinations.
1
Press [Edit] and on the next screen press [Select of Output].
NOTE: Output destination is displayed with the optional job separator, document finisher or 3000
sheet document finisher is installed.
The output destination setting applies to all other steps. It may only be configured as the first step.
2
Specify the output destination. For further details, refer to Selecting Output Destination on
page 1-42.
3
Press [Close].
Page 83

2-1
2 Document and Output Management Functions
This chapter explains the functions used for managing original documents as well as jobs during
copying.
• Document Management Functions...2-2
• Output Management Functions...2-11
Page 84

Document and Output Management Functions
2-2
Document Management Functions
Overview of Document Management Functions
Document management functions enable you to store documents (such as scanned images of
originals) on the machine hard disk for printing later.
Documents are assigned to different ‘boxes’, the document storage areas, depending on the
functions to be used. Stored documents are accessible from the boxes where they are kept until
deleted.
The following boxes are available.
Shared Data Box
Save originals as documents in the Shared Data Box to print them later in the desired quantity
without the actual originals. It is particularly convenient to register frequently used formats.
Registering Documents
Register documents in the Shared Data Box as follows. The box can store up to 100 documents.
1
Place the original to be saved as a document and press the Document Management key.
2
Press [Document Input] ([Document
Registr.]). under Shared Data Box.
3
Press [Change Name] and input the
document name.
Refer to Character Input Method on
page 7-47 for how to enter text.
If you prefer not to name the document,
go to the next step.
Box Description Reference
Page
Shared Data Box For storage of documents consisting of scanned originals.
Users can print any number of sets whenever needed.
page 2-2
Synergy Print Box For storage of documents consisting of scanned originals.
Up to ten of these docume nts can be co mbined into a s ingle
copy job for printing.
page 2-5
Document Management
Select function.
Document
Shared Data Box
Document Document Document
Synergy Print Box
Box
Editing
Box
Editing
08/0
8
Input Printing Input Printing
Place origina ls then press S tart key.
Docum ent Input
Shared Data Box
Original
11×8½"
Documents
Change
Select
Auto
Reduce
Basic
Quality
Auto size
Select
Regi. Size
1 sided
Original
100%
08/0
8
Doc001
Name
Orig.Size Type
/Enlarge
Ready to register doc. ( )Full-Color
Page 85

Document and Output Management Functions
2-3
4
Press the Auto Color, Full Color or Black&White key to select a color mode.
5
Complete the scanning settings required for the original.
The following functions are available.
6
Press the Start key. Scanning of the original begins. Display is returned to Document Management
when complete. To continue registering other documents, replace the original and rep eat ste p s 2 to
6.
Printing Documents
Print documents stored in the Shared Data Box as follows.
1
Press the Document Management key.
2
Press [Document Printing] under Shared Data Box.
3
Select the job to reprint and press
[Finish selecting].
NOTE: You can change the document sort order. Press [Order of indication] and select from [Sort
by Date] ([NewJOld] and [OldJNew]) and [Sort by Name] ([AJZ] and [ZJA]).
Press [Document Properties] ([Check/Rev. Details]) to verify details of the selected document. For
further details, refer to Reviewing and Renaming Documents on page 2-4.
4
Complete the function settings as requ ire d.
The following functions are available.
To change your document selection, press [Select document] and select the document(s) again.
5
Use the numeric keys to enter the copy quantity.
6
Press the Start key. Printing begins.
Tab Function
Basic Selection of original sizes, selection of original types, selection of document
sizes, zooming, and original orientatio n
Quality Scan exposure level, image quality, color balance
†
, hue adjustment †,
sharpness
† This setting is available when the color mode is set to Full Color or Auto Color.
Edit Border erase and batch scanning
Document Printing
Order of
Document Management Shared Data Box
Document
Up
Down
Properties
Document Data Box
Doc003
Doc002
Doc001
1 08/08/'05
1 08/08/'05
1 08/08/'05
indication
-
Tab Function
Basic Paper selection, 1-sided/2-sided, so rt/offset, stapling
†
† Requires the optional document finisher or 3000 sheet document finisher.
Edit Cover page, booklet, margins, page numbering, output selection
††
†† Requires th e job separator, document finisher, or 3000 sheet document finisher.
Page 86

Document and Output Management Functions
2-4
Reviewing and Renaming Documents
Check the size, save time and other inform ation on docu ments stored in the Share d Data Box. Also,
rename documents. You can also print the first page of documents for review.
1
Press the Document Management key.
2
Press [Document Printing] or [Box Editing] under Shared Data Box.
3
Select the document to verify and press
[Document Properties] ([Chec k /Rev.
Details]).
NOTE: You can change the document
sort order. Press [Order of indication]
and select from [Sort by Date]
([NewJOld] and [OldJNew]) and [Sort
by Name] ([AJZ] and [ZJA]).
4
Check the displayed selection.
Press [Print from 1st] ([Head Print]) to
print the first page for reviewing.
To rename the document, press
[Change doc. name] and enter the new
document name.
Refer to Character Input Method on
page 7-47 for how to enter text.
5
Press [Close] after all settings are complete. The touch panel will return to the screen in step 3. To
verify another document, repeat steps 3 - 5.
6
Press [Cancel] ([Job cancel]) or [Close]. Display is returned to Document Management.
Deleting Documents
Delete unnecessary documents in the Shared Data Box.
1
Press the Document Management key.
2
Press [Box Editing] under Shared Data Box.
3
Select the job to delete and press
[Delete].
NOTE: You can change the document
sort order. Press [Order of indication]
and select from [Sort by Date]
([NewJOld] and [OldJNew]) and [Sort
by Name] ([AJZ] and [ZJA]).
4
Press [Yes]. To delete other documents, repeat steps 3 and 4.
5
Press [Close]. Display is returned to Document Management.
Box Editing
Order of
Documen t Management Shared Data B ox
Document
Up
Down
Properties
Document Data Box
Doc003
Doc002
Doc001
1 08/08/'05
1 08/08/'05
1 08/08/'05
indication
-
Delete
Check/Corr ect Details
Document Management Shared Data Box
Item Details
Copy
Bo x Editing
Print
from 1st
Change
11×8½"
User name
Document Name
Registration Size
Orig . Set D i rection
page #
Input Source
Resolution
Registration Date
Top Edge
- - - - - - - -
1.
08/08/’05 05:41
Doc003
doc. name
--
Box Editing
Order of
Document Management Shared Data Box
Document
Up
Down
Properties
Document Data Box
Doc003
Doc002
Doc001
1 08/08/'05
1 08/08/'05
1 08/08/'05
indication
-
Delete
Page 87

Document and Output Management Functions
2-5
Synergy Print Box
Register originals as documents in the Synergy Print Box to print later in the desired quantity as
needed without the originals themselves. Up to ten of these documents can be combined into a
single copy job for printin g. You can also print out all documents in the Synergy Print Box as a single
job.
The Synergy Print Box holds 100 individual boxes (numbered 001 to 100). The boxes can be
assigned to each department.
Registering Documents
Register documents in the Synergy Print Box as follows.
1
Place the original to be saved as a document and press the Document Management key.
2
Press [Document Input] ([Docume nt
Registr.]) under Synergy Print Box.
3
Select the destination box. Directly pre ss
the box key or use the numeric keys to
input the box number and press [Enter].
4
Press [Change Name] and input the
document name.
Refer to Character Input Method on
page 7-47 for how to enter text.
If you prefer not to name the document,
go to the next step.
5
Press the Auto Color, Full Color or Black&White key to select a color mode.
Document Management
Select function.
Document
Shared Data Box
Document Document Document
Synergy Print Box
Box
Editing
Box
Editing
08/0
8
Input Printing Input Printing
Docum ent Input
Document Management Synergy Print Box-
Place origina ls then pre s s S tart key.
Docum ent Input
001
Original
Documents
Change
Select
Auto
Reduce
Basic
Quality
Auto size
Select
Regi. Size
1 sided
Original
100%
08/0
8
Doc001
Name
Orig.Size Type
/Enlarge
Ready to register doc. ( )Full-Color
11×8½"
Page 88

Document and Output Management Functions
2-6
6
Complete the scanning settings required for the original.
The following functions are available.
7
Press the Start key. Scanning of the original begins. Display is returned to Document Management
when complete. To register other documents, repeat steps 2 to 7.
Combining and Printing Documents
Combine and print docu ments stored in the Syne rgy Print Box as follows . You can combine up to 10
documents for printing as a single copy job.
1
Press the Document Management key.
2
Press [Document Printing] under Synergy Print Box.
3
Select the box where the documents for printing are stored. Directly press the box key or use the
numeric keys to input the box number and press [Enter].
If a password has been set up for the box, a screen for password entry will be displayed. Use the
numeric keys to enter the password and press [Enter].
NOTE: See Setting Box Passwords on page 2-9 for how to set a password.
4
Select the job to print and press [Finish
selecting]. You can choose up to 10
documents.
NOTE: You can change the document sort order. Press [Order of indication] and select from [Sort
by Date] ([NewJOld] and [OldJNew]) and [Sort by Name] ([AJZ] and [ZJA]).
Press [Document Properties] ([Check/Rev. Details]) to verify details of the selected document. For
further details, refer to Reviewing and Renaming Documents on page 2-7.
When selecting multiple documents, choose documents that are all the same size. An error will
occur if you select documents of different siz es.
Tab Function
Basic Selection of original sizes, selection of original types, selection of document
sizes, zooming, and original orientation
Quality Scan exposure level, image quality, color balance
†
, hue adjustment †,
sharpness
† This setting is available when the color mode is set to Full Color or Auto Color.
Edit Border erase and batch scanning
ing
Cancel
Order of
ement Synergy Print Box
Document
Finish
Up
Down
Properties
Select:
1 SUN 05:46
1 SUN 05:46
1 SUN 05:46
indication
selecting
-
1 SUN 05:45
1 SUN 05:46
Select/
Cancel
Print once
all da ta
Page 89

Document and Output Management Functions
2-7
5
Complete the function settings as requ ire d.
The following functions are available.
To change your document selection, press [Select document] and select the document(s) again.
6
Use the numeric keys to enter the copy quantity.
7
Press the Start key. Printing begins.
Batch Printing of Documents
Combine and print documents stored in the Synergy Print Box as follows.
1
Press the Document Management key.
2
Press [Document Printing] under Synergy Print Box.
3
Select the source box. Directly press the box key or use the numeric keys to input the box number
and press [Enter].
If a password has been set up for the box, a screen for password entry will be displayed. Use the
numeric keys to enter the password and press [Enter].
NOTE: See Setting Box Passwords on page 2-9 for how to set a password.
4
Press [Print once all data]. Printing
begins.
Reviewing and Renaming Documents
Check the size, save time and other information on documents stored in the Synergy Print Box.
Also, rename documents. You can also print the first page of documents for review.
1
Press the Document Management key.
2
Press [Document Printing] or [Box Editing] under Synegy Print Box.
3
Select the box to be checked. Directly press the box key or use the numeric keys to input the box
number and press [Enter].
If a password has been set up for the box, a screen for password entry will be displayed. Use the
numeric keys to enter the password and press [Enter].
NOTE: See Setting Box Passwords on page 2-9 for how to set a password.
Tab Function
Basic Paper selection, 1-sided/2-sided, so rt/offset, stapling
†
† Requires the optional document finisher or 3000 sheet document finisher.
Edit Cover page, booklet, margins, page numbering, output selection
††
†† Requires th e job separator, document finisher, or 3000 sheet document finisher.
ing
Cancel
Order of
ement Synergy Print Box
Document
Finish
Up
Down
Properties
Select:
1 SUN 05:46
1 SUN 05:46
1 SUN 05:46
indication
selecting
-
1 SUN 05:45
1 SUN 05:46
Select/
Cancel
Print once
all da ta
Page 90

Document and Output Management Functions
2-8
4
Select the document to verify and press
[Document Properties] ([Chec k /Rev.
Details]).
NOTE: You can change the document
sort order. Press [Order of indication]
and select from [Sort by Date]
([NewJOld] and [OldJNew]) and [Sort
by Name] ([AJZ] and [ZJA]).
5
Check the displayed selection.
Press [Print from 1st] ([Head Print]) to
print the first page for reviewing.
To rename the document, press
[Change doc. name] and enter the new
document name.
Refer to Character Input Method on
page 7-47 for how to enter text.
6
Press [Close] after all settings are complete. The touch panel will return to the screen in step 4. To
verify another document, repeat steps 4 - 6.
7
Press [Cancel] ([Job cancel]) or [End]. Display is returned to Document Management.
Deleting Documents
Delete unnecessary documents from the Synergy Print Box.
1
Press the Document Management key.
2
Press [Box Editing] under Synergy Print Box.
3
Select the box where the documents to be dele ted a re stored. Directly press the box key or us e th e
numeric keys to input the box number and press [Enter].
If a password has been set up for the box, a screen for password entry will be displayed. Use the
numeric keys to enter the password and press [Enter].
NOTE: See Setting Box Passwords on page 2-9 for how to set a password.
4
Select the job to delete and press
[Delete].
NOTE: You can change the document
sort order. Press [Order of indication]
and select from [Sort by Date]
([NewJOld] and [OldJNew]) and [Sort
by Name] ([AJZ] and [ZJA]).
5
Press [Yes]. To delete other documents, repeat steps 4 and 5.
6
Press [End]. Display is returned to Document Management.
End
Order of
ement Synergy Print Box
Document
Up
Down
Properties
1 SUN 05:46
1 SUN 05:46
1 SUN 05:46
indication
-
1 SUN 05:45
1 SUN 05:46
Delete
Delete all
Data/Box
Box
Password
Check/Corr ect Details
Document Management Synergy Print Box
Item Details
Copy
Box Editing
Print
from 1st
Change
11×8½"
User name
Document Name
Registration Size
Orig . Set D i rection
page #
Input Source
Resolution
Registration Date
Top Edge
- - - - - - - -
1.
08/08/’05 05:45
Doc001
doc. name
--
Box Editing
Order of
Document Management Synergy Print Box
Document
Up
Down
Properties
Doc005
Doc004
Doc003
1 SUN 05:46
1 SUN 05:46
1 SUN 05:46
indication
-
Doc001 1 SUN 05:45
Doc002 1 SUN 05:46
Delete
Page 91

Document and Output Management Functions
2-9
Deleting All Documents
Delete all documents in selected Synergy Print boxes in one operation.
1
Press the Document Management key.
2
Press [Box Editing] under Synergy Print Box.
3
Select the box where all documents to be deleted are stored. Directly press the box key or use the
numeric keys to input the box number and press [Enter].
If a password has been set up for the box, a screen for password entry will be displayed. Use the
numeric keys to enter the password and press [Enter].
NOTE: See Setting Box Passwords on page 2-9 for how to set a password.
4
Press [Delete all Data/Box] ([Delete all
box data]).
5
Press [Yes].
6
Press [End]. Display is returned to Document Managem ent.
Setting Box Passwords
Specify passwords to maintain the confidentiality of documents stored in the Synergy Print Box. A
Synergy Print Box password must be entered to review, print, or delete the documents.
1
Press the Document Management key.
2
Press [Box Editing] under Synergy Print Box.
3
Select the box to be assigned a password. Directly press the box key or use the numeric keys to
input the box number and press [Enter].
If a password has been set up for the box, a screen for password entry will be displayed. Use the
numeric keys to enter the password and press [Enter].
4
Press [Box Password].
5
Use the numeric keys to enter the password and press [Enter].
NOTE: Enter a password from 1 - 8 digits long.
To skip setting a password, press [Clear] and press [Enter] leaving the fields blank.
End
Order of
ement Synergy Print Box
Document
Up
Down
Properties
1 SUN 05:46
1 SUN 05:46
1 SUN 05:46
indication
-
1 SUN 05:45
1 SUN 05:46
Delete
Delete all
Data/Box
Box
Password
End
Order of
ement Synergy Print Box
Document
Up
Down
Properties
1 SUN 05:46
1 SUN 05:46
1 SUN 05:46
indication
-
1 SUN 05:45
1 SUN 05:46
Delete
Delete all
Data/Box
Box
Password
Page 92

Document and Output Management Functions
2-10
6
Press [End]. Display is returned to Document Management.
Page 93

Document and Output Management Functions
2-11
Output Management Functions
Overview of Output Management Functions
Output management functions enable you to manage multiple copy jobs in job queue. You can
manage both queued and fin ished jobs. Als o, printi ng fr om a compu ter or dat a re ceive d when usi ng
the optional fax function can be managed as a single print job or fax job, just like a copy job.
Output management functio ns are conve ni ent in the fol lowi ng sit uati ons .
Purpose Method
You want to know the order in which a job
will be completed whe n th e jo b is qu eued.
You can check the status of currently queued jobs on
the [Prt Status] ([Prnt Status]) screen. The jobs will be
completed in the order listed, from the top down,
enabling you to check the order of your job.
Y ou want to know whether a job has been
completed when the job is queued.
Press [Prt Status] ([Prnt Status]). If the document is
visible in the [Prt Status] ([Prnt Status]) screen, it has not
yet been printed.
You want to verify the print status of a job
being printed from a computer or for data
received from a fax.
Like a copy job, verify using the [Prt Status] ([Prnt
Status]) screen. In the list, indicates copy jobs,
indicates print jobs, and indicates fax jobs.
You want to check the content of queued
copy or print jobs.
Use the [Prt Status] ([Prnt Status]) screen to verify the
job type, number of original pages, sets to be printed,
save time, and prin ting st atus. If y ou need m ore det ailed
information, select a job and press [Document
Properties] ([Check/Rev. Details]) to display the job
name, output paper size and output destination (if a
destination was specified).
You want to quickly print a queued job. Select the job from the [Prt Status] ([Prnt Status]) screen
and press [Move Ahead] ([Move up]). This will move the
job to a higher position in the output queue. Or, press
[Interrupt Print] to cancel the currently printing job and
immediately begin printing the selected job.
You want to cancel printing of a queued
copy job.
Select the job from the [Prt S t atus] ([ Prnt S t atus]) sc reen
and press [Cancel/Delete]. The job is canceled.
Page 94

Document and Output Management Functions
2-12
Using the Output Management Functions
Manage jobs using the [Prt Status] ([Prnt Status]) screen for output management function.
Press the Output Management key. [Prt Status] ([Prnt Status]) screen is displayed.
[Prt Status] Screen
Displays information about current printing status and queued jobs.
1Job List – Shows job information. The job currently in progress is listed on top, with
subsequent jobs listed below in the order they will be finished. Job items are indicated by ,
print jobs by , and fax jobs by .
2 [Move Ahead] ([Move up]) – Increases the print priority of the selected job. (Copy jobs may
not be moved to a higher priority than print jobs or fax jobs.)
3 [Move Behind] ([Move down]) – Decreases the print priority of the selected job.
4 [Interrupt Print] – Cancels the current print operatio n and begi ns printing the selec ted job. Th e
job is moved to the top of the list.
5 [Cancel/Delete] – Deletes the selected copy job.
6 [Document Properties] ([Check/Rev. Details]) – Displays the Check/Correct Details
(Check/Revise Details) screen. From this screen, you can check the content of the selected
job, change the print quantity, and other details.
7[S]/[T] – Use to select the desired job.
8[End] – Close the Output Management Functio n. Pres si ng this ke y displays the [Basic] scree n
or shows the current progress.
Print Management
End
Printing
Document
Job Inp u t Source Origina l Set Regis tration St a te
Waiting
Prt Status
Properties
Interrupt
Print
Mov eMove Cancel/
BehindAhead Delete
Copy
Copy
1
2
3 4 5 6
7
8
Page 95

3-1
3 Printer Settings
This chapter explains how to configure the printer function. Operation panel settings are used as
default settings according to the usage environment. Normally, the printer driver settings made by
the application software take precedence.
The main configurable settings are as follows.
• Print Status Page...3-2
• Interface Configuration...3-5
• Emulation...3-10
• Font Setting...3-13
• Page Set Configuration...3-17
• Print Quality...3-21
• Setting Color Mode...3-22
• Paper Handling...3-23
• Handling Memory Devices...3-27
• e-MPS Functions...3-34
• Other Settings...3-41
Page 96

Printer Settings
3-2
Print Status Page
Print a status page to check details such as current settings, available memory, and installed
optional equipment.
1
Press the Printer key.
2
Press [Printer Menu].
3
Press [Print Status Page].
4
Press [Printing].
Processing is displayed and the status page is printed.
5
When printing is complete, the screen returns to printer mode.
Printer menu
Print Status Page
Interface
Emulation
Page Set
Print
Paper
RAM DISK
Mode
Select item.
Font
Color Mode
Handling
Quality
Others
Page 97

Printer Settings
3-3
Status Page Details
A sample status page output is displayed.
NOTE: Items or values contained in the status page may vary depending on the firmware version.
Memory
Installed Options
Network Status
Emulation
Consumable Status
Interfaces
Hardware Information
Page Information
STATUS PAGE
Firmware Version:
Released:
Page 98

Printer Settings
3-4
Item Description
Firmware version The version and publication date of the loaded firmware.
Hardware Information Shows major function setting information such as the paper size
and paper type for each cassette.
Memory Shows overall instal led memory, currently available memory , a nd
current RAM disk status.
Page Information Shows the current resolution, set page count, and overall page
count.
Installed Options Shows the status of installed optional equipment.
Network Status Shows the setting st atus of the network . The TCP/IP area shows
the IP address, subnet address, and gateway address.
Emulation Shows all available emulation modes.
Consumables St atu s Shows the approximat e rem aining tone r for the to ner cont ain ers.
The remaining toner decreases from 100 to 0.
Interfaces Shows all installed interfaces and the fonts and emulation
configured for each interface.
Page 99

Printer Settings
3-5
Interface Configuration
This device includes as standard equipment a parallel interface, a USB interface, and a network
interface. An optional serial interface or network interface can be installed as needed.
Emulation and font environments may
be set individually for each of these
interfaces.
NOTE: Selection of the interface t ab doe s not specify which in terface is use d for receivi ng data . The
interface is automatically selected when receiving data.
Parallel Interface Mode Configuration
The parallel port interface supports bidirectional communication and high-speed mode. For normal
usage, leave the default setting as [Auto].
NOTE: Use a parallel interface cable compliant with the IEEE1284 specification.
1
Press the Printer key.
2
Press [Printer Menu].
3
Press [Interface].
4
Press [Parallel] and press [Change #].
5
Select the desired mode.
6
Press [Close]. The display is returned to the Printer menu screen.
Interface
Send & receive mode
Parallel Network
Setting Item Value
Auto
USB
Printer menu
Serial O ption
Change #
Mode Description
Auto Automatically switches the mode to match the connected
computer. For normal usage, there is no need to change this
setting.
Normal Perform standard communi ca tion over the C entro ni cs interfa ce .
High Speed Data can be transferred between this device and the computer in
high speed mode. (Select this mode if data is not correctly printed
when the copier is connected to a workstation)
Nibble (High) Sends and receives data in a high speed mode compliant with
IEEE1284 specification.
Printer menu
Print Status Page
Interface
Emulation
Page Set
Print
Paper
RAM DISK
Mod e
Select item.
Font
Color Mode
Handling
Quality
Others
Page 100

Printer Settings
3-6
Serial Interface Mode Configuration
An optional serial interface can be installed. Configure the baud rate (communication speed), data
big, stop bit, parity, and protocol to be used by the serial interface. These protocol settings must
match the settings of the computer serial interface.
1
Press the Printer key.
2
Press [Printer Menu].
3
Press [Interface].
4
Press [Serial].
5
Press [S] or [T] to select Baud Rate and press [Change #].
6
Select the desired mode.
7
Press [Close]. The display returns to the Serial screen.
8
Refer to steps 5 - 7 to configure data bit, stop bit, parity and protocol.
9
Press [Close]. The display is returned to the Printer menu screen.
Network Interface Setting
This device includes a network interface as standard equipment which supports TCP/IP, IPX/SPX,
NetBEUI and AppleTalk protocols to enable network printing for Windows, Macintosh, UNIX,
Netware and other environments.
NOTE: Follow the same steps to s et the optio nal netwo r k in terfa ce as well as the st an da rd network
interface.
TCP/IP Settings
To connect to a Windows network via TCP/IP, set to [On]. Continue to set DHCP, BOOTP, IP
address, subnet mask address, and gateway address.
NOTE: Before setting the IP address, check with your network administrator for an IP address in
advance. For environments that use DHCP or BOOTP to automatically assign the IP address, this
setting is not required because the DHCP and BOOTP are set to [On] by default.
Setting Item Selection Item
Baud rate 1200, 2400, 4800, 9600, 19200, 38400, 57600, 115200
Data bit 7, 8
Stop bit 1, 2
Parity None, Odd, Even, Ignore
Protocol DTR (positive) &XOn/XOff, DTR (positive), DTR (negative),
XOn/XOff, ETX/ACK
Printer menu
Print Status Page
Interface
Emulation
Page Set
Print
Paper
RAM DISK
Mode
Select item.
Font
Color Mode
Handling
Quality
Others
 Loading...