

Kyocera 13600, 9600, 11100 Adjustment Manual

ADJUSTMENT GUIDE


TABLE OF CONTENTS
Introduction......................................................................................................................................................... 3
How to Read This Manual................................................................................................................................. 4
Symbols Used in the Manuals.......................................................................................................................4
Disclaimer........................................................................................................................................................4
Notes...............................................................................................................................................................4
Machine Types............................................................................................................................................... 5
Manuals for This Machine................................................................................................................................. 6
About Printing Surfaces...................................................................................................................................... 7
1. Adjustment Settings for Skilled Operators
Displaying the [Adjustment Settings for Skilled Operators] Button.................................................................9
Accessing Adjustment Settings for Skilled Operators....................................................................................12
Layout of Adjustment Settings for Skilled Operators..................................................................................... 14
Features of the Displayed Items and Setting Operations..............................................................................15
Notes on How Adjustment Settings are Applied to Printed Copies............................................................. 17
2. Details of Menu Items in Adjustment Settings for Skilled Operators
Menu Items and Functions...............................................................................................................................19
Setting Values................................................................................................................................................... 27
[Machine: Image Position].......................................................................................................................... 27
[Machine: Image Quality]...........................................................................................................................34
[Machine: Paper Feed/ Output]................................................................................................................ 39
[Machine: Maintenance]............................................................................................................................ 47
[Finishing: Finisher].......................................................................................................................................54
[Finishing: Fold]............................................................................................................................................ 76
[Finishing: Stacker].......................................................................................................................................84
3. Custom Paper Settings for Administrators
Accessing Advanced Settings......................................................................................................................... 91
Access Using the Control Panel.................................................................................................................. 91
Access Using Web Image Monitor............................................................................................................ 93
Description of Paper Icons...............................................................................................................................94
Deleting Saved Custom Paper Profiles........................................................................................................... 95
Backing up and Restoring Custom Paper Profiles..........................................................................................97
Backing up Custom Paper Profiles Saved in the Saved Paper Library.................................................... 97
Backing up Custom Paper Profiles Registered Under the [Edit Custom Paper] Setting..........................98
1

Paper Presets in "Advanced Settings".............................................................................................................99
Displaying the Paper Profile Version.......................................................................................................... 99
4. Details of Menu Items in Advanced Settings
Menu Items and Functions............................................................................................................................ 101
Setting Values.................................................................................................................................................108
Paper Feed Adjustment............................................................................................................................. 108
Paper Delivery Adjustment........................................................................................................................109
Image Position/Scaling Adjustment.........................................................................................................110
Line Speed Adjustment..............................................................................................................................116
Toner Adhesion Adjustment......................................................................................................................119
Transfer Adjustment................................................................................................................................... 119
Paper Feed Adjustment: Two-tray wide LCT........................................................................................... 122
Fuser Adjustment........................................................................................................................................124
Decurler Adjustment.................................................................................................................................. 129
Finishing Position Adjustment....................................................................................................................130
2

Introduction
This manual contains detailed instructions and notes on the operation and use of this machine. For your
safety and benefit, read this manual carefully before using the machine. Keep this manual in a handy
place for quick reference.
3

How to Read This Manual
Symbols Used in the Manuals
This manual uses the following symbols:
Indicates points to pay attention to when using the machine, and explanations of likely causes of paper
misfeeds, damage to originals, or loss of data. Be sure to read these explanations.
Indicates supplementary explanations of the machine’s functions, and instructions on resolving user
errors.
This symbol is located at the end of sections. It indicates where you can find further relevant information.
[ ]
Indicates the names of keys on the machine's display or control panels.
Disclaimer
To the maximum extent permitted by applicable laws, in no event will the manufacturer be liable for any
damages whatsoever arising out of failures of this product, losses of documents or data, or the use or
non-use of this product and operation manuals provided with it.
Contents of this manual are subject to change without prior notice.
Make sure that you always copy or have backups of the data registered in this machine. Documents or
data might be erased due to your operational errors or malfunctions of the machine.
In no event will the company be liable for direct, indirect, special, incidental, or consequential damages
as a result of handling or operating the machine.
Notes
Contents of this manual are subject to change without prior notice.
The manufacturer shall not be responsible for any damage or expense that might result from the use of
parts other than genuine parts from the manufacturer with your office products.
For good output quality, the manufacturer recommends that you use genuine toner from the
manufacturer.
4

Some illustrations in this manual might be slightly different from the machine.
Two kinds of size notation are employed in this manual.
Machine Types
Check the type of your machine before reading the manuals.
• Type 1: 9600
• Type 2: 11100
• Type 3: 13600
Certain types might not be available in some countries. For details, please contact your local dealer.
Certain options might not be available in some countries. For details, please contact your local dealer.
5

Manuals for This Machine
The following manuals are for skilled operators only.
Adjustment Item Menu Guide
This manual explains the items in [Adjustment Settings for Skilled Operators] and the advanced
settings for custom paper adjustment in "Advanced Settings".
Replacement Guide
This manual explains how to replace the machine's components.
Troubleshooting
This manual explains how to troubleshoot problems related to image quality, paper delivery, and
other aspects of machine operation.
6

About Printing Surfaces
DSM008
DSM009
Depending on the setting, printed copies are fed as follows:
Side 1 is the surface of the paper printed during one-sided printing, or the surface of the first print during
duplex printing.
Side 2 is the surface of the paper printed on the back side of Side 1 during duplex printing.
Single-sided printing: Printed side face down
A. Side 1
B. Paper feed direction of Side 1
Single-sided printing: Printed side face up
A. Side 1
B. Paper feed direction of Side 1
7
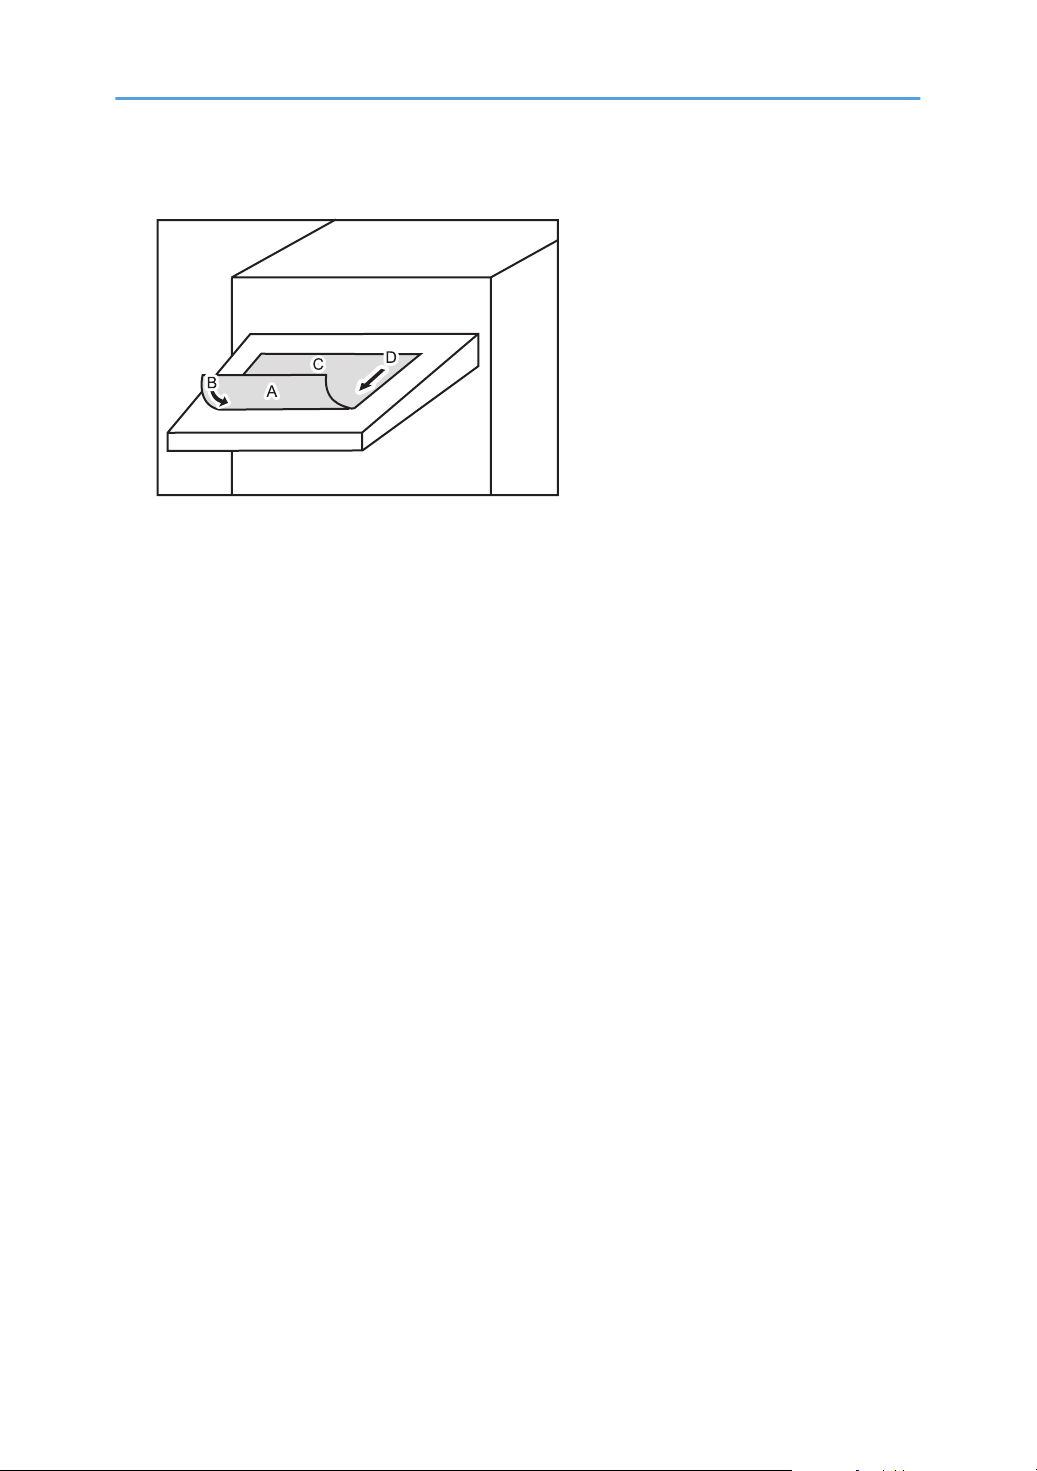
Duplex printing
DSM010
A. Side 1
B. Paper feed direction of Side 1
C. Side 2
D. Paper feed direction of Side 2
8
1. Adjustment Settings for Skilled
CWW222
Operators
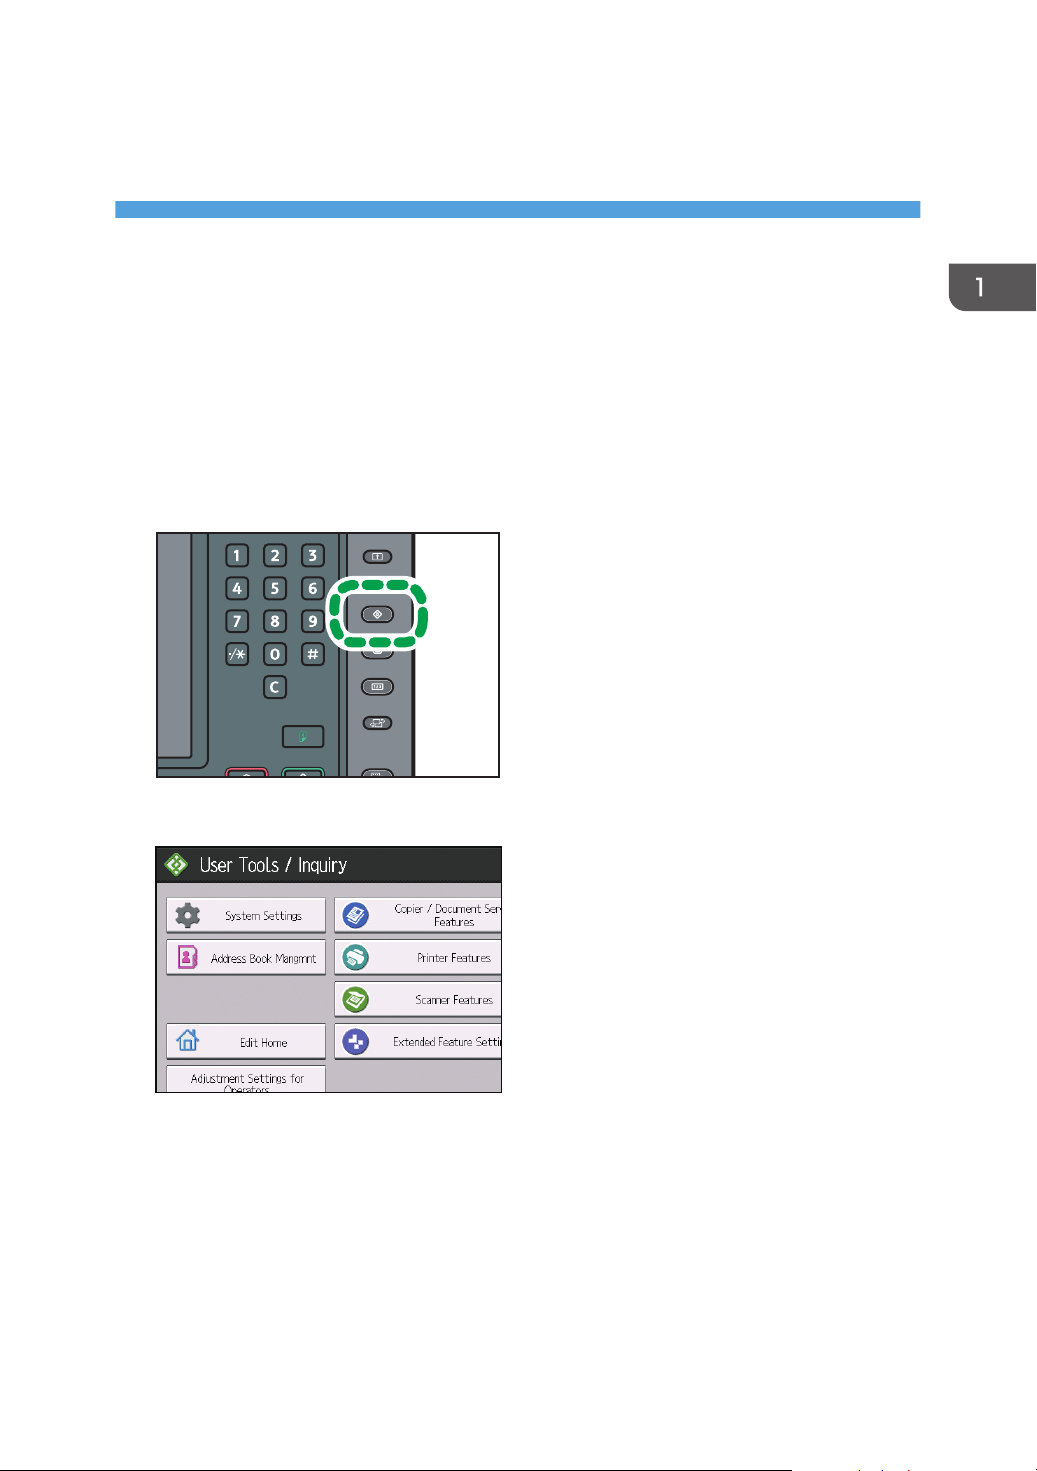
Displaying the [Adjustment Settings for Skilled Operators] Button
To use the Adjustment Settings for Skilled Operators, you must first configure your machine's
Administrator Authentication Management setting.
1. Press the [User Tools] key on the control panel.
2. Press [System Settings] on the display.
9
1. Adjustment Settings for Skilled Operators
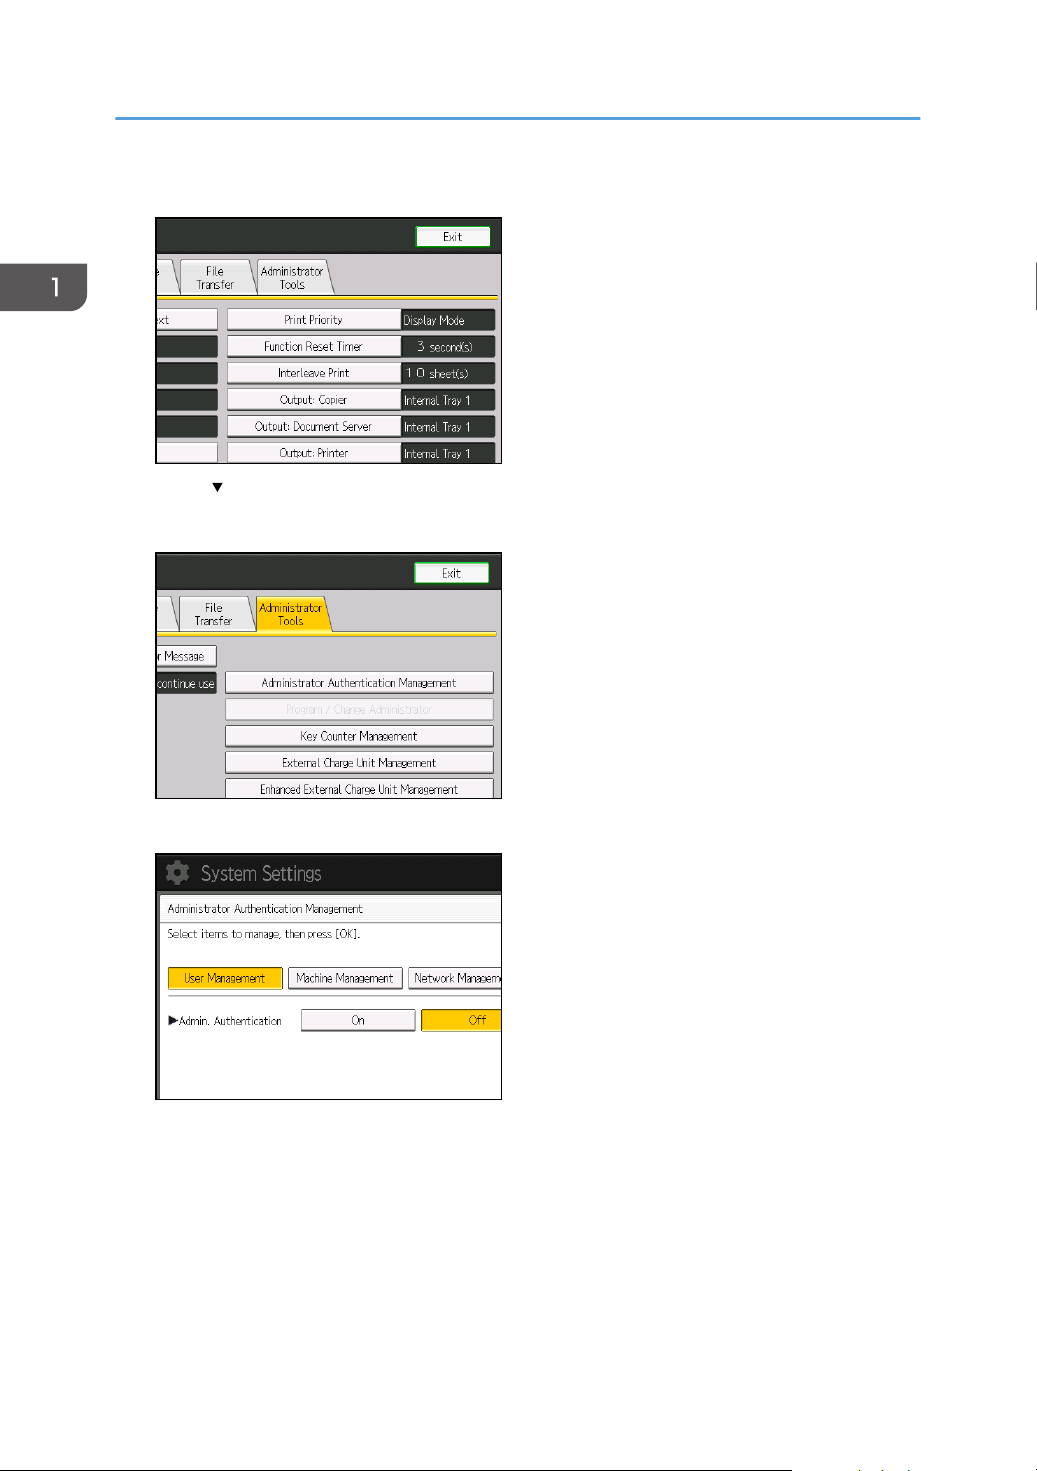
3. Press [Administrator Tools].
4. Press [ Next].
5. Press [Administrator Authentication Management].
10
6. Press [Machine Management].
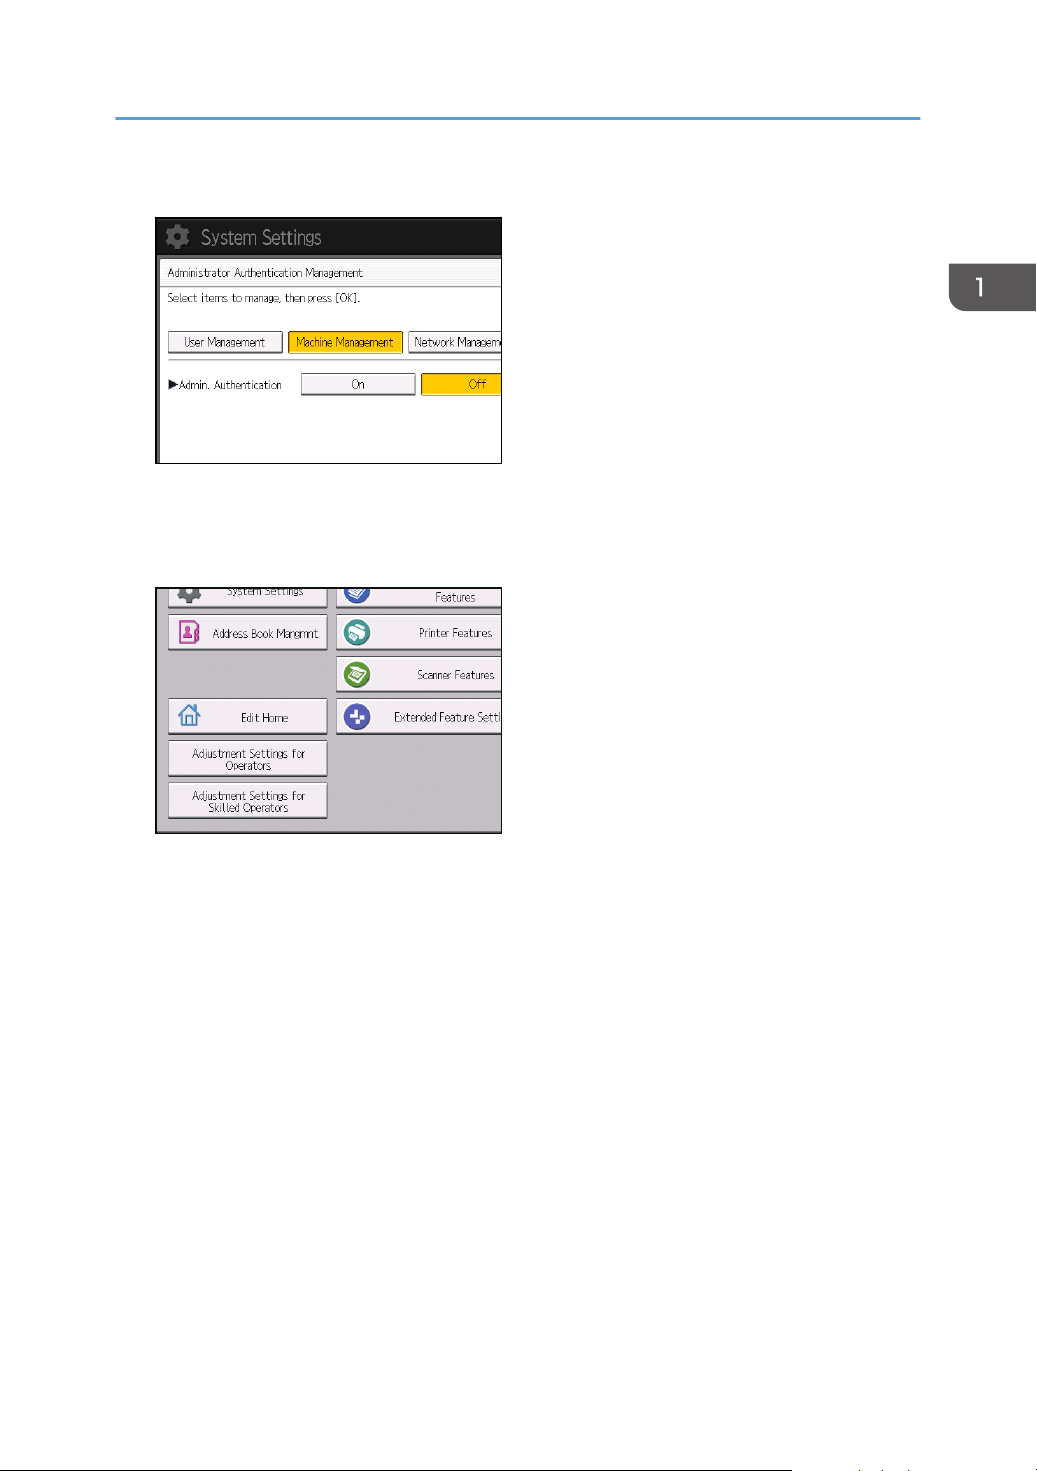
Displaying the [Adjustment Settings for Skilled Operators] Button
7. Select [On] for "Admin. Authentication".
8. Press [OK].
9. Press [Exit].
The [Adjustment Settings for Skilled Operators] button appears.
11
1. Adjustment Settings for Skilled Operators
Accessing Adjustment Settings for Skilled Operators
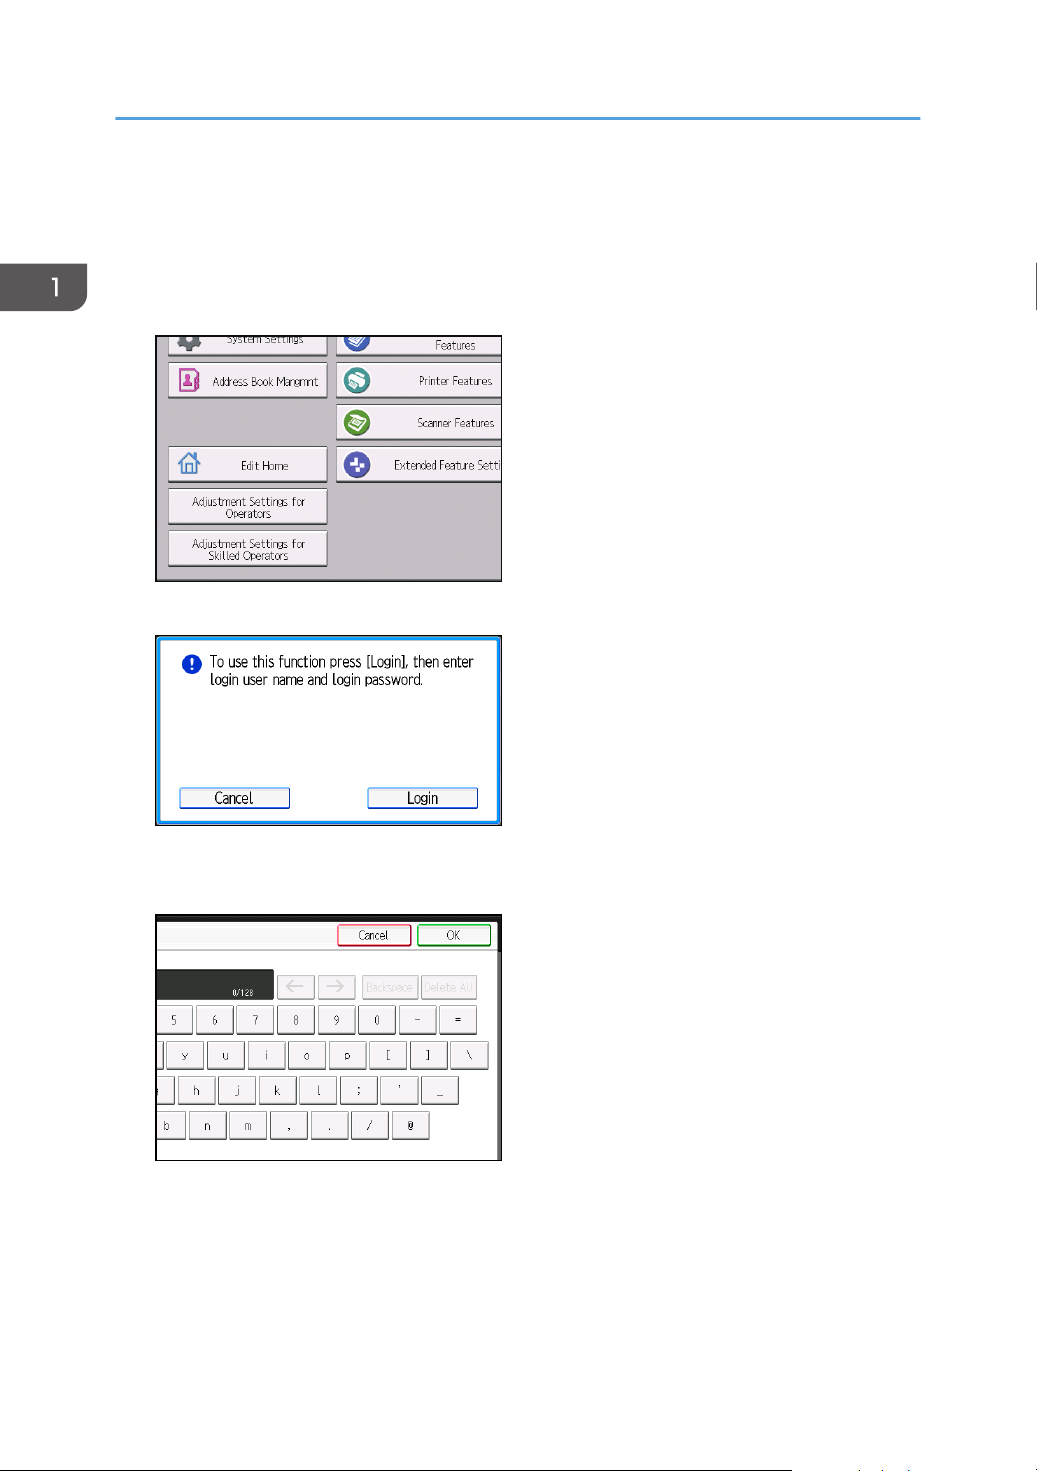
1. Press [Adjustment Settings for Skilled Operators].
2. Press [Login].
12
3. Enter your login user name, and then press [OK].
If you are logging on as the administrator for the first time, enter "admin".
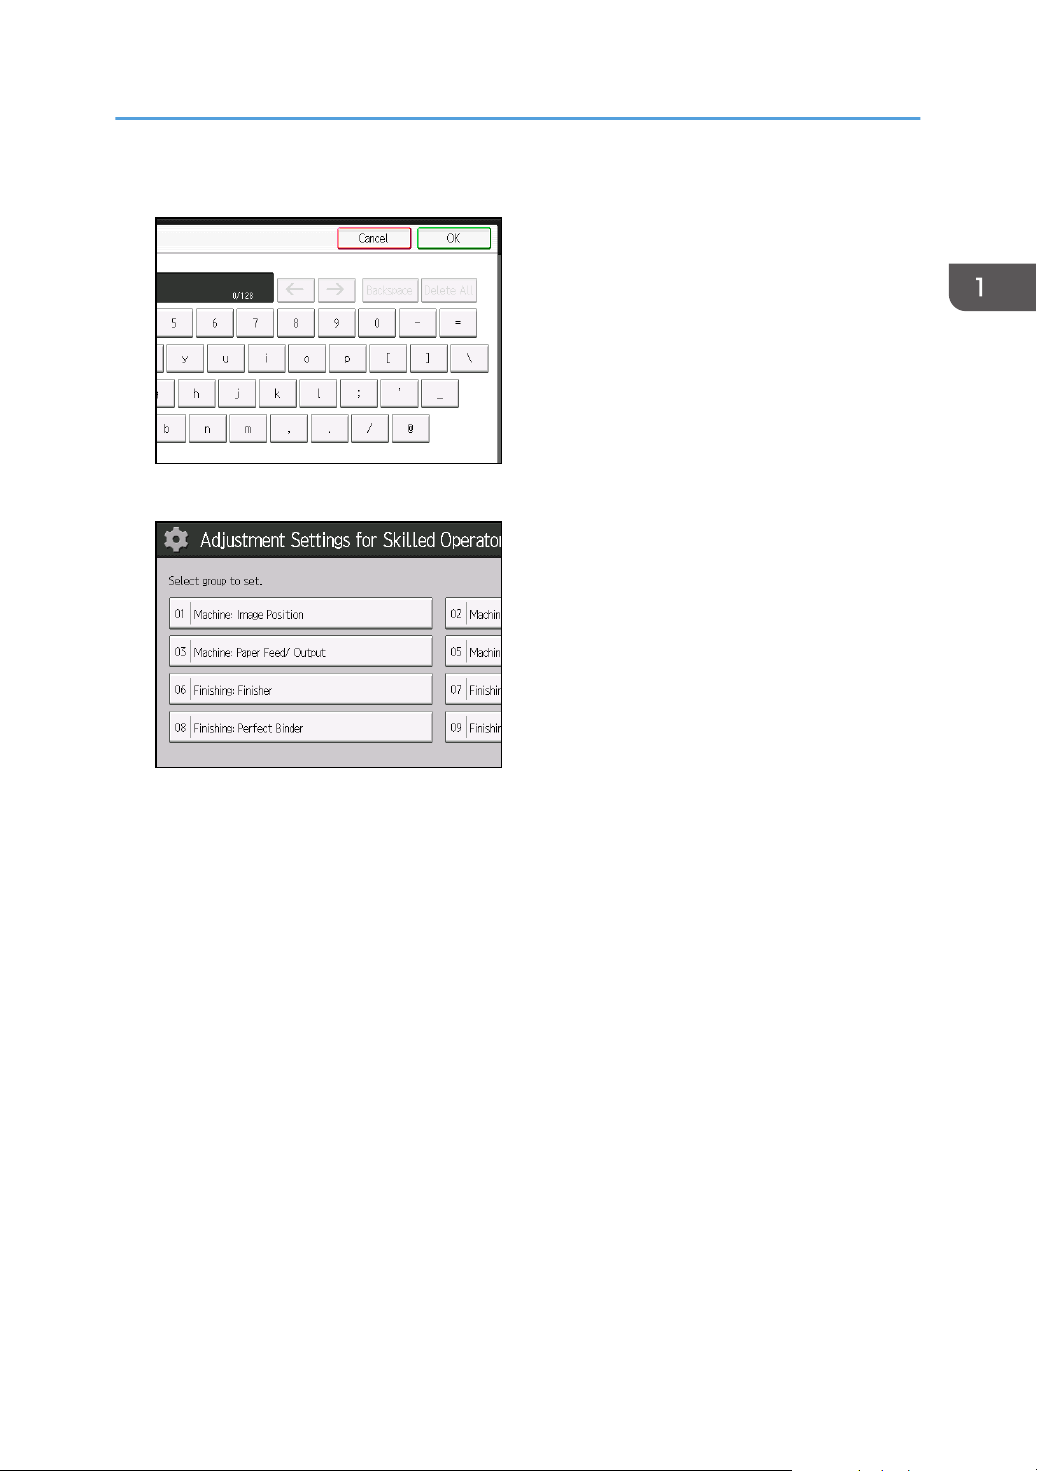
4. Enter your login password, and then press [OK].
The Adjustment Settings for Skilled Operators appears.
Accessing Adjustment Settings for Skilled Operators
13
321
DTJ001
1. Adjustment Settings for Skilled Operators
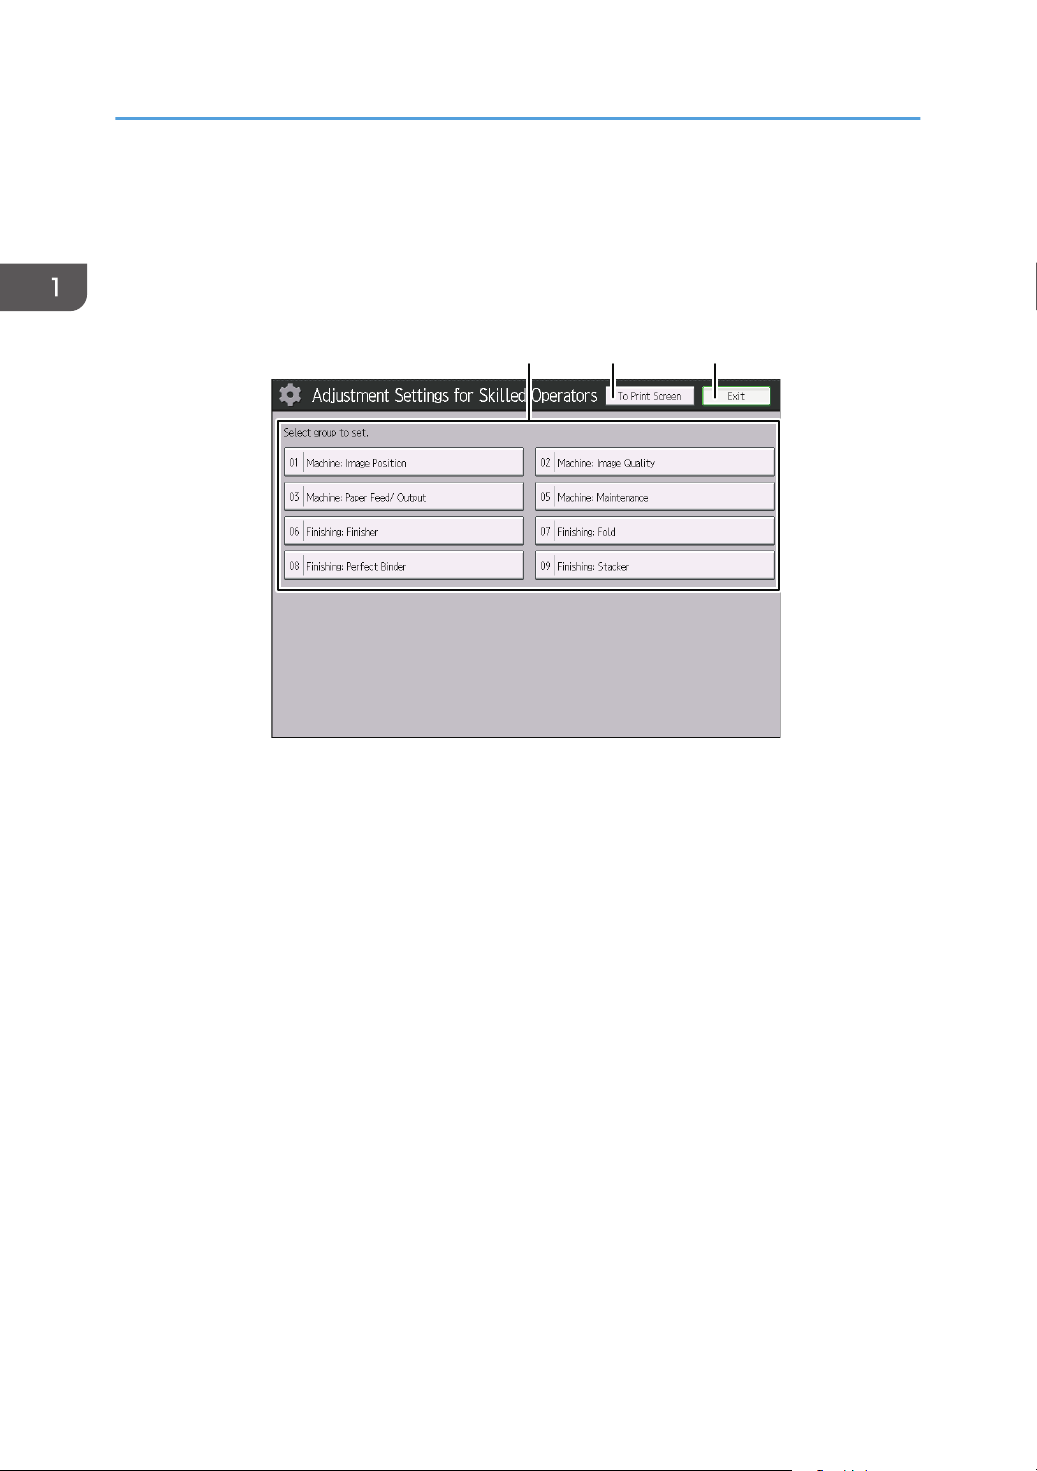
Layout of Adjustment Settings for Skilled Operators
This section explains how to use Adjustment Settings for Skilled Operators.
1. Adjustment items are displayed in this area. Select the setting you want to specify or change.
2. Press this button to display the print screen. You can use this screen to view the changes you have
made.
3. Press this button to close Adjustment Settings for Skilled Operators.
14
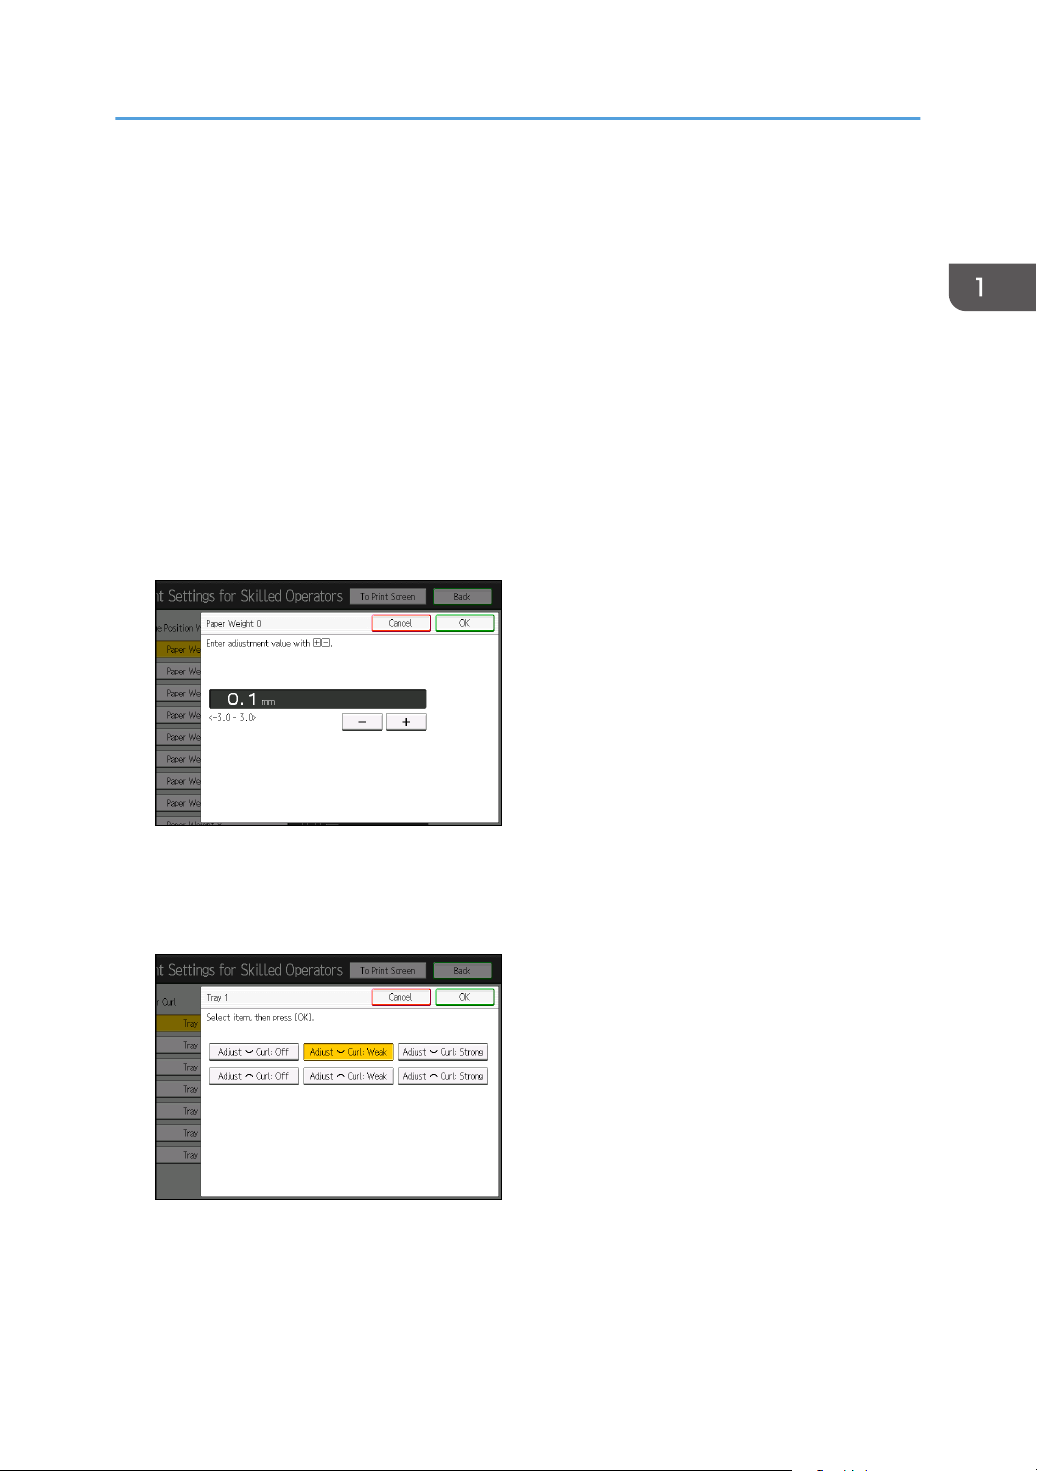
Features of the Displayed Items and Setting Operations
Features of the Displayed Items and Setting
Operations
The following operations are available for each adjustment item:
• Value setting
• Item setting
• Executing
• Display only
Value setting
Press [+] to increase the value, or [-] to decrease.
Select [OK] to apply the new setting.
Item setting
Select the item you require.
Select [OK] to apply the new setting.
Executing
Press [OK] to perform a selected function.
15
1. Adjustment Settings for Skilled Operators
Display only
You can check the setting for the selected item.
16

Notes on How Adjustment Settings are Applied to Printed Copies
Notes on How Adjustment Settings are Applied
to Printed Copies
The adjustment settings are applied to printed copies according to the settings specified for each paper
tray, paper size, and paper weight.
Depending on the adjustment setting, the same settings specified under different categories may be
applied to printed copies concurrently.
• Settings for each paper tray
• Settings for each paper weight
• Settings for each paper size
Settings for each paper tray
These adjustment settings can be specified for each paper tray.
The settings are applied only to printed copies fed from each paper tray.
Settings for each paper weight
These adjustment settings can be specified for each paper weight.
The settings are applied only to printed copies of each paper weight*1.
This appears as [Paper Thickness] in "Tray Paper Settings".
*1
17
1. Adjustment Settings for Skilled Operators
Settings for each paper size
These adjustment settings can be specified for each paper size.
The settings are applied only to printed copies of each paper size.
• For information about the paper tray, paper thickness, and tray paper size settings that can be
specified for a particular function, see the manual for the relevant function.
18

2. Details of Menu Items in Adjustment Settings for Skilled Operators
Menu Items and Functions
[Machine: Image Position]
For details about the following items, see page 27 "[Machine: Image Position]".
No. Item Description
0101 [Adjust Image Position With
Feed Direction]
0102 [Adjust Image Position
Across Feed Direction]
0103 [Adjust Registration Paper
Buckle]
0104 [Adjust Registration Paper
Buckle (Thick Paper)]
0105 [Deactivate Image Position
Adjustment Across Feed
Dir]
0106 [Select Test Pattern for
Image Position Adjustment]
*2
Adjust the horizontal position of the print image.
Adjust the vertical position of the print image.
Adjust the degree of paper arching at the registration
gate*1.
Adjust the degree of paper arching at the registration
gate*1 when using paper of Paper Weight 5 to 8.
Specify whether or not the machine automatically detects
paper pathway deviations during the paper feeding
process and adjusts the vertical position of the print
image accordingly.
Also specify whether or not to stop printing when the
vertical position has deviated exceeding the adjustable
range (3 mm/0.1 inch) when feeding.
Select the test image for adjusting the image position.
*2
*2
Adjust the position and scaling applied to scanned
images when using the Auto Document Feeder (ADF).
Specify whether or not to detect multiple feeding of
originals loaded in the Auto Document Feeder (ADF).
0107 [ADF Adjustment]
0108 [ADF Double Feed
Detection]
This is an internal function for adjusting skew correction and transfer timing.
*1
This function is available for 11100 and 13600.
*2
19

2. Details of Menu Items in Adjustment Settings for Skilled Operators
[Machine: Image Quality]
For details about the following items, see page 34 "[Machine: Image Quality]".
No. Item Description
0201 [Adjust Erase Margin With
Feed Direction]
Adjust the mask width at the leading edge or trailing
edge of the image.
0202 [Adjust Image Density] Execute image density control manually.
0203 [Image Density Adjustment
Execute Interval]
0204 [Adjust Maximum Image
Density]
Specify the number of sheets the machine prints before it
automatically adjusts image density.
Specify the adhesion of toner to the drum surface and
intermediate transfer belt when image density adjustment
is executed.
0205 [Adjust Line Width] Adjust the intensity of the laser for transferring image
data to the drum.
0206 [Adjust Density Difference
Across Feed Direction]
0207 [Adjust Fusing Temperature
on Standby]
0208 [Avoid Ppr Trnsf Shock
Jitter: Feed Interval Adj]
Adjust the image density difference between the top and
bottom of the image.
Adjust the set fusing temperature according to the
machine status.
Specify whether or not to enable the mode to reduce the
jitter*1 produced when paper enters the paper transfer
roller.
0211 [Toner Refreshing Mode] Specify the threshold for the average image area ratio at
0212 [Productivity Priority Mode] Specify whether or not to increase throughput on a job
0213 [Continuous Slip Sheet
Feed Mode]
A shock that occurs as the leading or trailing end of paper passes through the transfer unit. When this
*1
shock is transmitted to the drum via the intermediate transfer belt, banding occurs.
[Machine: Paper Feed/ Output]
For details about the following items, see page 39 "[Machine: Paper Feed/ Output]".
20
which toner refreshing mode is enabled.
that involves printing on thick and then on thin paper.
Specify whether or not to temporarily stop the imaging
unit in order to avoid reductions in image quality that
may occur in continuous slip sheet feed mode.

Menu Items and Functions
No. Item Description
0301 [Double Feed Detection] Specify whether or not to detect double feeding of
paper.
0302 [When Double Feed is
Detected]
Specify how the machine behaves when it detects a
double feed.
0304 [Skew Detection] Specify whether or not to detect paper skew.
0305 [Skew Detection Level] Adjust the permissible range of skew.
0306 [Adjust Wide LCT Fan
Level]
0307 [Adjust Wide LCT Fan
Timer]
Adjust the airflow of the three-tray wide LCT (LCIT
RT5080) for fanning the sheets.
Adjust the duration of the airflow of the three-tray wide
LCT (LCIT RT5080) for fanning the sheets.
0308 [Pickup Assist Setting] Specify the paper feed roller movement when using
three-tray wide LCT (LCIT RT5080), LCT (LCIT RT5070),
and multi bypass tray.
0309 [Adjust Paper Separation
Time]
To prevent multi-feeding, adjust the paper separation
time when feeding paper.
0310 [Adjust Paper Curl] Specify the method for straightening curled sheets.
0311 [Registration Jam Detection
with Feed Direction]
Specify whether or not to stop printing when the
deviation in the feed direction exceeds the adjustable
range (3 mm/0.1 inch) when feeding paper in the
paper tray or duplex unit.
0312 [Lower Jam Detection
Strictness]
Disables the following jam detection functions:
• Skew Detection (J49)
• Registration Detection with Feed Direction out of
range(J050) (correction control to be performed)
• Registration Detection across Feed Direction out of
range(J080) (correction control to be performed)
In addition, fix the CIS light intensity in Color Paper
Correction setting to Color Paper 2.
The setting is applied to all the paper types and trays at
a time.
21

2. Details of Menu Items in Adjustment Settings for Skilled Operators
[Machine: Maintenance]
For details about the following items, see page 47 "[Machine: Maintenance]".
No. Item Description
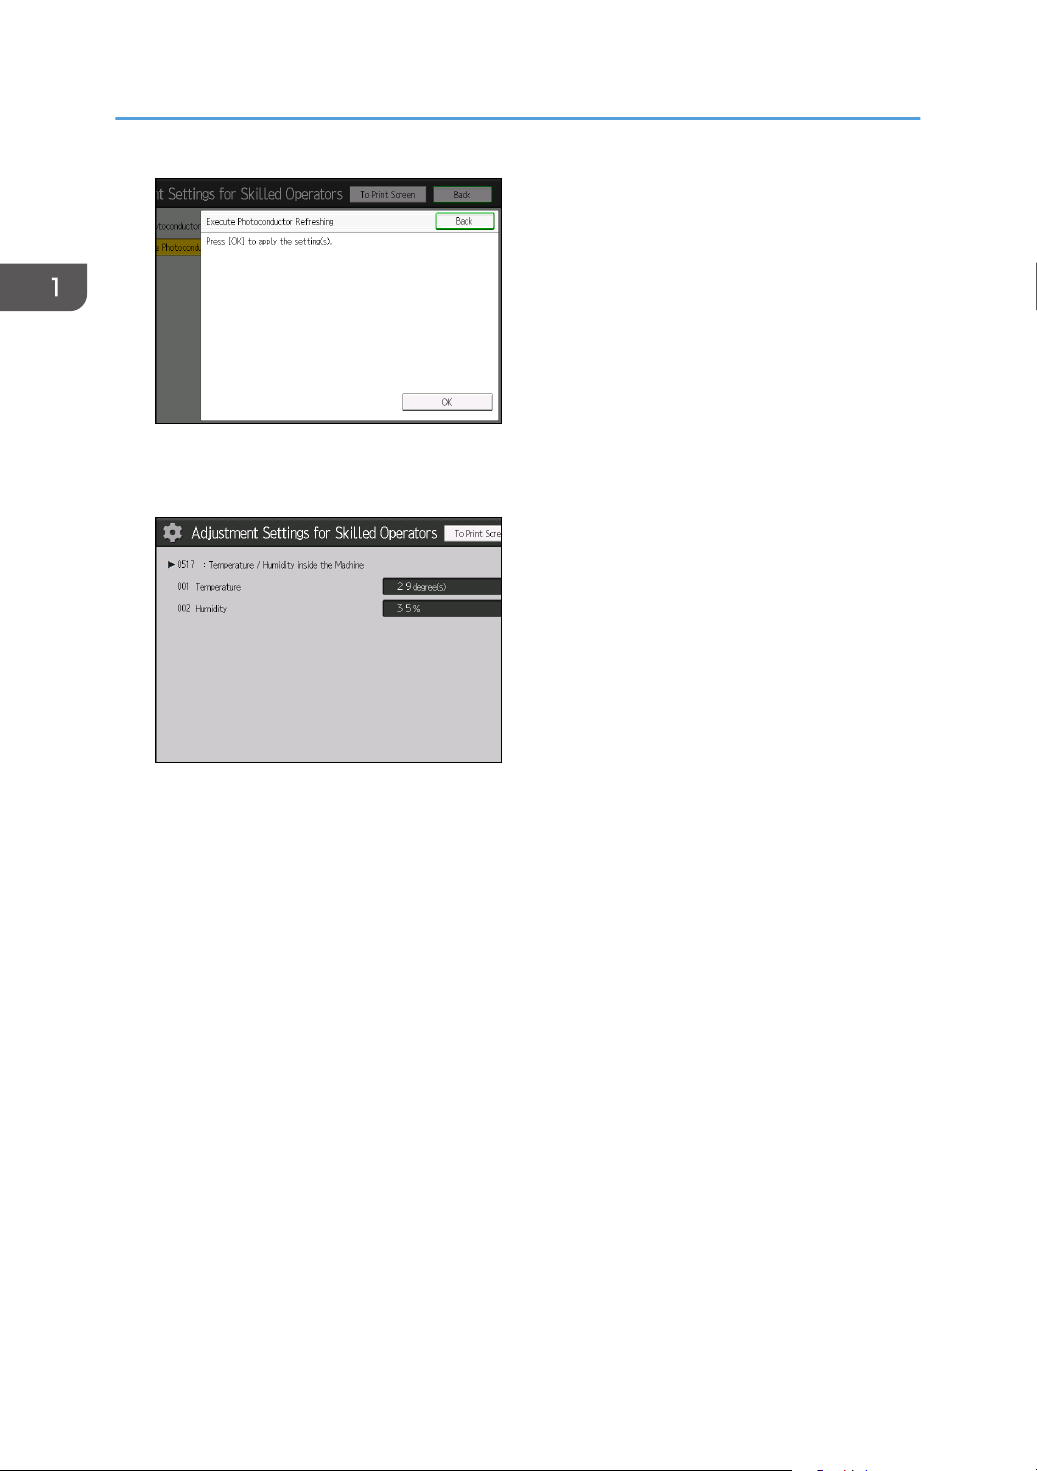
0502 [Execute Photoconductor
Remove dust on the drum surface.
Refreshing]
0503 [Unscrew/Screw-on Cap
Screw on or unscrew the toner bottle cap.
to Replace Toner Bottle]
0504 [Developer Fill] Fill the developer unit with fresh developer.
0505 [Developer Fill: Result] Display the result of filling developer.
0506 [Developer Exhaust] Discharge used developer into the developer bottle.
0507 [Developer Exhaust: Result] Display the result of discharging developer.
0509 [Developer Setup: Result] Display the result of developer setup.
0512 [ITB Manual Lubrication] Lubricate the intermediate transfer belt.
0515 [Reset Replaceable Parts
Counter Reset the counter for replaceable parts.
Counter]
0516 [Estimated Life Already
Display the duty cycle counters of replaceable parts.
Used]
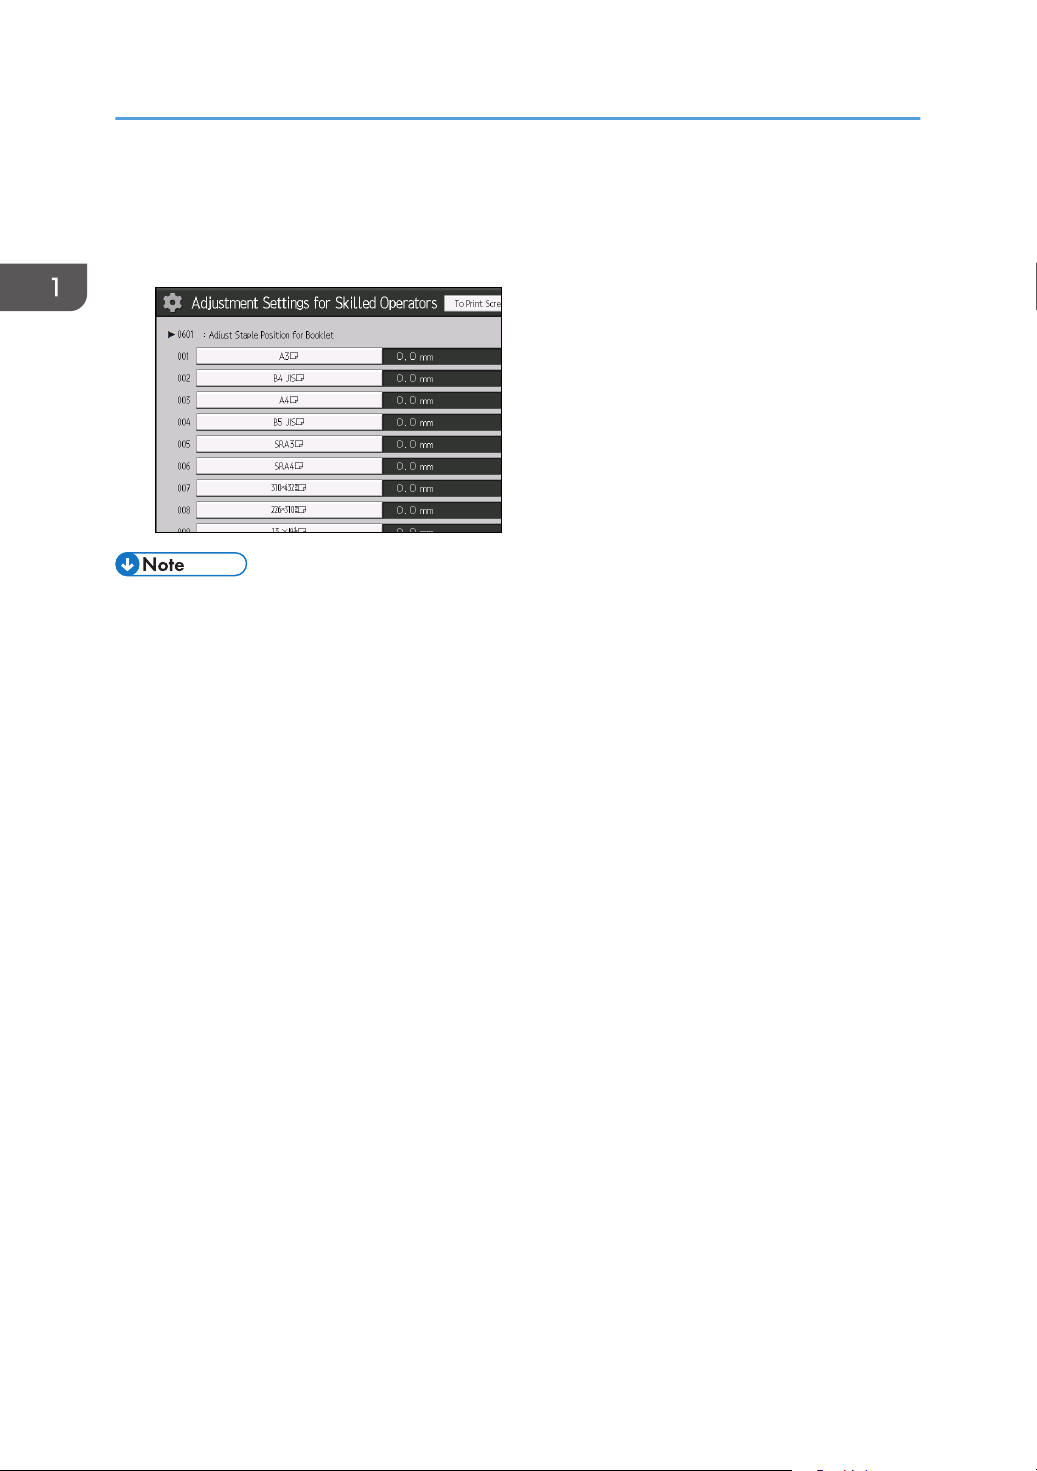
0517 [Temperature / Humidity
Display the internal temperature and humidity.
inside the Machine]
[Finishing: Finisher]
22
0518 [Temperature / Humidity
Display the external temperature and humidity.
outside the Machine]
0520 [Back Up / Restore Custom
Back up and restore custom paper profiles.
Paper Data]
0521 [Counter Settings for Fusing
Unit Replacement]
This setting can be used with multiple fuser units.
Up to four fuser units can be recorded.
Displays the counter of each part of the fuser unit.
0522 [Execute Charger
Clean the charge unit.
Cleaning]
For details about the following items, see page 54 "[Finishing: Finisher]".

No. Item Description
Menu Items and Functions
0601 [Adjust Staple Position for
Booklet]
0602 [Adjust Folding Position for
Booklet]
0603 [Adjust Staple Position
Across Feed Direction 1]
0604 [Adjust Staple Position
Across Feed Direction 2]
0605 [Adjust Staple Position With
Feed Direction]
0606 [Adjust Punch Position
Across Feed Direction]
0607 [Adjust Punch Position With
Feed Direction]
0608 [Paper Alignment for
Booklet Across Feed Dir.]
Adjust the horizontal position of the booklet staples when
using Booklet Finisher SR5060.
Adjust the horizontal position of the folding when using
Booklet Finisher SR5060.
Adjust the vertical position of the staple (applied at an
edge) when using the Finisher SR5050 or Booklet
Finisher SR5060.
Adjust the vertical position of the staples (dual) when
using the Finisher SR5050 or Booklet Finisher SR5060.
Adjust the horizontal position of the staples when using
Finisher SR5050 or Booklet Finisher SR5060.
Adjust the vertical position of the punch holes when using
Finisher SR5050 or Booklet Finisher SR5060.
Adjust the horizontal position of the punch holes when
using Finisher SR5050 or Booklet Finisher SR5060.
Adjust the width of the staple jogger*1 for booklets when
using Booklet Finisher SR5060.
0609 [Set Number of Folds for
Booklet]
0610 [Paper Alignment for
Booklet With Feed Dir.]
0611 [Paper Alignment for
Stapling Across Feed
Direction]
0612 [Paper Alignment in Shift
Tray Across Feed Direction]
0613 [Paper Alignment for
Stapling With Feed
Direction]
Specify the number of additional booklet folds when
using the Booklet Finisher SR5060.
Adjust the travel distance of the paper edge stopper for
booklets when using Booklet Finisher SR5060.
Adjust the width of the staple jogger*1 for edge stapling
when using Finisher SR5050 or Booklet Finisher
SR5060.
Adjust the width of the paper alignment jogger*1 in the
shift tray when using Finisher SR5050 or Booklet Finisher
SR5060.
Adjust the travel distance of the paper edge stopper for
edge stapling when using Finisher SR5050 or Booklet
Finisher SR5060.
23

2. Details of Menu Items in Adjustment Settings for Skilled Operators
No. Item Description
0614 [Punch Skew Correction] Disable punch skew correction if jams or edge-folding
problems occur particularly when punching lightweight
paper using Finisher SR5050 or Booklet Finisher
SR5060.
0615 [Z-fold Skew Correction] Specify how to correct skew (occurring during paper
transport) when Z-folding with the folding unit.
0616 [Correct Z-fold Skew] Adjust the length of sheets moved for Z-fold skew
correction.
0617 [Correct Z-fold Skew
(Reverse)]
Adjust how much the registration roller rotates in reverse
for Z-fold skew correction.
0618 [Correct Punch Skew] Adjust the amount of skew correction for punching when
using Finisher SR5050 or Booklet Finisher SR5060.
0619 [Paper Alignment in Shift
Tray Setting]
Specify the accuracy of printed paper alignment when
applying shift-sorting with the Finisher SR5050 or
Booklet Finisher SR5060.
0620 [Number of Sheet Align for
Stapling]
0621 [Adjust Output Tray
Descending Position]
Specify the number of sheets the staple unit aligns at a
time for stapling.
Specify the descending position for the finisher shift tray
when paper is delivered to it using Finisher SR5050 or
Booklet Finisher SR5060.
0622 [Adjust Exit Guide Close
Timing (Booklet Fin)]
Specify when to close the exit guide after paper is
delivered to the finisher shift tray of Finisher SR5050 or
Booklet Finisher SR5060.
0623 [Output Trail Edge Press
Setting]
Specify whether or not to press down the trailing edge of
the paper when it is delivered to the finisher shift tray of
Finisher SR5050 or Booklet Finisher SR5060.
24
0624 [Output Fan Setting] Specify how the shift tray fan moves when using Finisher
SR5050 or Booklet Finisher SR5060.
0625 [Adjust Output Fan Level] Adjust the airflow of the shift tray for fanning the sheets
when using Finisher SR5050 or Booklet Finisher
SR5060.
0626 [Maximum No. Stacked
Sheets in Output Tray]
Specify the amount of paper stacked in Finisher SR5050
or Booklet Finisher SR5060.

Guide for alignment of printed paper. Printed paper is centered by the right and left guides.
*1
[Finishing: Fold]
For details about the following items, see page 76 "[Finishing: Fold]".
No. Item Description
Menu Items and Functions
0701 [Half Fold Position (Multi-
sheet Fold)]
0702 [Letter Fold-out Position 1
(Multi-sheet Fold)]
0703 [Letter Fold-out Position 2
(Multi-sheet Fold)]
0704 [Letter Fold-in Position 1
(Multi-sheet Fold)]
0705 [Letter Fold-in Position 2
(Multi-sheet Fold)]
0706 [Folding Unit Tray Full
Detection]
0707 [Number of Sheets Folded
after Full Detection]
Adjust the fold position of half folded sheets when using
the multi-folding unit.
Adjust the fold position for the bottom segment of letter
fold-out sheets when using the multi-folding unit.
Adjust the overall fold size of letters fold-out sheets when
using the multi-folding unit.
Adjust the fold position of the bottom segment of letter
fold-in sheets when using the multi-folding unit.
Adjust the fold position of letters fold-in sheets when
using the multi-folding unit.
Specify whether or not to automatically detect when the
folding unit tray becomes full.
Specify the number of sheets the machine prints when it
detects that the folding unit tray is full before displaying a
warning message.
0708 [Adjust Z-fold Position 1] Adjust the width of the bottom end segment of Z-folded
sheets when using the multi-folding unit.
0709 [Adjust Z-fold Position 2] Adjust the overall fold size of Z-fold sheets when using
the multi-folding unit.
[Finishing: Stacker]
For details about the following items, see page 84 "[Finishing: Stacker]".
No. Item Description
0901 [Paper Alignment in
Stacker Tray Across Feed
Adjust the width of the main jogger*1 when the high
capacity stacker is installed.
Direction 1]
25

2. Details of Menu Items in Adjustment Settings for Skilled Operators
No. Item Description
0902 [Paper Alignment in
Stacker Tray Across Feed
Adjust the width of the sub jogger*1 when the high
capacity stacker is installed.
Direction 2]
0903 [Paper Alignment in
Stacker Tray With Feed
Adjust the travel distance of the paper edge stopper
when the high capacity stacker is installed.
Direction]
0904 [Paper Alignment in 2nd
Stacker Tray Across Feed
Adjust the width of the main jogger*1 when the second
high capacity stacker is installed.
Dir. 1]
0905 [Paper Alignment in 2nd
Stacker Tray Across Feed
Adjust the width of the sub jogger*1 when the second
high capacity stacker is installed.
Dir. 2]
0906 [Paper Alignment in 2nd
Stacker Tray With Feed
Adjust the travel distance of the paper edge stopper
when the second high capacity stacker is installed.
Direction]
0907 [Maximum Stack Quantity
Set the maximum number of sheets for the stacker tray.
in Stacker Tray]
Guide for alignment of printed paper. Printed paper is centered by the right and left guides.
*1
26
Setting Values
(Leading Edge) (Trailing Edge)
Left
To p
Bottom
Right
Paper feed direction
(+)(-)
Default
CEZ012
(Leading edge)(Trailing edge)
Left Right
Paper feed direction
(+)
(-)
Default
CEZ013
To p
Bottom
[Machine: Image Position]
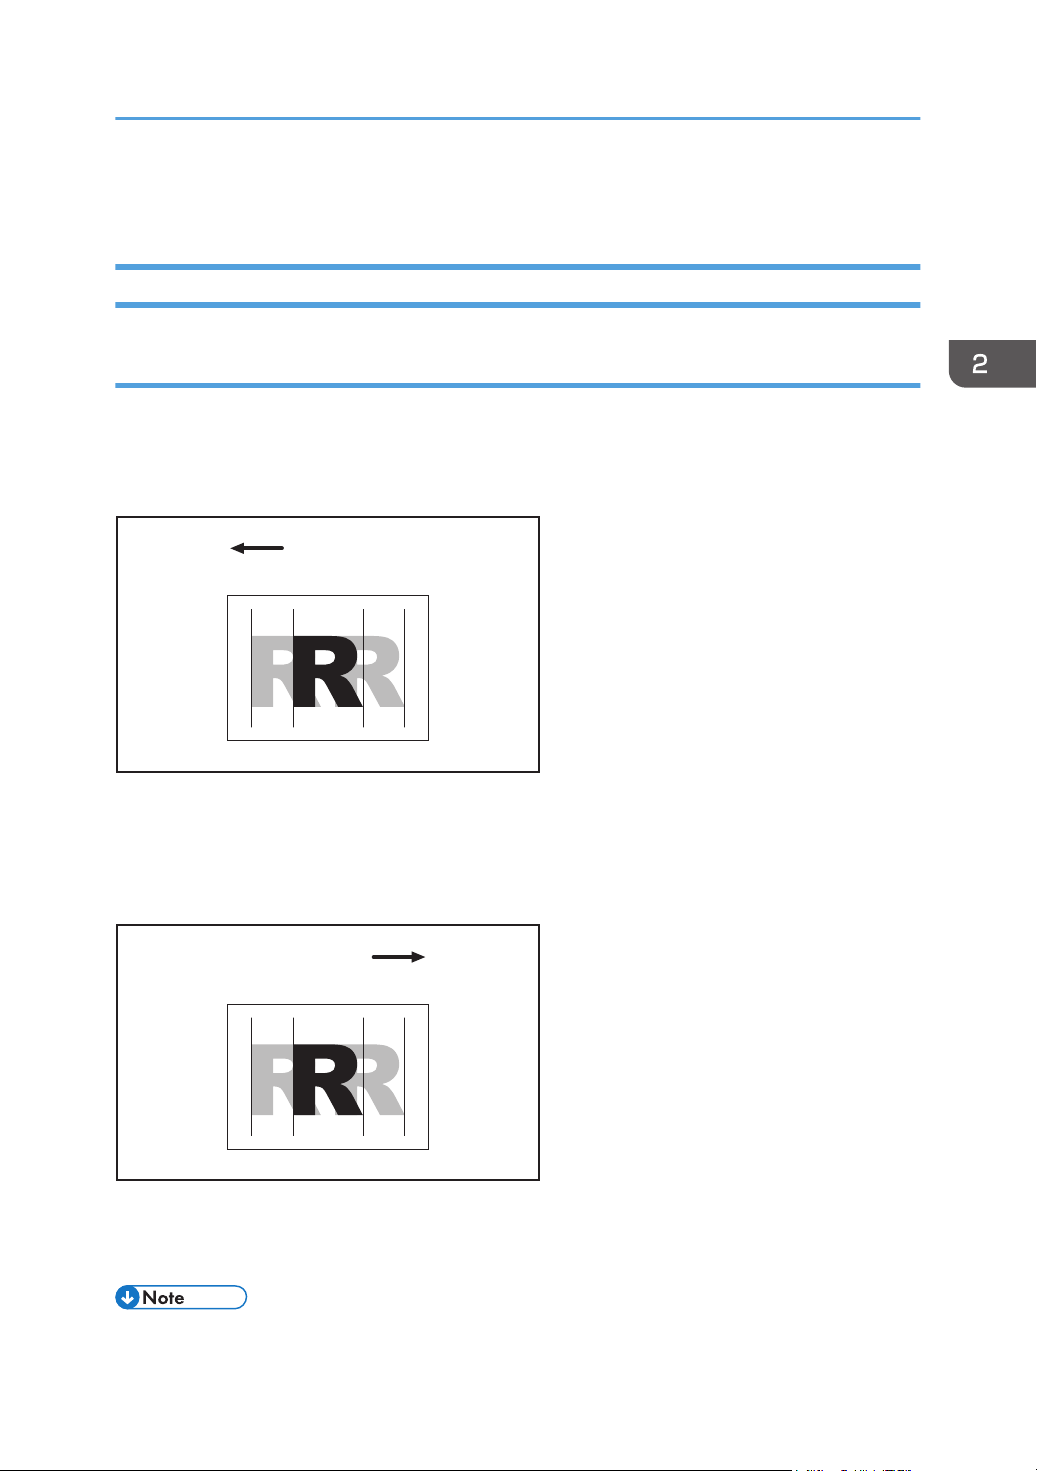
0101: [Adjust Image Position With Feed Direction]
Adjust the horizontal position of the print image.
You cannot individually adjust the image position on sides 1 and 2.
Side 1
Setting Values
Press [+] to shift the image to the right (trailing edge).
Press [−] to shift the image the left (leading edge).
Side 2
Press [+] to shift the image to the left (trailing edge).
Press [−] to shift the image to the right (leading edge).
• If sheets are delivered face down, turn them over horizontally and check the image position.
27
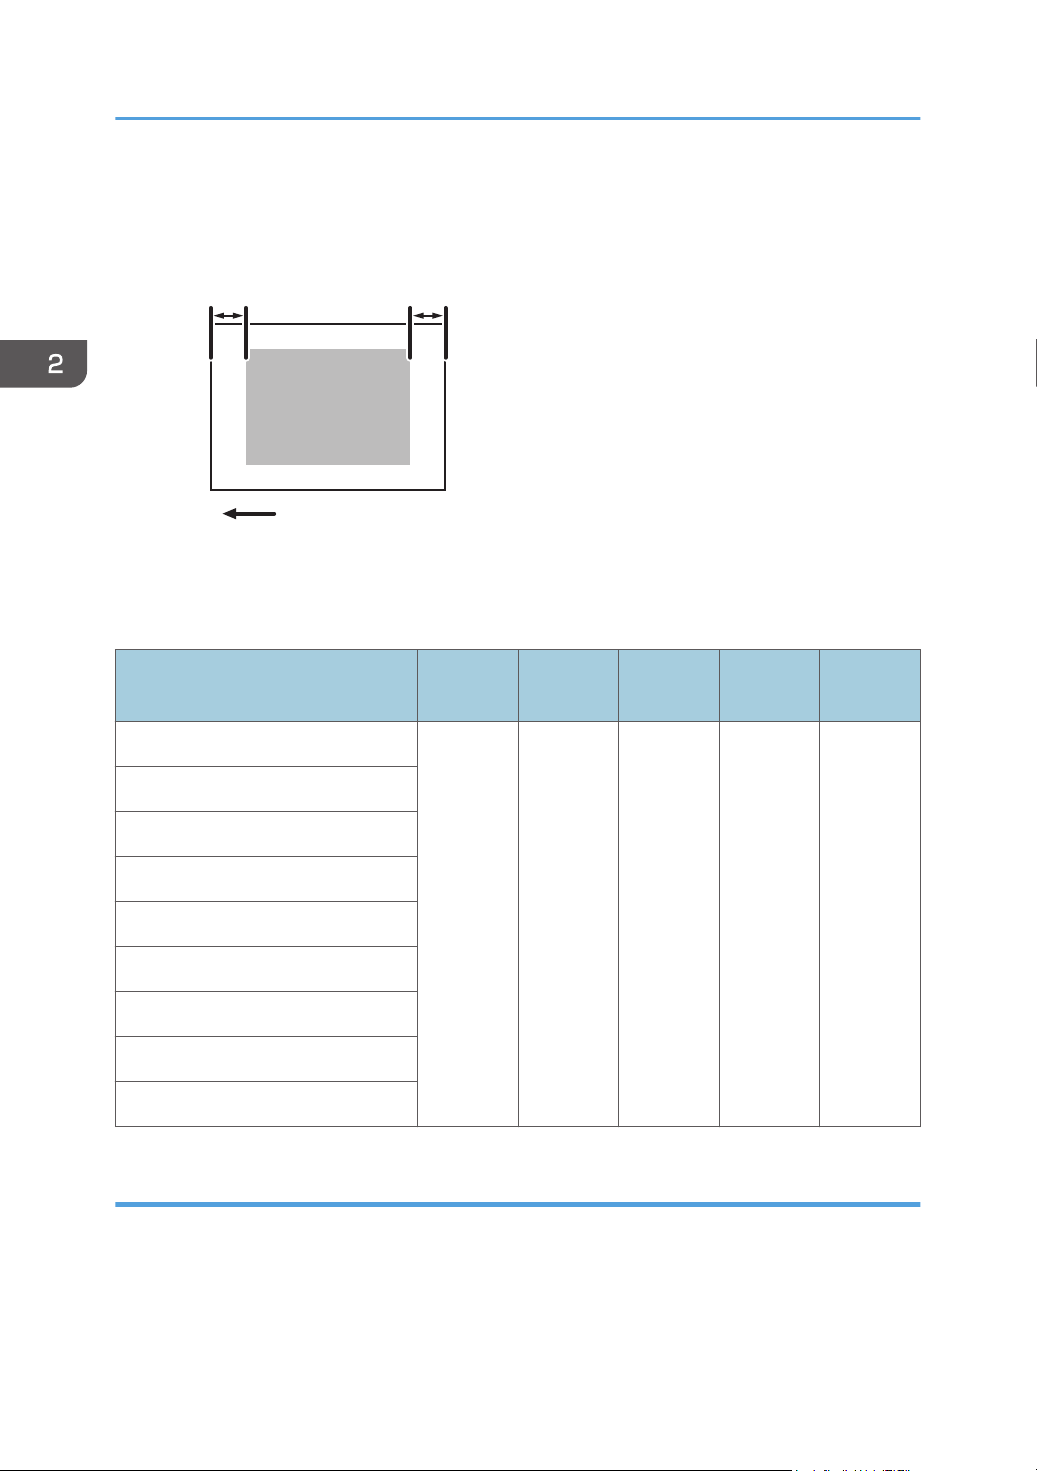
Paper feed direction
Leading-edge margin Trailing-edge margin
CEZ586
2. Details of Menu Items in Adjustment Settings for Skilled Operators
• If the leading-edge margin on Side 1 of the paper is too narrow, paper jams may occur.
• If the trailing-edge margin on Side 1 of the paper is too narrow, paper jams may occur when
printing on the back side of paper during duplex printing.
• This setting is not effective for paper fed from paper trays with custom paper presets. For such
paper, the value specified in 08: [Adj Image Position of Side1 With Feed], 09: [Adj Image Position
of Side2 With Feed] in "Advanced Settings" takes precedence.
Setting Items
[Paper Weight 0] 0.0 3.0 -3.0 0.1 mm
[Paper Weight 1]
[Paper Weight 2]
[Paper Weight 3]
[Paper Weight 4]
[Paper Weight 5]
[Paper Weight 6]
[Paper Weight 7]
[Paper Weight 8]
0102: [Adjust Image Position Across Feed Direction]
Adjust the vertical position of the print image.
Default
Value
Max.
Value
Min.
Value
Step Unit
28
 Loading...