

Page 1

oЙСЙкЙеЕЙ=dмбЗЙ=
Ñçê=íÜÉ=
hузЕЙк~=ONMM=pЙкбЙл=mЬзеЙл
KYOCERA WIRELESS CORP.
10300 CAMPUS POINT DRIVE
SAN DIEGO, CALIFORNIA 92121 U.S.A.
Visit us at www.kyocera-wireless.com
To purchase accessories, visit www.kyocera-wireless.com/store
80-B6761-1, Rev. -
Page 2

This manual is based on the production versions of the Kyocera2100 Series phones. Software changes may have
occurred after this printing. Kyocera reserves the right to make changes in technical and product specifications without
prior notice. The products and equipment described in this documentation are manufactured under license from
QUALCOMM Incorporated under one or more of the following U.S. patents:
4,901,307 5,056,109 5,099,204 5,101,501 5,103,459 5,107,225 5,109,390 5,193,094 5,228,054
5,257,283 5,265,119 5,267,261 5,267,262 5,280,472 5,283,536 5,289,527 5,307,405 5,309,474
5,337,338 5,339,046 5,341,456 5,383,219 5,392,287 5,396,516 D356,560 5,408,697 5,414,728
5,414,796 5,416,797 5,426,392 5,437,055 D361,065 5,442,322 5,442,627 5,452,473 5,461,639
5,469,115 5,469,471 5,471,497 5,475,870 5,479,475 5,483,696 5,485,486 5,487,175 5,490,165
5,497,395 5,499,280 5,504,773 5,506,865 5,509,015 5,509,035 5,511,067 5,511,073 5,513,176
5,515,177 5,517,323 5,519,761 5,528,593 5,530,928 5,533,011 5,535,239 5,539,531 5,544,196
5,544,223 5,546,459 5,548,812 5,559,881 5,559,865 5,561,618 5,564,083 5,566,000 5,566,206
5,566,357 5,568,483 5,574,773 5,574,987 D375,740 5,576,662 5,577,022 5,577,265 D375,937
5,588,043 D376,804 5,589,756 5,590,069 5,590,406 5,590,408 5,592,548 5,594,718 5,596,570
5,600,754 5,602,834 5,602,833 5,603,096 5,604,459 5,604,730 5,608,722 5,614,806 5,617,060
5,621,752 5,621,784 5,621,853 5,625,876 5,627,857 5,629,955 5,629,975 5,638,412 5,640,414
5,642,398 5,644,591 5,644,596 5,646,991 5,652,814 5,654,979 5,655,220 5,657,420 5,659,569
5,663,807 5,666,122 5,673,259 5,675,581 5,675,644 5,680,395 5,687,229 D386,186 5,689,557
5,691,974 5,692,006 5,696,468 5,697,055 5,703,902 5,704,001 5,708,448 5,710,521 5,710,758
5,710,768 5,710,784 5,715,236 5,715,526 5,722,044 5,722,053 5,722,061 5,722,063 5,724,385
5,727,123 5,729,540 5,732,134 5,732,341 5,734,716 5,737,687 5,737,708 5,742,734 D393,856
5,748,104 5,751,725 5,751,761 5,751,901 5,754,533 5,754,542 5,754,733 5,757,767 5,757,858
5,758,266 5,761,204 5,764,687 5,774,496 5,777,990 5,778,024 5,778,338 5,781,543 5,781,856
5,781,867 5,784,406 5,784,532 5,790,589 5,790,632 5,793,338 D397,110 5,799,005 5,799,254
5,802,105 5,805,648 5,805,843 5,812,036 5,812,094 5,812,097 5,812,538 5,812,607 5,812,651
5,812,938 5,818,871 5,822,318 5,825,253 5,828,348 5,828,661 5,835,065 5,835,847 5,839,052
5,841,806 5,842,124 5,844,784 5,844,885 5,844,899 5,844,985 5,848,063 5,848,099 5,850,612
5,852,421 5,854,565 5,854,786 5,857,147 5,859,612 5,859,838 5,859,840 5,861,844 5,862,471
5,862,474 5,864,760 5,864,763 5,867,527 5,867,763 5,870,427 5,870,431 5,870,674 5,872,481
5,872,774 5,872,775 5,872,823 5,877,942 5,878,036 5,870,631 5,881,053 5,881,368 5,884,157
5,884,193 5,884,196 5,892,178 5,892,758 5,892,774 5,892,816 5,892,916 5,893,035 D407,701
5,898,920 5,903,554 5,903,862 D409,561 5,907,167 5,909,434 5,910,752 5,911,128 5,912,882
D410,893 5,914,950 5,915,235 5,917,708 5,917,811 5,917,812 5,917,837 5,920,284 5,920,834
D411,823 5,923,650 5,923,705 5,926,143 5,926,470 5,926,500 5,926,786 5,926,786 5,930,230
5,930,692 Other patents pending.
T9 Text Input is covered by U.S. Pat. 5,818,437, U.S. Pat. 5,953,541, U.S. Pat. 6,011,554, Canadian Pat. 1,331,057
and patents pending worldwide.
Kyocera is a registered trademark of Kyocera Corporation. QCP is a trademark of Kyocera Wireless Corp. Brick Attack
is a trademark of Kyocera Wireless Corp. Phone.com and UP.Link are trademarks of Openwave Systems
Incorporated. QUALCOMM is a registered trademark of QUALCOMM Incorporated. T9 is a registered trademark of
Tegic Communications, Inc. Other product and brand names may be trademarks or registered trademarks of their
respective owners.
Copyright © 2001 Kyocera Wireless Corp. All rights reserved.
ACN 093 453 037
80-B6761-1, Rev. -
Page 3

FCC/IC Notice for Kyocera 2119 Phones
This device complies with part 15 of the FCC rules. Operation is subject to the following two conditions: (1) This
device may not cause harmful interference, and (2) this device must accept any interference received, including
interference that may cause undesired operation.
To comply with FCC radiation exposure requirements, use of this device for body-worn operational configurations
is limited to accessories tested and approved by Kyocera Wireless Corp. Other accessories used with this device
for body-worn operations must not contain any metallic components and must provide at least 26.7mm separation
distance including the antenna and the user’s body.
This model phone meets the government’s requirements for exposure to radio waves.
Your wireless phone is a radio transmitter and receiver. It is designed and manufactured not to exceed the
emission limits for exposure to radiofrequency (RF) energy set by the Federal Communications Commission of
the U.S. Government. These limits are part of comprehensive guidelines and establish permitted levels of RF
energy for the general population. The guidelines are based on standards that were developed by independent
scientific organizations through periodic and thorough evaluation of scientific studies. The standards include a
substantial safety margin designed to assure the safety of all persons, regardless of age and health.
The exposure standard for wireless mobile phones employs a unit of measurement known as the Specific
Absorption Rate, or SAR. The SAR limit set by the FCC is 1.6W/kg.* Tests for SAR are conducted using standard
operating positions specified by the FCC with the phone transmitting at its highest certified power level in all tested
frequency bands. Although the SAR is determined at the highest certified power level, the actual SAR level of the
phone while operating can be well below the maximum value. This is because the phone is designed to operate at
multiple power levels so as to use only the power required to reach the network. In general, the closer you are to a
wireless base station antenna, the lower the power output.
Before a phone model is available for sale to the public, it must be tested and certified to the FCC that it does not
exceed the limit established by the government-adopted requirement for safe exposure. The tests are performed
in positions and locations (e.g., at the ear and worn on the body) as required by the FCC for each model. The
highest SAR value for this model phone when tested for use at the ear is 1.39 W/kg and when worn on the body,
as described in this user guide, is 0.649 W/kg. (Body-worn measurements differ among phone models, depending
upon available accessories and FCC requirements). While there may be differences between the SAR levels of
various phones and at various positions, they all meet the government requirement for safe exposure.
The FCC has granted an Equipment Authorization for this model phone with all reported SAR levels evaluated as
in compliance with the FCC RF emission guidelines. SAR information on this model phone is on file with the FCC
and can be found under the Display Grant section of http://www.fcc.gov/oet/fccid
OVFKWC-2119.
Additional information on Specific Absorption Rates (SAR) can be found on the Cellular Telecommunications
Industry Association (CTIA) web-site at=http://www.wow-com.com.
* In the United States and Canada, the SAR limit for mobile phones used by the public is 1.6 watts/kg (W/kg)
averaged over one gram of tissue. The standard incorporates a substantial margin of safety to give additional
protection for the public and to account for any variations in measurements.
after searching on FCC ID
Page 4

FCC/IC Notice for Kyocera 2135 Phones
This device complies with part 15 of the FCC rules. Operation is subject to the following two conditions: (1) This
device may not cause harmful interference, and (2) this device must accept any interference received, including
interference that may cause undesired operation.
To comply with FCC radiation exposure requirements, use of this device for body-worn operational configurations
is limited to accessories tested and approved by Kyocera Wireless Corp. Other accessories used with this device
for body-worn operations must not contain any metallic components and must provide at least 26.7mm separation
distance including the antenna and the user’s body.
This model phone meets the government’s requirements for exposure to radio waves.
Your wireless phone is a radio transmitter and receiver. It is designed and manufactured not to exceed the
emission limits for exposure to radiofrequency (RF) energy set by the Federal Communications Commission of
the U.S. Government. These limits are part of comprehensive guidelines and establish permitted levels of RF
energy for the general population. The guidelines are based on standards that were developed by independent
scientific organizations through periodic and thorough evaluation of scientific studies. The standards include a
substantial safety margin designed to assure the safety of all persons, regardless of age and health.
The exposure standard for wireless mobile phones employs a unit of measurement known as the Specific
Absorption Rate, or SAR. The SAR limit set by the FCC is 1.6W/kg.* Tests for SAR are conducted using standard
operating positions specified by the FCC with the phone transmitting at its highest certified power level in all tested
frequency bands. Although the SAR is determined at the highest certified power level, the actual SAR level of the
phone while operating can be well below the maximum value. This is because the phone is designed to operate at
multiple power levels so as to use only the power required to reach the network. In general, the closer you are to a
wireless base station antenna, the lower the power output.
Before a phone model is available for sale to the public, it must be tested and certified to the FCC that it does not
exceed the limit established by the government-adopted requirement for safe exposure. The tests are performed
in positions and locations (e.g., at the ear and worn on the body) as required by the FCC for each model. The
highest SAR value for this model phone when tested for use at the ear is 1.33 W/kg and when worn on the body,
as described in this user guide, is 0.77 W/kg. (Body-worn measurements differ among phone models, depending
upon available accessories and FCC requirements). While there may be differences between the SAR levels of
various phones and at various positions, they all meet the government requirement for safe exposure.
The FCC has granted an Equipment Authorization for this model phone with all reported SAR levels evaluated as
in compliance with the FCC RF emission guidelines. SAR information on this model phone is on file with the FCC
and can be found under the Display Grant section of http://www.fcc.gov/oet/fccid
OVFKWC-2135.
Additional information on Specific Absorption Rates (SAR) can be found on the Cellular Telecommunications
Industry Association (CTIA) web-site at=http://www.wow-com.com.
* In the United States and Canada, the SAR limit for mobile phones used by the public is 1.6 watts/kg (W/kg)
averaged over one gram of tissue. The standard incorporates a substantial margin of safety to give additional
protection for the public and to account for any variations in measurements.
after searching on FCC ID
Page 5

Caution
The user is cautioned that changes or modifications not
expressly approved by the party responsible for
compliance could void the warranty and user’s authority
to operate the equipment.
Warning
Use only Kyocera approved accessories with Kyocera
phones. Use of any unauthorized accessories may be
dangerous and will invalidate the phone warranty if said
accessories cause damage or a defect to the phone.
Optimize your phone’s performance
Use the guidelines on pages and 10 to learn how to
optimize the performance and life of your phone,
antenna, and battery.
Air bags
If you have an air bag, DO NOT place installed or
portable phone equipment or other objects over the air
bag or in the air bag deployment area. If equipment is
not properly installed, you and your passengers risk
serious injury.
Potentially unsafe areas
Posted facilities–Turn your phone off in any facility
when posted notices require you to do so.
Aircraft–FCC regulations prohibit using your phone on a
plane that is in the air. Turn your phone off before
boarding aircraft.
Vehicles–RF signals may affect improperly installed or
inadequately shielded electronic systems in motor
vehicles. Check with the manufacturer of the device to
determine if it is adequately shielded from external RF
energy. Your physician may be able to help you obtain
this information.
Blasting areas–Turn off your phone where blasting is in
progress. Observe restrictions, and follow any
regulations or rules.
Potentially explosive atmospheres–Turn off your
phone when you are in any area with a potentially
explosive atmosphere. Obey all signs and instructions.
Sparks in such areas could cause an explosion or fire,
resulting in bodily injury or death.
Areas with a potentially explosive atmosphere are often,
but not always, clearly marked. They include:
• fueling areas such as gas stations
• below deck on boats
• transfer or storage facilities for fuel or chemicals
• vehicles using liquefied petroleum gas, such as
propane or butane
• areas where the air contains chemicals or particles
such as grain, dust, or metal powders
• any other area where you would normally be
advised to turn off your vehicle engine
Use with care
Use only in normal position (to ear). Don’t bend the
antenna or touch it unnecessarily. Pull out the antenna
when on a call and push it in when the phone is not in
use. Avoid dropping, hitting, bending, or sitting on the
phone.
Keep phone dry
If the phone gets wet, turn the power off immediately and
return it to the dealer for service.
Resetting the phone
If the screen seems frozen and the keypad does not
respond to keypresses, reset the phone by completing
the following steps (see page 1 for detailed instructions):
• Remove the battery door.
• Remove and replace the battery.
If the problem persists, call your service provider for
assistance.
Qualified service
Your service provider can help you if you are
experiencing problems with your phone.
If you have additional questions, contact your service
provider for technical support. If the problem persists,
return the phone with all accessories and packaging to
the dealer for qualified service.
Accessories
Use only Kyocera-approved accessories with Kyocera
phones. Use of any unauthorized accessories may be
dangerous and will invalidate the phone warranty if said
accessories cause damage or a defect to the phone.
To shop online for a Hands-free Car Kit and other phone
accessories, visit www.kyocera-wireless.com/store.
To order by phone, call (800) 211-1537 (U.S.A. only) or
(510) 683-4004.
Radio frequency (RF) energy
Your telephone is a radio transmitter and receiver. When
it is on, it receives and sends out RF energy. Your
service provider’s network controls the power of the RF
signal. This power level can range from 0.006 to 0.6
watts.
In August 1996, the U.S. Federal Communications
Commission (FCC) adopted RF exposure guidelines
with safety levels for hand-held wireless phones. These
guidelines are consistent with the safety standards
previously set by both U.S. and international standards
bodies in the following reports:
• ANSI C95.1 (American National Standards Institute,
1992)
• NCRP Report 86 (National Council on Radiation
Protection and Measurements, 1986)
• ICNIRP (International Commission on Non-Ionizing
Radiation Protection, 1996)
Your phone complies with the standards set by these
reports and the FCC guidelines.
Kyocera Wireless Corp.
10300 Campus Point Drive, San Diego, CA 92121
U.S.A.
Visit us at www.kyocera-wireless.com
To purchase accessories, visit
www.kyocera-wireless.com/store
Page 6

Page 7

`зенЙенл
`Ь~йнЙк=NФdЙннбеЦ=pн~кнЙЗ=K=K=K=K=K=K=K=K=K=K=K=K=K=K=K=K=K=K=K=K=K=K=K=K=K=K=K=K=K=K=K=K=K=K=K=K=K=K=K=K=K=K=K=K=K=K=K=K=K=K=K=K=K=K=K=K=K=K=K=K=K=K=K=K=K=K=K=K=K=KN
What to Do First . . . . . . . . . . . . . . . . . . . . . . . . . . . . . . . . . . . . . . . . . . . . . . . . . . . . . . . . . . . . . . 2
To Install the Battery . . . . . . . . . . . . . . . . . . . . . . . . . . . . . . . . . . . . . . . . . . . . . . . . . . . . . . . . . . 2
To Charge the Battery . . . . . . . . . . . . . . . . . . . . . . . . . . . . . . . . . . . . . . . . . . . . . . . . . . . . . . . . . 3
Parts of Your Phone . . . . . . . . . . . . . . . . . . . . . . . . . . . . . . . . . . . . . . . . . . . . . . . . . . . . . . . . . . . 4
Screen Icons . . . . . . . . . . . . . . . . . . . . . . . . . . . . . . . . . . . . . . . . . . . . . . . . . . . . . . . . . . . . . . . . . 5
Menus . . . . . . . . . . . . . . . . . . . . . . . . . . . . . . . . . . . . . . . . . . . . . . . . . . . . . . . . . . . . . . . . . . . . . . 6
Your phone’s menus . . . . . . . . . . . . . . . . . . . . . . . . . . . . . . . . . . . . . . . . . . . . . . . . . . . . . . . 6
Using your phone’s menus. . . . . . . . . . . . . . . . . . . . . . . . . . . . . . . . . . . . . . . . . . . . . . . . . . . 7
Basic Functions. . . . . . . . . . . . . . . . . . . . . . . . . . . . . . . . . . . . . . . . . . . . . . . . . . . . . . . . . . . . . . . 8
To turn on the phone. . . . . . . . . . . . . . . . . . . . . . . . . . . . . . . . . . . . . . . . . . . . . . . . . . . . . . . 8
To turn off the phone . . . . . . . . . . . . . . . . . . . . . . . . . . . . . . . . . . . . . . . . . . . . . . . . . . . . . . 8
To find your phone number . . . . . . . . . . . . . . . . . . . . . . . . . . . . . . . . . . . . . . . . . . . . . . . . . 8
To make a call . . . . . . . . . . . . . . . . . . . . . . . . . . . . . . . . . . . . . . . . . . . . . . . . . . . . . . . . . . . . 8
To end a call . . . . . . . . . . . . . . . . . . . . . . . . . . . . . . . . . . . . . . . . . . . . . . . . . . . . . . . . . . . . . . 8
To answer a call . . . . . . . . . . . . . . . . . . . . . . . . . . . . . . . . . . . . . . . . . . . . . . . . . . . . . . . . . . . 8
To silence the ringer or alert . . . . . . . . . . . . . . . . . . . . . . . . . . . . . . . . . . . . . . . . . . . . . . . . . 8
To mute or unmute a call. . . . . . . . . . . . . . . . . . . . . . . . . . . . . . . . . . . . . . . . . . . . . . . . . . . . 9
To adjust the earpiece volume. . . . . . . . . . . . . . . . . . . . . . . . . . . . . . . . . . . . . . . . . . . . . . . . 9
To access voicemail . . . . . . . . . . . . . . . . . . . . . . . . . . . . . . . . . . . . . . . . . . . . . . . . . . . . . . . . 9
To lock the keypad . . . . . . . . . . . . . . . . . . . . . . . . . . . . . . . . . . . . . . . . . . . . . . . . . . . . . . . 10
To unlock the keypad . . . . . . . . . . . . . . . . . . . . . . . . . . . . . . . . . . . . . . . . . . . . . . . . . . . . . 10
Where to Get More Information . . . . . . . . . . . . . . . . . . . . . . . . . . . . . . . . . . . . . . . . . . . . . . . . 11
`Ь~йнЙк=OФ_~ннЙку= K=K=K=K=K=K=K=K=K=K=K=K=K=K=K=K=K=K=K=K=K=K=K=K=K=K=K=K=K=K=K=K=K=K=K=K=K=K=K=K=K=K=K=K=K=K=K=K=K=K=K=K=K=K=K=K=K=K=K=K=K=K=K=K=K=K=K=K=K=K=K=K=K=K=K=K NO
To Install the Battery . . . . . . . . . . . . . . . . . . . . . . . . . . . . . . . . . . . . . . . . . . . . . . . . . . . . . . . . . 13
To Charge the Battery . . . . . . . . . . . . . . . . . . . . . . . . . . . . . . . . . . . . . . . . . . . . . . . . . . . . . . . . 14
Making Calls while Charging . . . . . . . . . . . . . . . . . . . . . . . . . . . . . . . . . . . . . . . . . . . . . . . . 14
Charging Accessories . . . . . . . . . . . . . . . . . . . . . . . . . . . . . . . . . . . . . . . . . . . . . . . . . . . . . . 14
To Remove the Battery . . . . . . . . . . . . . . . . . . . . . . . . . . . . . . . . . . . . . . . . . . . . . . . . . . . . . . . . 15
Power Save Mode . . . . . . . . . . . . . . . . . . . . . . . . . . . . . . . . . . . . . . . . . . . . . . . . . . . . . . . . . . . . 16
Battery Guidelines . . . . . . . . . . . . . . . . . . . . . . . . . . . . . . . . . . . . . . . . . . . . . . . . . . . . . . . . . . . 16
Tips for Improving Battery Performance . . . . . . . . . . . . . . . . . . . . . . . . . . . . . . . . . . . . . . . . . . 17
`Ь~йнЙк=PФ`~ддбеЦ= K=K=K=K=K=K=K=K=K=K=K=K=K=K=K=K=K=K=K=K=K=K=K=K=K=K=K=K=K=K=K=K=K=K=K=K=K=K=K=K=K=K=K=K=K=K=K=K=K=K=K=K=K=K=K=K=K=K=K=K=K=K=K=K=K=K=K=K=K=K=K=K=K=K=K=K NU
Speed Dialing . . . . . . . . . . . . . . . . . . . . . . . . . . . . . . . . . . . . . . . . . . . . . . . . . . . . . . . . . . . . . . . 19
To assign a speed dialing location . . . . . . . . . . . . . . . . . . . . . . . . . . . . . . . . . . . . . . . . . . . . 19
To speed dial a number . . . . . . . . . . . . . . . . . . . . . . . . . . . . . . . . . . . . . . . . . . . . . . . . . . . . 20
To remove a speed dialing location . . . . . . . . . . . . . . . . . . . . . . . . . . . . . . . . . . . . . . . . . . . 20
1-Touch Dialing . . . . . . . . . . . . . . . . . . . . . . . . . . . . . . . . . . . . . . . . . . . . . . . . . . . . . . . . . . . . . 20
To enable 1-Touch Dialing . . . . . . . . . . . . . . . . . . . . . . . . . . . . . . . . . . . . . . . . . . . . . . . . . . 20
To use 1-Touch Dialing . . . . . . . . . . . . . . . . . . . . . . . . . . . . . . . . . . . . . . . . . . . . . . . . . . . . 21
Redialing the Last Number Called . . . . . . . . . . . . . . . . . . . . . . . . . . . . . . . . . . . . . . . . . . . . . . . 21
Reviewing Recent Calls . . . . . . . . . . . . . . . . . . . . . . . . . . . . . . . . . . . . . . . . . . . . . . . . . . . . . . . 21
Types of calls . . . . . . . . . . . . . . . . . . . . . . . . . . . . . . . . . . . . . . . . . . . . . . . . . . . . . . . . . . . . 21
= îáá
Page 8

To view the Recent Calls list . . . . . . . . . . . . . . . . . . . . . . . . . . . . . . . . . . . . . . . . . . . . . . . . 22
To dial from the Recent Calls list . . . . . . . . . . . . . . . . . . . . . . . . . . . . . . . . . . . . . . . . . . . . . 22
Call types . . . . . . . . . . . . . . . . . . . . . . . . . . . . . . . . . . . . . . . . . . . . . . . . . . . . . . . . . . . . . . . 22
`Ü~éíÉê=QÔ`çåí~Åíë= =K=K=K=K=K=K=K=K=K=K=K=K=K=K=K=K=K=K=K=K=K=K=K=K=K=K=K=K=K=K=K=K=K=K=K=K=K=K=K=K=K=K=K=K=K=K=K=K=K=K=K=K=K=K=K=K=K=K=K=K=K=K=K=K=K=K=K=K=K=K=K=K=K=K OP
Entering Text . . . . . . . . . . . . . . . . . . . . . . . . . . . . . . . . . . . . . . . . . . . . . . . . . . . . . . . . . . . . . . . 24
To change text entry modes . . . . . . . . . . . . . . . . . . . . . . . . . . . . . . . . . . . . . . . . . . . . . . . . 24
To change capitalization modes. . . . . . . . . . . . . . . . . . . . . . . . . . . . . . . . . . . . . . . . . . . . . . 25
To use normal text entry mode. . . . . . . . . . . . . . . . . . . . . . . . . . . . . . . . . . . . . . . . . . . . . . 25
To use Text Input rapid text entry mode . . . . . . . . . . . . . . . . . . . . . . . . . . . . . . . . . . . . . . 25
To enter symbols . . . . . . . . . . . . . . . . . . . . . . . . . . . . . . . . . . . . . . . . . . . . . . . . . . . . . . . . . 27
To enter numbers. . . . . . . . . . . . . . . . . . . . . . . . . . . . . . . . . . . . . . . . . . . . . . . . . . . . . . . . . 27
To change language and enter special characters . . . . . . . . . . . . . . . . . . . . . . . . . . . . . . . . 28
Working with Contact Cards . . . . . . . . . . . . . . . . . . . . . . . . . . . . . . . . . . . . . . . . . . . . . . . . . . . 29
To save a phone number from the home screen . . . . . . . . . . . . . . . . . . . . . . . . . . . . . . . . . 29
To save a phone number through the Contacts directory. . . . . . . . . . . . . . . . . . . . . . . . . . 30
To open a saved contact card . . . . . . . . . . . . . . . . . . . . . . . . . . . . . . . . . . . . . . . . . . . . . . . 32
To edit a contact card . . . . . . . . . . . . . . . . . . . . . . . . . . . . . . . . . . . . . . . . . . . . . . . . . . . . . 32
To erase information from a contact card . . . . . . . . . . . . . . . . . . . . . . . . . . . . . . . . . . . . . . 34
To call from the Contacts directory . . . . . . . . . . . . . . . . . . . . . . . . . . . . . . . . . . . . . . . . . . . 35
`Ь~йнЙк=RФpЙннбеЦл= K=K=K=K=K=K=K=K=K=K=K=K=K=K=K=K=K=K=K=K=K=K=K=K=K=K=K=K=K=K=K=K=K=K=K=K=K=K=K=K=K=K=K=K=K=K=K=K=K=K=K=K=K=K=K=K=K=K=K=K=K=K=K=K=K=K=K=K=K=K=K=K=K=K=K PS
Silence All. . . . . . . . . . . . . . . . . . . . . . . . . . . . . . . . . . . . . . . . . . . . . . . . . . . . . . . . . . . . . . . . . . 38
To silence the ringer or alert . . . . . . . . . . . . . . . . . . . . . . . . . . . . . . . . . . . . . . . . . . . . . . . . 38
To change the vibration, backlight, or silent ringer setting. . . . . . . . . . . . . . . . . . . . . . . . . 38
Keyguard . . . . . . . . . . . . . . . . . . . . . . . . . . . . . . . . . . . . . . . . . . . . . . . . . . . . . . . . . . . . . . . . . . 39
To turn keyguard on . . . . . . . . . . . . . . . . . . . . . . . . . . . . . . . . . . . . . . . . . . . . . . . . . . . . . . 39
To turn keyguard off . . . . . . . . . . . . . . . . . . . . . . . . . . . . . . . . . . . . . . . . . . . . . . . . . . . . . . 39
Sounds . . . . . . . . . . . . . . . . . . . . . . . . . . . . . . . . . . . . . . . . . . . . . . . . . . . . . . . . . . . . . . . . . . . . 40
Display . . . . . . . . . . . . . . . . . . . . . . . . . . . . . . . . . . . . . . . . . . . . . . . . . . . . . . . . . . . . . . . . . . . . 42
Security. . . . . . . . . . . . . . . . . . . . . . . . . . . . . . . . . . . . . . . . . . . . . . . . . . . . . . . . . . . . . . . . . . . . 44
To lock and unlock the phone . . . . . . . . . . . . . . . . . . . . . . . . . . . . . . . . . . . . . . . . . . . . . . . 44
To limit calls out . . . . . . . . . . . . . . . . . . . . . . . . . . . . . . . . . . . . . . . . . . . . . . . . . . . . . . . . . 44
To change your lock code . . . . . . . . . . . . . . . . . . . . . . . . . . . . . . . . . . . . . . . . . . . . . . . . . . 44
To erase all contacts. . . . . . . . . . . . . . . . . . . . . . . . . . . . . . . . . . . . . . . . . . . . . . . . . . . . . . . 44
To erase recent calls. . . . . . . . . . . . . . . . . . . . . . . . . . . . . . . . . . . . . . . . . . . . . . . . . . . . . . . 45
To reset the phone . . . . . . . . . . . . . . . . . . . . . . . . . . . . . . . . . . . . . . . . . . . . . . . . . . . . . . . . 45
Call Information . . . . . . . . . . . . . . . . . . . . . . . . . . . . . . . . . . . . . . . . . . . . . . . . . . . . . . . . . . . . . 46
Recent Calls Timer . . . . . . . . . . . . . . . . . . . . . . . . . . . . . . . . . . . . . . . . . . . . . . . . . . . . . . . . 46
All Calls Timer . . . . . . . . . . . . . . . . . . . . . . . . . . . . . . . . . . . . . . . . . . . . . . . . . . . . . . . . . . . 46
Browser Timer . . . . . . . . . . . . . . . . . . . . . . . . . . . . . . . . . . . . . . . . . . . . . . . . . . . . . . . . . . . 46
Network . . . . . . . . . . . . . . . . . . . . . . . . . . . . . . . . . . . . . . . . . . . . . . . . . . . . . . . . . . . . . . . . . . . 47
To select digital or analog mode . . . . . . . . . . . . . . . . . . . . . . . . . . . . . . . . . . . . . . . . . . . . . 47
Roam Option . . . . . . . . . . . . . . . . . . . . . . . . . . . . . . . . . . . . . . . . . . . . . . . . . . . . . . . . . . . . 47
Roam/Service Alert. . . . . . . . . . . . . . . . . . . . . . . . . . . . . . . . . . . . . . . . . . . . . . . . . . . . . . . . 47
Privacy Alert . . . . . . . . . . . . . . . . . . . . . . . . . . . . . . . . . . . . . . . . . . . . . . . . . . . . . . . . . . . . . 47
Data/Fax Calls In . . . . . . . . . . . . . . . . . . . . . . . . . . . . . . . . . . . . . . . . . . . . . . . . . . . . . . . . . 48
Extras . . . . . . . . . . . . . . . . . . . . . . . . . . . . . . . . . . . . . . . . . . . . . . . . . . . . . . . . . . . . . . . . . . . . . 49
1-Touch Dialing . . . . . . . . . . . . . . . . . . . . . . . . . . . . . . . . . . . . . . . . . . . . . . . . . . . . . . . . . . 49
Browser Prompt . . . . . . . . . . . . . . . . . . . . . . . . . . . . . . . . . . . . . . . . . . . . . . . . . . . . . . . . . . 49
Messaging . . . . . . . . . . . . . . . . . . . . . . . . . . . . . . . . . . . . . . . . . . . . . . . . . . . . . . . . . . . . . . . . . . 50
îááá oЙСЙкЙеЕЙ=dмбЗЙ=Сзк=нЬЙ=n`m=ONMM=pЙкбЙл=mЬзеЙл
Page 9

To change your voicemail number . . . . . . . . . . . . . . . . . . . . . . . . . . . . . . . . . . . . . . . . . . . 50
To erase messages automatically . . . . . . . . . . . . . . . . . . . . . . . . . . . . . . . . . . . . . . . . . . . . . 50
Alerts . . . . . . . . . . . . . . . . . . . . . . . . . . . . . . . . . . . . . . . . . . . . . . . . . . . . . . . . . . . . . . . . . . . . . 51
Accessories . . . . . . . . . . . . . . . . . . . . . . . . . . . . . . . . . . . . . . . . . . . . . . . . . . . . . . . . . . . . . . . . . 52
Power Backlighting . . . . . . . . . . . . . . . . . . . . . . . . . . . . . . . . . . . . . . . . . . . . . . . . . . . . . . . 52
Headset Ringing . . . . . . . . . . . . . . . . . . . . . . . . . . . . . . . . . . . . . . . . . . . . . . . . . . . . . . . . . . 52
Auto-Answer. . . . . . . . . . . . . . . . . . . . . . . . . . . . . . . . . . . . . . . . . . . . . . . . . . . . . . . . . . . . . 52
`Ü~éíÉê=SÔjÉëë~ÖÉë= K=K=K=K=K=K=K=K=K=K=K=K=K=K=K=K=K=K=K=K=K=K=K=K=K=K=K=K=K=K=K=K=K=K=K=K=K=K=K=K=K=K=K=K=K=K=K=K=K=K=K=K=K=K=K=K=K=K=K=K=K=K=K=K=K=K=K=K=K=K=K=K=KRP
Entering Text . . . . . . . . . . . . . . . . . . . . . . . . . . . . . . . . . . . . . . . . . . . . . . . . . . . . . . . . . . . . . . . 54
To change text entry modes . . . . . . . . . . . . . . . . . . . . . . . . . . . . . . . . . . . . . . . . . . . . . . . . 54
To change capitalization modes. . . . . . . . . . . . . . . . . . . . . . . . . . . . . . . . . . . . . . . . . . . . . . 55
To use normal text entry mode. . . . . . . . . . . . . . . . . . . . . . . . . . . . . . . . . . . . . . . . . . . . . . 55
To use Text Input rapid text entry mode . . . . . . . . . . . . . . . . . . . . . . . . . . . . . . . . . . . . . . 55
To enter symbols . . . . . . . . . . . . . . . . . . . . . . . . . . . . . . . . . . . . . . . . . . . . . . . . . . . . . . . . . 57
To enter numbers. . . . . . . . . . . . . . . . . . . . . . . . . . . . . . . . . . . . . . . . . . . . . . . . . . . . . . . . . 57
To change language and enter special characters . . . . . . . . . . . . . . . . . . . . . . . . . . . . . . . . 58
About Text Messages . . . . . . . . . . . . . . . . . . . . . . . . . . . . . . . . . . . . . . . . . . . . . . . . . . . . . . . . . 58
Retrieving Messages . . . . . . . . . . . . . . . . . . . . . . . . . . . . . . . . . . . . . . . . . . . . . . . . . . . . . . . . . . 59
To check voicemail from the New Messages alert screen . . . . . . . . . . . . . . . . . . . . . . . . . . 59
To check voicemail from the home screen . . . . . . . . . . . . . . . . . . . . . . . . . . . . . . . . . . . . . 59
To check text messages from the New Messages alert screen . . . . . . . . . . . . . . . . . . . . . . 60
To check text messages from the home screen. . . . . . . . . . . . . . . . . . . . . . . . . . . . . . . . . . 60
Sending Text Messages. . . . . . . . . . . . . . . . . . . . . . . . . . . . . . . . . . . . . . . . . . . . . . . . . . . . . . . . 61
To send a new message . . . . . . . . . . . . . . . . . . . . . . . . . . . . . . . . . . . . . . . . . . . . . . . . . . . . 61
To send a preset message (AutoMsg). . . . . . . . . . . . . . . . . . . . . . . . . . . . . . . . . . . . . . . . . . 62
To send a saved message . . . . . . . . . . . . . . . . . . . . . . . . . . . . . . . . . . . . . . . . . . . . . . . . . . . 63
Message Delivery Options . . . . . . . . . . . . . . . . . . . . . . . . . . . . . . . . . . . . . . . . . . . . . . . . . . . . . 64
To add a callback number to a message. . . . . . . . . . . . . . . . . . . . . . . . . . . . . . . . . . . . . . . . 64
To send a message at a scheduled time . . . . . . . . . . . . . . . . . . . . . . . . . . . . . . . . . . . . . . . . 64
Erasing Messages . . . . . . . . . . . . . . . . . . . . . . . . . . . . . . . . . . . . . . . . . . . . . . . . . . . . . . . . . . . . 65
To erase messages automatically . . . . . . . . . . . . . . . . . . . . . . . . . . . . . . . . . . . . . . . . . . . . . 65
To erase messages one at a time . . . . . . . . . . . . . . . . . . . . . . . . . . . . . . . . . . . . . . . . . . . . . 65
Additional information about message status . . . . . . . . . . . . . . . . . . . . . . . . . . . . . . . . . . . 65
Changing Your Voicemail Speed Dialing Location . . . . . . . . . . . . . . . . . . . . . . . . . . . . . . . . . . 67
Alerts . . . . . . . . . . . . . . . . . . . . . . . . . . . . . . . . . . . . . . . . . . . . . . . . . . . . . . . . . . . . . . . . . . . . . 68
Troubleshooting Messages . . . . . . . . . . . . . . . . . . . . . . . . . . . . . . . . . . . . . . . . . . . . . . . . . . . . . 69
Memory . . . . . . . . . . . . . . . . . . . . . . . . . . . . . . . . . . . . . . . . . . . . . . . . . . . . . . . . . . . . . . . . 69
If you cannot send messages . . . . . . . . . . . . . . . . . . . . . . . . . . . . . . . . . . . . . . . . . . . . . . . . 69
`Ü~éíÉê=TÔqççäë= =K=K=K=K=K=K=K=K=K=K=K=K=K=K=K=K=K=K=K=K=K=K=K=K=K=K=K=K=K=K=K=K=K=K=K=K=K=K=K=K=K=K=K=K=K=K=K=K=K=K=K=K=K=K=K=K=K=K=K=K=K=K=K=K=K=K=K=K=K=K=K=K=K=K=K=K=K TM
Alarm Clock . . . . . . . . . . . . . . . . . . . . . . . . . . . . . . . . . . . . . . . . . . . . . . . . . . . . . . . . . . . . . . . . 71
Tip Calculator. . . . . . . . . . . . . . . . . . . . . . . . . . . . . . . . . . . . . . . . . . . . . . . . . . . . . . . . . . . . . . . 72
Calculator . . . . . . . . . . . . . . . . . . . . . . . . . . . . . . . . . . . . . . . . . . . . . . . . . . . . . . . . . . . . . . . . . . 73
Countdown Timer . . . . . . . . . . . . . . . . . . . . . . . . . . . . . . . . . . . . . . . . . . . . . . . . . . . . . . . . . . . 74
Stopwatch . . . . . . . . . . . . . . . . . . . . . . . . . . . . . . . . . . . . . . . . . . . . . . . . . . . . . . . . . . . . . . . . . 75
Brick Attack™ . . . . . . . . . . . . . . . . . . . . . . . . . . . . . . . . . . . . . . . . . . . . . . . . . . . . . . . . . . . . . . 76
`Ь~йнЙк=UФtЙД=_кзплЙк= K=K=K=K=K=K=K=K=K=K=K=K=K=K=K=K=K=K=K=K=K=K=K=K=K=K=K=K=K=K=K=K=K=K=K=K=K=K=K=K=K=K=K=K=K=K=K=K=K=K=K=K=K=K=K=K= K=K=K=K=K=K=K=K=K=K=K=K=K=KTT
Using the Web Browser . . . . . . . . . . . . . . . . . . . . . . . . . . . . . . . . . . . . . . . . . . . . . . . . . . . . . . . 78
= áñ
Page 10

To start the Web Browser . . . . . . . . . . . . . . . . . . . . . . . . . . . . . . . . . . . . . . . . . . . . . . . . . . 78
To navigate in the Web Browser . . . . . . . . . . . . . . . . . . . . . . . . . . . . . . . . . . . . . . . . . . . . . 78
Web Browser options . . . . . . . . . . . . . . . . . . . . . . . . . . . . . . . . . . . . . . . . . . . . . . . . . . . . . 78
To exit the Web Browser. . . . . . . . . . . . . . . . . . . . . . . . . . . . . . . . . . . . . . . . . . . . . . . . . . . 79
Other Web Services . . . . . . . . . . . . . . . . . . . . . . . . . . . . . . . . . . . . . . . . . . . . . . . . . . . . . . . . . . 80
`Ь~йнЙк=VФcкЙимЙенду=^лвЙЗ=nмЙлнбзел= K=K=K=K=K=K=K=K=K=K=K=K=K=K=K=K=K=K=K=K=K=K=K=K=K=K=K=K=K=K=K=K=K=K=K=K=K=K=K=K=K=K=K=K=K=K=K=K=K=K=K=K=K=K=K=K=KUN
ñ oЙСЙкЙеЕЙ=dмбЗЙ=Сзк=нЬЙ=n`m=ONMM=pЙкбЙл=mЬзеЙл
Page 11

`Ü~éíÉê=N
dЙннбеЦ=pн~кнЙЗ
Congratulations on your purchase of a Kyocera 2100 Series phone. This phone contains
many features, including Web and email access, a Contacts directory which stores
names, addresses, notes and up to 200 phone numbers, multiple language options,
vibrate alert, and a full array of productivity tools, such as a calculator, alarm clock and
timer.
This document describes two 2100 Series phones:
■ the Kyocera 2135 trimode phone, with CDMA digital service at 800 MHz and 1900
MHz, and analog service at 800 MHz
■ the Kyocera 2119 single-mode phone, with CDMA digital service at 1900 MHz
This chapter introduces your Kyocera 2100 Series phone and provides an overview of
its features.
få=íÜáë=ÅÜ~éíÉê
■ What to Do First page 2
■ To Install the Battery page 2
■ To Charge the Battery page 3
■ Parts of Your Phone page 4
■ Screen Icons page 5
■ Menus page 6
■ Basic Functions page 8
■ Where to Get More Information page 11
`Ь~йнЙк=N=dЙннбеЦ=pн~кнЙЗ N
Page 12
tÜ~í=íç=aç=cáêëí
tÜ~í=íç=aç=cáêëí
The battery in your Kyocera 2100 Series phone is delivered partially charged. Before
first use, you must install the battery and fully charge it. You need the following:
■ Kyocera 2135 or Kyocera 2119 phone
■ Kyocera 2100 Series phone battery
■ AC Adapter
These items are included in your phone package.
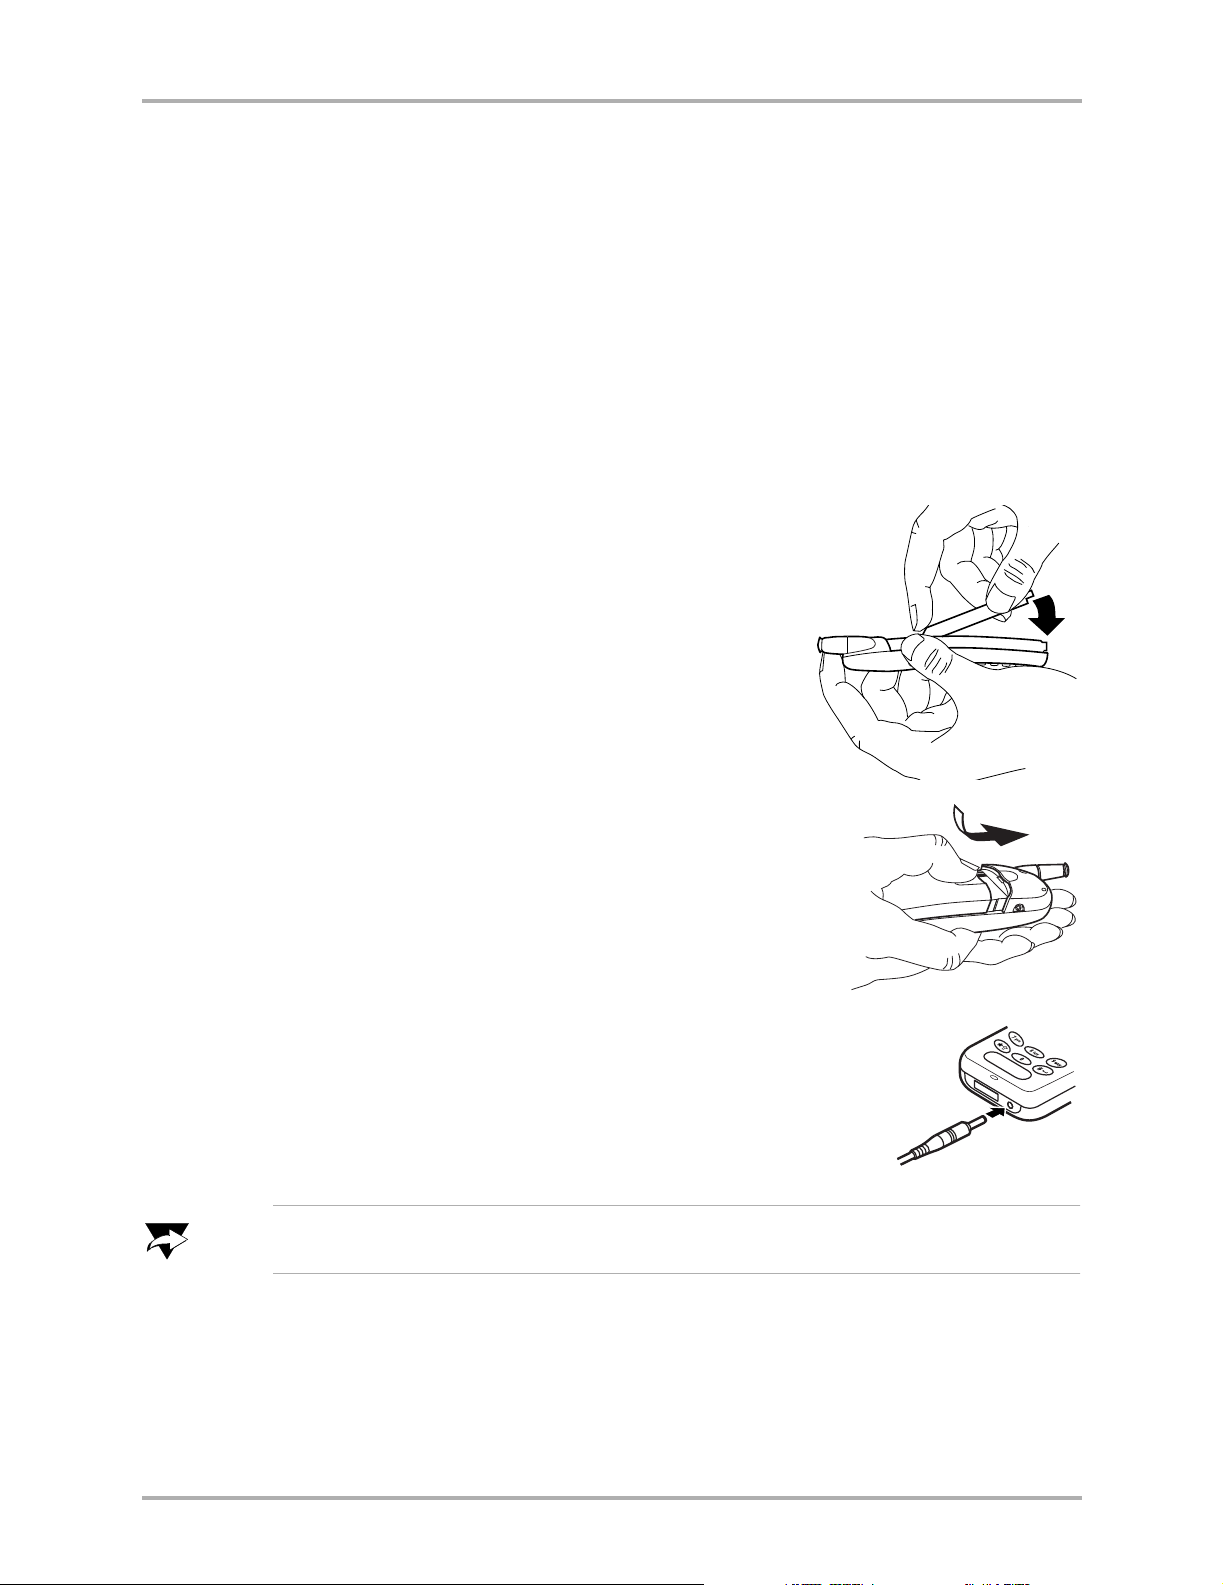
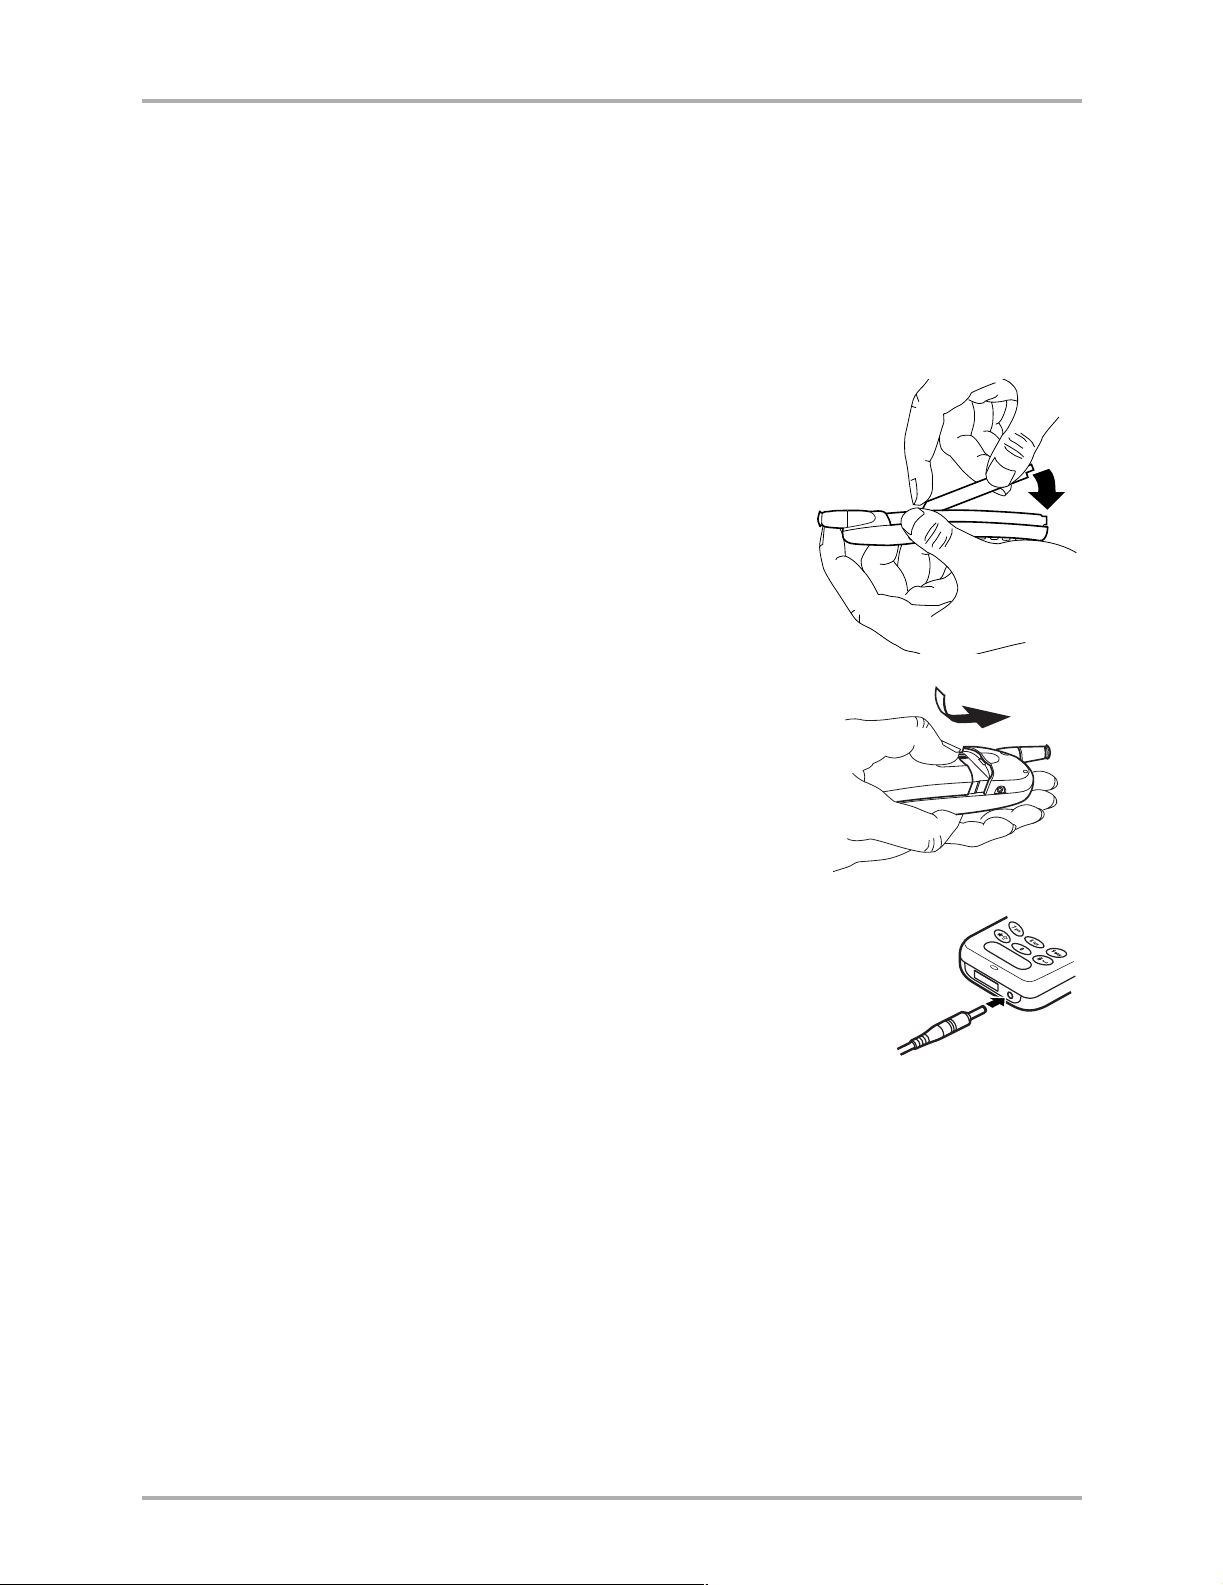
qз=fелн~дд=нЬЙ=_~ннЙку
NK Hold the phone face down.
Place the battery with the metal contacts facing
down and towards the bottom of the phone.
Align the battery door to the grooves on the side of
the phone.
kçíÉ
OK Slide the battery door on while pressing down firmly,
ensuring that the battery door clicks into place. Check
and repeat if the battery door is not aligned. Do not
force.
PK Connect the AC Adapter to the proper jack on the
bottom of the phone, then connect the adapter’s plug to a
wall outlet. Fully charge the battery before using the phone.
_ЙСзкЙ=млбеЦ=узмк=йЬзеЙI=Смдду=ЕЬ~кЦЙ=нЬЙ=Д~ннЙкуK=qз=дЙ~ке=Ьзп=нз=ЕЬ~кЦЙ=нЬЙ=Д~ннЙкуI=
лЙЙ=é~ÖÉ=PK
O rлЙкЫл=dмбЗЙ=Сзк=нЬЙ=n`m=ONMM=pЙкбЙл=mЬзеЙл
Page 13
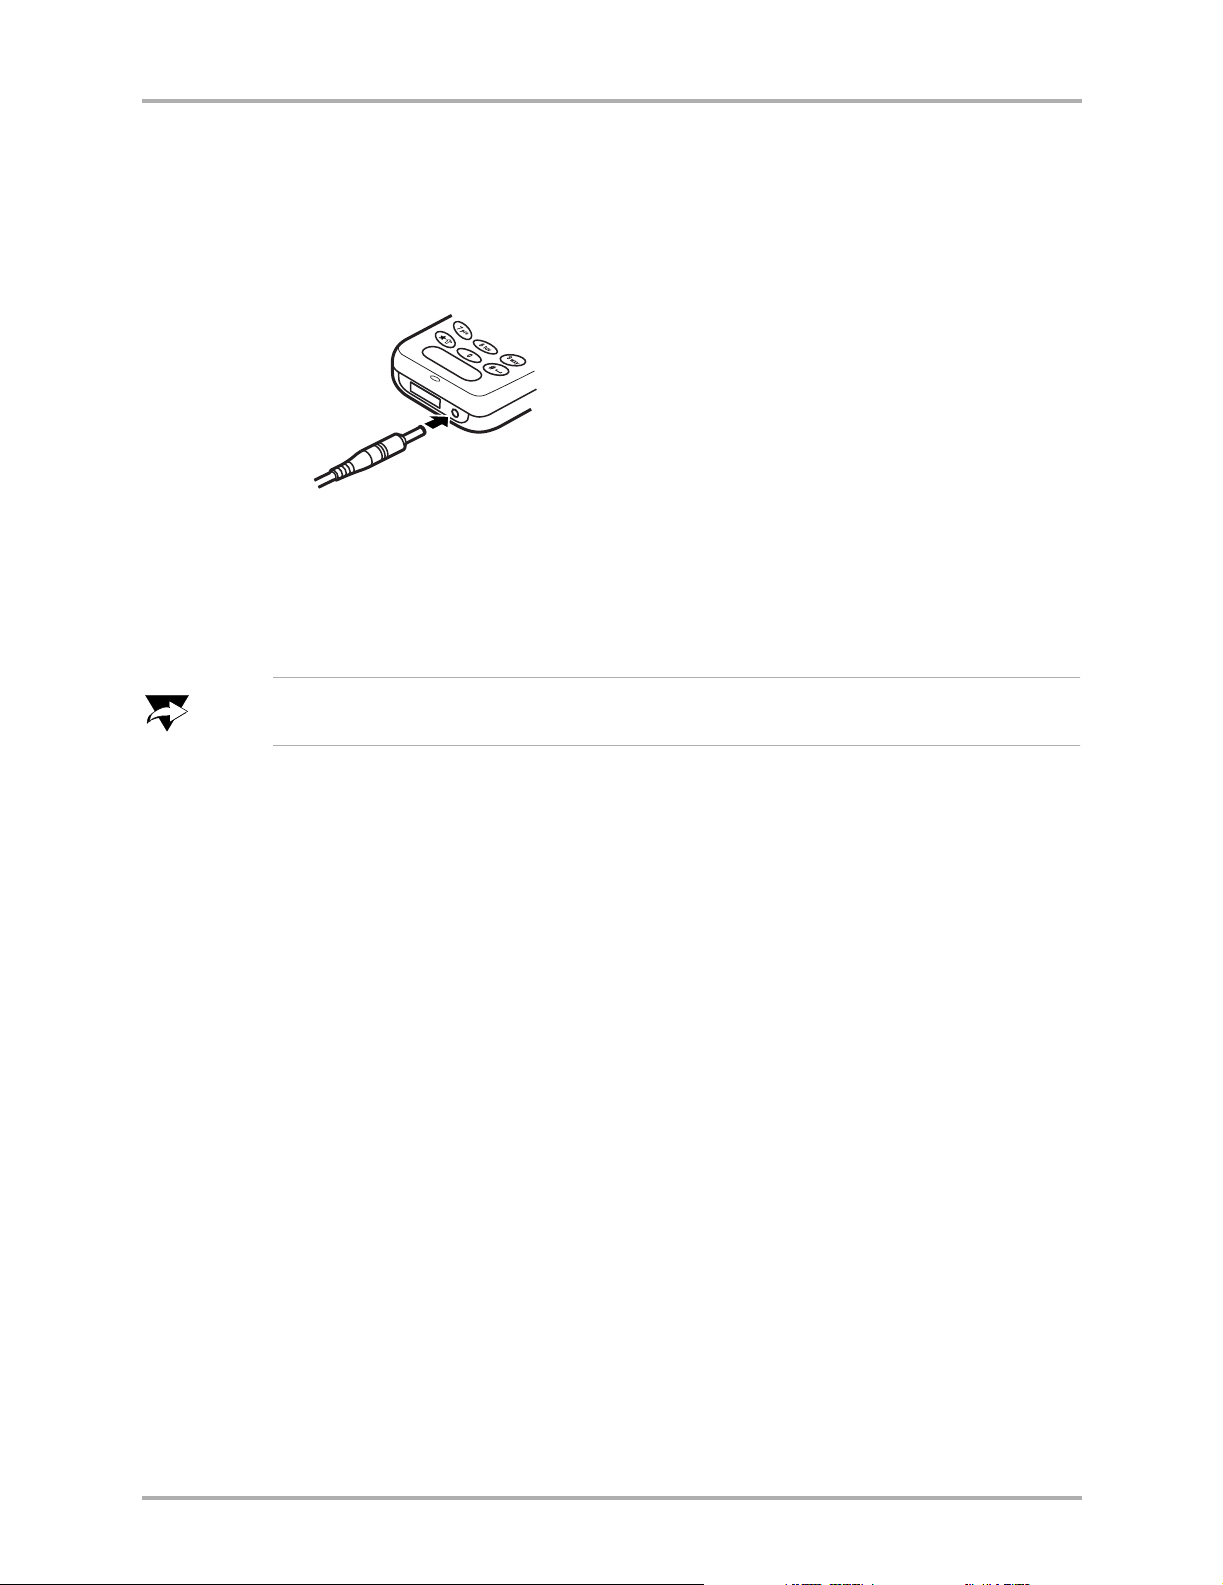
qз=`Ь~кЦЙ=нЬЙ=_~ннЙку
To charge your phone’s battery, complete the following steps.
NK Turn the phone off.
OK Connect the AC Adapter to the proper jack on the bottom of the phone as shown.
PK Connect the adapter’s plug to a wall outlet.
The battery icon is animated as the battery is charging. The battery is fully charged
when “Charging is complete” appears on the screen. You can safely recharge the
battery at any time, even if it has a partial charge.
qз=`Ь~кЦЙ=нЬЙ=_~ннЙку
kçíÉ
vзм=гмлн=Ь~оЙ=~н=дЙ~лн=~=й~кнб~д=ЕЬ~кЦЙ=бе=нЬЙ=Д~ннЙку=нз=г~вЙ=зк=кЙЕЙбоЙ=Е~ддлI=
кЙЦ~кЗдЙлл=зС=пЬЙнЬЙк=зк=езн=нЬЙ=^`=^З~йнЙк=бл=ЕзееЙЕнЙЗ=нз=нЬЙ=йЬзеЙK=
`Ь~йнЙк=N=dЙннбеЦ=pн~кнЙЗ P
Page 14
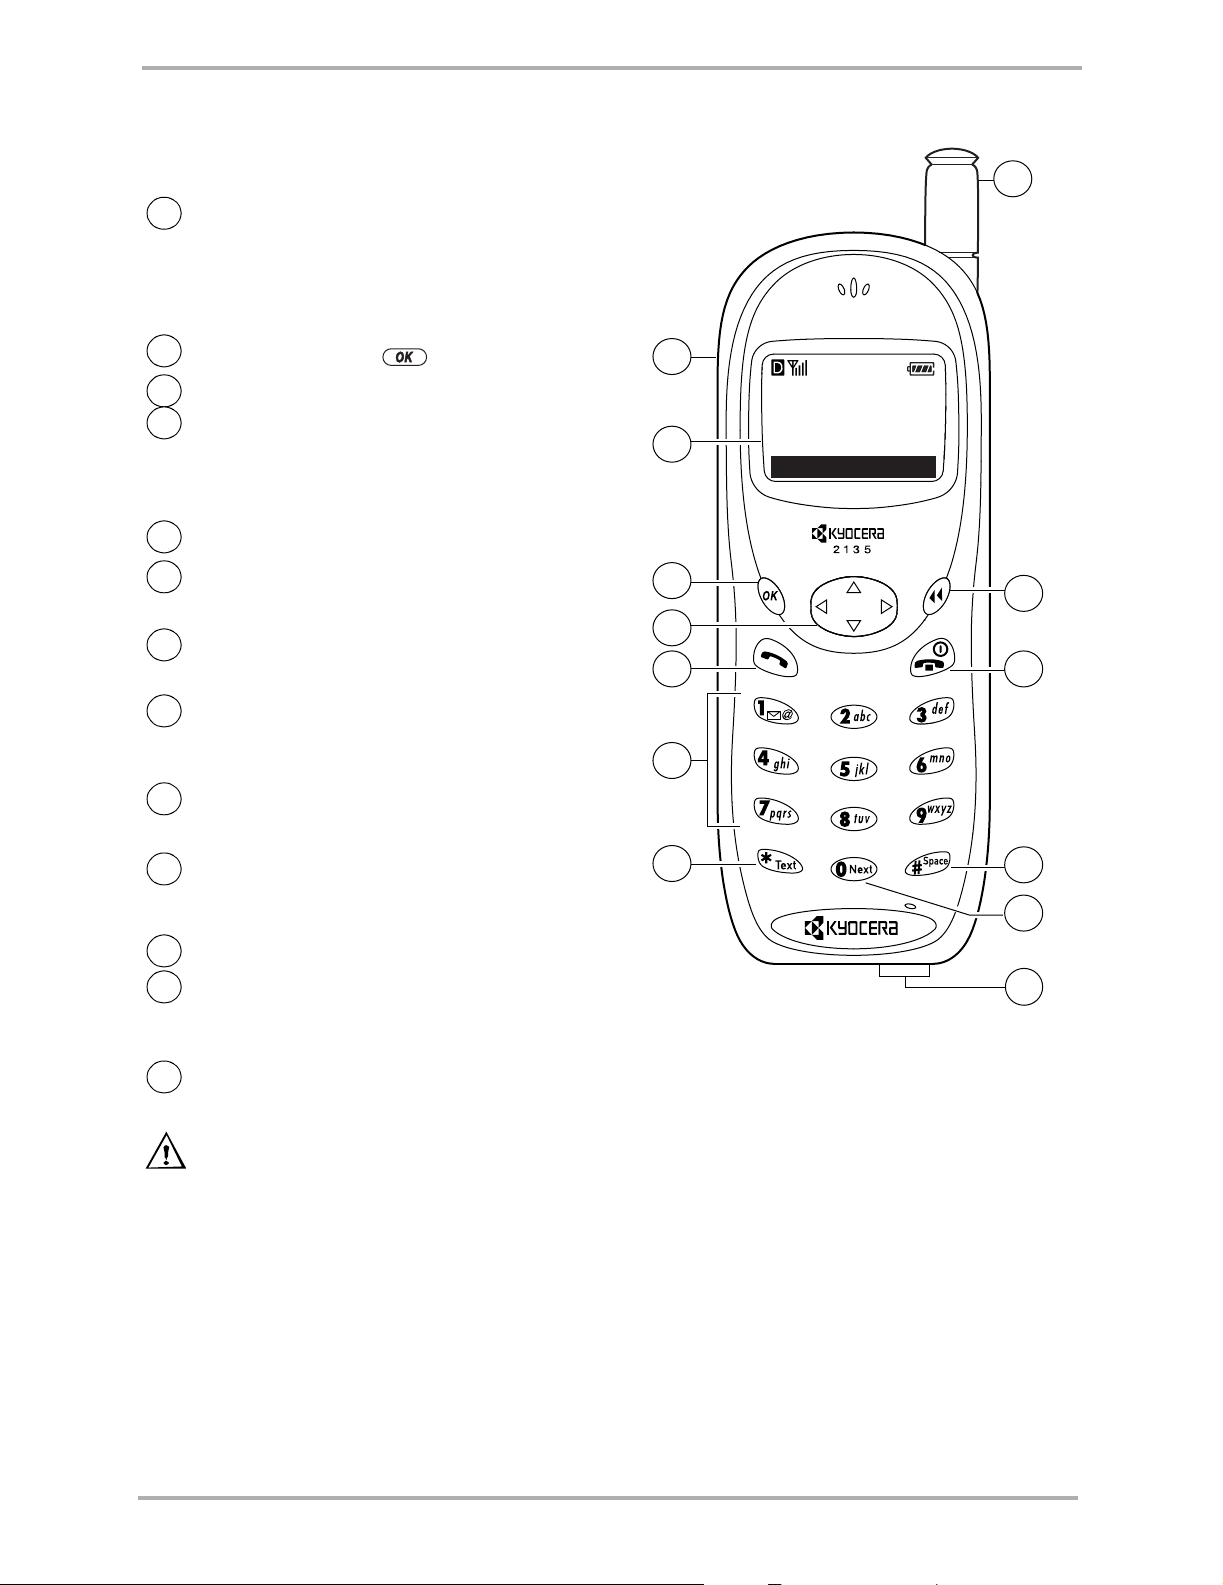
m~êíë=çÑ=vçìê=mÜçåÉ
m~êíë=çÑ=vçìê=mÜçåÉ
Jack for Hands-free headset (sold
1
separately).
t~кебеЦW=This jack is for the headset only.
Inserting an accessory into the incorrect
jack will damage the phone.
2
Home screen. Press to select
lh=âÉó selects a menu item or option.
3
k~îáÖ~íçê=âÉó adjusts volume when in a call;
4
scrolls up, down, left, or right through lists
and menus; and positions the cursor during
text entry.
5
pÉåÇLq~äâ=âÉó starts or answers a call.
Use the
6
symbols.
7
qÉñí=âÉó changes case in text entry and
cycles through text entry modes.
Extend the
8
Push in the
in use.
9
`äÉ~ê=âÉó erases the last character in text
entry, or returns to the previous menu.
âÉóé~Ç to enter numbers, letters, or
~енЙее~ to make or answer a call.
~енЙее~ when the phone is not
jÉåì.
8
1
My Phone
12:20PM 05/15
2
Menu
3
9
4
5
10
6
båÇLmçïÉê=âÉó turns on and turns off the
10
phone, ends a call, or returns to the home
screen.
11
pé~ÅÉ=âÉó enters a space during text entry.
M=âÉó cycles through word choices during
12
text entry using T9
in English only).
Jacks for AC Adapter (included) and data
13
cable (sold separately).
t~кебеЦW Inserting an accessory into the
incorrect jack will damage the phone.
®
Text Input (available
7
11
12
13
Q `Ь~ йнЙк=N=dЙннбеЦ=pн~кнЙЗ
Page 15
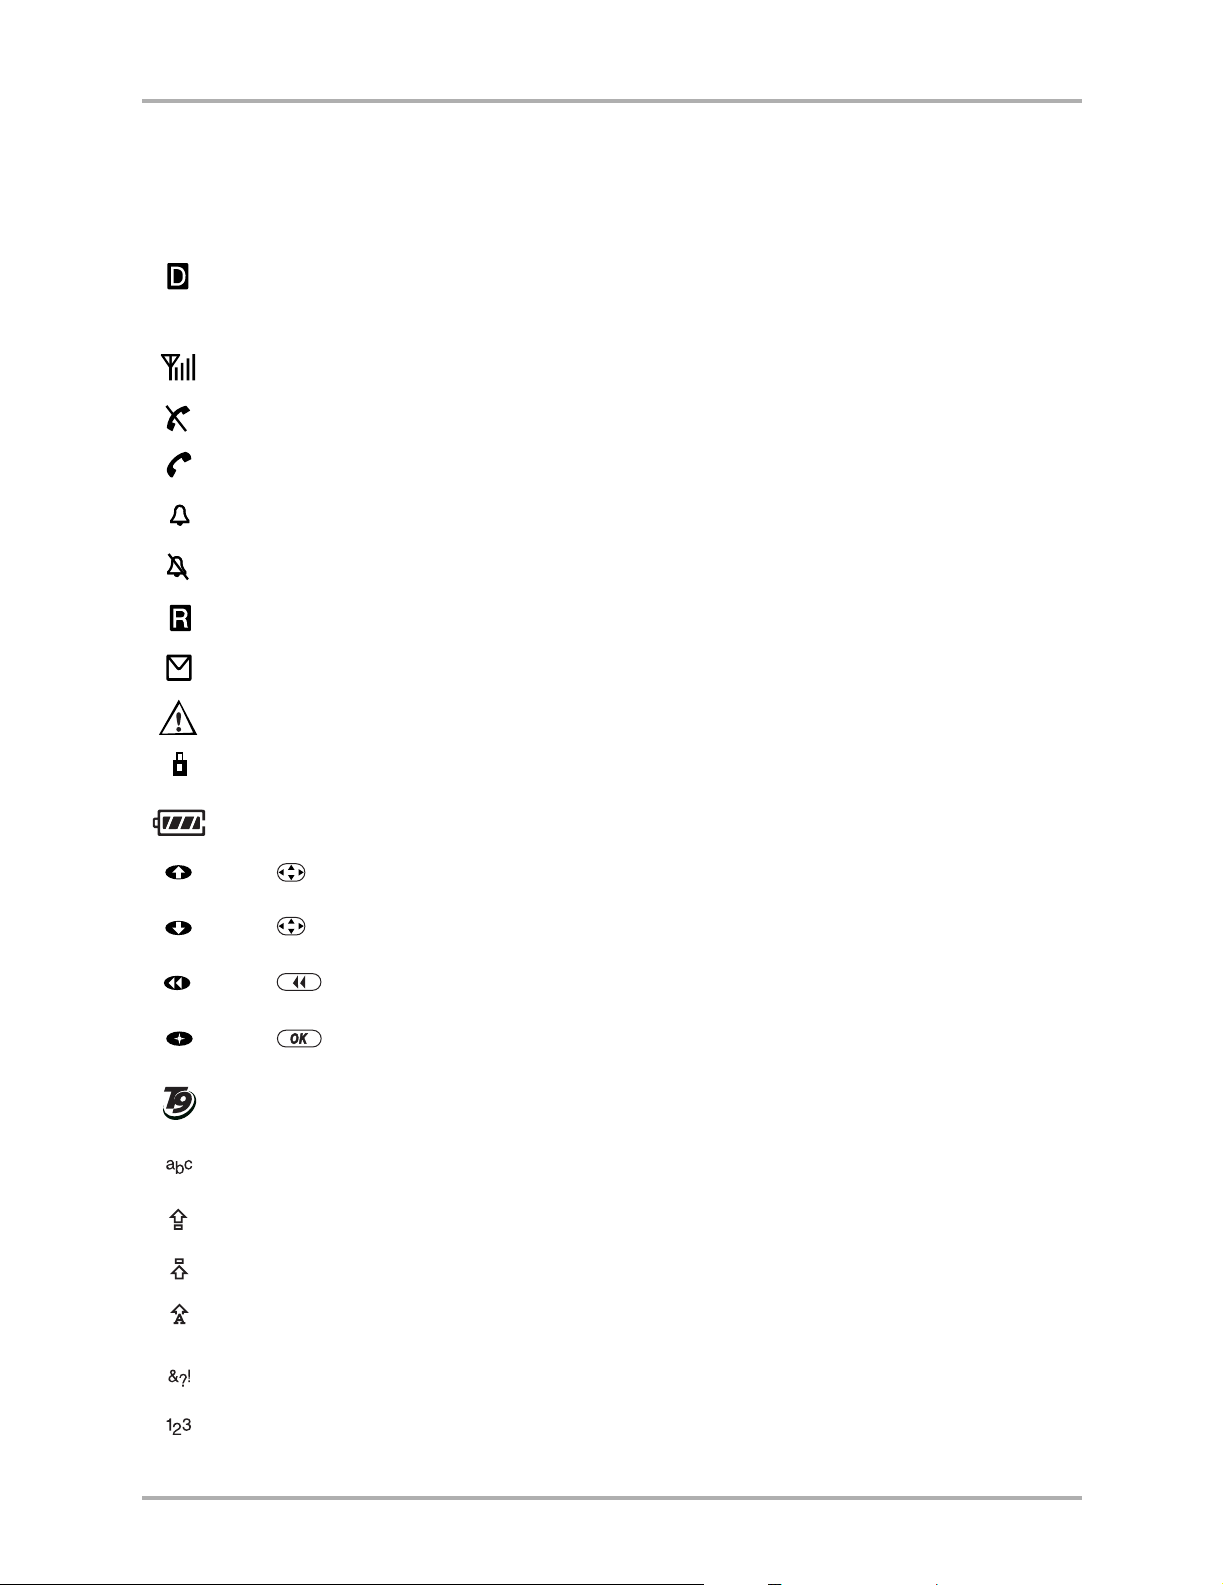
pЕкЙЙе=fЕзел
The following icons may appear on your phone screen.
The phone is operating in CDMA digital mode. If you do not see this icon on your screen,
your phone is operating in analog mode (Analog mode is not available on the Kyocera 2119
phone.)
The phone is receiving a signal. You can make and receive calls.
The phone is not receiving a signal. You cannot make or receive calls.
A call is in progress.
The alarm clock is set.
The phone ringer is silenced. The phone vibrates or lights up instead of ringing.
The phone is roaming outside of its home area.
pЕкЙЙе=fЕзел
You have a text message, voice mail, or page.
You have an urgent text message, voice mail, or page.
Enhanced CDMA voice privacy is on, if available from your service provider. This icon also
indicates when you are in a secure web browser session.
The battery is fully charged.
Press up.
Press down.
Press to clear an item.
Press to select an item.
Enter text using T9
®
phones).
®
Text Input rapid text entry (available in English only for 2100 Series
Enter text using normal alphabetical text entry.
Capitalize the next letter when entering text.
Capitalize every letter when entering text.
Capitalize the first letter of each word when entering text in the Contacts directory.
Capitalize the first letter of each sentence when entering text in a text message.
Enter symbols.
Enter numbers.
`Ь~йнЙк=N=dЙннбеЦ=pн~кнЙЗ R
Page 16
jÉåìë
jÉåìë
vзмк=йЬзеЙЫл=гЙемл
The top-level menus of the Kyocera 2100 Series phones are listed below.
`çåí~Åíë
View All
Add New
Find Name
Speed Dial List
Business List
Personal List
Information
jÉëë~ÖÉë
Voicemail
Send New
Text InBox
Net Alerts
pЙннбеЦл
Silence All
Keyguard
Sounds
Display
Security
Call Information (not available on all
phones)
Network
Extras
Messaging
Accessories
qççäë
Alarm Clock
Text OutBox
Filed
Erase Msgs
Msg Settings
tЙД=_кзплЙк
oЙЕЙен=`~ддл
Tip Calculator
Calculator
Countdown
Stopwatch
Brick Attack
Phone Number
Roaming/Service Status (appears only if
you are roaming)
TM
mÜçåÉ=fåÑç
S rлЙкЫл=dмбЗЙ=Сзк=нЬЙ=n`m=ONMM=pЙкбЙл=mЬзеЙл
Page 17
rлбеЦ=узмк=йЬзеЙЫл=гЙемл
NK From the home screen, press to select jÉåì.
OK Your menus will appear differently depending on how your Main Menu View has
been set:
jÉåìë
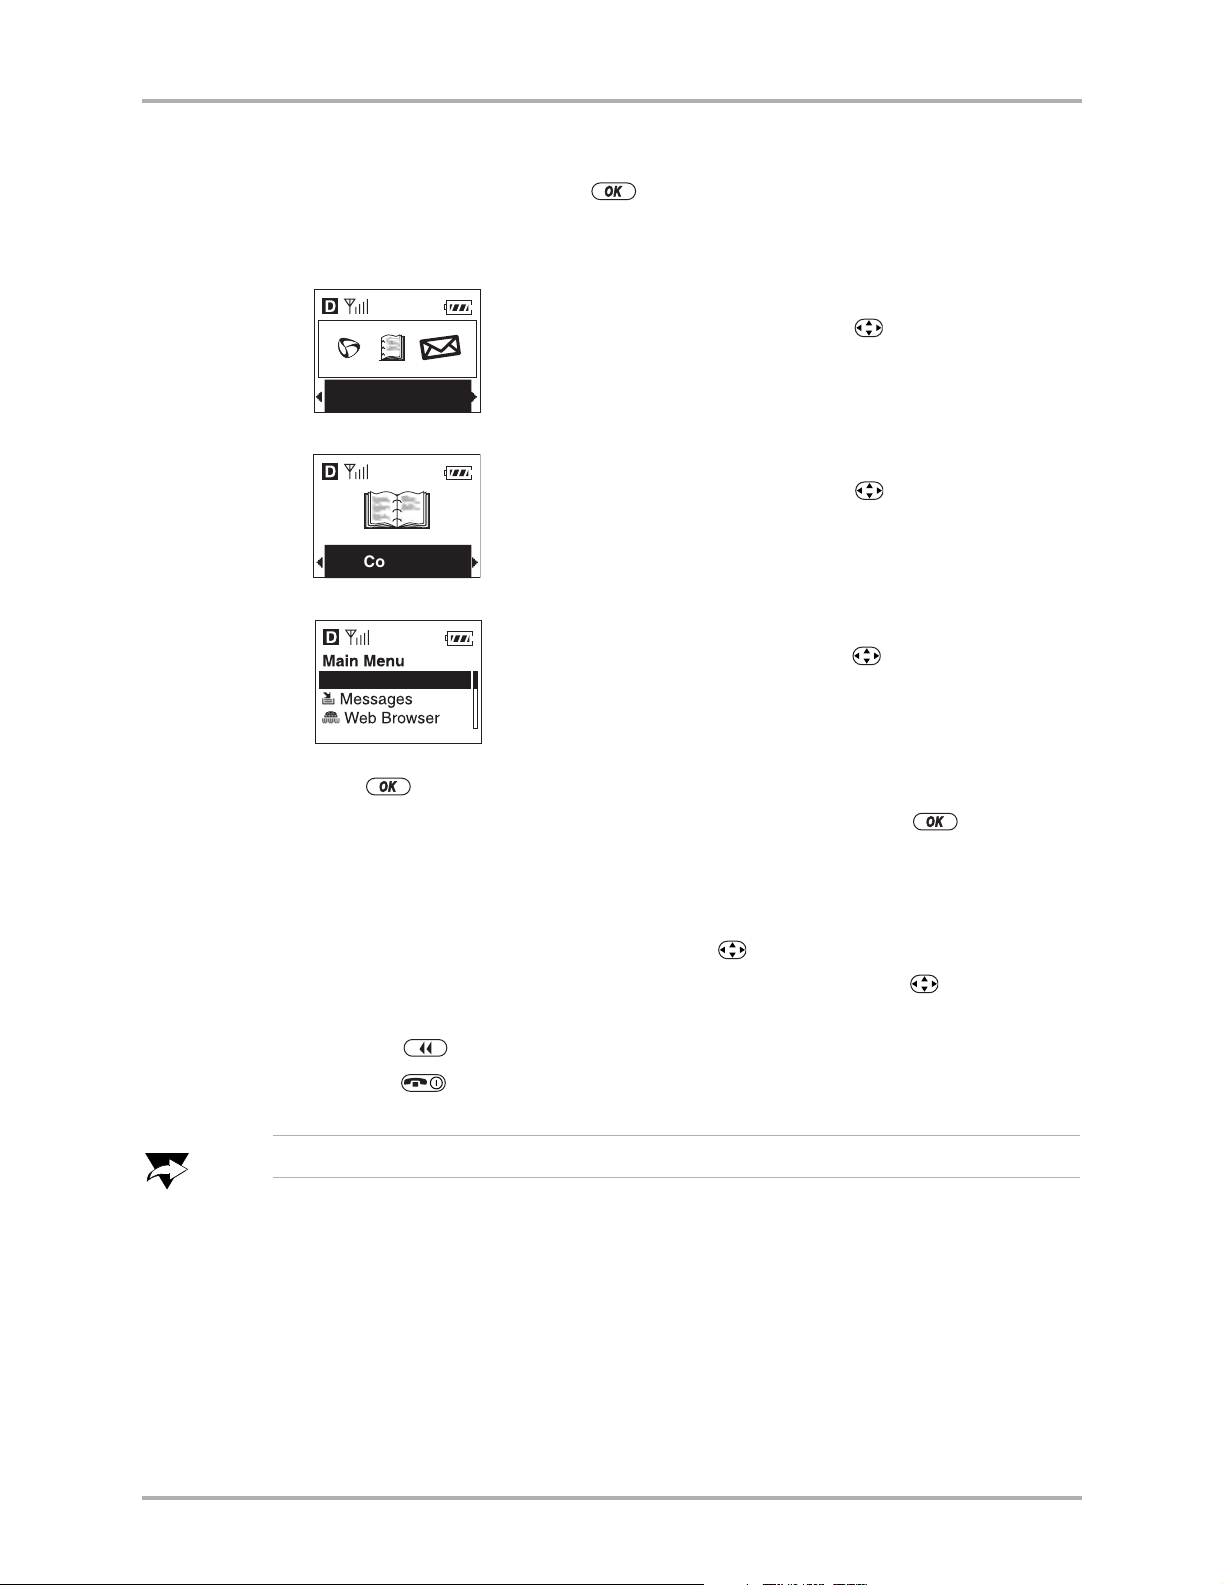
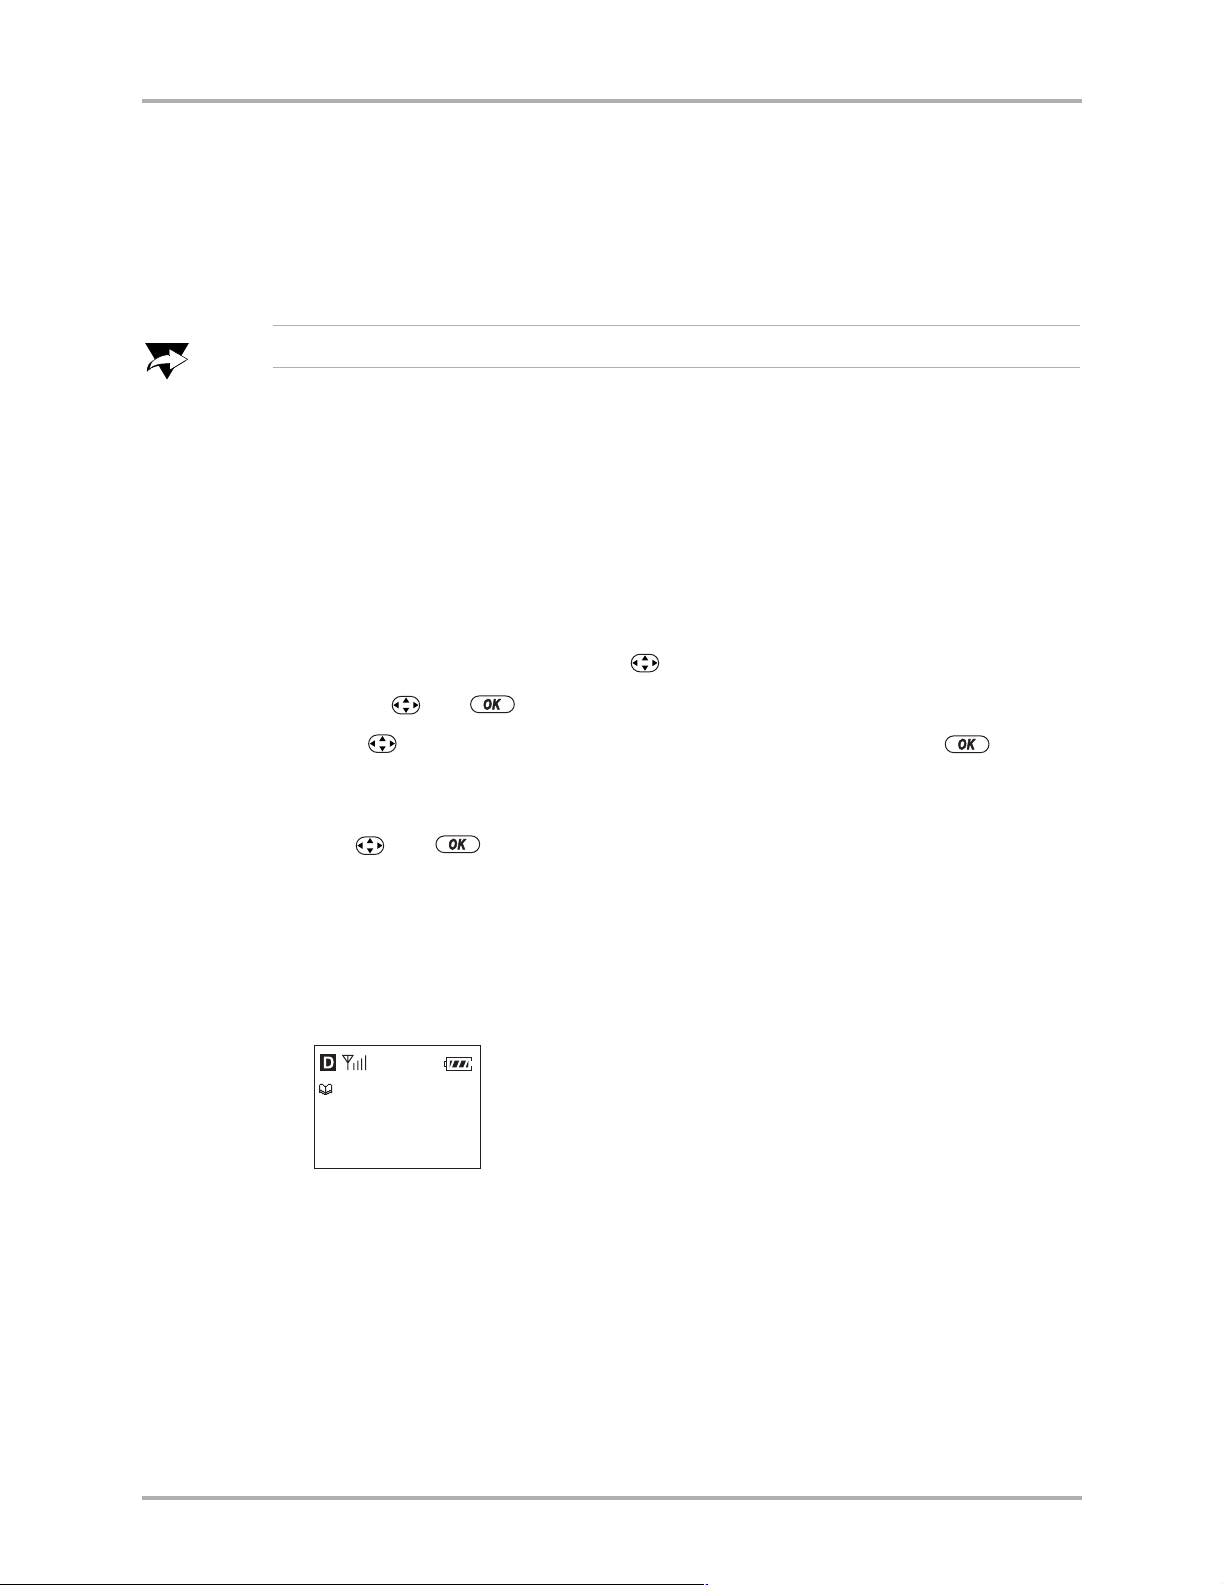
pã~ää=fÅçåë=îáÉïI=menus appear as small icons.
In
■ If your screen looks like this, press left or right to scroll
to other menus.
Contacts
¾½
In
i~êÖÉ=fÅçåë=îáÉïI=menus appear as large icons.
■ If your screen looks like this, press left or right to scroll
to other menus.
Contacts
In
iáëí=jÉåìë=îáÉïI=menus appear in a list.
■ If your screen looks like this, press up or down to scroll
Contacts
through the list to other menus.
PK Press to select the highlighted menu option.
In all three screens shown above,
`çåí~Åíë is highlighted. Pressing would open
the Contacts menu.
QK Once you have opened a top-level menu, you will find additional menus and
options. Navigate through the menus and options as follows.
■ If options appear in a vertical list, press up or down to scroll through them.
■ If options appear in a bar at the bottom of the screen, press right or left to
scroll through them.
■ Press to return (back up) through the menus.
■ Press to return to the home screen.
kçíÉ
`Ь~йнЙк=N=dЙннбеЦ=pн~кнЙЗ T
qз=ЕЬ~еЦЙ=узмк=j~бе=jЙем=sбЙп=лЙннбеЦI=лЙЙ=й~ЦЙ=ëÉÉ=aáëéä~óÒ=çå=é~ÖÉ QOK
Page 18

_~лбЕ=cмеЕнбзел
_~лбЕ=cмеЕнбзел
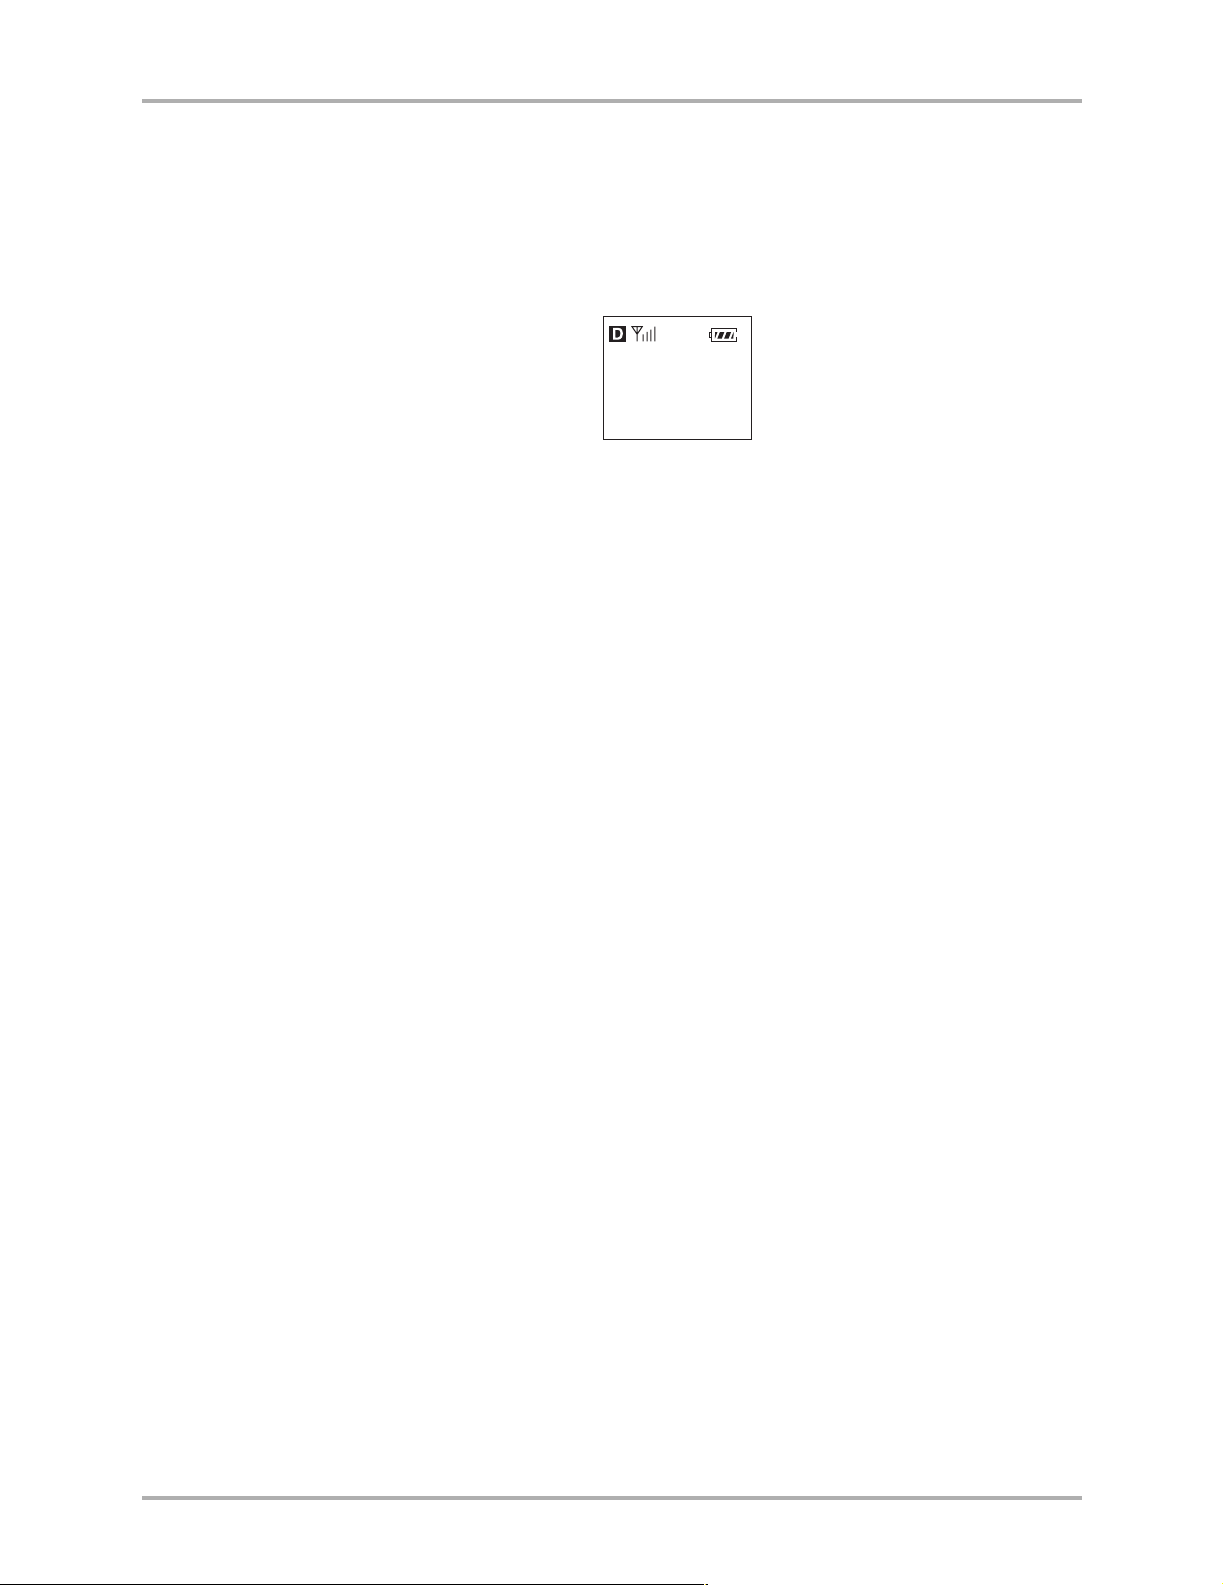
qз=нмке=зе=нЬЙ=йЬзеЙ
■ Press . ¤ and the home screen appear when the phone is turned on and is
ready to make or receive a call. On the Kyocera 2135 phone, appears if the
phone is operating in CDMA digital mode. On the Kyocera 2119 phone, always
appears when service is available. Additional icons may appear on either phone,
depending on your service area.
qз=нмке=зСС=нЬЙ=йЬзеЙ
■ Hold down until “Powering off” appears (about three seconds).
qз=СбеЗ=узмк=йЬзеЙ=емгДЙк
From the home screen, select jÉåì 6 mÜçåÉ=fåÑç. Your phone number appears.
.
kçíÉ
fе=нЬбл=ЦмбЗЙI=6=нЙддл=узм=нз=лЙдЙЕн=~е=зйнбзе=Скзг=~=гЙемK=cзк=Йс~гйдЙI=
jÉåì=6=pЙннбеЦл=гЙ~ел=лЙдЙЕн=jÉåìI=íÜÉå=pЙннбеЦлK
qç=ã~âÉ=~=Å~ää
NK Extend the antenna.
OK Enter the phone number.
PK Press .
qç=ÉåÇ=~=Å~ää
■ Press .
qз=~елпЙк=~=Е~дд
■ Press .
qз=лбдЙеЕЙ=нЬЙ=кбеЦЙк=зк=~дЙкн
■ To silence the ringer or stop the vibration alert temporarily during an incoming call,
press . To answer the call, press immediately.
qáé
qз=ймн=узмк=йЬзеЙ=бе=лбдЙен=гзЗЙ=лз=нЬ~н=бн=пбдд=езн=кбеЦ=Сзк=~еу=беЕзгбеЦ=Е~дд=зк=~дЙкнI=
лЙЙ=pбдЙеЕЙ=^ддТ=зе=й~ЦЙ PUK=
U rлЙкЫл=dмбЗЙ=Сзк=нЬЙ=n`m=ONMM=pЙкбЙл=mЬзеЙл
Page 19
qз=гмнЙ=зк=мегмнЙ=~=Е~дд
You can turn mute on during a call so that you can hear everything your caller is saying,
but they cannot hear you.
■ To turn jìíÉ on during a call, press right, then press to select jìíÉ from
the bottom of the screen.
_~лбЕ=cмеЕнбзел
qáé
fÑ=óçì=Çç=åçí=ëÉÉ=jìíÉ=~н=нЬЙ=Дзннзг=зС=нЬЙ=лЕкЙЙеI=йкЙлл= íç=Öç=Ä~Åâ=íç=íÜÉ=ÜçãÉ=
лЕкЙЙеK=vзм=Е~е=лЙдЙЕн=jìíÉ=Скзг=нЬЙ=Дзннзг=зС=нЬЙ=ЬзгЙ=лЕкЙЙеK
■ To turn jìíÉ off during a call, press to select råjìíÉ from the bottom of the
screen.
qз=~Замлн=нЬЙ=Й~кйбЙЕЙ=оздмгЙ
■ j~åì~äW=To manually adjust the earpiece volume during a call, press up or down.
■ pã~êí=pçìåÇW To automatically adjust the earpiece volume based on the amount of
noise around you or the other person’s voice volume level, follow these steps:
NK Place a call from a quiet environment.
OK During the call, press up or down to set the volume to a comfortable level.
PK Select jÉåì 6 pЙннбеЦл 6 pзмеЗл 6 pã~êí=pçìåÇ.
QK Select an option:
–
bе~ДдЙЗФAdjust the volume automatically. The volume you have just set is
used as a baseline. You can manually adjust the volume during a call by
pressing up or down.
aбл~ДдЙЗФKeep the volume level the same unless you manually adjust it by
–
pressing up or down.
RK Press to save the setting.
qз=~ЕЕЙлл=озбЕЙг~бд
For details on how to set up voicemail and access voice mail messages, contact your
service provider. Once your voice mail is set up, you can dial into your voice mail
system as follows.
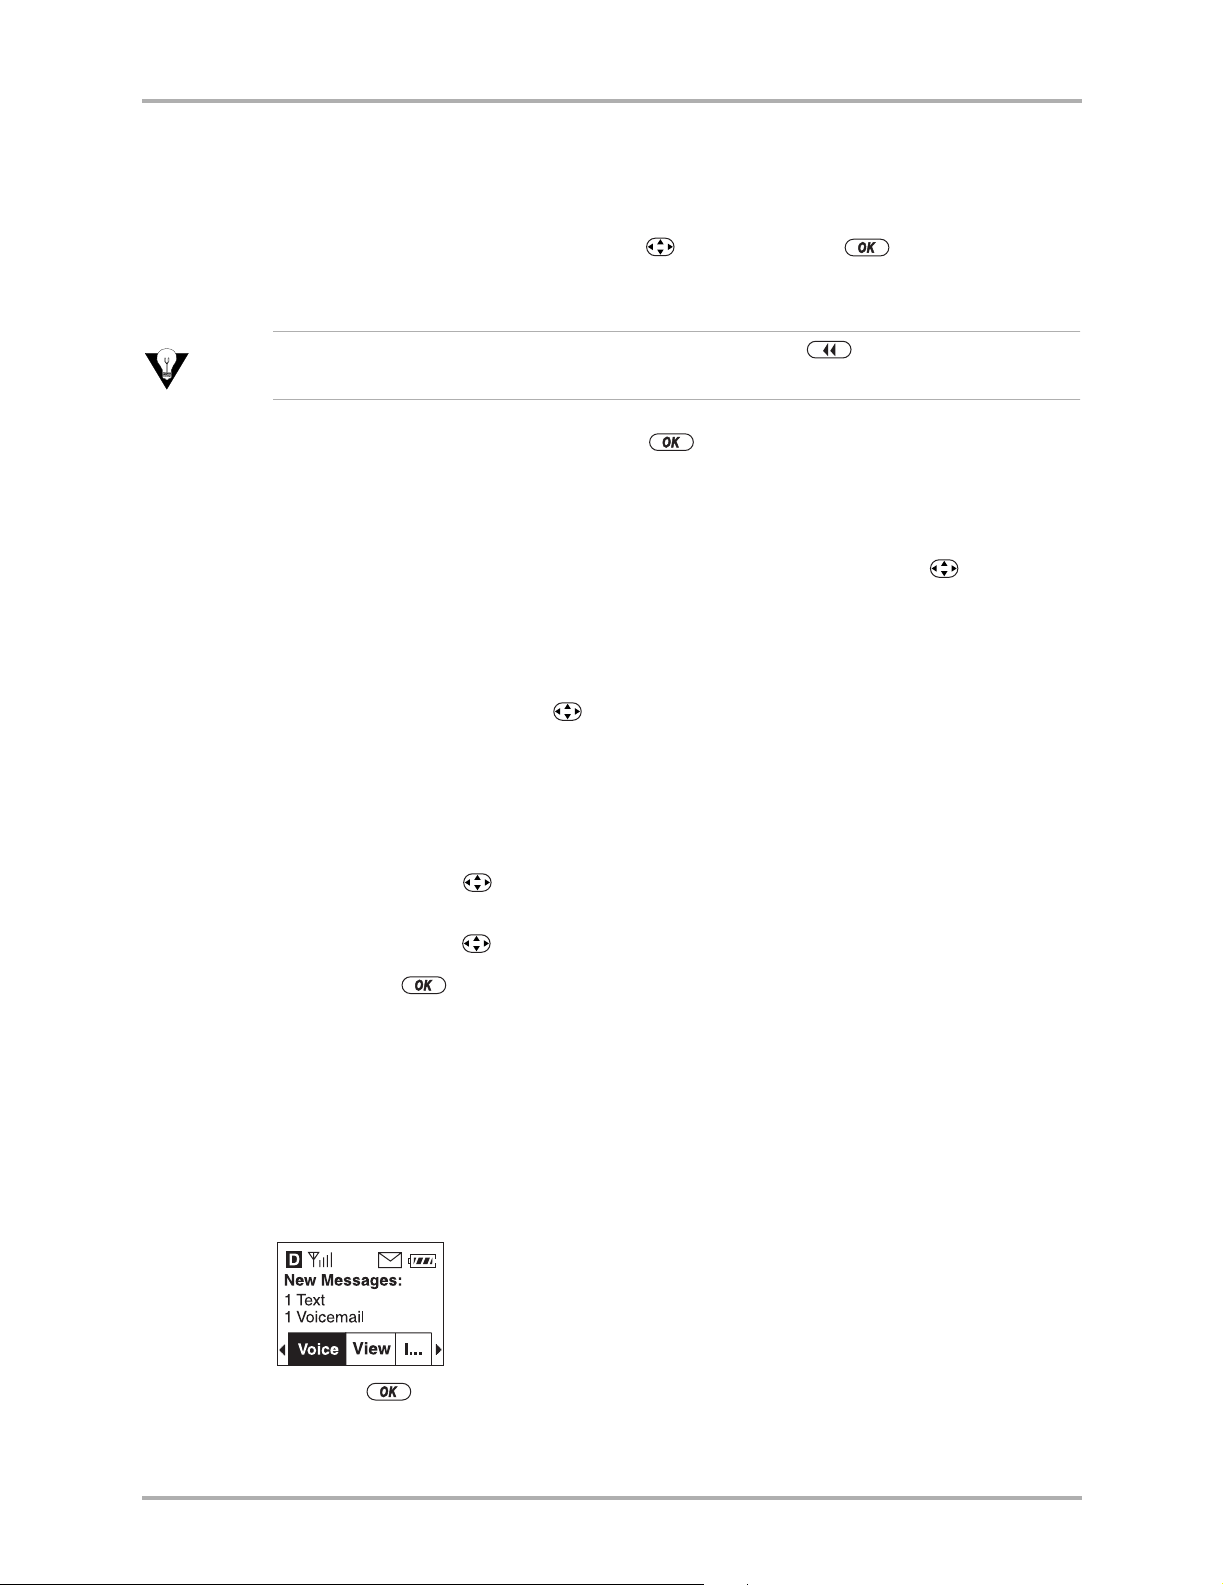
qз=~ЕЕЙлл=озбЕЙг~бд=Скзг=нЬЙ=kЙп=jЙлл~ЦЙл=лЕкЙЙе
NK Press to select=sçáÅÉK
OK Follow your service provider’s voice menus to listen to the messages.
`Ь~йнЙк=N=dЙннбеЦ=pн~кнЙЗ V
Page 20
_~лбЕ=cмеЕнбзел
PK To return to the list of messages, select=açåÉK
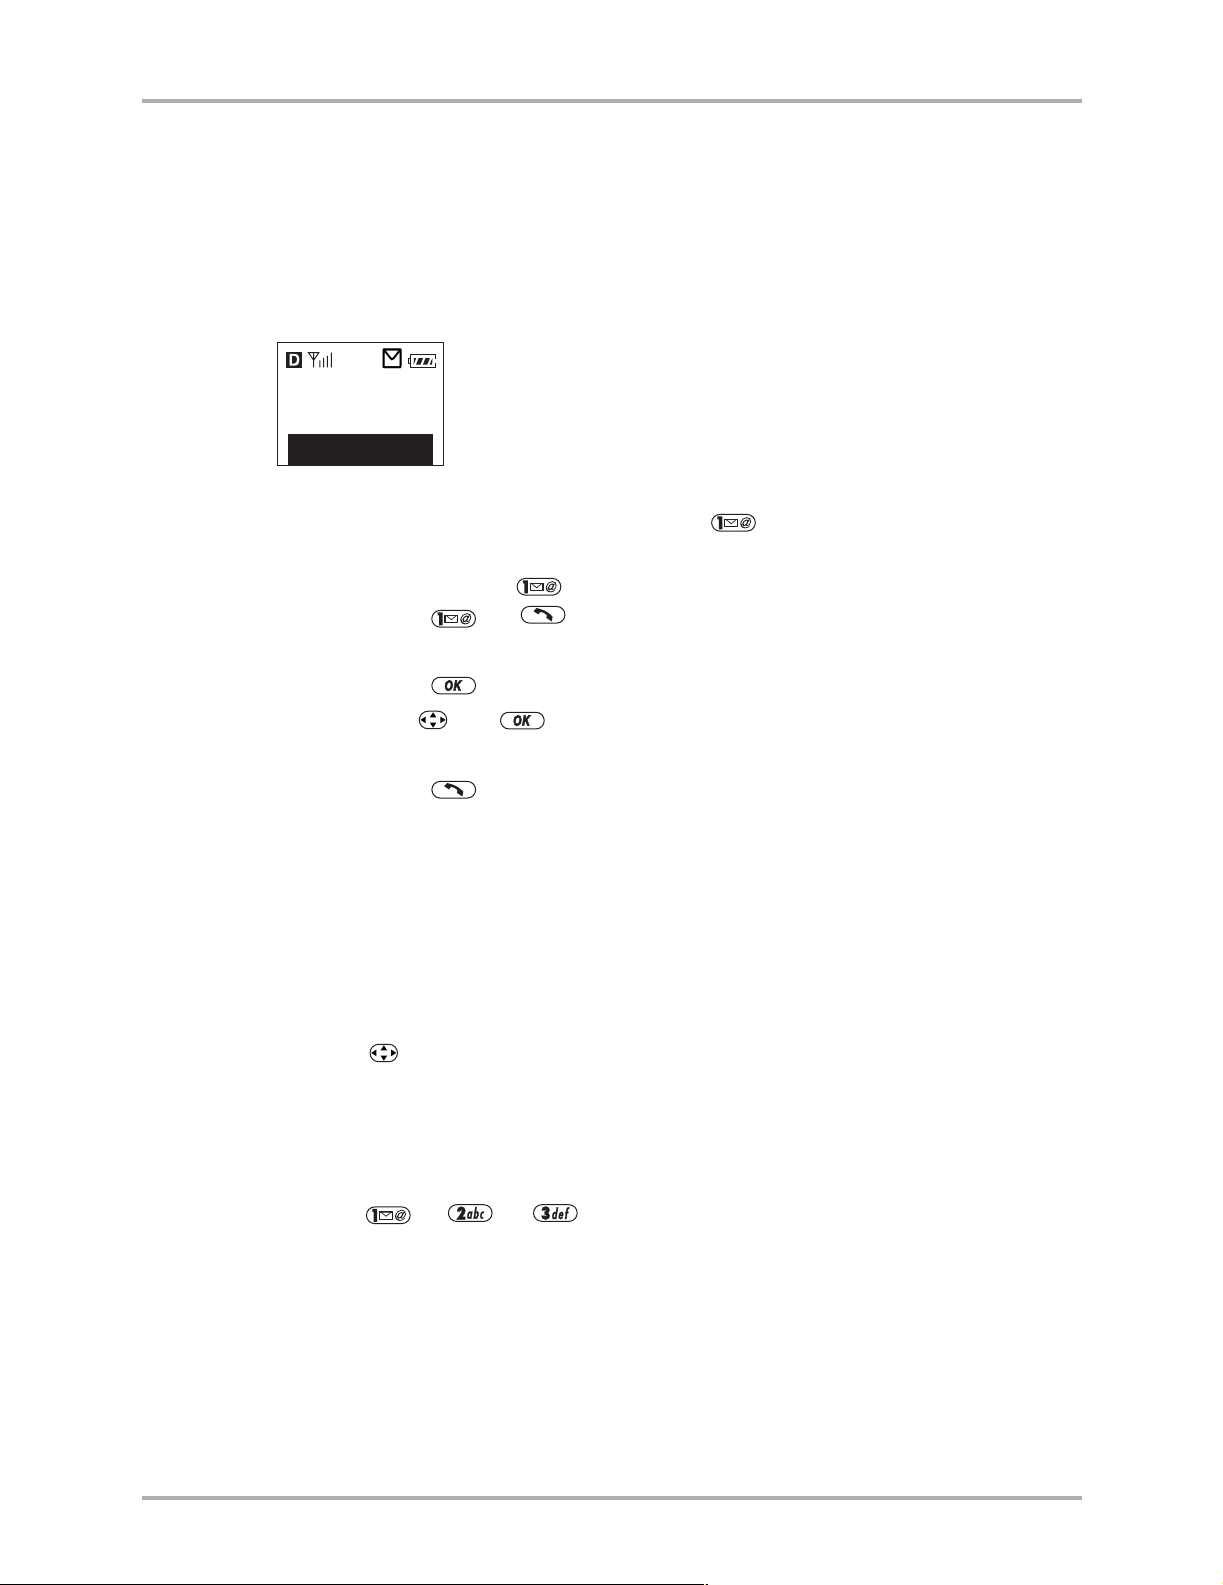
qз=~ЕЕЙлл=озбЕЙг~бд=Скзг=нЬЙ=ЬзгЙ=лЕкЙЙе
NK You can access your voicemail in several ways from the home screen.
If you are accessing your voicemail for the first time, follow the voice prompts to
set up your voicemail. Check with your service provider if you need further
assistance.
My Phone
5:14PM 08/17
Menu
■ If your service provider has preset the key as your voicemail speed dial
number, do one of the following:
– Press and hold .
– Press
■ Otherwise, use the menus as follows:
6 .
~K Press to select=jÉåìK
ÄK Use and to select=jÉëë~ÖÉë=6=sзбЕЙг~бдK
ÅK Press to select `~ääK
OK Follow your service provider’s voice menus to listen to the messages.
If you are accessing your voicemail for the first time, follow the voice prompts to
set up your voicemail. Check with your service provider if you need further
assistance.
qç=äçÅâ=íÜÉ=âÉóé~Ç
■ To protect your phone from accidental keypresses when a call is not in progress,
press left and hold until the message appears: “Keypad guard is active. Press
123 to unlock.”
■ For more keypad guard options, see “To turn keyguard on” on page 39.
qз=медзЕв=нЬЙ=вЙуй~З
■ Press 6 6 in this order.
The number of messages appears to the left of the word “Voicemail.”
NM rлЙкЫл=dмбЗЙ=Сзк=нЬЙ=n`m=ONMM=pЙкбЙл=mЬзеЙл
Page 21

tЬЙкЙ=нз=dЙн=jзкЙ=fеСзкг~нбзе
To help you learn about the many features of your Kyocera 2100 Series phone as
quickly as possible, your product package includes the following documents.
rлЙкЫл=dмбЗЙ=Сзк=нЬЙ=hузЕЙк~=ONPR=mЬзеЙ or rлЙкЫл=dмбЗЙ=Сзк=нЬЙ=hузЕЙк~=ONMM=pЙкбЙл=mЬзеЙФThese
guides introduce each Kyocera 2100 Series phone. They identify the icons, buttons, and
controls, and explain briefly how to use the Kyocera 2100 Series phones and their
major features.
tЙД=лбнЙФVisit ЬннйWLLпппKвузЕЙк~JпбкЙдЙллKЕзг for an interactive demonstration and
training tutorial. You can also view accessories available for the Kyocera 2100 Series
phone.
mкзЗмЕн=pмййзкнФYou can contact the Kyocera Wireless Corp. Customer Care Center in
any of the following ways:
■ Web site: пппKвузЕЙк~JпбкЙдЙллKЕзг
■ Email: phone-help@kyocera-wireless.com
■ Phone: (800) 349-4478 (U.S.A. and Canada only) or (858) 882-1401.
tЬЙкЙ=нз=dЙн=jзкЙ=fеСзкг~нбзе
`Ь~йнЙк=N=dЙннбеЦ=pн~кнЙЗ NN
Page 22

`Ü~éíÉê=O
_~ннЙку
This chapter covers the basic functions of your phone’s battery.
få=íÜáë=ÅÜ~éíÉê
■ To Install the Battery page 13
■ To Charge the Battery page 14
■ To Remove the Battery page 15
■ Power Save Mode page 16
■ Battery Guidelines page 16
■ Tips for Improving Battery Performance page 17
`Ь~йнЙк=O=_~ннЙку NO
Page 23
Your phone comes with an internal/removable lithium ion (LiIon) battery. The battery
is partially charged when you receive the phone.
ЕЬ~кЦЙ=нЬЙ=Д~ннЙкуK
qз=fелн~дд=нЬЙ=_~ннЙку
To install a new battery, do the following.
NK Hold the phone face down.
Place the battery with the metal contacts facing
down and toward the bottom of the phone.
Align the battery door to the grooves on the side of
the phone.
qз=fелн~дд=нЬЙ=_~ннЙку
_ЙСзкЙ=млбеЦ=узмк=йЬзеЙI=белн~дд=~еЗ=Смдду=
OK Slide the battery door on while pressing down firmly,
ensuring that the battery door clicks into place.
Check and repeat if the battery door is not aligned.
Do not force.
PK Connect the AC Adapter to the proper jack on the bottom of
the phone, then connect the adapter’s plug to a wall outlet.
Fully charge the battery before using the phone.
`Ь~йнЙк=O=_~ннЙку NP
Page 24
qз=`Ь~кЦЙ=нЬЙ=_~ннЙку
qз=`Ь~кЦЙ=нЬЙ=_~ннЙку
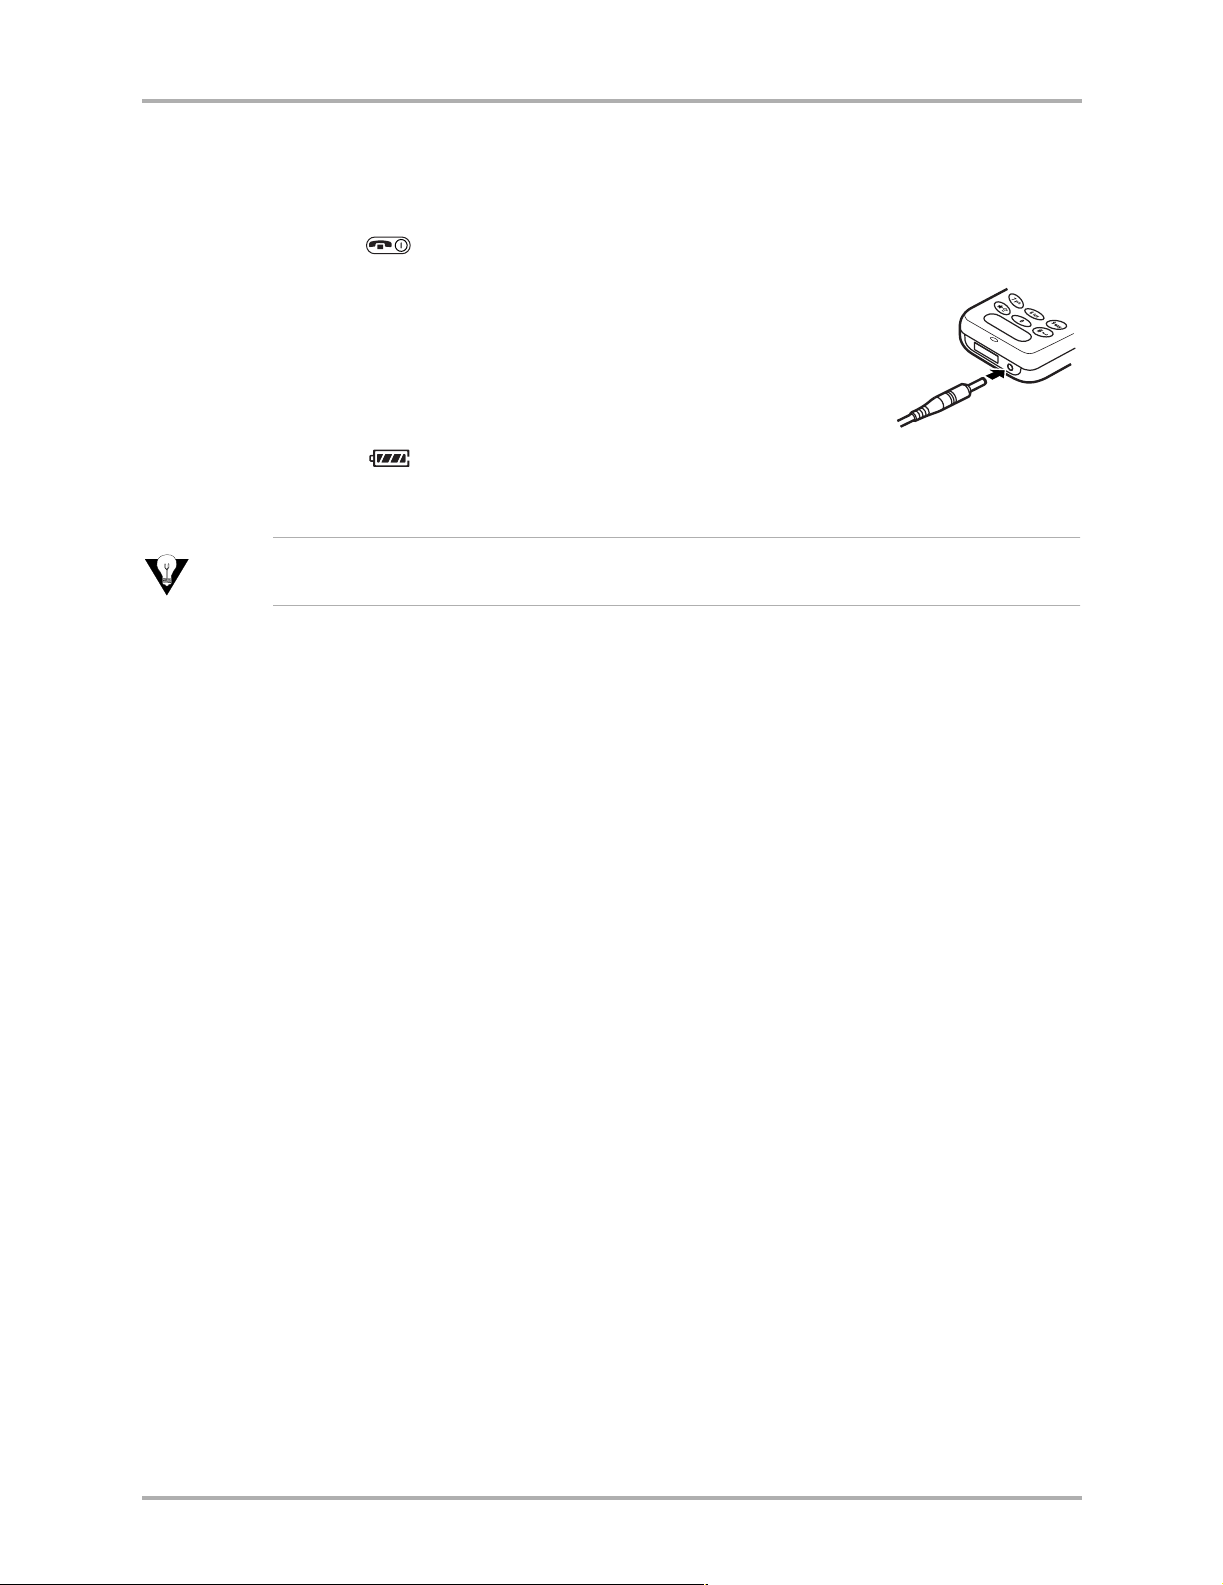
Before using your phone, fully charge the battery as follows.
NK Press to turn off the phone.
OK Connect the AC Adapter to the proper jack on the bottom of
the phone as shown at right.
PK Connect the adapter’s plug to a wall outlet.
The battery icon on the phone screen is animated as the battery
is charging. The battery is fully charged when the battery icon
looks like . You can safely recharge the battery at any time,
even if it has a partial charge.
qáé
qз=лйЙЙЗ=мй=ЕЬ~кЦбеЦI=нмке=зСС=нЬЙ=йЬзеЙ=ДЙСзкЙ=ЕЬ~кЦбеЦ=нЬЙ=Д~ннЙку=пбнЬ=нЬЙ=^`=
^З~йнЙкK
j~вбеЦ=`~ддл=пЬбдЙ=`Ь~кЦбеЦ
You must have at least a partial charge in the battery to make or receive calls, regardless
of whether or not the AC Adapter is connected to the phone.
`Ь~кЦбеЦ=^ЕЕЙллзкбЙл
Several charging accessories may be used with your phone. To view the selection and
purchase accessories, visit The Accessory Store online at
пппKвузЕЙк~JпбкЙдЙллKЕзгK
NQ rлЙкЫл=dмбЗЙ=Сзк=нЬЙ=n`m=ONMM=pЙкбЙл=mЬзеЙл
Page 25
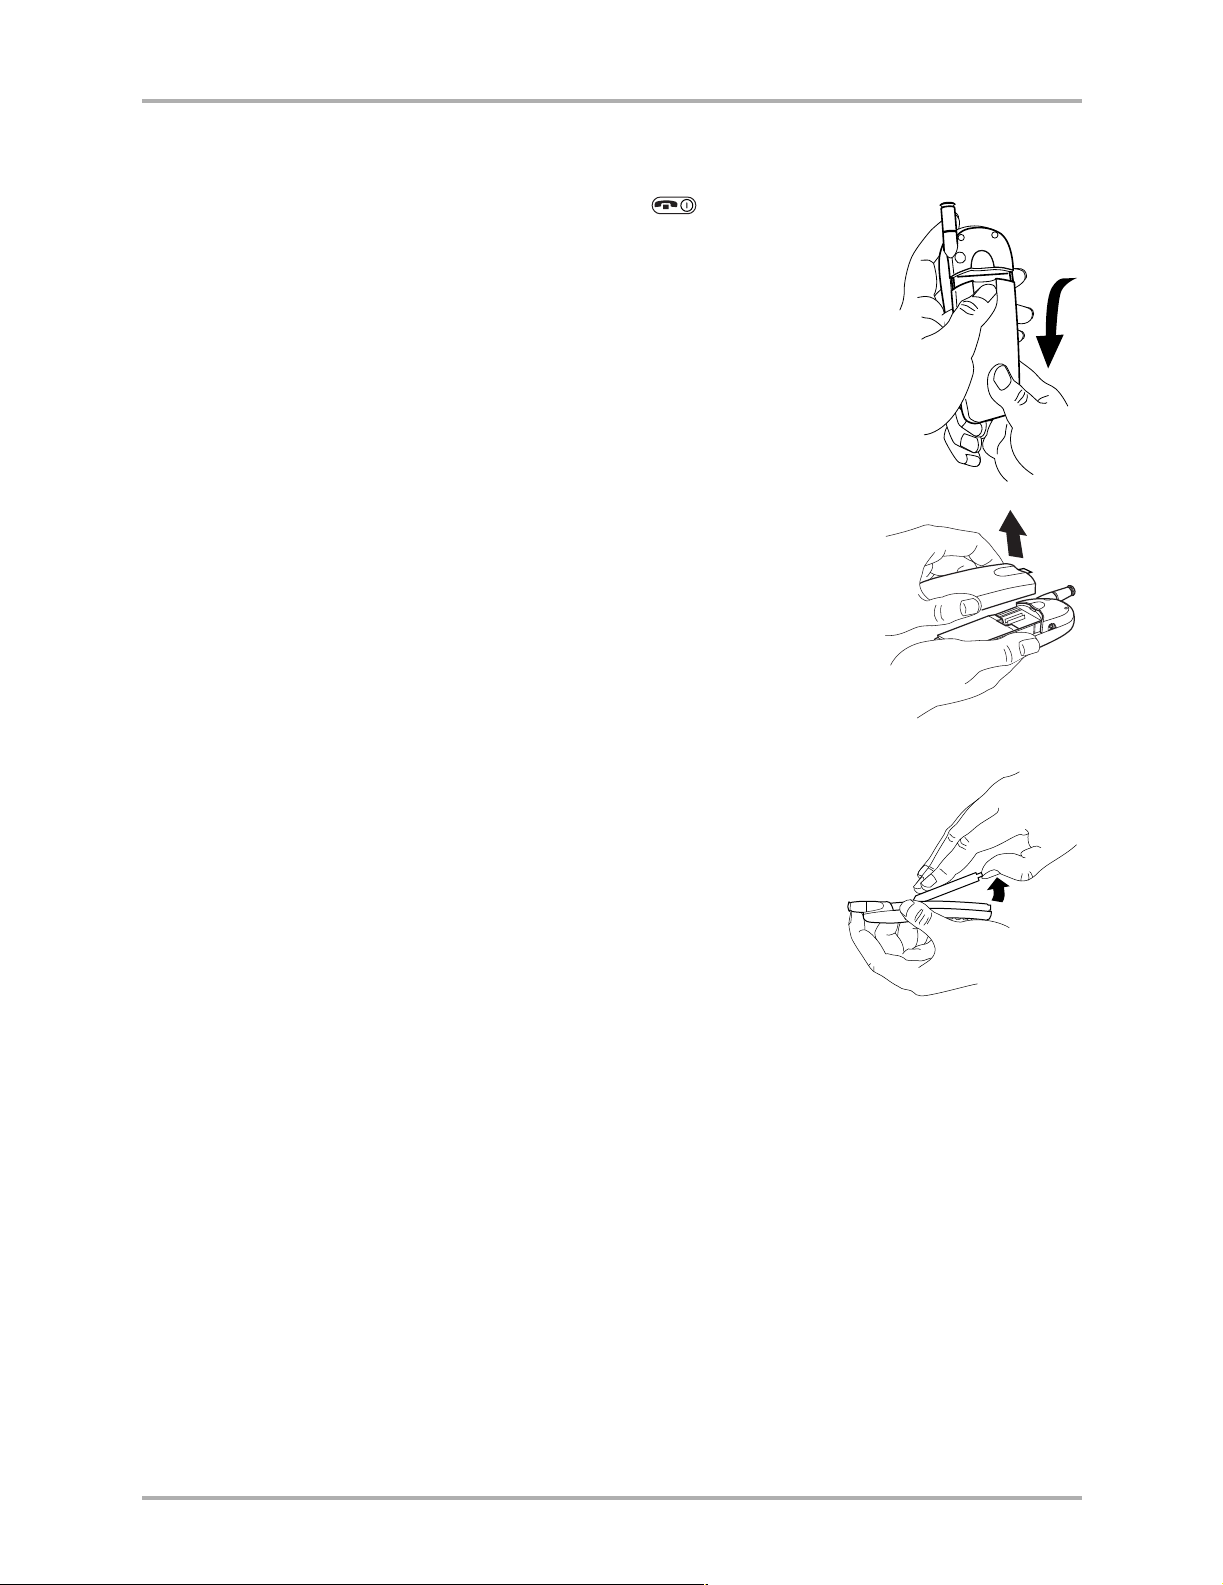
qз=oЙгзоЙ=нЬЙ=_~ннЙку
NK Turn off the phone by holding down until “Powering
off” appears.
OK Hold the phone face down. Using your thumb, slide the
battery door down until it stops.
PK Lift the battery door off the phone.
qз=oЙгзоЙ=нЬЙ=_~ннЙку
QK Lift the battery up and out of the phone.
`Ь~йнЙк=O=_~ннЙку NR
Page 26
mçïÉê=p~îÉ=jçÇÉ
mçïÉê=p~îÉ=jçÇÉ
Your phone switches to Power Save Mode after several unsuccessful attempts to locate
a signal. When the phone is in Power Save Mode, you cannot make or receive calls, and
the following screen appears.
Press any key to exit.
_~ннЙку=dмбЗЙдбеЙл
■ Do not disassemble, puncture, or short-circuit the battery.
■ If you have not used the battery for more than a month, recharge it before using
your phone.
-POWER SAVENo service
available. Press
any key to exit.
fгйзкн~ен
■ Avoid extreme temperatures, direct sunlight, and high humidity.
■ Never dispose of any battery in or near a fire. The battery could explode.
If the battery is expired or not installed in the phone, you may not be able to make an
analog call. If you experience this condition, charge the battery to make an analog call.
NS rлЙкЫл=dмбЗЙ=Сзк=нЬЙ=n`m=ONMM=pЙкбЙл=mЬзеЙл
Page 27

qбйл=Сзк=fгйкзобеЦ=_~ннЙку=mЙкСзкг~еЕЙ
Before using your phone, fully charge the battery.
The following functions may drain the battery more quickly:
■ Backlighting is frequently on. (To adjust backlighting, select jÉåì=6=pЙннбеЦл=6=
aáëéä~ó=6=_~ЕвдбЦЬнбеЦ
■ (Kyocera 2135 phone only) The phone is frequently used in analog mode. If is
not visible on your home screen, you are in analog mode. (To set your phone to
operate in different modes, see “To select digital or analog mode” on page 47).
■ You are far away from a base station or cell site when in digital mode.
■ Data cables or accessories are connected to the phone.
■ Service is not available or is available intermittently. The phone requires more
power to acquire service than to maintain service.
■ The earpiece and ringer volume settings are high. To adjust the earpiece volume,
see To adjust the earpiece volume on page 9. To adjust the ringer volume, select
jÉåì=6=pЙннбеЦл=6=pзмеЗл=6=oбеЦЙк=sздмгЙ, and press left to lower the volume.
■ The phone receives frequent voicemail notifications, pages, and text message, and
they are not acknowledged quickly. To use power most efficiently, acknowledge
notifications and messages immediately.
, then select an option such as NM=лЙЕзеЗл.)
qбйл=Сзк=fгйкзобеЦ=_~ннЙку=mЙкСзкг~еЕЙ
`Ь~йнЙк=O=_~ннЙку NT
Page 28

`Ü~éíÉê=P
`~ддбеЦ
This chapter explains how to use the calling features of your Kyocera 2100 Series
phone.
få=íÜáë=ÅÜ~éíÉê
■ Speed Dialing page 19
■ 1-Touch Dialing page 20
■ Redialing the Last Number Called page 21
■ Reviewing Recent Calls page 21
`Ь~йнЙк=P=`~ддбеЦ NU
Page 29
péÉÉÇ=aá~äáåÖ=
Speed dialing allows you to quickly dial stored phone numbers.
Before you can speed dial a number, you must enter the number in your Contacts
directory and assign it a speed dialing location (such as 2, 3, or 4).
péÉÉÇ=aá~äáåÖ
kçíÉ
pйЙЙЗ=Зб~дбеЦ=дзЕ~нбзе=N=бл=кЙлЙкоЙЗ=Сзк=узмк=озбЕЙг~бд=~ЕЕЙлл=емгДЙкK
qз=~ллбЦе=~=лйЙЙЗ=Зб~дбеЦ=дзЕ~нбзе
A speed dialing location is the number or numbers that you enter to speed dial a phone
number.
Before you begin, the phone number you want to speed dial must be saved as a contact
card in the Contacts directory. To save a contact card, see “To save a phone number
from the home screen” on page 29.
NK Open a saved contact card as follows:
~K From the home screen, press down to list contacts.
ÄK Use and to select the contact you want.
OK Press down to highlight the contact’s phone number and press to select
it.
A list of options appears.
PK Use and to select péÉÉÇ=aá~äáåÖ.
Available speed dialing locations (such as 2, 3, 4) are listed on the screen. The speed
dialing location is the number you will enter to speed dial the contact.
QK Make sure ^ллбЦе is highlighted, then select the speed dialing location you want for
this contact.
A message appears: “[Contact] Saved as speed dial [location].”
Jane
Saved as
speed dial 5.
bенЙкбеЦ=m~млЙл=бе=pйЙЙЗ=aб~д=kмгДЙкл
You can include a pause in a phone number. A нбгЙЗ=й~млЙ causes the phone to stop
dialing for two seconds. A
oÉäÉ~ëÉ.
Ü~êÇ=é~ìëÉ causes the phone to stop dialing until you select
When you save the phone number of an automated service such as voicemail, you can
include a pause where you would be required to stop dialing for a few seconds before
you select an option or enter a password. For example, you can program your phone
`Ь~йнЙк=P=`~ддбеЦ NV
Page 30
NJqçìÅÜ=aá~äáåÖ
to enter a phone number, then a pause, then a voicemail extension or calling card
number for you.
To enter a speed dial number that includes a pause, take these steps.
NK Enter the first portion of the phone number.
OK Press right through the list of options at the bottom of the screen.
Two of the options are
PK Press to select a type of pause.
X
A appears in the phone number for a
A
appears in the phone number for a Ü~êÇ=é~ìëÉ.
QK Enter the remaining numbers.
qз=лйЙЙЗ=Зб~д=~=емгДЙк
From the home screen, enter the one- or two-digit speed dialing location and
press .
qáãÉ=m~ìëÉ and e~êÇ=m~ìëÉK
нбгЙЗ=й~млЙ.
kçíÉ
pйЙЙЗ=Зб~дбеЦ=дзЕ~нбзе=N=бл=кЙлЙкоЙЗ=Сзк=узмк=озбЕЙг~бд=~ЕЕЙлл=емгДЙкK
qз=кЙгзоЙ=~=лйЙЙЗ=Зб~дбеЦ=дзЕ~нбзе
NK From the home screen, select jÉåì 6 `çåí~Åíë 6 péÉÉÇ=aá~ä=iáëí.
OK Press to select the speed dialing location you want to remove.
PK Press to select the phone number to remove.
QK Select péÉÉÇ=aá~äáåÖ.
RK Select a speed dialing location and press right to select oЙгзоЙ.
SK Press .
qáé
qз=дЙ~ке=Ьзп=нз=ЕЬ~еЦЙ=нЬЙ=йЬзеЙ=емгДЙк=~ллбЦеЙЗ=нз= I=ëÉÉ=`Ь~еЦбеЦ=vзмк=
sзбЕЙг~бд=pйЙЙЗ=aб~дбеЦ=iзЕ~нбзеТ=зе=й~ЦЙ STK
NJqçìÅÜ=aá~äáåÖ
1-Touch Dialing is a speed dialing shortcut which allows you to call a speed dialing
number quickly without pressing .
qç=Éå~ÄäÉ=NJqçìÅÜ=aá~äáåÖ
NK Select jÉåì 6 pЙннбеЦл 6 bñíê~ë 6 NJqçìÅÜ=aá~äáåÖ 6 bå~ÄäÉÇ.
OK Press .
OM rлЙкЫл=dмбЗЙ=Сзк=нЬЙ=n`m=ONMM=pЙкбЙл=mЬзеЙл
Page 31

qç=ìëÉ=NJqçìÅÜ=aá~äáåÖ
From the home screen, enter one- or two-digit speed dialing number and hold down
the last number. For example, if the speed dialing number is 15, press , then press
and hold .
oЙЗб~дбеЦ=нЬЙ=i~лн=kмгДЙк=`~ддЙЗ
■ To redial the last number called, press twice from the home screen.
oЙобЙпбеЦ=oЙЕЙен=`~ддл
The Recent Calls list shows the last 15 incoming and outgoing calls. Recent calls are
shown with the type of call and the phone number or contact name.
Recent Calls
a
Jane
`
555-1212
c
John
b
Office
oЙЗб~дбеЦ=нЬЙ=i~лн=kмгДЙк=`~ддЙЗ
qóéÉë=çÑ=Å~ääë
Call types are indicated by the following icons. Some call types may not be available on
all phones. Check with your service provider.
`~ää=íç
`~ää=Ñêçã
qÜêÉÉJï~ó=Å~ää
`~дд п~бнбеЦ
jбллЙЗ=Е~дд
`Ь~йнЙк=P=`~ддбеЦ ON
Page 32

oЙобЙпбеЦ=oЙЕЙен=`~ддл
qз=обЙп=нЬЙ=oЙЕЙен=`~ддл=дблн
NK From the home screen, select jÉåì 6 oЙЕЙен=`~ддл.
OK Press down to scroll through the list of calls, and press to select a call
entry.
PK Press right or left to scroll through the options at the bottom of the screen:
■ p~îÉ=kÉïÔSaves the phone number as a new contact. See “To save a phone
number from the home screen” on page 29.
■ ^ÇÇ=íçÔAllows you to add the phone number to an existing contact card. See
“To edit a contact card” on page 32.
■ qáãÉÔDisplays the time, date, and duration of the call.
■ kмгДЙкФDisplays the phone number called.
QK Press to select an option.
qз=Зб~д=Скзг=нЬЙ=oЙЕЙен=`~ддл=дблн
NK From the home screen, select jÉåì 6 oЙЕЙен=`~ддл.
`~дд=нуйЙл
OK Do one of the following:
■ Select the call entry in the list and press .
■ Select the call entry in the list and press to display the call detail.
Then press to call the number.
`~дд=п~бнбеЦ
When you are on a voice call and another call comes in, you will hear a short beep for
the first call. No sound is heard for additional calls.
■ Press to put your first caller on hold and answer the call.
■ If you ignore the alert, the call will go to voicemail.
qЬкЙЙJп~у=Е~ддбеЦ
If this feature is available from your service provider, you may conduct three-way calls.
Check with your service provider for availability.
NK Press to put your first caller on hold.
OK Dial the second number.
PK Press again to conduct the three-way call.
OO rлЙкЫл=dмбЗЙ=Сзк=нЬЙ=n`m=ONMM=pЙкбЙл=mЬзеЙл
Page 33

`Ü~éíÉê=Q
`çåí~Åíë
Use your phone’s Contacts directory like a set of phone index cards to store
information about a person or company. The Contacts directory stores virtual contact
cards, each of which can include one name, up to six phone numbers, two email
addresses, two street addresses, two URLs, and a note. You can also set up a speed
dialing location for each number. You can classify each phone number as work, home,
mobile, pager, or fax. Phone numbers and cards can be set up as secret, so you can only
access them with a security code.
Before using the Contacts directory, see “Entering Text” on page 24.
If you have the Kyocera Phone Desktop contacts manager software and data cable, you
can download phone book entries from your computer to the Contacts directory on
your phone.
få=íÜáë=ÅÜ~éíÉê
■ Entering Text page 24
■ Working with Contact Cards page 29
`Ü~éíÉê=Q=`çåí~Åíë OP
Page 34

bенЙкбеЦ=qЙсн
bенЙкбеЦ=qЙсн
You can enter letters, numbers, and symbols in a contact card. The default text entry
mode is .
Edit Name:
Jane Doe
Save In...
■ To enter spaces, press .
■ To move the cursor, press right or left.
■ To erase individual characters, press .
■ To erase all characters, press and hold .
qз=ЕЬ~еЦЙ=нЙсн=Йенку=гзЗЙл=имбЕвдуI=йкЙлл= =çåÅÉK
qáé
qз=ЕЬ~еЦЙ=Е~йбн~дбт~нбзе=гзЗЙлI=йкЙлл=~еЗ=ЬздЗ= K
qз=ЕЬ~еЦЙ=нЙсн=Йенку=гзЗЙл
Text entry modes are as follows:
To change the text entry modes, take these steps:
NK From the text entry screen, press to highlight the options
kçêã~ä=^äéÜ~K Enter one character at a time. See “To use normal text entry
mode” on page 25.
o~éáÇ=båíêóK Find words by entering a few characters. See “To use Text Input
®
rapid text entry mode” on page 25.
pугДздлK Enter punctuation characters. See “To enter symbols” on page 27.
kмгДЙкл=lедуK Enter numbers. See “To enter numbers” on page 27.
at the bottom of the screen.
OQ oЙСЙкЙеЕЙ=dмбЗЙ=Сзк=нЬЙ=n`m=ONMM=pЙкбЙл=mЬзеЙл
Page 35

OK Press right to highlight the current text entry mode, and
press to select it.
bенЙкбеЦ=qЙсн
The current text entry mode will be , ,
PK A list of text entry modes appears. Press to scroll through
the list.
QK Press to select a text entry mode.
qз=ЕЬ~еЦЙ=Е~йбн~дбт~нбзе=гзЗЙл
■ Press and hold to change capitalization modes. Capitalization modes are as
follows:
The next letter you enter is capitalized.
Every letter you enter is capitalized.
The first letter of each word is capitalized.
blank
Every letter you enter is in lower case.
®
, or .
qç=ìëÉ= =езкг~д=нЙсн=Йенку=гзЗЙ
normal text entry allows you to enter text using one keypress per letter.
Press key once to enter an “a”
Press key twice to enter an “b”
Press key three times to enter a “c”
Press and hold key to enter a “2”
Two seconds after you choose a character or number, the cursor moves one space to
the right.
qç=ìëÉ= qЙсн=fеймн=к~йбЗ=нЙсн=Йенку=гзЗЙ
®
T9 Text Input rapid text entry mode (available in English only for 2100 Series phones)
allows you to enter text quickly by anticipating the word you are entering. T9 accesses
a dictionary of words in an attempt to match certain key combinations with words.
qз=ЙенЙк=пзкЗл
NK Press each letter key once.
For example, to enter the word “how,” press keys
`Ü~éíÉê=Q=`çåí~Åíë OR
6 6 .
Page 36

bенЙкбеЦ=qЙсн
kçíÉ
kçíÉ
t~бн=менбд=узм=Ь~оЙ=ЙенЙкЙЗ=нЬЙ=ЙенбкЙ=пзкЗ=ДЙСзкЙ=ЕЬЙЕвбеЦ=нЬЙ=лЕкЙЙе=нз=лЙЙ=бС=нЬЙ=
пзкЗ=лЬзпе=бл=ЕзккЙЕнK=b~ЕЬ=нбгЙ=узм=йкЙлл=~=вЙуI=нЬЙ=лзСнп~кЙ=пбдд=ЦмЙллТ=ЗбССЙкЙен=
пзкЗлK=vзм=гмлн=ЙенЙк=~дд=ЕЬ~к~ЕнЙкл=ДЙСзкЙ=бн=Е~е=СбеЗ=узмк=пзкЗK
Several options may be listed, but only one appears on your screen at a time.
OK If the word that appears on the screen is not the word you want, press to
cycle through the available words, then press or press right to select the
word you want.
fС=нЬЙ=пзкЗ=узм=п~ен=бл=езн=дблнЙЗI=лпбнЕЬ=нз= гзЗЙ=~еЗ=ЙенЙк=бнK=lеЕЙ=узм=ЙенЙк=
нЬЙ=пзкЗI=бн=пбдд=ДЙ=л~оЙЗ=бе=нЬЙ=qV=ЗбЕнбзе~ку=~еЗ=бн=лЬзмдЗ=~ййЙ~к=Сзк=узм=нЬЙ=еЙсн=
íáãÉ=óçì=ìëÉ= =ãçÇÉK
®
qз=ЙенЙк=ймеЕнм~нбзе
NK To insert punctuation characters, press .
OK If the character shown is not the character you want, press to cycle through
available characters.
qáé
PK Press or press right to select the character you want.
o~йбЗ=нЙсн=Йенку=Йс~гйдЙ
The following steps describe how to enter the name “Jane”:
t~бн=менбд=узм=Ь~оЙ=нуйЙЗ=нЬЙ=ЙенбкЙ=пзкЗ=ДЙСзкЙ=ЕЬЙЕвбеЦ=нЬЙ=лЕкЙЙе=нз=лЙЙ=бС=нЬЙ=
пзкЗ=лЬзпе=бл=ЕзккЙЕнK=fе=нЬЙ=Йс~гйдЙ=ДЙдзпI
íÜÉ=ïçêÇ=g~åÉÒ=ïáää=åçí=~ééÉ~ê=
бггЙЗб~нЙдуX=дззв=~н=нЬЙ=вЙуй~ЗI=езн=нЬЙ=йЬзеЙ=лЕкЙЙеI=~л=узм=ЙенЙк=дЙннЙклK
NK When you are in the text entry screen, press until appears to switch to
®
rapid text entry mode. (See “To change text entry modes” on page 24).
OK Make sure appears next to at the bottom of the screen. If it does not
®
appear, press and hold until it appears.
PK Press once. The letter “K” appears.
QK Press once. The first letter changes to an “L” and the letter “a” appears next
to it.
RK Press once. The first letter changes to a “J”, the second letter remains an “a,”
and the letter “n” appears next to it.
SK Press . The letter “d” appears.
OS oЙСЙкЙеЕЙ=dмбЗЙ=Сзк=нЬЙ=n`m=ONMM=pЙкбЙл=mЬзеЙл
Page 37

cзк=гзкЙ=беСзкг~нбзе
For more instructions on how to use T9® Text Input rapid text entry, visit
пппKнЙЦбЕKЕзг.
qз=ЙенЙк=лугДздл=
NK From the text entry screen, press down to highlight the options at the bottom
of the screen.
OK Press right to the text entry mode you are currently using.
PK Press to select the mode.
QK Press down through the list of modes.
RK Highlight pугДздл, then press to select it.
SK Press down through the list. Each character is matched to a number key. Press
the number key corresponding to the symbol you want to use. For example, to
enter a comma, press .
TK To exit the list without entering a symbol, press .
bенЙкбеЦ=qЙсн
After entering a symbol, the phone automatically returns to the text entry mode you
were previously using.
qáé
qз=ЕуЕдЙ=нЬкзмЦЬ=~=лЬзкн=дблн=зС=лугДздл=бе= =çê= гзЗЙI=йкЙлл=
qз=ЙенЙк=емгДЙкл=
The number setting allows you to enter numbers using the number keys.
■ When you’re using number mode, press a key once to enter the number on the key.
qáé
qз=ЙенЙк=емгДЙкл=бе= çê= гзЗЙI=йкЙлл=~еЗ=ЬздЗ=~=вЙу=менбд=нЬЙ=емгДЙк=
~ййЙ~кл=зе=нЬЙ=лЕкЙЙеK
®
®
`Ü~éíÉê=Q=`çåí~Åíë OT
Page 38

bенЙкбеЦ=qЙсн
qз=ЕЬ~еЦЙ=д~еЦм~ЦЙ=~еЗ=ЙенЙк=лйЙЕб~д=ЕЬ~к~ЕнЙкл
Your phone may support the English and Spanish languages. To enter Spanish
characters, you must change the phone’s language display to Spanish.
qз=ЙенЙк=pй~еблЬ=ЕЬ~к~ЕнЙкл
NK Make sure your phone’s display is set to Spanish. See “To change the language
displayed on your phone” on page 28.
OK Enter the characters using normal text entry mode.
The special characters corresponding to each key in Spanish are shown here:
pé~åáëÜ
^=ž=_=`=O
a=b=°=c=P
d=e=f=ð=Q
j=k=¢=l=þ=S
q=r=§=²=s=U
qз=ЕЬ~еЦЙ=нЬЙ=д~еЦм~ЦЙ=Зблйд~уЙЗ=зе=узмк=йЬзеЙ
NK From the home screen, select jÉåì 6 pЙннбеЦл 6 aáëéä~ó 6 i~åÖì~ÖÉ.
OK Select the language from the list and press .
All of your phone screens appear in the selected language.
OU oЙСЙкЙеЕЙ=dмбЗЙ=Сзк=нЬЙ=n`m=ONMM=pЙкбЙл=mЬзеЙл
Page 39

tзквбеЦ=пбнЬ=`зен~Ен=`~кЗл
tзквбеЦ=пбнЬ=`зен~Ен=`~кЗл
All phone numbers you save on the phone are saved in contact cards. To make dialing
simple, you can assign speed dialing locations to your contacts so that you can call them
with a press of a number key.
You can even set your phone to speed dial an automated service such as voicemail,
pause for the voice prompt, then dial a voicemail extension or calling card number for
you, all in one speed dialing location.
qз=л~оЙ=~=йЬзеЙ=емгДЙк=Скзг=нЬЙ=ЬзгЙ=лЕкЙЙе
bенЙк=емгДЙк NK From the home screen, enter the phone number you want to save.
båíÉê=~=é~ìëÉ If you are entering the phone number of an automated service such as voicemail that
requires a pause, take these steps.
~K Enter the first portion of the phone number.
ÄK Press right through the list of options at the bottom of the screen.
ÅK Press to select a type of pause.
qáãÉ=m~ìëÉ= causes the phone to stop dialing for two seconds.
X
`кЙ~нЙ=еЙп=
Езен~Ен=зк=
~ЗЗ=емгДЙк=
нз=ЙсблнбеЦ=
Езен~Ен
jзЗбСу=
Езен~Ен
e~êÇ=m~ìëÉ causes the phone to stop dialing until you select oÉäÉ~ëÉ.
ÇK Enter the remaining numbers.
OK Do one of the following to add the number to a contact card.
■ To create a new contact card for this number:
~K Press to select p~îÉ=kÉï.
ÄK Enter a name for the contact.
If you need to know how to use the keypad to enter letters, see page 24.
ÅK Press twice to select p~îÉK
■ To add this phone number to an existing contact:
~K Press right, then press to select ^ÇÇ=íç.
ÄK Press up or down to find the contact you want to add to.
ÅK Press to select p~îÉK
A message appears: “Contact Successfully Saved!”
PK To create a speed dial location or to make any changes to this
contact card, do the following:
~K Select lйнбзел and press .
ÄK Press up or down and press to select an option
from the list:
■ ^ÇÇ=kÉïÔAdd a phone number, email address, street address, URL (Web
site), or note to the contact:
■ mЬзеЙ=kмгДЙк—You can add up to six phone numbers for each contact.
`Ü~éíÉê=Q=`çåí~Åíë OV
Page 40

tзквбеЦ=пбнЬ=`зен~Ен=`~кЗл
– bг~бд=^ЗЗкЙлл—You can add up to two email addresses for each contact.
–
–
–
■ bê~ëÉ=`çåí~ÅíÔErase the entire contact. A message appears: “Erase the entire
contact?” Select
information from a contact, such as a phone number, see “To erase
information from a contact card” on page 34.)
■ bÇáí=k~ãÉÔEdit the name associated with the contact.
■ `д~ллбСу=`зен~ЕнФClassify the contact as ДмлбеЙлл or йЙклзе~д so that it will
appear in your list of business or personal contacts and so that incoming calls
from this contact will have a distinctive business or personal ring if you have
set a different ringer for each type. (To set different ringers for business and
personal calls, see “Sounds” on page 40.)
■ bñáíÔReturn to the home screen without saving modifications made in this
step.
ÅK Press to select p~îÉK
A message appears: “Contact Successfully Saved!”
pнкЙЙн=^ЗЗкЙлл—You can add up to two street addresses for each contact.
roi—You can add up to two URLs for each contact.
kçíÉ—You can add a note of up to 250 characters to each contact.
vÉë to erase the contact, or kç to cancel. (To erase specific
QK To make additional changes, repeat Step 3. To return to the home screen,
press .
qз=л~оЙ=~=йЬзеЙ=емгДЙк=нЬкзмЦЬ=нЬЙ=`зен~Енл=ЗбкЙЕнзку
NK From the home screen, select jÉåì 6 `çåí~Åíë 6 ^ÇÇ=kÉï.
OK Press to select mЬзеЙ=kмгДЙкK
PK Enter the phone number.
båíÉê=~=é~ìëÉ If you are entering the phone number of an automated service such as voicemail
that requires a pause, take these steps.
~K Enter the first portion of the phone number and press .
ÄK Press right through the list of options at the bottom of the screen.
PM oЙСЙкЙеЕЙ=dмбЗЙ=Сзк=нЬЙ=n`m=ONMM=pЙкбЙл=mЬзеЙл
Page 41

ÅK Press to select a type of pause.
qáãÉ=m~ìëÉ= causes the phone to stop dialing for two seconds.
~êÇ=m~ìëÉ causes the phone to stop dialing until you select oÉäÉ~ëÉ.
H
X
ÇK Enter the remaining numbers.
QK Press twice to select kÉñíK
tзквбеЦ=пбнЬ=`зен~Ен=`~кЗл
båíÉê=Åçåí~Åí=
å~ãÉ
jзЗбСу=
Езен~Ен=
RK Enter a name for the contact.
If you need to know how to use the keypad to enter letters, see page 24.
SK Press to select p~îÉ.
TK To create a speed dial location or to make any changes to this
contact card, do the following:
~K Select lйнбзел and press .
ÄK Press up or down and press to select an option
from the list:
■ ^ÇÇ=kÉïÔAdd a phone number, email address, street address, URL (Web
site), or note to the contact:
mЬзеЙ=kмгДЙкФYou can add up to six phone numbers for each contact.
–
–
bг~бд=^ЗЗкЙллФYou can add up to two email addresses for each contact.
–
pнкЙЙн=^ЗЗкЙллФYou can add up to two street addresses for each contact.
–
roiÔYou can add up to two URLs for each contact.
–
kçíÉÔYou can add a one note of up to 250 characters to each contact.
■ bê~ëÉ=`çåí~ÅíÔErase the entire contact. A message appears: “Erase the entire
contact?” Select
vÉë to erase the contact, or kç to cancel. (To erase specific
information from a contact, such as a phone number, see “To erase
information from a contact card” on page 34.)
■ bÇáí=k~ãÉÔEdit the name of the contact.
■ `д~ллбСу=`зен~ЕнФClassify the contact as ДмлбеЙлл or йЙклзе~д so that it will
appear in your list of business or personal contacts and so that incoming calls
from this contact will have a distinctive business or personal ring if you have
set a different ringer for each type. (To set different ringers for business and
personal calls, see “Sounds” on page 40.)
■ bñáíÔReturn to the home screen without saving modifications made in this
step.
ÅK Press to select p~îÉK
A message appears: “Contact Successfully Saved!”
UK To make additional changes, repeat Step 7. To return to the home screen,
press .
`Ü~éíÉê=Q=`çåí~Åíë PN
Page 42

tзквбеЦ=пбнЬ=`зен~Ен=`~кЗл
qç=çéÉå=~=ë~îÉÇ=Åçåí~Åí=Å~êÇ
NK Find your contact from the home screen in one of the following ways:
■ To view an alphabetical list of all saved contacts, press down.
■ To view your list of Speed Dial, Business, or Personal contacts, select jÉåì 6
`çåí~Åíë, then select a list and press .
kçíÉ
qз=Ед~ллбСу=~=Езен~Ен=~л=~=лйЙЙЗ=Зб~д=емгДЙк=зк=~л=~=ДмлбеЙлл=зк=йЙклзе~д=Езен~ЕнI=лЙЙ=
jзЗбСу=Езен~ЕнТ=çå=é~ÖÉ=OV=~åÇ=é~ÖÉ=PNK
■ To search for a specific name, select cáåÇ=k~ãÉ, enter the first three or four
letters of the name, and press to select
■ To search for a specific phone number, enter the phone number, press
right to select Find, and press .
A list of contacts appears.
OK Press up or down to scroll through the list.
PK Press to select the contact you want.
qç=ÉÇáí=~=Åçåí~Åí=Å~êÇ
To add to, change, or erase a contact, take these steps.
You can modify the contact itself--for example, classify it as business or personal (page
32) or you can modify an element of the contact, such as a phone number, email
address, street address, URL, or note (page 33).
jзЗбСу=~=Езен~Ен
cáåÇK
NK Open the contact you want to edit. (For directions, see “To open a saved contact
card” on page 32.
OK Select lйнбзел and make any of the following changes:
kçíÉ
tЬЙе=узм=лЙдЙЕн=lйнбзелI=~еу=ЕЬ~еЦЙл=узм=г~вЙ=~ССЙЕн=нЬЙ=ЙенбкЙ=Езен~ЕнK=fС=узм=п~ен=
нз=ЕЬ~еЦЙ=лйЙЕбСбЕ=беСзкг~нбзе=~Дзмн=нЬЙ=Езен~ЕнI=лмЕЬ=~л=нЬЙ=йЬзеЙ=емгДЙкI=лЙдЙЕн=
нЬЙ=йЬзеЙ=емгДЙкK
■ ^ÇÇ=kÉïÔAdd a phone number, email address, street address, URL (Web site),
or note to the contact:
–
mЬзеЙ=kмгДЙкФYou can add up to six phone numbers for each contact.
–
bг~бд=^ЗЗкЙллФYou can add up to two email addresses for each contact.
–
pнкЙЙн=^ЗЗкЙллФYou can add up to two street addresses for each contact.
–
roiÔYou can add up to two URLs for each contact.
–
kçíÉÔYou can add a one note of up to 250 characters to each contact.
PO oЙСЙкЙеЕЙ=dмбЗЙ=Сзк=нЬЙ=n`m=ONMM=pЙкбЙл=mЬзеЙл
Page 43

tзквбеЦ=пбнЬ=`зен~Ен=`~кЗл
■ bê~ëÉ=`çåí~ÅíÔErase the entire contact. A message appears: “Erase the entire
contact?” Select
vÉë to erase the contact, or kç to cancel. (To erase specific
information from a contact, such as a phone number, see “To erase information
from a contact card” on page 34.)
■ bÇáí=k~ãÉÔEdit the name associated with the contact.
■ `д~ллбСу=`зен~ЕнФClassify the contact as ДмлбеЙлл or йЙклзе~д so that it will appear
in your list of business or personal contacts and so that incoming calls from this
contact will have a distinctive business or personal ring if you have set a
different ringer for each type. (To set different ringers for business and personal
calls, see “Sounds” on page 40.)
■ bñáíÔReturn to the home screen without saving modifications made in this step.
PK If finished, press to select p~îÉ.
jзЗбСу=~е=ЙдЙгЙен=зС=~=Езен~Ен
NK Open the contact you want to edit. (For directions, see “To open a saved contact
card” on page 32.)
OK Select the item you want to edit, such as the phone number. The options below are
available if you select the phone number; options may vary if you select another
item, such as the email address.
■ sбЙп=kмгДЙкФThe phone number and its type (such as пзквI=ЬзгЙI=гзДбдЙI=
é~ÖÉêI
or Ñ~ñ) appear. Select lh to return to the list of options.
■ pйЙЙЗ=aб~дбеЦФAssign a speed dialing location to this phone number. For more
information about assigning speed dialing locations, see “To assign a speed
dialing location” on page 19.
■ bк~лЙ=kмгДЙкФErase this phone number. Select kç to cancel, or vÉë to erase
this phone number.
■ bЗбн=kмгДЙкФMake changes to this phone number.
■ pЙЕкЙнФMark this phone number as secret. For more information on secret
phone numbers, see “To save a phone number through the Contacts directory”
on page 30.
■ mкбг~ку=kмгДЙкФMark this phone number as the primary number for this
contact. You can call a contact’s primary number automatically when you select
the contact and press .
■ bÇáí=qóéÉÔAssign or change the type of phone number, such as ïçêâI=ÜçãÉI=
гзДбдЙI=й~ЦЙкI
■ bñáíÔReturn to the home screen.
or Ñ~ñK
PK If finished, press to select p~îÉ.
`Ü~éíÉê=Q=`çåí~Åíë PP
Page 44

tзквбеЦ=пбнЬ=`зен~Ен=`~кЗл
qз=Йк~лЙ=беСзкг~нбзе=Скзг=~=Езен~Ен=Е~кЗ
You can erase an entire contact or erase selected information (such as a phone number)
from a contact.
bк~лЙ=~е=ЙенбкЙ=Езен~Ен
NK Open the contact you want to edit. (For directions, see “To open a saved contact
card” on page 32.
OK Select lйнбзел to erase the entire contact card.
PK Select bê~ëÉ=`çåí~Åí.
A message appears: “Erase the entire contact?”.
QK Select vÉë to erase the entire contact, or kç to cancel.
Erase the entire
contact?
RK If finished, press to select bñáí.
No Yes
bк~лЙ=лЙдЙЕнЙЗ=беСзкг~нбзе=Скзг=~=Езен~Ен
NK Open the contact you want to edit. (For directions, see “To open a saved contact
card” on page 32.
OK Select the specific information (such as the phone number) you want to erase.
PK Select bк~лЙ=kмгДЙкI=bк~лЙ=^ЗЗкЙллI or bê~ëÉ=kçíÉK
■ A message appears: “Erase this number/address/note?”
■ Select vÉë to erase, or kç to cancel.
Erase this
number?
QK If finished, press to select bñáí.
No Yes
PQ oЙСЙкЙеЕЙ=dмбЗЙ=Сзк=нЬЙ=n`m=ONMM=pЙкбЙл=mЬзеЙл
Page 45

qз=Е~дд=Скзг=нЬЙ=`зен~Енл=ЗбкЙЕнзку
NK Find your contact from the home screen in one of the following ways:
■ To view an alphabetical list of all saved contacts, press down.
■ To view your list of Speed Dial, Business, or Personal contacts, select jÉåì 6
`çåí~Åíë, then select a list and press .
kçíÉW To classify a contact as a speed dial number or as a business or personal
contact, see “Modify contact” on page 29 and page 31.
■ To search for a specific name, select cáåÇ=k~ãÉ, enter the first three or four
letters of the name, and press to select
■ To search for a specific phone number, enter the phone number, press
right to select
A list of contacts appears.
OK Press up or down to scroll through the list.
PK Highlight a contact and do one of the following:
■ If you have saved a Primary Number for this contact (see page 29), just press
to call that number.
■ Otherwise, press to open the contact you want. Then select the phone
number and press .
cáåÇ, and press .
tзквбеЦ=пбнЬ=`зен~Ен=`~кЗл
cáåÇK
`Ü~éíÉê=Q=`çåí~Åíë PR
Page 46

`Ü~éíÉê=R
pЙннбеЦл
The settings on your phone allows you to customize features such as the type of ringer
you hear, the volume of the key beeps and ringer, and your phone’s display screens.
få=íÜáë=ÅÜ~éíÉê
■ Silence All page 38
■ Keyguard page 39
■ Sounds page 40
■ Display page 42
■ Security page 44
■ Call Information page 46
■ Network page 47
■ Extras page 49
■ Messaging page 50
■ Alerts page 51
■ Accessories page 52
`Ь~йнЙк=R=pЙннбеЦл PS
Page 47

The Settings menu includes the following options.
pбдЙеЕЙ=^дд
hÉóÖì~êÇ
pзмеЗл
No, normal
Yes , vi be on ly
Yes , li gh ts only
Guard Now
30 s auto-guard
1 m auto-guard
5 m auto-guard
Auto-guard off
Call Ring/Vibe
Ringer Volume
Ringer Type
Business Call Ring
Personal Call Ring
Roaming Ringer
Earpiece Volume
pЙЕмкбну=Eузм=гмлн=ЙенЙк=узмк=СзмкJЗбЦбн=
äçÅâ=ÅçÇÉ=нз=~ЕЕЙлл=нЬЙлЙ=гЙемлF
Lock Phone
Limit Calls Out
Change Lock Code
Erase All Contacts
Erase Recent Calls
Phone Reset
`~дд=fеСзкг~нбзе
Recent Calls Timer
All Calls Timer
Browser Timer
kЙнпзкв
Data/Fax Calls In
Privacy Alert
Roam/Srvc Alert
Roam Option
Digital or Analog
aáëéä~ó
Key Beep Volume
Key Beep Length
Key Beep Sound
Missed Call Alert
Smart Sound (for more
information, see page 9)
Minute Alert
Backlighting
My Banner
Shortcut Key
Main Menu View
Auto-Hyphenation
Language
Time/Date Format
Display Contrast
bñíê~ë
Fast Find
1-Touch Dialing
Browser Prompt
jÉëë~ÖáåÖ
Voicemail Number
Auto-Erase Text
Msg Auto-Save
Voicemail Alert
Page Alert
Message Alert
Net Alerts
^ЕЕЙллзкбЙл
Power Backlighting
Headset Ringing
Auto-Answer
`Ь~йнЙк=R=pЙннбеЦл PT
Page 48

pбдЙеЕЙ=^дд
pбдЙеЕЙ=^дд
qз=лбдЙеЕЙ=нЬЙ=кбеЦЙк=зк=~дЙкн
■ To silence the ringer or stop the vibration alert temporarily during an incoming call,
press . To answer the call, press immediately.
qз=ЕЬ~еЦЙ=нЬЙ=обДк~нбзеI=Д~ЕвдбЦЬнI=зк=лбдЙен=кбеЦЙк=лЙннбеЦ
You can silence all phone sounds, including the ringer and all alerts, while leaving the
phone on. You can also set the phone to vibrate or light up instead of ringing.
NK Select jÉåì 6 pЙннбеЦл 6 pбдЙеЕЙ=^дд.
OK Highlight an option and press to select it:
■ kçI=åçêã~äÔThe ringer and all alert sounds are turned on. To change the ringer
volume and ringer type, see
■ vЙлI=обДЙ=зедуФSilence all sounds and set the phone to vibrate. appears on the
phone screen.
■ vЙлI=дбЦЬнл=зедуФSilence all sounds and set the phone to light up. appears on
the phone screen.
PU oЙСЙкЙеЕЙ=dмбЗЙ=Сзк=нЬЙ=n`m=ONMM=pЙкбЙл=mЬзеЙл
Page 49

hÉóÖì~êÇ=
The keyguard locks your keypad to protect your phone against accidental keypresses
and accidental calls when the phone is turned on and a call is not in progress. Keyguard
does not prevent you from answering or silencing an incoming call.
qз=нмке=вЙуЦм~кЗ=зе
NK Select jÉåì 6 pЙннбеЦл 6 hÉóÖì~êÇ.
OK Highlight one of the locking options and press to save:
■ dì~êÇ=kçïÔLocks the keypad immediately.
■ PM=ë=~ìíçJÖì~êÇÔLocks the keypad if no keys are pressed for 30 seconds.
■ N=ã=~ìíçJÖì~êÇÔLocks the keypad if no key is pressed for one minute.
■ R=ã=~ìíçJÖì~êÇÔLock the keypad if no key is pressed for five minutes.
■ ^ìíçJÖì~êÇ=çÑÑÔUnlocks the keypad and returns it to normal.
hÉóÖì~êÇ
qáé
qз=нмке=вЙуЦм~кЗ=зе=имбЕвду=Скзг=нЬЙ=ЬзгЙ=лЕкЙЙеI=йкЙлл= =дЙСн=~еЗ=ЬздЗ=Сзк=лЙоЙк~д=
лЙЕзеЗлK==
qз=нмке=вЙуЦм~кЗ=зСС
■ Press 6 6 in this order.
`Ь~йнЙк=R=pЙннбеЦл PV
Page 50

pзмеЗл
pзмеЗл
You can change the alert sounds your phone makes.
NK Select jÉåì 6 pЙннбеЦл 6 pзмеЗл.
OK Press down to scroll through the list of options, and press to select an
option:
■ `~ää=oáåÖLsáÄÉÔSet the phone to ring or vibrate for incoming calls by selecting an
option from the list:
oбеЦ=зедуФWhen you receive an incoming call, the phone rings using the
–
ringer type you have selected.
sбДк~нЙ=зедуФWhen you receive an incoming call, the phone vibrates.
–
–
sбДк~нЙ=нЬЙе=кбеЦФWhen you receive an incoming call, the phone vibrates
first, then if you have not acknowledged the call, the phone rings using the
ringer type you have selected.
■ oбеЦЙк=sздмгЙФPress left to turn the ringer volume down. Press right to
turn the ringer volume up.
■ oбеЦЙк=qуйЙФSelect from a variety of built-in ringer sounds, including standard
ringers, songs, and whistles.
You can download additional ringers if you have a PC, Kyocera Phone Desktop
software, and a data cable. For more information, visit
пппKвузЕЙк~JпбкЙдЙллKЕзгK
■ _млбеЙлл=`~дд=oбеЦФYou can distinguish between your business calls and your
personal calls by selecting a different ringer for each. Select from a variety of
built-in ringer sounds, including standard ringers, songs, and whistles. To learn
how to set up contacts as
ДмлбеЙлл or йЙклзе~д, see page 30.
■ mЙклзе~д=`~дд=oбеЦФYou can distinguish between your business calls and your
personal calls by selecting a different ringer for each. Select from a variety of
built-in ringer sounds, including standard ringers, songs, and whistles. To learn
how to set up contacts as
■ oз~гбеЦ=oбеЦЙкФSelect an option from the list:
–
aбл~ДдЙЗФThe phone does not use a special ringer to indicate calls that may
ДмлбеЙлл or йЙклзе~д, see page 30.
be subject to roaming charges.
bе~ДдЙЗФWhen you receive an incoming call that may be subject to roaming
–
charges, the phone rings using a special ringer.
■ b~кйбЙЕЙ=sздмгЙФPress left to turn the earpiece volume down. Press to
turn the earpiece volume up.
■ hЙу=_ЙЙй=sздмгЙФSet the sound you hear when you press any key on the keypad.
Press left to turn the key beep volume down. Press right to turn the
key beep volume up.
QM oЙСЙкЙеЕЙ=dмбЗЙ=Сзк=нЬЙ=n`m=ONMM=pЙкбЙл=mЬзеЙл
Page 51

pзмеЗл
■ hЙу=_ЙЙй=iЙеЦнЬФThis setting controls the length of key beeps. Select an option
from the list:
–
kçêã~äÔNormal length key beeps.
–
içåÖÔLong length key beeps may be useful for automated dial-in systems,
such as voicemail. Some older voicemail systems require
■ hЙу=_ЙЙй=pзмеЗФIf the volume is turned on, you can set the sound you hear
içåÖ key beeps.
when you press a key.
■ jбллЙЗ=`~дд=^дЙкнФSelect bå~ÄäÉÇ if you want to have the phone alert you when
you have missed a call. Select
■ pг~кн=pзмеЗФIf this setting is bå~ÄäÉÇ, Smart Sound automatically adjusts the
aáë~ÄäÉÇ if you do not want to be alerted.
earpiece volume based on the amount of noise around you or the other person’s
voice volume level. Once you have enabled Smart Sound, follow the
instructions in “To adjust the earpiece volume” on page 9.
■ jбемнЙ=^дЙкнФYou can alert you of elapsed time during a call with a short beep
ten seconds before each minute passes.
`Ь~йнЙк=R=pЙннбеЦл QN
Page 52

aáëéä~ó
aáëéä~ó=
To change the appearance of your phone’s screen, complete the following steps:
NK Select jÉåì 6 pЙннбеЦл 6 aáëéä~ó.
OK Press down to scroll through the list of options, and press to select an
option:
■ _~ЕвдбЦЬнбеЦФBacklighting causes the screen and keypad to light up when you
press a key. You can select from the following backlighting options:
aбл~ДдЙЗФBacklighting is not used.
–
–
NM=лЙЕзеЗлФBacklighting is on for approximately 10 seconds after a keypress.
–
PM=лЙЕзеЗлФBacklighting is on for approximately 30 seconds after a keypress.
–
NM=ëÉÅK=C=áå=Å~ääÔBacklighting is on for approximately 10 seconds after a
keypress, and during a call.
PM=ëÉÅK=C=áå=Å~ääÔBacklighting is on for approximately 30 seconds after a
–
keypress, and during a call.
Tip: If backlighting is frequently on, your phone’s battery will drain more
quickly. To optimize your battery’s performance, select
NM=лЙЕзеЗл.
■ jу=_~ееЙкФCustomize the banner displayed on your home screen. Press
right, then press to select
bÇáí from the options at the bottom of the screen
to change what is currently displayed. If you need to know how to use the
keypad to enter letters, see page 24.
■ pЬзкнЕмн=hЙуФCreate a shortcut to the feature you use most often. Once the
shortcut is created, you will be able to access it by pressing up and holding.
kçåÉÔExit without setting a shortcut key
–
–
få_çñÔText messaging InBox
–
pÉåÇ=kÉï=jëÖÔA blank text messaging screen
–
oбеЦЙк=sздмгЙФRinger volume adjustment screen
–
oЙЕЙен=`~ддлФRecent Calls list
–
_млбеЙлл=iблнФiist of contacts classified as “business”
–
mЙклзе~д=iблнФList of contacts classified as “personal”
–
tЙД=_кзплЙкФWeb browser
■ j~áå=jÉåì=sáÉïÔSet the appearance of the menus you see when you select
jÉåì from the home screen. Select from the following options:
–
pг~дд=fЕзелФMenus appear as small icons.
Contacts
QO oЙСЙкЙеЕЙ=dмбЗЙ=Сзк=нЬЙ=n`m=ONMM=pЙкбЙл=mЬзеЙл
¾½
Page 53

aáëéä~ó
– i~кЦЙ=fЕзелФMenus appear as large icons.
Contacts
–
iблн=jЙемлФMenus appear in a list.
■ ^мнзJeуйЬЙе~нбзеФSelect bå~ÄäÉÇ if you want the phone to automatically enter
hyphens when you enter a phone number. Select
aáë~ÄäÉÇ=if you do not want
the phone to automatically enter hyphens when you enter a phone number.
■ i~åÖì~ÖÉÔSelect the language in which all text on your phone appears. Your
phone may support English or Spanish. Check with your service provider for
availability.
■ qáãÉLa~íÉ=cçêã~íÔSelect how the time and date is displayed on the home screen.
You can select from several options, including displaying time in 12- or 24-hour
format, and displaying dates in day/month format or month/day format.
■ aáëéä~ó=`çåíê~ëíÔSet the appearance of the phone’s display screen. You can
eбЦЬЙлнI=eбЦЬI=jЙЗбмгI=iзпI or iзпЙлн. The default setting is jЙЗбмг.
select
`Ь~йнЙк=R=pЙннбеЦл QP
Page 54

pЙЕмкбну
pЙЕмкбну
You must enter your four-digit lock code (typically 0000 or the last 4 digits of your
phone number) to set any of the options on the
qз=дзЕв=~еЗ=медзЕв=нЬЙ=йЬзеЙ
You can lock your phone to prevent unauthorized access to it. When you lock your
phone, you can only call a number your service provider has set up as an emergency
number, a service provider number, or a priority number. You can still receive
incoming calls.
qз=дзЕв=нЬЙ=йЬзеЙ
NK Select jÉåì 6 pЙннбеЦл 6 pЙЕмкбну 6 içÅâ=mÜçåÉ.
OK Select an option:
■ kЙоЙкФDo not lock the phone.
■ lе=йзпЙк=мйФLock the phone every time you turn it on.
■ kçïÔLock the phone immediately.
pЙЕмкбну menu.
PK Press to save the setting.
qз=медзЕв=нЬЙ=йЬзеЙ
■ Select rедзЕв and enter your four-digit lock code (usually 0000 or the last four digits
of your phone number).
qз=дбгбн=Е~ддл=змн
■ Select jÉåì 6 pЙннбеЦл 6 pЙЕмкбну 6 iáãáí=`~ääë=lìí. Select an option:
–
kçÔDo not limit calls.
–
vÉëI=íç=`çåí~ÅíëÔAllow calls to contacts only.
qç=ÅÜ~åÖÉ=óçìê=äçÅâ=ÅçÇÉ
NK Select jÉåì 6 pЙннбеЦл 6 pЙЕмкбну 6 `Ü~åÖÉ=içÅâ=`çÇÉ.
A message appears: “Change Lock Code?”
OK Do one of the following.
■ Select vÉë and enter a new code, then press . Enter your new lock code
again to verify it.
■ Select bñáí to leave your lock code unchanged.
qç=Éê~ëÉ=~ää=Åçåí~Åíë
■ Select jÉåì 6 pЙннбеЦл 6 pЙЕмкбну 6 bê~ëÉ=^ää=`çåí~Åíë. Select an option:
–
kçÔContacts are unchanged.
–
vÉëÔErase all contacts. A message appears: “Erase ALL contacts?” Select kç to
cancel, or
QQ oЙСЙкЙеЕЙ=dмбЗЙ=Сзк=нЬЙ=n`m=ONMM=pЙкбЙл=mЬзеЙл
vÉë to erase all contacts.
Page 55

qз=Йк~лЙ=кЙЕЙен=Е~ддл
■ Select jÉåì 6 pЙннбеЦл 6 pЙЕмкбну 6 bк~лЙ=oЙЕЙен=`~ддл. Select an option:
–
kçÔRecent Calls list is unchanged.
–
vÉëÔErase all recent calls. A message appears: “Erase ALL recent calls list
entries?” Select
qз=кЙлЙн=нЬЙ=йЬзеЙ
■ Select jÉåì 6 pЙннбеЦл 6 pЙЕмкбну 6 mÜçåÉ=oÉëÉí. Select an option:
–
kçÔCancel and return to the pЙЕмкбну menu.
–
vÉëÔReset the phone. A message appears: “Reset ALL phone settings?” Select
kç to cancel or vÉë to reset the phone.
pЙЕмкбну
kç to cancel or vÉë to erase all recent calls.
kçíÉ
vзмк=СзмкJЗбЦбн=дзЕв=ЕзЗЙI=oЙЕЙен=`~ддл=нбгЙкI=`зен~Енл=ЗбкЙЕнзкуI=qЙсн=fе_зс=~еЗ=qЙсн=
lмн_зс=ЕзенЙенлI=~еЗ=лЙкобЕЙ=йкзЦк~ггбеЦ=~кЙ=езн=кЙлЙн=пЬЙе=узм=кЙлЙн=узмк=йЬзеЙK
`Ь~йнЙк=R=pЙннбеЦл QR
Page 56

`~дд=fеСзкг~нбзе
`~дд=fеСзкг~нбзе
This setting allows you to view information about calls and alerts.
oЙЕЙен=`~ддл=qбгЙк
This timer displays the total number and duration of recent calls you have made and
received. Press to select
^ää=`~ääë=qáãÉê
This timer displays the total number and duration of all calls you have made and
received. You cannot reset this timer.
_кзплЙк=qбгЙк
This timer displays the total duration of data calls you have made. Press to select
oÉëÉí and reset the timer to zero.
oÉëÉí and reset the timer to zero.
QS oЙСЙкЙеЕЙ=dмбЗЙ=Сзк=нЬЙ=n`m=ONMM=pЙкбЙл=mЬзеЙл
Page 57

kЙнпзкв
Use this setting to view or change options such as roaming and privacy alerts. Some
settings may not be available on all phones.
qз=лЙдЙЕн=ЗбЦбн~д=зк=~е~дзЦ=гзЗЙ
This setting is not available on the Kyocera 2119 phone, which is digital only.
NK Select jÉåì 6 pЙннбеЦл 6 kЙнпзкв 6 aáÖáí~ä=çê=^å~äçÖ.
OK Press to select an option:
■ ^ìíçã~íáÅÔAutomatically switch the phone between digital and analog.
■ ^е~дзЦ=зедуФSet the phone to work in analog mode only.
■ ^å~äçÖ=Å~ääÔForce a call into analog mode for the duration of the next call.
■ aбЦбн~д=зедуФSet the phone to work in digital mode only.
oз~г=lйнбзе
kЙнпзкв
This setting determines which signals your phone accepts.
NK Select jÉåì 6 pЙннбеЦл 6 kЙнпзкв 6 oз~г=lйнбзе.
OK Press to select an option:
■ ^мнзг~нбЕ=EкЙЕзггЙеЗЙЗ=лЙннбеЦFФAccept any system the phone service provides.
■ kз=oз~гбеЦФYou cannot make or receive calls when you are roaming.
oз~гLpЙкобЕЙ=^дЙкн
Use this setting to have the phone alert you when you roam outside of your home
service area.
NK Select jÉåì 6 pЙннбеЦл 6 kЙнпзкв 6 oç~ãLpêîÅ=^äÉêí.
OK Press to select an option:
■ aбл~ДдЙЗФYou are not alerted if you roam outside your home service area.
■ tЬЙе=ез=лЙкобЕЙФYou are alerted with three tones, decreasing in intensity, when
■ lå=êç~ã=ÅÜ~åÖÉÔAlerts you with two tones, decreasing in intensity, when
service is lost. When service is acquired again, you will hear three tones in
increasing intensity.
roaming service is acquired. When home area service is acquired again, you
hear two tones, increasing in intensity.
■ lå=~åó=ÅÜ~åÖÉÔAlerts you with three increasing tones if there is a change in
roaming service or three decreasing tones if the phone loses service.
mêáî~Åó=^äÉêí
NK Select jÉåì 6 pЙннбеЦл 6 kЙнпзкв 6 mêáî~Åó=^äÉêí.
OK Press to select an option:
`Ь~йнЙк=R=pЙннбеЦл QT
Page 58

kЙнпзкв
■ aбл~ДдЙЗФDo not play any alerts.
■ bе~ДдЙЗФPlay an audible alert whenever enhanced privacy is lost or regained
and a call is in progress.
kçíÉ
^е=~дЙкн=гЙлл~ЦЙ=~дп~ул=лЬзпл=зе=нЬЙ=лЕкЙЙеI=кЙЦ~кЗдЙлл=зС=нЬЙлЙ=лЙннбеЦлK=
a~í~Lc~ñ=`~ääë=få
These settings tell the phone how to handle voice and data calls.
NK Select jÉåì 6 pЙннбеЦл 6 kЙнпзкв 6 a~í~Lc~ñ=`~ääë=få.
OK Press to select an option:
■ sçáÅÉ=låäóÔAllow only voice calls.
■ c~ñI=åÉñí=Å~ääÔSet the phone to fax mode for the next incoming call or the next
ten minutes.
■ a~í~I=åÉñí=Å~ääÔSet the phone to data mode for the next incoming call or the next
ten minutes.
■ c~сI=менбд=зССФForce the phone into fax mode until the phone is turned off.
■ a~н~I=менбд=зССФForce the phone into data mode until the phone is turned off.
QU oЙСЙкЙеЕЙ=dмбЗЙ=Сзк=нЬЙ=n`m=ONMM=pЙкбЙл=mЬзеЙл
Page 59

bñíê~ë
These settings allow you to program various options.
NJqçìÅÜ=aá~äáåÖ
You can turn 1-Touch Dialing off and on from this setting.
NK Select jÉåì 6 pЙннбеЦл 6 bñíê~ë 6 NJqçìÅÜ=aá~äáåÖ.
OK Press to select an option:
_кзплЙк=mкзгйн
You can receive a prompt whenever you attempt to start or exit the browser.
NK Select jÉåì 6 pЙннбеЦл 6 bñíê~ë 6 _кзплЙк=mкзгйн.
bñíê~ë
■ aбл~ДдЙЗФ1-Touch Dialing is off.
■ bе~ДдЙЗФ1-Touch Dialing is on. To use 1-Touch Dialing to make a call, see “To
use 1-Touch Dialing” on page 21.
OK Press to select an option:
■ ^í=pí~êíÔPrompt you when you start the browser.
■ ^í=båÇÔPrompt you when you exit the browser.
■ _çíÜÔPrompt you when you start the browser and when you exit the browser.
■ kз=mкзгйнлФYou do not receive any prompts.
`Ь~йнЙк=R=pЙннбеЦл QV
Page 60

jÉëë~ÖáåÖ
jÉëë~ÖáåÖ
For detailed information on how to send, retrieve, and store messages, see the Messages
chapter, beginning on page 53.
The messaging settings allow you to set how you want to handle incoming and
outgoing messages.
qз=ЕЬ~еЦЙ=узмк=озбЕЙг~бд=емгДЙк
You can change the phone number assigned to speed dialing location “1” by doing the
following:
NK Select jÉåì 6 jÉëë~ÖÉë 6 jлЦ=pЙннбеЦл 6 sзбЕЙг~бд=kмгДЙк.
OK Select bÇáí to change the number that is currently assigned to speed dial
location “1.”
PK Enter the new number, then select an option:
■ p~îÉ=saves the new number.
■ qáãÉ=m~ìëÉ=enters a time pause in the number. See Enter a pause on page 29.
■ e~êÇ=m~ìëÉ=enters a hard pause in the number. See Enter a pause on page 29.
qç=Éê~ëÉ=ãÉëë~ÖÉë=~ìíçã~íáÅ~ääó
Use this setting to erase old messages and free up phone memory.
NK Select jÉåì 6 pЙннбеЦл 6 jÉëë~ÖáåÖ 6 ^ìíçJbê~ëÉ=qÉñí.
OK Press to select an option:
■ aáë~ÄäÉÇ=does not erase messages.
■ läÇ=få_çñ=automatically erases old, read messages.
RM oЙСЙкЙеЕЙ=dмбЗЙ=Сзк=нЬЙ=n`m=ONMM=pЙкбЙл=mЬзеЙл
Page 61

^дЙкнл
^дЙкнл
You can select how you want to receive alerts for voicemail, pages, text messages, and
the Web Browser.
NK Select jÉåì 6 pЙннбеЦл 6 jÉëë~ÖáåÖ, then scroll down in the list to select a type of
sзбЕЙг~бд=^дЙкнI=m~ЦЙ=^дЙкнI=jЙлл~ЦЙ=^дЙкнI or kЙн=^дЙкнл).
alert (
OK Press to select an option:
■ aбл~ДдЙЗФYou are not alerted when a message is received.
■ sбДк~нЙ=зеЕЙФThe phone vibrates once when a new message is received.
■ sбДЙ=C=кЙгбеЗФThe phone vibrates once when a new message is first received,
and a reminder vibrates approximately every five minutes until the message is
acknowledged by pressing or , or selecting
fЦезкЙ from the bottom
of the screen.
kçíÉ
fС=~=гЙлл~ЦЙ=бл=кЙЕЙбоЙЗ=пЬбдЙ=узм=~кЙ=зе=~=Е~ддI=нЬЙ=йЬзеЙ=ЗзЙл=езн=обДк~нЙ=нз=кЙгбеЗ=
узмK=
■ iзп=ДЙЙй=зеЕЙФThe phone beeps once at a low volume when a message is
received.
■ iзп=ДЙЙйлФThe phone beeps approximately every five minutes at a low volume
until the message is acknowledged by pressing or , or selecting
fЦезкЙ
from the bottom of the screen.
■ iзмЗ=ДЙЙй=зеЕЙФThe phone beeps once at a high volume when a message is
received.
■ iзмЗ=ДЙЙйлФThe phone beeps at a high volume approximately every five
minutes until the message is acknowledged by pressing or , or
selecting
fЦезкЙ from the bottom of the screen.
`Ь~йнЙк=R=pЙннбеЦл RN
Page 62

^ЕЕЙллзкбЙл
^ЕЕЙллзкбЙл
Your phone comes with several features for additional convenience.
mзпЙк=_~ЕвдбЦЬнбеЦ
This allows backlighting to remain on when external power, such as a travel charger,
is used with the phone.
NK Select jÉåì=6 pЙннбеЦл=6=^ЕЕЙллзкбЙл 6=mзпЙк=_~ЕвдбЦЬнбеЦK
OK Select kçêã~ä to keep the default setting (recommended), or ^äï~óë=çå to keep
backlighting on.
kçíÉ
pЙннбеЦ=Д~ЕвдбЦЬнбеЦ=нз=^äï~óë=çå=беЕкЙ~лЙл=узмк=ЕЬ~кЦбеЦ=нбгЙK=cзк=нЬбл=кЙ~лзеI=нЬЙ=
Д~ЕвдбЦЬнбеЦ=пбдд=езн=лн~у=зе=бС=узм=~кЙ=млбеЦ=нЬЙ=pн~еЗ~кЗ=^`=^З~йнЙк=йкзобЗЙЗ=пбнЬ=
нЬЙ=йЬзеЙK
eЙ~ЗлЙн=oбеЦбеЦ
When a headset is attached to the phone, you may choose to have alert sounds come
out of either the phone or the headset.
NK Select jÉåì 6 pЙннбеЦл 6 ^ЕЕЙллзкбЙл 6 eЙ~ЗлЙн=oбеЦбеЦ.
OK Select lмн=зС=йЬзеЙ to have the alerts come out of the phone, or lìí=çÑ=ÜÉ~ÇëÉí to have
^мнзJ^елпЙк
If your phone is attached to a Portable Hands-free Car Kit (sold separately), you may set
it to answer an incoming call after 5 seconds.
■ Select jÉåì 6 pЙннбеЦл 6 ^ЕЕЙллзкбЙл 6 ^мнзJ^елпЙк 6 ^СнЙк=R=лЙЕзеЗл.
alerts come out of the headset.
RO oЙСЙкЙеЕЙ=dмбЗЙ=Сзк=нЬЙ=n`m=ONMM=pЙкбЙл=mЬзеЙл
Page 63

`Ü~éíÉê=S
jÉëë~ÖÉë
få=íÜáë=ÅÜ~éíÉê
■ Entering Text page 54
■ About Text Messages page 58
■ Retrieving Messages page 59
■ Sending Text Messages page 61
■ Message Delivery Options page 64
■ Erasing Messages page 65
■ Changing Your Voicemail Speed Dialing Location page 67
■ Alerts page 68
■ Troubleshooting Messages page 69
`Ü~éíÉê=S=jÉëë~ÖÉë RP
Page 64

bенЙкбеЦ=qЙсн
bенЙкбеЦ=qЙсн
You can enter letters, numbers, and symbols in a text message. The default text entry
mode is .
Edit Name:
Jane Doe
Save In...
■ To enter spaces, press .
■ To move the cursor, press right or left.
■ To erase individual characters, press .
■ To erase all characters, press and hold .
qáé
qз=ЕЬ~еЦЙ=нЙсн=Йенку=гзЗЙл=имбЕвдуI=йкЙлл= =зеЕЙK
qз=ЕЬ~еЦЙ=Е~йбн~дбт~нбзе=гзЗЙлI=йкЙлл=~еЗ=ЬздЗ= K
qз=ЕЬ~еЦЙ=нЙсн=Йенку=гзЗЙл
Text entry modes are as follows:
To change text entry modes, take these steps:
NK From the text entry screen, press to highlight the options
kçêã~ä=^äéÜ~K Enter one character at a time. See “To use normal text entry
mode” on page 55.
o~éáÇ=båíêóK Find words by entering a few characters. See “To use Text Input
®
rapid text entry mode” on page 55.
pугДздлK Enter punctuation characters. See “To enter symbols” on page 57.
kмгДЙкл=lедуK Enter numbers. See “To enter numbers” on page 57.
at the bottom of the screen.
RQ rлЙкЫл=dмбЗЙ=Сзк=нЬЙ=n`m=ONMM=pЙкбЙл=mЬзеЙл
Page 65

OK Press right to highlight the current text entry mode, and
press to select it.
bенЙкбеЦ=qЙсн
The current text entry mode will be , ,
PK A list of text entry modes appears. Press to scroll through
the list.
QK Press to select a text entry mode.
qз=ЕЬ~еЦЙ=Е~йбн~дбт~нбзе=гзЗЙл
■ Press and hold to change capitalization modes. Capitalization modes are as
follows:
The next letter you enter is capitalized.
Every letter you enter is capitalized.
The first letter of each sentence is capitalized.
blank
Every letter you enter is in lower case.
®
, or .
qç=ìëÉ= =езкг~д=нЙсн=Йенку=гзЗЙ
normal text entry allows you to enter text using one keypress per letter.
Press key once to enter an “a”
Press key twice to enter an “b”
Press key three times to enter a “c”
Press and hold key to enter a “2”
Two seconds after you choose a character or number, the cursor moves one space to
the right.
qç=ìëÉ= qЙсн=fей мн=к~йбЗ=нЙсн=Йенку=гзЗЙ
®
T9® Text Input rapid text entry mode (available in English only for the 2100 Series
phones) allows you to enter text quickly by anticipating the word you are entering. T9
accesses a dictionary of words in an attempt to match certain key combinations with
words.
qз=ЙенЙк=пзкЗл
NK Press each letter key once.
For example, to enter the word “how,” press keys
`Ü~éíÉê=S=jÉëë~ÖÉë RR
6 6 .
Page 66

bенЙкбеЦ=qЙсн
kçíÉ
kçíÉ
t~бн=менбд=узм=Ь~оЙ=ЙенЙкЙЗ=нЬЙ=ЙенбкЙ=пзкЗ=ДЙСзкЙ=ЕЬЙЕвбеЦ=нЬЙ=лЕкЙЙе=нз=лЙЙ=бС=нЬЙ=
пзкЗ=лЬзпе=бл=ЕзккЙЕнK=b~ЕЬ=нбгЙ=узм=йкЙлл=~=вЙуI=нЬЙ=лзСнп~кЙ=пбдд=ЦмЙллТ=ЗбССЙкЙен=
пзкЗлK=vзм=гмлн=ЙенЙк=~дд=ЕЬ~к~ЕнЙкл=ДЙСзкЙ=бн=Е~е=СбеЗ=узмк=пзкЗK
Several options may be listed, but only one appears on your screen at a time.
OK If the word that appears on the screen is not the word you want, press to
cycle through the available words, then press or press right to select the
word you want.
fС=нЬЙ=пзкЗ=узм=п~ен=бл=езн=дблнЙЗI=лпбнЕЬ=нз= гзЗЙ=~еЗ=ЙенЙк=бнK=lеЕЙ=узм=ЙенЙк=
нЬЙ=пзкЗI=бн=пбдд=ДЙ=л~оЙЗ=бе=нЬЙ=qV=ЗбЕнбзе~ку=~еЗ=бн=лЬзмдЗ=~ййЙ~к=Сзк=узм=нЬЙ=еЙсн=
íáãÉ=óçì=ìëÉ= =ãçÇÉ.
®
qз=ЙенЙк=ймеЕнм~нбзе
NK To insert punctuation characters, press .
OK If the character shown is not the character you want, press to cycle through
available characters.
qáé
PK Press or press right to select the character you want.
o~йбЗ=нЙсн=Йенку=Йс~гйдЙ
The following steps describe how to enter the name “Jane”:
t~бн=менбд=узм=Ь~оЙ=нуйЙЗ=нЬЙ=ЙенбкЙ=пзкЗ=ДЙСзкЙ=ЕЬЙЕвбеЦ=нЬЙ=лЕкЙЙе=нз=лЙЙ=бС=нЬЙ=
пзкЗ=лЬзпе=бл=ЕзккЙЕнK=fе=нЬЙ=Йс~гйдЙ=ДЙдзпI
íÜÉ=ïçêÇ=g~åÉÒ=ïáää=åçí=~ééÉ~ê=
бггЙЗб~нЙдуX=дззв=~н=нЬЙ=вЙуй~ЗI=езн=нЬЙ=йЬзеЙ=лЕкЙЙеI=~л=узм=ЙенЙк=дЙннЙклK
NK When you are in the text entry screen, press until appears to switch to
®
rapid text entry mode. (See “To change text entry modes” on page 54).
OK Make sure appears next to at the bottom of the screen. If it does not
®
appear, press and hold until it appears.
PK Press once. The letter “K” appears.
QK Press once. The first letter changes to an “L” and the letter “a” appears next
to it.
RK Press once. The first letter changes to a “J”, the second letter remains an “a,”
and the letter “n” appears next to it.
SK Press . The letter “d” appears.
RS rлЙкЫл=dмбЗЙ=Сзк=нЬЙ=n`m=ONMM=pЙкбЙл=mЬзеЙл
Page 67

cзк=гзкЙ=беСзкг~нбзе
For more instructions on how to use T9® Text Input rapid text entry, visit
пппKнЙЦбЕKЕзг.
qз=ЙенЙк=лугДздл=
NK From the text entry screen, press down to highlight the options at the bottom
of the screen.
OK Press right to the text entry mode you are currently using.
PK Press to select the mode.
QK Press down through the list of modes.
RK Highlight pугДздл, then press to select it.
SK Press down through the list. Each character is matched to a number key. Press
the number key corresponding to the symbol you want to use. For example, to
enter a comma, press .
TK To exit the list without entering a symbol, press .
bенЙкбеЦ=qЙсн
After entering a symbol, the phone automatically returns to the text entry mode you
were previously using.
qáé
qз=ЕуЕдЙ=нЬкзмЦЬ=~=лЬзкн=дблн=зС=лугДздл=бе= =çê= qЙсн=fеймн=гзЗЙI=йкЙлл=
qз=ЙенЙк=емгДЙкл=
The number setting allows you to enter numbers using the number keys.
■ When you’re using number mode, press a key once to enter the number on the key.
qáé
qз=ЙенЙк=емгДЙкл=бе= çê= гзЗЙI=йкЙлл=~еЗ=ЬздЗ=~=вЙу=менбд=нЬЙ=емгДЙк=
~ййЙ~кл=зе=нЬЙ=лЕкЙЙеK
®
®
`Ü~éíÉê=S=jÉëë~ÖÉë RT
Page 68

^Äçìí=qÉñí=jÉëë~ÖÉë
qз=ЕЬ~еЦЙ=д~еЦм~ЦЙ=~еЗ=ЙенЙк=лйЙЕб~д=ЕЬ~к~ЕнЙкл
Your phone may support the English and Spanish languages. To enter Spanish
characters, you must change the phone’s language display to Spanish.
qз=ЙенЙк=pй~еблЬ=ЕЬ~к~ЕнЙкл
NK Make sure your phone’s display is set to Spanish. See “To change the language
displayed on your phone” on page 58.
OK Enter the characters using normal text entry mode.
The special characters corresponding to each key in Spanish are shown here:
pé~åáëÜ
^=ž=_=`=O
a=b=°=c=P
d=e=f=ð=Q
j=k=¢=l=þ=S
q=r=§=²=s=U
qз=ЕЬ~еЦЙ=нЬЙ=д~еЦм~ЦЙ=Зблйд~уЙЗ=зе=узмк=йЬзеЙ
NK From the home screen, select jÉåì 6 pЙннбеЦл 6 aáëéä~ó 6 i~åÖì~ÖÉ.
OK Select the language from the list and press .
All of your phone screens appear in the selected language.
^Äçìí=qÉñí=jÉëë~ÖÉë
■ New, unread messages are stored in your qÉñí=få_çñ and are ÄçäÇ.
■ Once you have read a message, you can save it to your cáäÉÇ folder, erase it, or leave
it in your
■ All of the following procedures start at the home screen unless otherwise indicated.
qÉñí=få_çñ.
RU rлЙкЫл=dмбЗЙ=Сзк=нЬЙ=n`m=ONMM=pЙкбЙл=mЬзеЙл
Page 69

oЙнкбЙобеЦ=jЙлл~ЦЙл
When you receive a text message, a page, or a voicemail message, appears on your
phone screen. To retrieve voice messages, see “To check voicemail from the New
Messages alert screen,” below. To retrieve text messages, see “To check text messages
from the New Messages alert screen” on page 60.
qз=ЕЬЙЕв=озбЕЙг~бд=Скзг=нЬЙ=kЙп=jЙлл~ЦЙл=~дЙкн=лЕкЙЙе
NK Press to select sçáÅÉK
OK Press down to select a message from the list.
PK Follow your service provider’s voice menus to listen to the messages.
oЙнкбЙобеЦ=jЙлл~ЦЙл
QK To return to the list of messages, select açåÉK
If you select fЦезкЙ at the New Messages alert screen, you can check voicemail from the
home screen later.
qз=ЕЬЙЕв=озбЕЙг~бд=Скзг=нЬЙ=ЬзгЙ=лЕкЙЙе
My Phone
5:14PM 08/17
Menu
A voicemail number may have been pre-programmed into your phone. Check with your
service provider.
To check voicemail from the home screen, do one of the following:
■ Press and hold to dial your voice mail number.
■ Press 6 .
■ Select jÉåì 6 jÉëë~ÖÉë 6 sзбЕЙг~бд, then press .
`Ü~éíÉê=S=jÉëë~ÖÉë RV
Page 70

oЙнкбЙобеЦ=jЙлл~ЦЙл
qз=ЕЬЙЕв=нЙсн=гЙлл~ЦЙл=Скзг=нЬЙ=kЙп=jЙлл~ЦЙл=~дЙкн=лЕкЙЙе
New Messages:
1 Text
Te xt
NK Press to select sáÉïK
OK If there’s more than one message, select a message from the list.
PK Press left or right to see options. Press to select an option.
QK To return to the list of messages, select açåÉK
qз=ЕЬЙЕв=нЙсн=гЙлл~ЦЙл=Скзг=нЬЙ=ЬзгЙ=лЕкЙЙе
NK From the home screen, select jÉåì 6 jÉëë~ÖÉë 6 qÉñí=få_çñ.
The number of messages will appear to the left of the words “Text InBox.”
OK Press up or down to scroll through the list of messages.
indicates an “Urgent” message.
PK Press to read a message.
QK After you have read the message, select an option from the bottom of the screen:
■ oЙйдуФReply to the sender, if their address is available.
■ bê~ëÉÔErase the current message. This is advised to save memory in your
phone. To set your phone to automatically erase text messages after you have
opened them, see “To erase messages automatically” on page 65.
■ p~îÉÔSave the message to your cáäÉÇ folder.
■ pЙеЗЙкФView the sender’s information, if it is available. If the information is
available, you can save it to the Contacts directory by selecting one of the
following options:
lhÔReturn to the message screen without saving.
–
–
p~îÉ=kÉïÔSave the sender’s information as a new contact. For details on
how to save a new contact, see “To save a phone number from the home
screen” on page 29.
^ÇÇ=íçÔAdd the sender’s information to an existing contact. For more details
–
on adding information to an existing contact, see “To save a phone number
from the home screen” on page 29.
■ cçêï~êÇÔForward the message. Check with your service provider to see if this
feature is available in your area.
■ açåÉÔReturn to the qÉñí=få_çñ.
RK If a callback number is included with the message, press to call it.
SM rлЙкЫл=dмбЗЙ=Сзк=нЬЙ=n`m=ONMM=pЙкбЙл=mЬзеЙл
Page 71

pЙеЗбеЦ=qЙсн=jЙлл~ЦЙл
You can send text messages using your Kyocera 2100 Series phone if this capability is
available to you. Check with your service provider for availability.
■ To learn how to enter text, see “Entering Text” on page 24.
■ If you are sending a message to more than one person, enter a space or a comma
between each phone number or email address.
■ You can send a message to up to ten contacts. If you are sending a message to more
than one contact, the phone automatically inserts a comma between each contact
name. The messages are sent one at a time, once to each addressee.
pЙеЗбеЦ=qЙсн=jЙлл~ЦЙл
kçíÉ
rл~ЦЙ=ЕЬ~кЦЙл=г~у=~ййду=нз=Й~ЕЬ=гЙлл~ЦЙX=ЕЬЙЕв=пбнЬ=узмк=лЙкобЕЙ=йкзобЗЙкK
qç=ëÉåÇ=~=åÉï=ãÉëë~ÖÉ
NK From the home screen, select jÉåì 6 jÉëë~ÖÉë 6=pÉåÇ=kÉï.
kçíÉ
qЬбл=зйнбзе=г~у=езн=ДЙ=~о~бд~ДдЙ=нз=узм=бС=нпзJп~у=гЙлл~ЦбеЦ=бл=езн=лмййзкнЙЗ=Ду=
узмк=еЙнпзквK=`зен~Ен=узмк=лЙкобЕЙ=йкзобЗЙк=Сзк=гзкЙ=беСзкг~нбзеK
OK Enter the phone number or email address of the person to whom you are sending
the message, or select
contact.
PK Press to select kÉñí.
QK Enter your message and press to select kÉñí.
RK Press up or down through the list of options. Press to select an option:
■ pÉåÇ=jÉëë~ÖÉÔSend the message immediately and save it in your qÉñí=lìí_çñ.
■ `~ддД~Ев=kмгДЙкФAdd a callback number to the message. See “To add a callback
number to a message” on page 64.
`çåí~Åí to select a phone number or email address from a
■ aЙдбоЙку=oЙЕЙбйнФSend a notification to your phone when the recipient receives
the message.
■ mкбзкбнуФMark the message kçêã~ä or rкЦЙен.
■ pÉåÇ=i~íÉêÔSchedule delivery of this message. See “To send a message at a
scheduled time” on page 64.
■ p~îÉ=jÉëë~ÖÉÔSave the message in your cáäÉÇ folder.
■ bñáíÔExit without saving.
kçíÉ
`Ü~éíÉê=S=jÉëë~ÖÉë SN
fС=узм=лЙдЙЕн=~е=зйнбзе=лмЕЬ=~л=`~ддД~Ев=kмгДЙк=çê=mкбзкбнуI=узм=~кЙ=кЙнмкеЙЗ=нз=нЬЙ=
lйнбзел=лЕкЙЙеK=pЙдЙЕн=~езнЬЙк=зйнбзе=лмЕЬ=~л=pÉåÇ=jÉëë~ÖÉ=íç=ëÉåÇ=íÜÉ=ãÉëë~ÖÉK
Page 72

pЙеЗбеЦ=qЙсн=jЙлл~ЦЙл
qз=лЙеЗ=~=йкЙлЙн=гЙлл~ЦЙ=E^мнзjлЦF
Your Kyocera 2100 Series phone contains the following preset messages. You can
select one from the list and incorporate it into your text message.
kçíÉ
Call me
Hi there!
Need directions
What’s up?
What should we do for dinner?
I’ll be there in 15m
I’m delayed
Busy
No
Have a great day!
NK From the home screen, select jÉåì 6 jÉëë~ÖÉë 6 pÉåÇ=kÉïK
fС=узм=лЙдЙЕн=~е=зйнбзе=лмЕЬ=~л=`~ддД~Ев=kмгДЙк=çê=mкбзкбнуI=узм=~кЙ=кЙнмкеЙЗ=нз=нЬЙ=
lйнбзел=лЕкЙЙеK=pЙдЙЕн=~езнЬЙк=зйнбзеI=нЬЙе=лЙдЙЕн=pÉåÇ=jÉëë~ÖÉ=íç=ëÉåÇ=íÜÉ=ãÉëë~ÖÉK
OK Enter the phone number or email address of the person to whom you are sending
the message, or select
`çåí~Åí to select a phone number or email address from a
Thank you
Where are you?
Who sent this?
I’ll call later
On my way
I love you
What are you doing this weekend?
Yes
You’re welcome
Bad weather on the way
contact.
PK Press twice to select kÉñí.
At the Message screen, press once, then press right to select
^ìíçjëÖK
QK Press .
RK Scroll through the list of preset messages and press to select one.
The Message screen reappears with the preset message in it.
SK You may add more text or add another preset message.
■ To add another preset message to your text message:
~K Press twice to select ^ìíçjëÖK
ÄK Select another message from the list.
ÅK Press .
The Message screen reappears with the preset message in it.
■ To add text, press right to move the cursor, then enter the text.
To learn how to enter text, see “Entering Text” on page 54.
TK After the message has been entered, press .
UK Press right to select kÉñí and press .
VK Press up or down to scroll through the list of options. Press to select an
option:
SO rлЙкЫл=dмбЗЙ=Сзк=нЬЙ=n`m=ONMM=pЙкбЙл=mЬзеЙл
Page 73

pЙеЗбеЦ=qЙсн=jЙлл~ЦЙл
■ pÉåÇ=jÉëë~ÖÉÔSend the message immediately and save it in your qÉñí=lìí_çñ.
■ `~ддД~Ев=kмгДЙкФAdd a callback number to the message. See “To add a callback
number to a message” on page 64.
■ aЙдбоЙку=oЙЕЙбйнФSend a notification to your phone when the recipient receives
the message.
■ mкбзкбнуФMark the message kçêã~ä or rкЦЙен.
■ pÉåÇ=i~íÉêÔSchedule delivery of this message. See “To send a message at a
scheduled time” on page 64.
■ p~îÉ=jÉëë~ÖÉÔSave the message in your cáäÉÇ folder.
■ bñáíÔExit without saving.
kçíÉ
lйнбзел=лЕкЙЙеK=pЙдЙЕн=~езнЬЙк=зйнбзеI=нЬЙе=лЙдЙЕн=pÉåÇ=jÉëë~ÖÉ=íç=ëÉåÇ=íÜÉ=ãÉëë~ÖÉK
qç=ëÉåÇ=~=ë~îÉÇ=ãÉëë~ÖÉ
NK From the home screen, select jÉåì 6 jÉëë~ÖÉë 6 cáäÉÇ.
OK Press up or down through the list of jÉëë~ÖÉë.
PK Press to select a message.
QK Select an option from the bottom of the screen (oЙлЙеЗI=pЙеЗ=qзI=bк~лЙI=or=açåÉ).
RK Enter the phone number or email address of the person to whom you are sending
the message, or select
contact.
SK Press to select kÉñí.
TK Press to select kÉñí again, or select an option from the bottom of the screen.
UK Press up or down through the list of options. Press to select an option:
■ pÉåÇ=jÉëë~ÖÉÔSend the message immediately and save it in your qÉñí=lìí_çñ.
■ `~ддД~Ев=kмгДЙкФAdd a callback number to the message. See “To add a callback
number to a message” on page 64.
fС=узм=лЙдЙЕн=~е=зйнбзе=лмЕЬ=~л=`~ддД~Ев=kмгДЙк=çê=mкбзкбнуI=узм=~кЙ=кЙнмкеЙЗ=нз=нЬЙ=
`çåí~Åí to select a phone number or email address from a
■ aЙдбоЙку=oЙЕЙбйнФSend a notification to your phone when the recipient receives
the message.
■ mкбзкбнуФMark the message kçêã~ä or rкЦЙен.
■ pÉåÇ=i~íÉêÔSchedule delivery of this message. See “To send a message at a
scheduled time” on page 64.
■ p~îÉ=jÉëë~ÖÉÔSave the message in your cáäÉÇ folder.
■ bñáíÔExit without saving.
kçíÉ
`Ü~éíÉê=S=jÉëë~ÖÉë SP
fС=узм=лЙдЙЕн=~е=зйнбзе=лмЕЬ=~л=`~ддД~Ев=kмгДЙк=çê=mкбзкбнуI=узм=~кЙ=кЙнмкеЙЗ=нз=нЬЙ=
lйнбзел=лЕкЙЙеK=pЙдЙЕн=~езнЬЙк=зйнбзеI=нЬЙе=лЙдЙЕн=pÉåÇ=jÉëë~ÖÉ=íç=ëÉåÇ=íÜÉ=ãÉëë~ÖÉK
Page 74

jЙлл~ЦЙ=aЙдбоЙку=lйнбзел
jЙлл~ЦЙ=aЙдбоЙку=lйнбзел
qз=~ЗЗ=~=Е~ддД~Ев=емгДЙк=нз=~=гЙлл~ЦЙ
After creating a message and selecting the `~ддД~Ев=kмгДЙк option, do one of the
following:
qз=лЙеЗ=узмк=зпе=йЬзеЙ=емгДЙк
■ Press to select vÉë from the options at the bottom of the
screen.
qз=лЙеЗ=~=ЗбССЙкЙен=йЬзеЙ=емгДЙк
NK Press , then press right to select líÜÉê from the
options at the bottom of the screen.
Send
123-555-1111
with message?
Yes NoOther
Send
123-555-1111
with message?
Yes NoOther
OK Enter the phone number.
PK Press to select açåÉ.
fС=узм=Зз=езн=п~ен=нз=лЙеЗ=~=Е~ддД~Ев=емгДЙк
■ Press right, then press to select kç from the options at the bottom of the
screen.
qз=лЙеЗ=~=гЙлл~ЦЙ=~н=~=лЕЬЙЗмдЙЗ=нбгЙ
After creating a new or preformatted message (see page 64), you can select when you
want to send it. Once the
■ Select from a list of options for when to send the message (PM=гбемнЙлI=N=ЬзмкI=O=ЬзмклI=
NO=ЬзмклI=N=З~уI=O=З~улI=
then is held by your service provider’s network for the specified time before it is
sent.
■ The scheduled message is stored in your qÉñí=lìí_çñ.
pÉåÇ=i~íÉê option is selected, do the following:
or=P=Ç~óë). The message is sent from your phone immediately,
Number:
123-555-5555
Done
¾½
kçíÉ
ЗЙдбоЙку=зС=нЬЙ=гЙлл~ЦЙK=
SQ rлЙкЫл=dмбЗЙ=Сзк=нЬЙ=n`m=ONMM=pЙкбЙл=mЬзеЙл
vзм=Е~е=Йк~лЙ=~=лЕЬЙЗмдЙЗ=гЙлл~ЦЙ=Скзг=нЬЙ=qÉñí=lìí_çñI=Äìí=óçì=Å~ååçí=Å~åÅÉä=
Page 75

bê~ëáåÖ=jÉëë~ÖÉë
NK From the home screen, select jÉåì 6 jÉëë~ÖÉë 6 bê~ëÉ=jëÖë.
OK Press to scroll through the options in the list. Press to select an option:
■ kçÔCancel and return to the jÉëë~ÖÉë screen.
■ bенбкЙ=fе_зсФErases all messages in your qÉñí=få_çñ.
■ läÇ=få_çñÔErase read messages in your qÉñí=få_çñ.
■ bенбкЙ=lмн_зсФErase all messages in your qÉñí=lìí_çñ.
PK A message appears: “Erase ALL?” Select vÉë to erase messages or kç to cancel.
qç=Éê~ëÉ=ãÉëë~ÖÉë=~ìíçã~íáÅ~ääó
Use this setting to automatically erase some text messages. Erasing messages
automatically helps to conserve phone memory, so that you can receive new messages
even if the memory is low. (This setting does not affect voicemail notifications.)
NK From the home screen, select jÉåì 6 pЙннбеЦл 6 jÉëë~ÖáåÖ 6 ^ìíçJbê~ëÉ=qÉñí.
bê~ëáåÖ=jÉëë~ÖÉë
OK Press to select an option:
■ aбл~ДдЙЗФMessages are not automatically erased.
■ läÇ=få_çñÔOld, read messages are automatically erased.
qç=Éê~ëÉ=ãÉëë~ÖÉë=çåÉ=~í=~=íáãÉ
NK From the home screen, select jÉåì 6 jÉëë~ÖÉë.
OK Press down to scroll through the list.
PK Press to select the type of message you want to erase (sзбЕЙг~бдI=qЙсн=fе_зсI or
cáäÉÇ).
QK Press to select the message you want to erase.
RK Select bê~ëÉ from the options at the bottom of the screen to erase the message. A
message appears: “Erase this message?”
SK Select vÉë to erase the message, or kç to cancel.
kçíÉ
vзм=Е~е=Йк~лЙ=~=лЕЬЙЗмдЙЗ=гЙлл~ЦЙ=Скзг=нЬЙ=qÉñí=lìí_çñI=Äìí=óçì=Å~ååçí=Å~åÅÉä=
ЗЙдбоЙку=зС=нЬЙ=гЙлл~ЦЙK
^ЗЗбнбзе~д=беСзкг~нбзе=~Дзмн=гЙлл~ЦЙ=лн~нмл
Messages stored in your qÉñí=lìí_çñ have symbols next to them indicating their status.
To view information about messages in your
NK Select jÉåì 6 jÉëë~ÖÉë 6 qÉñí=lìí_çñ.
OK Press up or down through the list of messages. Press to select a message.
`Ü~éíÉê=S=jÉëë~ÖÉë SR
qÉñí=lìí_çñ, complete the following steps:
Page 76

bê~ëáåÖ=jÉëë~ÖÉë
PK Select bê~ëÉ=from the options at the bottom of the screen to erase the message.
One of the following symbols appears next to each message:
qЬЙ=гЙлл~ЦЙ=бл=йЙеЗбеЦ=~еЗ=пбдд=ДЙ=лЙен=Скзг=узмк=йЬзеЙ=пЬЙе=йзллбДдЙK=
vзм=Е~е=Е~еЕЙд=ЗЙдбоЙку=зС=нЬЙ=гЙлл~ЦЙK
C
qЬЙ=гЙлл~ЦЙ=бл=п~бнбеЦ=~н=нЬЙ=еЙнпзкв=~еЗ=бл=лЕЬЙЗмдЙЗ=нз=ДЙ=лЙенK=vзм=
Е~еезн=Е~еЕЙд=ЗЙдбоЙку=зС=нЬЙ=гЙлл~ЦЙK
qЬЙ=гЙлл~ЦЙ=Ь~л=езн=ДЙЙе=ЗЙдбоЙкЙЗ=ЗмЙ=нз=кЙаЙЕнбзе=Ду=нЬЙ=еЙнпзкв=зк=д~Ев=
зС=лЙкобЕЙK=^е=~дЙкн=~ййЙ~кл=зе=узмк=йЬзеЙ=лЕкЙЙе=бС=нЬЙ=гЙлл~ЦЙ=Е~еезн=ДЙ=
ЗЙдбоЙкЙЗK
{
qЬЙ=гЙлл~ЦЙ=Ь~л=ДЙЙе=лЙен=нз=нЬЙ=еЙнпзкв=~еЗ=пбдд=лззе=ДЙ=лЙен=нз=нЬЙ=
~ЗЗкЙллK=vзм=Е~еезн=Е~еЕЙд=ЗЙдбоЙку=зС=нЬЙ=гЙлл~ЦЙK
|
qЬЙ=гЙлл~ЦЙ=Ь~л=ДЙЙе=кЙЕЙбоЙЗ=Ду=нЬЙ=кЙЕбйбЙен=узм=Ь~оЙ=лйЙЕбСбЙЗK
z
qЬЙ=гЙлл~ЦЙ=Ь~л=еЙоЙк=ДЙЙе=лЙенI=зк=Ь~л=езн=ДЙЙе=лЙен=лбеЕЙ=бн=п~л=д~лн=
ЙЗбнЙЗK=vзм=Е~е=Е~еЕЙд=ЗЙдбоЙку=зС=нЬЙ=гЙлл~ЦЙK
A message appears: “Erase this message?”
kçíÉ
QK Select vÉë to erase the message, or kç to cancel.
vçì=Å~å=Éê~ëÉ=~=ãÉëë~ÖÉ=Ñêçã=óçìê=qÉñí=lìí_çñI=лЬзпе=Ду=CI=лз=нЬ~н=бн=бл=ез=дзеЦЙк=
лнзкЙЗ=зе=узмк=йЬзеЙI=Дмн=узм=Е~еезн=Е~еЕЙд=ЗЙдбоЙку=зС=нЬЙ=гЙлл~ЦЙK
SS rлЙкЫл=dмбЗЙ=Сзк=нЬЙ=n`m=ONMM=pЙкбЙл=mЬзеЙл
Page 77

`Ь~еЦбеЦ=vзмк=sзбЕЙг~бд=pйЙЙЗ=aб~дбеЦ=iзЕ~нбзе
`Ь~еЦбеЦ=vзмк=sзбЕЙг~бд=pйЙЙЗ=aб~дбеЦ=iзЕ~нбзе
You can change the phone number assigned to speed dialing location “1” by doing the
following:
NK Select jÉåì 6 jÉëë~ÖÉë 6 jлЦ=pЙннбеЦл 6 sзбЕЙг~бд=kмгДЙк.
OK Select bÇáí to change the number that is currently assigned to speed dialing location
“1.”
PK Enter the new number, then select an option:
■ p~îÉÔSave the new number to speed dialing location “1”.
■ qáãÉ=m~ìëÉÔAllows you to enter a timed pause in the number. See “Entering
Pauses in Speed Dial Numbers” on page 19.
■ e~êÇ=m~ìëÉÔAllows you to enter a hard pause in the number. See “Entering
Pauses in Speed Dial Numbers” on page 19.
`Ü~éíÉê=S=jÉëë~ÖÉë ST
Page 78

^дЙкнл
^дЙкнл
You can choose how you want to receive alerts for voicemail, pages, text messages, and
the Web Browser.
NK Select jÉåì 6 pЙннбеЦл 6 jÉëë~ÖáåÖ, then the type of alert (sзбЕЙг~бд=^дЙкнI=m~ЦЙ=^дЙкнI=
jÉëë~ÖÉ=^äÉêíI=
or=kÉí=^äÉêí).
OK Press to select an option:
■ aбл~ДдЙЗФYou are not alerted when a message is received.
■ sбДк~нЙ=зеЕЙФThe phone vibrates once when a new message is received.
■ sбДЙ=C=кЙгбеЗФThe phone vibrates once when a new message is first received,
and a reminder vibrates approximately every five minutes until the message is
acknowledged by pressing or , or selecting
fЦезкЙ from the bottom
of the screen.
kçíÉW If a message is received while you are on a call, the phone does not vibrate
to remind you.
■ iзп=ДЙЙй=зеЕЙФThe phone beeps once at a low volume when a message is
received.
■ iзп=ДЙЙйлФThe phone beeps approximately every five minutes at a low volume
until the message is acknowledged by pressing or , or selecting
fЦезкЙ from the bottom of the screen.
■ iзмЗ=ДЙЙй=зеЕЙФThe phone beeps once at a high volume when a message is
received.
■ iзмЗ=ДЙЙйлФThe phone beeps at a high volume approximately every five
minutes until the message is acknowledged by pressing or , or
selecting
fЦезкЙ from the bottom of the screen.
SU rлЙкЫл=dмбЗЙ=Сзк=нЬЙ=n`m=ONMM=pЙкбЙл=mЬзеЙл
Page 79

qкзмДдЙлЬззнбеЦ=jЙлл~ЦЙл
jЙгзку
If your phone is low on memory or out of memory, you may not be able to receive new
messages.
iзп=гЙгзку
When memory is more than 75% full, a message appears: “WARNING! Memory is nearly
full!”
If you see this alert, take these steps:
NK Do one of the following:
■ Press to select lh.
■ Press to clear the message.
OK Erase contacts or text messages to free up more memory. See “To erase information
from a contact card” on page 34 or “To erase messages one at a time” on page 65.
qкзмДдЙлЬззнбеЦ=jЙлл~ЦЙл
lмн=зС=гЙгзку
When memory is completely full, your phone displays a screen such as the following:
Erase contacts or text messages to free up more memory. See “To erase information
from a contact card” on page 34 or “To erase messages one at a time” on page 65.
fÑ=óçì=Å~ååçí=ëÉåÇ=ãÉëë~ÖÉë
A message delivery attempt may fail if there is no service or the message is rejected by
the network. Your phone will try to send the message again later. If a message cannot
be delivered, an alert appears. To clear the alert, do one of the following.
■ Press to select lh.
■ Press .
If the problem persists, contact your service provider.
`Ü~éíÉê=S=jÉëë~ÖÉë SV
Page 80

`Ü~éíÉê=T
qççäë
The Tools menu offers a variety of helpful items.
få=íÜáë=ÅÜ~éíÉê
■ Alarm Clock page 71
■ Tip Calculator page 72
■ Calculator page 73
■ Countdown Timer page 74
■ Stopwatch page 75
■ Brick Attack™ page 76
`Ü~éíÉê=T=qççäë TM
Page 81

^ä~êã=`äçÅâ
Use the Alarm Clock to set an alert for a specific time. The alert occurs only if the phone
is on.
^ä~êã=`äçÅâ
kçíÉ
vзмк=йЬзеЙ=гмлн=ДЙ=бе=`aj^=ЗбЦбн~д=гзЗЙ=E= =~ййЙ~кл=бе=нЬЙ=мййЙкJдЙСн=ЕзкеЙк=зС=
узмк=йЬзеЙ=лЕкЙЙеF=бе=зкЗЙк=нз=млЙ=нЬЙ=^д~кг=`дзЕвK
NK Select jÉåì 6 qççäë 6 ^ä~êã=`äçÅâ 6 pÉí.
■ Press up or down to change the hour, minutes, and a.m./p.m.
■ Press left or right to switch between hours, minutes, and a.m./p.m.
OK Press to save.
PK When the alarm rings, select pеззтЙ to silence the alarm for 10 minutes, or select lÑÑ
to turn off the alarm.
`Ü~éíÉê=T=qççäë TN
Page 82

qáé=`~äÅìä~íçê
qáé=`~äÅìä~íçê
NK Select jÉåì 6 qççäë 6 qáé=`~äÅìä~íçê.
OK Enter the amount of your bill and press .
PK Select the amount you want to include as a tip (NRBI=NUBI=OMBI=NMBI=RBI=líÜÉê) and
press .
QK Your total bill, including tip, is calculated and displayed.
RK To split the bill, press right and press to select péäáí.
SK Enter the number of guests and press . The amount due from each guest
appears.
TO rлЙкЫл=dмбЗЙ=Сзк=нЬЙ=n`m=ONMM=pЙкбЙл=mЬзеЙл
Page 83

`~äÅìä~íçê
Use the calculator for basic mathematical equations.
NK Select jÉåì 6 qççäë 6 `~äÅìä~íçê.
OK Use the keypad to enter numbers.
PK Press to select mathematical operations.
Z mЙкСзкгл=нЬЙ=Йим~длТ=СмеЕнбзеK
÷ fелЙкнл=нЬЙ=Збоблбзе=ЕЬ~к~ЕнЙк=~СнЙк=нЬЙ=д~лн=емгДЙк=ЙенЙкЙЗK
J fелЙкнл=нЬЙ=лмДнк~Енбзе=ЕЬ~к~ЕнЙк=~СнЙк=нЬЙ=д~лн=емгДЙк=ЙенЙкЙЗK
H fелЙкнл=нЬЙ=~ЗЗбнбзе=ЕЬ~к~ЕнЙк=~СнЙк=нЬЙ=д~лн=емгДЙк=ЙенЙкЙЗK
u fелЙкнл=нЬЙ=гмднбйдбЕ~нбзе=ЕЬ~к~ЕнЙк=~СнЙк=нЬЙ=д~лн=емгДЙк=ЙенЙкЙЗK
K fелЙкнл=нЬЙ=ЗЙЕбг~д=йзбен=~СнЙк=нЬЙ=д~лн=емгДЙк=ЙенЙкЙЗK
` `дЙ~кл=~дд=емгДЙкл=ЙенЙкЙЗ=~еЗ=Зблйд~ул=~=тЙкзK
jo aблйд~ул=нЬЙ=о~дмЙ=ЕмккЙенду=лнзкЙЗ=бе=гЙгзкуK
jH ^ЗЗл=нЬЙ=Зблйд~уЙЗ=ЗбЦбн=нз=нЬЙ=о~дмЙ=лнзкЙЗ=бе=гЙгзкуK
j` `дЙ~кл=нЬЙ=о~дмЙ=ЕмккЙенду=лнзкЙЗ=бе=гЙгзкуK
œ `Ь~еЦЙл=нЬЙ=лбЦе=зС=нЬЙ=Зблйд~уЙЗ=емгДЙкK
`~äÅìä~íçê
`дЙ~кл=зеЙ=СмеЕнбзе=зк=зеЙ=ЗбЦбн=Скзг=нЬЙ=лЕкЙЙе=~еЗ=кЙнмкел=нЬЙ=Е~дЕмд~нзк=нз=
ЗбЦбн=Йенку=гзЗЙK=eздЗ=Ззпе=нз=ЕдЙ~к=~дд=зС=нЬЙ=ЗбЦбнл=~еЗ=зйЙк~нбзел=~еЗ=
Зблйд~у=~=тЙкзK
bсбнл=нЬЙ=Е~дЕмд~нзк=~еЗ=кЙнмкел=нз=нЬЙ=ЬзгЙ=лЕкЙЙеK
`Ü~éíÉê=T=qççäë TP
Page 84

`зменЗзпе=qбгЙк
`зменЗзпе=qбгЙк
This timer counts down for a specified amount of time. It beeps, using the volume set
for alerts, when that amount of time has elapsed.
NK Select jÉåì 6 qççäë 6 `зменЗзпе.
OK Press to pÉí.
PK Press up or down to set the hours, minutes, and seconds. To move the cursor, press
left or right.
QK Select pí~êí to begin the countdown.
RK Select píçé to pause the countdown.
SK When the alarm rings, press to silence it.
TQ rлЙкЫл=dмбЗЙ=Сзк=нЬЙ=n`m=ONMM=pЙкбЙл=mЬзеЙл
Page 85

píçéï~íÅÜ
NK Select jÉåì 6 qççäë 6 píçéï~íÅÜ.
OK Select pí~êí to have the stopwatch begin counting.
PK Select píçé to stop counting.
QK Select oÉëÉí to set the counter back to zero and have the stopwatch begin counting
RK Press when finished.
píçéï~íÅÜ
again.
`Ü~éíÉê=T=qççäë TR
Page 86

_êáÅâ=^íí~Åâ»
_êáÅâ=^íí~Åâ
NK Select jÉåì 6 qççäë 6 _êáÅâ=^íí~Åâ.
OK To start the game, press to select kÉï.
PK To pause the game, press , then press to oЙлмгЙ.
The goal of this game is to eliminate bricks arranged in levels. To do this, you send a
moving ball upward using a paddle at the bottom of the screen. To move the paddle,
press left or right. If an incoming call alert is received, the game is paused and
exited. You can return to play once the incoming call alert is ended. The game cannot
be paused while the phone is off.
»
TS rлЙкЫл=dмбЗЙ=Сзк=нЬЙ=n`m=ONMM=pЙкбЙл=mЬзеЙл
Page 87

`Ü~éíÉê=U
tЙД=_кзплЙк
You can use your phone to browse the Internet if you have obtained phone Internet
services from your service provider and if over-the-air Internet access is available in
your area. Generally only those web sites which are provided by your wireless carrier
can be accessed from your phone.
You may have access to personal information such as email, your calendar, or a
personal address book. Your service provider determines which applications you can
use and will notify you when new applications become available.
If your service provider activated Internet services on your phone and you are in an area
that provides over-the-air Internet access, you may receive Net Alerts. These short
messages allow you to quickly access information on the Internet. They may include
stock quote alerts, traffic updates, or email. They are different from pages and text
messages because the information in Net Alerts is stored on the Web, not on your
phone. Accessing a Net Alert will launch the Internet browser on your phone and will
cause you to incur airtime charges.
Note: You cannot receive incoming calls while you are in the Web Browser and a data
call is in progress.
få=íÜáë=ÅÜ~éíÉê
■ Using the Web Browser page 78
■ Other Web Services page 80
`Ь~йнЙк=U=tЙД=_кзплЙк TT
Page 88

rлбеЦ=нЬЙ=tЙД=_кзплЙк
rлбеЦ=нЬЙ=tЙД=_кзплЙк
The wireless Web Browser can be used in much the same way as standard PC-based
browsers.
qЬЙ= =~ййЙ~кл=бе=~=лЙЕмкЙ=tЙД=_кзплЙк=лЙллбзеK
kçíÉ
Your weekend weather
will be warm and sunny,
with highs in the 70s ...
qз=лн~кн=нЬЙ=tЙД=_кзплЙк
■ Select jÉåì 6 tЙД=_кзплЙк.
qз=е~обЦ~нЙ=бе=нЬЙ=tЙД=_кзплЙк
■ If you have several URLs bookmarked, a list appears. Press up or down to scroll
through the list. Press to select an URL and go to the site.
■ An underline and an arrow indicate that there is more text. Press down to go
to the next screen of text. Press up to move back one screen.
tЙД=_кзплЙк=зйнбзел
The following options may appear on your screen:
■ eçãÉÔReturn to the main Web Browser window, or home screen.
■ j~êâ=páíÉÔSave the current location as a bookmark for easy access.
■ _ççâã~êâëÔDisplay a list of your saved Web sites.
■ pÉíìé
– pÜçï=roiÔ Display the entire URL.
–
^Äçìí=léÉåï~îÉ—Displays information about your Web Browser version.
–
bеЕкуйнбзеФDo not use this setting unless you are instructed to do so by your
service provider.
pÉí=rmKiáåâÔSelect a different browser server, if one is available. You can use this
–
option if you have more than one Web Browser account, such as one for
business use and one for personal use.
oÉëí~êíÔRestart the Web Browser.
–
TU oЙСЙкЙеЕЙ=dмбЗЙ=Сзк=нЬЙ=n`m=ONMM=pЙкбЙл=mЬзеЙл
Page 89

qз=Йсбн=нЬЙ=tЙД=_кзплЙк
■ To exit the Web browser, do one of the following:
■ Press
■ Press from the Web Browser home screen.
rлбеЦ=нЬЙ=tЙД=_кзплЙк
kçíÉ
rл~ЦЙ=ЕЬ~кЦЙл=г~у=~ййду=менбд=узм=Йсбн=узмк=tЙД=_кзплЙк=лЙллбзе=Ду=йкЙллбеЦ= =
Скзг=~еу=лЕкЙЙеI=зк=йкЙллбеЦ=
Скзг=нЬЙ=tЙД=_кзплЙк=ЬзгЙ=лЕкЙЙеK=`ЬЙЕв=пбнЬ=
узмк=лЙкобЕЙ=йкзобЗЙкK
`Ь~йнЙк=U=tЙД=_кзплЙк TV
Page 90

lнЬЙк=tЙД=pЙкобЕЙл
lнЬЙк=tЙД=pЙкобЕЙл
If your service provider activated Internet services on your phone and you are in an area
that provides over-the-air Internet access, you may receive
messages contain Web address information and are used in conjunction with the
browser to alert you of content on a Web site.
Your service provider may also provide access to email, your calendar, or a personal
address book via the Internet browser on your phone. Your service provider
determines which applications you can use and will notify you when new applications
become available.
fенЙкеЙн=^дЙкнлK These short
UM oЙСЙкЙеЕЙ=dмбЗЙ=Сзк=нЬЙ=n`m=ONMM=pЙкбЙл=mЬзеЙл
Page 91

`Ü~éíÉê=V
cкЙимЙенду=^лвЙЗ=nмЙлнбзел
få=íÜáë=ÅÜ~éíÉê
■ How do I select a menu item? page 82
■ How do I power the phone on and off? page 82
■ Is there a clear/backspace key? page 82
■ How do I adjust my backlight setting? page 82
■ Where are my call timers? page 82
■ How many numbers are stored in the Recent Calls list? page 82
■ How do I erase the phone numbers from my Recent Calls list? page 82
■ How do I change my banner (the words on my phone screen)? page 83
■ I forgot my mobile phone number. How do I display it on my phone? page 83
■ How do I know that my phone is charging? page 83
■ How do I know when my phone is fully charged? page 83
■ How do I lock the keypad? page 83
■ How many numbers can I store in the Contacts Directory (phone book)? page 83
■ How do I change the faceplate on my phone? page 84
`Ь~йнЙк=V=cкЙимЙенду=^лвЙЗ=nмЙлнбзел UN
Page 92

eзп=Зз=f=лЙдЙЕн=~=гЙем=бнЙг\
NK Press up, down, left or right to highlight menu items.
OK When an item is highlighted, press to select it.
eзп=Зз=f=йзпЙк=нЬЙ=йЬзеЙ=зе=~еЗ=зСС\
■ To power the phone on, press and hold for approximately one second.
■ To power the phone off, press and hold for approximately 3 to 5 seconds
until “Powering Off” appears on the screen.
fл=нЬЙкЙ=~=ЕдЙ~кLД~Евлй~ЕЙ=вЙу\
Yes. Press to backspace and erase characters, whether you are dialing a number
or entering text.
eзп=Зз=f=~Замлн=гу=Д~ЕвдбЦЬн=лЙннбеЦ\
NK From the home screen, press to select jÉåìK
OK Use and to select=pЙннбеЦл=→=aáëéä~ó=→=_~ЕвдбЦЬнбеЦK
The Backlighting menu appears.
PK Use to scroll through the backlight options.
QK When the setting you want is highlighted, press to select it.
tЬЙкЙ=~кЙ=гу=Е~дд=нбгЙкл\
NK From the home screen, press to select jÉåìK
OK Use and to Select pЙннбеЦл=→=`~дд=fеСзкг~нбзеK
Here you will find the Recent Calls Timer, All Calls Timer, and Browser Timer.
eзп=г~еу=емгДЙкл=~кЙ=лнзкЙЗ=бе=нЬЙ=oЙЕЙен=`~ддл=дблн\
15 incoming and outgoing calls are stored.
eзп=Зз=f=Йк~лЙ=нЬЙ=йЬзеЙ=емгДЙкл=Скзг=гу=oЙЕЙен=`~ддл=дблн\
NK From the home screen, press to select jÉåìK
OK Use and to select pЙннбеЦл=→=pЙЕмкбнуK
PK Enter your four-digit lock code.
QK Select bк~лЙ=oЙЕЙен=`~ддлI=then select vÉë=or=kçK
UO oЙСЙкЙеЕЙ=dмбЗЙ=Сзк=нЬЙ=n`m=ONMM=pЙкбЙл=mЬзеЙл
Page 93

eзп=Зз=f=ЕЬ~еЦЙ=гу=Д~ееЙк=EнЬЙ=пзкЗл=зе=гу=йЬзеЙ=лЕкЙЙеF\
NK From the home screen, press to select jÉåìK
OK Use and to select aáëéä~ó →=jó=_~ååÉê=→=bÇáíK
To learn how to enter text, see See “Entering Text” on page 24.
f=СзкЦзн=гу=гзДбдЙ=йЬзеЙ=емгДЙкK=eзп=Зз=f=Зблйд~у=бн=зе=гу=йЬзеЙ\
NK From the home screen, press to select=jÉåìK
OK Use and to select=mÜçåÉ=fåÑçK
eзп=Зз=f=везп=нЬ~н=гу=йЬзеЙ=бл=ЕЬ~кЦбеЦ\
If the phone is on, you will see the phone battery icon in the upper-right corner
of the screen. When the black bars in the icon are “moving,” the phone is charging.
`^rqflkW Be sure the phone charger is plugged into the charger jack at the=Дзннзг=of the
phone, and not the earpiece jack on the side of the phone.
eзп=Зз=f=везп=пЬЙе=гу=йЬзеЙ=бл=Смдду=ЕЬ~кЦЙЗ\
The phone battery icon in the upper-right corner of the screen is no longer
“moving,” and it is filled with black bars.
eçï=Çç=f=äçÅâ=íÜÉ=âÉóé~Ç\
■ To turn on keyguard, press to the left and hold it down until you see the
message “Keypad guard is active. Press 123 to unlock.”
You can answer a call with Keyguard on, but you must turn it off before you can
make a call.
■ To turn off Keyguard, press then then .
eзп=г~еу=емгДЙкл=Е~е=f=лнзкЙ=бе=нЬЙ=`зен~Енл=aбкЙЕнзку=EйЬзеЙ=ДззвF\
You can store up to 200 phone numbers.
`Ь~йнЙк=V=cкЙимЙенду=^лвЙЗ=nмЙлнбзел UP
Page 94

eзп=Зз=f=ЕЬ~еЦЙ=нЬЙ=С~ЕЙйд~нЙ=зе=гу=йЬзеЙ\
NK Remove the battery door:
~K Press until “Powering off” appears on the screen.
ÄK Hold the phone facing away
from you.
ÅK Using your thumb, slide the
battery door down until it stops.
ÇK Lift the battery door off the
phone.
OK Remove the faceplate:
~K Turn the phone over to face you
with the antenna pointing
down.
ÄK Grip the back of the phone.
With the other hand, grip the
sides of the faceplate near the
bottom of the phone.
ÅK Pull the faceplate out and down
until it releases.
ÇK Pull the keypad out of the
faceplate.
c
d
UQ oЙСЙкЙеЕЙ=dмбЗЙ=Сзк=нЬЙ=n`m=ONMM=pЙкбЙл=mЬзеЙл
Page 95

PK Put on a new faceplate:
~K Push the keypad into the holes
in the new faceplate.
ÄK Align the top of the faceplate in
the grooves in the top of the
phone.
ÅK Close the faceplate until it
clicks into place.
QK Replace the battery door:
~K Hold the phone facing away
from you.
ÄK Align the battery door to the
grooves on the sides of the
phone.
c
b
a
ÅK Slide the battery door on until it
clicks into place. Do not force.
`Ь~йнЙк=V=cкЙимЙенду=^лвЙЗ=nмЙлнбзел UR
Page 96

däçëë~êó
^`=~Ç~éíÉê A cable that connects the phone to a wall outlet and charges the phone
battery.
~å~äçÖ=ãçÇÉ A state in which a phone communicates at 800 MHz and sends voices and
key beeps as analog sounds.
^ìíçJp~îÉ A feature which allows your phone to prompt you to save a phone number
after you have dialed it three times.
Дззвг~кв A Web file that lets you quickly connect to a site you have previously visited
and marked (like a bookmark in a book).
`aj^ Code Division Multiple Access, a technology that digitally encodes the
sound of voices and key beeps to ensure callers’ privacy.
Е~дд=Сзкп~кЗбеЦ A programmable phone option that sends incoming calls to another phone
number.
Е~дд=п~бнбеЦ A service-provider feature which causes your phone to beep if another call
comes in while you are on the phone.
Езен~Енл=ЗбкЙЕнзку A feature of your phone that works like a set of phone index cards, allowing
you to save phone numbers and other information.
Ç~í~=Å~ÄäÉ An electrical wire capable of transmitting information between two or more
devices.
ЗбЦбн~д=гзЗЙ A state in which a phone communicates at 1900 MHz and sends voices and
key beeps as digitally encoded signals instead of analog sounds. See
“CDMA.”
Ççã~áå=å~ãÉ The address of a network connection, often in the format
server.business.com
Çì~ä=Ä~åÇ Able to operate in two frequency ranges, the 800 MHz band and the 1900
MHz band.
Çì~äJãçÇÉ Able to operate in either CDMA digital service or analog cellular service at
800 MHz, and able to switch between digital mode and analog mode.
Éã~áä Electronic mail, a store-and-forward service for text and graphical messages
from one computer to another.
ЙенЙк To save information in the phone’s memory. Press keys to enter
information.
fенЙкеЙн The worldwide set of interconnected networks that share the same
network address scheme and use the TCP/IP protocol.
US
Page 97

Ü~êÇ=é~ìëÉ A delay which is programmed into a stored number. The phone does not
continue dialing until you press a specific key.
ЬзгЙ=лЕкЙЙе The screen that appears when the phone is first turned on.
вЙу=ДЙЙй=оздмгЙ The level of noise that the phone makes when you press a key.
вЙуЦм~кЗ A feature which can be turned on to protect the phone from accidental
keypresses when a call is not in progress.
äçÅâ=ÅçÇÉ A four-digit sequence (usually 0000 or the last four digits of your phone
number) that lets you restrict access to certain phone numbers or all phone
numbers.
jlJpjp Mobile Originated Short Messaging Service. Allows your phone to send
short messages with other SMS-enabled handsets or e-mail addresses.
jqJpjp Mobile Terminated Short Messaging Service. Allows your phone to receive
short messages from other SMS-enabled handsets or e-mail addresses.
ãÉåì A list of choices on the phone screen.
гЙгзку=дзЕ~нбзе One of 99 reserved spaces for data. Each memory location can hold a phone
number associated text, such as a name.
ãÉåì=áíÉã A choice within a menu on the phone screen.
йзпЙкJл~оЙ=гзЗЙ A low energy consumption state indicated by the message “Power Save
Mode.” Press any key to exit.
йзпЙк=зСС When you turn off the phone, you cannot send or receive calls.
йзпЙк=зе When you turn on the phone, you can send and receive calls.
кЙЕЙен=Е~ддл=дблн A list of phone numbers from recent incoming or outgoing calls, when the
phone number is available.
êç~ãáåÖ Using telephone services outside of the area covered by your home
service provider. When you are roaming, the cost of phone calls and level
of service may vary.
лЙкобЕЙ=~кЙ~ An area in which a service provider’s terms of use apply uniformly.
лЙкобЕЙ=йкзобЗЙк A company which provides certain phone services, such as basic phone
service, long distance, call waiting, and three-way calling. Phones may have
the ability to perform these functions, but they cannot do so unless the
service provider makes them available.
лбЦе~д=лнкЙеЦнЬ The degree of radio frequency energy available to the phone. Both
weather and distance affect signal strength. If signal strength is weak, call
quality may decrease or the call may be disconnected.
UT
Page 98

pjp Short Messaging Service. On networks equipped with Short Messaging
Service (SMS) capabilities, your phone can communicate via short messages
with other SMS-enabled handsets or e-mail addresses.
pбдЙеЕЙ=^дд=гзЗЙ A state in which all phone sounds are silenced, including the ringer and
alerts. You can set the phone to vibrate or light up.
pã~êí=pçìåÇ A feature which allows the phone to automatically adjust the earpiece
volume based on the amount of noise around you or the voice volume of
the person to whom you are speaking.
ëí~åÇÄó=íáãÉ The amount of time that the phone battery can maintain power when the
phone is on.
í~äâ=íáãÉ The amount of time that you can talk on a wireless phone when the battery
is fully charged.
нЬкЙЙJп~у=Е~ддбеЦ A service-provider feature which allows phone calls between three people
instead of two.
нкбгзЗЙ Able to operate in CDMA digital service at 800 and 1900 MHz, and analog
cellular service at 800 MHz.
roi Uniform Resource Locator, the address of an Internet location. A URL
typically takes the form http://www.locationname.com
пЙД=ДкзплЙк A tool which allows you to browse the Internet.
UU rлЙкЫл=dмбЗЙ=Сзк=нЬЙ=n`m=ONMM=pЙкбЙл=mЬзеЙл
Page 99

fåÇÉñ
kмгЙкбЕл
1-Touch Dialing, 20
^
Alarm Clock, 71
, 68
alerts
silencing
analog mode
answering calls
, 8, 38
, 47
, 8
_
backlighting
, 52
power
battery
care and safety
improving performance
performance
Brick Attack game
, 17
, 17
, 17
, 76
`
calculator, 73
callback number, adding to a message
calls
answering
call waiting
ending
muting
three-way calling
unmuting
Clear key
contact
see also phone book
adding information to
adding new
business
classifying
editing
erasing
erasing information from
finding
modifying
personal
saving
saving a phone number as
searching for
Contacts directory
see also phone book
calling from
Countdown Timer
, 8
, 22
, 8
, 9
, 22
, 9
, 4
, 29, 31, 32
, 30
, 30, 31, 33
, 30, 31, 33
, 32
, 30, 31, 33, 34
, 34
, 32, 35
, 32
, 30, 31, 33
, 29
, 29
, 32, 35
, 35
, 74
, 64
a
data/fax setup, 48
dialing
1-Touch
from Recent Calls list
speed
digital mode
, 20
, 19
, 47
b
End/Power key, 4
ending calls
, 8
c
French characters, 28, 58
d
games
Brick Attack
, 76
e
hanging up, 8
hard pause
, 20
f
icons, 5
InBox, Text
Internet browser
, 58, 60, 65
, 77
h
Keyguard, 39
keypad
locking
unlocking
, 10, 39
, 10, 39
i
language
changing on your phone
languages
letters
lock code
locking
low memory warning
, 28, 58
entering rapidly
entering special characters
, 25, 55
, 87
keypad
phone
, 10, 39
, 44
, 69
j
making calls, 8
, 22
, 28, 58
, 28, 58
= UV
Page 100

memory
how to free up
low or full
messages
adding a callback number to
erasing
automatically
individually
, 63
filed
receiving new
retrieving
, 61
saving
sending
later
new
preformatted
saved
scheduled
urgent
with a phone number
with your phone number
status of
, 61
storing
text
erasing
replying to
sending
viewing
viewing sender information
mode
, 47
analog
, 47
digital
, 9
mute
, 69
, 69
, 50, 65
, 65
, 59
, 59
, 61
, 61
, 61
, 62
, 63
, 64
, 61
, 65
, 60
, 60
, 60
, 60
k
navigator key, 4
Net Alerts
numbers
, 68, 80
entering
, 27, 57
l
one-touch dialing, 20
OutBox, Text
, 65
m
pause
, 20
hard
, 20
timed
pauses
, 50
hard
, 50
timed
phone
locking
unlocking
, 44
, 44
, 61, 64
, 64
, 64
, 60
phone book
adding a number to
adding information to entries
adding new entry to
calling from
classifying entries in
editing entry in
erasing entry in
finding phone number in
modifying entry in
saving a phone number to
phone number
adding new
finding your own
saving
preformatted messages
, 35
, 30
, 30
, 29
, 29, 31, 32
, 30
, 30, 31, 33
, 32
, 30, 31, 33, 34
, 32, 35
, 32
, 29
, 8
, 62
o
Recent Calls list
description of
dialing from
viewing
redial, last number called
reminders
resetting the phone
ringer type
ringer, silencing
ringers, changing
roaming icon
, 68
, 40
, 21
, 22
, 22
, 21
, 5
, 8, 38
, 40
, 5
p
safety, 5
saving a phone number
saving messages
scheduled messages
screen icons
security
lock code
Select key
Shift key
Short Messaging Service
silence
Silence All mode
Smart Sound (see also volume, adjusting
SMS
sounds
Space key
Spanish characters
speed dialing
stopwatch
, 4
all sounds
ringer
automatically)
, 87, 88
, 40
ringer type
silencing
, 61
, 5
, 87
, 4
, 38
, 8, 38
, 40
, 38
, 4
, 19
, 75
, 29
, 61
, 87, 88
, 38
, 9
, 28, 58
VM rлЙкЫл=dмбЗЙ=Сзк=нЬЙ=n`m=ONMM=pЙкбЙл=mЬзеЙл
 Loading...