

Page 1
QCP 800/1900
SER GUIDE
U
Kyocera Wireless Corp.
10300 Campus Point Drive
http://www.kyocera-wireless.com
80-B6675-1EN, Rev. -
Page 2

This manual is based on the production version of the QCP 800 and QCP
1900 phone. Software changes may have occurred after this printing.
QUALCOMM reserves the right to make changes in technical and
product specifications without prior notice.
The products and equipment described in this documentation are
manufactured under one or more of the following U.S. Patents:
4,901,307 5,056,109 5,099,204 5,101,501 5,103,459 5,107,225
5,109,390 5,193,094 5,228,054 5,257,283 5,265,119 5,267,261
5,267,262 5,280,472 5,283,536 5,289,527 5,307,405 5,309,474
5,337,338 5,339,046 5,341,456 5,383,219 5,392,287 5,396,516
D356,560 5,408,697 5,414,728 5,414,796 5,416,797 5,426,392
5,437,055 D361,065 5,442,322 5,442,627 5,452,473 5,461,639
5,469,115 5,469,471 5,471,497 5,475,870 5,479,475 5,483,696
5,485,486 5,487,175 5,490,165 5,497,395 5,499,280 5,504,773
5,506,865 5,509,015 5,509,035 5,511,067 5,511,073 5,513,176
5,515,177 5,517,323 5,519,761 5,528,593 5,530,928 5,533,011
5,535,239 5,539,531 5,544,196 5,544,223 5,546,459 5,548,812
5,559,881 5,559,865 5,561,618 5,564,083 5,566,000 5,566,206
5,566,357 5,568,483 5,574,773 5,574,987 D375,740 5,576,662
5,577,022 5,577,265 D375,937 5,588,043 D376,804 5,589,756
5,590,069 5,590,406 5,590,408 5,592,548 5,594,718 5,596,570
5,600,754 5,602,834 5,602,833 5,603,096 5,604,459 5,604,730
5,608,722 5,614,806 5,617,060 5,621,752 5,621,784 5,621,853
5,625,876 5,627,857 5,629,955 5,629,975 5,638,412 5,640,414
5,642,398 5,644,591 5,644,596 5,646,991 5,652,814 5,654,979
5,655,220 5,657,420 5,659,569 5,663,807 5,666,122 5,673,259
5,675,581 5,675,644 5,680,395 5,687,229 D386,186 5,689,557
5,691,974 5,692,006 5,696,468 5,697,055 5,703,902 5,704,001
5,708,448 5,710,521 5,710,758 5,710,768 5,710,784 5,715,236
5,715,526 5,722,044 5,722,053 5,722,061 5,722,063 5,724,385
5,727,123 5,729,540 5,732,134 5,732,341 5,734,716 5,737,687
5,737,708 5,742,734 D393,856 5,748,104 5,751,725 5,751,761
5,751,901 5,754,533 5,754,542 5,754,733 5,757,767 5,757,858
5,758,266 5,761,204 5,764,687 5,774,496 5,777,990 5,778,024
5,778,338 5,781,543 5,781,856 5,781,867 5,784,406 5,784,532
5,790,589 5,790,632 5,793,338 D397,110 5,799,005 5,799,254
5,802,105 5,805,648 5,805,843 5,812,036 5,812,094 5,812,097
5,812,538 5,812,607 5,812,651 5,812,938 5,818,871 5,822,318
5,825,253 5,828,348 5,828,661 5,835,065 5,835,847 5,839,052
5,841,806 5,842,124 5,844,784 5,844,885 5,844,899 5,844,985
5,848,063 5,848,099 5,850,612 5,852,421 5,854,565 5,854,786
5,857,147 5,859,612 5,859,838 5,859,840 5,861,844 5,862,471
5,862,474 5,864,760 5,864,763 5,867,527 5,867,763 5,870,427
5,870,431 5,870,674 5,872,481 5,872,774 5,872,775 5,872,823
5,877,942 5,878,036 5,870,631 5,881,053 5,881,368 5,884,157
5,884,193 5,884,196 Other patents pending.
Copyright © 2000 Kyocera Wireless Corp.
All rights reserved. Printed in the United States of America.
QUALCOMM is a registered trademark and registered service mark of
QUALCOMM Incorporated. QCP 800 and QCP 1900 are a registered
trademark and Smart Key is a trademark of QUALCOMM Incorporated.
Page 3

CONTENTS
Introduction ............................................................5
Highlights ............................................................5
Important Information........................................6
Getting Started .......................................................7
Sliding Earpiece ..................................................7
Display Indicators .............................................10
Using the Battery..............................................11
Turning the Phone On and Off.........................13
Antenna .............................................................14
Charging the Battery ........................................15
Basic Functions ................................................... 16
Function Keys....................................................16
Making a Call ....................................................17
Correcting Dialing Mistakes.............................17
Getting Your Own Phone Number ...................17
Receiving Calls ..................................................18
Redialing Calls ..................................................19
Adjusting Volume..............................................19
Emergency Dialing............................................19
Signal Strength .................................................20
Power Save Mode ..............................................21
Phone Book Feature............................................22
The Two Phone Book Types..............................22
Saving Numbers to Your Primary
Phone Book .................................................23
Retrieving Numbers from Your
Phone Book .................................................24
Changing Your Phone Book..............................27
Dialing Numbers from Your Phone Book ........28
Advanced Phone Book Features.......................29
3
Page 4

Menu Feature....................................................... 32
Main Menu ........................................................32
Menu Access Method ........................................32
Shortcut Menu Access Method .........................33
Menu Item Descriptions ...................................33
Paging, Messaging, and Voice Mail................. 40
New Message Alert ...........................................41
Viewing Pages and Messages ...........................42
Voice Mail Notifications....................................44
Low Memory Warning ......................................45
Out of Memory Warning ...................................45
Accessories ........................................................... 46
Phone Safety ........................................................ 47
Background........................................................47
For Best Performance .......................................48
Caring for the Battery ......................................49
Driving Safety ...................................................50
Other Safety Guidelines ...................................50
Where To Find Help............................................ 53
Your Service Provider .......................................53
Your Phone Documentation..............................53
Kyocera Technical Support...............................53
Index ...................................................................... 55
4
Page 5

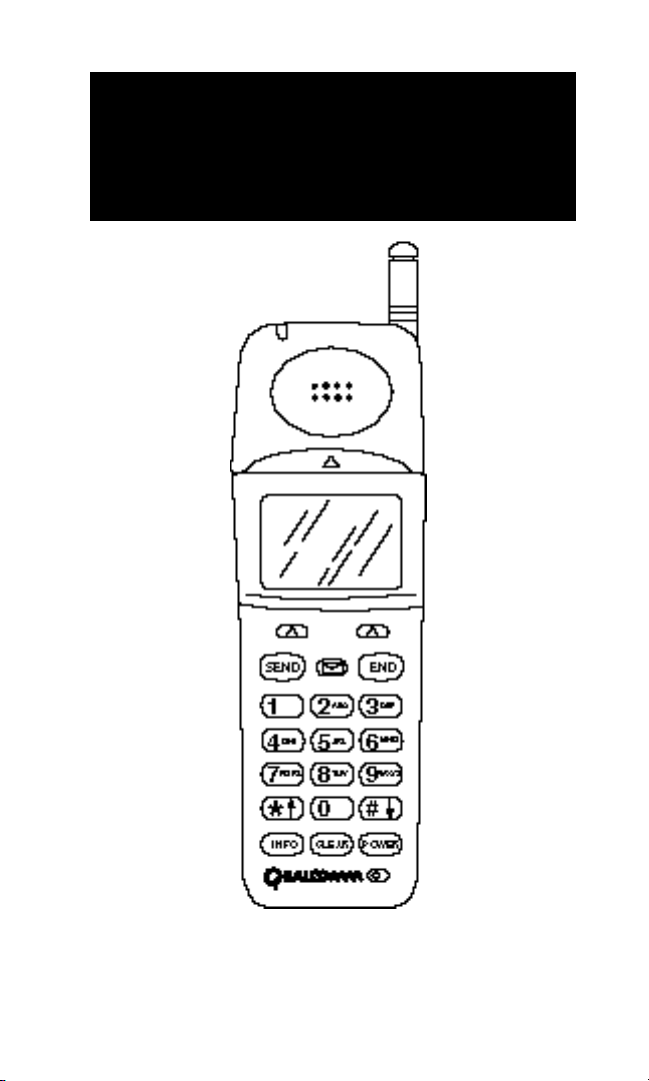
INTRODUCTION
Highlights
Congratulations on your purchase of the QCP 800 or
QCP 1900 phone. It is an easy-to-use, versatile, and
dependable phone which provides many unique
features including:
• Large, easy-to-read, 4-line backlit text display
with an additional line for informative icons
• 20-button lighted keypad
• Menu-driven interaction with prompts
• Inherent call privacy through CDMA encoding
• Slide-up earpiece that extends for placing/
receiving calls which retracts for minimum size,
maximum portability, and keypad locking
• Exceptionally long battery life
• Any key answer, speed dial, auto redial, and 99
memory locations for phone numbers
• Advanced features such as short messaging
service and caller ID
• Optional accessories
5
Page 6

Important Information
Caution
Any changes or modifications not expressly
approved in this document could void your warranty
for this equipment and void your authority to
operate this equipment.
Warning
Only use the batteries, antennas, and chargers
provided by QUALCOMM. The use of any other
type will invalidate the warranty and may be
dangerous.
FCC/IC Notice
The phone may cause TV or radio interference (i.e.,
when using the telephone in close proximity to
receiving equipment). The FCC/IC can require you
to stop using the telephone if such interference
cannot be eliminated. If you need assistance, contact
your local dealer.
6
Page 7
GETTING STARTED
This section includes drawings of the important phone
parts and instructions on getting your phone powered up
and ready to use.
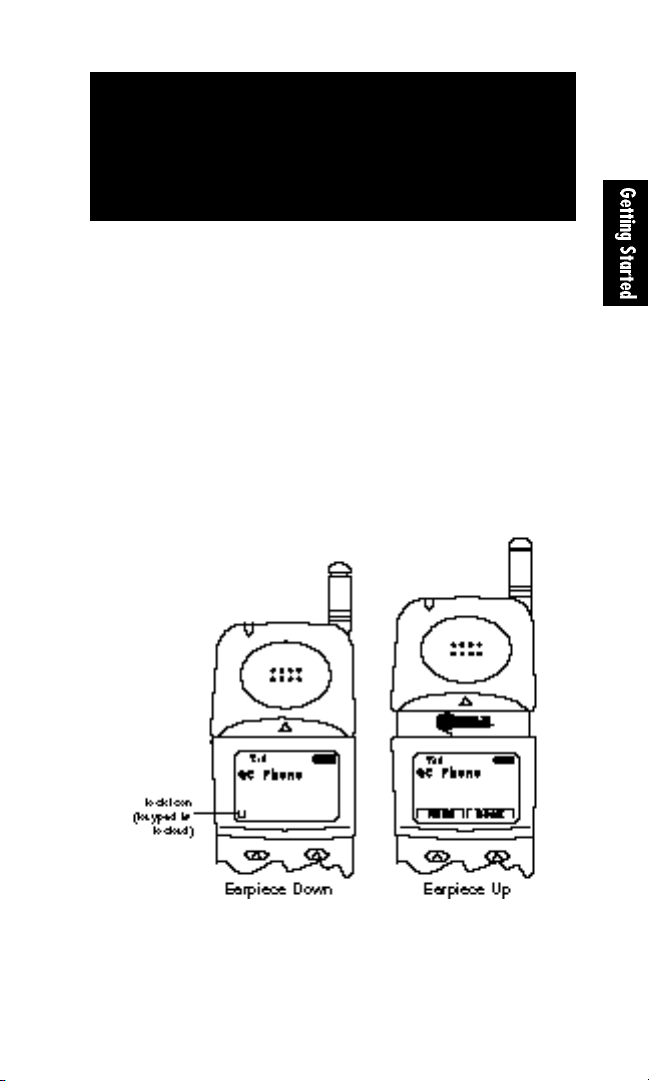
Sliding Earpiece
The earpiece moves up and down. It must be up to
use any of the phone’s features including making
calls. When the earpiece is down, the keypad is
locked and you will see a lock icon. You will hear the
phone ring (if the phone is on) but must raise the
earpiece to answer the call.
This feature allows you to keep the phone on, and in
your pocket or brief case, without accidently
pressing any keys. The earpiece must be up to turn
off the phone.
7
Page 8
Front View of the Phone
8
Page 9

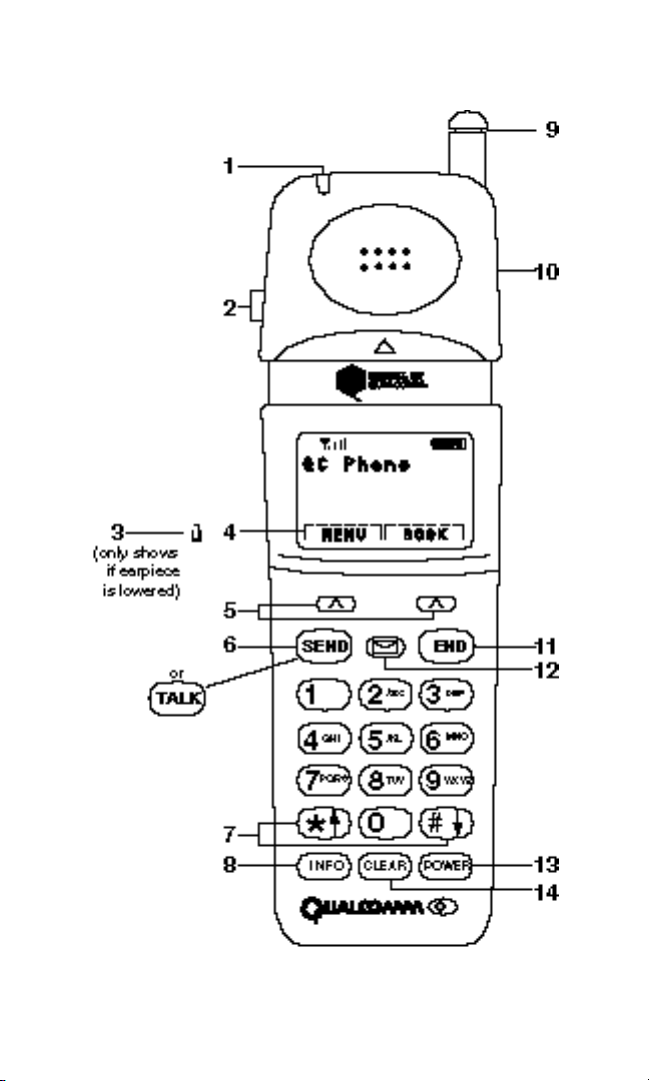
Front View Description
1 Red Light lights when power key is pressed
and when there are incoming calls
and messages.
2 Volume/Scroll let you adjust the volume and scroll
Keys through the menus.
3 Lock Icon indicates that the keypad is locked
because the earpiece is down.
4 Smart Key border and word that defines the
Name Indicator current operation of the Smart Key
.
5 Smart Keys™ are used in context with the text
display. The current operation of a
Smart Key is defined by the word
above it on the display.
6 SEND/TALK is used to place and receive calls
and activate network features (i.e.
call waiting and three-way calling).
7 Scroll Keys allow you to scroll through the
menu options and displays.
8 INFO is used to provide additional
information about the call record or
display and for added functionality.
9 Antenna provides best voice quality when all
the way up.
10 Earpiece when lowered, locks the keypad
and terminates a call in progress,
when raised, unlocks the keypad
and answers an incoming call.
11 END is used to end a call and/or return
to standby display.
12 Message allows quick access to text and
Key voice mail notification messages.
13 POWER turns power on and off (earpiece
must be up).
14 CLEAR clears the digits and/or text from
the display.
9
Page 10
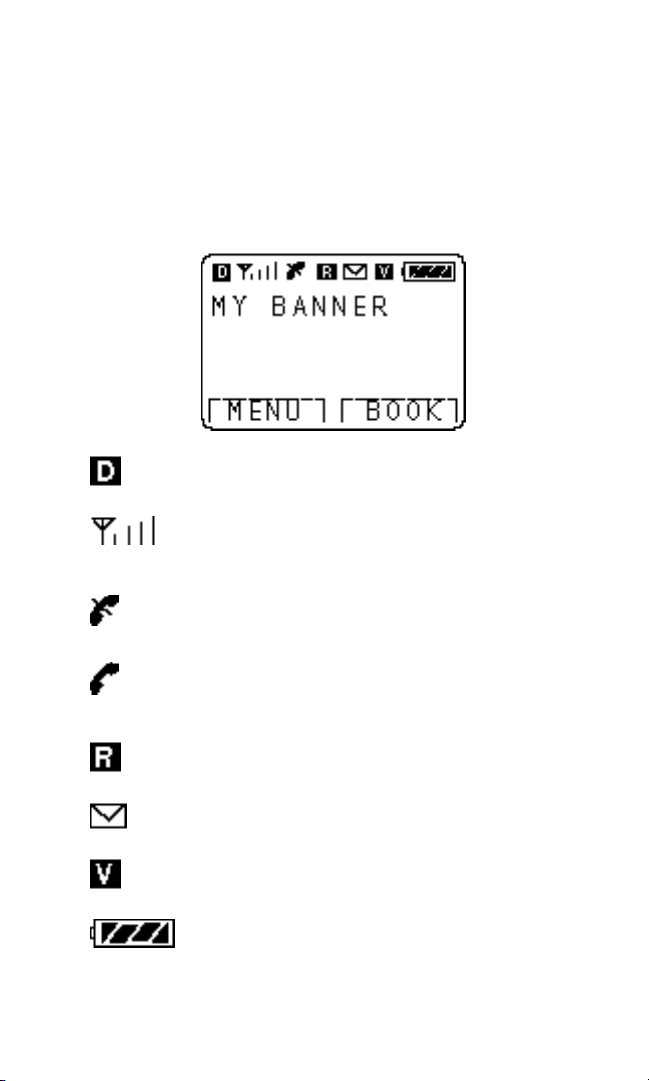
Display Indicators
Display indicators are located at the top of the
display. Different indicators appear based on the
phone’s operating mode.
Digital Indicates that you are
Indicator receiving a digital signal.
Signal Indicates current signal
strength. More lines means
better signal strength.
No Service The phone is not receiving a
signal from the system.
In Use The call is in progress.
No Icon The phone is in standby.
Roaming The phone is outside of its
home area.
Text There is a text message
Message or page waiting.
Voice There is a voice mail
Message notification message waiting.
Battery Indicates battery charge level
status. The more black you
see the greater the charge.
10
Page 11
Using the Battery
The phone comes with a rechargeable battery pack.
The battery pack is shipped with approximately
50% capacity so you can use it immediately after
purchasing the phone. Remember to charge the
battery as soon as possible in order to maximize the
talk time and standby time.
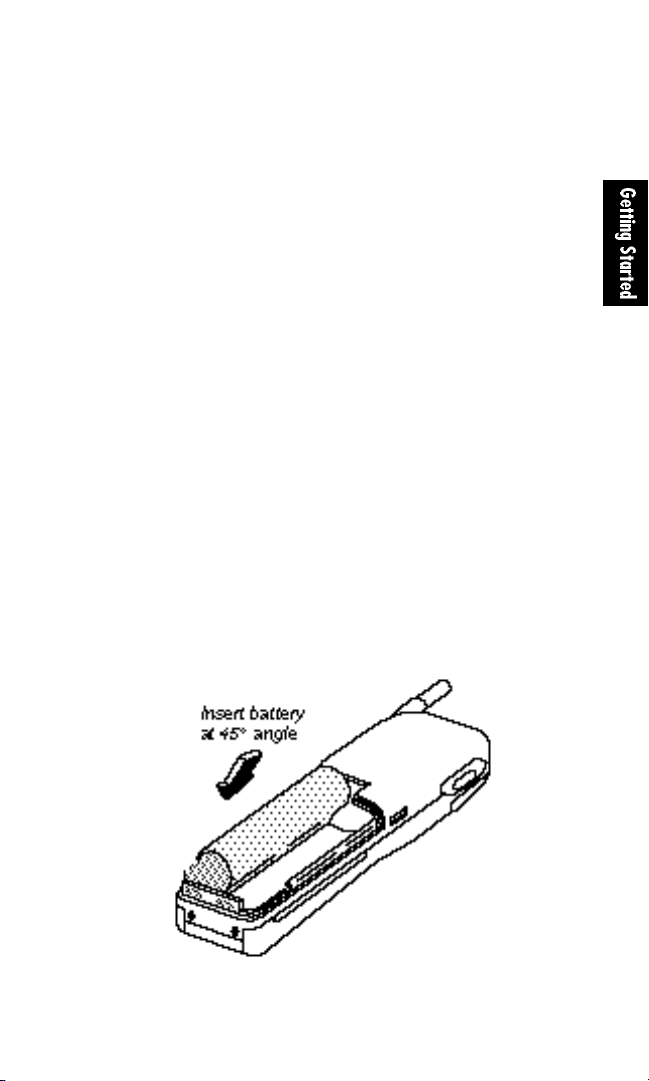
Installing the Battery
Remove the battery cap before installing the
battery.
1. Press down on the battery release latch and
simultaneously slide the back cover down and
out.
2. Place the battery pack into the opening at a 45°
angle with the metal contacts at the top and
facing downward.
3. Press down on the battery pack until it drops
into place.
11
Page 12
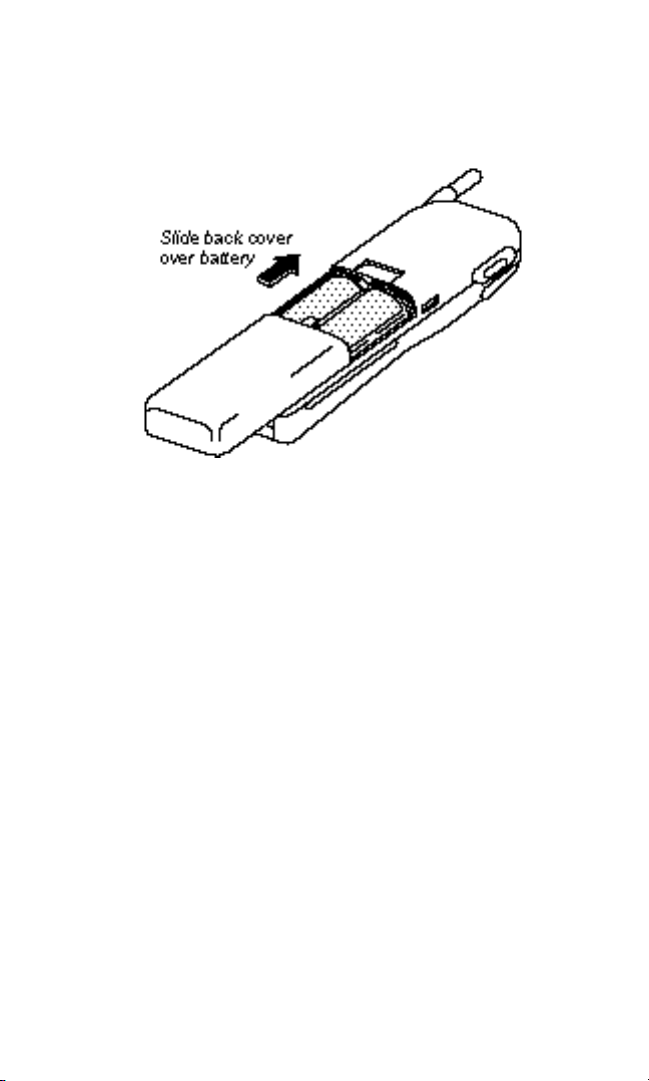
4. Replace the back cover by sliding it up toward
the battery release latch.
Removing the Battery
1. Turn the power off; Otherwise, you may lose
stored numbers and messages.
2. Press down at the battery release latch and
simultaneously slide the back cover down and
out.
3. Hold the battery pack at the bottom right corner
and pull up and out at a 45° angle.
12
Page 13
Turning the Phone On and Off
Turning On
Make sure that the charged battery pack has been
installed in the back of the phone or that you have
external power (using the cigarette lighter adaptor
or car kit).
1. Raise the earpiece.
2. Press for a few seconds until the red light
at the top of the earpiece is lit.
Turning Off
1. With the earpiece raised, press for a few
seconds until “Powering Off” is displayed.
2. Release .
3. Lower the earpiece.
When the power is off, nothing displays on the
screen.
Note
If is pressed for less than 1 second, the phone
will not turn off. If earpiece is down, the phone will
not turn off.
13
Page 14
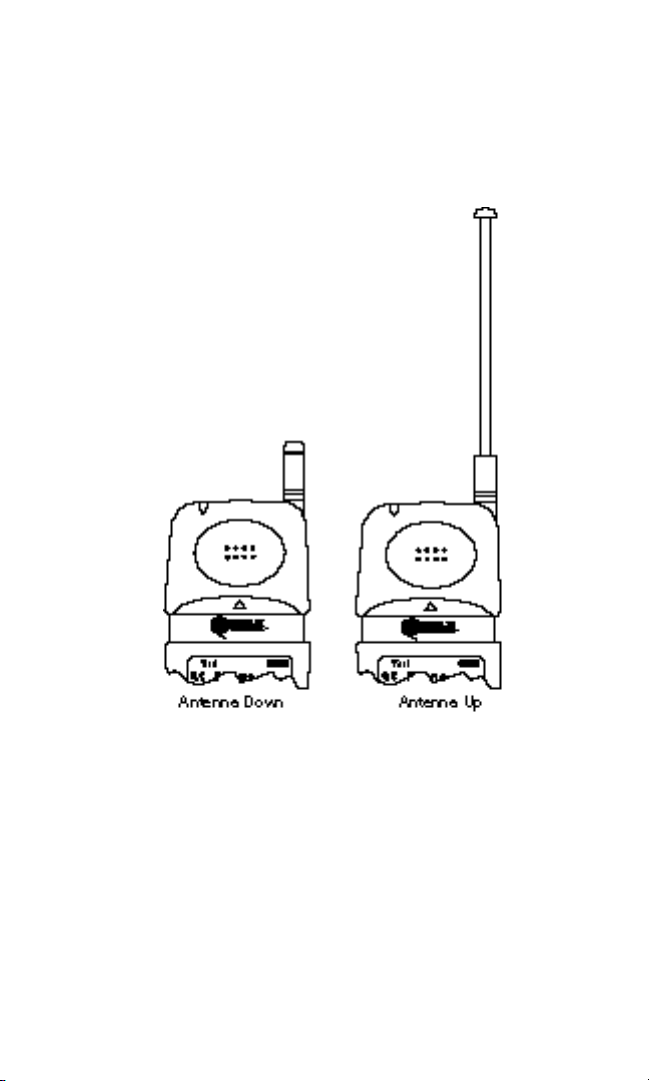
Antenna
Raise the antenna for best voice quality.
14
Page 15

Charging the Battery
The battery charge level is shown at the top right of
the display.
When the battery charge level becomes low, the low
battery sensor will alert you by displaying the
screen icon and sounding an audible tone. If the
battery level becomes too low, the phone will switch
off and any function in progress will not be saved.
Batteries may be charged using the standard
QUALCOMM desktop charger, optional travel
charger, or cigarette lighter adaptor.
Using the Desktop Charger
Warning: Only use the desktop charger and AC adaptor
provided with the phone. Using the wrong adaptor may
cause damage.
1. Plug one end of the AC adaptor into the charger
holder and the other end into a wall outlet.
2. Insert either the battery pack alone or the phone
with installed battery pack into the slot. You
should then see a red light on the charger
indicating that the battery is being charged.
If completely discharged, the battery will charge in
approximately 5 to 6 hours. If you leave the phone
on while it is in the desktop charger, the battery
will take longer to charge.
You do not need to completely discharge the battery
before charging. Unlike other battery systems, there
is no memory effect which could degrade the battery
performance.
15
Page 16
BASIC FUNCTIONS
Function Keys
The following keys perform these functions when
pressed during most procedures:
Clears characters from the screen. Press
once to erase one digit or character.
Press and hold to erase all digits. When
in a menu, press once to go back one
level and press and hold to go back to
the standby display.
Disconnects a call. Also exits all the way
out of a menu back to the phone’s most
basic standby display without changing
the setting.
Provides hyphens, and hard or timed
pauses when programming a number in
memory; accesses special characters
when in text mode; and also provides
additional information and functions.
Places a call.
Left and right Smart Keys select
whatever option is directly above them.
Scrolls through phone book entries and
menu items.
... Enters numbers, characters, and
chooses menu items.
16
Page 17

Making a Call
First, check that your phone is on. The display
indicators should be visible on the screen.
1. Raise the earpiece.
2. Enter the phone number.
3. Press . If the phone is locked, the
number is restricted, or there is another problem,
you will see a help message.
4. Press or lower the earpiece to disconnect
the call.
Correcting Dialing Mistakes
Press to erase one digit at a time. Press and
hold for at least one second to delete all digits
or letters.
Getting Your Own Phone Number
If your phone has been activated, you can see your
phone’s number by doing the following:
1. Turn the phone on.
2. Press
Or if the phone is already on:
1. Raise the earpiece.
2. Press
.
.
17
Page 18
Receiving Calls
Your phone must be on to receive calls. The earpiece
may be up or down.
If the earpiece is down:
Raise the earpiece.
Or if the earpiece is already up:
Press any key (except or the volume keys)
to answer.
To disconnect the call:
Press or lower the earpiece.
Call Waiting
Your service provider may offer call waiting. When
you are in a call, you may hear two beeps indicating
another incoming call.
1. Press to access this call.
2. Press again to toggle between the two
callers.
Three-way Calling
Your service provider may offer three-way calling.
Press to connect the three parties.
See your service provider for more instructions.
18
Page 19

Redialing Calls
Redialing Last Outgoing Number
1. Press to redial the last outgoing call.
Redial Last Ten Calls
You can redial any of your last ten calls through the
call history list. See the Phone Book section.
Adjusting Volume
The volume keys on the side of the phone can be
used for three different functions:
• Adjusting earpiece volume when you are in a call
• Adjusting ringer volume when you first raise the
earpiece
• Scrolling through menu items when you are
using the menus or phone book features
Emergency Dialing
You can place calls to 911 or one of the other three
emergency numbers that are in your phone book
even if your phone is locked or restricted. The
service provider may have preprogrammed the
three emergency numbers for you.
Making Emergency Calls
1. Press or one of the other three
emergency numbers.
2. Press .
19
Page 20

Saving and Editing Emergency Numbers
1. Press under [MENU].
2. Press for Security menu.
3. Enter the lock code. The lock code is typically set
to either 0000 or 1234 as a default.
4. Press for Emergency #.
5. Press under [EDIT] to make changes to the
first emergency number.
or
Press under [NEXT] to see the next
emergency number.
Signal Strength
The quality of the call depends on the signal
strength in your area. The phone displays the
current strength as a number of bars next to the
signal strength icon; the more bars, the better the
signal.
If the signal is poor, raise the antenna for best
performance. If you are in a building, the reception
may be better near a window.
20
Page 21

Power Save Mode
The power save mode feature will automatically
turn on if the phone has not been able to acquire
any systems after 15 minutes of searching. While
this feature is active, the phone’s battery charge is
conserved. The phone will automatically recheck for
service periodically. To manually force the phone to
recheck for service, press any key or raise the
earpiece. A message on the display will indicate
when the phone is operating in power save mode.
21
Page 22

PHONE BOOK FEATURE
The Two Phone Book Types
You should be familiar with the basic functions of
the phone before using the phone book. There are
two types of phone books: primary phone book
memory and recent call history list.
Primary Phone Book Memory
The phone has 99 general use phone book memory
locations where you can store entries of up to 32
digits with an associated name up to 12 characters.
Recent Call History List
The phone keeps a list of the last 10 calls you made,
accepted, missed, or added.
Depending on the operating mode and available
features, each entry may contain the phone number,
name, and time stamp (which indicates when the
call occurred).
You may see one of the following entries:
MISSED Indicates an unanswered incoming
call if caller ID is available.
CALLED BY Indicates a call you received and
answered if caller ID is available.
CALL TO Indicates a call you placed.
ADDED Indicates that the number was
added using the scratch pad feature.
22
Page 23

• While viewing a call history entry, press
to
show additional information available such as
the time stamp.
Saving Numbers to Your Primary Phone Book
Memory locations 1 to 9 should be used for onetouch dial or most commonly used phone numbers.
1. Enter the phone number that you want to save.
[SAVE] will then appear.
2. Press under [SAVE].
3. Enter a name to go with the number.
Press the key labeled with the letter you want.
Press it once to get the first letter on the key,
twice to get the second, three times to get the
third, and four times for the number (or fourth
letter). If you miss the letter you want, keep
pressing the key until it reappears. Press
to correct any mistakes. Two seconds after you
choose a character, the cursor moves to the right
one character. Repeat this process until the name
is entered.
4. Press under [OK] to save the name and
move to the next step.
23
Page 24

5. Press under [OK] to store the number in the
first available storage location.
or
Enter a specific, two digit location number.
6. Press under [OK] to save the number.
or
Press under [NEXT] and then under
[OK] to save the number as secret. (Secret
numbers do not display on the screen.)
Retrieving Numbers from Your Phone Book
Press under [BOOK] to access the phone book.
Retrieving all Manually Stored Memory Locations
1. Press under [BOOK].
2. Press or to scroll through the
memory list.
24
Page 25

3. Press under [VIEW] to see what is in that
memory location.
4. Press under [ERASE] or [EDIT] or press
to call.
Retrieving One Entry by Memory Location Number
1. Press under [BOOK].
2. Enter the two digit memory location number.
You will then see what is in that memory
location.
3. If occupied, to call or press
under [ERASE] or [EDIT].
Retrieving by Name Search
1. Press under [BOOK].
2. Press under [NAME].
3. Enter the letter(s) that you want to look for.
4. Press under [FIND].
The phone then searches for names with those
letters. You will see a list of matches.
5. Press or to scroll through the list.
6. Press under [VIEW].
or
Press to call.
25
Page 26

Retrieving Recent Call History
1. Press under [BOOK].
2. Press under [CALLS].
3. Press or to scroll through the last ten
calls.
4. Press to place a call.
or
Press under [VIEW] to see specifics of the
call.
5. Press under [SAVE] to save the number to
a memory location.
If the number already has a name associated with
it, it is already entered into a memory location.
While viewing an entry, press
to show
additional information available such as the time
stamp.
Retrieving by Part of Phone Number Search
You can look for a phone number if you know at
least three of the digits.
1. Enter any three sequential digits from the phone
number on the main screen..
2. Press under [FIND].
3. If there is a match, press or to scroll
to desired entry.
4. Press under [VIEW] to see the entry or
to place a call.
26
Page 27

Changing Your Phone Book
Erasing a Stored Memory
1. Press under [BOOK]. Recall and view the
memory location.
2. Press under [ERASE]. This will erase the
name and number from the memory location
leaving it free for a future entry.
3. Press under [OK].
4. “-erased-” will flash on the display to confirm
that the entry has been erased.
Editing a Stored Memory Location
1. Recall the memory location.
2. Press under [EDIT].
3. Edit the number using the digit keys, and .
4. Press under [OK].
5. Edit the name using or , the digit
keys, and .
6. Press under [OK]. You are then prompted
for a memory location.
7. Press under [OK] to use the memory
location listed or enter a new memory location.
8. Press under [OK] to finish the editing
process and store as a nonsecret entry.
27
Page 28

Dialing Numbers from Your Phone Book
You can make a call using any memory location
either by speed dialing from the list or by pressing
while viewing the full contents of the
memory location.
Speed Dialing
You can quickly dial numbers that are saved in your
phone’s phone book.
1. Press the key(s) that correspond to the numeric
memory location. For example, for memory
location 10, Press under [BOOK], and then
press .
2. Press . The phone will find the
telephone number in its phone book, display it on
the screen, and then dial it.
One-touch Dialing
One-touch dialing enables you to dial phone book
entries through one key press (for locations 1 to 9)
or two key presses (for locations 10 to 99).
You can turn one-touch dialing on through the
“One-Touch” item under the “Features” menu.
For memory locations 1 to 9:
Press and hold the appropriate key for at least
one second.
For locations 10 to 99:
1. Press the first digit.
2. Press and hold the key for the second digit.
28
Page 29

Dialing from a Memory List
1. Press under [BOOK].
2. Press or to go to the memory location
you want.
3. Press .
Dialing from within a Memory Location
While viewing any memory location, press
.
Advanced Phone Book Features
Pause Feature
When you call automated systems (such as voice
mail or credit card billing numbers), you often have
to enter a series of numbers. Instead of entering the
numbers by hand, you can store the numbers in
your phone book separated by special characters
called pauses. There are two kinds of pauses:
• Hard Pauses– You have to press under
[RESUME] to go to the next number.
• Timed Pauses–The phone will send the next set
of numbers after two seconds. Each additional
timed pause will add two more seconds to the
pause length.
Storing a Number with Pauses
1. Enter the number.
2. Press
3. Press for HardPause.
.
29
Page 30

or
Press for TimePause.
4. Enter additional numbers (i.e., pin number,
credit card number).
5. Press under [SAVE].
Note
You can press for Hyphens. Hyphens are used
for appearance only; the phone dials the number
without any delays.
Punctuation Characters for Name Entry
You can use any of the 18 special characters while
you are entering names during phone book storage
or editing.
1. Press
during the “Enter Name” step.
You will then see a list of characters.
2. Press the or to see the other nine
characters that you may choose from.
3. Press the number next to the character that you
want.
4. Continue entering the name.
30
Page 31

Case Changing During Name Entry
When entering a name, you can use both upper and
lower case letters.
1. Press under [A->a] to change case.
2. Enter letters.
“Prepending” a Stored Number
“Prepend” is used if you are out of your home
system and need to add the area code to an existing
phone book number. When a phone book entry, call
history entry, or messages callback number shows
up on the display, you can make additions to the
beginning of the original number. However, you
can’t edit the original number during “prepend.”
To “prepend” a number:
1. Recall a number in memory.
2. Press any digits. Digits entered will prepend the
recalled number.
3. Press to dial the new, longer
number.
Making an Entry Secret
You can set memory locations to “secret” (which
hides the phone number and only displays the
name). If you do not enter a name to go with the
number, you will see the word “secret” in any
memory displays or lists. “Secret” memory locations
can only be deleted, not edited.
31
Page 32

MENU FEATURE
Main Menu
This section describes the various menu items. An
arrow to the right of the title indicates if there is
more information before (↑) or after (↓) that
particular number. The main menu looks like the
following:
Menus allow you to check or change the phone’s
various features and settings. You may see the
different menus using either the menu access
method or the shortcut menu access method.
Menu Access Method
1. Press the under [MENU].
2. Press or to step forward or backward
through the list of features.
3. Press to go back one step.
4. Press the number corresponding to the menu
item that you want to select.
32
Page 33

5. Press under [NEXT].
or
Press or to cycle through the possible
settings. A check mark indicates the current
option selection.
6. Press under [OK] to save the setting.
7. Press to cancel without saving.
Shortcut Menu Access Method
Each menu feature can also be quickly accessed by
pressing under [MENU] and the numbers on
the desired menu screen. For example, when the
shortcut is used, the phone displays the current
menu item setting.
Menu Item Descriptions
1 Volume
This allows you to adjust the ringer, key beep, and
earpiece volume.
1 Ringer Adjust ringer and new message
alert volume with the or
keys or volume keys. You
can also adjust the ringer
volume by pressing the volume
keys only while the phone is in
standby or is ringing. Possible
settings: silent, low, M-, M+, high.
33
Page 34

2 Key Beep Adjust the key beep volume (the
sound the phone makes when
the keys are pressed with the
or keys or volume
keys). Possible settings: silent,
low, M-, M+, high.
3 Earpiece Adjust the earpiece volume with
the , keys or volume
keys. You can also adjust this
during a call by pressing only
the volume keys. Possible
settings: low, M-, M+, high.
2 Call Info
This allows you to see the number and duration of
various kinds of calls.
1 Last Call Display duration of last call in
minutes and seconds.
2 Home Calls Display the total number of calls
and time (minutes and seconds),
of all calls made while in the
home system (i.e., not roaming),
since last reset. Press
under [ZERO] to reset.
3 Roam Calls Display the total number of calls
and time (minutes and seconds)
of all calls made while roaming.
Press under [ZERO] to
reset.
34
Page 35

4 All Calls Display the total number of calls
and time (minutes and seconds)
including calls made while in the
home system and while roaming.
This is NOT resettable.
3 Security
You must enter the lock code to see what is in the
security menu. Typical default values are either the
last 4 digits of your phone number or 0000.
1 Lock Mode Choose when you want the
phone to lock. Possible settings:
“on power up,” “now,” “never.”
“Now” immediately locks the
phone.
When the lock code is entered,
this is reset to “never.”
“On power up” locks the phone
when the phone is turned on.
“Never” means that the phone is
never locked.
When locked, you can only make
emergency calls or receive
incoming calls. All other
functions of the phone are
disabled. If you forget your lock
code, please call your service
provider for help.
2 Restrict Set phone use restrictions to
“yes” or “no.” If set to “yes,” you
can only make calls to
emergency numbers and phone
numbers in locations 1 to 9.
3 New Code Enter a new four digit lock code
number.
35
Page 36

4 Emergency# Enter three emergency numbers.
You can call these numbers and
911 even when the phone is
locked or restricted. If dialing
the number, it must exactly
match one of these programmed
numbers for it to override the
lock and restriction settings.
5 Clear Calls Clear the call history
information.
4 Features
1 Auto Answer Select the number of rings
before the phone automatically
answers a call. Possible settings:
“5 rings,” “3 rings,” “1 ring,” and
“off.” The earpiece must be
raised for auto answer to work.
This feature is most commonly
used with the car kit.
2 Auto Retry Set the length of time the phone
waits before automatically
redialing a number when the
system is busy. Possible settings:
“every 60 seconds,” “every 30
seconds,” “every 10 seconds,”
“off.”
3 Scratch Pad Store phone numbers during a
call. These numbers are added to
call history.
4 Mute Switch the microphone on and
off while in a call. When the
microphone is off, the other
party can not hear you.
36
Page 37

5 Key Beep Set key beep length and touch
tone playback speed. Possible
settings: “long,” “normal.”
6 One-touch Enable/disable one-touch phone
book memory dialing. Possible
settings: “enable,” “disable.”
7 Privacy Set the voice privacy feature for
CDMA calls. Possible settings:
“enhanced,” “standard.”
CDMA offers inherent voice
privacy. Check with your service
provider for availability of the
enhanced voice privacy mode.
During a call, if active, you will
see an inverse “P” on the same
line as the call time.
5 Display
This allows you to choose what you see on the
display.
1 Backlight Choose the setting of the LCD
and keypad backlighting.
Possible settings: “always on,”
“always off,” “10 seconds,” “30
seconds,” “on when earpiece up.”
“10 seconds” turns the backlight
off 10 seconds after the last key
was pressed. “30 seconds” waits
30 seconds after the last key
press. For the 10 and 30 seconds
options, backlighting will not
turn on if the earpiece is down.
37
Page 38

“On when earpiece up” causes
the backlight to turn on (and
remain on) only when the
earpiece is up. “Always on”
means that the backlight is on
whether the earpiece is up or
down. Choosing “always on”
significantly increases
battery drain. “Always off”
means that the backlight is
never on.
2 Banner A banner enables you to
personalize your phone by
displaying your name, for
example. Enter the banner (up
to 12 characters) that will
display on the top line when the
phone powers up and when it is
in standby. Press under
[EDIT] to make changes to the
existing banner. Enter the
characters the same way you do
for the phone book.
3 Show Time Choose whether to display date
and time. Possible settings:
“yes,” “no.”
4 Auto Hyphen Possible settings: “on,” “off.”
When on, automatically inserts
hyphens to be consistent with
U.S. phone numbers.
38
Page 39

6 Alerts
1 Fade Set an alert to inform you when
you have lost a call or lose
service. Possible settings: “on,”
“off.”
2 Minute Set minute minder to beep every
10 seconds before the minute
while in a call.
3 Service Set an alert to beep when a
network service parameter
changes.
7 System
This allows you to set some of the PCS network
settings.
1 Set NAM Select the phone’s NAM
(Number Assignment Module) if
the phone is registered with
multiple service providers.
2 Auto NAM Allows the phone to
automatically switch to one of
the programmed NAMs if it is
operating in the corresponding
service provider area.
3 Activation If supported by your service
provider, this item enables
you to initiate over-the-air
activation in order to get
your phone working through
a few key presses.
39
Page 40

PAGING, MESSAGING,
AND VOICE MAIL
This feature allows your phone to receive messages
when it is turned on. A single key, , allows you
to access your messages while a four line display
provides for easy viewing. While reading a message,
you can return a call to the callback number
provided in the message simply by pressing
twice.
Messages are stored in the phone’s memory and are
not erased when the phone is turned off. The phone
has the capability of storing up to 23, 40 character
messages. However, the number of messages that
can be stored will be reduced if messages are
greater than 40 characters.
Note
Check with your service provider regarding the
availability of this feature. The information
contained in a message, such as time stamp and
callback number, depends on the mode the phone is
operating in and the service provider’s network
capabilities.
This phone supports three types of messages:
Message typically contains text
Page typically contains digits
40
Page 41

Voice Mail indicates the number of new
Notification voice mail messages that your
voice mailbox has. You must call
your voice mail number to listen
to these messages.
New Message Alert
The phone will notify you of a new message by a
display on the screen, five short beeps (if enabled), a
flashing red light on the earpiece, and by turning on
an icon on the top of the display. If a message is
marked URGENT, the corresponding icon ( or
) will flash. In addition, the first line of the
display will contain asterisks (*) on each side of the
label for example, “* MESSAGE! *”.
To acknowledge the new message indication:
Press any key.
or
Raise the earpiece.
The phone will then be returned to the display
that was present before the alert. The red light
will continue to flash and a reminder beep will
occur every two minutes until the new message is
acknowledged.
41
Page 42

Viewing Pages and Messages
These messages may consist of a time stamp, a
callback number, a name (if the callback number
matches a phone number stored in a memory
location), and text. They are accessed as text type
messages as shown below.
Reading New Messages
1. Press . The display will then show the
number of new messages.
2. Press under [TEXT]. You will see the
messages in the order they were received except
for all urgent messages, which will be displayed
first.
Messages will automatically scroll page by page.
To manually scroll through the message line by
line, press or . At the end of the
message, the Smart Key options will be [ERASE]
and [NEXT].
3. Press under [ERASE] to erase the message
and go to the next message.
or
Press under [NEXT] to keep the message in
memory and go to the next message.
4. Press to view the callback number
provided in the message.
5. Press again to place a call to the
callback number.
42
Page 43

Note
When there are no new messages, the phone will
display a list of previous messages.
If the callback number has not been previously
stored into one of the phone’s memory locations, you
can do so by pressing under [SAVE].
If a name appears with the callback number, the
number is already stored in a phone memory
location.
After storing the number in phone book memory,
the phone returns to the callback screen. Press
to place the call. You may prepend
digits, such as an area code, simply by pressing the
desired digits before pressing .
Reading Previous Messages
1. Press .
2. Press under [TEXT]. This displays the list
of previous messages. Each line will show the
first 11 characters of the messages.
3. Press or to select the message.
4. Press under [ERASE]. This erases the
message and goes to the next message.
or
Press under [VIEW]. This lets you view the
message.
43
Page 44

5. While viewing a message or with the arrow
pointing to the desired message, you can press
to place a call to the callback number
provided in the message. After you see the
callback number on the display, press
again to place the call.
6. Press under [QUIT]. This brings you back
to the list of previous messages.
Voice Mail Notifications
Voice mail notification indicates the number of new
voice mail messages in your mailbox. Only the most
recent voice mail notification will be stored in the
phone; previous messages will be overwritten. You
must call your voice mail service to retrieve these
messages.
Reading Voice Mail Notification Messages
1. Press .
2. Press under [VOICE] to view the entire
message. The phone will automatically scroll
page by page. To manually scroll, press or
.
3. Press to call back your voice mailbox
if your voice mail system has sent a callback
number.
or
Press under [QUIT] when you get to the
end of the message.
44
Page 45

or
Press under [ERASE] to erase the message
and turn the icon off. Usually, this is not
required because the network will command the
phone to automatically turn the icon off when
you have no new messages.
Low Memory Warning
The phone will alert you when the amount of
available message memory is less than 25%.
Although the phone can still receive new messages,
you should erase messages you no longer need to
avoid running out of memory.
Out of Memory Warning
When the phone has no more available message
memory, it can no longer accept new messages.
When this occurs, the phone will display an “Out of
Memory” message.
45
Page 46

ACCESSORIES
You can purchase a number of accessories for your
QCP 800 or QCP 1900 phone, including batteries,
chargers, and a hands-free car kit. For our full line
of accessories, visit our Accessories Store at
■ www.kyocera-wireless.com/store
Or order by phone at
■ (800) 211-1537 or (510) 683-4004
46
Page 47

PHONE SAFETY
AND CARE
Background
The hand-held portable personal communication
service telephone is one of the most exciting and
innovative electronic products ever developed. With
it you can stay in contact with your office, your
home, emergency services etc.
Your personal communication service telephone is a
radio transmitter and receiver. When it is ON, it
receives and also sends out radio frequency (RF)
energy. The phone operates in the frequency range
of 800MHz to 840MHz (QCP 800) or 1850 MHz to
1990 MHz (QCP 1900). When you use your phone,
the system handling your call controls the power
level at which your phone transmits. The power
level can range from 0.006 of a watt to 0.3 of a watt.
Exposure to Radio Frequency Energy
In 1991, the Institute of Electrical and Electronics
Engineers (IEEE) and in 1992, the American
National Standards Institute (ANSI) updated the
1982 ANSI Standard for safety levels with respect
to human exposure to RF energy. Over 120
scientists, engineers, and physicians from
universities, government health agencies, and
industry, after reviewing the available body of
research, developed this updated standard.
47
Page 48

In March 1993, The U.S. Federal Communications
Commission (FCC) proposed the adoption of this
updated standard.
The design of the QCP 800/QCP 1900 phone
complies with this updated standard. Of course, if
you want to limit RF exposure even further than the
updated ANSI Standard, you may choose to control
the duration of your calls and operate your phone in
the most power efficient manner.
For Best Performance
To properly operate the phone and maintain safe
and satisfactory service, follow these rules:
• Extend the antenna fully.
• Hold the phone with the antenna up and over
your shoulder.
• Do not hold the phone antenna at any time.
• Do not use the phone with a damaged antenna.
• Speak directly into the mouth piece.
• Use the phone when the car is stopped.
Avoid exposing the phone and accessories to rain or
liquid spills. If the phone gets wet, turn the power
off immediately and remove the battery pack. If the
phone is inoperable, then return it to the dealer for
service.
Only authorized personnel should install or service
the phone and its accessories. Faulty installation or
service may be dangerous and may invalidate the
warranty.
48
Page 49

Caring for the Battery
For best battery performance, follow these
guidelines:
• Only use QUALCOMM battery packs, model
number TABAT0001, and QUALCOMM
chargers, model numbers TATVL0001 or
TADTC0002. Do not use any other battery pack
or charger.
QUALCOMM’s chargers are designed to
maximize the battery life performance.
• Do not charge the battery pack in temperatures
outside of 32°F to 122°F (0°C to 50°C) because
damage could occur.
• Do not use the battery charger in direct sunlight
or in places with high humidity such as the
bathroom.
• Never dispose of the battery pack by a fire.
• Keep the metal contacts at the top end of the
battery pack clean.
• Do not attempt to disassemble or short circuit
the battery pack.
• You may need to recharge the battery if it has
not been used for a long time.
• Replace the battery when it no longer provides
acceptable performance. The battery pack may be
recharged hundreds of times before it will need to
be replaced.
• Do not store the battery pack for long periods in
places where high temperatures frequently occur.
Follow these storage rules:
less than 1 month: -4°F to 140°F (-20°C to 60°C )
more than 1 month: -4°F to 113°F (-20°C to 45°C)
49
Page 50

Driving Safety
Talking on the phone while driving is extremely
dangerous and is illegal in some states. Remember,
safety comes first.
Check the laws and regulations on the use of PCS
phones in the areas where you drive. Always obey
them.
When using the phone in the car:
• Give full attention to driving.
• Use hands-free operation.
• Pull off the road and park before making or
answering a call.
If you must use the phone while driving, please use
one-touch, speed dialing, and auto answer modes.
FAILURE TO FOLLOW THESE INSTRUCTIONS
MAY LEAD TO SERIOUS PERSONAL INJURY
AND POSSIBLE PROPERTY DAMAGE.
Other Safety Guidelines
For the safe and efficient operation of your phone,
observe the following guidelines.
Remember to follow any special regulations in force
in any given area. Always turn off the phone
wherever its use is forbidden or when it may cause
interference or danger.
Electronic Devices
Most modern electronic equipment is shielded from
RF energy. However, RF energy from PCS
telephones may affect inadequately shielded
electronic equipment.
50
Page 51

RF energy may affect improperly installed or
inadequately shielded electronic operating and
entertainment systems in motor vehicles. Check
with the manufacturer or its representative to
determine if these systems are adequately shielded
from external RF energy.
You should also check with the manufacturer of any
equipment that has been added to your vehicle.
Consult the manufacturer of any personal medical
devices (such as pacemakers, hearing aids, etc.) to
determine if they are adequately shielded from
external RF energy.
Turn off the phone in health care facilities and
request permission before using the phone near
medical equipment.
Aircraft
Turn the phone off before boarding any aircraft. Use
it on the ground only with crew permission. Do not
use it in the air. To prevent possible interference
with aircraft systems, U.S. Federal Aviation
Administration (FAA) regulations require you to
have permission from a crew member to use your
phone while the plane is on the ground. To prevent
interference with personal communication service
systems, FCC regulations prohibit using your phone
while the plane is in the air.
Children
Do not allow children to play with your phone. It is
not a toy. Children could hurt themselves or others
(by poking themselves or others in the eye with the
antenna for example). Also, children could damage
the phone or make calls that increase your
telephone bills.
51
Page 52

Blasting Areas
To avoid interfering with blasting operations, turn
your phone OFF when in a “blasting area” or in
areas posted: “Turn off two-way radio.” Construction
crews often use remote control RF devices to set off
explosives.
Potentially Explosive Atmospheres
Turn your phone OFF when in any area with a
potentially explosive atmosphere. It is rare but your
phone or its accessories could generate sparks.
Sparks in such areas could cause an explosion or
fire resulting in bodily injury or even death.
Areas with a potentially explosive atmosphere are
often, but not always, clearly marked. They include
fueling areas such as gas stations; below deck on
boats; fuel or chemical transfer or storage facilities;
areas where the air contains chemicals or particles,
such as grain, dust, or metal powders; and any other
area where you would normally be advised to turn
off your vehicle engine.
Do not transport or store flammable gas, liquid, or
explosives in the compartment of your vehicle which
contains your phone or accessories.
Vehicles using liquefied petroleum gas (such as
propane or butane) must comply with the National
Fire Protection Standard (NFPA-58). For a copy of
this standard, contact the National Fire Protection
Association, One Batterymarch Park, Quincy, MA
02269, Attn: Publication Sales Division.
52
Page 53

contact your service provider first.
WHERE TO
Your service provider’s customer
support department can answer
questions about your phone,
FIND HELP
Your Service Provider
For questions about your phone and phone service,
contact your service provider. Your service
provider’s customer support department can answer
questions about your phone, phone bill, call
coverage area, and specific features (such as call
forwarding or voice mail) available to you.
Your Phone Documentation
If you have questions about the features of the
phone, refer to this guide and other materials
provided with your phone. To view or download the
most current version of this user’s guide, visit us at
www.kyocera-wireless.com.
Kyocera Technical Support
If you have additional questions, contact the
Kyocera Wireless Corp. Customer Care Center in
any of these ways:
■ Web site: www.kyocera-wireless.com
■ U.S. and Canada: (800) 349-4478
■ Other Countries: (858) 882-1400
■ Email: phone-help@kyocera-wireless.com
53
Page 54

Before requesting support, please try to reproduce
and isolate the problem. When you contact the
Customer Care Center, be ready to provide the
following information:
■ The name of your service provider
■ The actual error message or problem you are
experiencing
■ The steps you take to reproduce the problem
■ The Electronic Serial Number (ESN) and Part
Number (MCN) of the phone. The ESN usually
starts with a “B” and the MCN usually starts
with a "61-." You will find these numbers inside
your phone by removing the battery.
54
Page 55

INDEX
A
AC adaptor 15
accessories 5, 48, 52
aircraft 51
alerts 39
fade 39
minute 39
service 39
setting 39
answering a call 7, 9, 18, 36, 50
Antenna 9, 14
antenna 6, 20, 48, 51
Auto NAM 39
automatic answer 36
automatic hyphenation 38
automatic redial 5, 36
automatic retry 36
automatic scrolling 42, 44
B
backlight 37, 38
banner 38
battery
care 49
charge 21
charging 11, 15
drain 38
installing 11
level indicator 10, 15
removing 12
55
Page 56

use 11
best performance 20, 48
blasting areas 52
C
call history 19, 22, 26, 31, 36
call info 34
call waiting 9, 18
calls
credit card 29
dialing 28, 29, 36
ending 9
incoming 9, 18, 22, 35
making 7, 17, 19, 50
receiving 18
redialing 19, 36
restrictions 35
roaming 10, 34, 35
three-way 9, 18
car kit 13, 36
CDMA 5, 37
children 51
cigarette lighter adaptor 13, 15
clear
calls 36
digits 9
clear digits 16
Code Division Multiple Access 5, 37
correcting dialing mistakes 17
customer service 6
D
dialing calls 19, 28, 37
dialing from memory location 29
digital system 10
display 5
display features 21, 27, 37, 38
display indicators 10, 17
56
Page 57

driving safety 50
E
earpiece
5, 7, 9, 13, 17, 18, 19, 21, 33, 34, 36, 37, 41
editing 30
memory 27
numbers 20
emergency numbers 19, 20, 35, 36
END key 9
ending a call 9
entering
a number 17, 23, 24, 25, 29, 36
letters 25
lock code 20, 35
lower case letters 31
name 23
punctuation 30
explosive atmospheres 52
F
fade alert 39
FCC 6, 48, 51
features 5, 7, 9, 19, 22, 29, 32, 36
frequency 47
Functions 16
functions 16, 19
I
incoming calls 9, 22, 35
INFO key 9
K
key beep volume 34
keypad lock 5, 7, 9
57
Page 58

L
last ten numbers dialed 19, 26
lock code 35
low battery 15
M
manual pauses 29
memory
clearing 27
editing 27
effect 15
locations 5, 22, 25, 26, 28, 31
retrieving 24
storage 40
menu
item descriptions 33–54
method 32
options 32
shortcuts 33
message
text 10
voice 10
message key 9
messages 40–54
minute alert 39
mute 36
muting voice 36
N
NAM 39
no service 10
Number Assignment Module 39
O
one-touch dialing 28, 37
own phone number 17
58
Page 59

P
pages 10, 40
pause dialing 29
performance tips 48
phone book 22
advanced features 29
dialing from 28, 37
editing 27
retrieving from 24
saving numbers to 23
phone number
viewing your own 17
power 12, 47
POWER key 9
power key 9
power save mode 21
powering off 13
powering on 13
R
radio frequency energy exposure 47
recalling last number dialed 19
recalling memory locations 24–26
recalling previously dialed numbers 26
Receive Signal Strength Indicator 10, 20
receiving calls 9, 18
receiving messages 41
red light 9, 13, 15, 41
redial 19
system busy timer 36
review last number dialed 19
reviewing memory contents 24–26
ringer volume 19, 33
RSSI 10, 20
S
safety 47, 50
59
Page 60

scratch pad 22, 36
scroll
through messages 44
through stored names 25
through stored numbers 26
scroll keys 9
searching
for names 25
for numbers 24, 25, 26
secret numbers 24, 31
signal strength 10, 20
Smart Keys 9, 16
speed dial 5, 28, 50
standby time 11
storing
names with numbers 23
numbers 20, 23–24
secret numbers 31
T
TALK key 9
talk time 11
timer
last call 34. See also call info
roaming 34. See also call info
total 35. See also call info
travel charger 15
V
voice mail 9, 10, 41, 44
volume
earpiece 19, 34
key beep 34
keys 9
ringer 19, 33
60
 Loading...