

Page 1
WARNING
WARNING
To avoid damage from the electronic fuel injection system, do not remove or install the
battery when the ignition switch is in the "ON" position.
The long-term storage of the vehicle could cause fuel and engine oil deterioration and
probably get into a non-start situation.
Service more frequently when operating in severe conditions such as dusty area, high
speed riding, frequent start and stop or extreme riding habit.
Make sure to keep away from any flammable materials such as dry grasses or leaves,
avoid them in contact with the exhaust pipe or muffler when parking the vehicle.
Page 2
Read this manual carefully.
This Owner’s Manual contains important information on safety, operation and maintenance of KYMCO XTown 300. Anyone who is going to ride should carefully read and understand the contents of this manual
before riding. For personal safety, understand and follow all of the warnings contained in this Owner’s
Manual and the labels attached on vehicle. This Owner’s Manual should be considered a permanent
part of the vehicle, keep it with the motorcycle. ON-ROAD USE ONLY for this motorcycle.
Particularly important information is provided in this manual by the following
symbols and signal words
:
The SAFETY ALERT symbol means ATTENTION! BE ALERT!
YOUR SAFETY CAN BE AFFECTED.
WARNING
CAUTION
Failure to follow these instructions can result in severe injury or death.
These instructions point out the special precautions must be
followed to avoid damage.
▆NOTE:
The NOTE indicates the additional important information.
Page 3
Identification Number s Record
Vehicle Identification Number (VIN)
Engine Serial Number (ESN)
Record the Vehicle Identification Number①,
Engine Serial Number②, in the blanks
above for a reference to assist you in
ordering parts from the authorized KYMCO
dealer or in case the vehicle is stolen.
1
2
Page 4

TABLE OF CONTENTS
SECTION 1–SAFETY INTRODUCTION....
Forward......................................................
.
Scooter Safety............................................
Accessories &
Modifications.......................
Locations of Parts & Controls.....................
SECTION 2–CONTROLS &
FEATURES...
Ignition Switch............................................
Security shutter..........................................
Instruments................................................
USB power supply.....................................
Right-hand Handlebar
Switch.....................
Left-hand Handlebar Switch.......................
Fuel Recommendation...............................
Seat............................................................
Suspension................................................
Side stand..................................................
SECTION 3–OPERATION.........................
Pre-ride Inspection.....................................
Break-In......................................................
Startin
g the
Engin
e........
..........
..........
.........
ABS
Syste
m
(Optio
nal)....
..........
..........
......
1
1
2
4
5
8
8
9
10
16
17
18
19
20
22
23
24
24
25
26
28
SECTION 4–MAINTENANCE................
Maintenance Schedule..........................
Engine Oil..............................................
Engine Oil Replacement........................
Transmission Fluid Change...................
Air Filter Element ..................................
Throttle Operation..................................
Spark Plug.............................................
Brake Fluid Level Inspection.................
Brake Lever Adjusters...........................
Brake Pad
Inspection..
..................
.........
Battery.......
..................
..................
.........
Fuse..........
..................
..................
.........
Tires..........
..................
..................
.........
Coolant......
..................
..................
.........
Clean the
Windshield.
..................
..........
Crankcase
Page 5

Blow-by Drain.......................
Storage...................................................
EMISSION CONTROL...........................
SPECIFICATIONS..................................
29
30
33
34
35
36
36
37
38
39
40
41
42
43
45
47
47
48
49
50
Page 6

SECTION 1 -
FORWARD & SAFETY INTRODUCTION
Thanks for purchasing this KYMCO X-Town 300, and welcome to the KYMCO family.
Please read this owner's manual carefully before riding so that you will be thoroughly familiar with
the proper operation of controls, features, capabilities, and limitations.
To ensure a long, trouble-free life for using the vehicle, provide it with the proper care and
maintenance as described in this manual.
For replacement parts and accessories, you should always use genuine KYMCO products, as they
have been specially designed for the vehicle and manufactured to meet the standards. Keep this
owner's manual with the motorcycle at all times so that you can refer to it whenever you need
information. This manual should be considered a permanent part of the motorcycle and should
remain with the vehicle when it is sold.
All information, illustrations, photographs and specifications contained in this manual are based on
the latest product information available at the time of publication. Due to improvements or other
changes, there may be slightly different from the vehicle. KYMCO reserves the right to
make product
and publication changes at any time without notice or obligation.
1
Page 7

SCOOTER SAFETY
IMPO RTANT SAFETY INFORMATION
It will be used longer and pleasure if you take
responsibility for your safety and understand the
challenges that you could face on the road. There
is much that you can do to protect yourself.
Here are man y helpful recommendations and
some very important tips in this manual.
Wear a helmet
The safety equipment starts with a quality helmet.
One of the most serious injuries in a crash is a
head injury. Always wear a properly approved
helmet and also wear suitable eyes protection.
Make
you
easy to see
To make yourself more visible, wear bright
reflective clothing to position yourself clearly, so
other drivers can see you, signal before turning or
changing lanes, and use your horn when it will help
others notice you.
Know your limit s
Always ride within the limitation of personal skill.
Know these limits and stay within them will help you
to avoid accidents.
2
Keep the vehicle in safe condition
For safe riding, it's important to inspect the
vehicle before every ride and perform all
recommended maintenance. Never exceed
load limits, and only use the approved
accessories.
Inspect the vehicle befo r e riding
Do not forget to perform an entire safety
inspection to ensure safety for all riders before
riding.
Be very conscious on bad weather
Riding on bad weather requires extra caution
especially it’s wet. Braking distance is longer
on a rainy day. Keep off the painted
surfaces, manhole covers and greasy spots
on the paved road as it could be especially
slippery. Use extreme caution on the railway
crossing or on the metal surface. Whenever in
doubt about the road condition, please slow
down.
Modification
Modification on the vehicle or removal of
original equipment may have the vehicle
become unsafe or illegal. Obey all the related
equipment regulations from the authority.
Page 8
SCOOTER SAFETY
PROTECTIVE CLOTHING
For your safety, always wear an approved
motorcycle or scooter helmet, eyes protection,
boots, gloves, long pants, and a long-sleeve shirt or
jacket during a ride.
Helmets and protection
The helmet is the most important gear because it
offers the best protection against head injury. The
helmet should fit your head comfortably and
securely. Always wear a face shield or goggles to
protect eyes, but not to interfere with the vision.
Additional rid ing gears
In addition to the head and eyes protection, you
should also use:
Sturdy boots with non-slip soles to help protect
feet and ankles.
Leather gloves to keep your hands warm and
prevent blisters, cuts, burns and bruises.
A motorcycle suit is designed for comfort as well
as protection. Bright color with reflection strips
can make you more noticeable. Be sure to avoid
loose clothes that could get caught on any part of
the vehicle.
The recommended riding gears:
①Wear gloves
②Clothes should be fit properly
③Always wear a helmet with eye protection
④Wear bright or reflective clothing
⑤Footwear should be the proper size, have low
heels, and offer ankle protection.
WARNING
∎Not wearing a helmet increases your
chance of serious injury or death in an
accident.
∎Be sure you and your passenger always
wear an approved motorcycle helmet
that fits properly. You should also wear
eyes protection and other protective
clothing during a ride.
Page 9

3
Page 10
ACCESSORIES & MODIFICATION
There is a large variety of accessories available to KYMCO vehicle owners. KYMCO cannot have
direct control over the quality or suitability of accessories you may wish to purchase. The addition of
unsuitable accessories can lead to unsafe operation. It is not possible for KYMCO to test each
accessory on the market or combinations of all the available accessories; however, the
KYMCO dealer can assist you in selecting quality accessories and then install them correctly.
Use extreme caution when selecting and install ing the accessories.
No modifications:
KYMCO strongly advises you against removing any original equipment or modifying the vehicle in
any way that would change its design or operation.
WARNING
Improper accessories or modifications can make the vehicle unsafe and can lead to an accident.
Never modify the vehicle through the improper installation or use of accessories. All parts
and accessories added to this vehicle should be genuine KYMCO parts or equivalent
components designed for use on this vehicle and should be installed and used according to the
correct instruction. If you have any questions, consult the authorized KYMCO dealer.
4
Page 11

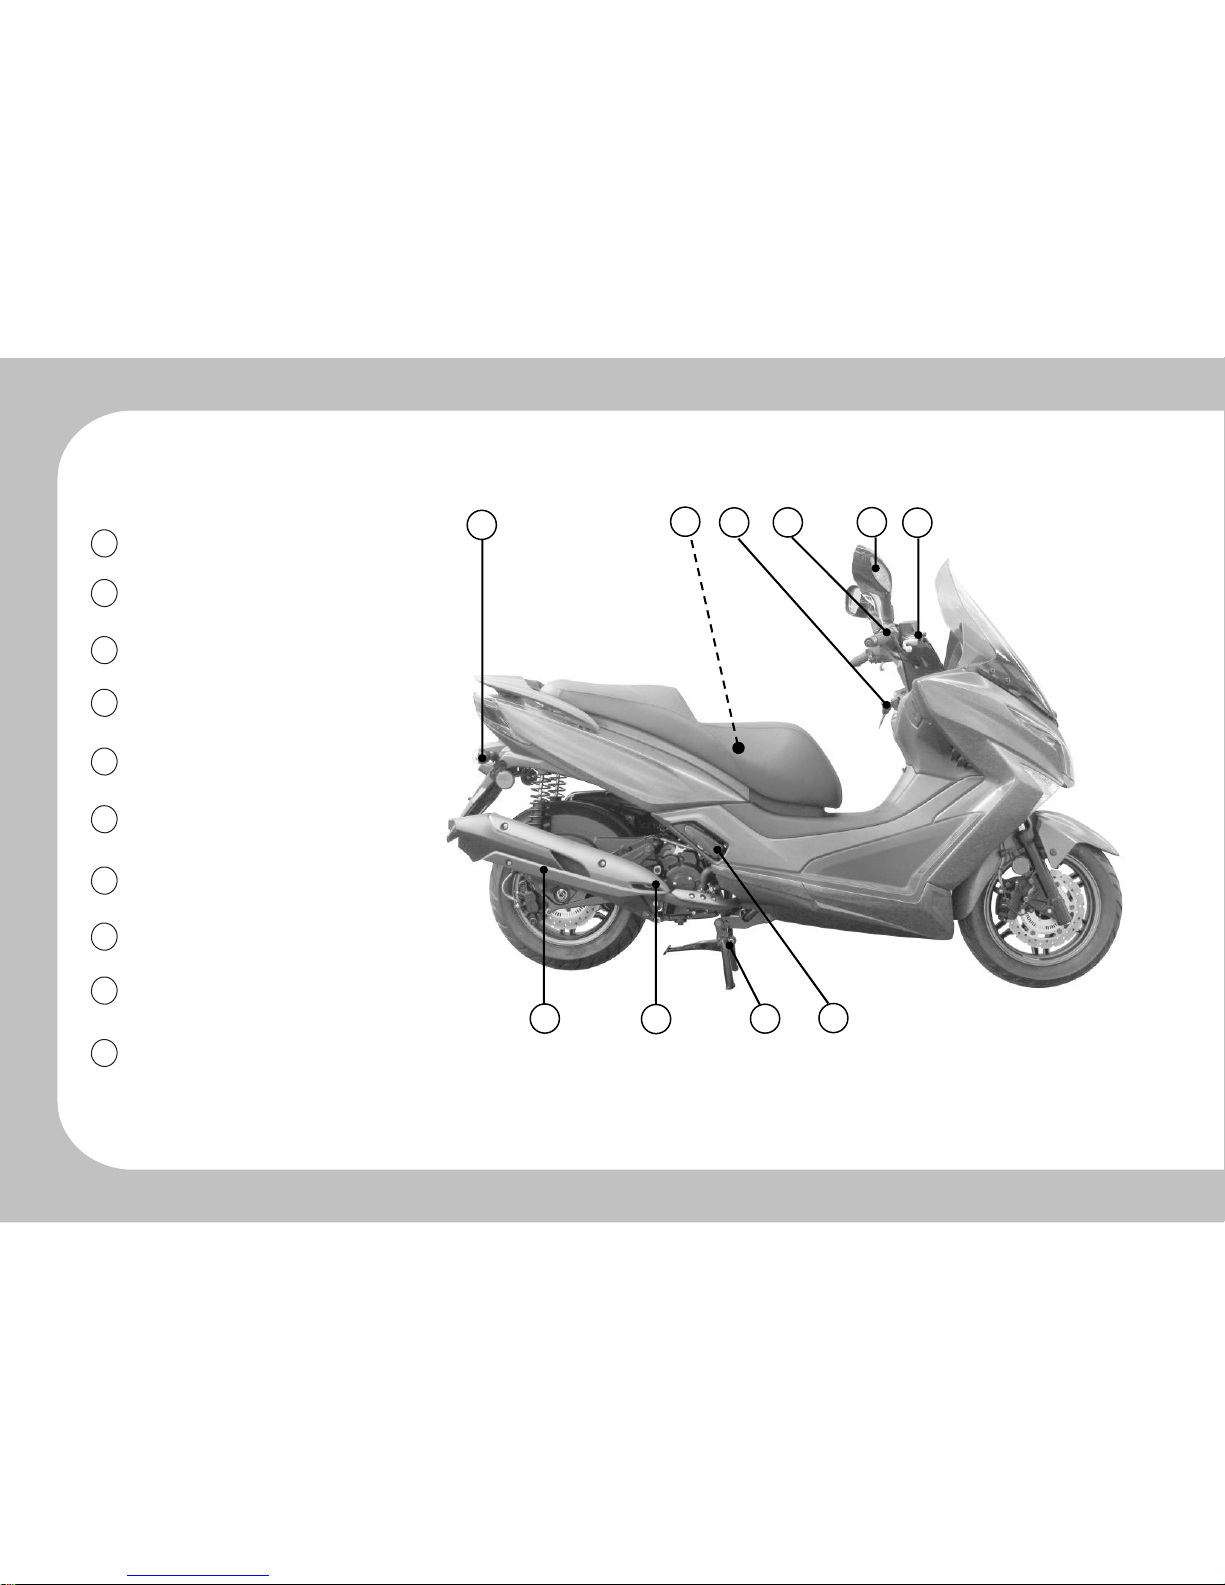
LOCATION OF PARTS & CONTROLS
1
Headlight
2
Rear Brake Lever
3
Front Left Turn Signal Light
4
Fuel Filler Cap
5
Helmet Hook
6
Side Stand
7
Seat
8
Engine Number
9
Air Cleaner
10
Rear
Left Turn Signal Light
11
Tail/Brake Light
12
Luggage Box
13 Reflector
▆NOTE: Your scooter may differ slightly in appearance from the images in this manual.
5
1 2 3 4 7
10
13
11
12
5
6 8 9
13
Page 12
LOCATION OF PARTS & CONTROLS
14 Right Turn Signal Light
15
Muffler
16
Oil Filler Cap/dipstick
17
Center Stand
18
Rear Passenger Foot Peg
19
Front Brake Lever
20
Right Turn Signal Light
21
Right Handlebar Switch
22
Ignition Switch
23
Vehicle Identification Number (VIN)
▆
NOTE: Your scooter may differ slightly in appearance from the images in this manual.
23
14
22
21
20
19
15
16
17
18
6
Page 13
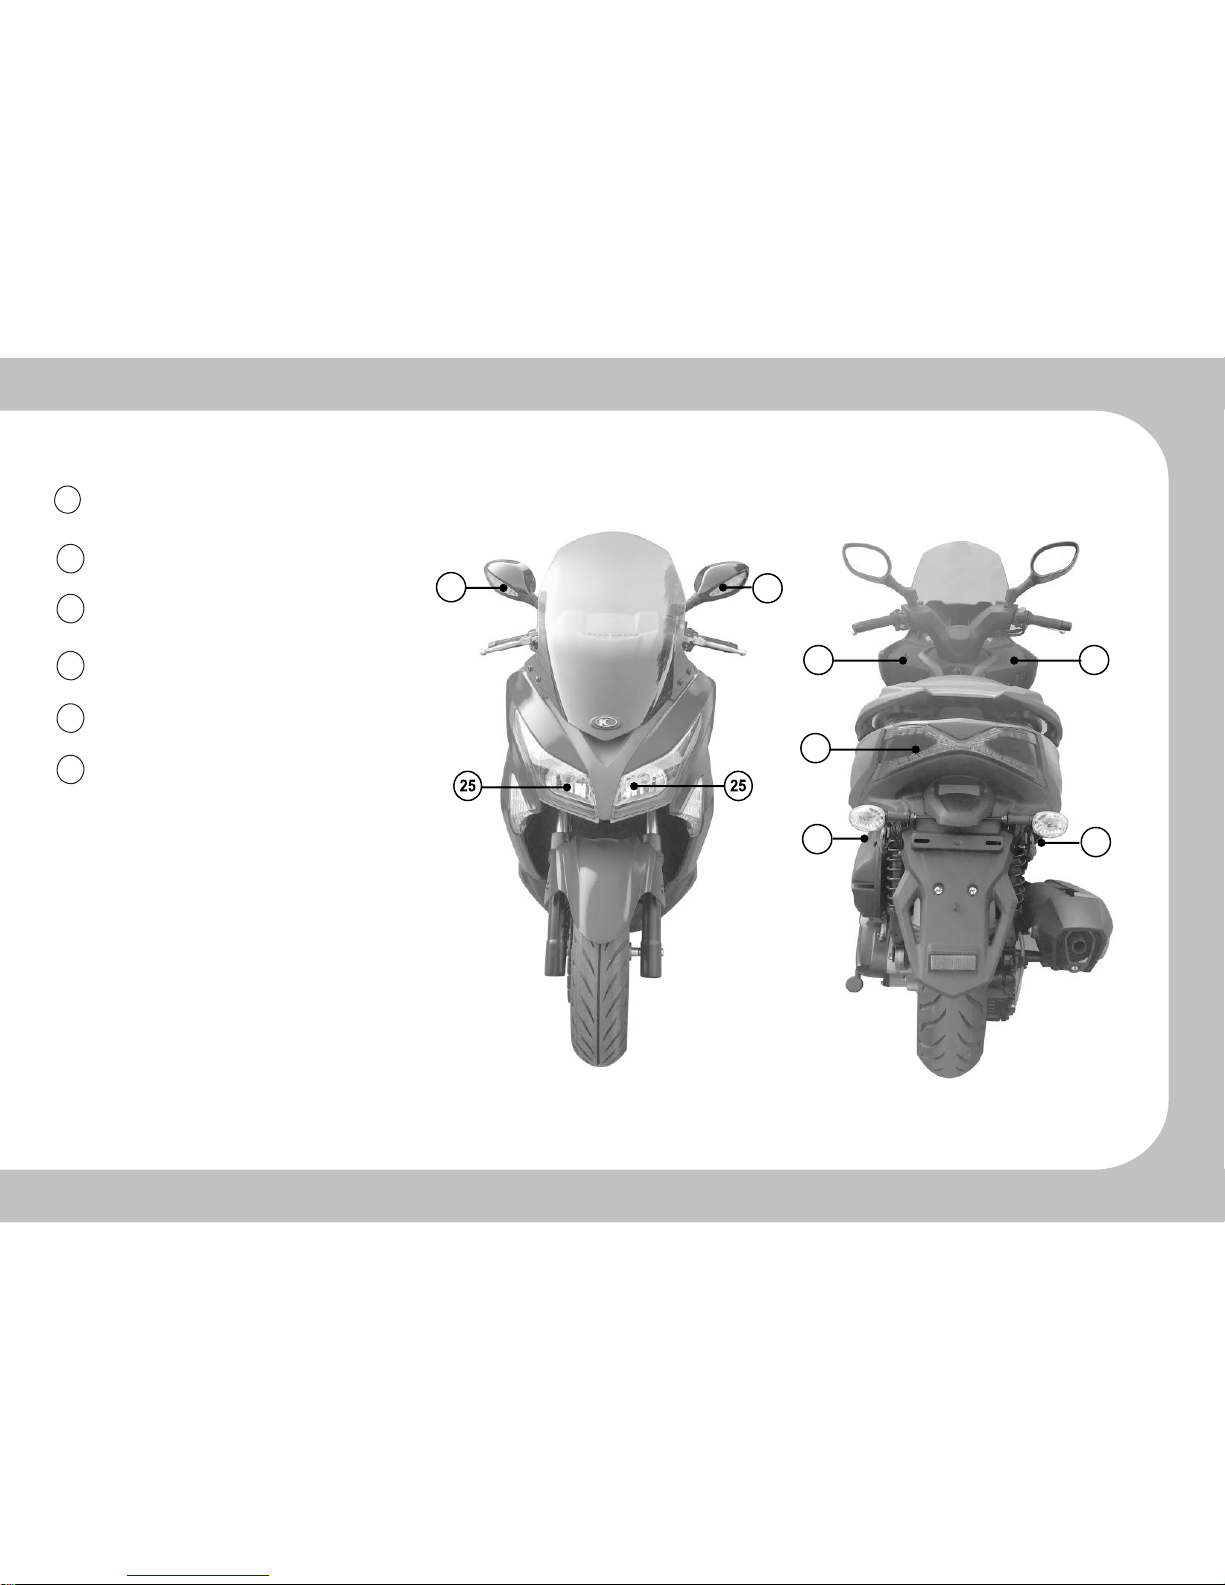
LOCATION OF PARTS & CONTROLS
24
Front Turn Signal Light
25 Headlight
26
Left Storage Compartment
(Accessory Socket)
27
Tail/Brake Light
28
Rear Turn Signal Light
29
Right Storage Compartment
▆
NOTE: Your scooter may differ slightly in appearance from the images in this manual.
7
24
24
27
29
28
28
26
Page 14
SECTION 2 - CONTROLS&FEATURES
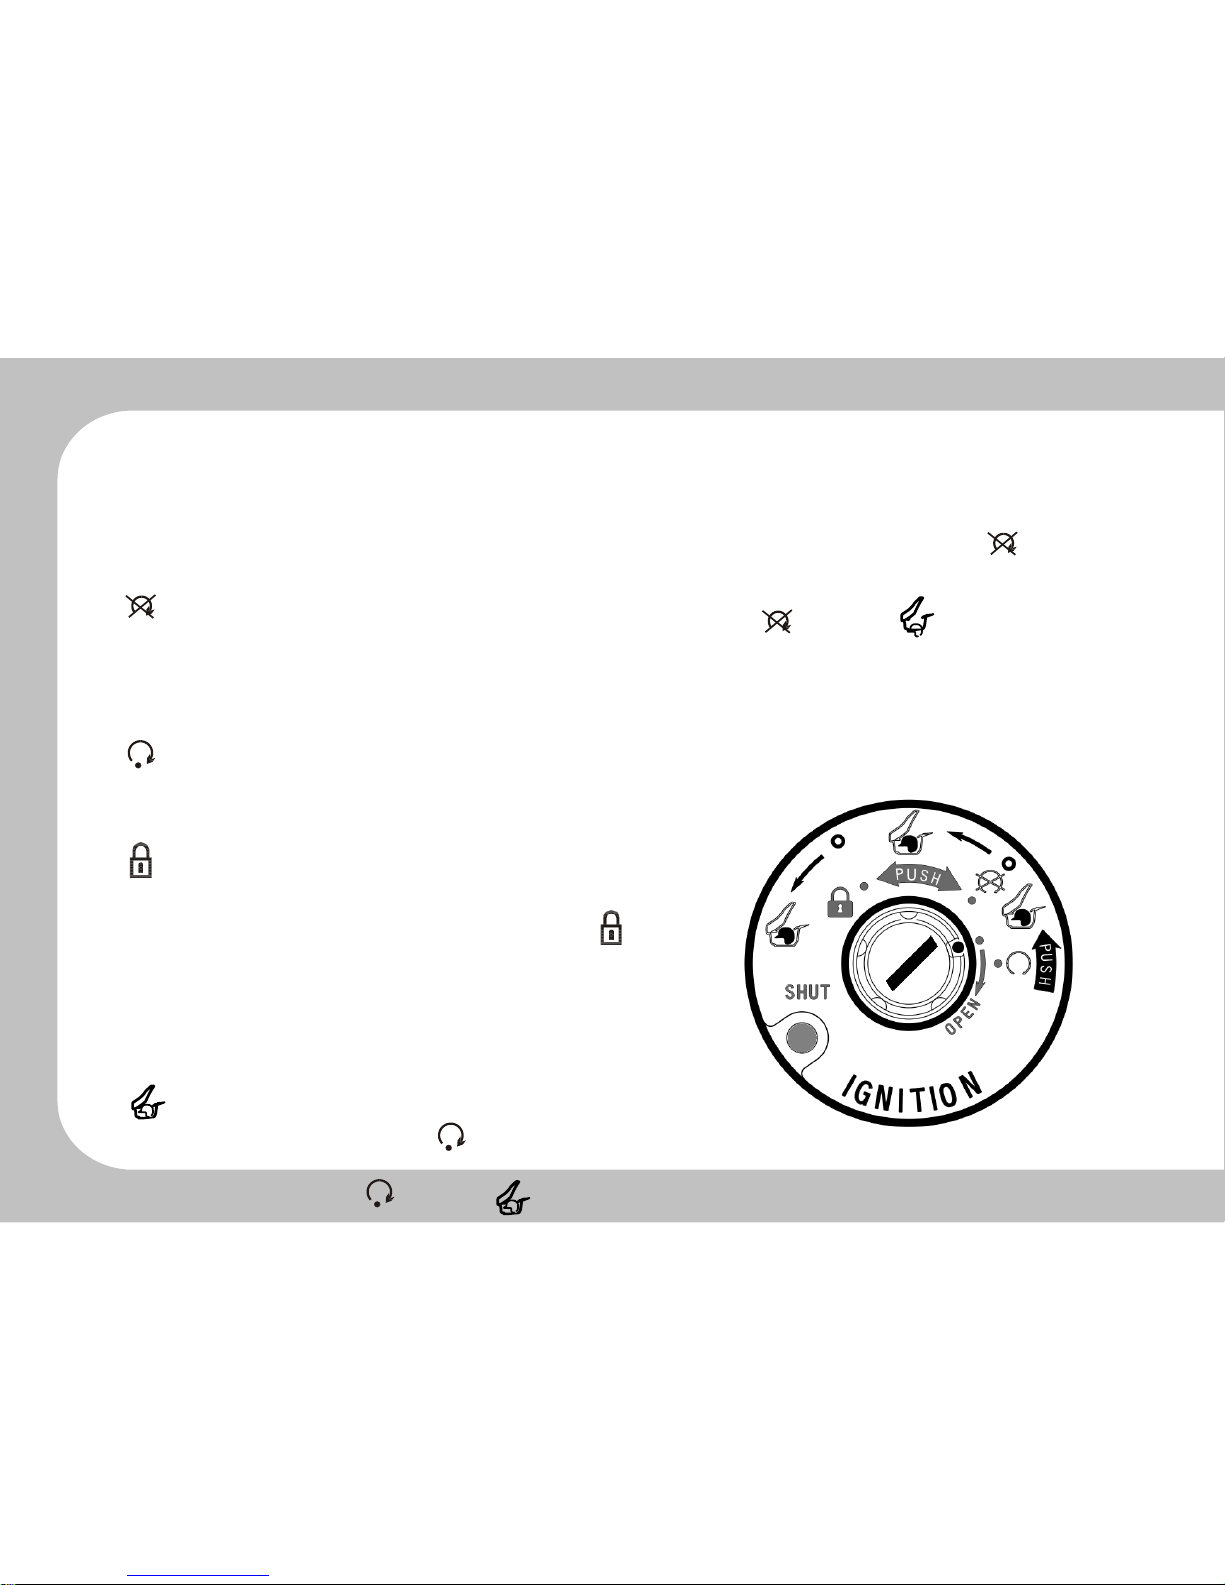
IGNITION SWITCH
To operate the ignition switch and it's functions:
With the ignition key in the " " position (the
engine is not running), turn the counterclockwise
“ ” Position :
All electrical circuits are off. The engine will not
from the " " to the
" "
position.
start or run.
“ ” Position :
The ignition circuit is "ON" and engine can be
started. The key can not be removed from the
ignition switch in this position.
Pull up on the back portion of the seat to lift it up.
“ ” Positi on:
To lock the steering, turn the handlebar all the way
to the left, push down and turn the key to the " "
position and remove the key. All electrical circuits
are off.
“ ” Positi on:
With the ignition key at the " " position (the
engine is running), push the key in and turn it
Page 15

counterclockwise from " " to the
" "
position.
8
Page 16
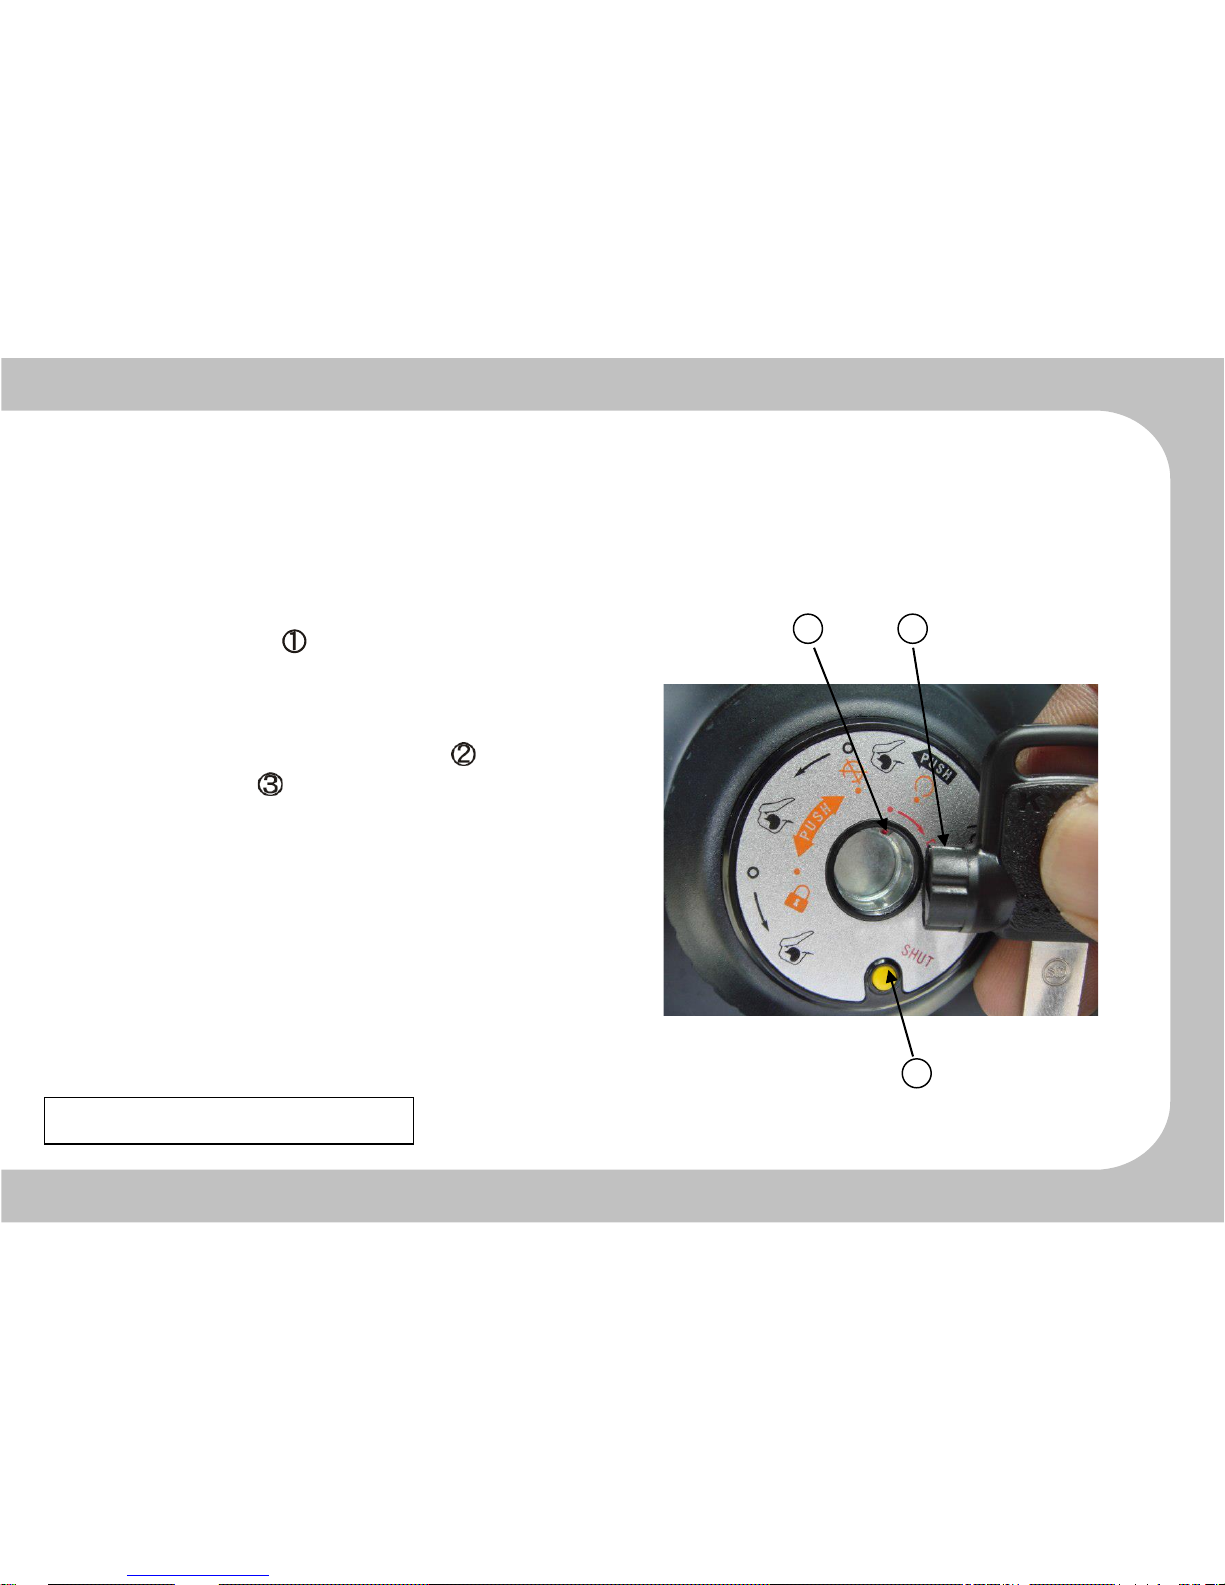
SECURITY SHUTTER
CONTROLS & FEATURES
To ope n the ign ition swit ch security
shutter :
Push the shut button on the ignition switch
panel to close the security shutter.
To shut the ignition swi tch securit y
shutter :
Insert the specific key until the notch is
aligned with the pin .
Turn clockwise to open the security shutter.
The keys have a unique code that is stamped on
the tab with the keys. This code is required if you
need to duplicate the key. Record this important
code on the blank column below.
Security shutter key code:
1
Page 17

9
Page 18
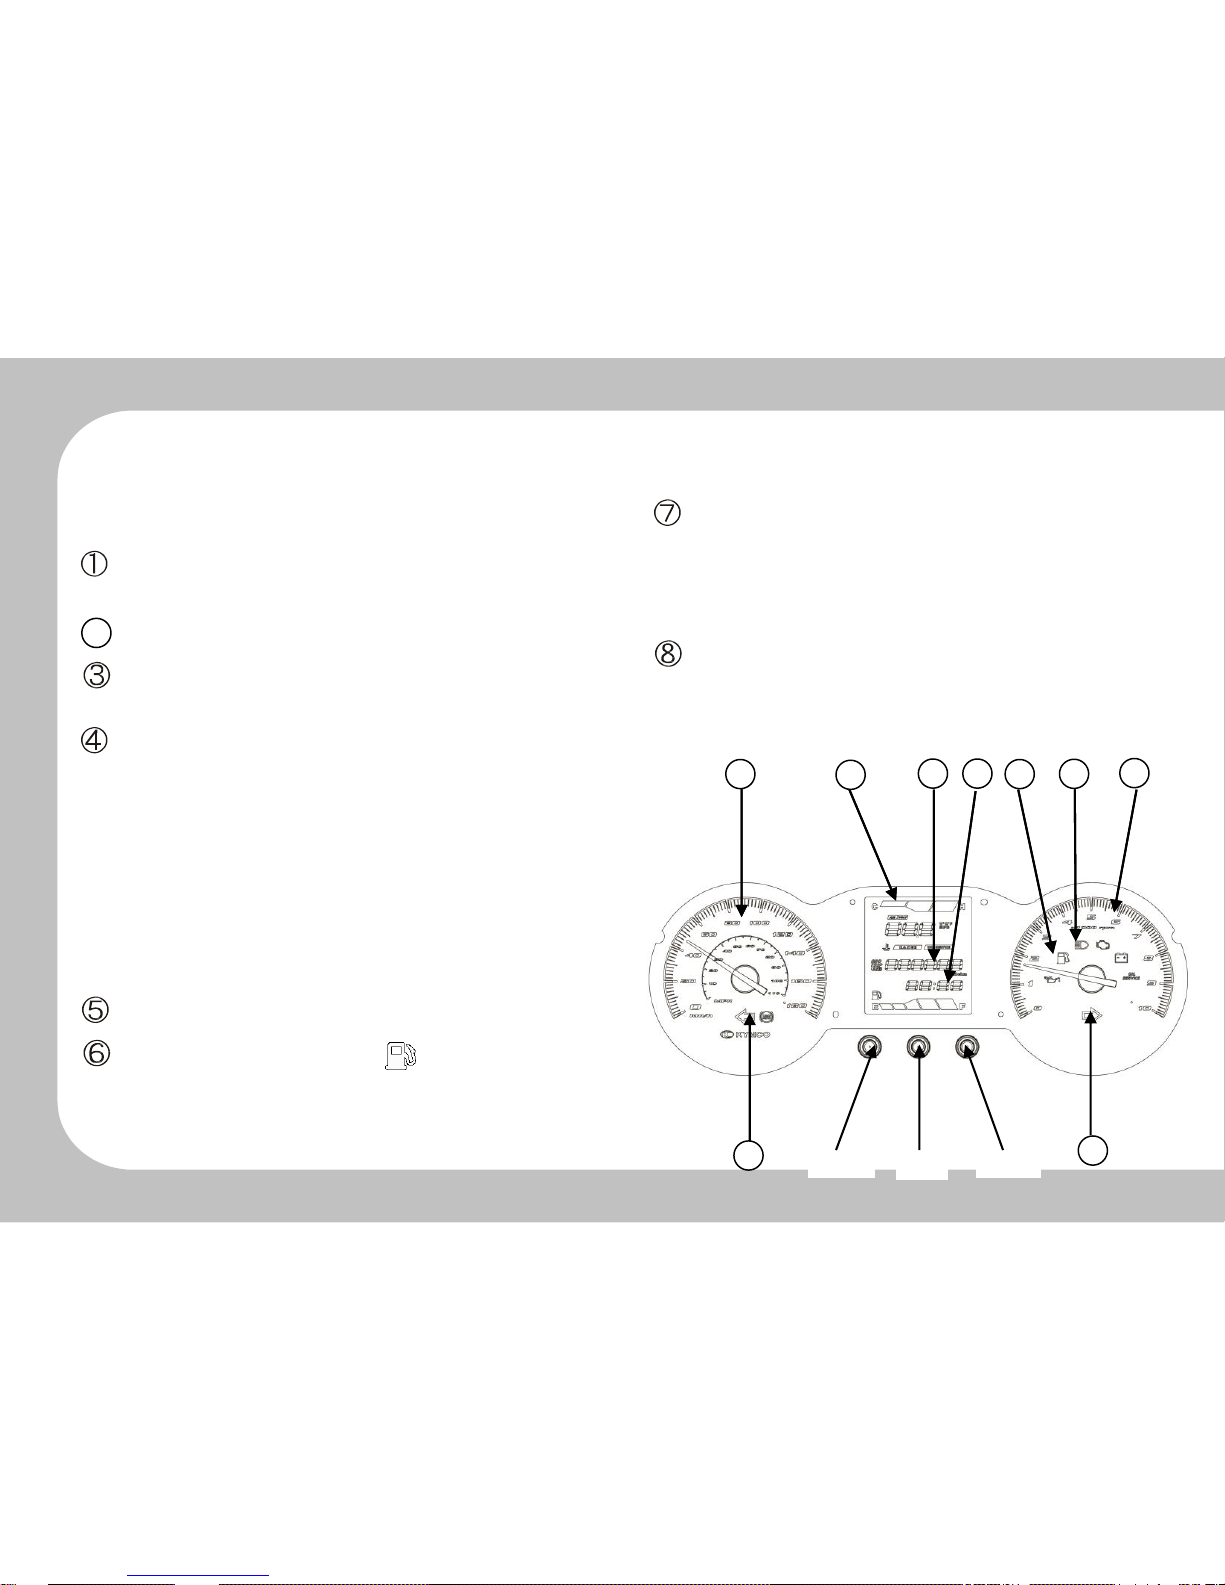
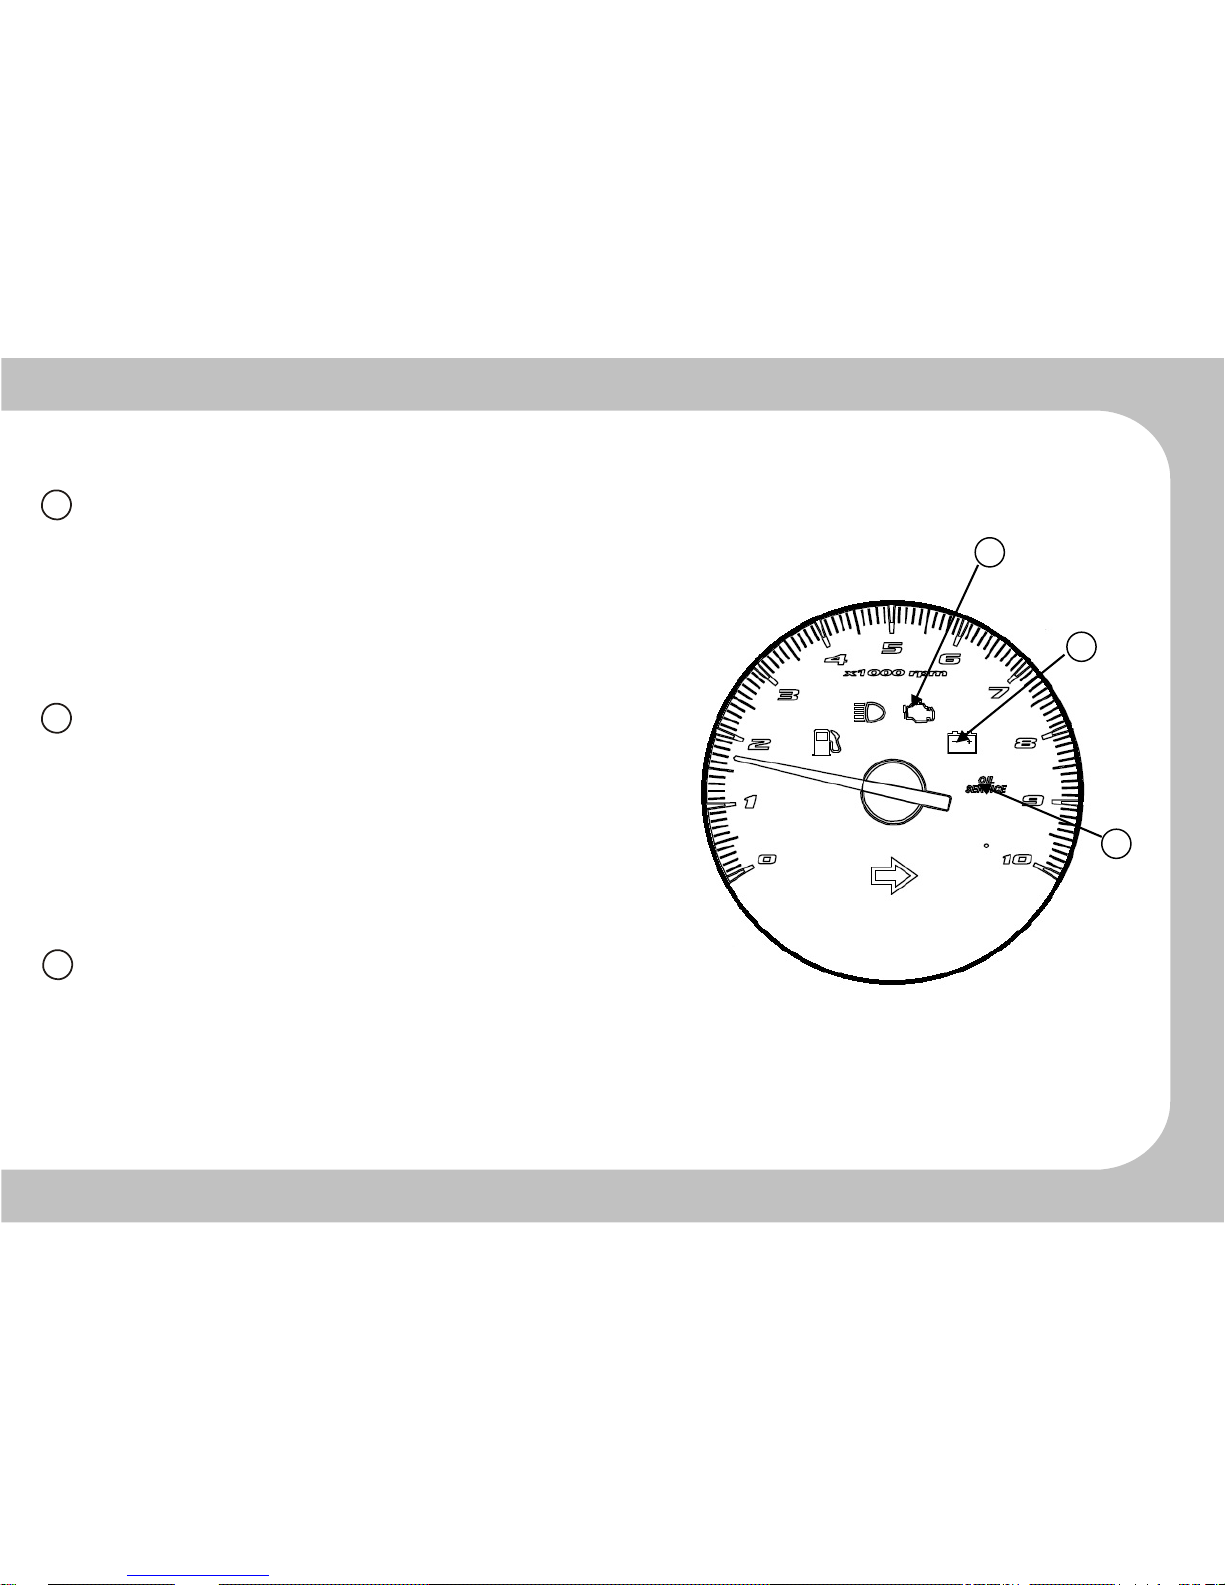
INSTR U MENTS
CONTROLS & FEATURES
Speedometer: Indicates the road speed in
Km/h (kilometers per hour).
Coolant temperature gauge
Turn Signal Indicator Light: Flashes when
either turn signal is being used.
Odometer/Trip meter: Press the mode button
to toggle between the overall and trip mileage,
or to reset the trip meter.
˙Press the “MODE” button to enter the ODO,
Trip A/B, Oil Service or Empty mode.
˙Press the “RESET” button for 3 seconds to
reset on the Trip A/B, Oil Service mode.
˙Press the “MODE” and “RESET” buttons for
3 seconds to set the unit of km/h or MPH.
Clock
Fuel Warning Indicator “ “: This indicator
lights when the fuel tank is near empty to alert
the rider to refill the fuel tank as soon as
possible.
High Beam Indicator Light: This light is
illuminated when the headlight high beam is
on.
Tachometer: Indicates the engine speed in
the revolutions per minute (RPM)
MODE
FUNC
RESET
1
2
3
3
45687
Page 19

10
10
Page 20
CONTROLS & FEATURES
9
CELP indicator: If flashing(EURO 4 models would keep
lighting), it indicates that a fault has been detected in the
EFI or electrical system. Need to have immediate
inspection by the authorized KYMCO dealer.
▆NOTE: The CELP indicator lights momentarily
when the ignition switch is turned on before starting
engine.
10 Oil service indicator: It lights up when reaching the
oil service mileage interval. Whenever the ignition
switch is turned on, it goes on then off at once after
starting engine.
˙Press the “MODE” button to enter the ODO,
Trip A/B, Empty display ( Service Mode )
˙Press the “RESET” button for 3 seconds to
reset on the Oil Service mode.
11 Battery Warning Indicator:
If the battery voltage is too low while starting the
engine. The indicator can be lighting. The engine
fails to be restarted unless the battery should be
recharged completely.
11
Page 21
CONTROLS & FEATURES
12
Oil service trip meter: It shows mileages from last
reset after oil service.
13 Cruise information: Press the “FUNC” button to switch
the mode for battery voltage, ambient temperature
14 Engine Warning Indicator: It goes with the Fi error
code (EURO 4 models do not have this function)
12
Page 22

CONTROLS & FEATURES
The battery voltage
Display the prompt battery voltage to get the
information without need to check battery directly.
The ambient temperature mode
Display the surrounding temperature, Press the
“FUNC” and “RESET” buttons for 3 seconds to
select the unit of “°C“ Celsius or “°F” Fahrenheit.
The oil service trip meter
Display the accumulated driving distance from the
previous reset after the oil service.
Press the “RESET” button for 3 seconds to reset the
oil service indicator and the oil service trip meter.
The Fi error code indicator
Display the error code of fuel injection
system. If appear any error codes and
display continuously, have the KYMCO
authorized dealer check the vehicle.
▆NOTE: If any error codes show up for a moment
then goes off and not repeat, it could result from an
electrical interference.
WARNING
If any error codes always show up, the
vehicle should be checked immediately.
TRIP A
TRIP B
OIL
SERVICE
VOLT
AIR
13
X-Town300
Page 23

CONTROLS & FEATURES
Adjust clock
The setting procedure:
1.
Turn the ignition switch to the ON position.
2.
Push the MODE button for more
than 2
seconds to select the ODO mode.
▆
NOTE: The digital clock can be only adjusted
in ODO
mode.
3. Push the MODE button for more than 2
seconds. The “hour” digits will be flashing and
the hour can be adjusted at that moment.
4. Push the RESET button to set the hour.
14
5. Push the MODE button; it will change to
make the “minute” digits be flashing.
6. Push the RESET button to set the minute.
7. Push both the MODE and RESET buttons at
the same time to finish the clock setting.
▆NOTE: The adjustment will be cancelled if any
button is not pressed within approximately ten
seconds.
▆NOTE: The clock will be reset to 12:00 when the
battery is disconnected.
Page 24

CONTROLS & FEATURES
ABS indicator light
The ABS indicator light is located on the right side of
the multifunction meter. This ABS system will
self-diagnose itself, if it’s normal, the indicator light will
come on when the ignition switch is turned on and
goes off shortly after the vehicle starts moving. The
ABS indicator light will stay off as long as the ABS
system works normally.
If an ABS fault is detected by the ABS ECU, the ABS
indicator will light on and stay on until the fault is
resolved. Even there’s an ABS system failure, the
system will work normally in conventional braking
condition just like a vehicle without ABS system.
▆NOTE: If the ABS indicates a fault, it’s very important to make
the authorized KYMCO dealer to check the ABS system
immediately.
15
Page 25

CONTROLS & FEATURES
Accessory Socket
This vehicle is equipped with the accessory USB
power socket which provides a function to charge
the mobile phone with capacity compliance as
below.
˙To use the accessory USB power supply, turn on
the ignition switch, and then start the engine.
˙Open the door of the left storage compartment
①.
˙Open the USB power socket cap ②.
˙Plug the charge connector into the USB socket.
The rated capacity:
Output voltage: DC 5V
Maximum output current: 2A
16
CAUTION
For battery charge of mobile phone only.
Use other electronic appliances may
cause damage on electrical system.
1
Page 26

CONTROLS & FEATURES
Righ t hand lebar switch
Starter button①:
Press starter button " " and pull brake lever
in the meantime to actuate the starter motor.
▆NOTE: The starter motor will not operate unless
the side-stand is fully stored up.
Engine stop switch②:
Switch button to “ “, the ignition system is on
before turning on the ignition switch.
Switch button to “ ", the ignition system is off
after turning off the ignition switch.
▆NOTE: If the ignition system is on, which might
cause the battery to discharge gradually
Hazard switch③:
Switch button to “ “, all the turn signals and turn
signal indicator will blink to warn other drivers.
3
Page 27

17
Page 28

CONTROLS & FEATURES
Left handlebar swit ch
Turn signal switch②:
Push to signal other drivers for an intention to make
turn
or change lane. The turn signal light is blinking while
the switch is pushed left or right.
" " for left turn.
" " for right turn.
To stop the turn signal, push the switch again.
Horn button③:
Press the horn button to sound the horn.
Dimmer switch④:
Switch to select the light with high or low beam
"
" for low beam.
"
" for high beam.
Passing button⑤:
Press this button to flash the headlight with high
beam to signal other drivers ahead for an
intention to overtake
18
2
3
4
5
Page 29

CONTROLS & FEATURES
Fuel level inspection / Refilling
If the low fuel indicator blinks, quickly refill the
fuel tank with the specified unleaded gasoline.
Fuel tank filler:
To refuel, do the following:
1. Open the fuel tank filler cover.
2. Use the ignition key to unlock the fuel cap.
3. Turn the key clockwise to unlock the fuel cap.
4. Once unlock, it’s able to take the fuel cap away.
5
To install the fuel cap, do the following:
1. Press it back into place on the fuel filler neck.
2. Push back the fuel cap with key inserted.
3. Make sure the triangle mark is toward front side.
3. Remove the key and close the fuel tank filler cover.
▆
NOTE:
Don’t push key while installing the fuel cap.
Fuel recommendation
Use unleaded gasoline with a research octane
number (RON) 92 or higher to prevent damage on
spark plug and catalytic converter.
19
Page 30

3
Seat
To unlock the seat
CONTROLS & FEATURES
With the ignition key at the " " position
(the engine is running), push the key in and
turn it counterclockwise from " " to the
" "
position.
With the ignition key in the " " position (the
engine is not running), turn the counterclockwise
from the " " to the" " position.
Open the seat by pulling up the rear end of seat.
Helmet holder
To use the helmet holders, open the seat and hang
the helmet on the holder hook①, then lock the
seat securely.
WARNING
Use the helmet holder only on parking. Do not
ride with a helmet hanged on the holder.
Page 31

20
CONTROLS & FEATURES
To lock the seat
Lower and push down the seat securely on the
right side where a lift rod supported and above
the lock hook.
▆NOTE: It’s no good to push down on the rear end of the
seat due to there are no the lock hooks beneath, therefore,
the seat is possibly not locked securely that will make
stolen more easily.
Before riding, pull the seat edge on the right side
to make sure the seat is locked securely.
21
CAUTION
Do not put any objects may interfere the lock
catch that might get caught while closing; it
will lead to lock insecurely or fail to open.
Page 32

CONTROLS & FEATURES
Suspension
Each shock absorber on your scooter has 5 spring
preload adjustment positions for different load or
riding conditions.
Use a fitting wrench to turn the adjuster’s boss ① .
Position 1 is for light loads and smooth road
conditions.
Position 3 to 5 increase spring preload for a more
stiff rear suspension and can be used under heavy
loading.
▆NOTE: Always adjust the shock absorber pre-load position in
sequence (1-2-3-4-5 or 5-4-3-2-1).
Attempting to adjust directly from 1 to 5 or 5 to 1 may damage
the shock absorber.
Standard spring preload position: 3
22
WARNING
Be certain to adjust both shock absorbers
to the same spring preload positions.
Improper setting of shock absorber will
cause unstable handling and might lead
to an accident.
①
Page 33

CONTROLS & FEATURES
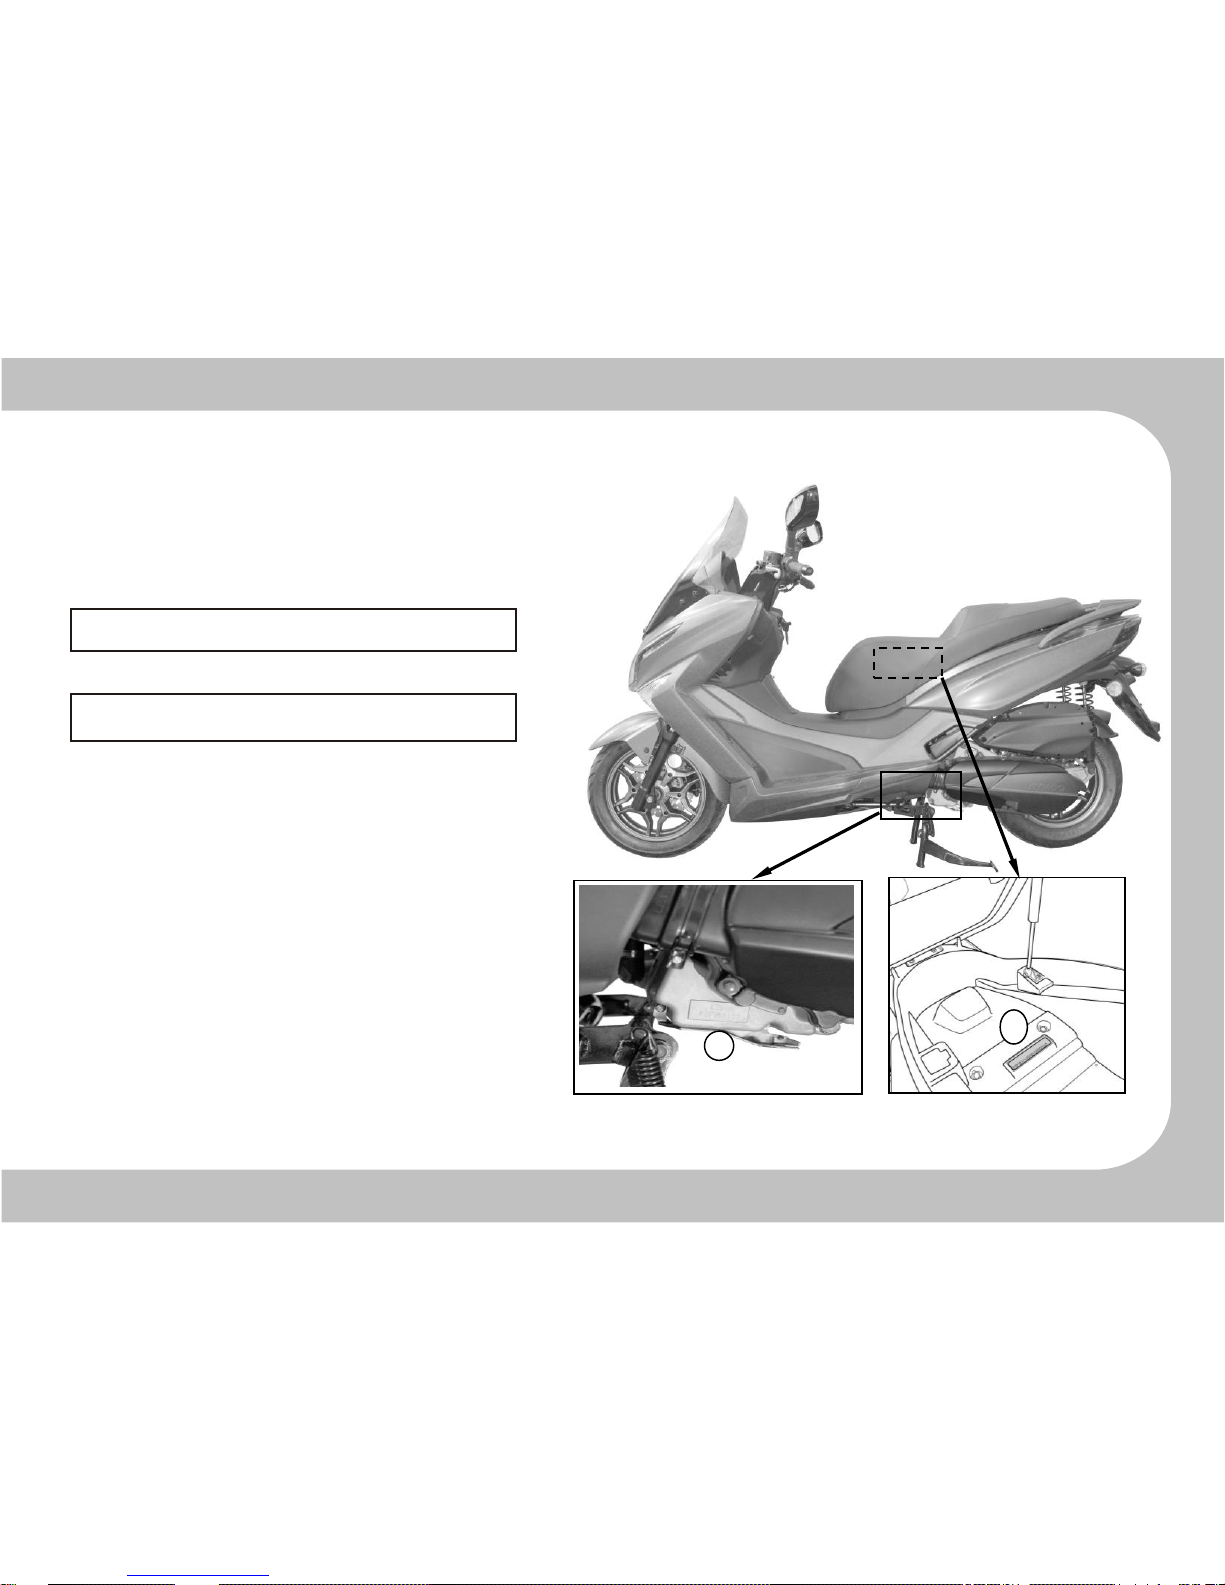
Side Stand
The side stand is not only necessary for
parking, but also it contains an important safety
feature. This feature can cut off the ignition
when the side stand is put down.
Perform the following side stand inspection for
interlock function check.
Check the ignition cut-off on the side stand:
●Position the vehicle on the level ground by
using the center stand ①.
●Put the side stand up and start the engine.
●Lower the side stand ②. The engine should
stop as doing.
▆NOTE: If the side stand system does not operate as
described, see your KYMCO dealer for service.
Page 34

23
Page 35

SECTION 3 - OPERATION
Pre-ride inspection
For your safety, it is very important to take a few
moments before each ride to walk around the
motorcycle and check its condition. If you detect
any problem, be sure to deal with it, or have the
KYMCO dealer to fix it.
WARNING
Improperly maintain the motorcycle or fail to
solve a problem before riding can cause a
crash in which you could be seriously hurt or
killed. Always perform a pre-ride inspection
before every ride and correct any problems.
1. Engine oil level:
Add engine oil if required(page35/36) .
Check if there’s a kind of leakage.
2. Fuel level:
Fill fuel tank when necessary (page 19).
Check if there’s a kind of leakage.
24
Page 36

3. Front and rear brakes:
Check operation; make sure there is no brake
fluid leakage (page 45).
4. Tires:
Check condition and inflation pressure
(page 48).
5. Throttle:
Check for smooth operation and that it can be
closed completely in all steering positions (page
41).
6. Lights and horn:
Check that headlight, tail/brake light, turn
signals, indicators and horn function properly.
7. Steering:
Check for condition and smoothness.
OPERATION
Break-In
The first 1600km (1000 miles) of riding is very
important to the life of usage. Proper break-in
operation during this period will help ensure
maximum life and performance.
The reliability and performance depend on a
special care and limited operation during the
break-in period.
The following limitations should be complied
during the break-in period:
Initial 800km (500 miles):
Less than 1/2 throttle or not over
Up to 1600km (1000 miles):
Less than 3/4 throttle
Vary the engine speed
The engine speed should be varied and not
held constantly for a long time and also
WARNING
The 1000km (600 miles) initial service
is very important to ensure an optimum
vehicle condition in the future.
Page 37

prohibited to have heavy load during the
break-in period.
Avoid constant low speed
Operate the engine at constant low speed
even of light load may cause the running
part a fit-in problem. Be sure to start up the
engine gently during the break-in period.
Avoid full throttle operation
Operate the engine at high speed may
cause running part a lubrication problem.
Be sure to keep in the limited speed range
during the break-in period.
25
Page 38

Starting the engine
OPERATION
Always follow the proper starting procedure
described here and on the following pages.
CAUTION
To protect the catalytic converter in the engine's
exhaust muffler, avoid idling too long and do not
use leaded gasoline.
CAUTION
To prevent damage to the starter motor, do not
operate the starter motor for more than 5
seconds at a time. If fail to start successfully,
check the fuel level and the battery condition, and
waiting for 15 seconds between each fail to start.
1. Position the motorcycle by the center stand
and put the side stand up.
2. Insert the ignition key and turn it to " ".
Page 39

26
Page 40

OPERATION
3. Squeeze the left (rear) brake lever to connect
electric power for ready to start engine .
4. Press the starter button with the throttle
closed, releases it at once as the engine starts.
5. Keep the throttle closed while warming up the
engine.
6. Keep the engine warming up thoroughly before
each ride.
CAUTION
If the engine is running with insufficient oil
pressure can cause serious engine damage.
27
Page 41

OPERATION
ABS SYSTEM
The ABS system is the equipment that
prevents wheel lockup in case of an
emergency braking, thus is capable to
keep stability when applying brakes.
Braking With ABS
Use steady, even braking application on the
front and rear brake levers simultaneously.
Apply the brake levers with the same grip
pressure as you would without ABS.
The system controls braking pressure
automatically and independently at each
wheel to prevent wheel lockup.
28
Limitations of ABS
ABS does not apply the brakes
automatically. It needs to apply the brakes
at the right time and with the right amount
of braking force.
The ABS system only starts to work after
applying the brake lever.
WARNING
The ABS does not prevent from falling down
while cornering into a slippery condition.
WARNING
ABS is not a substitute for safe driving. Even
with ABS, you must remain alert, react
appropriately and in a timely and defensive
manner during the travel.
Don’t take unnecessary risks.
Cautious driving practices, such as
maintaining an adequate distance away from
the vehicle ahead, not speeding, anticipating
obstacles and adjusting your vehicle’s speed
for traffic, weather and road conditions, are
essential for safe operation.
Page 42

SECTION 4 -
MAINTENANCE
The importance of maintenance
Maintaining the motorcycle properly is essential
for safe, economical and trouble-free riding. It will
also help reduce air pollution and maximize fuel
economy.
To properly take care of the motorcycle, the
following pages in this Owner's Manual include a
maintenance schedule to help you make sure the
motorcycle is serviced at the appropriate intervals.
These instructions are based on the assumption
that the motorcycle will be used normally on the
design purpose. Usually under high speed
driving or riding in unusually wet or dusty area will
require more frequent service than specified in
the maintenance schedule. Consult with the
KYMCO dealer for recommendations about your
personal needs.
▆NOTE: Always follow the inspections, service
recommendations and schedules on later pages.
WARNING
If the motorcycle turnovers or becomes involved
in a crash, be sure to have the KYMCO dealer
inspect all major parts, even if you are able to
make some repairs.
Improperly maintain the motorcycle or fail to
solve a problem before next riding could result
in a crash in which you could be seriously hurt
or dead.
WARNING
When performing maintenance service on the
motorcycle you may need to start the engine.
Running the engine indoors can be hazardous.
Exhaust ga s contains carbon monoxide which
is colorless and odorless, and can cause death
or severe injury. Start the engine only where is
ventilated well, preferably operate outdoors.
29
Page 43

*
**
MAINTENANCE
Maintenance schedule
Perform the pre-ride inspection (see page 15) at each scheduled maintenance period. This interval
should be judged by odometer reading or by months, whichever comes first.
Maintenance schedule chart:
I: INSPECT AND CLEAN, ADJUST, LUBRICATE OR REPLACE IF NECESSARY
C: CLEAN R: REPLACE A: ADJUST L: LUBRICATE
D: DIAGNOSE
The maintenance schedule on the following two pages specifies the maintenance required to keep
the motorcycle in good running condition. Maintenance should be performed according to the
design standards and specifications by the authorized KYMCO dealer.
Be serviced by the KYMCO dealer, unless you have the proper tools, service data and are
technically qualified.
For safety reason, we recommend these items be serviced only by the KYMCO dealer. KYMCO
recommends that the KYMCO dealer should take a road test after each maintenance service.
▆NOTES:
1. For higher odometer readings, repeat by the service interval illustrated here.
2. Service more frequently for long-term riding in unusually wet or dusty areas.
3. Service more frequently for long-term riding in rain or with full throttle.
4. Inspect every 5000 km (3000 mi) after replacement and replace every 10000 km (6000 mi).
5. Replace every 5000km (3000mi) or every 6 months. Replacement requires mechanical skill.
6. Replace every 2 years. Replacement requires mechanical skill.
30
Page 44

MAINTENANCE
31
FREQUENCY
ITEM
WHICHEVER
COMES FIRST
ODOMETER
READING (NOTE1)
X 1000 km
1 3 6 9 12
15
18
REFER
TO
PAGE
X 1000 mi
0.6 2 4 6 8
10
12
MONTH
3 6 9 12
15
18
AIR CLEANER
NOTE 2
R
R R R R R
36
SPARK PLUG
NOTE 4
I R I
37
THROTTLE OPERATION
I I I I I I 36
VALVE CLEARANCE
A A
FUEL LINE
I
CRANKCASE BREATHER
NOTE 3
C C C C C C C
ENGINE OIL
R R R R R R R 33
ENGINE OIL SCREEN
C C C R C C R
ENGINE IDLE SPEED
I I I
TRANSMISSION OIL
NOTE 5
R R R R
35
DRIVE BELT
I I I R I
**
RADIATOR COOLANT
Replace at every10000km or every year
Page 45

MAINTENANCE
FREQUENCY
ITEM
WHICHEVER
COMES FIRST
ODOMETER
READING (NOTE1)
X 1000 km
1 3 6 9 12
15
18
REFER
TO
PAGE
X 1000 mi
0.6 2 4 6 8
10
12
MONTH
3 6 9 12
15
18
CLUTCH SHOE WEAR
I I I
BRAKE FLUID
NOTE 6
Replace at every10000km or every year
38
BRAKE PAD WEAR
I I I I I I 40
BRAKE SYSTEM
I I I I I I
BRAKE LIGHT SWITCH
I I I I I I
STEERING BEARINGS
I I I I I I
HEADLIGHT AIM
I I I I I I
NUTS,BOLTS,FASTENERS
I I I I I I
WHEEL/TIRES
I I I I I I 43
CVT FILTER
C C C
INJECTOR
D D C D D C
ENGINE LIMIT LEVER
RUBBER GASKET
every 10000km Inspection
every 30000Km replacement
32
Page 46

MAINTENANCE
Engine oil
Engine oil recommendation
Use a high quality 4-stroke engine oil to ensure
longer life. Choose oil with the classification
API SJ or higher.
Engine oil viscosity: SAE 5W-50
If the viscosity grade is not compliable, choose
alternative engine oil according to the following
chart.
Full capacity: 1.1 L (1.16 US qt)
Exchange capacity: 0.9L(0.95 US qt)
Engine oil level ins pection
Check the engine oil level each day before
riding. The oil level must be between the high line
① and low line ② on the oil level dipstick ③.
CAUTION
Running the engine with insufficient oil pressure
can cause serious engine parts burnout.
3
33
Page 47

MAINTENANCE
Engine oil checking
● Start engine and keep idling for a few minutes.
● Stop the engine and stand the scooter on level
ground by center stand.
● Wait a while, remove the oil level dipstick.
● Wipe oil off, then reinsert the oil level dipstick
without screwing in.
● Remove the oil level dipstick. The oil level should
be between the high and low lines on the dipstick.
● If required, add the specified oil so the oil level
reaches the high level line on the dipstick.
Do not overfill.
● Reinstall the oil level dipstick. Check for oil leaks.
WARNING
The engine and related parts can become very
hot. Be careful when inspecting the oil level so
not to suffer burns. Make the engine and
exhaust system cool down before inspection.
Engine oil replacement
Engine oil quality is the major factor that affects
engine life. Change your scooter's engine oil
as specified in the maintenance schedule.
● Warm engine up thoroughly then stop.
● Stand vehicle by using the center stand
● Place an oil container beneath the drain hole.
● Remove the oil level dipstick.
● Remove the drain bolt and drain off thoroughly
● Tighten the drain bolt to the specified torque.
● Add oil to reach the high line on the dipstick
● Screw the oil level dipstick into place securely.
Tightening torque
Engine oil drain bolt: 25N·m (2.5kg·m, 18ft·lb)
CAUTION
Use the genuine engine oil or another with
the same quality and grade to avoid burnout
on the engine parts.
34
Page 48

MAINTENANCE
Transmis sion Gear Oil chang e
1. Stand the scooter by the center stand.
2. Remove the gear oil drain bolt ①.
3. Remove the gear oil filler bolt ②, and then slowly
rotate the rear wheel to drain the gear oil off.
4. Fill with the recommended oil to reach the capacity
listed below.
5. Install the transmission filler bolt and tighten it to
the specified torque.
Gear oil type: SAE 90
Full capacity: 0
.23 L
(0.24 US qt)
Exchange capacity: 0.
18L
(0.19 US qt)
CAUTION
Use the genuine engine oil or another with the
same quality and grade to avoid burnout on
the bearing or damage on the gear set.
CAUTION
Must follow the local regulation and obey the
related prohibition about the disposal of oil.
2
35
Page 49

MAINTENANCE
Air cleaner filter element
The air cleaner filter element ① should be
serviced at regular intervals by the KYMCO
dealer.
▆NOTE: Have the element serviced more often when riding
in unusually wet or dusty areas.
CAUTION
Using the wrong KYMCO air cleaner element
or a non-KYMCO air cleaner element which
is not of equivalent quality may cause
engine wear quickly or performance
problems.
Throttle operation
1. Before riding, check for smooth rotation from
fully open to fully closed at both full end of
steering.
2. Measure the throttle free play ② as shown at
right.
Throttle free play: 2.0 - 6.0 mm (0.08-0.24 in)
1
Page 50

Spark plug
MAINTENANCE
Remove the carbon deposits from the spark plug
with a nonmetal brush and the suitable solvent.
After cleaning, check to adjust the spark plug gap
to specified limit by using a spark plug gap
thickness gauge. The spark plug should be
replaced periodically.
Recommend to consult with the KYMCO dealer
when choosing an alternative spark plug instead.
Recommended spark plug300:DPR6EA-9
CAUTION
An improper spark plug may have an incorrect fit
or heat range for your engine. This may cause
severe engine damage which will not be covered
under warranty. Never use a spark plug with an
improper heat range, as it could result in severe
engine damage.
Spark plug gap:
X-Town300 :
0.8~0.9 mm
0.8~0.9
Page 51

37
Page 52

Brake fluid
Brake fluid level
inspection
MAINTENANCE
With the scooter in an upright position, check
the front and rear fluid level.
Change the brake fluid at the time specified in
the maintenance schedule.
The fluid level should be above the lower level
line①. If the fluid level is below the lower level
mark "L", check over the worn brake pad or
leakage.
▆NOTE: Make sure there is no fluid leaking. Check for
fluid deterioration or crack on the brake hoses and fittings.
Brake fluid type: DOT- 4
WARNING
∎Use only DOT4 brake fluid from a
sealed container.
∎Clean the filler cap before removing.
1
Page 53

Page 54

Brake lever adjusters
MAINTENANCE
There is an adjuster on each brake lever.
Each adjuster has 4 positions so that the
released lever position can be adjusted to suit
the personal grabbing requirement.
To adjust the distance of the lever from the
handlebar grip, push the lever forward and turn
the adjuster ① to align the number ② with the
mark ③ on the brake lever.
NOTE: The nearest distance from the grip to the
released lever is set at number 1 and the farthest is set at
number 4.
3
Push
Page 55

Page 56

MAINTENANCE
Brake Pad Inspection
Inspect the thickness of brake pad to verify if
there is enough lining to brake properly.
If the wear indicated groove at the brake pad
is no longer visible, this means that the brake pad
is worn and requires replacement.
Before riding, apply braking several times to
reach the proper lever stroke and firm feel
on braking action that will ensure the brake
pads are pressed against the brake disks
securely
WARNING
∎The brakes will wear quickly if the lever is
continually applied during riding.
∎The worn brake pad will increase the stop
distance and may cause an accident
easily.
Page 57

40
Page 58

Battery
MAINTENANCE
The battery is a sealed type, so it is un necessary
to check the battery's electrolyte level or add
distilled water any more.
▆NOTE: If your battery seems weak and/or the electrolyte
is leaking to cause hard start or other electrical troubles,
contact the KYMCO dealer immediately.
● Disconnect the negative (-) terminal ①.
● Disconnect the positive (+) terminal ②.
● Remove the disabled battery.
● To reinstall is the reverse sequence of removal.
▆NOTE: If the cap strip is removed, the battery will
become permanently damaged.
Page 59

MAINTENANCE
Fuse
When fuse fails frequently, it usually indicates a
short circuit or an overload in the electrical
system.
WARNING
∎Never use a fuse of different rating.
∎If the new fuse blows in a short time, consult
WARNING
Electrolyte is toxic and dangerous since it
contains sulfuric acid, which causes severe
burns. Avoid any contact with skin, eyes or
clothing and always shield your eyes when
working near batteries. In case of contact,
administer the following FIRST AID.
∎External: Flush with plenty of water.
∎Internal: Drink large quantities of water or
milk and immediately call a physician.
∎Eyes: Flush with water for 15 minutes and
seek prompt medical attention.
Batteries produce explosive hydrogen gas.
Therefore, keep sparks, flames, cigarettes,
etc., away from the battery and provide
sufficient ventilation when charging it in an
enclosed space.
KEEP THIS AND ALL BATTERIES OUT
OF THE REACH OF CHILDREN.
41
Page 60

the KYMCO dealer immediately.
Fuse Allocation
All functional fuses are located in the fuse
box, there’s a sticker on the back of the fuse
box cover. Fuse should be inserted
according to this sticker.
Equipped with ABS:
Good
Blown
42
Page 61

MAINTENANCE
Tires
Tire pressure
Insufficient tire pressure not only advances
wear but also affects the riding stability. Underinflated tires make turning not smooth and overinflated tires decrease the contact area with the
ground, which can lead to skid and loss of
control. Make sure that the inflation pressure is
within the specified limits all the time.
▆NOTE: Check the tire inflation pressure and tire tread
condition at the interval listed in the periodic maintenance
schedule. For maximum safety and better tire life, the tire
pressures should be inspected more often.
▆NOTE: Tire pressure should only be adjusted when
the tires are cold.
Front tire: 2.00kg/cm2(one rider)
2.00kg/cm2(rider and passenger)
Rear tire: 2.25kg/cm2 (one rider)
2.25kg/cm2 (rider and passenger)
Tire size:
Front tire: 120/80-14M/C 58S
Rear tire: 150/70-13M/C 64S
WARNING
Fail to follow the instruction below may result
in an accident due to tire failure. The rider’s
personal safety is dependent on the
condition of the scooter's tires.
∎Check tire condition and pressure, and
adjust the inflation pressure before each
ride.
∎Avoid overload on the vehicle.
∎Replace tires which have been worn to the
specified limit, or have any damages such
as cuts or cracks.
∎Always use the designated size and type of
tires as specified in this Manual.
∎Balance the wheel after tire installation.
∎Fail to perform the break-in of the tires could
cause tire slip and loss of control.
∎Be very careful when riding on new tires as
the grip is limited between the ground.
∎Perform proper break-in of the tires to avoid
excessive acceleration, sharp cornering, or
hard braking for the first 160 km (100
miles).
43
Page 62

MAINTENANCE
Tires Inspection
Tire wear changes the tire profile and may
affect the vehicle’s handling characteristics.
Check the tire condition before each riding.
Replace the tires if tread depth is less than
the following limit:
Minimum tread depth:
Front: 0.8 mm (0.03 in )
Rear: 0.8 mm (0.03 in)
▆NOTE: Measure the tread depth ①, do not
judge by a visual inspection.
▆NOTE: Be sure to balance the wheel after
repairing a puncture or the tire. Proper wheel
balance is important to avoid variable contact
between tire and ground, and to avoid uneven tire
wear.
▆NOTE: Replace the tires if there’s visual
evidence of damage as cracks or cuts.
WARNING
An improperly repaired, installed, or
balanced tire can cause you to lose
control of your scooter or shorten tire life.
Ask the authorized KYMCO dealer, or a
qualified tire shop to perform tire repair,
replacement, and balancing due to the
proper tools and experience are required.
Always install tires according to the
rotation direction shown by arrow on the
sidewall of each tire.
44
Page 63

MAINTENANCE
Coolant
Coolant level inspection
The coolant reservoir In the front in the box.
Check
the coolant lever through the inspection
window ①at the left side skirt white the engine is at
the normal operating temperature,with the scooter
in an upright position..
If the level is below the “LOW” level line③, remove
the left foot mat, remove the lid screw④, the reservoir
lid ⑤, and the reservoir tank cap⑥to add coolant
until it reaches the “FULL” level line②.
WARNING
∎Engine coolant is toxic.
∎Keep coolant away from children.
∎If coolant is swallowed, call for emergency.
∎If contact with skin or eyes, wash out with
considerable water.
34516
FULL
LOW
45
Page 64

MAINTENANCE
Coolant replacement
The coolant should be replaced by an authorized
KYMCO dealer.
▆NOTE: Always notice coolant level in the reserve tank.
Do not attempt to add coolant by removing the radiator cap.
Coolant recommendation
Use the proper type and amount of coolant. The
coolant must be in good condition and have the
proper ratio of anti-freeze and distilled water to
prevent freezing, overheating, and corrosion.
Use only high quality ethylene glycol anti-freeze
that contains corrosion protection inhibitors and
the formula is for aluminum alloy engines.
(See the label on the container)
A 50:50 solution of anti-freeze and distilled water
is required. It’s for most operating temperature
and also with good corrosion protection.
MAINTENANCE
CAUTION
∎Use only low-mineral drinking water or
distilled water as a part of the anti-freeze
solution.
∎Use tap-water will cause engine damage.
∎Use a higher concentration of anti-freeze in
freezing weather and be replaced by the
KYMCO dealer. This higher concentration of
antifreeze should not exceed 60%. When
becoming warm, change the anti-freeze ratio
back to the standard ratio.
∎A concentration of less than 40:60(40%
anti-freeze) will not provide proper corrosion
protection.
WARNING
Removing the radiator cap may have the
coolant sprayed out to suffer burns while the
engine is hot.
47
47
46
Page 65

Clean the Windshield and
Plastic parts
To avoid possible scratches, use only water and a
soft cloth or sponge to clean the windshield and
other plastic parts with a soft and clean cloth.
Avoid using detergents or any kind of chemical
cleaner.
For a much dirty condition, use a diluted neutral
detergent with a sponge and plenty of water. Make
sure to wash off all the detergent, the remaining
detergent residue may cause cracks or paint
fading.
Crankcase Blow-by Drain
The air cleaner has a drain tube ① that is for
draining the oil condensed fluid from the
crankcase.
When the fluid has accumulated to a certain
amount in the transparent drain tube, remove
the clip ② and plug ③, drain the fluid into a
container, and then reinstall in place.
▆NOTE: Drain frequently if often riding in the rain, often
at full throttle, or the vehicle has been overturned. Follow
the oil disposal regulation.
MAINTENANCE
CAUTION
∎Don’t use organic solvents such as gasoline
thinner, etc.
∎Use neutral soap to clean windshield and
other plastic parts.
∎Replace the windshield if scratch level is too
severe to have a clear vision.
1
47
Page 66

STORAGE
Take necessary steps to be in good condition
for next use after long storage.
●Perform any necessary periodic maintenance or
repairs before storage
●Exchange new oil after warming up the engine.
●Empty the fuel tank and make sure no fuel
remaining by idling until the engine stalls.
●Remove the battery and keep from direct
sunlight or freezing temperature, it’s better to
do a slow charge once a month.
●Wash and dry the vehicle thoroughly
●Apply corrosion inhibitor to all unpainted metal.
●Inflate all tires to the rated pressure and put the
wheel stands to raise tires off the ground.
●Cover the vehicle, store indoors and keep dry.
Removal from Storage
●Remove cover from the vehicle
●Check the battery voltage or charge it if
necessary, and then install it in the vehicle.
●Fill the fuel tank with fuel.
●Check all the points listed in the Pre-ride
Inspection section.
EMISSION CONTROL
WARNING
∎Gasoline is easily flammable and
explosive. It’s possible to get burned, even
seriously injured when fueling with
carelessness.
∎Stop the engine and keep away from any
heat source, spark fire, and flames.
∎Be sure to add fuel outdoors and wipe the
spill up at once.
48
Page 67

Crank case Emiss ion Control System
The motorcycle is equipped with a closed crankcase system. Blow-by gas is recycled into the
combustion chamber via the intake system. This arrangement is to prevent blow-by gas from
spreading to the atmosphere.
Exhaust Emission Con trol Sy stem
The exhaust emission from the motorcycle is controlled by combustion management, fuel delivery,
ignition setting and exhaust system. The exhaust system also includes the catalytic converter in the
muffler.
Evaporative Emis sion Control System
The evaporative emission control system is used to prevent gasoline vapors from escaping into
the atmosphere from the fuel tank and fuel system.
Nois e Exha ust Emission Control System
The engine, intake and exhaust systems of the motorcycle are designed to comply with federal or
local noise regulations. Do not modify the intake or exhaust system; this behavior will offend against
the noise regulations.
WARNING
Do not adapt any original factory design and setting, which
will deteriorate the sound or emission level.
49
Page 68

SPECIFICATIONS –X-Town300 ABS
Dimensions
Chassis
Overall length.......................... ....... 2250 mm
Overall width........................... ........ 800 mm
Overall height........................... ...... 1385 mm
Wheel base............................. ...... 1545 mm
Capa cities
Engine oil (Exchange)................. ......... 0.9 L
Transmission oil (Exchange)... .... ... ... 0.18 L
Fuel tank............................... ...... ...... .. 13 L
Net weight.................................. ... .... 195kg
Engine
Type....................4-stroke, liquid-cooled SOHC
Displacement....................... ...............275.6cc
Bore and stroke.......................72.7 X 66.4 mm
Compression ratio....................................10.6
Max. Horsepower ......... .. ....17.05kW /8000rpm
Spark plug...................................... DPR6EA-9
Idle speed.................................. 1600±100 rpm
Fuel system................................Fuel injection
Ignition system...................ECU (full transistor)
Tire size, front............................120/80-14
Tire size, rear.............................150/70-13
Brake (front)..................................... ABS
Brake (rear)...................................... ABS
Elec trical
Ignition type ...............Inductive ignition coil
Battery......................................12V10.5A
Headlight........................... 12V 35W/35W
Tail light............................12v/0.7Wx2 LED
Brake light........................12v/3.5Wx2 LED
Turn signal light..... .....Front: 12v 2.2W X 2
Rear: 12v 10W X 2
Main & H/L Beam fuse.......................15A
ECU & Ignition & Fan fuse..................10A
Charge fuse.......................................30A
Page 69

50
 Loading...