

KYMCO UXV 450i Owner's Manual
KWANG YANG MOTOR CO.,LTD.
OFF ROAD
UXV 450i
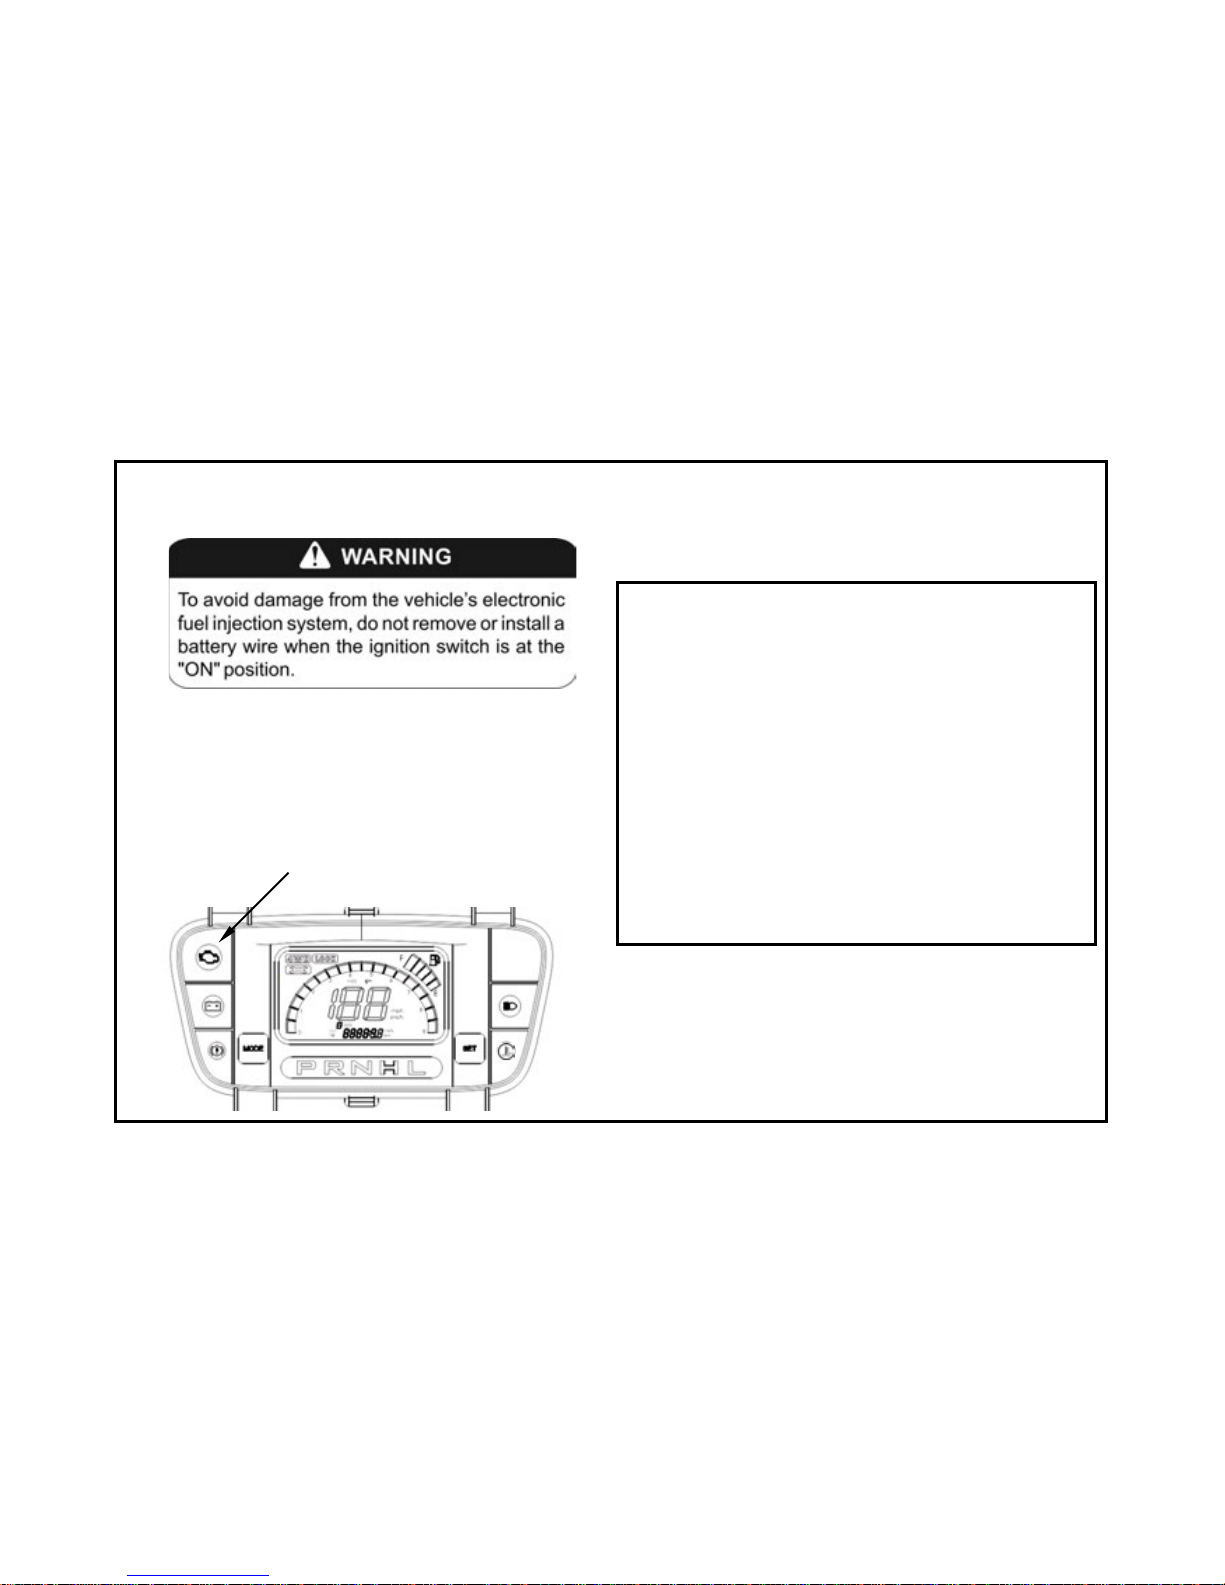
Battery & EFI Damage Alert
CELP indication :
If brightness, it indicates that a fault has
been detected in the vehicle 's EFI or
electrical syst em. Requires i mmediate
inspection by a KYMCO dealer.
CELP indication
Dangerous Alert
CAUTION:
PO TENT I AL H AZAR D
Operating your UTV in areas with tall or
loose vegetation.
WHAT CAN HAPPEN
Combustible materi als s uch as tall grass or
reeds .exposed to the exhaust syst em’ s hot
components could result in a fire.
HOW TO A VOID THIS HAZARD
Clear away plant debr i s or other material s
away from the exhaust system Use care as
the exhaust system can get very hot.

Dear KYMCO UXV 450i Users:
Thank you for purchasing this KYMCO UXV 450i and welcome to the family
of KYMCO UXV 450i riders. To enjoy safety and more pleasant riding, become
thoroughly familiar with this owner manual before you ride the UXV 450i.
Your safety depends not only on your own alertness and familiarity with the
UXV 450i but also the UXV mechanical condition.
A pre-ride inspection before every outing and regular maintenance are
essential. The quality of each KYMCO UXV 450i is guaranteed.
Note: The information and specifications stated in this manual are for
reference only and subject to change without notice.

TABLE OF CONTENTS
A D
Auxiliary Ou tl et 25 32-33
Air Cleaner 60 Daily S afety Check s 43
B
Driving Saf ely 44
Battery remove 62 Driving Downhil l 47
Brake Fl uid Ins pec tion 59 Driving Up hill 48
Brake P edal 34 Driving Reverse 50
C E
Carg o B ed 36-38 Emission Control System 51-52
En gine Oil 53-56
Crossing Water 49
F
Cooling Sys tem In s pec tion
64 Fuel Lever In s pection /Ref illin g 16
Fuse Repl ac em ent 63
Diff er ent ial Lock Mod e

TABLE OF CONTENTS
G O
Gear Selector 28 19-24
H
Hood 39-40
P
I
Period ic Main ten ance/ Lubrication 74-76
Ind ic ator Lights 17 Pillows Ad uu s t 27
Ign ition S witch 29 Parking Brake 35
Ign ition S witch K ey 6 Parking 47
L R
Light S witch 30 Right Glove Compart m ent K ey 6
Location Of Parts
7-10
S
Serial Number Location s 4-5
Start The Engine 45-46
Steering Wheel Ad juster 34
Spark Arrestor 52
Spark Plu g Inspection 67
Specifications
69-73
Seat Removal 26
Seat Belt s 26
Op er ation Instr uction for

TABLE OF CONTENTS
T
Throttle Pedal 34
Tool Kit 68
W
2WD/ 4WD Swit c h 31
Warning Labels Locaton 11-15
This vehicle can be dangerous to operate.
An impact or rollover can occur quickly ev en during routine maneuvers such
as turning and driving on hills or over obstacles, if you fail to take proper
precautions.
For your safety, understand and follow all the warnings contained in this
Owner’s Manual and labels on this vehicle.
Keep this Owner’s Manual with this vehicle at all times.
Failure to follow th e warning s contained in this manual
can result in serious injury or death.
Particularly important information is distinguished in this manual by the
Following notations:
Indicates a strong possibility that serious injury or death may
result if instructions are not followed.
Indicates a possibility that equipment or property damage
could result if instructions are not followed.
●Note: Gives helpful information
!
WARNING
!
CAUTION
1

This vehicle is not a toy and can be dangerous to operate.
●Always go slowly and be extra careful when operating on unfamiliar terrain.
Alway s be alert in terrain conditions when operating this vehicle.
●Never operate on too rough, slippery, or loose terrain.
●Always follow proper procedures for turning as represent in this manual.
Institution turning at slow speeds before attempting to turn at faster speeds.
Do not turn at intemperate speed.
●Never operate on hills too steep for your abilities and cross the side of a hill,
Practice on smaller hills before attempting larger hills .
●Always use proper procedures if you stall or roll backward when climbing a hill.
To avoid maintain a steady speed when climbing a hill. In case of you stall or
roll return, follow the procedure for braking described in this manual.
●Operation of this vehicle is restricted to people 16 years of age and older who
possess a valid operator’s license. Usually , no person under the age of 6
may ride as a passenger on this vehicle.
2

3
Safety Watchful
●Always read the owner’s manual carefully and follow the operating
procedures described. Pay special attention to the warnings contained
In the manual and on all labels.
●
Never operate this vehicle with the canopy frame removed.
●
Always wear the seat belt, helmet and eye protection when driving.
●
Never operate this vehicle on a public road, even a dirt or gravel
one ,because you may not be able to avoid colliding with other vehicles.
●
Always avoid paved surfaces. This vehicle isn’t designed to be used on
paved surfaces and may seriously affect handling and control.
●
Always follow this age prescription:
Operation of this vehicle is restricted to people 16 years of age and older who
possess a valid operator’s license. Usually , no person under the age
Of 6 may ride as a passenger on this v ehicle.
●
Always keep combustible materials away the exhaust system. Exposure to
the hot components could result in a fire.
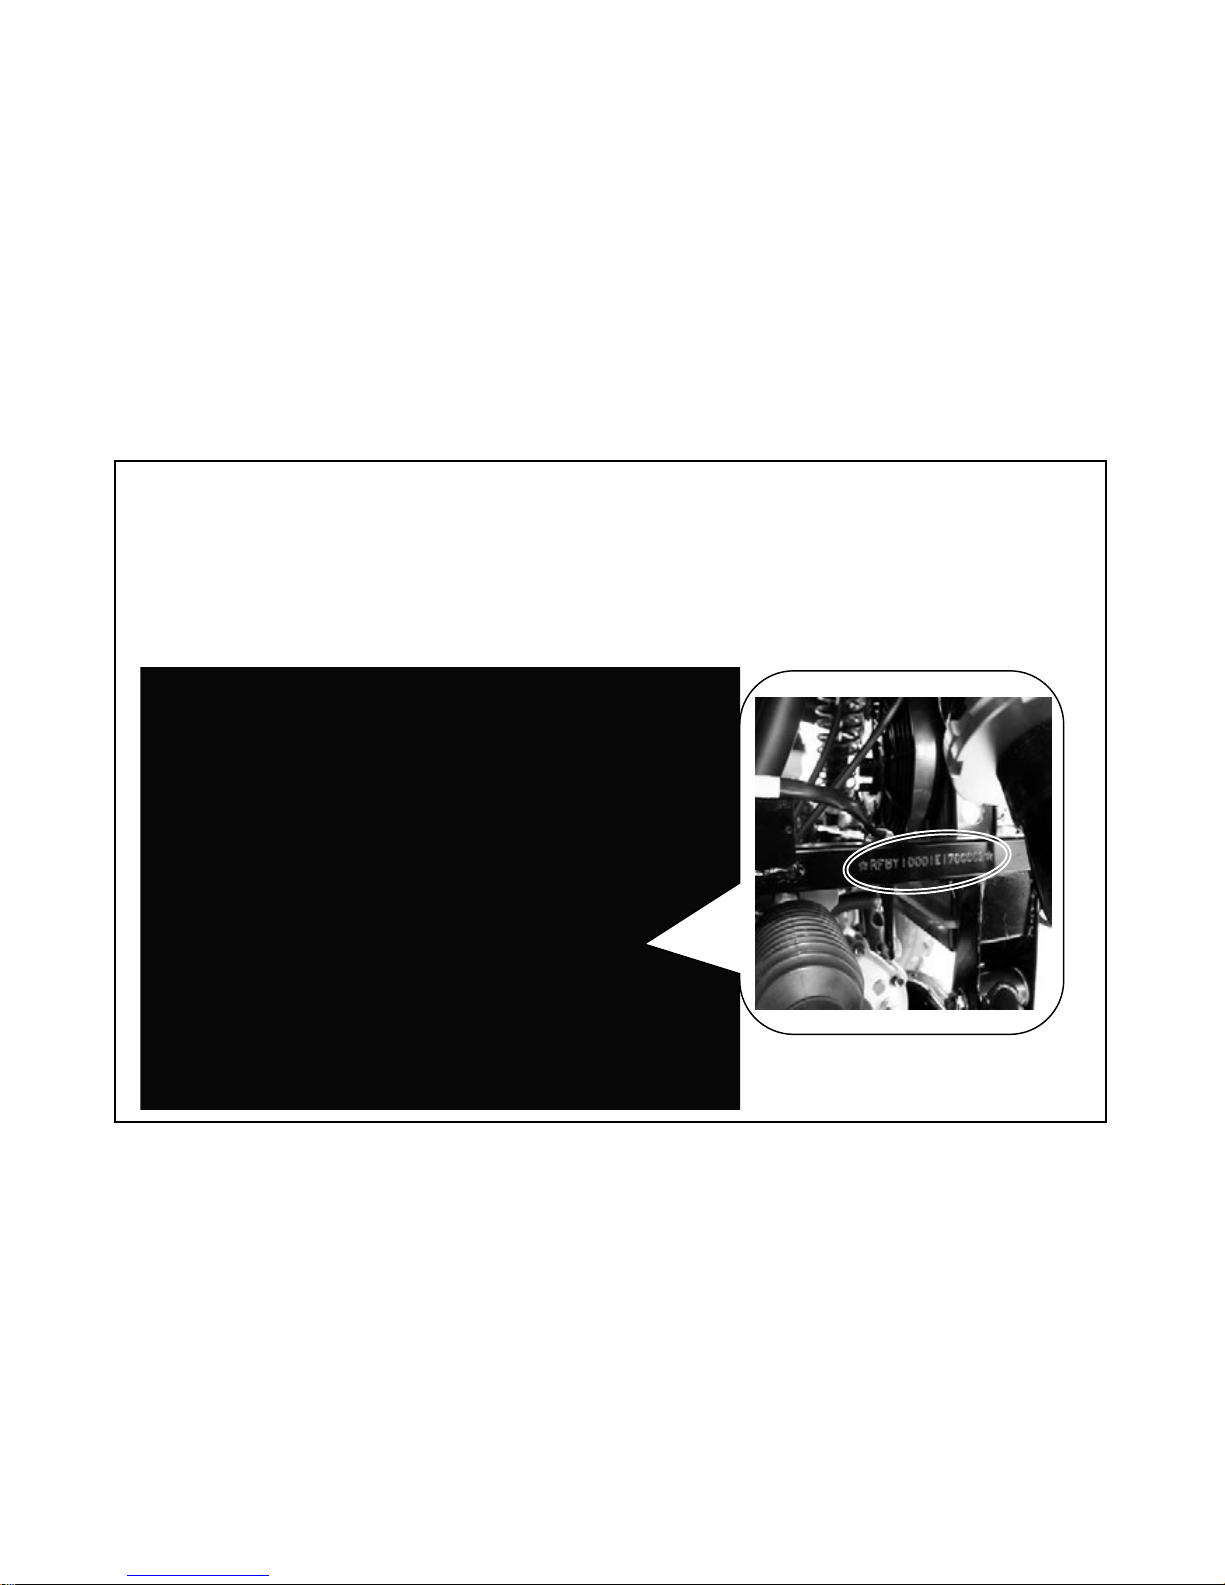
Serial Number Locations
This vehicle has 2 serial numbers:The frame number and Engine serial number.
The frame number is located on the frame near right front wheel place.
Frame Number
4
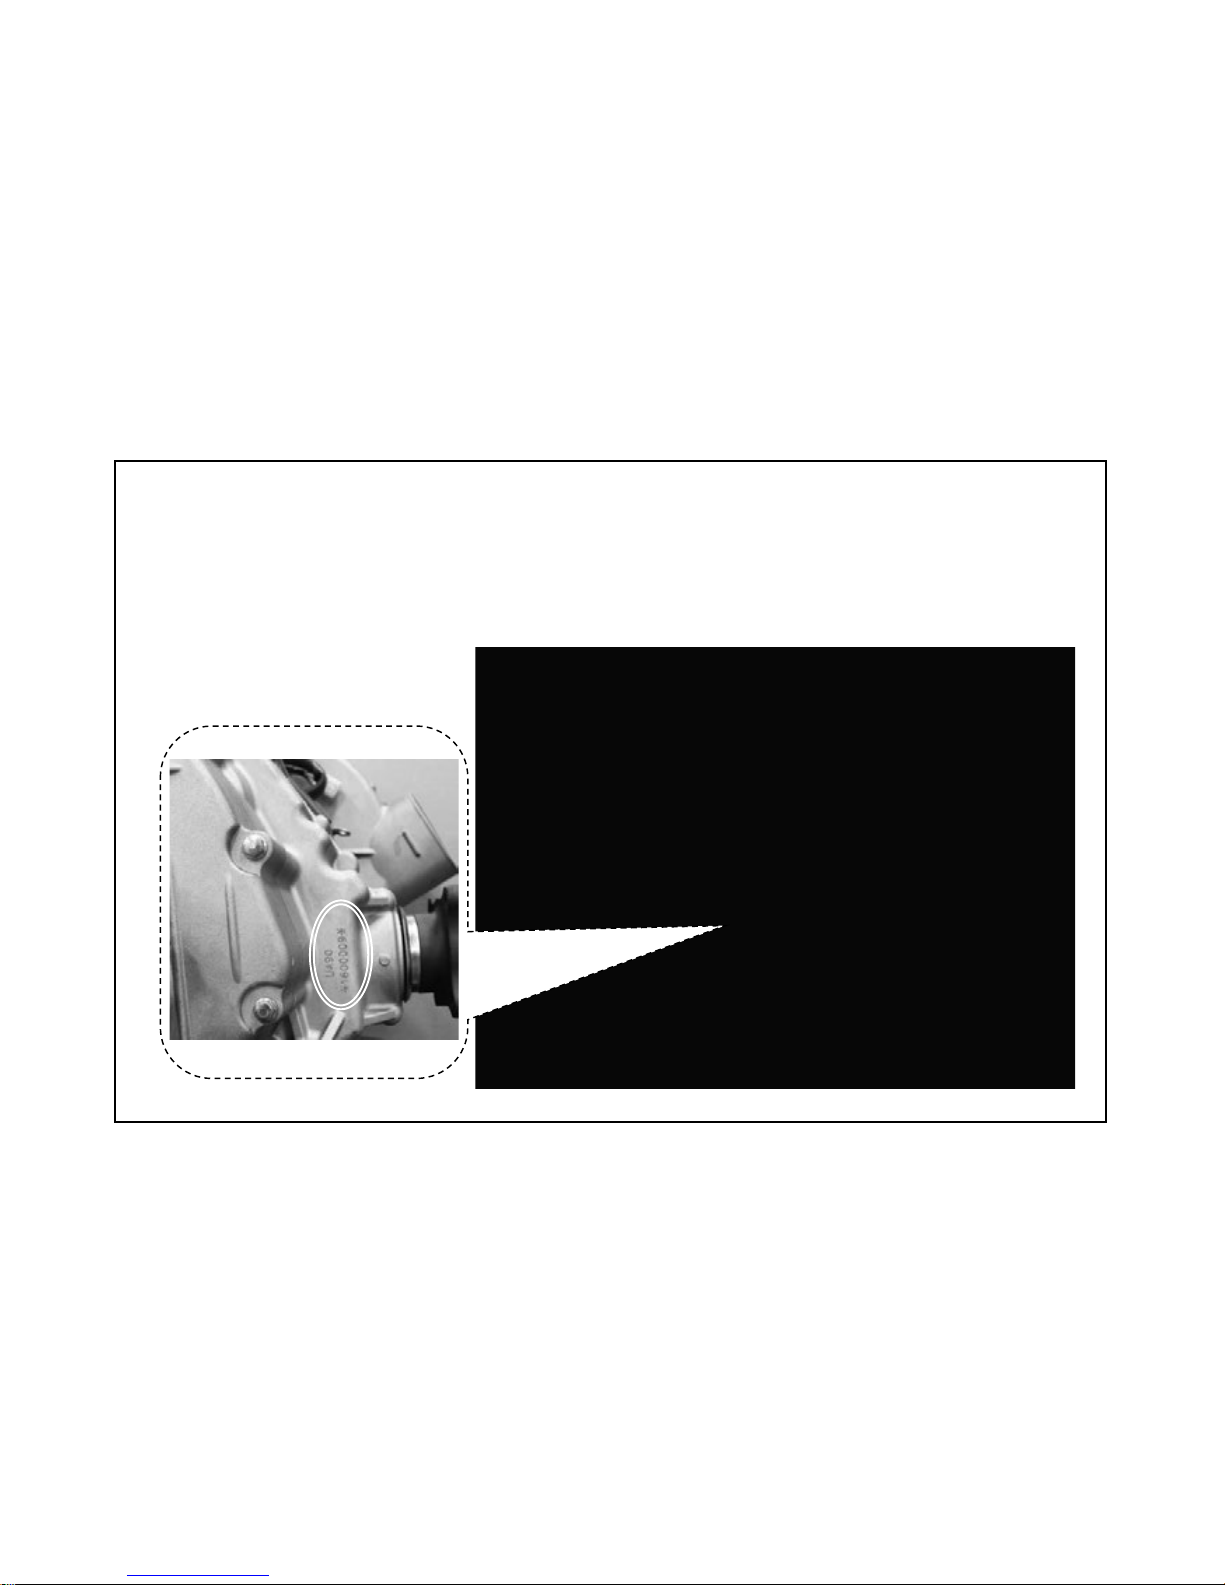
Serial Number Locations
The engine serial number is located on the left side of the engine crankcase.
Engine Serial Num ber
5
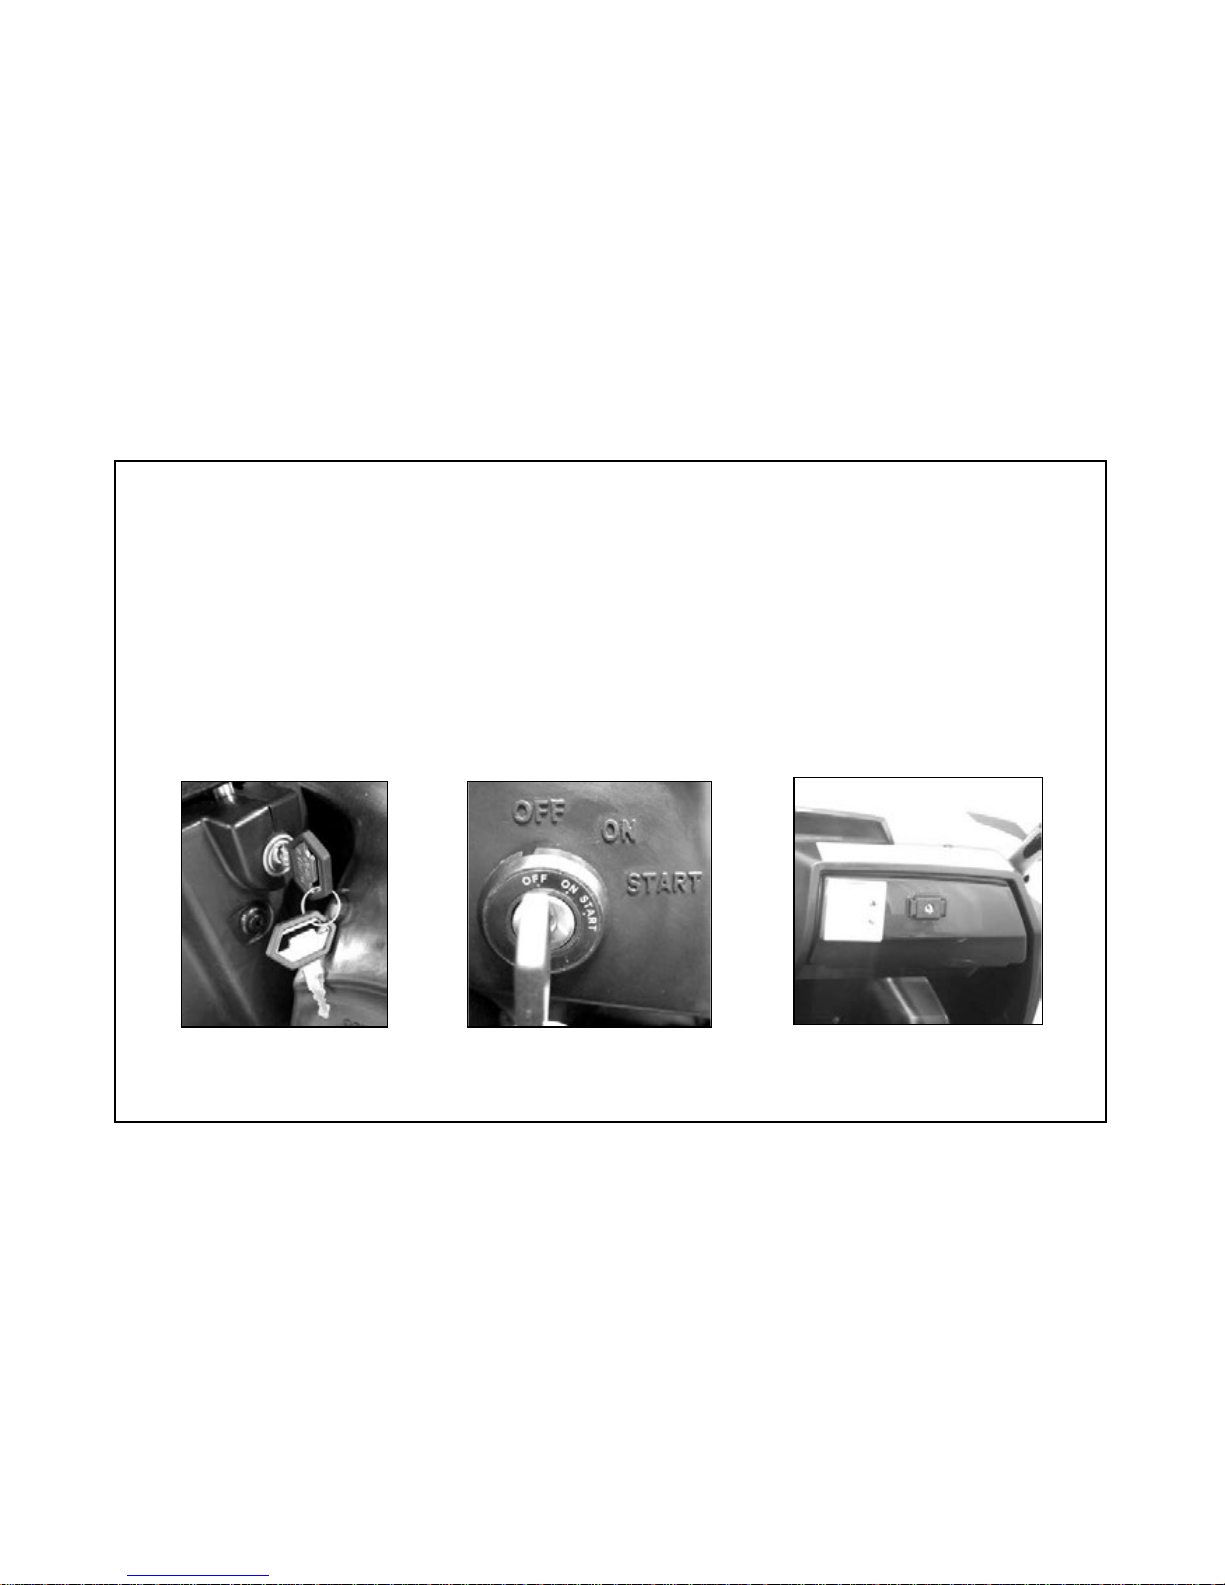
Wheel steering lock Key/
Ignition Switch Key/Fuel Cap Key
Right Glove Compartment Key
There are two keys come with this vehicle. Keep the spare in the safe place.
The key is for wheel steering lock, ignition switch, fuel cap and right glove
compartment.
1.Wheel steering
lock
6
2.Ignition Sw itch 3.Right Glove
Compartment
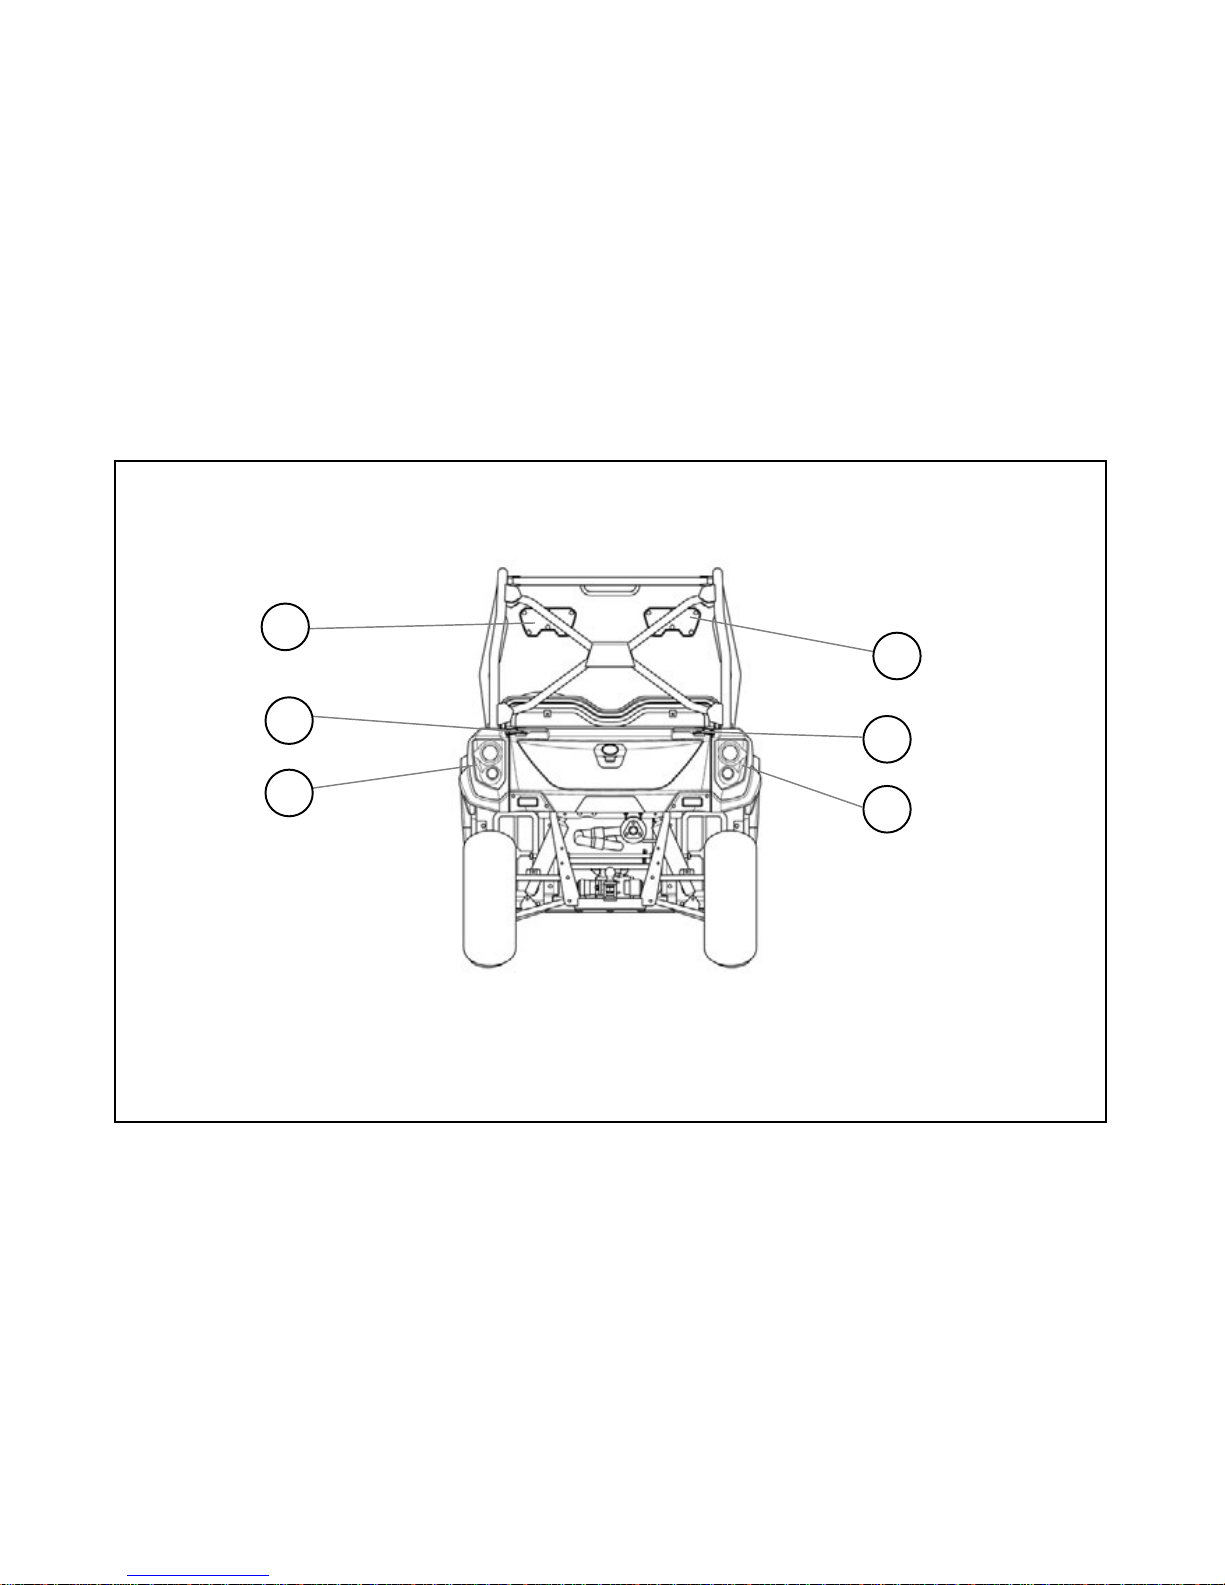
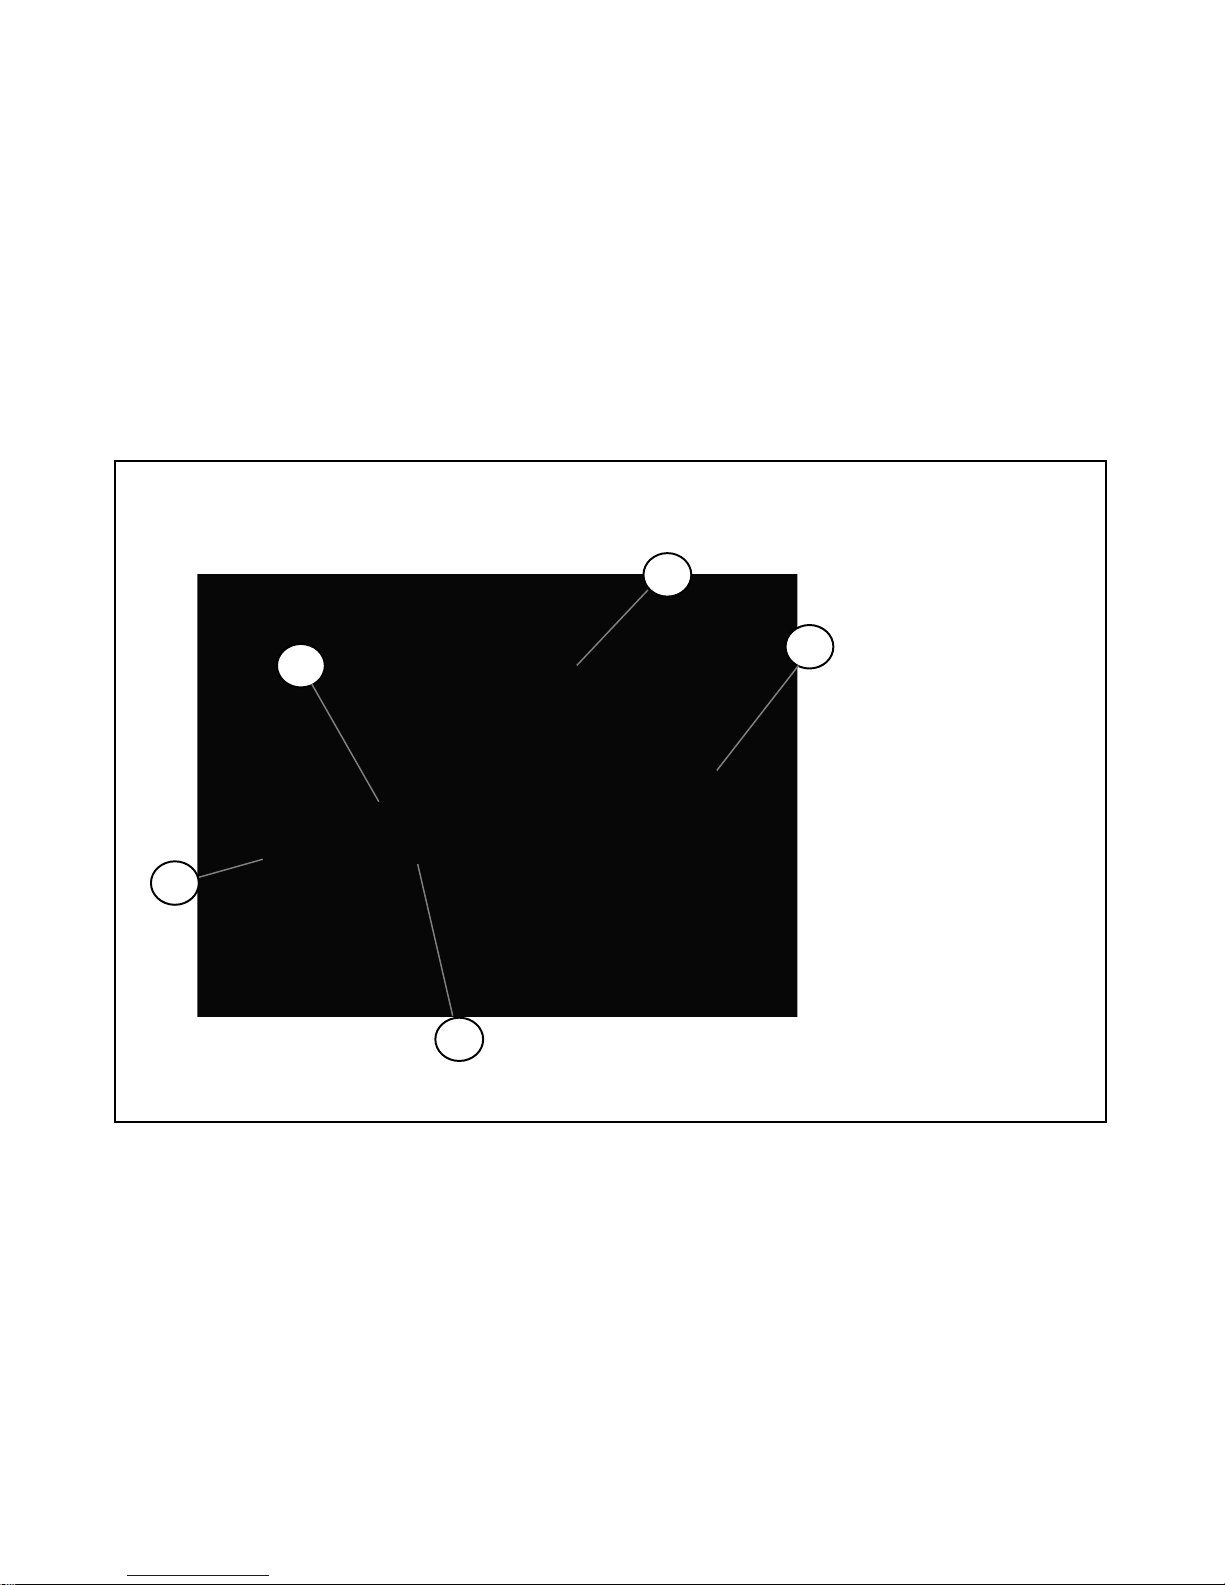
Location Of Parts (1)
5
1
2
6
1.Right Head Cushion 2.Left Head Cushion 3.Right Latch Handle
4.Left Latch Handle 5.Right Tail /Brake Light 6.Left Tail /Brake Light
7
4
3
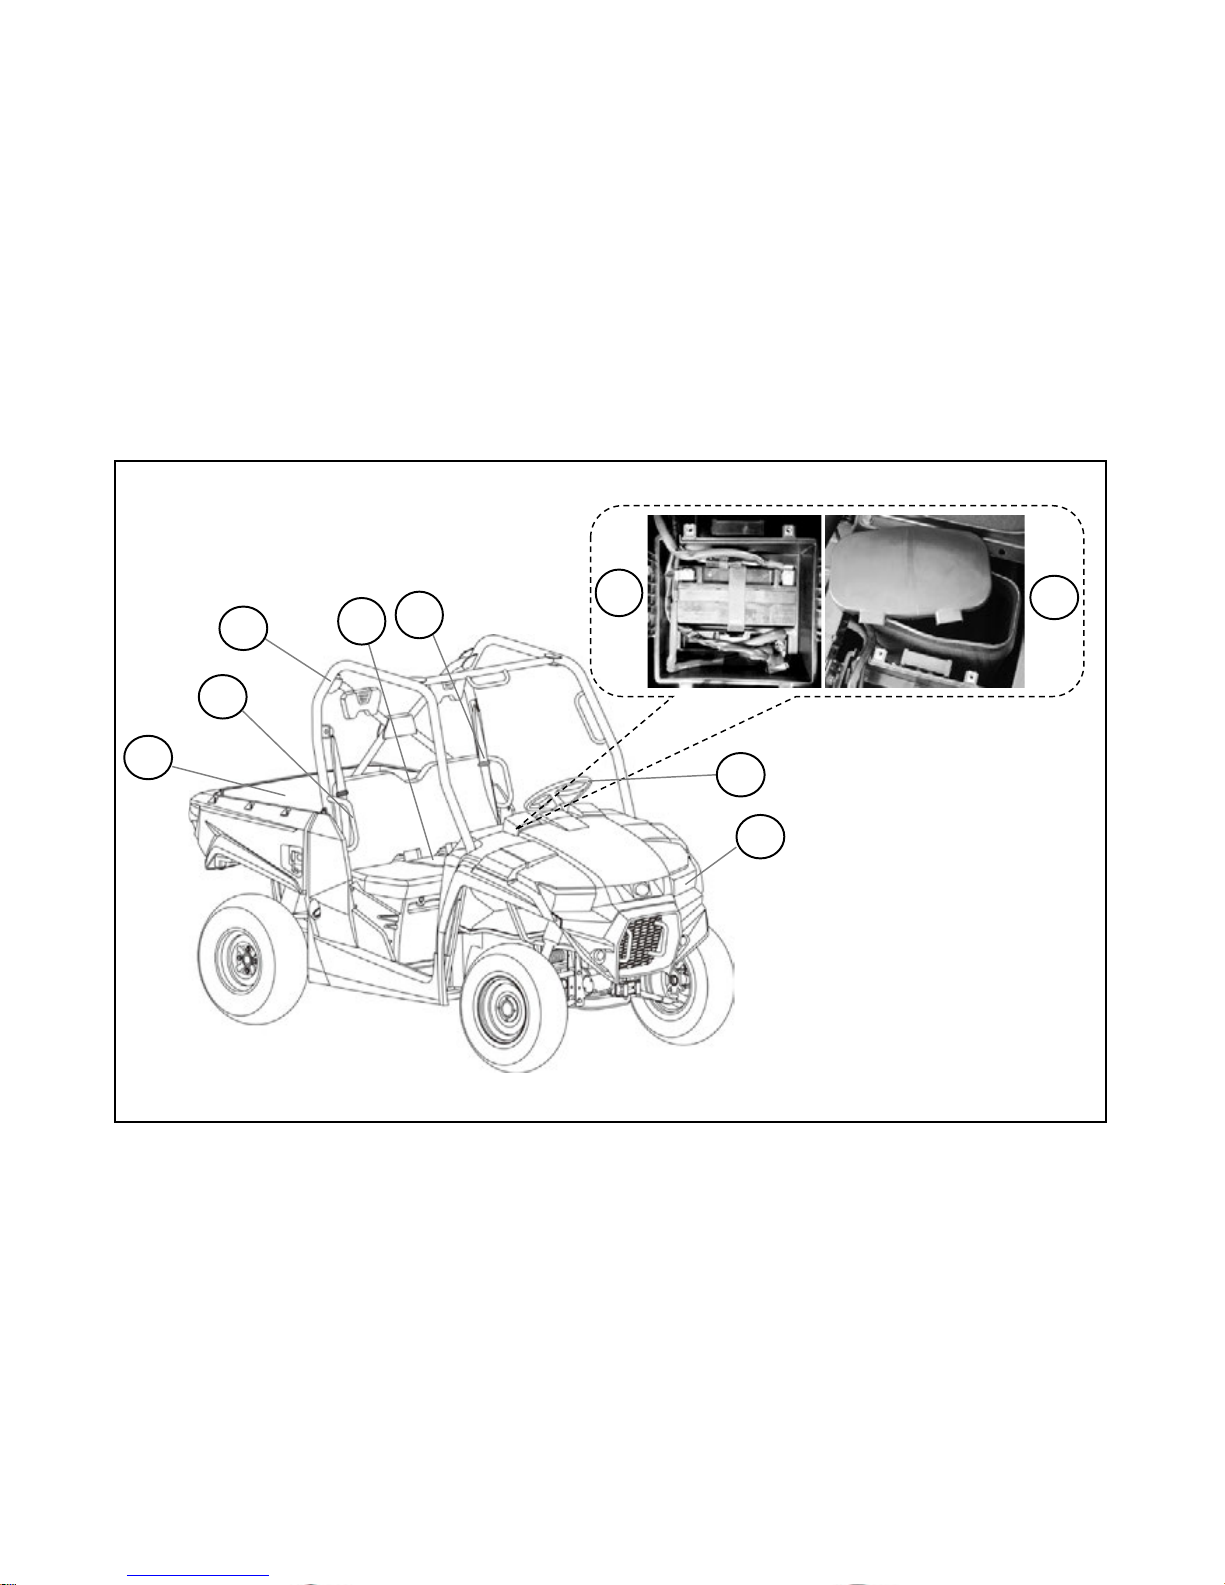
Location Of Parts (2)
07.Seat
08.Seat Belts
09. Battery
(Under the seat)
10.Tool or Parts Box
(Under the seat)
1 1.Steering Wheel
12.Headlights
13.Cargo Bed
14.Grab Handles
15.Canopy
9
12
14
15
8
7
8
13
10
11
Location Of Parts (3)
16.Hood
17.Grab Handles
18.Fuel Tank Cap
19.Muffler&
Spark Arrestor
20.Cargo Bed Lever
16
19
18
9
17
20
10
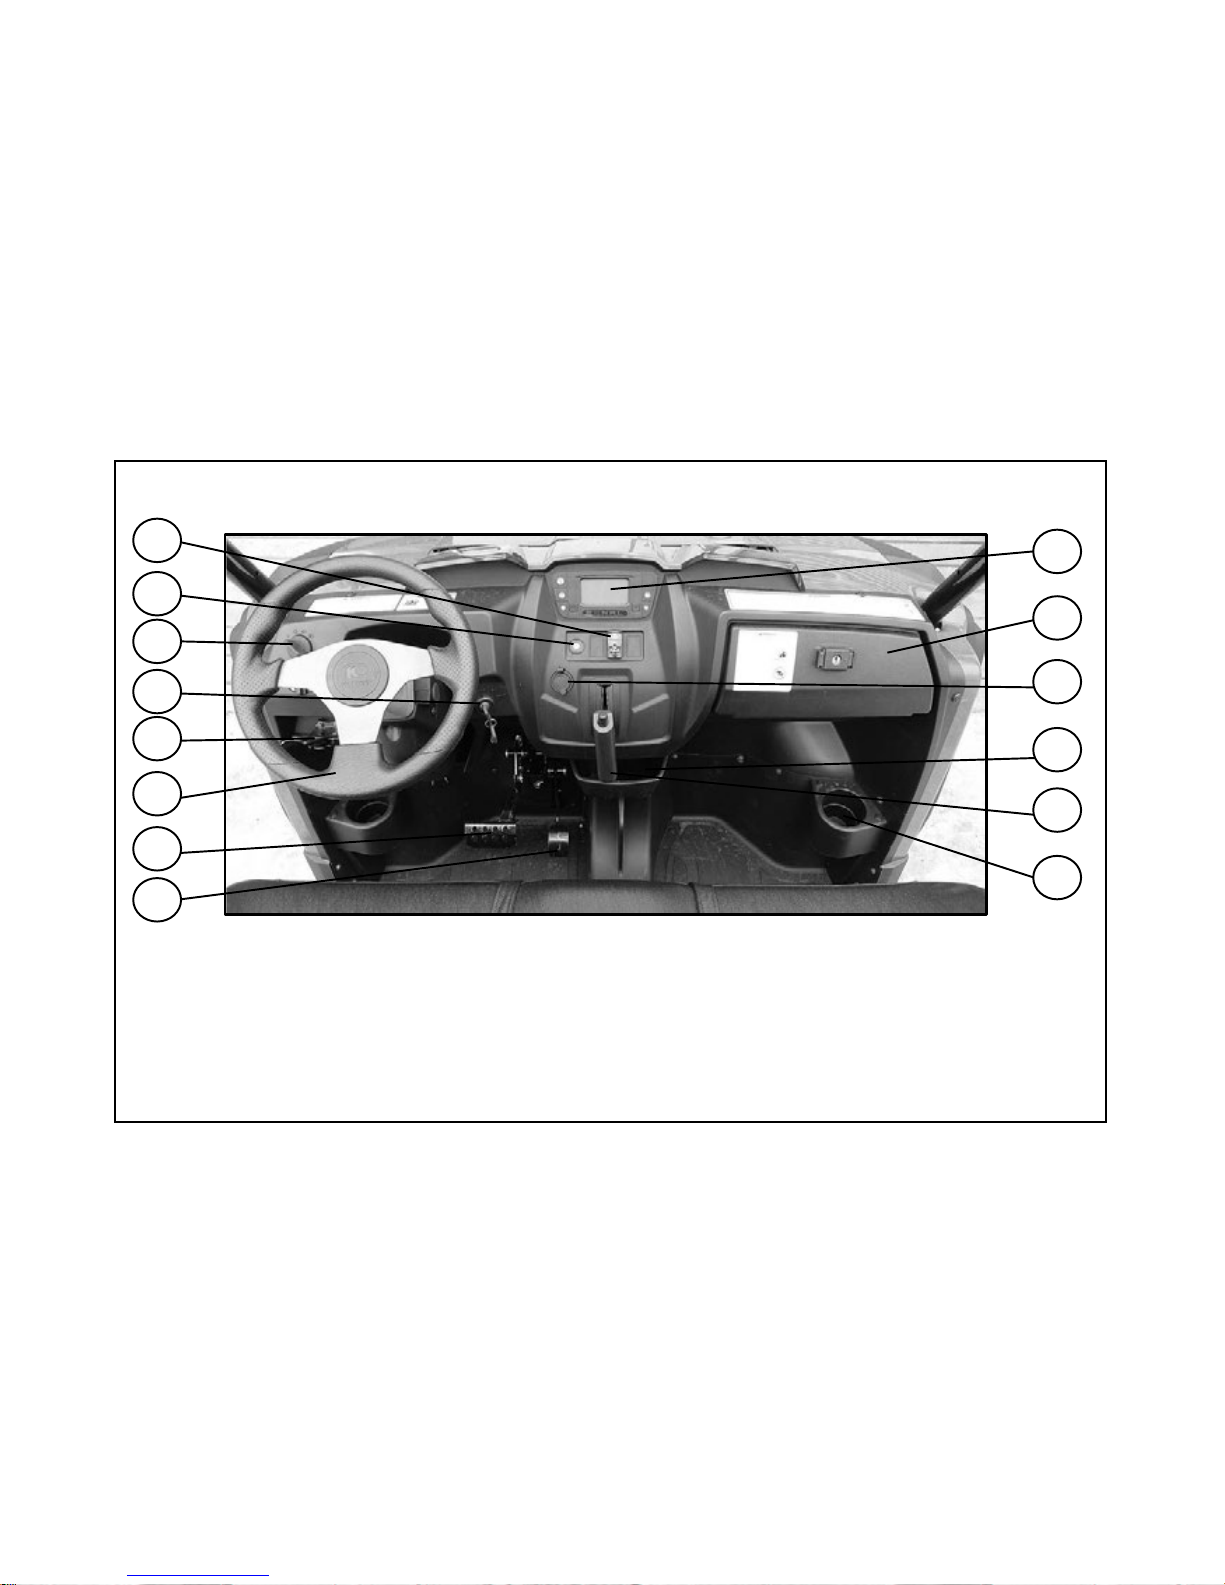
Location Of Parts(4)
29
21
22
23
24
25
31
33
34
21. Speedometer 22. R ight Glove Compartmen t 23. Auxiliary Outlet
24. Center Glov e Compartment 25.Gear Shifter 26. Side Compartment
27. Rear differenti a l lock switch (Optional) 28. Seat belt lamp 29. Light Switch
30. Ignition Switch 31. Parking Brake Lever 32. Steering Wheel
33. Brake Pedal 34. Throttle Pedal
26
32
30
28
27
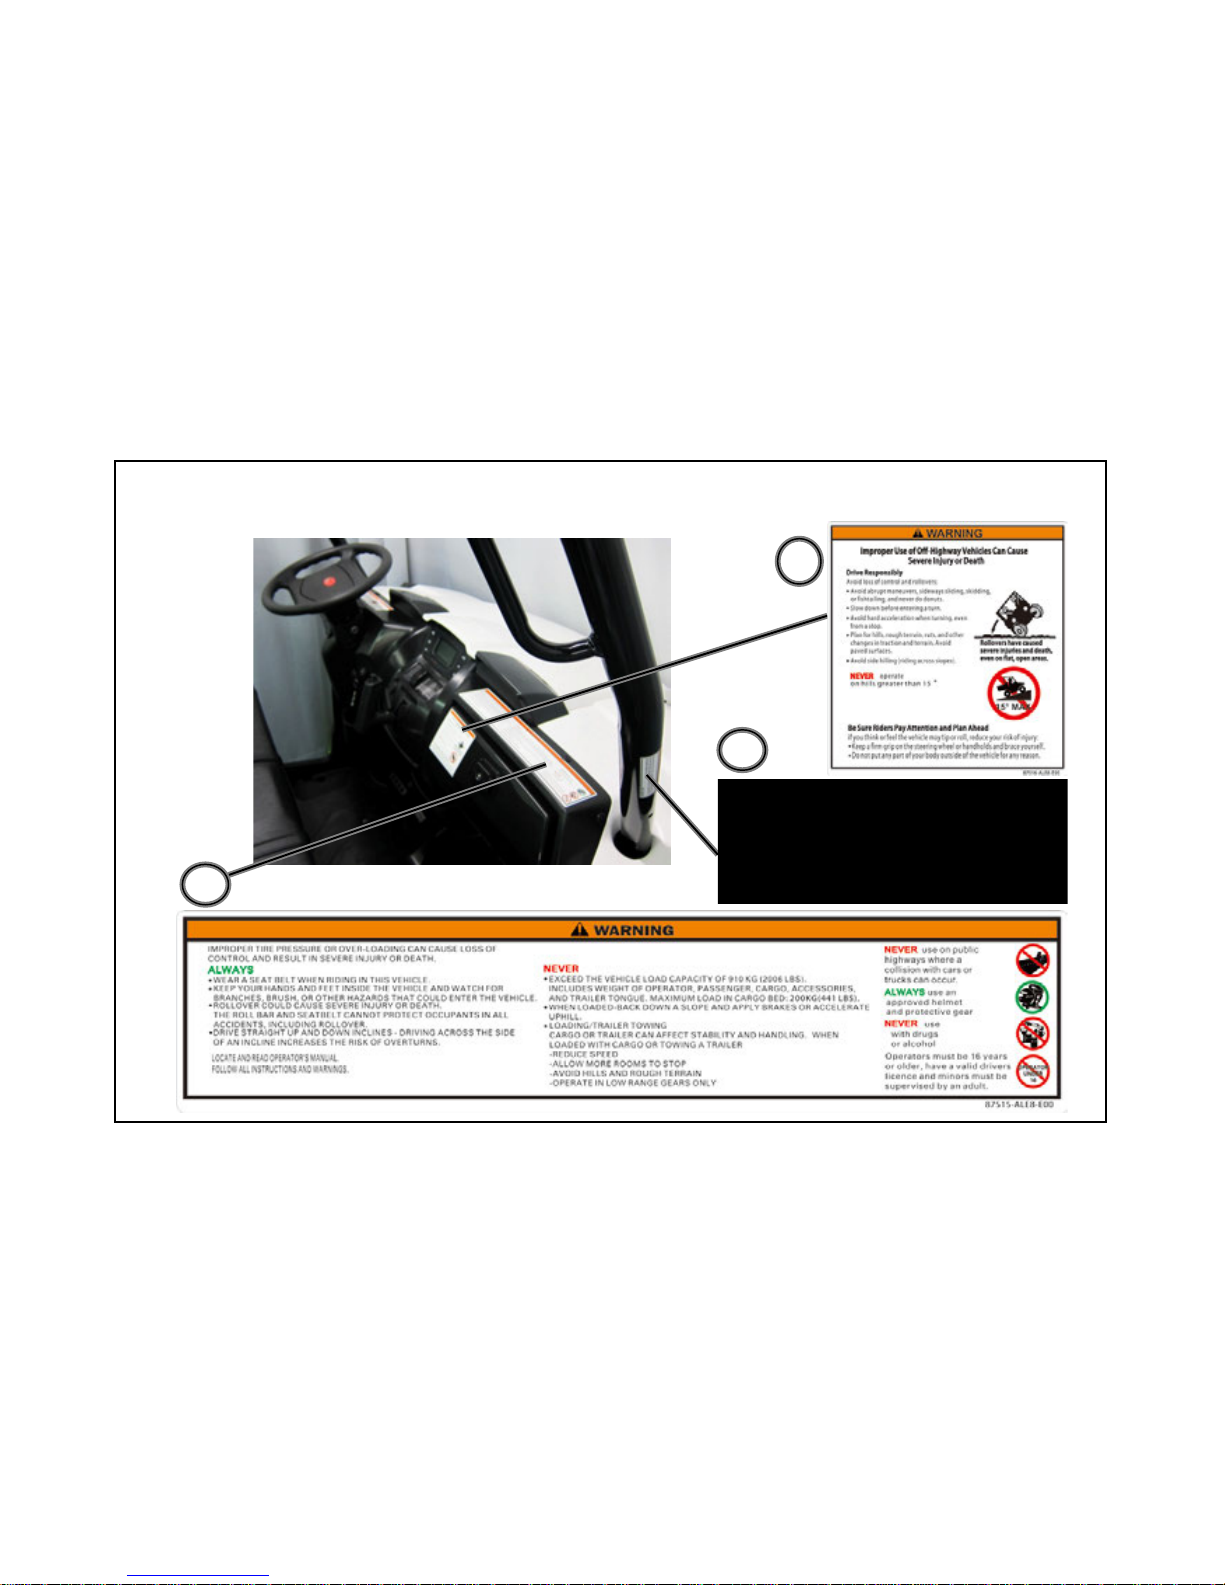
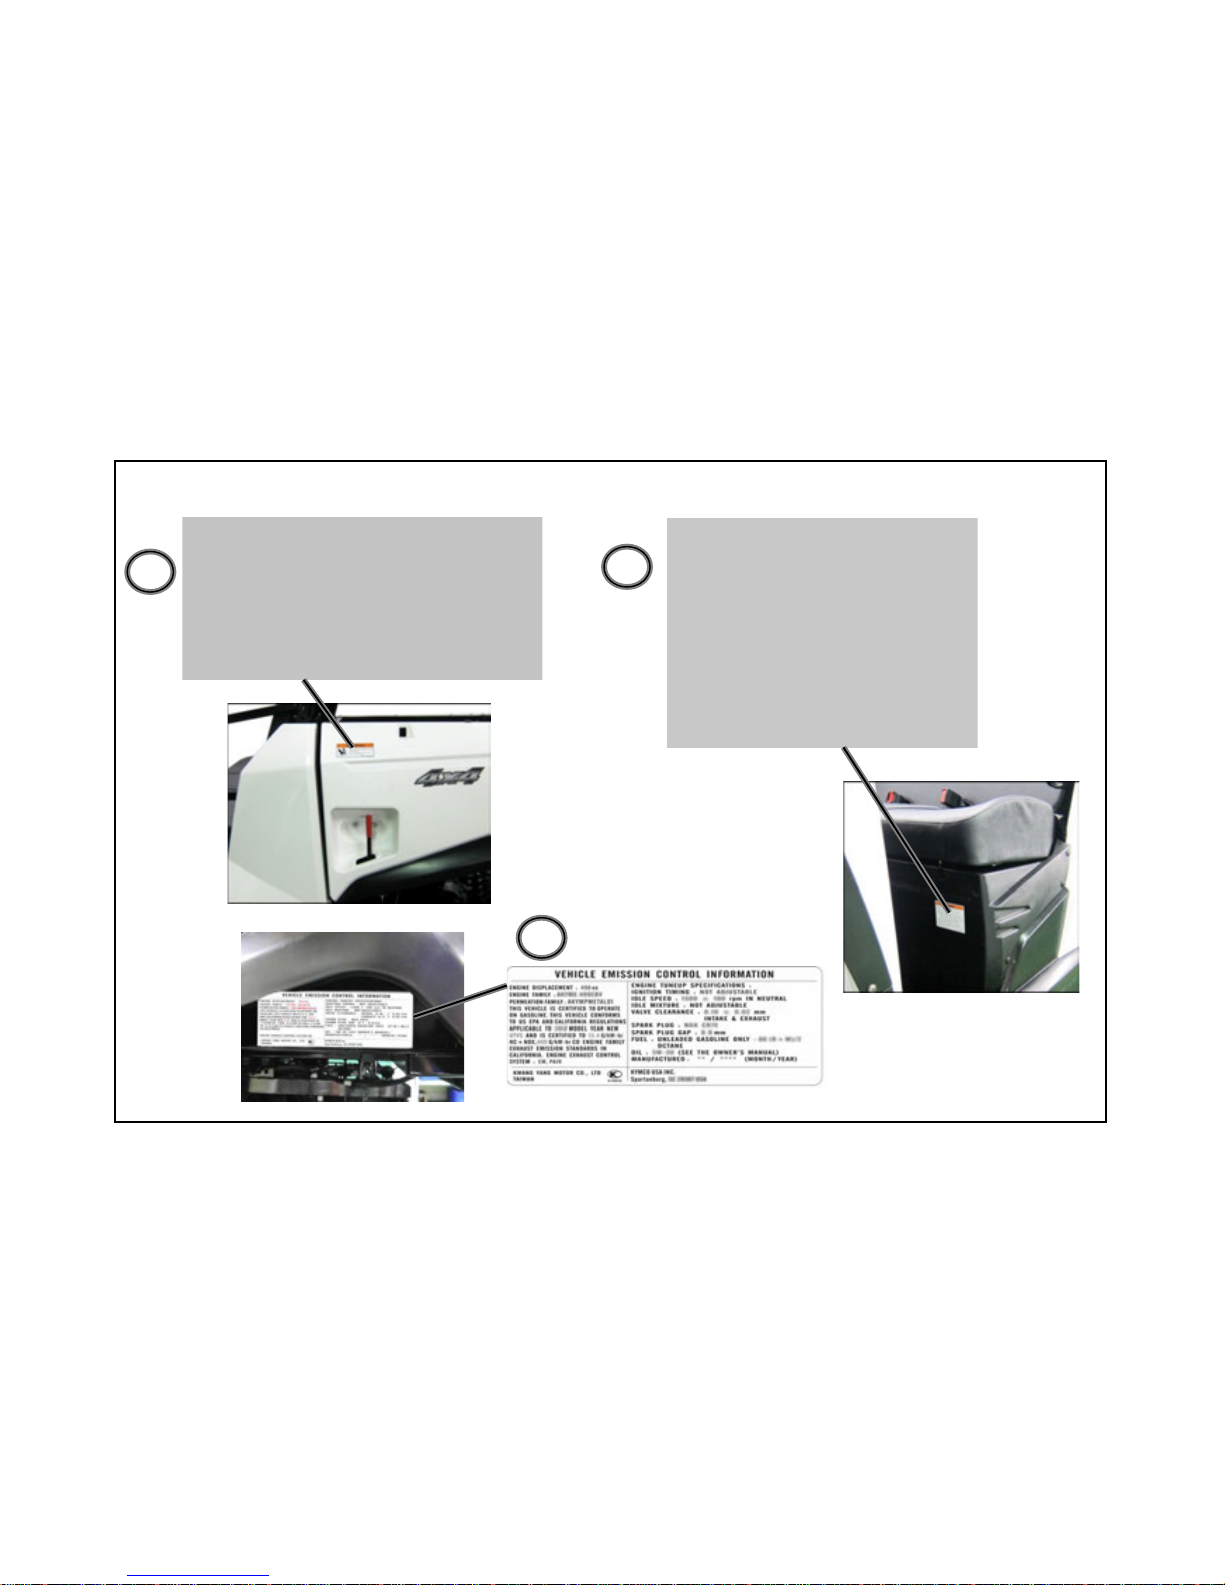
W arning Labels Location
11
2
3
1

W arning Labels Location
12
6
4
5
13
W arning Labels Location
7
8
9
10
14
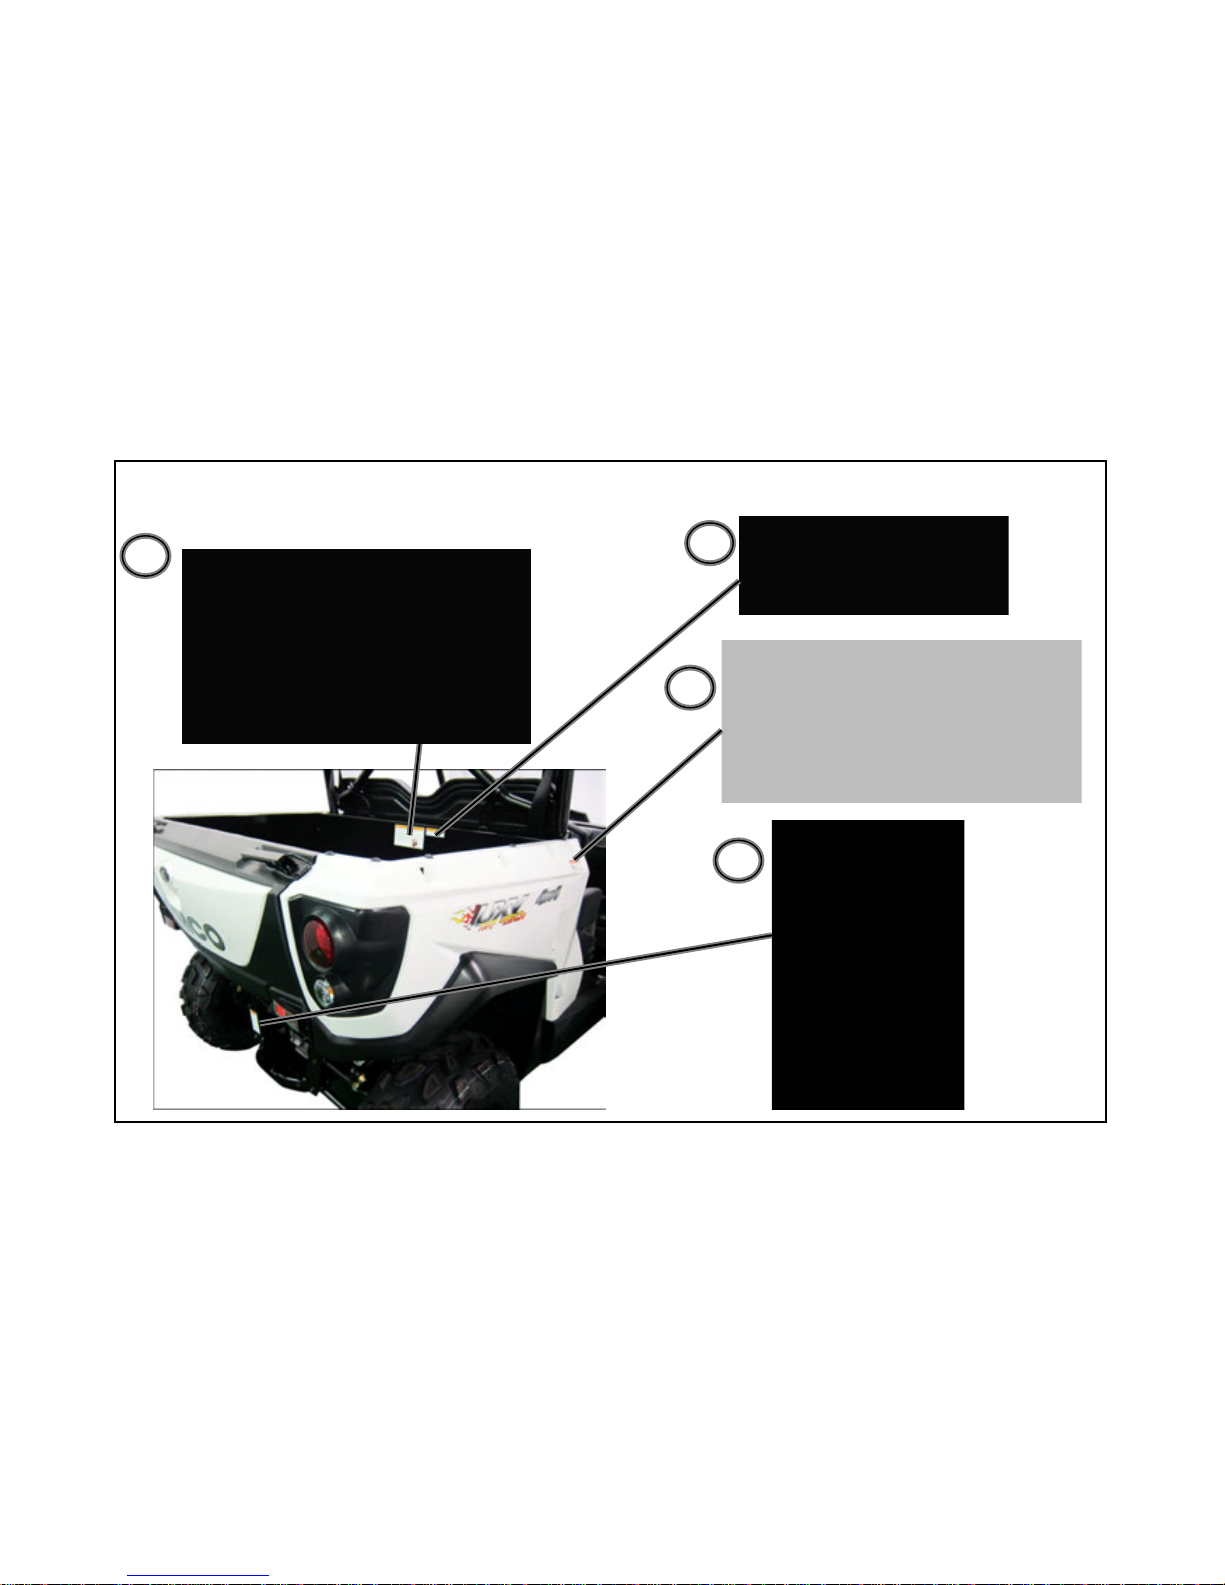
W arning Labels Location
11
12
13
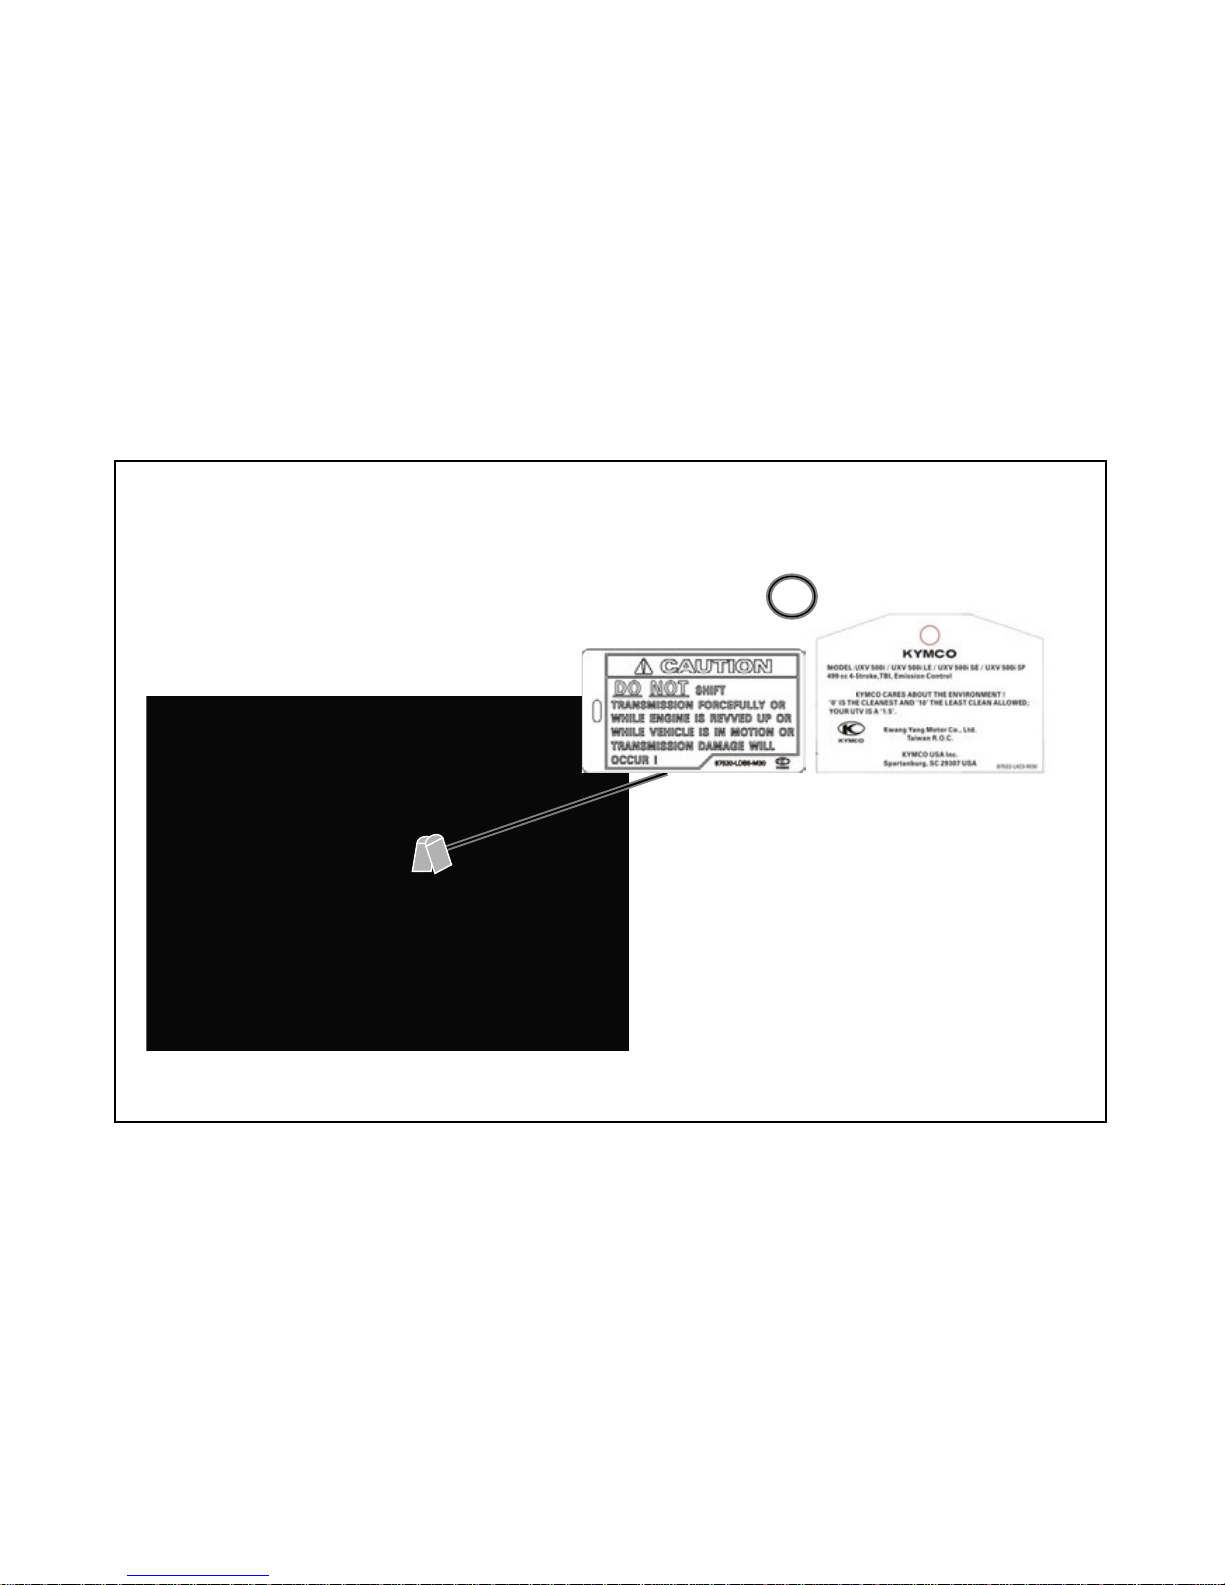
W arning Labels Location
15
14

KWANG YANG MOTER CO .,LTD
NO.35 Wan Hsing Street,San Min District
Kaohsiung, Taiwan, Republic Of China
Telephone : 886-7-3822526
Fax : 886-7-3950021
Printed in Taiwan

Features And Controls
Fuel Level Inspection/Refilling
Check if fuel is sufficient.
If the fuel gauge pointer is E(flash).refill
nonleaded gasoline as soon as possible.
(Refilling Method)
1.Turn the tank cap counterclockwise with
hand to open the cap.
2.Use only nonleaded gasoline.
3.Turn the fuel tank cap clockwise to tighten
it.
4.Fill the fuel tank to the fuel level as shown.
5.Close the fuel tank cap in the reverse
order of opening.
!
CAUTION
Be sure to stop the engine before refilling. The gasoline level shall not
exceed the fuel level as drawing shown, otherwise the fuel will penetrate
out and contaminate the vehicle.
16
Fuel Level
17
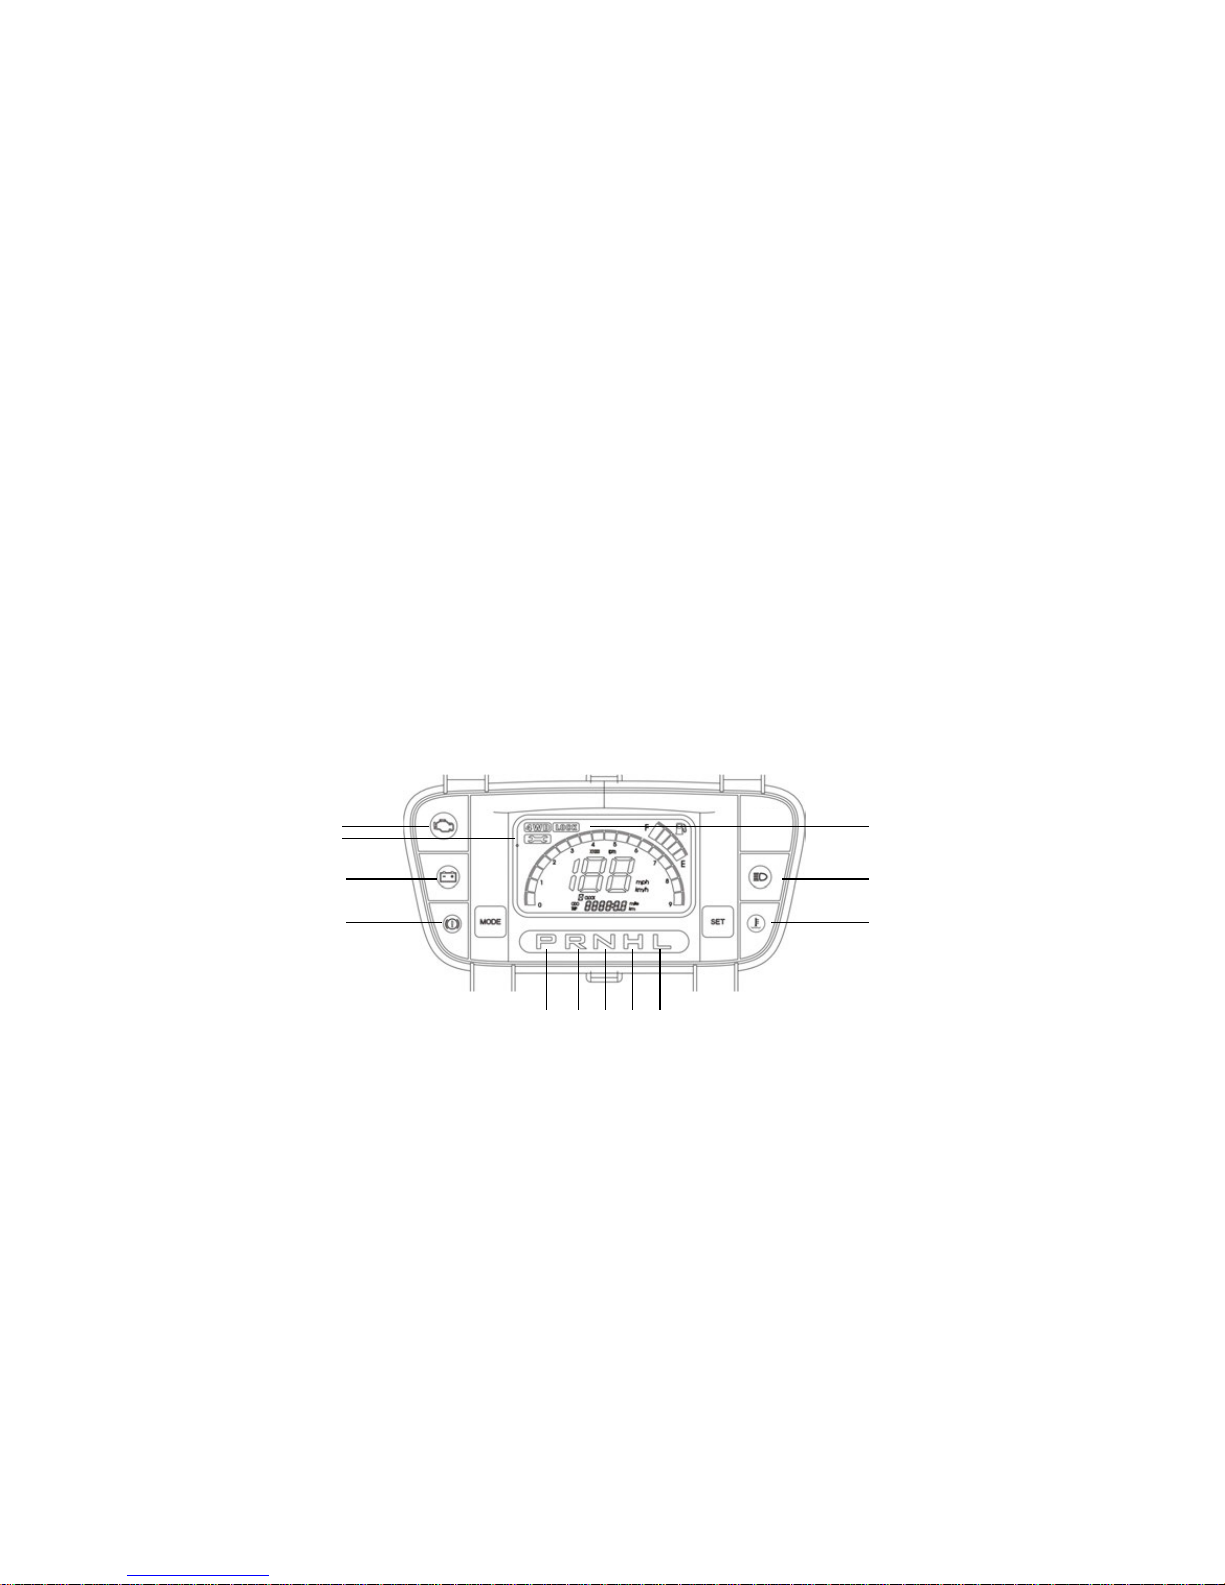
Features And Controls
Indicator Lights
The indicator lights on the console display:
1. Lower Gear 2. High Gear 3.Neutral Gear 4.Reverse Gear 5. Parking Gear
6. High Beam Indicator Light 7. FI System Indicator Light 8.Lock:( Differential
Lock Indicator Light )9.Battery Low Voltage Indicator Light 10. High Coolant
Temperature Indicator Light 1 1. Parking Brake
2134
5
9
7
6
1011
8

18
Features And Controls
Instruments and Indicators
1.Speedometer 2. Km/h or Mph 3. Clock 4. 4WD 5.Fuel Gauge 6.ODO Meter
7. Adjust Button 8.Engine T achometer
2
1
3
4
5
6
8
7

Features And Controls
Operation Instruction for Multi-meter
19
Button A (MODE)
Button B (SET)

Features And Controls
Operation Instruction for Multi-meter
Press and hold button A until 2
seconds over.
Shift the unit mph or km/h
Button A (MODE)
20
 Loading...