

Page 1
OPERATING
MANUAL
Mini S ForU
Page 2

Page 3

Introduction
With the Mini S ForU, you have now purchased a product which has
been manufactured in accordance with the newest technical
capabilities and based on the highest operating comf ort.
We have placed great value on the simplest possible operation and
long service life in both construction and material selection.
A large variety of useful access ories rounds off our range in addition
to the ForU
s Operating Manual assum es that the suit ability of the u ser for
Thi
scooter usage has been discussed with a doctor, therapist and/or
dealer before operation.
The operating manual wi ll help you get to know the function of our
ForU scooter and, in addition, describes
• operation
• care and maintenance
• repair
The manual has been drawn up using information available at the time
of printing with regard to construction and oper ation of the scooter.
We reserve the right to make changes due to technical improvements.
scooter.
If you have any other questions about thisscooter please contact
your retailer or supplier .
3
Page 4

Contents
1.0 Safety instructions ................................................................……………….8
1.1
Symbols used . .............................. .................. ................. ............ 8
1.2
Inten ded use ................................... ............................................. 8
1.3
Genera l Inform ation ..................................................................... 9
1.4
Safety when driving .................................................................... 10
1.5
Safety during transport, assembly and maintenance .................... 11
1.6
Safety when handling batteries ................................................... 12
1.7
Safety - information about electronics. ......................................... 12
Versions ............................................................................................ .13
2.0
Extent of delivery ............................................................................. .13
3.0
Components ..................................................................................... .14
4.0
4. 1 The Mini S ForU
4. 2
5.0
Brief instructions ............................................................................. .15
5. 1 Driving
5. 2
6.0
Setting up the scooter. ...................................................................... 19
6.1
6.2
6.3 Adjusting the tiller angle ............................................................. 23
7.0 Information about safe
7.1
7.2
7.3
7.4
8.0 Driving
8.1
The dashboard - displays and controls . ..................................... 14
...............................................................................…15
T r ansporting the sooter .............. ..............................................1 7
Adjusting the seat height ........................................................... 19
Adjusting the seat position ......................................................... 21
6.2.1
6.2.2
6.2.3
Drivin
Overcoming obstacles ............................................................... 26
7. 2. 1 Driving Inf ormation – Overcoming kerbs .......................27
Overload protection - motor protection ....................................... 28
Battery charging state = driving rang e ........................................ 2 9
7.4.1
7.4.2
7.4.3
Getting on and off ...................................................................... 31
Adjusting the distance
Adjusting the armrest width ............................................ 22
Adjusting the armrest height ........................................... 22
g up inclines and down slopes .......................................... 25
Battery charging state .................................................... 2 9
Driv ing ran ge .................................................................. 3 0
Overdischarge protection - battery protection .................. 30
....................
scooter.
..................................................................... 31
.......... ............. .......... .......... ........... ..... 1 4
seat ........................................... 22
driving .................................................... 24
8.2
Turning the seat ......................................................................... 33
8.3
Switching on ...........................................................................33
8.3.1 Operation indicator and fault display ...............................33
8.5
Adjusting the speed ................................................................... 34
8.6
Before drivi ng ............................................................................ 34
4
Page 5

Contents
8.7
Driving ....................................................................................... 35
8.8
Using the motor brake ................................................................ 35
8.9
Using the horn ........................................................................... 36
8.1 0 Switching off / parkin
9.0
Pushing ......................
10.0
At
taching the shopping basket .......................................................37
Charging the batteries .....................................................................38
11.0
11. 1Cha rgin g the ba tte ries .................... ............................................3 9
11.11 Charging the batterie
Ah batteries) ............................................39
(22
11.
1.2 Charging the 22 Ah batteries in the battery case............4 0
when removed from the scooter) ...................................40
11.13 LED information at battery charger during charging ........41
11. 2After ch arging ............................................................................ 41
12.0
Things to know ................................................................................ 42
12. 1 The battery charger - functioning principle ................................. .4 2
12.2 The Batteries ............................................................................. 42
12.2 . 1 What are batteries for cyclic use? ..................................43
12.2.2
12.2.3
12. 3 Anti tipping wheels ..................................................................... 43
12. 4 Wheels and tyres ....................................................................... 43
When do the batteries achieve their maximum
perf orman ce? .................................................................. 43
How do I make sure the batteries achieve their
best service life? ............................................................ 43
g ..................
.................................................................. 37
........................................... 3 6
s via the tiller
12. 6 The drive unit ............................................................................. 4 4
12.7 The working principl e ................................................................. 44
12. 8 The control unit .......................................................................... 45
12.9 The auto switch-off .................................................................... 45
12.10 Brakes
12.11 Driver´s licence ...................................................................... 46
12.12 Insurance ................................................................................46
12. 13 Approval for road traffic use ....................................................46
13.0
Transporting the
13.1 Transport information .................................... ............................. 47
13.2 T ransporting the complete scooter ............................................. 47
13.3 Preparation for transport - separating components ..................... 47
13.3.1 Working step summary ...................................................48
13.3. 2 Removing the seat ..........................................................48
...............................................................................45
scooter .............................................................. 47
5
Page 6

Contents
13.3. 3 Removing the battery case ..............................................48
1
3.3.4 Folding the tiller down ..................................................... 49
13.3.6 Dis
Cl
eaning ........................................................................................... ..50
Maintenance and Inspection ........................................................... ..51
15. 1 Daily maintenance before start of journey .................................. .51
15. 3 Annual inspection - inspection timetable ..................................... 52
Troubleshooting ................................................................................ 55
16.1 Before troubleshooting ................................................................ 55
16.2 Troubleshooting ............................................................................56
16.3 Operation indicator blink codes ................................................... 58
16.3.1 Blink list ..................................................................... 58
engaging the drive unit from the chassis ................... 49
Repairs .............................................................................................. 59
17.1 Information about safety at work ................................................ 59
17.2 Tools .......................................................................................... 59
17.3 Wheels - removal and replacement……………………................. 60
17. 5 Replacing the tyre ...................................................................... 63
17.6 Fuses ........................................................................................ 64
17.7 Batteries .................................................................................... 65
17.7.1 Disposal of used or damaged batteries ..........................65
17.7 .2 Replacing the batteries - 22 Ah ......................................66
18.0 Temporary storage ........................................................................... 67
Appendix .......................................................................................... 67
19.1 Specifications ..................................... ..................................... .. 68
19.1.1 General data ..................................................................68
6
Page 7

Contents
19. 2 Torque for fixing screws ............................................................. 69
19. 3 Disposing of the scooter ............................................................ 69
Warranty information ....................................................................... 70
20.0
Work shop use only....................................................... 71
7
Page 8
Safety instructions
1.0
Safety information
1.1
1.2
Symbols used
This instruction manual contains the following symbols which are used
to highlight special hazards in dealing with the product or information for
simplifying the handling.
Caution!
This symbol identifies safety information which notifies you of
hazards when dealing with the product.
NOTE
ou will also find information about dealing with the product
Y
under this symbol.
Intended use
The KYMCO Healthcare scooter is constructed for use both indoors
(Suggest general use : indoors )
It
is intended to increase the mobility of persons who are both
physically and mentally capable of assessing any driving situations
correctly and reacting correspondingly to them at any time.
The MINI S models areclassifiedasan“invalidcarriage”foruse
indoors, on pavement s, footpaths, pedestria n zones and areas free
from motor traffic.
They must not be driv en on public roads with the exception of crossing
or when no pavements are available.
and outdoors .
This product’s seat could include
Phthalates - WHO officially announced as an environmental
one, with the role of female hormones in the body can interfere
horm
with the body's endocrine system, advis
prol
onged use of this product.
e pregnant women to avoid prolonged use of this product.
Advis
phthalates material in its surface.
e pregnant women to avoid
8
Page 9

Safety information
1.3
General Information
Read the entire operating manual thoroughly before using the
Mini S ForU!
Ensure that:
• The operating manual is read by all people who drive, care for and
service the scooter.
•
All persons who drive, care f or , service or repair the scooter hav e
access to the operating manual at any tim e.
Any
damages resulting from non-observation o
are exclu
ded from the guarantee.
f this operating manual
Risk of accidents!
• Do NOT
through consumption of
• Only
• Only
any breakdowns occur
• If
and secure
is
• It
could
immediatel
• Observe
nly use accessories and
• O
KYMCO
The scooter
•
Do
•
use
the scooter if your driving capability is impaired
medicine
use
the scooter for its correct intended use.
use
the scooter
it against unauthorized use.
imperative that
influence the function and safety of the scooter
y
.
maximum loading
Healthcare UK Limited.
is only
not
carry
out
when
, stop using the scooter immediately
you always
spare parts authorized by
authorized for transport of one person.
any
seat adjustments while driving.
or alcohol.
it is in perfect working order .
rectify any faults which
= see Specifications
Tipping hazard!
• Do not adjust the seat if the scooter is standing on an incline.
Do
not
lean
out
over
•
bac
krest to the
the armrest to the sides or over the
rear
.
9
Page 10

Safety information
1.4
Safety when driving
Risk of accidents!
•
Check
correct functioning of the brakes before e very journey .
Check
•
• Always
•
•
• Only
• Only
• Don´t
the tyre
use
the seat belts
Do
not switch the scooter off while driving.
Do
not
drive up or down
on
obstacles
Observe
drive
and ramps
drive up or down inclines
adjusted to
gradients or up and down ramps.
maximum climb angle
through restricted widths, around bends, inclin es
with
ver
drive
too
Tipping hazard!
• Do not carry out any seat adjustments while driving.
• Only drive over obstacles and up
point an
• Av oid sudden changes of direction and spe ed.
• Avoid steep gradients where there i s a danger of skidding
(ice, snow, wet surfaces etc.).
• Avoid loose surfaces whose characteristics y ou are not able to
assess (woodlands, turf, beaches, gravel etc.)
Always drive straight up and down gradients - do not drive in
•
zigzags.
• Do not turn around on inclines.
• Do not drive down steps.
• Do not drive backwards down gradients, stairs or kerb
or ove
d at right angles.
r obstacles.
air pressure regular
when
driving (if fitted).
gradients which are too steep, over
= see Specifications
reduced
tical.
close
suitable speed.
when the backrest has been
to
open
waterways.
ly.
dropped kerbs at the lowest
s,
10
Page 11
Safety information
b
o
c
o
Danger due to unintentional movement!
• Always turn the scooter off using the keyswitch if you:
-
want to get on or off
-
intend to stop for
-
are
putting the scooter away.
1.5 Safety during transport, assembly and maintenance
If the scooter is transported in the vehicle when fully
assembled:
- no persons may sit on the scooter during loading!
- no persons may sit on the scooter during transport!
Clamping and crushing hazard!
Increased hazards due to clamping or crushing resu lt due to the
high component weight (such as batteries) during preparation
for transport and maintenance work.
• Always
• Always try to get
sto
• Only
with the tools required.
• Only
carry
wing par
carry
carry
ts for tr
out
out
long periods
out
any work
help
anspor
any work described
work using
to be done with great care.
from a second person, especially when
t.
suitable tools.
if you are used to working
Injury hazard due to improper assembly!
• Ensure that
correctly assembled.
• After
correctly.
Accident hazarddue to incorrectly
• If bolted connections
that these
•
Do
not
• If bolted connections
washers when reassemb
all
components in the Scooter have been
assembly, check
are replaced when
replace
self-locking nuts with normal nuts.
that all locking de vice s are hol ding
lted
have
self-locking nuts, ensure
reassembling.
have
lock washers, check loc k
ling and replace if necessary .
nnections!
11
Page 12

Safety information
1.6
Safety when handling batteries
Fire hazard!
• Do not
charging
• Only
cover
batteries.
use
the battery
the battery
charger
charger
Risk of accidents!
• Only
use
the
original
your dealer replace your
• Let
use
• Only
“Specifications”.
• Observe
manu
• Batter
batteries as detailed in the chapter entitled
warning
facturer .
ies are e
battery charger (included in delivery ).
battery .
information given by the battery
xtremely
hea
vy.
Burn hazard due to damaged batteries!
Batteries discharging acid can lead to seri ous burns.
•
Do
not touch
rubber
• If
acid should
immediately with plenty of
acid should come in
• If
immediately with lots of
• Always
immediatel
damaged
gloves!
contact
change any
y
.
batteries with your bare hands. Use
your
skin, wash the affected area
w
contact with your eyes, rinse them out
w
ater and visit a doctor.
clothing soiled with battery acid
and ventilation slot while
in well-ventilated areas.
ater and contact a doctor.
1.7
12
Safety - information about electronics
Accident hazard due to failures!
Radio, tele vision, radio transmissi on devices and mobil e phones
produce electromagnetic fields. These can negatively influence
the scooter electronics functions.
•
Do
not
drive close
(transmitter masts).
• Switch the scooter off if
to strong
you
radio
or television transmitters
are using your mobile phone.
Interference caused to other devices!
The scooter produces an electromagnetic field whi ch can
negatively affect functioning of electrical devices such as
medicinal devices, radio receivers or mobile telephones within
the vicinity.
Page 13
V
ersions
V
2.0
3.0 Extent
ersions
of
delivery
After receiving your FOR U scooter, please
c
heck the following:
• that the delivery is complete
in accordance with the list below
the delivery co ndition using
•
the inspection plan (chapter14.2)
If any faults are apparent or
components are missing, please
contact your supplier or dealer.
The following it emsare included in
delivery in addition to the scooter:
1. Shopping basket
2. Two vehicle keys for switching
the on / off
3. Battery charger
4. Operating Manual
13
Page 14
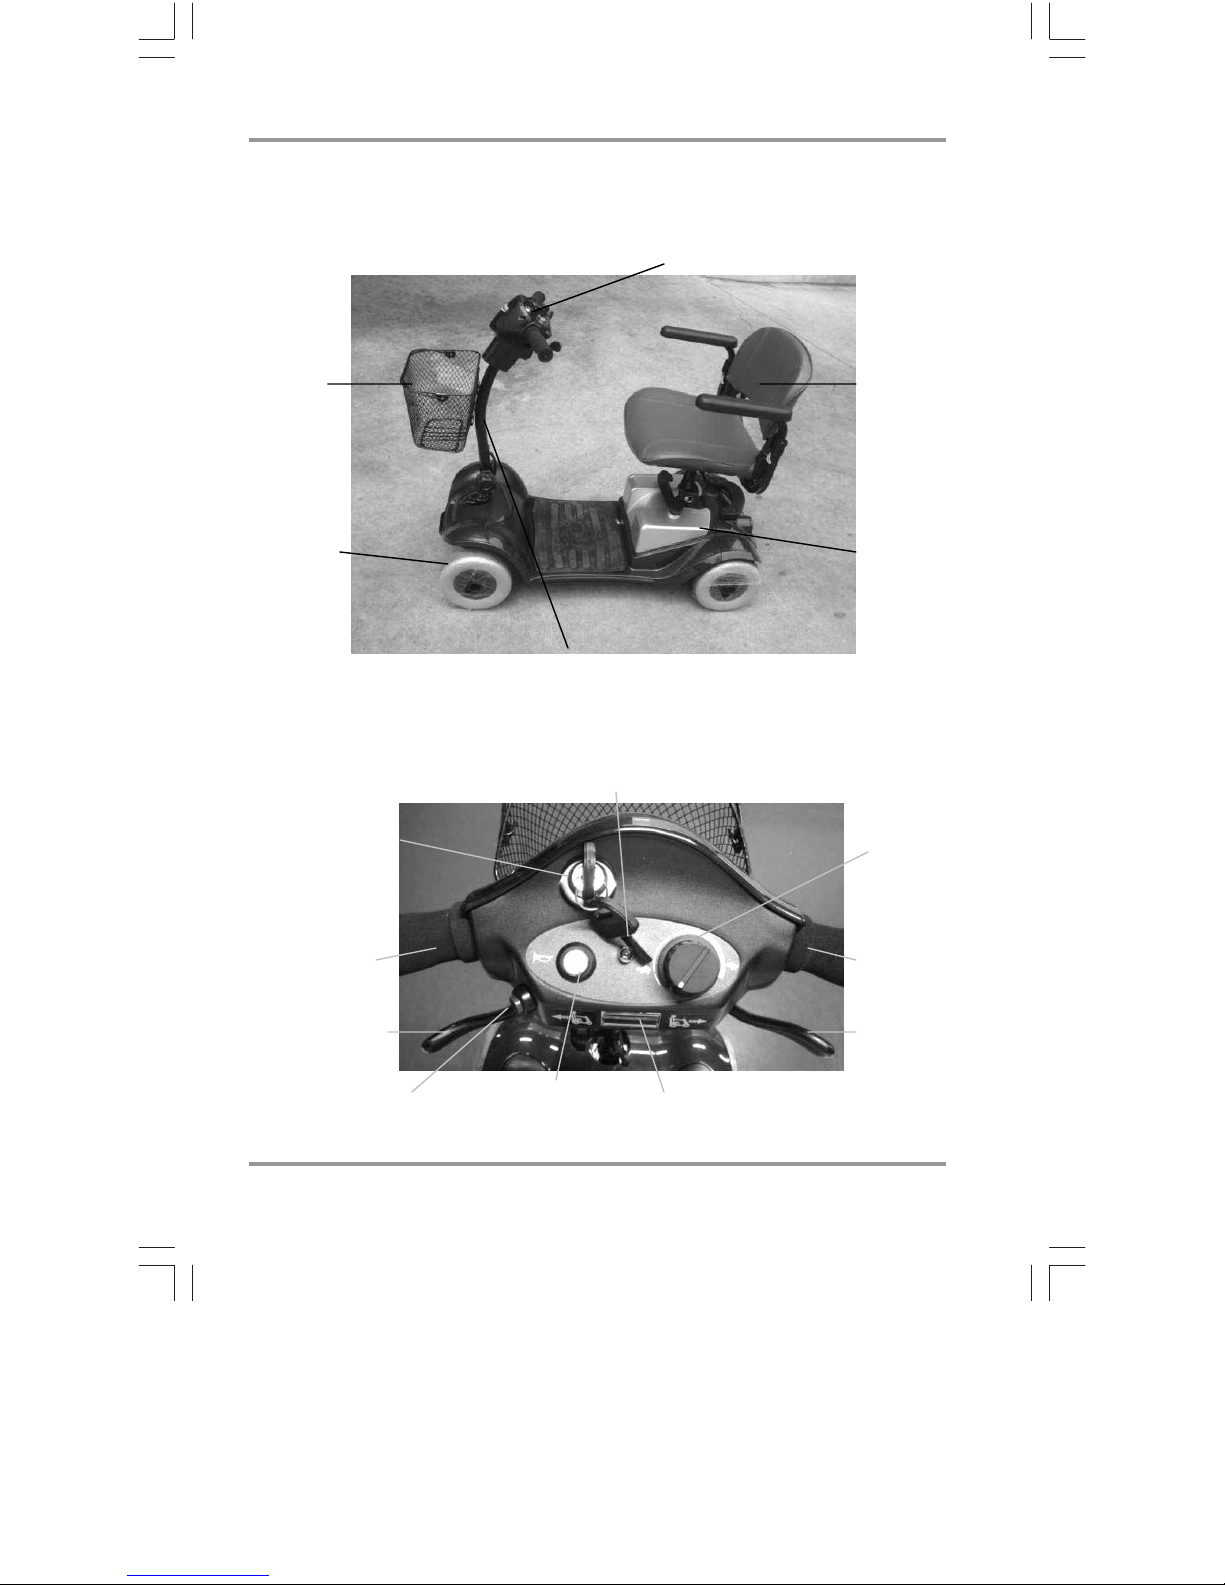
4.0 Components
Components
4.1 The ForU
Shopping
basket
Steering wheel
Tiller
Dashboardwithcontrols
Seat unit with
armrests
Battery case
4.2 The dashboard - displays and controls
Operation indicator
(fault display)
Keyswitch
(ON-OFF switch) Speed contoller
Handle
Drive lever
(reverse)
Front /Rear Position
light
14
Horn button
Handle
Drive lever
(forward s )
Battery charge
display
Page 15
Brief instructions
5.0
f instructions
Brie
The following brief i nstructions shoul d enable people to quic kl y get used
to operating the scooter after a long period of non-use and to refresh
existing knowledge of operation.
It is imperative that you follow the instructions given in the main
manual!
5.1 Driving the scooter
NOTE
Before starting driving, adjust the seat height, the
backrest and the armrests to a comfortable position.
Your specialist dealer would be v ery glad to help.
1.)
Turn the seat to the outside.
2.) Get in - turn the seat in the
direction of travel
3.)Switchonthe scooter
ON
15
Page 16

Brief instructions
5.) Check the battery
charging state
6.) Set the maximum speed
Red-reserve
Yellow-medium
Green-full
= lowest possible driving
speed (approx. 2.0 mph)
= highest possible driving
speed (approx. 4 mph)
7.) Driving
Operate the drive lever slowly until the required speed has been reached
The drive le
speed variably right up to maximum
Standstill
(brake engaged)
Re
ver position controls the
driving speed.
1
verse
Fo
Standstill
(brake engaged)
rwards
16
8.) Braking = release dri
lever (1)
(1)
ve
9.) Ho
rn
Page 17

Brief instructions
5.2
Transporting the scooter
Dismantling the scooter (stages 1 to 4)
1.) Remove the seat
2.) Remo
3.) Fold the tille
ving the battery case
r down
17
Page 18
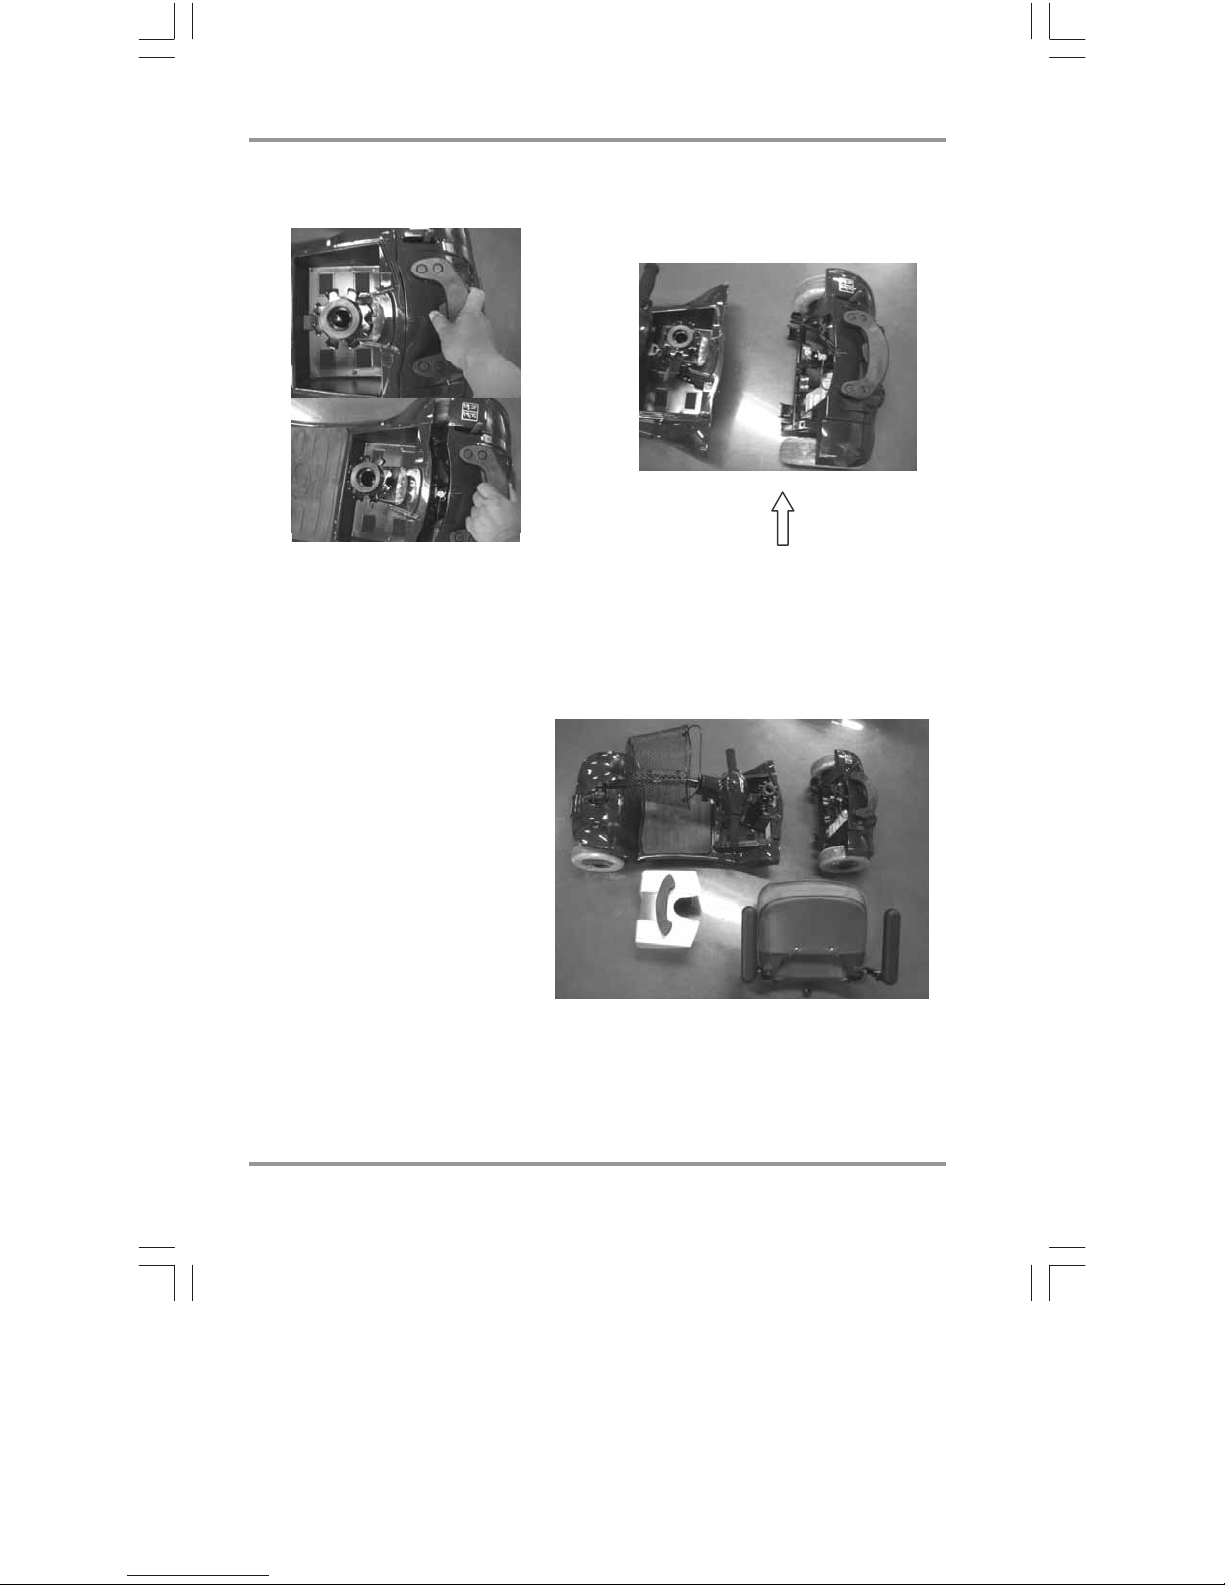
4.) Remove the chassis
The ForU dismantled:
1. Chas sis
2. Drive unit
3. Battery case
4. Seat unit
{
|
Briefinstructions
Reassembling the ForU
(Stages 4 to 1)
{{
}
|
18
}
~
Page 19
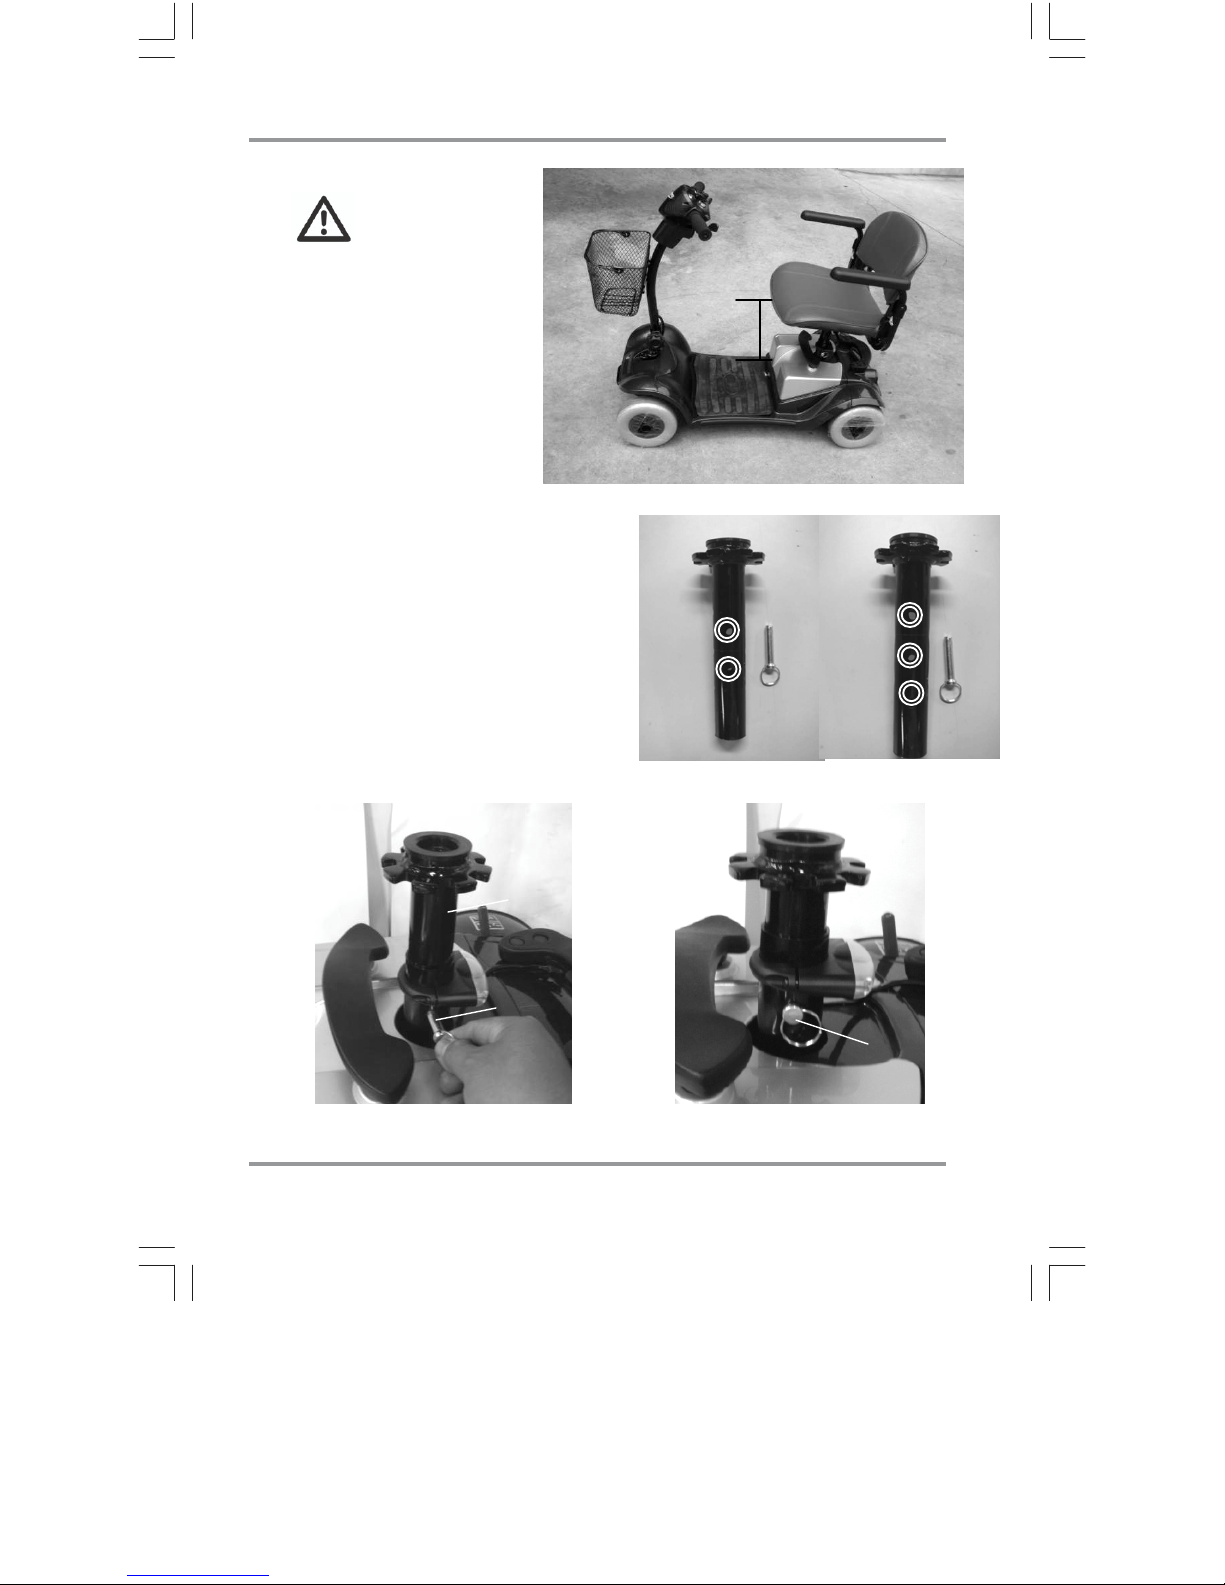
A
djusting
the seat height
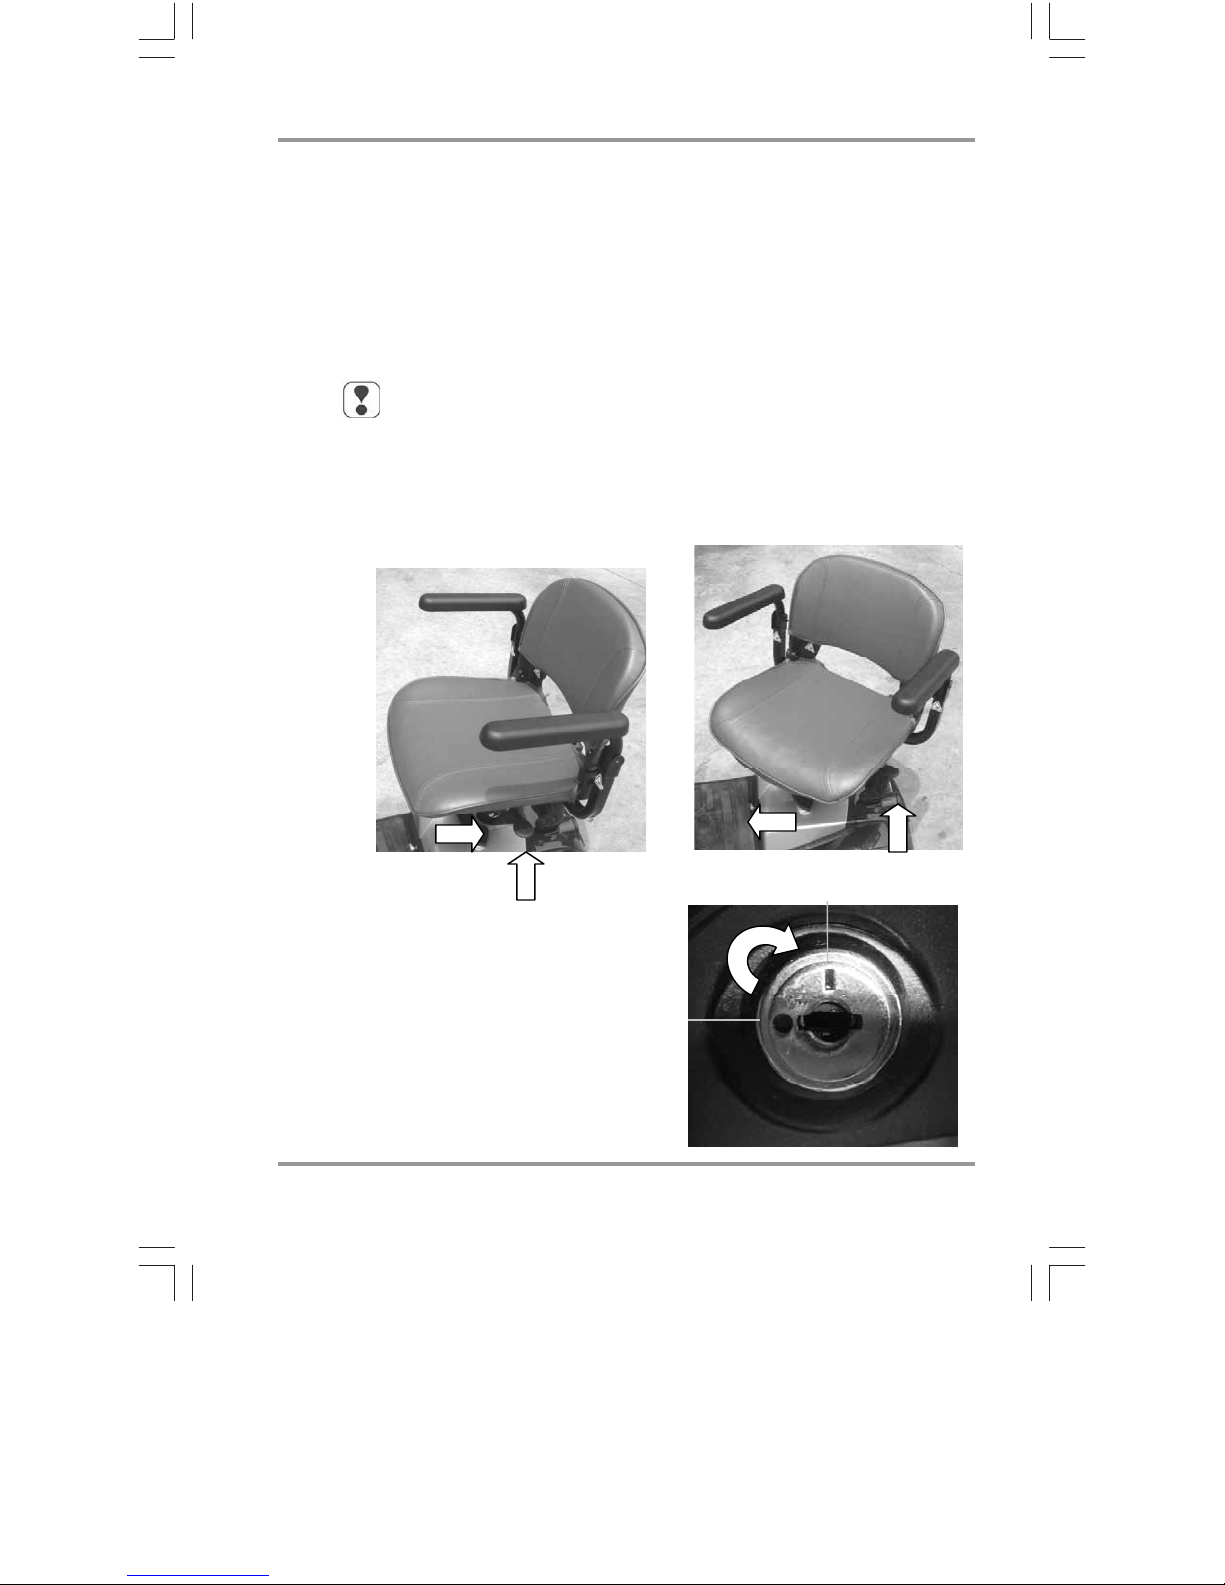
6.0
6.1
up
Setting
The following passage de scribes how to set up your scooter in order to
ensure that you ha ve a comfortable an d saf e driv e .
the scooter
Adjusting the seat height
NOTE!
The seat must be removed from the scooter
order to adjust the seat height. Y ou should try
to get help from a second person if possible o
contact your dealer.
Removing the seat:
Tilt the backrest forwards
Lift the seat whilepulling the seat
lock (a) out of the seat support (1).
in
r
Removing the seat
Adjusting the seat height:
Pull the clamping bolt (1)
Out of the seat support (2).
{
1
ving the clamping
Remo
bolt
a
|
19
Page 20
A
In order to avoid danger
when driving. Please
adjust the height of seat,
and then confirm if the
seat’s bolt is at the right
position, otherwise, the
seat would be shaked.
The seat height (h) is adjust edusingthe
five holes (1-5) in the seat support.
Pull the seat support (6) out as far as
the required height until the correct
hole (1-5) appears in the se at tube
hole (7).
Push the clamping bolts (8) into the
seat tube from the front.
djusting
the seat height
h
holes
20
Page 21
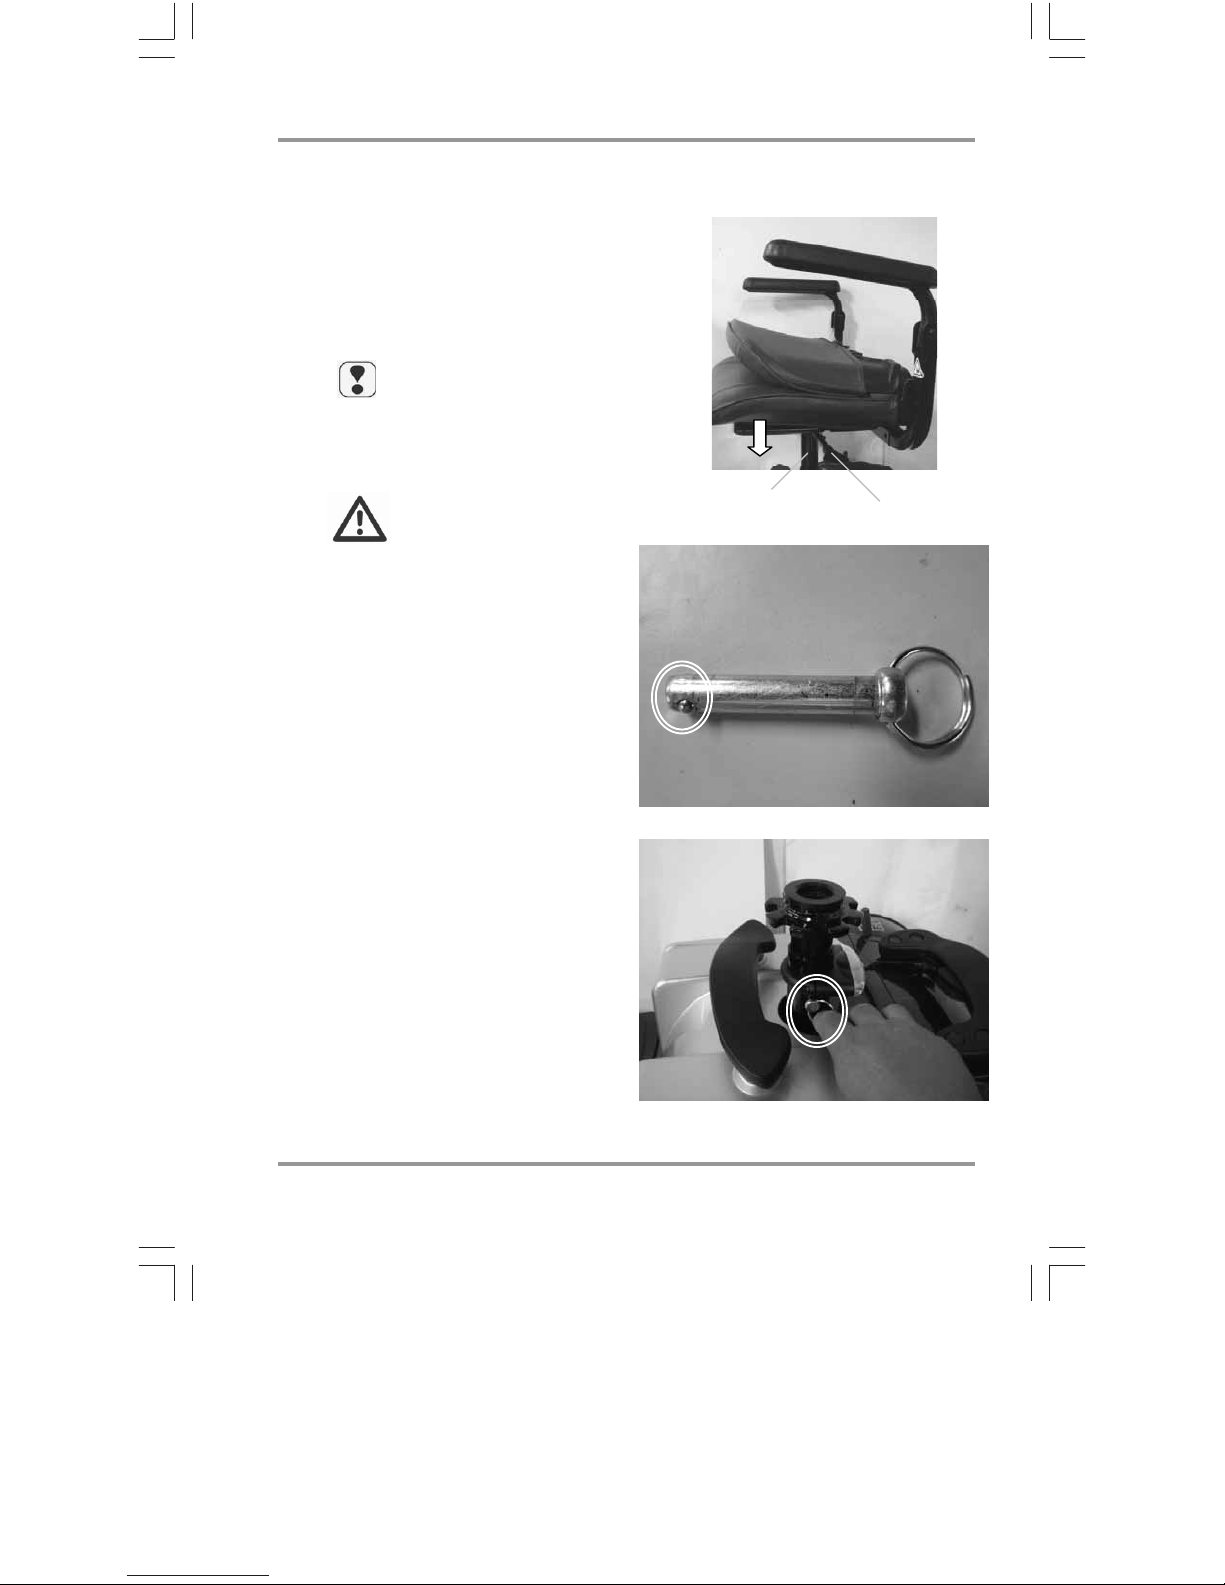
A
djusting
O
T
O
T
the seat height
Inserting the seat:
Pull the seat lock (a) and guide the seat
into the seat support (1) from above.
Let go off the seat lock and engage
the rotational adjus tment by turning the
seat a little one way then the other.
N
E
If after inserting the seat it is
not possible to turn the seat or
to pull the seatlock, the seat is
not properly locked.
N
E
Confirm the seat pin(2) for
smoothness. If necessary,
replace a new one.
Confirm if the seat pin is
inserted within the adjusting
hole(3).
Inserting the seat
a1
(2)
(3)
21
Page 22
A
djusting
the seat
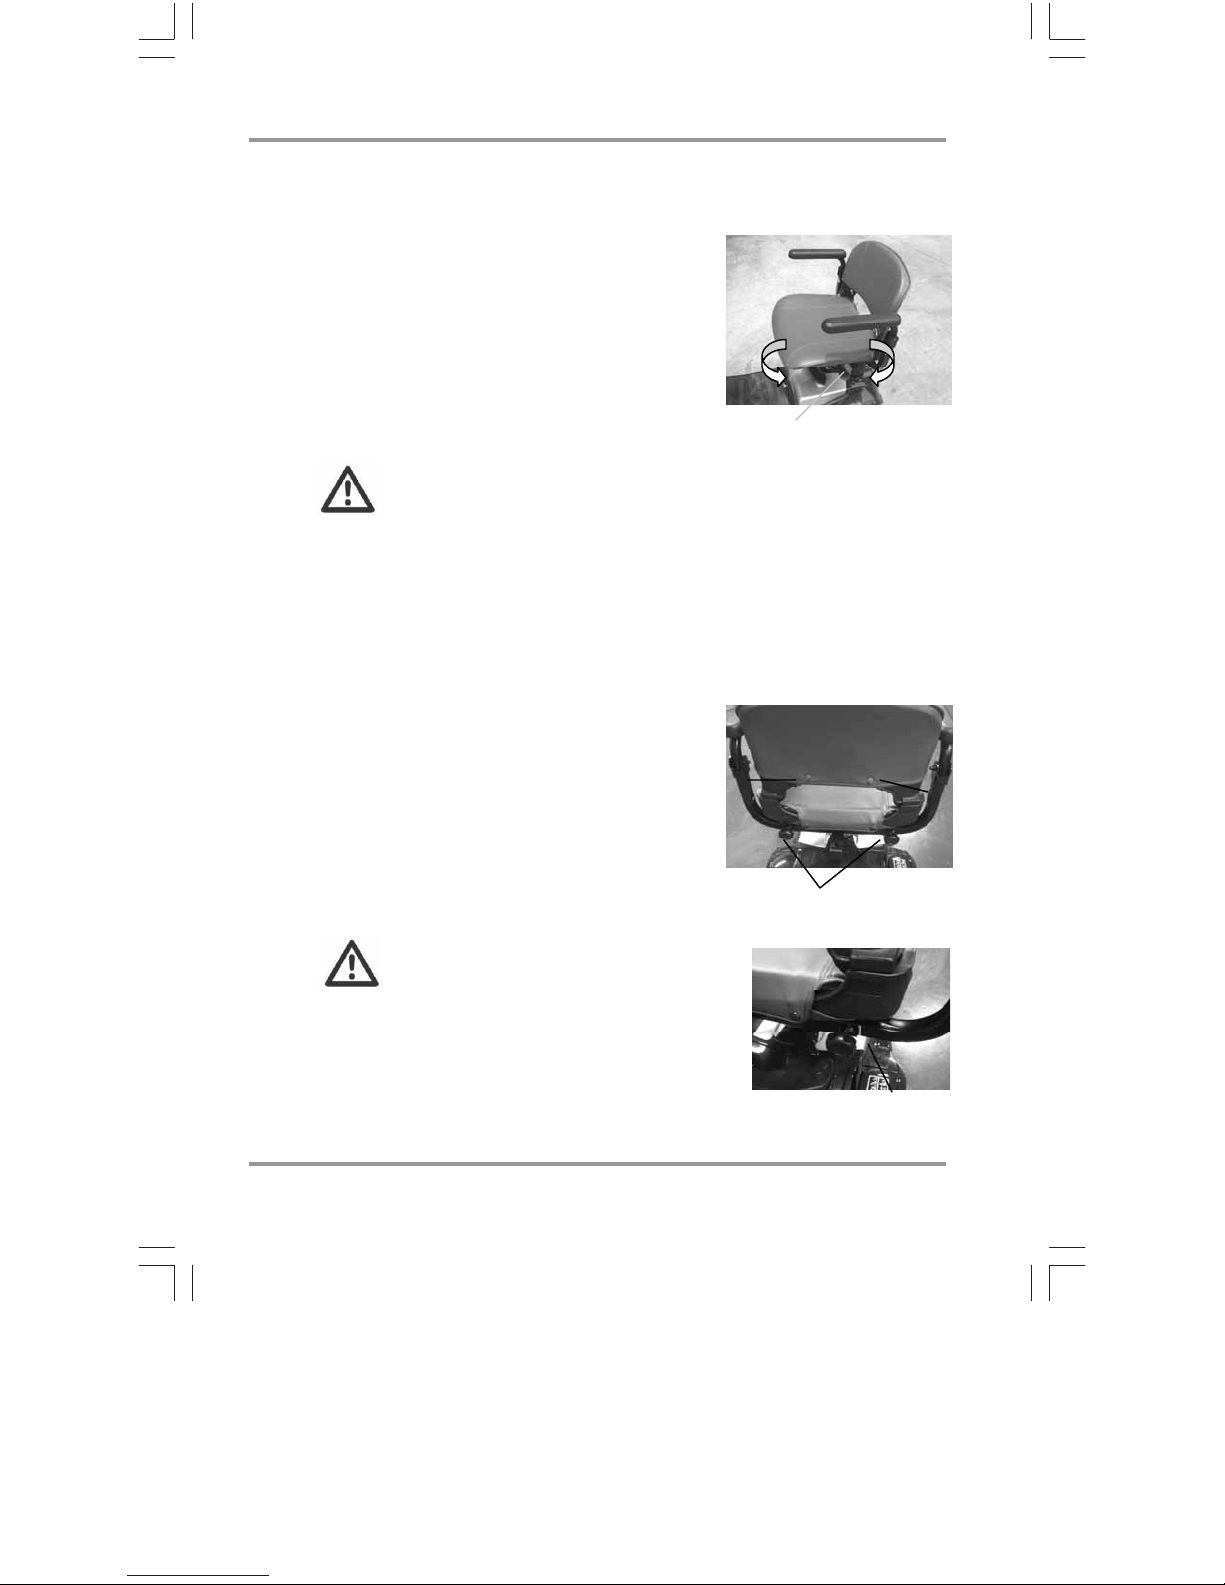
6.2 Adjusting the seat position
6.2.1
Adjusting seat
Pull the locking lever (1) upwards and move
the seat in a circular motion to the
required position.
Let go of locking lev er and engage t he
locking mechanism by slightly moving the
seat round until the seat locks.
Accident hazard due to
non-engaged seat!
• Ensure that the seat is
after adjustment.
the seat slightly until
.
6.2.
engaged
Rotate
the seat locks
2
Adjusting the armrest width
Loosen both clamping screws (2).
Pull both armrests (3) simultaneously to
the required width.
Secure the armrests by tightening the
clamping screws.
properly
Moving the sea
(1)
Adjusting the armrest
width
(3)
t
22
CAUTION!
• Do not
out than the
maximum
pull
armrest width.
the armrests further
marking (a)
for
(2)
(a)
Page 23
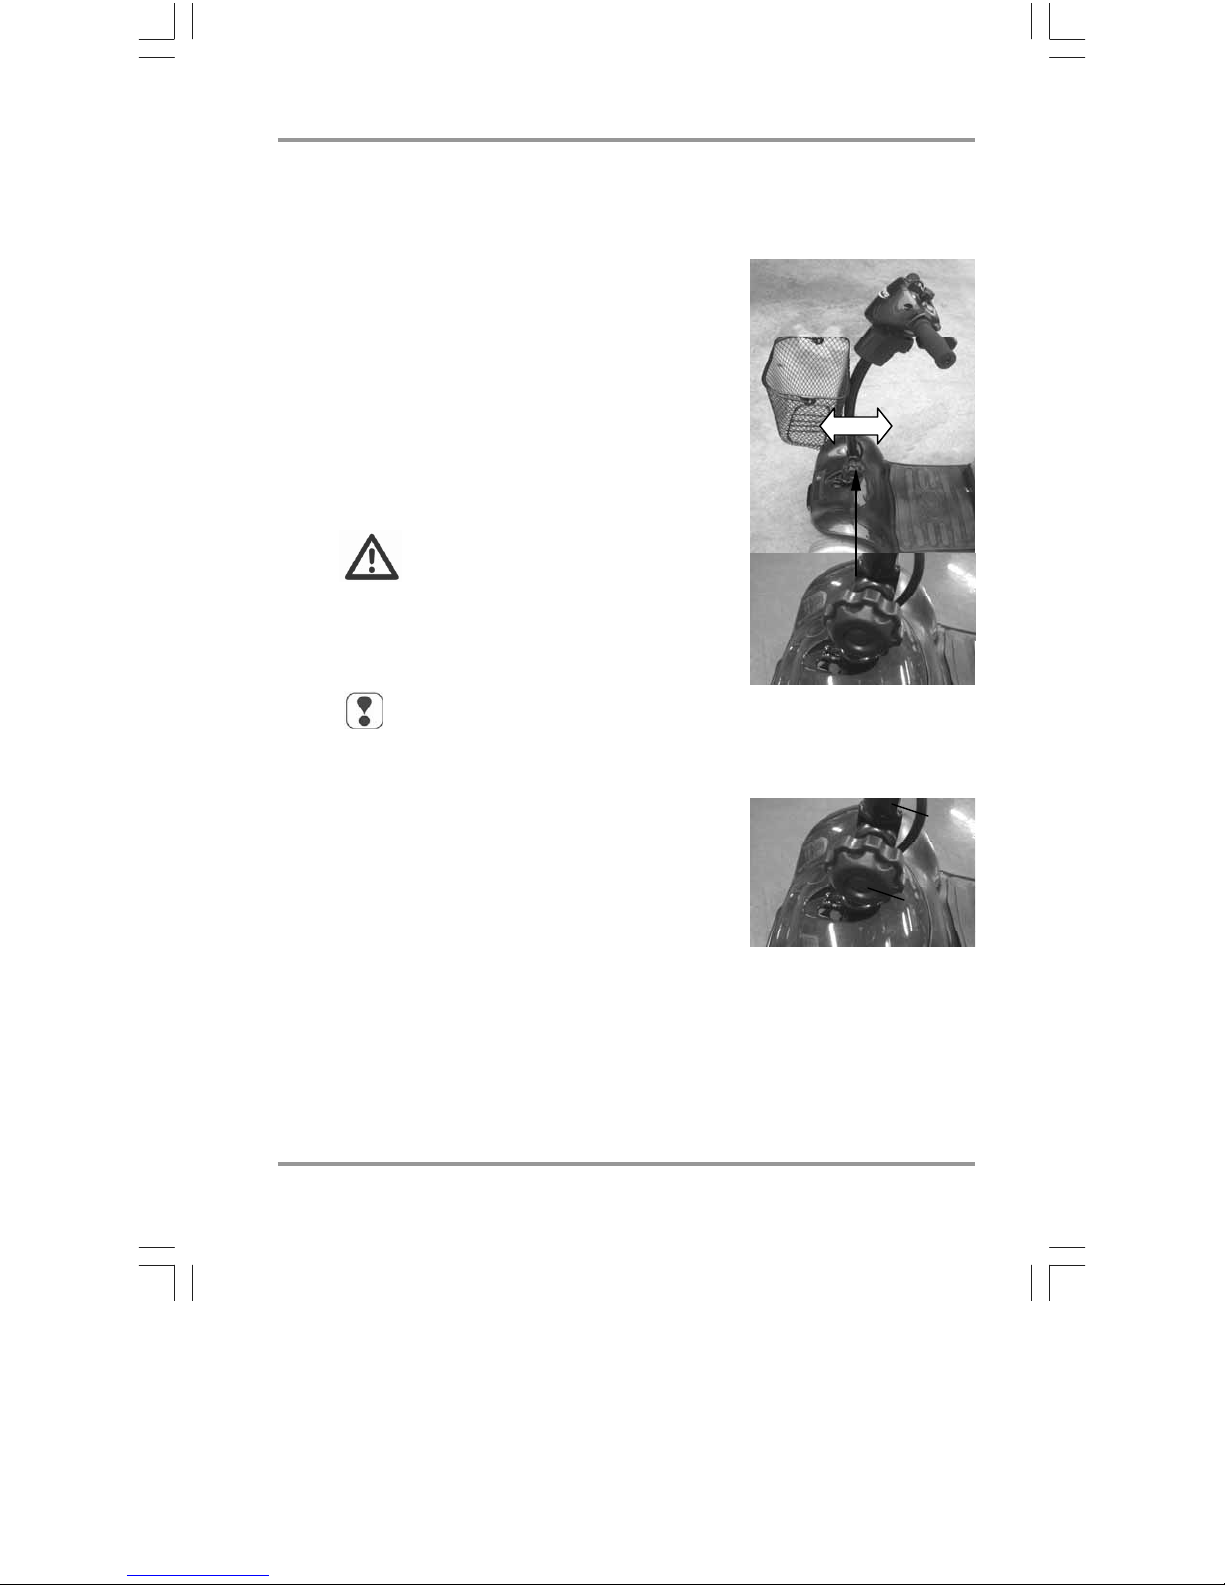
6.3 Adjusting the tiller angle
Always adjust the tiller so that you can
reach all displays and controls easily at any
time. The tiller can be variably adjusted.
Turn and loose the locking knob(1)
Push the tiller forwards or backwards
into the required position (2).
Tighten the locking knob .
Ensure that the tiller is engaged
properly by moving slightly forwards
and backwards.
Accident hazard due to
non-engaged tiller!
• Ensure that the tiller is
engaged
pushing
then backwards.
NOTE:
The locking knob must be fully
tightened.
after adjustment by
it slightly forwards and
properly
A
djusting
adjusting the tiller
Adjusting the handle
the Tiller
(2)
(1)
(3)
ting t
Adjus
Pull the tube (3) and turn knob
tight (4).
he handle:
(4)
23
Page 24

Driving informatio
n
7.0
Information
about safe
driving
Always carry out the safety information described in
chapter 1.4 “Safety when driving“!
Driving is very simple and after a few practice sessions you will
Find
it very easy.
The following information should help you to drive safely through traffic:
•
always match your speedto the driving situation in which you find
self.
your
always reduce the speed when you are driving through:
•
- unclear areas
- narrow gaps
- tight curves
- inclines
- ramps
•
take a trial
in
a closed-off area
•
always steer the
•
a
lways keep your feet in the foot area while d riving
run with your scooter
scooter
using both hands on the handlebars
in an are a with no pedest rians, or
.
24
Page 25
Driving informatio
A
v
v
r
f
n
7.1
Driving up inclines and down slopes
If the payload is less than 80kg. It may run 130 m at 8° incline.
If the payload is less than 120kg. It may run 75 m at 8° incline.
If the payload is less than 136kg. It may run 60 m at 8 ° incline.
(above performance is dependant on ambient temperature,
drive surface and speed setting-guide only)
The scooter will slow down to a safe reduced speed to protect the
motor if in overload/ over heated conditions.
Please switch off and allow the motor to cool down before
continuing your journey.
You may need to choose an alternative more suitable route i
overload trip re-occurs.
Climb angle examples:
a 1 metre long ramp should not be higher than. 14 cm
a 2 metre long ramp should not be higher than. 28 cm
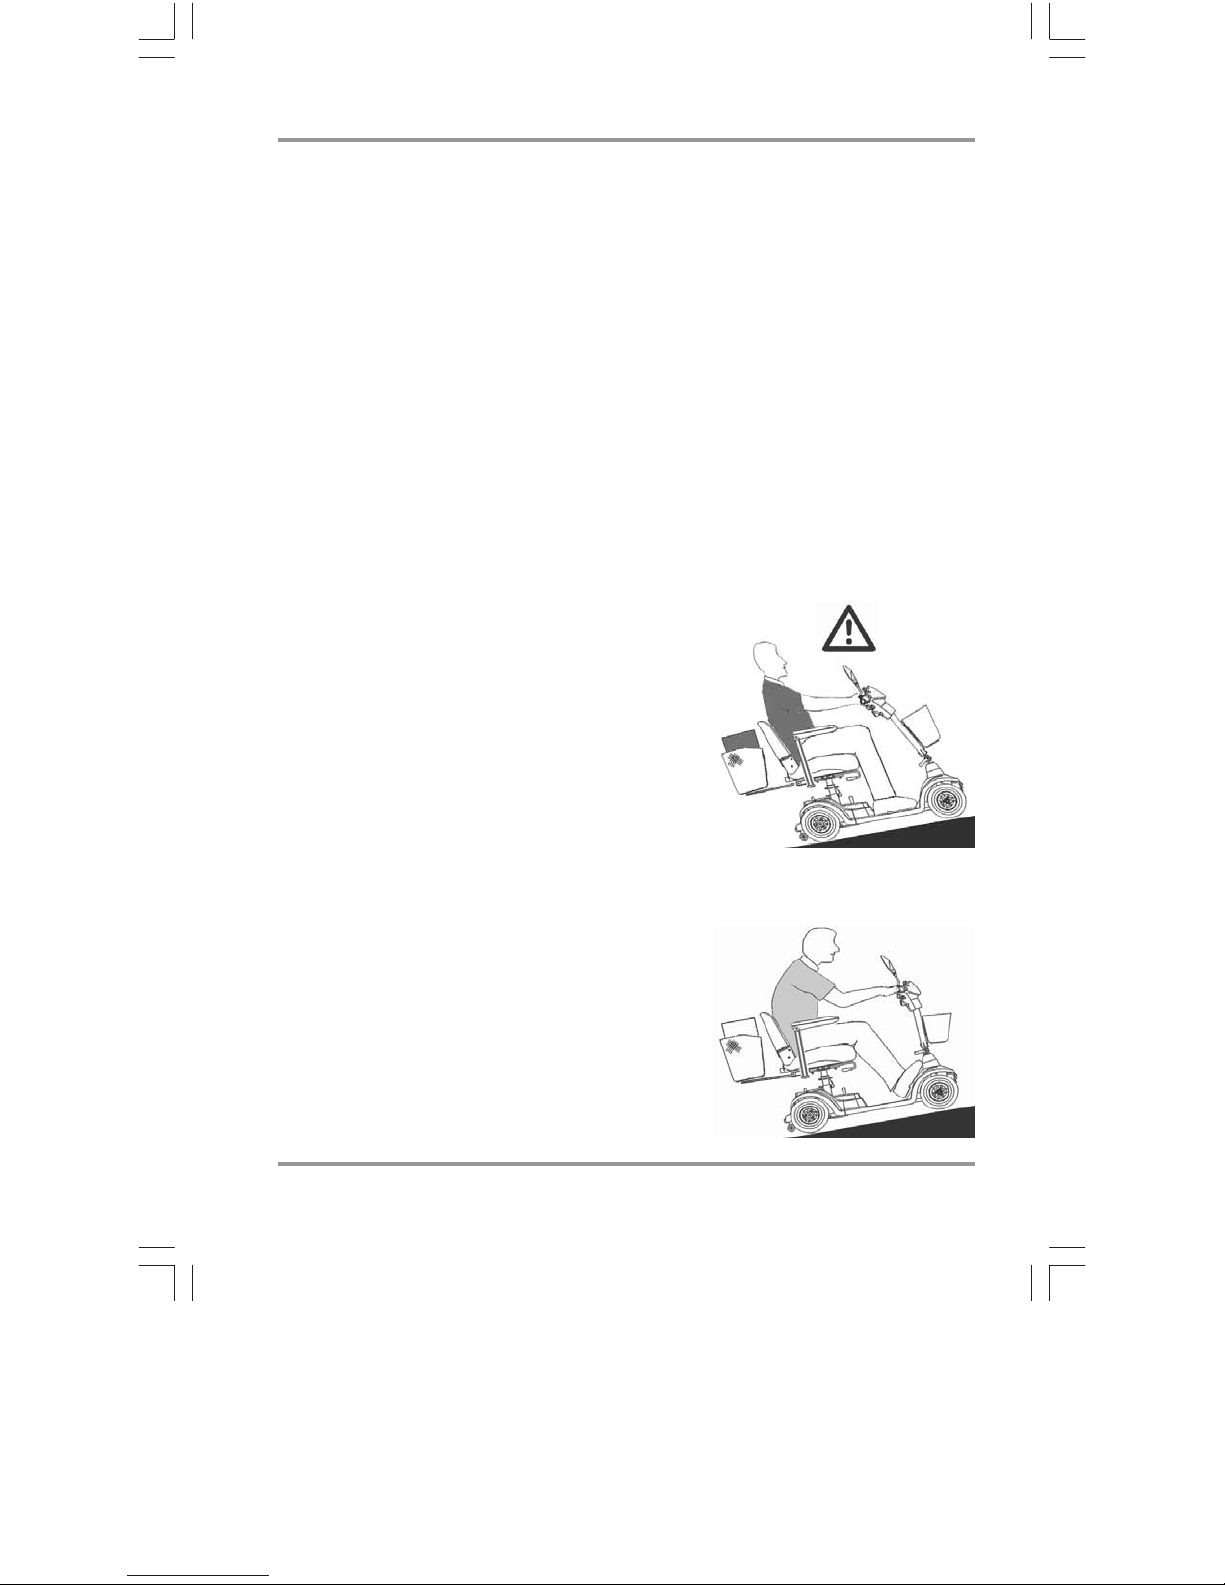
oid driving across an incline
•
(always try to drive in the direction
of the incline / decline).
There is an increased dangerof tipping
when climbing or de scending gradients if:
Tipping
hazard!
• the
scooter is loaded at the back and
additionally the seat has been adjusted
to its rear position.
You can achie
• you adjust the seat in a more forward
position.
• you lean your upper body slightly
forwards (see sketch).
e increased tipping safetyif:
Inc
eased
tipping safety
25
Page 26

Driving information
7.2
Overcoming obstacles
The scooter can climb over obstacles
su
ch as kerbstones up to height of 6
cm without any problem.
Please observe the following points to make
sure that your
c
limbing obstacles:
•
don’t try to drive over ob stacles which
are t
oo high
example: kerbstones
reme dy : always climb up kerbstones
• Do NOT try to climb an obstacle when on
an incline.
••approach the obstacl eat a right angle
try to clear the obstacle in one go.
• DO NOT drive overthe obstac le with just
wheel.
one
scooter doesn’t tip over while
at lowered entry areas
such as driveways.
6 cm
6 cm
6 cm
26
• DO NOT drive backwardsover an obstacle.
• DO
NOT drive backwardsdown a kerb.
• DO
NOT dr
ive downstairs or steps.
Page 27

Driving information
7.2.1
Driving Information – Overcoming kerbs
Risk of accidents!
Neogating kerbs needs some practice.
• Please
• Please start practicing kerb clim bing with sma ll k erbs .
Approach the kerb at a right angle.
Stop approximately0.5 Meter /
19 inches in front of the kerb.
observe
the
maximum
obstacle hights of 6 cm.
Approach at a right angle
in front of the kerb
Stop
Adjust the speedcontroller
Adjust the speed controller to maximum
speed.
ess the drive lever fully forward and try
Pr
to clear the kerb in one go.
The speed of the scooter should only be
at 1 mph when the front wheels hit the
kerb.
eep the drivelever in the fully forwards
K
p
osition until the rear wheels have cleared
the kerb.
Overcome kerb
27
Page 28

Driving information
7.3 Overload protection - motor protection
The overload protection switches the drive off if the motor becomes
overloaded by trying to climb over too high an obstacle such as a
kerbstone, or if you try to climb too ste
If the motor is overloaded, the following happens:
• the scooter
• the control system switc hes the scooter
To rectify this:
Switch the scooter off and allow it tocool down for a few minutes.
Switch the scooter on again and ...
... reverse away from the obstacle (such as kerbstone) and then
try again at a lower point.
... be careful turning the scooter around on inclines, and always
reverse away very slowly.
becomes noticeably slower and then stops
Tipping hazard!
There is an increased tipping hazard if the incline is very steep.
ry
to get
help
• T
scooter around.
from a
second person
ep an incline.
off
when turning your
28
Accident hazard in push mode!
If the incline is too steep, there is a danger that you will not
be able to hold onto the scooter and that it will roll down the
incline uncontrolled.
ry
to get
• T
scooter around.
help
Avoid using push mode on inclines.
from a
second
person when turning your
Page 29

Driving informatio
7.4 Battery charging state = driving range
n
7.4.1 Battery charging state
Battery charge display:
he battery charger display on the
T
dashboard shows the battery charging state.
= maximum range
Full
Medium =
Reserve
Important information about reading the battery charge display:
•
If
harging state is shown higher than it actually is.
c
The display can vary greatly while the vehicle is travelling (depending
•
on load).
•
If the vehicle is under heavier loadi ng (for exampl e heavy
acceleration, driving up hills), the pointer can sometimes go to the red
area of the displa y. This is not critical and does not indicate the actual
charging state of the batteries.
If the pointer has gone into the red are a of the di splay after the
•
journey, it will often show green after
a lo
This does not indicate the actual charging state of the batteries!
If the pointer is in the red area of the display at the end of the journey,
the batteries mu st be charged before cont inuing the journe y .
Disregarding this can lead to destruction of the batteries!
decreased driving range, charge
batteries after journey
= minimum driving range, end
j
ourney as soon as possible,
charge batteries
the scooter is at standstill, it is often the case that the battery
ng period.
Battery charge display
Display ranges
Red-reserve
Yellow-medium
Green-full
switching the scooter off for
Determining the actual charging state:
Drive at a constant speed for about 200 m along a straight level
route. The value shown by the display during the journey is the
actual battery
charge
state.
29
Page 30

Driving informatio
n
7.4.2
7.4.3
Driving range
driving range is dependent on the following conditi ons in
The
addition
-
-
-
For this reason, informationabout the driving range is only given as a
guideline. The more experienced you are , the easier it will be for you
to de
You will be able to achieve the best possible driving range if you:
•
•
•
•
•
The driving range will be decreased if you:
•
•
•
Overdischarge protection - battery protection
In order to protect the batteries from over-discharging, the control unit
switches
below 1
Display:
the battery charger display pointer is pointing to
the left at the end of the red area.
To rectify this:
You must not driv
Conn
charge the batteries for at least 12 hours.
to battery charge:
landscape conditions (level or steep)
weight of user
weather conditions (cold, rain)
driving with headlights (if fitted)
termine the driving range using the battery charging state.
ensure that the tyre sare inflated correctly
avoid steep inclines as much as possible
do not carry any unnecessary luggage
drive at an even spee d
do not accelerate or br ake unne cessarily.
drive with headlights
drive in cold weather
drive in hilly regions
NOTE
please see the information about batteries in the Appendix.
off
. This takes place when the bat t ery voltag e falls
7 Volts.
any longer!
e
ect the Scooter to the battery charger and
- low consumption LED lights on Mini S
Battery charge
display
NOTE
If the battery voltage falls below 16 V olts , the bat teries can no
longer be charged with the battery charger supplie d. In this case
you must contact y our dealer .
30
Page 31

Driving
8.0
8.1
Driving
Getting on and off
Please observe the following before
getting on or off:
•
scooter must be sta nding on firm, l evel
The
and
non-slippery ground.
The engaging lever for push mode must be
•
in the drive position (see chapt. 9.0)
•
•
•
off and remove the ke y.
Tur n
T
ilt the steering column forwards
(see chapt. 6.3)
When getting in and out, ensure that your
clothing does not get caught on the drive
lever.
Afte r you have got onto the scooter, pull
the
seat lock (1) forwards again, turn th e
seat to face the direction of travel (4 )
and engage.
Turning the seat
getting
on
Accident hazard due to
non-engaged seat!
• Ensure that the seat
properly
on by
left
engaged
turning the seat slightly
and
right.
is
after getting
31
Page 32

NOTE!
If you feel you are safe enough, you
can of course get onto the
without turning the seat round.
• You can lift up the armrest on the
side where you are standing and
then get on.
scooter
Driving
32
Page 33

Driving
8.2
8.3
Turning the seat
The seat can be turned to bo th sides of the
angle, and firmly engaged in 8 positions
(each position turns 45°).
Turning the seat:
Pull the turning lock (1), turn the seat
in the required direction or position (2)
and engage.
Accident hazard due to
incorrect seat position!
• Always turn the seat to face
forwards
driving.
If the seat has been turned, the
possibility of tipping is increased.
Before turning the seat,
•
ensure
even and solid
and engage
that the scooter is on an
it before
always
surface.
Switching on
The switch (1) is located on the dashboard.
itching on
Sw
ON
8.3.1
Insert the key into the switch and turn it to
the right to switch
Operation indicator and fault display
This light
an
d ready for driving.
It also
electronics and electrical system. Fault
display takes place using different blinking
speeds or b li nk se que nces . Y ou ca n f in d
more information in the chapter entitled
“Troubleshooting”.
shows the scooter is switched on
displays any errors in the
on.
Operation indicator
33
Page 34

Driving
8.4
Adjusting the speed
Your maximum driving speed can be variably adjusted using
the speed controller .
Maximum driving speed = drive lever pressed as far as stop
Controller symbols:
lowest possible maximum driving
=
speed (approx. 2.0 mph)
= highest possiblemaximum driving
speed
(approx. 4 mph)
Adjust the required maximum driving
speed by turning the speed controller.
NOTE
Use the cont
Select a lower speed if you are driving through narrow gaps,
on inclines or through crowds.
8.5 Before driving
Checks before driving:
•
Are the batteries charged?
Speed controller
roller to adjust the speed to suit local conditions.
heck the display! inworking order!
C
34
Are the brakes working?
•
• Are the tyres and wheels
unda
maged and is the
air pressure correct?
• Is the tiller locked
Only start driving if everything is in working
order! Get defects repaired immediately.
To check, driveslowly
and stop again
Visual check of tyres
and wheels
serve
Ob
c
hapter 13.3.4 !
inworking order!
inworking order!
inworking order!
Page 35

8.6 Driving
Hold the tiller firmly in both hands.
Press the drive lever (1) in the direction
of travel until the required speed has
been reached.
Driving
Accident hazard due to locked tiller!
• Before
Observe chapter 13.3.4.
driving
off, turn the tiller to check that it is not locked.
Handle Handle
= driving forwards
= driving in reverse
The drive lever position controls the
speed va
Standstill
(brake engaged)
Reverse
8.7 Using the motor brake
Let go of the drivelever (1).
The drive lever stops in the central position
- the scooter uses the motor to brake.
Emergency braking = let go of the drive lever!
The drive lever automatically returns to the central position if
you let go. The scooter automatically brakes using the motor .
riably right up to maximum
driving speed.
1
Forwards
Motor brake
Standstill
(brake engaged)
35
Page 36

Driving
8.8
8.9
Using the horn
Press the horn button (5).
It will sound for as long as you hold the
button down.
Switching off / parking
Turn the key to the left to switch off.
Always turn
key switch if you:
•
want to get on or off.
• intend to stop for long periods.
Always remove the key from the key
switch if you:
• want to par
off using the
k and get off.
the ho
Using
Switching off
OFF
rn
36
Page 37

Pushing
9.0
Pushing
In order to be able to push the scooter you
must disengage the drive motor.
The disengaging lever (1) is located on the
rear right-hand side of the scooter.
No one is permitted to sit on the scooter
when it is being p ushed.
= Pushing (a):
Switch the ForU off.
Push the disengaging lever (1) forwards
as far as the stop (limit position).
iving (b):
=Dr
Pull the disengaging lever (1) to the rear
as far as the stop (limit position).
NOTES
• Always switch
• If a pre-set speed is exceeded while you are pushing,
the drive motor will s witch on automatically and brake the scooter.
off to push.
Disengaging the drive
Risk of accidents!
• Do not
Never
•
sitting
• The
limit position.
Do
•
10.0
Attaching the s
Push the shopping basket (1) from
a
bove in to the baske t holder r eceptac les
(2) on the tiller.
NOTE
Use the shopping basket only for
smallloading
pull
switch to push mode when somebody is
on
engaging lever always
not
disengage
the
disengaging
the scooter.
the motor when on an incline.
hopping b
lever while driving.
needs to engage securely at the
asket
37
Page 38

11.0
Charging the batteries
Charging the batteries
Please also see the information given in the chapter entitled “Things to
know“.
Charging information:
•
The surrounding temperatureshouldbe between 10°and 30° Celsius.
The charging time will increase at lower temperatures.
Only use the original battery charger (included in delivery ).
•
•
Only use the battery charger in a dry and well-ventilated room.
•
Do not cover the battery charger and ventilation slot
batteries.
The battery charger has an automatic switch-off device which
•
prevents overcharging the batteries. Do not leave the battery
charger connected to the scooter for more than 24 hours.
- The batteries can be charged overnight.
Switch the
•
en
Wh
•
the batte
•
after the final journey of the day
•
at least once per week
scooter off before charging the batteries.
is charging required?
ry charge displayis in the red area
s while charging
38
Charging times:
Between 8 and 14 hours depending on curre nt battery ch arge state.
NOTE
The battery charger is designed to be able to charge completely
discharged batteries within eight hours to 80% of their capacity.
Page 39

11.1 Charging the batteries
11.1.1 Charging the batteries
via the tiller (
Switch off.
Engage the engaging lever for push
mode into the “drive“ position.
22 Ah batteries)
Charging the batteries
Switching off
OFF
It is imperative that you observethe
quence for connecting and
se
disconnecting the battery charger.
T
he jack socket (3) for connecting the
battery charger is located on the tiller.
(1.) Connect the battery charger plug( 4)
to the charging socket.
(
2.) Connect thebattery c hargerma ins
plug (5) to a mains socket and
switch on.
NOTE:
The battery cha
on automatically when
connected to the mains.
rger switches
Engaging
Connecting the battery
charger
39
Page 40

11.1.2 Charging the 22 Ah batteries in the battery case
(when removed from the scooter)
Thi
s section applies to the
22 Ah batterie
22 Ah batteries can b e recognised beca use
the battery case (1) is a single unit.
Remove the battery case upwards out of
the chas si s.
It is imperative that you observethe
quence for connecting and
se
disconnecting the battery charger.
The jack socket (2) for connecting th e
battery charger is located on the rear of the
battery case.
(1. ) Connect the batterycharger plug (3)
s.
to the battery case charging socket.
Mini S fitted with
Removing the battery cas
onnecting the
C
battery charger
e
40
2.) Connect the battery charger mains
(
plug (4) to a mains socket and
switch on.
NOTE:
The battery cha
on automatically when
connected to the mains.
rger switches
Page 41

Charging the batteries
11.1.3 LED information at battery charger during
charging
Me
LED -> Colo
(a) -> Red
ur
aning
->
-> battery charger on
LED
-> Orange -> ch
-> Green -
11.2 After charging
(1.) Switch off and remove the battery
charger plug from the mains socket.
) Pull the battery charger jackplug out
2.
(
of the jack socket.
argingin progress
>
charging complete
(a)
Removing
ains
the m
plug
Removing the battery
charger
|.
41
Page 42

Thi
12
.
0
Things t
12.1 The battery charger - functioning principle
The battery charger regulates the voltage
(V olt) and the current (Ampere) from your
mains connection down to the voltage
required for ch arging your batteries (24 V olt).
The amount of charging current required is
dependent on the charging state of the
discharged batteries.
Batteries mostly discharged = more charging current
Batteries half discharged
Batteries completely charged = no
Since n
the batteries cannot be overcharged.
o know
= decreased charging current
charging current
o charging current is flowing when the batteries are full,
ngs t
o k
now
12.2
The Batteries
The entire power supply is taken over by
two cycle-proof 12 V batteries.
The Scooter is fitte
(Amp-hou
Only enclosed maintenance-free deep cycle
batteries are used.
The batteries located in the removable
battery case beneat h the seat.
• The 22 Ah batteries are located in one
bat
The batt
is fitted with its
means that it is possible to charge the
batteries when separated from the scooter
(Chapter
r) batteries.
tery case
ry case fitted with 22 Ahbatteries
e
11.1.2).
d with 22 Ah
own charging socket. This
22 Ahx 2
42
Page 43

Thi
ngs t
12.2.1 What are batteries for cyclic use?
Batteries for cyc
used in cars, so that they deliver continu ous energy over a longer
period of time and allow a considerable number of charging cycles.
.2.2 When do the batteries achievetheir maximum performance?
12
Fixed cycle batteries achieve a maximum performance after four or five
charging and discharging cy cles. Only at this point is their internal
chemical equilibrium achieved so that they can produce maximum
performance and service life.
3 How do I make sure the batteries achievetheir best service life?
12.2.
•
Always charge yourbatteries completelyafter use.
r
•
•
ge your batteries regularly .
Cha
Only store completely charged batteries in the vehicle.
lic use are designed, in contrast to starter batteries as
Anti tipping wheels
o k
now
12.3
12.4
Anti tipping wheels
The anti tipping wheels (1 ) reduce the
danger of tipping during extreme
manoeuvres when fixed to the rear of the
scooter.
It
is not permitted to drive the
ithout anti tipping wheels.
w
scooter
Wheels and tyres
The Mini S ForU is fitted with
.80 x2.50x4
2
(solid tyres)
Wheels and t
yres
43
Page 44

12.5 The drive unit
Thi
ngs t
o know
The complete drive unit is located in the
rear of the
llowing main components:
fo
• the battery ca se (3)
• the drive motor with rear axle (4)
scooter and consists of the
12.6 The working principle
The drive consists of the drive motor, the
gearbox and the rear axle.
Drive takes place from the drive motor via
the gearbox and rear axle to the rear
wheels .
Drive unit
44
Page 45

Thi
ngs to know
12.7
The control unit
The control unit is a programmable
electronic regulating unit. It regulates drive
characteristics such as acceleration,
maximum speed and braking beha viour .
The drive characteristics can be set to
match the user’ s requirement s by altering
the programming.
Reprogramming may only be carried out by
specialist dealers.
12.8 The auto switch-off
The auto switch-off automatically switches
scooter off after 20 minutes at a stand-
the
ill.
st
This protects the batteries from being
scooter was inadvertently
scooter is at a standstill or
e.
12.9
discharged if the
ot switched off.
n
Brakes
The scooter is automatically braked if the
e lever (1) is in the central po sition.
driv
To apply the brakes, simply let go off the
drive lever which is then returned to its
central position by a spring.
scooter is then braked by the drive
The
tor. When the
mo
has been switched off, it is braked by
a magnetic brak
Drivelever
45
Page 46

Thi
ngs toknow
12.10
12.11
Driver´s licence
Not required!
Insurance
As a scooter user you must be aware of the risks involved to both
yourself and othe rs. It is recommended that you take out third pa rty
insurance to cover you against any possible claims. Advice and
policies are available from insurance companies or alternatively ask
your scooter supplier for details.
12.12 Approval for road traffic use
Mini S ForU models are not defined as motor vehicles, but are a Class
2 Type invalid carriage. This type of scooter is for use on pa vements
and pedestria n areas with t he except ion of crossing roads.
Use on public roads only permissible when no pav ement is availabl e.
46
Page 47

13.0
T
ranspor
ting t
he Scooter
13.1 Transport information
Depending on the size of the transport vehicle, the scooter can be
dismantled in a few steps so that it can also be easily transported in
smaller vehicles.
When transporting, take particular care to ensure that the batteries are
securely fastened and make sure components cannot tip over.
No liability can be accepted for damage caused by transportation.
13.2 Transporting the complete scooter
No persons are permitted to sit on the scooter during loading!
No persons are permitted to sit on the scooter during transport!
Drive or push the scooter up a ramp into the vehicle.
‘
Switch the engaging lever to drive mode.
Secure against tipping over by fastening it to the
transport vehicle with transport straps.
T
ransport
ing t
he Scooter
13.3 Preparation for transport - separating components
Clamping and crushing hazard!
Increased hazards due to clamping or crushing can re sult due to
high component weight (such as batteries) during preparation for
transport.
carry
out
ays
• Alw
• Always try to get
sto
wing par
ts for tr
any work
help
anspor
to be done with great care.
from a second person, especially when
t.
47
Page 48

In just a few steps you can
dismantle the scooter down to
the following components to
make it ready f or tr ansport:
1. Chas sis
drive unit
Rear
2.
Battery case
3.
4. Seat unit
13.3.1 Working step summary
1. Remove the seat unit.
2. Remove the battery case.
3. Fold the tiller down.
4. Disengage rear drive unit from the chassis.
T
ransport
ing t
he Scooter
Removing the seat
13.3.2
13.3.
48
Removing the seat
Tilt the seat backrest forwards.
Lift the seat while pulling the seat lock
(a) out of the seat support (1).
3
Removing the battery case
Remove the battery case upwards out of
the scooter chassis.
a
oving the battery case
Rem
Page 49

T
ransport
ing t
he Scooter
Folding the tiller down
13.3.4
Folding the tiller down
urn and loose the locking knob(1)
T
Push the tiller forwards or backwards
into the required position (2).
Tighten the locking knob .
Ensure that the tiller is engaged
properly by moving slightly forwards
and backwards.
13.3.5 Disengaging the drive unit from
the chassis
Push the locking device (3) and tilt
drive unit to the rear onto the anti tip
wheels (4).
13.3.6 Installing step
order of removal.
s in the reverse
(2)
(1)
Tilt the drive unit away
49
Page 50

14.0
Cleaning
NOTE
• Only use mild detergents without scouring agents to clean any
surfaces.
• Please observe instructions for use on the detergents to avoid
damage to the component surfaces.
• Do not use any sharp-edged tools such as knives, metal
scrapers or aggressive solvents for cleaning.
• Do not use high-pressure cleaners to clean the scooters.
• Never direct water spray onto the fittings on the tiller or drive unit
components.
Light soiling or dust is best removed using soft cloths.
Heavy soiling can be st be remov ed with damp cloths and
slightly soapy water .
Use a dry cloth to dry the scooter off after cleaning!
All lacquered surfaces can be cleaned and preserved using car
polish.
Cleaning
50
Page 51

15.0
Maintenance and Inspectio
If you find any faults on your scoo ter during maintenance which are not
covered by the repa ir inf ormation, please contact y our deal er.
Always remove faulty scooters from op eration and secure them again st
unauthorized use (remove key).
n
15.1 Daily maintenance before start of journey
Check the brakes by driving slowly and then braking.
Make a visual check of wheels an d ty res for dam age.
51
Page 52

Maintenance an
d i
nspection
15.2
Annual inspection - inspection timetable
Take your scooter once per year to y our dealer f or an inspection.
They will have the necessary tools and experience to service your
scooter correctly .
Description
(Component / inspection for)
Component : Seat
Seatbelt / no damag e
fixed securely
can be easily adjusted
closed securely
Armrest padding / no damage, fixed securely
Armrest, folding mechanism / no play in joint
functions easily
Armrests, width adjustment / no dam age
functions easily
Backrest upholstery / no d a m a g e
fixed securely
Assessment
Defective
OK
52
Backrest adjustment / no play in joint
functions easily
Seat upholstery / no dam age
fixed securely
Seat and back frames / no damage
Seat support - chassis connection / no damage,
no play in connection
Page 53

Maintenance and inspection
Description
(Component / inspection for)
Component : Tiller
Panelling / no dama ge
fixed securely
Grip rubbers / no damage
fixed securely
Tiller, f olding mechanism / no play in joint
functions easily
Component :
Connections / no dam age
Fram es / no d amag e
Reflectors / no damage
Steering mechanism / no damag e
chassis
no corrosion
no play in joint
functions easily
Assessment
Defective
OK
Wheels / no damage
fixed securely
Tyres / no damage
Antitipper wheels / no da mage
rollers turn easily
53
Page 54

Maintenance and inspectio
n
Description
(Component / inspection for)
Component :
electronic system
Drive lever/ No damage
Dashboard switches / no dam age
Dashboard displays / no dama ge
Indicator lamps / no d a mag e
Displays and
Easy fun
lever movement
Returns to central position after releasing
from any position
Secure blockage of magnetic brakes
when lever is in central position
(ForU can not be pushed)
controls, electric sy stem,
ctioning over the entire
safe function
safe function
safe function
Assessment
Defective
OK
54
Charger jack socket / no damag e
Batteries / no damage
fixed securely
Check battery voltage (12-14 V olt per battery)
Check battery capacity
Control unit / no d amag e
fixed securely
Cables and connecting plugs / no dama ge
fixed securely
Page 55

Maintenance and inspection
Description
(Component / inspection for)
Component :
Motor, drive / no dam age
Motor, magneti c brake /
Engaging lever / no dama ge
16.0
Troubleshooting
Drive
fixed securely
drive noise
holding force OK
(F
orU can not be pushed with
engaging lever in drive-position)
functions easily
lever engaged
(lever remains engaged)
16.1 Before troubleshooting
Before you start troubleshooting, please
observe the following points to avoid
simple error sources.
Switch off.
Ensure
inserted tightly.
Ensure that the battery case (2) is
firmly inserted in the chass is.
that the main plug (1) is
Assessment
Defective
OK
Swit
ch on after waiting
about 1 minute.
If the error should occur again, you
can find information about
troubleshooting and appropriate
remedies in the lists in sections 16.2
and 16.3.
55
Page 56

16.2 Troubleshooting
Fault Cause Remedy
Scooter does not run /
no display at the dashboard
Scooter does not run
Troubleshooting
Scooter not Switch the scooter
switched on on (chapter 8)
Power
supply
interrupted
Batteries Charge the
discharged batteries
Batteries Replace
batteries defective (deale r )
Check b att er y Charge the batteries
charge display (chapter 10)
(battery discharged).
Battery not pluged
in
Front unit connector
not plugged in
Check the battery
fuses
(chapter 17)
Check fuse in
power supply to
tiller head
(chapter 17)
(chapter 10)
56
switched Switch to drive
to pus h m ode mode (chapter 9)
Drive lever Release
drive lever pressed
while switching on
Fault on drive Visit your dealer
lever
Automatic switch- Switch scooter off
off (overload and switch scooter
protection) active on again a few
seconds later for
the unit to reset.
Operati on Check blink code
indicator blinking (chapter 16)
Page 57

Troubleshooting
Fault Cause Remed y
Main fuses blow frequently Batteries defective
Motor defective
Fault in control
unit
Short-circuit in
electrical
equipment
Visit your dealer
Battery charge display moves
rapidly to discharged during
journey
Motor jerks during driving
Batteries do not charge
Batterie s Charge the bat teries
disc harge d (chapter 10)
Batteries defective
Motor defective
Defective fuse in
power supply to Visit your dealer
tiller head
Defective fuse in
battery pack
Front unit
connector not connector
plugged in (chapter 13)
Battery charger
defective
Batteries
completely
discharged
Visit your dealer
Visit your dealer
Plug in front unit
Visit your dealer
57
Page 58

Troubleshooting
16.3 Operation indicator blink codes
The operation indicator (1) on the dashb oard
is also designed as a display for error
messages.
V arious faults in the drive electronics are
displayed using blink sequence
16.3
.1 Blink list
as listed.
Instru ment in dicator
Error code LED indicator Cause
slight bl ink Aut o sw itch off
0
02,003 8x bl ink Fault in ECU o r wires
0203,0204 8xblink Fault in ECU or wires
0810 0814~17 7x bl ink Fault in dr ive lever, Lev er does not r es et
1000 blin king qu ickl y Char gin g t he scootor, sc oot or does not r un
1400 3x bl ink Fault to m otor brake or wires
1500 ~1502 9xblin k Fault to mot or br ak e
1600 10x blink Battery voltage to o l o w
1705 8x bl ink Fault in ECU o r wires
1802 1805 8xblink Fault in ECU o r w ir es
1B20 8xbl in k Fault in ECU or w ires
1D02 7x bl ink Fault in dr ive lever, Lev er does not r es et
(scootor idle 20min ) ,KEY-ON ag ain
1E03
2102 8x bl ink Fault in ECU o r wires
2C00,2C01 1xblink contiute slowly Batteries voltage too low
2D01 8xblin k Fault in ECU or w ires
3100 3102 8xblink Fault in ECU o r w ir es
3210 3213 8xblink Fault in ECU o r w ir es
3600~360E 8x blink Fault in ECU or w ir es
3B01 2xblin k M ot or c abl e short-circuited
4401 8x bl in k wir
7
000~7001 4x bl in k Par kin g br ak e of f
6x bl in k Chargin g t he scootor , s coot or does not run
ing fault
58
Page 59

17.0
Repairs
The following repair information should enable you to carry out small
repairs on your vehi cle yourse lf. You should, howev er , only carry out
such work if you are used to working with the tools described here since
it is impossible to fully prevent inju ry h azards whe n ha ndling tool s. I f
you are not sure, you should try to get help fr om a s ec ond pers on if
possible or conta ct your dealer .
In order to guarantee that all nuts and fixing screws are fitted tightly
after repairs, you should ensure that these are tightened using the
torque
settings specified.
17.1 Information about safety at work
Clamping and crushing hazard!
Pa y particular attention to hazards caused by clampin g and
crushing while carrying out any repair work. This applies
particularly to all rotating and adjustable parts of the scooter such
as around the
The
as removing the wheels.
Before you lift the scooter, make sure you prevent it rolling awa y
by wedging it securely.
Make sure the vehicle cannot fall do wn when raised by using
suitable supports such as wooden blocks.
Always place the blocks under metal components such as frames
or drive units.
Do not support the scooter by the plastic panelling!
scooter must be lifted in order to carry out certain work such
front steering wheels.
Repairs
17.2
Tools
The following tools are necessary to carry out the
repairs described:
1 x screwdriver; P hillips head No . 2
1 x screwdriver
1 x ring spanner, size 8 mm
1 x ring spanner; size 12 mm
1 x ring spanner; size 14 mm
1 x ring spanner; size 17 mm
1 x socket spanner, size 12 mm
59
Page 60

Repairs
17.3
Wheels - removal and replacement
Tools required:
Front wheel: 1 x sock et spanner, size 12 mm
Rear wheel: 1 x socket spanner, size 12 mm
Removing the wheels:
Loosen the self-locking bolt (2) for the
wheel fastening.
Secure
L
R
wheel fastening.
Pull the wheel off the stem.
against rolling away.
scooter and support it
ift the
emove the self-locking bolt for the
NOTE
Do not use fo
wheels from the axles.
Your specialist dealer has the
necessary special tools.
rce to remove the
Front wheel
Real wheel
60
Page 61

Repairs
Fitting the front wheel:
Push the wheel onto the stem (3) as far
as the wheel stop.
Screw the wheel fixing self-locking bolt
(4) and tighten it (size 12 mm).
ower the
L
R
etighten the self-locking bolt (3).
Fitting the rear wheel:
Place the key (5) in the slot in the drive
sh
aft (6).
scooter.
NOTE
The key is rectangular. Place
it with its widest side in the
axle slot.
Fitting the front wheel
Locating the axle key
the wheelonto the stem and align
Push
the wheel hub groove (7) with the key in
the drive shaft.
Push the wheel on as far as the drive
shaft stop.
Fitting the rear wheel
61
Page 62

Place the washer (8).
Scr
ew the wheel fixing self-locking bolt
(9) and tighten it (size 12 mm).
L
ower the
R
etighten the self-locking boltt.
scooter.
Repairs
Locating the washer
Securing the rear wheel
62
Page 63

17.5 Replacing the wheel
Remove the damaged wheel.
(wheel
The wheel to be repla
with a ne
with tyre is one part)
ced
w one.
nt wheel
Fro
Rear wheel
63
Page 64

Repairs - fuses
A
A
r
y
17.6 Fuses
The ForU is fitted with the following fuses.
• 7
Position: in cable between charging socket
Wiring diagram
resetable fuse
and batteries (2).
• 40
Position: in each battery positive cable (2)
External fuse position on battery case:
fusible fuse
(3) for 22 Ah batteries
64
Batte
fuses
Page 65

To replace Fuse:
T
e
Pull out fuse and replace
17.7 Batteries
Only replace the batteries wi th the f ollowing batt ery types:
Repairs -batteries
12 V / 22 Ah,
u may not use wet cell batteries with detachable cover caps.
Yo
Kymco sealed lead acid deep cycle batteries.
Risk of accidents!
• Refitting the battery
17.7.1 Disposal of used or damaged batteries
may
only be carried out by your dealer .
Caution acid!
• Observe safety information in chapter 1
BATTERIES ARE HAZARDOUSWASTE!!
Used an
of and only handed over to the correct disposal points.
Please giveused ordamaged batteries backto your dealer.
They will ensure that they are properly disposed of.
Handling
When handling damaged batteries or objects which
Always wash soiled objects and tools with plenty of water.
damaged batteries:
h
ave been soiled with acid, you must always wear:
- protective goggles
- acid-proof gloves
- respiratory protection
d defective batteries must be properly disposed
ransporting damaged batteries:
Always wear protective goggles and acid-proof glo ves.
Always transport and store batteries in an acid-p roof contain
65
Page 66

17.7.2 Replacing the batteries
Fire and burn hazard if battery terminal is
short-circuited!
•
Never
touch the positive
sim
ultaneously with metal
Repairs -batteries
and
negative battery terminals
par
ts (short-circuiting).
e
Remove the battery
as
described in chapter 13.
Remove all six bolts (1) on the bottom
of the battery case.
Put the battery case down on its bottom
side and open it.
oving the batteries
Rem
1. First remove the cable from the battery
negative terminal (-).
2. Then remove the cable from the
battery positive terminal (+).
sert the battery and connect thebattery
In
cables in reverse order:
1. First connect the cable to the battery
positive terminal (+).
2. Then connect the cable to the battery
negative terminal (-) .
cas
, to do this:
Opening the battery
case
Loosening the battery
cable
Connecting the battery
cable
Close the battery case, screw in all the
bolts and tighten.
66
Page 67

18.0
T
emporary storage
If you are not intending to use your scooter
f
or longer periods (e.g. over the winter, you
should prepare it as follows:
Remove soiling and dust.
Charge the batteries completely.
Place the
gh enough so that the tyres are no longer
hi
touching the floor.
scooter on supports. Lift
T
emporary storage
Front support
Care during storage:
Recharge the batteries once a month
(see chapter 10).
Rear support
67
Page 68

19.1 Specifications
19.1.1 General data
Mini S ForU application class ........................ internal and external use
ersion ................ ........................................... Mini S ForU
V
T urni ng radiu s .................................... ............
................................................ 12
Speed
............................................................. 6.4 kph (4 mph)
Maximum range*
22 Ah batteries ............................................... approx.
M
aximum climable incline .. ............................. 8°
(see page 25)
Maximum climable obstacle ........................... 60 mm
T otal weight (ready for driving incl. batteries)
22 Ah batteries ..............................................
.............................................. 54.0 kg
weight heaviest part ....................................... 19
Maximum worki
ng load (user weight) ..............
Appendix - specifications
2 cm
26km
.5 kg
135 kg
Wheel size ........................................230mm x 4 (2.8/2.5-4 x 4)(solid tyres)
ng voltage (battery voltage) ................... 24 Volt
Worki
Batteries ......................................................... see chapter 17
Main fuse ....................................................... 1 x 40 A
Stor age te mpe rat ure .......................................- 40°C to + 65°C
Ambient temperature ...................................... - 25°C to + 50°C
* Theoretical range iscalculated under test conditionsinaccordance
with European standards.
Actual range in normal us
c
ondition of the vehicle and its batteries, the weight of the
driver, correct tyre pressure, ambient temperature, and the gradient
and surface of the road or pavement.
e will depend on many factors, including the
68
Page 69

A
ppendi
x-t
ighteningto
rques
19.2
19.3
Torque for fixing screws
Front wheel central self-locking bolt
Rear wheel central self-locking bolt
General torque for nuts and bolts:
5
= 4.5 to 6 Nm
M
M6
= 8 to 12 Nm
M8
= 18 to 25 Nm
M10
= 30 to 40 Nm
M12
= 50 to 60 Nm
=40Nm
= 50 Nm
Disposing of the scooter
The scooter consists of metal and plastic components, electronic
components, electrical cables and batteries.
Disposal of the individual materials must be carried out in accordance
with environmental and disposal regulations in the relevant country, and
may only take place after the scooter has been dismantled.
To dismantle the electromobile and to separate and dispose of the
materials, you would be advised to hand it over to your specialist dealer.
Batteries may not be disposed of in domestic waste, and must be
disposed of according to national regulations
69
Page 70

20.0
v
y
Warranty
Warranty
The Mi n i S ForU Model Mini scooters are warranted for 12 months from
date of purchase.
Important!
•
During the warranty period anyparts that ha
to faulty workmans hip or material wil l be repaired or replaced wit hout
charge by KY M CO HEALTHCARE supplier / dealer .
The warranty exclude s tyres and all ite ms that have been su bject
•
to undue wear and items subjected to misuse.
Unauthorized change s or modifications will f orf eit your w arranty.
•
If a defect or fault is discovered, KYMCO Healthcare supplier / dealer
•
from whom the scooter was purchase d should be notif ied immediately.
Limitation of liabilit
The warranty does not extend to the consequential costs resulting from
fault clearen ce, in particular freight and tra vel costs, loss of earnings,
expenses , et c .
The manufacturer will not accept responsibility for any damage or injury
caused by misuse or non-observanc e of the instructio ns set out in this
user manual.
information
e becomedefective due
70
Page 71

Work Shop use only-- Replacing the ECU(1)
ECU Version:
The control unit is a programmable electronic regulating unit. It
regulates drive characteristics such as acceleration, maximum
speed and braking behavior.
The drive characteristics can be set to match the user's
requirements by altering the programming.
Reprogramming may only be carried out by specialist dealers.
71
Page 72

Work Shop use only-- Replacing the ECU(2)
Switch the Scooter off.
remove ECU protect cover
Disassemble the battery plugs (+)(-)and (1)(2) as picture--
Disassemble the ECU’s plug as picture--
Remove ECU bolts --.
Disassemble the ECU--.
Installation is in the reverse order of removal.
72
Page 73

Work Shop use only-- Removing and
installing the motor
Switch the Scooter off.
Removing the seat.
Removing the batteries case .
Removing drive unit as picture.--
Remove the rear wheels.
Remove the motor stay bolts as picture.--
Disassemble the electric motor.
73
Page 74

Work Shop use only - Adjusting the TOE- IN(1)
Step 1: Handlebar
- Push the tiller backward into the required position.
- Moving the handlebar to the seat as picture
- Ensure the handlebar is fixed firmly by seat. If the
throttle levers touch the seat, remove the throttle levers.
74
Page 75

Work Shop use only - Adjusting the TOE-IN(2)
Step 2: Measure the tyre’s “toe-in”
Separately measure the figure between the upper and
lower side.
Lower Upper
Standard
poin
t
Step 3: Adjusting the longer rod’s figure
- For tyre’s “toe-in”, the upper distance should be less
than the lower one.
Standard: Maxi 0~5 mm
Midi XL& Midi 0~4 mm
Mini & Micro 0~3 mm
To tighten the rod’s nuts after adjusting
Correct
Wrong
Forwar
75
Page 76

Work Shop use only-Adjusting the TOE-IN(3)
Step 4 : Adjusting the shorter rod’s figure
- To straighten the front tyres
- The steering stem should be centered the body frame by
adjusting the shorter rod
- The front tyre parallels the steering stem by sight.
- Tighten the shorter rod‘s nut after adjusting.
76
Page 77

Work Shop use only- SP1 (Diagnostic Tool)
(1)
introduction
Menus:
You are in a menu if the display shows a message ending
with” ? “
Use the up and down keys to look through the menu.
Use the help key to find out what each menu item does
?
Press the enter key to use a menu item
Once you are inside a menu item
Use the help key to find out what to do next
Trying out your setting
?
You can drive at any time
77
Page 78

Work Shop use only- SP1 (Diagnostic Tool)
(2)
introduction
Using your SP1:
Plug in the sp1.--
Switch on the controller.
The SP1 is ready for use.
When you finish:
Unplug the SP1.
The controller is ready to drive.
78
Page 79

Work Shop use only-Controller work shee
t
P&G Sdrive 24 Volt 110Amp
CONTROLLER WORKSHEET
CONTROLLER PARAMETERS
FORWARD ACC ELERATION
FORWARD DECELERATION
REVERSE ACCELERATION
REVERSE DECELERATION
FORWARD SPEED
REVERSE SPEED
THROTTLE INVE RT
SLEEP TIMER
Read system log
DESIRED SETTINGS RANGE UNITS
FAST SLOW
20 30
810
30 40
15 15
95 50
50 30
NO
20
PARAMETER NO.:36010-LHD7-900
ECU :36000-LDH7-900
EQ20CA(UK)
0.1 TO 10S
FAST / SLOW
0.1 TO 10S
FAST / SLOW
0.1 TO 10S
FAST / SLOW
0.1 TO 10S
FAST / SLOW
0 TO 100%
FAST / SLOW
0 TO 100%
FAST / SLOW
YES/NO
0 TO 20
MINUTES
Work Shop use only-Rear position light
Switch the Scooter off.
Removing the floor panel cover bolts.
Removing. floor panel cover .
Remove the rear position light connector and bolts.
Remove the rear position light comb.
Installation is in the reverse order of removal.
DESCRIPT ION
Correct Wrong
79
Page 80

By KYMCO HealthcareUK Limited.
First Edition, May. 2010
All rights reserved. Any reproduction or
unauthorized use without the written permission of
KYMCO Heallthcare UK Limited
is strictly prohibited.
T300-EQ20CA -A1
Kymco Healthcare UK Limited
Heol Mostyn,
Village Farm Industrial Estate,
Pyle,
Bridgend,
United Kingdom,
CF33 6BJ
Date printed:May.2010
Page 81

Y
A
A
HEALTHCARE
KYMCO Healthcare UK Limited
Heol Mostyn
Village Farm Industrial Estate
Pyle
Bridgend
CF33 6BJ
TEL:01656 670095 FAX:01656 858353
www.kymcohealthcare.co.uk
KWANG
No.35 Wan Hsing Street,San Min Distrist
Kaohsiung Taiwan, Republic of ROC
Telephone:886-7-3822526
F
NG MOTOR CO., LTD
X : 886-7-3950021
 Loading...