

Page 1

Do not remove this Owner’s Manual from the ATV per the agreement guidelines of
the U.S. Consumer Product Safety Commission. Read this manual carefully before
operating the ATV as it contains important safety information.
Page 2
5 Stan Perkins Road
Spartanburg, SC 29307
Telephone: (864) 327-4744
FAX: (864) 327-4745
Prepared July 2009
T200-LB70AA-A5
Page 3
Your ATV can be hazar dous to oper ate.
WARNING
CAUTION
WARNING
A collision or a rollover can happen quickly, even during routine maneuvers such as turning and driving on hills or over
obstacles, if you fail to take proper precautions.
For your safety, understand and follow all of the warnings contained in this Owner’s Manual and the labels applied to your ATV.
Keep this Owner’s Manual with your ATV at all times.
FAILURE TO FOLLOW THE WARNINGS CONTAINED IN THIS MANUAL CAN RESULT IN SERIOUS INJURY OR DEATH.
Particularly important information is called out in this manual by the following icons and notations:
The SAFETY ALERT symbol with the exclamation point in the triangle means ATTENTION!
BE ALERT! YOUR SAFETY CAN BE AFFECTED.
Failure to follow instructions associated with a WARNING symbol could result in severe injury
or death to the operator, a passenger, a bystander, or a person inspecting or repairing the ATV.
A CAUTION symbol indicates that special precautions must be taken to avoid damaging
the ATV.
NO NO
NO
NO NO
TETE
TE
TETE
The NOTE symbol indicates key information about a procedure or to clarify an operation.
California Proposition 65
This product contains or emits chemicals known to the State of California to cause
cancer and birth defects or other reproductive harm.
Page 4
Identification Numbers Record
11
1
11
3
2
1. KEY IDENTIFICATION NUMBER
The key identification number is stamped on the key as shown in the illustration 1. If you require a replacement key, you will
need this code to obtain a new key from your authorized KYMCO ATV dealer. Record the key number in the box above.
2. VEHICLE IDENTIFICATION NUMBER (VIN)
3. ENGINE SERIAL NUMBER (ESN)
Record the Vehicle Identification Number 2 and Engine Serial Number 3 in the boxes above for future reference (to assist
you in ordering parts from your authorized KYMCO ATV dealer or for reference in case the ATV is stolen).
Page 5

SECTION 1 - SAFETY
Age (Years)
6-11
12-15
16 and Older
Engine Size (cc)
Up to 70
Up to 90
Over 90
10 - Governed
15 - Maximum
15 - Governed
30 - Maximum
According to Local
Regulations
INTRODUCTION
FOREWORD
Congratulations, and thank you for your purchase of a KYMCO All-Terrain Vehicle (ATV). Built with American engineering and
global manufacturing knowledge, it is designed to provide a superior ride, great comfort, and strong utility capabilities.
This Owner’s Manual was produced to ensure that you become aware of safe ATV operating procedures. It also includes
information about the general care and maintenance of your ATV.
Carefully read this manual. If you have any questions regarding your ATV, contact an authorized KYMCO ATV dealer for assistance.
Remember, only authorized KYMCO ATV dealers have the knowledge and resources to provide you with the best service possible.
PROTECT YOUR SPORT
Being able to use and enjoy your ATV requires you and your family to operate it in a responsible manner. Before riding your ATV
you should:
Learn and adhere to all local and state off-road riding laws
Respect your ATV and its capabilities and limitations
Respect the environment and the rights of others
We also advise you to strictly follow the recommended maintenance program for your ATV as outlined in the manual. This
preventative maintenance program was designed to ensure that all of the critical components of your ATV are thoroughly
inspected at various intervals.
The information in this manual is based on the latest product data and specifications available at the time of printing. KYMCO
Inc. reserves the right to make product changes and improvements which may affect illustrations or explanations without notice.
KYMCO and the ATV Safety Institute
recommend that all ATV operators ride
an ATV appropriate for their age.
Indicates a potential hazard that could
result in serious injury or death.
Speed Limitations (MPH)
1
Page 6

TABLE OF CONTENTSTABLE OF CONTENTS
TABLE OF CONTENTS
TABLE OF CONTENTSTABLE OF CONTENTS
INTRODUCTION ........................................................................................................1
TABLE OF CONTENTS ............................................................................................. 2
SECTION 1 - SAFETY ....................................................................................... 3 - 52
EPA & SVIA Labels..................................................................................................... 6
Hang Tags & Warning Information .............................................................................7
Warning Label Locations........................................................................................ 8-9
LOCATION OF PARTS & CONTROLS...................................................................1 0
WARNINGS....................................................................................................... 11 - 21
PREVENTION...................................................................................................22 - 27
Safe Riding Clothing and Gear ................................................................................22
Condition of the ATV.................................................................................................24
First Aid and Survival ................................................................................................27
ACTIVE RIDING ............................................................................................... 28 - 42
Basic Operating Maneuvers .....................................................................................28
How to Handle the ATV (Active Riding Techniques) ...............................................31
Tips ............................................................................................................................40
SOUND JUDGMENT ........................................................................................ 43 - 50
Environment ..............................................................................................................44
Those around you .....................................................................................................46
Equipment .................................................................................................................47
Personal Choices ......................................................................................................47
Load Capacity Ratings Chart ...................................................................................48
Speedrack .................................................................................................................48
SUPERVISION.................................................................................................. 51 - 52
Taking Responsibility ................................................................................................51
SECTION 2 - OPERATION & MAINTENANCE.............................................. 53 - 82
PREFACE ............................................................................................................... 53
PARTS & ACCESSORIES ....................................................................................... 53
SPECIFICATIONS....................................................................................................54
GENERAL INFORMATION .............................................................................. 55 - 65
ATV Identification Numbers ......................................................................................55
Ignition Switch Key ...................................................................................................55
CONTROL LOCATIONS AND FUNCTION..................................................... 55 - 62
Fuel Petcock .............................................................................................................56
Transmission Shift Lever..........................................................................................56
2WD/4WD Selector Switch .......................................................................................57
BRAKES ........................................................................................................... 57 - 58
Parking Brake............................................................................................................57
Left Handlebar Switch ..............................................................................................58
Throttle Lever ............................................................................................................59
Speedometer / LCD ..................................................................................................59
Clock (setting) ...........................................................................................................60
Primer and Cold Start ...............................................................................................60
Gas/Vent Hoses........................................................................................................60
Carburetor Float Bowl Drain.....................................................................................61
2
Oil Level Dipstick ......................................................................................................61
Seat Latch .................................................................................................................61
Safety Flag Bracket ..................................................................................................62
Rack Loading (Front and Rear)................................................................................62
Trailering and Towing ................................................................................................62
Transporting the ATV ................................................................................................63
Gasoline-Oil-Lubricant..............................................................................................63
Break-In Procedure ........................................................................................ 64 – 65
Differential Lubricant .................................................................................................64
Fuel Tank Filling ........................................................................................................64
GENERAL MAINTENANCE ............................................................................ 66 - 80
Maintenance Schedule .............................................................................................67
Oil Cooler ..................................................................................................................68
Shock Absorbers.......................................................................................................68
General Lubrication ..................................................................................................68
Hydraulic Hand Brakes ..................................................................................... 70 - 71
Rear Foot Brake........................................................................................................71
Brake Hoses ..............................................................................................................72
Brake Pads ................................................................................................................ 7 2
Protective Rubber Boots .................................................................................. 72 - 73
Battery ............................................................................................................... 73 - 74
Spark Plug ......................................................................................................... 74 - 75
Engine Idle RPM Adjustment ...................................................................................75
Throttle Cable Adjustment ........................................................................................75
Air Filter .....................................................................................................................76
Air Filter Housing Drain ............................................................................................76
V-Belt Cover Fluid Drain...........................................................................................77
Tires................................................................................................................... 77 - 78
Wheel Removal .........................................................................................................78
Muffler/Spark Arrester...............................................................................................78
Light Bulb Replacement ...........................................................................................78
Checking/Adjusting Headlight Aim ................................................................... 79 - 80
Fuses.........................................................................................................................80
Electrical Output Terminals.......................................................................................80
Storage Compartment ..............................................................................................80
STORAGE......................................................................................................... 81 - 82
Preparation for Storage ............................................................................................81
Preparation after Storage .........................................................................................82
WARRANTY INFORMATION ........................................................................... 83 - 85
KYMCO USA Limited Warranty ................................................................................83
Emission Control Information ...................................................................................84
USA EPA Emission Control Warranty Statement ....................................................85
MAINTENANCE RECORD .............................................................................. 86 - 87
INDEX........................................................................................................................85
Indicates a potential hazard that could
IDENTIFICATION NUMBERS RECORD (inside of back-cover)
result in serious injury or death.
Page 7

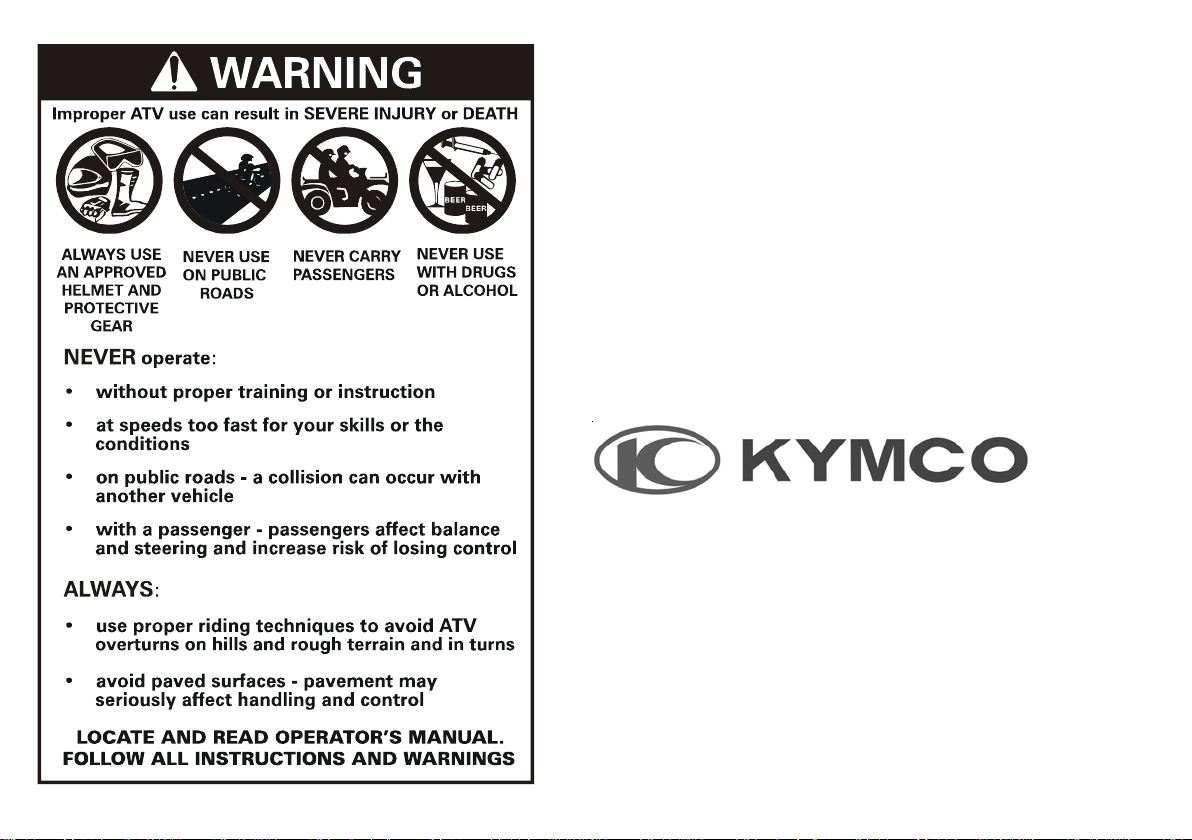
AN ATV IS NOT A TOY AND CAN BE HAZARDOUS TO OPERATE.
Always ride slowly and be extra careful when operating
your ATV on unfamiliar terrain. Always be alert for changing
conditions and terrain when operating your ATV.
Never operate your ATV on excessively rough, slippery,
or loose terrain.
Always follow proper procedures for turning as described
in this manual. Practice turning at slow speeds before attempting to turn at faster speeds. Do not turn at an excessive speed.
Always have your A TV inspected by an authorized KYMCO
ATV dealer if it has been involved in an accident.
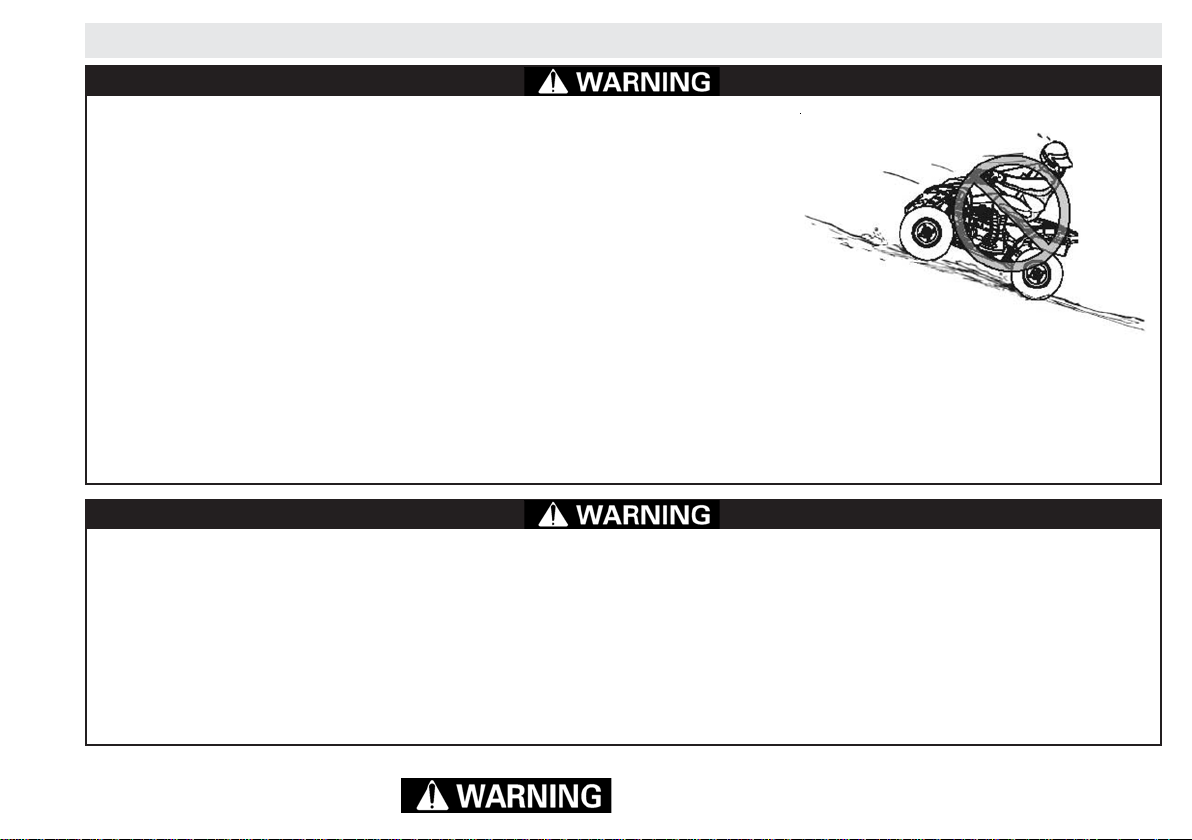
Never operate your ATV on hills that are too steep for the
ATV or for your abilities. Practice on smaller hills before attempting larger hills.
Always follow proper procedures for climbing hills as described in this manual. Check the terrain carefully before you
start up any hill. Never climb hills that have slippery or loose
surfaces. Shift your weight forward when climbing hills. Never
open the throttle suddenly or make sudden gear changes.
Never go over the top of any hill at high speed.
Always follow proper procedures for going down hills and
for braking on hills as described in this manual. Check the terrain carefully before you start down any hill. Shift your weight
backward when descending a hill. Never go down a hill at high
speed. Avoid going down a hill at an angle which would cause
the ATV to lean sharply to one side. Go straight down the hill
where possible.
Always follow proper procedures for crossing the side of a
hill as described in this manual. Avoid hills with slippery or loose
surfaces. Shift your weight to the uphill side of the ATV. Never
attempt to turn the ATV around on any hill until you have mastered the turning techniques described in this manual on level
ground. Avoid crossing the side of a steep hill if possible.
Always use proper procedures if you stall or roll backwards
when climbing a hill. To avoid stalling, maintain a steady speed
when climbing a hill. If you stall or roll backwards, follow the
special procedure for braking described in this manual. Dismount on the uphill side or to either side if pointed straight uphill. Turn the ATV around and remount it following the procedure described in this manual.
Indicates a potential hazard that could
result in serious injury or death.
3
Page 8

AN ATV IS NOT A TOY AND CAN BE HAZARDOUS TO OPERATE.
Always check for obstacles before operating in an area
that you are unfamiliar with. Never attempt to operate your
ATV over large obstacles, such as large rocks or fallen trees.
Always follow proper procedures when operating over obstacles as described in this manual.
Always be alert for conditions that could cause skidding or
sliding. On slippery surfaces such as ice, go slowly and be
very cautious in order to reduce the chance of skidding or sliding out of control.
Never operate an ATV in fast flowing water or in water
deeper than the footrests. Remember that wet brakes may
reduce stopping capability. Test your brakes after leaving water. If necessary, apply them lightly several times to let friction
dry out the pads.
Always be sure there are no obstacles or people behind
you when you operate the ATV in reverse. When it is safe to
proceed in reverse, go slowly. Avoid turning at sharp angles in
reverse.
Always use the size and type tires specified in this manual.
Always maintain proper tire pressure as described in this
manual.
Never improperly install or improperly use accessories on
this ATV.
Never install a twist grip throttle on this ATV.
Never exceed the stated load capacity for any ATV. Cargo
should be properly distributed and securely attached. Reduce
speed and follow instructions in this manual for carrying cargo
or pulling a trailer and allow greater distance for braking.
No one under the age of 16 should operate this ATV. Some
operators at the age of 16 may not be able to operate an ATV
safely. Parents should supervise the use of the ATV at all times.
Parents should permit continued use only if they determine
that the operator has the ability to operate the ATV safely.
Indicates a potential hazard that could
4
result in serious injury or death.
Page 9

ATV SAFETY ALER T
You should be aware that AN ATV IS NOT A TOY AND CAN BE HAZARDOUS TO OPERATE. An ATV handles differently
from other vehicles, including motorcycles and automobiles. A collision or rollover can occur quickly, even during routine
maneuvers such as turning and driving on hills and over obstacles if you fail to take proper precautions.
TO AVOID DEATH OR SEVERAL PERSONAL INJURY
• Pay special attention to the warnings contained in this manual and on all safety labels on the ATV.
• Never operate an ATV without proper instruction. Beginners and experienced riders should complete a training course.
• Always follow these age recommendations:
♦ A child under 12-years of age should never operate an ATV with an engine size 70cc or greater.
♦ A child under 16-years of age should never operate an ATV with an engine size greater than 90 cc.
♦ A child under 16-years of age should never operate an ATV without adult supervision. Children need to be
observed carefully because not all children have the strength, size, skills, or judgment to operate an ATV safely.
• Never carry a passenger on an ATV. Carrying a passenger may upset the balance of the ATV and doing so may cause it to go out
of control.
• Always avoid paved surfaces. ATVs are not designed to be used on paved surfaces and may seriously affect handling and control.
• Never operate an ATV on a public road, even a dirt or gravel one, because you may not be able to avoid colliding with other
vehicles. Also, operating an ATV on a public road may be against the law.
• Never operate an ATV without an approved motorcycle helmet, eye protection, boots, gloves, long pants, and a long-sleeved
shirt or jacket.
• Never consume alcohol or drugs before or while operating an ATV.
• Never operate an ATV at excessive speeds. Go at a speed which is proper for the terrain, visibility conditions, and your
experience.
• Never attempt to do wheelies, jumps, or other stunts.
• Always be careful when operating an ATV, especially when approaching hills, turns, and obstacles, and when operating on
unfamiliar or rough terrain.
• Never loan your ATV to anyone who has not taken a training course or has not been driving an ATV for at least a year.
Indicates a potential hazard that could
result in serious injury or death.
5
Page 10
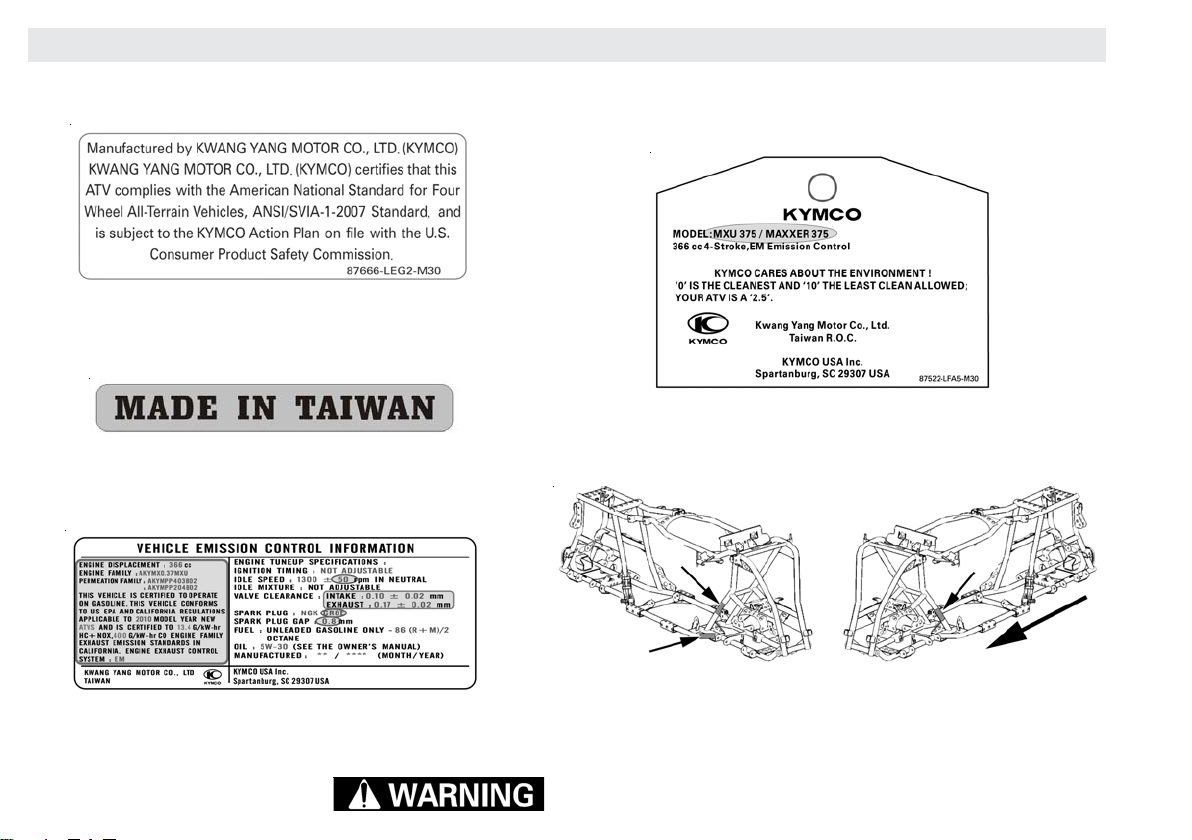
EPA & SVIA LABELS
1. SVIA CERTIFICATION LABEL 1 4. EPA HANGTAG
2. MANUFACTURING ORIGIN
LABEL 2
5. LABEL LOCATIONS
3. EPA LABEL 3
11
1
11
33
3
33
22
2
22
Indicates a potential hazard that could
6
result in serious injury or death.
Front of ATV frame
Page 11
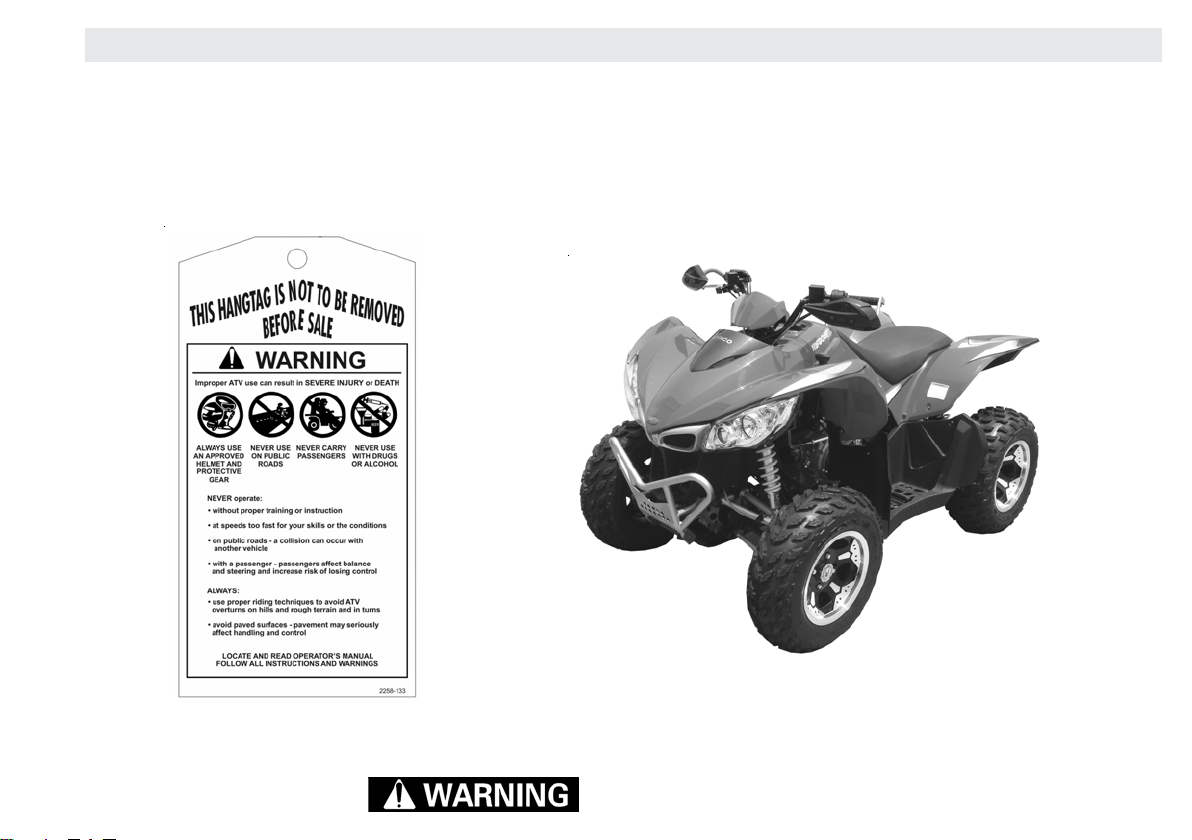
HANGTAGS & WARNING INFORMATION
Your KYMCO ATV comes equipped with hangtags and several labels containing important safety information. Anyone who rides the ATV should read and understand this information before riding the ATV. The labels should be
considered permanent parts of the ATV. If a label comes off or becomes hard to read, contact your KYMCO ATV dealer
immediately for a replacement.
Indicates a potential hazard that could
result in serious injury or death.
7
Page 12
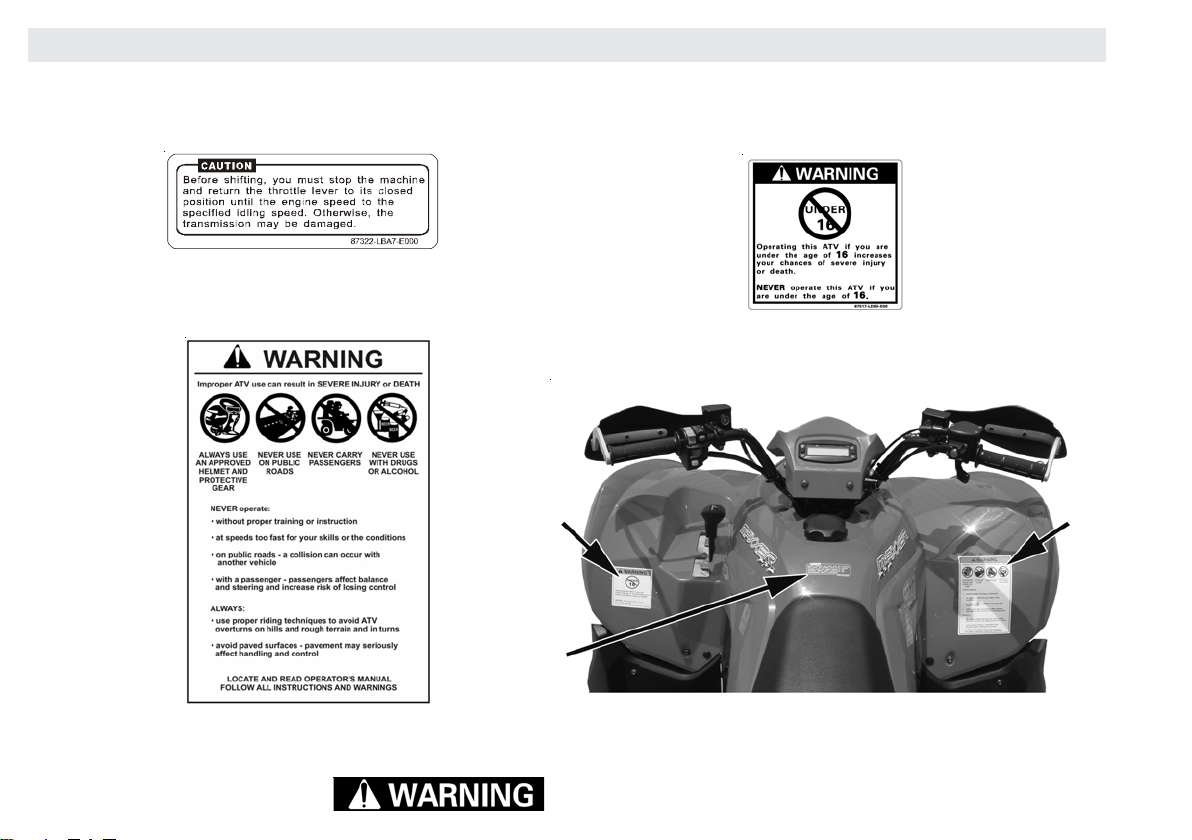
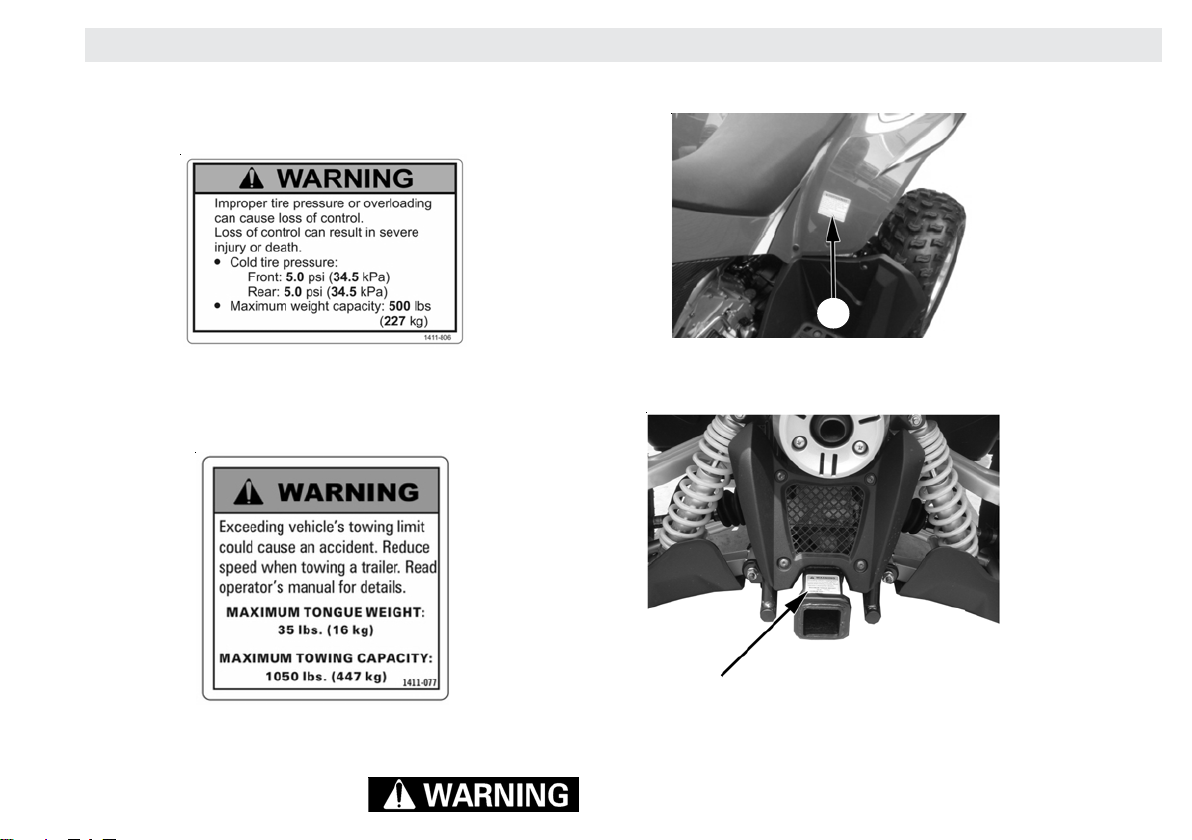
WARNING LABELS
11
1
11
22
2
22
33
3
33
11
1
11
33
3
33
22
2
22
Indicates a potential hazard that could
8
result in serious injury or death.
Page 13
WARNING LABELS
44
4
44
55
5
55
44
4
44
55
5
55
Indicates a potential hazard that could
result in serious injury or death.
9
Page 14
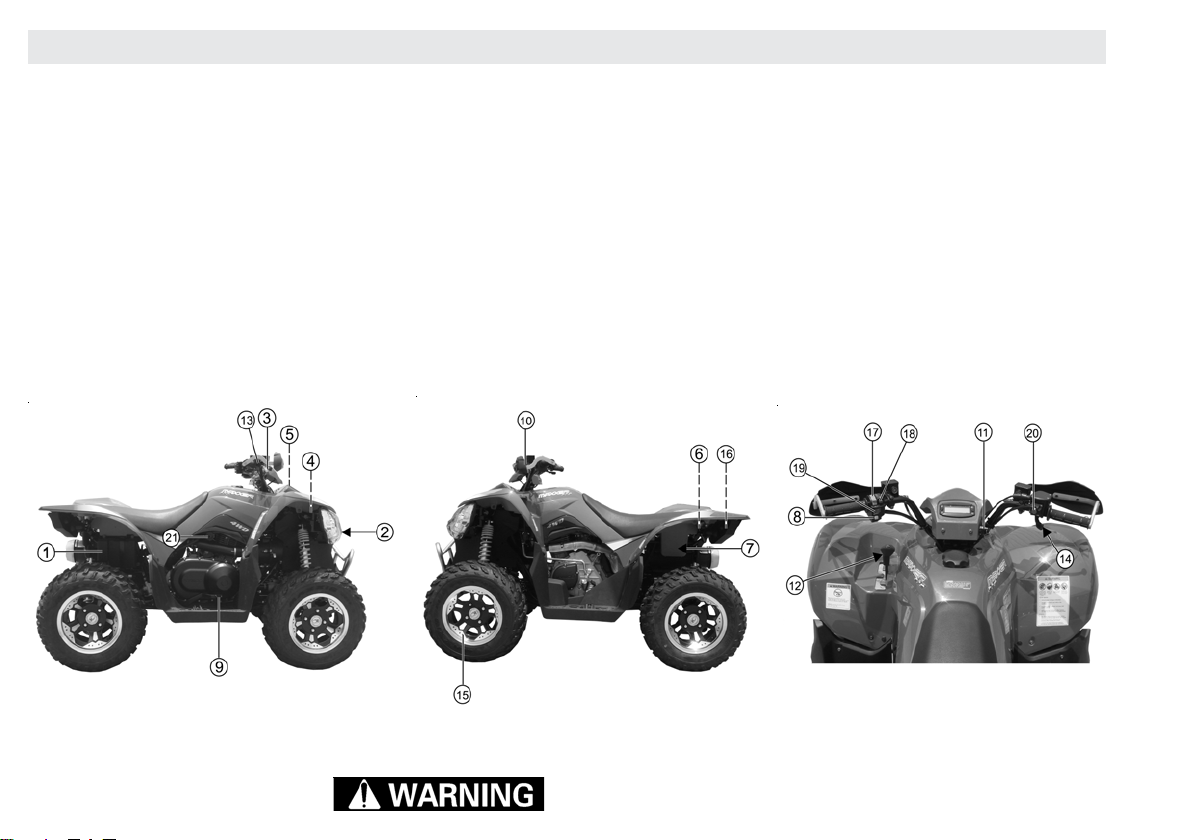
LOCATION OF PARTS AND CONTROLS
1 Battery
2 Headlights
3 Hand Brake Lever
4 Power Distribution Module
5 Electrical Access Panel
6 Seat Latch
7 Storage Compartment
8 Override Button
9 Foot (rear) Brake Pedal
AT Brake Lever Lock (parking)
AK Ignition Switch
AL Shift Lever
AM Throttle Limiter
AN Throttle Lever
AO Aluminum Wheel
AP Taillight/Brakelight
AQ Headlight HI/LO Switch
AR Engine Starter Button
AS Engine Stop Switch
BT 2WD/4WD Selector Switch
BK Fuel Petcock
NOTE: Your ATV may differ slightly in appearance from the images in this manual.
Indicates a potential hazard that could
10
result in serious injury or death.
Page 15
WARNINGS
POTENTIAL HAZARD
Operating this ATV without proper instruction.
WHAT CAN HAPPEN
The risk of an accident is greatly increased if you do not know how to operate the ATV properly in different situations and on different types of terrain.
HOW TO AVOID THIS HAZARD
Whether you are a beginning or an experienced ATV rider, you should complete a certified training course. You should then regularly practice the skills
learned in the course in conjunction with the operating techniques described in this Owner's Manual.
POTENTIAL HAZARD
Allowing anyone under 16-years of age to operate this ATV.
WHAT CAN HAPPEN
Use of an ATV by children can lead to severe injury or death of the child. Children under 16-years of age may lack the skills, abilities, or judgment to operate
the ATV safely and may be involved in a serious accident.
HOW TO AVOID THIS HAZARD
A child under 16-years of age should never operate this ATV.
POTENTIAL HAZARD
Carrying a passenger on this ATV.
WHAT CAN HAPPEN
Carrying a passenger greatly reduces your ability to balance and control this ATV. This could cause an accident, resulting
in injury or death to you and/or your passenger.
HOW TO AVOID THIS HAZARD
Never carry a passenger. The long seat on this A TV is designed to allow you to shift positions as needed during operation. It is not for carrying passengers.
Indicates a potential hazard that could
result in serious injury or death.
11
Page 16
WARNINGS
POTENTIAL HAZARD
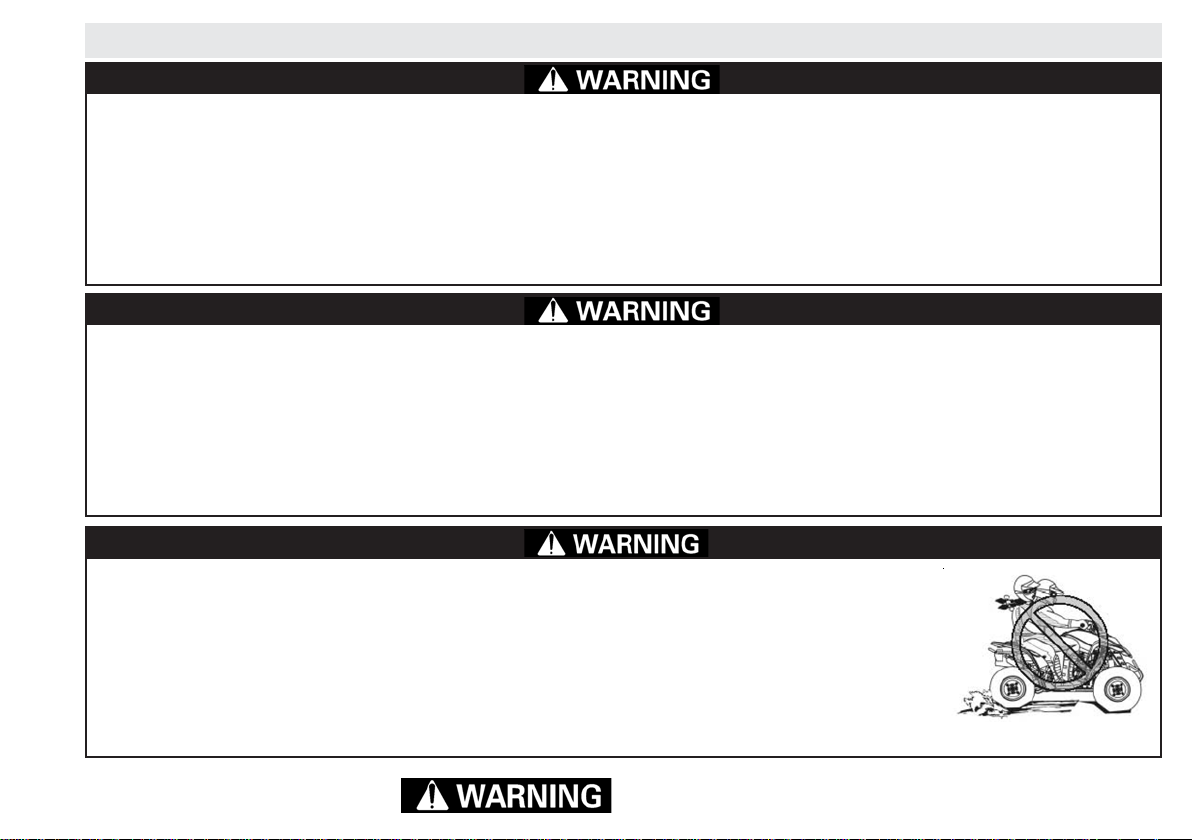
Operating your ATV on paved surfaces.
WHAT CAN HAPPEN
Your ATV's tires are designed for off-road use only, not for use on pavement. Paved surfaces may seriously
affect vehicle handling and may result in your inability to control the ATV.
HOW TO AVOID THIS HAZARD
Never operate your ATV on any paved surfaces, including sidewalks, driveways, parking lots, and streets.
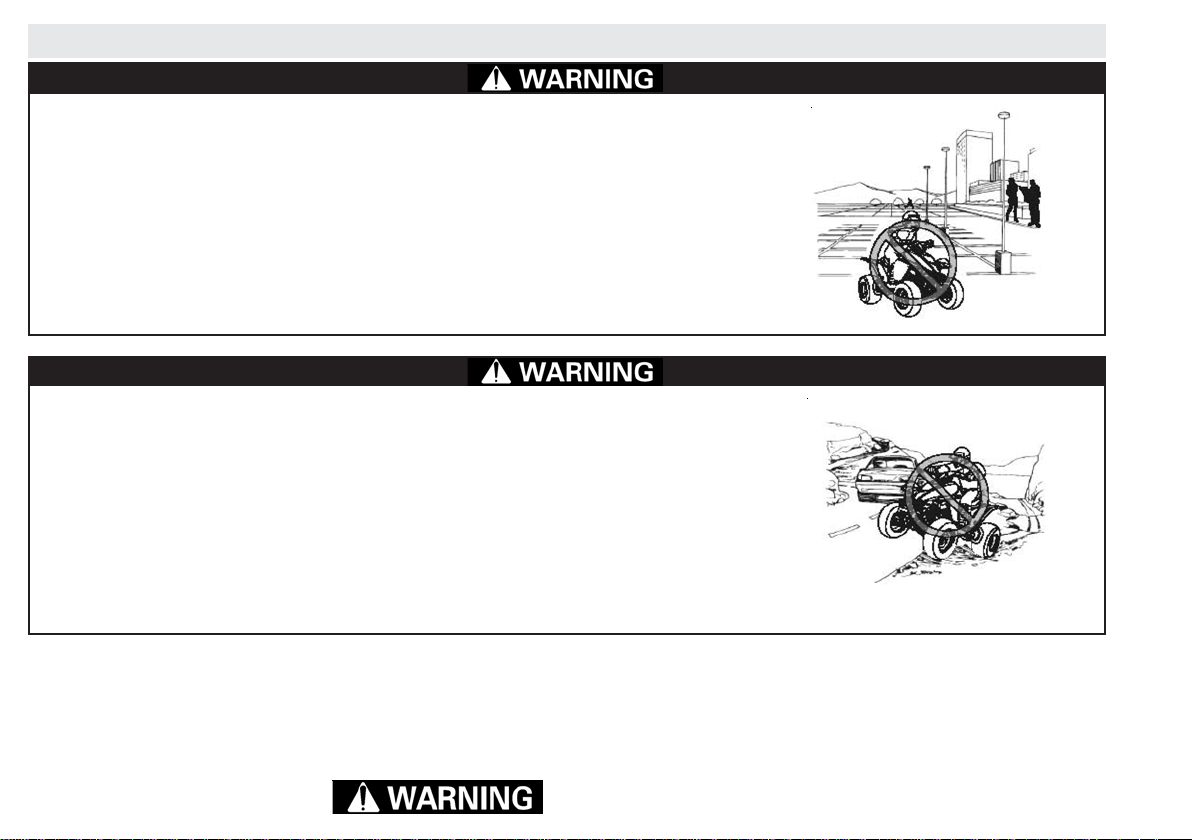
POTENTIAL HAZARD
Operating your ATV on public streets, roads, or highways.
WHAT CAN HAPPEN
You can collide with another vehicle.
HOW TO AVOID THIS HAZARD
Never operate your ATV on any public street, road, or highway, even a dirt or gravel road. In many states
it is illegal to operate an ATV on public streets, roads, or highways.
12
Indicates a potential hazard that could
result in serious injury or death.
Page 17
WARNINGS
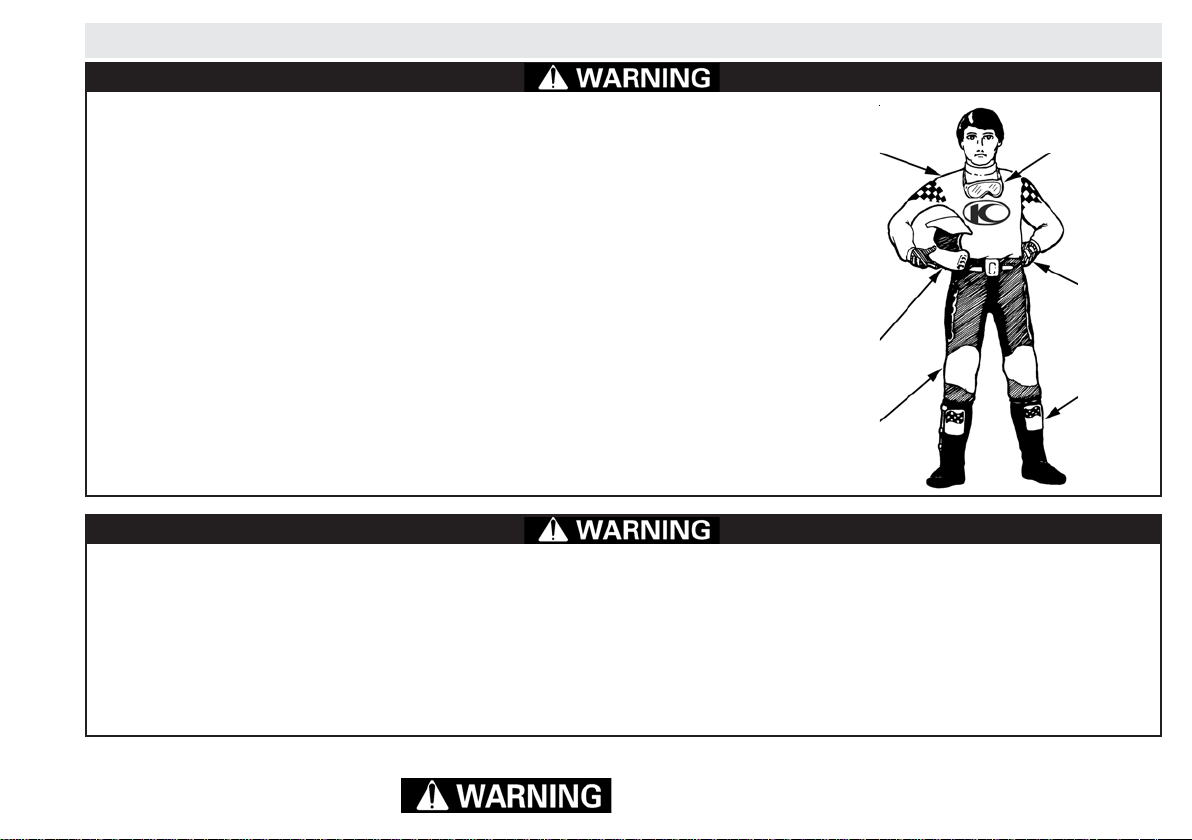
POTENTIAL HAZARD
Operating your ATV without wearing an approved helmet, eye protection and
protective clothing.
Protective clothing
(jersey)
Eye protection
(goggles)
WHAT CAN HAPPEN
Operating an ATV without an approved helmet increases your chances of a severe head injury or
death in the event of an accident.
Operating an ATV without eye protection can result in an accident and increases your chances of a
severe injury, including loss of sight in the event of an accident.
Operating an ATV without protective clothing increases your chances of severe injury in the event
Gloves
of an accident.
HOW TO AVOID THIS HAZARD
Always wear an approved helmet that fits properly.
You should also wear:
Helmet
Boots
* Eye protection (goggles or helmet face shield)
* Gloves * Boots
* Long-sleeved shirt, riding jersey or long sleeved jacket
Protective clothing
(pants)
* Long-legged pants or riding pants
POTENTIAL HAZARD
Operating your ATV after or while consuming alcohol or drugs.
WHAT CAN HAPPEN
Consuming alcohol or drugs can seriously affect your judgment. Consuming alcohol or drugs will cause you to react more slowly and will affect your
balance and perception. Operating your ATV with these impairments may result in an accident.
HOW TO AVOID THIS HAZARD
Never consume alcohol or drugs before, or while driving your ATV.
Indicates a potential hazard that could
result in serious injury or death.
13
Page 18
WARNINGS
POTENTIAL HAZARD
Operating your ATV at excessive speeds.
WHAT CAN HAPPEN
Operating your ATV at excessive speeds increases your chances of losing control of the vehicle, which can result in an accident.
HOW TO AVOID THIS HAZARD
Always ride your ATV at a speed that is proper for the terrain, visibility and operating conditions and your experience.
POTENTIAL HAZARD
Attempting wheelies, jumps, and other stunts when riding your ATV.
WHAT CAN HAPPEN
Attempting wheelies, jumps, and other stunts increases the chance of an accident, including a rollover, when
riding your ATV
HOW TO AVOID THIS HAZARD
Never attempt stunts such as wheelies or jumps. Do not try to show off when riding your ATV.
POTENTIAL HAZARD
Failure to inspect your ATV before operating it. Failure to properly maintain your ATV.
WHAT CAN HAPPEN
By not keeping your ATV in proper working order, you increase the possibility of an accident or equipment damage.
HOW TO AVOID THIS HAZARD
Always inspect your ATV each time you use it to make sure it is in safe operating condition. Always follow the inspection and maintenance schedules and
procedures in this Owner's Manual.
14
Indicates a potential hazard that could
result in serious injury or death.
Page 19
WARNINGS
POTENTIAL HAZARD
Removing your hands from handlebars or your feet from your ATV's footrests while riding.
WHAT CAN HAPPEN
Removing even one hand or foot can reduce your ability to control your ATV or could cause you to lose your balance and fall off the ATV. If you remove a
foot from a footrest, your foot or leg may come into contact with the wheels, which could injure you or cause an accident.
HOW TO AVOID THIS HAZARD
Always keep both hands on the handlebars and both feet on the footrests of your ATV while riding.
POTENTIAL HAZARD
Failure to use extra care when riding your ATV on unfamiliar terrain.
WHAT CAN HAPPEN
When riding on unfamiliar terrain you may come upon hidden rocks, bumps, or holes without enough time to react.
This could result in the ATV overturning or you losing control of the ATV.
HOW TO AVOID THIS HAZARD
Go slowly and be extra careful when riding your ATV on unfamiliar terrain. Always be alert to changing conditions in
the terrain when riding your ATV.
POTENTIAL HAZARD
Failure to use extra care when riding your ATV on rough, slippery, or loose terrain.
WHAT CAN HAPPEN
Riding your ATV on rough, slippery, or loose terrain can cause loss of traction or control, which could result in an
accident, including a rollover.
HOW TO AVOID THIS HAZARD
Do not ride your ATV on rough, slippery, or loose terrain until you have learned and practiced the skills necessary
to control the ATV on these surfaces. Always be especially cautious when riding your ATV on rough, slippery,
or loose terrain.
Indicates a potential hazard that could
result in serious injury or death.
15
Page 20
WARNINGS
POTENTIAL HAZARD
Turning the ATV improperly.
WHAT CAN HAPPEN
Your ATV might go out of control, causing a collision or rollover.
HOW TO AVOID THIS HAZARD
Always follow proper procedures for turning your ATV as described in this Owner's Manual. Practice turning at slow speeds before attempting to turn at
faster speeds. Do not turn your ATV at excessive speeds.
POTENTIAL HAZARD
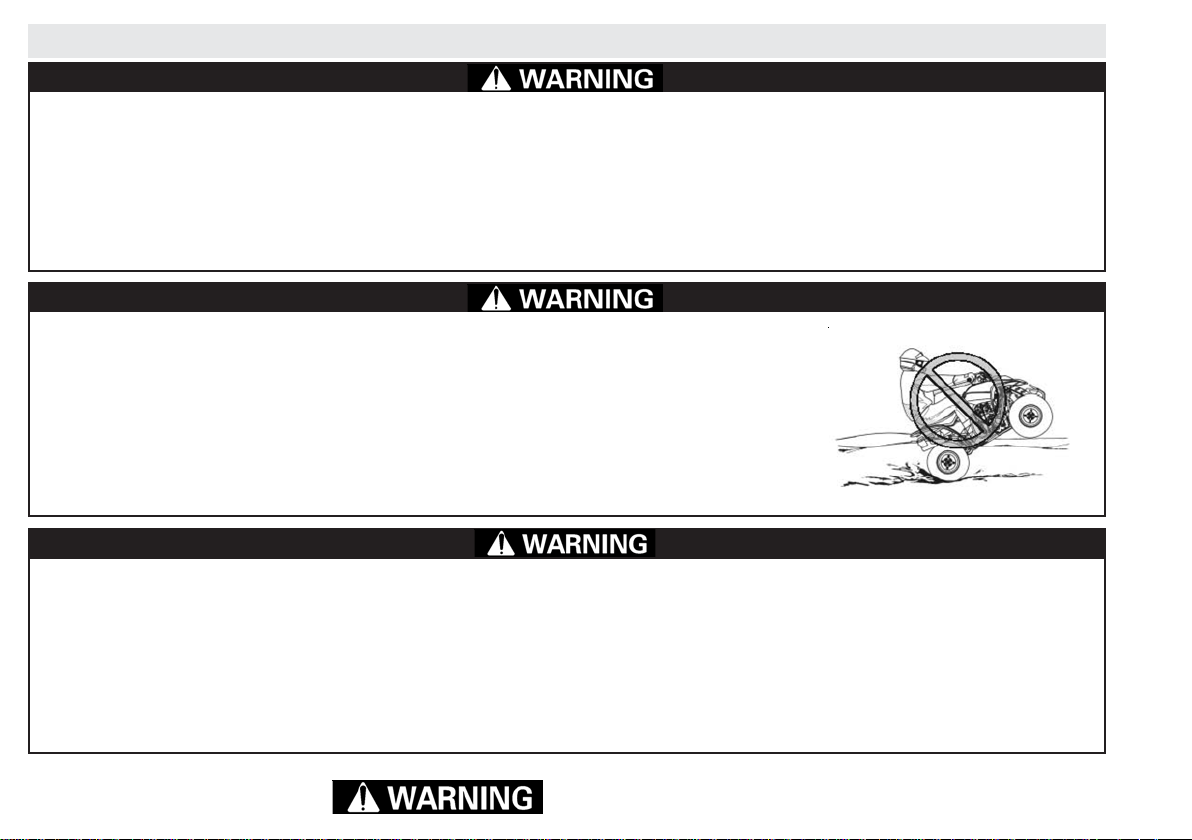
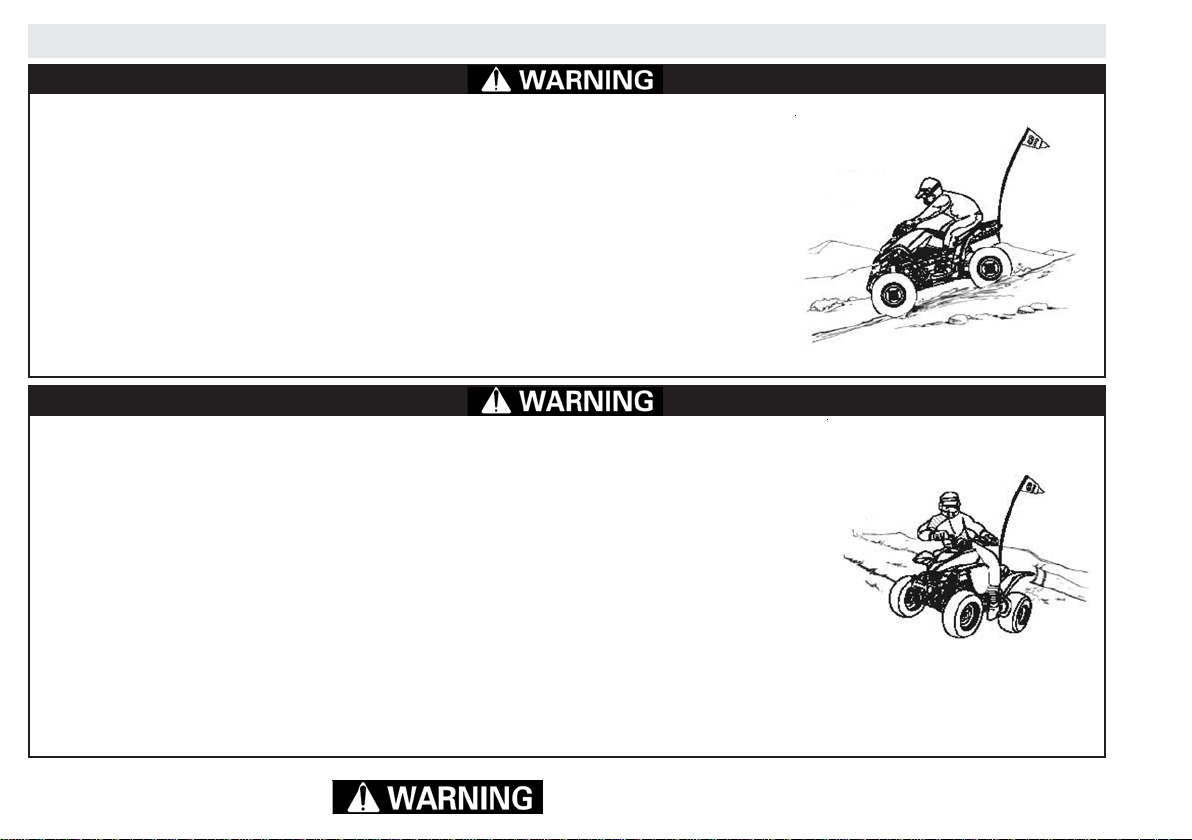
Operating your ATV on steep hills..
WHAT CAN HAPPEN
Your ATV can overturn more easily on steep hills than on level surfaces or small hills.
HOW TO AVOID THE HAZARD
Never operate your ATV on hills that are too steep for the ATV or for your abilities. Practice riding on
smaller hills before attempting to ride on larger hills.
OK
16
Indicates a potential hazard that could
result in serious injury or death.
Page 21
WARNINGS
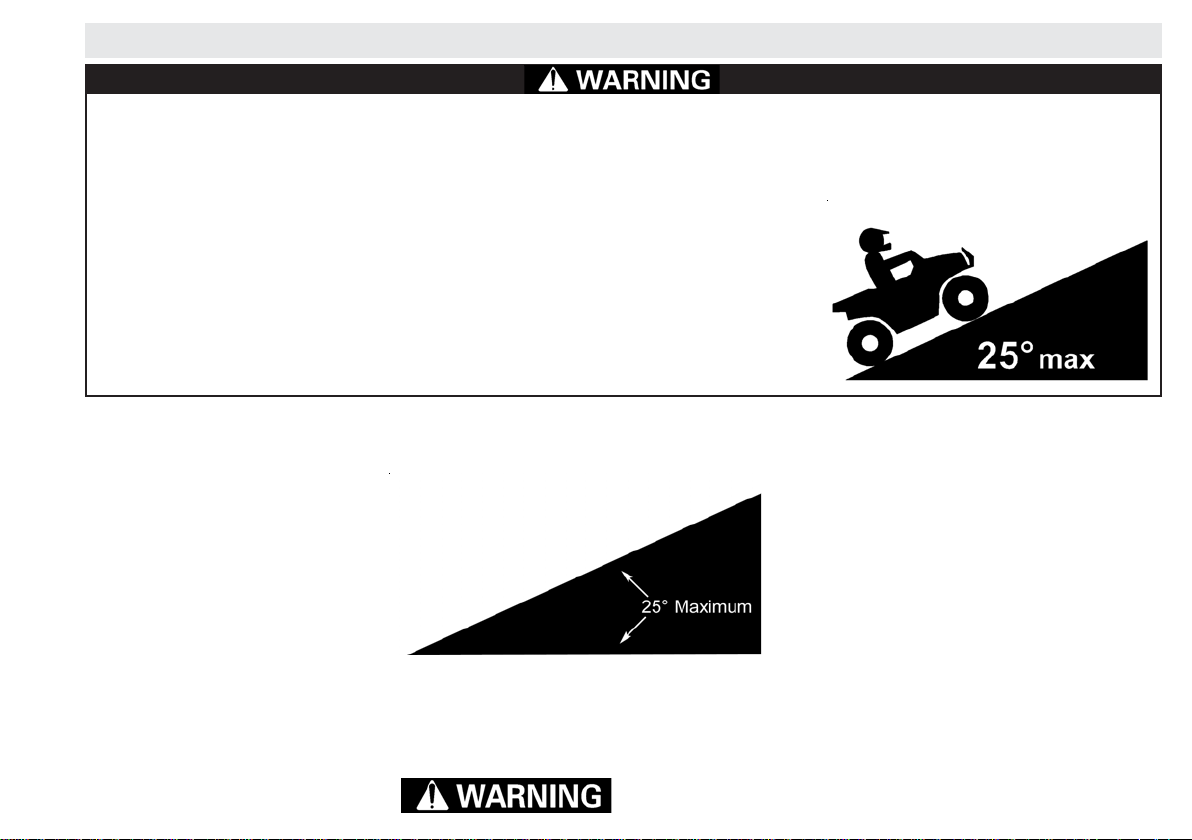
POTENTIAL HAZARD
Climbing hills improperly with your ATV.
WHAT CAN HAPPEN
Climbing hills improperly could cause you to lose control of your ATV or cause the ATV to overturn.
HOW TO AVOID THIS HAZARD
Always follow proper procedures for climbing hills as described in this Owner's Manual. Always check the
terrain carefully before you start up any hill.
Never climb hills with slippery or loose surfaces. Shift your weight forward when riding your ATV up a hill.
Never open the throttle suddenly or make sudden gear changes, as the ATV could flip over backwards.
Never go over the top of any hill at high speed, as an obstacle, a sharp drop, or another vehicle or person
could be on the other side of the hill.
NEVER RIDE YOUR ATV UP OR DOWN HILLS
STEEPER THAN 25
O
Indicates a potential hazard that could
result in serious injury or death.
17
Page 22
WARNINGS
POTENTIAL HAZARD
Going down a hill improperly on your ATV.
WHAT CAN HAPPEN
Going down a hill improperly could cause you to lose control of your ATV or cause the ATV to overturn.
HOW TO AVOID THIS HAZARD
Always follow proper riding procedures for going down hills as described in this Owner's Manual.
Always check the terrain carefully before you start down any hill on your ATV.
Shift your weight backwards.
Never go downhill at a high speed.
Avoid going down a hill at an angle that would cause your ATV to lean sharply to one side.
Go straight down the hill whenever possible.
POTENTIAL HAZARD
Improperly crossing hills or turning on hills while riding your ATV.
WHAT CAN HAPPEN
Improperly crossing hills or turning on hills could cause you to lose control of your ATV or cause the ATV to overturn.
HOW TO AVOID THIS HAZARD
Never attempt to turn your ATV around on any hill until you have mastered the turning technique as described in
this Owner's Manual.
Practice these maneuvers first on level ground.
Be very careful when turning your ATV on any hill.
Avoid crossing the side of a steep hill, if possible.
When crossing the side of a hill on an ATV:
* Always follow proper procedures as described in this Owner's Manual.
* Avoid hills with slippery or loose surfaces.
* Shift your weight to the uphill side of the ATV.
OK
OK
18
Indicates a potential hazard that could
result in serious injury or death.
Page 23
WARNINGS
POTENTIAL HAZARD
Stalling, rolling backwards, or improper dismounting while climbing a hill on your ATV.
WHAT CAN HAPPEN
Stalling, rolling backwards, or improper dismounting could result in the ATV overturning.
HOW TO AVOID THIS HAZARD
Select the proper transmission gear and maintain a steady speed when climbing
If you lose all forward speed:
If you begin rolling backwards:
POTENTIAL HAZARD
Improperly riding your ATV over obstacles.
WHAT CAN HAPPEN
Improperly riding over obstacles could cause you to lose control of your ATV or cause a collision. A loss of control or a collision could cause the ATV to
overturn.
* Keep your weight uphill
* Apply the brakes
* Engage the brake lever lock (parking brake) after you are stopped
* Keep your weight uphill
* Apply the brakes while rolling backwards
* When the ATV comes to a full stop, engage the brake lever lock (parking brake) and dismount
the ATV on the uphill side, or to the side pointed uphill
* Turn the ATV around so it faces downhill and remount following the procedure described in this
Owner's Manual
HOW TO AVOID THIS HAZARD
Before operating your ATV in a new area, check for obstacles. Never attempt to ride your ATV over large obstacles, such as large rocks or fallen trees.
When you go over obstacles, always follow the proper riding procedures as described in this Owner's Manual.
Indicates a potential hazard that could
result in serious injury or death.
19
Page 24
WARNINGS
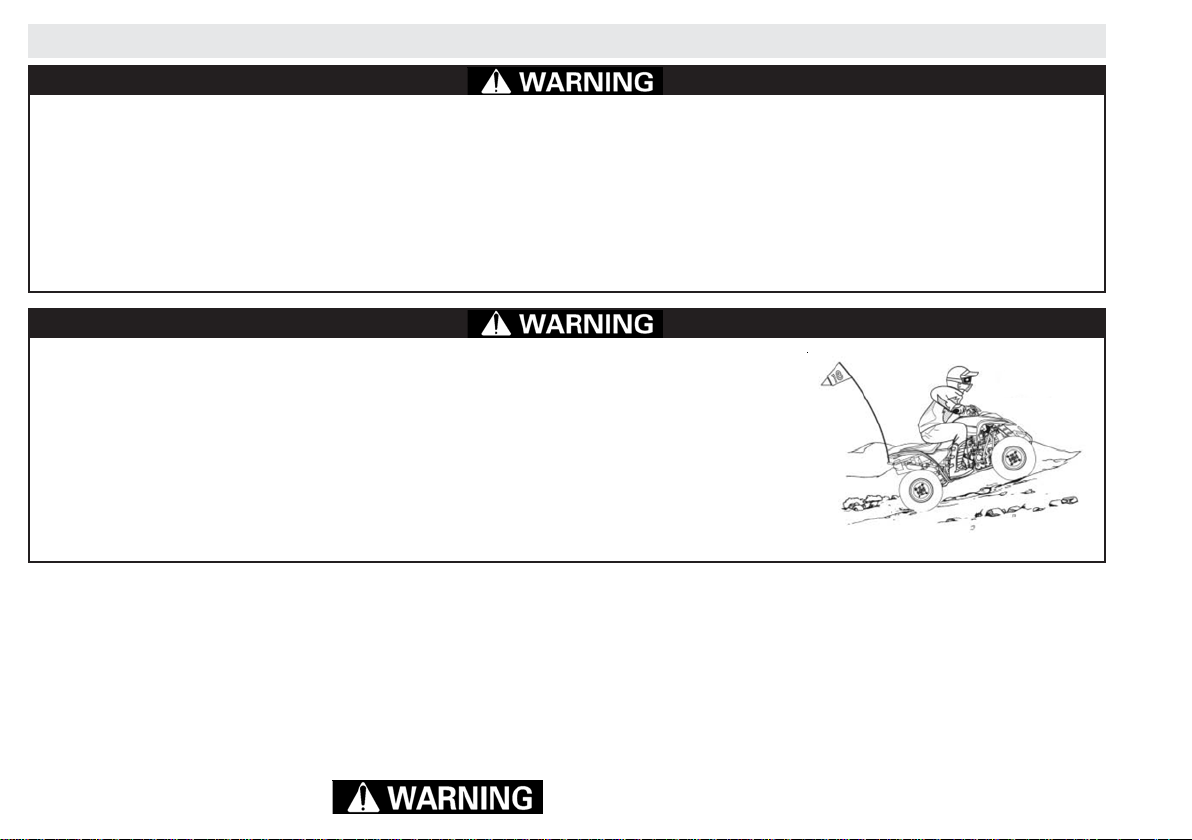
POTENTIAL HAZARD
Skidding or sliding when riding your ATV.
WHAT CAN HAPPEN
Skidding or sliding could cause you to lose control of your ATV. When skidding or sliding, your ATV might regain traction unexpectedly which could cause
the ATV to overturn
HOW TO AVOID THIS HAZARD
Learn to safely control skidding or sliding by practicing on your ATV at slow speeds and on smooth terrain. On extremely slippery surfaces such as ice, go
slowly and be very cautious to reduce the chance of skidding or sliding your ATV out of control.
POTENTIAL HAZARD
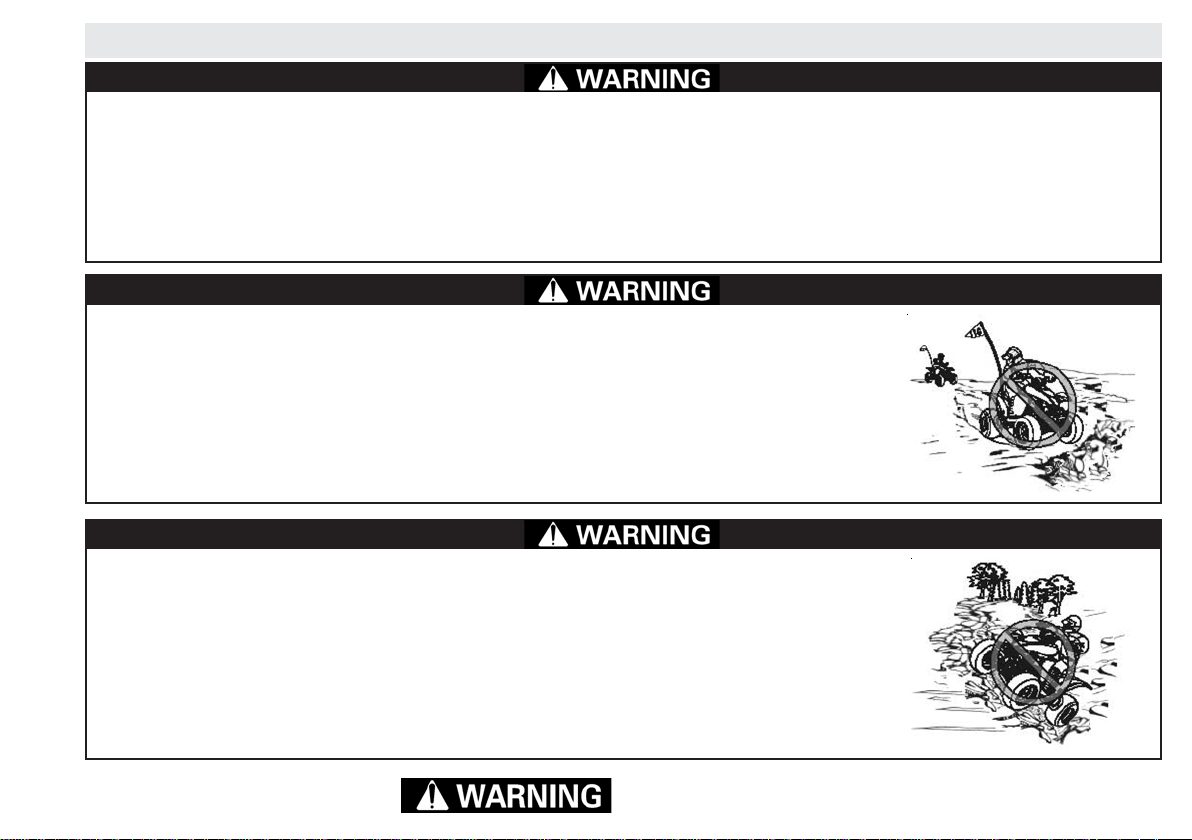
Operating your ATV through deep or fast flowing water.
WHAT CAN HAPPEN
Y our ATV's tires may float, causing loss of traction and loss of control, which could lead to an accident. Water can also reduce the stopping capability of your
ATV’s braking system.
HOW TO AVOID THIS HAZARD
Never operate your ATV in fast flowing water, or in water deeper than the footrests. Remember that wet brakes may have reduced stopping capability. Test
your ATV's brakes after leaving water. If necessary, apply the brakes smoothly several times to dry the pads, drums and rotors.
POTENTIAL HAZARD
Improperly operating your ATV in reverse.
WHAT CAN HAPPEN
You could hit an obstacle or person behind you with the ATV, resulting in serious injury.
HOW TO AVOID THIS HAZARD
Before you engage reverse gear, make sure there are no obstacles or people behind you. When it is safe to proceed, operate the ATV in reverse at slow
speeds.
20
Indicates a potential hazard that could
result in serious injury or death.
Page 25

WARNINGS
POTENTIAL HAZARD
Operating your ATV with improper tires or with tires that have improper or uneven tire pressure.
WHAT CAN HAPPEN
The use of improper tires on your ATV, or riding your ATV with improper or uneven tire inflation, could cause you to lose control of the ATV,
increasing the chance of an accident..
HOW TO AVOID THIS HAZARD
Always use the proper tire sizes and types as specified in this Owner's Manual. Always maintain proper tire pressure in your ATV's tires, as
described in this Owner's Manual.
POTENTIAL HAZARD
Operating your ATV with improper modifications.
WHAT CAN HAPPEN
Improper installation of accessories or modifications to your ATV may cause changes in handling which, in some situations, could lead to an accident.
HOW TO AVOID THIS HAZARD
Never modify your ATV or install accessories that are not specifically designed for your ATV. All parts and accessories added to this ATV should be
genuine KYMCO ATV components designed for use on your ATV, and should be installed and used according to the installation instructions. Never
install a twist-grip type throttle. If you have questions about personalizing your ATV, consult an authorized KYMCO ATV dealer.
POTENTIAL HAZARD
Overloading your ATV or carrying loads or towing cargo improperly.
WHAT CAN HAPPEN
Improper loading and towing could cause changes your ATV's handling characteristics, which could lead to an accident.
HOW TO AVOID THIS HAZARD
Never exceed the stated load capacity of your ATV (as noted in this Owner's Manual). Cargo should be properly distributed and securely attached.
To aid in controlling your ATV, reduce speed when carrying cargo or pulling a trailer, and allow greater distances for braking. Always follow the
instructions and recommendations in this Owner's Manual for carrying cargo or pulling a trailer.
Indicates a potential hazard that could
result in serious injury or death.
21
Page 26
PREVENTION
OVEROVER
OVER
OVEROVER
VIEWVIEW
VIEW
VIEWVIEW
When riding an ATV, PREVENTION is the name of the game.
"Had you only known" something could go wrong, you would
have prevented it. If you do not take notice of the current terrain and its specific conditions before riding your ATV, you increase the risk of losing control over the situation. Using ATV
prevention techniques will help you forecast potential hazards
before they injure you or damage your ATV.
Following the safety instructions and warnings in this manual
will help you "P.A.S.S." the safety test. P .A.S.S. stands for "Prevention," "Active Riding," "Sound Judgment," and "Supervision."
Remembering P.A.S.S. and what it stands for will help you have
a safe, enjoyable ride every time you go out to enjoy your ATV.
SAFE RIDING CLSAFE RIDING CL
SAFE RIDING CL
SAFE RIDING CLSAFE RIDING CL
OO
THING THING
O
THING
OO
THING THING
AND GEARAND GEAR
AND GEAR
AND GEARAND GEAR
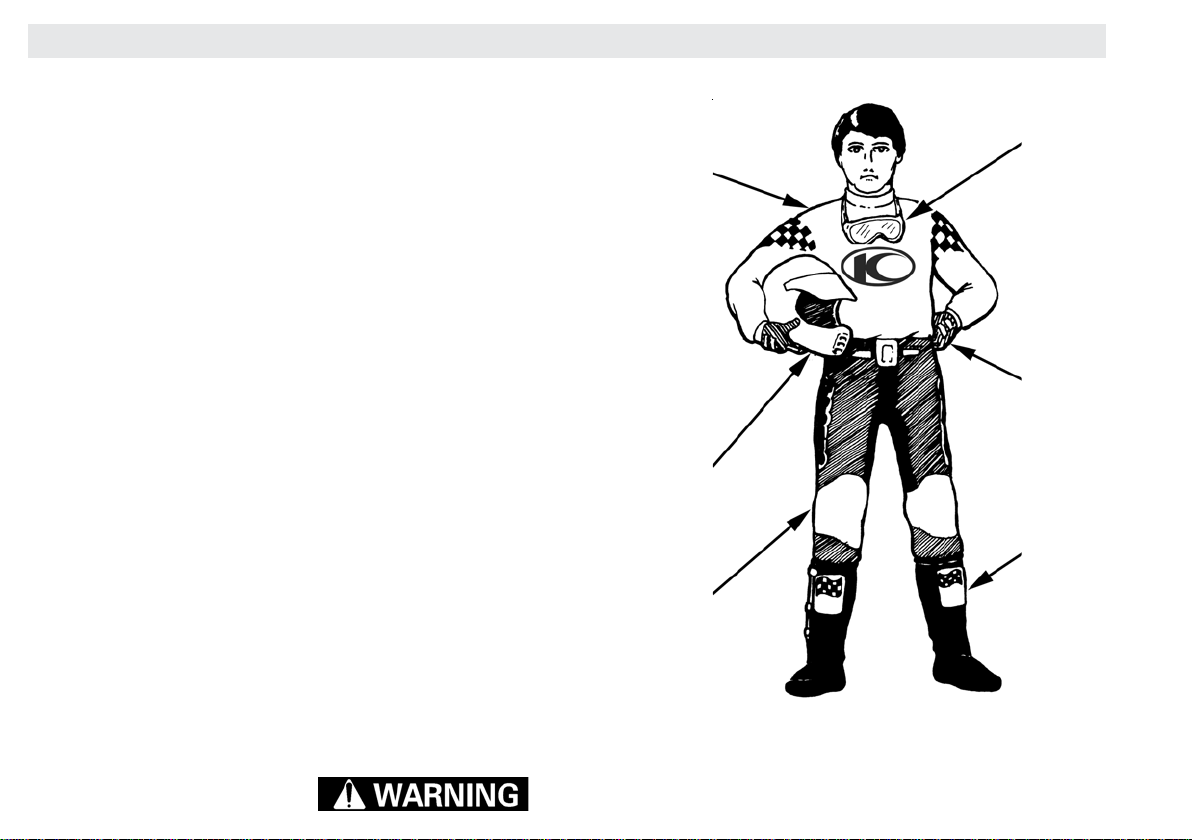
Always wear clothing suited to the type of riding you will be
doing. ATV riding requires special protective clothing which will
make you feel more comfortable and reduce the possibility of
injury. It is important to dress correctly for ATV riding in order to
prevent scraped skin and serous head injuries. Practicing
proper prevention in advance is simple and may prevent the
inconvenience of having to attend to injuries. It is also important to take into account specific climate and weather conditions where you will be riding. Wear a liner under your helmet
and layers of clothing during cooler weather and lighter, protective clothing when it is warmer. The following sections review the minimum protective gear you need to wear during
every ride.
Protective clothing
(jersey)
Helmet
Protective
clothing (pants)
Eye protection
(goggles)
Gloves
Boots
22
Indicates a potential hazard that could
result in serious injury or death.
Page 27

PREVENTION
GLGL
OO
VES VES
GL
O
VES (hand protection)
GLGL
OO
VES VES
Your hands are targets for flying objects and branches. Along
with providing skin protection, gloves will shield your hands
from harsh weather. Wear gloves that are weather resistant
and have a gripping surface to keep them from sliding off the
handlebars. Off-road style gloves with knuckle pads are the
best for comfort and protection.
BOOBOO
TS TS
BOO
TS (foot & ankle protection)
BOOBOO
TS TS
Wear a boot that covers the largest possible area of your leg
(preferably up to your knee) and can handle significant impact. Choosing boots with low heels and a good tread will help
prevent your feet from slipping off the footrests in wet or rugged conditions or getting hurt if they get hit by rocks, dirt, or
branches.
HELMET HELMET
HELMET (head protection)
HELMET HELMET
Your helmet is your most important piece of protective gear for
safe ATV riding. A proper helmet can prevent a severe head
injury. The best type of helmet is a full-face type that provides
protection to the wearer's face as well as the head.
If you drop or damage your helmet, get a new one immediately. Your helmet may not protect your head from injury if it
has cracks, fissures, or other damage to its outside or to the
core padding and liner (which are designed to absorb the energy of an impact).
Remember, even the best helmet is ineffective if it is not the
proper size and the chin strap is not fastened.
GOGGLES GOGGLES
GOGGLES
GOGGLES GOGGLES
(eye protection)
Always wear eye protection, such as goggles, to completely
surround your eyes to prevent getting dirt or other debris in
your eyes. Do not depend on sunglasses or even prescription
glasses for proper eye protection. Glasses of this type are not
recommended as they do not prevent objects from flying in
through the sides, and the lenses may be damaged upon
impact.
LONG PANTSLONG PANTS
LONG PANTS
LONG PANTSLONG PANTS
(riding pants - body protection)
and
LONG-SLEEVED SHIRLONG-SLEEVED SHIR
LONG-SLEEVED SHIR
LONG-SLEEVED SHIRLONG-SLEEVED SHIR
(jersey - body pr otection)
TT
T
TT
Long-legged pants and long-sleeved shirts can protect your
body from branches, long grass, airborne objects, or anything
else that could scrape your skin. The thicker and more durable
the material, the better protection it will provide. Riding pants
with kneepads, and a jersey with shoulder pads specifically
designed for ATV or off-road motorcycle use will provide the
best protection.
Indicates a potential hazard that could
result in serious injury or death.
23
Page 28

PREVENTION
CONDITION OF CONDITION OF
CONDITION OF
CONDITION OF CONDITION OF
YY
OUR OUR
Y
OUR
YY
OUR OUR
AA
A
AA
TVTV
TV
TVTV
The second step in PREVENTION is checking the condition
of your ATV before you ride it. Chances are good that you will
be using your ATV in some rough terrain and you do not want
something to prevent you from enjoying your ride. Your best
approach is to take steps to ensure that your ATV is properly
maintained so you can avoid equipment failure or a hazardous situation.
You need to check the following items on your ATV
before every ride.
1 Brakes
2 Throttle
3 Tires and Wheels
4 Fluids
5 Lights
6 Electrical
7 Controls and Cables
8 Chassis and Suspension
9 Miscellaneous Items
Inspection of your ATV
An easy way to remember what items you need to check on
your ATV is by using the acronym "T-CLOC."
This acronym means:
TCL CO
TIRES
& WHEELS
Follow the guidelines on the following pages and in the rest
of this Owner’s Manual when inspecting your ATV.
CONTROLS
& CABLES
LIGHTS
& ELECTRIC
OIL
& FUEL
CHASSIS
24
Indicates a potential hazard that could
result in serious injury or death.
Page 29

PREVENTION
TIRES AND WHEELSTIRES AND WHEELS
TIRES AND WHEELS
TIRES AND WHEELSTIRES AND WHEELS
Correct tire pressure is crucial to the proper operation of your ATV.
Consult the SPECIFICATIONS section of this manual for tire pressure guidelines. Incorrect tire pressure can cause poor handling,
instability, and could cause you to lose control of your ATV.
Check:
1 . Tire pressure
2 . Tire surface (tread and sidewall)
While checking your ATV's tire pressure, inspect the tread and the
sidewalls of the tires for cracks, cuts, or other damage. Immediately replace any tire that is damaged..
CONTRCONTR
CONTR
CONTRCONTR
With your ATV's engine running and parking brake applied, check
the transmission operation by shifting into each drive mode: forward, neutral, and reverse. After testing, shift back into neutral and
turn the engine off before dismounting.
Check:
OLS OLS
OLS
OLS OLS
1. Forward
2. Neutral
3. Reverse
AND CABLESAND CABLES
AND CABLES
AND CABLESAND CABLES
A. BRAKESA. BRAKES
A. BRAKES
A. BRAKESA. BRAKES
Squeeze the ATV's hand brake lever. If the lever does not feel
firm, or if it feels soft or "weak," the brake system could be low on
fluid or have a leak.- refer to the GENERAL MAINTENANCE section of this manual for instructions. Do not use your ATV unless
the brakes are operating normally.
Test the parking brake (brake lever lock) to confirm that it locks
the hand brake lever into position then disengage it to release the
brake. Be sure that the rear brake pedal (the auxiliary brake) near
the footrest is working. The brakes on your ATV are essential for
safety and could fail if they are not maintained properly.
Check:
1. Hand brake lever
2. Rear brake pedal (auxiliary brake pedal)
3. Parking brake (brake lever lock)
BB
..
THRTHR
OO
B
BB
.
..
THR
THRTHR
TTLETTLE
O
TTLE
OO
TTLETTLE
Your ATV's throttle lever should have a free, smooth range of
motion. If it seems to "stick" at any point, or does not return when
released, refer to the GENERAL MAINTENANCE section of this
manual for instructions. Riding your ATV with a sticking throttle
can cause you to lose control of your ATV and could cause an
accident. Do not ride your ATV if the throttle action is not smooth
and the lever does not return after it is released.
Check:
1. Free, smooth range of motion
2. The lever returns after it is released
Indicates a potential hazard that could
result in serious injury or death.
25
Page 30

PREVENTION
LIGHTS AND ELECTRICLIGHTS AND ELECTRIC
LIGHTS AND ELECTRIC
LIGHTS AND ELECTRICLIGHTS AND ELECTRIC
Turn your ATV's hi-beam and low-beam on and off to make sure
they work. At the same time, check that the taillight and brake
lights work. Also, check the status/warning indicators (reverse,
neutral, and hi-lo beam) on the dash when you start the ATV.
Check the ignition switch and engine stop switch operation. Do
not ride your ATV unless all the systems are working properly.
Check:
1. Headlight hi-beam
2. Headlight low-beam
3. Taillight/brake light
4. Status/warning indicators
Check:
1. Ignition switch
2. Stop switch
OIL AND FUELOIL AND FUEL
OIL AND FUEL
OIL AND FUELOIL AND FUEL
Start with a full tank of gas before every ride, and make sure the
oil is at the proper level. Don't forget to check for fluid leaks around
the ATV. Watch the overheat indicator on the dash to ensure the
engine coolant level is adequate.
Check:
1. Gas
2. Oil
3. Fluid leaks
CHASSISCHASSIS
CHASSIS
CHASSISCHASSIS
Grass, leaves and other debris can get entangled in your ATV's
suspension and shocks. Keep the suspension arms, shock springs,
and fenders clean and free of debris. Check the steering smoothness by turning the handlebar full-left and full-right. Make sure
there is no binding, restrictions, free-play, or looseness in the steering components.
Check:
1. Suspension arms
2. Shock springs
3. Fenders
4. Steering
MISCELLANEOUS ITEMSMISCELLANEOUS ITEMS
MISCELLANEOUS ITEMS
MISCELLANEOUS ITEMSMISCELLANEOUS ITEMS
Inspect your ATV's air filter. Look for debris or damage that may
indicate you need to replace it, as a clogged filter can prevent your
engine from running. Check the battery terminals for tightness and
corrosion. Also, be sure to tighten any loose parts, nuts, or bolts
on the chassis.
Check:
1. Air filter
2. Battery
3. Tighten chassis fasteners, any loose parts
26
Indicates a potential hazard that could
result in serious injury or death.
Page 31

PREVENTION
FIRST FIRST
FIRST
FIRST FIRST
Before riding your ATV, you need to prepare for the unexpected.
Emergencies and accidents are traumatic, but the situation can
be worse if your are not prepared for it. During every ride, you
should have the following items on board your ATV:
For ATV rides that are longer in duration and distance, you should
carry these additional items:
TOOLSTOOLS
TOOLS
TOOLSTOOLS
Routine maintenance on your A TV will generally eliminate the need
for emergency repairs. However, riding on rough terrain can cause
nuts, bolts, and other fasteners to become loose. Carrying this
Owner's Manual and the right tools on your ATV can prevent an
inconvenience from becoming a more serious problem.
Carry these items on your ATV:
WAWA
WA
WAWA
Water is so important that you need to carry it regardless of the
duration of your ride. Heat exhaustion and heat stroke can occur
AID AID
AID
AID AID
AND SURAND SUR
AND SUR
AND SURAND SUR
VIVVIV
VIV
VIVVIV
ALAL
AL
ALAL
* Tools * Water
* Identification * First Aid Kit
* Cellular Telephone * Maps/GPS
* Emergency Kit with Flashlight and First Aid Kit
1. Spare light bulbs
2. Duct tape
3. Rope
4. Spark plugs
5. Spare parts (fuses)
6. Tool kit
TERTER
TER
TERTER
suddenly and without warning. If you become dehydrated, you could
find yourself physically unable to safely operate your ATV.
IDENTIFICAIDENTIFICA
IDENTIFICA
IDENTIFICAIDENTIFICA
TIONTION
TION
TIONTION
If something does happen to you, the emergency personnel will
need to know who you are and whom to contact. It is possible you
may be unable to give them that information. Put your I.D. in your
pocket before you ride. Without it, you are anonymous.
CELLCELL
CELL
CELLCELL
ULAR ULAR
ULAR
ULAR ULAR
TELEPHONETELEPHONE
TELEPHONE
TELEPHONETELEPHONE
It may be necessary to make an urgent phone call or to alert friends
and family where you are.
MAPS/GPS MAPS/GPS
MAPS/GPS (Global Positioning System)
MAPS/GPS MAPS/GPS
Maps may be unnecessary when you are familiar with the area,
but when you are riding on unfamiliar trails, it is good to know
where you are, what is coming up, and how to find your way home.
EMEREMER
EMER
EMEREMER
GENCY KIT GENCY KIT
GENCY KIT (with Flashlight & First Aid Kit)
GENCY KIT GENCY KIT
You will need several items in your ATV's Emergency Kit including
a flashlight. Matches will come in handy if you need to start a fire to
stay warm, and flares are appropriate for signaling for help. A first
aid kit is very important if an injury of some type should happen,
your kit should include bandages, antiseptic spray, gauze and tape.
Carry these items on your ATV (or your person):
1. Flashlight
2. Matches
3. Flares
4. First Aid Kit
5. Money
Indicates a potential hazard that could
result in serious injury or death.
27
Page 32

ACTIVE RIDING
OVEROVER
OVER
OVEROVER
"Active Riding" is the second part of "P.A.S.S." It involves an understanding of how your body weight, balance, gravity, and physical forces affect the handling of your ATV . For example, when you
turn an automobile quickly into a sharp turn, your body is pulled to
the outside of the vehicle by centrifugal force. While an automobile is relatively stable in comparison, enough centrifugal force
can cause an ATV to overturn. Constantly shifting your weight is
one major difference between driving an automobile and riding
an ATV. Knowing how to shift your weight is necessary to avoid
rolling or flipping your ATV.
BASIC OPERABASIC OPERA
BASIC OPERA
BASIC OPERABASIC OPERA
Active riding and basic maneuvers are the foundation of your ATV
ride. Without basic skills, it is impossible to advance to the level of
active riding.
These are your basic maneuvers:
VIEWVIEW
VIEW
VIEWVIEW
TING MANEUVERSTING MANEUVERS
TING MANEUVERS
TING MANEUVERSTING MANEUVERS
* Mounting the ATV
* Starting the Engine
* Starting a Cold Engine
* Braking/Stopping
* Shifting
* Parking
* Dismounting the ATV
MOUNTING THE ATV
Use care when mounting your ATV. While your ATV is a fourwheel vehicle, you still must use care to not upset the chassis
when mounting it.
To get seated:
1. From the left side of the ATV, grab the left-side
handlebar, apply the brake, and put your left foot
on the footrest
2. Grab the right-side handlebar
3. Swing your leg over the seat and set your right
foot down on the right-side footrest
4. Get seated in a comfortable position
5. Always keep your feet planted on the footrests
STST
ARAR
ST
STST
AR
ARAR
TING TING
TING
TING TING
THE ENGINETHE ENGINE
THE ENGINE
THE ENGINETHE ENGINE
Always start your ATV when it is at rest on a flat, level surface.
Carbon monoxide poisoning can kill you, so never run your ATV’s
engine in an enclosed space.
Follow these steps to start your ATV:
1. Climb up onto the ATV and sit down.
2. Engage the parking brake (brake lever lock)
3. Shift into neutral
4. Turn on the ignition switch
5. Move the emergency stop switch to RUN
6. Press the starter button
7. Let the engine warm up
28
Indicates a potential hazard that could
result in serious injury or death.
Page 33

ACTIVE RIDING
An easy way to remember the starting procedure for your
ATV is by using the acronym "BONE-C."
This acronym means:
BON CE
BRAKES
LOCKED
STARTING A COLD ENGINE
NOTE: Do not to touch or compress the throttle lever
when starting a cold engine, as this will prevent the
engine from starting easily.
IGNITION
SWITCH ON
NEUTRAL
TRANSMISSION
ENGINE
SWITCH
AUTOMATIC
CHOKE
11
1
11
2. Press the starter button. Do not hold the starter button down for
more than eight seconds.
1. Turn off all electrical accessories (hand warmers, lights, etc.),
then rotate the ignition switch key to the first position (ON) leaving the headlights OFF. Note that the "N" indicator will be illuminated on the dash display.
NOTE: If the air temperature is at 32° F (0° C) or colder,
pump the primer lever
11
1 three times. To access the
11
primer lever, the seat and right-side heat shield must
be removed.
11
1
11
Allow 30-seconds between starting attempts to allow the
starting motor to cool. Continuous starting attempts will
result in overheating and damage to the starting motor.
3. If the engine does not start, press the starter button for another
eight seconds.
NOTE: If the engine does not start at this point, pump
the primer lever
11
1 three more times and press the
11
starter button for eight seconds.
4. Once started, allow the engine to warm up for approximately
two to three minutes, or until the ATV will accept throttle and
accelerate smoothly.
Indicates a potential hazard that could
result in serious injury or death.
29
Page 34

ACTIVE RIDING
BRAKING / STOPPING
Always allow plenty of room and time to stop your ATV safely. Be
alert and prepared, as sometimes quick stops are inevitable.
Whether you are stopping slowly or stopping quickly, follow these
braking guidelines:
SHIFTING
This KYMCO A TV is equipped with an automatic, dual-range transmission with reverse capability. To shift your ATV into the different
drive modes, follow these steps:
1. Squeeze the brake lever on the left handlebar to apply both the
front and rear brakes.
2. If your wheels lock, release the brake lever for a second, then
apply the brakes again.
3. Avoid prolonged application of the brakes. Even maintaining
minimal pressure on the brake lever will cause the brake pads
to drag on the brake rotor and may cause overheating of the
brake fluid.
Prolonged and repetitive use of the ATV's hydraulic brake
for high speed stops will cause overheating of the brake
fluid and premature brake pad wear which can cause unexpected loss of braking ability.
Use only KYMCO approved brake fluid. Never substitute
or mix different types or grades of brake fluid, as unexpected loss of braking ability can result. Check the ATV's
brake fluid level and pad wear before each use. The loss of
braking ability can result in severe injury or even death.
Indicates a potential hazard that could
30
result in serious injury or death.
LOW range
HIGH range
Neutral
Reverse
1. To engage the HIGH range from neutral, move the shift lever
forward.
2. To engage the LOW range from HIGH range, move the shift
lever outward and forward.
NOTE: The HIGH range is for normal riding with light
loads. The LOW range is for carrying heavy loads or
trailer towing. Compared to HIGH range, the LOW range
position provides slower speed and greater torque to
the wheels.
Page 35
ACTIVE RIDING
Always shift the transmission into LOW range when
operating on wet or uneven terrain, when towing or
pushing heavy loads, or when using a plow. Failure to
follow this caution may result in premature V-belt failure or other damage to the drive system.
3. To engage reverse gear from neutral, move the shift lever
forward, outward and back to the “R” position.
Never shift the transmission while your ATV is in motion. Should your ATV be on a surface that is not level,
engage the parking brake (brake lever lock) before shifting into another transmission range or into reverse.
Do not start the engine or operate your ATV with the
clutch shield removed. Severe injury could result.
PARKING
Parking your ATV involves the same guidelines as braking, as
well as the following guidelines:
1. After the ATV is stopped, shift into neutral
2. Stop the engine using the engine stop switch
3. Turn off the ignition switch
4. Always try to park your ATV on level ground. If you have to park
on a hill, shift the ATV’s transmission into low gear.
5. Engage the parking brake (brake lever lock)
DISMOUNTING YOUR ATV
To park and dismount from your ATV:
1. Doublecheck that the parking brake (lever lock) is engaged
2. Swing your right leg over to the left side of the seat
3. Step to the ground on the left side of the ATV
HOW TO HANDLE THE ATV
(Active Riding Techniques)
Active riding involves moving your body as you maneuver your
ATV. You must learn to lean and shift your weight into your
turns to maintain control of your ATV. Your safety depends on
using safe riding techniques.
Safe riding techniques include:
* Starting
* Leaning, Weight Shift, and Balance
* Wide Turns * Sharp Turns
* Quick Turns * K-Turns
* Riding Uphill * Riding Downhill
* Sidehilling/Transversing
* Swerving * Crossing Obstacles
Indicates a potential hazard that could
result in serious injury or death.
31
Page 36

ACTIVE RIDING
ST ARTING
Once the engine is warm, your ATV is ready to ride.
1. Keep both of your feet on the footrests and both hands on
the handlebars at all times
2. Hold the brake lever, and release the parking brake (lever lock)
3. Shift the transmission into gear
4. Release the brake lever slowly and apply the throttle
LEANING, WEIGHT SHIFT,
AND BALANCE
When you turn your ATV, the goal is to move forward and slide
over to the side of the seat that is on the inside of the turn.
Support your body weight on the outside footrest and lean your
body into the inside of the turn. Pay attention to the ATV's handling. If you feel the tires coming off the ground, reduce speed,
shift more of your body weight to the side of the ATV that is
lifting, and make the turn wider if possible.
32
Indicates a potential hazard that could
result in serious injury or death.
Page 37

ACTIVE RIDING
WIDE TURNS
About 20% of ATV accidents happen during turns. If you don't
understand turning techniques, you can lose control of your ATV
by losing traction, plowing, or tipping. Use this riding method for
wide turns:
1. Ease off the throttle as you approach the turn to slow down
2. Use the principles of leaning, weight shifting, and balancing:
shift your body weight to the inside of the turn
3. Gradually increase your speed as you come out of the turn
SHARP TURNS
After mastering wide turns, practice the advanced skill of sharp
turns. Use this riding method for sharp turns:
1. Ease off the throttle as you approach the turn to slow down
2. Use the principles of leaning, weight shifting, and balancing:
shift your body weight to the inside of the turn
3. You might have to lean into the turn more than you do in a
wide turn
4. If shifting your weight and balance aren't enough to keep
your ATV's tires on the ground, straighten out the handlebars as much as you can
5. Gradually increase your speed as you come out of the turn
Indicates a potential hazard that could
result in serious injury or death.
33
Page 38

ACTIVE RIDING
QUICK TURNS
Quick turns are the most difficult turns, and should only be
attempted after you have become very familiar with the handling characteristics of your ATV. Use this riding method for
quick turns:
1. Ease off the throttle as you approach the turn to slow down
2. Turn the handlebars, shift your weight, and balance at the
same time as you enter the turn (use the principles of leaning, weight shifting, and balancing: shift your body weight to
the inside of the turn)
3. Follow your weight shift with slight acceleration
4. For multiple turns, repeat this movement as needed
5. To make your turn quicker, try raising yourself off the seat a
few inches as you shift your weight to your outside foot
34
Indicates a potential hazard that could
result in serious injury or death.
Page 39

ACTIVE RIDING
K-TURNS
Use the K-turn maneuver if you accidentally stall your A TV while
riding uphill. Using a K-turn will enable you to point the ATV
downhill in a controlled manner and prevent the ATV from rolling back. Use the turning method on this page for K-turns:
1. Stop where you are, apply the brakes, and shift the transmission into neutral
2. Shut off the ATV's engine
3. Keep your body weight shifted forward
4. Dismount the ATV on the uphill side
5. If you are to the left of the ATV, turn the handlebar all the
way to the left
6. Partially release the brake, but lightly hold the brake lever
so you can control the ATV rolling
7. Let the ATV roll slowly to your right side until it faces slightly
downhill
8. Reapply the brakes firmly
9. Remount the ATV from the uphill side, and keep your weight
shifted uphill when you sit down
10. Start the engine and follow the method for riding downhill
Indicates a potential hazard that could
result in serious injury or death.
35
Page 40

ACTIVE RIDING
RIDING UPHILL
Approximately 20% of ATV accidents that happen while riding
on hills and as a result of the ATV rolling or flipping. Use extreme caution when riding your ATV on hills, and use this
method for riding uphill.
1. Shift the transmission down a gear and accelerate before
you start climbing; then maintain a steady pace
2. Lean as far forward as possible. For steeper hills, lift slightly
off of the ATV's seat, stand and lean forward
3. If you lose speed, quickly shift to a lower gear (on an ATV
with a manual transmission), or carefully apply more throttle
(on an ATV with a automatic transmission). Be prepared to
release the throttle (so your front tires won’t lift), OR
4. If that doesn't work and you still have forward motion and
the terrain permits, do a U-turn, go back down, and try climbing again, OR
5. If you have lost all forward motion, use the K-turn maneuver
to go safely down the hill
NEVER RIDE YOUR ATV UP OR DOWN
HILLS STEEPER THAN 25
O
36
Indicates a potential hazard that could
result in serious injury or death.
Page 41

ACTIVE RIDING
RIDING DOWNHILL
Success in riding downhill depends on how familiar and skilled
you are with using your ATV's brakes. Use care to balance
braking force and downhill speed so you don't lose control and
flip your ATV over. Use this method for riding downhill.
If you're in a situation where you absolutely have to sidehill on
your ATV, use this riding method:
1. Shift your body weight as far back on the seat as possible
2. Select a low gear; stay out of neutral
3. Lightly apply the brakes and use very little throttle
SIDEHILLING / TRAVERSING HILLS
Sidehilling requires advanced ATV riding skills, as the terrain
can be difficult and unpredictable. Whether your skills are advanced or not, try to avoid this kind of riding.
1. Keep your ATV's speed low and consistent
2. Shift all your body weight to the uphill side of the seat; also,
support your weight on the uphill footrest
3. Steer as if you are driving into the hill
4. If your ATV feels like it may tip over, turn the handlebar
downhill. If that is not possible because of the terrain or
other conditions, or if it just does not work, stop and get off
the ATV. Dismount your ATV on the uphill side.
Indicates a potential hazard that could
result in serious injury or death.
37
Page 42

ACTIVE RIDING
SWERVING
Swerving is an emergency maneuver required to avoid an obstacle, but is similar in action to a quick turn. Swerving differs
as a quick turn involves slight acceleration during the turn. Do
not accelerate if you swerve to maintain better control of your
ATV. If you are in a situation where you feel you must swerve
your ATV, use this riding method:
1. Ease off the throttle as you approach the obstacle
2. Turn the handlebar, and at the same time, shift your weight
and balance as you swerve. Using the principles of leaning,
weight shifting, and balancing, shift your body weight to the
inside of the turn
3. Avoid using the brakes until the obstacle avoidance swerve
is complete and you have regained full control of your ATV
38
Indicates a potential hazard that could
result in serious injury or death.
Page 43

ACTIVE RIDING
CROSSING OBSTACLES
Crossing obstacles is dangerous, and even experienced ATV
riders should avoid this practice if possible. Riding over logs,
rocks, and ruts means you must combine all the active riding
skills into one big motion. Your ATV will respond differently for
different obstacles (logs, ruts, etc.), but these are general guidelines for overcoming two-track (both tires contacting the obstacle at the same time) obstacles:
1. Keep the ATV's speed very low - less than 5 MPH
2. Approach the obstacle head-on
3. Lift up slightly off the seat
4. Keep your weight on the footrests
5. Apply a slight amount of throttle when the front tires make
contact with the obstacle
6. Lean forward and release the throttle when the front tires
clear the obstacle
7. Keep your body loose to absorb any shock from going over
the obstacle
8. If the ATV begins to tip, shift your weight to maintain balance
To clear a single-track (only one tire contacts the obstacle)
hazards, follow the same guidelines, except:
1. Use the ATV's momentum to clear the obstacle
2. Do not pull up on the handlebar
3. Do not apply the throttle
Indicates a potential hazard that could
result in serious injury or death.
39
Page 44

ACTIVE RIDING
TIPS
Riding an ATV and driving a automobile have some similarities;
however, there are certain situations that require special attention:
* Reversing * Skidding or Sliding
* Parking on a Hill * Stalling on a Hill
* Crossing Water * Crossing Roads
* Riding in Cold Weather
* Stopping the ATV * Stopping the Engine
REVERSING
Remember, it is difficult to see behind you as you back up your ATV.
1. Proceed slowly, using a slight amount of throttle
2. Keep your handlebar straight.
3. Avoid backing down hills; use a U-turn or K-turn to turn around
SKIDDING or SLIDING
Be careful: it's easy to lose control of your ATV riding through
sand, ice, mud, or water. Follow these suggestions on controlling
a skid or slide:
1. Turn your handlebar into the direction of the slide
2. Avoid using the brakes until you are out of the skid
3. Shift your weight forward.
Sometimes your ATV may not respond and will go straight ahead in-
stead turning.
1. Slow down and move forward on the seat
2. Lean to the inside of the turn and turn the handlebar
Indicates a potential hazard that could
40
result in serious injury or death.
PARKING ON A HILL
In the rare case you need to park your ATV on a hill:
1. Keep the ATV’s transmission in gear
2. Engage the parking brake (lever lock)
3. Find something to block the rear tires
STALLING ON A HILL
If you use the proper method for riding your ATV uphill, you should
avoid this situation. If you stall on a hill, follow these guidelines:
1. If your ATV has not started rolling backwards yet, follow the
procedure for the K-turn, OR
2. If your ATV is already rolling backwards, lean as far forward as
possible, standing up on the footrests
3. Gently apply the parking brake (lever lock)
4. When you come to a stop, perform a K-turn
5. If your ATV continues to roll backward, dismount immediately
on the uphill side
CROSSING WATER
Your ATV can only handle water up to its footrests. Crossing
water deeper than that risks engine damage and/or personal
injury. Avoid fast moving water. ATV tires can be buoyant, so if
the water is too deep, your ATV may float.
Riding your A TV through water deeper than the footrests may
lead to severe engine damage due to water ingestion.
Page 45

ACTIVE RIDING
NOTE: Engine damage caused by water ingestion or im-
mersion will not be covered by your KYMCO warranty.
1. Physically check the depth and current of the water, especially
if you can't see the bottom. Look for boulders, logs, or other
submerged obstacles that could impede your crossing
2. Keep your speed steady and slow
3. Make sure you have a way out on the other side of the water
4. If you get stuck in the sludge or mud, try rocking your ATV from
side to side to free it
5. Once you've cleared the water, briefly apply the brakes to make
sure they function
CROSSING ROADS
Crossing paved roads can be dangerous and should be avoided.
However, if you must cross a road follow these guidelines:
1. Before crossing, stop completely on the shoulder of the road
2. Check both directions for oncoming traffic
3. Do not cross near a blind corner or intersection because the
lack of visibility is dangerous
4. Ride straight across the road to the opposite shoulder
5. Be aware that since your ATV could stall, give yourself enough
time to cross and get off the road
6. Assume that oncoming vehicles cannot see you, and if they do,
they may not be able to predict your actions
7. It is illegal to cross public roads in some states and communities. Become aware of your local laws
RIDING IN COLD WEATHER
NOTE: Check that all control levers move freely. Make
sure that the footrest, shift lever, and rear brake pedal
are free of ice and snow.
For your personal safety, it is very important to wear
cold-weather clothing that will be appropriate for the
coldest anticipated temperatures.
1. With the transmission in neutral, move the ATV forwards and
backwards to see if the wheels roll freely. If the ATV will not roll,
the tires may be frozen to the ground or the brake pads may be
frozen to the brake rotors or drums
2. If the tires are frozen to the ground, pour warm water around
them to melt the ice
Before riding, manually rock the A TV forwards and backwards to make certain that all the wheels roll freely.
3. If the brakes are frozen, move the A TV to a warmer area to thaw
out the brakes
Do not attempt to free frozen brakes by pouring warm
water on the brake pads, brake rotors or drums.
Indicates a potential hazard that could
result in serious injury or death.
41
Page 46

ACTIVE RIDING
NOTE: After the brakes thaw, dry them by applying
them several times while riding slowly.
NOTE: After riding through water, mud, snow, or
slush, it is important to dry both the front and rear
brake systems before parking your ATV.
Ride slowly and be extra careful when riding on snowcovered or ice-covered terrain. Always be alert to
changing terrain conditions when operating your ATV
in cold or wet weather.
4. Practice driving in an open snow-covered or ice-covered
area at slow speeds before driving on snow-covered or icecovered trails
5. Pay attention to how your ATV responds to steering and braking on the type of terrain you will encounter on your trail ride
STOPPING YOUR ATV
To stop your ATV, first release the throttle lever, then apply the
brakes evenly.
STOPPING YOUR ATV’S ENGINE
To stop your ATV's engine, turn the ignition switch key to the
OFF position or push the emergency stop switch to the OFF
position.
NOTE: Remember to turn the ignition switch to the
OFF position if your ATV is not going to be ridden
so you will not deplete the battery’s energy.
42
Indicates a potential hazard that could
result in serious injury or death.
Page 47

SOUND JUDGMENT
OVERVIEW
Human beings are not invincible, we need to use sound judgment to keep ourselves and others safe from harm. Knowing
that the first "S" in "P.A.S.S" stands for "Sound Judgment"
means you need to use yours when you operate your ATV.
Do you consider yourself to be pretty conservative, or are you
a heavy risk-taker? Before continuing with this section of the
manual on sound judgment, check your RISK FACTOR by
completing this short survey:
1. Do you drive over the speed limit?
1
Never
2. Are you more daring around your friends than when you are alone?
1
Never
3. Do you drive your automobile when the gas gauge is on empty?
1
Never
4. Do you feel that no matter what you do, you won't get hurt?
1
Never
5. Do you drink or use drugs before you drive your automobile?
1
Never
6. Do you drive your automobile even if it has a major problem
with the brakes, tires, or engine?
1
Never
2
Sometimes
2
Sometimes
2
Sometimes
2
Sometimes
2
Sometimes
2
Sometimes
3
Often
3
Often
3
Often
3
Often
3
Often
3
Often
7. Do you thrive on the adrenaline rush you get from speeding and
dangerous situations?
1
Never
2
Sometimes
3
Often
8. Do you hurt yourself because you try to do things that are beyond
your abilities?
1
Never
2
Sometimes
3
Often
9. Do you tailgate other drivers when you think they're driving too
slow?
1
Never
2
Sometimes
3
Often
10. Do you ignore weather reports before you do outside activities
like swimming, camping, fishing, or boating?
1
Never
2
Sometimes
3
Often
Add the totals from survey questions 1 through 10, the total
points indicate your RISK FACTOR.
10 to 15 points indicates that your are fairly conservative. You
probably make safe choices that will help you avoid hurting
yourself and the people around you.
16 to 20 points indicates that you can alternate between conservative and risky choices. Depending on your mood or whom
you're with, the choices you make may help you or hurt you.
21 to 30 points indicates that you are taking risks. You should
reconsider a lot of the judgments you make. You probably put
yourself in dangerous situations that could potentially hurt yourself and the people around you.
Indicates a potential hazard that could
result in serious injury or death.
43
Page 48

SOUND JUDGMENT
ENVIRONMENT
The environment that you will operate your ATV in is often
harsh and sometimes dangerous if you don't take proper
precautions.
WEATHER
You need to consider the weather when you participate in an
outdoor activity such as riding an ATV. It is dangerous to ride
your ATV when the weather is bad or could potentially become
bad. Before starting out on your ATV, check the weather forecast for the location and duration of your ride.
TERRAIN
Always pay close attention to the terrain you're on, even if it is
in an area familiar to you. Do not assume that the landscape
you're used to doesn't change. Changes to landscape can
happen at any time: fences can be constructed and excavations dug in a short period of time. Weather, climate, and development take their toll as well as erosion and other changes
that can affect your ATV's ability to ride smoothly and surely.
Because terrain can constantly change in configuration, you
may not know how it has changed until you get there. Whether
it's familiar or not, check out your surroundings before and
during your ride.
NIGHT RIDING
It is best to avoid riding your ATV at night when visibility is
limited. With little to no light, it is difficult to see what is
around you.
If you must ride at night, proceed slowly and never ride at a
speed that would prevent you from reacting to something that
could come up in the limited view of your ATV's headlamps.
PAVED SURFACES
Avoid riding your ATV on paved surfaces. Your ATV was not
designed for use on pavement and its handling will become
more difficult and unpredictable than when riding on non-paved
surfaces.
44
Indicates a potential hazard that could
result in serious injury or death.
Page 49

SOUND JUDGMENT
TRAIL RIDING
Use sound judgment when trail riding with your ATV. You should only ride on trails that suit your riding ability. If the trail is very
rugged, standing up on your footrests will make it easier for you to endure the rough terrain.
Make yourself visible to others by using your ATV's headlights and taillights. If you stop, pull completely off the trail in a way to
protect yourself, your ATV and the environment.
Outsloped trails (trails that slant to allow rain to run off) make trail riding more challenging. To ride on outsloped trails, keep your
weight shifted towards the uphill of the slope. Proceeding slowly with your weight shifted towards the slope will help you from
sliding off the trail.
Be aware of the rules and the laws that govern the area in which you will be riding your ATV. Learn which trails you can legally
and safely ride on and who else might be on those trails. The signs shown on this page are examples of those currently used
in many areas to designate trail types and restrictions.
TRAIL SIGNS
Indicates a potential hazard that could
result in serious injury or death.
45
Page 50

SOUND JUDGMENT
THOSE AROUND YOU
People do all kinds of things that you can't predict or control.
Be aware of others and their behavior, as it can affect your
enjoyment and safety when your ride your ATV.
Take steps with your riding apparel choices and your actions to
make yourself very visible. Remember, if you can't see other
vehicles coming, that means they cannot see you.
RIDING COMPANIONS
Always leave a lot of space between you and other riders, especially in dusty and dirty conditions when it is difficult to see
the riders in front of you stopping or avoiding obstacles.
Riding with a group of ATV riders is not the same as riding your
ATV alone. You must be more alert, as you cannot predict the
actions of the other riders. Other riders can also be a distraction keeping you from properly scanning the terrain on which
you are riding.
PASSENGERS
You should never carry a passenger on your ATV. Passengers
are prohibited, as it is unsafe for a number of reasons. One
critical reason is the extra weight of the passenger, even a
small person, on the seat makes an ATV difficult to control.
Statistics indicate that about 50% of all ATV accidents involve passengers.
OTHER VEHICLES
Depending on where you're riding, you might encounter other
ATVs, motorcycles, bicycles, or large motor vehicles on roads
and trails. Respect the presence of automobiles and other vehicles if you're crossing roads or riding in public areas.
Indicates a potential hazard that could
46
result in serious injury or death.
HIKERS
Even though your ATV can take you to remote areas, don't
assume that you are alone. Many people participate in hiking,
camping, and other outdoor activities, and these people may
be in remote areas where you would not expect them. For your
safety and theirs, be alert at all times.
EQUESTRIANS
Many people enjoy horses. The trails that are enjoyable for
ATV riding are also well suited for equestrian riding. Watch for
horseback riders and provide them a wide berth so you do not
startle their horses. Approach slowly and if you see the horse
react to your ATV's presence, stop immediately and turn off the
engine until the horse and rider have left the area.
ANIMALS AND NATURE
Respect the outdoors that your ATV enables you to enjoy. Don't
use your ATV to chase animals or birds. Drive around young
trees rather than over them. Keep clear of streams and ditches
with standing water.
Tread Lightly and leave the environment as you found it.
Page 51

SOUND JUDGMENT
EQUIPMENT
The last thing you would expect is that your KYMCO A TV would
break down in the middle of a field. KYMCO products are usually so reliable that sometimes you forget that your ATV, like
any machine, has service needs and usage limitations.
ATV MAINTENANCE
You have to maintain your ATV for your safety, its operational
integrity and to protect your investment. The General Maintenance section of this Owner's Manual tells you how to take
care of your ATV. If at any time, abnormal noises, vibrations, or
improper operation of any component on your ATV is detected,
DO NOT OPERATE YOUR ATV. Take your ATV to an authorized KYMCO ATV dealer for inspection, adjustment or repair.
CARGO LIMITATIONS
One of the reasons why passengers are prohibited on ATVs is
because their presence disrupts the weight and balance of the
ATV. Cargo will do the same if it weighs too much or is positioned improperly. Limit your ATV to the load capacity ratings
identified in the chart on the following page. So if you and
your load weighs over 242 lb. (110 Kg), leave some of that
extra cargo at home. The combined weight limit, including
you and your trailer’s tongue weight, is a specific amount,
so consult the ATV Load Capacity Ratings Chart and adjust
your load accordingly.
Extra cargo weight will negatively affect your ATV's balance if
it's not distributed evenly, side-to-side and front-to-rear. If you
carrying a great deal of cargo and you are heading up an incline, shifting your own weight forward is not enough compensation for too much cargo sitting over the back tires.
Cargo has such a significant affect on ATV handling that you
need to adjust your speed to match your load. Even on level
ground, you should keep your ATV's speed below 10 MPH (16
kph) if you are towing a trailer. Avoid uneven terrain when towing a trailer. Do not forget that your braking distance is going to
increase as you carry more weight or you tow a trailer.
Think about these factors when dealing with cargo:
1. Trailer weight limit
2. Weight distribution
3. ATV speed
PERSONAL CHOICES
A safe, enjoyable ATV ride is dependent on many personal
choices. An ATV, like all motorized vehicles, can be dangerous
to operate if you choose to ignore safety precautions, take unnecessary chances, or ride beyond your ability or your machine's
capability. Don't allow the thrill of freedom or adventure to affect your ability to make good, safe choices.
Indicates a potential hazard that could
result in serious injury or death.
47
Page 52

SOUND JUDGMENT
LOAD CAPACITY RATINGS
KYMCO KYMCO
KYMCO
KYMCO KYMCO
AA
TV Load CaTV Load Ca
A
TV Load Ca
AA
TV Load CaTV Load Ca
pacity Rpacity R
pacity R
pacity Rpacity R
aa
tingstings
a
tings
aa
tingstings
Item Specifications
Max Load Capacity ......................................... 242 lb. (110 Kg)
Tongue Weight .................................................... 35 lb. (16 Kg)
Towing Capacity ............................................. 277 lb. (126 Kg)
SPEEDRACK
When installing Speedrack accessories on your ATV, make
sure to read and carefully follow the instructions provided in
each kit.
NOTE: Use extra caution when operating your ATV
with additional loads such as accessories and/or
cargo. Handling of your ATV may be adversely affected. Reduce speed when adding additional loads.
Max Load Capacity - Total weight of rider and the tongue
weight.
Tongue Weight - Weight on trailer tongue.
Towing Capacity - Total weight of trailer and all cargo in the
trailer.
POTENTIAL HAZARD
Overloading your ATV or carrying loads or towing cargo improperly.
WHAT CAN HAPPEN
Improper loading and towing could cause changes your ATV's handling characteristics, which could lead to an accident.
HOW TO AVOID THIS HAZARD
Never exceed the stated load capacity of your ATV (as noted in this Owner's Manual). Cargo should be properly distributed and securely attached.
To aid in controlling your ATV, reduce speed when carrying cargo or pulling a trailer, and allow greater distances for braking. Always follow the
instructions and recommendations in this Owner's Manual for carrying cargo or pulling a trailer.
48
Indicates a potential hazard that could
result in serious injury or death.
Page 53

SOUND JUDGMENT
ALCOHOL AND DRUG CONSUMPTION
Alcohol is related to 30% of all hospital admissions caused by
ATV accidents in the United States. It is extremely dangerous
to drink alcoholic beverages and ride an ATV. Alcohol, even in
moderation, severely impairs your ability to control an ATV.
Substances to avoid when riding:
1. Alcohol
2. Over-the-counter or prescription drugs
3. Illegal/mood altering drugs
Be aware that prescription and over-the-counter medications
can cause drowsiness and impaired judgment. A wide range
of medications, including allergy, cold, flu, and headache medications, will affect your physical abilities and judgment.
Your physical size and weight will not minimize the effects of
even one antihistamine tablet, so use extreme care if you need
to take medications before you plan to ride your ATV.
Illegal drugs not only inhibit your judgment and ability to ride
your ATV, but there can be severe legal consequences if you
are confronted by law enforcement authorities. The same is
true for excessive alcohol use, so never use alcohol or drugs
before or during your ATV ride.
THE EFFECTS OF ALCOHOL*
The Number of Drinks that
Impair Mental and Physical Abilities
1 to 2 DRINKS Mental processes such as restraint,
awareness, concentration, and judgment are affected, reaction time
slowed; and inability to perform complicated tasks.
3 to 4 DRINKS Depth perception, glare recovery, eye
movement, and focus affected; decreased judgment and control.
5 or more DRINKS Coordination deteriorates; loss of criti-
cal judgment, and impaired memory
and comprehension.
*According to the ATV Safety Institute
Indicates a potential hazard that could
result in serious injury or death.
49
Page 54

SOUND JUDGMENT
YOUR PHYSICAL CONDITION
Being physically exhausted is like being intoxicated. When fatigued, you will not be able to perform detail-oriented tasks and
your coordination will be affected. This will severely inhibit your
ability to ride your ATV safely.
riders use extra care and sound judgment to make sure that the
activities do not get out of hand. Being wise and responsible is the
best way for you and your riding friends to avoid injury or even
death from an ATV accident.
Do not ride:
1. Your ATV when you're tired
RECKLESS RIDING
Riders who have an ATV accident when speeding have a 25%
chance of being hospitalized from the resulting injuries. The faster
you ride your ATV, the more likely a crash can injure your head
and internal organs. Avoid stunts and uncontrolled riding such as
wheelies and jumps that reduce your control and can create greater
injuries or even death if you crash your ATV.
LAWS AND REGULATIONS
Any law enforcement officer will tell you that ignorance of the law
is no excuse for improper behavior. Before operating your ATV,
check out your local, state, or provincial off-road laws. Before starting a ride, make sure that you can legally ride in the proposed
area. Be a good off-road citizen: Illegal or irresponsible riding will
cause authorities and landowners to close riding area.
GROUP BEHAVIOR
It is a proven psychological fact people will do irresponsible and
riskier things in a group that they would never consider doing
when they are alone. When you are riding your ATV with other
Indicates a potential hazard that could
50
result in serious injury or death.
SIPDE
Individually, the safe behaviors and sound judgments listed in this
manual will have limited impact, but combined they become the
foundation of safe and responsible ATV use. When you're paying
attention to your physical condition, when you're monitoring the
movements of your ATV, and when you're constantly evaluating
your environment you are practicing SIPDE.
This acronym means:
SIP ED
SCAN /
SEARCH
IDENTIFY
HAZARDS
PREDICT
WHAT WILL HAPPEN
DECIDE
WHAT TO DO
EXECUTE
THE DECISION
Page 55

SUPERVISION
OVERVIEW
When you allow others to ride your ATV you become responsible
for their safety and their actions. The riding ability of your guests,
their awareness of proper ATV operation, the terrain, and the condition of your ATV must be factored into your decision to allow
others to ride your ATV. Additionally, you can be legally responsible for the actions your guests may take while riding your ATV.
TAKING RESPONSIBILITY
The final letter in the "PASS" acronym stands for SUPERVISION.
As outlined in this manual, there are a number of elements for
enjoyable and safe ATV riding and ownership. As the owner of an
ATV, you are directly responsible to supervise its use.
INEXPERIENCED/UNTRAINED RIDERS
Never let anyone who has not been educated in proper and safe
ATV operation to ride your ATV . Even guests who own an ATV or
who have prior riding experience may not have the foundation of
a formal training course that would have educated them about
safe ATV operation. As the vehicle owner it is your responsibility
to keep uneducated guests (especially under-aged children) off
of your ATV.
EXPERIENCED/TRAINED RIDERS
When anyone borrows your ATV, you become responsible to supervise them and control their actions. Before a guest rides your
A TV, have them take an A TV training course, have them watch the
ATV safety video, and have them read this Owner's Manual. As
the owner of the ATV, you are responsible for their training.
Not every ATV operates in the same way or has the same handling characteristics that your ATV possesses. The riding position
may be different, the controls may differ, and the power delivery
will vary from brand and model of A T V . So regardless of how much
experience your guests may have with ATVs in general, they don't
have experience with your ATV. Spend time with your guests to
make sure they are familiar and comfortable with the operation of
your ATV before you let them ride.
Indicates a potential hazard that could
result in serious injury or death.
51
Page 56

SUPERVISION
ATV RIDER AGE GUIDELINES
Regardless of experience, you should never let anyone under 16-years of age operate your ATV.
KYMCO and the ATV Safety Institute recommend that all ATV operators ride the appropriately sized ATV for their age.
ATV RIDER AGE GUIDELINES
Age (Years) Engine Size (cc) Speed Limitations (MPH)
6 to 11 ................................................................ Up to 70 ............................10 - Governed / 15 - Maximum
12 to 15.............................................................. Up to 90............................15 - Governed / 30 - Maximum
16 & Older...........................................................Over 90 ...........................According to Local Regulations
52
Indicates a potential hazard that could
result in serious injury or death.
Page 57

SECTION 2 - OPERATION & MAINTENANCE
PREFACE
Thank you for choosing this quality KYMCO ATV. It has been
designed and manufactured to provide you with reliable and
enjoyable operation. This Owner's Manual should be considered a permanent part of your ATV and must remain with
the ATV in the event of a resale. If the ATV changes ownership, contact the KYMCO USA Customer Service Department for information on how to register the new owner.
Section 2 of this manual was prepared by the engineers
and service staff of KYMCO to provide you with the information required to operate and maintain your ATV. This section also covers rider-related instructions, as well as service and storage instructions. If your ATV ever requires repairs or service, contact an authorized KYMCO ATV dealer
for professional service.
PARTS AND ACCESSORIES
When you need replacement parts, oil, or accessories for your KYMCO ATV, be sure to use only
GENUINE KYMCO PARTS, OIL, AND ACCESSORIES. Genuine KYMCO parts, oil, and accessories have been engineered and approved to meet the standards and requirements of your KYMCO
ATV. For a complete list of accessories, refer to the current KYMCO ATV Accessory Catalog. To
aid in service and maintenance procedures on this ATV, a Service Manual and an Illustrated
Parts Manual are also available from your local KYMCO ATV dealer.
As the owner and rider of a KYMCO ATV, you should become thoroughly familiar with your ATV's basic operation,
maintenance and storage procedures. Please read and
understand the entire Owner's Manual before operating your
KYMCO ATV to ensure safe and proper use. Always operate your ATV within your level of skill and current terrain
conditions.
At the time of publication, all of the information and illustrations in this manual are technically correct. Some illustrations herein are used to best represent a certain procedure
or item and are not intended to depict actual conditions.
Because KYMCO is constantly refining and improving its
products, there may be differences between the vehicle images and the text depicted in this manual and your ATV. As
such, no retroactive obligation to the product is available.
53
Page 58

SPECIFICATIONS*
ENGINE AND DRIVE
Type Four-Cycle/Oil Cooled
Bore x Stroke 81 mm x 71.2 mm
(3.19 x 2.80 in.)
Displacement 366 cc (22.33 cu in.)
Ignition Type CDI
Spark Plug Type NGK CR8E
Spark Plug Gap 0.7 - 0.8 mm (0.028 - 0.032 in.)
Brake Type Hydraulic
with Parking Brake & Foot Brake
Carburetor Type Keihin CVK34
CHASSIS
Length (Overall) 190.5 cm (76.0 in.)
Height (Overall) 121.0 cm (48.0 in.)
Width (Overall) 123.0 cm (49.0 in.)
Suspension Travel 19.9 cm (8.0 in.)/ 20.3 cm (8.1 in)
Wheelbase 122.5 cm (49.0 in.)
Tire Size (Front) 23 x 8-12
MISCELLANEOUSMISCELLANEOUS
MISCELLANEOUS
MISCELLANEOUSMISCELLANEOUS
Dry Weight (Approx) 268 kg (590.0 Ib)
Gas Tank Capacity (Rated) 15 L (3.75 U.S. Gal.)
Differential Capacity 270 ml (9.1 fl oz)
Rear Drive Capacity 250 ml (8.5 fl oz)
Engine Oil Capacity 3.3 L (3.5 U.S. qt)
Engine Oil Changed Capacity 2.2 L (2.3 U.S. qt)
Engine Oil Changed Capacity
with Oil Filter Changed 2.4 L (2.5 U.S. qt)
Gasoline (Recommended) 87 Octane
Regular Unleaded
Engine Oil (Recommended) SAE 5W-30
Differential/Rear Drive
Lubricant SAE 80W-90 Hypoid
Taillight/Brakelight 12V/5W/21W
Headlight 12V/35W (4)
* Specifications subject to change without notice.
Tire Size (Rear) 23 x 10-12
Tire Inflation Pressure 0.4 kg/cm2 (5.7 psi)
54
Page 59

GENERAL INFORMATION
ATV IDENTIFICATION NUMBERS
Your KYMCO ATV has two identification numbers, the Vehicle
Identification Number (VIN), and the Engine Serial Number
(ESN).
The VIN 1 is located on the lower-front cross-member of the
frame.
11
1
11
The ESN is located on the back of the engine crankcase and is
visible from the side of the ATV.
The VIN and ESN are required by your KYMCO dealer to order proper parts, perform service, and to submit warranty
claims. Always provide your ATV's year, model, VIN and ESN
when contacting an authorized KYMCO A TV dealer for assistance.
NOTE: Record your VIN, ESN and ignition switch key
numbers on the inside, back cover of this manual.
Warranty repairs will be declined by KYMCO if the VIN or ESN
on your ATV have been removed or altered in any way. If your
ATV requires a repair that will replace the engine crankcase or
the frame, ask your dealer to contact KYMCO to discuss the
situation.
IGNITION SWITCH KEY
Y our KYMCO A TV is delivered with two keys.
Keep the second key as a spare and store it
22
2
in a safe place. An identifying number 2 is
stamped on each key. Use this number when
ordering a replacement key.
22
CONTROL LOCA TIONS
& FUNCTIONS
IGNITION SWITCH OPERATION
Use your ATV's key to "unlock" and operate the ignition switch.
The ignition switch has three positions.
ON
OFF
OFF position - All electrical circuits (except the accessory plug) are off.
The engine will not start or run. The key can be removed in this position.
ON position - The ignition circuit is complete and the engine can start
and run. The key cannot be removed in this position.
LIGHTS position - The ignition circuit is complete, the engine can start
and run, and the headlights and taillight are lit. The key cannot be removed in this position.
NOTE: The accessory plug is powered by the battery
at all times.
LIGHTS
55
Page 60

CONTROL LOCATIONS & FUNCTIONS
2. To engage LOW range from HIGH range, move the shift lever
Do not leave the ignition switch in the LIGHTS position
for a long period of time without the engine running, as
the battery voltage will be depleted. Always leave the ignition switch in the OFF position when engine is not running.
FUEL PETCOCK
The fuel petcock is set on the side of the gas tank. To control
the flow of gasoline, there are three petcock positions: ON,
RES, and OFF.
OFF position - The fuel will not flow to carburetor.
NOTE: The HIGH range is for normal riding with light loads.
ON position (the normal operating position) - Fuel will flow
from the tank to the carburetor. In this position, 2.46 L (0.65
U.S. gal.) of fuel will remain in the tank as a reserve quantity.
RES position - The petcock will flow the remaining 2.46 L
(0.65 U.S. gal.) of fuel from the tank to the carburetor.
NOTE: When turning the petcock to any of the three posi-
.
tions, be sure the handle’s indicator is pointed directly at
the position desired.
Always shift the transmission into LOW range when
operating on wet or uneven terrain, when towing or
pushing heavy loads, or when using a plow. Failure to
follow this caution may result in premature V-belt fail-
ure or other damage to the drive system.
Never leave the fuel petcock in the ON or RES position
when the engine is not running.
3. To engage reverse gear from neutral, move the shift lever
SHIFTING
This KYMCO A TV is equipped with an automatic, dual-range transmission with reverse capability. To shift your ATV into the different
drive modes, follow these steps:
1. To engage HIGH range from neutral, move the shift lever forward.
56
Never shift the transmission while your ATV is in mo-
tion. Should your ATV be on a surface that is not level,
engage the parking brake (brake lever lock) before shift-
ing into another transmission range or into reverse.
outward and forward.
LOW range
HIGH range
Neutral
Reverse
The LOW range is for carrying heavy loads or trailer towing.
Compared to HIGH range, the LOW range position provides
slower speed and greater torque to the wheels.
forward, outward and back to the “R” position.
Page 61

CONTROL LOCATIONS & FUNCTIONS
2WD/4WD SELECTOR SWITCH
11
1
11
The 2WD/4WD selector switch 1 allows you to operate your
ATV in either two-wheel drive (rear wheels powered) or fourwheel drive (all wheels powered).
2WD should be adequate for normal riding on flat, dry, hard
surfaces. 4WD can be used for rough trail conditions. To engage or disengage power to the front wheels, move the switch
to the 4WD position or to the 2WD position.
Never operate the 2WD/4WD selector switch while your
ATV is in motion as you may damage the differential.
BRAKES
Your KYMCO ATV is equipped with front and rear hydraulic
brakes that can be activated with hand and foot controls.
LEFT HAND BRAKE - Activates front and rear brakes
RIGHT HAND BRAKE LEVER - Activates front brake only
REAR BRAKE PEDAL - Activates front and rear brakes
Left Hand Brake Lever
The left hand brake mounted on the left handlebar activates the
front and rear brakes on your ATV. To apply the front and rear
brakes, squeeze the lever towards the handlebar grip.
Right Hand Brake Lever & Parking Br ake
Parking brake
(lever lock)
Hand brake lever
The hand brake mounted on the right handlebar activates the front
brakes on your ATV. To apply the front brakes, squeeze the lever
towards the handlebar grip.
To engage or release the parking brake (brake lever lock), use
the following procedure:
1. Squeeze the hand brake lever two or three times to achieve
maximum brake pressure, and then release it
2. Depress and hold the brake lever lock
3. While holding in the brake lever lock, squeeze the brake lever.
NOTE: The brake lever lock will click as it engages and
the brake lever will not return to its released position.
4. Release the parking brake's lever lock by squeezing the brake
lever. Once the lock is disengaged the lever will return to its
released position.
Use the following procedure to verify that the parking brake
(brake lever lock) locks the front wheels when engaged:
1. Squeeze the hand brake lever two or three times
2. Depress and hold the brake lever lock
3. Attempt to push the ATV
57
Page 62

CONTROL LOCATIONS & FUNCTIONS
NOTE: The parking brake (lever lock) must lock the ATV’s
front wheels. If it does not, take your ATV to an authorized
KYMCO ATV dealer for service.
11
1
11
22
2
22
Always make sure that the parking brake (lever lock) has
been disengaged before operating your ATV. An accident
can result if the parking brake is left engaged while the
ATV is ridden. Never rely on the parking brake as the sole
means of securing the ATV when parking on a hill. Always block the downhill side of the ATV’s wheels or park
the ATV perpendicular to the hillside.
Rear Brake Pedal
Rear Brake Pedal
Pressing the rear brake pedal downward with your right foot
will apply the front and rear wheel brakes.
LEFT HAND HANDLEBAR CONTROLS
Headlight Hi / Lo Switch
Use the HI/LO 1 switch to select the high or low headlight beam
when the ignition switch is in the LIGHTS position. When the switch
is in the HI position, the high beam will illuminate. When the switch
is in the LO position, the low beam will illuminate.
58
33
3
33
44
4
44
Starter Button
Pressing this button 2 activates the starter motor . Before starting
the engine, make sure the ignition switch is in the ON position, the
transmission is in neutral, and the parking brake is engaged.
NOTE: Your ATV has a safety feature which prevents
starting when the transmission is not in neutral.
Emergency Stop Switch
Use the emergency stop switch 3 to stop the engine without
turning off the ignition switch. OFF position - The ignition circuit is
off and the engine cannot be started and will not run. RUN posi-
tion - The ignition circuit is on; the engine can start and run.
NOTE: The battery will be depleted if the ignition is left ON for
a long period when the Emergency Stop Switch is OFF.
Rever se Override Button
Pressing the reverse override button 4 when the ATV is in
REVERSE will bypass a feature of your KYMCO ATV’s ignition that reduces engine RPM in reverse.
Be alert when using the reverse override button as the A TV’s
engine performance and speed will be increased. Always
look for obstacles before riding your ATV in reverse.
Page 63

CONTROL LOCATIONS & FUNCTIONS
THROTTLE LEVER
The position of the throttle lever controls engine output. Operate the throttle lever with your thumb. Pushing it forward increases engine RPM, allowing the lever to return to its original
position decreases engine RPM.
THROTTLE LIMITER SCREW
Locking Nut
Limiter Screw
Throttle lever travel may be limited by adjusting the throttle
limiter screw. The throttle limiter permits you to adjust the
engine's output to match the rider's skill and experience. To
adjust the throttle limiter, use the following procedure:
1. Loosen the locking nut
Turn the throttle limiter screw clockwise to decrease maximum en-
2.
gine RPM or counterclockwise to increase maximum engine RPM
3. Tighten the locking nut securely
NOTE: Your ATV is equipped with an ignition limiter
that retards timing when maximum engine RPM is approached. When this RPM limiter is activated, it can be
misinterpreted as a high-speed ignition misfire.
SPEEDOMETER / LCD
11
1 Adjust/Set Button - Use in conjunction with the Mode Button 2, to set
11
the clock and reset the trip meter to zero. This button is also used to toggle
between MPH and km/h.
NOTE: Depress and hold the Adjust/Set Button
Button
ting functions. Approximately ten seconds after releasing the buttons,
the display will return to normal operating mode.
2 2
2 Mode Button - Used this button to toggle between the Clock, Hour Meter,
2 2
Odometer, and Trip Meter display 5 on the LCD. Use in conjunction with the
Adjust/Set Button 1 to set the clock or reset the trip meter to zero
3 3
3 Gear Position Indicator - Indicates which transmission mode is selected:
3 3
R = Reverse, N = Neutral, L = Low Range, H = High Range.
An E will be displayed if the transmission is not engaged in a selected gear.
4 4
4 Speedometer- Indicates the approximate ATV speed in miles per hour
4 4
(MPH) or kilometers per hour (km/h).
5 5
5 Clock/Hour Meter/Odometer/Trip Meter - Displays time, total engine
5 5
hours, total miles/kilometers traveled, or trip miles/kilometers traveled. To set
the clock, use steps A through C. To reset the trip meter, proceed to step D.
11
1 and the Mode
2 2
2 simultaneously for three seconds to activate the gauge set-
2 2
A. To set the clock, press and hold the Mode Button 2 until CLOCK is
displayed
B. Press and hold the Adjust/Set Button 1 and Mode Button 2 ap-
proximately three seconds until the hour display starts to flash, then
release the buttons and press the Mode Button 2 to set the hour.
11
59
Page 64

CONTROL LOCATIONS & FUNCTIONS
D. To reset the trip meter, press and hold the Mode Button 2 until TRIP
NOTE: The hour display will read from 1 to 24 and may be cycled
rapidly by holding the Mode Button
C. After you have selected the desired hour, press and release the Ad-
just/Set Button 1 to toggle the clock to the minute display (the minute
digits will flash), then press the Mode Button 2 to set the minutes.
After approximately ten seconds, the minute display will stop flashing
and the gauge will return to normal operation.
NOTE: Power for the clock memory is supplied through the 15-amp
accessory fuse; the gauge verifies when the ATV's ignition is turned
ON. If the clock loses its memory power supply (failed fuse, etc.), the
gauge will "power-up," reset, and shut down repeatedly until clock
memory power supply is restored. Always check the 15-amp accessory fuse first if this gauge begins to cycle through this "power-up"
sequence.
60
22
2 down for three seconds.
22
PRIMER - COLD START
A primer pump is located on the carburetor. Depress and release
the lever several times prior to attempting to start a cold engine
(see page 29 of this manual).
FUEL/VENT HOSES
Replace the ATV's fuel hoses every two years. Damage from aging may not always be visible. Do not bend or obstruct the routing
of the carburetor/throttle body vent hose. Make certain that the
vent hose is securely connected to the carburetor/throttle body
and hose holder and the opposite end of the hose is always open.
is displayed in the display; then press and hold the Adjust/Set Button
1 and Mode Button 2 until the trip meter reads O (zero).
Page 65

GENERAL INFORMATION
CARBURETOR FLOAT BOWL DRAIN
11
1
11
22
2
22
33
3
33
The fuel in the carburetor should be drained periodically to remove
water or other debris that may have accumulated in the float
bowl 1. To drain the float bowl, use the following procedure:
1. Connect a hose from the float bowl drain nipple 2
Do not drain float bowl contents directly onto the engine.
Gasoline is highly flammable and could ignite. Use a hose
to drain fuel into a suitable container.
2.
Loosen the drain screw 3 and allow the gasoline, debris and
water to flow out
3. Tighten the drain screw 3 securely and remove the hose
It is very important that the drain screw be tightened securely. If it is not tightened securely, gasoline could drip
onto the engine.
DIP STICK (oil level stick)
There is a dip stick on the left side of the engine for checking the
engine oil level. To check the oil level, use the procedure listed on
this page.
F
Dipstick
NOTE: The ATV should be parked on level ground, with
the engine off, when checking the engine oil level.
1. Unscrew the dip stick, remove it and wipe it with a clean cloth
2. Reinstall the dip stick, thread it into the engine case
3. Unscrew the dip stick and visually note the oil level on the
stick. The engine oil level should be above the "L" mark but
not higher than the "F" mark. Add or remove oil as required
Do not overfill the engine with oil. Overfilling the engine can cause oil leaks and/or oil contamination of
the air filter element. Always make sure the oil level is
above the "L" mark but not higher than the "F" mark.
SEAT LATCH
1. To remove the seat, lift up on
the latch release (located under
the rear fender at the rear of the
seat), then raise the rear of the
seat, slide it rearward and lift if
from the ATV.
L
61
Page 66

GENERAL INFORMATION
2. To remount the seat to the ATV, slide the front of the seat into
the seat retainers and push down firmly on the rear of seat.
The seat should automatically latch into position.
Make sure the seat is secure before mounting and riding
the ATV. Severe personal injury may result if the seat is
not properly secured.
SAFETY FLAG BRACKET
A bracket has been supplied for mounting a safety flag at
the rear of your ATV.
TRAILERING AND TOWING
Your KYMCO ATV is equipped with a frame-mounted receiver for a standard 5.1 cm (2 in.) receiver hitch. A standard receiver hitch must be purchased separately.
When loading a trailer properly,
two items are critical: Gross
Trailer Weight (the weight of
the trailer plus cargo) and
Trailer Tongue Weight See the
ratings chart on page 48 of this
manual.
Make sure that the load in the trailer is properly secured
and will not shift while moving. Also, do not overload the
trailer's capacity.
NEVER EXCEED ANY OF THE
ATV’S WEIGHT RESTRICTIONS
Trailer Tongue Weight is the downward force exerted
on the hitch by the trailer coupler when the trailer is
fully loaded and the coupler is at its normal towing
height. Refer to the Load Capacity Ratings Chart on
page 48 of this manual for tongue weight information.
Always maintain a slow speed when trailering and towing, and avoid sudden accelerations, quick maneuvers,
and sudden stops. Braking distance will be affected
when towing a trailer. When towing a trailer, always
maintain slow speed and allow for more stopping distance than when not towing a trailer.
Riding your ATV when towing a trailer requires extreme
caution or the activity will be hazardous. Trailer towing
will affect the handling and braking of your A TV . You should
only tow at low speeds and never exceed 10 mph. Avoid
sudden accelerations and stopping. Do not make quick
maneuvers. A void uneven surfaces and do not tow on hills.
Never carry passengers in a trailer unless the trailer is
designed for such use and has a rigid tow bar. Allow for
more stopping distance when towing a trailer.
62
Page 67

GENERAL INFORMATION
TRANSPORTING YOUR ATV
When transporting your ATV, KYMCO recommends to set
the ATV in its normal operating position (level, on all four
wheels) and use the following procedure:
1. Engage the parking brake and place the transmission in gear
2. Secure the ATV with hold-down straps rated to hold a load in
excess of your ATV's weight
NOTE: Suitable hold-down straps are available from
your KYMCO ATV dealer. Ordinary rope is not recommended because it can stretch under load.
When attaching hold-down straps, care must be taken not
to damage the ATV.
When transporting the ATV, make sure the parking brake
(brake lever lock) is engaged, the transmission is in first
gear, and the ATV is properly secured.
GASOLINE-OIL-LUBRICANT
Recommended Gasoline
The recommended fuel to use in your ATV is regular unleaded gasoline with a 87 minimum octane rating. In many
areas, oxygenates (either ethanol or MTBE) are added to
the gasoline. Oxygenated gasolines containing up to 10%
ethanol, 5% methane, or MTBE are acceptable fuel.
When using ethanol blended gasoline, it is not necessary
to add a gasoline antifreeze since ethanol will prevent the
accumulation of moisture in the fuel system.
Recommended Engine/ Transmission Oil
The recommended engine oil to use in your ATV is an oil
which is rated SE, SF, or SG under the API service classification. These oils meet all of the lubrication requirements
of a KYMCO ATV engine. The recommended oil viscosity is
SAE 5W-30. Ambient temperature should determine the
correct weight of oil. See the viscosity chart below or consult
an authorized KYMCO ATV dealer for guidance.
63
Page 68

GENERAL INFORMATION
Any oil used in place of the KYMCO recommended
engine oil can cause serious engine damage.
Recommended
Front Differential/Rear Drive Lubricant
The recommended lubricant for your KYMCO ATV (front differential and rear drive when applicable) is an SAE approved
80W-90 Hypoid fluid.
Any lubricant used in place of the KYMCO recommended lubricant can cause serious front differential/rear drive damage.
Filling the Gas Tank
Always fill your ATV's gas tank in a well-ventilated area.
Never add gasoline to the ATV gas tank near any open
flames or with the engine running or hot. DO NOT
SMOKE while filling the gas tank.
Gas Tank Filler Neck
Allow your ATV's engine to cool before filling the gas tank.
Care must be taken not to overfill the tank. If overfilled, gas
may leak onto the engine creating a fire hazard.
Do not spill or overflow gasoline when filling the gas tank.
This will greatly increase the risk of a fire hazard. Always
allow the engine to cool before filling the gas tank.
Maximum Fuel Level
Do not overfill the gas tank.
Tighten the tank cap securely after filling the ATV's gas tank.
Since gasoline expands as its temperature increases, the gas
tank on your ATV should only be filled to its rated capacity.
Expansion room must be maintained in the tank particularly if
the tank is filled with cold gasoline and the ATV is then moved
to a warm area.
64
BREAK-IN PROCEDURE
New ATVs and renewed ATV engines require a "break-in"
period. The first month is most critical to the life of your ATV's
engine, and proper operation during this break-in period will
help assure maximum life and performance from your ATV.
Page 69

GENERAL INFORMATION
During your ATV's first ten hours of operation, always use a
light throttle, keeping engine RPM well below the maximum.
Varying the engine RPM during the break-in period allows the
engine and transmission components to mate together so they
will operate smoothly in the future. Applying some higher engine RPM's and other loads during the break-in period is not
detrimental when done in moderation. Do not pull a trailer or
haul very heavy cargo loads during the break-in period.
When the engine starts, allow it to warm up properly. Permit
the engine to idle for several minutes until the it has reached
normal operating temperature. However, do not allow the engine to idle for excessively long periods of time, as this additional heat can affect future engine integrity.
BRAKE PADS MUST BE BEDDED-IN TO ACHIEVE
FULL BRAKING EFFECTIVENESS.
Braking distance will be greater until brake pads are
properly bedded-in.
TO PROPERLY BED-IN THE BRAKES, USE FOLLOWING PROCEDURE:
* Choose an area sufficient to safely accelerate your
ATV to 30 mph and smoothly brake to a stop
* Accelerate to 30 mph, then compress the brake
lever to decelerate to 0 - 5 mph
* Repeat procedure five times
Do not attempt sudden stops or put yourself into a situation with your ATV where a sudden stop will be required until the brake pads are properly bedded-in.
After the completion of the break-in period, your ATV's engine
oil and oil filter should be changed. Other maintenance after
break-in should include checking of all prescribed adjustments
and tightening of all fasteners. It is your responsibility, as the
owner and rider of your ATV, to arrange for and pay for this
initial service.
Because of the technical ability and resources available to an
authorized KYMCO ATV dealer, it is best to take your ATV to
the dealer for service rather than attempting to perform this
initial service yourself.
65
Page 70

GENERAL MAINTENANCE
NOTE: Proper maintenance of your ATV is important for
optimum performance and safety. Follow the Maintenance
Schedule listed in this manual and in other official KYMCO
publications.
If you become aware of any abnormal noises, vibrations, or improper function of any component of your ATV, DO NOT OPERATE THE ATV. Take your ATV to an authorized KYMCO ATV
dealer for inspection and adjustment or repair.
If you do not feel qualified to perform any of the maintenance
procedures or inspections listed in this Owner's Manual, take your
ATV to an authorized KYMCO ATV dealer for professional service.
NOTE: The instructions and information on the following
pages refer to specific items in the maintenance and care of
your ATV.
66
Page 71

GENERAL MAINTENANCE
67
Page 72

GENERAL MAINTENANCE
OIL COOLER
11
1
11
NOTE: Dirt and debris must be cleaned from the cooler's
11
fins
1 regularly to ensure proper engine oil cooling.
11
The shock absorbers have spring force adjustment sleeves with
five positions to allow the spring rate to be adjusted for different
riding and loading conditions. If the spring rate is too soft or too
stiff, adjust the sleeve according to the chart below.
NOTE: Use a spanner
wrench to adjust the
spring force adjustment sleeve
desired position.
2 2
2 to the
2 2
Operating your ATV with high engine temperature may
result in engine damage or premature wear.
NOTE: High engine RPM, low vehicle speed, or heavy
load will raise engine temperature. Decreasing engine
RPM, reducing load, and selecting an appropriate transmission gear can lower the temperature.
SHOCK ABSORBERS
Each shock absorber on your ATV should be visibly checked
weekly for excessive fluid leakage (some seal leakage is normal),
cracks or breaks in the shock body, or a bent shock rod. If any one
of these conditions is detected, replacement is necessary.
NOTE: If you ride your ATV in extremely cold weather
(-10o F / -23o C or colder), a small amount of fluid leakage may occur on the shock rod. Unless the leakage is
excessive, replacement of the shock absorbers is not
necessary.
68
22
2
22
GENERAL LUBRICATION
Cables
Under normal use, the cables do not require lubrication. However,
it is advisable to lubricate the ends of the cables periodically with a
quality cable lubricant.
Engine/Transmission - Oil and Filter
NOTE: Refer to the recommended oil viscosity chart (on
page 64) in this manual to select the proper engine oil for
your ATV.
Page 73

GENERAL MAINTENANCE
Change your ATV's engine oil and oil filter at the scheduled
intervals. The engine should always be warm when the oil is
changed so the oil will drain easily and completely.
1. Park the ATV on level ground
2. Remove the oil dip stick. Be careful not to allow dirt to enter the
dip stick hole.
Drain
Dipstick
Bottom of ATV
3. Remove the drain plug from the bottom of the engine and drain
the oil into a drain pan
4. Remove the oil filter plug from the filter mounting boss (located
on the front-right side of the transmission case) and allow the
oil to drain from the filter completely
5. Using an oil filter wrench and a ratchet handle (or a socket or
box-end wrench), remove the old oil filter and dispose of it properly. Do not reuse the removed oil filter
NOTE: Clean up any excess or spilled oil after remov-
ing the oil filter.
6. Apply some oil to the new filter's O-ring gasket and check to
make sure it is positioned correctly, then install the new oil filter. Tighten it securely
7. Install the oil filter drain plug and tighten securely
plug
8. Install the engine oil drain plug and tighten it securely. Pour the
recommended oil in the filler hole. Install filler plug
9. Start the engine (while the ATV is outside on level ground) and
allow it to idle for a few minutes
10. Turn the engine off and wait approximately one minute. Recheck the oil level and adjust as necessary
11. Inspect the area around the drain plug and oil filter for leaks
NOTE: Dispose of the used oil and filter in an environ-
mentally proper way.
Front Differential
and Rear Drive Gear Lubricant
(Inspecting/Changing)
Inspect and change the gear lubricants in your ATV according
to the Maintenance Schedule. When changing the lubricant,
only use the approved SAE 80W-90 hypoid-type fluid and use
the following procedure:
1. Park your ATV on level ground
2. Remove each fluid filler plug
3. Drain the fluid into a drain pan by removing the drain plug from the
Front Differential 1
11
1
11
69
Page 74

GENERAL MAINTENANCE
4. Drain the fluid into a drain pan by removing the drain plug from the
Rear Drive 2
Inspect the oil for any signs of metal filings or water. If
found, take your ATV to an authorized KYMCO ATV dealer
for servicing.
5. After all the fluid has been drained, reinstall the drain plugs and
tighten them securely
6. Pour recommended oil into each filler hole
NOTE: If the gear case has a level plug, add fluid up to
the threads of the level plug. If your ATV's gear case
only has a fill plug, add fluid to within 1 in. of the threads
of the fill plug.
BRAKES
Your ATV's brakes must be maintained periodically to remain
fully functional.
Be sure to inspect the entire brake system before each
ride. Maintain the brakes according to the Maintenance
Schedule.
BRAKE FLUID - RIGHT HAND BRAKE
Check the fluid level in the brake reservoir sight glass. If the
level in the sight glass is not visible , add DOT 4 brake fluid.
Brake Fluid Sight
Window
7. Reinstall the fluid filler plugs and level plugs
70
Be sure to inspect the hydraulic brake system before
every ATV ride. Always maintain brakes and the brake
fluid according to the Maintenance Schedule
NOTE: If the sight glass appears dark, there is an
insufficient amount of brake fluid in the reservoir,
or the fluid requires replacement.
Page 75

GENERAL MAINTENANCE
BRAKE FLUID - LEFT HAND BRAKE
Check the fluid level in the brake fluid reservoir sight glass. If
the level in the sight glass 1 is not visible, add DOT 4 brake
fluid to set the level between the “L” and “F” marks.
11
1
11
F
1. Squeeze the right hand brake lever two or three times
2. Depress and hold the brake lever lock
3. Attempt to push the ATV
NOTE: The parking brake (lever lock) must lock the wheels.
If it doesn't, take your ATV to an authorized KYMCO ATV
dealer for service.
L
Be careful not to spill any fluid when filling the brake fluid
reservoir. Brake fluid can damage the finish of plastic parts,
so wipe away spilled fluid immediately.
Parking Brake (Br ake Lever Lock)
Check to make sure the parking brake lock functions properly and
that the brake (when engaged) locks the wheels.
Parking brake
(lever lock)
Right front hand
brake lever
REAR FOOT BRAKE
Your ATV's rear foot brake must be maintained periodically to
remain fully functional.
Be sure to inspect the rear brake system before each ride.
Maintain the brakes according to the Maintenance Schedule.
1. Check the fluid level in the rear brake fluid reservoir. The fluid
level must be maintained between the MAX and MIN level
marks. If the level in the reservoir is low, add DOT 4 brake fluid.
NOTE: The brake fluid reservoir
is located under the seat.
2. Press down on the rear brake pedal several times to check
for firmness
3. If the pedal response is not firm, the system must be bled
NOTE: Take your ATV to an authorized KYMCO ATV
dealer for any brake system fluid bleeding.
71
Page 76

GENERAL MAINTENANCE
Brake Hoses
Carefully inspect the hydraulic brake hoses for cracks or other
damage. If found, take the ATV to an authorized KYMCO ATV
dealer to have the brake hoses replaced.
Brake Pads
The clearance between the brake pads and brake discs is adjusted automatically as the pads wear. The only maintenance that
is required is to replace brake pads when they become worn. To
check the thickness of the brake pads use this procedure:
1. Remove a front wheel
2. Measure the thickness of each brake pad
PROTECTIVE RUBBER BOOTS
The protective boots over the ATV's drive shafts and steering should be inspected periodically.
Ball Joint Boots & Tie Rod Boots
1. Secure your ATV on sturdy stand to elevate the front wheels
2. Remove both front wheels
3. Inspect the four ball joint boots for cracks, tears, or perforations
4. Check the ball joint for free-play by grasping the steering knuckle
and turning it from side to side, and up and down.
3. If the thickness of the pads is less than 1.0 mm (0.039 in.), take
your ATV to a KYMCO ATV dealer to have brake pads replaced
4. Reinstall the wheel and tighten the lug nuts to 40 ft-lb.
NOTE: Take your ATV to an authorized KYMCO ATV
dealer for any brake pad replacement service.
72
5. Inspect the four tie rod boots for cracks, tears, or perforations.
Page 77

GENERAL MAINTENANCE
6. Check the tie rod end free-play by grasping the tie rod near the
end and attempting to move it up and down.
7. If boot damage is present, or if ball-joint or tie-rod end free-play
seems excessive, contact an authorized KYMCO ATV dealer for
service
Drive Axle Boots
BA TTER Y
The battery is located under the seat of your ATV. After initial
service, your battery will require regular cleaning and recharging in order to deliver peak performance and maximum service life. The procedures listed in this manual are recommended for servicing maintenance-free (MF) type batteries.
Always read and follow instructions provided with battery
chargers and battery-related products.
NOTE: You can perform your own battery maintenance if
you are qualified to do so. If you do not feel qualified, take
your ATV to an authorized KYMCO ATV dealer for battery
service. As with all other periodic maintenance, you are
responsible to arrange and pay for this service.
Battery service must be performed in an area free of
any sparks, open flame, cigarettes, or any other flame.
Always wear safety glasses. Protect skin and clothing
when handing a battery. When servicing battery in enclosed space, keep the area well-ventilated.
1. Remove the battery hold-down and then disconnect the battery cables (negative cable first)
2. Remove the battery from the battery compartment. Then thoroughly wash the battery and its compartment with soap and water
1. Inspect all drive axle boots for cracks, tears, or perforations
2. If boot damage is present, contact an authorized KYMCO ATV
dealer for service
NOTE: If the battery posts, cable ends, or the battery
case has a buildup of white/green powder residue, apply water and baking soda to neutralize this acid residue and rinse with warm soapy water.
73
Page 78

GENERAL MAINTENANCE
3. Use a wire brush to clean the battery posts and cable ends,
removing all corrosive buildup. Replace any damaged cables.
Never use remove the sealed caps from your ATV’s MFtype battery. This will disturb the chemical balance of
the battery and reduce it’s electrical output. It will also
expose you to battery acid. Battery acid is harmful if it
contacts eyes, skin, or clothing. Extreme care must be
taken whenever handling a battery.
4. Use a multimeter to test the battery voltage. The voltage for a
fully charged battery should be at least 12.5 DC Volts
NOTE: If the meter indicates the proper voltage, the bat-
tery may be reinstalled in the ATV (see step 8).
5. If the meter indicates low voltage, charge the battery using an
automatic battery charger specifically designed to be used on
maintenance-free type batteries.
NOTE: When using an automatic battery charger, always
follow the charger manufacturer's instructions.
An battery overheated from using an improper battery
charger (constant rate type) or from improper charging could explode causing severe injury or death. Always monitor charging times and charge rates carefully.
Stop charging if the battery becomes very warm to the
touch. Allow it to cool before resuming charging.
74
6. The automatic battery charger will indicate if the charging cycle
is complete. Remove the battery charger and allow the battery
to sit and cool for one hour.
7. Test the battery voltage again. The meter should read at least
12.5 DC Volts. If the voltage is as specified, the battery is ready
to be reinstalled in the ATV.
NOTE: If voltage in step 9 is below specifications, charge the
battery again and retest. If the voltage is proper, then the battery can be reinstalled in the ATV.
8. Reinstall the battery into the battery compartment and apply a light
coat of dielectric grease on the battery posts and cable ends.
Before reconnecting the battery, make sure the ATV’s
ignition switch is in the OFF position. Connecting the
battery cables in reverse (positive to negative and negative to positive) can cause serious damage to the electrical system.
9. Connect the battery cables (positive cable first) and reattach
the battery hold-down.
SPARK PLUG
Y our ATV is equipped with a specific spark plug (see the specifications chart for the correct spark plug). The appearance of
the insulator on a used spark plug will help determine if it is the
proper one for your ATV. A light brown insulator indicates that
the spark plug is correct. A white or dark insulator indicates
that the engine may need to be serviced or the carburetor may
need to be adjusted. Consult an authorized KYMCO A TV dealer
if the plug insulator is not proper.
Page 79

GENERAL MAINTENANCE
To help prevent cold weather fouling (a buildup of carbon and
unburned fuel on the spark plug) make sure you thoroughly
warm up your ATV's engine before riding. Before inspecting a
spark plug, clean the area around the spark plug to prevent
dirt from entering the engine when removing or installing the
spark plug.
11
1
11
Adjust the spark plug's ground electrode
gap to 0.028- 0.032 in. (0.7-0.8 mm). Use a
wire-type feeler gauge to check the gap.
When installing a spark plug, be sure to tighten it securely. A
new spark plug should be tightened 1/2 turn once the washer
contacts the cylinder head. A used spark plug should be tightened 1/8 -1/4 turn once the washer contacts the cylinder head.
ENGINE IDLE SPEED ADJUSTMENT
To properly adjust the engine idle speed on your ATV, a tachometer is required. If you do not have one, take your ATV to
an authorized KYMCO ATV dealer.
NOTE: The idle adjustment screw is located on the
right-hand side of the carburetor.
To adjust the engine idle speed (RPM) follow this procedure:
1. Start your ATV's engine and warm it to normal operating
temperature
2. Turn the idle adjustment screw 1 in or out until the engine idles
between 1250 to 1350 RPM
Adjust the idle to the correct RPM after making sure
the engine is at normal operating temperature.
THROTTLE CABLE ADJUSTMENT
Follow this procedure to adjust your ATV's throttle cable free-play:
1. Slide the rubber boot 2 back and loosen the jam nut 3
from the throttle cable adjuster
2. Turn the adjuster 4 until the throttle lever has the proper
free-play of 1/8 to 1/4 in. (3 - 6 mm).
33
3
33
44
4
44
22
2
22
Free-play
1/8 to 1/4 in. (3 - 6 mm)
3. Tighten the jam nut against the throttle cable adjuster securely
and slide the rubber boot back over the adjuster
75
Page 80

GENERAL MAINTENANCE
AIR FILTER
The air filter element inside the air filter housing must be kept
clean to provide good engine power, gas economy and to prevent premature engine wear. If you use your ATV under normal
conditions, service the filter at the intervals specified. If you ride it
in dusty, wet, or muddy conditions, inspect and service the filter
more frequently. Use the following procedure to remove the filter
and then inspect and clean it:
1. Rotate the three latches to release the filter housing cover, then
loosen the inlet boot clamp
2. Remove the filter housing cover and air filter element
3. Fill an adequately sized wash pan with a nonflammable solvent
and wash the element clean of debris
4. Squeeze the element by pressing it between the palms of both
hands to remove excess solvent. Do not twist or ring-out the
element or you may damage it
5. Dry the element
6. Put the element into a plastic bag. Pour air filter oil into the bag
and work the oil into the element
7. Squeeze the element to remove excess oil
A torn air filter can cause damage to your ATV's engine.
Dirt and dust may get inside the engine if the element is
torn. Carefully examine the element for tears before and
after cleaning it. Replace the element with a new one if it
is torn or damaged in any way.
8. Clean any dirt or debris from inside the air cleaner. Be sure
no dirt enters the carburetor.
9. Reinstall the air filter and cover.
10. Reconnect the inlet boot and tighten the clamp securely.
AIR FILTER HOUSING DRAIN
You should occasionally drain any fluid that has accumulated in
your ATV's air filter housing. Do this using the rubber-flap drain
valve located on the side of the housing. Squeeze the flap to
allow fluid to drain from the housing. Inspect the drain to make
sure it is not blocked with debris and it is sealing properly.
76
Page 81

GENERAL MAINTENANCE
DRAINING THE V-BELT COVER
V-belt Cover Drain
NOTE: If your ATV has been driven through water, the
V-belt cover must be drained of any fluid.
1. Place your ATV on a level surface.
2. Remove the drain bolt from the cover to allow fluid to drain out
3. Shift the range lever to the neutral position; then start the engine.
4. Increase and decrease engine RPM several times to force out
any additional fluid, then stop the engine.
5. Reinstall the drain bolt and tighten securely
NOTE: The V-belt and pulleys should be inspected ev-
ery 500 miles and the belt replaced when necessary.
TIRES
Tire Tread Condition
The use of worn-out tires on your ATV is very dangerous. A tire is
considered to be worn-out when the depth of the tread is less
than 1/8 in (3 mm). Be sure to replace the tires on your ATV
before reaching this minimum specification.
The use of worn-out tires on your ATV can be dangerous and can increase the risk of an accident.
Tire Replacement
Your ATV has low-pressure tubeless tires. Air is sealed by the
contact surfaces of the inner wheel rim and the tire bead. If either
the inner wheel rim or tire bead are damaged, air may leak. Be
extremely careful not to damage these areas when replacing tires.
It is very important to use the proper tools when repairing or replacing tires to prevent damage to the tire, the tire bead or wheel
rims. If you do not have access to the proper tools or lack the
technical ability, have your tires serviced by an authorized KYMCO
ATV dealer.
Always use the size and type of tires specified for your
KYMCO ATV. Refer to the specifications chart in this
manual for tire-related information and always maintain proper tire inflation pressure.
When breaking the tire bead loose from the wheel,
be extremely careful not to damage the inner wheel
surface or the tire bead.
77
Page 82

GENERAL MAINTENANCE
Use only KYMCO approved tires on your A TV when replacing
tires. Failure to do so could result in unstable ATV operation.
Tubeless Tire Repair
Should a leak or flat tire occur due to a puncture, the tire may be
repaired using a plug-type repair. If the damage is from a cut or if
the puncture cannot be repaired using a plug, the tire must be
replaced. When riding your ATV in areas where transportation or
service facilities are not readily available, you should carry a plugtype repair kit and a tire pump.
WHEEL REMOVAL
1. Park your ATV on level ground and engage the parking brake
2. Loosen the lug nuts on the wheel to be removed
3. Elevate the ATV by placing a sturdy jack under the axle
4. Remove the lug nuts
5. Remove the wheel
6. Install the wheel and reinstall the lug nuts
7. Tighten the nuts in a crisscross pattern to 40 ft-lb. of torque
8. Remove the jack
MUFFLER / SPARK ARRESTER
The muffler on your ATV has a spark arrester which must be
periodically cleaned. Refer to the intervals listed in the Maintenance Schedule and clean the spark arrester using the procedure listed on this page.
1. Remove the cap screws 1 securing the spark arrester assembly to the muffler and then remove the spark arrester
11
1
11
2. Using a suitable brush, clean the carbon deposits from the
screen, taking care to not damage the screen
NOTE: If the spark arrester screen or gasket is damaged
in any way, they must be replaced.
3. Install the spark arrester assembly and secure with the cap
screws. Tighten the screws securely
LIGHT BULB REPLACEMENT
The wattage rating of each bulb is listed below. When replacing a
burned bulb on your ATV, always use the same wattage rating.
Headlight ..................... 12V/35W (4)
Taillight/Brakelight ........ 12V/5W/21W
Before service, wait for the muffler to cool to avoid burns.
78
Only use bulbs that are specified in this manual as replacement bulbs on your ATV.
Page 83

GENERAL MAINTENANCE
Headlight
NOTE: The bulb portion of the headlight is fragile.
HANDLE WITH CARE. When replacing the headlight
bulb, do not touch the glass portion of the bulb. If the
glass is touched, it must be cleaned with a dry cloth
before installing. Oil residue from your skin on the bulb
will cause the bulb to fail.
To replace the headlight bulb, use the following procedure:
1. Disconnect the wiring connector from the back of the headlight
2. Grasp the bulb housing, turn it counterclockwise, and remove the bulb
3. Install the new bulb into the housing and rotate it completely clockwise
4. Reinstall the wiring harness connector
When replacing your ATV's headlight bulb, be careful not
to touch the glass portion of the bulb. Grasp the new bulb
with a clean cloth.
Taillight / Brakelight
To replace your ATV's taillight/brakelight bulb, use the following
procedure:
1. Rotate the socket counterclockwise and remove it from the
housing
2. To remove the bulb from the socket, push in and rotate counterclockwise
3. To install the new bulb, push in and turn clockwise
4. Insert the socket into the housing and rotate it clockwise
CHECKING / ADJUSTING HEADLIGHT AIM
Your ATV's headlights can be adjusted vertically and horizontally. The projected center of the HIGH beam should to be used
for vertical and horizontal aiming.
1. Position your ATV on a level floor so the headlights are approximately 20 ft (6.1 m) from an aiming surface (a wall or
similar surface)
20 ft (6.1 m)
NOTE: There should be an average operating load on
Aiming Surface
2 in.
(5 cm)
your ATV when adjusting the headlight aim.
2. Measure the distance from the floor to the center of each headlight
3. Using the measurements obtained in step 2, make horizontal marks on the aiming surface
4. Make vertical marks which intersect the horizontal marks on
the aiming surface directly in front of the headlights
5. Switch on the ATV's lights. Make sure the HIGH beam is on.
DO NOT USE LOW BEAM
6. Observe each headlight beam aim. Proper aim is achieved
when the most intense beam is centered on the vertical mark
2 in. (5 cm) below the horizontal mark on the aiming surface
7. Adjust each headlight until you achieve the correct aim by
turning the necessary adjuster clockwise or counterclockwise (see image on following page)
79
Page 84

GENERAL MAINTENANCE
Headlamp Aim Adjuster
11
1
11
22
2
22
Always replace a failed fuse with a fuse of the same type
and rating. If the new fuse fails after a short period of use,
consult an authorized KYMCO ATV dealer immediately.
ELECTRICAL OUTPUT TERMINALS
Your ATV has two output terminals for electrical accessories
located on the front and rear wiring harnesses. The accessory
plug is located on the front body panel.
NOTE:
FUSES
The ATV's fuses are located in a power distribution module in
front of the steering post under the electrical access panel. If
there is any type of electrical system failure, always check the
fuses first.
NOTE: To remove a fuse, compress the locking tabs
on either side of the fuse cover and lift it out.
80
1 1
1 = Lower
1 1
2 2
2 = Raise
2 2
Always use electrical accessories on your ATV that
draw less than 180 W.
STORAGE COMPARTMENT
Store this owner's manual in your ATV's storage compartment 3 located under the seat.
33
3
33
Page 85

GENERAL MAINTENANCE
PREPARATION FOR STORAGE
Prior to storing your ATV, it should be properly serviced
to prevent component rusting and deterioration.
KYMCO recommends the procedures listed on this page to prepare your ATV for storage. If you lack the technical ability to prepare your ATV for storage, consult an authorized KYMCO ATV
dealer about performing this service.
1. Clean the seat cushion (cover and base) with a damp cloth
and allow to the seat’s surface to dry
2. Clean your ATV thoroughly by washing dirt, oil, grass, and
other debris from the entire vehicle. Allow the A TV to dry thoroughly. DO NOT get water into the engine, air intake or exhaust
3. Drain the gas tank completely or add a fuel stabilizer to the
fuel in the gas tank. Remove the air filter housing cover and
air filter
4. Start the engine and allow it to idle, then spray KYMCO Engine Preserver into the air filter opening for a period of ten to
twenty seconds. Turn off the engine and reinstall the air filter
and housing cover
6. Plug the exhaust system outlet with a clean cloth
7. Apply some light oil to the upper steering post bushing and
shafts of the shock absorbers
8. Tighten all nuts, bolts, cap screws, and screws - tighten
these fasteners to the proper torque specification. Make sure
that the rivets holding components together are tight - replace all loose rivets
9. Disconnect the battery cables (negative cable first) and then
remove the battery. Clean the battery posts and cables.
Store the battery in a clean, dry area were you can access
it for periodic charging
10. Store your ATV indoors, parked in a level position
Do not store your ATV outside in direct sunlight to
avoid damage to the body work. Avoid using a plastic cover as moisture can condense on the A T V, causing rust and corrosion.
If the interior of the air filter housing is dirty, clean it of any
debris before starting the ATV’s engine.
5. Drain the gasoline from the carburetor float bowl
81
Page 86

GENERAL MAINTENANCE
PREPARATION OF YOUR ATV FOR RIDING AFTER STORAGE
After storage, your ATV requires particular attention and adjustments to make sure you will enjoy many miles of trouble-free riding.
To take your ATV out of storage, KYMCO recommends using the
following procedure:
1. Clean your ATV thoroughly
2. Clean the engine. Remove the cloth from the exhaust system
outlet
3. Check all control wires and cables for signs of wear or fraying. Replace any suspect items
4. Change the engine/transmission oil and filter
5. Charge the battery and test the voltage (refer to page 73)
before installation. When installing the battery, connect the
positive cable first
Before installing the battery, make sure the ignition
switch is in the OFF position. Connect the positive
cable to the battery first.
6. Inspect the front and rear brake systems. Verify the good condition of the brake fluid, pads and the controls -
7. Verify the proper operation and adjustment of all controls, headlights, taillight, brakelight, and the headlight aim - adjust or replace items as necessary
8. Check the tire pressures - inflate the tires to the recommended
pressure
9. Tighten all nuts, bolts, cap screws, and screws - tighten
these fasteners to the proper torque specification. Make sure
that the rivets holding components together are tight - replace any loose rivets
10. Make sure the steering moves freely and does not bind
11. Check the spark plug - clean or replace as necessary
12. Follow the recommendations listed in the Pre-Ride Inspection
82
Page 87

KYMCO USA LIMITED WARRANTY
83
Page 88

EMISSION CONTROL INFORMATION
Crankcase Emission Control System
Your MAXXER 375’s engine is equipped with a closed crankcase system. Blow-by gases are routed back in to the combustion chamber via the intake system. This system does not allow the blow-by gases to enter the atmosphere.
Exhaust Emission Control System
The exhaust emissions from your MAXXER 375 are controlled by engine design, factory-set fuel delivery, ignition settings,
and exhaust system design. This system also includes a secondary air supply system and a catalyzer in the exhaust system.
Noise Exhaust Emission Control System
The engine, intake and exhaust systems of your MAXXER 375 were designed to comply with federal, state and local noise
level requirements. Do not modify the engine ,intake or exhaust components, as doing so will affect compliance these noise
level requirements.
Please do not modify or change any KYMCO-designed components that may alter the sound or emission level from
your MAXXER.
84
Page 89

EPA EMISSION WARRANTY
85
Page 90

MAINTENANCE RECORD
DATE MILEAGE SERVICE PERFORMED & NOTES
86
Page 91

MAINTENANCE RECORD
DATE MILEAGE SERVICE PERFORMED & NOTES
87
Page 92

INDEX
Accessories ......................................................................................... 53
ACTIVE RIDING ........................................................................... 28 - 42
Air Filter Housing Drain ...................................................................... 76
Alcohol (Effects) .................................................................................. 49
Air Filter ................................................................................................ 76
ATV Identification Numbers ................................................................ 55
Basic Operating Maneuvers ............................................................... 28
Battery........................................................................................... 73 - 74
Boots (ATV Protective) ....................................................................... 72
BON-C.................................................................................................. 29
Brake (Hand - Hydraulic) ..............................................................57, 70
Brake (Rear Foot Brake) ..................................................................... 71
Brake Fluid ........................................................................................... 70
Brake Hoses ........................................................................................ 72
Brake Pads (Bedding In) .................................................................... 65
Brake Pads .......................................................................................... 71
BRAKES........................................................................................ 57 - 58
Braking/Stopping ................................................................................. 30
Break-In Procedure ......................................................................64 - 65
Cables .................................................................................................. 68
Carburetor Float Bowl Drain............................................................... 61
Checking/Adjusting Headlight Aim ..............................................79 - 80
Choices (Personal) .............................................................................. 47
Clock (setting) ..................................................................................... 60
Clothing & Gear ................................................................................... 22
Cold Weather Riding ........................................................................... 41
Condition of the ATV ........................................................................... 24
CONTROL LOCATIONS AND FUNCTION................................. 55 - 62
Cooler (Oil) .......................................................................................... 68
Crossing Obstacles ............................................................................. 39
Crossing Roads ................................................................................... 41
Crossing Water .................................................................................... 40
Differential Lubricant ........................................................................... 64
Dip Stick (oil level stick)...................................................................... 61
Dismounting the ATV .......................................................................... 31
Electrical Output Terminals................................................................. 80
Electrical Output Terminals................................................................. 80
Emission Control Information ............................................................. 84
Engine Idle RPM Adjustment ............................................................. 75
Environment......................................................................................... 44
EPA & SVIA Labels ............................................................................... 6
Equipment........................................................................................... 47
Experienced/Trained Riders ............................................................... 51
First Aid & Survival ............................................................................. 27
Fuel Tank Filling .................................................................................. 64
Fuses.................................................................................................... 80
Gas Tank Filling ................................................................................... 64
Gas Tank Petcock ............................................................................... 56
Gas/Vent Hoses .................................................................................. 60
Gasoline-Oil-Lubricant ........................................................................ 63
General Information ............................................................................ 55
GENERAL INFORMATION ..........................................................55 - 6 5
General Lubrication ............................................................................. 68
GENERAL MAINTENANCE ........................................................ 66 - 80
Handling the ATV................................................................................. 31
88
Hang Tags & Warning Information ....................................................... 7
Headlight Aim (Checking/Adjusting) .................................................. 79
Headlight HI/LO Switch ...................................................................... 57
Hoses (Brake/Gas/Vent) ............................................................... 61, 71
How to Handle the ATV (Active Riding Techniques) ......................... 31
Hydraulic Hand Brakes ................................................................70 - 71
I.D. NUMBERS RECORD ................................... (insid e of back-cover)
Identification Numbers ........................................................................ 55
Idle RPM Adjustment .......................................................................... 75
Ignition Switch Key .............................................................................. 55
INDEX .................................................................................................. 85
Inexperienced/Untrained Riders ........................................................ 51
K-Turns................................................................................................. 35
INTRODUCTION ................................................................................... 1
KYMCO USA Limited Warranty .......................................................... 83
Leaning, Weight Shift, and Balance .................................................. 32
Left Handlebar Switch ......................................................................... 58
Light Bulb Replacement ..................................................................... 78
Load Capacity Ratings Chart ............................................................. 48
LOCATION OF PARTS & CONTROLS .............................................. 10
Lubricant (Inspecting/Changing) ........................................................ 69
Lubrication (Front Differential/Rear Drive) ........................................ 64
Lubrication (General) .......................................................................... 68
Maintenance (General) ....................................................................... 66
MAINTENANCE RECORD .......................................................... 86 - 87
Maintenance Schedule ...................................................................... 67
Mounting the ATV ................................................................................ 28
Muffler/Spark Arrester ......................................................................... 78
Oil and Filter ........................................................................................ 68
Oil (Engine/Transmission) .................................................................. 63
Oil Cooler ............................................................................................. 68
Operating Maneuvers (Basic) ............................................................. 28
Operation/Maintenance ...................................................................... 53
Parking Brake (Lever Lock) ..........................................................57, 71
Parking ................................................................................................. 31
PARTS & ACCESSORIES .................................................................. 53
Parts and Controls (Locations) .......................................................... 10
Parts ..................................................................................................... 53
Personal Choices ................................................................................ 47
PREFACE ........................................................................................... 53
Preparation after Storage ................................................................... 82
Preparation for Storage ...................................................................... 81
PREVENTION .............................................................................. 22 - 27
Primer- Cold Start ............................................................................... 60
Protective Rubber Boots .............................................................. 72 - 73
Quick Turns .......................................................................................... 34
Rear Foot Brake .................................................................................. 71
Responsibility ...................................................................................... 51
Reversing............................................................................................. 40
Riding Downhill .................................................................................... 37
Riding Uphill ........................................................................................ 36
Safe Riding Clothing and Gear .......................................................... 22
Safety Alert ............................................................................................ 5
Safety Flag Bracket ............................................................................. 62
Seat Latch............................................................................................ 61
SECTION 1 - FOREWORD .................................................................. 1
SECTION 1 - SAFETY ...................................................................3 - 52
SECTION 2 - OPERATION & MAINTENANCE .........................53 - 8 2
SECTION 2 - PREFACE..................................................................... 53
Selector Switch (2WD/4WD) .............................................................. 56
Sharp Turns ......................................................................................... 33
Shifting ........................................................................................... 30, 56
Shock Absorbers ................................................................................. 68
Sidehilling/Traversing Hills ................................................................. 37
SIPDE................................................................................................... 50
Skidding or Sliding .............................................................................. 40
SOUND JUDGMENT ...................................................................4 3 - 5 0
Spark Plug .................................................................................... 74 - 75
SPECIFICATIONS............................................................................... 54
Speedometer / LCD ............................................................................ 59
Speedrack ............................................................................................ 48
Starter Button ...................................................................................... 58
Starting a Cold Engine........................................................................ 29
Starting the Engine ............................................................................. 28
Starting................................................................................................. 32
Stop Switch (Emergency) ................................................................... 58
Stopping the ATV................................................................................. 42
Stopping the Engine ............................................................................ 42
Storage (Prep for Riding) .................................................................... 82
Storage (Preparation For) ................................................................... 81
Storage Compartment ......................................................................... 80
STORAGE..................................................................................... 8 1 - 8 2
SUPERVISION .............................................................................51 - 52
Survival ................................................................................................ 27
.............................................................................................. 38
Swerving
TABLE OF CONTENTS ........................................................................ 2
Taking Responsibility .......................................................................... 51
T-CLOC ................................................................................................ 25
Those around you ............................................................................... 46
Throttle Cable Adjustment .................................................................. 75
Throttle Lever ...................................................................................... 59
Throttle Limiter Screw......................................................................... 59
Tips ....................................................................................................... 40
Tire Inflation Pressure ......................................................................... 54
Tire Repair (Tubeless) ........................................................................ 78
Tire Replacement ................................................................................ 77
Tire Tread Condition ........................................................................... 77
Tires .............................................................................................. 77 - 78
Trailering and Towing .......................................................................... 62
Transmission Shift Lever .................................................................... 56
Transporting your ATV ........................................................................ 63
USA EPA Emission Control Warranty Statement .............................. 85
V-Belt Cover (Draining) ....................................................................... 77
Warning Information .............................................................................. 7
Warning Label Locations ................................................................... 8-9
WARNING S .................................................................................. 11 - 21
Warranty (Limited) ............................................................................... 85
Warranty Coverage (U.S. EPA only) .................................................. 84
WARRANTY INFORMATION ...................................................... 8 3 - 8 5
Wheel Removal ................................................................................... 78
Wide Turns ........................................................................................... 33
 Loading...