

Page 1

Do not remove this Owner ’s Manual from the vehicle. Read this
manual carefully before operating the vehicle as it contains
important safety information.
C 2009 KYMCO. All rights reserved. Printed in Taiwan. www.kymco.com
LIKE 200i
Owner’s Manual
Page 2

TABLE OF CONTENTS
SECTION 1 - SAFETY................................... 1 - 6
Forward .........................................................1
Scooter Safety.............................................2 - 3
Accessories & Modifications.............................4
Locations of Parts & Controls.........................5 - 6
SECTION 2 - CONTROLS & FEATURES....7 - 13
Ignition Switch ................................................7
Ins trumen ts.... ...... ...... ...... ...... ...... ...... ...... .....8
Right-hand Handlebar Switch..........................10
Left-hand Handlebar Switch............................10
Fuel Recommendation...................................12
Seat.............................................................13
SECTION 3 - OPERATION.........................14 - 16
Pre-ride Inspection........................................14
Starting the Engine........................................15
SECTION 4 - MAINTENANCE....................17- 30
Maintenance Schedule.............................18 - 19
Engine Oil.....................................................20
Engine Oil Replacement.................................21
Transmission Fluid Change............................23
Air Filter Element Change...............................24
Throttle Operation..........................................24
Spark Plug....................................................25
Brake Fluid Level Inspection...........................26
Brake inspection............................................27
Battery & Fuse...............................................29
Tires............. ................................................30
Pa king........... ......................................... ......31
EM ISSION CONTROL..............................32
S P E C I F I C A T I O N S . . . . . . . . . . . . . . . . . . . . . . . . 3 3
Page 3

Page 4

SECTION 1 FORWARD & SAFETY INTRODUCTION
Thank you for purchasing this KYMCO LIKE 200i scooter, and welcome to the KYMCO riding family.
Please read this owner's manual carefully before riding so that you will be thoroughly familiar with the proper
operation of your scooter controls, its features, capabilities, and limitations.
To ensure a long, trouble-free life for your scooter, provide it with the proper care and maintenance as
described in this manual.
For replacement parts and accessories, you should always use genuine KYMCO products, as they have
been specially designed for your vehicle and manufactured to meet KYMCO's demanding standards.
Keep this owner's manual aboard your scooter at all times so that you can refer to it whenever you need
information. This manual should be considered a permanent part of the scooter and should remain with the
scooter when it is sold.
All information, illustrations, photographs and specifications contained in this manual are based on the latest
product information available at the time of publication. Due to improvements or other changes, there may be
information in this manual that differs slightly from your vehicle. KYMCO reserves the right to make product
and publication changes at any time without notice and without incurring any obligation.
1
Page 5

SCOOTER SAFETY
IMPO RTANT SAFETY INFORMATION
Your scooter can provide you many years of
service and pleasure if you take responsibility for
your own safety and understand the challenges
that you can meet on the road. There is much that
you can do to protect yourself when you ride. You
will find many helpful recom mendatio ns
throughout this manual. Here are some very
important safety tips:
Wear a helmet
Scooter safety equipment starts with a quality
helmet. One of the most serious injuries you can
suffer in a crash is a head injury. Always wear a
properly approved helmet. You should also wear
suitable eye protection.
Make your self easy to see
To make yourself more visible, wear bright
reflective clothing, position yourself so other
drivers can see you, signal before turning or
changing lanes, and use your horn when it will help
others notice you.
Know your lim its
Ride within the boundaries of your own skill at all
times. Knowing these limits and staying within
them will help you to avoid accidents.
2
Keep you r scooter in s afe condi tion
For safe riding, it's important to inspect your
scooter before every ride and perform all
recommended maintenance. Never exceed load
limits, and only use accessories that have been
approved by KYMCO for this scooter.
Insp ect your sc ooter befo r e r iding
Do not forget to perform an entire safety inspection
to ensure you, and your passenger's safety, before
each ride.
Be extra safety conscious on bad
weather days
Riding on bad weather days, especially wet ones,
requires extra caution. Braking distance can
double on a rainy day. Stay off of the painted
surfaces, manhole covers and greasy appearing
areas on the pavement, as they can be especially
slippery. Use extreme caution at railway crossings
and on metal gratings and bridges. Whenever your
are in doubt about the road conditions, slow down.
Modi fication
Modification of your scooter, or removal of original
equipment may render the vehicle unsafe or illegal.
Obey all applicable equipment regulations in your
area.
Page 6

SCOOTER SAFETY
PROTECTI VE APPAREL
For your safety, always wear an approved
motorcycle or scooter helmet, eye protection,
boots, gloves, long pants, and a long- sleeved shirt
or jacket whenever you ride your scooter.
Helm ets and protecti on
Your helmet is your most important piece of riding
gear because it offers the best protection against
head injuries. Your helmet should fit your head
comfortably and securely. Always wear a face
shield or goggles to protect your eyes and to aid
your vision.
Addit ional riding g ear
In addition to a helmet and eye protection, you
should also use:
Sturdy boots with nonslip soles to help protect your
feet and ankles.
Leather gloves to keep your hands warm and help
prevent blisters, cuts, burns and bruises.
A motorcycle or scooter riding suit or jacket that has
been designed for comfort as well as protection.
Bright colored and reflective clothing can help make
you more noticeable in traffic. Be sure to avoid loose
clothes that could get caught on any part of your
scooter.
WARNING
Not wearing a helmet increases your chance of
serious injury or death in a crash.
11
55
11
Wear gloves
22
Clothes should be fit properly (not too tight or
33
44
22
loose)
33
Always wear a helmet. You should also wear
eye protection
44
Wear bright or reflective clothing
55
Footwear should be the proper size, have low
heels, and offer ankle protection
WARNING
Be sure you and your passenger always wear an
approved motorcycle helmet that fits properly.
You should also wear eye protection and other
protective apparel when you ride.
3
Page 7
ACCESSORIES & MODIFICATION
There is a large variety of accessories available to KYMCO scooter owners. KYMCO cannot have direct
control over the quality or suitability of accessories you may wish to purchase. The addition of unsuitable
accessories to your scooter can lead to unsafe operating conditions. It is not possible for KYMCO to test
each accessory on the market or combinations of all the available accessories; however, your KYMCO
dealer can assist you in selecting quality accessories and then install them correctly.
Use extreme caut ion when selecti ng and install ing the access ories for your
scoo ter.
No mod ifications
KYMCO strongly advises you against removing any original equipment or modifying your scooter in any way
that would change its design or operation.
WARNING
Improper accessories or modifications can make your scooter unsafe and can lead to an accident.
Never modify your scooter through the improper installation or use of accessories. All parts and
accessories added to this vehicle should be genuine KYMCO or equivalent components designed for use
on this scooter and should be installed and used according to instruction. If you have any questions,
consult an authorized KYMCO dealer.
4
Page 8
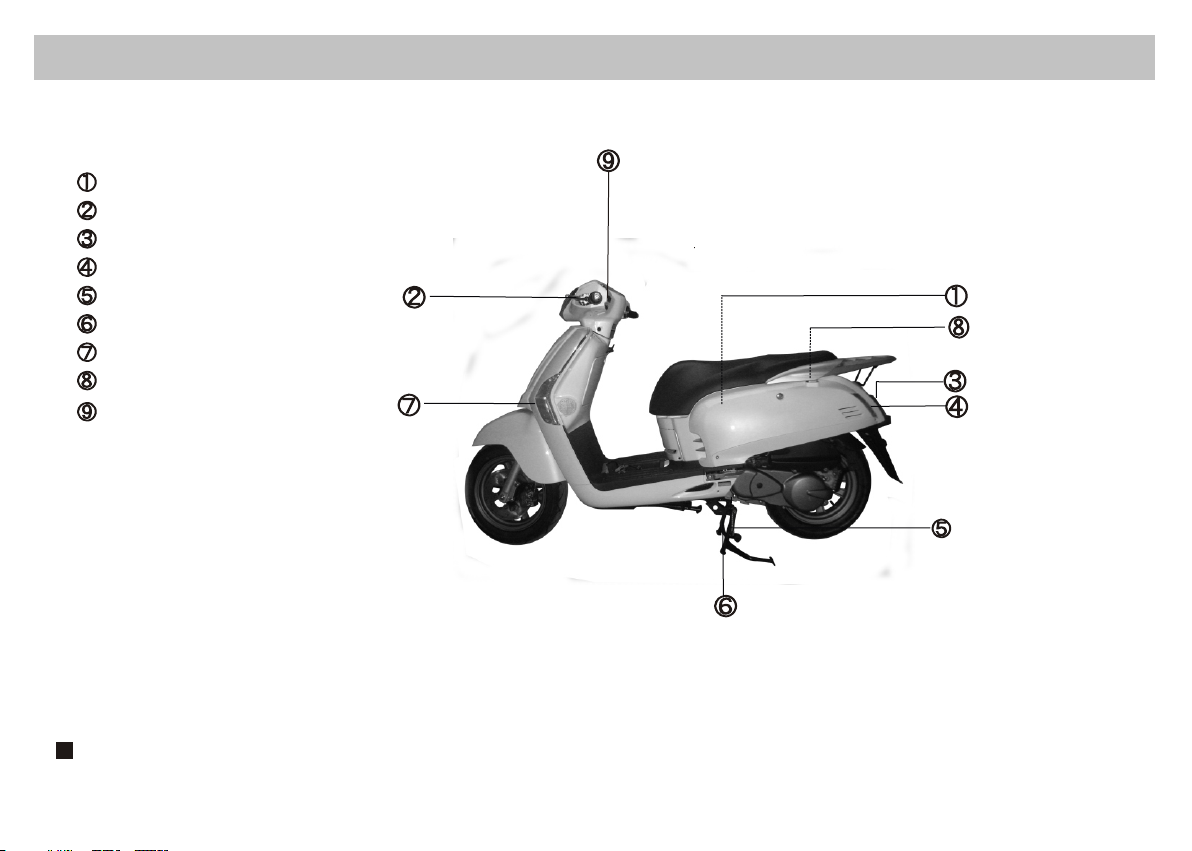
LOCATION OF PARTS & CONTROLS
Met-in BoxMet-in Box
Rear Brake LeverRear Brake Lever
Taillight/StoplightTaillight/Stoplight
L. Rear Turn Signal Light L. Rear Turn Signal Light
Engine Serial NumherEngine Serial Numher
Main StandMain Stand
L. Front Turn Signal LightL. Front Turn Signal Light
Fuel FillerFuel Filler
Turn Signal SwitchTurn Signal Switch
Headlight Dimmer
Headlight Dimmer
Switch
Switch
Passing Signal Switch
Passing Signal Switch
Horn Button
Horn Button
NOTE: Your scooter may differ slightly in appearance from the images in this manual.
5
Page 9
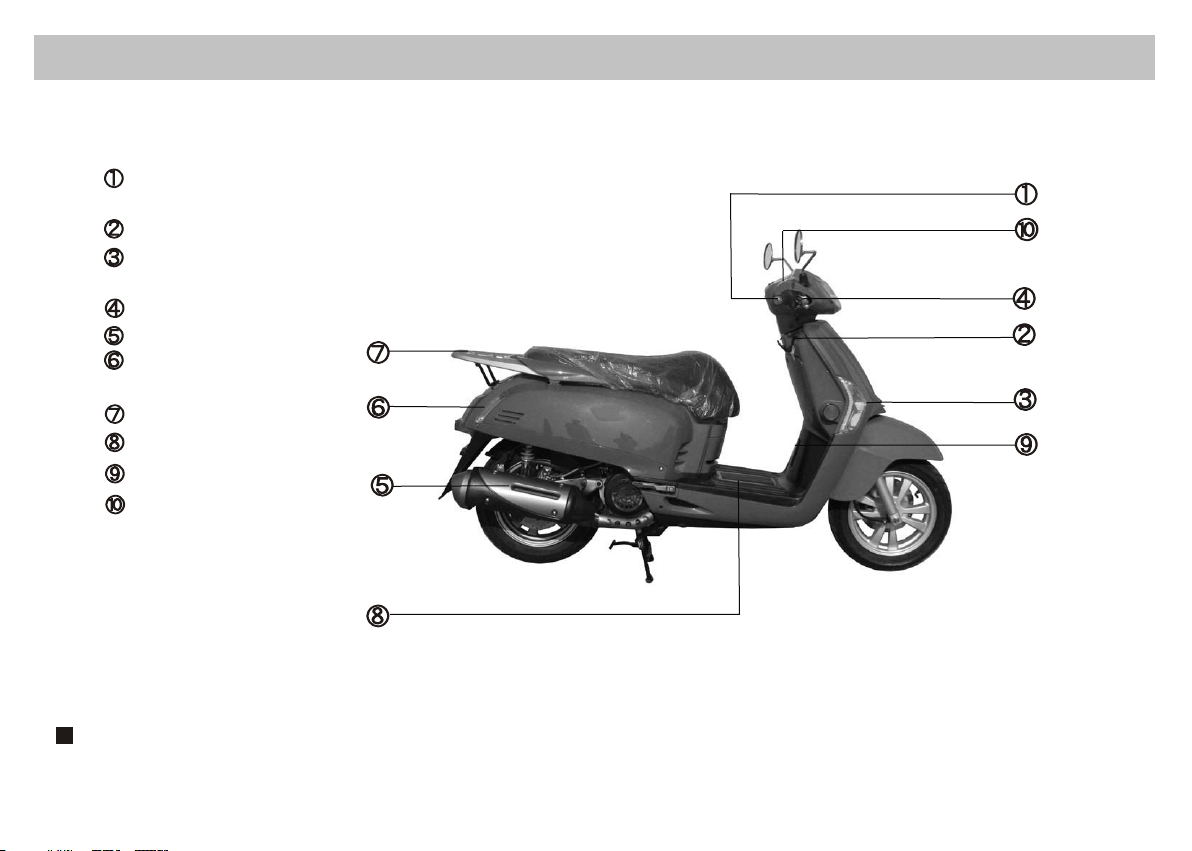
LOCATION OF PARTS & CONTROLS
Headlight Switch Headlight Switch
Electric Starter Button Electric Starter Button
Ignition SwitchIgnition Switch
R. Front Turn R. Front Turn
Signal Light Signal Light
Brake LeverBrake Lever
Exhaust Muffler Exhaust Muffler
R.Rear TurnR.Rear Turn
Signal Light Signal Light
Rear CarrierRear Carrier
BatteryBattery
Frame Serial NumberFrame Serial Number
InstrumentsInstruments
NOTE: Your scooter may differ slightly in appearance from the images in this manual.
6
Page 10
SECTION 2 CONTROLS&FEATURES
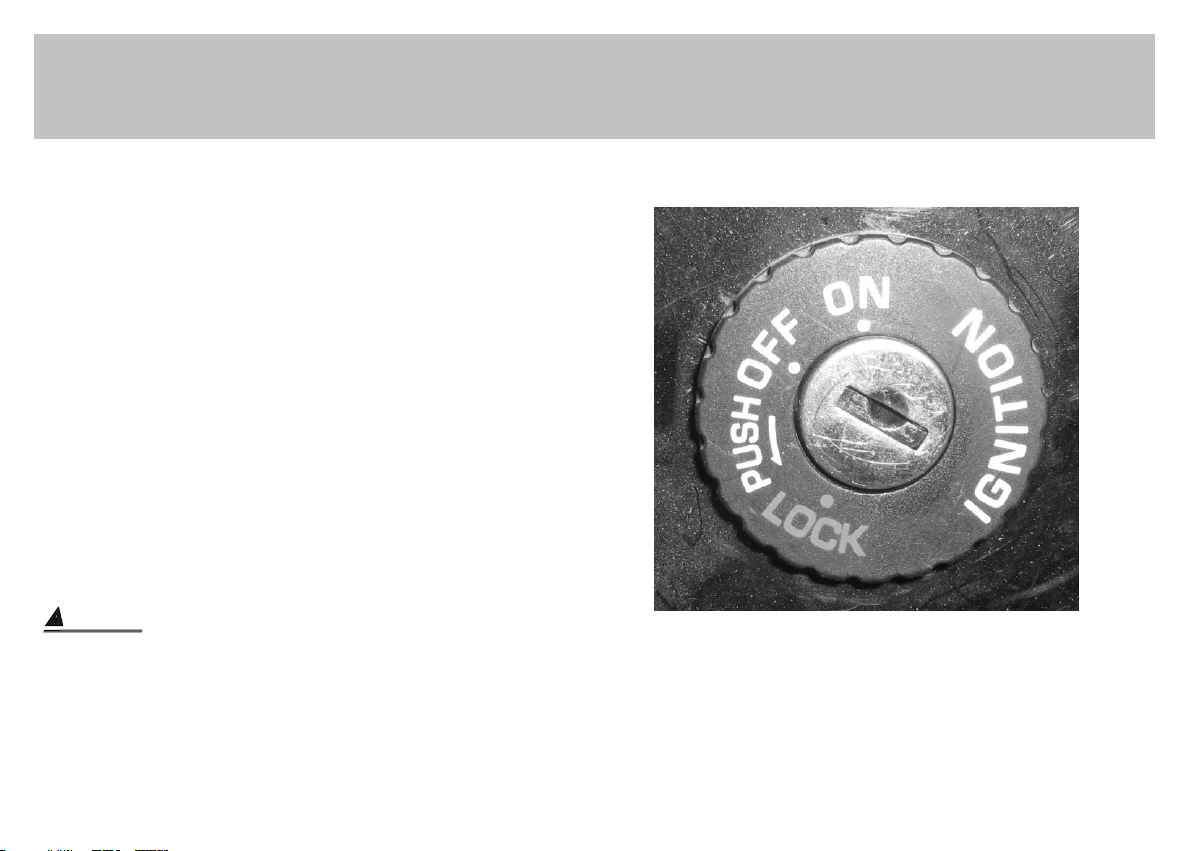
IGNI TION SWITCH
To operate the ignition switch and it's functions:
“ ON ” Position:
Power is connected to start the engine. The key
Power is connected to start the engine. The key
cannot be taken out.
cannot be taken out.
“ OFF ” Position :
Power is cut off and the engine stops. The key
Power is cut off and the engine stops. The key
can be taken out.
can be taken out.
“ LOCK ” Posit ion:
The steering handlebar is locked. The key can
The steering handlebar is locked. The key can
be taken out.
be taken out.
CAUTION: CAUTION:
After locking, turn the handlebar gently to
After locking, turn the handlebar gently to
make sure that it is locked.
make sure that it is locked.
Do not turn the ignition switch to the"LOCK"
Do not turn the ignition switch to the"LOCK"
Position during riding, otherwise the handlebar
Position during riding, otherwise the handlebar
will be out of control and cause accidents.
will be out of control and cause accidents.
Don't park your scooter at a place to hinder
Don't park your scooter at a place to hinder
the traffic.
the traffic.
7
Page 11
CONTROLS & FEATURES
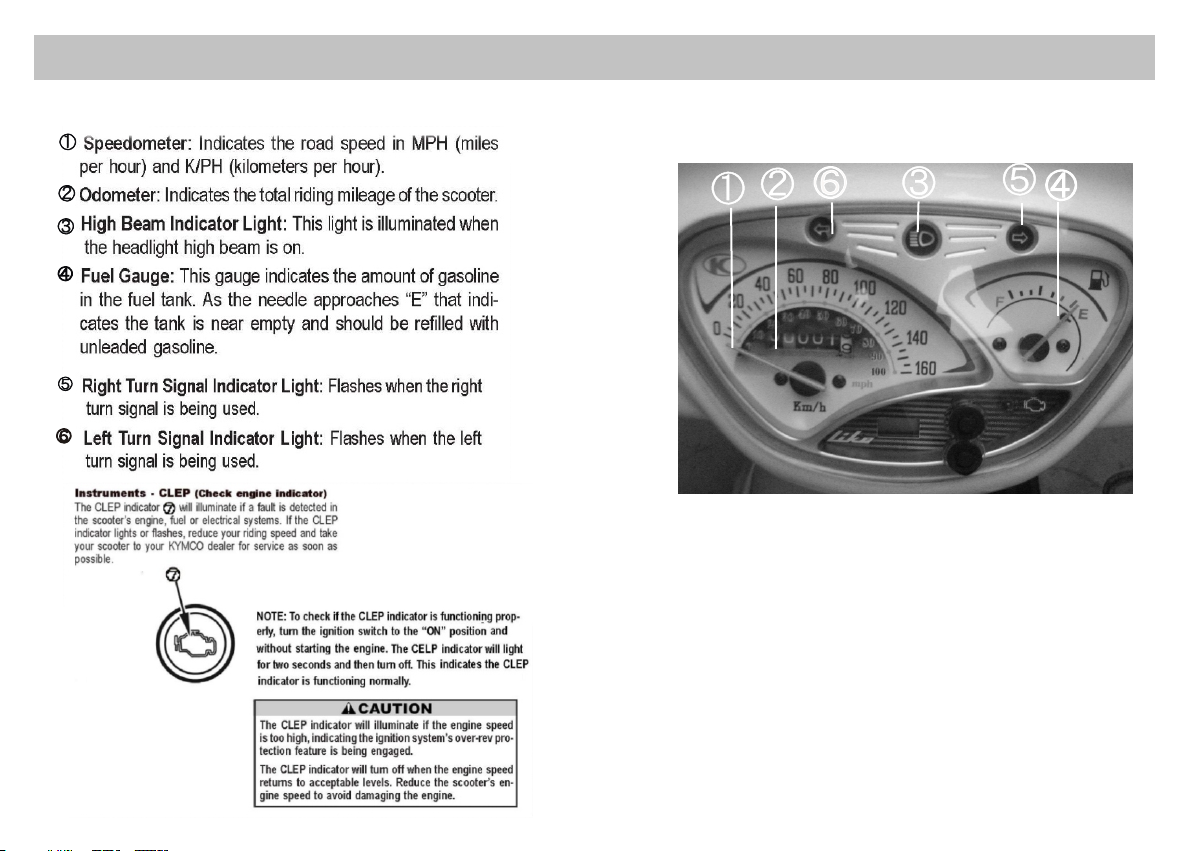
Inst r ument s
8
Page 12

CONTROLS & FEATURES
CLOCK SETTING
CLOCK SETTING
1.Press and hold the MODE button and the ADJUST
1.Press and hold the MODE button and the ADJUST
button at the same time for more than two
button at the same time for more than two seco-
nds
. The “hour”digits will begin flashing,
nds . The “hour”digits will begin flashing,
indicating the clock time can be adjusted.
indicating the clock time can be adjusted.
A)To set hour display, press the ADJUST button
A)To set hour display, press the ADJUST button
until it displays the correct “hour”time. To
until it displays the correct “hour”time. To
change the minute display, press the MODE
change the minute display, press the MODE butt-
on
until the“minutes” digits begins flashing.
on until the“minutes” digits begins flashing.
B)To set minute display, press the ADJUST butt-
B)To set minute display, press the ADJUST butt-
on until it displays the correct“minute”time.
on until it displays the correct“minute”time.
To change the month display, press the MODE
To change the month display, press the MODE
button until the “month” digits begins flash-
button until the “month” digits begins flash-
ing.
ing.
C)To set month display, press the ADJUST button
C)To set month display, press the ADJUST button
until it displays the correct month”time. To
until it displays the correct“month”time. To
change the date display, press the MODE button
change the date display, press the MODE button
until the “date”digits begins flashing.
until the “date”digits begins flashing.
D)To set month display, press the ADJUST button
D)To set month display, press the ADJUST button
until it displays the correct “date”time. To
until it displays the correct “date”time. To
end the clock and month/date adjustment, press
end the clock and month/date adjustment, press
the MODE and ADJUST buttons at the same time.
the MODE and ADJUST buttons at the same time.
The display will stop flashing automatically.
The display will stop flashing automatically.
The adjustment will be cancelled if an button
The adjustment will be cancelled if an button
is pressed within approximately ten seconds.
is pressed within approximately ten seconds.
“
seco-
butt-
CLOCK ADJUST MODE
CLOCK ADJUST MODE
9
Page 13

CONTROLS & FEATURES
Righ t handlebar switch
Left h andlebar switch
Turn signal switch :
Use the turn signal indicator to signal to other traffic
your intention to turn or change lanes. The turn
signal light on the dash will flash to alert the rider
that the switch is engaged.
" " for turning to the "left".
" " for turning to the "right".
To cancel the turn signal, press the switch in when
it is in the center position.
Horn button :
Press the horn button to sound the horn.
10
44
22
44
Page 14

CONTROLS & FEATURES
Dimmer switch :
" " switch position turns the headlight low beam
on.
" " switch position turns the headlight high beam
on and the high beam indicator light on the dash is
activated as well.
Passing light button :
Use this button to rapidly flick the headlamp high
beam on and off to signal other vehicles that you
wish to pass.
Front brake lever (right handlebar)
Apply the front brake only by squeezing the right
hand brake lever gently towards the grip. The
brake light will illuminate when the lever is
squeezed.
Rear brake lever (left handlebar)
Apply the rear brake only by squeezing the left
hand brake lever gently towards the grip. The
brake light will illuminate when the lever is
squeezed.
55
55
11
Page 15

CONTROLS & FEATURES
12
Page 16

CONTROLS & FEATURES
Helmet holder
To use the helmet holders, open the seat and hook
your helmet's fastener ring to the holder and
close the seat securely.
WARNING
Use the helmet holder only when your scooter is
parked. Do not ride with a helmet hanging from
the holder.
13
Page 17

SECTION 3 OPERATION
Pre-ride inspection
For your safety, it is very important to take a few
moments before each ride to walk around your
scooter and check its condition. If you detect any
problem, be sure to address it immediately, or have
it corrected by your KYMCO dealer.
WARNING
Improperly maintaining your scooter or failing to
correct a problem before riding can cause a
crash in which you can be seriously hurt or killed.
Always perform a pre-ride inspection before
every ride and correct any problems.
Engine oil level: Add engine oil if required (page
1.
20). Check for leaks.
Tires: Check condition and inflation pressure
4.
(page 30).
Throttle: Check for smooth operation and that it
5.
closes completely in all steering positions (page
24).
6.
Lights and horn: Check that headlight, tail/brake
light, turn signals, indicators and horn function
properly.
Steering: Check for condition and smoothness.
7.
Fuel level: Fill fuel tank when necessary (page
2.
12). Check for leaks.
3.
Front and rear brakes: Check operation, make
sure there is no brake fluid leakage (page 28).
14
Page 18

OPERATION
Starting the engine
Always follow the proper starting procedure
described here and on the following pages.
CAUTION
To protect the catalytic converter in your
scooter's exhaust system, avoid idling for
extending periods of time and do not use leaded
gasoline.
CAUTION
To prevent damage to the starter motor, do not
operate the starter motor for more than five
seconds at a time. If the scooter fails to start
immediately, check the fuel level and the battery
condition, and allow the starter motor to cool
before attempting to start the engine again.
Place your scooter on its center stand and put
1.
the side stand up.
Insert the ignition key and rotate the ignition
2.
switch to " ON " .
15
Page 19

OPERATION
Squeeze the left (rear) brake lever.
3.
NOTE: The electric starter will only work when
the left (rear) or right(front) brake lever is
squeezed.
With the throttle closed, press the starter
4.
button .
Release the starter button as soon as the
engine starts.
CAUTION
Operating your scooter's engine with
insufficient oil pressure can cause serious
engine damage.
Keep the throttle closed while warming up the
5.
engine
Keep the engine to warm up fully before riding.
6.
16
11
Page 20

SECTION 4 MAINTENANCE
The importance of maintenance
Maintaining your scooter properly is essential for
safe, economical and trouble-free riding. It will also
help reduce air pollution and maximize fuel
economy.
To help you properly care for your scooter, the
following pages in this Owner's Manual include a
maintenance schedule to help you make sure your
scooter is serviced at the appropriate intervals.
These instructions are based on the assumption
that your scooter will be used exclusively for its
designed purpose. Sustained high speed
operation or operation in unusually wet or dusty
conditions will require more frequent service than
specified in the maintenance schedule. Consult
your KYMCO dealer for recommendations
applicable to your individual needs and use.
NOTE: Always follow the inspection and
maintenance recommendations and schedules in
this Owner's Manual.
WARNING
If your scooter tips over or becomes involved in a
crash, be sure your KYMCO dealer inspects all
major parts, even if you are able to make some
repairs.
Improperly maintaining this scooter or failing to
correct a problem before you ride could result in
a crash in which you could be seriously hurt or
killed.
WARNING
When performing maintenance on your scooter
you may need to start the engine. Running your
scooter's engine indoors or in a garage can be
hazardous. Exhaust gas contains carbon
monoxide, a gas that is colorless and odorless,
and can cause death or severe injury.
Operate the engine only where these is
adequate ventilation, preferably outdoors.
17
Page 21

MAINTENANCE
Maintenance schedule
Perform the pre-ride inspection (see page 14) at each scheduled maintenance period. This interval should
be judged by odometer reading or months, whichever comes first.
Maintenance schedule legend (see page 19):
I: INSPECT AND CLEAN, ADJUST, LUBRICATE OR REPLACE IF NECESSARY
C: CLEAN R: REPLACE A: ADJUST L: LUBRICATE T:TIGHTEN D:INSPECT WITH DIAGNOSIS
INSTRUMENT M:MAINTENANCE
The maintenance schedule on the flowing two pages specifies the maintenance required to keep your LIKE
200i scooter in peak operating condition. Maintenance work should be performed in accordance with
KYMCO standards and specifications by properly trained and equipped technicians. Your KYMCO dealer
meets all of these requirements.
Should be serviced by your KYMCO dealer, unless you have the proper tools, service data and are
*
technically qualified.
In the interest of safety, we recommend these items be serviced only by your KYMCO dealer.
**
KYMCO recommends that your KYMCO dealer road test your scooter after each periodic
maintenance service is completed.
18
Page 22

MAINTENANCE
300 1000 3000 5000 7000 9000 11000 13000
Engine Oil R R R R R R R R
Engine Oil Strainer C C C C
Gear Oil R R R R
Spark Plug
Valve Clearance A A A A
Drive Belt I
Bolts & Nuts T T T
Air Cleaner I R I R I R I
Tire Pressure I I I I I I
Fuel Filter Screen R
Break System I I I I I I I
Throttle Body D D D
Fuel Nozzle D D D
Idle Air Bypass Vavle D D D
Engine Temperature Sensor D D D
Temaperature-MAP Sensor D D D
TILT Sensor D D D
Regular sevice mileage (KM)
Item
4Stroke
Daily Inspection
Clean at every 2000KM and replace at every 5000KM.
The above items are applicable to different models.Perform suitable items for each model.
When exceeding the listed mileages,perform maintenance accroding to the listed intervals.
The air cleaner requires more frequent cleaning or replacing when ridden in unusually dusty areas.
I
19
Page 23

MAINTENANCE
Engine oil
Engine oil recommendation
Use a premium quality 4-stroke engine oil to
ensure longer service life of your scooter. Only use
oils that have a SD rating above per the API
service classification.
Engine oil viscosity : SAE 10W-40
If these viscosities are not available, select an
alternative engine oil according to the chart shown
below.
ENGINE OIL VISCOSITIES
20W-40 , 20W-50
20W-40, 20W-50
15W-40 , 15W-50
15W-40, 15W-50
10W-40
10W-40
10W-30
10W-30
20W-40 , 20W-50
-10 0 10 20 30 40 C
0 20 40 60 80 100 F
Engine oil capacity: 0.95 qt (0.9 L)
5W-50
0
0
Engi ne oil level inspection
Check the engine oil level each day before riding
your scooter. The level must be maintained
between the upper and lower level marks on
the oil filler cap/dipstick .
Start the engine and let it idle for a few minutes.
1.
CAUTION
Running the engine with insufficient oil pressure
can cause serious engine damage.
2.
Stop the engine and put the scooter on its center
stand on level ground.
20
Page 24

MAINTENANCE
After a few minutes, remove the oil filler
3.
cap/dipstick, wipe it clean, and reinsert the oil
filler cap/dipstick without screwing it in. Remove
the oil filler cap/dipstick. The oil level should be
between the upper and lower marks on the oil
filler cap/dipstick.
If required, add the specified oil (see page 22)
4.
so the oil level touches the upper level mark on
the dipstick. Do not overfill.
Reinstall the oil filler cap/dipstick . Check for
5.
oil leaks.
WARNING
The engine and related components can
become very hot. Use care when inspecting the
oil level so you do not burn yourself. If needed, let
the engine and exhaust system cool before
working in those areas.
Engine oil replacement
Engine oil quality is the primary factor that affects
engine longevity. Change your scooter's engine oil
as specified in the maintenance schedule (see
page 20).
NOTE: Change the engine oil with the engine at
normal operating temperature and the scooter on
its center stand to assure complete and rapid
draining.
Remove the oil filler/dipstick from the right
1.
crankcase cover.
Place a suitable container (drain pan) under the
2.
left crankcase.
21
Page 25

MAINTENANCE
Remove the oil drain plug from the crankcase
3.
to drain the oil.
Reinstall the drain plug and tighten it to the
4.
specified torque.
Oil drain plug torque: 18 lb-ft (25 N-m)
Add oil to the engine per the amounts listed
5.
below, and reinstall the oil filler/dipstick.
Engine oil capacity: 0.85 qt (0.8 L)
NOTE: Amounts are after draining the oil
only.
Start the engine and let it idle for 2 - 3 minutes.
6.
Stop the engine and check the oil level on the
7.
dipstick when the scooter is parked on the
center stand, on level ground.
CAUTION
Running the engine with insufficient oil pressure
can cause serious engine damage.
Adjust the oil level as required (so the level
8.
reaches the upper mark on the dipstick).
Replace the dipstick and inspect for any leaks.
22
Page 26

MAINTENANCE
Transmissi on fluid cha nge
Place the scooter on its center stand.
1.
Remove the transmission fluid drain bolt .
2.
Remove the transmission fluid filler bolt , then
3.
slowly rotate the rear wheel to drain the fluid.
Fill the transmission with the recommend fluid to
4.
the capacity listed below.
Transmission fluid type: SAE 90
Transmission fluid capacity:
0.20 L
Install the transmission filler bolt and tighten it to
5.
the specified torque.
Transmission fluid filler/drain bolt
torque: 15 lb-ft (20 N-m)
23
Page 27

MAINTENANCE
Air cleaner filter element
The air cleaner filter element should be serviced
at regular intervals by a KYMCO dealer, unless you
have the proper tools, service data and are
technically qualified to do so.
Have the element serviced more often when riding
in unusually wet or dusty areas.
CAUTION
Using the wrong KYMCO air cleaner element or
a non-KYMCO air cleaner element which is not
of equivalent quality may cause premature
engine wear or performance problems.
Throttle operation
Before each ride, check for smooth throttle grip
1.
rotation from the fully open to the fully closed
position at both full steering positions.
Measure the throttle grip free play at the throttle
2.
grip flange (per the illustration right).
2-6 mm
(0.08-0.24 in)
Throttle free play:
0.08-0.24 in (2.0 - 6.0 mm)
24
Page 28

MAINTENANCE
Spark plug
Remove the carbon deposits from the spark plug
with a small wire brush or a spark plug cleaning
machine. After cleaning (or when installing a new
spark plug) readjust the spark plug gap to specified
limit by using a spark plug gap thickness gauge.
The spark plug should be replaced periodically.
Whenever removing the carbon deposits, be sure
to observe the color of the removed spark plug's
porcelain tip. This color tells you whether or not the
standard spark plug is suitable for your type of
riding. Under normal usage, a spark plug's
porcelain tip should be light brown or tan color.
If the spark plug porcelain tip is very white or
glazed appearing, then the spark plug has been
operating too hot. In such a situation, you should
replace the standard spark plug with a spark plug
that has a colder heat range (usually a higher
number; consult with your KYMCO dealer when
selecting an alternate spark plug).
CAUTION
An improper spark plug may have an incorrect fit
or heat range for your engine. This may cause
severe engine damage which will not be covered
under warranty. Never use a spark plug with an
improper heat range, as severe engine damage
could result.
Spark plug gap: 0.024 - 0.028 in
(0.6 - 0.7 mm)
Recommended spark plug:CR7HSA (NGK)
25
Page 29

MAINTENANCE
Brake fluid
Brake fluid level inspection
With the scooter in an upright position, check the
front and rear fluid level.
The level should be above the lower level mark. If
the level is at or below the lower level mark "L",
check the brake pads for wear.
NOTE: Other checks - make sure there are no
fluid leaks. Check for deterioration or cracks in the
hoses and fittings.
WARNING
Worn brake pads should be replaced
immediately. If the pads are not worn, have your
brake system inspected for leaks. Do not ride
your scooter unless the brakes are in perfect
working order.
L
Brake fluid type: DOT 4
26
Page 30

MAINTENANCE
Brake inspection
Your scooter requires the proper brake lever freeplay so the brakes will be responsive and will not
drag, causing premature wear to the brake pads.
The free-play is the measured distance between
the brake lever at rest and a fully applied brake.
Measure the free-play and the brake lever end
1.
0.4 - 0.6 in (10 - 20 mm).
Use the cable adjuster on rear brake lever perch
2.
for minor free play adjustment.
To perform free play adjustment outside of the
3.
range of the cable adjusters on the brake lever
perches, use the adjuster nut at the end of the
brake cable where it connects to the brake arm.
NOTE: Before adjusting the free play with the
brake arm adjuster nut, turn the adjusters on the
brake lever perches as far as they will turn in a
clockwise direction.
0.4 -0 .6 in (10-20 mm)
27
Page 31

MAINTENANCE
Brake PAD WEAR
Break pad wear depends upon the severity of
usage, the type of riding, and road condition.
Inspect the pads at each regular maintenance
Interval.
FRONT/REAR BRAKE
Check the wear indicator make on each pad. If
either pad is wear indicator mark, replace both
pads as a set. See your authorized KYMCO dealer
for this service.
28
Page 32

MAINTENANCE
Battery
Your KYMCO scooter is equipped with a
maintenance-free (sealed) type battery so it is not
necessary to check the battery's electrolyte level or
add distilled water.
NOTE: If your battery seems weak and/or is
leaking electrolyte (causing hard starting or other
electrical troubles), contact your KYMCO dealer
immediately.
CAUTION
Your battery is a maintenance-free type and can
be permanently damaged if the cap strip is
removed.
BATTERY
Fuse
When frequent fuse failures occur, it usually
indicates a short circuit or an overload in the
electrical system.
NOTE: See your KYMCO dealer for electrical
system diagnosis and repair.
WARNING
Never use a fuse with a different rating from that
specified. Serious damage to the electrical
system or a fire may result, causing a dangerous
loss of lights or engine power.
Fuse Specification: 15A/10A
29
Page 33

MAINTENANCE
Tires
WARNING
Failure to follow these warnings may result in an
accident due to tire failure. The tires on your scooter
are a crucial link between your scooter and the road.
You and your passenger's personal safety are
dependant upon the condition of your scooter's tires.
Follow these instructions:
Check tire condition and pressure, and adjust the
inflation pressure before each ride.
Avoid overloading your scooter.
Replace a tire when worn to the specified limit, or if you
find any damage such as cuts or cracks.
Always use the proper size and type of tires as
specified in this Owner's Manual.
Balance the wheel after tire installation.
Read this section of Owner's Manual carefully.
Failure to perform a reasonable break-in of the tires
could cause tire slip and loss of control.
Use extra care when riding on new tires as the grip
will be limited. Perform proper break-in of the tires, as
stated in the break-in recommendation section of this
manual. Avoid hard acceleration, hard cornering, and
hard braking for the first 100 miles (160 km).
NOTE: Check the tire inflation pressure and tire
tread condition at the periods listed in the periodic
maintenance schedule. For maximum safety and
good tire life, the tire pressures should be
inspected more often.
Tire pressure
Insufficient air pressure in the tires not only
accelerates tire wear but it also affects the stability
of your scooter. Under-inflated tires make smooth
cornering difficult and overinflated tires decrease
the amount of tire in contact with the ground, which
can lead to skids and loss of control. Make sure
that the tire pressures on your scooter are within
the specified limits at all times.
NOTE: Tire pressure should only be adjusted
when the tires are cold.
Front tire (rider only): 25.0 PSI (1.75 kg/cm )
Rear tire (rider only): 29.0 PSI (2.0 kg/cm )
Front tire (rider & passenger):25.0 PSI (1.75 kg/cm )
Rear tire (rider & passenger): 32.0 PSI (2.25 kg/cm )
2
2
2
2
30
Page 34

MAINTENANCE
Parking
Place the motorcycle on its main stand on level
ground and do not hinder the traffic.
Stand on the left side and grip the handlebar
straight with left hand and the side rod or rear
carrier with right hand. Then, step down the main
stand evenly with right foot and pull the motorcycle
backward by force with right hand.
CAUTION
1.The motorcycle may easily fall down if it is
parked on an uneven ground.
2.X: Wrong way
O: Right way
31
Page 35

EMISSION CONTROL
Crankcase Emission Control System
Your LIKE 200i engine is equipped with a closed crankcase system. Blow-by gases are routed back in to
the combustion chamber via the intake system. This system does not allow the blow-by gases to enter the
atmosphere.
Exhaust Emission Control System
The exhaust emissions from your LIKE 200i are controlled by engine design, factory-set fuel delivery,
ignition settings, and exhaust system design. This system also includes a catalyzer in the exhaust system.
Noise Exhaust Emission Control System
The engine, intake and exhaust systems of your LIKE 200 were designed to comply with federal, state
and local noise level requirements. Do not modify the engine ,intake or exhaust components, as doing so will
affect compliance these noise level requirements.
Please do not modify or change any KYMCO-designed components that may alter the sound or emission
level from your LIKE 200i .
32
i
Page 36

SPECIFICATIONS - LIKE 200i
Dime nsions
Ov e r a ll l e n g th .. . . . .. . . . .. .. . . . .. . . . .. .. . . 1 92 5 m m
Ov e r a ll w i d t h. .. . . . .. . . . .. .. . . . .. . . . .. .. . . 68 5 mm
Ov er a l l h e i g h t . .. .. . . . . . . . . . .. .. .. . . . . . . . . 111 0 m m
Whe el b ase... ........... ...... ...... ........... 1315 mm
Capac ities
E n g i n e o i l . . . . . . . . . . . . . . . . . . . . . . . . . . . . . . . . . . 0 . 9 L
T r a n s m i s s i o n o i l . . . . . . . . . . . . . . . . . . . . . . . 0 . 2 L
F u e l t a n k . . . . . . . . . . . . . . . . . . . . . . . . . . . . . . . . . . . 6 L
N e t w e i g h t. . . . . . . . .. . . . . . . . .. . . . . . . . .. . . . . . . . 12 0 k g
Engi ne
Type.....................Four-stroke, air-cooled SOHC
Displacement.........................................163 cm
Bore and stroke..............................60 X 57.8mm
Compression ratio......................................9.5:1
Max. Horsepower.......................11.5ps/7500rpm
Spark plug...........................................CR7HSA
Idle speed......................................... 1700 RPM
Cooling system..................................air-Cooled
Starting system............................Electric starter
Transmission.............................. Automatic CVT
3
Chas sis
Tire size, front .....................................120/70-12
Tire size, rear......................................130/70-12
Brake(front)......................................... Disk type
Brake(rear).......................................... Disk type
Elec trical
Ignition type ...............................................ECU
Battery.................................................12v-9Ah
Headlight..................................12v 35W/35W* 2
Tail/brake light.............................. 12v 5W/21W
Turn signal light................................12v 10W X 4
Main Fuse............................................ 15A /10A
33
 Loading...