

Page 1
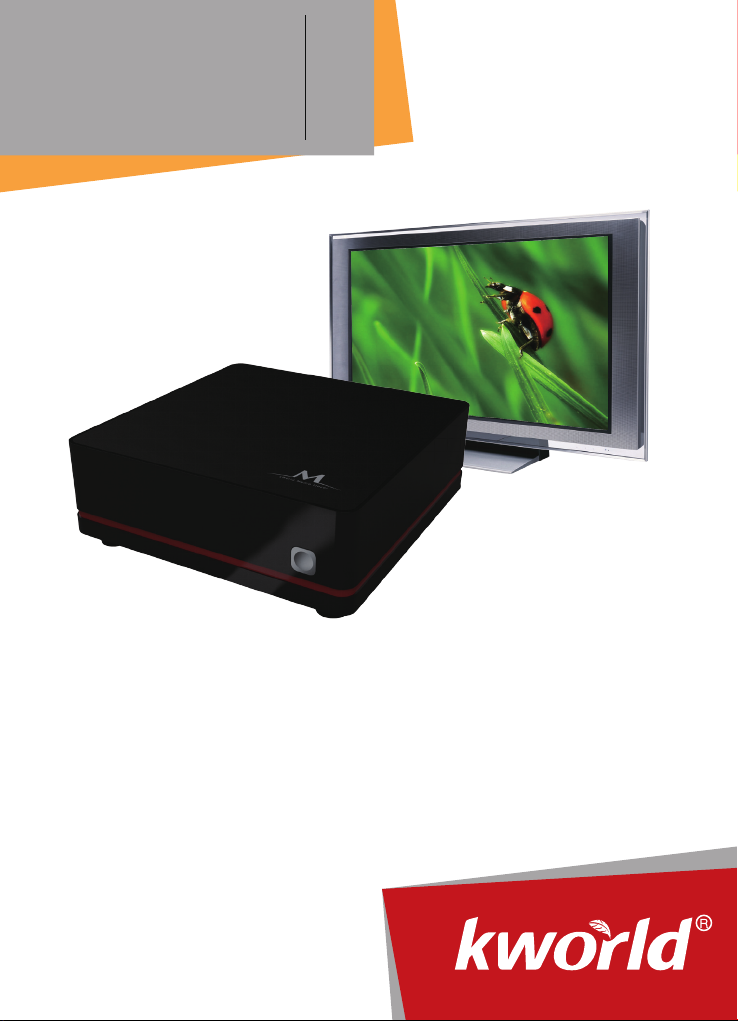
Home Media Center
Media Player
M210
User Manual
Page 2

Contents V1.1
ONE Simple Explanation of Operation
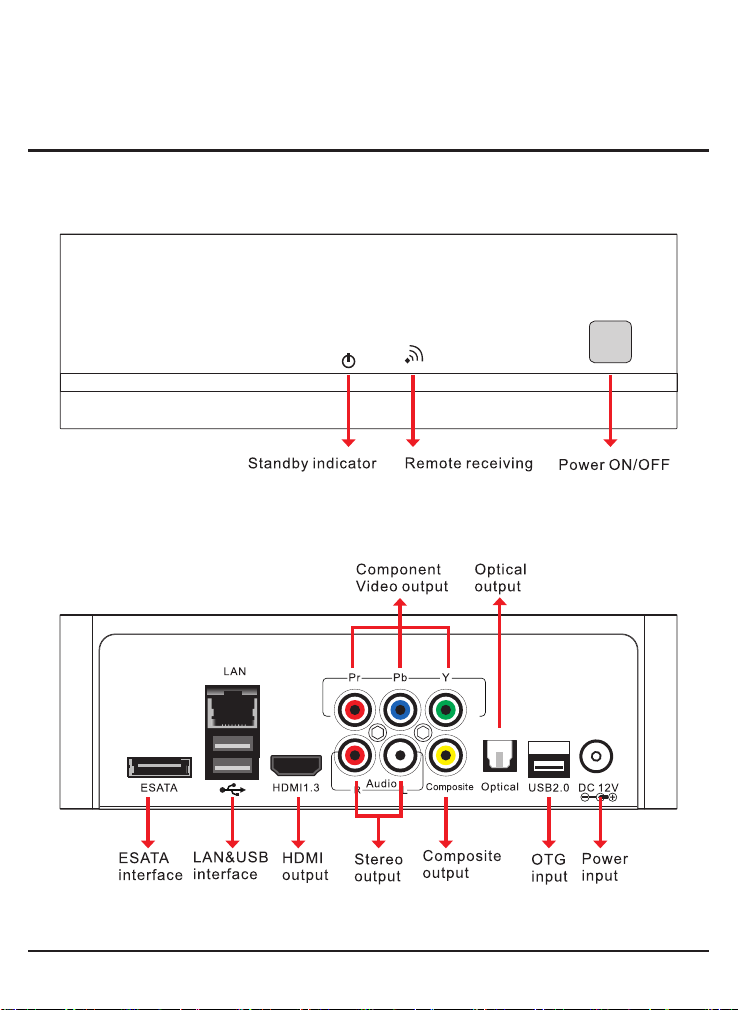
1.1 Front Pane
1.2 Rear panel
1.3 Remote Control
TWO Menu Introduction
2.1 Start-up Screen
2.2 Media Center Menu
THREE Setup Menu
3.1 Audio Settings
3.2 Video Settings
3.3 Changing Network Settings
3.4 Changing System Settings
3.5 MISC
FOUR File Browser Menu
FIVE IMS
SIX File cope
......................................................................................19
.................................................................................20
SEVEN System Upgrade
EIGHT BT and Samba
NINE Browse the les via network
TEN About UPnP Network
..........................................................02
.............................................................02
.....................................................03
................................................................04
........................................................04
.................................................04
....................................................................05
.................................................................05
...............................................................06
..............................................07
.................................................12
...............................................................................13
.......................................................14
.........................................................22
..................................................................24
................................................29
............................................................32
ELEVEN Hard Disk Installation diagram
.....................................02
.......................................34
Page 3
2
1.1 Front Panel
1.2 Rear panel
ONE
Simple Explanation of Operation
© 2011 KWorld
Page 4

1.3 Remote Control
Key Function
POWER button:
Press the power button to turn on or turn off the M210 Device
SETUP button:To access the S etup Menu, that you can directly to
change system settings.
EJECT button:To eject a DVD from the DVD Loader.
Number buttons:To input the number or character
MENU button:
On the DVD playback, Press to return to the DVD navigation menu.
On the BD-like file playback, Press to return to the simple BD menu.
INFO button:
During video playback, press to show the file’s detail information.
HOME button:To view the main menu. Refer to “The Media Center
Menu” for more details.
RETURN button:Return to the previous menus.
Navigational buttons:
Use for control the media player more easily
VOL + / - buttons:
Press to increase or decrease the volume.
Next/Prev buttons:
In the File browser, use to page up and page down
In the BD/DVD playback,use to switch next and previous chapter
In the Media file playback,use as switch next and previous file.
In the Photo slide show,use as switch next and previous file.
PLAY button:
Press to play or pause
STOP button:
Press to stop playback
FR(FAST REWIND) button:
Press to fast rewind the current playback.
Press repeatedly to select faster rewind speeds.
AUDIO button:
Press to select an audio track on a media file.
SUBTITLE button:
In the media files playback mode: Press to enter the
subtitles menu to change the subtitle track, size, color and position.
Dvd playe r mode,Press to select a subtitle track on disk file
FF(FAST FORWARD )button:
Press to fast forward the current playback.
Press repeatedly to select fast forward spee ds.
SEARCH button:
During video playback, Press to pop up the search menu
MUTE button:
Press to mute audio or resume
REPEAT button:
Press to repeat one file, or you could also set a number of files, which
you would like to repeat it one after another.
Bookmark button:
During video playback, mark the current position.
TITLE button:
Press to show HDD or DVD Title List.(only valid in DVD playback)
ZOOM button:
Press to zoom in/out when playing back photos or Video programs
Photo Zoom level: 2x, 4x, 8x, 16x.
Video Zoom level: 1x, 2x, 3x, 4x,8x
Aspect ratio Button:
Press to select the mode among of 16:9, 4:3Letter Box , 4:3 Pan Scan
TV MODE button:
Press to switch among of 480、576、720、1080i、1080p.
COLOR buttons:
Reserved key, different function on different menu page.
3
M210
Page 5
4
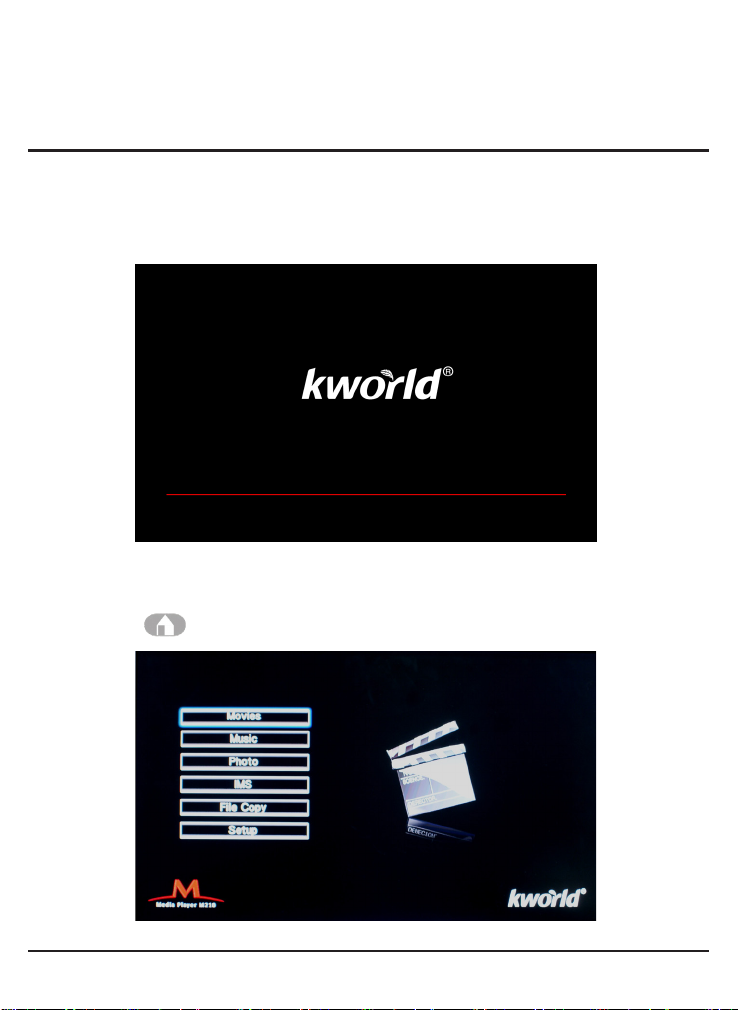
2.1 Start-up Screen
Turn the power of the media player ON, and immediately will display the booting
screen.
2.2 Media Center Menu
TWO
Menu introduction
Press to enter the Media Center Menu.
© 2011 KWorld
Page 6
THREE
Setup Menu
The Setup Menu allows you to configure audio, video, network, photo and system
settings.
Select Setup from the Media Center or press the button
of the remote control to enter the menu.
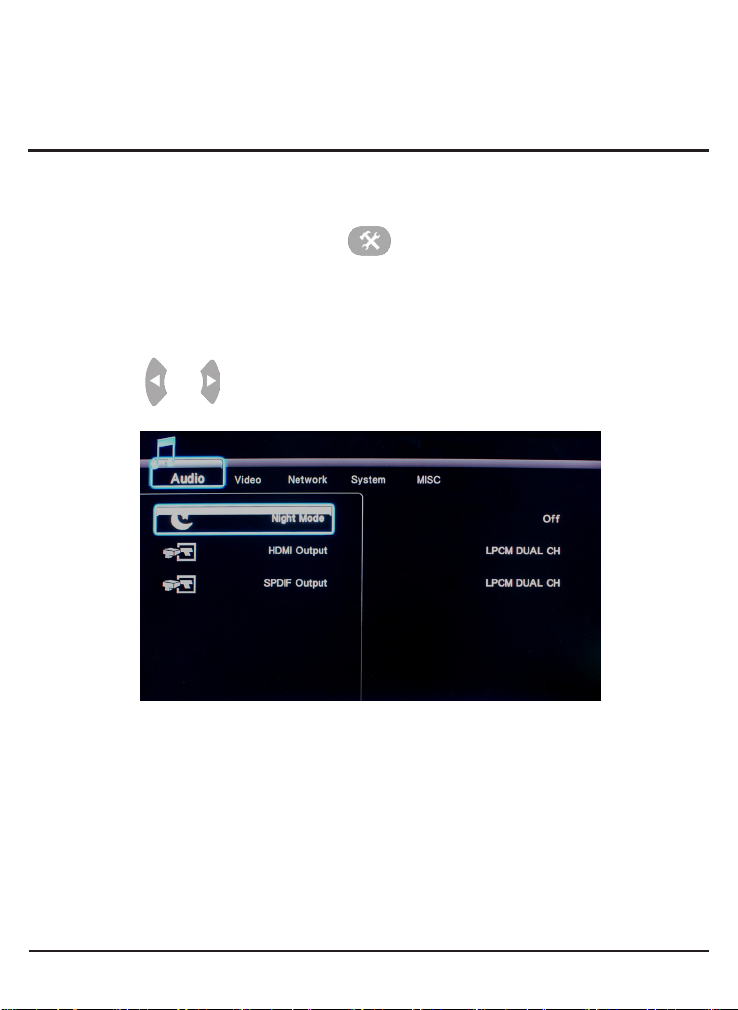
3.1 Audio Settings
Press and on the remote control to select the Audio tab from the menu bar.
5
(1) Night Mode
Select to turn Night Mode on and off.
(2) Digital Output
S/PDIF (Sony/Phillips Digital Interface Format)
the player and the
amplier devices, such as a home theater with surround system.
The HDMI(High Denition Multimedia Interface)
interface for
transmitting uncompressed digital streams.
RAW
data is the original digital stream of the audio and it will provide a better quality.
LPCM
is the default setting, and provides 2 channels audio output.
carries digital audio signals between
is a compact audio/video connector
M210
Page 7

6
3.2 Video Settings
Press and on the remote controller to select the Video tab from the menu bar.
3.2.1 Aspect Ratio:
3.2.2 Brightness:
3.2.3 HUE:
3.2.4 Contrast:
3.2.5 Digital Noise Reduction:
3.2.6 TV System:
NTSC/PAL/480P/576P/720P 60HZ/1080I 50HZ/1080I 60HZ/1080P 50HZ/1080P 60HZ
3.2.7 1080P 24HZ:
after playback,system will come back to original settings.
© 2011 KWorld
Including Pan Scan 4:3/Letter Box 4:3/16:9/16:10;
User can setting brightness based on own favorite
Setting HUE on own favorite.
Set ting contrast based on own favorite.
On / off for selection.
Setting TV system, change video output configure, HDMI AUTO/
1080P 24HZ on,if the movie is 25f/s,the unit will switch to this mode,
Page 8

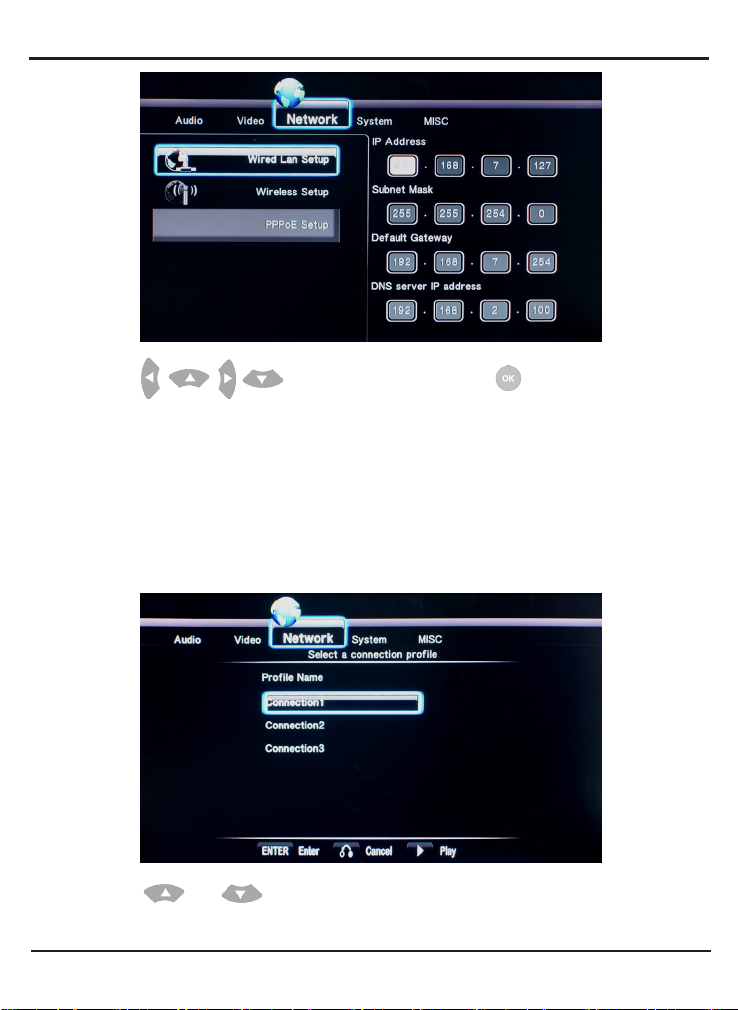
3.3 Changing Network Settings
Select the
3.3.1 Wired Lan Setup
Select to set the Network Setting. Before using the Network functions, please check
following items:
1. Connect the M210 to Network rst
2. Enable NetBIOS of TCP/IP protocol on computer.
3. Shut down your PC’s rewall.
4. Please share the folders which you wish to browse in your PC
Network
tab from the setup menu
7
Press and to select DHCP (AUTO) or FIXED IP (MANUAL).
Press to conrm.
DHCP DNS(AUTO)
Use DHCP(Dynamic Host Conguration Protocol) to set the IP address automaticlly .
Press to conrm.
FIX IP (MANUAL)
Using Fixed IP, it is required to enter followings. IP address, Subnet Mask, Default
Gateway. For further assistant to above settings, please contact to the network
administrator.
M210
Page 9
8
3.3.2 Wireless Setup
Before configuring the WLAN settings, please check the following Make sure the
WLAN USB Adapter is connected to the USB HOST port Make sure there is a wireless
router or an AP (Access Point) on the network, or your PC is equipped with a wireless
network adapter/card; Make sure your player is in the effective range of the W LAN
Select a Prole Name
to enter the IP address Press to conrm
Press and to select. Press the
Press Play button to direct connect. Press the
© 2011 KWorld
ENTER
button to the next step.
RETURN
button to go back.
Page 10
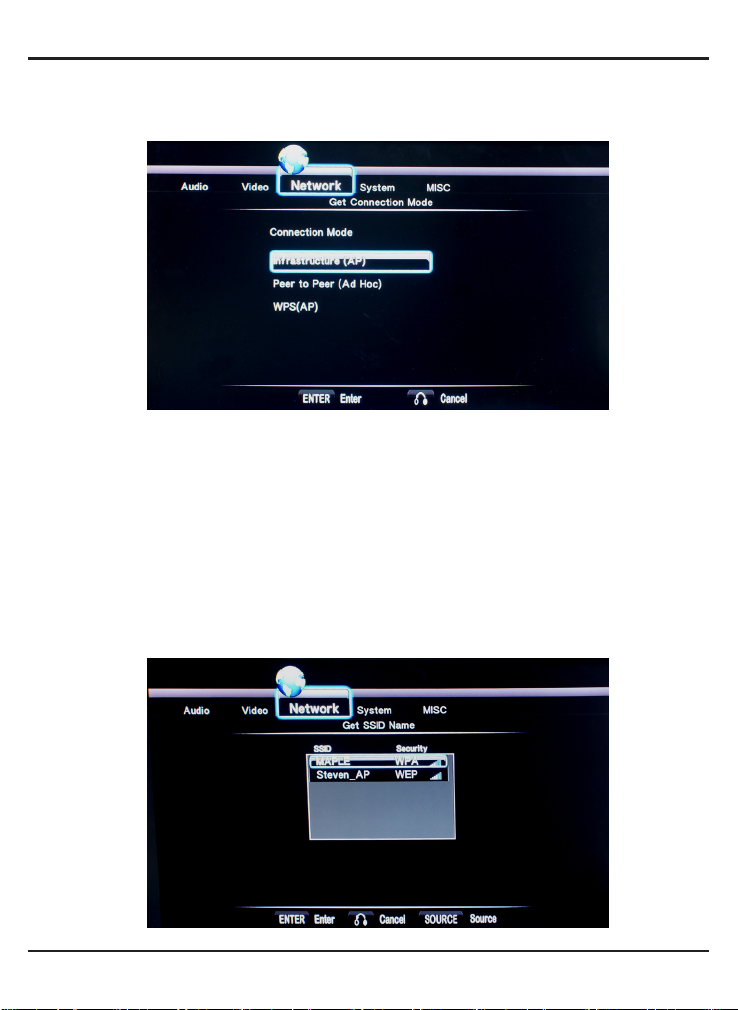
Get Connection Mode
There are two connection modes:
Hoc)
mode
Press the UP / DOWN button to select items.
Infrastructure (AP)
mode and Peer to Peer
Infrastructure (AP)
Infrastructure mode is used to connect computers with wireless network adapters, also
known as wireless clients,which connect to an existing wired network with the help of
wireless router or access point
Get SSID Name
System will search for an existing SSID (Service Set Identier) auto. And select the
access point you wish to access from the SSID list.
9
(Ad
M210
Page 11
10
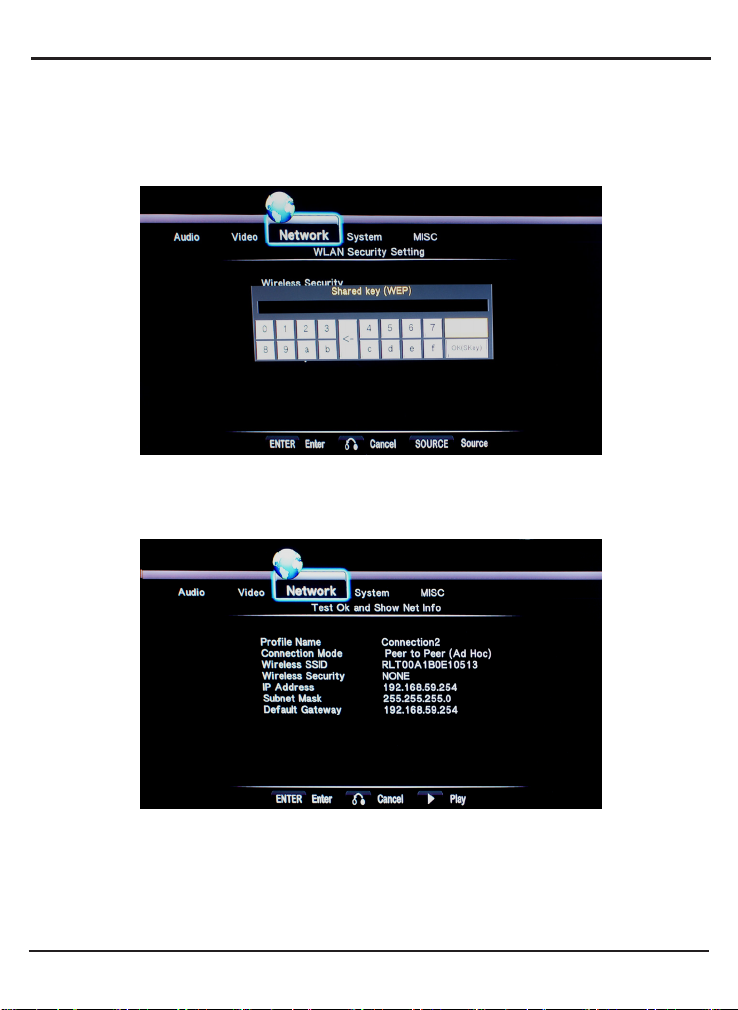
Note:
In the Security list,
WEP
(Wired Equivalent Privacy) and
WPA
(Wi-Fi Protected
Access) means the network is encrypted, i.e. an encryption key is needed to access
the network.
Open System
Select
(WEP)
WPA Key
or
NONE
means it is an
if the network is not encrypted. Otherwise,
to enter the encryption key
open system
network.
select Shared Key
Select SSID the system will get the IP address automatically. The test will take for
a while, please be patient to wait.If the test is ok, the network information will be
displayed
Peer to Peer (Ad Hoc)
Peer to Peer mode, which is also called Ad Hoc mode or computer-to-computer mode,
is used to connect wireless clients directly together, without the need for a wireless
router or access point.
© 2011 KWorld
Page 12
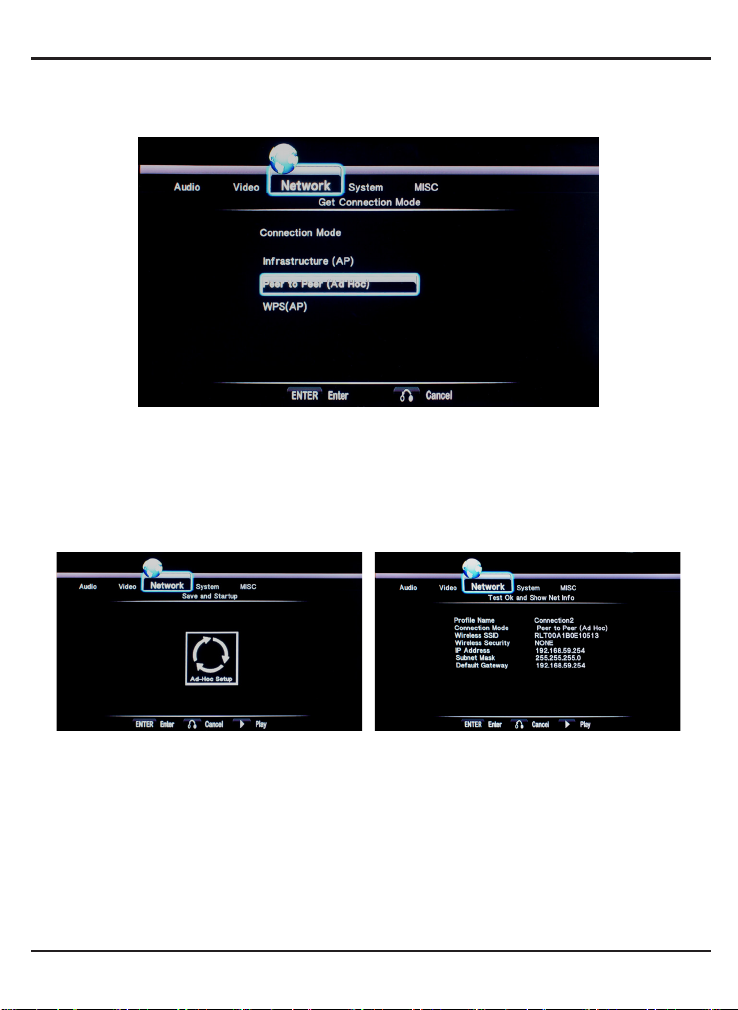
Ad Hoc Setup
Wireless SSID, Wireless Security
Set the
ENTER
Press
button to enter. Press RETURN to return.
Note:
Both the player and your PC need to use the Ad Hoc mode, share a common
SSID, and be put into the same IP range
Select PLAY button to conrm and the next step.
, and
Host IP
for the Ad Hoc connection.
11
If the test is ok, the network information will be displayed
Helpful tips:
The Wireless Network Card for USB is optional and not all wireless Network cards
that can be used for this player are sold on the market. It only supports the model as
Realtek RTL8187B and Realtek RTL8191SU. Please consult with your sale agent
when you wish to make the best use of this product.
M210
Page 13

12
3.4 Changing System Settings
Press and on the remote controller to select the System tab from the menu.
Language menu:
1.
Traditional Chinese/ English / Japanese/ Russian / Spanish/ Dutch/ Italian/ French /
German
Text decoding:
2.
Western/Turkish/ Center European/ Greek/ Cyrillic/Hebrew/SE European//UTF8
Login Control:
3.
login prompt to enter a user name and password.
BT and SANBA:
4.
system update:
5.
device.
Time:
6.
setting correct time by gure keys.
Parental control:
7.
R/RW Auto play:
8.
Angle mark:
9.
HDD format:
10.
hdd can’t be format.
Restore default:
11.
select the OSD language you may need here: Simple Chinese/
setting subtitle language: Simple Chinese/Traditional Chinese/
for the installation of the BT download software, whether using IE
Before this option is available, rst you must format the hard disk.
Press “ok” for upgrade the system from ash disk or other storage
setting password for access. Initial password is 0000
setting DVD ROM turn on or turn off automatically.
on/off;
HDD format. Pls notice never power off during formatting. Otherwise
Recovery factory settings.
© 2011 KWorld
Page 14

3.5 MISC
Press and on the remote controller to select the MISC tab from the menu.
5.1 Resume play: Users can continue watching the movie from the last stop segment.
5.2 Slide sequence: setting playback interval, there is 2sec/5sec/10sec/30sec/1minute/2
minute
5.3 Transition effect: Cross fade/left to right/top to bottom/waterfall/snake/dissolve/strip
left down/all effect shufe for selection.
5.4 Ken burns: display the picture with the burning effect.
5.5 Music background: Store music les and picture les into the same folder, therefore
while the pictures are being shown the music background will be played.
5.6 Screen Saver: setting on/off for selection.
5.7 Movie preview: Before playback, user can preview movie in advance. On/off for
selection.
13
M210
Page 15

14
4.1 All
4.2 Music
FOUR
File Browser Menu
Select the Movie, Music or picture tab from the Media center’s main menu to browse
the movie, photo or music stored either on a HDD, USB Card reader or NET.
Maximum hard disk support to 2TB
Under this mode, all les that belong to this player will be listed. For selecting the le
you wish to play, please press “OK”.
Select audio les with arrow keys of remote control, there is a bottom bar for display
le info, press “ok” for playback.
© 2011 KWorld
Page 16

4.3 Photo
1. Select the picture you want to view, press “ok” for full screen display.
2. To quickly browse all pictures please press the yellow button of remote control, press
“ok” for full screen display.
Notice:
1. When picture playback is in full screen mode, system will automatically adopt to
slide License Notice and Trademark Acknowledgement. Manufactured under license
from Dolby Laboratories. Dolby and the double-D symbol are trademarks of Dolby
Laboratories 18 show with background music which is from the same folder.
2. During slide show, user can switch to last or next picture by press previous and next
keys.
3. Rotate picture by left/right key.
4. Zoom out or zoom in picture by press after zoom in, user can move picture
freely
15
M210
Page 17

16
4.4 Movies
Select which you want to browse, press “ok” for full screen play.
1. During playback, press zoom button for zoom out or zoom in
2. During playback, press time seek button for special timing play by timing search
or pull the schedule bar.
3. During playback, press audio button for audio track switch
4. During playback, press subtitle button for subtitle selection and adjusting
5. During playback, press info button for checking le detail information
4.5 Browsing network
You can playback the multimedia files, which are shared on the local area network
(Ethernet or WLAN). Before viewing the following, please make sure that you have
read “Changing Network Settings” and made the right settings. When selecting NET
in the local network there are two ways. One way is to browse through workgroup; the
other way is to browse through ‘My Shortcuts’.
© 2011 KWorld
Page 18

1. Browsing through Workgroup
You can choose the workgroup from the workgroup list which your PC belongs to, nd
your PC name, and press the ENTER button to conrm
Then select the shared multimedia le that you want to browse.
Notice:
1. While browsing high definition video files (resolution up to 720p / 1080i / 1080p)
via Ethernet or WLAN, the video might be buffering. It is normal due to the limit of
network speed or signal strength(WLAN).
2. Due to different network conditions, sometimes the workgroup might not be
accessed or shown in the list. And then you need to use ‘My Shortcuts’ to browse
shared les
3. Use the network stream the media le, some of 1080P les may not play smoothly.
17
M210
Page 19

18
4.6 File Edit Menu
select the le or folder, press green color key to display the Edit tab
1. Return, return back to main menu.
2. Rename, select “rename” item by up/down button, rename screen will display
3. Select alphanumeric by up/down/left/right buttons, “<-“ is for delete, “->” is for insert,
4. After rename, select “ok” for conrm; if you want to cancel, press “return”.
5. Delete file, select files which need delete, press “ok” key from remote control for
© 2011 KWorld
nally select ok for conrm.
conrm; if not, press“return”.
Page 20

FIVE
IMS
5.1 User can select Network Video/ weather/ rss news from ims;
5.2 select the "Weather" option, press the 'conrm' option. Select region you need to visit
that the corresponding weather will be display
If you would like to add the weather forecast to favorite, press the “green” button of
your control remote. If you would like to edit the area, please go to the main menu of
the weather forecast, then select the region which you want to edit by pressing the
“green” button of your control.
19
M210
Page 21

20
1. Select source device rst.
Access le copy menu, select source device by up/down keys, press “right” key for
next step.
2. Select destination device.
Access destination list, press RED color key select target storage device by up/down
key, press “right” key to next step.
SIX
File copy
© 2011 KWorld
Page 22

Notice: if destination is the ash-bin, it means delete le.
3. Select le or folder.
Press “ok” to get le list, press red color key for selection, after that, there will appear
mark (“tick”)
before the le, if cancel, pls press “stop” button , select “right” to next step.
4. In destination, rst press “OK” to get the folder list, press up/down key to nd the
target folder. Then, press the “right” key to go to next step.
5. From the pop-up menu, select “copy” to start copy.
6. Process of copy.
21
7. After successful copy, there will appear the notice of “File Copy Completed!” on the
screen. If failure, it will appear “File Copy failed!”
M210
Page 23

22
How to get the new rmware
To get the latest rmware, pls. visit kworld website:
http://www.kworld-global.com
7.1 How to upgrade:
1. Download new FW named “install.img” into the root of the USB ash disk;
2. Plug in the USB ash disk into one of USB host ports.
3. Press the “Navigation” keys on the remote control to enter to “setup” menu, press “ok”
for access..
4. Go to the “system” tag.
5. Find “system update”
SEVEN
System Upgrade
© 2011 KWorld
Page 24

7.2 Press “OK” for upgrading, then it will appear on the screen same as the picture
below
7.3 Updating procedure will take about 5 minutes, please keep the power “ON” during
the process
23
M210
Page 25

24
EIGHT
BT and Samba
1.Web management and BT Download To use this function, you need to format the
Internal HD in Settings-> System-> Format menu;
8.1 Log in to Web Management Page
Please make sure player is connected to the network, and get the IP address of the
player under Setup->Network menu.
Tap the IP address (e.g.192.168.0.195) in the address bar of Internet Explore on your
PC. Then you can access the Web server on your PC.
Note:
rst you go settings -> System -> Login control -> ON or Off., if you press ON you
will need to enter the user name and password.
The default user name is' admin ', default password is '123'.
If the login control is off, you will not need to enter a password and directly log in to your
main page showed as below:
© 2011 KWorld
Page 26

8.2 Account Management
At Home page, select “Account Management” into Account Management page.
If click “Account Management” is not into this page, please press “ok” to Log in.
25
Login password can be modied here. Please set your own password.
Please input password twice and click “Enter” to conrm.
M210
Page 27

26
8.3 Visit Neighbor Web
Click Visit Neighbor on the home page of Neighbor Web.
All the devices are displayed here and you can click to visit.
8.4 BT Download
The BitTorrent client btpd is running in daemon (a process running in the background)
Mode and you can manipulate the process via the Web server.
Click BitTorrent Download on the home page of Neighbor Web, then you will enter the
BitTorrent Download page.
© 2011 KWorld
Page 28

8.5 Add new torrent
Click Add new torrent on the BitTorrent Download page.
Click Browse to upload a torrent le, and click Yes to conrm
8.6 Managing the downloadsr
The BitTorrent Download page also allows you to start, stop, delete a torrent, and set
priorities for torrents, you can also view the status of current torrent.
27
Click Start to begin download.
Click Stop to stop download.
Click Delete to delete the selected torrent.
Click Refresh to refresh the current status.
Click the Down arrow to decrease the priority for the selected torrent.
Click the Up arrow to increase the priority for the selected torrent.
M210
Page 29

28
8.7 Settings
Click Setting on the BitTorrent Download page to enter the BitTorrent Setting page.
In the BitTorrent Setting page, you can congure the following settings:
Set the maximum download rate.
Set the maximum upload rate.
Set the idle hours to start the next download automatically.
Set the seeding hours to automatically delete the network les from neighbor web.
Set to delete the nished torrent les automatically or not.
Set the maximum number of simultaneous download tasks.seed
8.8 Network Attached Storage
This product may serve as the network storage device (NAS, Network-Attached Storage).
Put it into your family network to make it convenient for you to store and manage the data
on LAN.
Before using this function, please make sure the network (Ethernet or wireless network)
has been connected correctly. Input the \\IP address in the address column of START
UP-> RUNNING or on the browser of Windows operating system and then press Enter key
on the keypad to access the built-in hard disk on the player from the computer on LAN.
E.g., input \\192.168.0.195 if the player’s IP address is192.168.0.195.)
© 2011 KWorld
With this method, you can access into
any partitions on the hard disk of the
player, you can manage, copy or store
the data in the player on LAN.
You can also access the player's
Internal HD (samba) by the chapter1.3
Visit Neighbor.
Page 30

NINE
Browse the les via network
9.1 Browse the les via network
There are three ways to locate media les shared on your local network in the Network
menu. One is to browse through My_Shortcuts; the other one is to browse through my
Neighbors. And the third way is to browse through workgroup.
8.9.1 Browsing through My Shortcuts
My Shortcuts: enter by inputting
IP address, users’ name and the
password directly.
1. Share a le on computer and set
access permissions for this folder,
you need to read the agreement
at least.
2. Close the windows rewall.
My_Shortcuts Instructions of Operations
Press the Up/Down keys on the remote
controller to select My_Shortcuts from the
network menu and press OK key to access.
29
Press the EDIT button and select Add option to
access
After the added item is selected, you will enter IP
setting window. Press OK key to set the Net
User ID, Net Password, and Specific File Server
IP. click Simple Detail to switch between simple
and advanced menu.
And you can also input the IP address in
Specific File Server IP first, then input Net
User ID, Net Password, and press confirm or
confirm and save to myshortcuts to access.
M210
Page 31

30
My_Shortcuts Instructions of Operations
Press OK key to select the dialog box, it will pop
up a visual key board. Use the navigation key to
input the characters for setting Net User ID, Net
Password.
If there is no Net User ID and Net Password for the
shared pc, please input the IP address in Specific
File Server IP directly
Select detail to setting Label, Net User ID, Net
Password, Domain, Host Name, and Specific File
Server IP. Click Simple/Detail to switch between
simple and advanced options.
Then you can select and play the shared media
files on the designated computer.
You can also select modify to modify initial settings. Select delete for deletion and select
return to exit.
9.2 Browsing through My Neighbors
The system will automatically search the computer that has been installed with
Transcode. If the computer is found, the player will display the computer name in the list
for users’ choice.
Then you can access to the les which you
shared on the computer by My_Neighbors.
© 2011 KWorld
Page 32

The player will display the computer’s name in the list for users’ choice.
WORKGROUP Instructions of Operations
Press Up/Down keys on the
remote controller to select the
workgroup and press OK key to
access.
Press Up/Down keys to select
the computer you want to
access and select the media
file to be played from the
computer directory and press
OK key to play.
Helpful tips:
The working group or computer will not be displayed in the list subject to different
network states sometimes. Then it’s recommended that you can preview it by My
Shortcuts.
Browsing from DVD
When you connect an external DVD ROM, the system will nd the device automatically,
and then you can select the DVD item in the browser and nd the le to be played.
31
If you set the R/RW auto-play as in Setup-System setting menu, then when the system
detects the DVD-ROM, it will be playing back the disk automatically.
M210
Page 33

32
About UPnP Network
Universal Plug and Play (UPnP) is a set of networking protocols dened by the UPnP
Forum. The objective of UPnP is to enable devices and/or facilitates at home to connect
each other cordlessly, while simplifying the installation of networks at home (data
sharing, communication and entertainment), or establishing a corporate setting with
simplied network connections through computers or related devices.
Once the UPnP is implemented, users can share multimedia les through UPnP Server
terminal such as PC or NAS. On the other hand, there are products in the market like
Media Player, PS3 and Xbox 360 that are built with UPnP Client terminal. Users can
directly open and play les shared on UPnP Server through the network.
This Media Player (Model M210) supports UPnP Client function, but it requires WIFI or
Ethernet to connect to UPnP Server to make it work. Users will be able to play les on
the UPnP Server through Network Streaming.
Media Player: UPnP Applications
UPNP Server
LCD TV
HDMI/YPbPr/CVBS
M210
UPNP Client
Projector
UPNP
Intranet
TEN
PC
Note
book
© 2011 KWorld
External
HDD
USB/Memory Card
Camera
HD-DVR
NAS
Page 34

Additional Tips for UPnP Server and Player Setup
For Windows Media Player
Check option in “Library”►“Media Sharing” or “Media Streaming”. This will run the
execution process that will handle UPnP server.
Note: It works independently and doesn’t need to run WMP (Windows Media Player) but
you do need to access to it for all media library management.
Note:
Windows Media Player can act
as UPnP Server and Player
(However, latter only if used on
Vista)
For more information, please
refer to Microsoft ofcial website
that has FAQ on media sharing.
For XBMC Media Center
Previously known as Xbox
Media Center, this software
has become a massive open
source with multiple media
applications. It can act as UPnP
server, player and renderer.
To enable the server, go to
Setting > Network > UPnP and
add the content that you want to
share.
33
For viewing the content, please add your UPnP share as the source when choosing a
media le for playback.
M210
Page 35

34
ELEVEN
Hard Disk Installation diagram
© 2011 KWorld
Page 36

End-user License Agreement
Please read this agreement carefully before using the product:
Please ensure:
(1)Do not dismantle the product for improper purposes.
(2)Do not read and refresh the rmware of the product by improper means.
(3)Do not conduct inverse engineering and disassembling for related software and codes of
the product
(4)The product and this license agreement can be transferred to a third party who accepts the
terms and conditions of the agreement. When you transfer the full or part of the product to
a third party, the license agreement for you to use the product terminates automatically.
How to use this user Manual:
Please read this user manual carefully before using the product. The content of the manual as
well as the hardware and software of the product have been processed with intensive care.
No responsibility is assumed for any direct or indirect losses arising from hardware damage,
program damage, le loss or system breakdown due to improper operations. As you have
carefully read this agreement, it is ensured that the terms and conditions have been fully
understood and will be strictly followed.
Precautions
Please carefully read and pay close attention to the following before using the product:
(1)Do not expose the product to rains or damp environments to prevent re or electric shock.
(2)Do not expose the product to moisture, dripping or splashing in order to reduce the danger
of re, electric shock or product damage.
Safety Instructions
(1)Use the original adapter for the product, and do not share an adapter with any other
devices.
(2)Do not place the power cord and plug of the adapter near heat sources.
(3)Do not dismantle and repair the adapter and its power cord.
(4)Do not open the enclosure of the product to ensure your safety. Please ask trained
professionals to conduct maintenance if necessary.
35
Maintenance Tips
(1)The product is of complicated and sophisticated structure, so only trained professionals are
allowed to open the product to prevent damage from happening.
(2)Do not dismantle components of the product on your own .The warranty mark will be invalid
automatically if you dismantle and repair the product on your own.
(3)Please contact our local warranty department to arrange for maintenance if necessary.
To replace devices or accessories, please select the original ones designated by the
manufacturer.
M210
Page 37

36
WARNING
This User’s Manual is for specic product, and all its contents are processed with due care but
are not ensured fully correct. We assume no responsibility for any loss arising from use of this
manual. The right to interpret all contents of this User’s Guide belongs to the company. The
manual is subject to change without notice. This User’s Manual is not authorized to any party
and no reproduction or copy, in part or whole, of the manual in any way is permitted.
KWorld Website: www.kworld-global.com
Technical Support
Thank you for reading this manual. If there is any further inquiry, please contact us at www.kworld-global.com
The information contained in this documentation is for reference only. The text, images and charts of this
documentation have been processed with intensive care and we have been dedicated to ensure the accuracy
and completeness. However, the content of this document is subject to change without notice and no liability
nor responsibility is assumed for any loss or damage arising from any kind of misunderstood, improper uses of
the hardware, software, and documents.
KWorld Computer Co., Ltd.
6/F, No. 113, Jian 2nd Road
Jhonghe Dist, New Taipei City 23585
Taiwan (R.O.C.)
http://www.kworld-global.com
@ 2011 KWorld Computer Co., Ltd. All rights reserved. All KWorld trademarks and logos are registered
trademarks of KWorld Computer Co., Ltd. All other trademarks and logos presented in this material are the
property of their respective owner. KWorld Computer Co. Ltd. reserves the right to revise the specications
mentioned above. No part of this documentation can be copied, reproduced or distributed in any kind of print or
electronic forms without legal permission.
© 2011 KWorld
Page 38

Home Media Center
Media Player
M210
KWorld Computer Co., Ltd.
Address: 6F., No.113, Jian 2nd Rd., Jhonghe
Dist., New Taipei City 23585, Taiwan (R.O.C.)
TEL: +886-2-8228-6066
FAX: +886-2-8221-6856
http://www.kworld-global.com
© 2011 KWorld Computer Co., Ltd. All rights reserved. All KWorld trademarks and logos are registered trademark of KWorld
Computer Co., Ltd. All other trademarks and logos presented in this material are the property of their respective owner.
KWorld Computer Co. Ltd. reserves the right to revise the specifications mentioned on this packaging.
 Loading...