

Page 1

Contents V1.1
ONE Introduction
1.1 Features
1.2 Specification
1.3 Package Contents
1.4 Remote Control Guide
1.5 Introducing the Unit
1.6 Connection Diagram for YPbPr
TWO Activating the Media Player
2.1 Setting Up Your KWorld Media Player M100
2.2 System Settings
2.3 Getting Started With Your Media Player M100
2.4 Format Factory........................
2.5 Updating a firmware file?
THREE FAQ
Technical Support
Thank you for reading this manual. If there is any further inquiry, please contact us at www.kworld-global.com
The information contained in thi s do cumentation i s fo r reference only. The text, ima ges and charts of this
documentation have been processed with intensive care and we have been dedicated to ensure the accuracy
and completeness. However, the content of this document is subject to change without notice and no liability
nor responsibility is assumed for any loss or damage arising from any kind of misunderstood, improper uses of
the hardware, software, and documents.
KWorld Computer Co., Ltd.
6/F, No. 113, Jian 2nd Road
Jhonghe City, Taipei County 235
Taiwan (R.O.C.)
http://global.kworld-global.com
@ 2010 KWorld Compu ter Co., L td. A ll rights r eserved. Al l K World trademark s and logos are registered
trademarks of KWorld Computer Co., Ltd. All other trademarks and logos presented in this material are the
property of their respective owner. KWorld Computer Co. Ltd. reserves the right to revise the specications
mentioned above. No part of this documentation can be copied, reproduced or distributed in any kind of print or
electronic forms without legal permission.
..............................................................02
..............................................................02
........................................................03
................................................03
.............................................04
.................................................05
.........................................06
...................................08
.................10
.............................................................10
...................12
...................................16
..............................................16
..............................................................17
Page 2

2
Instruction
Introduction
Thank you for purchasing the KWorld Media Player M100 and you will be able to enjoy
digital entertainment on the big screen in your living room. This manual will guide you
through all of the installation and instruction. You will be able to use many of the exciting
and useful features that make your multimedia experience more enjoyable than ever.
1.1 Features
• A light and compact device.
• User-friendly OSD control.
• No installation of application software and driver is necessary.
• Video playback: Supports video formats in AVI/MP4(Divx, Xvid),Mpeg 1/2, RM, RMVB,
DAT, and VOB
• Music playback: Supports MP3, WAV, OGG, and WMA audio formats
• Picture playback: Supports JPEG, BMP, TIFF, and PNG image formats
• Subtitle format: Supports SRT, SUB, SSA, SMI subtitle in AVI video format
• Supports USB Host interface and hot swap of devices (you can save and remove
instantly, without waiting for the system to reply that it is safe to remove the device. Files
will be safely stored.) .
• Directly displays les from USB devices such as USB disk or HDD enclosure.
• File Management: Copy, delete les directly within the USB device or memory card. No
PC or notebook is necessary.
• Maximum resolution: YPbPr up to 720p.
• Multi-TV display mode: NTSC Composite/PAL Composite/HD YPbPr/NTSC Interlace/
NTSC Progressive/PAL Composite/PAL Interlace/PAL Progressive.
• Maximum resolution of RM/RMVB les: Up to 1024 x 576. Resolution of other video
formats is 720 x 576 / 640 x 480.
• Supports 4:3 and 16:9 display ratio
• Card reader: Supports SD/SDHC/MS memory cards.
• A remote control with full functions
• Bonus software: Format Factory
ONE
© 2010 KWorld
Page 3
1.2 Specications
TV System
HDD Partition
Max output Resolution
System I/O
AV output
Card Reader
Power Adaptor
Support Media format
Support Subtitle format
PAL/NTSC
FAT32,NTFS
YPbPr:720P
Card reader * 1
IR Receiver * 1
USB Host * 1 (USB2.0)
Power Jack * 1
YPbPr output RCA * 3
CVBS output RCA * 1(The Y connector)
Audio L/R RCA * 2
SD/SDHC/MS
AC102-240V 50/60Hz 5V 2A
AVI/MP4(Divx,Xvid),Mpeg 1/2, RM, RMVB, DAT, VOB, MP3,
WAV, OGG, WMA, JPEG, BMP, TIFF, PNG
SRT,SUB,SSA,SMI
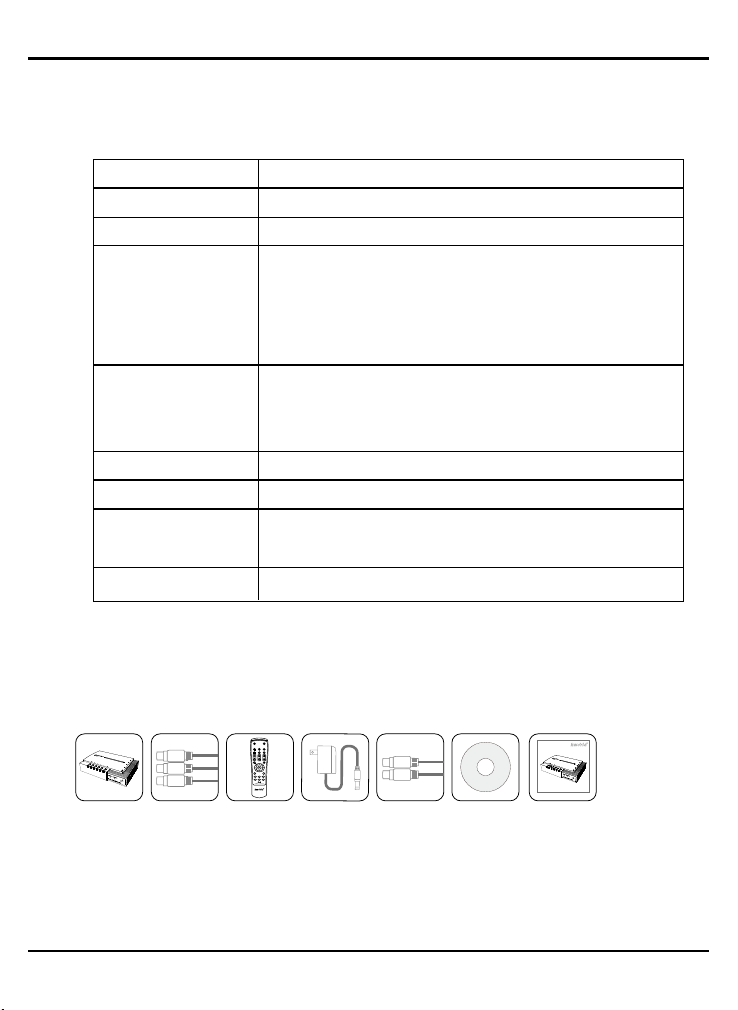
Media Player M100
User Manual
Power Adaptor
(DC5V, 2A)
AV cableRemote Control
(no AAA batteries)
Format Factory CD
YPbPr Cable
Y
Pb
Pr
Media Player M102
Photo Music Movie
16:9/4:3 Turn Zoom
Vol
BGMExit
OSD Menu
Video Standard
3
1.3 Package Contents
M100
Page 4
4
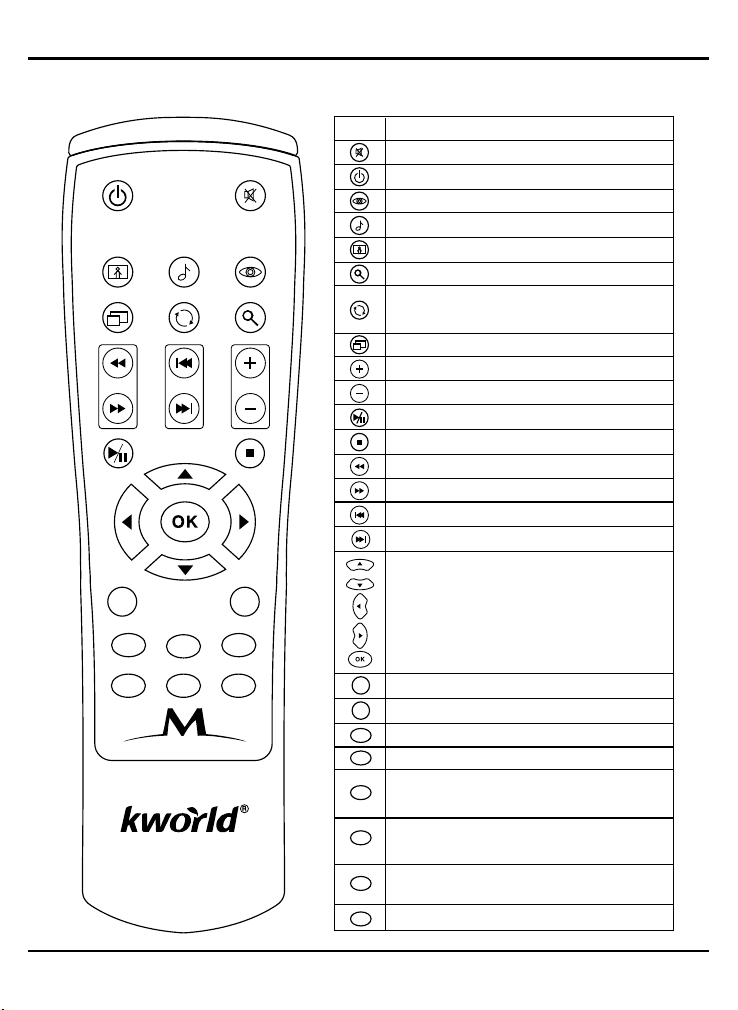
Key
Function
Volume up
Switch between different aspect ratio
Volume down
Play/Pause
Stop
Rewind
Fast Forward
Previous
Next
BGM: Playback background music
Exit: Exit or Back to previous page
OSD: OSD menu / Info
Menu: Enter Main Menu page
Blue: Subtitle
Video Standard: Switch between different output
modes (YPbPr/Composite…). It only works in the
Menu page.
Red (the “Memory” button): saves the part of video
you are watching into the memory space of your
storage device that you connect to this media player
Green (the “Resume” button): resumes to the part of
video that you saved with the Red button.
Arrow key, Up
Arrow key, Down
Arrow Key, Left
Arrow Key, Right
OK key, Select and confirm
Turn: The photo will rotate 90 degrees clockwise
each time this button is pressed Switch between
different aspect ratio
Zoom: Zoom image
Photo: Enter Photo page.
Music: Enter Music page.
Movie: Enter Movie page.
Power on/off: activate Stand by mode
Mute: Enable/Disable Mute function.
Media Player
Photo Music Movie
16:9/4:3 Turn Zoom
Vol
BGMExit
OSD Menu
Video Standard
1.4 Remote Control Guide
© 2010 KWorld
Page 5
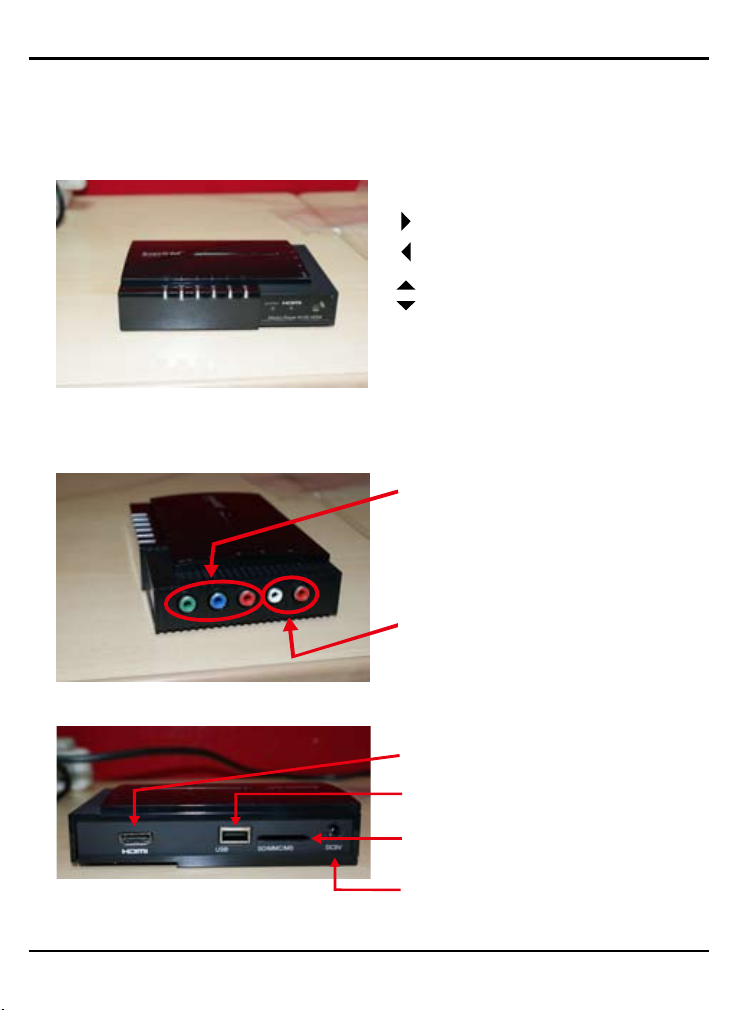
1.5 Introducing the Unit:
This media player is built with touch buttons and ports on the media player unit.
Front Panel
Exit: exit from the currently accessed page
move right on the menu
(enter sub-directory)
move left on the menu
(back to previous directory)
move up on the menu
move down on the menu
OK: conrm your selection or access to an
item on the menu
Side Panel
TheYPbPr output ports to plug in the
YPbPr (green, blue, red) cables.
The green port can be plugged by the
yellow one of the AV cable as well.
L/R: the audio output port to plug the
audio cables (the red and the white).
5
Rear Panel
HDMI port:
plug the HDMI cable to this port
USB port: plug in an USB device
SD/MMC/MS slot:
insert memory card here
DC5V port:
plug the power adapter into this port
M100
Page 6
6
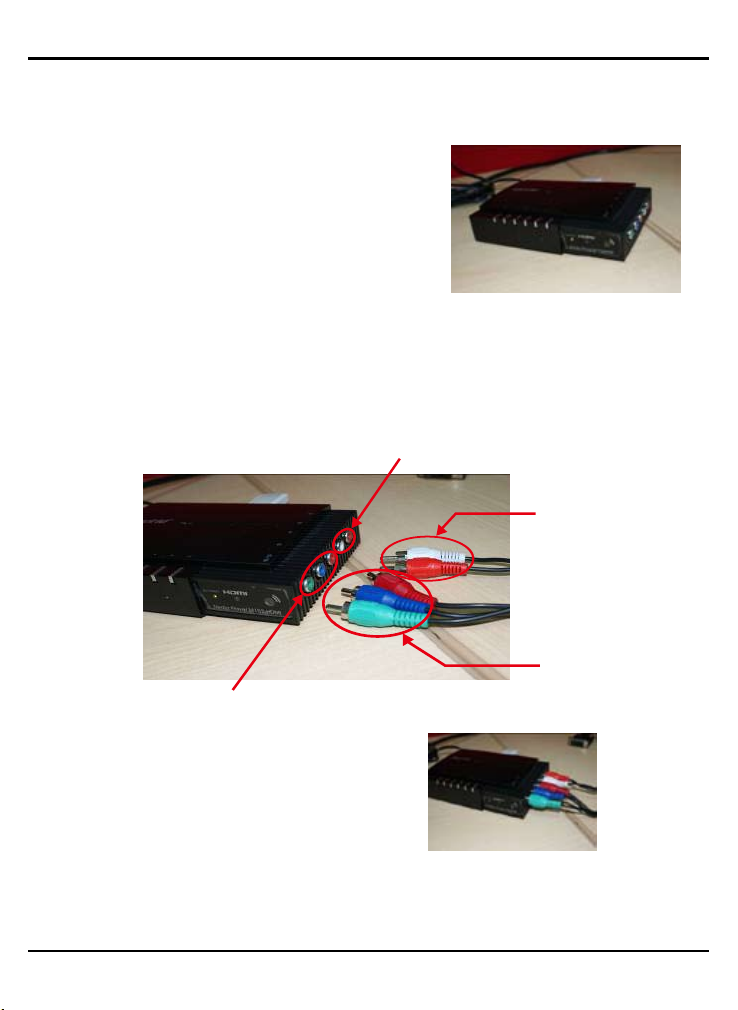
1.6 Connection Diagram for YPbPr
1. Take out the media player unit from the product
package.
2. Plug the YPbPr (the green, blue and red ones) and the audio (the white and red ones)
cable to the YPbPr and audio input ports of the unit.
Notes: the YPbPr cables are for video display and the audio cable is for the output of
sound.
a.
The YPbPr output ports of the unit
b. Once you have properly connected the cables
to the unit, like the picture right, plug the YPbPr
and audio cables to the corresponding input
ports on your TV.
Note: the green one of the YPbPr can be connected to the yellow output port of the AV
inputs, if there is no YPbPr input ports on your TV.
© 2010 KWorld
The output ports for audio
Audio cable
(white and red)
YPbPr cables
(green, blue and red)
Page 7

3. Insert a USB device to the USB port at the rear of the unit for the source of les and
plug the power adapter.
Plug the power
adapter included
The USB port for
in the package
inserting an USB
device
7
M100
Page 8

8
Activating the Media Player
1. Once you have followed the steps above (in the Connection Diagram for YPbPr or the
Connection Diagram for HDMI section) to set up the media player properly, please turn
on your TV.
2. When you turn on your TV, you must switch the “VIDEO” source for your TV FIRST.
You can either do it with the remote or the buttons on your TV set.
Tip: your remote should have a button with a function like the video source switch, as
the picture shown below.
Note: this picture is for reference only
The video input
button to switch
video source
3. You may see a picture like the one below on your TV screen.
Note: this picture is for reference only
TWO
Tip: choose “Component” if you connect the media player unit to a TV with YPbPr
cables. Select “HDMI” if you connect it with a HDMI cable.
© 2010 KWorld
Page 9

4. The main screen will appear on your TV once you
have switched to the appropriate video source.
However, it is possible to encounter the
“black screen” like the gure at the right.
Tips to solve this problem:
a.Since the default output mode of the media player is “PAL Composite”, you can
connect with AV cables in order to see the picture on the screen, though be in lower
picture denition with approximately 480i. To do so, plug the yellow one of the AV cable
into the Y (the green) port of the media player and then connect the AV cable to AV
input ports of your TV set. Then, you can change the output mode for better pictures
in “SETTING” and do the change at “TV System”. (please refer to the SETTING --> TV
System section of this manual)
b.Another way to solve this problem is to press the “Video Standard” button on the
media player remote control to switch the video output modes of the media player.
9
The “Video Standard” button on the media
player remote:
Each time you press this button, the video
output mode is switched in the following order:
” PAL Composite / PAL Interlace / PAL
Progressive / NTSC Composi te / HD YPbPr /
HDMI / NTSC Interlace/NTSC Progressive”.
You will see the picture when you switch to the
video output mode that matches your signal
(YPbPr, HDMI) and TV system.
For instance, if you use YPbPr as your output mode, you may see “black and white”
pictures or incorrect colors. A good way to solve it is to enter “SETTINGS” on the main
menu and choose “HD YPbPr” at the “TV System”.
M100
Page 10

10
2-1. Setting up Your KWorld Media Player M100
1.If you have inserted an USB device to your media
player unit, the main screen will appear with an
USB icon. That means you can access to your
USB device that is connected to the media player
unit to search and playback les.
2-2. System Settings
Once you have entered the “SETTINGS” page, you will
see the following options:
Language: Please use the ◄/► key on the Remote to
select your preferred language, then press “OK” to conrm.
Slideshow duration: Set your slideshow interval to 3 sec,
5 sec, 15 sec, 1 min, 15 min or 1hour. Please use the ◄/►
key on the Remote to select the preferred time interval
that you like to set for your slideshows, then press “OK” to
conrm.
Slideshow Mode: “Random/Fading off/Off/Bottom To Top/
Top To Bottom/Left to Right/Right to Left/Door Close/Door
Open/Hori-Cross/Verti-Cross”. Please use the ◄/► key on
the Remote to select your preferred mode, then press “OK”
to conrm. (This function supports photos in JPEG format)
© 2010 KWorld
Page 11

Music repeat Mode: You can set the Music Play Mode as
“Repeat one” or “Repeat All”. Please use the ◄/► key on
the Remote to select which one you prefer, then press “OK”
to conrm.
Movie repeat Mode: You can set the Video Play Mode as
“Repeat one” or “Repeat All”. Please use the ◄/► key on
the Remote to select, then press “OK” to conrm.
Display Mode: Set the display ratio based on your TV
screen ratio. Please use the ◄/► key on the Remote to
set the proper ratio, then press “OK” to conrm.
11
TV System: You can set your TV settings as “NT SC
C omp os i t e , HD Mo de , NT S C In te r l a ce, N T SC
Progressive, PAL Composite, PAL Interlace or PAL
Progressive”. Please use the ◄/► key on the Remote to
select the proper TV setting, then press “OK” to conrm.
M100
Page 12

12
Autorun: You may en ab le or dis ab le the au to play
function. Please use the ◄/► key on the Remote to set
your preference, then press “OK” to conrm.
File Sort mode: You can choose how your les are sorted
by “Name/Size/Time”. Please use the ◄/► key on the
Remote to select the proper TV setting, then press “OK” to
conrm.
Default: To return to the default settings. Simply select it,
then press “OK” to conrm.
2-3. Getting Started With Your Media Player M100
This Main Menu lists out all the media functions such as
Movie, Music, Photo, Text and File. User can enjoy the
selected multimedia functions in full screen by pressing the
Movie, Music, Photo keys on the Remote.
© 2010 KWorld
Page 13

1.Movie: Please select the Movie icon on the Main Menu and press “OK” key to enter the
video le list. Choose a video le, and proceed to the full screen play mode.
For Video Playback:
Use the “▼/▲” key on the Remote to select the video le and press “OK” to play or press the
“Exit” key to return to the previous page and back to the le listing. In full screen mode, press
the “OK” key on the Remote to enable the Video Control Bar. Use the “◄/►” key to select the
icon and press “OK” to conrm.
Note: If you want to exit the current video playing or return to the previous menu, just press the
“Exit” key on the Remote or select Stop on the Video Control Bar.
13
Subtitle: The subtitle is only available when you watch the video in AVI format. You may press
the “OK” key on the Remote and select the Subtitle icon on the Video Control Bar to turn on or
off the subtitle. Please note this function is not available in other video formats.
Notes on the Subtitle Function:
A.Subtitle Format: supported only by ANSI encoding format. Please refer to FAQ-7 on
how to make a subtitle le with ANSI encoding format.
B.When naming the subtitle file, it should correspond with the video file name. For
example, if the video le name is “A.avi”, then the Subtitle le name must be “A.srt”.
C.The corresponding video and subtitle les must be stored in the same folder.
D.The timing of the corresponding video playback and subtitle display must be exact.
Otherwise, the subtitle would be ahead or delayed.
M100
Page 14

14
Memory and Resume Functions for Videos:
When you are watching a video, you can press the ” ” button on your remote to
activate the video memory function. There will be a icon appearing on the top right
corner of the screen. This icon indicates that the media player has memorized the part of
video you are currently watching. If you want to resume to the part of video that you have
memorized, just press the button on the remote. There will be a icon appearing on
the top right corner of the screen, indicating that the resume was successful. If you have
not memorized anything for the videos with the button, the icon will appear on the
top right corner of the screen, indicating that there is no memorized parts of videos for
playback resume.
2. Music: Select the Music icon on the Main Menu and press “OK” key to enter Music
play list. You can also use the “Music” key on the Remote to enter the Music play page
directly.
For Music Playback:
Press the “▼/▲” key to select a music le and “OK”
key to play. You can use the “◄” key to return to the
previous page or the catalog. You can also enter the
catalog by pressing the “OK” key. In full screen play,
press “OSD” key on the remote to enable the Music
Control Bar. Use the “◄/►” keys to select the icon and
press “OK” to conrm.
Music playback with lyrics: you can view lyrics while
playing music. However, it only supports lyrics in LRC
formats and the le names for LRC lyrics must be the
same as the ones for the music les. If your les are in
A.mp3 or A.lrc, you have to download the lyrics.
3. Photo: Select the Photo icon on the Main Menu and press the “OK” key to enter Photo
listing, and enter the photo-play page. You can also simply press the “Photo” key on the
Remote to enter it directly.
For Photo Playback:
Press the “▼/▲/◄/►” key to select the photos and
press “OK” to enable full-screen play. Use the “Zoom”
key to zoom-in/out of the photos and the “▼/▲/◄/►”
key to browse the photos. Press the “Exit” key if you
wish to return to the preview page. In full screen play
mode, please press the “OSD” key on the Remote to
enable the Photo Control Bar and select the icon to
proceed.
© 2010 KWorld
Page 15

Background Music: You can play background music during the photo slideshow by pressing
“BGM” key on the remote.
4. Text: Select the Text icon on the Main Menu and press the “OK” key to enter Text le
listing page.
For Text Files Viewing:
Please press the “▼/▲” key to select text les and press “OK” to start full-screen mode. Use the
“▼/▲” key on the Remote to scroll up and down the text le.
5.File: Select the File icon on the Main Menu and
press the “OK” key to en ter Fi le Lis ting page.
Please press the ▼/▲ keys on the remote to
browse the les and press the “►” key to conrm
your selection, and then a check mark will appear
on the right of the selec ted file. To cancel the
selection, simply press the same key again.
15
File Copy/Delete: Press the “OSD” key on the Remote
to enable le option (Copy/Delete). Press ▼/▲ keys
to select Copy or Delete, and then the “OK” key to
con firm. To can cel the selecti on, simply pres s th e
“OSD” key to return to the le menu.
To make a copy of a le, please select the le and use the ▼/▲/◄/► keys to select the le
location you wish to store it, then press the “OK” key to conrm the le path selected. Press the
“OK” key again to conrm the copy.
To delete a le, select the le and press the “OK” key to conrm, then the les will be deleted.
Note: The le path for the copied le should be different from the one of the original le.
M100
Page 16

16
2-4. Format Factory
KWorld has included a multi-functional media converter – Format Factory as a bonus software
that you can easily convert your video, audio and picture files from one format to another.
This software supports 48 languages and le conversion in MP4, 3GP, MPG, AVI, WMV, FLV,
SWF, MP3, WMA, AMR, OGG, AAC, WAV, JPG, BMP, PNG, TIF, ICO, GIF, and TGA. You can
also rip DVD into a video le or input RMVB les for your source les for conversion. Besides
converting one format to another, you may attach subtitle les during the conversion so that the
video would appear with subtitles. For more information, please refer to the “Help” section of this
software application.
2-5. Updating a rmware le?
1. Please download the rmware le from KWorld
ofcial website.
2. Unzip the rmware le to USB Thumb Drive or
Memory Cards and then plug it to Media Player
M100. Select the “USB” or “SD” icon and then
press “OK“ to enter Main Menu.
3. Please select “File” and press “OK” to enter le
browser.
4. Press ▼/▲/◄/► key to select the rmware le,
and then “OK” key to update rmware. A dialog
box will pop up. Please select “√” with ◄/►
key, and then press “OK” to update the selected
rmware.
5. Please wai t a moment while the fi rmware is
upgrading. Once it is finished, the system will
reboot automatically.
© 2010 KWorld
Page 17

THREE
FAQ
Q1: Why can’t I enter the Main Menu, or the Start-up Screen looks different?
A1: Please follow the steps below:
1. Please check the connections. Have you properly connected all of the necessary
cables? (For example, the power cord for your KWorld Media Player M100.)
2. Is the TV set at “YPbPr input” or “AV input” mode?
Q2: How do I restore to the factory settings on my Media Player M100?
A2: Please press the “Menu” key on the remote to enter the Setup page and select
the Factory Default option then press the “OK” key to return to the factory
default settings.
Q3: Why is there no sound?
A3: Please check the connection of the audio cables and the audio volume.
Q4: How do I adjust the time interval for the photo slideshow?
A4: Please press the “Menu” key on the Remote to enter the Setup page Select the
Slide Interval option and use the ◄/► key to select the interval period that you
prefer. Then, press the “OK” key to save the setting.
Q5: Why can’t my Media Player M100 detect the USB HDD enclosure?
A5: Please follow the steps below:
1. Is your USB HDD enclosure working properly when it is connected to other
devices such as your PC?
2. Please check if the USB HDD enclosure is properly linked with M100.
3. Please check the Power LED of your USB HDD enclosure to see if it’s properly
powered-up.
17
Q6: Why can’t my Media Player M100 detect my memory cards or USB
memory stick?
A6:Please check if your memory card or USB memory stick works when it is
connected to other devices such as your PC. If it works with other devices,
please try re-plug it.
M100
Page 18

18
Q7: How do I create subtitle les in SRT format with ANSI encoding?
A7: Since Media Player M100 only supports subtitle les in ANSI encoding format,
please follow the steps below:
Ple ase op en th e s ubt i tle file wi th
Notepad (a program that comes with
your Windows Operating System). Click
on the Files Menu and select the “Save
As” option. Please change the Encode
option to ANSI encoding and click on
Save to proceed.
Q8: Why doesn’t my Media Player M100 respond when playing some media
le?
A8:If the le size is too big or there are many les in your storage device, it will
take a few minutes to load the le. Please wait for a while.
Q9: Why isn’t the LED of the remote on?
A9:The remote control for Media Player M100 is an IR (infrared sensor) one. That
is why the LED is not on when you press a button on the remote.
© 2010 KWorld
Page 19

End-user License Agreement
Please read this agreement carefully before using the product:
Please ensure:
(1)Do not dismantle the product for improper purposes.
(2)Do not read and refresh the rmware of the product by improper means.
(3)Do not conduct inverse engineering and disassembling for related software and codes of
the product
(4)The product and this license agreement can be transferred to a third party who accepts the
terms and conditions of the agreement. When you transfer the full or part of the product to
a third party, the license agreement for you to use the product terminates automatically.
How to use this user Manual:
Please read this user manual carefully before using the product. The content of the manual as
well as the hardware and software of the product have been processed with intensive care.
No responsibility is assumed for any direct or indirect losses arising from hardware damage,
program damage, le loss or system breakdown due to improper operations. As you have
carefully read this agreement, it is ensured that the terms and conditions have been fully
understood and will be strictly followed.
Precautions
Please carefully read and pay close attention to the following before using the product:
(1)Do not expose the product to rains or damp environments to prevent re or electric shock.
(2)Do not expose the product to moisture, dripping or splashing in order to reduce the danger
of re, electric shock or product damage.
Safety Instructions
(1)Use the original adapter for the product, and do not share an adapter with any other
devices.
(2)Do not place the power cord and plug of the adapter near heat sources.
(3)Do not dismantle and repair the adapter and its power cord.
(4)Do not open the enclosure of the pro duct to ensure your safety. Please ask trained
professionals to conduct maintenance if necessary.
19
Maintenance Tips
(1)The product is of complicated and sophisticated structure, so only trained professionals are
allowed to open the product to prevent damage from happening.
(2)Do not dismantle components of the product on your own .The warranty mark will be invalid
automatically if you dismantle and repair the product on your own.
(3)Please contact our local warranty department to arrange for maintenance if necessary.
To replace devices or accessories, please select the original ones designated by the
manufacturer.
M100
Page 20

20
WARNING
This User’s Manual is for specic product, and all its contents are processed with due care but
are not ensured fully correct. We assume no responsibility for any loss arising from use of this
manual. The right to interpret all contents of this User’s Guide belongs to the company. The
manual is subject to change without notice. This User’s Manual is not authorized to any party
and no reproduction or copy, in part or whole, of the manual in any way is permitted.
KWorld Website: www.kworld-global.com
© 2010 KWorld
 Loading...