

Page 1

User Manual
Windows & Macintosh
V1.01
Page 2

Table of the Contents
About This User’s Manual ......................... 2
Notes for This Manual ............................... 2
Safety Information ..................................... 3
Care and Cleaning ..................................... 3
1. Product Introduction.............................. 4
Package Contents ................................ 5
Tablet .................................................... 6
Digital Pen ............................................ 8
4. Using the Bundled Software ............... 45
System Requirements ........................ 46
Introduction to Tablet Software ........... 47
Supporting Operating Systems ........... 48
Installing Tablet Software .................... 49
Uninstalling Tablet Software ................ 51
5. Specification Summary ....................... 52
Tablet .................................................. 53
Digital Pen .......................................... 54
2. Getting Started ..................................... 10
Installation ........................................... 11
Windows ...................................... 11
Mac OS ........................................ 13
Configuration ...................................... 16
Windows ...................................... 16
Mac OS ........................................ 27
3. Using the Tablet ................................... 38
Holding the Pen .................................. 39
Working Area ...................................... 40
Positioning .......................................... 41
6. Troubleshooting ................................... 55
Testing your device ............................. 56
FAQ .................................................... 58
Service and Technical Support ........... 60
Driver Download ................................. 61
Appendix .................................................. 62
Declarations and Safety Statements ... 63
FCC ................................ ............. 63
CE................................................ 63
Ordering Components and
Clicking ............................................... 42
Dragging ............................................. 43
Pressure Control ................................. 44
Accessories ...................................... ..64
Copyright Information ......................... 65
Limitation of Liability ........................... 66
1
Page 3

1.
WARNING
Important Information that must be followed for safe operation.
2.
IMPORTANT
Vital information that must be followed to prevent damage to data,
components, or persons.
3.
TIP
Tips for completing tasks.
4.
NOTE
Information for special situations.
About This User’s Manual
You are reading the Kanvus Office 54 Graphic Tablet User Manual. This Manual provides
information regarding the components in the Kanvus Graphic Tablet and how to use them. The
following are major sections of this User’s Manual :
1. Product Introduction
Provides information on the Kanvus Graphic Tablet’s components.
2. Getting Started
Provides information on getting started with the Kanvus Graphic Tablet.
3. Using the Tablet
Provides information on using the Kanvus Graphic Tablet.
4. Using the Bundled Software
Provides information on using the Kanvus Graphic Tablet’s utility.
5. Specification Summary
Gives you specifications summary of Kanvus Graphic Tablet.
6. Troubleshooting
Provides information on Kanvus Graphic Tablet, where you can find the answers to most
common questions.
Notes for This Manual
A few notes and manuals are used throughout this guide, allowing you to complete certain tasks
safely and effectively.
2
Page 4

Safety Information
Adhering to the following safety information will prolong the life of the Tablet.
1. DO NOT try to open the housing of the tablet and the digital pen. It will void
your warranty.
2. DO NOT expose to or use near liquids, rain, or moisture.
3. DO NOT place or drop objects on top of the Tablet.
4. DO NOT expose to strong magnetic or electrical fields.
5. DO NOT throw the Tablet in municipal waste. The product has been
designed for proper reuse and recycling of parts. The symbol of the
crossed-out wheeled bin indicates that the product should not be placed in
municipal waste. Check your local regulations for disposal of electronic
products.
Care and Cle a ning
1. DO NOT expose to dirty or dusty environments to avoid wearing-down the
surface of the tablet.
2. Regular cleaning of the tablet surface with a soft cloth will help expand the
life span of your tablet. DO NOT use any kind of volatile liquid on the tablet
surface, as it will damage the plastic case.
3. Store your tablet and the pen in a clean, dry place and avoid extreme
temperatures.
3
Page 5

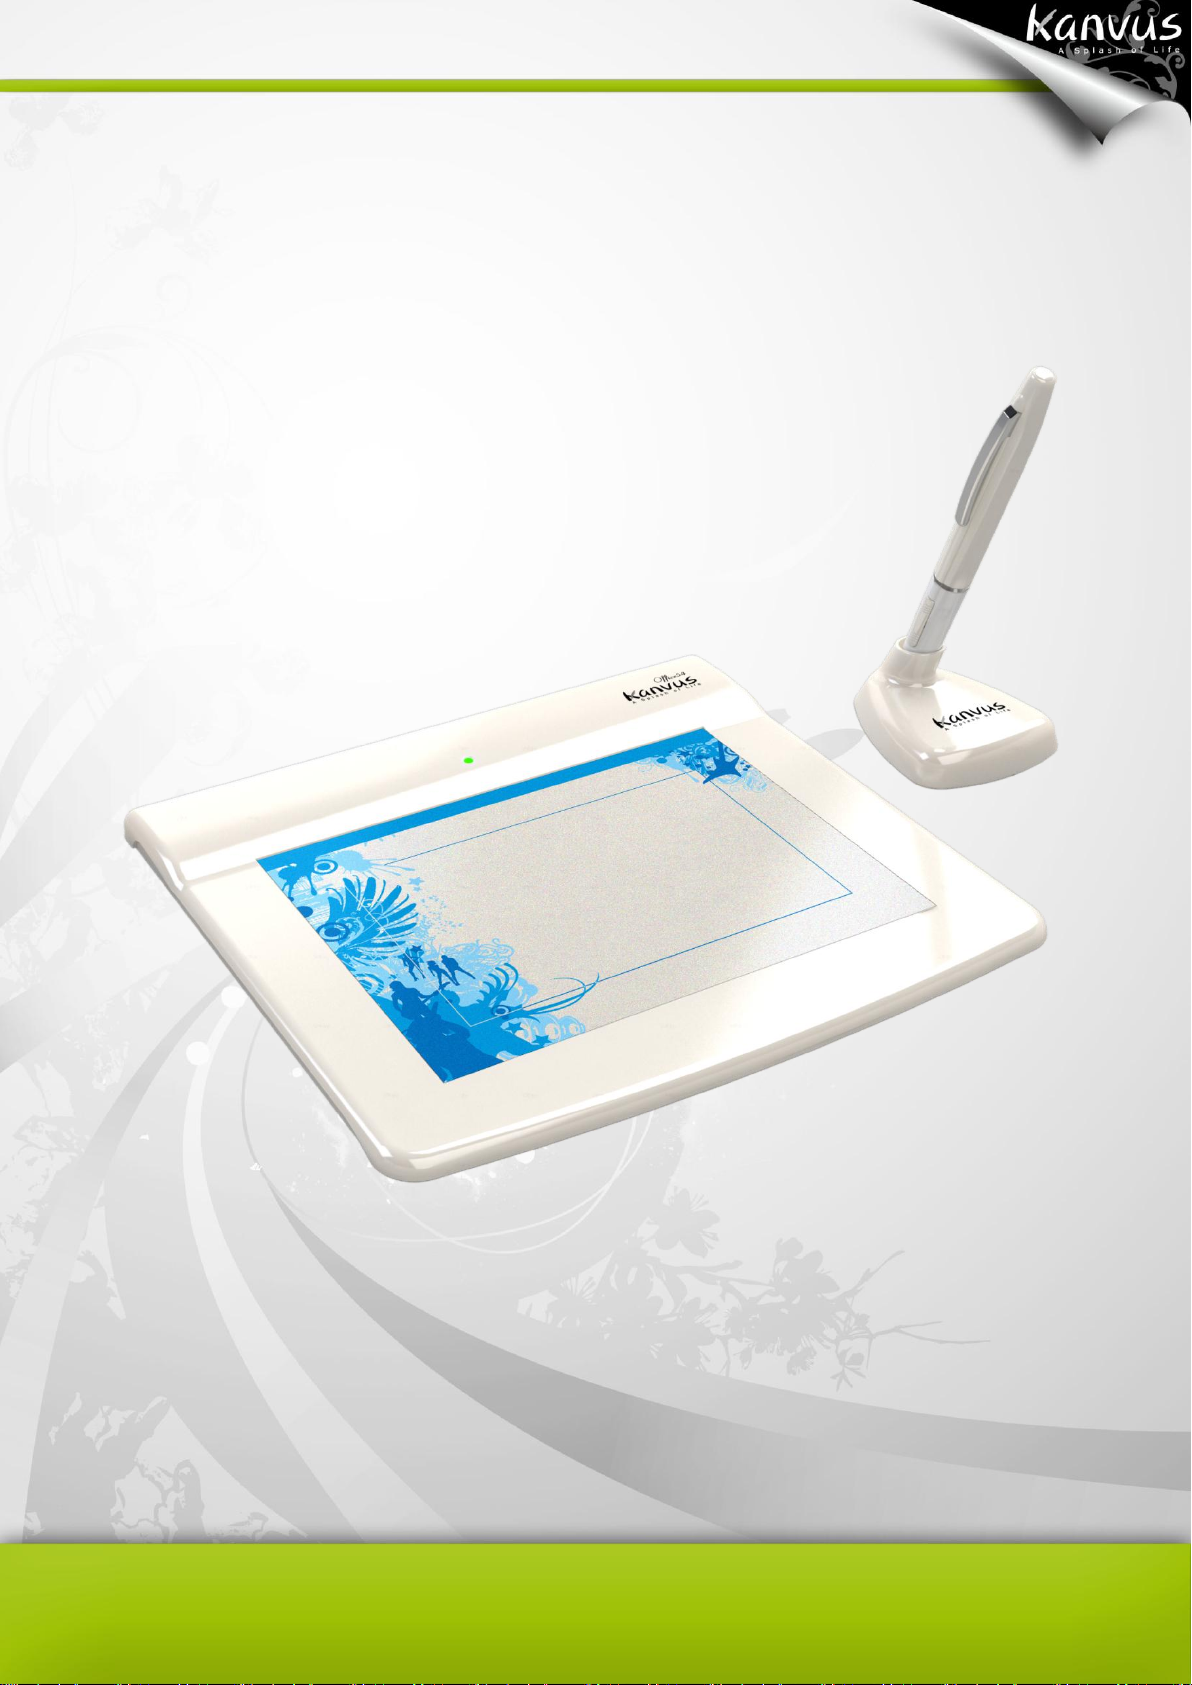
1. Product Introduction
-Package Contents
-Tablet
-Digital Pen
4
Page 6
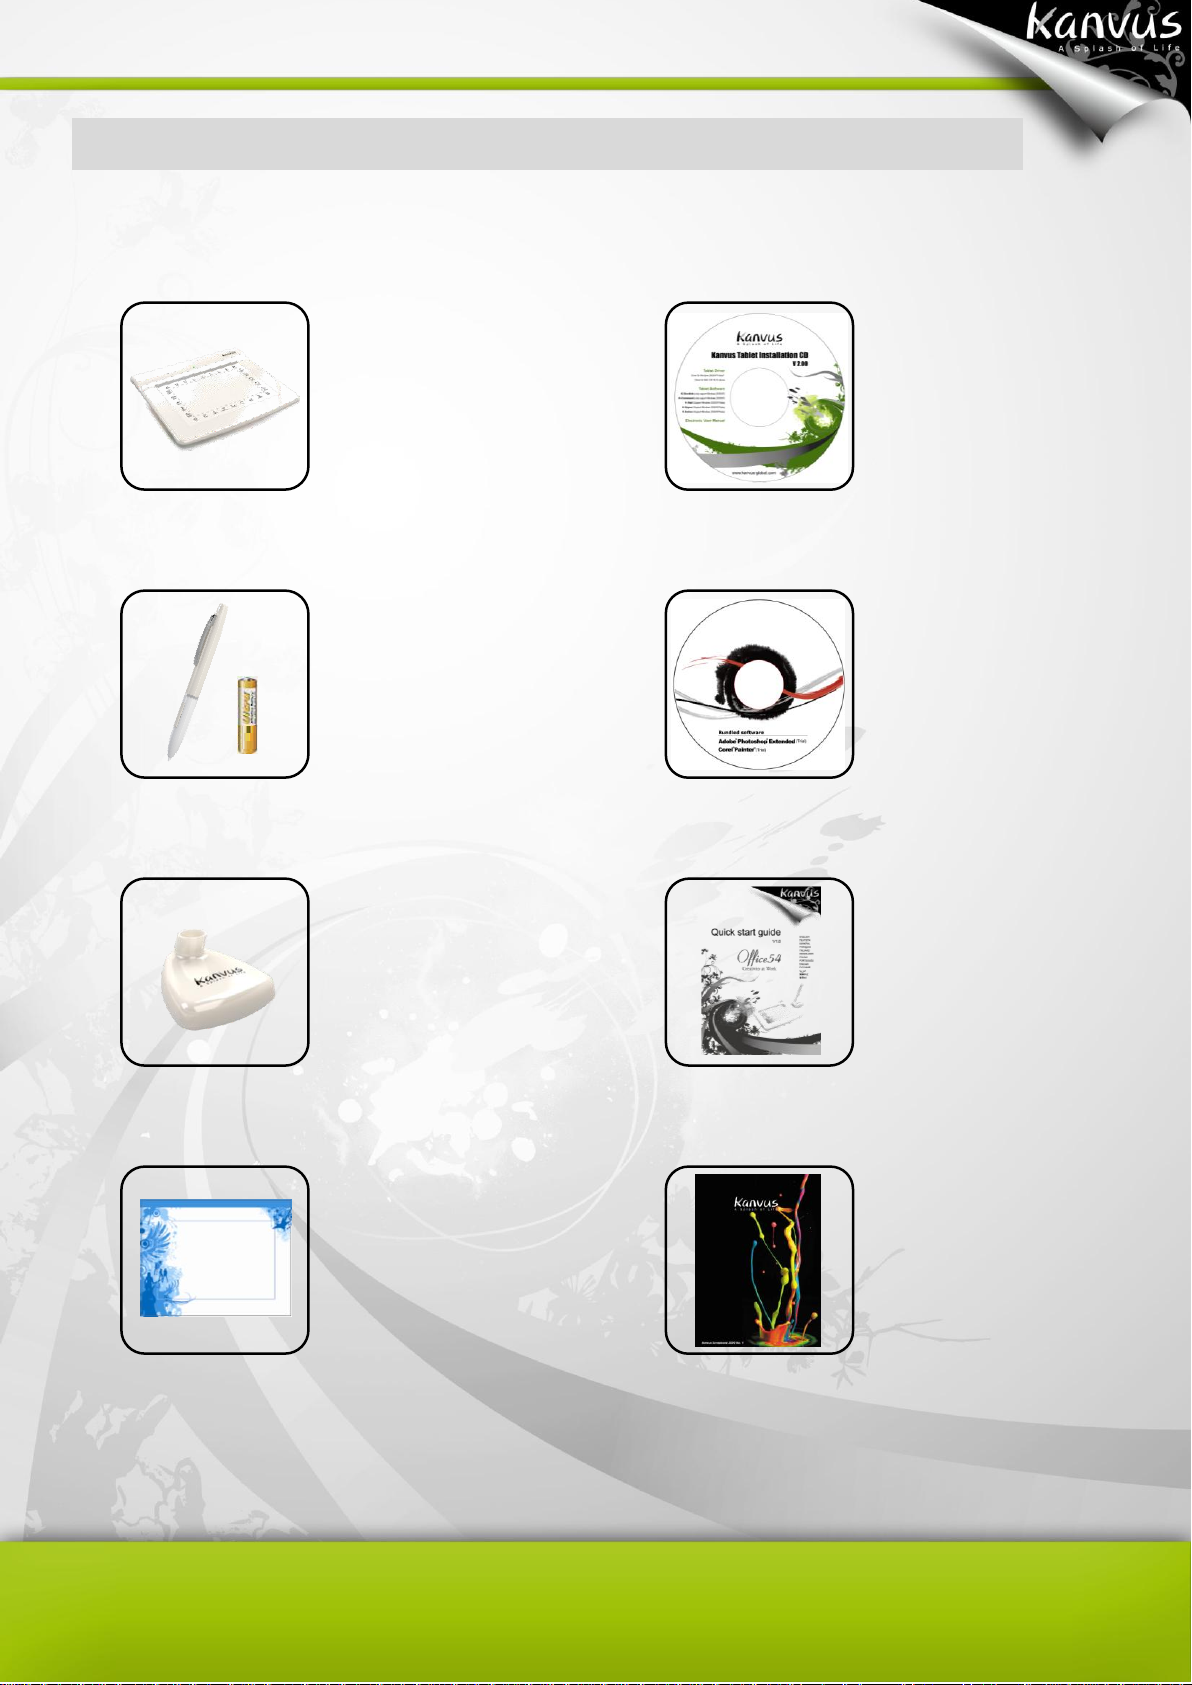
Package Contents
Check your package for the following items.
Kanvus Office 54 Digital Tablet
Digital Pen & 1.5V AAA Battery
Installation CD
Bundled Software(Trial Version)
Installation CD
Pen Stand
Pad-Cover
Quick Guide
Kanvus DM
5
Page 7
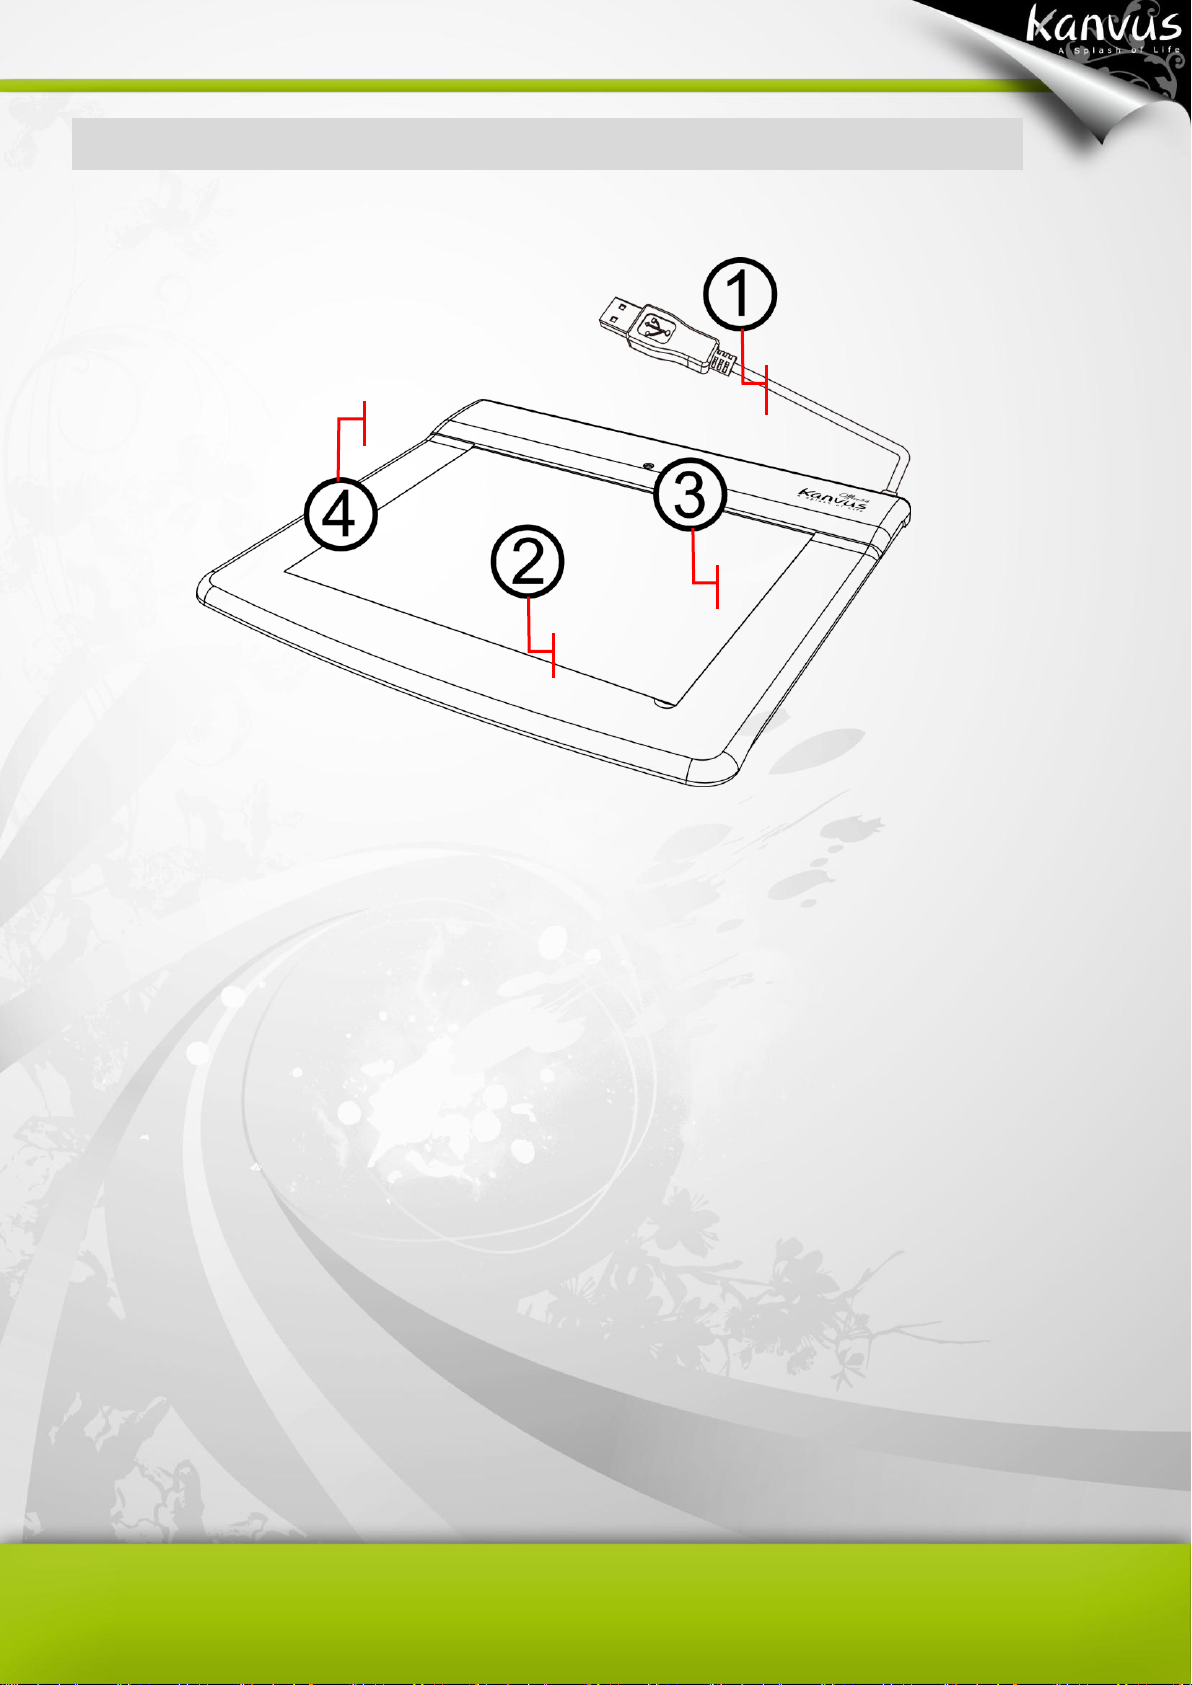
Working Area
LED Indicator
Hotspot Area
USB Connector
Tablet
Refer to the picture below.
Descriptions
1 — USB Connector : Connect to a USB port on your PC.
○
2 — Working Area : Please refer to Working area section for detail descriptions.
○
3 — LED Indicator : The green LED light on the tablet is the main indicator for hardware
○
operation. This LED normally stays off, and will only be turned on/off in response to certain
conditions. Pay attention to the states of the LED when you are encountering the following
situations :
(a) A built-in power saving function would execute the power saving mode for the pen if it
is left unused for a period of time. Tap anywhere on the surface with the tip of the pen
to “wake it up” if it has gone into power saving mode.
6
Page 8

After the tablet’s device driver has been properly installed, a small
tablet icon will appear in the System Tray, which is normally at
the lower right corner of the desktop.
(b) When the pen tablet is re-activated, the LED light will go on for a moment, and will
then turn off again.
(c) When the tablet detects the digital pen, the LED will blink slowly. This happens when
the pen tip is idling or is being placed within the working area on the tablet.
(d) When you press a button on the pen barrel, the LED light will be turned on.
(e) Moving the pen around the working area will cause the cursor on the screen to move
accordingly.
4 — Hotspot Area : The hotspot area is located at the edge of the working area. A hotspot is
○
used as a hot key. Press the hotspot to start a default or user-defined application or function.
7
Page 9
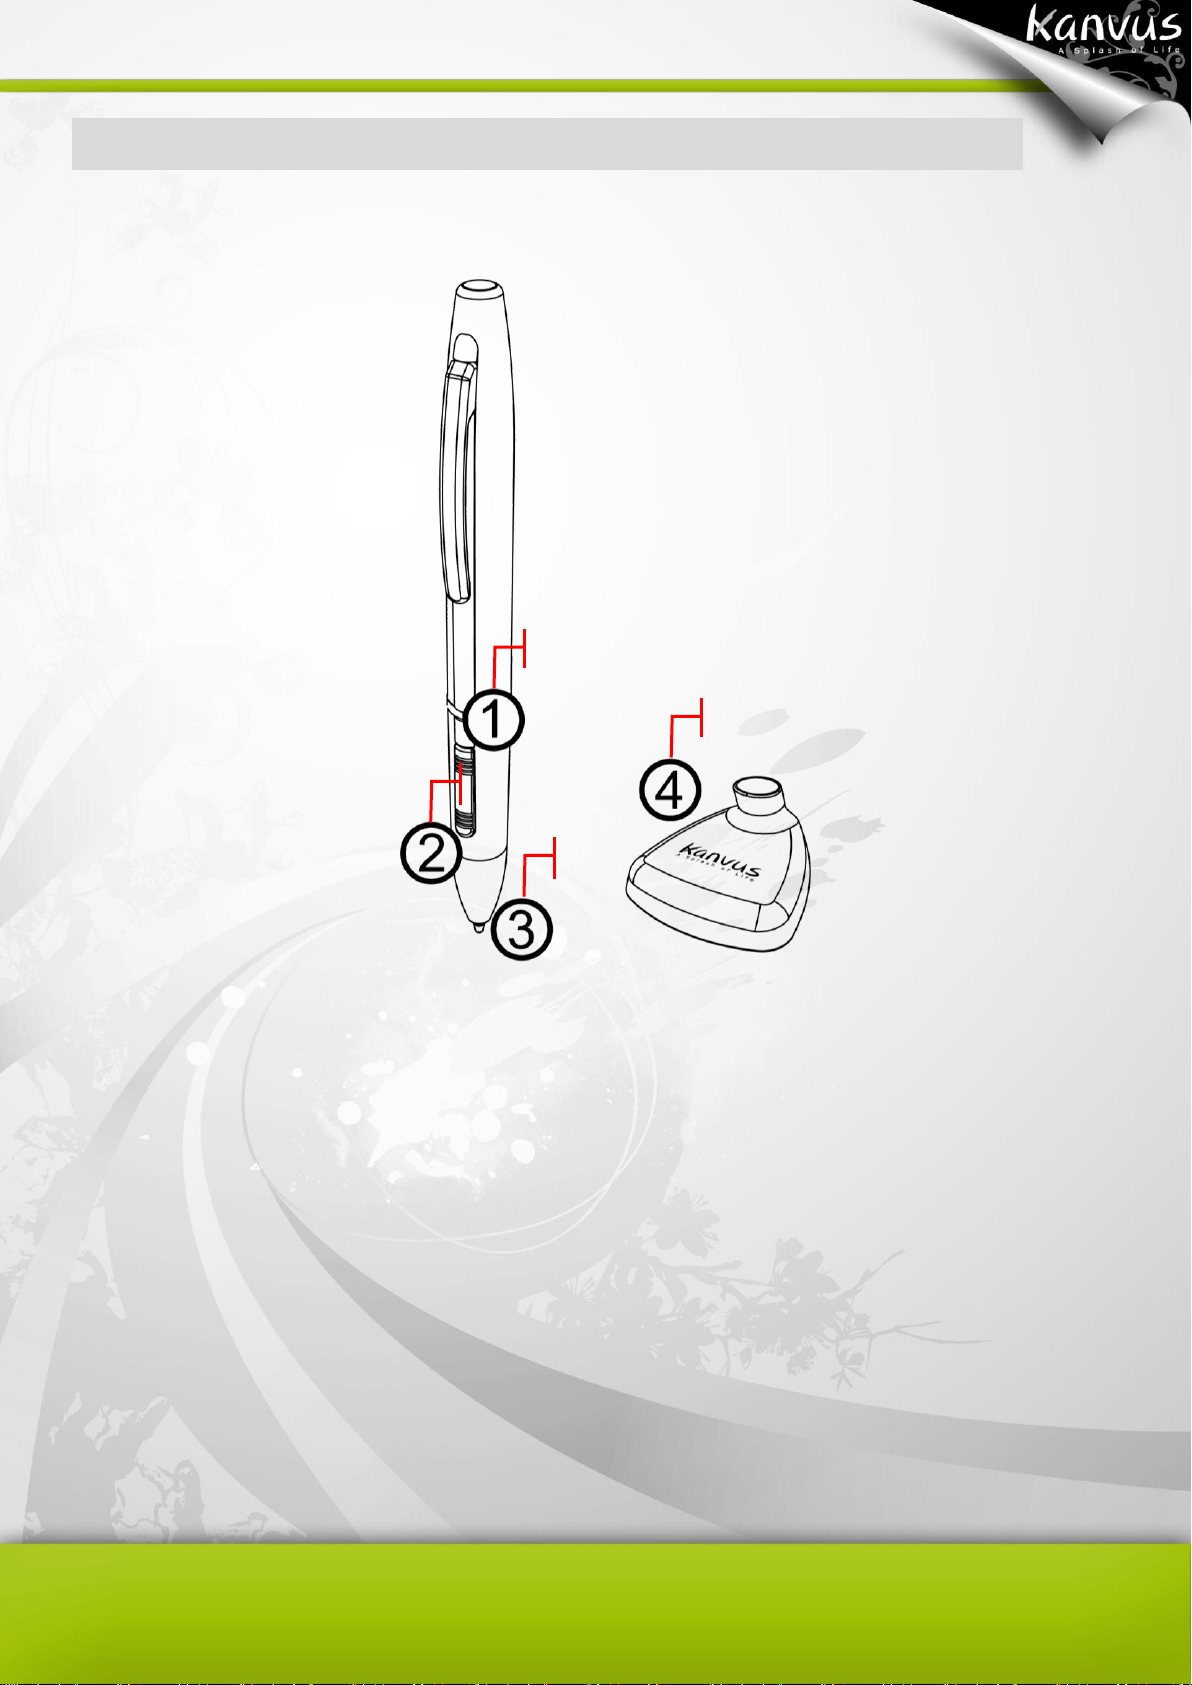
Button 2
Button 1
Pen Tip
Pen Stand
Digital Pen
Refer to the pictures below.
Descriptions
1 — Button 2 : This button functions as the Right Click of the mouse (by default).
○
2 — Button 1 : Functions like the scroll of the mouse, you can move up/down/left/right (by
○
default).
3 — Pen Tip : It is a pressure-sensitive freehand tool for image editing and creating pen strokes
○
similar to real handwriting. Tap the Pen tip on tablet acts as the Left Click of the mouse (by default).
8
Page 10
The power saving mode will be activated if the pen is left unused
for about 3 minutes. To wake the pen up, please press the pen tip
once anywhere on the surface before you start writing again.
Please refer to Configuration section for more detail settings.
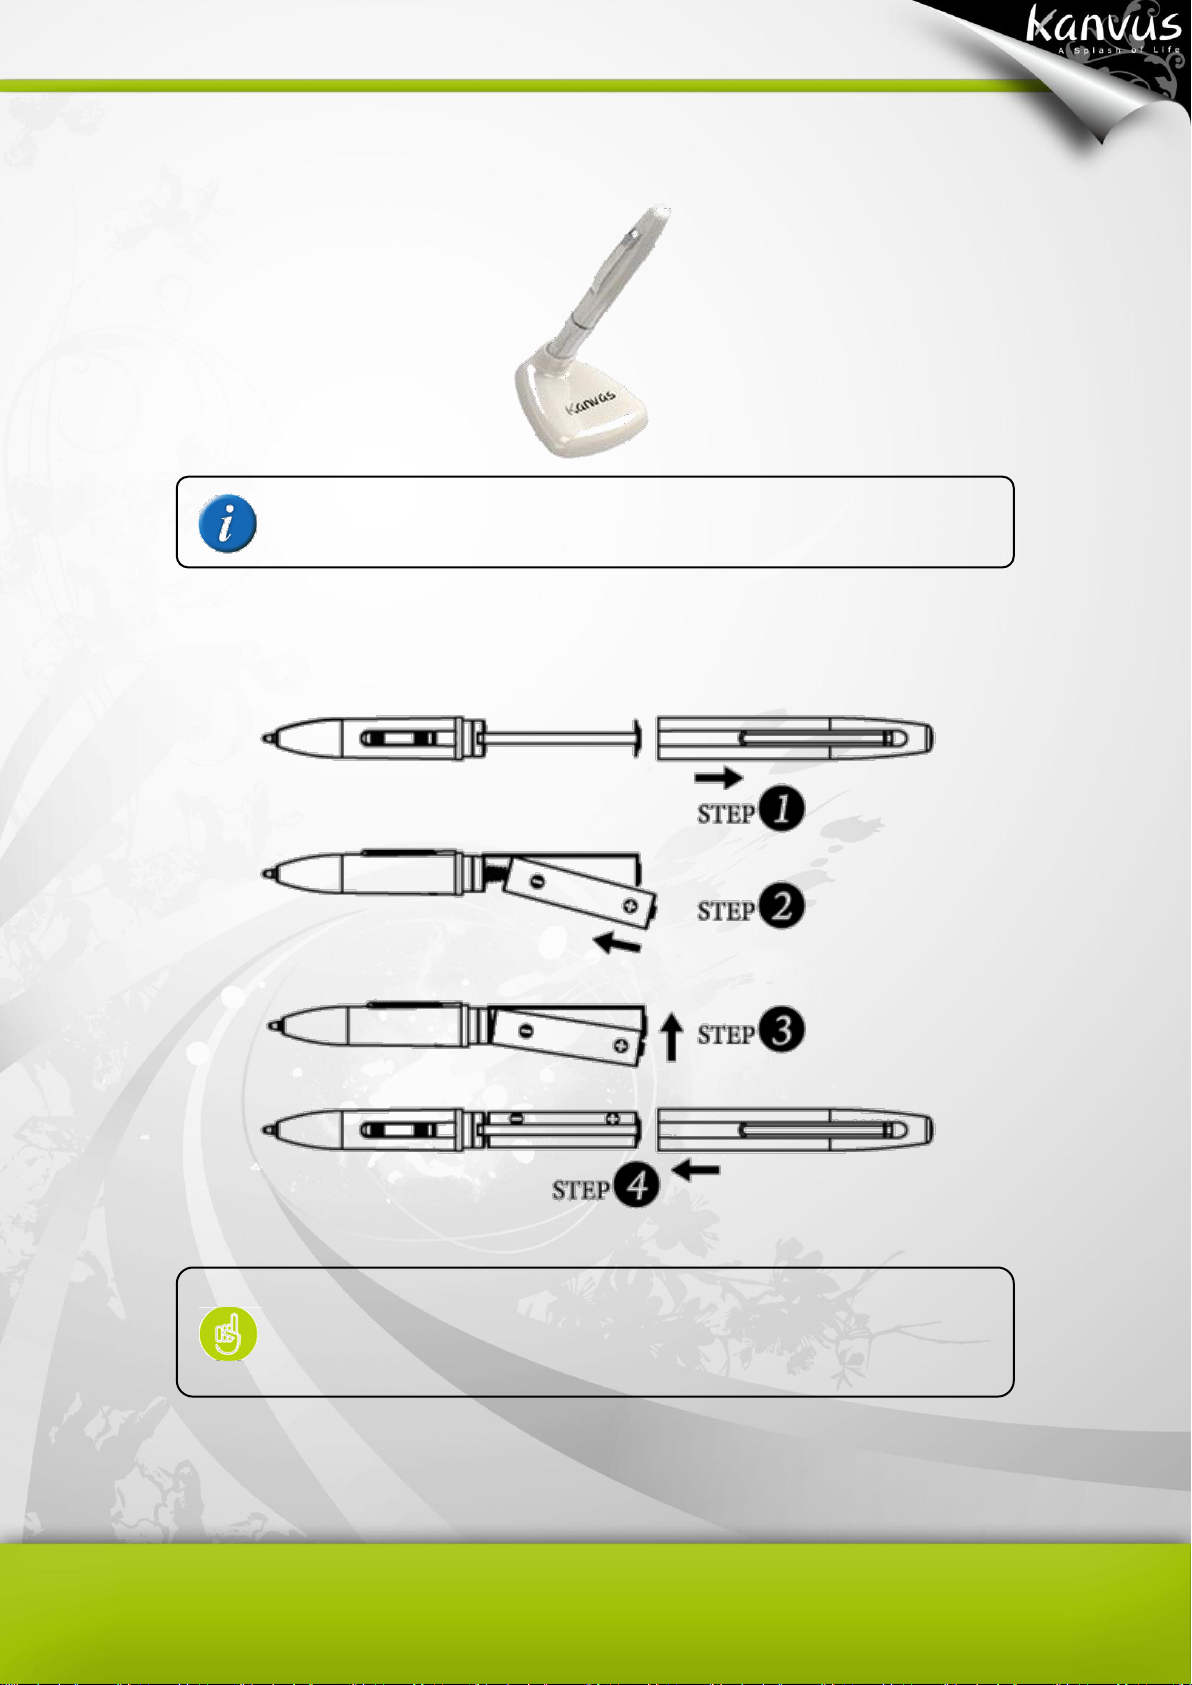
4 — Pen Stand : Use the Pen stand to store the pen between tasks.
○
Changing the battery
9
Page 11
2. Getting Started
-Installation
-Configuration
10
Page 12

Installation
Windows
Installing the Driver Software on Windows
Please follow the installation instructions below for Microsoft Windows 2000, XP, Vista and 7
operating systems :
1. Insert the packaged installation CD into CD-ROM drive.
2. The main installation window will appear automatically. If not, please start the installation
manually by opening 【My Computer】►【CD/DVD ROM】► then click on the 【Autorun】
program.
11
Page 13
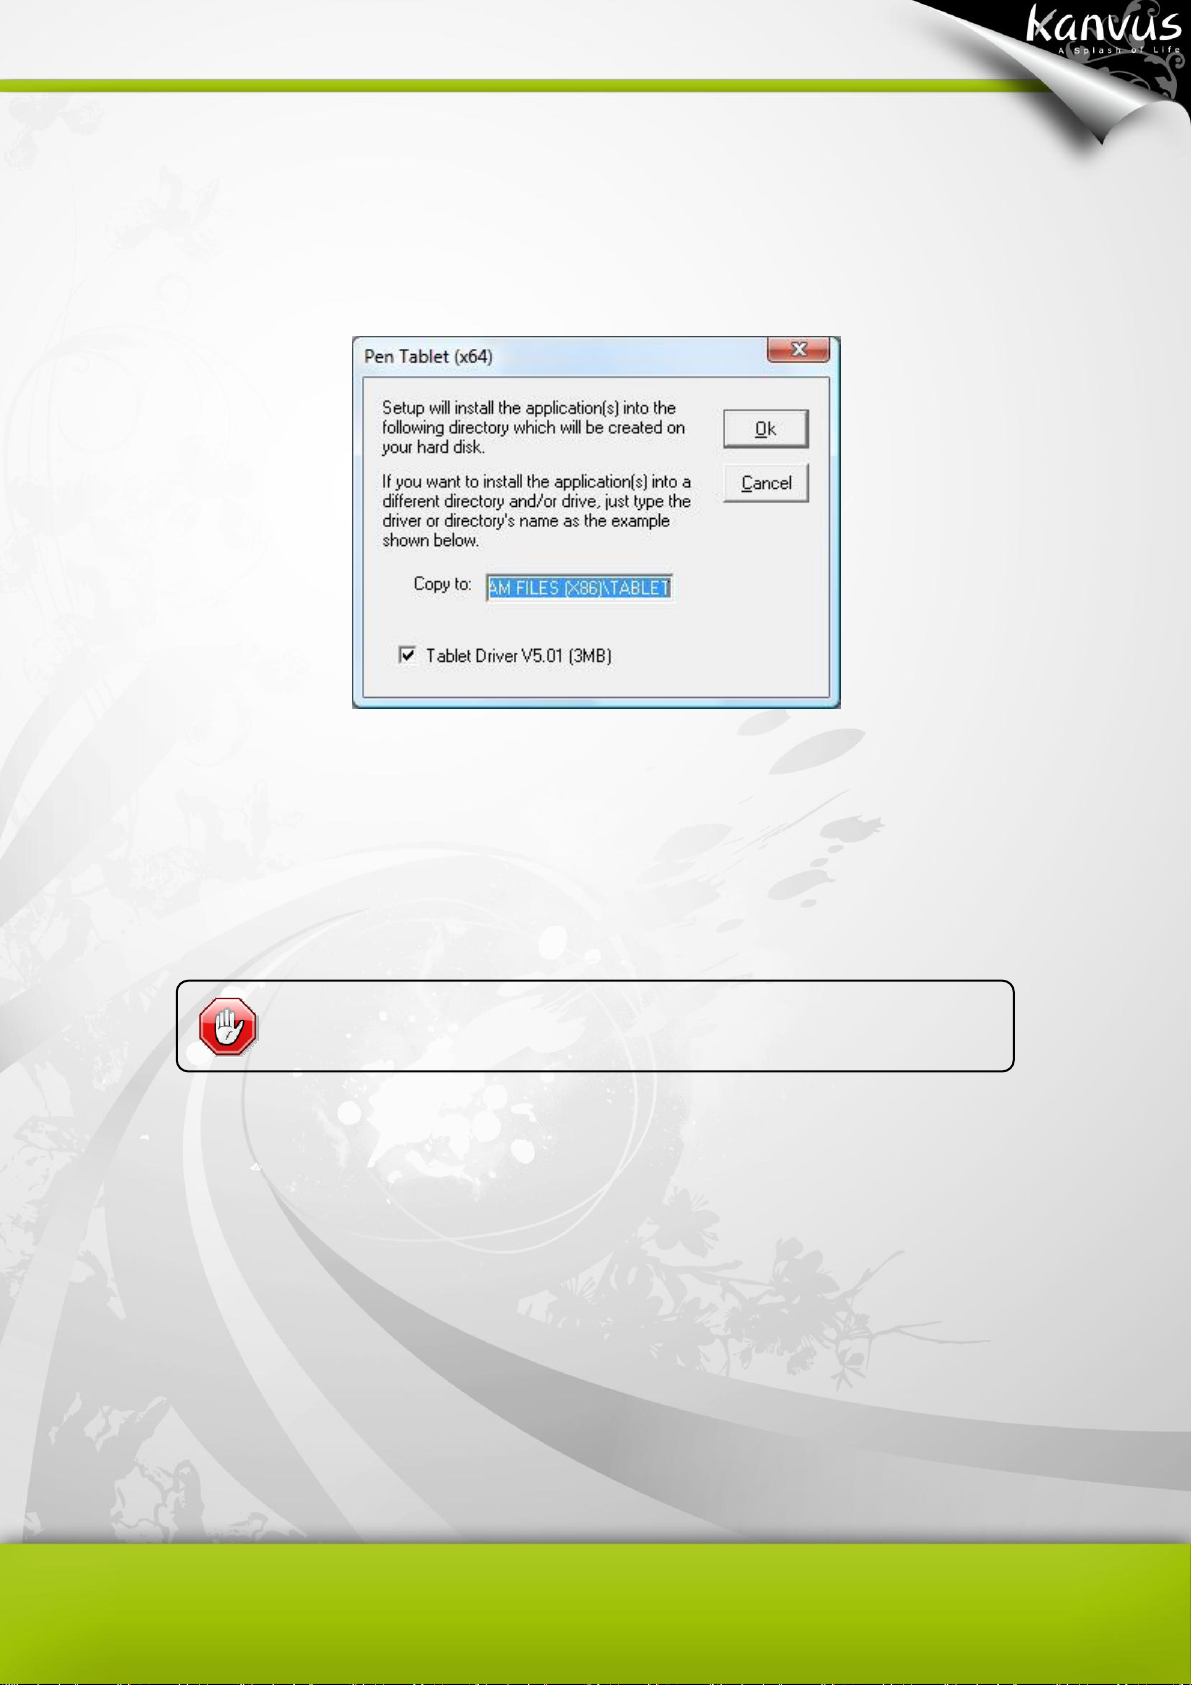
Driver must be installed before you connect the device.
3. When installing the driver, please follow the installation instructions on screen and press the
“Enter” key for each step. After the installation is completed, please reboot the computer
(recommended).
Hardware Installation
Connect the tablet to a PC via an available USB port, after you have installed the driver and
rebooted your PC.
12
Page 14
Mac OS
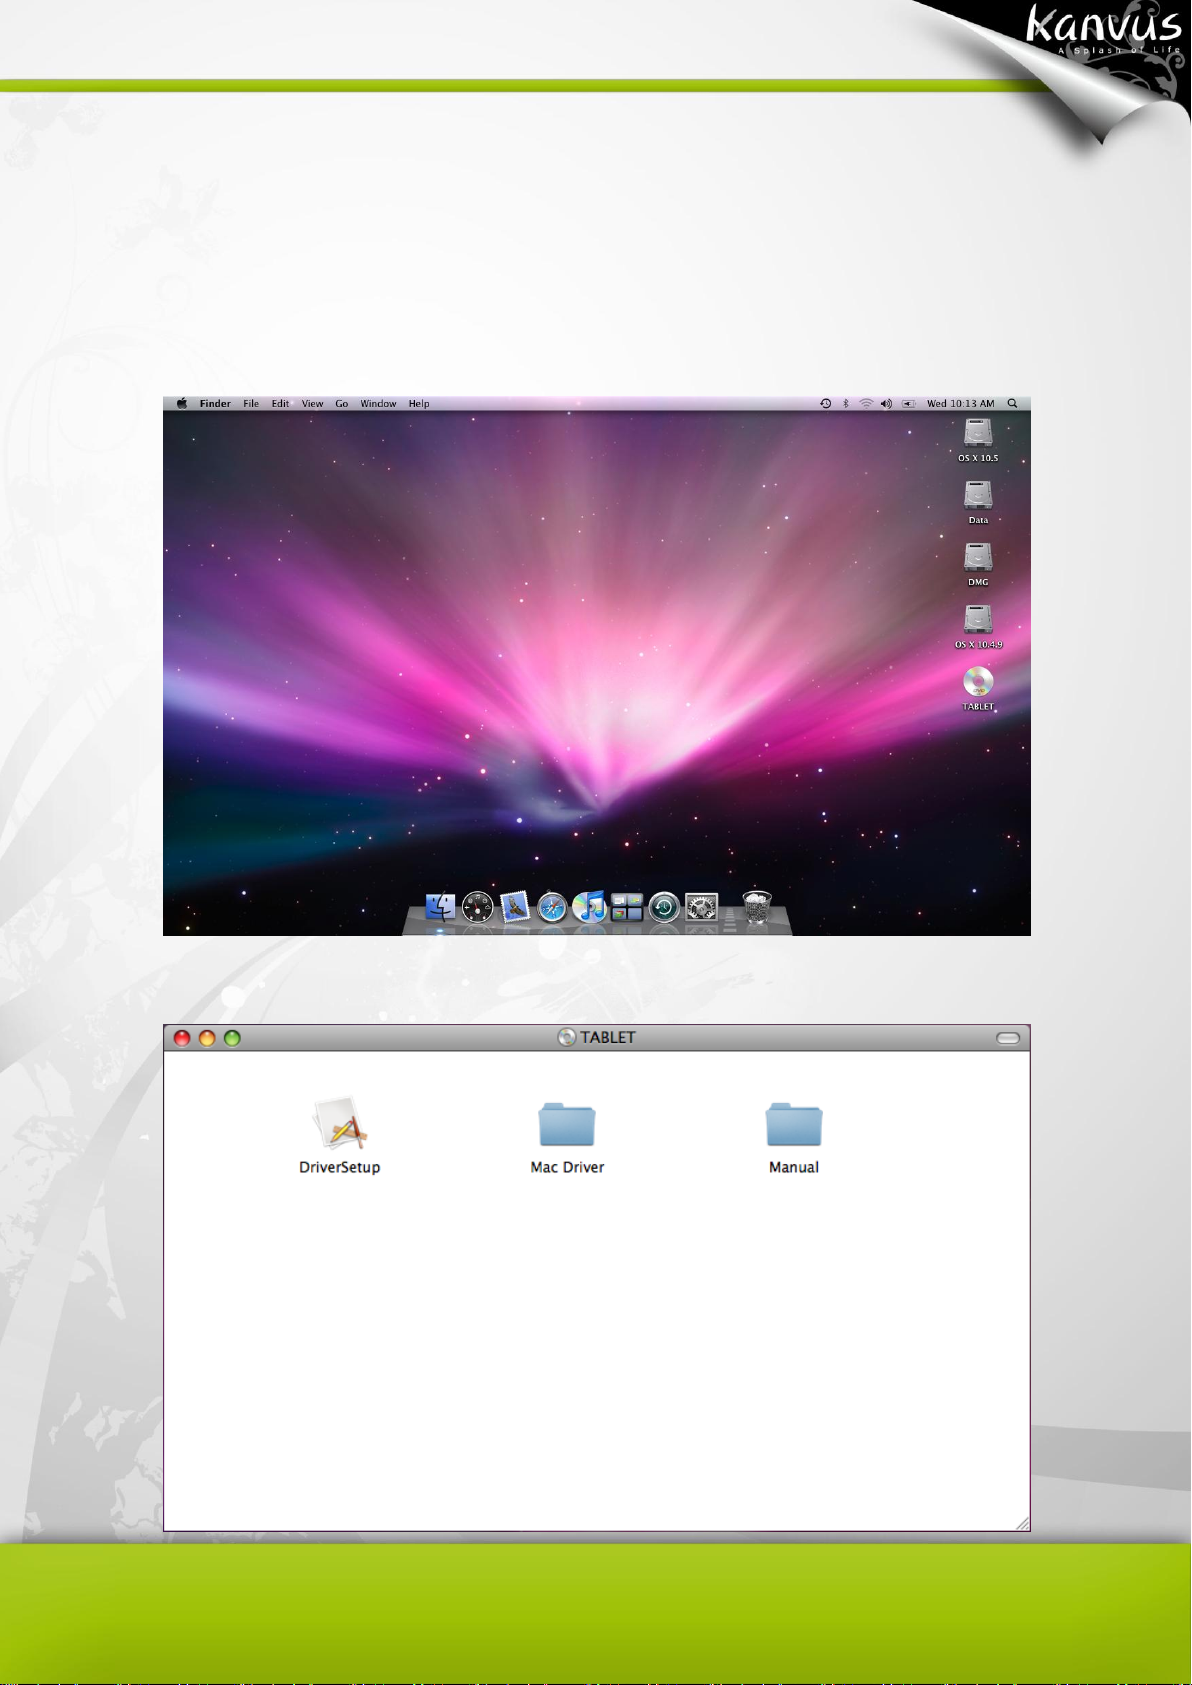
Installing the Driver Software on Mac OS
Please follow the steps below to install the driver :
1. Place Tablet CD into the CD-ROM drive.
2. Click “DriverSetup” on the TABLET window.
13
Page 15

If your Mac OS version is below Mac OS X, please browse your
CD. (Mac Driver / Mac OS 9)
3. Choose “Driver Setup” when the “Setup Items” dialog box appears.
4. Key-in your name and password (Mac computers require username and password).
5. Click “Install” when the “OS X - PenTablet Driver” message appears.
14
Page 16
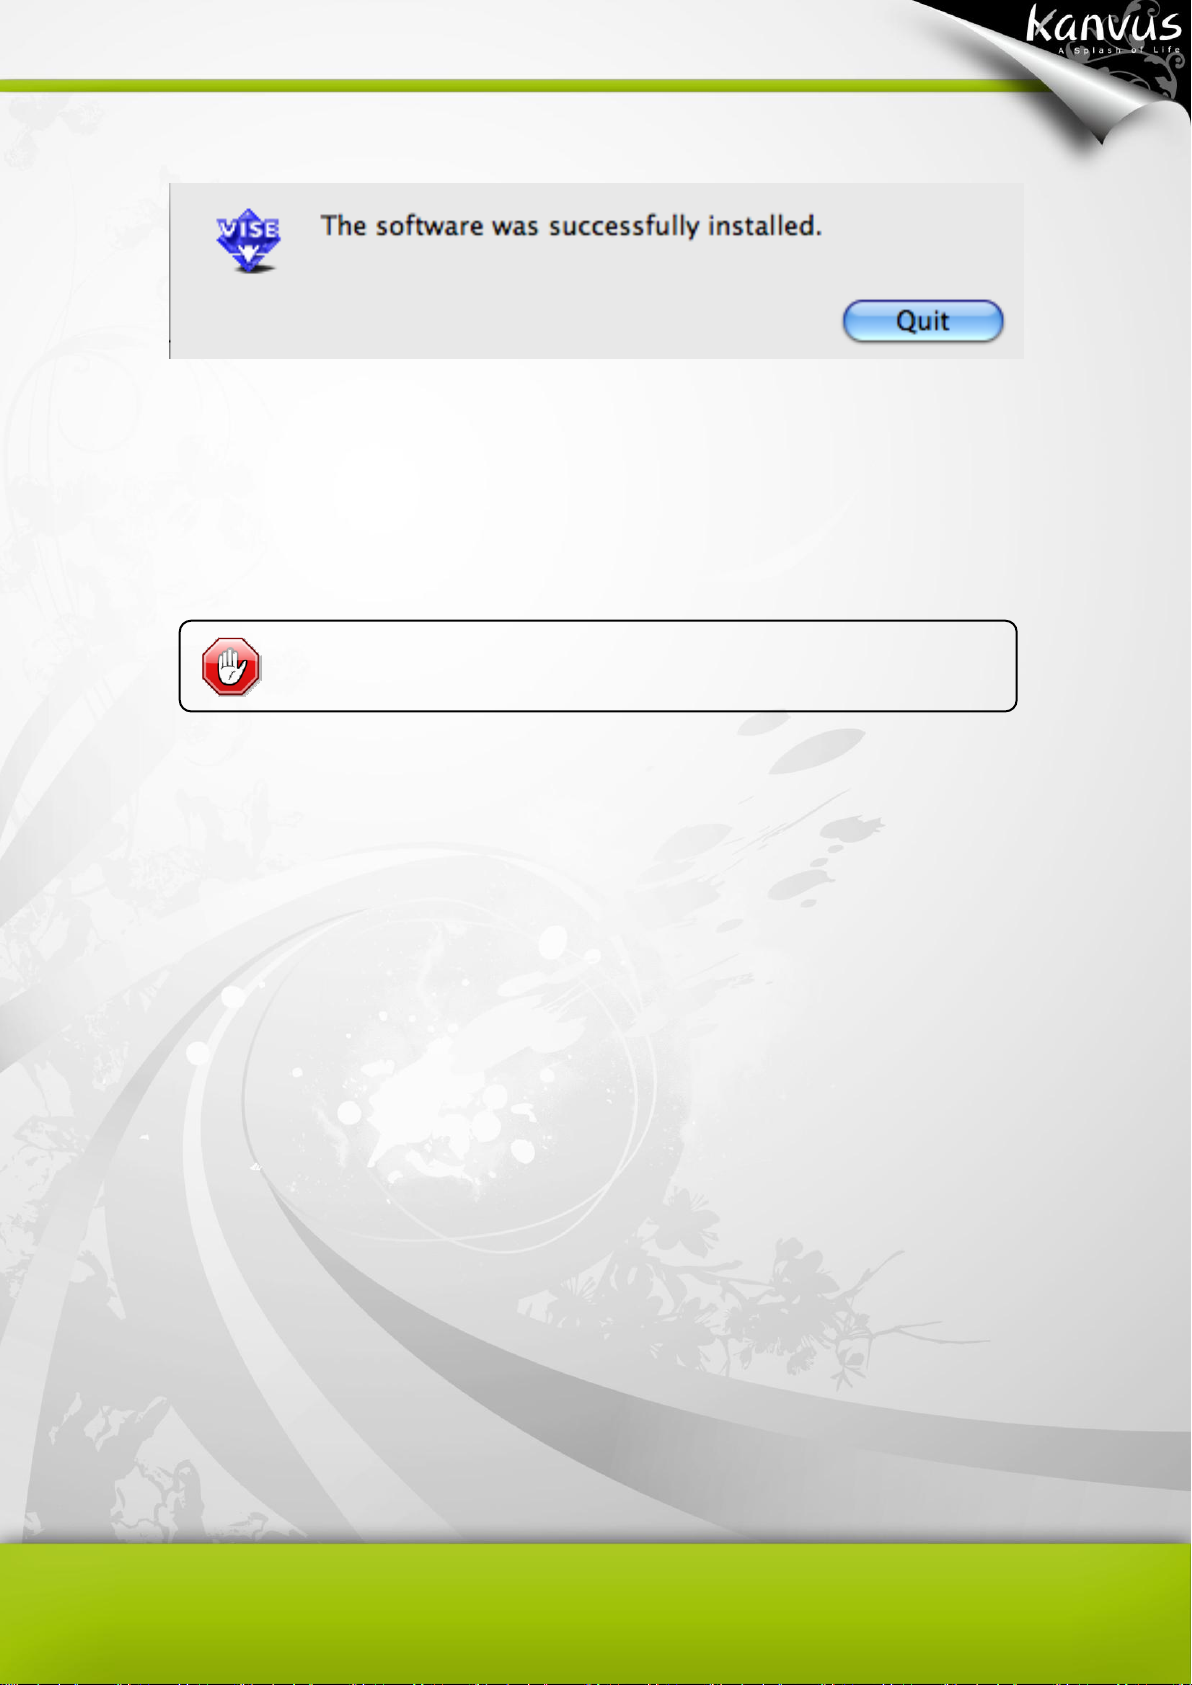
Driver must be installed before you connect the device.
6. Click “Quit” once the system message showed that “The software was successfully installed”.
Hardware Installation
Connect the tablet to a PC via an available USB port, after you have installed the driver and
rebooted your PC.
15
Page 17
Configuration
Windows
To configure your tablet, please press【Start】►【Settings】►【Control Panel】, and double-tap
the【Tablet Setting 】icon.
Or tap on the tablet icon ( ) in the System Tray (located at the lower right corner of the screen).
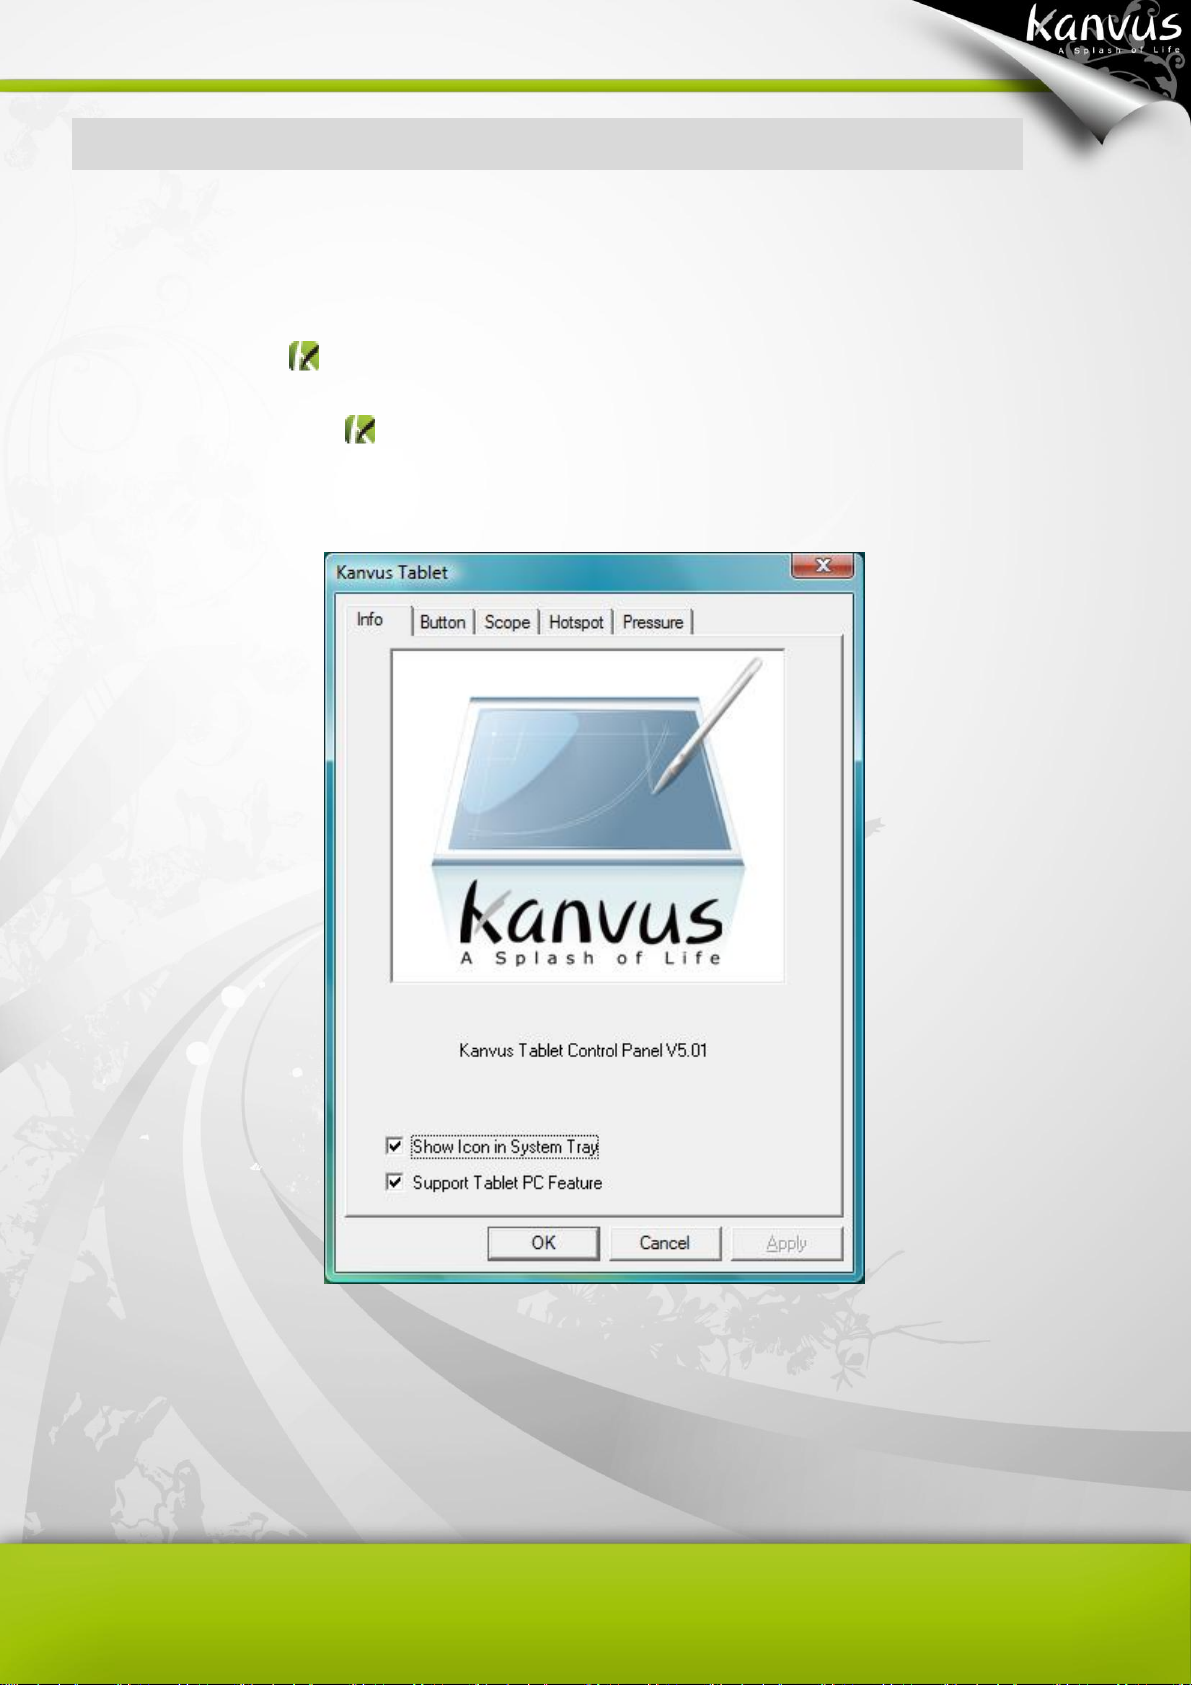
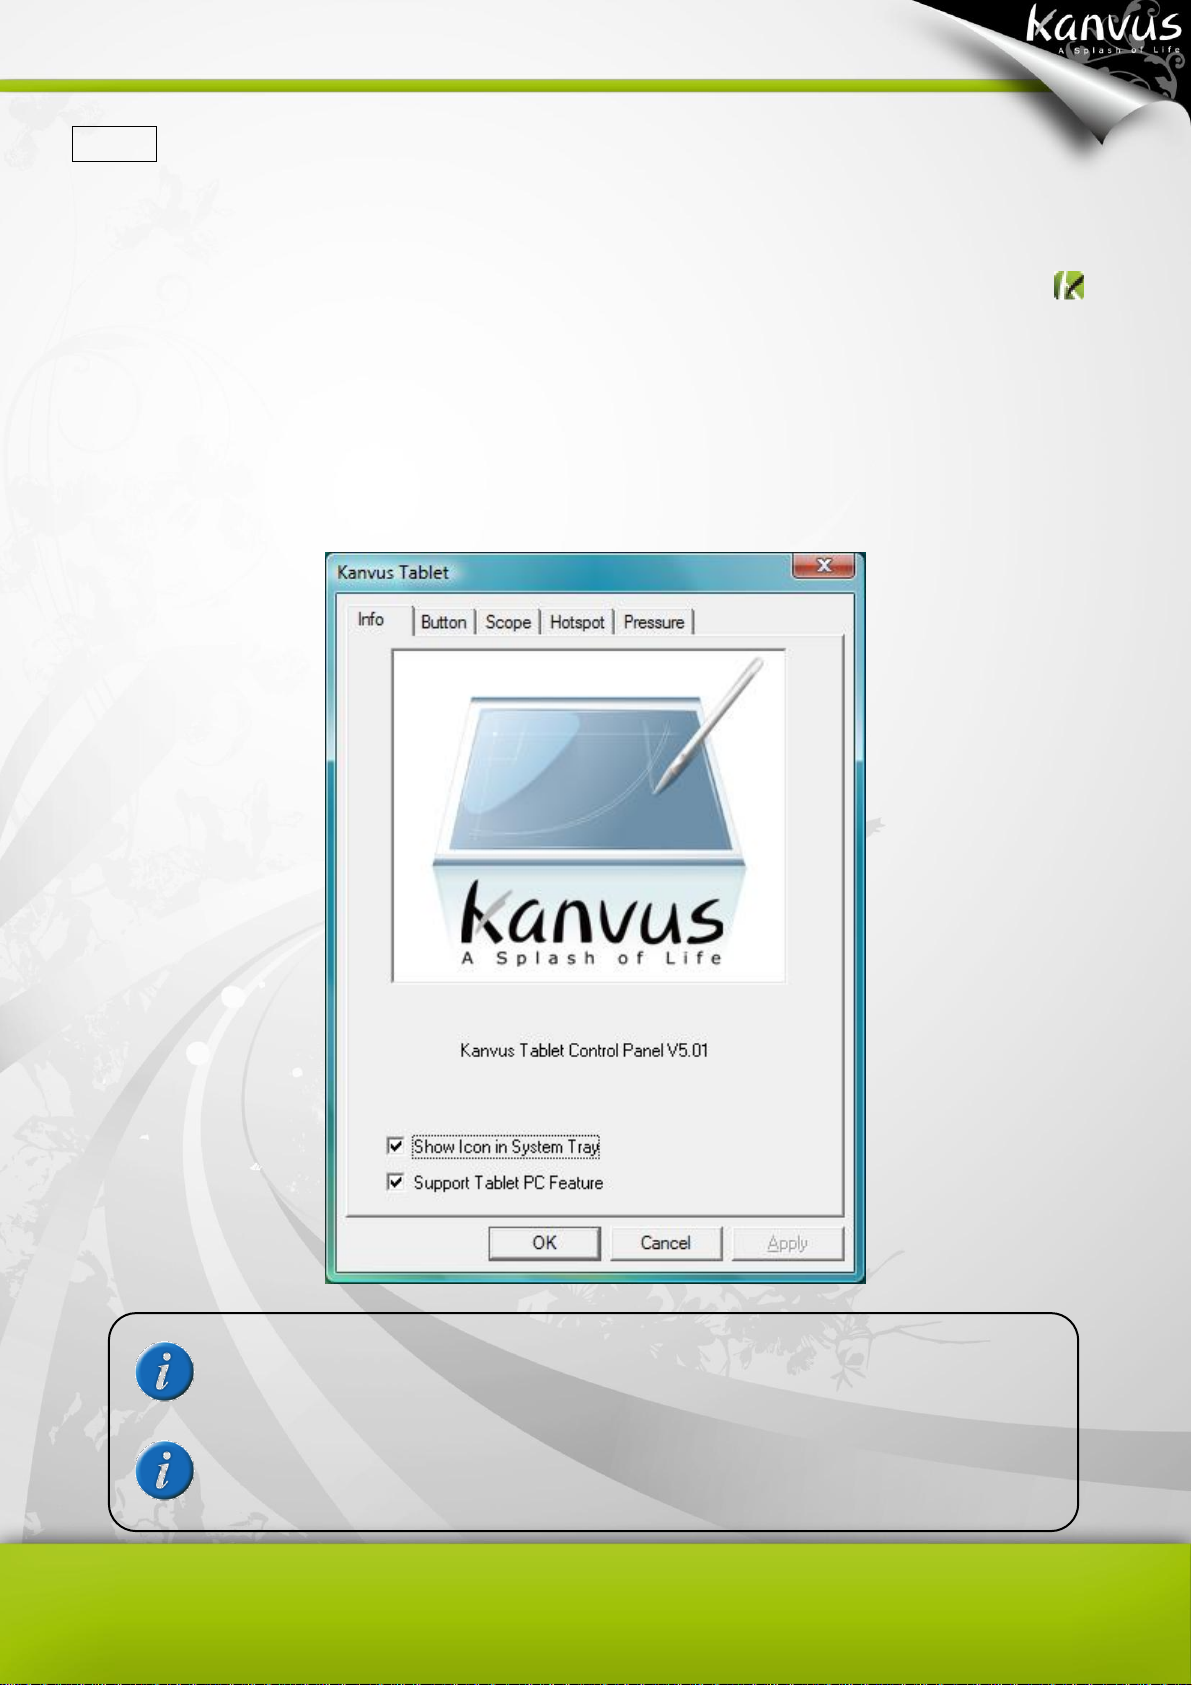
There are 5 tabs : Info, Button, Scope, Hot Cells, Pressure.
16
Page 18
Once the Tablet driver is installed in Windows, the Tablet PC setting will support
pressure in MS Journal, OneNote (2003, 2007) etc.
Even when the Tablet PC setting is disabled, the pen pressure for most of the art
software packages (Photoshop, Illustrator, Corel Painter) will still be working, but
the pen pressure will not function in MS Journal, OneNote (2003,2007) etc.
1. Info
The Info tab displays the version number of the driver and Tablet PC function.
(1) Show Icon in System Tray : Tick the box beside it if you want to show the tablet icon ( ) in
the system tray.
(2) Support Tablet PC Feature : Tick the box Support Tablet PC Feature to enable the Tablet PC
function of pressure sensitivity.
17
Page 19
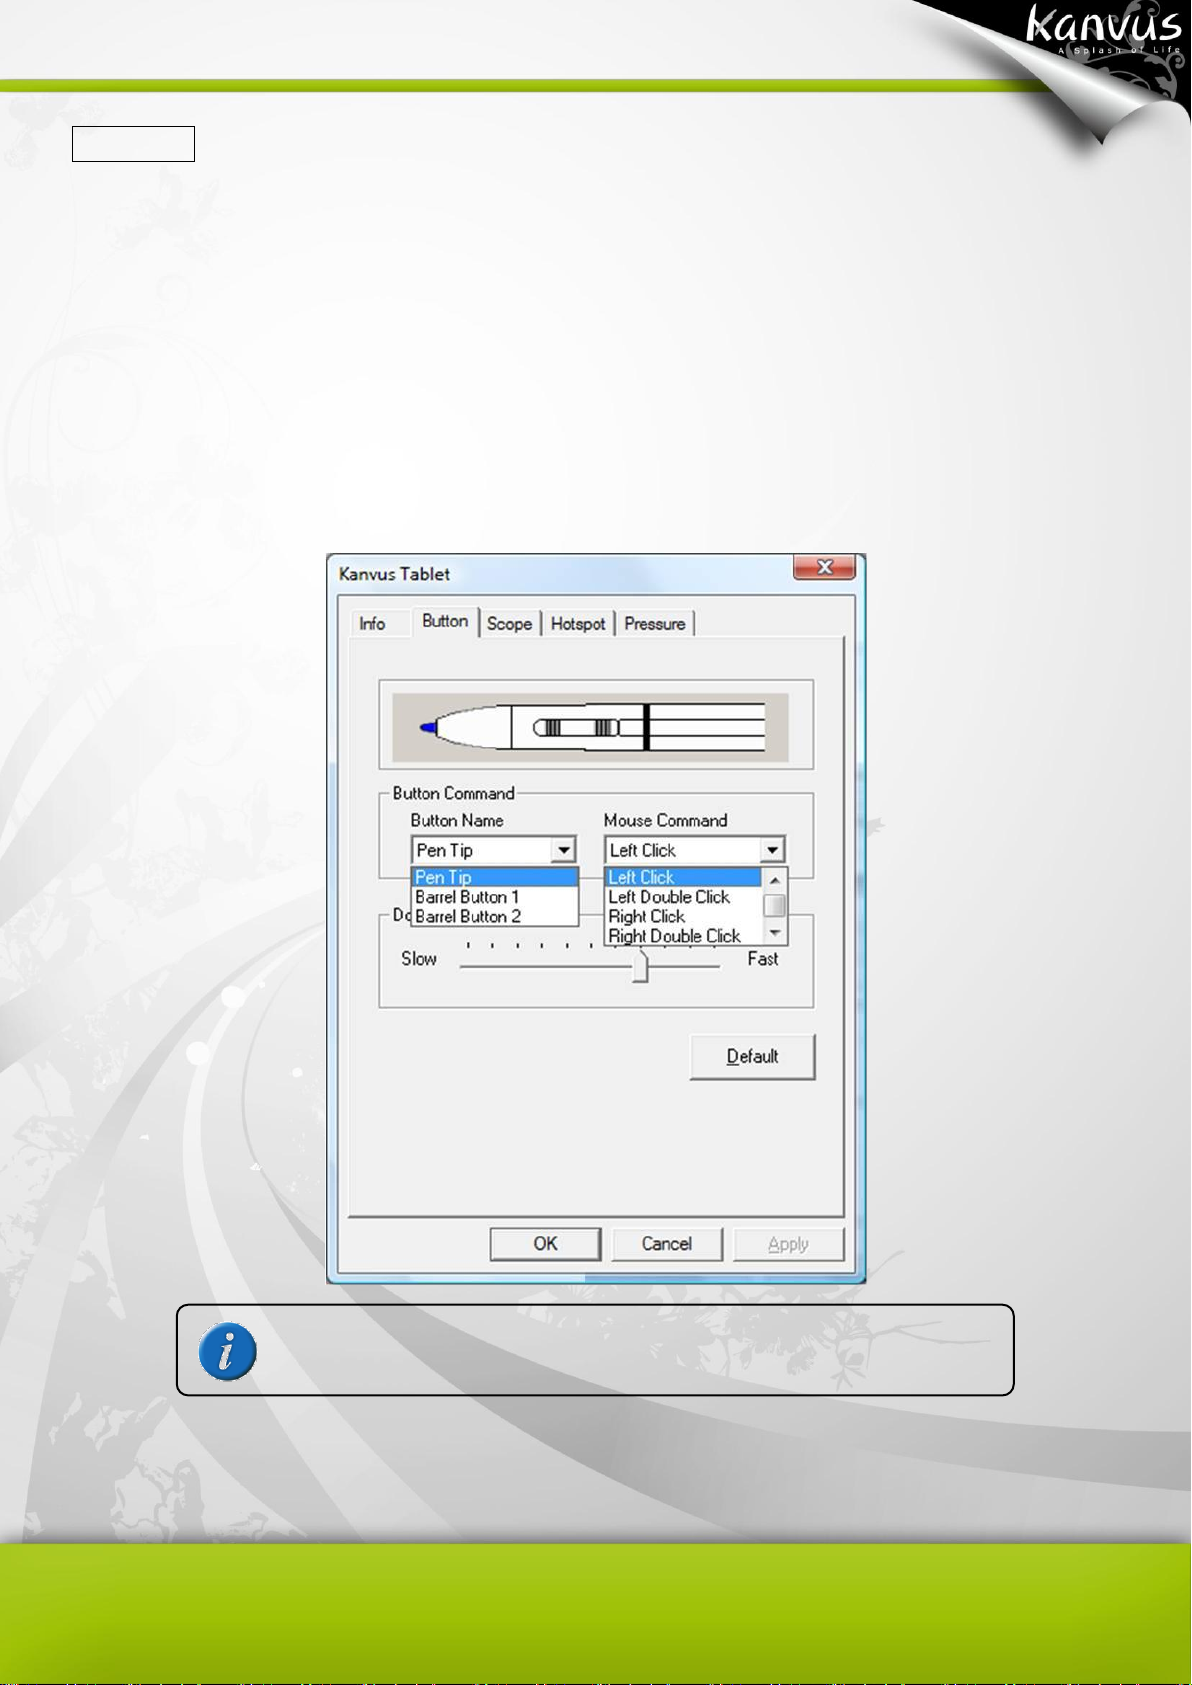
The Mouse Command is based on the three-button mouse model.
2. Button
(1) Button Name
You may configure the functions of Pen Tip, Barrel Button 1 and Barrel Button 2 by clicking the
drop-down menu for Button Name. Assign a command according to the Mouse Command list.
You can select No Action, Left Click, Left Double Click, Middle Click, Middle Double Click, Right
Click, or Right Double Click.
18
Page 20
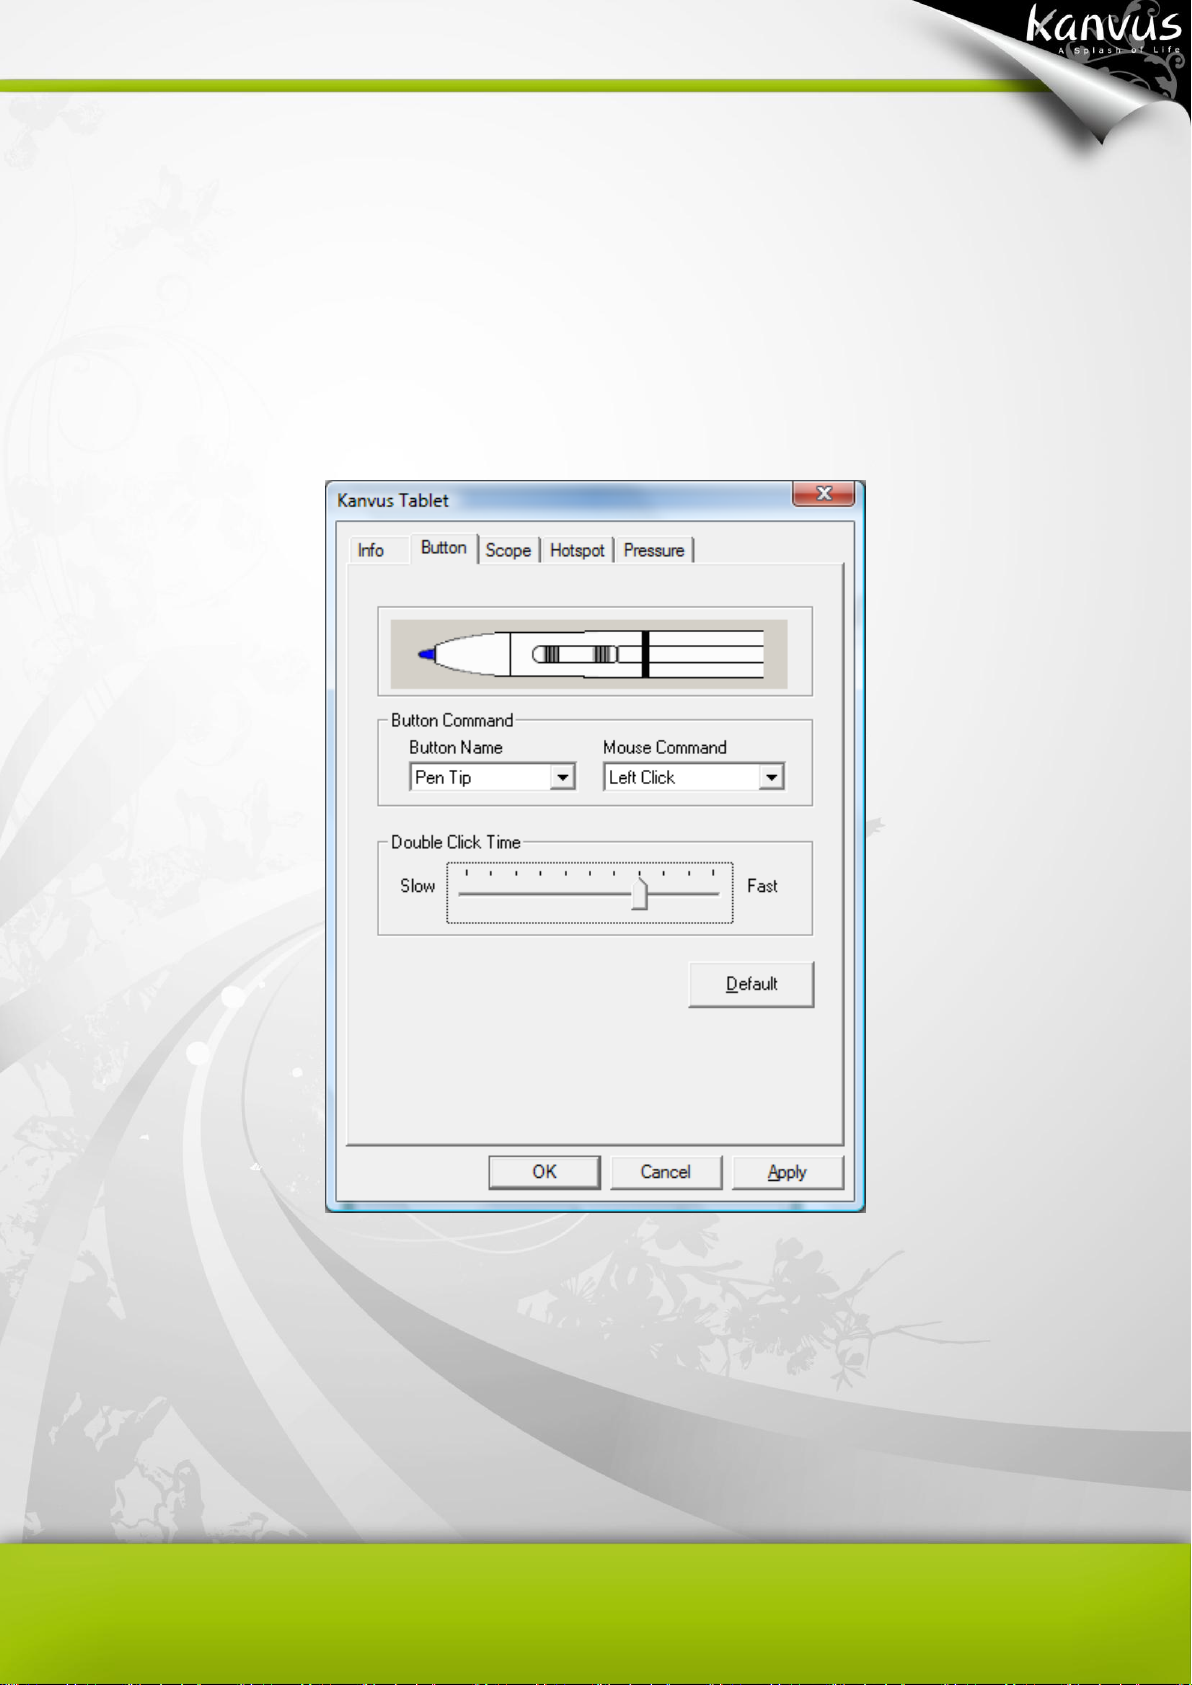
(2) Double Click Time
Move the cursor towards “Slow” if you want a slower double-tapping time with the Pen Tip, or move
towards “Fast” if you want it faster. You can achieve the same setting if you go to the Double-click
Speed page displayed by selecting【Start】►【Control Panel】►【Mouse】►【Buttons】, which
allows you to adjust the speed setting.
(3) Default
Tap on the “Default” button to return to the factory default setting.
19
Page 21
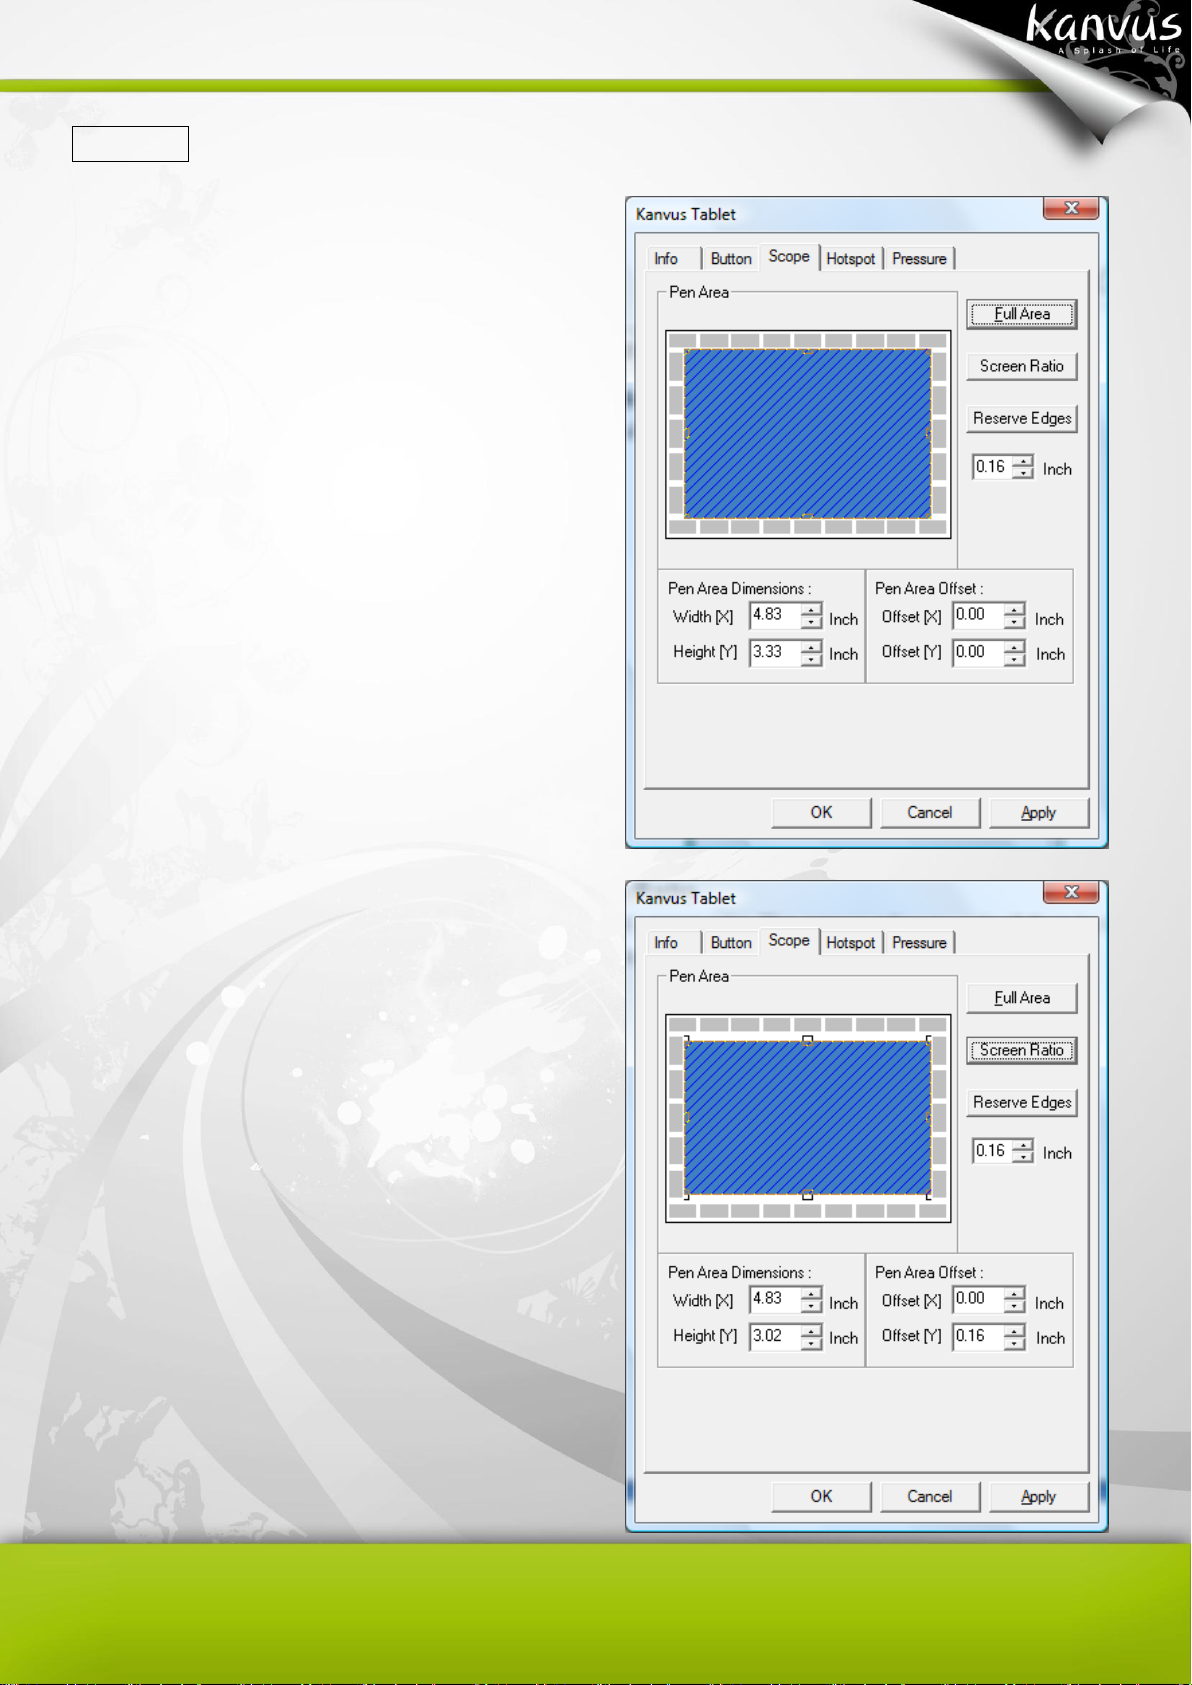
3. Scope
(1) Full Area
Tap on the “Full Area” button to enable the full
working area.
(2) Screen Ratio
Set the tablet screen ratio. The screen ratio you
set will then be the screen size of your working
area.
20
Page 22

(3) Reserve Edges
Tap on the “Reserve Edges” button to allocate
spaces for the tablet’s hotspots.
(4) Pen Area Dimensions
This indicates the current height and width in
the Pen Area Dimensions. Enter new values
here if you wish to change the dimensions of
the pen area.
21
Page 23

(5) Pen Area Offset
This indicates the horizontal and vertical
distances from the upper left corner of the Pen
Area to the upper left corner of the maximum
Pen Area. Enter new values by typing in
numbers or clicking the up/down arrows if you
wish to adjust the offset distance.
22
Page 24

4. Hotspot
(1) Hot Pad Layout
You can see the properties of the hot keys by
clicking the blue blocks at the edges of the
digital tablet.
(2) Hot Edges
There are four edges around the tablet for
you to allocate the hot keys.
(3) Define
Press the Define key to configure hotspots
for running programs, the Internet or hot
keys.
(a) Define Hotspot – Run
Run – You may use the browse
button to select a file and run it, or
you may type in a file name with
complete the path.
Start in – This is the initial folder
from where the program starts to run.
23
Page 25

Parameters – The string type will be passed to the program as parameters. For example,
you may type in a document name here and it will be passed to a word processing program.
Then it will be run as the Run option above.
(b) Define Hotspot – Internet
Kind of Service – You can select
some Internet services, for example,
browsing a website, newsgroup,
sending an E-mail, or using other
Internet services. The exact program
to be initiated (for example, the
browser program) depends on the system settings.
Address – The URL address for the selected service. For example, the Website or e-mail
addresses.
(c) Define Hotspot – Hot Key
Configure the key combination –
You may select any key such as
alphabet, numeric key or cursor
control key, to be combined with
Shift, Ctrl and / or ALT key.
24
Page 26

(4) Print
Tap on the “Print” button to print an overview of all hot spot functions.
(5) Clear
Tapping on this button will clear up the definition of the selected Hotspot, so no action will be taken
when the Hotspot is tapped later on.
(6) Load Default
Return to original default.
25
Page 27

5. Pressure
(1) Pressure Test
You can click the slide bar below to adjust
pressure sensitivity and there are 4 color
choices for the pen : Black, Red, Green and
Blue. There is a Pressure Test area to see
the thickness of a line for a certain sensitivity
of the pen tip on the tablet pad. The
numerical value of the pressure level is
shown in a box above the “Clear” button.
(2) Clear
Tap on the “Clear” button to clean up the space in the Pressure Test area.
(3) Click Sensitivity
You can tap with the pen tip or left-click the mouse to move the slider in order to adjust the
sensitivity of the pen tip (it is assumed that you are in the default setting). Light allows the pen tip to
react quickly with just a slight press, while Heavy means the pen needs greater pressure applied to
it.
26
Page 28

Mac OS
Go to Tablet Setting Page
1.1 Click【GO】►【Applications】
1.2 Click Pen Tablet Setting
27
Page 29

1.3 Click Tablet Setting
28
Page 30

There are 5 tabs : Info, Button, Scope, Hot Cells, Pressure.
1. Info
The Info tab displays the version number of the driver and Tablet Mac information.
.
29
Page 31

2. Button
(1) Button Name
You may configure the commands of the pen tip and the two barrel buttons by selecting the button
name from the drop down menu and assigning a command based on a traditional three-button
mouse. You can select No Action, Left Click, Left Double Click, Right Click, or Right Double Click.
(2) Default
Tap on the “Default” button to return to the factory default settings.
30
Page 32

3. Scope
(1) Full Area
Tap on the “Full Area” button to enable
full working area.
(2) Screen Ratio
Set the screen ratio for the tablet
working area. The screen ratio chosen
will be the screen size for the working
area.
31
Page 33

(3) Reserve Edges
Tap on the “Reserve Edges” button to
allocate spaces for the tablet’s
hotspots.
(4) Pen Area Dimensions
This indicates the current height and width of
the Pen Area Dimensions. Enter new values
here if you wish to change the dimensions of
the pen area.
(5) Pen Area Offset
This indicates the horizontal and vertical distances from the upper left corner of the Pen Area to the
upper left corner of the maximum Pen Area. Enter new values by typing in numbers or clicking the
up / down arrows if you wish to adjust the offset distance.
32
Page 34

4. Hot Cells
(1) Hot Pad Layout
You can see the property of a hot key by clicking the blue cells surrounding the digital tablet.
(2) Hot Edges
There are four edges around the tablet where you can allocate your hot key locations.
(3) Define
Press the “Define” key to define Run, Internet or Hot Key functions.
33
Page 35

(a) Define Hot Cells – Run
Run – You may use the browse button
to select a file and run it, or you may
type in a file name with the complete
path.
(b) Define Hot Cells – Internet
Kind of Service – You can select
some Internet services, for example,
browsing a website, newsgroup,
sending an E-mail, or using other
Internet services. The exact program
to be initiated (for example, the
browser program) depends on your
system settings.
Address – The URL address for the
selected service. For example, the
Website or e-mail addresses.
34
Page 36

(c) Define Hot Cells – Hot Key
Configure the key combination – You may select any key such as alphabet, numeric key
or cursor control key to be combined.
(4) Clear
Tapping on this button will clear up the definition of the selected Hot Cell, so there is no action will
be taken when the Hot Cell is tapped later on.
35
Page 37

5. Pressure
(1) Pressure Test
There are four different colors for selecting and the pressure sensitivity of the pen tablet can be
adjusted in this tab. There is a test area to see the thickness of a line by pressing a certain pressure
of pen tip on the tablet pad. The numerical value of the pressure level is shown in the field above
the “Clear” button.
(2) Clear
Tap on the “Clear” button to clean the space up in the Pressure Test area.
36
Page 38

(3) Click Sensitivity
By default setting, tapping with the pen tip is equivalent to a left click of a mouse. Move the slider in
the sensitivity bar to adjust the response of the pen tip. Light means when presses the pen tip that
will be reacted very quickly with a slight power, but the heavy function is opposite.
37
Page 39

3. Using the Tablet
-Holding the Pen
-Working Area
-Positioning
-Clicking
-Dragging
-Pressure Control
38
Page 40

To maintain the sensitivity of your pen tip, do not store the pen in a
container where it will rest on its tip.
Holding the Pen
Hold the digital pen as you would hold a pencil. Keep the buttons of the pen close to your index
finger or thumb so that you can click the button easily.
When the pen is not in use, place it in the pen stand or lay it flat on your desk.
39
Page 41

The cursor in the screen area indicates pen position, and the
cursor follows the movement of the pen.
Screen Area
Working Area
Working Area
Working area is the area of the tablet that can sense the movement of the digital pen. The
working area of the tablet corresponds with the screen of your PC.
40
Page 42

Positioning
Use the digital pen to position the cursor on your PC screen.
The distance between the pen tip and the tablet surface must be less than 10mm so that the
tablet can sense the movement / location of the pen. The cursor location on the screen
corresponds with the location of your pen tip on the tablet.
Lift the pen tip and place the pen tip in a new location on the tablet. The cursor will jump to the
new position.
41
Page 43

You can also set the function of pen buttons to click or
double-click. To assign new switch functions, see “Configuration”.
Clicking
One Click : Tapping the pen tip once on the tablet surface within the working area performs a
click. A “Click” is used to select something.
Double Click : A double tap with the pen tip in the working area performs a double-click.
“Double-Click” is used to open something you select.
42
Page 44

Dragging
To drag an object, simply point to and click on the object (to highlight the object), then move the
pen tip to the location you want to drag to.
43
Page 45

Pressure Control
The tablet comes with drawing applications that support pressure sensitivity, so you can change
the thickness of the line you draw with different pressure, just as if you were using a real pen or
pencil.
To draw with pressure sensitivity, first select a pressure-sensitive tool from your application’s
tool bar. Then draw along the surface of the tablet while applying various amounts of pressure
downward on the tip of the pen. Press hard for thick lines or thin lines or dense color. Press
gently for thin lines or softer color.
44
Page 46

4. Using the Bundled Software
-System Requirements
-Introduction to Tablet Software
-Supporting Operating Systems
-Installing Tablet Software
-Uninstalling Tablet Software
45
Page 47

Operating System
Windows 2000, XP, Vista or 7
CPU
Pentium III or above
Hard Disk
256 MB or Higher
RAM (Memory)
256 MB (Windows 2000 / XP), 1 GB (Windows Vista / 7)
Equipments
USB connector, CD/DVD ROM
System Requirements
46
Page 48

K-WorkInk
Allows you to handwrite, make notes or put
annotations on Microsoft Word documents and you
can save the handwriting / notes.
K-Notice
You can take a snapshot of the pictures on the
screen and then insert your selected text and
pictures for use in presentations or e-mails.
K-Command
Allows you to write down the command symbols
directly on the digital pen tablet in order to execute
computer commands or open files.
K-Mail
You can write your own signature for your e-mails
to family and friends.
K-Signer
Insert signatures or hand drawn graphics onto the
document.
Introduction to Tablet Software
47
Page 49

Operating System
Windows
2000
Windows
XP
Windows
XP 64
Windows
Vista
Windows
7
K-Notice
V V V V V
K-Mail V V V V
V
K-WorkInk
V V V X X
K-Command
V V V X X
K-Signer
V V V V V
K-WordInk : Suggestion! Windows Vista / 7 users are able to use
the Annotation function through MS OFFICE 2003 or 2007.
K-Command : Suggestion! Windows Vista / 7 users are able to
use the handwriting and input function built-in under the Windows
Vista / 7 system.
Supporting Operating Systems
48
Page 50

1.
Open your computer and start the Windows.
2.
Place the CD disc into the CD/DVD ROM driver
and the installation program will be automatically
activated (See figure to the right).
Select “Tablet Software Setup”, and press the
“Enter” key to start the Tablet Software installation.
3.
The message box will come out with the software
selection. Select the software you want to install
and confirm the installation location. Then, press
“OK” to install.
4.
After the installation is completed, press “OK” to
finish software installation.
To use the Tablet software, you need to install the Driver first and
then install the Tablet Software. (For more information about the
installation of driver, please refer to the included Driver Installation
Manual.)
Installing Tablet Software
49
Page 51

When you run the installation with Windows
Vista/7, after you finish step 4, please wait until
you see the message box (see figure to the
right) and select “This program installed correctly”.
After your computer system has finished reading
the data from the CD/DVD ROM, take the CD out
and finish the installation.
50
Page 52

Uninstalling Tablet Software
In order to uninstall the Tablet Software, move your cursor to the lower left corner of the screen
【Start】►【Programs】►【Tablet Software】►【Uninstall】.
51
Page 53

5. Specification Summary
-Tablet
-Digital Pen
52
Page 54

Active area
5.5" X 4"
Dimension (L X W X H)
204 X 191 X 9.2 mm
Weight
318g
Interface
USB 1.1 (Full Speed)
Resolution
2000 LPI
Report rate
100 RPS
Pressure sensitivity
512 Level
Reading height
10 mm (From up case)
Hotspot
28 Hotspots
(Top : 9, Bottom : 9, Left : 5, Right : 5)
Power consumption
0.35 W
USB cable length
1.5 m
Windows® OS
Windows® 2000 / XP / Vista / 7
Macintosh© OS
Mac OS X 10.2.8 above
Tablet
53
Page 55

Dimension
137.7 X 12 / 16.4 mm
Weight
9g (Except battery)
Power supply
One 1.5V AAA alkaline battery
Power consumption
180 uW
Buttons
3 keys (Pen Tip, Side Button x 2)
Power saving Mode
Yes
Time to stand by
5 ~ 30 Min.
Durability batteries
5000 Hr.
Digital Pen
54
Page 56

6. Troubleshooting
-Testing your device
-FAQ
-Service and Technical Support
-Driver Download
55
Page 57

Testing your device
Please do the following tests first to identify your problem.
1. Check the connection :
After you connect the device to your computer, you should see a tablet icon in the system tray. If
you do not see the icon, please follow these steps :
(1) Make sure the USB cable is properly connected to a USB port.
(2) Try connecting to another USB port.
(3) If the device is connected to a USB Hub, please make sure the USB Hub is properly
connected to a USB port.
(4) Check if your USB controller is activated or not.
2. Diagnose the device :
If the pen or the tablet still do not work properly, please follow these steps to help diagnose the
problem with the device.
(1) Pull off the tablet's USB plug from the computer.
(2) Remove the Tablet driver from the system.
(3) Re-connect the Tablet's USB to the computer.
(a) Check whether the tablet's LED is blinking or not. If the LED is not on, that means
there is an error with your tablet.
(b) Test your wireless digital pen on the tablet working area. If it can work as a mouse, it
56
Page 58

If you do not have the pen pressure, it means the pen itself might
be faulty.
means the hardware is OK. If it does not work, try replacing the battery.
(c) After changing the pen’s battery, if it is still not working, this means there is an error
with the hardware.
(4) Download the latest version of the driver directly from our official website. You can also
check the latest FAQ on our web site for other information.
(5) After installing the new version of the driver, the system will require you to restart your
computer.
(6) After restarting your computer, you can find the tablet icon ( )at the bottom right of the
screen.
(a) If you cannot find the tablet icon ( ) at the bottom right of the screen, it means the
driver failed during startup. This might be caused by an incompatibility issue.
(b) Check from 【My Computer】►【Properties】►【Hardware】►【Device Manager】,
if there is an exclamation mark, it means the installed tablet driver is incompatible
with the windows system. If you have this problem, please contact us immediately for
help.
(7) By clicking the tablet icon ( ) at the bottom right of the screen, you can test the pressure
sensitivity to see whether the pen pressure function works or not. (Refer to Configuration.)
57
Page 59

FAQ
Question : Why is the LED of the tablet blinking continuously ?
Answer : It means that the USB port on your PC has a bad connection or the power supply is not
stable. Please re-plug in your USB again. If the problem persists, try changing to another USB port.
Question : How can I get the updated software ?
Answer : You can download the new driver from our website.
1. Uninstall your old driver : Click【Start】►【Programs】►【Kanvus Tablet】►【Uninstall】
2. Download the latest version of the driver in the download section and save it onto your hard
drive.
3. Unzip the file in a folder on your hard drive (with Windows built-in unzip utility or a program like
Winzip for instance).
4. Double-click the Setup.exe in the folder where you unzipped the file.
Question : How to install a new Pad-Cover ?
Answer : Please follow the steps below.
1. Remove the device from USB port.
2. Remove the current Pad-Cover. (need some force)
3. Clean the surface with a wet cloth to keep it clean and smooth.
4. Tear off the protective film on the double-sided tape of the new Pad-Cover.
5. Put the new Pad-Cover on the tablet
58
Page 60

Question : Why can‘t I select K-WordInk or K-Command to install during installation ?
Answer : Because both K-WordInk and K-Command are for Windows 2000 or XP version only. For
Windows Vista/7 user, Windows Vista/7 has built-in Annotation function through Office 2003 / 2007
which is similar to K-WordInk, and also the built-in Pen flicks function that can perform common
actions as K-Command.
We suggest users to use the built-in applications under the Windows Vista/7 system for more
ensured compatibility.
59
Page 61

Service and Technical Support
If your tablet does not work properly, please check the Troubleshooting procedure and FAQ first.
You can go to our web site to download the latest driver/software and check the updated FAQ. If
your problem still remains unsolved, please contact our service and technical support staff.
support@kanvus-global.com
KWorld Computer Co., Ltd.
Tel : +886 2 8228 6066
6/F, No. 113, Jian 2nd Road Jhonghe City, Taipei County 235, Taiwan (R.O.C.)
http://www.kanvus-global.com/
60
Page 62

Driver Download
You can download the latest driver and e-documents from the following web sites.
http://www.kanvus-global.com/
61
Page 63

A p p e n d i x
-Declarations and Safety Statements
-Ordering Components and Accessories
-Copyright Information
-Limitation of Liability
62
Page 64

Declarations and Safety Statements
FCC
This device complies with Part 15 of the FCC Rules. Operation is subject to the following two
conditions:
(1) This device may not cause harmful interference, and
(2) This device must accept any interference received, including interference that may cause
undesired operation.
This equipment has been tested and found to comply with the limits for a Class B digital device,
according to Part 15 of FCC Rules. These limits are designed to provide reasonable protection
against harmful interference in a residential installation.
This equipment generates, uses, and can radiate radio frequency energy and, if not installed and
used in accordance with the instructions, may cause harmful interference to radio communications.
However, there is no guarantee that interference will not occur in a particular installation.
You can determine whether the equipment is causing interference by disconnecting it from your
computer. If the interference stops, it was probably caused by the equipment.
If the equipment does cause interference to radio or television, you may be able to correct the
interference by using one or more of the following measures :
1 Rotate the television or radio antenna until the interference stops.
2 Move the equipment farther away form the television or radio.
3 Plug the equipment and computer into an outlet that is on a different circuit form the television
or radio.
If necessary, consult with your dealer or an experienced radio/television technician for help.
CE
The Kanvus tablet has been tested and found to comply with the following harmonized European
Norms :
1 EN55024 (electromagnetic immunity)
2 EN55022 (electromagnetic emissions)
63
Page 65

Ordering Components and Accessories
To purchase parts and accessories, please contact your local dealer or distributor.
64
Page 66

Copyright Information
No part of this manual, including the products and software contained in it, may be reproduced,
transmitted, transcribed, stored in a retrieval system, or translated into any language in any form or
by any means, without the legal, written permission of Kworld Computer Co.LTD.
Kanvus PROVIDES THIS MANUAL “AS IS” WITHOUT WARRANTY OF ANY KIND, EITHER
EXPRESSED OR IMPLIED, INCLUDING BUT NOT LIMITED TO THE IMPLIED WARRANTIES
OR CONDITION OF MERCHANTABILITY FOR A PARTICULAR PURPOSE. IN NO EVENT SHALL
KANVUS, ITS DIRECTORS, OFFICERS, EMPLOYEES OR AGENTS BE LIABLE FOR ANY direct
or indirect, INCIDENTAL, OR CONSEQUENTIAL DAMAGES (INCLUDING DAMAGES FOR LOSS
OF PROFIT, LOSS OF BUSINESS, LOSS OF DATA, INTERRUPTION OF BUSINESS AND THE
LIKE), EVEN IF KANVUS HAS BEEN ADVISED OF THE POSSIBILITY OF SUCH DAMAGES
ARISING FROM ANY DEFECT OR ERROR IN THIS MANUAL OR PRODUCT.
Products and corporate names appearing in this manual may or may not be registered trademarks
or copyrights of their respective companies and are used only for identification or explanation and
to the owners’ benefit, without intent to infringe.
SPECIFICATIONS AND INFORMATION CONTAINED IN THIS MANUAL ARE PROVIDED FOR
INFORMATION ONLY AND ARE SUBJECT TO CHANGE WITHOUT NOTICE, AND SHOULD
NOT BE CONSTRUED AS A COMMITMENT BY KANVUS. KANVUS ASSUMES NO
RESPONSIBILITY OR LIABILITY FOR ANY ERRORS OR INACCURACIES THAT MAY APPEAR
IN THIS MANUAL, INCLUDING THE PRODUCTS AND SOFTWARE DESCRIBED IN IT.
Copyright© 2009 Kworld Computer Co. Ltd. All Rights Reserved.
65
Page 67

Limitation of Liability
Circumstances may arise where because of a default on Kanvus part or other liability, you are
entitled to recover damages from Kanvus. In each such instance, regardless of the basis on which
you are entitled to claim damages from Kanvus , Kanvus is liable for no more than damages for
bodily injury (including death), damage to real property and tangible personal property; or any other
actual and direct damages resulted from omission or failure in performing legal duties under this
warranty statement, up to the listed contract price of each product.
Kanvus will only be responsible for or indemnify you for loss, damages or claims based on contract,
tort or infringement under this Warranty Statement.
This limit also applies to Kanvus suppliers and its distributors. It is the maximum for which Kanvus,
its suppliers, and its distributors are collectively responsible.
UNDER NO CIRCUMSTANCES IS KANVUS LIABLE FOR ANY OF THE FOLLOWING :
(1) THIRD-PARTY CLAIMS AGAINST YOU FOR DAMAGES;
(2) LOSS OF, OR DAMAGE TO, YOUR RECORDS OR DATA; OR
(3) SPECIAL, INCIDENTAL, OR INDIRECT DAMAGES, OR FOR ANY ECONOMIC
CONSEQUENTIAL DAMAGES (INCLUDING LOSS OF PROFITS OR SAVINGS), EVEN IF
KANVUS, ITS SUPPLIERS OR DISTRIBUTORS ARE INFORMED OF THEIR POSSIBILITY.
66
 Loading...