

Page 1

HyperMedia Software User Manual
Contents
V1.2
Chapter 1 : HyperMedia software functions .............................................................................2
Chapter 2 : STVR......................................................................................................................3
2.1 System setting and channel setting...............................................................................3
2.2 Main panel.................................................................................................................... 6
2.2.1 Channel list......................................................................................................... 7
2.2.2 Information window ........................................................................................... 7
2.2.3 Basic tool ............................................................................................................ 7
2.2.4 Input source ........................................................................................................ 7
2.2.5 Volume adjust .....................................................................................................7
2.2.6 Basic Function.................................................................................................... 8
2.2.7 Record, Playback ,Time Shifting........................................................................ 8
2.3 Scheduled Recording.................................................................................................. 10
2.3.1 Capture..................................................................................................................... 10
2.3.2 Time option.............................................................................................................. 10
2.4 Setup utility for HyperMedia...................................................................................... 12
2.4.1 Channel setup properties ......................................................................................... 12
2.4.2 Capture setup properties..........................................................................................12
2.4.3 V ideo setup properties............................................................................................. 13
2.4.4 Other setup properties.............................................................................................. 13
2.5Channel preview..........................................................................................................14
2.6Snapshot....................................................................................................................... 14
2.7Sleeping Timer............................................................................................................. 14
2.8EPG.............................................................................................................................. 15
2.9Pop-Up menu............................................................................................................... 15
2.10Teletext ...................................................................................................................... 16
Chapter 3 : FAQ....................................................................................................................... 17
FAQ 1 : How to use the “Scheduled Recording in Power-Off mode (SRPO)” function?17
1
Page 2

Chapter 1 : HyperMedia software functions
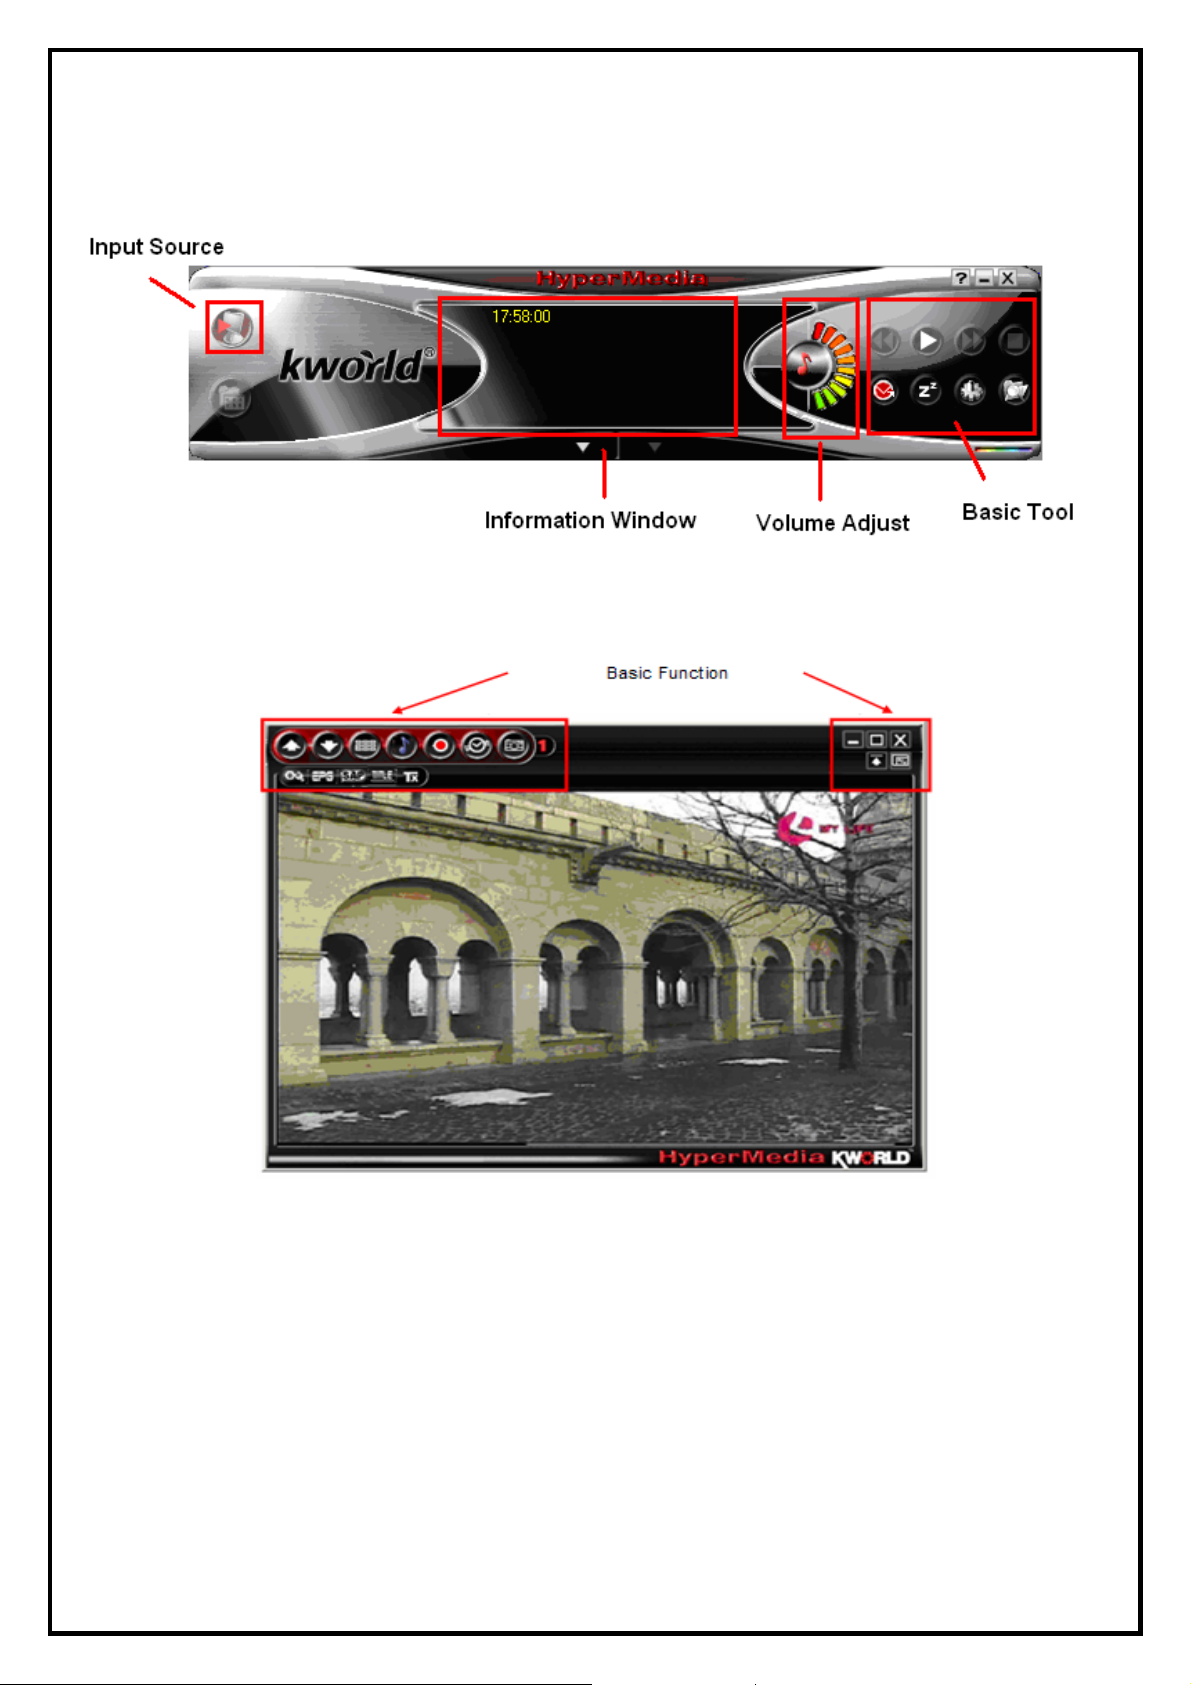
When using HyperMedia, There are some different functions to choose from. Picture below is an example of
how the interface looks like and a short description of each function.
• Input Source : STVR turns your PC into a full-featured video recorder.
2
Page 3
Chapter 2 : STVR
STVR is a powerful and easy-to-use TV application which includes feature-rich video/audio entertainment
functions. STVR provides a convenient way to watch and record digital terrestrial TV programs or video on
your PC and also allows you to playback recorded TV or video files. You could also listen to digital radio
broadcasts (NOT DAB) under radio mode if it is included in your model.
2.1 System setting and channel setting
When executing STVR at first time, TV Setup Wizard will help you to set your TV configurations step-by-
step.
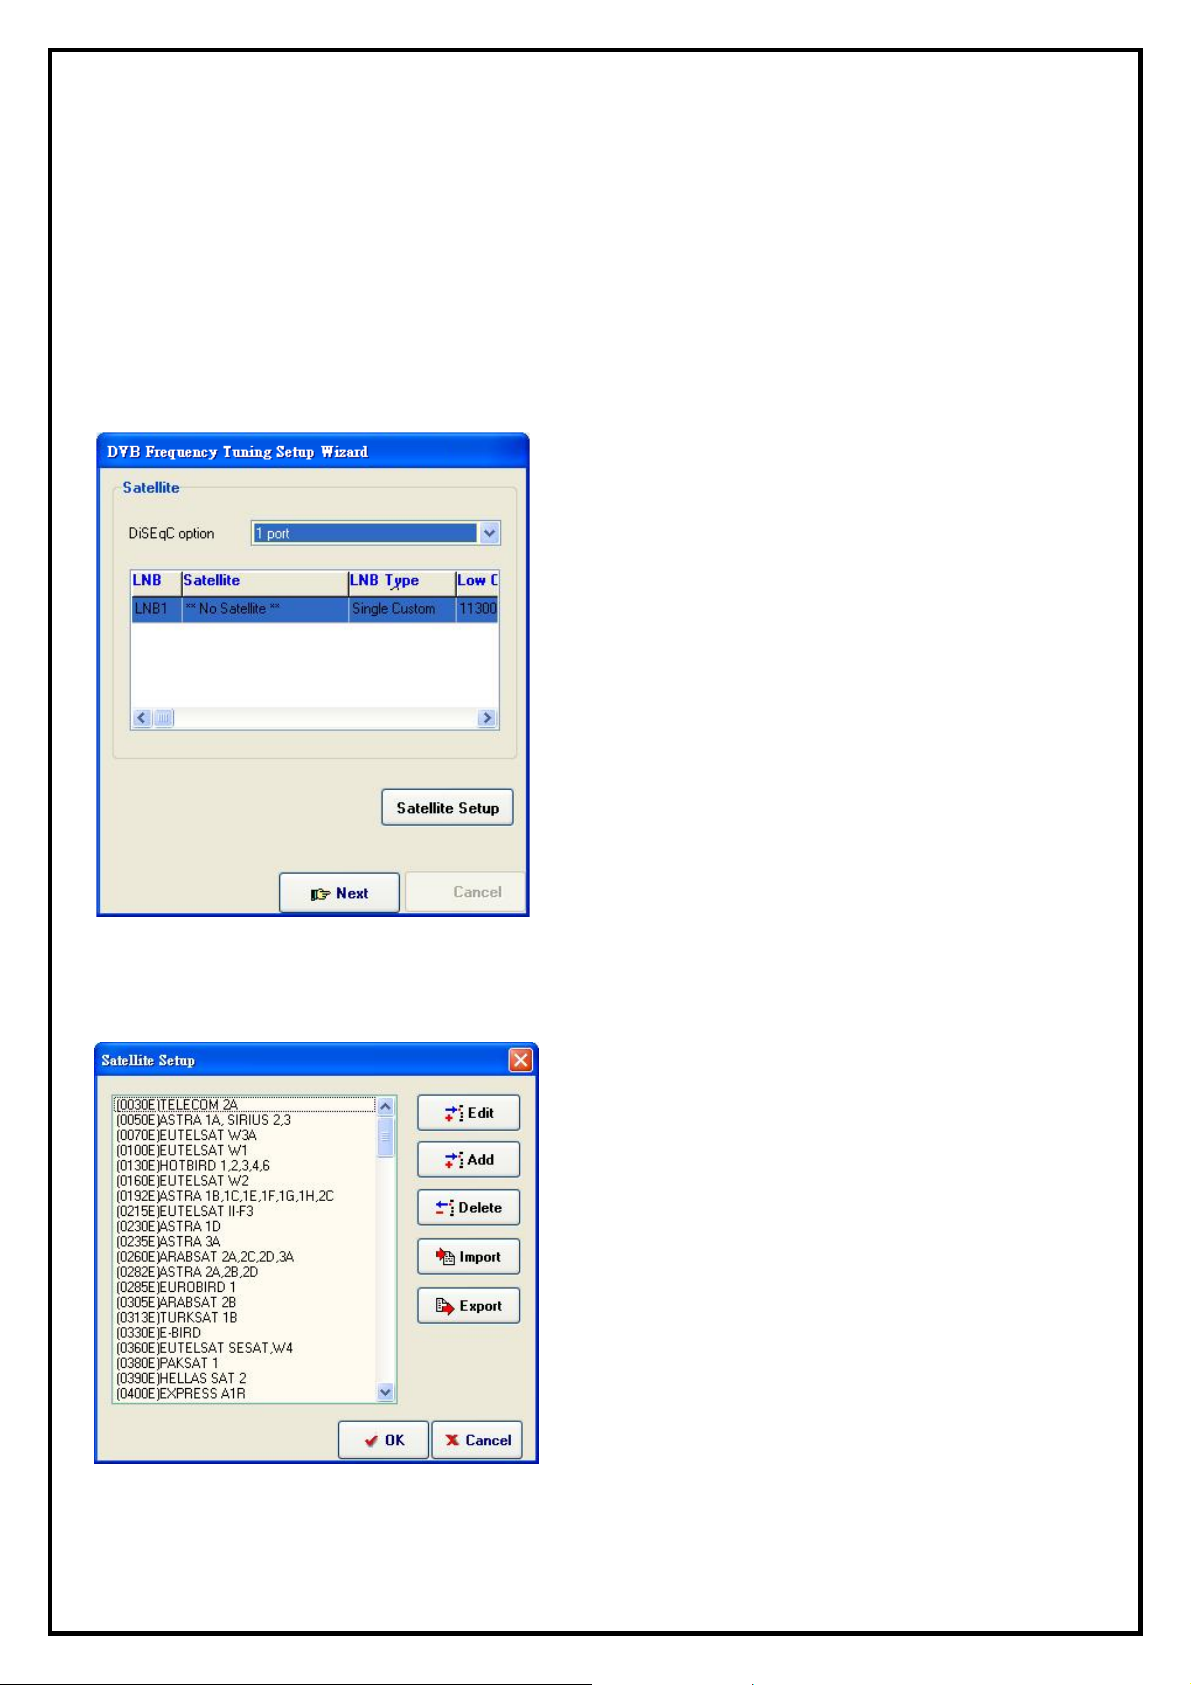
1. Please use the “Satellite Setup” utility to set up your
satellite parameter. Double click on “LNB1” to input
your satellite setting. (Note: If you are using DiSEqc
switch, select the amount of satellites you have
connected from drop down option list next to
“DiSEqc option”. If you using four port DiSEqc
switch, for example, you will have to select “4 port”
and enter the relative parameters of each satellite.)
2. Click “Satellite Setup” button then you will see
“Satellite Setup” frame like the one on the left. You
can Edit/Add/Delete satellite information. Satellite
information includes satellite name, longitudinal
position, latitudinal position and its default frequency
table. Double click on any satellite to edit/add/delete
the frequency table and consequent parameters.
3
Page 4
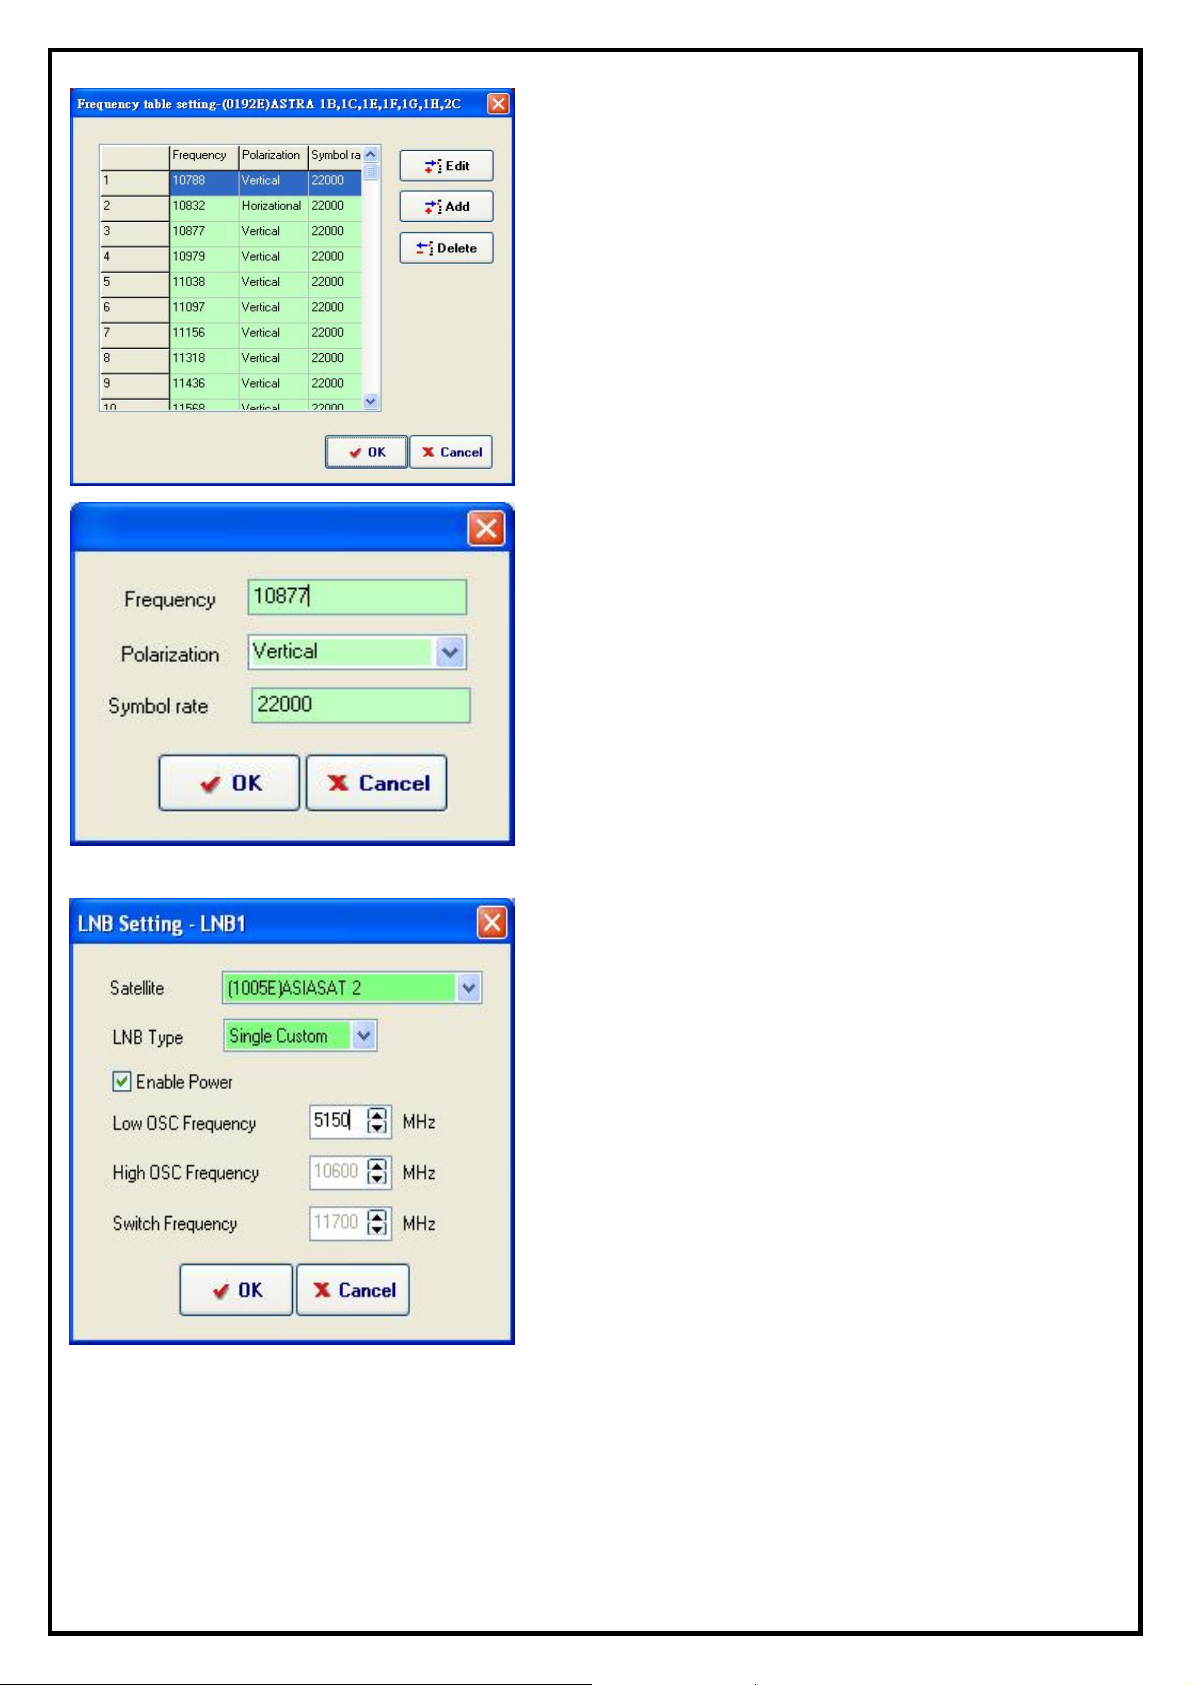
. Default frequency table in “Frequency table setting”
3
is assigned only for auto-scan option. Otherwise, users
must assigned a frequency scanning range for each
channel. Auto-scan wizard will scan all frequencies
based on the default frequency table.
. Double click on any column to add/edit/delete default
4
frequency table. The “Frequency table setting” will
guide you through to either add/edit/delete consequent
parameters.
. Please select the satellite which you have and enter the
5
relative frequency value for LNB.
z ch your satellite dish
Satellite: Select the satellite in whi
is aiming at. (Here we use ASIASAT2 as an example)
z
LNB Type: There are four LNB types to choose from.
a. Universal
b. Normal
c. Signal Cus
d. Dual Custom
z E b Turns on LNB power of satellite
ote: For information of LNB settings, please check with your dish provider to get the correct information.
N
na le LNB Power:
dish.
tom
4
Page 5
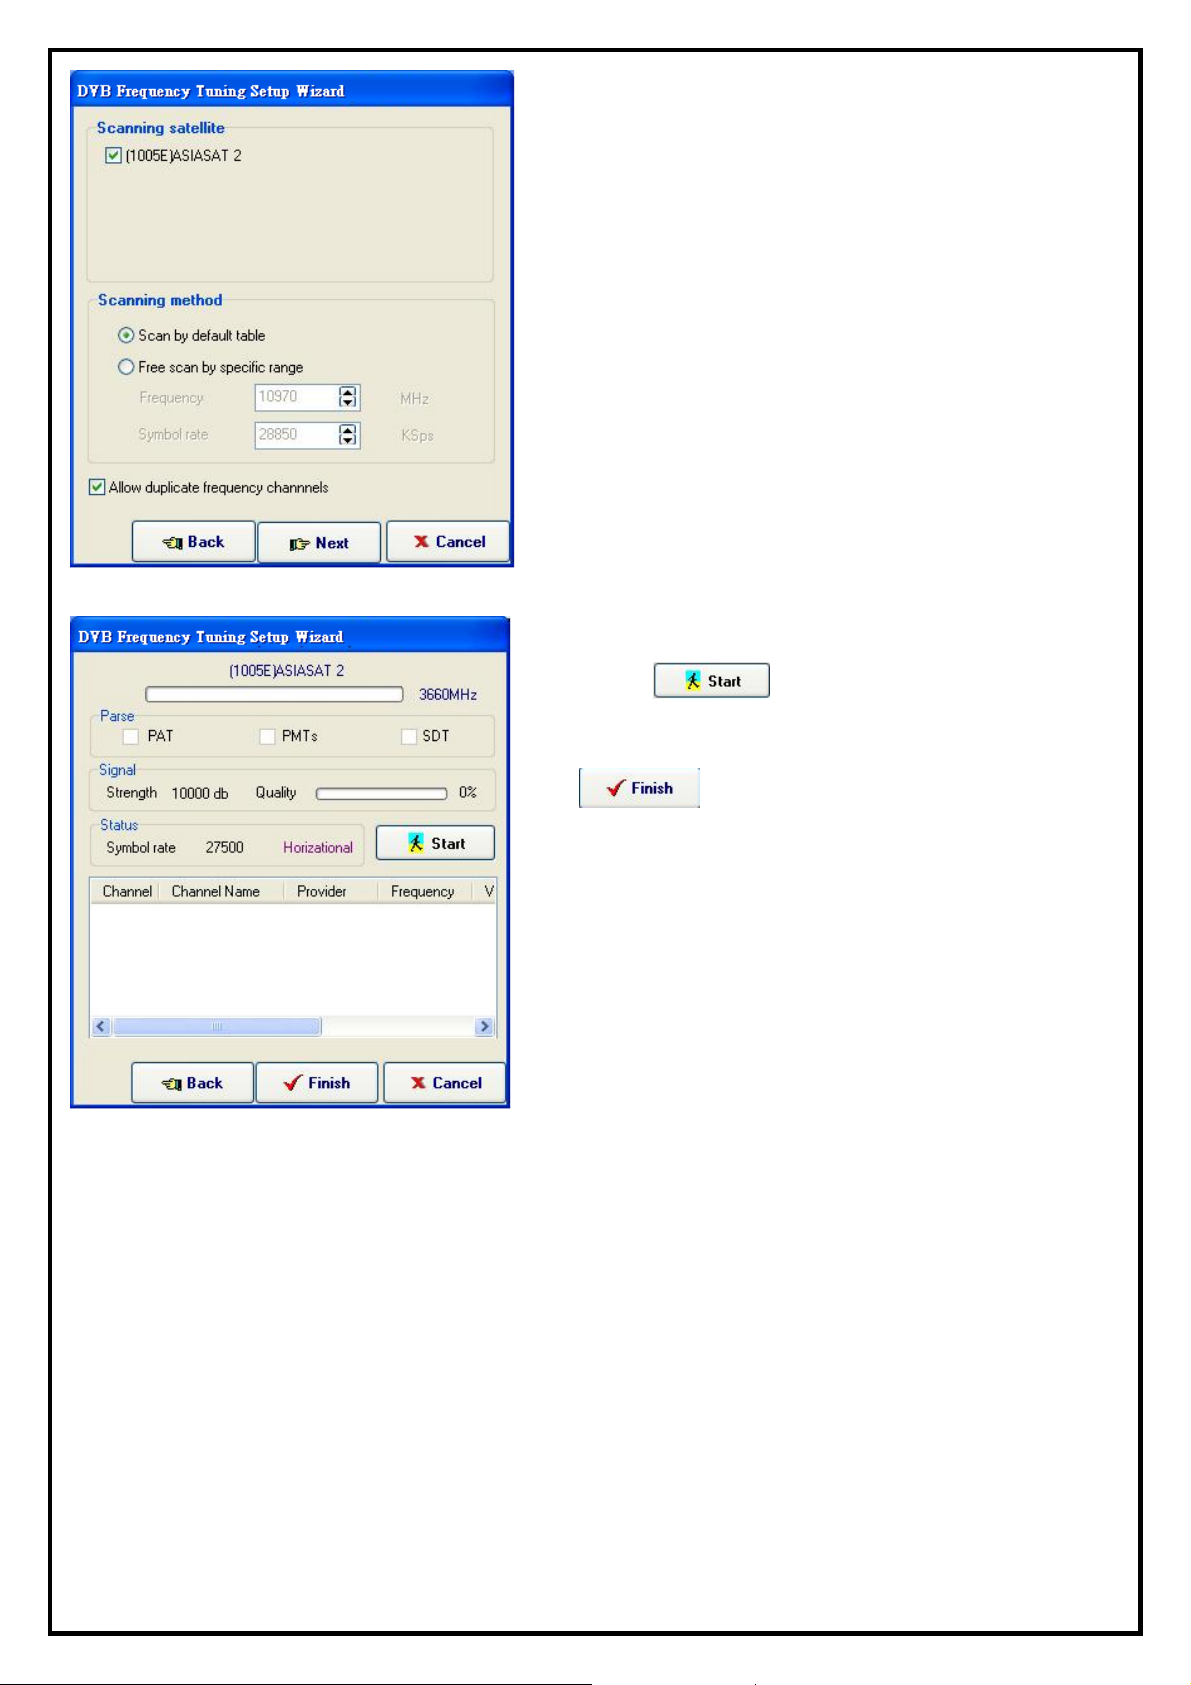
Scanning Satellite: Check the box next to the satellite
6.
you want to scan. If you have selected more than one
satellite, please also check the box next to its name.
Scanning Method: Choose either “Scan by defa
table” with the default frequency table or “Free scan
by specific range” to enter the specific Frequency
range and Symbol rate manually.
Allow duplicate frequency cha
option will list the entire TV channels even if different
channels are using the same name.
7. Click
channels. When finish with channel scan, please click
to end and exit Frequency Setup Wizard.
button to start scanning TV
nnels: Enabling this
ult
5
Page 6
2.2 Main panel
Preview window size can be adjusted by mouse or double click to switch to full-screen. There are six major
functions of STVR.
6
Page 7

2.2.1 Channel list
The channel list shows you the channels that you have scanned. You can
sort it by “All Channels”, “TV Channels”, “Radio”, “FTA TV
Channels” and “Scrambled TV Channels”.
2.2.2 Information window
Displays the current time, current status (Live, REC, Playback, Time Shifting), video format of the channel,
recording file size, recording time, channel station.
2.2.3 Basic tool
There are 8 sub functions, refer to the following table for icon definition.
Backward
Play
Forward
Stop
Scheduled recording
Sleeping Timer
Setup
Open Media File
2.2.4 Input source
There is one video input sources to select “DVB-S”. Input source can be opened or closed.
2.2.5 Volume adjust
: Volume increase
: Volume decrease
: Mute sound
7
Page 8

2.2.6 Basic Function
Next channel Snapshot
Previous channel Setup
Channel Preview EPG
Mute SAP
Start Capture Subtitle
Time shifting Teletext
2.2.7 Record, Playback ,Time Shifting
1. Record function
Any current live video can be recorded by clicking the record button, on Control Panel or choose
"Record" in popup menu. To stop recording, simply click the “Stop” button on Control Panel or
choose "Stop" in popup menu to stop current recording. Recorded files can be reviewed in the playback list
after recording.
2. Playback function
By clicking the “Play” button, on control panel or choose "Play" in popup menu to playback any
recorded files. A playback dialog which shows all recorded video files and all recently played files will pop
up. More than one video/Audio files from either recorded file or files of your own collections can be entered
into a play list.
Button definition:
•
: Play
: Backward •
•
: Stop
: Forward •
8
Page 9

To add a selected item to the Play list. Double-click the selected item.
Delete the selected item.
Delete all items.
Rename the selected item.
Import file(s) to the play list.
Clear all items on the play list.
3.Time-Shifting function
Time-Shifting can be done during live mode by clicking on control panel or choose "Time-Shifting"
in popup menu. In Time-Shifting mode, simply click on control panel or choose "Play" in popup menu
to go forward and watch the channel from where you left. Click
popup menu to stop Time-Shifting. During Time-Shifting mode, you can switch from current video to
Time-Shifting video window and vice versa by choosing "Real Screen" in popup menu.
on control panel or choose "Stop" in
9
Page 10

2.3 Scheduled Recording
To setup a scheduled recording, click from the control panel to enter the “Scheduled Recording
Agent” properties window.
2.3.1 Capture
Capture Source: Choose the input source where you
want to capture from.
Channel: Select the channel to record from.
Capture format (profile): Choose the desired file format
for saving the recorded file.
Capture size: Choose the frame size of the recording file.
Bit rate (Kbps): Choose the recording bit rate.
Capture quality: Choose the capture quality.
Frame rate: Choose the number of frames per second for
the recording schedule.
Capture audio option: Four options to choose from,
"Capture audio", "Capture audio only, No video" or
"No audio".
File name option: Use the “date/time” as the default file
name for recorded video files or define a different name.
2.3.2 Time option Current time: Shows the current time. Starting time: Date and time of the set schedule recording event. Duration: Time length of the set schedule recording event. Recording rule: Enter the recording rule for the schedule recording. The default value is "Once only"
When a recording schedule is entered, the entered
recording schedule will be shown in the table like the
one on the left.
Insert: Inserts a new recording schedule record.
Edit: Edit a recording schedule record.
Delete: Delete a recording schedule records.
Delete All: Delete all the recording schedule from the
list.
Start Power-off Schedule : This function allows users
to turn off the system immediately and it will turn your
PC back on automatically few minutes prior to the
schedule recording.
10
Page 11

Note: To enable this function, please first enable
“Hibernate” function in the windows power
management configuration (Please refer to Chapter 3
FAQ 1).
The “Today To-do List” frame shows all of the
recording schedules set for today.
If any recording schedule had failed, an error message
will be created automatically into the “Log” frame.
Output folder: A different directory can be chosen to
save the recorded files.
Auto-execute at start up: Enable this option in order
when a schedule recording is finished.
11
Page 12

2.4 Setup utility for HyperMedia
The setup utility will be different for different video sources and will display different video interfaces.
2.4.1 Channel setup properties
z LNB: Reset LNB setting.
z EDIT: Edit a particular channel by manual.
z Delete: Delete a TV channel from your channel list.
z Auto Scan: Click the button to start Auto-scan function.
z Import: Import a TV channel from a saved channel list.
z Export: Export current channel list and save it to a hard
disk.
z Update Channel: Please select the channel you want to
see and click “Update Channel” to change it.
2.4.2 Capture setup properties
z Capture format(profile): When you select the DVB-S
as the capture source, you can use MPEG2 PS,TS as
capture format.
z Capture location: Setting your capture folder.
z Capture filename: Setting your capture file name. You
can choose “User date/time” as filename or define by
yourself.
z Enable time limit: To limit your record time.
Note:
PS format: Will record the current TV channel you are watching
TS format: Will record all of the TV channels in the same transponder setting.
12
Page 13

2.4.3 Video setup properties
Color:
Adjusts the brightness, contrast, hue and saturation
adjustment. You can change each scroll independently to
view the effect.
Default: Click to return to the default settings
2.4.4 Other setup properties
Preview
z Display Aspect Ratio: Set the aspect ratio of the
display window (Free, 4:3 or 16:9)
z Enable DXVA: DXVA (DirectX VA) is the new
Microsoft standard API for accelerating video
rendering under DirectShow. If your VGA card
supports hardware that can accelerate MPEG2
video playback, please enable this function for
better video playback performance, and reduce the
amount of CPU usage. Your display window will
be smoother when you enable this function.
z Enable VMR: If your VGA card supports VMR,
please use it as the display mode. If your VGA card
doesn’t support VMR, please disable this function.
OSD
z Enable OSD: Enables OSD function.
z Set OSD display color: Set the On Screen
Display’s font color.
z Preview time interval: Setting the interval time. The minimized value is 8 seconds.
z Preview dimension: To select the Preview dimension as 2x2, 3x3, 4x4 or 5x5.
Continuous shooting
13
Page 14

z Total pictures: Setting the total pictures.
z Time interval: Setting the interval time. The minimized value is 200 m seconds.
Teletext
z Country: Setting the country.
2.5Channel preview
Click from the control panel or choose "Channel Preview" on popup menu.
While in channel preview mode, use the arrow
keys on the keyboard and press “Enter” or
double click the left button on the mouse to
exit the preview mode and watch the selected
channel.
2.6Snapshot
Snapshots (still image capture) can be taken from current viewing window by clicking from the control
panel or choose "Snapshot" in popup menu. The Snapshot window will pop up when a snapshot is taken.
Here, users can view, save or delete images taken.
Note: The captured images can be saved in either bitmap or JPEG file format when saving the file.
2.7Sleeping Timer
is selected, you can use “Sleeping Timer” function. If
After you select the button, you would see the dialog box as below:
You can use slide bar or left and right key to adjust the timer
value, click “OK” to start or “Cancel” to exit.
14
Page 15

2.8EPG
Click on the EPG icon and it will pop up as shown in the window below.
You will see the information provided by the TV supplier in the message window.
2.9Pop-Up menu
When running STVR, you can move the cursor onto the display window or control panel and right-click the
mouse for the menu to pop-up. This menu will also appear when you press the [F12] key on your keyboard.
The commands on this right-click menu are the same as those on the STVR control panel, along with some
extra options added.
z Always On Top - Set display window to topmost
z Display Aspect Ratio - Sets the aspect ratio of the display window (Free, 4:3
or 16:9)
z Full Screen - Switch to full screen or restore to normal window
z Previous Channel - Go to previous available channel
z Next Channel - Go to next available channel
z Recall Channel - Go back to last selected channel
z Channel Preview - Browse available channels as sub-window
z Capture - Start recording video
z Time shifting - Start time shifting
z Snapshot - Capture still images of current picture
z Setup - Open STVR setup window
z Teletext - Use the Teletext function
z EPG - Use the EPG function
15
Page 16

2.10Teletext
When watching the STVR, you can execute the Teletext function to get a lot of information. There are two
modes you can choose. Click once, you can see the STVR and Teletext at POP mo de . Click twice, you can
see the full screen of Teletext. During operation, You just use mouse to control. It’s so friendly function that
KWorld has.
Teletext file Next Page
Next Channel Previous page
Previous Channel Next subpage
Home page Previous subpage
16
Page 17

Chapter 3 : FAQ
FAQ 1 : How to use the “Scheduled Recording in Power-Off mode (SRPO)” function?
ANS: Before you use the power-off scheduled recording function, please make sure your system can support
hibernate function.
Enter to the “Display Properties” and choose “Screen
Saver”.
Click the “Power” button to and enter to the “Hibernate”
function. You would see the option “Enable hibernate
support”. Check the box to activate the settings of
“Scheduled Recording in Power-Off” function.
Click on to start setting the Schedule Recor
Properties. After you finish the setting, please cl
“OK” to the next step.
Then you would see your setting in the schedule. If you want
to use power-off schedule recording now, click on the
“Start Power-off Schedule” button. A confirmation
message will pop up to confirm if you want to shutdown
system. If you click “YES”, the system will shutdown
ding
ick the
immediately. PC will be turned back on automatically few
minutes prior to the recording schedule.
.
17
 Loading...