

Page 1

GM220 User Manual
Catalog
Chapter 1: Hardware Connection............................................................................................................2
Chapter 2: Software Installation..............................................................................................................6
Chapter 3: How to use TiVme?..............................................................................................................11
3.1 Activating TiVme.......................................................................................................................11
Chapter 4: TiVme function Overview....................................................................................................15
4.1 Instruction the main icon of the control panel........................................................................15
4.2 Normal Mode .............................................................................................................................16
4.3 Control Buttons on the Window...............................................................................................16
4.4 Snapshot .........................................................................................................................16
4.5 Capture ............................................................................................................................17
4.6 Video Setting ...................................................................................................................20
4.7Display Ratio ...................................................................................................................20
4.8 OSD ..................................................................................................................................21
4.9 Schedule Record .............................................................................................................21
4.10 Playback ........................................................................................................................24
4.11 Setup ..............................................................................................................................27
4.12 The Tool Menu.........................................................................................................................32
Chapter 5: Appendix ..............................................................................................................................34
1
Page 2

Chapter 1: Hardware Connection
Basic Connection:
a. Video Input: Connect your Video Source machine and GM220 by the YPbPr/S-Video/Composite
Cable.
b. Video Output: Connect your TV monitor and GM220 by the YPbPr/S-Video/Composite Cable if you
want to show the video on the TV monitor and desktop/laptop in the same time.
c. USB Connection: Connect the desktop/laptop and GM220 by the USB Cable.
The below connection diagrams are the YPbPr/S-Video/Composite connection, please connect the
GM220 with your desktop/laptop and TV monitor.
2
Page 3
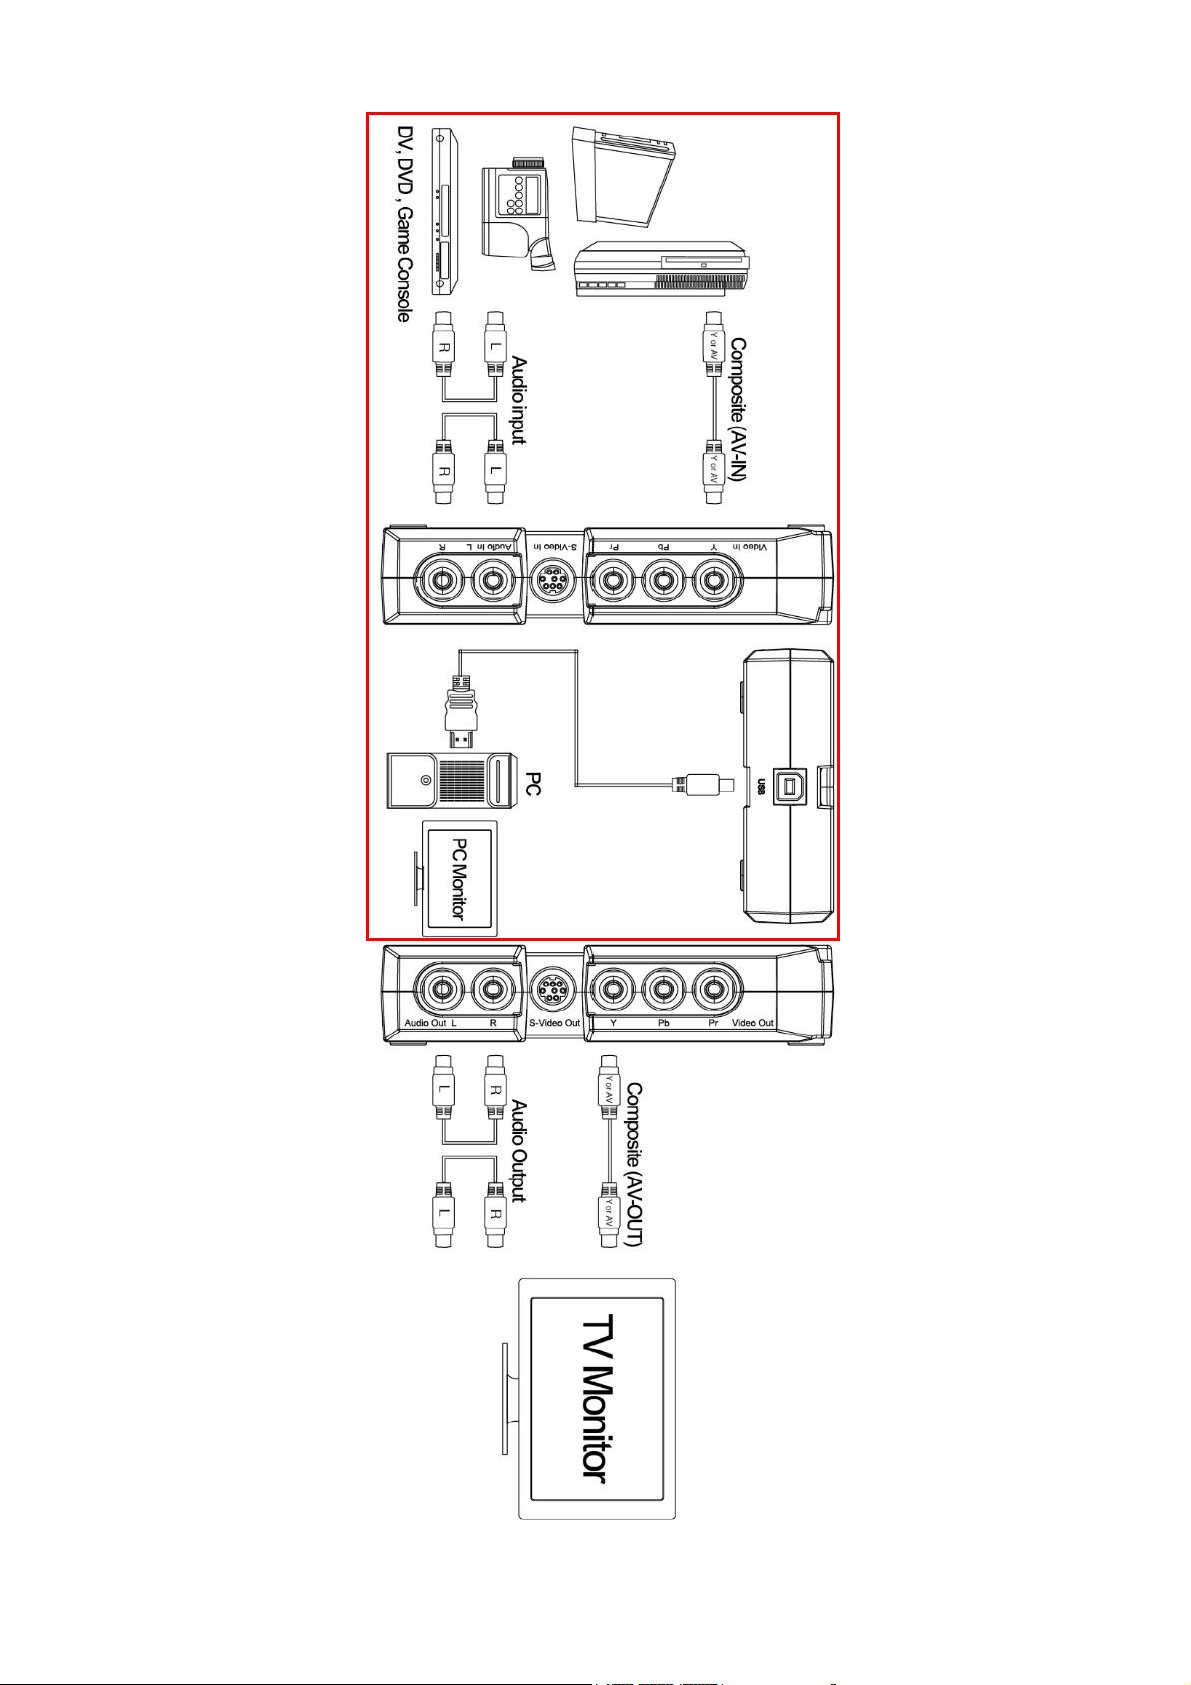
Composite Connection:
3
Page 4
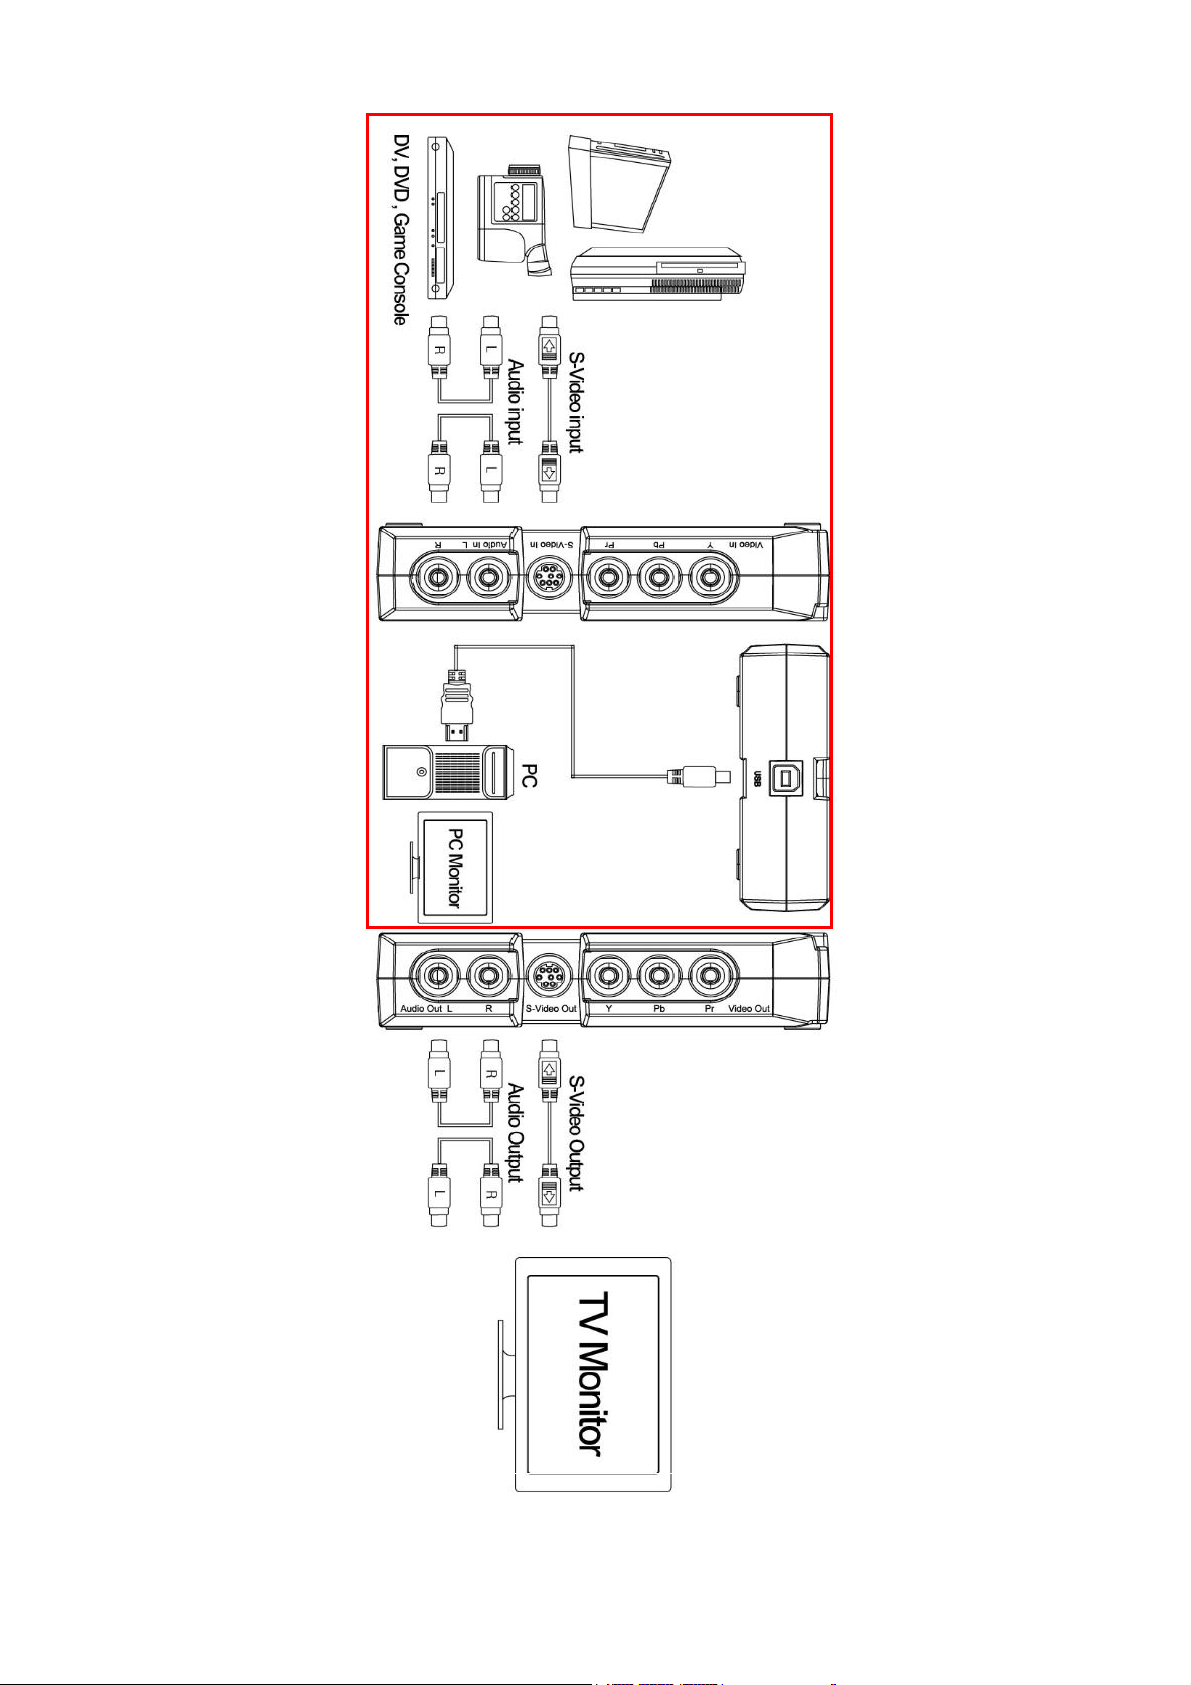
S-Video Connection:
4
Page 5
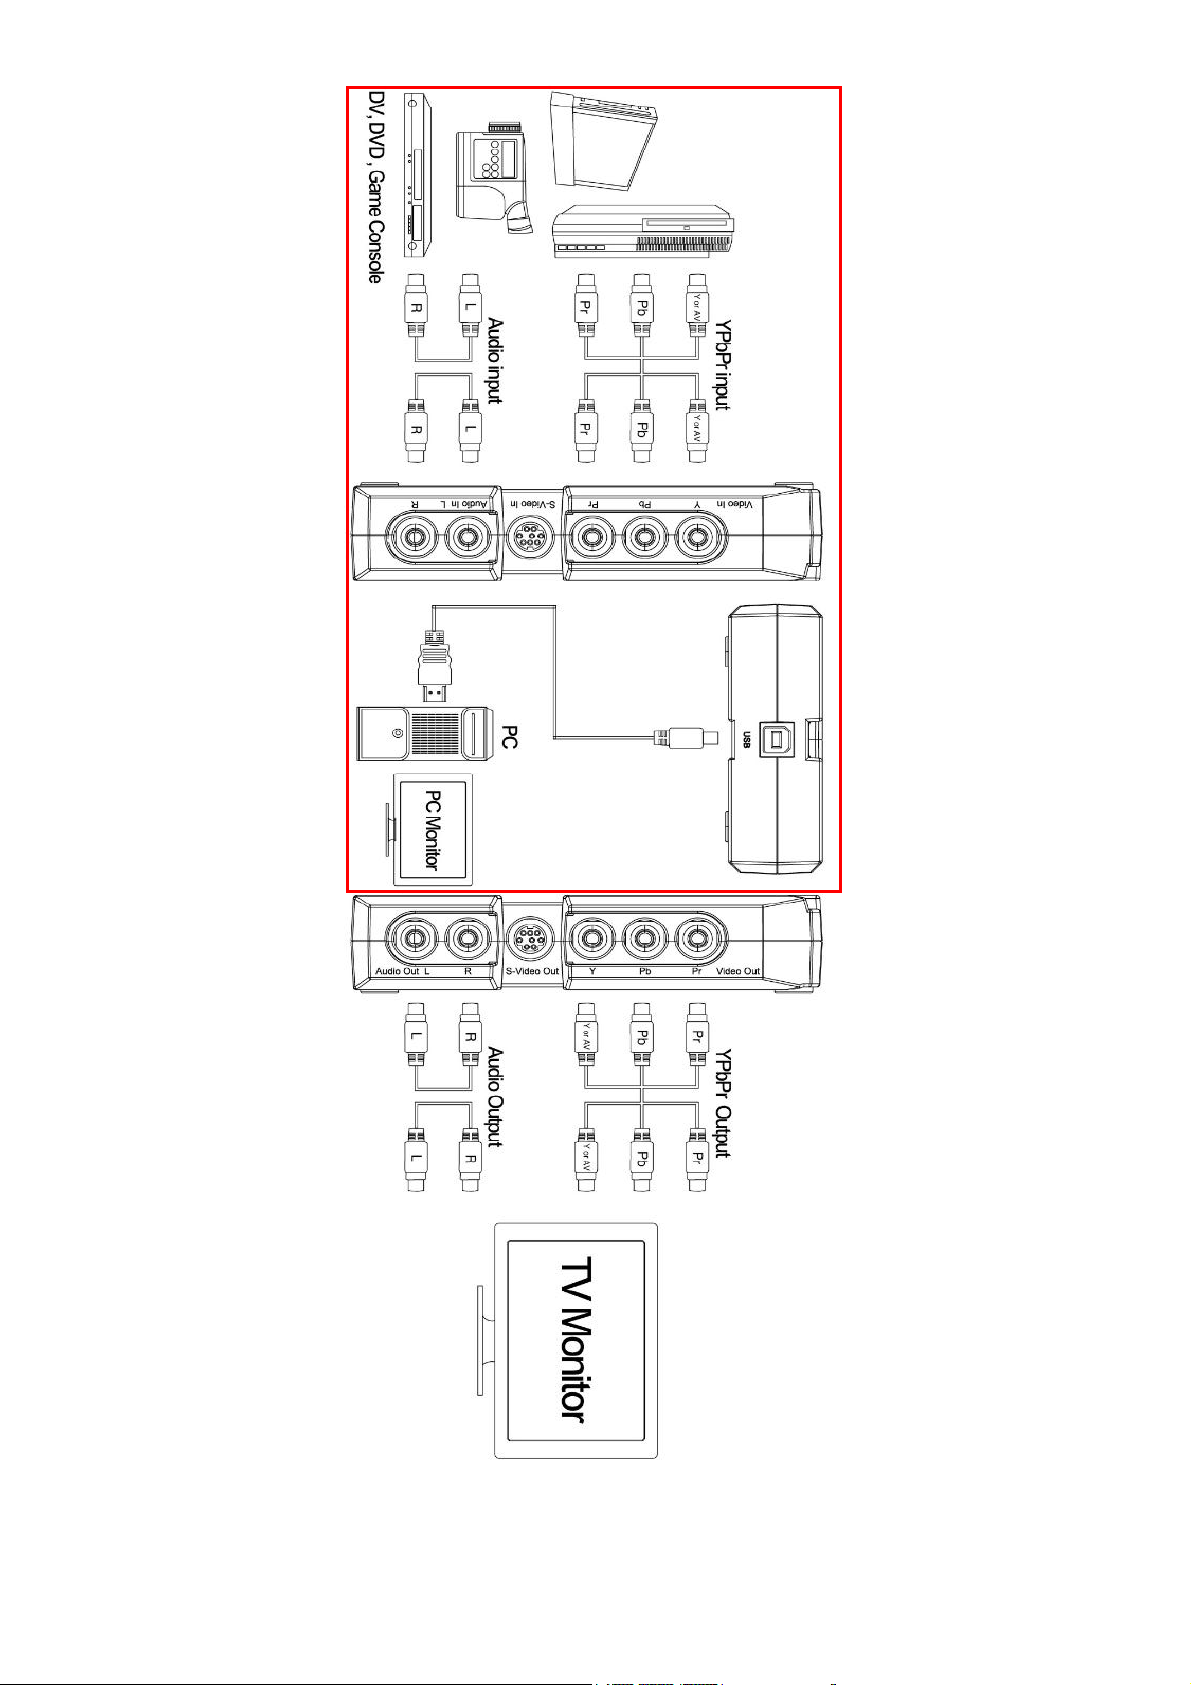
YPbPr Connection:
5
Page 6
Chapter 2: Software Installation
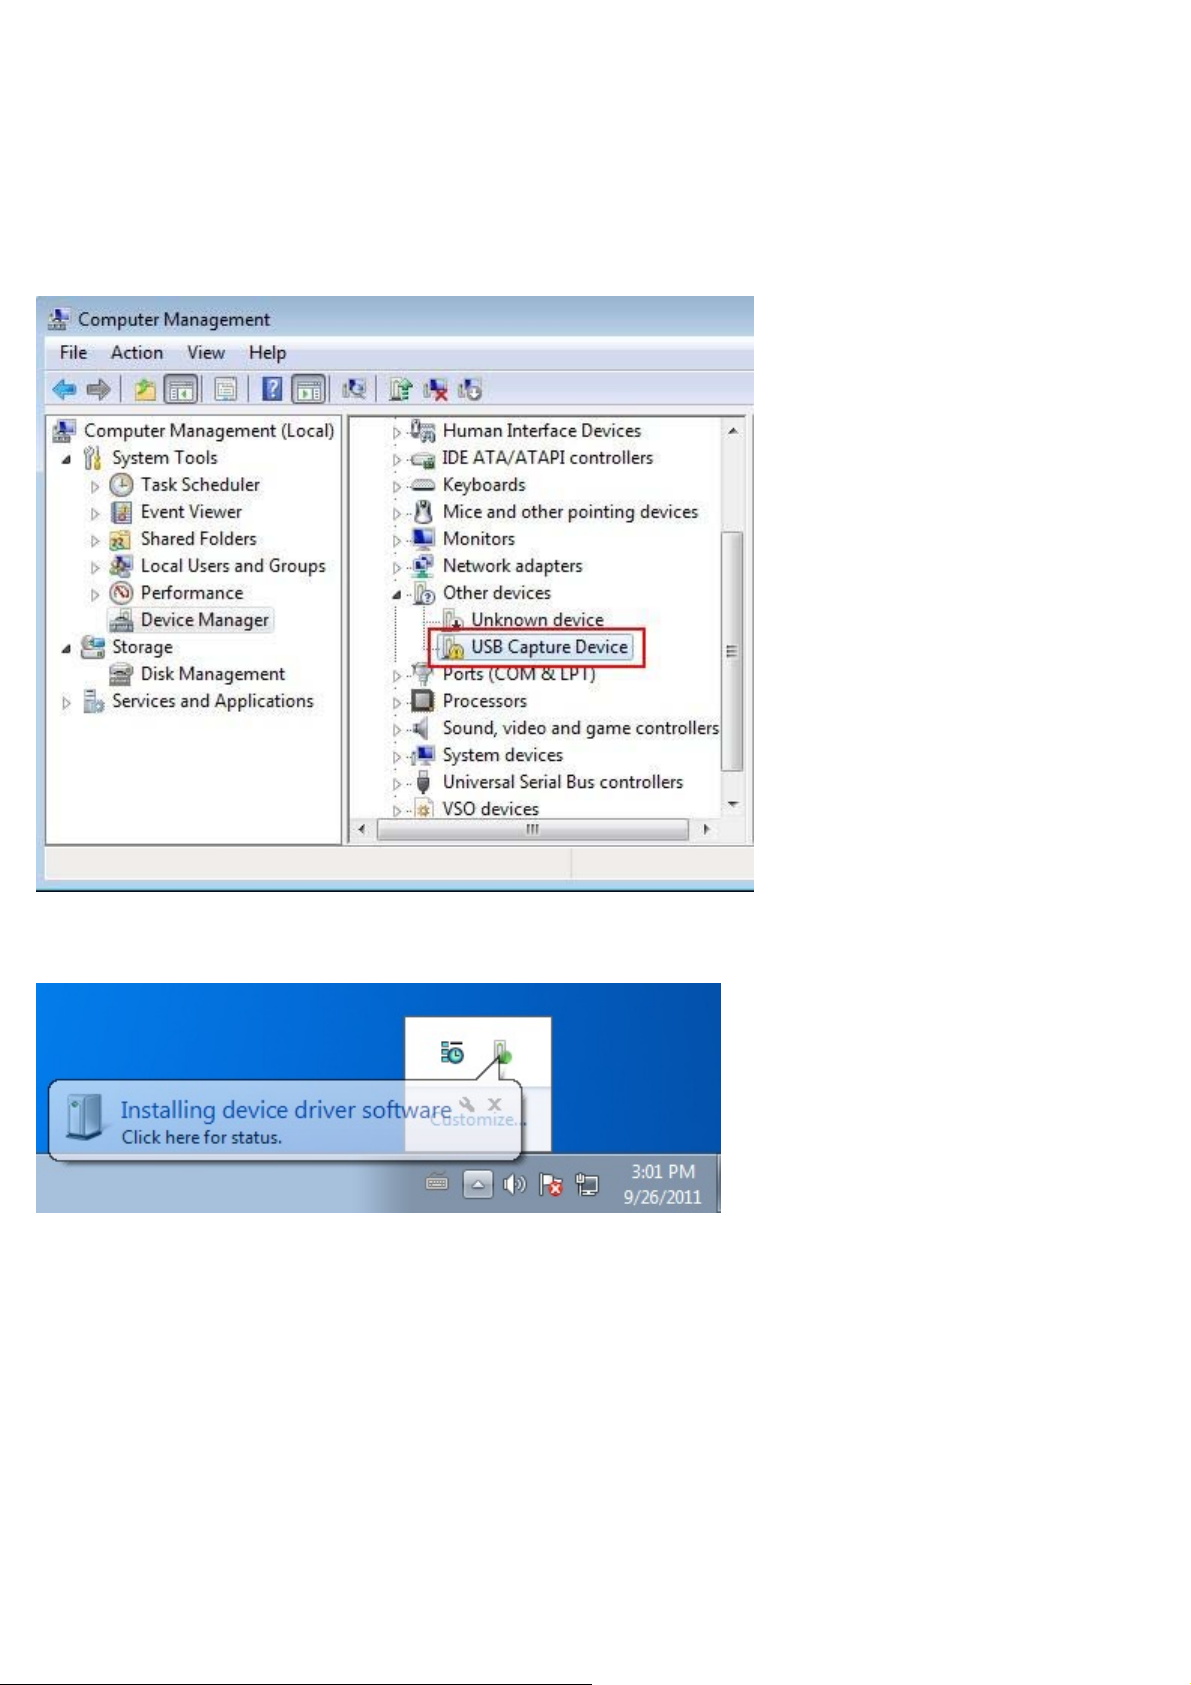
Step1.
(1) First, please check GM220 whether has been connected in USB port of desktop/laptop and detected in
the『Device Manager』list before the start of software installation. (Figure1)
(2) You can close the dialog window first (Figure2) while the system detects GM220 at the lower right
corner.
(Figure1)
(Figure 2)
Step2.
(1) Please wait for the installation screen to appear after you insert the installation DVD into your
DVD-ROM.
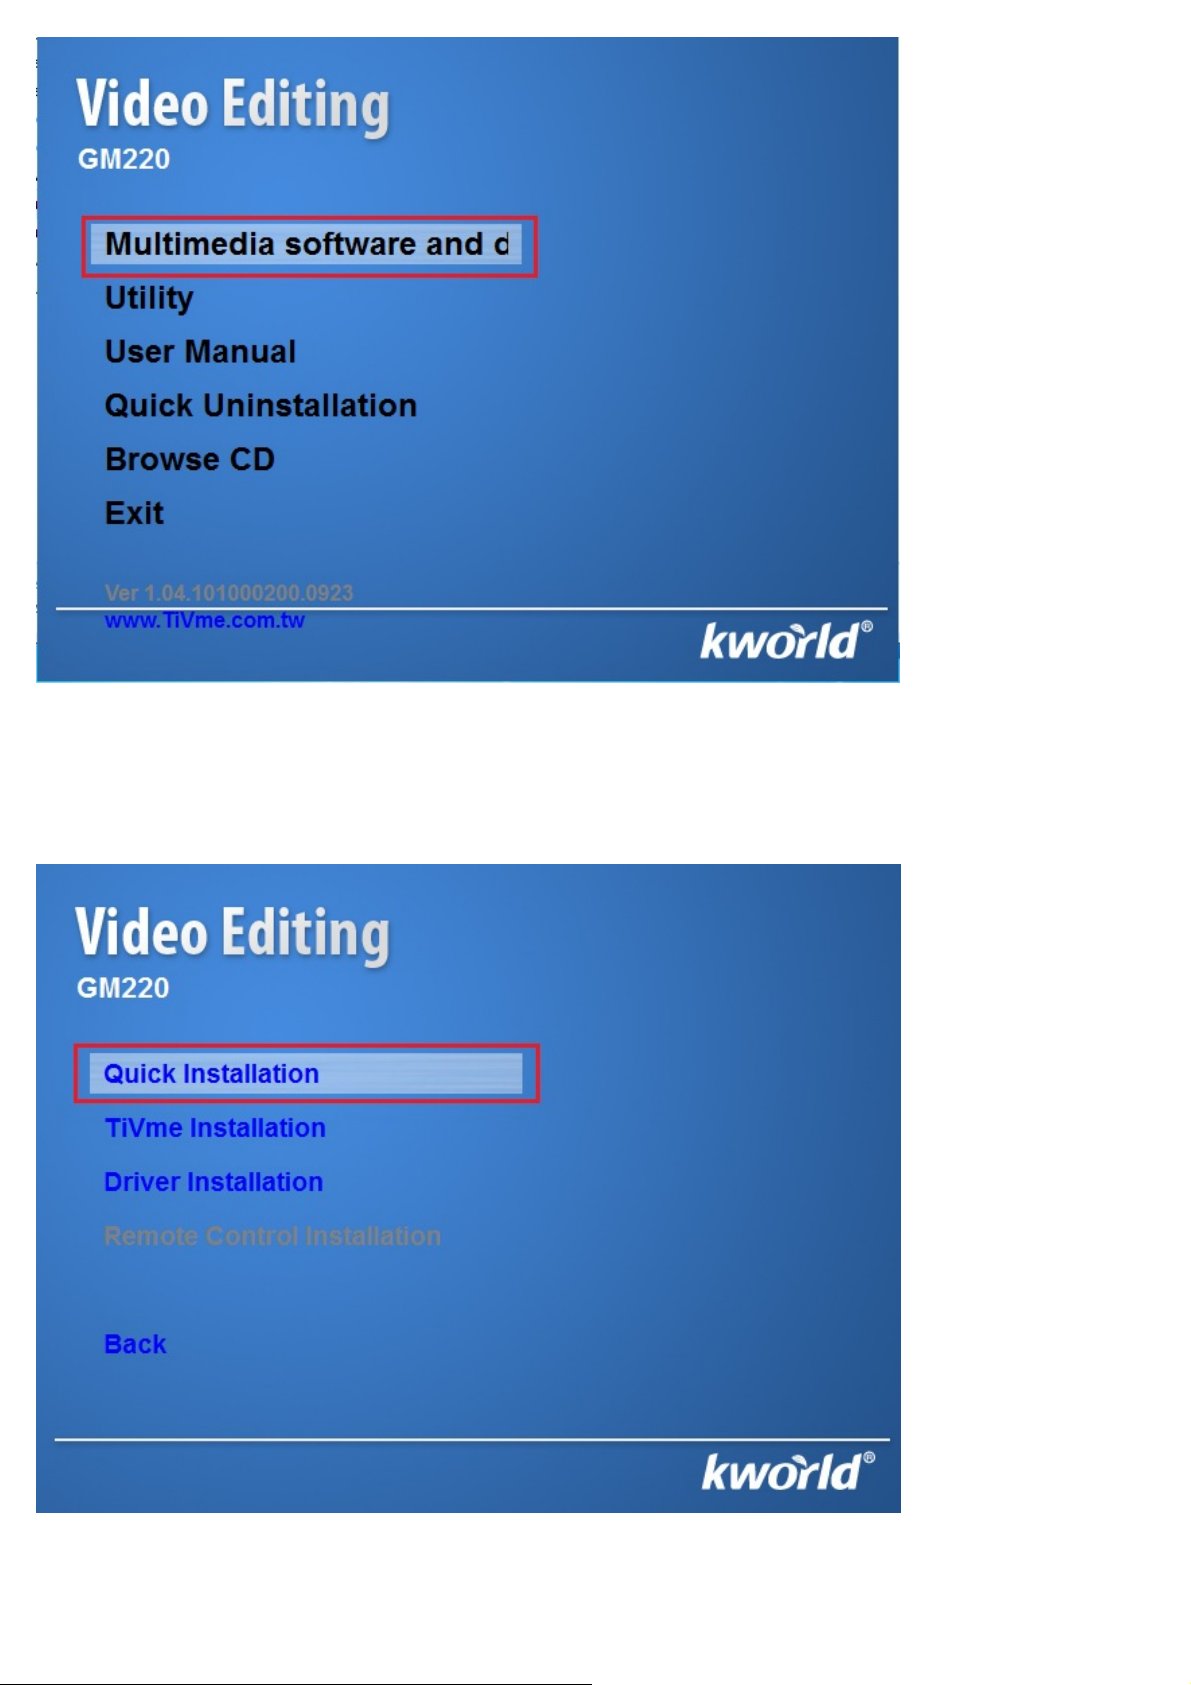
(2) The installation screen will appear and recommend to choose “Multimedia software and driver”.
For advanced users, they can skip to the “Utility” to install the software and program individually.
6
Page 7
Attention: Advanced users who wish to install the software and program must install
“Microsoft.Net Framework 3.0” or above first in order to install the TiVme.
(3) You will see the list of installation options at the left side of window which recommend to click the
“Quick Installation”. “Quick Installation” will install all the necessary programs and software for you.
You can install TiVme、Driver and other 3
rd
party software individually up to your request.
7
Page 8
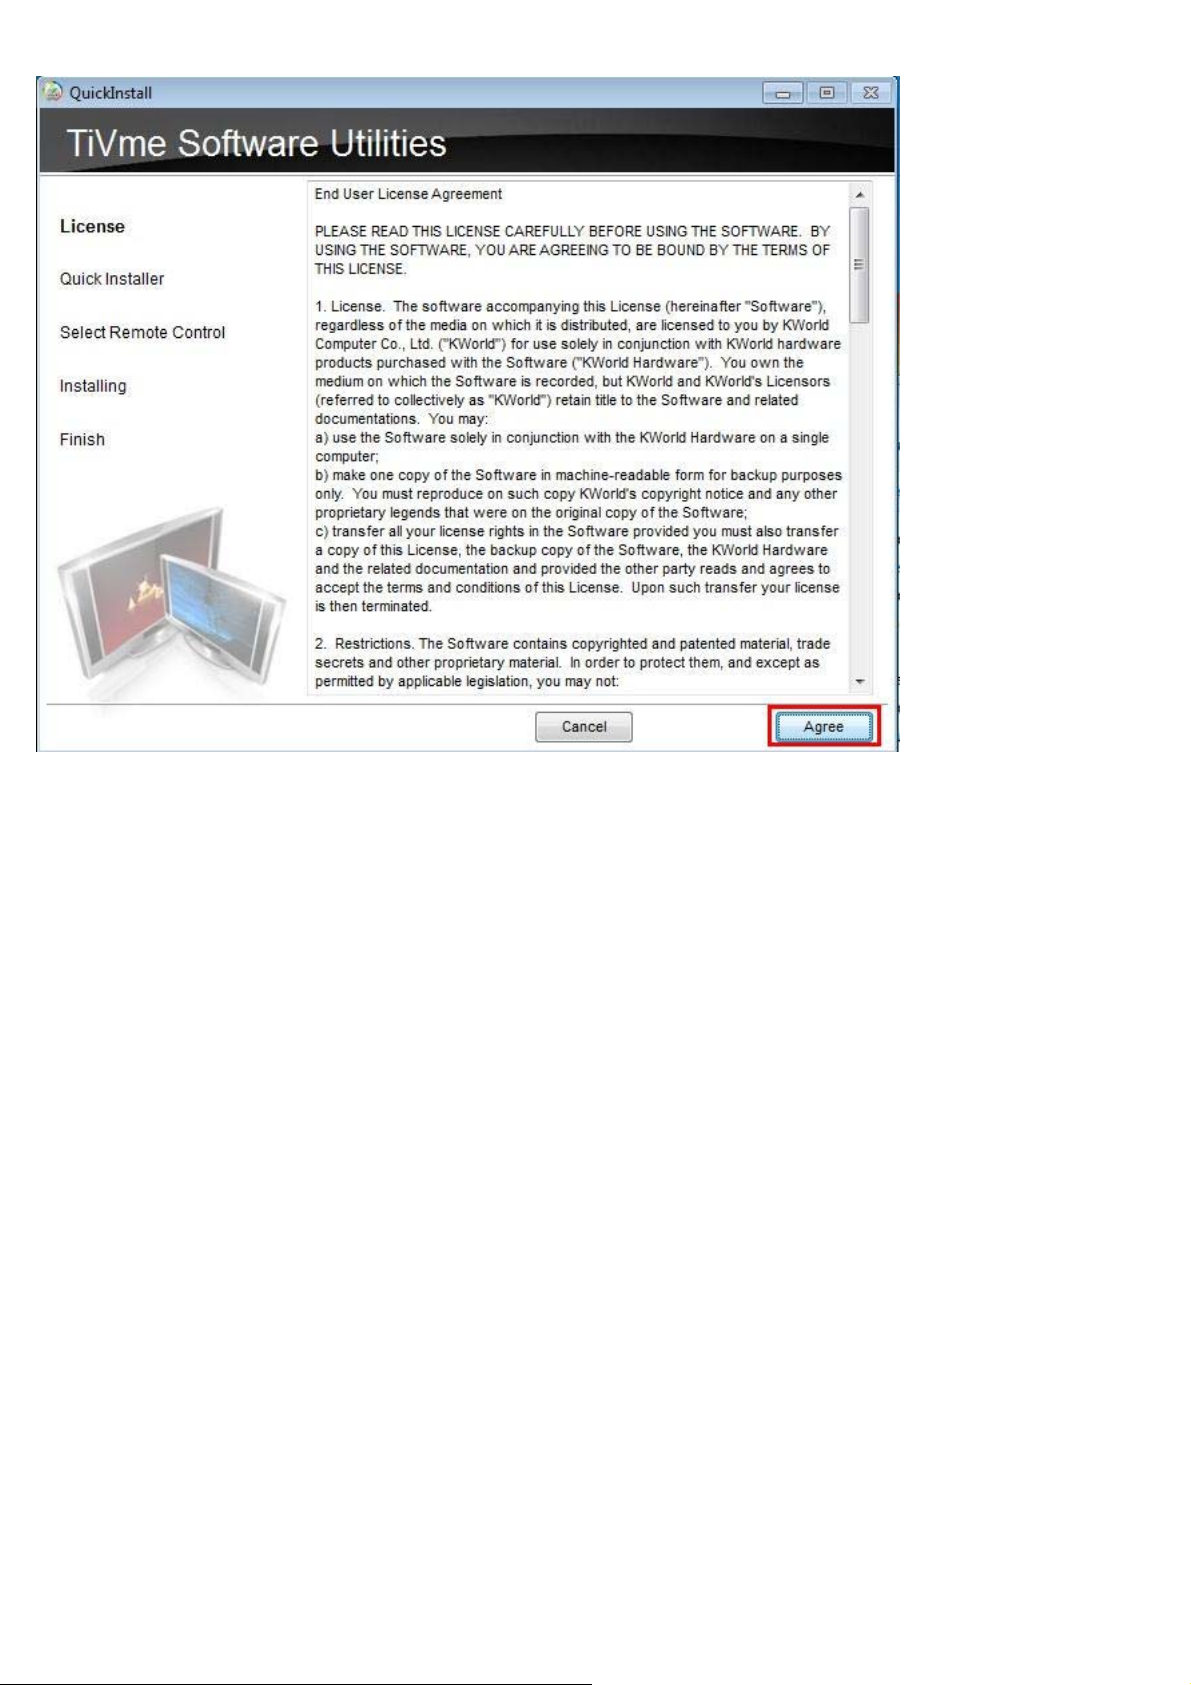
(4) Please read the “End User License Agreement” and click “Agree”.
(5) You can choose “Typical Installation” or “Custom Installation”. “Typical Installation” will install all the
required Driver、TiVme and 3rd party software (PowerDirector/PowerProducer). You can also choose
the “Custom Installation” to install the program or software individually. Click “Next” when you make
your selection.
8
Page 9
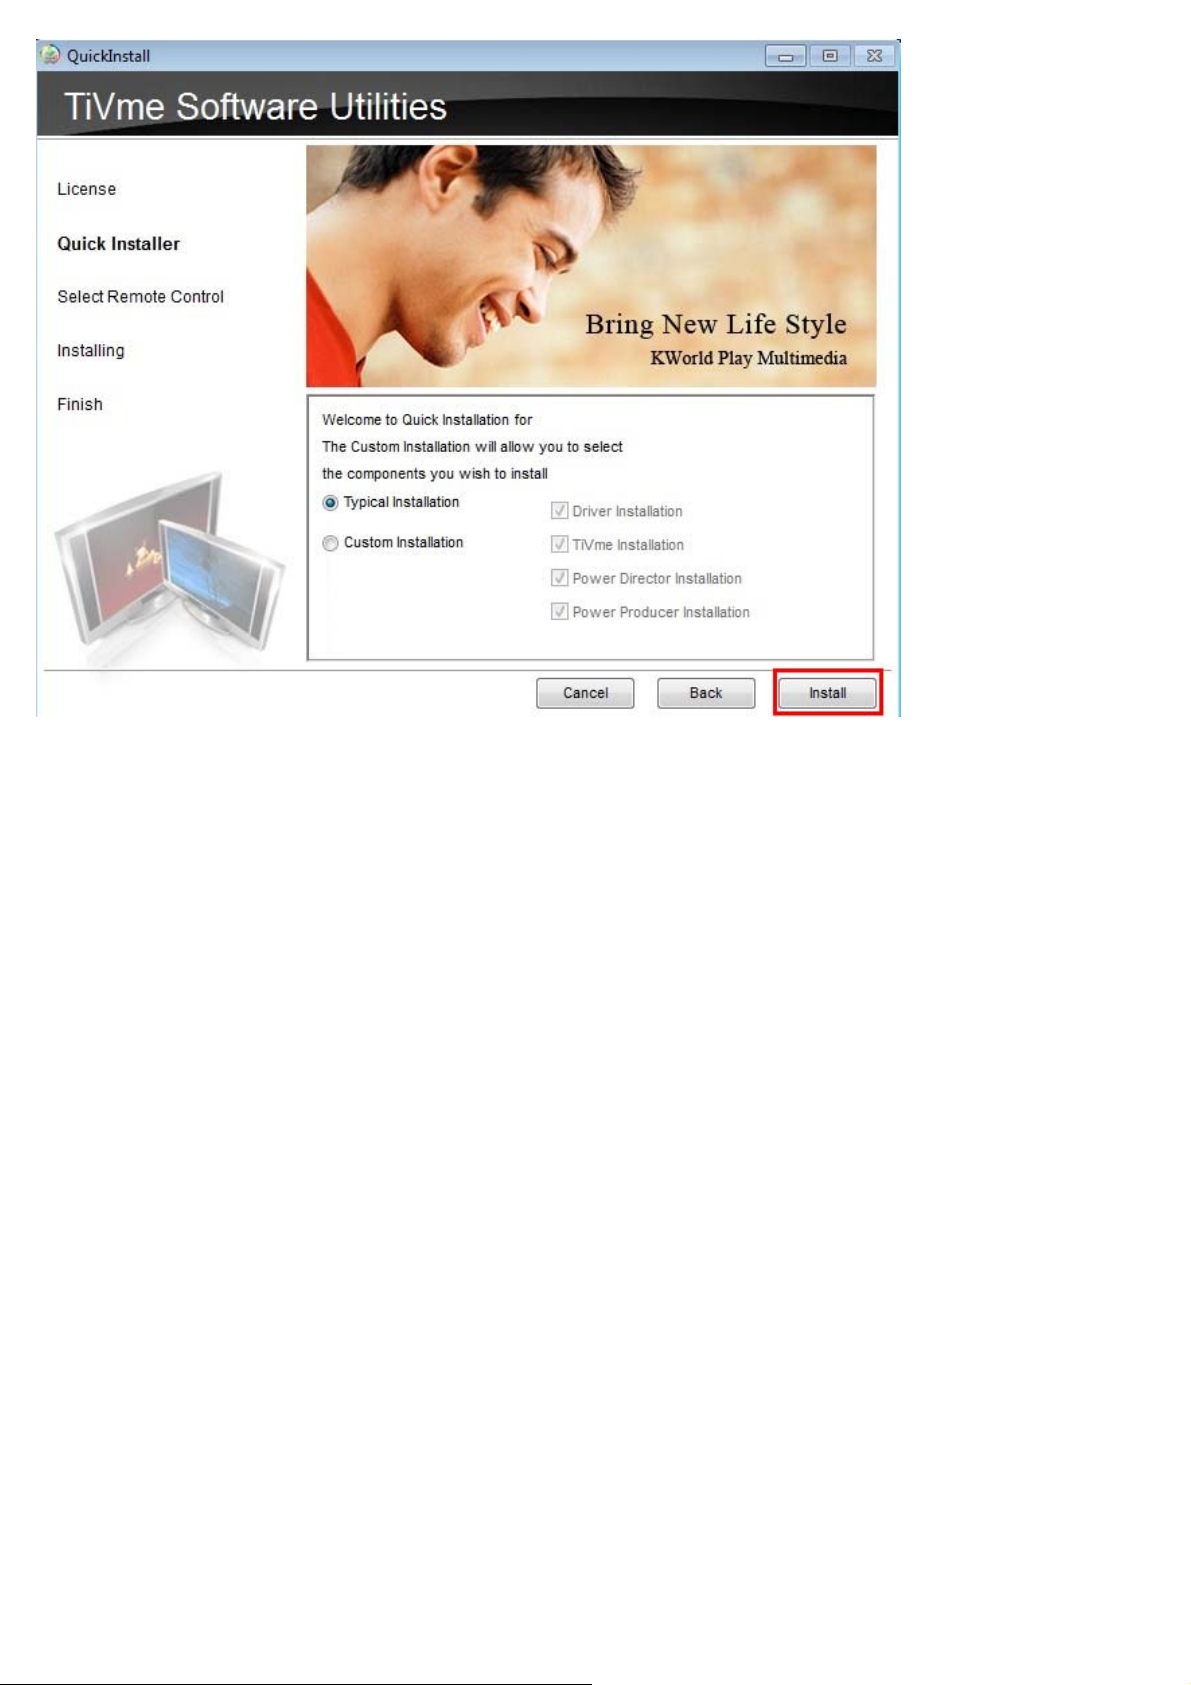
Attention: In “Custom Installation”, please check if the “TiVme Installation” and “Driver
Installation” have been installed /selected already before clicking the “Install”.
(6) The installation will take a period of time. Please wait.
(7) When the installation is completed, the system will ask whether you would like to restart your computer.
Please click “Yes, I want to restart my computer now” to ensure the installation is totally finished.
9
Page 10
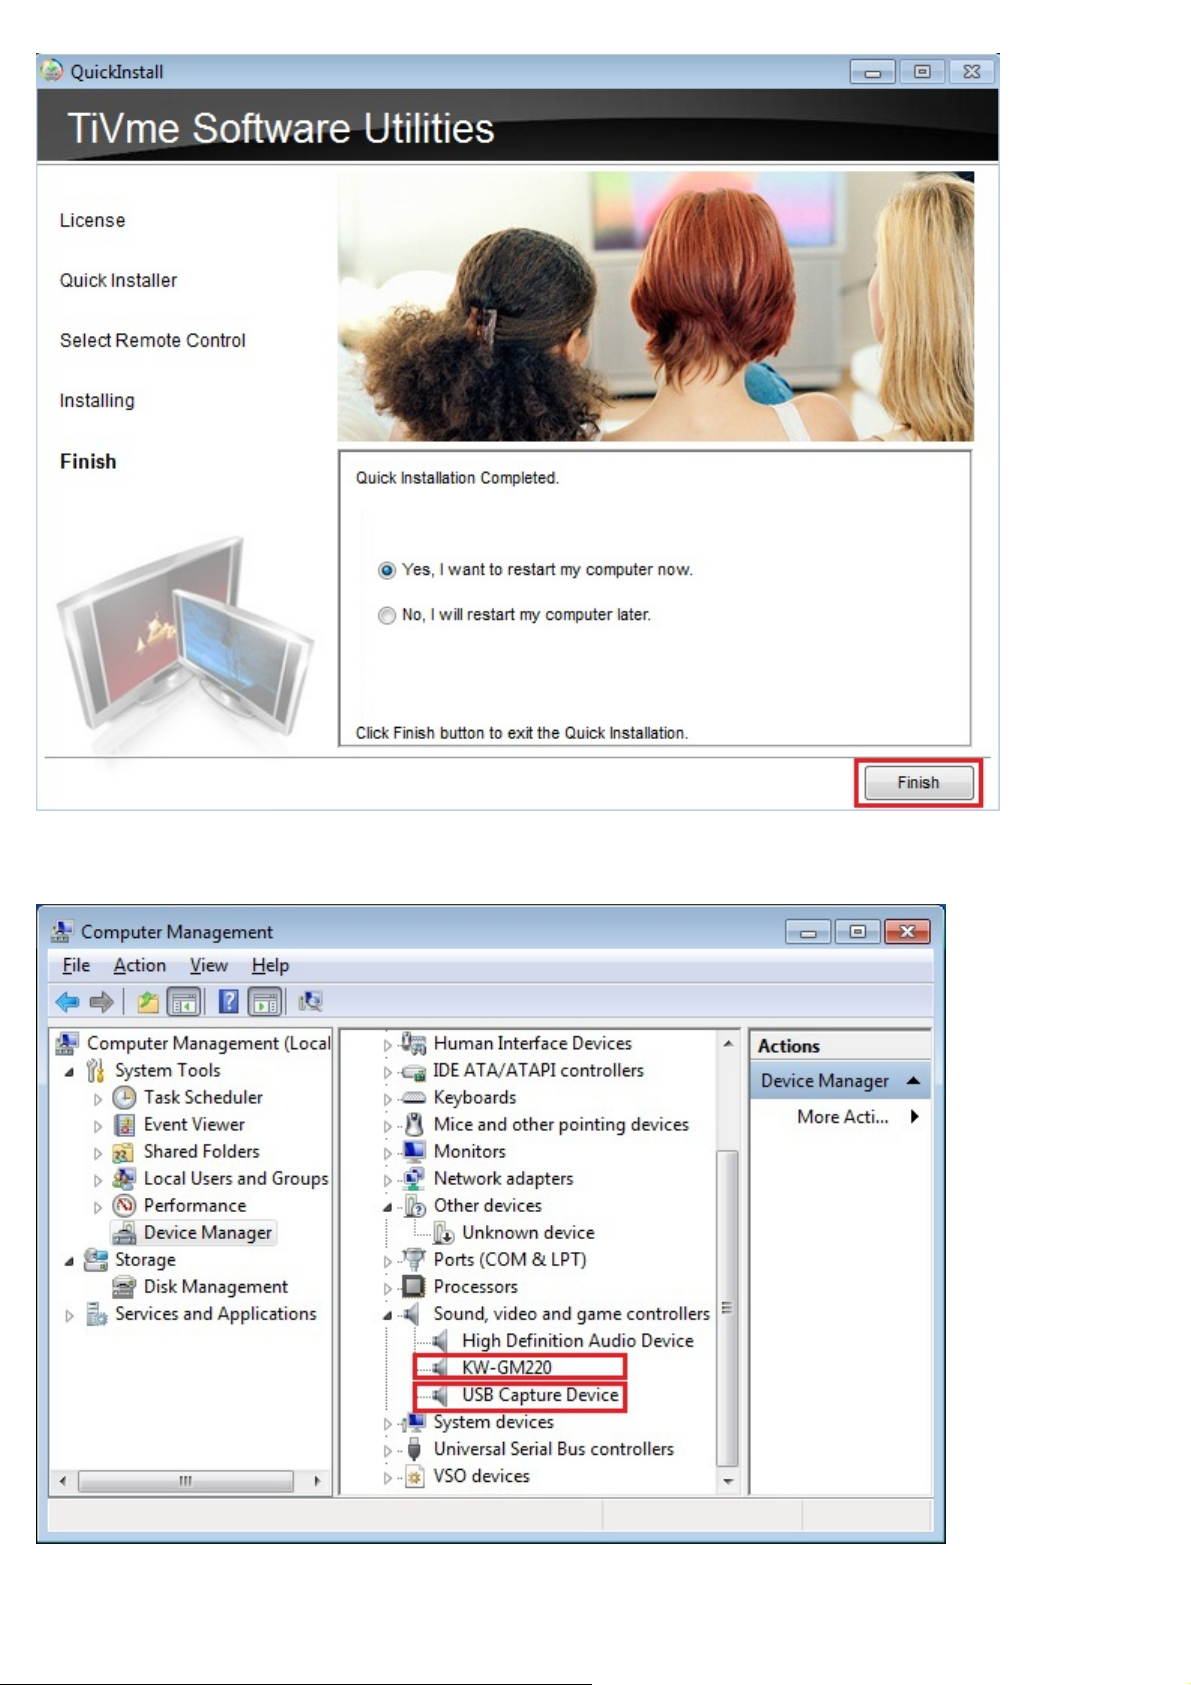
(8) After finishing the installation and restarting the system ,you can double-check the GM220 Driver
whether it has been installed already and showed up below two icons in the『Device Manager』.
10
Page 11
Chapter 3: How to use TiVme?
3.1 Activating TiVme
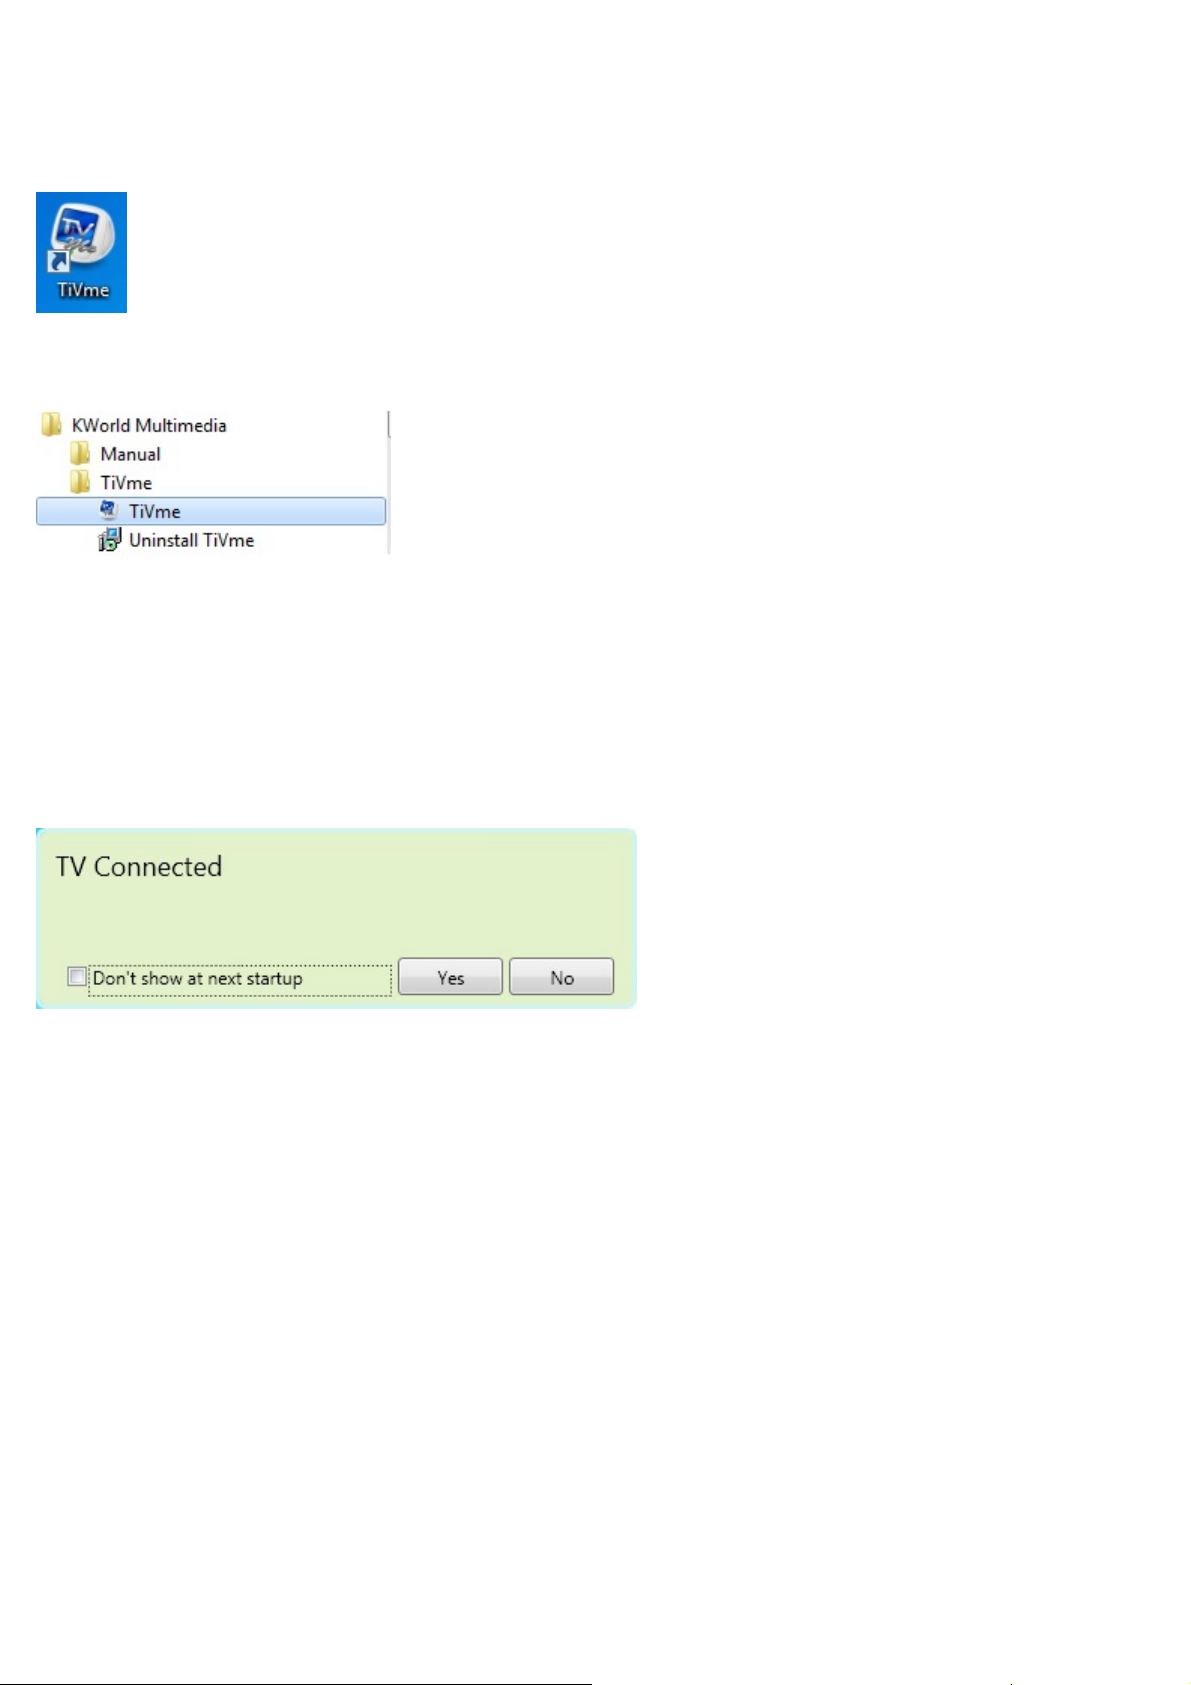
(1) Double-click in the TiVme icon on your PC desktop.
(2) To run it from the “Programs” menu, move your mouse cursor to “Start”→”Programs” →”KWorld
Multimedia” →”TiVme” →”TiVme”
Initial Setup
When you activate TiVme for the first time, the system will guide you through the necessary steps of Video
setting.
The “TV Connected” dialog widow will appear when you activate TiVme. If GM220 has been connected
TV monitor, please select「Yes 」;if not, please select「NO」.
If you don’t want to check this dialog window in activating TiVme every time, you can click the “Don’t show
at next startup” option to disable this function.
Select Device→『GM220』,and click the “Next”
11
Page 12

Select the source input type (GM220: Capture Device) and click”Next”
Please select the correct Video System (PAL/NTSC) by your actual video source, and click” Exit”.
12
Page 13

Please click and select the right Source Input by your connection (Composite/S-Video/YPbPr/
YPbPr (HD)) in the TiVmed control panel.
Attention:
(If the Video input source is the YPbPr, please select the correct option according to different resolution)
For example, the resolution of your video source is the 480P/576P/720P/1080i, please select the
“GM220-YPbPr (HD)”; the others lower resolution, please select the “GM220-YPbPr”
The Videos/Games will be showed on the window after selecting the source input
You can use the control panel icon to capture/snapshoot the Videos/Games.
13
Page 14

14
Page 15

Chapter 4: TiVme function Overview
4.1 Instruction the main icon of the control panel
Source Input Snapshot Capture Schedule Record
Playback Video Setting Display Ratio OSD
Setup
15
Page 16

4.2 Normal Mode
When you finish the initial setup and select the correct video source, you can use the panel icon for
watching/recording.
4.3 Control Buttons on the Window
Always on top Minimize Maximize Exit/Close
Capture Snapshot Display Ratio Volume Down
Volume Up Audio Mute
4.4 Snapshot
You can click the “Snapshot” icon to take snapshots.
When the screen shows “Snapshot OK”, it means the image has been successfully saved to your file
folder as picture files.
16
Page 17

When you click on the arrow beside the Snapshot icon , you can configure the setting for
“Snapshot”
Snapshot Format: You can capture your favorite scenes of the shows and save in BMP、JPG、
PNG、TIFF formats.
Snapshot Count and Snapshot Interval: Snapshot Count indicates the number of snapshot
pictures and snapshot Interval (unit: ms) means the time interval between snapshots. Both can be
changed to meet your preferences.
Picture Path: You can select the storage path for your snapshot pictures with “Picture Path”
4.5 Capture
You can click it to capture the scenes you like. Once you capture the scene, it is saved in your Video path.
Click it again to resume to regular play mode.
17
Page 18

Another way to resume to normal mode is to right click on the screen and then enable “Stop Capture”.
When you click on the scroll-arrow beside the Capture icon, you can configure the settings for
“Capture”:
Video Path: allows you to change your storage path.
Silent Recording: open mute-recording to prevent potential distraction when you are working on
something on your PC. (Note: the sound is muted during recording. When you watch your recorded
file, the sound is kept).
Capture Name Setting: file-naming option. The default is “Date-time format”, or you can put a
specific name in “User define”.
Enable Time Limit: sets the recording time-length. The recording will stop once the time is reached.
Enable File Size Limit: sets the limit for recording files. The recording will stop once the file size is
reached.
Capture Format: select the Capture Format you want to record. It offers below format: MPEG1, VCD,
MPEG2, DVD.
Capture Bitrate: choose the BitRate of recording video you want. The default is 2000Kbps.
Capture Resolution: choose the recording size you want.
18
Page 19

19
Page 20

4.6 Video Setting
Color Mode: You can change different Color Mode setting or adjust detail setting in the User Mode.
Clicking on the arrow beside this icon enables you to enter video setting and you can adjust the
Brightness/Contrast/Hue/Saturation/ Sharpness in user mode. The video setting you configure can be
applied to all channels/ Video Source (GM220) or you may return to default value.
VMR Type: You can switch the different Video Mixed Render by your operation system and Graphic card
support.
Modify TV Position: You can click the direction button to move the image if the video is not in center of the window.
4.7 Display Ratio
If you click the arrow beside this icon , you can set the screen ratio individually: Free/4:3/16:9.
20
Page 21

4.8 OSD
The OSD function enables you to adjust the font color, font size and displaying location for the on-screen
displayed texts in the window. To do so, just click on the arrow beside it .For example, when you
change the font color, the text appears on the screen turn to the color you adjusted (please refer to the
picture below, the one at the right). You may also enable/disable OSD (on-screen display) texts by ticking
the “Enable OSD” option on/off.
4.9 Schedule Record
You can set up the time limit and program your recording schedule. The system will automatically record
the program when the time is reached. When you click the Schedule-record icon, you will see a window
like the picture as below.
Schedule List: you can “Add”, “Edit”, “Delete” or “Clear All” your scheduled recording list.
Note: If you didn’t add any new schedule, the list would be empty.
21
Page 22

If you click “Add”, you can create a new recording schedule like the picture as below.
Capture Setting
․Select a Capture Device: select the device you are using
․Capture Source Type: select the source type you want to record
․Channel Name: choose the channel name from the list (Only for TV card/USB Stick products)
․Capture Format: choose your recording format
․Capture Size: choose the recording size you want
․Audio Option: configure your audio setting
22
Page 23

․BitRate (Kbps): choose the BitRate of recording video you want
Time Option Setting
․Start Time: set the starting time for the recording
․End Time: set the ending time for the recording
․Record Rule: define record rule. The default is Only Once
․Record in Silent Mode: enable/disable silent recording
S.R.P.O: schedule record in power-off. When you activate this function, the system will go into a
hibernation mode before the time you set for recording. The system will “wake up” to start the scheduled
recording around 3 ~ 5 minutes before the time you set for schedule recording. Please be noted that
power-off means the system will go into hibernation, and make sure your computer system supports
Hibernation in order to enable this function.
Setting:
Save Path: You configure the “Save Path” for your recorded file by click on【.....】.
File Name Setting: There are two choices for “File Name Setting”: “Use datetime formats file name” and
“Use Specific Name”. The “Use datetime formats file name” is the default. All the file that you want to save
will be named in a date-time manner, such as “20090512_XXXX” for instance. Users can also input any
specific name for their files in “Use specific name”.
System Option: you may define the system option after record. The default is ‘No Action”.
23
Page 24

Log: the log shows the information your scheduled recording if you have set any recording schedule.
4.10 Playback
When you click on the arrow beside the Playback icon , you can choose a recorded file for playback
or a file from folders in your PC. (Note: continuous file playback is available)
24
Page 25

․Add: add a selected file to the playlist at the bottom half of the window
․Add All: add all the files to the playlist
․Delete: delete a file from the playlist
․Delete All: delete all the files on the playlist
․Play: play the selected file that is in the playlist at the bottom half of Playback
․Exit: exit Playback
When you select a file for playback, TiVme will play the video for you in another screen as illustrated
below.
25
Page 26

Control Buttons for Playback Mode
Backward Play Pause Forward Stop
Previous File Next File Repeat (on) Repeat (off) Display Ratio
Audio ON Volume Up Volume Down Control Slide for Playback
26
Page 27

4.11 Setup
Enter the software setting page
Sleep Timer: set the sleep timer for the system. You can make the system to close application, log off,
hibernate, shut down or reboot when the time is up.
27
Page 28

Analog Setting: set de-noise level to allow better analog quality. You may also tick “Use Adv De-Noise”
for advanced de-noise.
Marquee: You can choose “Input Text” or “Select Text File” to place the words you want to show the image
window and decide the show way in『Repeat Forever』、『Moving Distance』、『Moving Interval』、『Next
Marquee Interval』options.
28
Page 29

Live Update: When you open “auto update “, TiVme will download the system update automatically (if
there is a new version. If not, it won’t do anything). If you click “Check”, TiVme will display version status.
Note: Before you want to update, please check if you have the Internet connection first.
Scan Setting: re-run the video system setup. It is the same step as you do the initial setup for TiVme (see
the Chapter3) if you like to set up the video system again.
User Interface: configure the user-interface, such as “Enable Transparent UI”, “Panel Size”, “Font Color”
and “Border Size”. You can also customize your background by ticking on “Enable customize background”
29
Page 30

and then you can browse and select files from your PC folders.
Other: configure settings like Multi-Language, Auto open last source when execute Application, and Boss
Key Setting (Function Key, Min Key and Restore Key).
Multi-Language: change the language for the interface.
Auto open last source when execute TiVme: when you tick the box, TiVme will run the video source
type you watched in last time.
30
Page 31

Gaming Device:
TV Connected: Please select it if you connected the Gaming Device (GM220) to output the video to the
TV monitor and laptop/desktop in the same time.
If you don’t want to check this dialog widow in activating TiVme every time, you can click the “Don’t show
at next startup” option to disable this function.
Enhance TV quality: You can tick this option to increase the picture quality on TV.
Note: It may depend on the resolution of video source higher than 1080i and the graphic card driver
31
Page 32

4.12 The Tool Menu
While you are watching video/game on TiVme, you can open the Tool Menu with a mouse right-click. The
Tool Menu allows you to access and activate functions of TiVme, which provides you another option
besides the icons in the interface.
Always On Top: open TiVme to remain at the top of all other application windows. It is the same if you
click on the Always on Top at the upper right corner of the normal mode window.
Display Ratio: you can adjust your display ratio when you move your mouse cursor to the arrow at the
right of this option. There are Free, 4:3, 16:9.It is the same as you click on the Display Ratio function icon
in the interface.
Preview Window: you can change your video viewing screen to Full Screen, Sizable Screen or
Borderless Screen
Source Input: switch your source input
Capture: select your video/image capture format, including MPEG1, VCD, MPEG2, DVD.
32
Page 33

.
Snapshot: activate Snapshot function to take the Snapshot. You can also do the same if you click on the
Snapshot icon on the main interface.
Digital Zoom: there are 4 zooming formats -- Original, 2X, 3X and 4X.
Mute: Audio on or off
Volume Up: increase the volume
Volume Down: decrease the volume
Hide Panel: hide or show the control panel (the TiVme panel)
Exit: close/exit TiVme window
33
Page 34

Chapter 5: Appendix
Technical Support
Thank you for reading this manual. If there is any further inquiry, please contact us at
http://www.kworld-global.com
The information contained this documentation is for reference only. The text, images and charts of this
documentation have been processed with intensive care and we have been dedicated to ensure the
accuracy and completeness. However, the content of this document is subjected to change without notice
and no liability nor responsibility is assumed for any loss or damage arising from any kind of
misunderstood, improper uses of the hardware, software, and documents.
Headquarter
KWorld Computer Co., Ltd.
6F., No.113, Jian 2nd Rd., Jhonghe Dist.,
New Taipei City 23585, Taiwan (R.O.C.)
http://www.kworld-global.com
Copyright
@ 2011 KWorld Computer Co., Ltd. All rights reserved. All KWorld trademarks and logos are registered
trademarks of KWorld Computer Co., Ltd. All other trademarks and logos presented in this material are
the property of their respective owner. KWorld Computer Co. Ltd. reserves the right to revise the
specifications mentioned above. No part of this documentation can be copied, reproduced or distributed in
any kind of print or electronic forms without legal permission.
34
 Loading...