

Page 1
Page 2
Page 3
Page 4

Page 5
Kurzweil International Contacts
tive.
US Customers:
Young Chang North America
Kurzweil Home Products
6000 Phyllis Drive
Cypress, CA 90630
Tel: 310 637-2000
Fax: 310 637-2025
Customers outside the US:
Young Chang Co., LTD.
9th Floor, Bldg 102, I-Park
Jeongja-Dong, Bundang-Gu, Seongnam-Si
Gyeonggi-Do 463-859
South Korea
Tel: +82 31 786 7900
www.ycpiano.co.kr
www.youngchang.com
-
www.kurzweil.com
support@kurzweil.com
www.facebook.com/kurzweilmusicsystems/
www.twitter.com/KurzweilMusic
www.youtube.com/user/KurzweilTutorials
Page 6

Page 7
Content s
Table of Contents
Chapter 1 Piano Assembly
Chapter 2 Front Panel
Chapter 3 Select Sounds
Chapter 4 Layering
Chapter 5 Splitting
Chapter 6 Function
Chapter 7 Recording
Chapter 8 DemoSong/Dual
Chapter 9 Metronome/Trans
Chapter 10 Pedals
Using the Bluetooth
8-12
13
14
15
16
17-20
21
21
22
23
24
Chapter 11 MIDI
Chapter 12 Connection
1.Using Headphones
.
2.Aux In Out
3.MP3 Aux In
Chapter 13 Drum Sets
Chapter 14 Demo Song List
Chapter 15 Sonatine,Rhythm List
Chapter 16 Specification
25
27
27
27
27
28
23
30
31
Page 8
Chapter 1
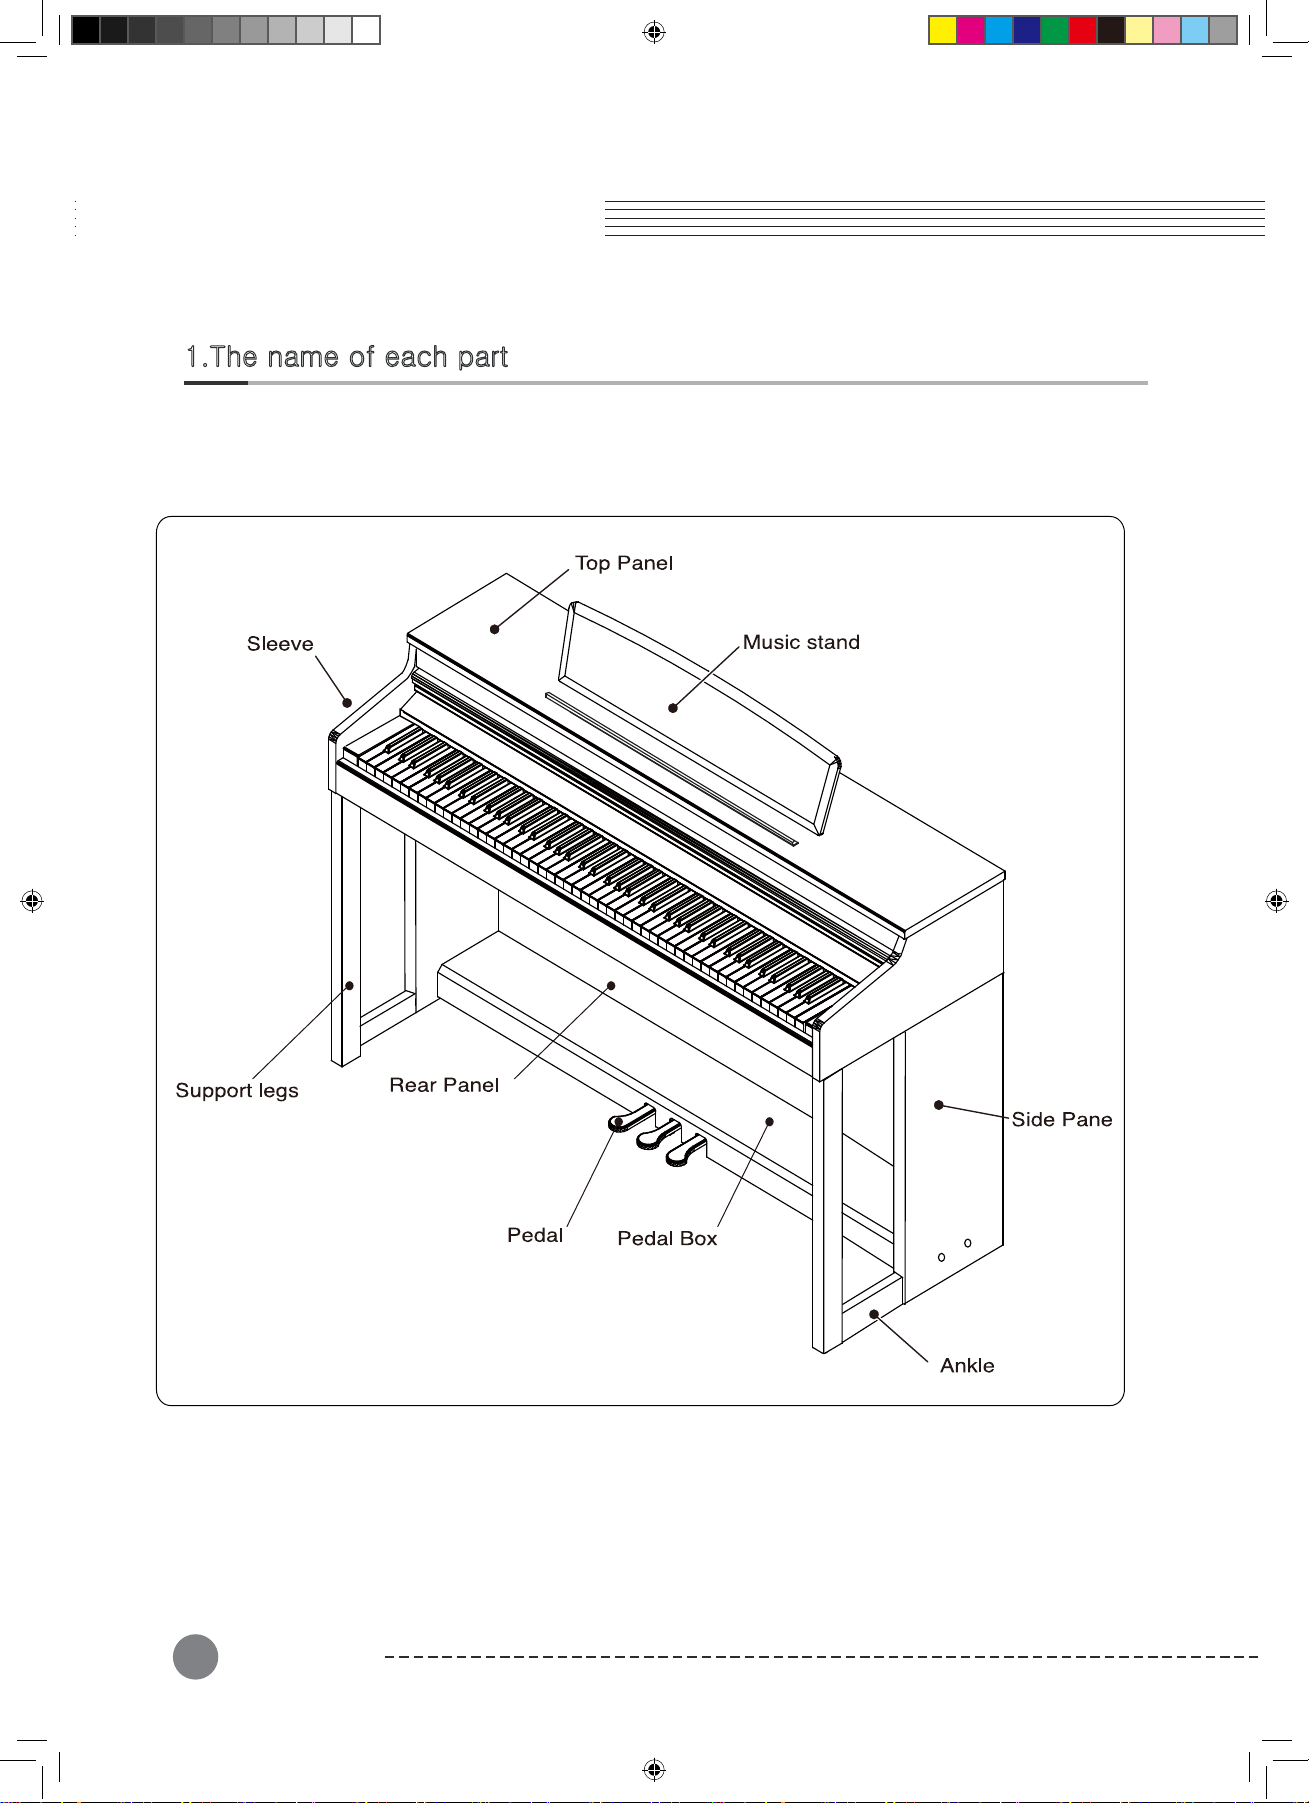
1.The name of each part
Piano Assembly
Piano Assembly
8
Page 9

Chapter 1
Piano Assembly
Check that all of the following items are present.
Keyboard 1 EA
➊
Side panel of stand(Left) 1 EA
➋
Side panel of stand(Right) 1 EA
➌
Pedal box 1 EA
➍
Real panel 1 EA
➎
➏
➋
➒
Screws for side panel and keyboard 4 EA
➏
Screws for side panel and pedal box 4 EA
➐
Screws for rear panel 2
➑
➒
Cord holder 2
➓
Support block for pedal box 2
➊
EA
6
E AScrews for rear panel and side panel
EA
EA
Please check the quantity of related part.
➏ ➐ ➑ ➒ ➓
Accessories
➎
➍
Pedal Adjuster bolt
➑
➒
➌
➐
Power Adapter
User manual
Piano Assembly
9
Page 10
Chapter 1
Piano Assembly
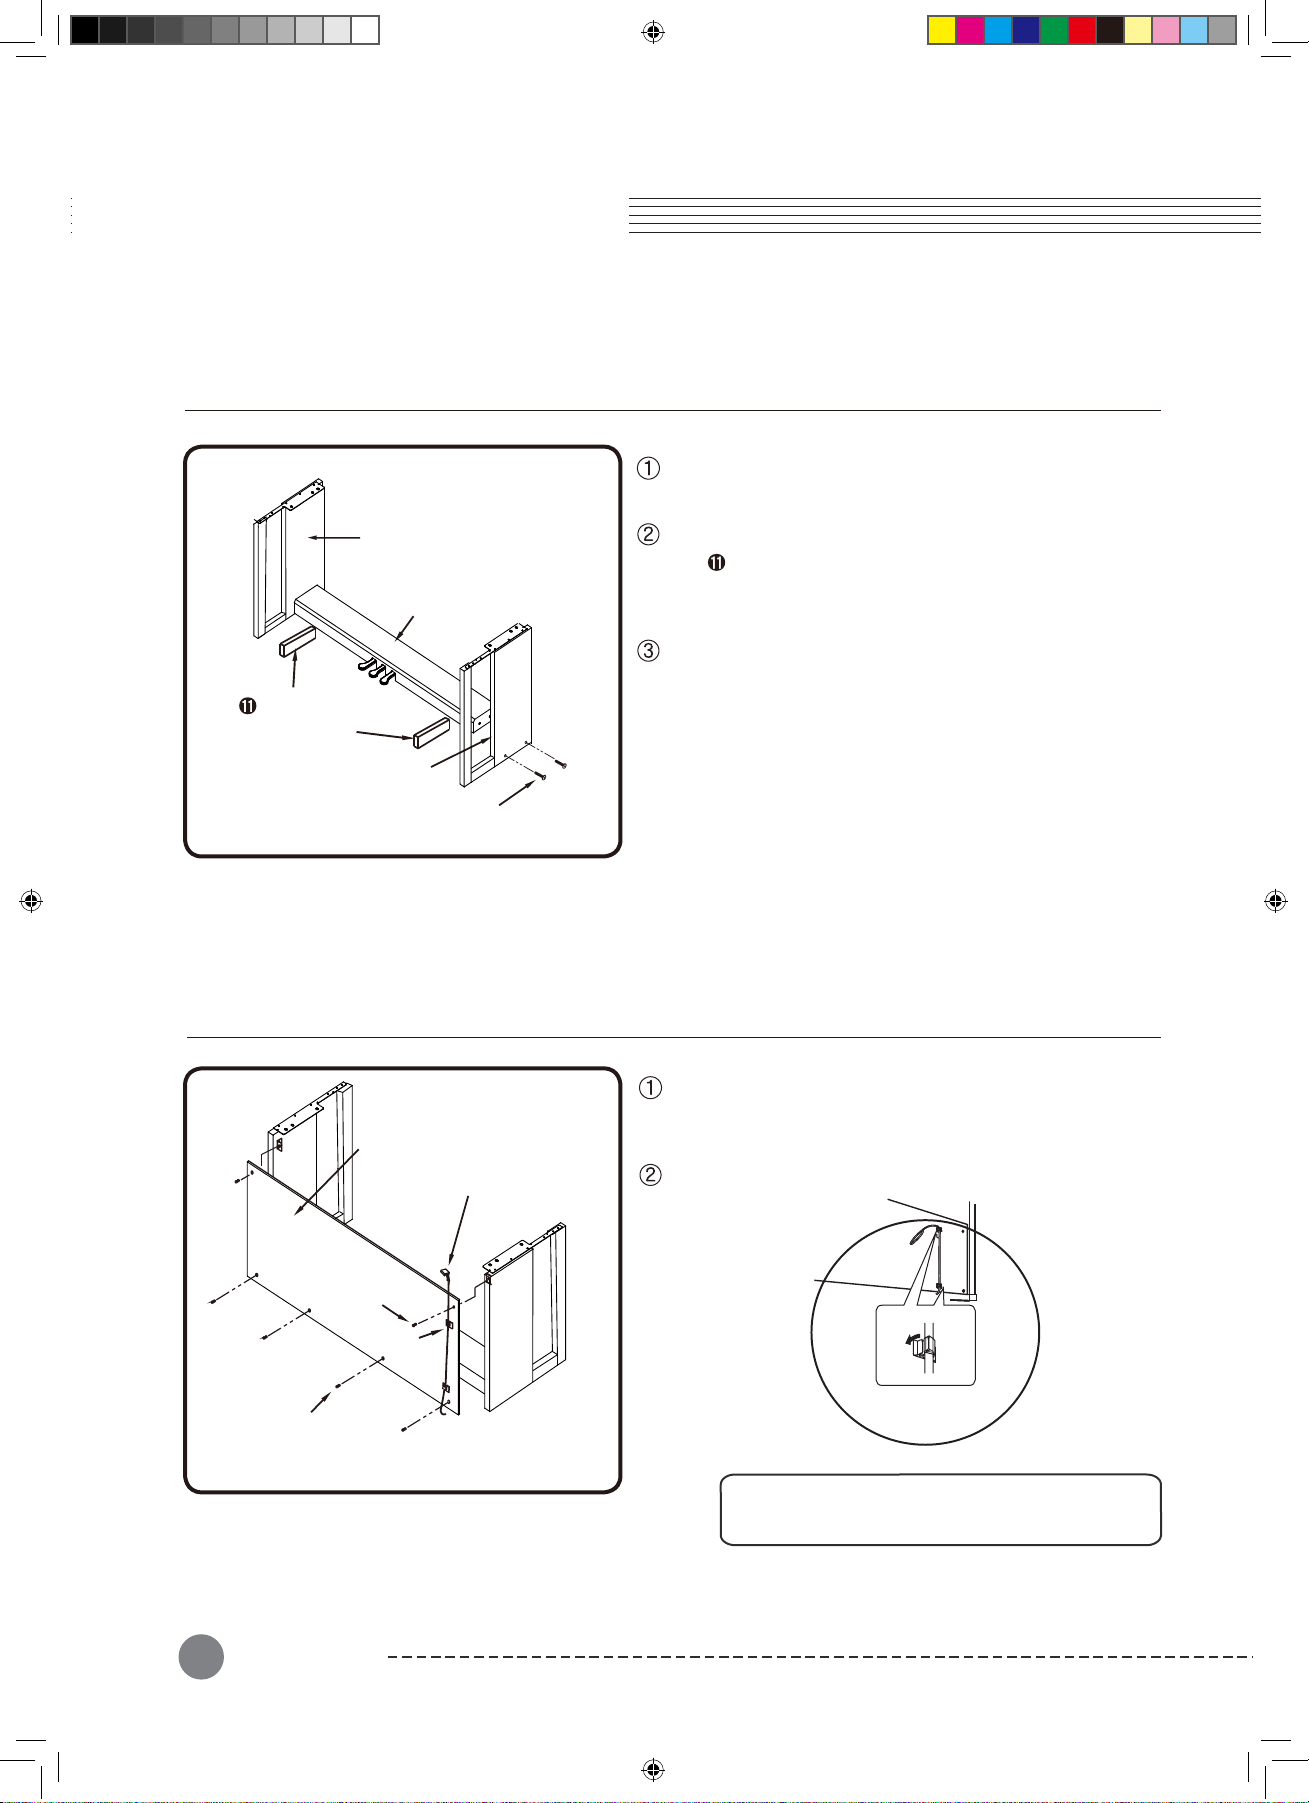
1. Stand Assembly
Side Panel and Pedal Box Assembly
Left Side Panel
➋
Pedal Box
➍
Support block for
pedal box
Right Side Panel
➌
Screws for Pedal Box
➐
Rear Panel Assembly
You can find the pedal cable in the pedal box . Untie
and straighten out the bundled pedal cable.
Place the pedal box on the support block for pedal
box . Then it will be the same as the position of the
left side panel holes. It can be easily fastened by using
the screw bolts .
The right side panel is also fastened the same way.
➍
➋
➐
➌
➍
Piano Assembly
10
➒
Rear Panel
➎
➑
➓
Pedal cord
Fit into the rear panel's hole in the side panel
brackets and then use the screws to fasten the rear
panel.
Use the screws to fasten the bottom of the rear
panel.
Attach the pedal cord holders to the rear panel
as shown, then clip the cord into the holders
➒
➎
➑
➓
Page 11

Chapter 1
Piano Assembly
Mounting the keyboard
➊
Keyboard
Place the keyboard on the stand and fit into the holes
in the side panel brackets.
Fasten the keyboard to the side panel using screws .
CAUTION : Have a second person hold the
keyboard steady until the side panel screws are
installed.
Fasten between the keyboard and the leg using
screws .
Pedal cord
➏
Pedal Adjuster
➒
Pedal cord connection
Insert the pedal cable plug into the pedal jack located
on the bottom of the keyboard.
Rotate the pedal adjuster until it comes in firm contact
with the floor surface. If the adjuster is not in firm
contact with the floor, the pedals will wobble and may
malfunction.
➐
Insert the pedal cord plug to the pedal jack from the rear.
● Connect the pedal cord after assembly is complete.
● If the connection is incorrect the pedal will not working.
Piano Assembly
11
Page 12

Chapte 1
Piano Assembly
2. Applying Power
Pow e r
Connecting the power cord
First insert the plug of the AC power cord into the AC connector on the Adaptor, then plug the
other end of the cord into the proper AC outlet on the wall. In some areas a plug adaptor may
be provided to match the pin configuration of the AC wall outlets in your area.
Plug the thin DC power cord into the DC Power Jack on the back of the piano.
Turn the power on
Press the power switch located on the right cheek block to turn the power on. The display
located in the center of the front panel should light with various patterns and after a
short time display "GRAND PIANO".
CAUTION
Even when the instrument is turned off, AC power is still flowing to the adapter at a
minimum level. When you are not using the instrument for a long time or during
electrical storms, unplug the AC power cord from the wall outlet.
3. Setting the Volume
Piano Assembly
12
To adjust the volume, use the [Volume] knob located
Play the keyboard while you adjust the knob to a comfortable and realistic
volume.
NOTE
Adjusting the [Volume] knob also affects the output level of the
Phones jacks and the output level of the Audio Out jacks.
on the
right cheek block.
Page 13

2
Previous - Next +
Jump
Favorite 1 Favorite 2
Volume
Split key
Function
Rhythm
Trans/Tempo
Play/Stop
Record
Layer
Split
Demo
Voice
Piano
1
2
Touch
Trans
3
4
5
Split key
6
7
8
9
10
13
Page 14

3
Page 15

4
Split key
Split key
Page 16

5
Split key
Split key
Page 17

6
Page 18

6
Page 19

6
Page 20

6
Page 21

7
Trans
Page 22

8
Trans
Touch
Page 23

9
Split key
Trans
Split key
Page 24

hapter
C
10
Pedals
1. Pedals
This piano has three foot pedals : damper (sustain) pedal (right), sostenuto pedal (center) and soft pedal (left)
that produce a range of expressive effects similar to those produced by the pedals of an acoustic piano.
2. Using the Pedals
Soft
Sustain Prdal
1
The sustain pedal functions in the same way as a damper pedal on
an acoustic piano. When the damper pedal is pressed, notes sustain
longer. Releasing the pedal immediately stops any sustained notes.
2
Sostenuto Pedal
If you play a note or chord on the keyboard and press the sostenuto
pedal while the notes are held, those notes will sustain as long as you
hold the pedal (as if the damper pedal had been pressed) but all
subsequently played notes will not be sustained. This makes it
possible to sustain a chord, for example, while other notes are played
"staccato".
Soft Pedal
3
The soft pedal reduces the volume and slightly changes the timbre of
notes played while the pedal is pressed. The soft pedal will not affect
notes that are already playing when it is pressed.
Sostenuto Sustain
When you press the sustain
pedal here, the notes you play
before you release the pedal
sustain loger.
When you press the sostenuto
pedal here while holding the note,
the note will sustain as long as
hold the pedal.
NOTE
Pedals
If the pedal doesn't work, make sure that the pedal
cord is properly plugged into the main unit (see page 10).
Also, avoid pressing any pedals while the piano booting.
Page 25

Chapter 11
MIDI
MIDI is acronym for Musical Instrument Digital Interface, which is an industry standard protocol for electronic
instruments to communicate with each other.
1. Connecting to a Computer
The instrument can be connected to the computer via a USB cable (AB type USB cable of less than 3 meters).
Connect the USB cable to the USB Type B terminal of the instrument, then to the USB Type A terminal of the
computer.
Previous - Next +
Jump
Favorite 1 Favorite 2
Volume Split key
Rhythm
Function
Trans/Tempo
Play/Stop
Record
Layer
Split
Demo
Voice Piano
2. MIDI Channel
A MIDI cable can transmit multiple channels of performance data which is similar to TV channels. Each
channel can be assigned its own voice. Typical MIDI instruments can play up to 16 channels at the same time
which is equivalent to 16 soloists.
If you want to use your piano and record your performances with a computer, a sequencer
program must be installed on your computer.
MIDI
Page 26

MIDI
Page 27

Chapter 12
Connection
1. Using Headphones
Connect a pair of headphones to one of the phones jacks. Two phones jacks are provided.
You can connect two sets of standard stereo headphones. (If you are using one pair headphones, you can
plug them into either of these jacks).
Botto m surfac e
CAUTION
Do not use headphones at a high volume for an
extended time. Doing so many cause hearing loss.
Stand ar d ster eo
phone plug
2. Audio In (Aux In)
You can connect the output jacks of an external device (such as CD player, tone generator) to the instrument's
Aux In jacks, letting you hear the sound of that device through the built in speakers of the instrument.
3. Audio Out (Aux Out)
You can connect a stereo system to amplify the instrument's sound by using the Aux Out jacks. When the
instrument's sound is output to an external device, first turn on the power to the instrument, then to the
external device. Reverse this order when you turn the power off.
MIDI
4. MP3 Aux In
You can connect the output jack of an MP3 player or smart phone to the instrument's MP3 Aux In jack on the
right cheek block. Do not use Audio In and MP3 Aux In at the same time.
CAUTION
When you connect the cable to the piano, plase turn the piano’s
power of first. Otherwise ,loud noise may occur while connecting .
the cable. .
Connection
Page 28

Chapter 13
Drumset
Annimal & Nature
Lion
Tiger
Cow
Horse
Horse Gallop
Dog
Duck
Goat
Cuckoo
Cock
Hen
Cat
Bird
Goose
Sheep
Pig
Rain
Wind
Thunder
Stream
Seashore
Applause
Bell
Ring
Intercom
Car string
Horn
Patrol car
Train
Helicopter
Boat
Drum set
Page 29

Chapter 14 Demo Song List
ARIA Goldenbe rg-Variationen BMW 988
Klavierstuck K . 15v
Minue tte in G
Without words song Op.38 No.2
Traumerei
Frolicher Landmann Op.68-10
Von fremden Landern und Menschen Op.1
Liebestraume N r.3
Fryhlingsstimmen Op.410
Reverie
Demo Song List
29
Page 30

Chapter 15
Sonatine,Rhythm List
N o Rh y t h m N o Rh y t h m
1 home Beat 13 Groove
2 Rhythm Beat 14 Euro Beat
3 Party Dance 15 Reggae
4 Love Disco 16 Rumba
5 Soft Rock 17 8 Beat
6 Slow Rock 18 16 Beat
7 Pop 1 19 ChaCha
8 Pop Polka 20 Bos an oba
9 Acid Jazz 21 Samba Disco
10 Sweet Beat 22 Fox Trot
11 Hard Rock 23 Ma rch
12 Swing Rock 24 Wa ltz
30
Rhythm List
Page 31

Chapter 16
Keyboard 88 note fully weighted Graded Hammer action (A0~C8)
Finish Simulated Rose wood or White
Cabinet Pattern type
ToneGen. Kurzweil V.A.S.T
Polyphony 128 Voices
Sounds 30 Programs
Rhythm 30 Patterns
Specifications
PlayMode
Education Bayer, Czerny 100,30,40, Sonatine
DemoSongs 50 PianoMasterpieces,Sonatine 45
Pedals 3 (Sustain, Soft, Sostenuto)
Display 5x7 Dot scrolling marix LED
Others Volume, Tune, Transpose, Metronome
Connectors MP3 Aux In, Audio In/Out, USB Slave,Bluetooth
AudioPower 20W x 2, 8 Ohms
Speakers 6.5" x 2 full-range (Ovaltype)
Dimensions 1400 x 470 x 850(W x D x H)
Layer, Split
Specifications
31
Page 32

Memo
Page 33

Memo
Page 34

Page 35

American Music & sound
22020 Clarendon Street,Suite 305
Woodland Hills,CA 91367
Te l : 800 - 431 - 2609
Fax : 818 - 597 - 0411
Email : info@americanmusicandsound.com
Yongchang Musi c Instr umen t, Bongsu Daer o 196,
Gaj wa 1(il)-dong, Seo-gu , Inche on, 404-7 14 Sout h Korea
 Loading...