

Page 1
M210
Page 2

Page 3
Page 4
Page 5

Contents Table of Contents
Chapter 1 Front Panel .........................
Main Buttons ............................
Chapter 2 Main Features ....................
Main Features ..........................
Chapter 3 Piano Assembly ..................
1. Piano Assembly ....................
2. Applying Power ....................
3. Setting the Volume ..............
Chapter 4 Selecting Sounds ...............
1. Selecting Sounds ...............
2. List of Voices .....................
3. List of Rhythms ..................
Chapter 5 Layering .............................
6
7
8
11
11
12
12
13
13
14
Chapter 8 Metronome/Rhythm ........
6
Selecting a Style .....................
Chapter 9 Record/X-Pose ...............
7
Recording a Performance ....
Chapter10DemoSongs......................
8
Listening to Demo Songs ......
Chapter 11 Pedals .................................
1. Pedals ..................................
2. Using the Pedals ................
Chapter 12 MIDI ....................................
1. MIDI Channel ......................
2. Connecting to a Computer
20
20
21
21
22
22
23
23
23
24
24
24
Layering Two Sounds ..............
Chapter 6 Splitting ..............................
1. Splitting the Keyboard ........
2. Dual(Duo) mode .................
Chapter 7 Functions ............................
1. Function Mode ....................
2. Selecting a Function ............
14
15
15
16
17
17
17
Chapter 13 Connection ........................
1. Using Headphones ............
2. Aux In ..................................
3. Aux Out ...............................
4. MP3 Aux In .........................
Chapter14DemoSongList................
Chapter15DrumSets.........................
Chapter 16 Specifications ....................
26
26
26
26
26
27
28
30
Page 6
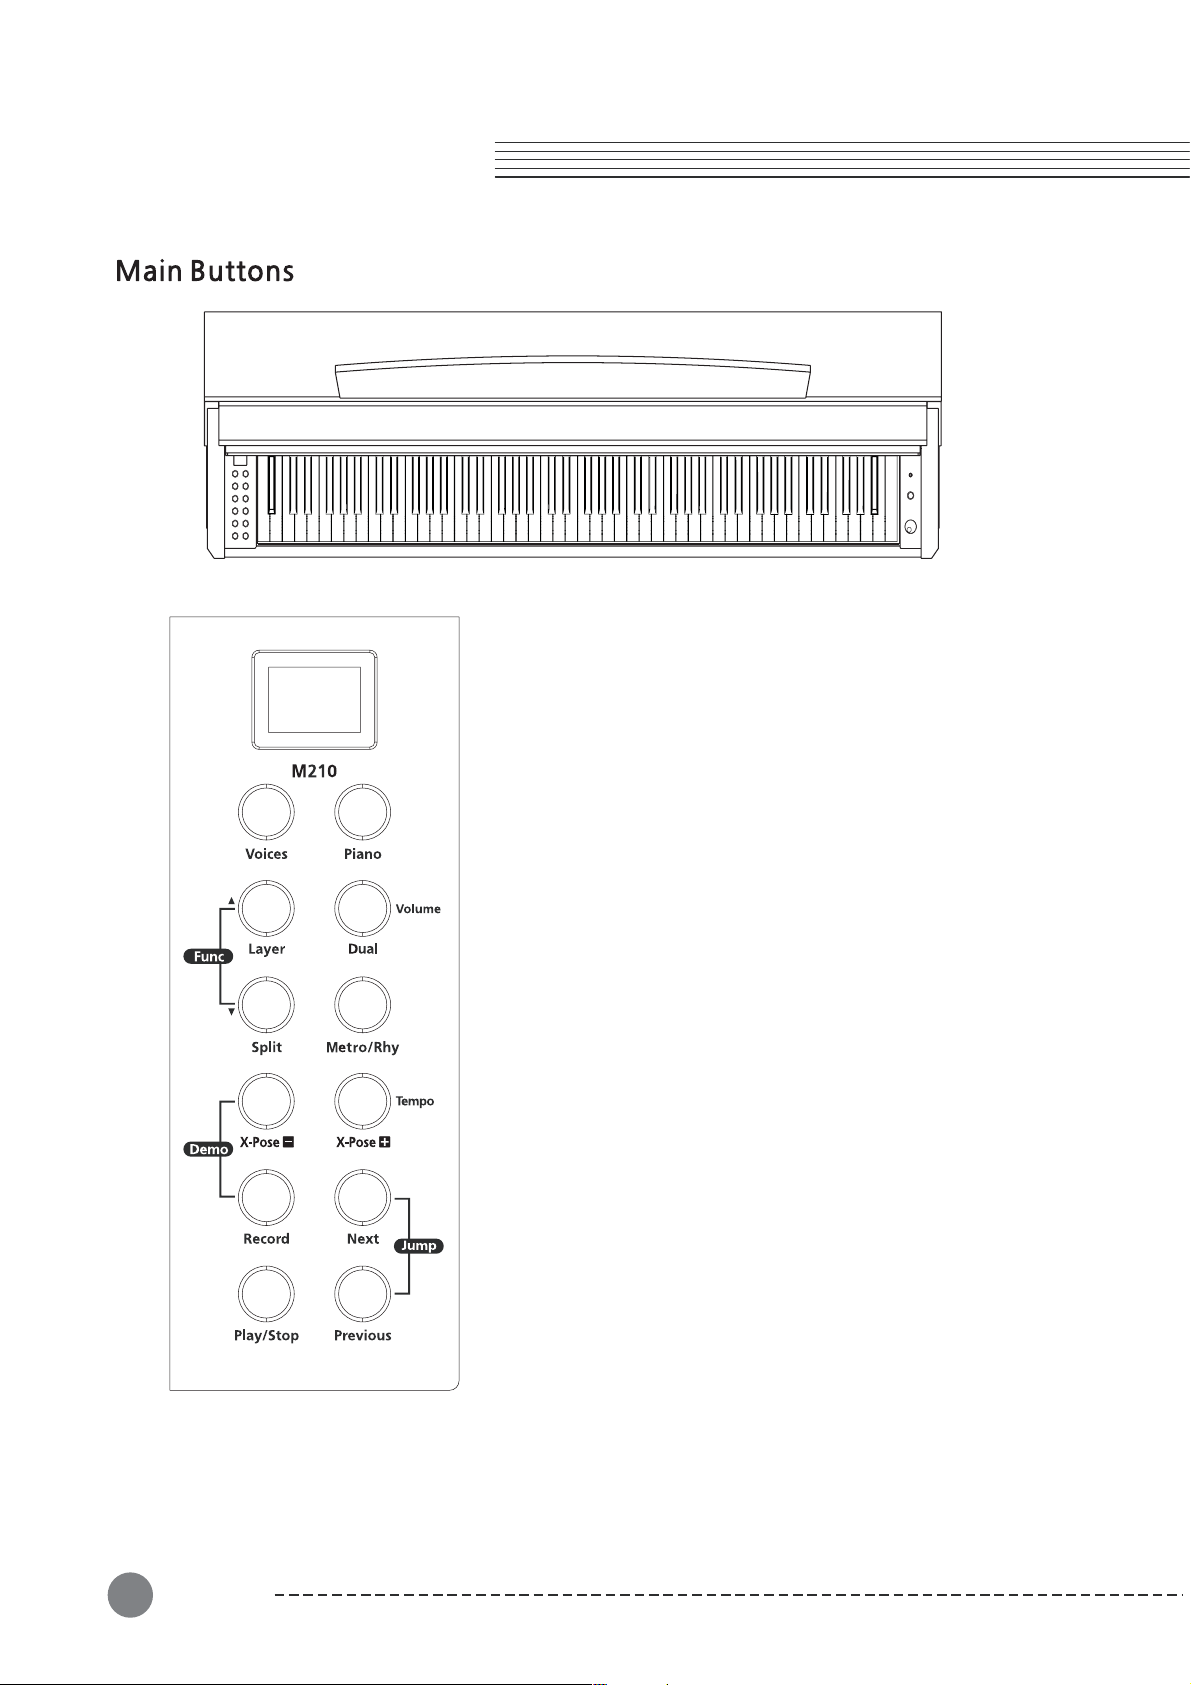
Chapter 1 Front Panel
(1) Voices button
Select among the 20 voices with the [Voices] button.
Piano
(2) button
Always selects "Grand Piano" sound.
(3) Dual button (Duo mode)
This function allows two different players to play.
(4) Rhy button
Metro/
Select among the 12 rhythms or metronome beat.
(5) Layer button
You can layer two voices and play them simultaneously to
create a thicker and richer sound.
(6) Split button
For playing different voices on the left-hand and right-hand
section of the keyboard.
(7)Demobuttonpair
Press together to select among the 50 demonstration songs.
(8) Func button pair
Press together to set functions like Tune, Touch, Effect, etc.
(9) Record button
For recording your keyboard performance.
(10) Play/Stop button
These control playback of or stop the demonstration songs
and your recorded song.
8
6
(11) Next button
Select the next higher Voice, Rhythm, or Demo Song, etc.
(12) Previous button
Select the next lower Voice, Rhythm, or Demo Song, etc.
FrontPanel
Page 7

Chapter 2
Main F eatures
Main Features
■
■
■
■
■
Thank you for purchasing a KURZWEIL Digital Piano. We recommend that you
read this manual carefully so that you can fully take advantage of the advanced
and convenient functions of your KURZWEIL Digital Piano.
88 Dynamic Touch Graded Hammer action keys with the feel of real Grand Piano
3 Pedals (Sustain, Sostenuto, Soft)
4 Touch sensitivity settings
Stereo audio Input, Output
2 Headphone jacks
■
USB MIDI
■
7 Segment LED display
■
20 Voices
■
12 Rhythms with accompaniment
■
Transpose, Tune functions
Layer, Split, Dual(Duo) mode
■
■
Recording function
MP3 Aux In
■
Main Features
7
Page 8
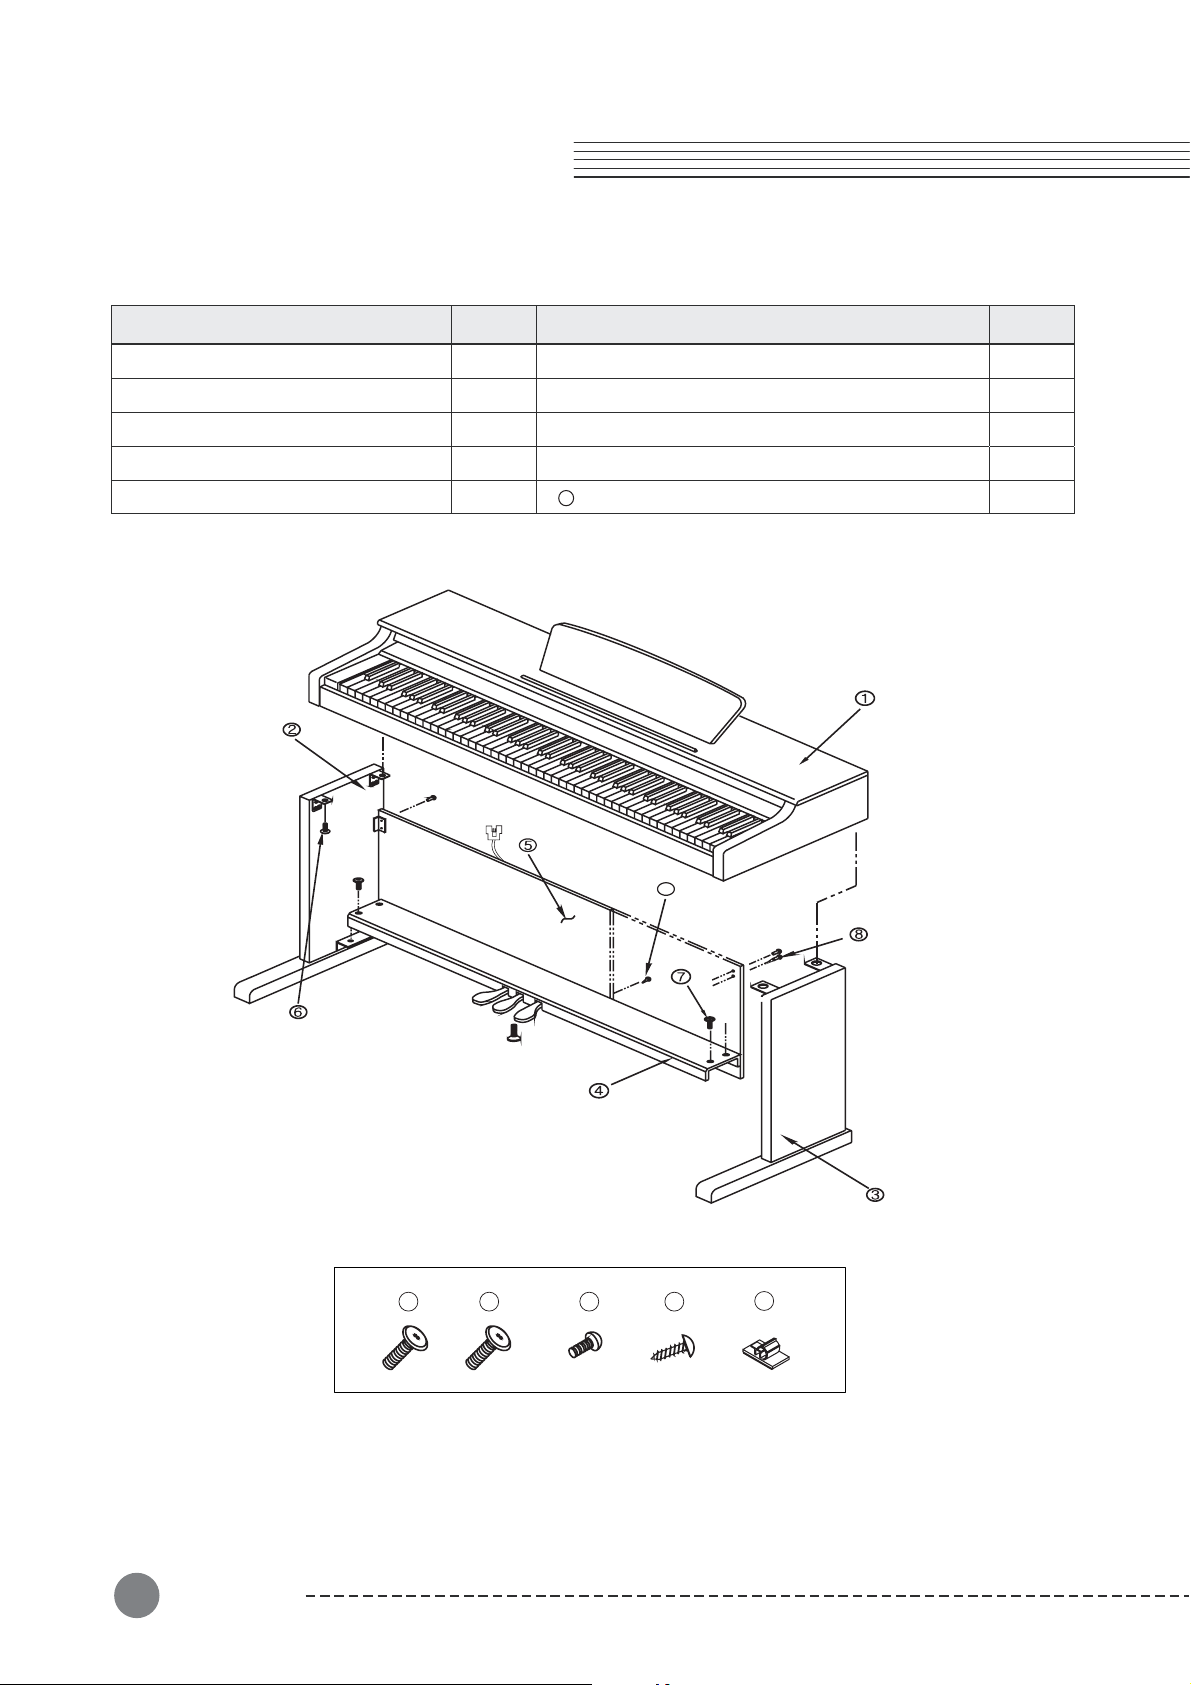
Chapter 3 Piano Assembly
Check that all of the following items are present.
Part Name Part Name
①
Keyboard
②
Side panel of stand (Left)
③
Side panel of stand (Right)
④
Pedal box
⑤
Rear panel
Q'ty Q'ty
⑥
1
EA
1
EA
1
EA
1
EA
1
EA
Screws for side panel and keyboard (25mm)
⑦
Screws for side panel and pedal box (25mm)
⑧
Screws for side panel and rear panel
⑨
Screws for rear panel
10
Cord holder
9
4
EA
4
EA
4
EA
EA
4
2
EA
8
Piano Assembly
8
6
7
8 9
10
Please check the quantity of related part.
Page 9
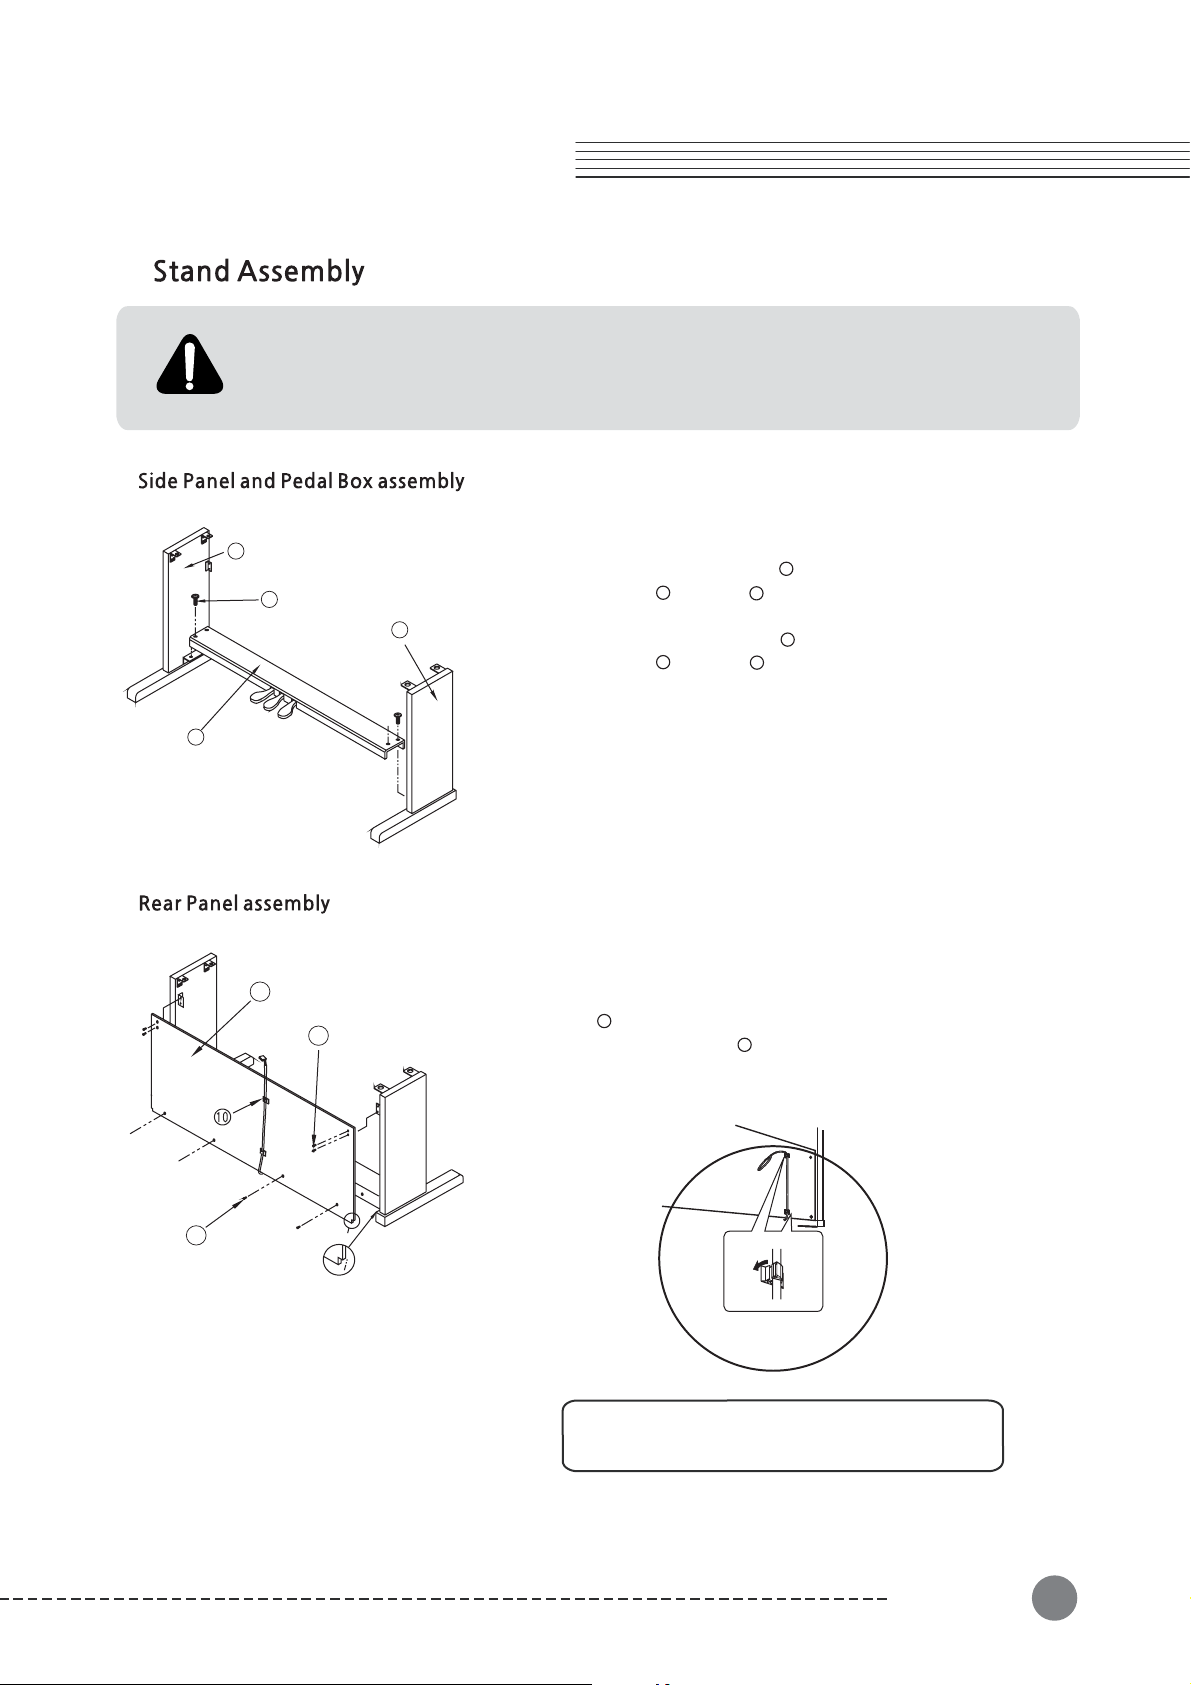
Chapter 3 Piano Assembly
1.
- Assembly should be carried out by at least two persons.
- Assemble the stand on a hard and flat floor with ample space.
- Be sure to use the included screws, and insert screws of the correct size in the correct
hole locations. Use of incorrect screws can damage the product.
1)
2)
2
1. Place the pedal box on the left side
2
7
3
panel and use screws to fasten
the side panel.
2. Place the pedal box on the right side
3
panel and use screws to fasten
4
7
4
7
the side panel.
3. You can find the pedal cable in the
4
pedal box . Untie and straighten out
④
the bundled pedal cable.
5
8
1. Fit into the rear panel's hole in the side
panel brackets and then use the screws
8
to fasten the rear panel.
2. Use the screws to fasten the bottom
9
of the rear panel.
9
Attach the pedal cord holders to the rear panel
as shown, then clip the cord into the holders
Piano Assembly
9
Page 10
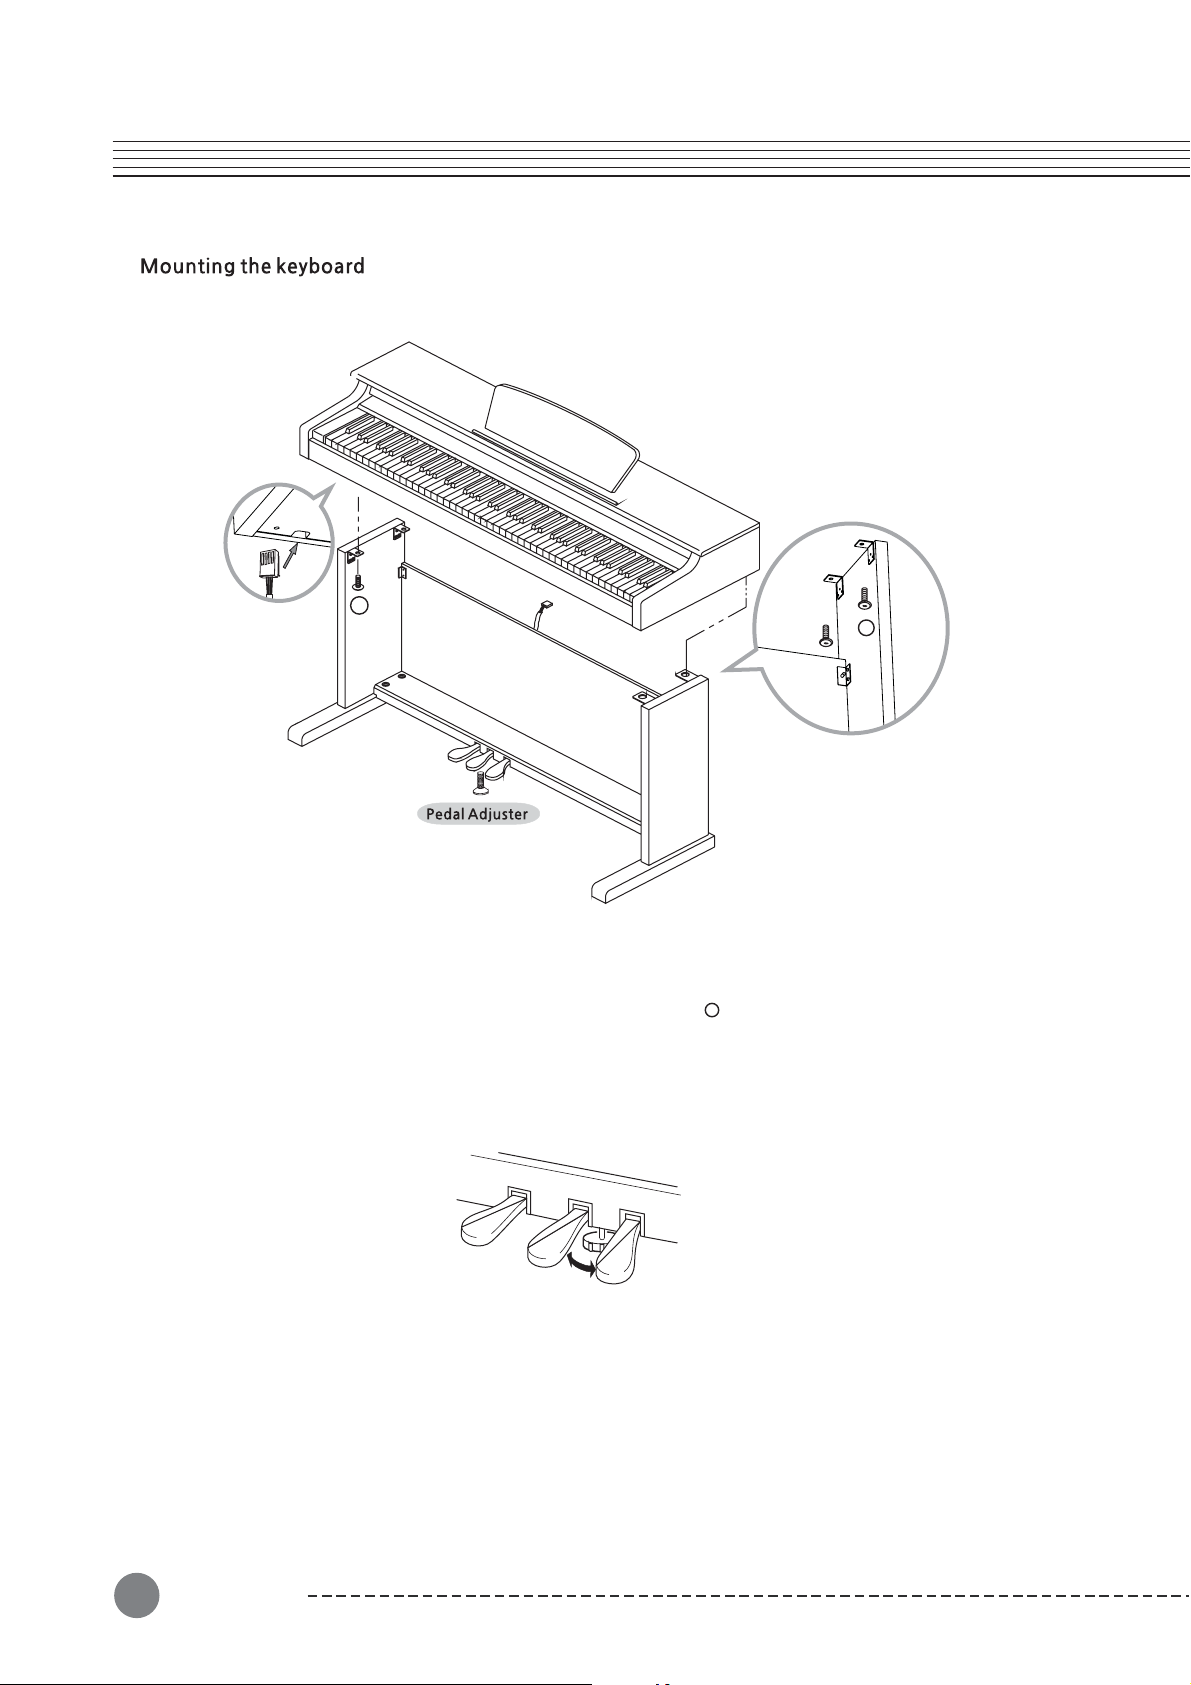
3)
Insert the pedal
cord plug to the
pedal jack from
the rear.
6
6
1. Place the keyboard on the stand and fit into the holes in the side panel brackets.
2. Fasten the keyboard to the side panel using screws .
6
CAUTION : Have a second person hold the keyboard steady until the side panel
screws are installed.
3. Insert the pedal cable plug into the pedal jack located on the bottom of the keyboard.
8
Piano Assembly
10
4. Rotate the pedal adjuster until it comes in firm contact with the floor surface.
If the adjuster is not in firm contact with the floor, the pedals will wobble and may
malfunction.
Page 11

2.
Power
1) Connecting the power cord
First insert the plug of the AC power cord into the AC connector on the Adaptor, then plug
the other end of the cord into the proper AC outlet on the wall. In some areas a plug adaptor may be provided to match the pin configuration of the AC wall outlets in your area.
2) Plug the thin DC power cord into the DC Power Jack on the back of the piano.
3) Turn the power on
Press the power switch located on the right of the front panel to turn the power on. The
display located in the center of the front panel should light with various patterns and after a
short time display "U11"(OS Version) and "n01"(Grand Piano).
CAUTION
Even when the instrument is turned off, AC power is still flowing to the adapter at a minimum
level. When you are not using the instrument for a long time or during electrical storms,
unplug the AC power cord from the wall outlet.
3.
To adjust the volume, use the [Volume] knob located at the right of
front panel. Play the keyboard while you adjust the knob to a comfortable
and realistic volume.
NOTE
Adjusting the [Volume] knob also affects the output level of the Phones
jacks and the output level of the Audio Out jacks.
Power
11
Page 12

Chapter 4 Selecting Sounds
1.
There are two ways of selecting one of the 20 voices :
with the [Voices] button and the [Piano] button.
Press the [Voices] button.
Then use the [Next] or [Previous] button to select
different voices in sequence.
Please refer to the table on the next page which
contains the list of all available voices and their
assigned keys.
If you want to play the Grand Piano voice immediately,
press the [Piano] button to set current voice to "n01,
Grand Piano".
"n" means that Main(primary) sound.
"01"
means that voice number (page 13).
If you press and hold the [Next] or [Previous] buttons,
the voice numbers will begin to change quickly.
If you press the [Next] and [Previous] buttons together,
it will skip to the first voice in the next category of
voices.
8
Selecting Sounds
12
Page 13

2.
No.
1
2
3
4
5
6
7
8
9
1
11
1
1
1
1
1
1
1
1
2
Voice
Grand Piano
Bright Piano
Elec Piano 1
Elec Paino 2
Harpsichord
Vibraphone
Organ 1
Organ 2
Steel Guitar
0
Jazz Guitar
Acoustic Bass
2
3
4
5
6
7
8
9
0
Slap Bass
Violin
Cello
Strings
Choir
Trumpet
Brass
Flute
Drum Sets
3.
No.
1
2
3
4
5
6
7
8
9
10
11
12
Rhythm
Fast Funcky
Break Beat
80's Pop
Funcky Pop
Techno
Soul Beat
Slow Rock
Country Rock
Pop Disco
Big Band
Waltz
Polka
Selecting Sounds
13
Page 14

Chapter 5 Layering
This function lets you layer and play two different
sounds at the same time. You can layer voices of two
different voices in the same category, and create a
composite voice of greater richness and texture.
Select the main voice in the usual way with the [Voices],
the [Next] or the [Previous] button if needed.
The primary(main) voice is "Grand Piano" by default.
Then press the [Layer] button and use the [Next] or
the [Previous] button to select a voice to be layered
with the first one.
The secondary(layered) voice is "Strings" by default.
"L" means that Layer(secondary) sound.
"15" means that voice number (page 13).
If you want, use the [Volume] button to adjust the
volume balance between two voices in layer mode.
I
t can be set to any number between 0 and 127.
By default, the Layer Volume is setting to 70, which
results in the secondary sound being a little softer than
the primary(main) sound.
You can not change the primary sound volume. It is
always setting to max 127.
The sustain pedal can be enabled or disabled while
you are in layer or split mode. While holding down
the [Layer] button or [Split] button, press the sustain
pedal.
8
14
Layering
Page 15

Chapter 6 Splitting
1.
Split mode enables you to play two different voices on
the keyboard - one with the left hand and another with
the right hand. For example, you can play a bass part
using the Bass voice with the left hand and a melody
voice with the right hand.
Select the primary voice in the usual way with the [Voices],
the [Next] or the [Previous] button if needed.
The primary(right hand) voice is "Grand Piano" by default.
Then press the [Split] button and use the [Next] or
the [Previous] button to select a split voice.
The secondary(left hand) voice is "Acoustic Bass" by
default.
"P" means that sPlit(secondary) sound.
"11" means that voice number (page 13).
It is transposed one octave up automatically.
By default the split point is just below "F 3". To change
the split point, use the [Split] button.
While the keyboard is split, hold down the [Split] button
about 3 second and the LED will display "F 3" which is
the default.
To change, press a key on the keyboard until the LED
shows the desired split point.
If you want, use the [Volume] button to adjust the
volume balance between two voices in split mode.
It can be set to any number between 0 and 127.
By default, the Split Volume is setting to 100, which
results in the secondary sound being a little softer than
the primary(main) sound.
You can not change the primary sound volume. It is
always set to max 127.
Splitting
15
Page 16

2.
The Dual(Duo) mode allows two different players to
play the instrument, one on the left and one in the
right, over the same octave range.
The keyboard is divided into two sections with the E3
key as Split Point.
The Split Point cannot be changed from E3.
Since Dual(Duo) is designed for two player piano
performance, different voice cannot be assigned to
Left and Right voice.
1) Sustain pedal : Applies sustain to the right section.
2) Sostenuto pedal : Applies sostenuto to both sections.
3) Soft pedal : Applies sustain to the left section.
8
16
Splitting
Page 17

Chapter 7 Function s
1) Style Volume
2) Accompaniment
3) Reverb
4) Chorus
5) Effect Level
6) Tune
7)
Touch Sensitivity
8) Demo Loop
9) Temperaments
10) Local Control
To go to Function Mode, press the [Func] button pair (press [Layer] and [Split] button together).
The LED will show "55" which indicates the style volume setting. The number displayed is the
current setting of the parameter. To change the parameter setting, use the [Next] button
and the [Previous] button. Press the [Layer] or [Split] button to move to the next or the previous
parameter. When you want to quit Function Mode, press the [Voices] or [Piano] button.
Functions
17
Page 18

1)
You can adjust the volume level of the style.
The range is between 1 to 100 and the default
setting is 55.
2)
You can change the Accompaniment mode
of the style. If you select "Aon", you can hear
the Drum, Bass and Accompaniment of the
style. If you select "AoF", you can only hear
the Drum pattern sound.
3)
The appropriate Reverb type and Level(depth)
are called up automatically when you select each
of the voices. This is why the Reverb need not be
selected, however, you can select a reverb type.
Available reverbs are Off, Room, Hall 1, Hall 2,
Stage.
4)
You can select a chorus type. Available chorus
types are Off, Chorus, Phaser, Tremolo.
5)
You can adjust the intensity of the reverbration
or other effect used by each voice. Normal is 60
but that can be adjusted by using the [Next] and
[Previous] buttons. The range is from 0(no effect)
to 127(max).
6)
1. rE0 : Off
2. rE1 : Room
3. rE2 : Hall 1
4. rE3 : Hall 2
5. rE4 : Stage
1. cH0 : Off
2. cH1 : Chorus
3. cH2 : Phaser
4. cH3 : Tremolo
8
18
You can finely tune the pitch up or down in about
0.5Hz steps. This function is useful when you play
or record with another instrument that is slightly
out of tune or can't be easily retuned. The default
setting is "40.0" (440Hz). The range is -427.0Hz to
453.0Hz. The LED will display from 27.0 to 53.0, but
not displayed the dot. The [Jump] button pair will
restore the default setting.
Functions
Page 19

7)
You can adjust how the keyboard responds to
your playing. Available touch sensitivity is Flat,
Hard, Normal, Soft. The default setting is Soft.
8)
You can set a playback mode for demo repeat.
The default setting is "All"
1) Off : Demo songs only play once.
2) One : Repeat playing of one song.
3) All : Repeat playing of all songs.
9)
Various historical temperaments other than
the modern "Equal" can be selected. Available
temperaments are Equal, Pythagorean, Pure
Major, Pure Minor, Mean Tone, Werckmeister III,
Kirnberger III.
10)
1. to1 : Flat
2. to2 : Hard
3. to3 : Normal
4. to4 : Soft
1. Equal
2. Pythagorean
3. Pure Major
4. Pure Minor
5. Mean Tone
6. Werckmeister III
7. Kirnberger III
You can set Local Control on or off here.
Local Control is the connection between
keyboard and internal sound producing
circuitry (engine). When Local Control is set
to "On", the keyboard delivers your performance
information to the sound engine, so you can
hear the sounds you play. At the same time,
the instrument transmits MIDI information via
its USB port.
There are, however, cases you need to set
Local Control to "Off". When using the
instrument with an external MIDI sequencer
or computer via MIDI, the instrument may
play the same note twice-once by the direct
sound engine connection and once by the
"echo" through the sequencer and coming
back. You can eliminate the echoing of notes
by setting Local Control to "Off" which interrupts
the direct connection. The default setting is
"On".
Functions
19
Page 20

Chapter8 Metronome/Rhythm
This instrument features a variety of rhythmic backing patterns with accompaniment (called )
in a variety of different musical genres including pop, waltz and many others.
1) Pressing the [Metro/Rhy] button will start the style
playback when a style is selected. Pressing the same
button again will stop the style playback.
2) To select a style, hold the [Metro/Rhy] button down. The
LED will show the currently selected style number.
3) Choose different preset styles with the [Next] and
[Previous] buttons. (Refer to the rhythm list on page 13)
Change the style tempo by pressing the [Tempo] button.
The [Next] and [Previous] buttons will speed up or slow down
the tempo. The range is 30 to 250.
"Style"
Use the [Volume] button then the [Previous] and [Next]
buttons to adjust the volume level of the style. The range is
from 1 to 100 and the default setting is 55.
1) Pressing the [Metro/Rhy] button will start the metronome
when a metronome signature is selected. Pressing the
same button again will stop the metronome.
2) To select a metronome signature, hold the [Metro/Rhy]
button down. The LED will show the currently selected
metronome signature.
3) Choose different metronome signatures with the [Next]
and [Previous] buttons.
4) Available signatures are 1/4, 2/4, 3/4, 4/4, 6/4, 6/8.
8
20
Rhythms
Page 21

Chapter 9 Record/X-Pose
You can record and playback your performance much like a tape recorder. This function can greatly
enhance your composition and performance results.
1) Press the [Record] button. A metronome count down
of one measure will be heard before recording begins.
2) Then press the [Play/Stop] button.
3) Alternatively, play a key on the keyboard directly, and
the recording will begin immediately.
4) Play your performance, then press the [Play/Stop]
again or the [Record] button to stop recording.
5) Press the [Play/Stop] button to start playback.
6) You can easily replace all of a saved user song by
recording again.
7) To delete recorded songs, hold down the [Record]
button about 3 seconds. Then the LED will show
"dEL".
You can shift the pitch of the entire keyboard up or
down in order to facilitate playing in difficult key
signatures to easily match of the keyboard to a singer.
The range is between -24 to 24 semitones.
The [X-Pose -] LED lights while the X-Pose value
is minus, otherwise, the [X-Pose +] LED lights while
its value is plus. The default setting is 0 and no light.
You can't hear any sound when you hit the lowest or
highest keys while it transposed up or down to +/- 20.
Recording
21
Page 22

Chapter 10 Demo Songs
1) Press the [Demo] button pair to enter the demo mode.
(Press the [Record] and [X-Pose] buttons at the same
time to access the demo songs)
To select a demo song, press the
2) [Next] or [Previous]
button. (Refer to the demo songs list on page 27)
3) Alternatively, you can select a song by pressing a key
on the keyboard.
) Press the [Play/Stop] button to start playback.
4
5) Press the [Play/Stop] button again to stop playback.
o exit the demo mode, press the [Demo] button.
6) T
(Press the [Record] or [X-Pose] button).
You can set a playback mode such as Off, One or All for
demo repeat in Function mode (page 19).
1) Off : Demo songs only play once.
2) One : Repeat playing of one song.
3) All : Repeat playing of all songs.
The LED will show the number of the demo song currently
playing.
8
22
Demo Songs
Page 23

Chapter 11 Pedals
This piano has three foot pedals : damper(sustain) pedal (right), sostenuto pedal (center)
and soft pedal (left) that produce a range of expressive effects like those produced by
the pedals of an acoustic piano.
2.
Soft
Sostenuto
Sustain
1) Sustain pedal
The sustain pedal functions in the same way as a damper
pedal on an acoustic piano. When the damper pedal is
pressed, notes sustain longer. Releasing the pedal immediately stops any sustained notes.
2) Sostenuto pedal
If you play a note or chord on the keyboard and press the
sostenuto pedal while the notes are held, those notes will
sustain as long as you hold the pedal (as if the damper
pedal had been pressed) but all subsequently played notes
will not be sustained. This makes it possible to sustain a
chord, for example, while other notes are played "staccato".
3) Soft pedal
The soft pedal reduces the volume and slightly changes
the timbre of notes played while the pedal is pressed. The
soft pedal will not affect notes that are already playing
when it is pressed.
When you press the sustain
pedal here, the notes you
play before you release the
pedal sustain loger.
When you press the sostenuto
pedal here while holding the
note, the note will sustain as
long as hold the pedal.
NOTE
If the pedal doesn't work, make sure that the pedal
cord is properly plugged into the main unit (see page 10)
Pedals
23
Page 24

Chapter 12
MIDI is acronym for Musical Instrument Digital Interface, which is an industry standard
protocol for electronic instruments to communicate with each other.
A MIDI cable can transmit multiple channels of performance data which is similar to
TV channels. Each channel can be assigned its own voice. Typical MIDI instruments
can play up to 16 channels at the same time which is equivalent to 16 soloists.
If you want to use your piano and record your performances with a computer, a
sequencer program must be installed on your computer.
MIDI
The instrument can be connected to the computer via a USB cable (AB type USB cable
of less than 3 meters).
Connect the USB cable to the USB Type B terminal of the instrument, then to the USB
Type A terminal of the computer.
8
24
MIDI
Page 25

Manufacturer:
Date : 5/15/2015
KURZWEIL
Version 1.0
0-19 0-19
MIDI
25
Page 26

Chapter 13 Connection
1.
Connect a pair of headphones to one of the phones jacks. Two phones jacks are provided.
You can connect two sets of standard stereo headphones. (If you are using one of pair headphones, you can plug them into either of these jacks).
Bottom surface
CAUTION
Do not use headphones at a high volume
for an extended time. Doing so many
cause hearing loss.
Standard stereo
phone plug
2. (
You can connect the output jacks of an external device (such as CD player, tone generator)
to the instrument's Aux In jacks, letting you hear the sound of that device through the built
in speakers of the instrument.
3.
You can connect a stereo system to amplify the instrument's sound by using the Aux Out
jacks. When the instrument's sound is output to an external device, first turn on the power
to the instrument, then to the external device. Reverse this order when you turn the power
off.
4.
You can connect the output jack of an MP3 player or smart phone to the instrument's MP3
Aux In jack on the right side of the front panel.
8
26
Connection
Page 27

Chapter 14 Demo Song List
ARIA Goldenberg-Variationen BMW 988
Klavierstuck K. 15v
Minuette in G
Without words song Op.38 No.2
Traumerei
Frolicher Landmann Op.68-10
Von fremden Landern und Menschen Op.1
Liebestraume Nr.3
Fryhlingsstimmen Op.410
Reverie
Demo Song List
27
Page 28

Chapter 15 Drum Sets
Pro 1:
Standard Set
Pro 9:
Room Set
Power Low Tom2
Power Low Tom1
Power Mid Tom1
Power Mid Tom2
Power Hi Tom2
Power Hi Tom1
Pro 17:
Power Set
Power Kick
Gated Snare
Power Low Tom2
Power Low Tom1
Power Mid Tom2
Power Mid Tom1
Power Hi Tom2
Power Hi Tom1
Pro 25:
Elec. Set
Elec Kick
Gated Snare
Elec Snare1
Elec Low Tom2
Elec Low Tom1
Elec Mid Tom2
Elec Mid Tom1
Elec Hi Tom2
Elec Hi Tom1
Reverse Cymbal
Pro 26:
TR808 Set
808 Bd
808 Rim shot
808 Snare Drum
808 Low Tom2
808 CHH[EXC1]
808 Low Tom2
808 CHH[EXC1]
808 Mid Tom2
808 OHH[EXC1]
808 Mid Tom1
808 Hi tom2
808 Cymbal
808 Hi Tom1
808 Cowbell
808HighConga
808 Mid Conga
808 Low Conga
1)*:NoSound
2) Blank : Same sound as "Standard Set"
3) Except "Pro 1" : Available from USB MIDI with channel 10
808 Maracas
808 Claves
8
28
Drum sets
Page 29

Pro 33:
Jazz Set
Zazz BD2
Zazz BD1
Pro 41:
Brush Set
Zazz BD2
Zazz BD1
Brush Tap
Brush Slap
Brush Swir1
Pro 49:
Ochestra Set
Closed Hi Hat
PedalHiHat
Open Hi Hat
Ride Cymbal
Concert BD2
Concert BD1
Concert SD
Castanets
Concert SD
Timpani F
Timpani F#
Timpani G
Timpani G#
Timpani A
Timpani A#
Timpani B
Timpani c
Timpani c#
Timpani d
Timpani d#
Timpani e
Timpani f
Concert Cymbal2
Concert Cymbal1
Pro 57:
SFX Set
*
*
*
*
*
*
*
*
*
*
*
*
High Q
Slap
Scratch Push
Scratch Pull
Sticks
Square Click
Metronome Click
Metronome Bell
Guitar Slide
Gt Cut Noise(down)
Gt Cut Noise(up)
Double Bass Slap
Key Click
Laughing
Screaming
Punch
Heart Beat
Footsteps1
Footsteps2
Applause
Door Creaking
Door Closing
Scratch
Wind Chime
Car Engine Start
Car Breaking
Car Pass
Car Crash
Police Siren
Train
Jet Take-off
Helicopter
Starship
Gun Shot
Machinegun
Lasergun
Explosion
Dog
Horse Gallop
Birds
Rain
Thunder
Wind
Sea Shore
Stream
Bubble
*
*
*
1)*:NoSound
2) Blank : Same sound as "Standard Set"
3) Except "Pro 1" : Available from USB MIDI with channel 10
Drum sets
29
Page 30

Chapter 16 Specifications
Keyboard
Finish
Cabinet
Polyphony
Sound
Rhythm
Play Mode
Touch
Demo Songs
Sequencer
Pedals
Display
Others
88 Dynamic Touch Graded Hammer action keys
Simulated Rosewood or White
Pattern type
128 Voices
20 Programs (Available 128 GM with USB MIDI)
12 Styles
Layer, Split, Dual(Duo)
4 Sensitivity levels
50 Piano Masterpieces
1 Track, 20,000 notes
3 (Sustain, Soft, Sostenuto)
3x7SegmentLED
Volume, Tune, Transpose, Metronome
Connectors
Audio Power
Speaker
Dimension
Weight
MP3 Aux In, Audio In/Out, USB MIDI
15Wx2,8Ohms
4.5"x2full-range(Ovaltype)
1384x415x837(WxDXH)
Keyboard : 29Kg, Stand : 22Kg with packing
8
Specifications
30
Page 31

Page 32

American Music Sound&
 Loading...